

Page 1
KGnmorG
Coin-Operated Commercial
Automatic Washer
3948597B Sears Roebuck and Co., Hoffman Estates, IL 60179 U.S.A. www.sears.com
Page 2

TABLE OF CONTENTS
Product Record.......................................................................2
WASHER SAFETY................................................................. 2
INSTALLATION REQUIREMENTS
Tools and Parts.......................................................................3
Location Requirements...................................................... ...4
Drain System
Electrical Requirements..........................................................5
INSTALLATION INSTRUCTIONS
Before You Start
Remove Stripping Strap..........................................................6
Connect Drain Hose................................................................6
Connect the Inlet Hoses..........................................................7
Secure the Drain Hose............................................................7
Install Coin Slide Mechanism..................................................7
For Sears \warranty information or to contact a Sears Service
Center, call 1-800-4-MY HOME™ (1-800-469-4663).
.....................................................................
.....................................................................
If you need SERVICE or PARTS for your Kenmore coin
operated washer
When requesting service, be ready to give the model number,
serial number (located on a plate under the lid) and date of
purchase. Record below.
...........................................
...........................................
13
...4
5
■"'ll
JlJCi
3
5
Level the Washer....................................................................8
Complete Installation
Adjusting Timer Clutch...................................................... 9
Washer Cabinet
Changing Vend Price............................................................10
WASHER USE.........................................................................11
Kenmore Energy-Saving Feature........
WASHER CARE....................................................................... 12
Before Transporting Washer to a New Location...
TROUBLESHOOTING.....
Washer and Components
Washer Operation.................................................................14
Washer Results.....................................................................15
NEW VEND PRICE
Order Form
Model number 110.
Serial number
Purchase date
.........
_____
____
..............................................................
......................................................................
.................................
................
.............
..................................................................
................................................................ 14
............................................13
..........
...........................................
8
9
12
13
13
14
Record Coin Box
Key Number
_________________
Key number is on key and/or coin box.
WASHER SAFETY
Your safety and the safety of others are very important.
We have provided many important safety messages in this manual and on your appliance. Aiways read and obey all
safety messages.
This is the safety alert symbol.
This symbol alerts you to potential hazards that can kill or hurt you and others.
All safety messages will follow the safety alert symbol and either the word “DANGER” or
“WARNING.” These words mean:
You can be killed or seriously injured if you don't
ADANGER
AWARNING
All safety messages will tell you what the potential hazard is, tell you how to reduce the chance of injury, and tell you
what can happen if the instructions are not followed.
immediately follow instructions.
You can be killed or seriously injured if you don't
follow instructions.
Page 3
IMPORTANT SAFETY INSTRUCTIONS
WARNING: To reduce the risk of fire, electric shock, or injury to persons when using the washer, follow basic
precautions, including the following:
Read all instructions before using the washer.
Do not wash articies that have been previously
cleaned in, washed in, soaked in, or spotted with
gasoline, dry-cleaning solvents, other flammable,
or explosive substances as they give off vapors
that could ignite or explode.
Do not add gasoline, dry-cleaning solvents, or
other flammable, or explosive substances to the
wash water. These substances give off vapors
that could ignite or explode.
Under certain conditions, hydrogen gas may be
produced in a hot water system that has not been
used for 2 weeks or more. HYDROGEN GAS IS
EXPLOSIVE. If the hot water system has not
been used for such a period, before using the
washing machine, turn on all hot water faucets
and let the water flow from each for several
minutes. This will release any accumulated
hydrogen gas. As the gas is flammable, do not
smoke or use an open flame during this time.
3AVE THESE INSTRUCTIONS
■ Do not allow children to play on or in the washer. Close
supervision of children is necessary when the washer is
used near children.
■ Before the washer is removed from service or discarded,
remove the door or lid.
■ Do not reach into the washer if the drum, tub or agitator
is moving.
■ Do not install or store the washer where it will be
exposed to the weather.
■ Do not tamper with controls.
■ Do not repair or replace any part of the washer or
attempt any servicing unless specifically recommended
in this manual or in published user-repair instructions
that you understand and have the skills to carry out.
■ See “Electrical Requirements” for grounding instructions.
INSTALLATION REQUIREMENTS
Assemble the necessary tools and supplies before beginning the
washer installation. The parts supplied are in the washer basket.
Tools needed for connecting the drain hose and
water inlet hoses:
■ Pliers that open to 1 ®/is in. (3.95 cm)
■ Flashlight (optional)
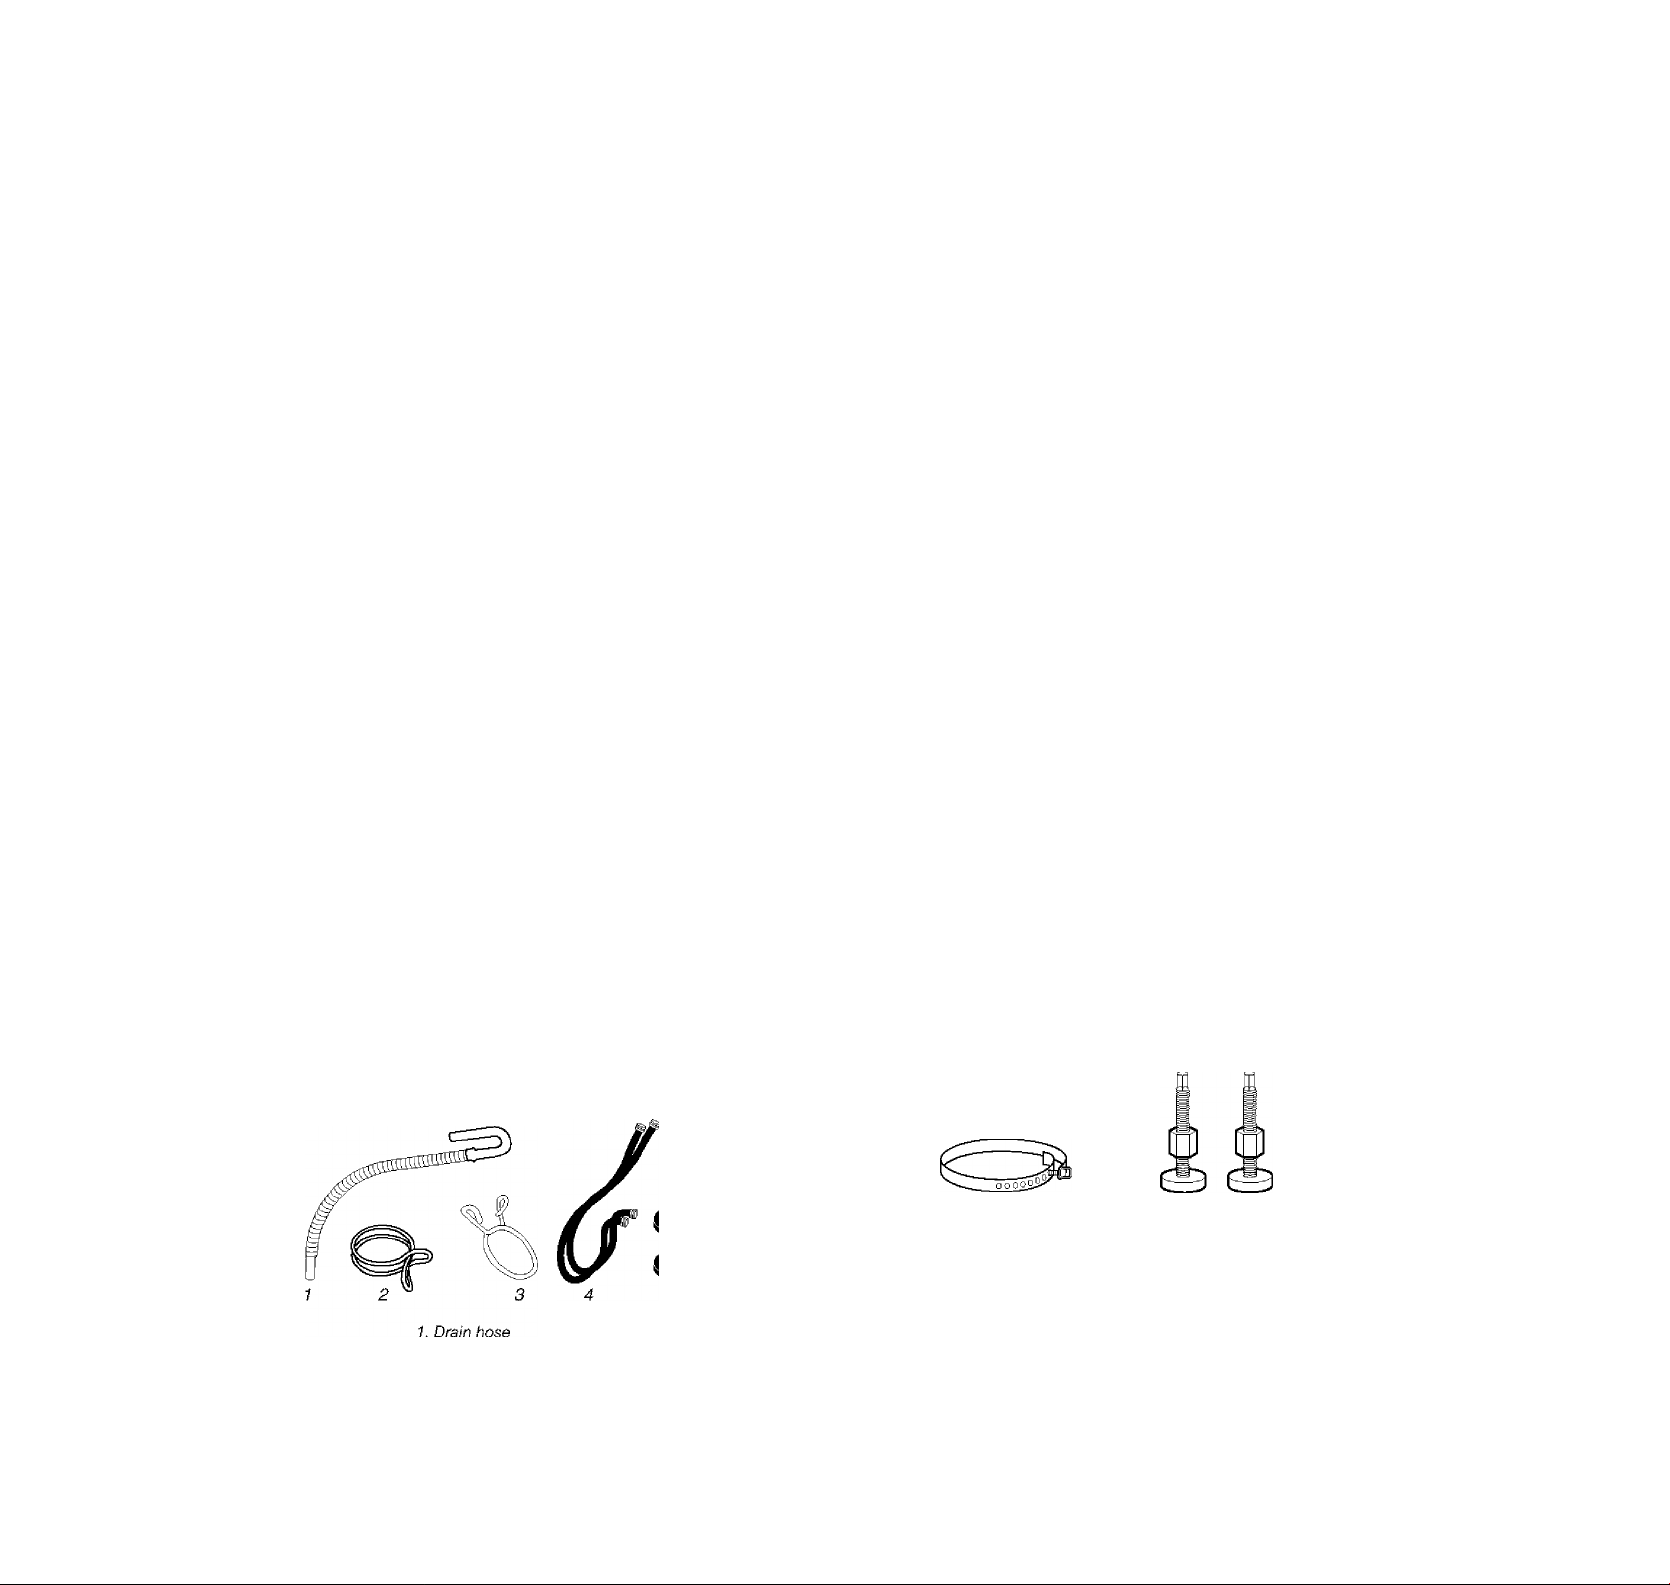
Parts supplied:
2. Silver, doublB-wire hose clamp
(for the bottom of the drain hose)
3. Yellow, single-wire hose clamp
(for the top of the drain hose)
4. Water inlet hoses (2)
5. Flat water inlet hose washers (4)
Tools needed for securing the drain hose and
leveling the washer;
■ Adjustable or open end wrench ®/i6 in. (14 mm)
■ Level
■ Wood block
■ Ruler or measuring tape
Parts supplied:
1. Shipping strap with fastener
2. Front leveling feet with nuts (2)
Tools needed for installing coin slide mechanism and removing/replacing cabinet:
■ Ratchet wrench and a Tie in. (8 mm) socket
■ Regular screwdriver
■ #2 Phillips screwdriver
Page 4
/Uternate Parts
Parts listed are available from your local Sears store or Sears
Service Center. Please reference the service numbers located on
the back page of this manual.
If You Have: You Will Need to Buy;
Floor drain Siphon break, Part Number 285320;
additional drain hose, Part Number
3357090 and connector kit,
Part Number 285442
ijriiir
The washer can be installed using the standpipe drain system
(floor or wall), the laundry tub drain system, or the floor drain
system. Select the drain hose installation method you need. See
“Alternate Parts.”
Drain hose too
short
Change Vend
Price *
Gearcase
Lubricant
’Unless otherwise ordered, all coin chutes are supplied with
Part 20-3006 in place.
Drain hose. Part No. 285442
Up to 7 quarters and 1 dime, Part
Number 20-3007
Up to 8 quarters and 0 dimes, Part
Number 20-3006
SAE60 Non-Detergent, Non-Foaming
Motor oil, 1 pint. Part Number 350572
?: ■■: ■ RcMiijirerrierits
Selecting the proper location for your washer improves
performance and minimizes noise and possible washer “walk.”
Your washer can be installed in a basement, laundry room,
closet, or recessed area. (See “Drain System.”)
IMPORTANT: Do not install or store the washer where it will be
exposed to the weather.
Proper installation is your responsibility.
You will need:
■ A water heater set to deliver 120°F (49°C) water to the
washer.
■ A grounded electrical outlet located within 4 ft (1.2 m) of
where the power cord is attached to the back of the washer.
(See “Electrical Requirements.”)
■ Hot and cold water faucets located within 4 ft (1.2 m) of the
hot and cold water fill valves, and water pressure of
10-100 psi (34.5-690 kPa). 20-100 psi (138-690 kPa) for best
performance.
■ A level floor with a maximum slope of 1 in. (2.5 cm) under
entire washer. Installing the washer on carpeting is not
recommended.
■ A sturdy floor to support the washer weight (washer, water
and load) of 315 lbs (143 kg).
Do not store or operate your washer in temperatures at or below
32°F (0°C). Some water can remain in the washer and can cause
damage in low temperatures. See “Washer Care” in the
Washer User Instructions for winterizing information.
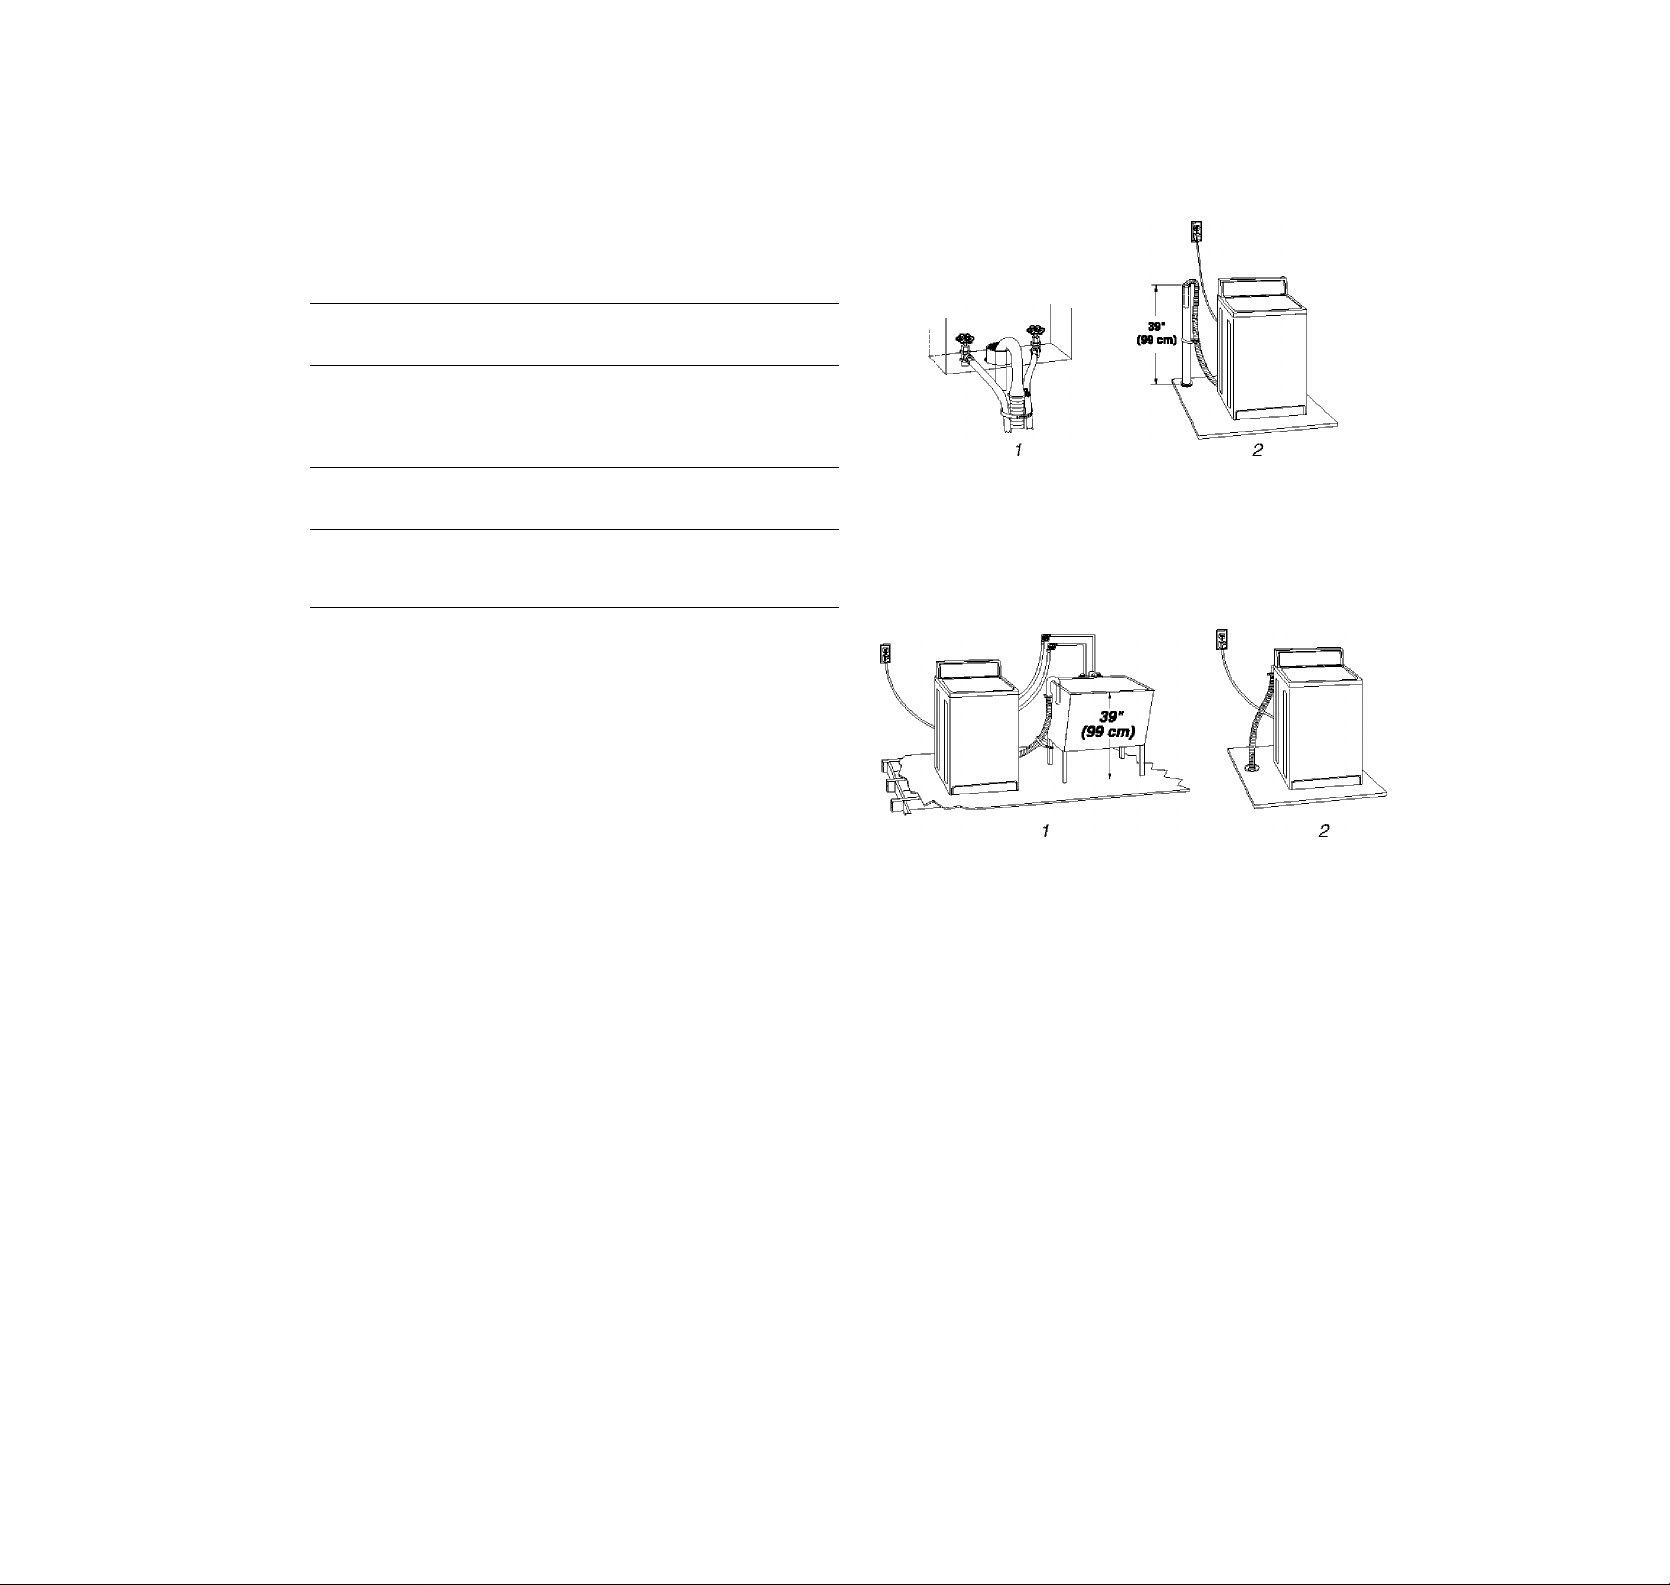
Standpipe drain system - wall or floor (wew 1 & 2)
The standpipe drain requires a minimum diameter standpipe of
2 in. (5 cm). The minimum carry-away capacity can be no less
than 17 gal. (64 L) per minute.
The top of the standpipe must be at least 39 in. (99 cm) high and
no higher than 96 in. (244 cm) from the bottom of the washer.
Laundry kib drain system (view 1)
The laundry tub needs a minimum 20 gal. (76 L) capacity. The top
of the laundry tub must be at least 39 in. (99 cm) above the floor
and no higher than 96 in. (244 cm) from the bottom of the washer.
Floor drain system (triew 2)
The floor drain system requires a siphon break that may be
purchased separately. See “Alternate Parts."
The siphon break must be a minimum of 28 in. (71 cm) from the
bottom of the washer. Additional hoses might be needed.
Page 5
Electrical ReqyirBnients
AWARNING
>8
GROUNDING INSTRUCTIONS
For a grounded, cord-connected washer:
This washer must be grounded. In the event of a mal
function or breakdown, grounding wili reduce the risk
of electrical shock by providing a path of least resist
ance for electric current. This washer is equipped with
a cord having an equipment-grounding conductor and
a grounding plug. The plug must be plugged into an
appropriate outlet that is properly installed and ground
ed in accordance with all local codes and ordinances.
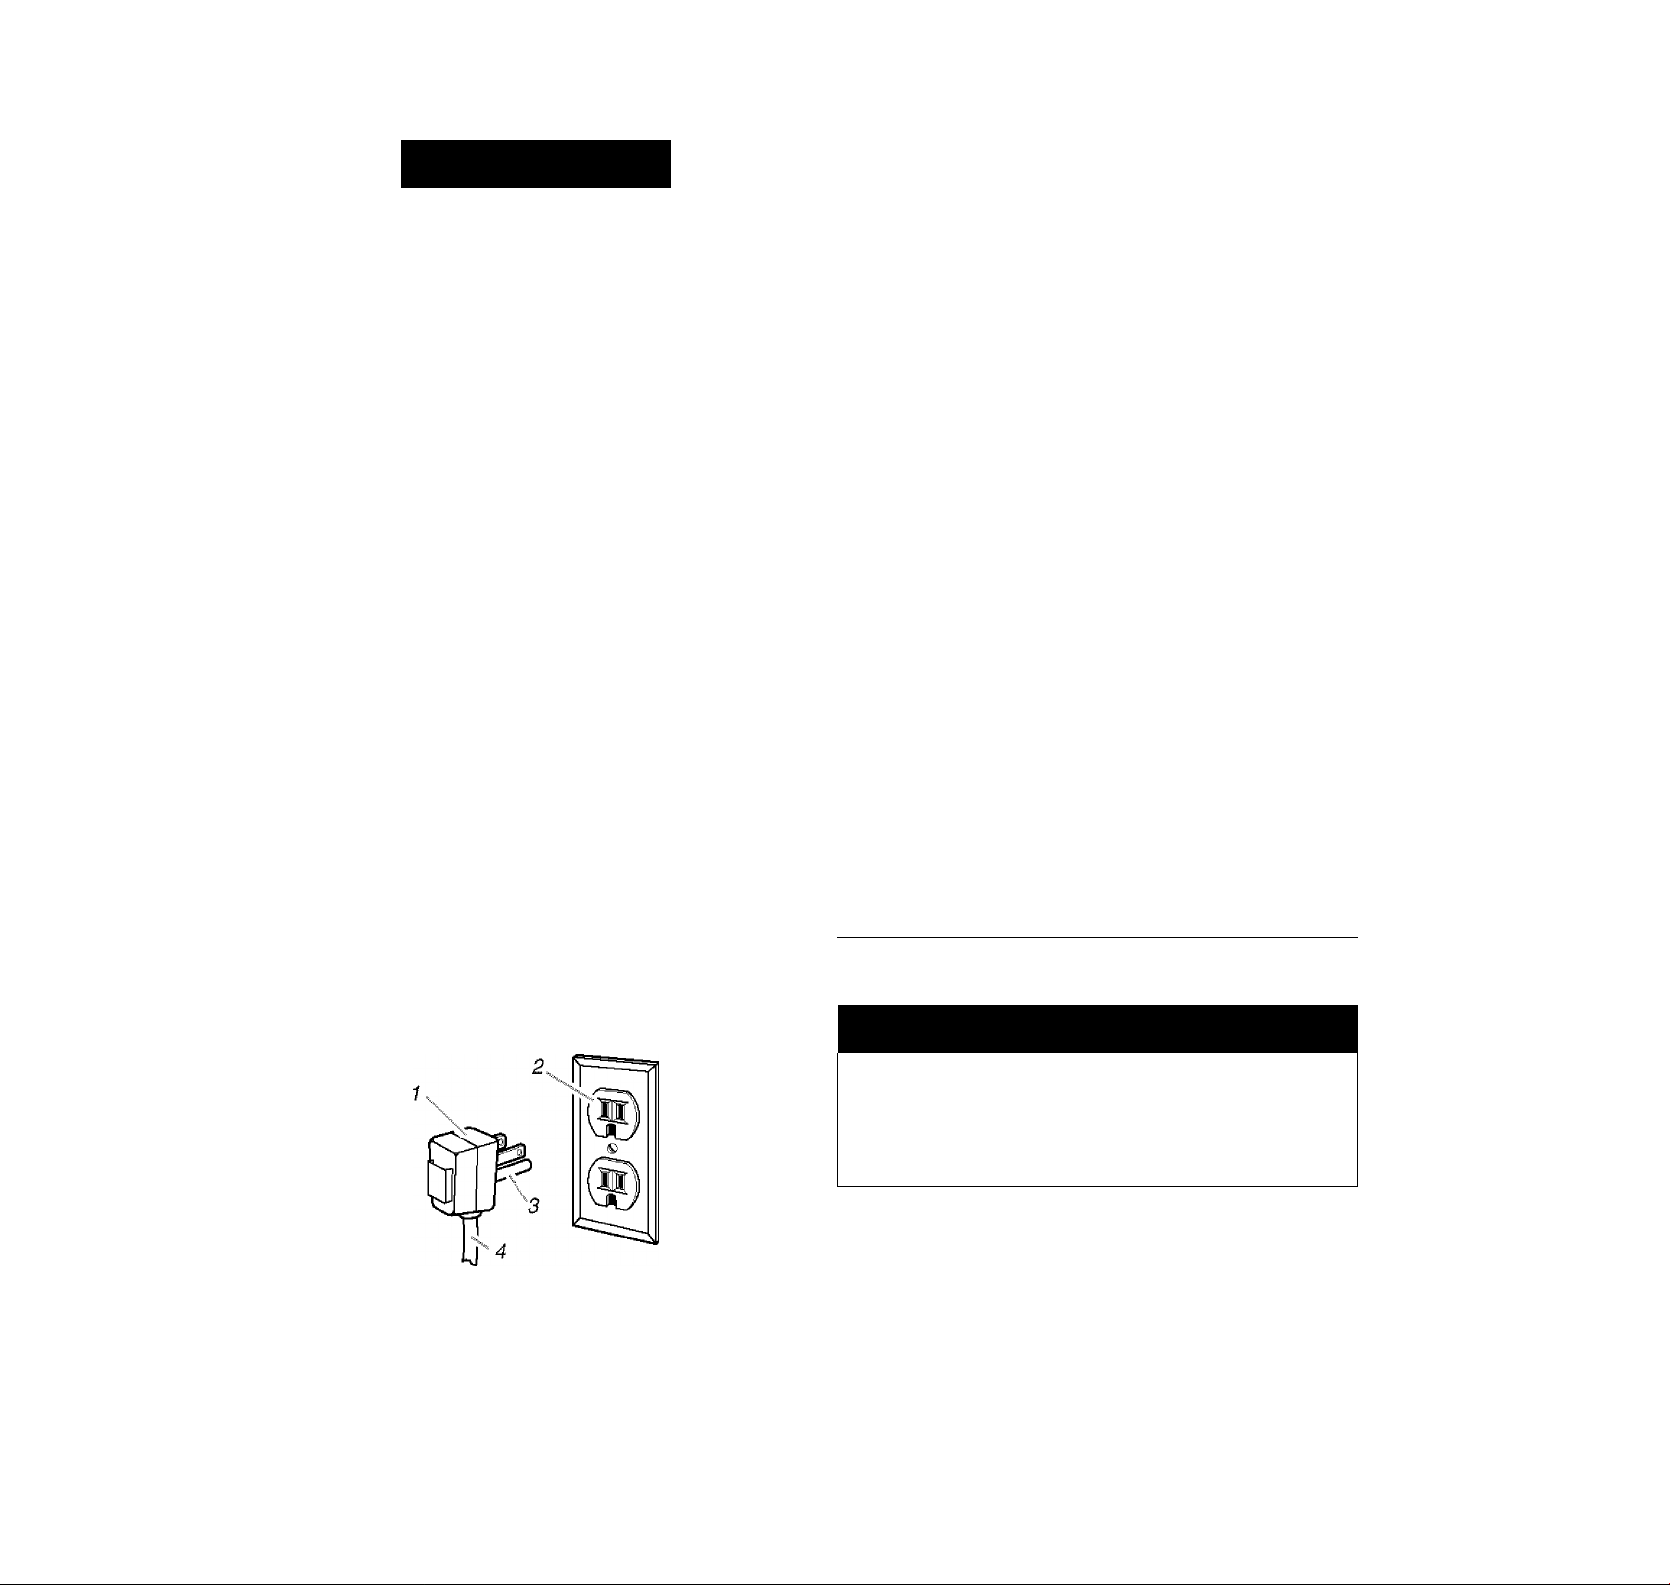
Electricai Shock Hazard
Plug into a grounded 3 prong outlet.
Do not remove ground prong.
Do not use an adapter.
Do not use an extension cord.
Failure to follow these instructions can result in
death, fire, or electrical shock.
A 120-volt, 60-Hz., AC-only, 15- or 20-ampere, fused
electrical supply Is required. Time-delay fuse or circuit
breaker Is recommended. It Is recommended that a separate
circuit serving only this appliance be provided.
This v\/asher is equipped with a power supply cord having a 3
prong ground plug.
To minimize possible shock hazard, the cord must be
plugged into a mating, 3 prong, ground-type outlet, grounded
in accordance with local codes and ordinances. If a mating
outlet is not available, it is the personal responsibility and
obligation of the customer to have the properly grounded
outlet installed by a qualified electrician.
it is
ground path is adequate.
Do not ground to a gas pipe.
Check with a qualified electrician if you are not sur
washer is properly grounded.
Do not have a fuse in the neutral or ground circuit.
that the
the
WARNING: improper connection of the equipment
grounding conductor can result in a risk of electric
shock. Check with a qualified electrician or serviceman
if you are in doubt as to whether the appliance is prop
erly grounded.
Do not modify the plug provided with the appliance if it will not fit the outlet, have a proper outlet installed
by a qualified electrician.
For a permanently connected washer:
This washer must be connected to a grounded metal,
permanent wiring system, or an equipment grounding
conductor must be run with the circuit conductors and
connected to the equipment-grounding terminal or lead
on the appliance.
INSTALLATION
INSTRUCTIONS
Before Ybii Start
AWARNING
1. 3 prong grounding plug
2. 3prong grounding-type outlet
3. Ground prong
4. Power supply cord
Excessive Weight Hazard
Use two or more people to move and install
washer.
Failure to do so can result in back or other injury.
To prevent floor damage, set the washer onto cardboard
before moving across floor.
Move the washer to within approximateiy 3 ft (90 cm) of the
finai iocation.
Page 6

Removing the shipping strap is necessary for smooth operation,
if the shipping strap is not removed, the washer wi!i make
excessive noise.
1. Do not cut yeilow strap. Puli yeilow strap firmiy, untii
compietely removed from washer. Depending on your model,
there will be either two or three cotter pins on the end of the
shipping strap when it is pulled out of the washer. The
electrical plug is attached to this shipping strap.
2. Pull firmly to remove the end of the shipping strap that
remains pinned to the back of the washer. This will release
the rear self-leveling feet.
4. Open clamp. Twist hose back and forth while pushing down
onto drain connector at the bottom of the washer. Continue
until hose contacts the ribbed stop on the cabinet.
5. Place clamp over area marked “CLAMP.” Release clamp.
1/4"
3. Cut the shipping strap about 16 in. (40 cm) from plug end.
Look for the words “CUT HERE.” Discard end with the cotter
pins. Slide remainder of shipping strap from the power cord.
You will use the remainder of the shipping strap later to
secure the drain hose.
Proper connection of the drain hose will protect your floors from
damage due to water leakage. To prevent the drain hose from
coming off or leaking, it must be installed per the following
instructions.
IMPORTANT: To ensure proper installation, this procedure must
be followed exactly.
1. Check the drain hose to see if it is the proper length.
2. Wet the inside of the straight end of the drain hose with tap
water. DO NOT USE ANY OTHER LUBRICANT.
3. Squeeze ears of silver, double-wire clamp with pliers to open.
Place clamp over the straight end of the drain hose 14 in.
(6 mm) from the end.
7. Drain Hose
2. Clamp
3. Ribbed Stop
4. Cabinet
For standpipe or laundry tub drain systems:
1. Open yellow, single-wire clamp with pliers and slide over
hooked end of drain hose to secure the rubber and
corrugated sections together.
1
,.2
1. Hooked end
2. Drain hose
2. Put hooked end of drain hose into laundry tub or standpipe.
Rotate hook to eliminate kinks.
To prevent drain water from going back into the washer:
■ Do not straighten hooked end of drain hose. Do not force
excess drain hose into standpipe. Hose should be secure,
but loose enough to provide a gap of air.
■ Do not lay excess drain hose in bottom of laundry tub.
For floor drain installation, see kit number required under
“Alternate Parts.”
Page 7

Hoses
1. Insert new flat washers (supplied) Into each end of the Inlet
hoses. Firmly seat the washers In the couplings.
1. Coupling
2. Washer
Connect the inlet hoses to the water faucets
Make sure the washer basket is empty.
2.
Attach the hose with the red coupling to the hot water faucet.
Screw on coupling by hand until seated on the washer.
Attach the hose with the blue coupling to the cold water
3.
faucet. Screw on coupling by hand until seated on the
washer.
4.
Using pliers, tighten the couplings with an additional two-
thirds turn.
Check for leaks
8. Turn on the water faucets and check for leaks. A small
amount of water might enter the washer. You will drain this
later.
NOTE; Replace inlet hoses after 5 years of use to reduce the
risk of hose failure. Record hose installation or replacement
dates for future reference.
■ If you connect only one water hose, you must cap off the
remaining water inlet port.
■ Periodically inspect and replace hoses if bulges, kinks,
cuts, wear, or leaks are found.
me
Drape the power cord over the console.
1.
Remove any cardboard used to move washer.
2.
Locate the remaining portion of shipping strap (not the end
3.
with the cotter pins) from step 3 of “Remove Shipping Strap.”
Remaining portion of Shipping Strap
4. Wrap the drain hose to the laundry tub leg or standpipe with
the tie strap. Push fastener into the nearest hole in the
shipping strap. (See illustration 1 or 2.)
'tiA.
□ Q QQQ>*''
MOTE: Do not overtighten. Damage to the valves can result.
Clear the water lines
5. Run water through both faucets and iniet hoses, into a bucket
or laundry tub, to get rid of particles in the water lines that
might clog the inlet valve screens.
Connect the inlet hoses to the washer
6. Attach the hose with the red coupling to the HOT (bottom)
inlet valve. Attaching the red coupling first makes it easier to
tighten connection with pliers. Screw on coupling by hand
until seated on the washer. Using pliers, tighten the couplings
with an additional two-thirds turn.
NOTE: Do not overtighten. Damage to the valves can result.
1. Cold water iniet vaive (blue)
2. Hot water iniet valve (red)
NOTE: The inlet valve may be on the right or the left side of
the washer, depending on your model.
7. Attach the hose with the blue coupling to the COLD water
(top) inlet valve. Screw on coupling by hand until seated on
the washer. Using pliers, tighten the couplings with an
additional two-thirds turn.
NOTE: Do not overtighten. Damage to the valves can result.
If the washer faucets and the drain standpipe are recessed,
put the hooked end of the drain hose in the standpipe. Tightly
wrap the tie strap around the water inlet hoses and the drain
hose. (See illustration 3.)
NOTE: If the coin slide mechanism has already been installed,
skip this step and proceed to “Adjusting Coin Box.”
Install Coin Slide
1. Remove the access panel from the top of the meter case by
unlocking the service lock with the key shipped inside the
parts bag found in the washer basket.
2. Deposit coins in coin slide and push coin slide all the way in.
Hold coin slide in extended position and insert through
opening in the front of the meter case.
3. From inside the meter case, place the threaded end of the
bolt through the center mounting hole in the front of the meter
case.
4. While holding the bolt in place, guide the coin slide
mechanism onto the threads and into the guide holes in the
front of the meter case.
5. Tighten the bolt as you guide the coin slide mechanism into
place.
Page 8

6. Tighten the bolt using a ratchet and a yi6-in. socket until the
slide mechanism is secure and does not move.
Adjusting Coin Box
1. Insert the coin box into the meter case from the front. The
tight fit of the coin box is set at the factory. You can loosen
the fit as desired by loosening the slotted rods inside the front
of the coin box.
4. Tilt the washer back and remove the wood block. Gently
lower the washer to the floor.
5. Slide to final location.
6. Tilt the washer forward until the rear of the washer is at least
4 in. (10.2 cm) off the floor. You may hear the self-adjusting
rear feet click into place. Lower the washer to the floor.
7. Check the levelness of the washer by placing a level on the
top edges of the washer, first side-to-side, then front-toback.
8. If the washer is not level, move the washer out slightly, tip
back, prop up the front of the washer with the wood block
and adjust the feet up or down as necessary. Repeat steps
5 through 8 until washer is level.
9. After the washer is in the final location and level, use a ®/is in.
(14 mm) open-end wrench to turn the nuts on the feet tightly
against the washer cabinet.
If the nuts are not tight against the washer cabinet, the
washer may vibrate.
NOTE: Keep a record of all coin box key numbers. A lost key can
only be replaced if ordered by key number from Sears Parts. The
key number is located on the key. If the key number is not
available, the lock must be drilled out to remove the coin box.
2. Replace the meter case access panel.
Properly leveling your washer prevents excessive noise and
vibration.
Install the front leveling feet
1.2.Prop up the front of the washer about 4 in. (10.2 cm) with a
wood block or similar object. The block needs to support the
weight of the washer.
Screw the lock nut onto each foot to within 1 in. (2.5 cm) of
the base.
3. Screw the feet into the correct holes at the front corner of the
washer until the nuts touch the washer.
NOTE: Do not tighten the nuts until the washer is level.
CoiiiDtete installation
1.
Check the electrical requirements. Be sure that you have the
correct electrical supply and the recommended grounding
method. (See “Electrical Requirements.”)
2.
Check to be sure all parts are now installed. If there is an
extra part, go back through the steps to see which step was
skipped.
3.
Check to be sure you have all of your tools.
4.
Check to be sure that the yellow shipping strap was removed
from the back of the washer and used to secure the drain
hose.
5.
Dispose/recycle all packaging materials.
6.
Check to be sure the water faucets are on.
7.
Check for leaks around faucets and inlet hoses.
ÂWARNING
Electrical Shock Hazard
Plug into a grounded 3 prong outlet.
Do not remove ground prong.
Do not use an adapter.
Do not use an extension cord.
Failure to follow these instructions can result in
death, fire, or electrical shock.
8. Plug into a grounded 3 prong outlet.
9. Remove the protective film on the console and any tape
remaining on the washer.
Page 9

Making a cycle check
1. Read “Washer Use” and run the washer through 1 complete
cycle.
2. Measure Vi of the normal recommended amount of powdered
or liquid detergent and pour it into the washer basket.
3. Close the lid.
4. The washer may be operated manually. Allow it to complete 1
whole cycle.
5. When the cycle is complete, check all hoses and connections
for proper operation and that they do not leak.
Testing and adjusting for standard start with coin slide
1. Advance timer manually to spin portion of cycle. Allow it to
shut off electrically.
2. Insert coin(s) and push the coin chute slide all the way in.
(Now pull the slide all the way out.) The appliance should start
on the return stroke of the coin chute slide.
3. If the washer does not start, see the "Adjusting Timer Clutch"
section and re-adjust the clutch.
4. After adjustment, retest the coin slide to make sure the unit
operates correctly.
All coin operated models have a timer that provides a QV^-minute
wash in the NORMAL Cycle. To check the cycle, push the coin
slide all the way in and pull all the way out. Note the wash cycle
time. If the washer does not start or does not provide the proper
wash time, the clutch assembly may need adjustment.
4. If the timer goes past the third increment of fill, less than %Vi-
minutes of wash will be provided in the NORMAL Cycle. Turn
the clutch adjustment screw counterclockwise (left).
2. .3
\ I
1. Timer Front
2. Start
3. Off
4. Rotate
Counterclockwise
5. Timer Clutch
Adjustment Screw
%„f€.
AWARNING
Electrical Shock Hazard
Disconnect power before servicing.
Replace all parts and panels before operating.
Failure to do so can result in death or
electrical shock.
NOTE: The washer was tested at the factory. Some time may
have been left so that the washer will start to operate before the
coin slide is operated. If this happens, take off the access panel
from the top of the meter case and set the clutch to OFF position
by hand. Then proceed with timer clutch check.
To adjust the clutch:
1. Unplug washer or disconnect power.
2. Remove the meter case access panel.
3. The clutch assembly has a timer clutch adjustment screw. If
the washer does not start after the coin slide has been
pushed all the way in and out, turn the clutch adjustment
screw clockwise (right).
AWARNING
>•
Electrical Shock Hazard
Disconnect power before servicing.
Replace all parts and panels before operating.
Failure to do so can result in death or
electrical shock.
Removing Cabinet
1. Unplug washer or disconnect power.
2. Remove 2 screws on console at left and right side on bottom.
Page 10

3. Pull console forward then tilt it back.
4. Remove washer cabinet clip on right side under console. Use
screwdriver blade as shown.
NOTE: For additional security, top can be locked to washer
with a lock and key in the hole provided. Screw type lock
available from industry sources.
NOTE: Place all screws and other items removed from coin slide
assembly on a cloth so they will not get lost.
AWARNING
Electrical Shock Hazard
Disconnect power before servicing.
Replace all parts and panels before operating.
Failure to do so can result in death or electrical shock.
7. Clips
2. Clip
3. Screwdriver Blade
5. Open top access panel in meter case. Loosen timer bolts
with Phillips screwdriver and lift timer out of the way.
NOTE: You do not have to disconnect the timer.
1. Access Pane!
2. Clip
6. Remove washer cabinet clip inside meter case,
using screwdriver.
7. Pull cabinet up and forward to remove.
Replacing Cabi№t
1. Put cabinet in place on washer.
Replace clips at top rear of washer cabinet.
Put timer back in place in meter case and tighten timer bolts.
Replace meter case access panel.
Swing console down into place, push toward rear.
Replace 2 console screws.
Plug in washer or reconnect power.
1. Unplug washer or disconnect power.
2. Remove slide mechanism from meter case.
3.
Remove slide return spring.
4.
Place coin(s) in coin slot(s) and push forward all the way.
Remove buffer.
5.
6.
Turn coin chute upside down and install or remove required
number of block-out keys. Remove keys to increase vend,
add keys to lower vend.
7.
Reassemble buffer.
8.
Pull slide back to original position and reassemble slide
return spring.
10
Page 11

9. Set new vend price by adding or removing the appropriate
block-out keys and/or dime inserts according to Table of
Vend Prices.
TABLE OF VEND PRICE
WASHER USE
VEND
PRICE
COIN BLOTS
1B34EB7B
□
1D(i
350
500
600
"750
B50
®1.DD
®1.1D
*1.25
*1.35
*1.50
*1.BD
*1.75
*1.B5
®2.aa
NOTES:
■ Black slots are dosed off by block-out key. To remove
block-out keys, pull straight up.
■ Be sure block-out keys and/or dime inserts are seated
properly and ratchet dog is in place with its spring
connected. Be sure the proper coin sizing block is in
place.
Part # 20-3007 for up to 7 quarters and 1 dime
Part # 20-3006 for up to 8 quarters and 0 dimes
■ Unless otherwise ordered, all coin chutes are supplied
with Part 20-3006 in place.
10. Plug in washer or reconnect power.
NOTE: Refer to the product information sheet provided with the
coin box for additional information.
dIDDDDII
IDDDDDII
dIDDDDDI
IDDDDDDI
dDDDDDDI
IDDDDDDD
dDDDDDDD
IDDDDDDD
AWARNING
Fire Hazard
Never place items in the washer that are
dampened with gasoline or other flammable
fluids.
No washer can completely remove oil.
Do not dry anything that has ever had any type of
oil on it (including cooking oils).
Doing so can result in death, explosion, or fire.
IMPORTANT:
■ Be sure your washer is installed as recommended in the
“Installation Instructions.”
■ Occasionally check the drain area to be sure lint is not
clogging the drain.
Cycle Time
The cycle time is 19V2 minutes plus the fill times for each
wash cycle.
Two-Speed Models
Water Temp. Speeds
Settings Wash Rinse Agitate Spin
Cotton/Sturdy Hot Cold Fast Fast
Permanent Press Warm Cold Fast Fast
Permanent Cold Cold Fast Fast
Delicate Warm Cold Slow Fast
Knit Warm Cold Slow Fast
Cycle Time = 19V2 Minutes -i- Fili
One-Speed Models
Water Temp. Speeds
Settings Wash Rinse Agitate Spin
Cotton/Sturdy Hot Cold Fast Fast
Permanent Press Warm Cold Fast Fast
Permanent Cold Cold Fast Fast
Cycle Time = 19V2 Minutes -i- Fili
11
Page 12

Typical Full
Load Loading Load Loading
Type Suggestion Type Suggestion
Mixed 2 double or Heavy 2 pair work pants
Load 1 king size sheet Work 3 work shirts
This washer provides al! cold water rinses. Laboratory analysis
indicates no rinse problems with either phosphate or powdered
non-phosphate detergents. Modern fabrics (synthetic knits and
blends, permanent press) benefit from a cold rinse because of
improved wrinkle resistance. See the following charts.
Load Chart
4 pillowcases
6 T-shirts
6 pair shorts
2 boy’s shirts
2 blouses
6 handkerchiefs
Clothes 1 coverall
3 pair jeans
Water Usage
The following chart shows approximate hot and cold water usage
with no clothes in the washer basket (measurements in gallons).
Type Cycle Selected Hot Water Cold Water
3. Pull console forward, then tilt it back.
4. Squeeze locking tab on water level switch and turn 45°.
5. Use pliers and turn shaft on the water level switch 45°.
6. Replace water level switch.
7. Swing console down Into place, push toward the rear.
8. Replace 2 console screws.
9. Plug in washer or reconnect power.
WATER SAVING
POSITION “B” ^
MAXIMUM WATER
POSITION “A”
/
Hot Wash - Cold Rinse 18.6 19.9
Warm Wash - Cold Rinse 9.2 29.3
Cold Wash - Cold Rinse 0 40
Water Satrings Option
Adjusting the water level switch allows you to save
10% water usage.
AWARNING
Electrical Shock Hazard
Disconnect power before servicing.
Replace all parts and panels before operating.
Failure to do so can result in death or
electrical shock.
To adjust the water level switch:
1. Unplug washer or disconnect power.
2. Remove 2 screws on the console at left and right side
on bottom.
WASHER CARE
LUBRICATING
Every Kenmore Automatic Washer is thoroughly lubricated at the
time of assembly and should not require further lubrication under
normal operating conditions. In exceptional cases where
lubrication is required, the following guide is provided.
Component Lubricant Application
Instructions
Gearcase SAE60
Non-Detergent,
Non-Foaming
Motor Oil
Lower
Centerpost
Bearing
Rear Leveling
Link
Mechanism
Agitator Shaft
& Upper
Centerpost
Bearings
Turbine Oil Use oz (7.4 mL) of
Lubriplate
630-2
Turbine Oil Upon repair or
Replace with 15 oz
(444 mL) of oil whenever
gearcase is repaired.
Pint cans are available
as Part Number 350572.
turbine oil (available in
pint cans), in the lower
centerpost bearing
before installing the
gearcase and
superstructure.
Rub lightly on moving
parts as required.
inspection, fill cavity
above centerpost
bearings with
turbine oil.
12
Page 13

NOTES:
■ Shut off hot and cold water outlets when washer is not in use.
■ Drain machine to prevent damage if washer will be subjected
to freezing temperatures.
Be sure the open end of the drain hose does not fall or drop
down lower than the water level in the machine. Water will siphon
out of washer if this happens.
TROUBLESHCX)TING
First try the solutions suggested here and possibly avoid
the cost of a service call...
NOTE: Washer will not operate with the lid open.
ffestieT 'T ■■ ^■■ irierits
1. Unplug washer or disconnect power.
2. Coil power cord and tape to rear of washer.
3. Remove inlet hoses from faucets. Push them into washer. Do
not kink.
4. Remove wire form and push drain hose into washer. Do not
kink.
5. Tape lid closed.
6. Prop washer up about 4 in. (10.2 cm) on one or two corner
posts from shipping carton, remove spacers, turn front feet in
flush with cabinet.
7. Push rear leveling legs up and tape securely.
8. Stuff a blanket between top of basket and washer lid EXCEPT
in area of safety lid switch.
9. Washer is ready for shipping.
NOTE: When washer is reinstalled, use new hoses.
If you need an additional parts list, contact your local Sears store
or Sears Service Center. Make sure to furnish the complete
model number when ordering.
Noisy
Is the load balanced and the washer level? The wash load
should be balanced and not overloaded. The washer must be
level. The front feet should be properly installed and the nuts
tightened. Reset the rear leveling legs (if needed). See the
Installation Instructions.
Did you completely remove the yellow shipping strap with
cotter pins? See the Installation Instructions.
Are the gears engaging after the drain and before spin, or
is the upper part of agitator clicking during wash? These
are normal washer noises.
Leaking
■ Check the following:
Are the fill hoses tight?
Are the fill hose washers properly seated?
Is the drain hose clamp properly installed? See the
Installation Instructions.
■ Is the sink or drain clogged? Sink and standpipe must be
able to handle 17 gal. (64 L) of water per minute.
■ Is water deflecting off the tub ring or the load? Center the
tub before starting the washer. The wash load should be
balanced and not overloaded. The fill or spray rinses can
deflect off the load. The washer must be level. The front feet
should be properly installed and the nuts tightened. Reset the
rear leveling legs (if needed). See the Installation Instructions.
■ Check household plumbing for leaks.
New Vend Price Order Form on Page 14.
13
Page 14

Basket crooked
Was the washer basket pulled forward during loading?
Push the basket to the center before starting wash.
Is the load balanced and the washer level? The wash load
should be balanced and not overloaded. The washer must be
level. The front feet should be properly installed and the nuts
tightened. Reset the rear leveling legs (if needed). See the
Installation Instructions.
The washer basket moves while washing. This is normal.
Agitator operation
The top of the agitator is loose, or moves in only one
. This is normal.
Wa: ■.■reratiori
Washer stops, won’t fill, rinse or agitate
Check the following:
Is the power cord plugged into a grounded 3 prong outlet?
Is the indicator on the Cycle Control knob properly lined up
with a cycle? Turn the Cycle Control knob to the right slightly
and pull to start.
Are the water inlet valve screens clogged?
Are both the hot and cold water faucets turned on?
Is the water inlet hose kinked?
Is the lid open? The lid must be closed to operate.
Does the water level seem too low, or does the washer
appear to not fill completely? The top of the agitator is
much higher than the highest water level. This is normal and
necessary for clothes to move freely.
Has a fuse blown or is the circuit breaker open? If problem
continues, call an electrician.
Are you using an extension cord? Do not use an extension
cord.
Is the washer overloaded? Wash smaller loads.
Washer won’t drain or spin
Is the drain hose clogged, or the end of the drain hose
more than 96 in. (244 cm) above the floor? See the
Installation Instructions for proper installation of drain hose.
Is the lid open? The lid must be closed to operate.
Is there excessive sudsing? Always measure detergent.
Follow manufacturer’s directions.
Washer continues to fill or drain, cycle seems stuck
Is the top of drain hose lower than the water level in
washer? The top of the hose must be higher than the water
level in the washer for proper operation. See the Installation
Instructions.
Does the drain hose fit too tightly in the standpipe, or is it
taped to the standpipe? The drain hose should be loose yet
fit securely. Do not seal the drain hose with tape. The hose
needs an air gap. See the Installation Instructions.
not what ! selected
Are the hot and cold water inlet hoses reversed? See the
Installation Instructions for more information. As your
frequency of loads washed increases, the water temperature
may decrease for hot and warm temperature selections. This
is normal.
NEW VEND PRICE
CJrcier rorrri
To change vend price, detach and mail the lower portion to:
Customer Service Department
Greenwald Industries Inc.
212 Middlesex Ave.
Chester, CT 06412
The coin chute has been pre-set at the factory.
When increasing in $.25 pricing
Follow product information instructions; no extra parts required.
When decreasing in $.25 pricing - or - changing to
$.10 pricing
(Coin sizing block required; see "Changing Vend Price" section.)
14
Order required parts using this tear-off. Block-out keys will be
shipped to you at no charge. Follow product information
instructions.
Quantity
Existing Vend Price
New Vend Price
Name
Company
Address
City
Daytime phone
Purchase date
__________
___
___ _____
_
_____
Page 15

"les
ì «лЭ
Load too wet
Did you use the right cycle for the load being washed?
Select a cycle with a higher spin speed (if available).
Did you use a cold rinse? Cold rinses leave loads wetter
than warm rinses. This is normal.
Residue or lint on load
Did you sort properly? Sort lint givers (towels, chenille) from
lint takers (corduroy, synthetics). Also sort by color.
Did you overload the washer? The wash load must be
balanced and not overloaded. Clothes should move freely.
Lint can be trapped in the load if overloaded. Wash smaller
loads.
Did you seiect the correct water level? The water level
should be correct for the load size. Clothes should move
freely in the water.
Did you use enough detergent? Follow manufacturer’s
directions. Use enough detergent to hold the lint in the water.
Did you line dry your clothing? If so, you can expect some
lint on the clothing.
Check the following:
Was paper or tissue left in the pockets?
Is your water colder than 70°F (21 °C)? Wash water colder
than 70“F (21 °C) may not completely dissolve the detergent.
Did you use the proper cycle time for the load? Reducing
wash time (duration) is another way to reduce lint.
Stains on load
Did you follow the manufacturer’s directions when adding
detergent and fabric softener? Measure detergent and
fabric softener. Use enough detergent to remove soil and hold
it in suspension. Dilute fabric softener and add to the rinse
portion of a cycle only. Do not drip fabric softener on clothes.
Is there above average iron (rust) in water? You may need
to install an iron filter.
Did you properly sort the load? Sort dark clothes from
whites and lights.
Did you unioad the washer promptly? To avoid dye transfer,
unload the washer as soon as it stops.
Load is wrinkled
Did you unload the washer promptly? Unload the washer
as soon as it stops.
Did you use the right cycle for the load being washed?
Use the cycle for Casual or Permanent Press clothes or
another cycle with low spin speeds (if available) to reduce
wrinkling.
Did you overload the washer? The wash load must be
balanced and not overloaded. Loads should move freely
during washing.
Was the wash water warm enough to relax wrinkles, or
are you using warm rinses? If safe for the load, use warm or
hot wash water. Use cold rinse water.
Are the hot and cold water hoses reversed? Check to be
sure the hot and cold water hoses are connected to the right
faucets. See the Installation Instructions.
Load is tangled or twisted
Did you overload the washer? The wash load must be
balanced and not overloaded. Loads should move freely
during washing.
Did you wrap items around the agitator? Drop items
loosely into the washer. Do not wrap items around the
agitator.
Gray whites, dingy colors
Did you properly sort the load? Dye transfer can occur
when mixing whites and colors in a load. Sort dark clothes
from whites and lights.
Was the wash temperature too low? Use hot or warm
washes if safe for the load. Hot water should be at least
111 °F (44'’C) to clean heavy soils.
Did you use enough detergent, or do you have hard
water? Use more detergent for washing heavy soils in cold or
hard water.
Are the hot and cold water hoses reversed? Check to be
sure the hot and cold water hoses are connected to the right
faucets. See the Installation Instructions.
Garments damaged
■ Check the following:
Were sharp items removed from pockets before washing?
Empty pockets, zip zippers, snap or hook fasteners before
washing.
Were strings and sashes tied to prevent tangling?
Were items damaged before washing? Mend rips and broken
threads in seams before washing.
■ Did you overload the washer? The wash load must be
balanced and not overloaded. Loads should move freely
during washing.
■ Did you add chlorine bleach properly? Do not pour chlorine
bleach directly onto load. Wipe up bleach spills. Undiluted
bleach will damage fabrics. Do not place load items on top of
the bleach dispenser when loading and unloading the washer
(on some models).
■ Did you follow the manufacturer’s care label instructions?
15
Page 16

Your Home
For repair-in your home-of all major brand appliances,
lawn and garden equipment, or heating and cooling systems,
no matter who made it, no matter who sold it!
For the replacement parts, accessories and
owner’s manuals that you need to do-it-yourself.
For Sears professional installation of home appliances
and items like garage door openers and water heaters.
1-800-4-MY-HOME® (1 -800-469-4663)
Call anytime, day or night (U.S.A. and Canada)
www.sears.coin
www.sears.ca
Our Home
For repair of carry-in items like vacuums, lawn equipment,
and electronics, call or go on-line for the location of your nearest
Sears Parts & Repair Center.
1-800-488-1222
Call anytime, day or night (U.S.A. oniy)
www.sears.com
To purchase a protection agreement on a product serviced by Sears:
1-800-827-6655 (U.S.A.) 1-800-361-6665 (Canada)
Para pedir servicio de reparación
a domicilio, y para ordenar piezas:
1-888-SU-HOGAR^
(1-888-784-6427)
Au Canada pour service en frangais:
1-800-LE-FOYER“^
(1-800-533-6937)
www.sears.ca
3948597B
© Sears, Roebuck and Co. ! Registered Trademark / ^^Trademark / ^^Servtce Mark oí Sears, Roebuck and Co.
Printed in U.S.A.
7/02
 Loading...