


Kenmope
SEWING MACHINE 19502
\qso_
/
i
S
SEARS, ROEBUCK AND CO.
Dear Homemaker,
CONGRATULATIONS!
You have just purchased a Kenmore Sensor Sew 70, a sewing machine that can, with some easy setting
by you, do both decorative and utility sewing more quickly and accurately than you ever dreamed
possible. This machine can take the guesswork, the frustrating trial and error out of sewing, virtually
eliminating hand-sewing. By just pressing a button or two, you can sew a seam or smock a dress,
reinforce a sleeve or darn socks, create a border or embroider a sampler.
Th_s manual will show you how to perform these wonders, making your sewing creations and crafts the
"talk of the town", and make you the "star of the bazaar"
You can also program this machine to automatically sew your borders and monogram your clothing, and
it will remember the entire sequence and repeat it when you press the foot control again.
Practice makes an expert I Follow these directions and suggestions carefully. Get to know your
machine intimately and it will turn your sewing tasks into an adventure I
These instructions will help you obtain the best sewing results and avoid unnecessary serwce expense for
conditions beyond our control, Advice on the operation and care of your machine ts always available
at your nearest Sears Retail Store. Please remember, if you have questions about your machine, always
mention the model number and serial number when you inquire,
Write them here, for easy reference: Model No. 385.
Serial No.
TABLE OF CONTENTS
SECTION
SECTION 2.
1. KNOW YOUR MACHINE
A Portable Case or Cabunet is Available .......... _ 4
Locate and Identify the Parts ................ 5_6
Locate and Identify the Accessories ........... 6
PREPARE YOUR MACHINE FOR SEWING
Set Up the Machine, , .................. 7_! i
• Plug _n the Machine and Switch on the Power ..... 7
o Set the Foot Control .............. 8
• Check Your Feed Balance Dial ............. 8
• Set the Pressure Dial ............. 8
o Adiust the Presser Foot Lever ........... 9
• Thread Cutter ........... , ........... 9
o Free-Arm Sewing: the Removable
Extension Table .................... 10_11
Know What the Presser Feet Will Do .......... 12_15
o Foot Storage Compartment ............. 12
o Presser Foot Types ................... 13_15
A, Zigzag Foot ....................... 13
B. Transparent Buttonhole Foot .............. 13
C, Overedge Foot ................... 13
D, Quitter ............. !4
E. Zipper Foot ................... 14
F. Satin Stitch Foot ............. 14
G. Blind Stitch Hem Foot ........ 15
H. Stra{ght Foot ................. 15
J. Sliding Buttonhole Foot ............ 15
Choose Your Needle and Thread .......... 16_17
o Check Your Needie ............... 16
. Fabrnc, Needle, Thread and Stitch Length Chart .... 17
e To Change Your Needte ................... 17
Prepare the Bobbin ........ ......... 18"_2t
m Put Thread on the Spool .............. 18
• Additional Spool Pin ................ 18
SECTION
SECTION 4.
• To Remove the Bobbin from the Machine ......... 19
Wind the Bobbin ...................... 19_20
o Insert the Bobbin into the Bobbin Holder ........ 21
Prepare Your Top Thread .................. 22_27
o Check Your Presser Foot ................. 22
o Change the Presser Foot ............. 23
. Thread Your Needle ................... 24
e Pick Up Your Bobbin Thread ............ 25
. Adjust the Top Thread Tenston .......... 26"27
For Straight Stitch .................... 26
For Zigzag Stitch ................... 27
3. LEARN TO USE THE CONTROLS
Up/Down Needle Position Button ................ 29
Control Panel ............................ 29
Pattern Indicator Screen ......... , ........... 30
Pattern Selection Buttons ..................... 30
Memory Button ......................... 31
Clear Button ............................ . 31
Straight and Zigzag Stitch Buttons ............. 31
StretchWidth and Length Buttons ............... 32_33
• Stitch Width Button .................... 32
o Stitch Length Button ................... 33
Reverse Stttch and Auto-Lock Buttons ............ 34
o Reverse St{tch Button ................... -,o_ 34
• Auto-Lock Button .................. 34
PRACTICE COMMON STITCHING SKILLS
Use the Seam Gutdes ..................... 35
Turn a Square Corner .................. 35
Sew on Heavy Fabrics ................. 36
Use the Darning Plate _ _ .............. 36
Basting [] ...................... 37
Darning [] ................ 38
SECTION 5.
Sew a Button ........ 39
Put m a Zipper ............... 40_42
LEARN THE STITCHES
Chart of Sewing Functrons ...................... 44
Stitch Pattern Chart ....................... 45_49
Straight Stitches [] _ [] ............... 50_55
o Straight Stitch .................... 50
o TopstJtching ........................ 51
= Position Your Needle for Topstitching .......... 52
• Pintucking ......... 53
= Quilting ........................ 54
=, Gathering ................. 55
Outline Stretch [] .............. 56
Straight Stretch [] ....................... 57
Saddle Stitch [] ........................ 58
Zigzag Stitches [] _ [] ................. 59_64
o Bastc Zigzag [] ............ 59
• Satin Stitch [] , . . 60
- Overcasting Stitch [] .................. 61
o Multiple Zigzag [] ................. 62
= Overedge Seam [] .................... 63
o Knit Stitch [] ............ 64
Buttonholes [] -- [] ,, . 65_68
o Adjust the Stitch Density ............ 68
Corded Buttonholes [] _ [] ............. 69
Hemming and EdgmgStitches [] _ [] . . . 70_74
, Blind Hem Stitch (stretch) [] ........... 71
, Blind Hem Stitch (woven) _ ........ 71
o Shell Stitch [] ..... 72
o Scallop Stitch [] ........ 73
o Cut-Out Work Edging and Applique [] ........ 74
Reinforcing Stitches [] and [] ......... 75_77
• Feather Stitch [] ..................... 75
o FagotlngStitch [] ............ 76
SECTION 6.
SECTION 7.
PARTS LIST
INDEX
• Elastic Casing Stitch [] ................... 77
Decorate with Geometric Patterns [] _ [_ .... 78
Cross Stitch [] ............ 79
Smocking [], [], [], _-_ ............. 80
Sand Stitch [] ..................... 81
Program Decorative Stitch
Patterns [] _ [] etc .................. 82_84
= One Cycle Stitching ................... 82
= Two Cycle Stitching ........................ 82
• Pattern Single Umts .................... 83
• To Adiust a Distorted Pattern ................. 84
Mooogra ,ng[] [] - [] ..... 85--Be
• Reduce the Size of Numbers and Letters ..... 86
PERFORMANCE PROBLEMS CHART
What to Do When ........ 87*"88
CARE FOR YOUR MACHINE
Replace the Light Bulb ................ 89
Clean the Bobbin Holder ................ 90
Clean the Hook Race and Feed Dogs .......... 91
Oil the Underside ......... 92
Oil the Face Cover Plate .................... 92
...................... 93_94
......... 95_96
3
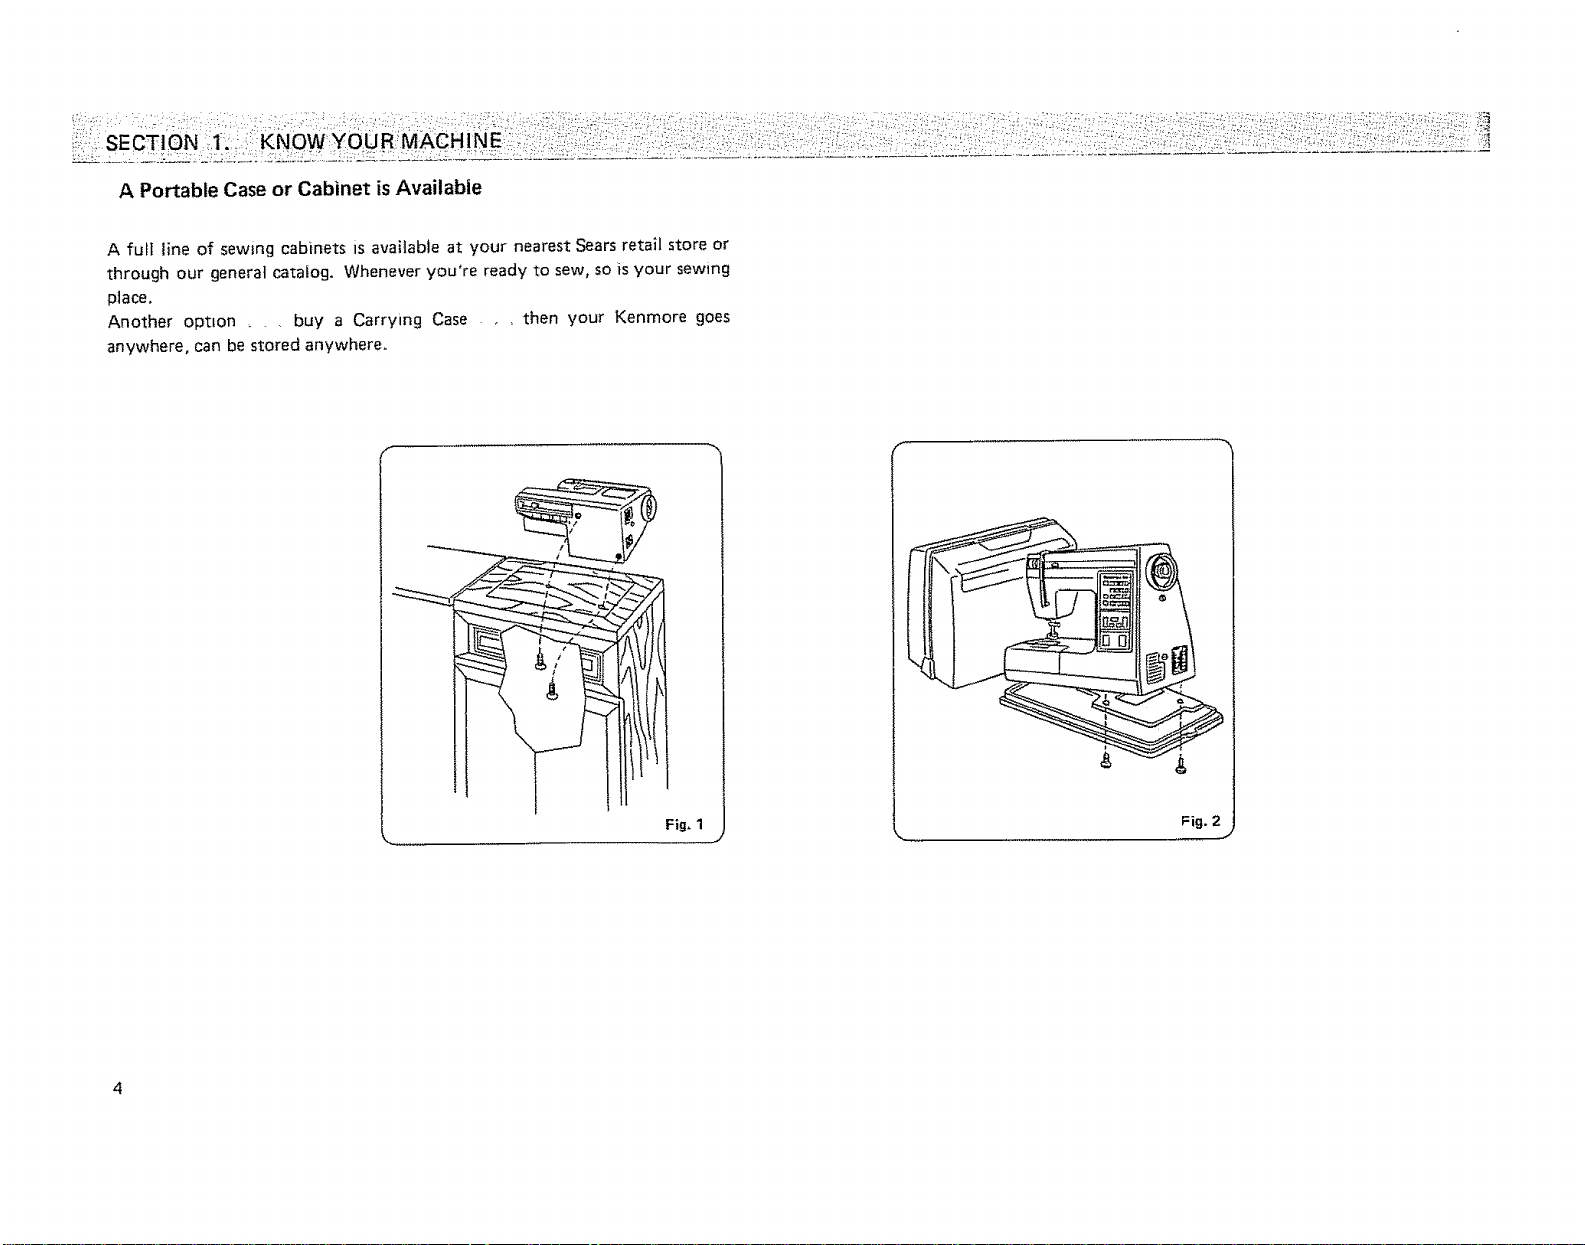
A Portable Case or Cabinet isAvailabie
A full line of sewing cabinets is available at your nearest Sears retail store or
through our general catalog. Whenever you're ready to sew, so is your sewing
p] ace.
Another option _ . buy a Carrying Case , _ then your Kenmore goes
anywhere, can be stored anywhere.
i
Fig, 1
J
Fig. 2
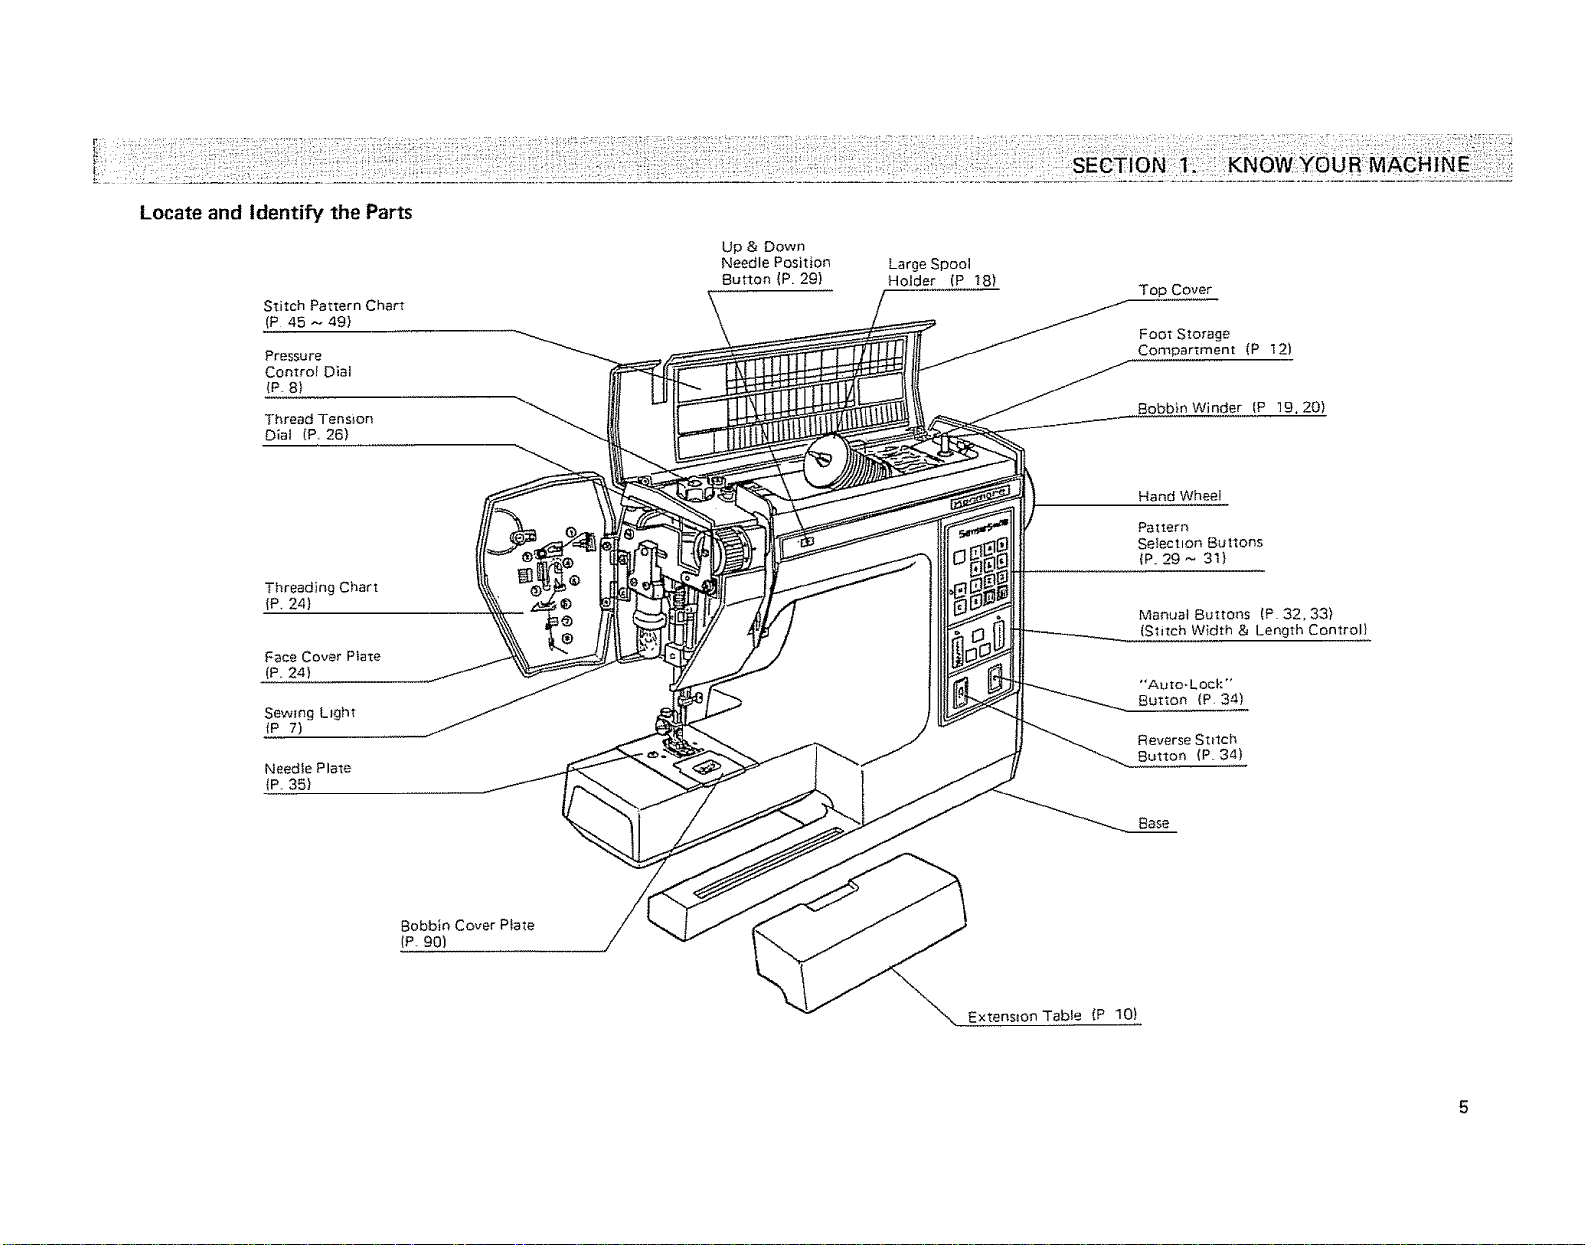
Locate and Identify the Parts
Stitch Pattern Chert
(P 45 _ 49}
Pressure
Contro! Dial
(P 8}
Thread Tension
Dial {P 26}
ThreadingChart
(P. 24}
Face Cover Plate
(P, 24)
Sewing Light
(P 7)
Needfe Plate
{P_ 35}
Up & Down
Needle Position
Button (P. 29)
Large Spool
Holder (P 18)
Top Cover
Foot StoTage
Compartment (P t2)
Bobbin Winder {P 19, 20)
Hand Wheel
Pa_tern
Setect_on Buttons
(P. 29 ~ 3t}
Manual Buttons (P 32,33)
(Stitch Width & Length Control}
"Auto-Lock"
Button {P. 34}
Reverse Stitch
Button (P- 34}
Bobbin Cover Plate
(P. 90}
Base
Extens_onTaMe (P 10)
Locate and Identify the Parts (Continued) Locate and Identify the Accessories
Accessory Storage Box
Accessory Box
Foot Control {P. 8)
\ Presser Foot IP. 12 _ 15)
Push-Pull Clutch
(P. 19}
Feed Balance
Dial (P, 8.68)
bght end
Power Switch
{P 7}
PIug Connector (P 7}
Presser Fool Le_er (P 9)
Arm (P 10 11)
J "_N omenclature P,ate
Bobbin
But[onhole Opener
Small Screw Driver
J
Large Screw Driver
J
Additional Spool Pin
Sliding
Buttonhole
Foot (J)
Pin @ SpooJ
Holder
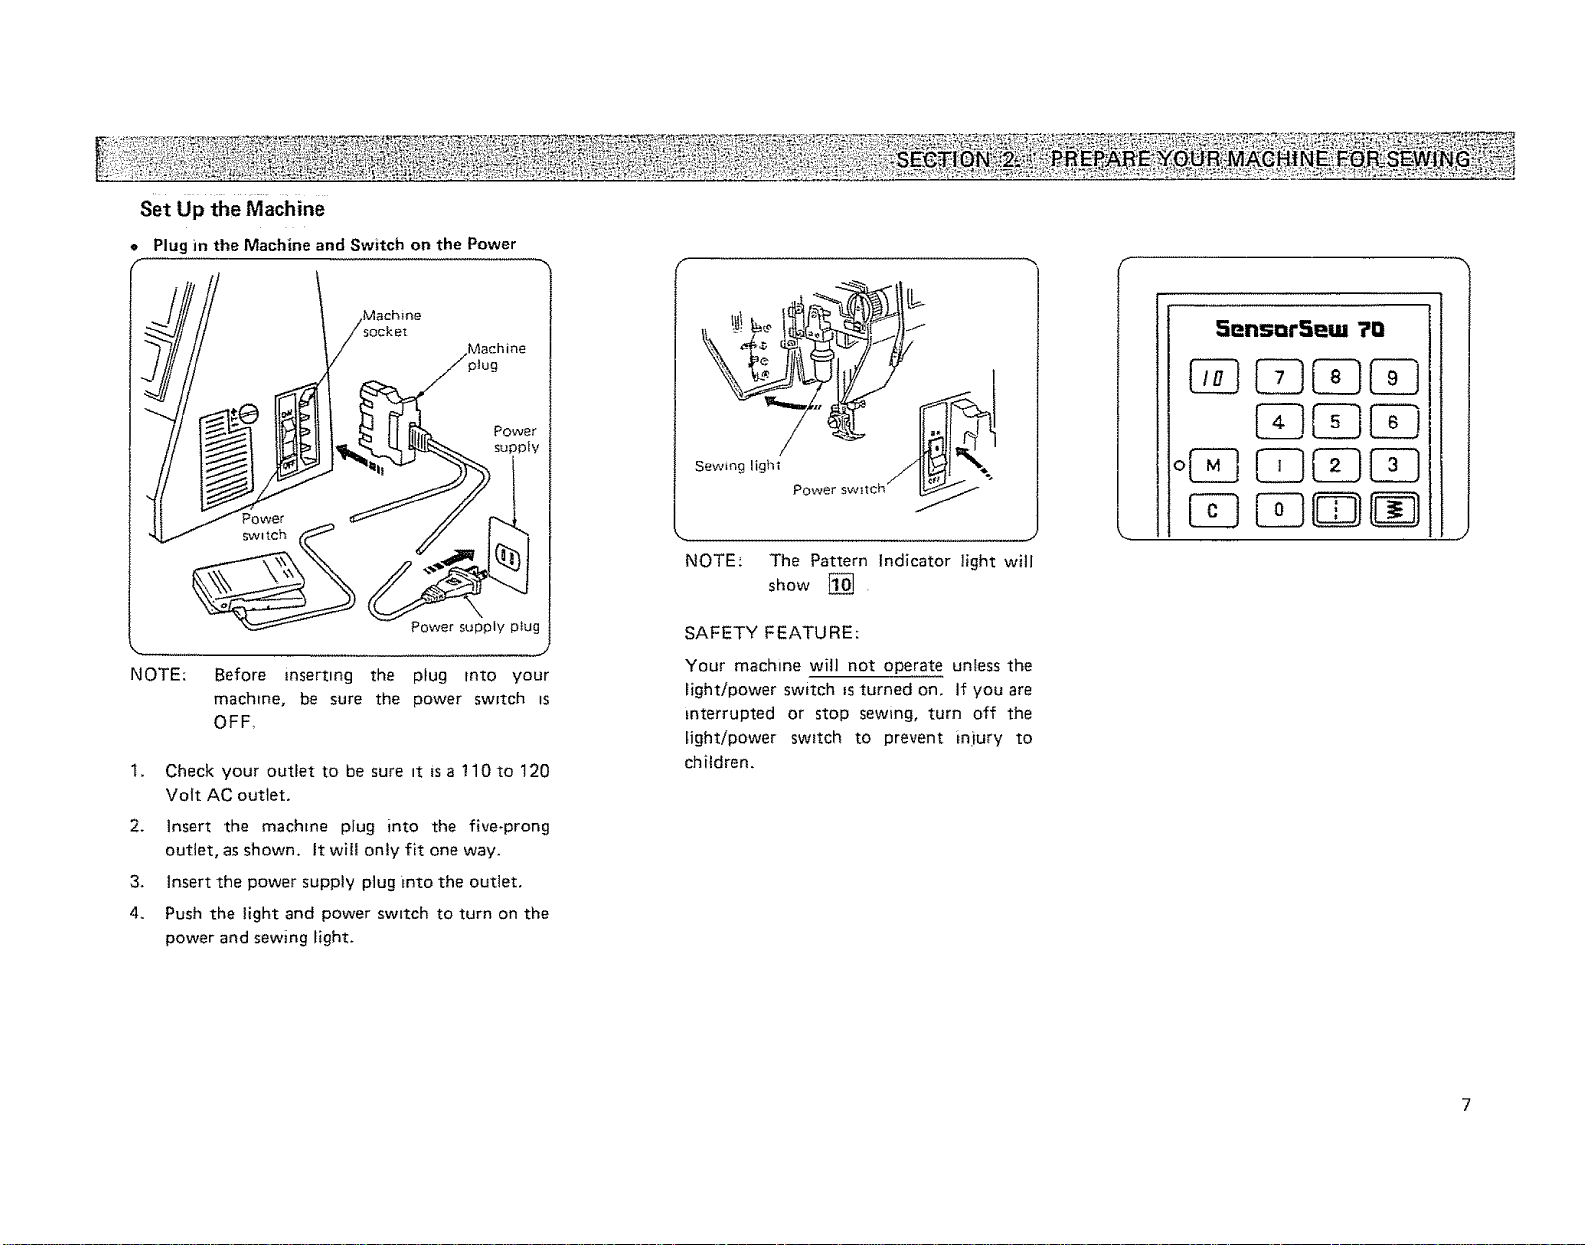
Set Up the Machine
• Plug in the Machine and Switch on the Power
- 1 /Machine
/socket
I / .Machine
./plug
Power
S_JppIv
5ensorSeua ?0
Sewing light
Power
NOTE: Before inserting the plug rnto your
machine, be sure the power sw_tch _s
OFR
1, Check your outlet to be sure _t is a !10to 120
Volt AC outlet.
2. Insert the machine piug into the five-prong
outlet, as shown. It will only fit one way.
3. Insert the power supply plug into the outlet.
4. Push the light and power switch to turn on the
power and sewing _ight.
NOTE: The Pattern Indicator light will
show []
SAFETY FEATU RE:
Your machine will not operate unless the
_ightipower switch _sturned on. if you are
interrupted or stop sewing, turn off the
light/power sw_tch to prevent injury to
children.
J
• o
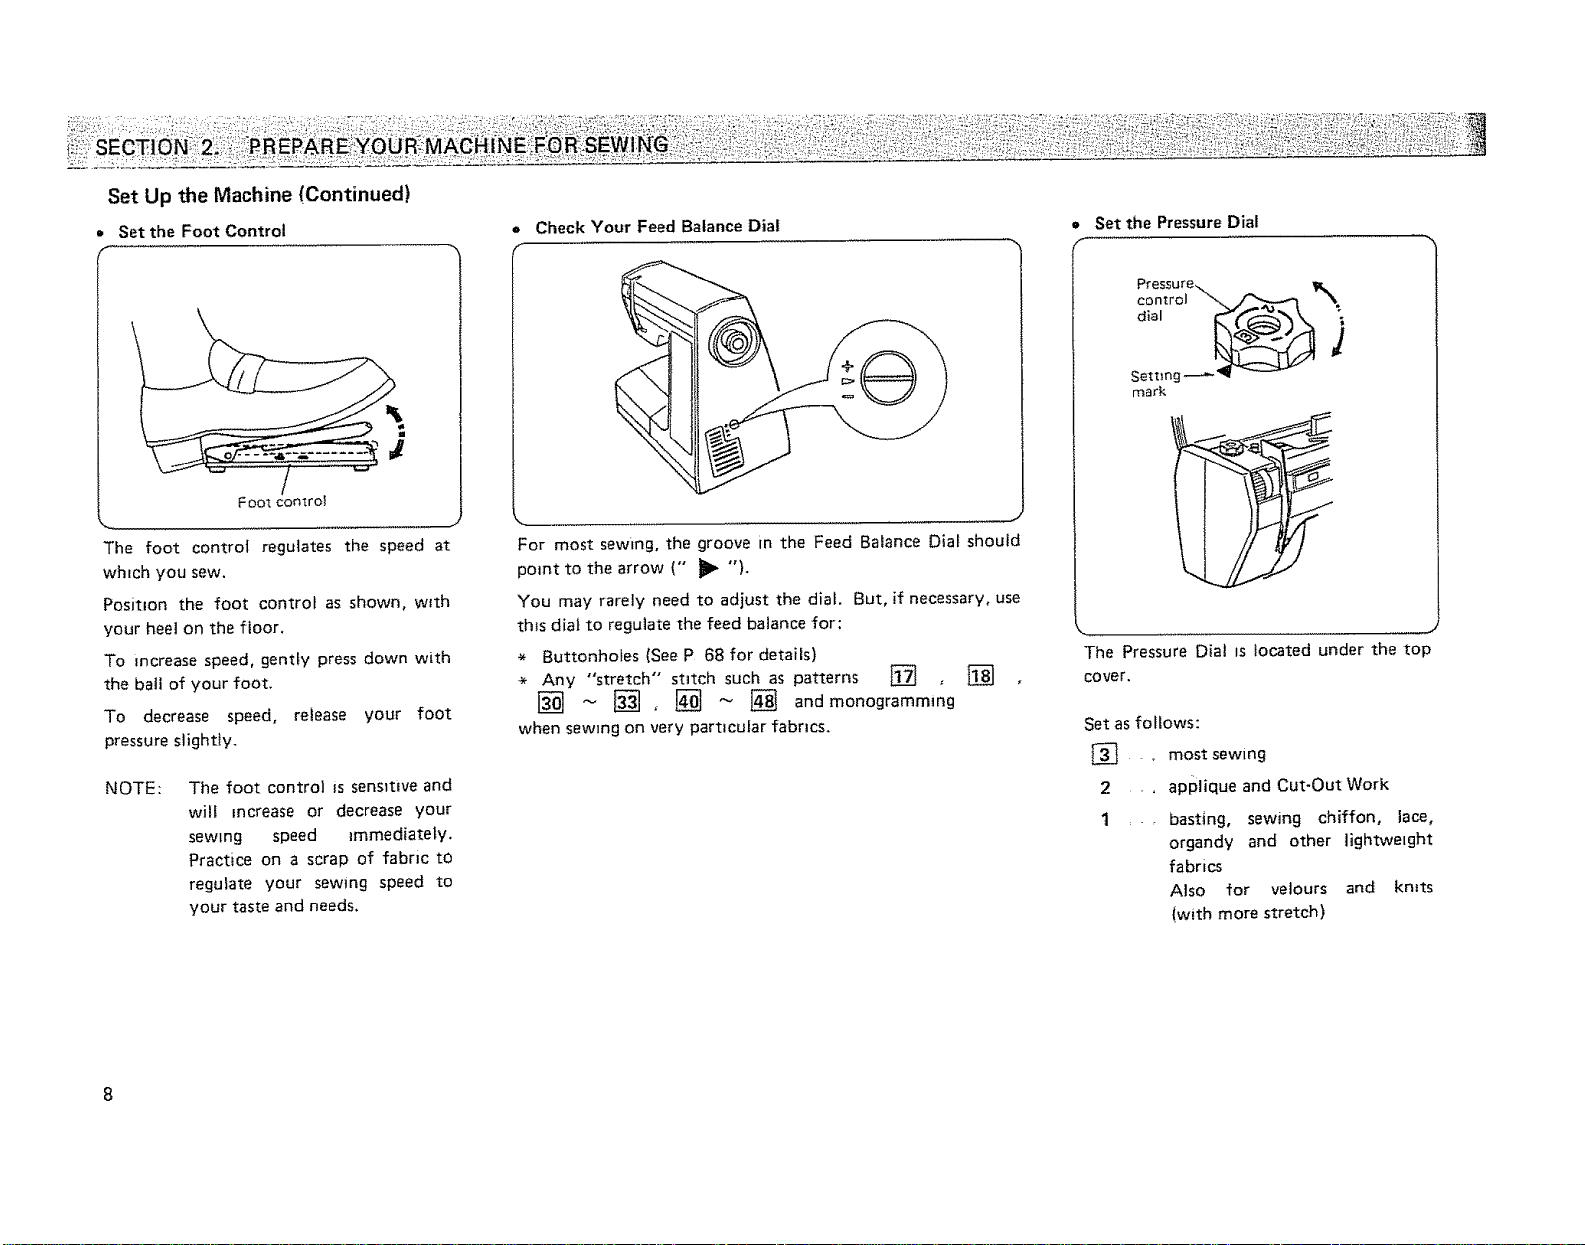
Set Up the Machine (Continued)
• Set the Foot Control
_0o_ conirol
The foot control regulates the speed at
which you sew.
Posit_on the foot controI as shown, w_th
your heel on the floor.
To increase speed, gently press down with
the bail of your foot.
To decrease speed, retease your foot
pressure slightly.
NOTE : The foot control is sens}twe and
wilf increase or decrease your
sewing speed immediately.
Practice on a scrap of fabric to
reguiate your sewing speed to
your taste and needs,
o Check Your Feed Balance Diat
f
J
• Set the Pressure Dial
Pressure_. _l_
control _ _
Settmg---_
mark
For most sewing, the groove m the Feed Balance Dial should
point to the arrow ('" _ ").
You may rarely need to adjust the dial. But, if necessary, use
th_s dial to regulate the feed balance for:
* Buttonholes (See P 68 for details)
* Any "'stretch" stitch such as patterns [] , [] ,
The Pressure Dia! is tocated under the top
cover,
[] - @ ~ @ andmonogromm, 0
when sewing on very partDcutar fabrics.
Set as foltows:
. most sewing
2 . . apP!ique and Cut-Out Work
1 ... basting, sewing chiffon, lace,
organdy and other lightweight
fabrics
Also for velours and kmts
{with more stretch)
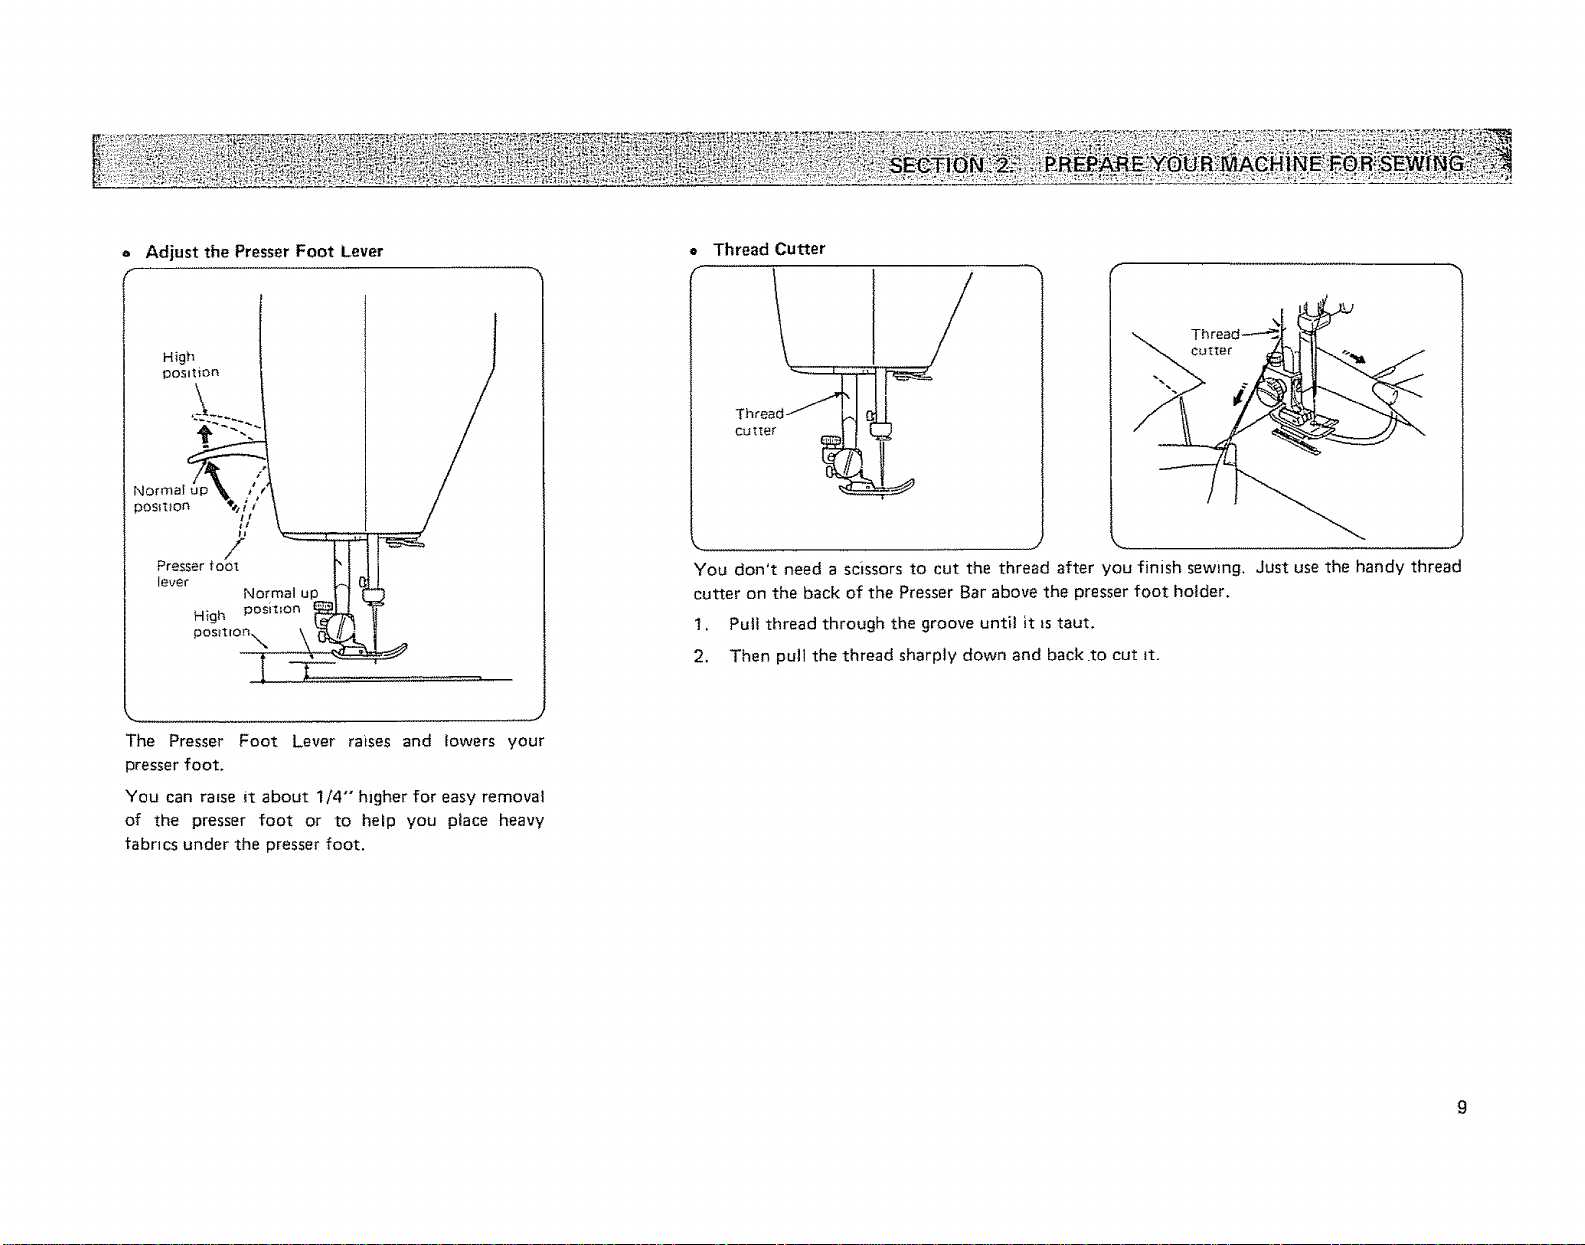
= Adjust the Presser Foot Lever
The Presser Foot Lever raises and lowers your
presser foot.
You can ratse it about 1/4" higher for easy removal
of the presser foot or to help you place heavy
tabncs under the presser foot.
o
Thread Cutter
f
cutter
You don't need a scissors to cut the thread after you finish sewing. Just use the handy thread
cutter on the back of the Presser Bar above the presser foot holder.
1. Puli thread through the groove untiI it is taut.
2, Then pull the thread sharply down and back to cut it.
J
Set Up the Machine (Continued)
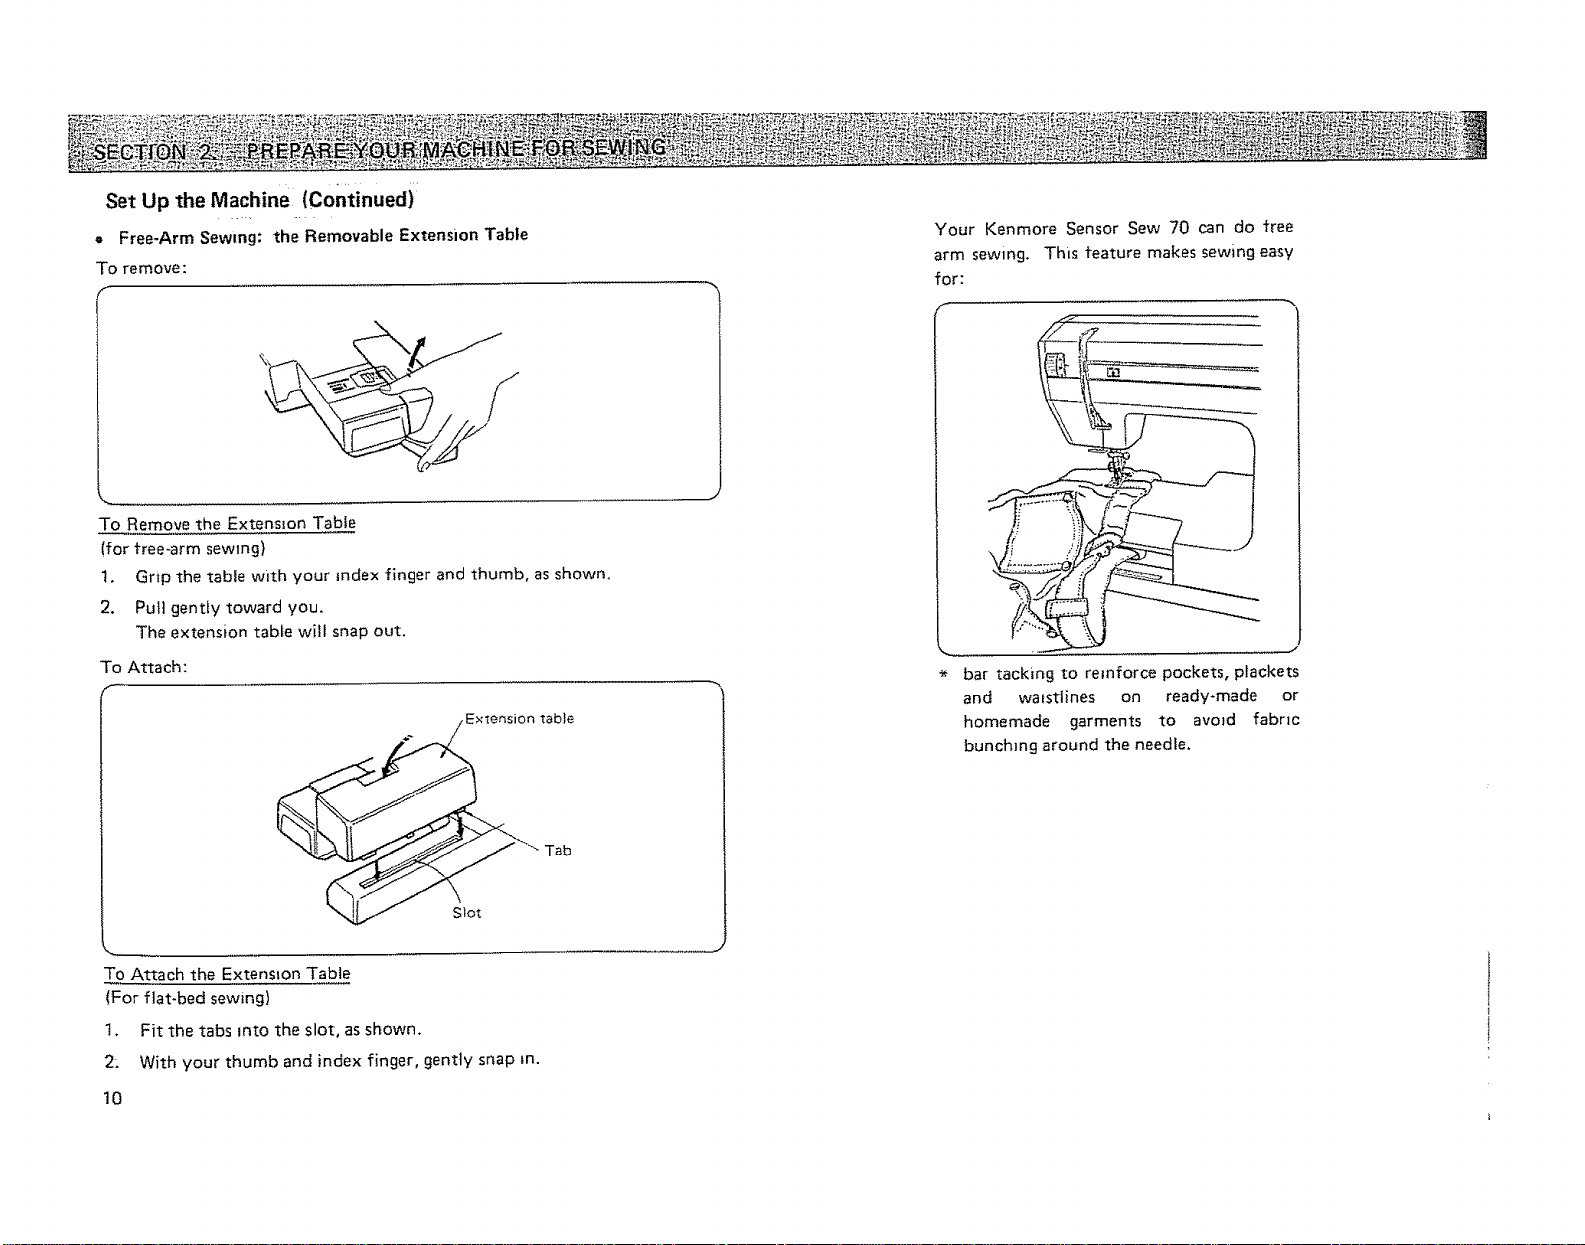
• Free-Arm Sewing: the Removable Extension Table
To remove:
f
To Remove the Extension Table
(for free-arm sewing}
t. Grip the table with your index finger and thumb, as shown.
2. Pull gentry toward you.
The extension table will snap out.
To Attach:
Your Kenmore Sensor Sew 70 can do tree
arm sewing. This feature makes sewing easy
for:
J
bar tacking to reinforce pockets, plackets
and waistlines on ready-made or
homemade garments to avoid fabric
bunching around the needle.
To Attach the Extension Table
(For fiat-bed sewing)
1. Fit the tabs into the slot, as shown.
2. With your thumb and index finger, gently snap m.
10
n table
"_ Tab
* Stitchingsleeves,watstbands,pantlegs,
oranycirculargarmentarea.
darmngsocksormendingknees,elbows,
orareasofwearinchildren'sclothes.
e sewingbuttonsonsleeves,waistabands,
etc.
11
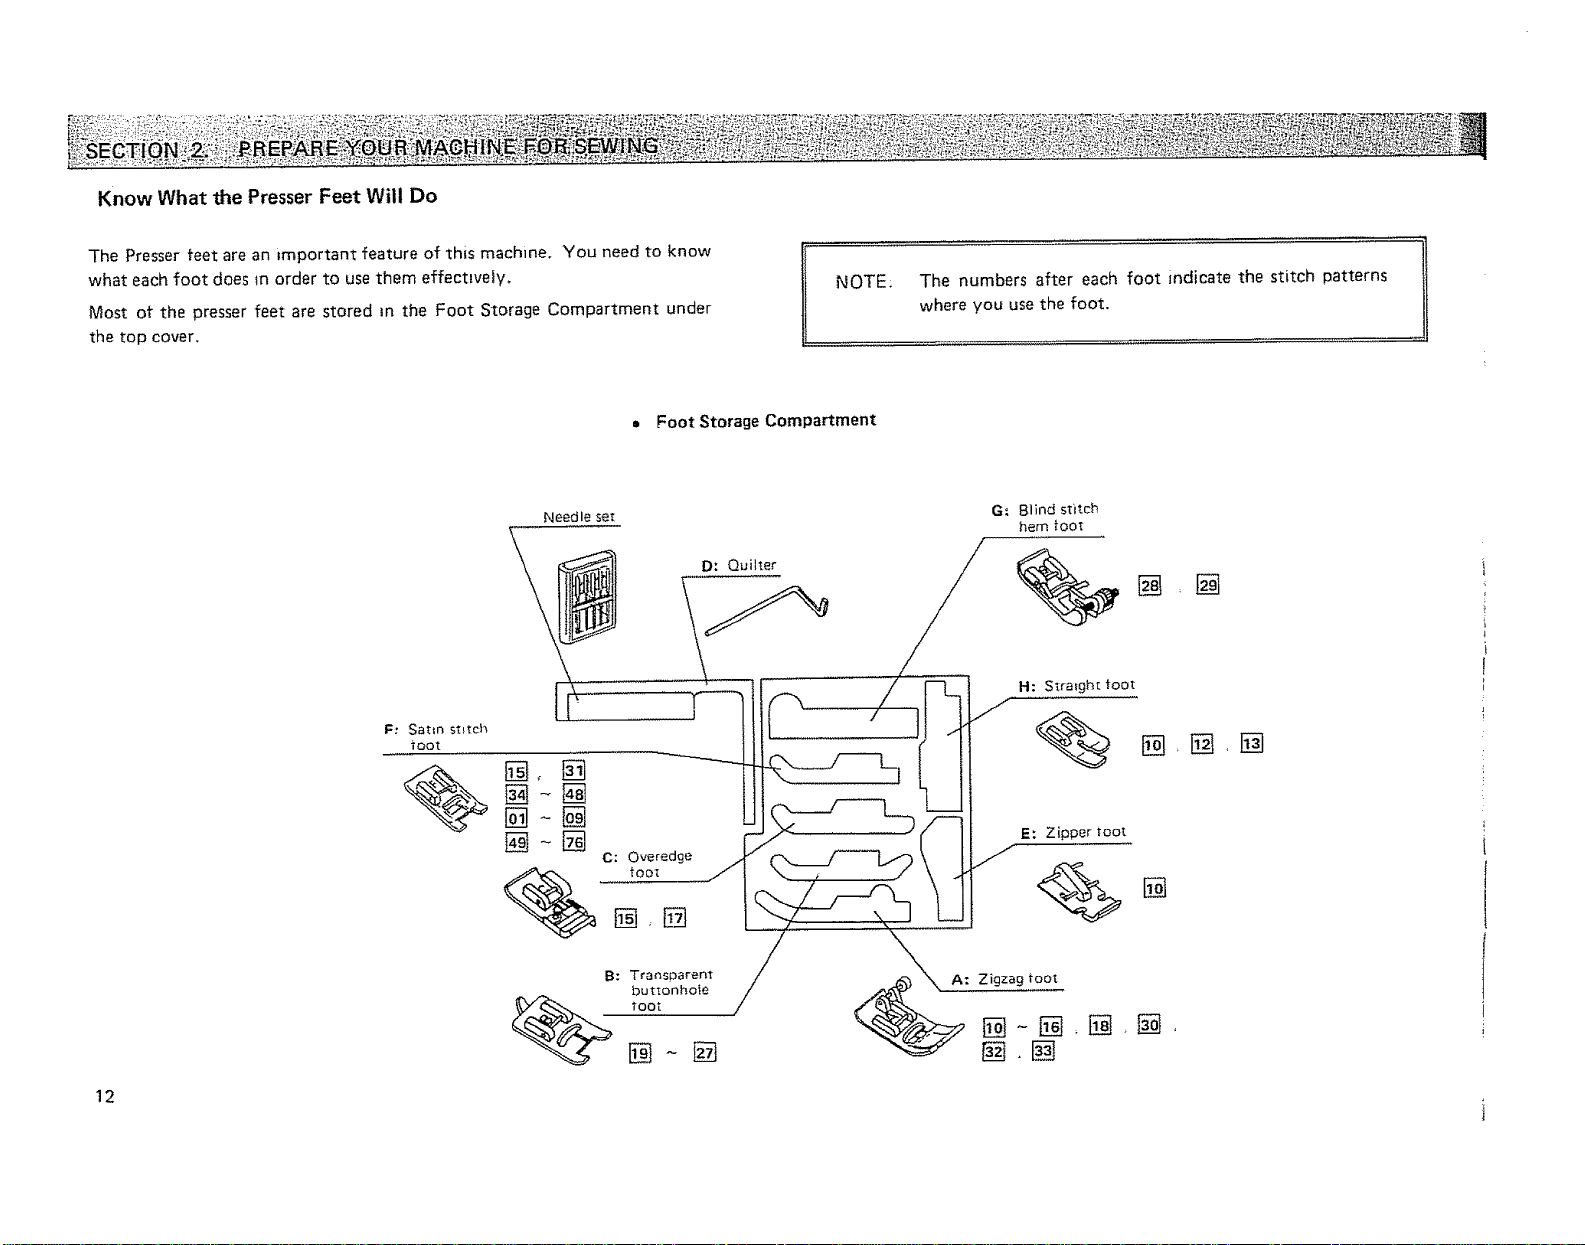
Know What the Presser Feet Will Do
The Presser feet are an important feature of this machine. You need to know
what each foot does m order to use them effectively,
Most of the presser feet are stored m the Foot Storage Compartment under
the top cover,
m Foot Storage Compartment
F; Satin stitch
toot
NOTE: The numbers after each foot indicate the stitch patterns
where you use the foot,
12
%
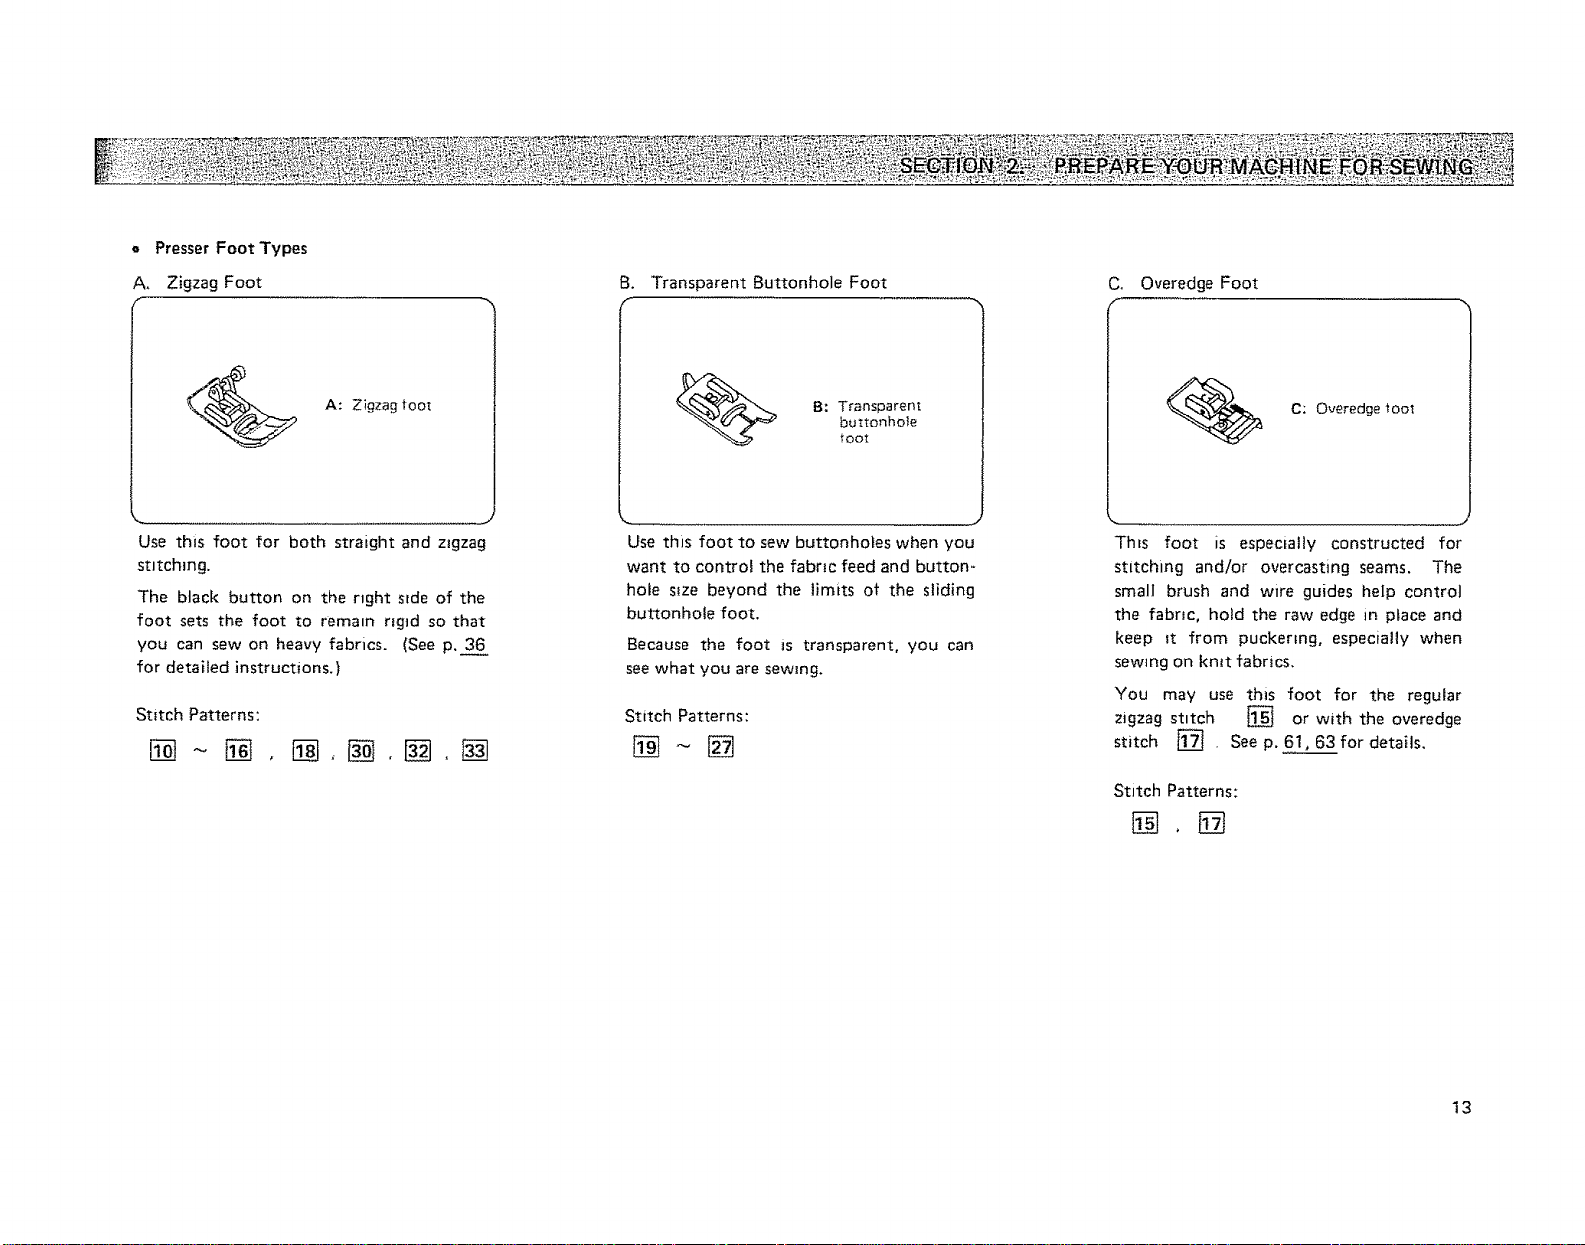
o Presser Foot Types
A, Zigzag Foot
B. Transparent Buttonhole Foot
C. Overedge Foot
A: Zigzag toot
Use this foot for both straight and zigzag
stitching.
The black button on the right side of the
foot sets the foot to rema=n rigid so that
you can sew on heavy fabrics. (See p. 36
for detailed instructions.)
Stitch Patterns:
~ [] , [] , [] , [] , []
buttonhole
B: Transparent
toot
J
Use this foot to sew buttonholes when you
want to control the fabric feed and buttom
hole size beyond the limits of the sliding
buttonhole foot.
Because the foot is transparent, you can
see what you are sewing.
Stitch Patterns:
This foot is especially constructed for
stitching and/or overcasting seams. The
small brush and wire guides help control
the fabric, hold the raw edge in place and
keep It from puckermg, especially when
sewing on knit fabrics_
You may use this foot for the regular
zigzag stitch [] or with the overedge
stitch [] . See po 61, 63 for details,
Stitch Patterns:
C; Overedge toot
.............. J
13
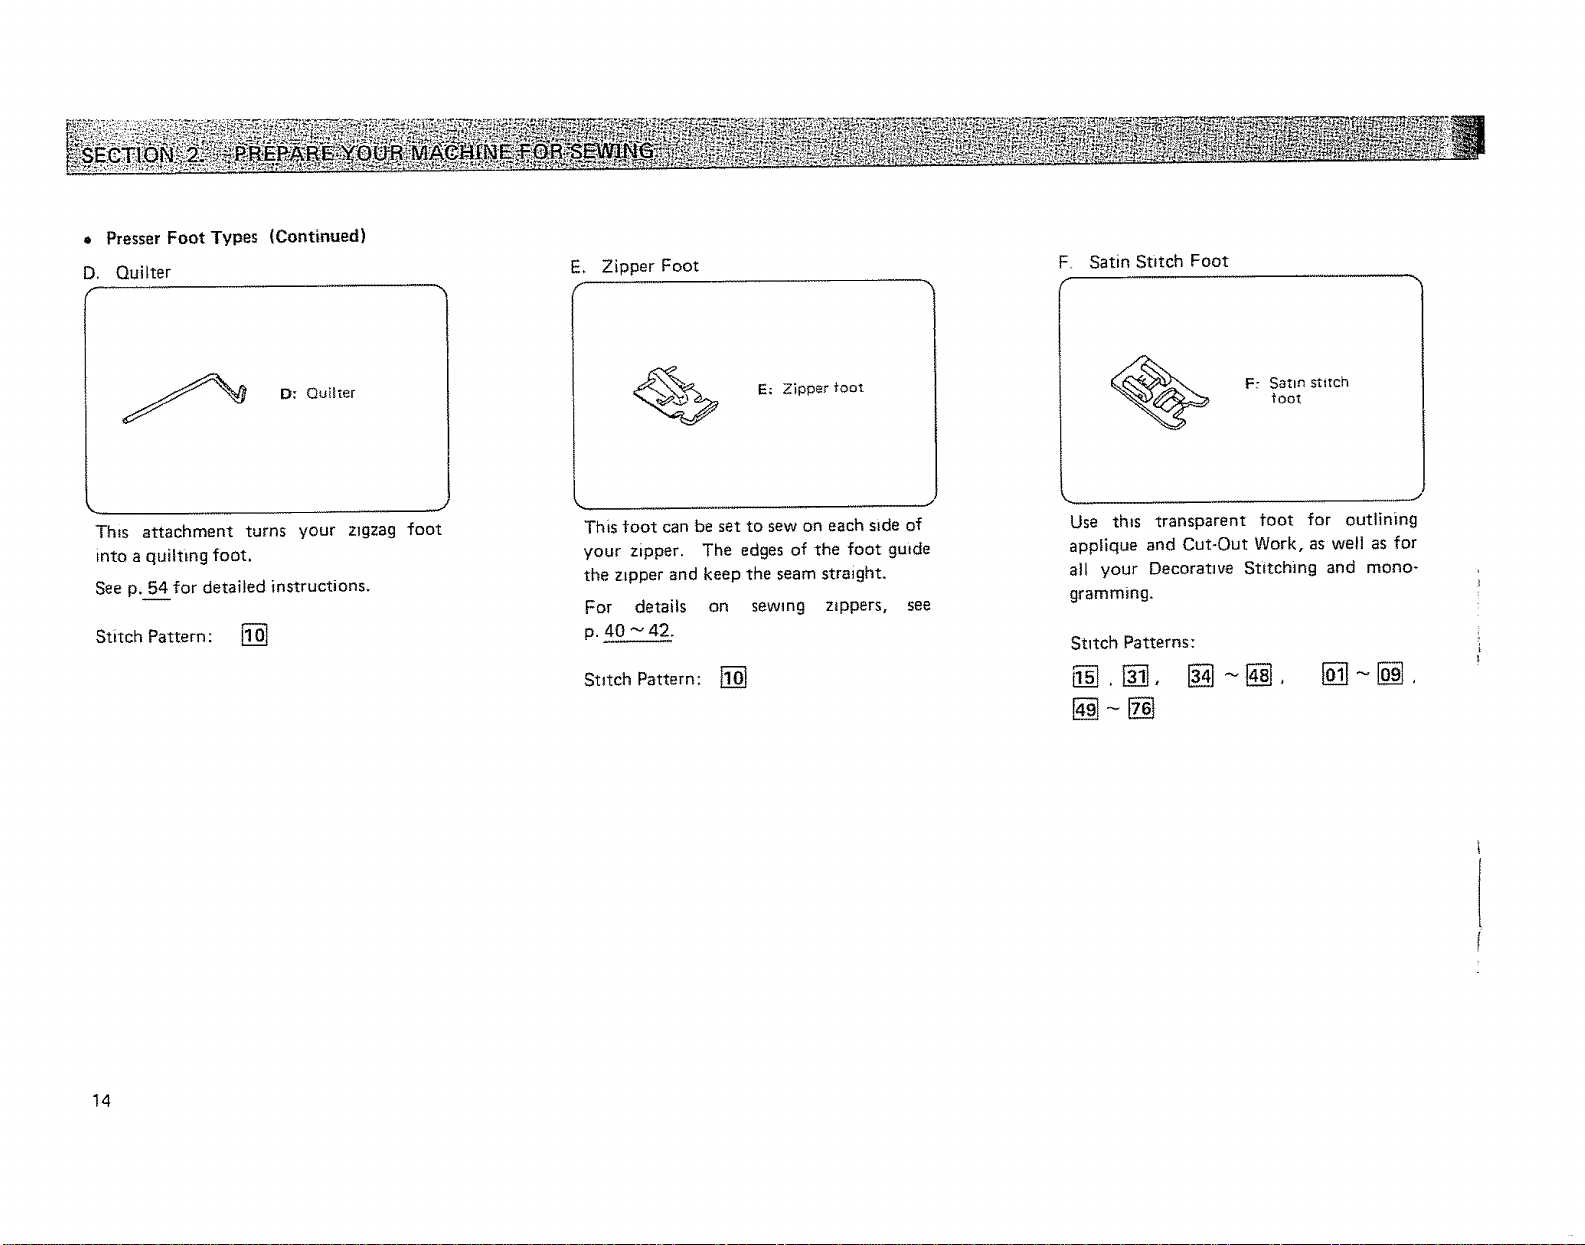
, PresserFoot Types (Continued)
D, Quilter
E, Zipper Foot
K
F. Satin St=tch Foot
K
D: Quilter
This attachment turns your zlgzag foot
into a quilting foot.
See p. 54 for detailed instructions.
Stitch Pattern : []
E: Zipper toot
This foot can be set to sew on each s=de of
your zipper. The edges of the foot guide
the z_pper and keep the seam straight.
For details on sewing zippers, see
p. 40 _ 42.
Stttch Pattern; []
toot
F: Satin stitch
...... J
Use this transparent foot for outlining
applique and Cut-Out Work, as well as for
all your Decorative Stitching and mono-
gramming.
Stitch Patterns:
[]~@,
14
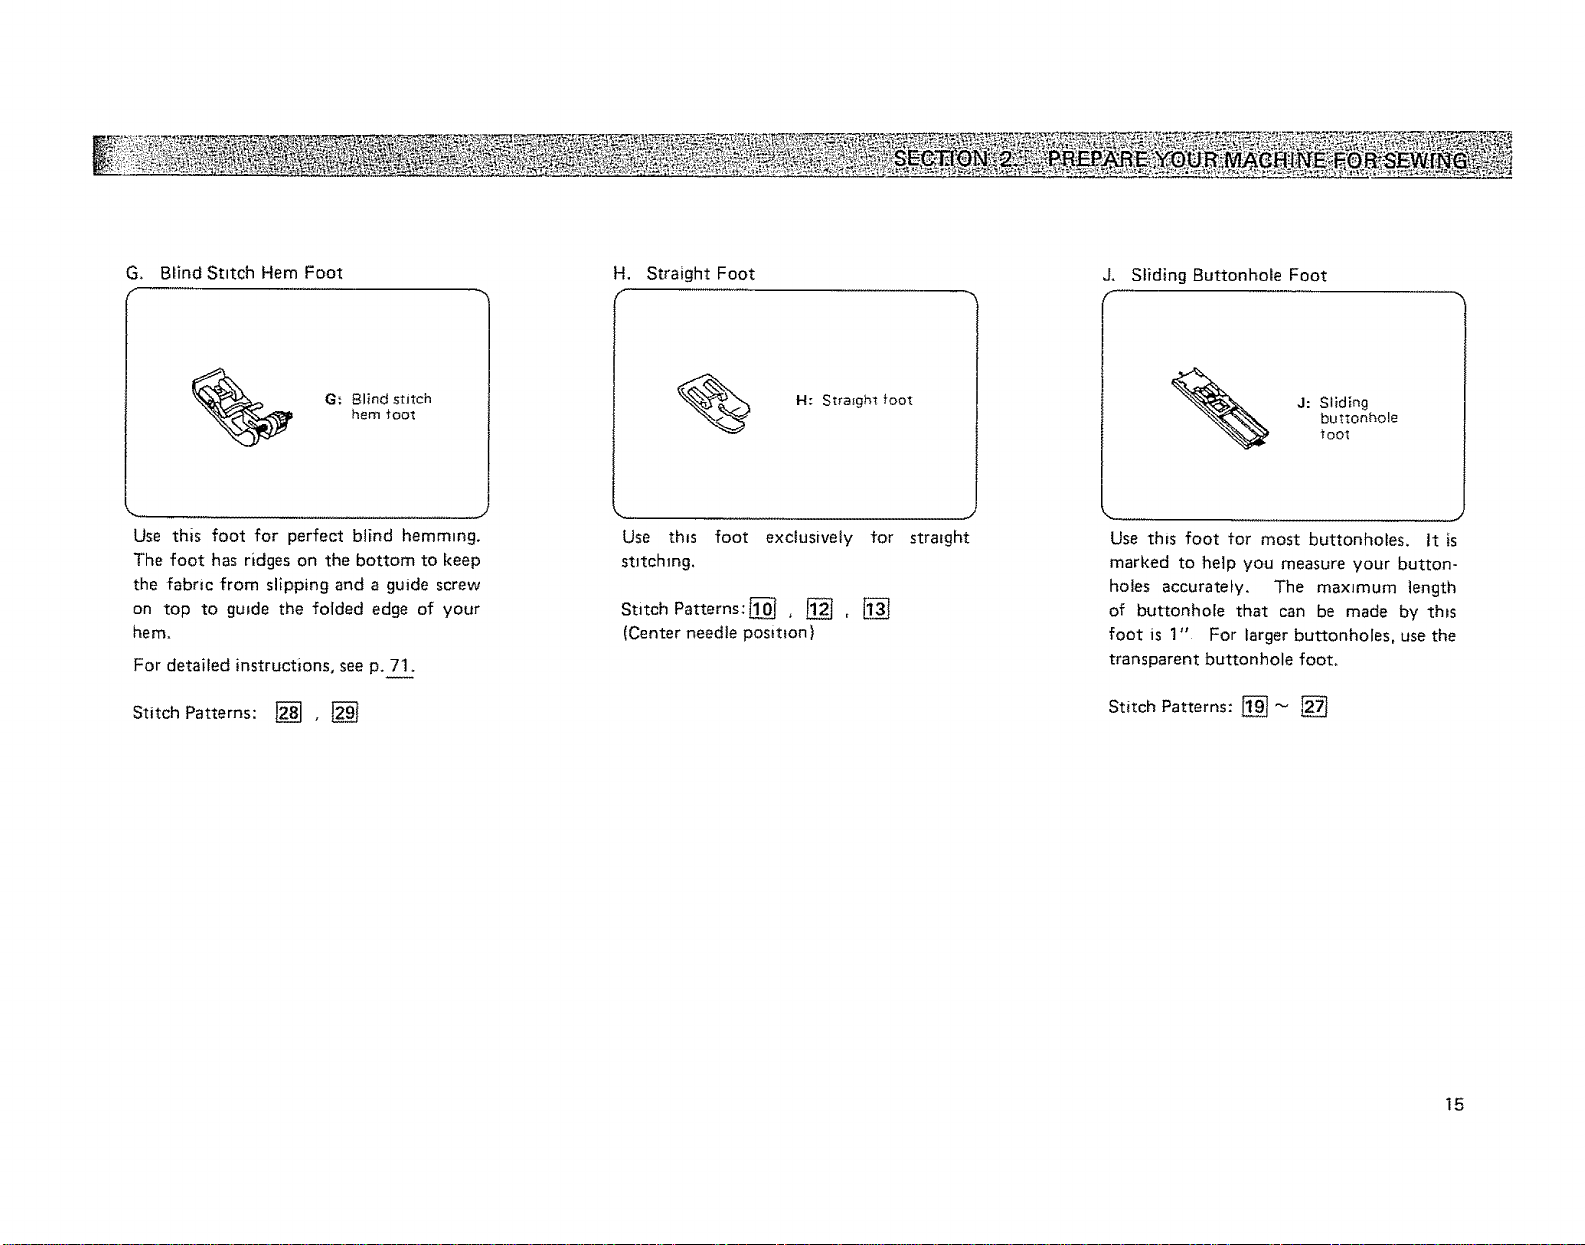
G. BlindStitchHemFoot
H. Straight Foot
J. Sliding Buttonhole Foot
f
hem foot
G: Blind stitch
Use this foot for perfect blind hemming.
The foot has ridges on the bottom to keep
the fabric from slipping and a guide screw
on top to guide the folded edge of your
hem.
For detailed instructions, see p. 71_.
Stitch Patterns: [] , []
H: Straight _oot
Use thts foot exclusively for straight
stitching.
Stitch Patterns: [] , [], []
(Center needle position)
buttonhole
J- Sliding
oot
Use this foot for most buttonholes. It is
marked to help you measure your button-
holes accurately. The maxlmum length
of buttonhole that can be made by this
foot is 1" For larger buttonholes, use the
transparent buttonhole foot.
Stitch Patterns: [] _ []
15
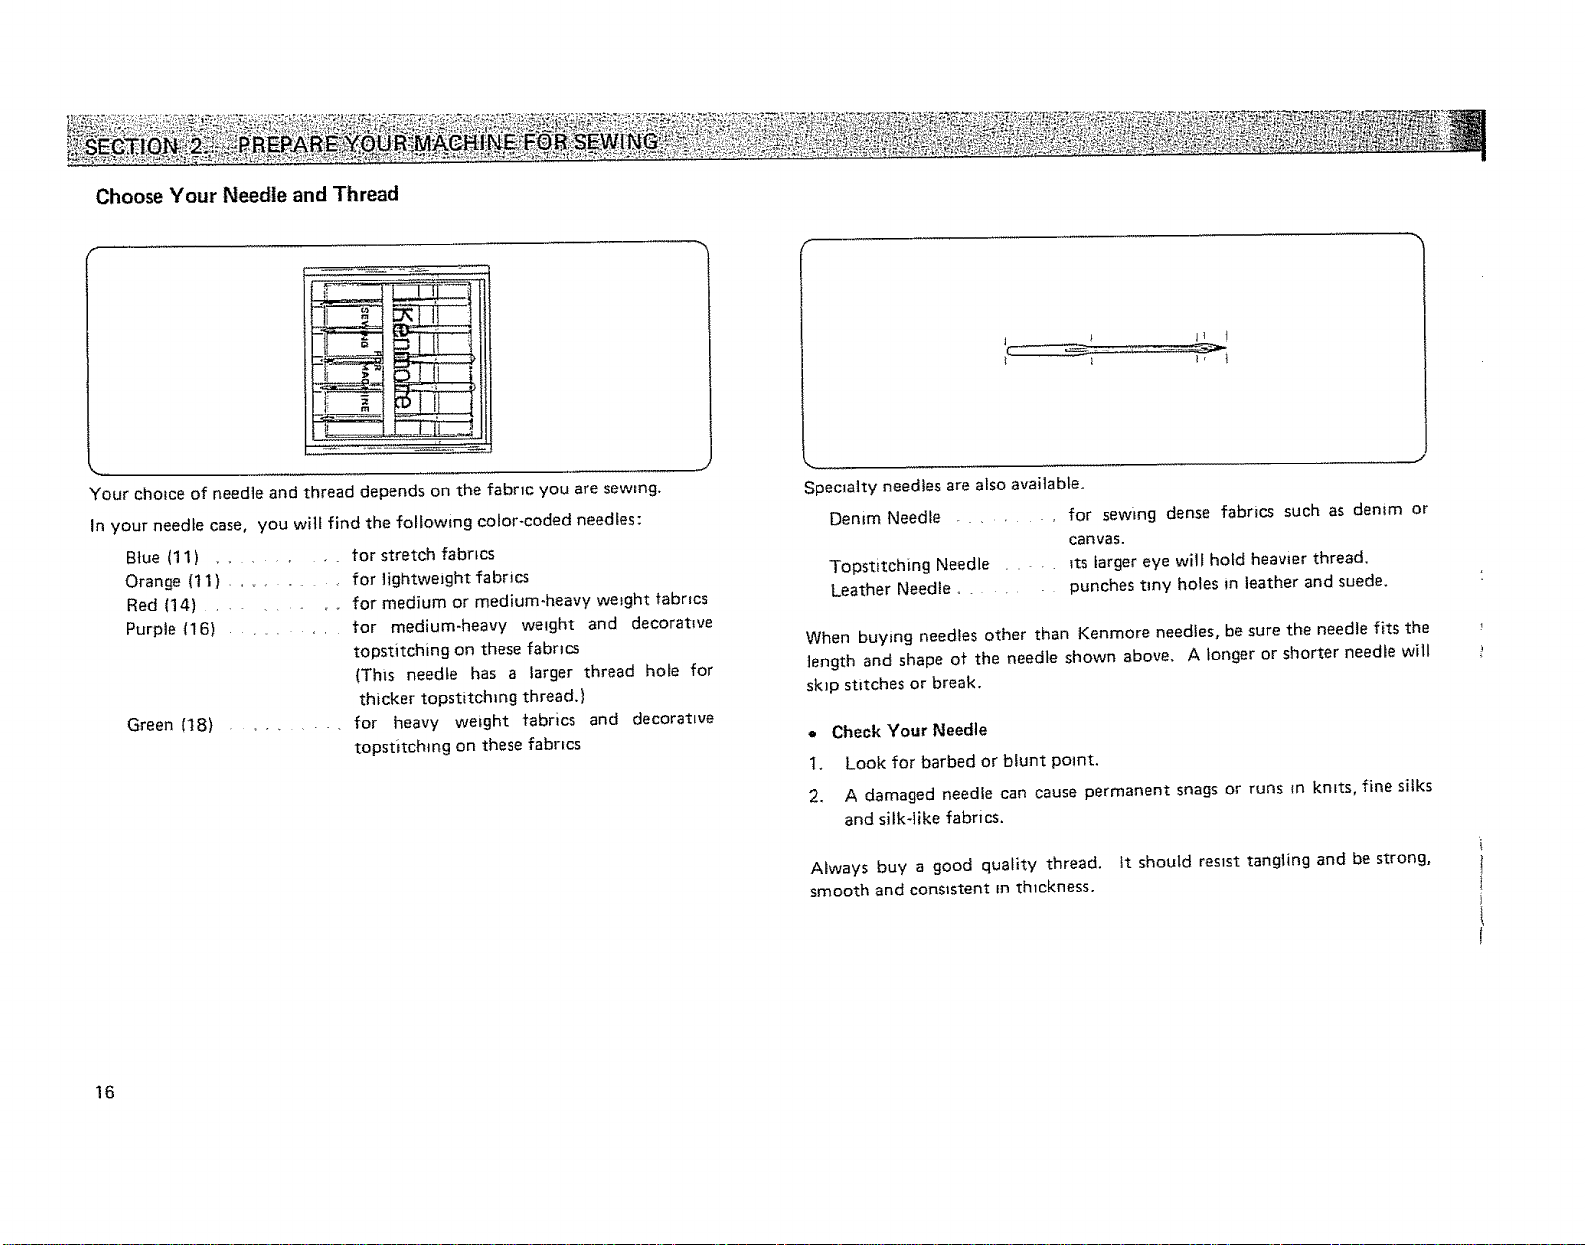
Choose Your Needle and Thread
.... j
Your choice of needle and thread depends on the fabric you are sew=rig.
In your needle case, you wilt find the following color-coded needles:
Blue (1 1) ......... for stretch fabrics
Orange (11) .......... for HghtweJght fabrics
Red (14) ......... for medium or medium-heavy weight fabrics
Purple (16) ........
for medium-heavy weight and decorative
topstitching on these fabrics
(This needle has a larger thread hole for
thicker topstitchmg thread.)
Green (18) .........
for heavy weight fabrics and decorative
topstitchmg on these fabrics
Spemalty needles are also available.
Denim Needle .......
for sewing dense fabrics such as denim or
canvas.
Topstitching Needle ....
Leather Needle .....
_ts larger eye will hold heavier thread.
punches troy holes in leather and suede.
When buying needles other than Kenmore needles, be sure the needle fits the
]ength and shape of the needle shown above. A longer or shorter needle will
skJp stitches or break.
Check Your Needle
t. Look for barbed or blunt point.
2. A damaged needle can cause permanent snags or runs _n kmts, fine silks
and silk-like fabrics.
Always buy a good quality thread, tt should resisttangling and be strong,
smooth and consistent m thickness.
./
16
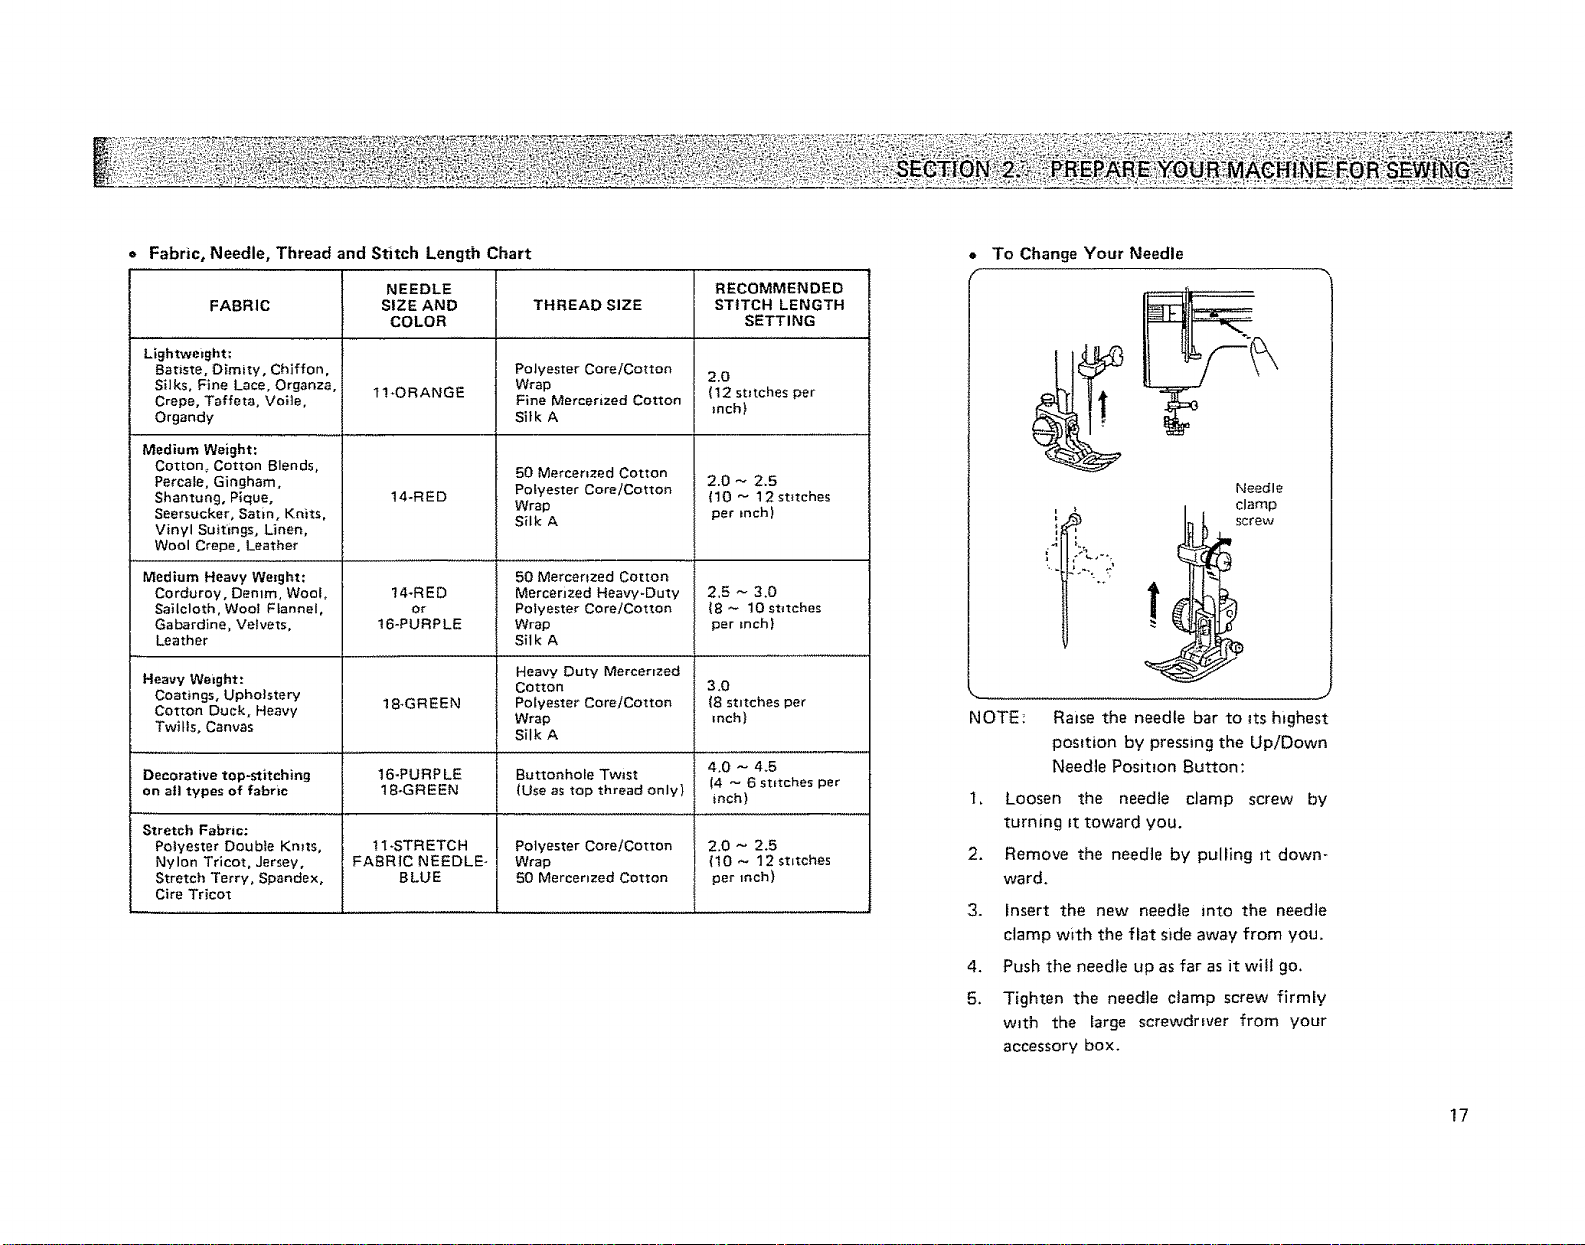
= Fabric, Needle, Thread and Stitch Length Chart
FABRIC
Lightweight:
Batiste, Dimity, Chiffon,
SUlks° Fine Lace, Organza,
Crepe, Taffeta, Voile,
Organdy
Medium Weight:
Cotton_ Cotton Blends,
Percale, Gingham,
Shantung, Pique,
Seersucker, Satin, Knits,
Vinyl Suitlngs, Unen,
Wool Crepe, Leather
Medium Heavy Weight:
Corduroy, Denim, Woot_
Sailcloth, Wool Flannel,
Gabardine, Velvets,
Leather
Heavy Weight:
Coatings, Upholstery
Cotton Duck, Heavy
Twitfs, Canvas
Decorative top-stitching
on nil types of fabric
Stretch Fabric:
Polyester Doubie Kmts,
Nylon Tricot, Jersey,
Stretch Terry, Spandex,
Cite Tricot
L
NEEDLE
SIZE AND
COLOR
11*ORANGE
14-RE D Polyester Core!Cotton
14-R E D Mercerized Heavy-Duty
O£
!6-PURPLE
18*GREEN
16-PURPLE
18-GREEN
! 1-STR ETC H
FABRIC NEEDLE-
BLUE
THREAD SIZE
Polyester Core/Cotton
Wrap
Fine Mercerized Cotton
Silk A
50 Mercerized Cotton
Wrap
Silk A
50 Mercerized Cotton
Polyester Core!Cotton
Wrap
Sil k A
Heavy Duty Mercerized
Cotton
Polyester Core/Cotton
Wrap
Silk A
Buttonhofe Twist
{Use as top thread only)
Polyester Core!Cotton
Wrap
50 Mercerized Cotton
RECOMMENDED
STITCH LENGTH
SETTING
2.0
(12 stitches per
mch)
2.0 _ 2.5
(10 _ 12 stitches
per inch)
2.5 _ 3.0
{8 ~ 10 stitches
per inch)
3°0
(8 stitches per
mch)
4.0 _ 4.5
{4 _ 6 stitches per
inch)
2.0 _ 2.5
(10 _ 12 stitches
per inch)
To Change Your Needle
Needle
, _ clamp
J L
NOTE: Raise the needle bar to its highest
position by pressing the UplDown
Needle Position Button:
t, Loosen the needle clamp screw by
turning it toward you.
2. Remove the needle by pulling tt down-
ward.
3. Insert the new needle into the needle
clamp with the flat side away from you.
4. Push the needle up as far as it will go.
5. Tighten the needle clamp screw firmly
with the large screwdriver from your
accessory box.
17
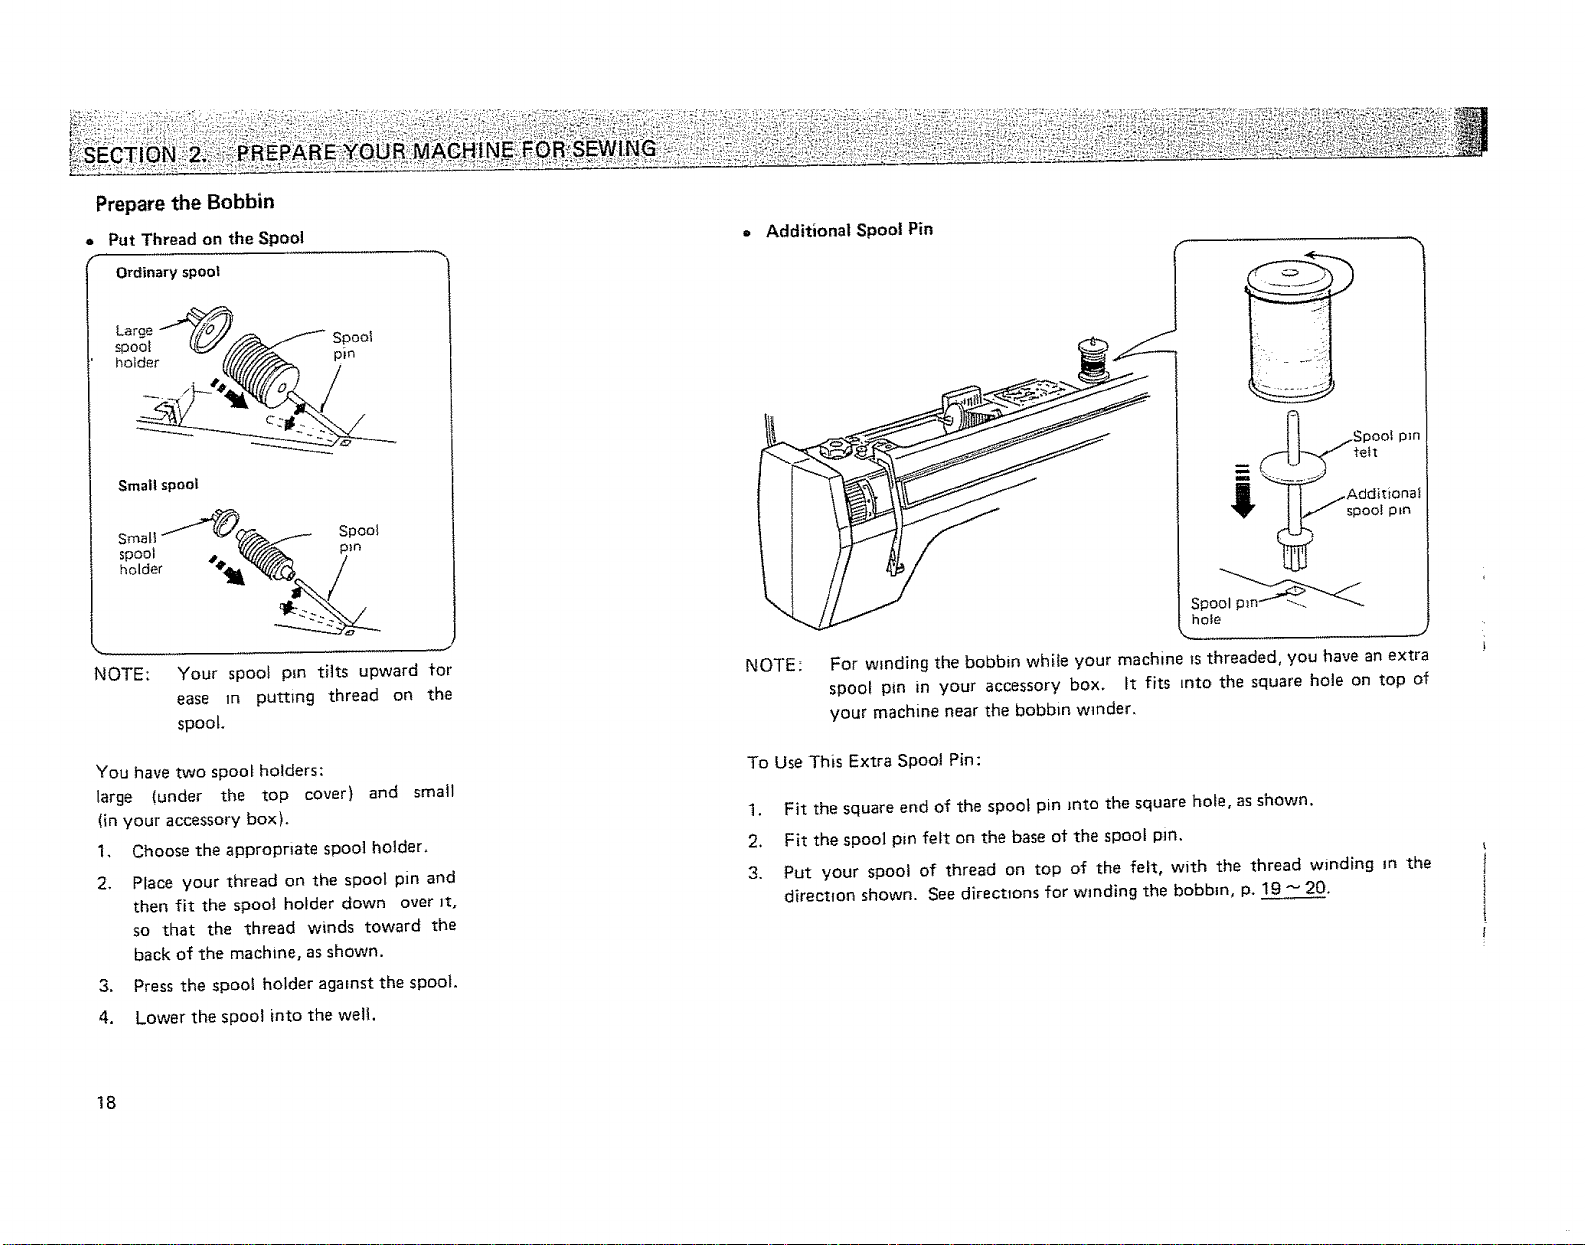
Prepare the Bobbin
o Put Thread on the Spool
f
Ordinary spool
Large _ _ .
_pooI __ spoo_
holder //////_._ pi_
Small spool
Small "_,_> .,.i---_ Spool
NOTE: Your spool pm tilts upward for
ease m pulling thread on the
spool.
• Additional Spool Pin
......J
NOTE: For winding the bobbin white your machine Is threaded, you have an extra
spool pin in your accessory box. _t fits into the square ho}e on top of
your machine near the bobbin winder.
You have two spool holders:
large (under the top cover)
(in your accessory box).
1.
Choose the appropriate spool holder.
2. Place your thread on the spool pin and
then fit the spoot holder down over it,
so that the thread winds toward the
back of the machine, as shown.
3. Press the spool holder against the spool.
4. Lower the spool into the well.
and small
18
To Use This Extra Spool Pin:
1. Fit the square end of the spool pin into the square hote, as shown.
2. Fit the spool pin felt on the base of the spoof pin.
3. Put your spool of thread on top of the felt, with the thread winding m the
direct{on shown. See directions for winding the bobbin, p. 19 _ 20.
To Remove the Bobbin from the Machine
1.
Gently push down on the pfastic
bobbin cover and slide it towards you,
2°
Set aside,
3.
Lift out the bobbin, as shown.
• Wind the Bobbin
®
Pull the Clutch away from the machane to stop the needle from moving while you
wind the bobbin.
2_
Pass the thread through the top cover thread guide and under the hook, as shown,
3.
Pul! the thread around the bobbin winder thread guide.
4.
Place the thread through one of the bobbin holes, from inside to outslde, as shown,
Place the threaded bobbin on the bobbin winder spindle, as shown, so that the thread
5.
comes out on top.
Push the bobbin winder spindle to the right until it clicks.
.
Clutch _'
J
19
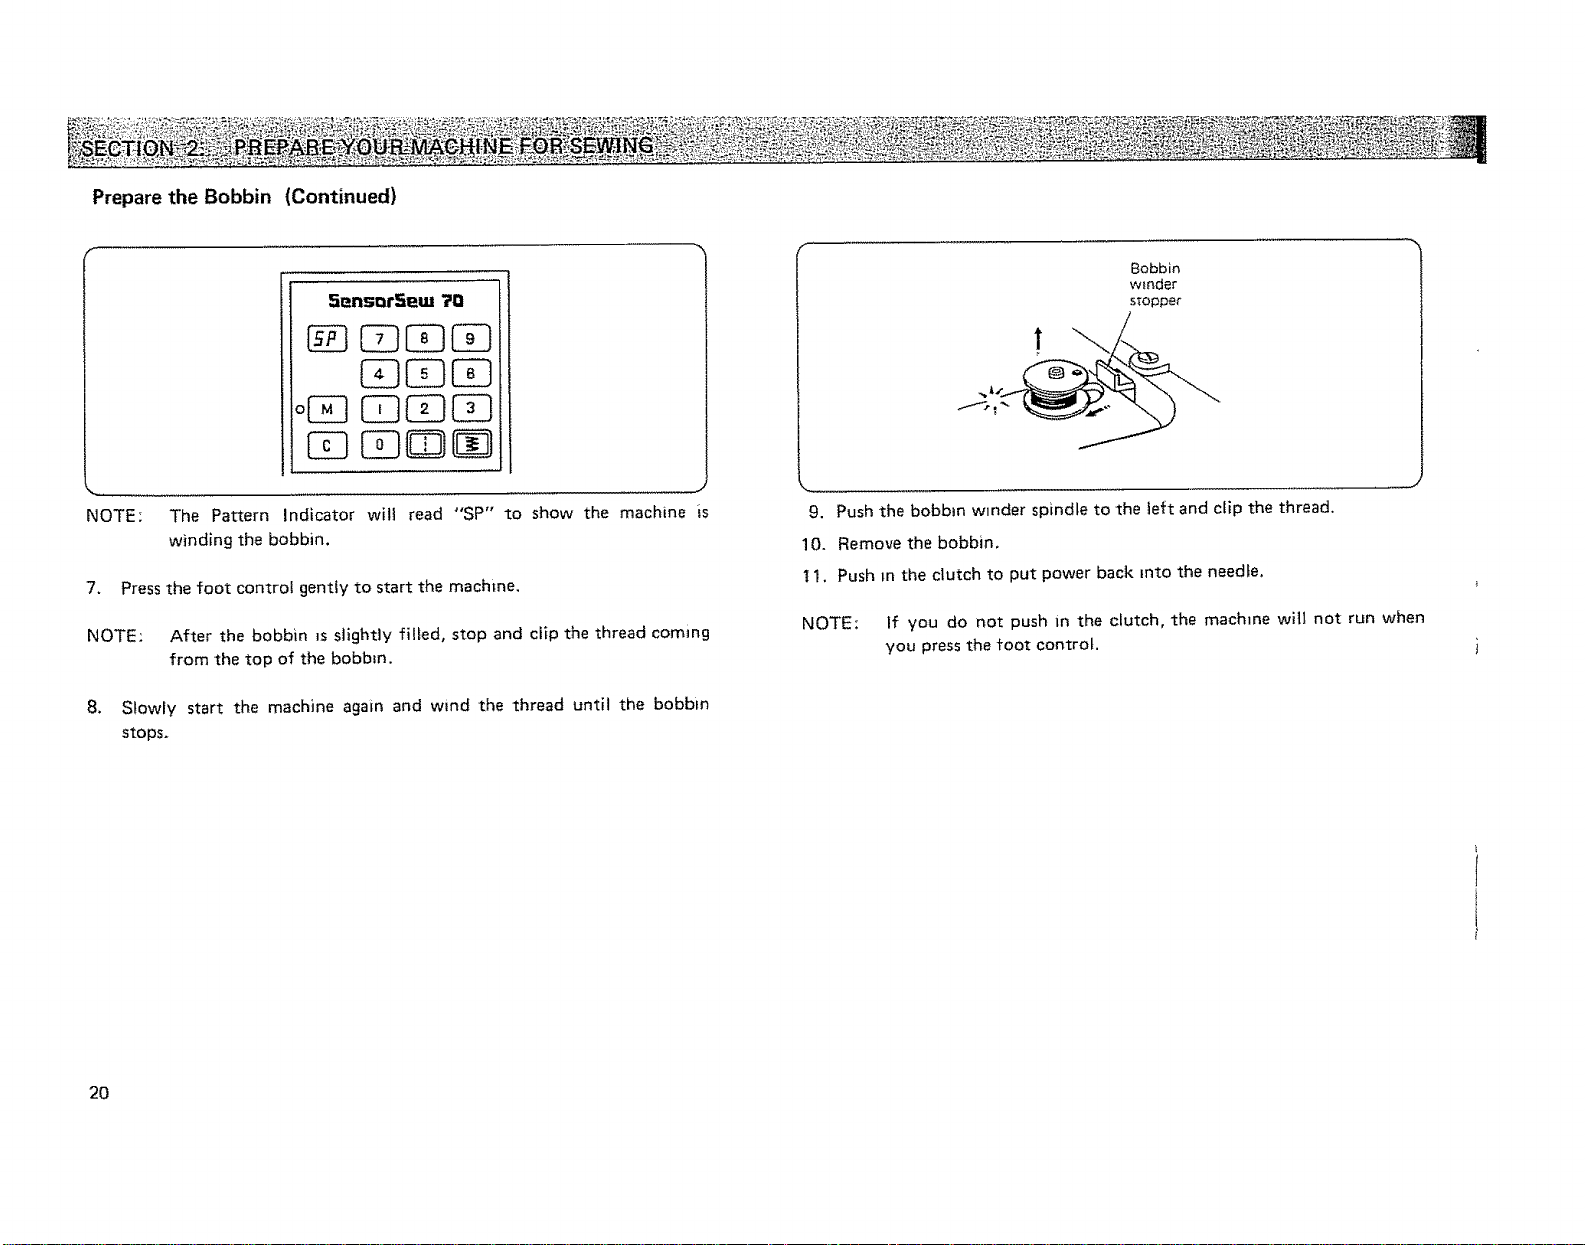
Prepare the Bobbin (Continued)
_iens=tSeu= ?g
Bobbin
winder
stopper
! "-..
NOTE: The Pattern Indicator will read "SP" to show the machine Is
winding the bobbin.
7. Press the foot control gently to start the machine,
NOTE: After the bobbin ts slightly filled, stop and cfip the thread coming
from the top of the bobbin.
8. Slowly start the machine again and wind the thread until the bobbin
stops.
2O
9. Push the bobbin winder spindle to the teft and clip the thread,
10, Remove the bobbin,
11. Push _n the clutch to put power back into the needle,
NOTE: If you do not push in the clutch, the machine will not run when
you press the foot control.
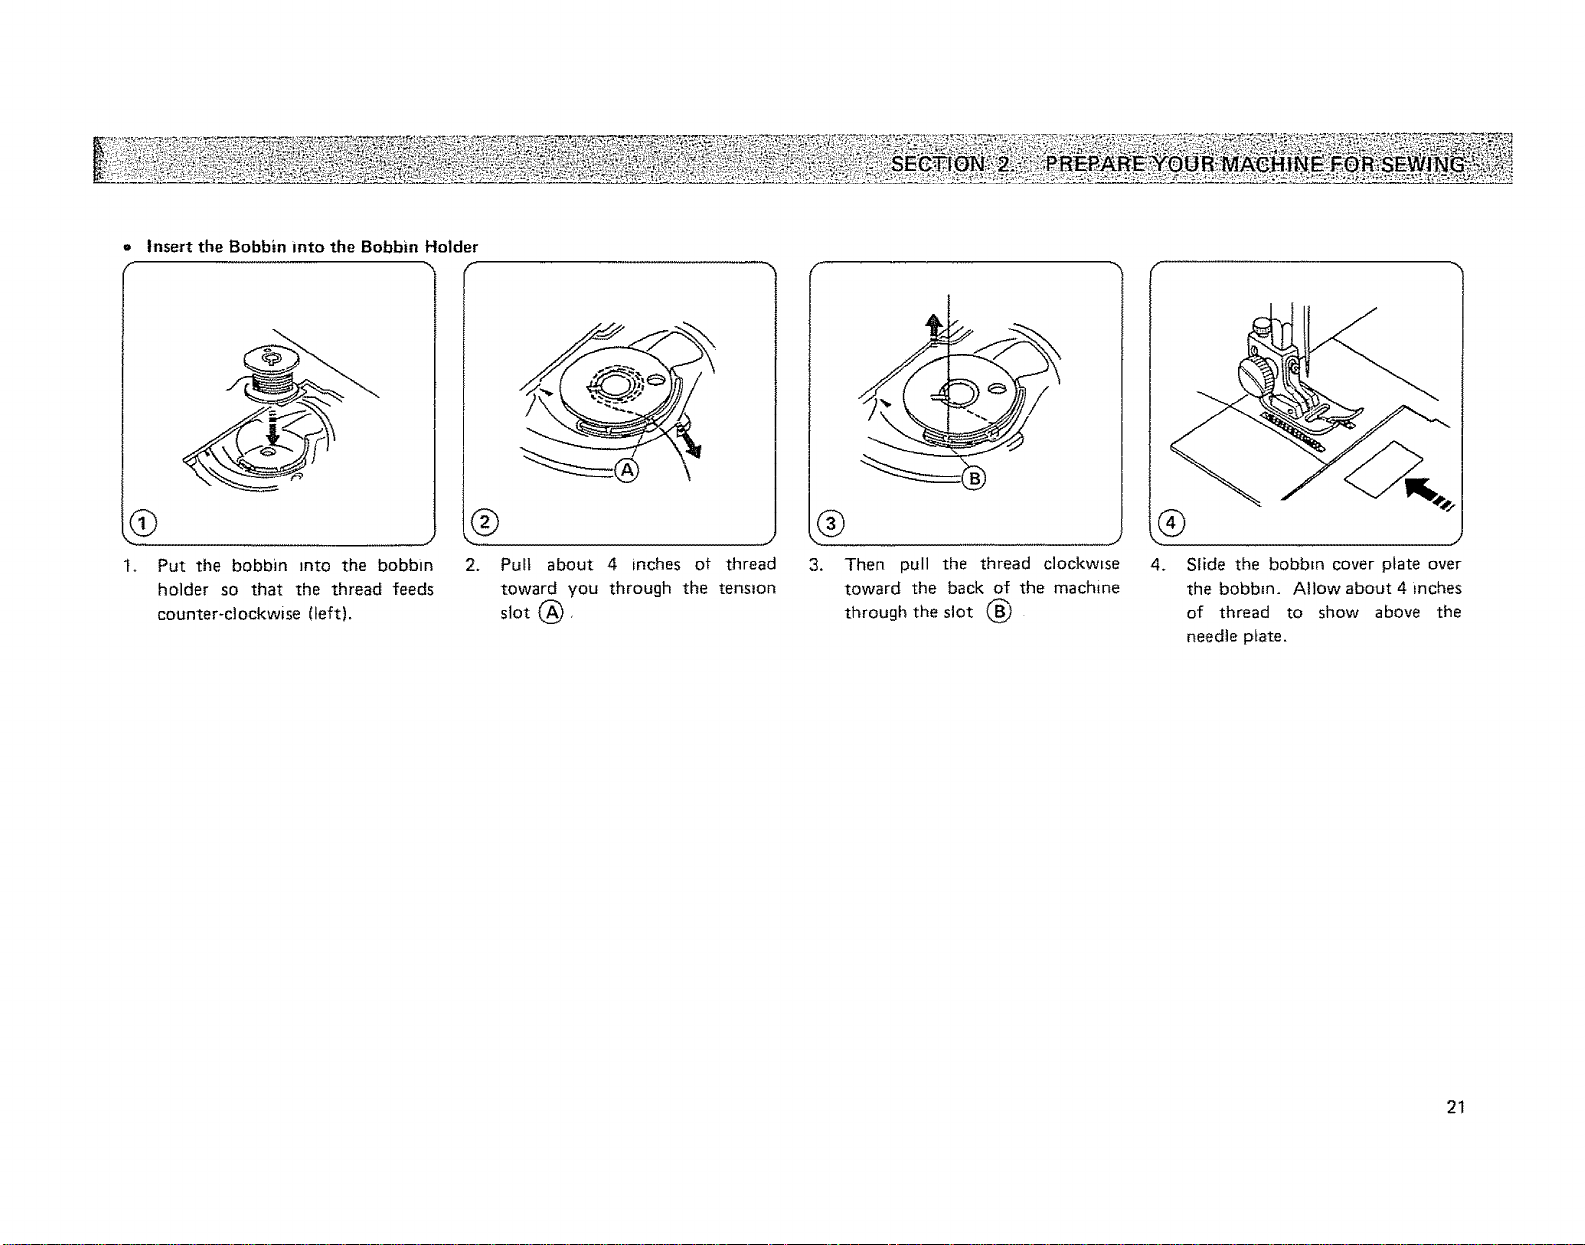
= Insert the Bobbin into the Bobbin Holder
Q
Put the bobbin into the bobbin
holder so that the thread feeds
counter-clockwise (left).
2. Pult about 4 inches of thread
toward you through the tension
slot @,
®
3. Then pull the thread clockwise
toward the back of the machine
through the slot (_
,. j
4. Slide the bobbm cover plate over
the bobbin. Allow about 4 inches
of thread to show above the
needte plate.
2t
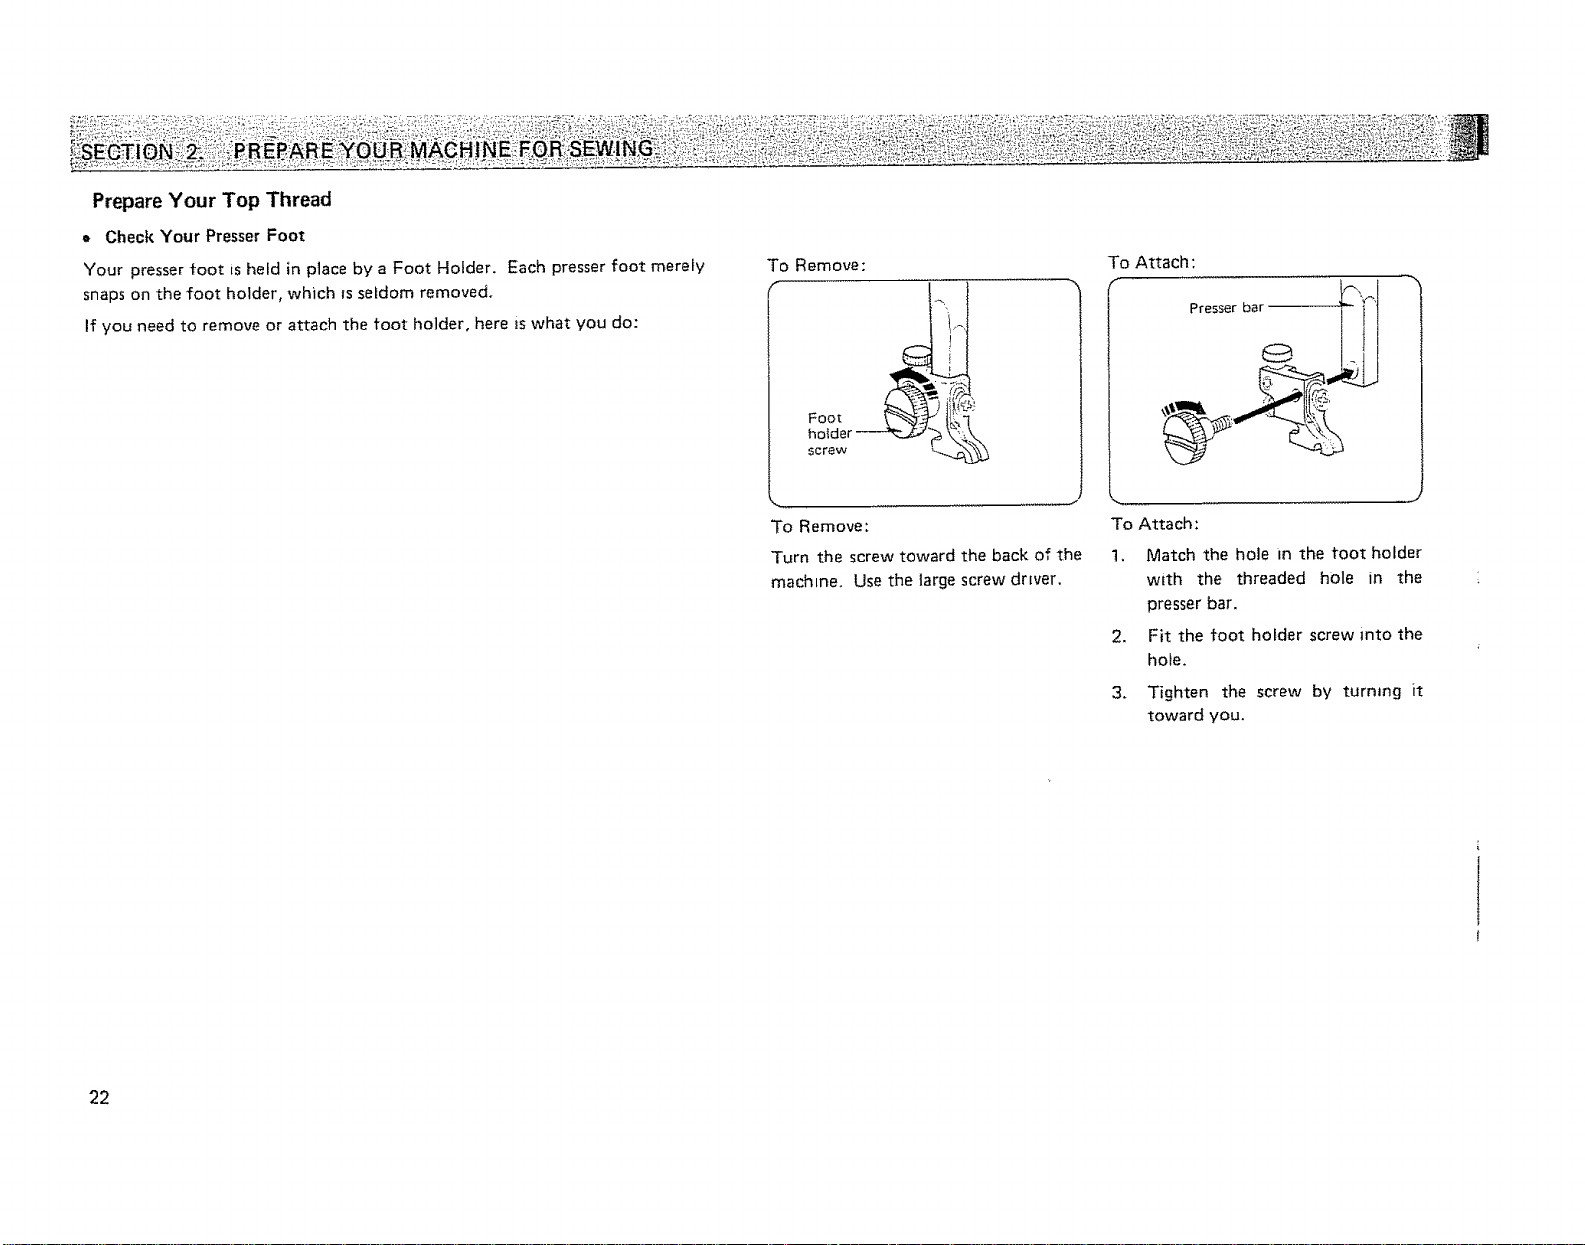
Prepare Your Top Thread
= Check Your Presser Foot
Your presser foot ts held in place by a Foot Holder. Each presser foot merely
snaps on the foot holder, which _sseldom removed.
If you need to remove or attach the foot holder, here is what you do:
To Remove:
f
To Attach:
Presser bar _f-_')_'l
22
To Remove:
Turn the screw toward the back of the
machine. Use the large screw driver.
To Attach:
1. Match the hole in the foot holder
with the threaded hole in the
presser bar.
2. Fit the foot holder screw into the
hole.
3. Tighten the screw by turning it
toward you.
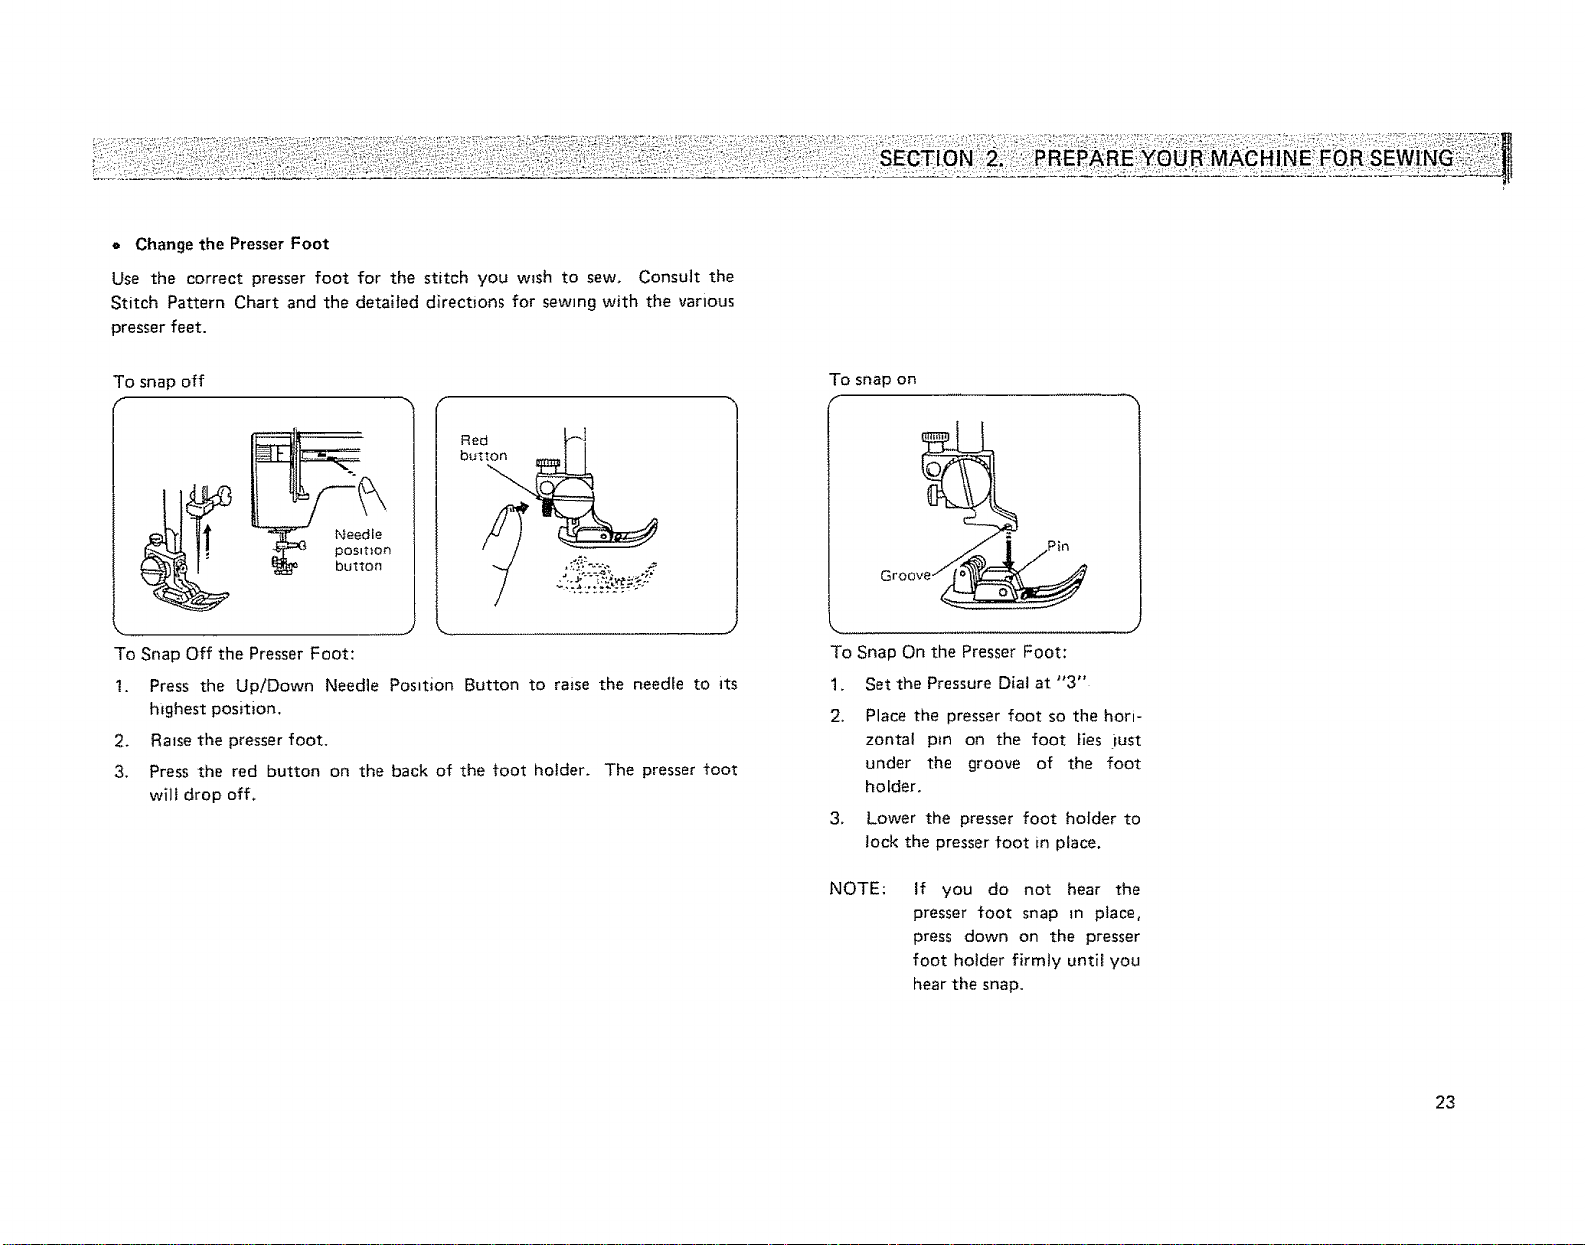
e Change the Presser Foot
Use the correct presser foot for the stitch you wish to sew. Consult the
Stitch Pattern Chart and the detailed directions for sewing with the various
presser feet.
To snap off
Needle
posit$on
bu_ton
To Snap Off the Presser Foot:
1. Press the Up/Down Needle Position Button to raise the needle to its
highest position.
2. Raise the presser foot.
3. Press the red button on the back of the foot holder. The presser foot
will drop off.
To snap on
f
L .......... j
To Snap On the Presser Foot:
1. Set the Pressure Dial at "3"
2. Place the presser foot so the hori-
zontal pm on the foot lies rust
under the groove of the foot
holder.
3.
Lower the presser foot holder to
lock the presser foot in place.
NOTE:
If you do not hear the
presser foot snap m place,
press down on the presser
foot holder firmly until you
hear the snap.
23
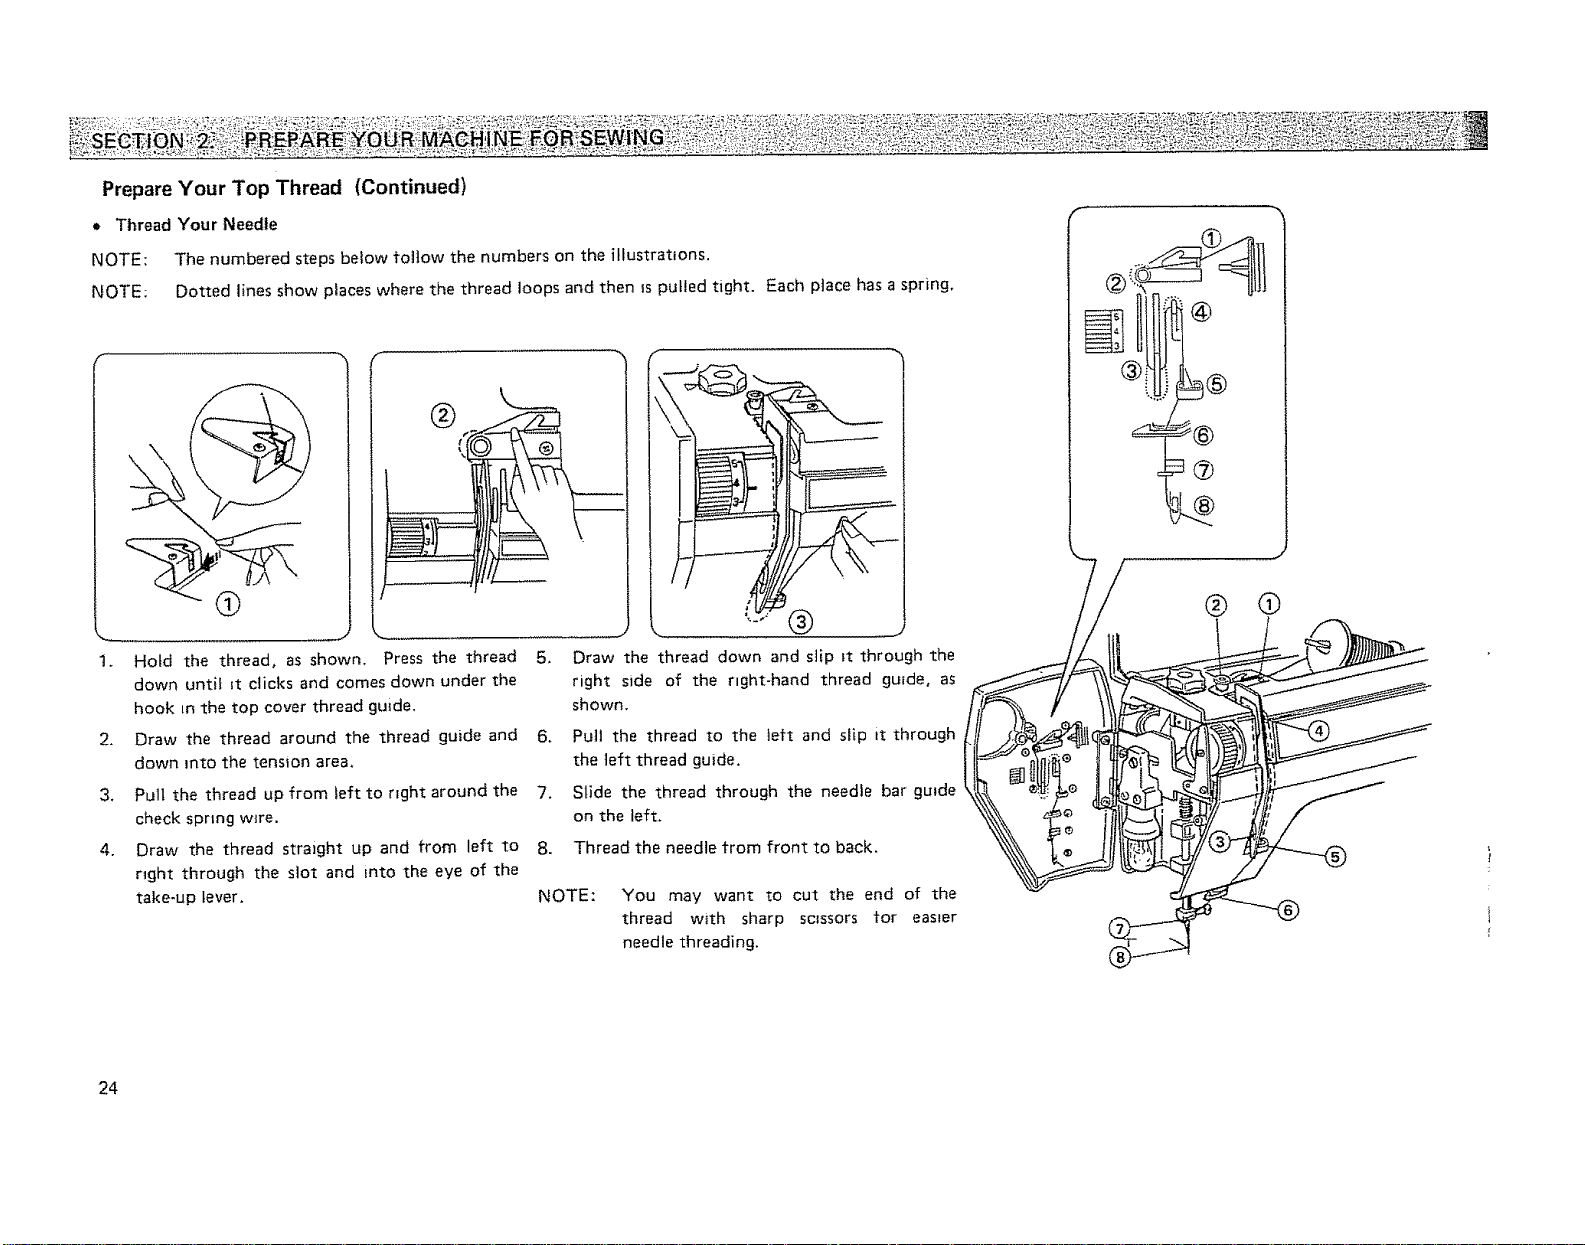
Prepare Your Top Thread (Continued)
, Thread Your Needle
NOTE: The numbered steps below toilow the numbers on the illustrations.
NOTE: Dotted lines show places where the thread loops and then ts pulled tight. Each piace has a spring.
. ® .
1. Ho[d the thread, as shown,
down until it clicks and comes down under the
hook in the top cover thread guide.
2. Draw the thread around the thread guide and
down into the tension area.
,
Pull the thread up from teft to right around the
check spring wire.
4,
Draw the thread straight up and from left to
right through the slot and into the eye of the
take-up lever.
Press the thread 5,
Draw the thread down and slip it through the
right side of the right-hand thread guide, as
shown.
6.
Pull the thread to the left and slip it through
the left thread guide,
7.
Slide the thread through the needle bar guide
on the left.
8. Thread the needle from front to back.
NOTE: You may want to cut the end of the
thread with sharp scissors for easier
needle threading.
@
24
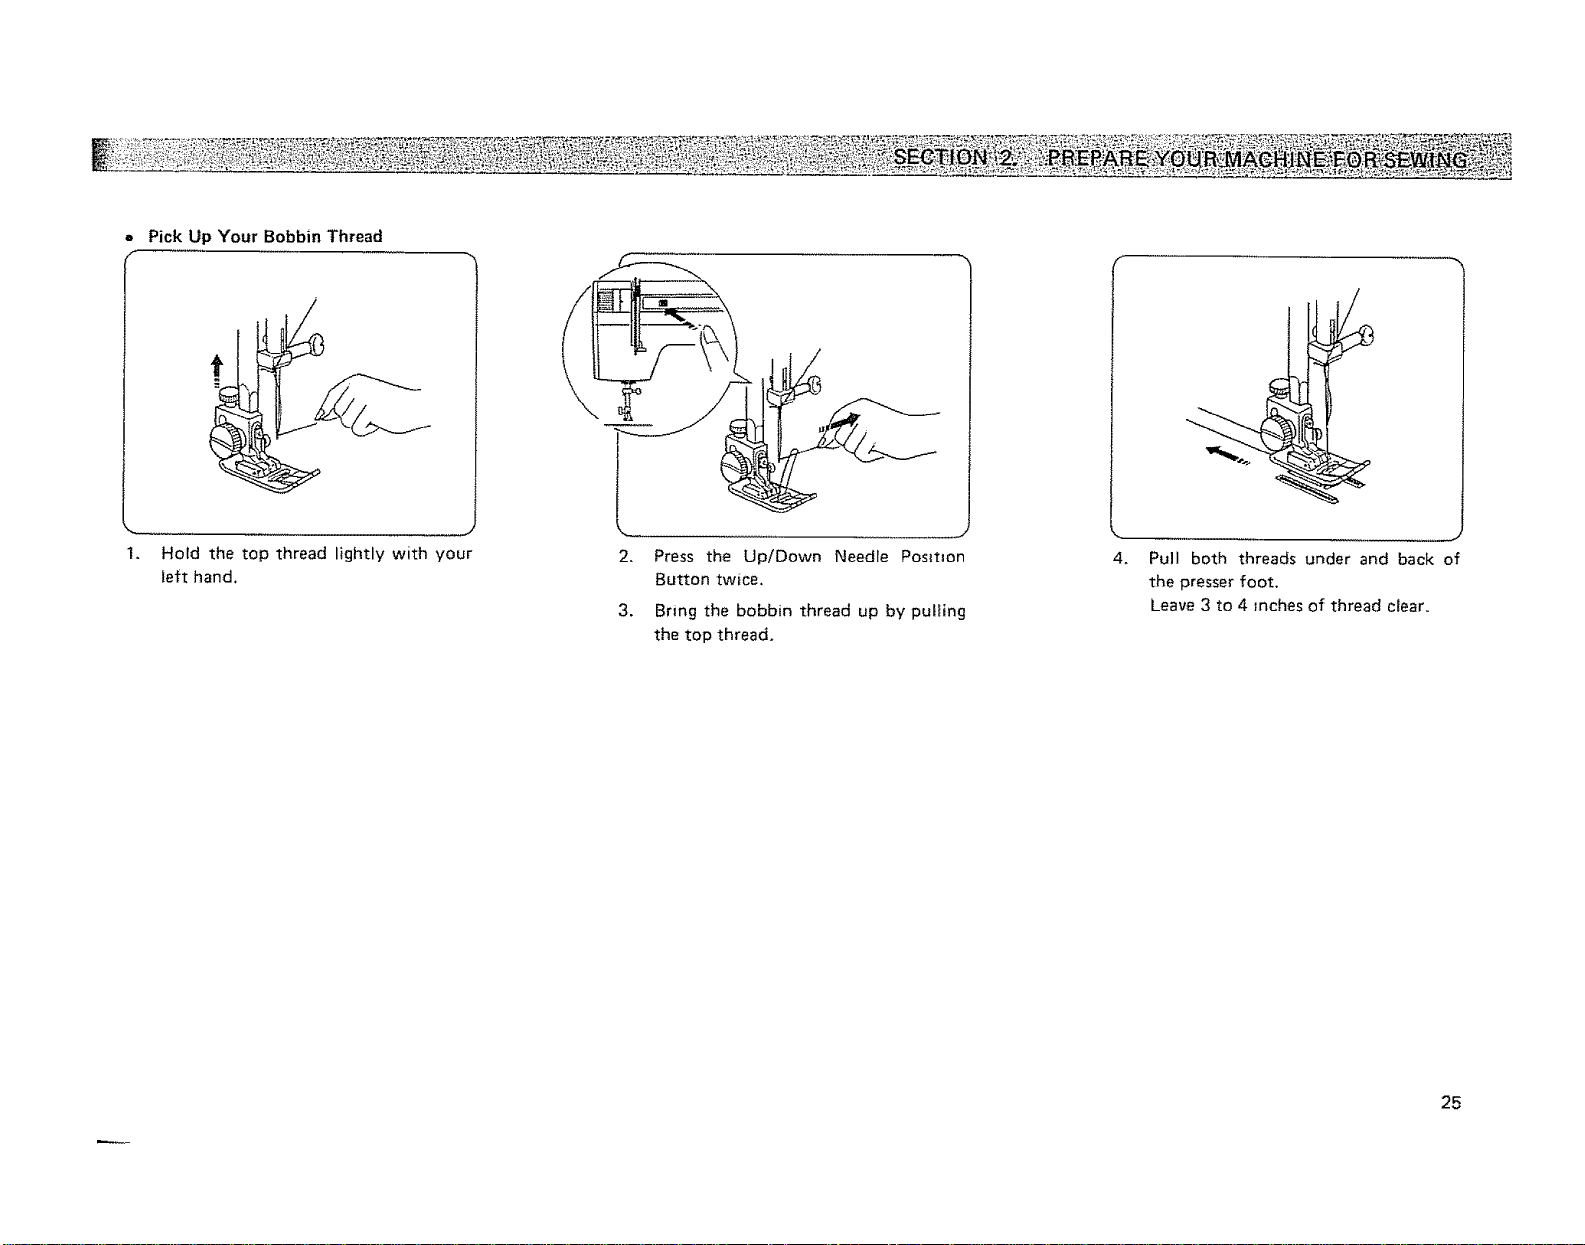
Pick Up Your Bobbin Thread
1.
Hold the top thread lightly with your 2_ Press the Up/Down Needle Postt_on
left hand. Button twice.
3. Bring the bobbin thread up by pulling
the top thread.
4. Pull both threads under and back of
the presser foot.
Leave 3 to 4 inches of thread clear.
25
Prepare Your Top Thread (Continued)
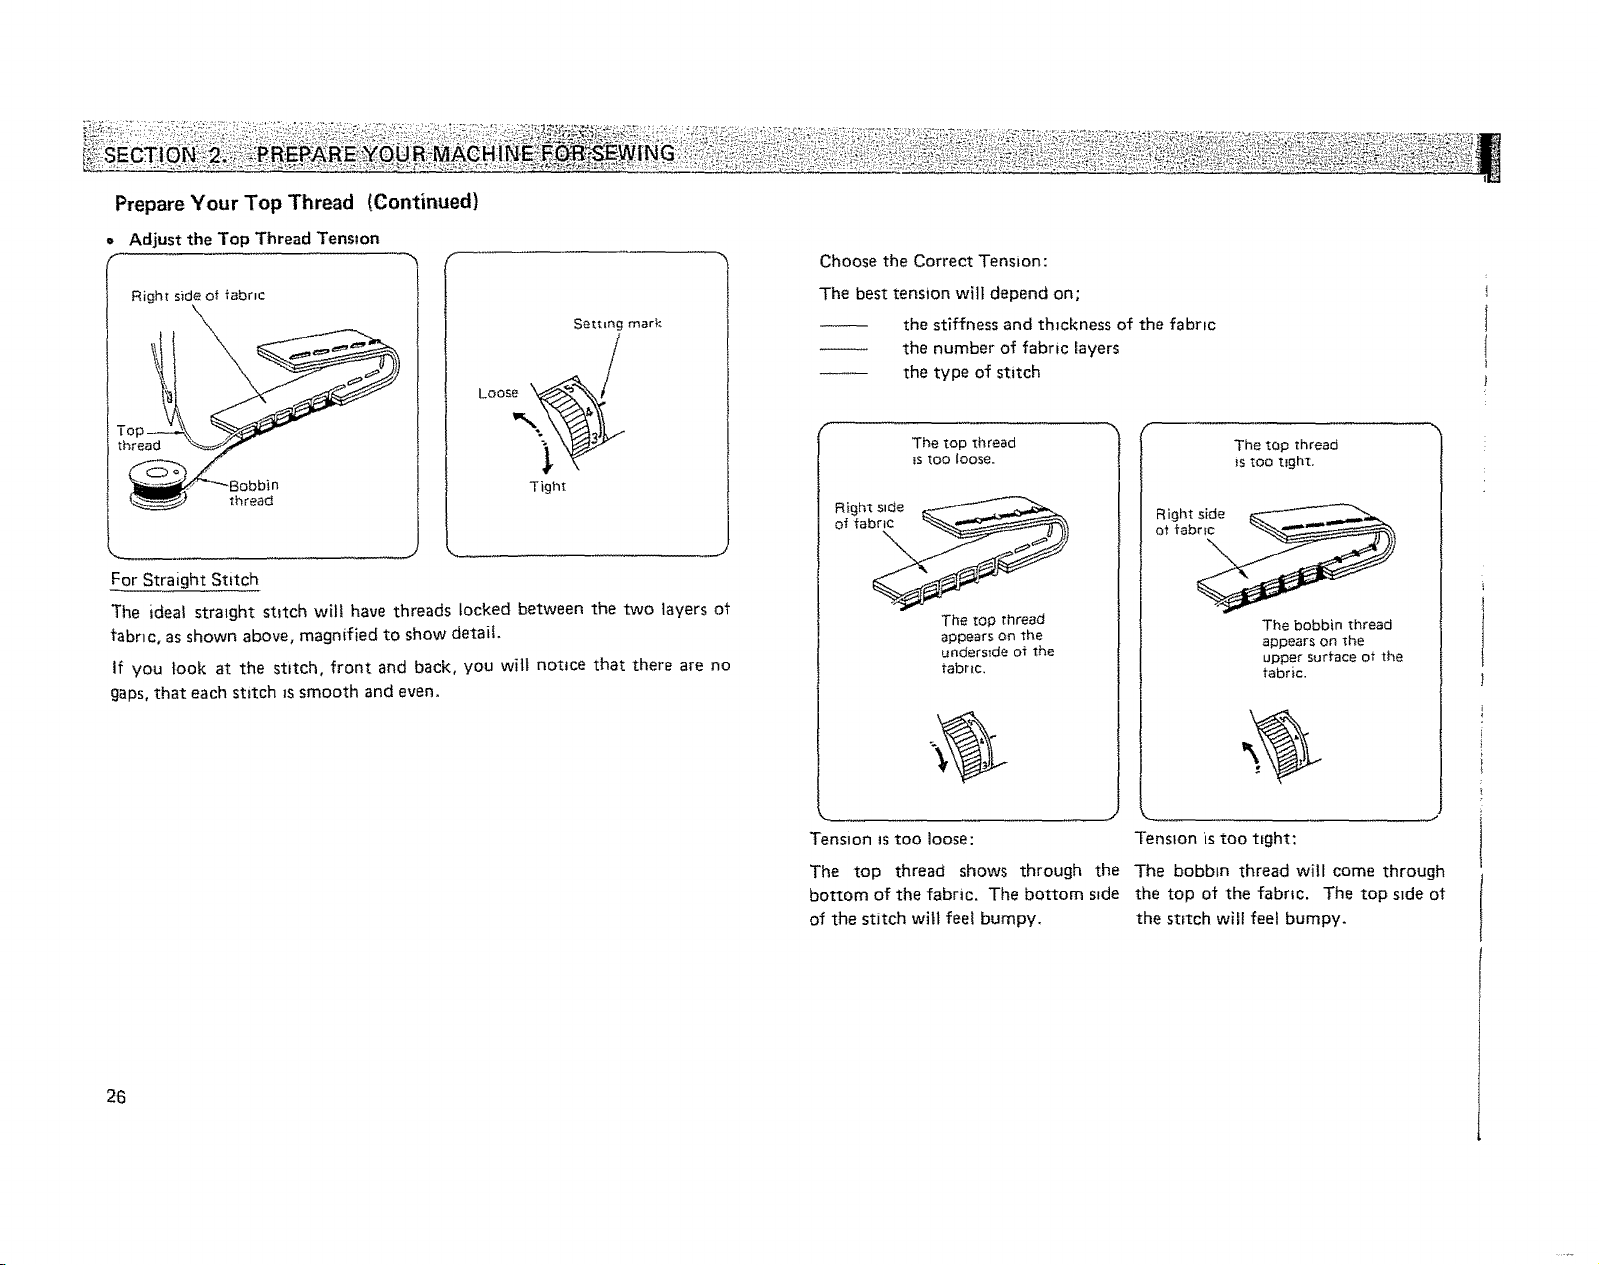
= Adjust the Top Thread Tension
r r"
Right sicleof _abrlc
Loos_%_
Tight
Setting mark
Choose the Correct Tension:
The best tension will depend on;
the stiffness and thickness of the fabric
the number of fabric layers
the type of stitch
The top thread
_stoo loose.
Right s=de
of fabric
l
J
!
The top thread
}Stoo tight.
Right side k_--__,,,,,
For Straight Stitch
The ideal straight stitch will have threads locked between the two layers ot
fabnc, as shown above, magnified to show detail.
if you look at the stitch, front and back, you wilt notice that there are no
gaps, that each stitch _ssmooth and even.
26
The top thread
appears on the
underside of the
tabrlc.
Tension IS too loose:
The top thread shows through the
bottom of the fabric. The bottom side
of the stitch will feel bumpy.
Ot fob_
The bobbin thread
appears on the
upper surface ot the
tabric.
.....J
Tenston is too tight:
The bobbin thread will come through
the top of the fabric. The top side ot
the stitch will feel bumpy.
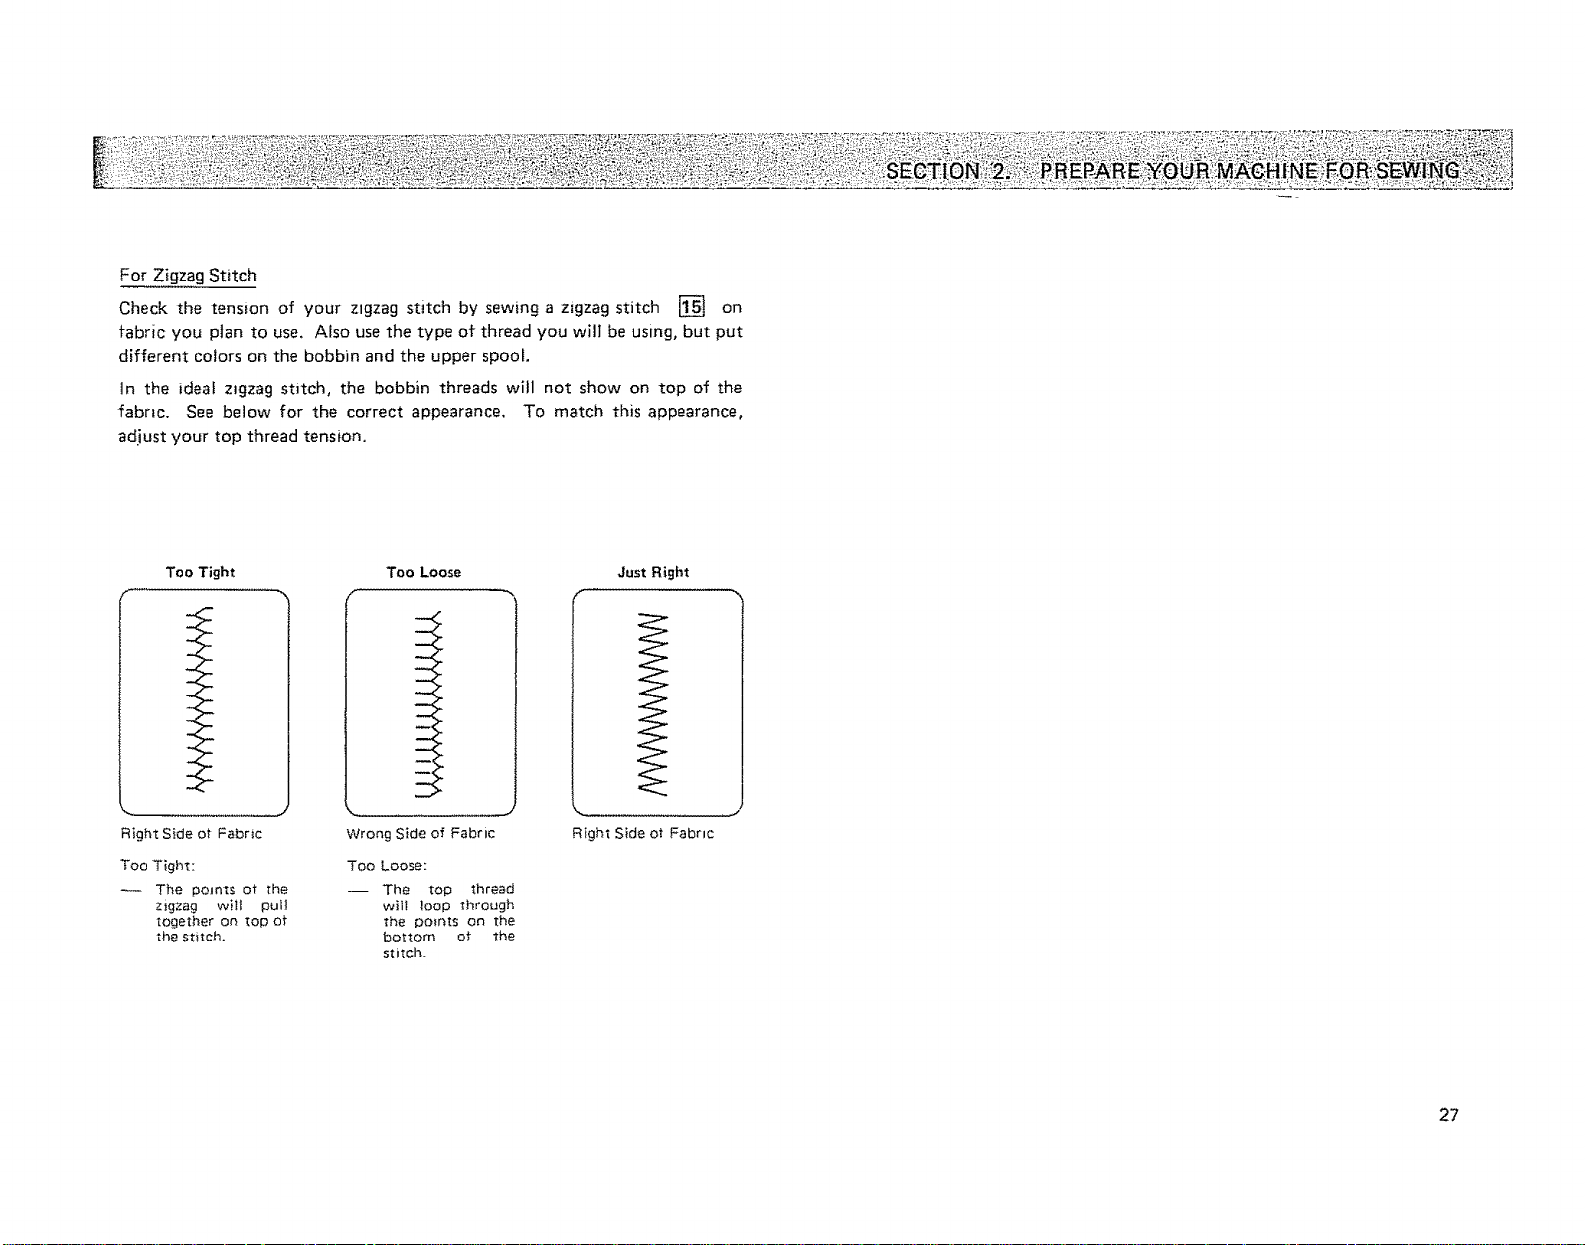
For Zigzag Stitch
Check the tension of your zigzag stitch by sewing a zigzag stitch [] on
fabric you ptan to usa. Also use the type of thread you will be using, but put
different colors on the bobbin and the upper spool.
In the ideaf zigzag stitch, the bobbin threads will not show on top of the
fabric. See below for the correct appearance. To match this appearance,
adjust your top thread tension.
R_ght Side ot Fabric
Too Tight:
The points ot the
zigzag w_t pult
together on top of
the st{tch.
Too Loose
( -
Wrong S_deof Fabric
Too Loose:
-- The top thread
will loop through
The points on the
bottom of the
stitch_
Just Right
Right Side ot Fabric
27
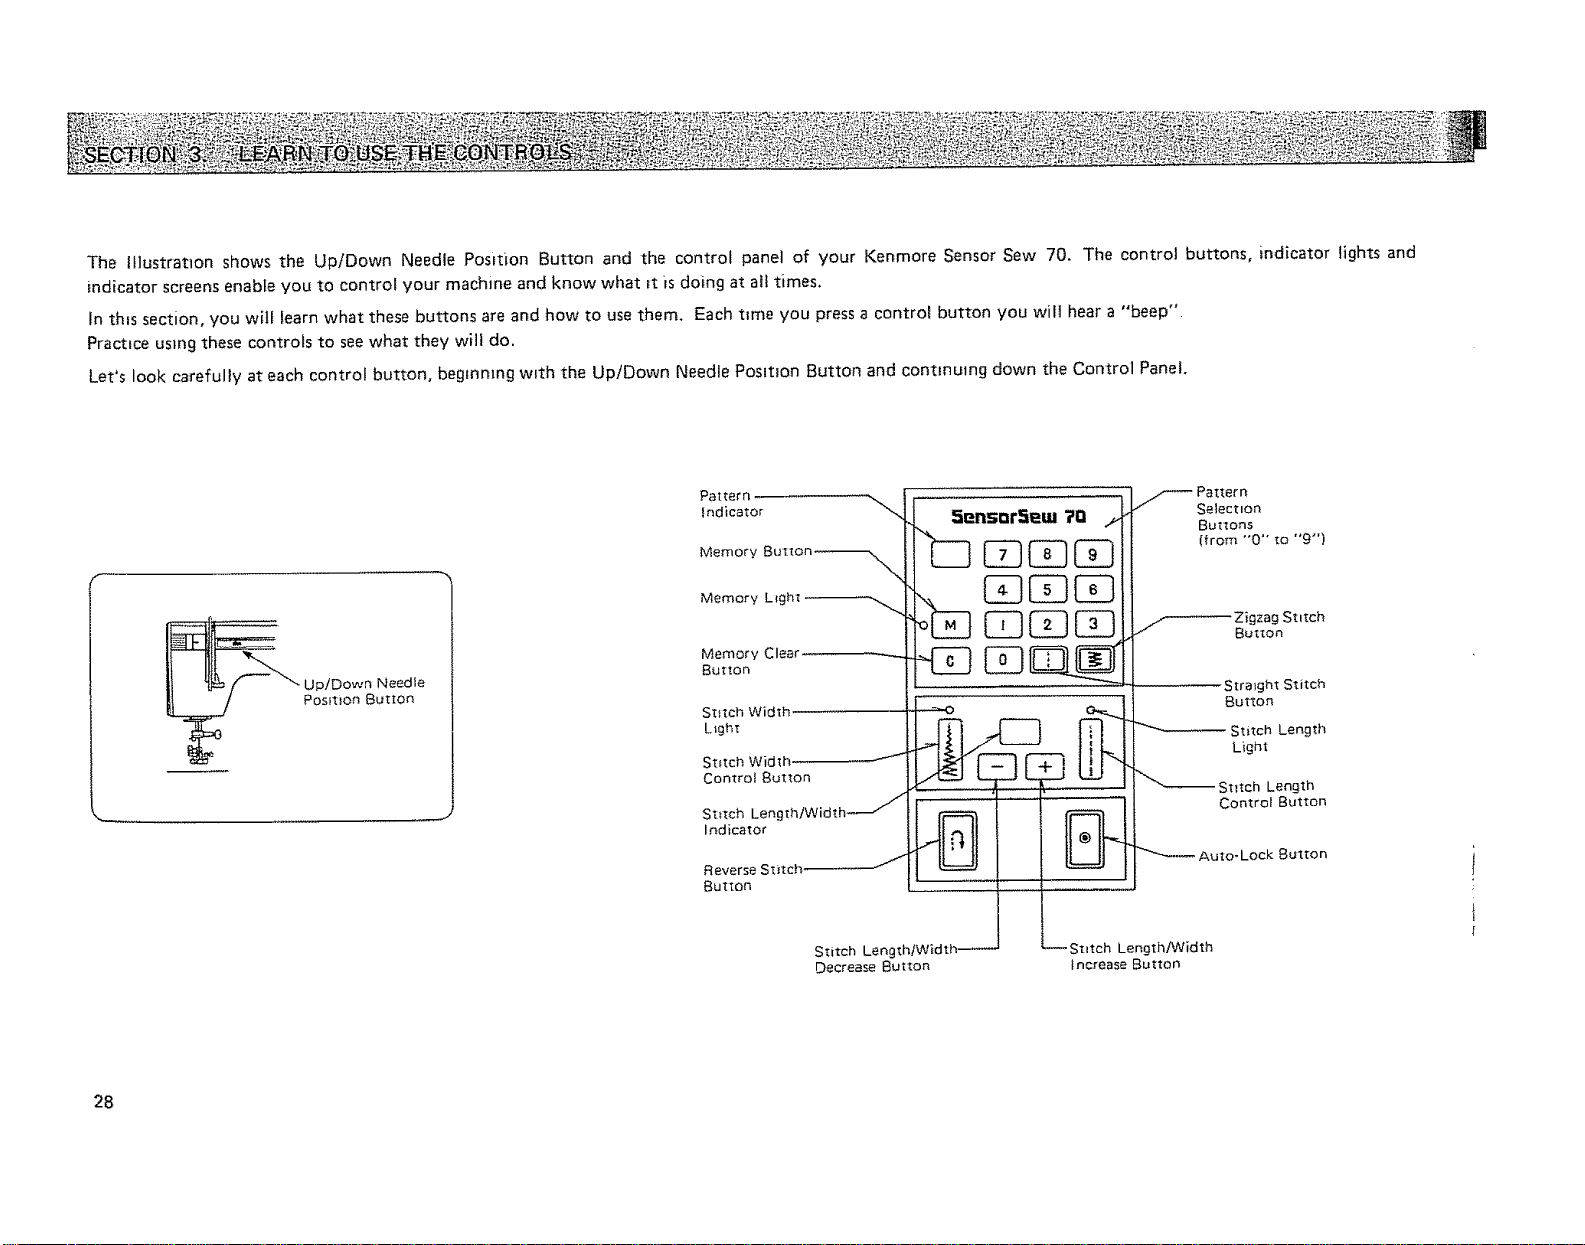
The Illustration shows the Up/Down Needle Posttion Button and the control panel of your Kenmore Sensor Sew 70, The control buttons, indicator lights and
indicator screens enable you to control your machine and know what _t is doing at att times.
In thins section, you will learn what these buttons are and how to use them. Each t_me you press a control button you will hear a "beep".
Practice using these controls to see what they will do.
Let's look carefully at each control button, begmmng w_th the Up/Down Needle Poslt_on Button and continuing down the Control Panel,
Up!Down Needle
PosR_on Button
Pattern
IndicatOr
Memory Button _.
Memory Light
Memory Clear-
Button
Stitch Width
L_ght
Stitch Width
Control Button
Stitch LengthiWidthJ
Indicator
Reverse Stitch _-'*-_"
Button
Stitch Length/Width_
Decrease Button
5ensarSew ?n ._
--Stitch LengthtWidth
increase Button
._ Pattern
Selection
Buttons
(from "'0 '° to '°9"'}
/----Zigzag Stitch
Button
Straight Stitch
Button
Stitch Length
L_ght
Stitch Length
ControI Button
Auto- Lock Button
28
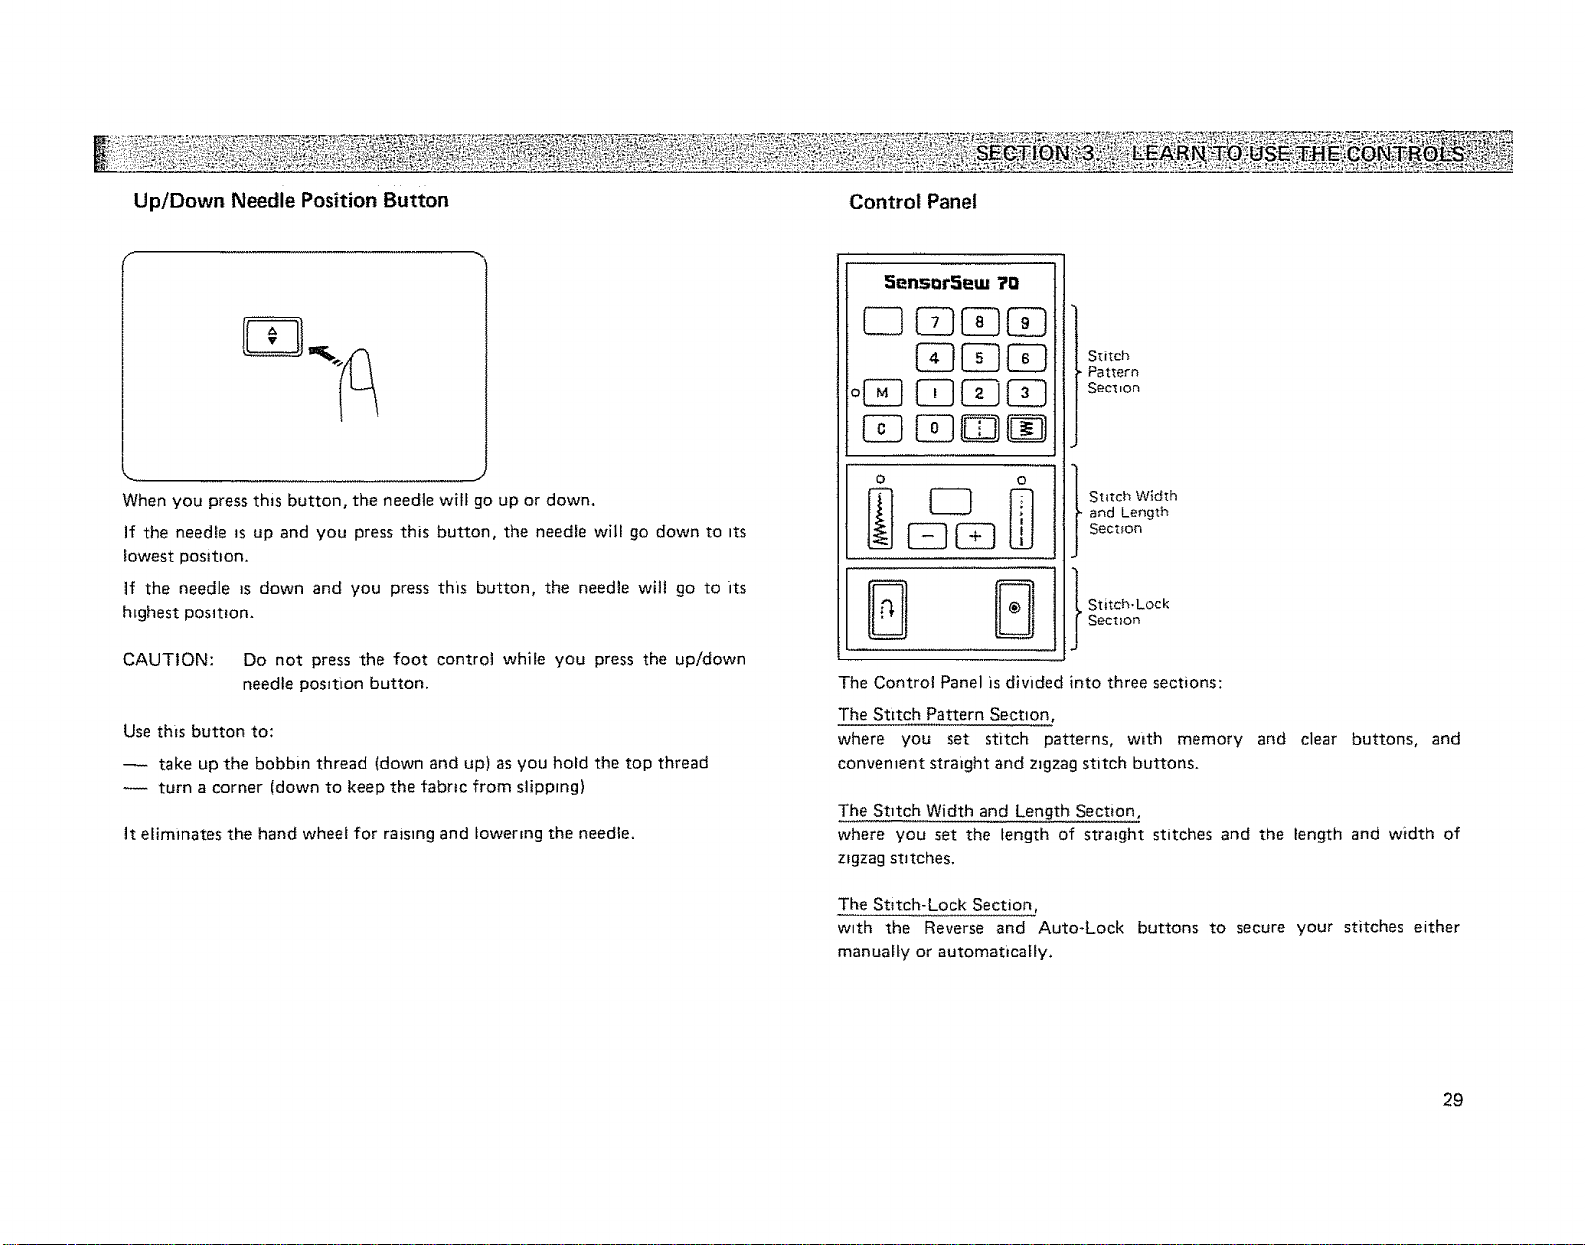
Up/Down Needle Position Button Control Panel
5ensurSem 71)
C3CZ3CD
Stitch
Pattern
Sectnon
When you press this button, the needle will go up or down.
if the needle _s up and you press this button, the needle will go down to its
lowest posit_on.
If the needle _s down and you press this button, the needle will go to its
htghest posJt_on.
CAUTION: Do not press the foot control while you press the up!down
needle pos_tLon button.
Use this button to:
take up the bobbin thread (down and up) as you hold the top thread
turn a corner (down to keep the fabric from slipping)
It eliminates the hand wheel for raising and fowermg the needle.
O O
Stitch Width
and Length
Section
D D
The Control Panel is divided into three sections:
The Stitch Pattern Sectnon,
where you set stitch patterns, with memory
convement straight and z_gzag stitch buttons.
The Stitch Width and Length Section,
where you set the length of strmght stitches and the length and width of
z_gzag stitches,
The Stitch-Lock Section,
with the Reverse and Auto-Lock buttons to secure your stitches either
manually or automatically.
and clear buttons, and
29

Pattern indicator Screen Pattern Selection Buttons
-, (.
ii s_.s=rs_=7= f
(0 ~ 9}
This two digit indicator screen lights
up to show what stitch pattern you are
using.
NOTE:
To Select a Stitch Pattern:
t. Press two numbers to indicate
2. The numbers will show on the
When you turn on your
machine, the indicator will
automatically show the
straight stitch _..
which pattern you want to use.
pattern indicator screen.
5_nsarSew 7Q t
J
You use these buttons to select a stitch pattern. They run from 0 to 9.
Example:
NOTE: If you select numbers not on the stitch pattern chart (See inside
You want to use decorative stitch [] .
1. Press [] , A number 4 and a flashing line will appear on the
pattern indicator screen.
2. Press _-_
You have selected stitch pattern []
machine top cover and p. 45 to 49 }, the machine will blink until you
select numbers on the chart.
3O

Memory Button Clear Button Straight and Zigzag Stitch Buttons
5ensurSem ?Q
The Memory Button, with its memory
indicator light, will "memorize" your
pattern selection. Your machine can
remember up to 31 stitch patterns,
including the Auto-Lock, which auto-
matlcalfy reinforces or locks the stitch
you have chosen. This button ts most
typ,calty used when monogramming or
combining patterns.
To Set the Memory:
Press the Memory Button after you
select your stitch pattern° The
memory indicator light will go on to
show that the machine has recorded
your selection.
NOTE:
If you are selecting a series
of different stitch patterns,
you must press the memory
button after each selection.
The Sensor Sew 70 will
remember them in order.
5ensurSmu ?U
I]Z]EZ][Z]r
The Clear Button will erase the st,tch
pattern you have selected and auto-
matically return your machine to
[] : the straight stitch pattern.
The Clear Button works in two ways
to clear a series of stitch patterns.
depending on whether you have
pressed the foot control.
Foot Control Not Pressed:
The Clear Button ciears one stitch
pattern at a ttme, beginning with the
last selected and ending with the first
selected until tt comes to "10"
Th,s allows you to correct any
mistakes you may make while pro m
gramm_ng a series of patterns.
Foot Control Pressed:
(even if only one stitch)
The Clear Button deletes all stitch
patterns in the series at once. You see
a [] right away.
5ensQrSem 7o
5ensorSem ?_1
<
You can set each of these most used stitches by pressing lust one button:
Straight or Zigzag. The pattern indicator screen will show [] (Straight) or
[] (Zigzag).
31

Stitch Width and Length Buttons
All stitches m your Sensor Sew 70 are pre-set for the best stitch
length and width, but if you wish to change the settings here's
how:
You can set stitch width and length with these two buttons.
(Use one at a time. The machine will remember the first one
while you set the other, without your having to press the
memory button.)
Use the Plus "+" or minus "-" buttons to increase or decrease
the stutch w_dth or length.
The indicator screen will show the stitch width or length you
have sefected.
o Stitch Width Button
This button controls the width of zigzag stitches.
NOTE: tf you press the stitch wldth button while doing
straight stitching, the stitch width light will go on and
the indicator screen will show "C", Your needle is
m the "Center" tf you press the "+" button, the
indicator will show "R '° (Right). If you press the
"--" button, the indicator wilt show "L" (Left).
When you press this button for zigzag stltches, the stitch width
light witl go on and the indicator screen wilt show the preset
stitch width of "5.0"-
NOTE: The range of stitch width depends on the stitch pattern you select.
f
E3Gq
J
To Decrease the Stitch Width:
Press the "-°' button. The width wilt decrease Press the "+" button, The zlgzag width wilt
by 0.5 mm to "0.0" each t=me you press the increase by 0.5 mm up to "7.0" each time you
button, press the button.
To Adjust the Stitch Width Quickly:
Hold Down the "--" or "+" button until you reach the stitch w_dth you desire.
To Return to the Preset Stitch Width (or clear the stitch wtdth):
Press the Stitch Width button again (or press the Clear button).
The stitch width light and the indicator screen will go off.
To Increase the Stitch Width:
32

o Stitch Length Button
This button sets the stitch length for both straight and zigzag stitches.
When you press the stitch Jength button, the stitch length light will go on and
the indicator screen will show the pre-set stitch length:
"2.0" for straight stitching
"1.5" for zIgzag stitching
NOTE: The range of stitch length depends on the stitch pattern you select.
To Decrease the Stitch Length:
Pressthe "-" button,
The stitch length witl decrease
by 0.1 mm from "1,0"" down to "0,0",
by 0.5 mm from "4.5" down to "1,0"
EE}
To IncFease the Stitch Length:
Press the "+'" button.
The stitch length will increase
-- by 0.1 mm from "0_0"" up to "1.0".
-- by 0.5 mm from "1.0" up to "4.5",
To Adjust the Stitch Length Qu_ckly:
Hold Down the "+" or "-" button until you reach the length you desire.
To Return to the Prese_ Stitch Length:
(or clear the stitch length setting)
..J
Press the Stitch Length button again (or press the Clear button). The stitch
length light and the indicator screen wilt go off.
33

ReverseStitch and Auto-Lock Buttons
Both of these buttons will secure seams.
= Reverse Stitch Button {manual -- no memory)
O
Auto-Lock Button {automatic with memory)
f-
Use this button to;
secure seams with an auto-lock stitch at the first and last stitch you sew.
To Use the Auto-Lock Stitch:
Press the Auto-Lock Button.
The pattern indicator screen wilt show "'AL".
The machine will take a few stitches in place and stop automatically.
Use this button to;
secure seams
reinforce the seams and the top edges of pockets
Press and hold the reverse stitch button.
The machine wilt sew in reverse until you release the button.
34
__J
To Use the Auto-Lock Memory:
I. Press the Auto-Lock Button.
2. Press the Memory Button,
3. Press the Stitch Pattern Buttons you desire. {Be sure to press the Memory
Button after each stitch pattern selection.)
See p, 82for more details.
4. Press the Auto-Lock Button.
5. Press the Memory Button.

The Stitching skills covered in this section require
some special skill from you. For all other
stitches, your machine does most of the work.
Even if you are skilled at these stitches, you wil]
want to learn the features of this machine that
may be new to you.
Use the Seam Guides
Needle plate
Turn a Square Corner
To turn a square corner 5/8" from the fabric edge:
1. Stop stitching and lower the needle by pressing the Up/Down Needle
Position button when the fabric edge facing you lines up w_th the
cornering guide, as shown,
2.
Raise the presser foot and turn the fabric to line the edge wtth the 5/8"
seam guide.
3. Lower the presser foot and begin stitching in the new direction.
Cornering guide
The seam guides on the needle plate are there to
hetp you measure seam width, The lines are 1/8"
apart, with the 5/8" and 7/8" lines marked,
J
35

Sew on Heavy Fabrics Use the Darning Plate
Darn{rig ptate
i lll_ ,,,,
Use this skill when sewing from 3 to 12 layers of fabric, such as sewing over
welt seams when hemming ieans.
1. Use Foot A (Zigzag foot) w lth the black spring button.
NOTE: This black button ]ocks the foot so it does not give with the fabric.
2. Sew as usual.
3. When your needle reaches the point where the fabric layers increase,
stop.
4. Lower the needle and raise the presser foot.
5, Press and hold the black button as you lower the presser foot.
6. Re{ease the black button and continue sewing.
Sometimes when you sew, you want to control the fabric yourself.
The Darning Plate covers the feed dogs so that they do not touch the fabric.
To Put on the Darning Plate:
NOTE: The rectangular holes in the Darning PIate match the holes m the
needle plate. In the darning plate, these holes are slightly to the
right of center.
I. Position the darning plate with the pins on the bottom.
2. Fit the darning plate pins into the needle plate holes at the
5/8" mark. The feed dogs will show through the darning plate
holes.
Use the darning plate in the following ways:
Basting (P 3.Z)
Darning (P, 3_.8.8)
Button Sewing (P. 3_99)
36

Basting []
Set the Machine
Thread tension
0 to 2.5
A: Zigzag
toot
Pressure
dial: 1
Blue needle No. t 1
Use the darmng plate for basting.
(See p. 36 for details.)
Use this stitch to:
baste seams
tailor tack
tack quilt layers
CAUTION : Do not use this stitch if the
needle will leave permanent
marks in the fabric. A small
needle wilt be tess likely to
leave permanent marks.
Darm ng plate
t. Press the foot control,
The machine will take one stitch
and stop automatically.
2. Release the foot control.
3. Hold the fabrfc taut and slide it
.......J
to the place where you want the
next stitch,
4. Press the foot control.
5, Take out the darning plate when
fimshed.
NOTE: Reset the tension and
pressure dial for straight
sewing.
37

Darning []
Set the Machine
![]
i @GCOl
loeb
Thread
tension
\Press
3_o6
M
L
F Satin stitch
38
tOOt
Pressure
dial: "1
Darmng plate
1. Put the darning plate on the needle plate (see p. 36).
2. Stretch the fabric with the hole in the center between
embroidery hoops, as shown.
3. Lower the presser bar and sew at a slow speed.
4. Move the fabric back and forth slowly until you have
covered the darning area.
5. Turn the fabric 1/4 turn and sew another layer of stitching
over the first layer.
NOTE: If your fabric Is thln or badly damaged, use a separate
piece of fabric under the hote to reinforce it.
6. When you finish darning, return the pressure dial to 3 and
remove the darning plate.
J
How to darn correctly
Make the turning points of each row blunt
or the stitching wilt draw little holes at the
ends, Beginners may prefer the L or M
movement.
Take care not to get circles.
The quick mastering ot this work depends
on regular guiding.
Therefore:
-- Hotd the hoop correctly,
-- Always work from left to right
(as when writing).
-- Move work lengthways (not sideways)
for selvedge and weftway.

SewaButton
Set the Machine
5-_Z_tSI_uJ 7D
@@D
oCE @DD@D
@D
Press
Stitch width controf
button
B: Transparen_
buttonhole
fooI
Darning piate
7"
Thread tenston
$
3to 7
Left hoie
......J
Use the darning plate for button sewing (see p. 36). 5.
1. Match the button holes to the horizontal slot
on the presser foot,
2. Lower the foot to hold the button in place,
3, Turn the hand wheel by hand until the needle
point is itust above the button.
4, Press the stitch wtdth button (+ or -) so the
needle will enter the left hole of the button,
Right hole
Draw thread to
reverse side of
............................. J
Turn the hand wheel so the needle will enter
the right hole of the button. Readjust the
stitch width if necessary.
6.
Stitch several times.
7.
After you finish sewing, cut the thread but
leave 3 to 4 inches of thread at the button.
8.
Draw the thread to the reverse side of the
fabric and knot the threads.
fabric
39

Put in a Zipper
It's as easyasA -- B -- C
Set the Machine
Thread
tension
\Press
3to6
A
___ he pIn on the
left hand s_de
B
Right s_de
of fabric
of opening
Top edge of fabric
4O
E. Zipper
foot
ISmimili_
A.
Attach the zipper foot, as shown.
1.
To sew on the right side of the zipper,
attach the presser bar to the right pins
on the zipper foot.
2,
To sew on the left side of the zipper,
attach the presser bar to the left pins on
the zipper foot,
]
;i
B. Prepare your fabric.
1, Put the right sides of the fabric together
and sew to the end of the zipper
opening. Use the reverse to lock the
stitches.
2. Set the stitch length at "4.5" and sew
the zipper opening.
4

C
Zipper teeth
C_
Sew in the zfpper,
1.
Fold back the Jeft seam allowance as
shown,
,
Turn under the right seam allowance to
form a 1/8"' foid.
3,
Place the zipper teeth next to the 1/8"
fold and pin in place.
NOTE: Be sure the top of the zipper
(the stider) is at the top of the
garment.
J
4. Attach the presser bar to the right p_ns
on the zipper foot.
5. Lower the zipper foot on the right side
/
J
8. Open the zipper.
9. Lower the presser foot and stitch the
rest of the seam.
at the bottom of the zipper so that the
needle pierces the fold and the z_pper
tape,
6. Sew through the fold and the zipper
tape to the point where the slider begins.
7. Lower the needle to hold the fabric and
raise the presser foot.
41

Put in a Zipper (Continued)
Right side
of fabric
Right side
of fabric
Right s_de
of fabric
{
10, Close the zipper and turn the fabric
right side up. Spread flat.
42
1t. Remove the zipper foot and attach the
presser bar to the left pLns on the zipper
foot.
12. Stitch across and below the bottom
of the ztpper.
13. Turn the corner and continue to guide
the foot along the zipper teeth, as
shown.
Stitch through the fabric and the ztpper
tape.
14. Stop about 2" from the top of the
zipper.
15. Lower the needle into the fabric and
raise the presser foot.
I6. Remove the basting stitches and open
the z=pper.
17. Lower the foot and stitch the rest of the
seam. Make sure the fold is even.

This section, discussing the many stitches available to you on this machine is organized by the stitch numbers on your Chart of Stitch Patterns, There are some
variations and overlaps, but generally the stitches are here m numencat order,
However, you may know what you want to sew but may not be aware of the stitch to use to complete your sewing task. A Chart of Sewing Functions precedes the
Chart of Stitch Patterns and the discussion of stltches, to aid you in locating quickly the stitch pattern and instructions you need.
NOTE: If a stitch pattern on this machine can be used for stitching stretch fabrics, you will find the word "stretch" in parentheses after the stitch pattern name.
All stitch pattern on the Chart of Stitch Patterns (P, 45 to 49) will be labeled with an "S" in the name box,
43

Chart of Sewing Functions
Now that you are familiar with your machine and ready to sew, what are you
going to sew? The following chart tells you (in alphabetical order) what
sewing functions th_s machine performs and directs you to the proper page
for detailed instructions, in many cases, you also have your choice of
stitches,
FUNCTION STITCH PATTERN(S) Ref, Page
APPLIQUE
BARTACK
BASTE
BATHING SUIT, SEW
BLIND HEM
BUTTON, SEW
BUTTONHOLE
B A RTAC K
ROUNDED
KEYHOLE
CROSS STITCH
CUT-OUT WORK
DARN
EDGE A GARMENT/PROJECT
DECORATE (WITH STITCHES)
ELASTIC. APPLY
EMBROIDER
FAGOTING (create open work)
FINISH RAW EDGES
3t
15/16
10/14
18
28, 29
15
47.74
46, 65, 67
37, 45
46, 64
47, 71
39, 46
19_21
22_24
25_27
41
31
10/t6
17/18/29/
30/31 71.
29/32133/ 47.
34_39, 42_47 78.
33/40
10/15/41/44
33/40
! 5/16/17
18/28129
46, 65~67
48,
47,
38
46,
48,
45,
48,
79
74
47, 63.64
72, 73, 74
48.49, 72. 75
80. 81.82--84
75. 77
48. 60.79, 81
76
47, 61,62
46,
63,
64, 71
FUNCTION STITCH PATTERN(S) Refo Page
GATHER
HEMS
KNITS, STRETCH FABRICS
MEND
PINTUCKS
QUILT
REINFORCE SEAMS
SHELL TUCKS
SMOCK
STRAIGHT SEAM
STRETCH STITCH
TOPSTITCH
SADDLE STITCH
OUTLINE STITCH
TRIMS, SEW
Z_PPER
10
17118t28129
See att Stitches
marked "S "°
10/15/t6
10
10/32
1t/16/33
29
32t42/43/48
10
12 and all stitches
_marked "S"
10
13
11
1o/15!16
lO
45,55
46.47,63,64,71
45_49,56.57.58
63,64.71,72,73.74
75,76,77,80.81
45,46,62
45,53
45,48,54
45,46,48,75_77
47.72
48.80
45,50_55
45_49,56,67_58o
63,64.71,72.73.74
75,76.77,80.81
45.51
45.58
45.56
45.46,59.64
40_42
44

Stitch Pattern Chart
Stitch
Pattern
STRAIGHT
OUTLINE
STR ETCH
STRAIGHT
STRETCH
SADDLE
STITCH
I No.
I to
Foot
Straight (H)
Zigzag IA)
11
Other
Attach.
Quilting
guide
Darning
plate
Zipper foot
Needle
Check
Chart
Btue (11 )
Thread
Tension
2_6
3_6
Pressure
Dial
Uses
Regutar seams, pmtucking, quilting, zippers,
topstitching, darmng, mending, basting,
gathermg, etc,
Use m place of straight stitch on knits, bias
seams, tricot, chiffon for a flat, non-puckering
seam.
Refer to Page
50 _ 55
56
S
12
s
t3
Strmght (H)
%
Zigzag {A)
%-
Zigzag (A}
Blind Stitch
Hem Foot (G)
Check
Chart
14, I6, t8
or
Check
Chart
2-6
2~6
Use on knits and other stretch fabrics, good
for topstitching.
Topstttching suits, blazers, jumpers, denim
outfits.
57
58
BASTING
S
14
Zigzag (A)
Darmng
plate
Blue {tl)
0 ~ 2.5
Basting, tailor tacks, tack quilt layers,
37
45

Stitch Pattern Chart (Continued)
Stitch
Pattern
ZIGZAG
_regu|ar}
ZIGZAG
(multiple}
.7
OVEREDGE
SEAM
i
l
KNIT
STITCH
No.
15
!6
18
Foot
Zigzag (A}
Other
Attach.
Needle
Check
Chart
Thread
Tension
2~5
Pressu re
Dial
3
Uses
Mend, darn_ fin=sh edges, apply trims,
embroider, gather, buttons, satin stitch,
monogram, decorative stitches
Refer to Page
59 ~ 61
Zigzag (A)
17
Overedge |C)
Check
Chart
Check
Chart
%
Zigzag (A}
Blue (tl)
3_6
3_7
3~6
3
Use for sewmg patches, repafrlng straight
or corner tears, fimshing seams on terry-
cloth, sewing bar tacks for be_t loops and
drapery p{eats (strong than z_gzag).
Use for overcasting, tor kmts and woven
fabrics needing extra strength, tot narrow
seams on knits or heavy weight woven fabrics.
Use for sw_mwear and stretch velour.
62
63
64
I- BUTTONHOLE
eartaek
Rounded
Keyhole
46
20/
21,
24,
26/
27,
19/
22/
23/
25/
SIid_ng
Buttonhole
(J)
Transparent
Buttonhole
{B)
Check 1_5
Chart
Buttonholes m three shapes; also corded
buttonholes,
£11g
Bartack Rounded Keyhote
65 _ 67

Stitch Pattern Chart (Continued)
Stitch
Pattern
BLIND HEM
STITCH
m
2--L__ s
BLIND HEM
STITCH
m7
2-3-i
SHELL
STITCH
i_ s
SCALLOP
STITCH
No. Foot
=
28
29
29 Transparent
30 Zigzag (A)
Blind Stitch
Hem Foot (G)
Blind Stitch
Hem Foot (G)
Buttonhole
Satin (F!
Other
Attach,
Needle
Check
Chart
Check
Chart
I Check
Chart
Check
Chart
Thread
Tension
1~4
t_4
4_9
3_6
Pressure
Dial
Uses
Use for stretch fabrics, more elastic
Use for woven fabrics: blind hem and
overcasting
Finish hems, sleeve and neck openings
Use on nylon tricot and other tinger=e to
overcast and seam,
Do shell tucking on blouses and lingerie.
t
Use for scalloped edges on cottars, pockets
or ptacemats, Create a delicate edge on thin
fabrics, Decorate edges on hemlines or
sleeves,
Refer to Page
71
71
72
73
CUT*OUT
WORK
APPLIQU E
7
3t
S
Satin (F)
j _-tt
Check
Chart
Use on cut-out work and applique for edging
the des_gnso also on placemats_ blankets_
coI{ars, cuffs and pockets.
74
47

Stitch Pattern Chart (Continued)
Stitch
Pattern
SMOCKING
STITCH
FEATHER
STITCH
DECORATIVE
GEOMETRtCS
ELASTIC
CAS! NG
FAGOTING
No.I
32 !
S
33
S
34/
35/
36/
37/
38/
39,
Foot
Zigzag (A)
Satin (F)
%
Zigzag (At
Satin (F)
"' .............. 1
Satin (F)
Satin (F}
I
I
Other Thread Refer to Page
Attach. Tens*on
Use paper
behind
Needle
Check
Chart
Check
Chart
Check
Chart
Check
Chart
t_4
'i N 4
3_7
Pressure
Dial
2
3
3
Uses
Use in smocking or as a decorative stitch.
Hand*quitting stitch, used to rmnforce stretch
and woven fabrics, use on spandex under-
garments and to decoratively hem elastic
fabric. Use for patchwork quilting,
Decorate garments with one row or several,
one stitch or a combination.
Elastic Casing: replace bias tape casings
Fagoting: Join two folded edges for
inwrists and waists; tack
down elastic.
decorat=ve open-work appearance.
8O
75
78
76, 77
48
CROSS
STITCHING
S
41
Satin (F)
Check
Chart
2_5
3
Use in embroidery, combine with letters and
numbers for samplers.
79

Stitch Pattern Chart (Continued)
Stitch
Pattern
SMOCKING
STITCHES
SAND
STITCHING
STRETCH
STITCH
DECORATIVE
MONOGRAM
Numbers,
Letters,
Period,
Space
No,
42/
43/
48
(32)
S
44
S
45/
46/
47.
Foot
Satin {F)
Satin {F}
Other
Attach,
Needle
Check
Chart
Check
Chart
Check
Chart
%
00 ~
09
49_
76.
Satin (F)
Check
Chart
Thread
Tension
1_4
!_4
2~5
2-5
Pressure
Dial
1
or
2
Uses
Smocking on chifdren's clothes0 biouses,
curtains, etc.
Filt in des=gns afready outlined with satin
or other embroidery stitch.
Decorate with flower or teat designs
Use =n combination (programmabfe)
or smgiy_
Numbers and letters or sentences may be
programmed in sequence for monogramming.
Refer to Page
80
8t
82 _ 84
85 _ 86
lq_IN_IS_Is21s_Isqlssls_IS_lsBls_iEoI_ds21
::t...... 1
tot I =iRiSTl ,lvpIxIYzlt:l
49

Straight Stitches 1_ _ []
When you turn on your machine, +t is auto-
mat_catfy set to sew a straight s_itch (pattern
Stratght Stitch
Set the Machine
!
lIo++++tt
/
Press
Thread tension
2to6
H: Stra+ght
toot
or
A: Zigzag toot
The Stitch and Its Uses
You can use your bas+c strmght st+tch +n
many ways besides just sewing a straight
seam. Three common uses for the straight
st+tch are:
Pintucking
Quilting
Topstitch mg
All are discussed in th_s sect+on.
To sew a straight stitch:
1. Raise the presser foot.
2+ Raise the needle to its highest posit+on.
3. Place the edge of the fabric next to a
st+tching guide line on the needle plate
(5/8" is most common).
4. Draw the threads towards the back and
lower the presser foot.
5. Press the foot control+
6. Hold the fabric looseiy and gently guide
+t along the guide line, so that _t feeds
naturally+
Do not force the fabr+c or try to pull it
tight.
!
7. At the end of the seam, you may want
to reverse to lock the stitch.
8. When you stop sew+ng, the needle will
automatically rlse to its highest position.
9. Raise the presser foot and remove the
fabr+c+
10. Cut the threads,
50

Topstitching
Set the Machine
Press
Thread tension
2to6
A: Zigzag toot
or
G. Blind stitch hem toot
The Stitch and its Uses
Topstttchlng emphasizes the lines of your
garment and keeps seams and edges flat and
crisp.
Accent suits or bJouses with one or two rows
of topstttchmg around the outer edges of
cuffs, lapels or collars,
Use the Auto-Lock button to secure your
topstttching and eliminate unsightly back_
tacking,
Here's How
1. Lower the presser foot.
2. Keep the edge of the fabric next to the
right edge of Foot A,
3. Evenly guide the fabric along this edge
to produce an even row of topstitching
3/8" from the edge.
NOTE:
You can easily adjust your needles
from left to rIght for topstitching
without moving your fabric from
under the presser foot.
51

Straight Stitches [] _ [] (Continued)
Position Your Needle for Topstitching
The needle has three positions:
left, center and right,
f
GD
C2O
i
To posttion the needle to the left:
1. Press the stitch width control button,
2. Press the stttch length/wLdth decrease button.
3, The stttch length/width indicator will show
"L" or left needle positron.
52
To position the needle at the center:
1, Press the stitch width control button.
2. The stitch length/width indicator shows
"'C" or canter needle position.
NOTE:
Left or right needle position is recommended for stitching edge of the fabnc.
Besides the normal straight stitch method of topstitching, this machine does other types of
topst]tching that are better for knits or produce a more elaborate decoratwe effect.
To pos_tlon the needle to the right:
1. Press the stitch width control button,
2. Press the stitch length!width increase button,
3. The stitch indicator wilt show "R" or right
needle position.

a
Pintucking
(
Set the Machine
Thread
tensfon
\
Press
3to6
G+ Blind stitch
hem _.oot
...... J
The Stitch and Its Uses
Pintucks are narrow tucks spaced close
together to add design interest on such +terns
as blouses and pillowcases. One pintuck can
form a permanent front crease on knit pants.
Sliding guide
Guide screw
Right side
of fabric
Here's How
1.
Attach the blind stitch hem foot.
2+
Place the folded fabric under the presser foot.
3+
Position the needle 1/16" inside from the folded edge and lower the presser
foot.
4.
Adjust the sliding guide on the blind hem foot to the folded edge by turning
the gu+de screw, as shown.
5+
Feed the folded edge smoothly against the sliding guide.
NOTE: If the fabric tends to pucker, hold the materlal slightly taut while
sewing. Also, try decreasing the upper tension slightly.
53

Straight Stitches []
• Quilting
Set the Mach{ne
D: Quilter
Thread
tenstion
[] (Continued)
Press
3to6
or
A: Zigzag toot
The Stttch and its Uses
Quiftmg is stitching two layers of fabric
together with batting in between to add
dimension and warmth.
Traditionally, quilting has been used for bed
covers, but now ut is used everywhere.
You can use quilting on entire garments or
parts of garments, such as yokes, pockets,
cuffs and collars. It is also popular for table
fashions. In addition to straight stitch
quilting, you can quilt with decoratrve
stitches or stitch pattern combinations.
H: Straight toot
Quilter
holding
screw
J
Here's How
To do quilting successfully, follow these simple steps:
1.
Loosen the quilter screw on the back of the presser foot as shown.
2.
Slide the quilting guide (D) into the opening under the screw to the width
between lines of quilting stitches you desire.
.
Tighten the screw.
4.
Sew the first row of stitching.
5.
Sew other rows, guiding the quilting guide over the previous row of stitching.
NOTE: When you are quilting large areas, tack the layers together with the
basting stttch, Then quilt from the center out.
Another quilting variation:
Instead of quilting wLth rows of straight stitches, you can barrack your quilt at
regular intervals.
Set up the machine as if you were going to sew a button (see p. 39___).Position
your fabric and bartack.
54

Gathering
Set the Machine
NOTE: Steps 3 and 4 are for 5/8" seam allowances. For other widths, adjust
your fabric accordingly,
5_rS_u,t 7Q t
!I[] QG[] I
GCB I
Press
Thread
tension
1 t04
A: Zigzag foo_
The Stitch and Its Uses
Use this stitch to gather trims, skirts, sleeves at the top, smocking or any time
you want more fullness. You will need two rows of stitches.
Here*s How (for medium wetght fabrics and tight, firm gathers)
t. Set the stitch length to "4.0"
2. Loosen the needle thread tension to "2" or as desired.
3. Sew the first row of stitches with the right edge of Foot A on the edge of
the fabric.
4. Sew the second row with the right edge of Foot A fo|towing the first row of
stitches.
5. Using both hands, putt the bobbin threads from each end of the fabric until
you have the gathers you want.
6. Knot the threads at each end and even out the gathers.
Here's How
1.
Set your stitch length at "4.5"
2.
Secure your gathering rows at the beginning.
&
Stitch two rows, as in steps 3 and 4 for medium weight fabrics.
4.
Do not Iock the threads at the end of your stitching rows.
5.
Pull the bobbin threads to produce the fullness you desire.
6.
Knot the threads and even out the gathers.
!for light wmght fabrics, ruffles and flounces)
55

Outline Stretch []
Set the Machine
f[] GQit
Thread
tension
3to6
A: Zigzag toot
Blue needle No. 11
The Stitch and Its Uses
This stitch pattern, a variation of the straight
stitch, is a narrow stretch stitch designed to
eliminate puckering on knit fabncs and bias
seams.
On tricot and fiimy chiffons, it can be used
to seam and overcast at the same time to
produce a narrow, almost invisible seam or
seam finish.
I
l
Here's How:
1.
PEace your fabric edge on the 6/8" seam line in order to produce a 5/8"
seam.
,
Sew as you would a straight stitch.
Helpful Hints (for lightweight fabrtcs)
1. Set the pressure dial at "1" or "2"'.
2, To seam and overcast tricot:
a. Set the stitch width at "'3"_
b. Sew with the right hand stitch failing off the fabric edge,
......... J
56

Straight Stretch _]
Set the Machine
QQ ®/I
Thread
tension
A: Zigzag toot
or
H: Straight toot
The Stitch and its Uses
This stitch is the stretch variation of the
straight stitch, especially developed for knJts
and stretch fabrics.
This stttch can atso be used for topstitching.
f
A NOTE ON STRETCH STITCHING
Stretch stttching was developed to be used on stretch fabrtcs and knits. It can be
used on other fabrics as well. It works welt on curved seams and on any
garments that will receive a great deal of strain (ie. children's clothes).
The stretch stitch does not actually stretch as Jt is being sewn, but is stitched in a
forward and back motion (somettmes called a "reverse-action" stitch), so that it
will give when the fabric stretches instead of breaking.
57

Saddle Stitch [_
Set the Machine
t cB@ N
eD®ll
Thread tension
2_o6
A: Zigzag toot
G, Blind stitch hem too_
The Stitch and Its Uses
The saddle stitch is formed wtth one stitch
forward, two stitches backward, and a
fourth stitch forward.
You can achieve a lovely hand-worked look
when topstttchmg suits, blazers, iumpers,
and denim outfits with the saddle stitch.
NOTE: Adjust the needle position for the
effect you want.
58
Here's How
1.
Sew as you would for topstltching,
2,
To turn corners:
a, Lower the needle into the fabric on the fourth stitch.
b, Raise the presser foot and turn the fabNc.
c. Lower the presser foot and continue to sew.
Helpful Hin__[t
The Biind stitch hem toot Js good to use when topstitching near the edge of the
garment. Just set the edge guide w_th the guide screw.

Zigzag Stitches [] : _ :_8]
Basic Zigzag []
Set the Machine
/! oOmpH
ticmooD J!
Thread tension
Press
2to5
A: Zigzag toot
The Stitch and Its Uses
The zigzag stitch is one of the most common
and most versatile stitches on your machine.
It can be a utility stitch for sewing buttons,
buttonholes, hemming, overcasting, mending
and darning. It can also be used to decorate
with trims, appliques and cut-out work or as
a decorative stitch.
Here's How
The many ways to sew a zigzag stitch are as varied as the stitch
patterns on this machine or as the width and length settings allow.
Consult the specific variations for detailed directions.
The zigzag stitch as a utility stitch has several variations, discussed in
this section:
Satin Stitch []
Overcasting Stitch []
Multiple Zigzag []
Overedge Seam []
Kmt Stitch []
59

Zigzag Stitches [] _ [] (Continued)
• Satin Stitch []
Set the Machine
o]oG{ ]O0
0000
St_[ch w_dth:/_
as desired
Thread
tension Sz_tch Length: 0,2 to 1.0
t to 4 tor as desired}
Press / Press
Pressure diaI:'i or 2
or
A: Z_gzag toot F Sa_m stitch foot
The Stitch and Its Uses
The Satin stitch ts a versatile and often used
decorative stitch, but tt can also be used to
overcast a raw edge (for example, blankets,
linens, tablecloths and napkins),
The Satin stitch _s especially attractive.in
applique and is the basis for the geometric
stitches [] .to [] on this machine,
Zigzag width:
Stitch
length:
Close to 0
1 .5 2 2.5 3 3.5 4 4.5
;>
<
Here's How
Once your machine ts set up to stitch, you may want to exper}ment on a
fragment of the fabric you are planning to use. Too tight a satin stitch may
pucker some light weight fabrics.
Otherwise, stitch as usual.
>
60

o Overcasting Stitch []
F
Set the Machine
Press
Thread tension
2to5
C. Overedge toot
_ J
The Stitch and Its Uses
This zigzag variation is very useful in
garment construction and in finishlng raw
edges of any sewing project,
Here's How
1, The black ridge and brush and the
guide wires on the overedge foot keep
the edge neat and the fabric straight,
2, Place your fabric so that the double
guide wires come to the edge.
NOTE: These wires keep light weight
fabric from rolling into a
ridge and hold medium
weight fabric flat.
The machine will stitch over these
wires, The black ridge and brush wilt
keep the loose threads in so that the
needle can stitch over them.
3, As you sew, be sure your fabric
edge pushes against the black
ridge and brush guide.
4. When you stop sewing, remove
the fabric by drawing Jt to the
back and out. The fabric will
catch on the wire guides if you
pull it toward you.
Helpful Hints
Start overcasting about t/8" inside the raw corner of your seam. If you start
right at the edge, the fabric will bunch up and the stitches will become tangled.
ridge and
brush guide
For overcasting folded fabric:
You can also fold the raw edge of the
seam and overcast.
I. Start the fold by sliding it under
the needle and lowering the
needle.
NOTE: Be sure your needle is in the
left position.
2. Lower the presser foot so that
both guide wires are on the fabric,
3, Fold the fabric to the left 1/8"
as you feed it into the machine
and stitch.
6t

Zigzag Stitches[] -_ _ (Continued)
= MultipLeZigzag []
Set the Machine
S_rt_rS_u
D
Thread tension
3to6
$
The Stitch and Its Uses
The multlpfe zigzag Is a combination ztgzag
and straight stitch, You may use the
muittple zigzag everywhere you would use
the basic zigzag stitch. It has more strength,
elasttcity, and is flatter than a regular z_gzag.
The multiple zigzag stitch is especially useful
for:
sewing patches smoothly and securely.
repairing straight tears.
finishing seams on terryctoth.
sewing bar tacks for belt Coops and
drapery pleats.
62
...............J,J
........ J
Here's How to Repair a Tear:
Straight -- position the tear under the needle so that the stitching will catch
both sides.
Cornered- stitch from each end to the center. Use a piece of tabric under
the tear to reinforce your mending.

= 0veredge Seam []
Set the Machine
[ 5_3euz TM
Thread tension
3[o7
C. Overedge too[
The Stitch and Its Uses
This stitch pattern combines the straight and
the zigzag stItches, using the overedge foot,
to stitch and overcast seams in one step,
It also has a reverse cycle to prowde
elasticity for kmts and extra strength for
woven fabrtcs,
Use this stitch when you want a narrow
seam that you do not need to press open
flat. It fs ideal for 1/4" seams on knits
(when attaching ribbing) or on medium to
heavyweight woven fabrics where you want
a narrow seam.
ridge and brush
guide
Here's How
1.
Place your fabric so that the raw edges
fit under the wire guides and touch the
J
black rtdge and brush guide.
2.
Gently guide the fabric so that the raw
edges always touch the black ridge and
brush guide.
NOTE: When sewing over several thick-
nesses (under arms, in crotch,
etc,) ratse the presser foot slightly
to ease the presser foot over the
hump and keep stitches from
bunching,
3, When you stop sewing, remove the
fabric by drawing it to the back and
out. The fabrtc or stitching wilt catch
on the wire guides if you pull it toward
you,
63

Zigzag Stitches []i _ _]
= Knit Stitch []
Set the Machine
EZ][Z]E ]
Thread _enslon
¢
(Continued)
¢-
3to6
A: Zigzag toot
Set the Pressure Dia! to "1", so that the
knit will retain its shape as you are sewing.
64
The Stitch and Its Uses
This kn=t stitch is ideal for sewing sw,mwear
and stretch velour, because tt provides the
greatest amount of elasticity and strength.
Here's How
1. Place your fabric to altow a 5/8" seam.
2. Trim the seam allowance after sewing.
NOTE: Be carefui not to cut the stItches.

Buttonholes [] _ 2_
Set the Machine
_Se._r_r_em 71_
I9_M_- M
Barrack
Press
Thread tension
"t to 5
J: SIiding buttonhole
toot
B: Transparent buttonhole
foot
22 23 2L/
Rounded
25 2_ 2q
Keyhole
The Kenmore Sensor Sew 70 can make three
types of buttonholes:
the Bartack ( 1_ _ [] )
the Rounded ( [] _ [] )
the Keyhole ( [] _ [] )
Use either the Transparent Buttonhole
Foot (B) or the Sliding Buttonhole
Foot (J) to sew buttonholes.
f
J: Sliding
buttonhole
toot
Foot (J) has marks you can use to decide on the length of your buttonhole,
Foot {B) has a r_dge down the bottom center of the foot to keep the
B: Transparent
buttonhole
toot
Here are some helpful tips.
t. Make sure you have a fiat sewing surface.
2. Use the B Foot for sewing next to a thick seam.
3. Make sure the fabric around the needle and foot is slack.
4. Sew several practice buttonholes, duplicating exactly:
It also helps you know when the two sides are even. It has rubber
grippers on the bottom to hold the fabric in place under the foot,
it is the preferred buttonhole foot.
stitched buttonhole sides evenly spaced, Use this buttonhole foot
for tight spaces or buttonholes too large for the J foot,
IMPORTANT
For Perfect Matching Buttonholes
(For details, follow the steps and notes on pages 66 and 67, carefully.)
* Use the extension table.
*Put cabinet-mounted machines in the flat-bed posltion_
* For table-top machines, support the fabric by hand.
* Do Not push or pull the fabric.
* Do bunch the fabric slightly all around the needle and foot to create
slack,
*the fabric
*the seam conditions
* the buttonhole position on the garment
, J
65

Buttonholes _ _ _ (Continued)
tf,o°o°.,o.,°
!1
Here's How
NOTE: Before you sew buttonholes on the actual garment, make several
practice buttonholes. Be sure to duplicate exactly:
the fabric
-- the seam conditions (folds, interfacing, topstitchmg, etm)
the buttonhole position on the garment
For Keyhole Buttonholes: Be sure the hole portion of the keyhole faces the
edge of the garment.
t. Be sure your sewing surface is flat to prevent the fabric pulling against
the fabric feed.
NOTE :
Fabric pulled tight by tts own weight (falling over the edges of the
sewing surface) witl be too tight and distort the automatic fabric
feed. The buttonhole length and shape may change slightly from
one buttonhole to another.
a. Attach the extension table.
b. If your machine is mounted in a cabinet, be sure the machine
is tn the flat-bed position.
c. If your machine is on a table, be sure to support the fabric
around the edges of the sewing machine surface.
J
2. Place the button on the fabric sample and mark the top and bottom to
determine the buttonhole length.
NOTE:
If the fabric is thick near the seam and your buttonholes, the
length and shape of your buttonholes may vary. Try one or more
of the fol!owing adjustments in order:
a. Change to the B Foot.
b. Start your buttonhole so that you sew towards the edge of
the fabric, mstead of away from it.
c. Put standard writing paper (see illustration) (not tissue paper)
under the buttonhole area next to the feed dogs, as you sew
the buttonhole (for woven and stretch fabrics).
d. Sew each buttonhole individually.
Do not use the Memory functlon.
66

5ensmrSetu 70
OD OOE O
oC 2.C
_ _'_ Press
3, Press the first pattern selection button ( [] for bartack.
rounded or [] for keyhole).
4, Lower the needle to the top mark.
NOTE: To assure more uniform length and shape of your buttonholes,
keep the fabric bunched slightly all around the needle and foot
(see illustration) as you sew the buttonhole, so that the fabric does
not pull tight in any direction,
For Barrack or Rounded Buttonholes, continue with Steps 5 and 6, For
Keyhole Buttonholes, go to Step 7.
5, Sew down the left side and stop at the bottom mark at the end of the
buttonhole.
6. Press the Memory Button [], The pattern Indicator screen will show:
[] -- Barrack
[] _ Rounded, Go to Step 8,
7_ Do not sew down to the bottom of the buttonhole but stop about t/8"
from the mark (NOTE: The red marks on the sliding buttonhole foot are
helpful here) and press [] .
The pattern indicator will show []
See the Chart of Stitch Patterns for the stitching areas of [] and _--_.
Go to Step 8.
8. Sew up the right side untif you come to the top mark. Stop.
[] for
J
9. Press the Memory Button [].
The pattern indicator will show:
[] -- Barrack
[] _ Rounded
[] -- Keyhole
The machine wilt bartack or auto-lock the end of the buttonhole and
stop.
IMPORTANT: The machine stitches the last stitches slowly. Hold down
the foot control until the machine has completed its
stitches and has stopped.
Practice until you achieve the results you desire:
Sfze
-- appearance
stitch density (see P, 68)
10. Remove the fabric and place a pin in front of the barrack at the end of
the buttonhole to prevent accidental cutting of the bartacks.
11. Cut the opening with the buttonhole opener m your accessory box.
NOTE: For keyhole buttonholes, plercethe hole first with the long point
on the buttonhole opener. Then cut the rest of the buttonhole.
Carefully remove the fabric from the keyhole with embroidery
scissors.
Memory Function
The machine has now memorized this buttonhole. It wilt sew a complete
buttonhole identical to the first one each time you press the foot control,
67

Buttonholes [] _ [] iContinued)
• Adjust the Stitch Density
You can adjust the stitch density of the entire
buttonhole or of only one sLde.
The stitch length button controts the stitch
dens=ty. It is pre-set at "0.4"
Set the Machine
Fine Coarse
stitches stitches
Stitch Density on One Side:
The stitches on each side of the buttonhole should
be the same stltch density. To adjust, use the feed
balance dial below the Hand Wheel.
Feed
belance
Stitch Density in Entire Buttonhole:
Press "+" or "-" to adjust the stitch density ot
the entire buttonhole.
68
A
For Condition A:
,J
Left Side Stitches too Far Apart
(see above)
Turn the feed balance dial slightly
toward "--" Use the large screw
driver in your accessory box.
After adjusting the feed balance dial, sew another test buttonhole to be sure
your adjustment _scorrect,
NOTE: Remember to turn the feed balance dial to the standard mark
( P, ) when you have completed your buttonholes.
For Condition B:
Right Side Stitches too
isee above)
Turn the feed balance dial
toward "+"
B
Far Apart
slightly

Corded Buttonholes _] _ [_]
Set the Machine
I UII ++++,
J: Sliding buttonhole ,__-_/
foot
or
B: Transparent buttonhole
foot
k,_.
Use this procedure when you want to
achieve a tailored, more attractive ratsed
button hole,
Use filler cord tat least 15 inches of heavy
thread),
Try a pract,ce buttonhole first.
NOTE: For this buttonhole use stitch
patterns [] to [_ _ The
sliding buttonhole foot is prefer-
able, but B Foot can also be used.
Don't repeat corded buttonholes
by memory. Make them indivldu+
ally.
GQ I
Stitch Width 4 to 5
Thread tension
i to 5
i
/
1. With the buttonhole foot raised, hook the filler cord on the cord spur at the back of the buttonhole toot.
2. Bring the ends toward you under the buttonhole foot until they clear the front end.
3. Hook the filler cord into the forks on the front of the J foot to hold them tight.
NOTE: For the B Foot, hotd the cords tight in front of the foot as you sew.
4. Lower the needle into the garment where the buttonhole will start and lower the foot.
5. Sew the buttonhole according to the buttonhole sewing instructions on p. 65 to 67.
Each side of the buttonhole and the bartacks wil! be sewn over the cord.
6.
Remove the fabric from the machine and cut the sewing threads.
7+
Pull the right end of the filler cord to tighten it.
8+
Thread the end through a darning needle, draw to the wrong side of the fabric and cut.
NOTE:
To adjust stitch density, see p. 68,
69

Hemming and Edging Stitches [] _- []
Hemming and Edging garments, table-
cloths, napkins and craft items have
often reqmred careful hand sewing
to produce a professional, fimshed
look_
Now your Sensor Sew 70 can do these
precision stitches much faster and
more precisely than you ever dreamed
possible.
G G ......F"
The Stitches covered in thussection are:
Blind Hem Stitch [] (stretch) []
Shell Stich []
Scallop Stitch []
Cut-Out Work Edging []
Applique []
7O

o Blind Hem Stitch {stretch) []
= Blind Hem Stitch lwoven) []
Set the Machine
Thread tension
1 to4
G. Blind stitch
hem toot
The St=tches and Their Uses
The
stretch Btind Hem Stitch [] is to be
used for stretch fabrics because it is the
stronger and more elasttc of the blind hem
stitches.
NO
A ^ A A _ i
JVV W\j _ _ _
L
NO
YES
is strongThe regular blind hem stitch []
enough for woven fabrics,
When the
needle comes
to the left
Light Welght Fabric l
i_When th4
: needle
.8-to=/8'"tI G2,'Je
Heavy Weight Fabric L
.............
Here's How
1. Finish the raw edge of your hem any way you desire. (See Overcasting, p. 61)
2. Measure, turn up your hem and pin.
NOTE: For light weight fabrics, you may need a double fold.
3.
Fold the material (wrong side out) on the edge to be stitched, as shown, leaving 1/8" of the finished hem edge
showing.
4,
Turn the sliding guide screw so that the sliding guide is very close (1/16") to the left side of the blind hem foot.
5.
Place the fold of the hem against the sliding guide so that the 1/8" extending edge shows on the right,
The long zigzag stitch should barely pierce the folded edge of the fabric, but still sew on the 1/8" extended edge.
See at left for proper stitch appearance.
6. After hemming, press both sides of the finished hem,
stitches.
Helpful Hint
Hemming Thin Fabrics:
Reduce pressure on the presser foot to avoid a distinct line.
.................. #
The right side of the garment will show only the blind
comes
to the
right
71

Hemming and Edging Stitches [_] (Continued)
Shell Stitch []
Set the Machine
_5_uJ 70
Thread tension
6to9
buttonhole
toot
B: Transparent _Y
or
S.,J
...............J
Here's How
!. For best effect
set the stitch width and length as you desire.
you may need to tighten the top thread slightly.
allow the needle to just clear the folded edge of the fabric when it
z_gzags.
2,
If you sew rows of shell stitches, space the rows 1/2" apart.
Bias
NN
F- Satin sti_ch foot
The Stitch and Its Uses
The Shell Stitch is formed by sewing a blind
hem over folded fabrJc, Severa] rows of shef!
stttchmg are called shetl tucks,
Shelf stitching can be used to finish hems,
sfeeve and neck openings.
Shelt tuckmg can be used to create scafloped
tucks on blouses and lingerie.
72
You can sew Shell Stitch on knits or soft silky wovens in any direction.

Scallop Stitch []
Set the Machine
_SeJ'dW_e._.u "PO
Thread tension
3to6
A: Zigzag foot
The Stitch and Its Uses
Use this attractive scallop stitch to create
scallop edges or decorate your sewing
projects, such as collars, pockets or
P]acemats, You can create a delicate
appearance on thin fabrics, such as chiffon,
using a single layer of fabric with a tear-away
backing for support while stitching.
You can also use this scallop stitch to sew
decorative edgings on the hemlines of dresses
or sleeves,
f II I I | Rightside _ _ Right _
%
Here's How
1. Sew your sca]tops at least 3/8" from the folded edge.
2. After stitching, trim fabric close to the stitching. Be carefu! not to cut the
thread.
Helpful Hints
For thin fabrics:
Use a single layer of fabric with a tear-away backing for support while stitching.
For hemlines and sleeves:
Use a tear-away backing, if necessary.
For collars, pockets or craft projects:
Place interfacing between the layers of fabric to provide stiffness.
73

Hemming and Edging Stitches []
Cut*Out Work Edging and Applique []
Set the Machine
Thread tension
I to4
F' Satin stitch \_j_"
toot
Pressure dial: 2
The Stitch and its Uses
Cut-Out Work and Applique are the major
uses for this stitch, but Jt can also be used to
provtde edgtng on many sewing projects,
including placemats, blankets, collars, cuffs
and pockets.
(Continued)
Here's How -- For Applique
l, Use a fusible heavy weight interfacing
behind each p_ece of your applique,
2. Cut the interfacing slightly smaller than
the design pieces.
3, Tape or baste the applique in place and
sew around each piece with stitch
pattern []
NOTE: You may also use a sattn stitch.
4. When sewing curves, leave the needle in
the fabric, ratse the presser foot and
turn the fabric.
5. Lower the presser foot and stitch.
Here's How-- For Cut-Out Work
1. Choose a simple design and trace the outline
on the r_ght s_de of the fabric.
2. Place a piece of tulle or organdy under the
design and pin in place.
NOTE: You may want to use a contrasting
insert fabric to accent your work.
3, Baste the layers together, st_tchmg just
outside the outline. Romove the pins,
4, Stitch around the design, using stitch pattern
[].
NOTE: You may also use a narrow satin stitch
(see p. 60).
5, Remove basting and cut the fabrtc inside the
design close to the stitching, using an
embroidery scissors.
74

Reinforcing Stitches []
= Feather Stitch []
Set the Machine
_e_,5_rSew 70
it GDD
IIo
rqrq
and
[]
o o
0000OI
: o o 0 _
:o o e o;
ro eo e'e'°'o
'0 0 0 i
D O #
o it O
.-.:.-
Thread tension
I to4
A: Zigzag toot
....... J
The Stitch and Its Uses
This stitch is strong, useful and decorative.
tt can reinforce stretch and woven fabrics.
You can use it to sew spandex under-
garments or decoratively hem elastic fabric.
You may also use this stItch in patchwork
quilting.
....... ;.',,r#_,_,,$:,
; 0 o 0
_ 0 it
it •
it i!0,0 It
O00it •
4* g_ o
o • •
• •
Here's How
t. Sew this pattern on a seam
already joined and pressed flat.
o
that 2, Butt two folded edges together and use
this stitch to loin them.
75

Reinforcing Stitches I_ and
= Fagoting Stitch []
Set the Machine
[]
GC E3
Thread tension
3_o7
Satin stitch
foot
The Stitch and fts Uses
Use this stitch to join two pieces of fabric to
create an open work appearance and add
design interest.
For other stitches that may be used in
fagoting, see stitch patterns [] (p. 75).
(Continued)
J
Right side
bnc
Paper
Here's How
1, Fold under each fabric edge 1/2" and
press.
2. Pin the two edges to paper or tear-away
backing 1/8" apart,
3. Sew slowty, guiding the fabr;c so the
needle catches the folded edge on each
side,
Helpful Hint
You may want to set the stitch on "7.0" for
maximum effect.
76

Elastic Casing Stitch []
Set the Machine
I_ G_
! []_
lopQ@_
LC_C_®
Thread tension
3to 7
®
F Satin stitch
foot
The Stitch and Its Uses
Use this stitch to replace bias tape casings
in such areas as wrists and waists. In
children's clothing, this stitch is especIally
helpful, because it reduces bulk.
Here's How
1. Slide a piece of 1/8" elastic under the
foot, then up through the slot in Foot F
(satin stitch).
2. Sew the elastic on the wrong side of the
fabric, pulling it gently to avoid sewing
through the elastic.
3. Pull on the elastic to gather the fabric
and bartack at both ends.
77

Decorate with Geometric Patterns [] _ _-_
Set the Machine
3_ 95 95 gq 3B
il DO®tf
Thread tension
t to4
Satin stttch
toot
The Stitches and Their Uses
These stitches are purely decorative.
You can sew one row or several or vary the
stitch width and length for special effects.
Experiment on a scrap of fabric to see what
specia! effects are possible.
Here's How
1. Adjust the stitch width and length as
you desire.
2. Practice the stitch on a scrap of fabric,
3. Mark the lines for decoration on the
fabric, using a washable fabric marker.
4. Lower the needle at the starting point.
5. Lower the presser foot.
6, Lock the stitch at the beginning (press
auto-lock),
7. Gently guide the fabric along the
marked line,
8. Use the auto-Lock to secure the row of
stitches at the end.
Helpful Hint
You may want to combine these geometric
decorative stitches with other decorative
stitches. See "Programming Decorative
Stitch Patterns" (p. 8_22)for detailed instruc-
tions.
78

Cross Stitch: []
Set the Machine
il [] 5050cD!1
535050
oE0E3@OG !
[D 50Q l
Thread tension
2to5
F Satin stitch
foot
The Stitch and Its Uses
You can make beautiful designs with this
embroidery stitch pattern, an half the time
it would take if embroidered by hand. You
can also combine cross stitches with the
other decorative patterns and letters or
numbers for attractlve samplers and other
sewing projects.
Here's How
1.
Choose a plain close weave fabric such as linen
J
or wool flannel for the background fabric.
2. If you choose light weight fabric, use a tear-
away fabric backing for support.
3. Adjust the stitch width and length as you
desire to match the pattern you have or plan.
4. Find the center of the design, or if the design
is a border, choose a starting point.
5. Count the cross stitches from the center up
and program the number.
(See p. 8__3,Pattern Single Units.)
Use Auto-Lock to begin and end.
For Cross-Stitching Without a Pattern:
1. Start in the center of the design and sew the
first row, letting the fabric feed naturally.
2. Then count the next row of stitches to the
teft or right.
3. Add or delete stitches by pressing the Clear
button and reprogrammmg.
4. Begtn each row by lowering the needle at the
corner of a previous stttch.
5. Use the placement arrow '" _A,, on Foot F to
insure stra}ght, even rows.
79

Smocking [3-_ , [] , _] , [] (or anydecorativestitch)
Set the Machine
1
Thread tension
1 to4
F Satin stitch
foot
92 _2 q3 L/B
The Stitches and Their Uses
Smocking isa delicate decorative treatment
for children's clothes or women's blouses.
$
Step! !1to6)
Stepll (7 to 8)
7
Here's How
1. Choose a soft, !ightwelght fabric such as batiste, gingham or challis.
2. Cut the fabric three times the finished width.
3. Set the stitch length control button at "4.5" and sew rows of strmght
gathering stitches 3/8" apart across the area to be smocked.
NOTE: Loosen the needle thread tension to make gathering easier,
4. Knot the threads along the edge.
5. Pull the bobbin threads and distribute the gathers evenly,
6. Secure the threads at the other end.
7. Sew the decorative stitches of your choice between the gathering stitches.
8. Pull out the gathering stitches.
80
Heipfut Hint
These stitches can be used m combination with others for any decoratwe effect
you desire.

Sand Stitch []
Set the Machine
F- SalJn stitch
toot
Pressure diai: I or 2
Thread tension
1 to4
\
The Stitch and Its Uses
The sand stitch fills in outlined embroidery
designs.
Here's How
t. Outline the pattern with a Satin Stitch
Set stitch width at "1.5",
Set stitch length at "0.3" or as you desire.
2. Fill in the design with the sand stitch.
3. Decrease the stttch width to fill in small
spaces.
4, Sew in rows, starting at the edge, until
the pattern _sfilled in,
81

To program stitch pattern combinations, press the pattern selection buttons
in the order shown.
Set the Machine
I to4
= Two Cycle Stitching
To sew two of any stitch pattern, press the memory button twice after
selecting the stitch pattern numbers.
NOTE: Continue to press the foot control until the machine stops
automatically.
Combine Stitch Patterns
[_ 1. Press the Auto-Lock.
F SatlnstitchfOOt
= One Cycle Stitching
_ 1. Press the Auto-Lock,
[_ 2, Press Memory.
_-_ 3, Press the stitch pattern.
$
4, Press Memory,
[_ 5. Press the Auto-Lock,
$
[_ 6, Press Memory.
See the Pattern Single Unit Chart.
You will sew one flower.
NOTE :
The Auto-Lock stitch is already programmed into the buttonhole
stitches and monograms, but not on any other stitches. You must
press Auto-Lock to lock the decorative or any other stitches.
[_ 2. Press Memory,
[_ 3, Press the stitch pattern.
[_ 4. Press Memory,
5, Press the next stitch pattern.
$
[_ 6. Press Memory.
_-_ 7. Press the stitch pattern.
[_ 8, Press Memory.
$
_] 9. Press the stitch pattern,
[_ 10. Press Memory.
11. Press the Auto+Lock.
0
$
[_ 12. Press Memory.
To repeat the same combination of stitches, just press the foot control again
after stitching the first combination.
82

= Pattern Single Units
(Aid to Programming)
OECORATIVE r STITCHES
The patterns shown in the upper cotumn are the umts of each pattern sewn when the memory
button Jstouched once.
Each buttonhole is automatically tocked at the end. "Auto-Lock" stitch is already programmed
on the buttonhole stitching but on no other stitch patterns shown here.
83

Program Decorative stitch Pa_erns []/
• To Adjust a Distorted Pattern
_ etc.
(Continued)
Feed
balance
dia!
If decorative stitch patterns are uneven when
you sew on a particular fabric, adjust them
with the feed balance dial.
0
IL
r
Compressed Patterns:
Correct by turning the feed
toward the "+" Use the
driver in your accessory box,
J
balance diat
targe screw
Drawn Out Pattern:
Correct by turning the
toward the "'-"
feed balance dial
84

Monogramming []--- FO_, []--- []
Your machine witf sew the 26 Letters of the alphabet,
the period and leave a space, plus the numbers from
0 to 9. You can program entire words and sentences.
Step
[-"x
I
I
r
1
Ln
J
Each number and letter is automatically locked at the
beginning and end so you can clip connecting threads.
OU DI 02 09 OV D5
._.L ÷i_ I_-- "¢
, ÷.-_ __-_ ÷,.L
OE
I'%.
r;
55
1I"I
"7
e-L
5E
J,:,_
E
E5
EE
&.,t_
75
..es_
The chart above shows where to clip the connecting threads and where each
pattern starts, marked by "o'"
You can program words and sentences in the same way as you program other
stitch patterns. Press the memory button after each stitch pattern selection
up to 31 selections. See example.
"IE
08 09
_6
5'I 58
I I
j_ _,.L
E'I I EH
•.'.1 T
|
85

= Reduce the Size of Numbers and Letters
7 mm
L::
t
4 mm
Here's How
t. Program the stttch pattern comb+nat+ons.
2+ Press the foot control.
3. When
4, Adjust the stitch width and fength as desired.
NOTE: Good proportions are:
5, Press the foot control again.
6. Your remain+ng letters will be smailer+
Decrease the s+ze of the numbers +n the same way.
the needle comes to point(_(see illustration) and the indicator
screen shows pattern _ , release the foot control at once.
Stitch Width -- "'4" to "'7"
Stttch Length _ "t.5'" to "2.5"
86

Wl_at,to Do Wilen;
PROBLEM PROBABLE CAUSE CORRECTION
The machine does not work. A single digit number was programmed. Two digit number must be programmed.
The machine does not work and the The area of feed dogs is filled with dust Clean the area of the feed dogs.
Pattern Indicator reads "'Er". and lint.
Irregular Stitches
Breaking Needle
Bunching of Thread
Puckering
Monograms and buttonholes are
not identical during memory sewing.
A number w_thout pattern was selected. A number in the stttch package chart must be selected.
Incorrect size needle.
Improper threading.
Loose upper thread tension.
Pulling fabric.
Light pressure on presser foot.
Loose presser foot.
Unevenly wound bobbin.
Nicks or burrs at hole of needle plate.
Pulling fabric.
Incorrect size needle.
Incorrect setting of needle.
Loose presser foot.
Upper and lower threads not drawn back
under presser foot before starting seam.
Incorrect thread tension(s).
Lfght pressure on presser foot.
Using two different sizes or kinds of thread.
Bent or blunt needle.
Loose presser foot.
Fabric too sheer or too soft,
Fabric feed }s restricted }n some way,
Choose correct size needle for thread and fabric.
Rethread machine.
Tighten upper thread tenston.
Do not pull fabric; guide it gently.
Increase pressure on presser foot.
Reset presser foot.
Rewind bobbin.
Replace needle plate, or polish off burrs completely.
Do not pull fabric; guide it gently.
Choose correct size needle for thread and fabric.
Reset needle.
Reset presser foot.
When starting a seam be sure to draw both threads under and
back of presser toot about 4" and hold until a few st_tchs are
formed.
Reset thread tension (s).
Increase pressure on presser foot.
Upper thread and bobbin thread shoutd be same size and kind.
Insert new needle,
Reset presser foot,
Use underlay of tissue paper,
Check threads for tangles.
Check feed dogs and clean, if necessary,
Be sure fabric does not pile up behind the presser foot.
See pages 65 _ 69 for buttonholing instructions,
87

What t0 DO when(c0ntinued)
PROBLEM PROBABLE CAUSE CORRECTION
Monograms and buttonholes not Machine was not allowed to complete the Hold down the foot control until the machine has
identical, last few stitches, stopped.
Incorrect size needte.
Bent or blunt needle.
Skipping Stitches
incorrect setting of needle.
Tight upper thread tension.
Light pressure on presserfoot.
Starting to stLtch too fast.
Improper threading.
Breaking Upper Thread
Breaking Bobbin Thread i Improper bobbin case threading. Check bobbin case threading,
Fabric not Moving
Machine Jamm=ng Knocking Noise Clean bobbin case and shuttle.
Buttonholes are not identical
in length and shape.
Tight upper thread tension.
Incorrect size needle.
Sharp eye in needle,
Nicks or burrs at hole of needle plate.
Lint In-bobbin case or shuttle. Clean bobbin case and shuttle,
Darning plate in place.
Light pressure on presser foot.
Thread knotted under fabric.
Push-putt clutch is disengaged.
Thread caught in shuttle.
Lint in bobbin case or shuttle,
Fabric is pulling and distorting the
automatic fabric feed.
Fabric is too thick near the seam and the
buttonholes.
Choose correct size needle for thread and fabric.
insert new needle.
Reset needle.
Loosen upper thread tension.
Increase pressure on presser foot.
Start to stitch at a medium speed.
Rethread machine.
Loosen upper thread tension.
Choose correct size needle for thread and fabric.
insert new needle.
Replace needle plate, or polish off burrs completely.
Remove darning plate.
increase pressure on presser foot,
Place both threads back under presser foot before beginning
to stitch.
Push in the clutch.
Disassemble and clean shuttle.
1. Keep the fabric from falling off the edges of the sewing
surface.
2. Bunch the fabric slightly all around the needle
(see illustration on page 67).
1. Use the B Foot in these instances.
2. Start the buttonhole so that you sew toward the edge of
the fabric.
3. Put standard writing paper {not tissue paper) under the
garment to aid fabric feed (for woven and stretch fabrics).
4. Do not use the Memory function.
Sew each button individually.
88

Replace the Light Bulb
1. Unplug the machine and open the face
cover.
CAUTION! The light bulb wilt be HOT.
Protect your fingers when
you handle it.
2. Push the bulb up and turn the bulb
counter-cLockwise to remove it.
3. Put the new bulb in by turning clock-
wise and pushing up.
==
=.
89

Clean the Bobbin Holder
To insure that your machine operates at its best, you need to keep the
essentral parts clean at atl t_mes.
The bobbin area can attract dust and lint. Your machine can become sluggish
or knock loudly if a thread is caught.
Follow these directions:
t. Turn off the power or unplug the
machine.
2. Remove the bobbin cover plate by
firmly pulling tt toward you.
3. Remove the bobbin,
9O
4. Brush or vacuum the dust and lint
out of the bobbin holder.
5, Replace the bobbin.
6. Slide on the bobbin cover plate by
pushing it into the grooves,

Clean the Hook Race and Feed Dogs
1. Unplug the machine and remove
the presser foot and needle.
2. Remove the bobbin face cover
plate.
3. Remove the screw on the left s_de
of the needle with the large screw
drwer from your accessory box.
4. Remove the needle plate.
5, Take out the bobbin. Lift up the
bobbm holder and remove it.
Use the lint brush m the accessory
box to clean the feed dogs, hook
race and bobbin holder. Also use
a soft, dry cloth.
j
7.
Line up the red marks and place
the bobbin holder so the knob fits
next to the stopper in the hook
race, as shown above.
91

Oil the Underside
Oil the Face Cover Plate
Fig. 1
1. Oil at those points indicated by short arrows tn the illustration above.
Fig. 2
1,
Tilt the machine head back.
2.
Remove the bottom covers by loosening the two screws, A and B, under
the free arm. !Fig, 1)
3,
Oil at the arrows shown in the illustration. (Fig. 2)
NOTE :
No other oiiing ts required,
92
No other oiling Is required.
DO NOT REMOVE the top cover or base cover. No customer service is
required in these areas.

PARTS LIST
1
%,
17 18 19
11
20
12
21 22
/
23
15
16
24
93

PARTS LIST (Continued)
All parts listed herein may be ordered from any Sears Roebuck
and Co. store or service center,
WHEN ORDERING REPAIR PARTS, ALWAYS GIVE THE
FOLLOWING INFORMATION:
t, PART NUMBER
2. PART DESCRIPTION
3_ MODEL NUMBER
4. NAME OF ITEM
If the parts you need are not stocked locally, your order will be
electronically transmitted to a Sears Repair Parts Distribution
Center for expedited handling.
Ref. No, Part No. Description
1
2
3
4
5
6
7
8
9
10
11
12
13
t4
15
16
17
18
19
20
2t
22
23
24
*These items are not furnished with
*20-6868
625031005
802422002
102403202
813404013
6551
6552
6553
6554
823502002
820822013
8238O1O04
822508005
822804004
820817015
823803006
822801001
820801005
822019004
822020008
*6864
6797
6830
41670
41669
*6889
802424004
823805008
Bobbin box wJth 10 bobbins
Thread spool pin
Quilter
Spool pin felt
No. t! Stretch fabric needles (BLU)
No, 11 Single needles (ORG)
No. 14 Single needles (RED)
No. 16 Single needles (PUR)
No. t8 Single needles (GRN)
Needle clamp wlth screw
Stiding buttonhofe foot
Stratght foot
Zigzag foot
Satin stitch foot
Blind stitch hem foot
Zipper foot
Overedge toot
Transparent buttonhole foot
Small spool holder
Large spool holder
Needle threader
Light bulb
Buttonhole opener
Large screw driver
Small screw driver
Oil and lint brush
L_nt brush
Darning plate
the machine, but may be ordered per
instructions above.
94

INDEX
A
Accessories ......... 6
Alphabet & numbers ........ 85, 86
Appliqueing ....................... 74
"Auto-Lock" button ............. 5, 34
Base ............................ 5
Basting ......... 37, 44, 45
Blind hemming ........... 44, 47, 71
Blind stitch hem foot .... 12, 15, 45, 47
Bobbin ............ 6, 18_21
Bobbin cover plate .............. 5, 90
Bobbin thread ................ 25
Bobbin winding ............... 19, 20
Buttonhole ............ 44, 46, 65_69
Buttonhole foot, sliding ...... 46, 65
Buttonhole foot, transparent ..... 46, 65
Button sewing ................ 39, 44
C
Cleaning bobbin holder, hook race .... 90, 91
Clear button ....................... 31
Cross stitchfng ............... 44, 48, 79
Cut-out work ................ 44, 47, 74
D
Darmng ................. 38, 44
Darning plate ........... 6, 37, 38, 39
Decorative stitching ....... 44, 48, 78
Distorted pattern ........... 84
E
Etastic casings ........... 44, 48, 77
Extensron table ........ 10
Fabric, needte, thread and
stitch length chart ............ 17
Face cover plate o . 5
Fagoting .................. 44, 48, 76
Feather stitching ..... 48, 75
Feed balance dial . . . 6, 8, 68
Foot control .................. 6, 8
Foot holder ........ 22
Foot storage compartment .... 12
Free arm sewing . . . !0, tt
G
Gathering .............. 55
H
Hand wheel ................ 5
K
Knit stitching ................... 64
L
Light and power switch ........... 7
Light bulb ....................... 89
M
Memory button ................. 31
Monogramming .................... 86
Multtpte zigzag stitching .... 46, 62
N
Needle ............. 16, 17
Needle clamp ......... 17
Needle plate ................ 5, 35
Needle posmon ............... 32
Needle, thread and fabric chart ....... 17
O
Oiling .................... 92
Outline stretch stitching ............. 45, 56
Overedge foot ................... 13
Overedge seam .................. 46, 63
Parts list .................... 93, 94
Pattern indicator screen .......... 30
Pattern memory ................ 3t
Pattern reduction ............... 86
Pattern selection ................. 29_31
Pattern seiectton button ............. 5, 28
Performance problems ......... 87, 88
Pintucking .............. 45, 53
Plug connector ................ 7
Portable case .................. 4
Power switch ................... 7
Presser foot .............. 12_15
Presser foot lever .............. 6, 9
Pressure control dial .............. 5, 8
Program sewing .............. 82, 83
95

INDEX (Continued)
Q
Quilter ........................ . . - t4
Quilting .................... 54
R
Replacing bobbin holder ....... , , 91
Reverse stitch button ............. 5, 34
Saddle stitching ............. 45, 58
Sand stitching ................... 81
Satin stitch foot ................. 14
Satin stitching ................. 60
Scaltop stitching ............... 73
Seam guides .................... 35
Sewing functions chart .............. 44
Sewing light ................... 5, 7
Sewing on heavy fabrics ....... 36
Shell stttchmg .............. - - 47, 72
Smocking stretchstttching - _ , .., - . . 48, 80
Spool holder ............... 5, 18
Spool pins .................... 6, 18
Stitch length adjustment ....... 32, 33
Stitch length/width indicator .... 28, 32, 33
Stftch length/width control
buttons ............. 28, 32, 33
Stttch pattern chart ............... 45"49
Stitch width adjustment ........... 32
Straight stitching ........... 45, 50_55
Straight stitch button ......... 28, 31
Stratght stretch stitching ....... 45, 57
Stretch stitching ........ 44, 56"58.63, 64
72_77, 80, 81
T
Thread guide .................. 6, 24
Thread tensions .............. 26, 27
Thread tension dial ................ 5, 26
Top cover ...................... 5
Topst_tching ................. 51,52
Top thread ................. 24"-26
Turning a square corner ...... , ....... 35
U
Up & down needle posltion button ..... 5, 29
Z
Zigzag foot ................... 13
Zigzag stitch button ............ 28, 31
Zigzag stitching ............. 46, 59_64
Zigzag overcasting ................. 6!
Zipper application ........ . . . 40442
96

WARRANTY
FULL 25-YEAR WARRANTY ON SEWING MACHINE HEAD
For 25 years from the date of purchase, Sears wi{l, free of charge, repair defects _n material or workmanship which
appear Jn the sewing machine head.
FULL TWO YEAR WARRANTY ON ELECTRICAL EQUIPMENT OF SEWING MACHINE
For two years from the date of purchase, Sears will, free of charge, repair defects in materia_ or workmanship which
appear in the electrical and electromc equIpment of the sewing machine, including motor, wiring, switch and speed contro_
_) and printed circuit boards.
FULL 90-DAY WARRANTY ON ALL PARTS AND MECHANICAL ADJUSTMENTS
For 90 days from the date of purchase, Sears will, free of charge, replace any parts and provide mechanical service
necessary for proper operation of the sewing machine, except for normal maintenance.
To obtain warranty service described above, SIMPLY CONTACT THE NEAREST SEARS STORE OR SE RV ICE CENTER iN
THE UNITED STATES. This warranty applies only wh_ie this product is in use in the United States,
# #
_1 This warranty gives you specific legal rights, and you may also have other rights which vary from state to state. {i
_) SEARS, ROEBUCK AND CO., Dept. 698/731A, Sears Tower, Chicago, IL 60684
 Loading...