

Kenmore 38519150090 Owner’s Manual
OWNER'S MANUAL
SEWING MACHINE
IMPORTANT SAFETY
INSTRUCTIONS
Your sewing machine is designed and constructed only for HOUSEHOLD use.
Read all instruct=on before using this sewing machine,
DA NGER- Toreduce the risk of electric shock:
1. An appliance should never be left unattended when plugged in. Always
unplug this appliance from the electric outlet immediately after using
and before cteamng.
2_ Always unplug before relampmg. Replace bulb with same type rated
13,2 V d.c., 3 Watts.
3, Do not reach for the appliance that has fallen into water. Unplug
immediately.
4. Do not place or store appliance where it can fall or be pulled into a tub
or sink, Do not place {n or drop into water or other liquid.
WAR NiNG- Toreducether,skofburns, fire, electric shock,
or injury to persons.
I. Do not allow to be used as a toy. Close attention is necessary when this
appliance ts used by or near children,
2. Use this appliance only for its intended use as described m this manual.
Use only attachments recommended by the manufacturer as contained in
this manual.
Never operate this appliance if _t has a damaged cord or plug, if it is not
working properly, if it has been dropped or damaged, or dropped into
,water. Return the appliance to the nearest authorized dealer or service
center for examination, repair, electrical or mechanical adjustment.
4. Never operate the appliance with any air opening blocked. Keep
ventilation openings of the sewing machine and foot controller free from
accumulation of lint, dust, and loose cloth.
5. Never drop or insert any object into any opening.
6. Do not use outdoors.
7. Do not operate where aerosol (spray) products are being used or where
oxygen is being administered.
8. To disconnect, turn all controls to the off ('O"} position, then remove
plug from outlet.
9. Do not unplug by pulling on cord. To unplug, grasp the plug, not the
cord.
10, Keep fingers away from all moving parts. Special care is required
around the sewing machine needle.
1t. Always use the proper needle plate. The wrong plate can cause the
needle to break.
12,
Do not use bent needles.
13.
Do not pull or push fabric while stitching.
tt may deflect the needle causing it to break.
14,
Switch the sewing machine off ('O') when making any adjustment in
the needle area, such as threading needle, changing needle, threading
bobbin, or changing presser foot, and the like.
15.
Atways unplug the sewing machine from the electrical outlet when
removing covers, lubricating, or when making any other adjustments
mentioned in the instruction manual.
SAVE THESE INSTRUCTIONS
IMPORTANT
Be sure to keep machine away heat sources, humidity, and direct
sunlight,
SEARS, ROEBUCK AND CO.
Dear Customer:
You have just invested in a very fine zigzag sewing machine. Before using your new Kenmore machine,
please pause for a moment and carefully read this booklet which contains instructions on how to operate
and care for your machine.
Specific instructions are given on threading, tension adjustments, cleaning, oiling, etc. This will help you
obtain the best sewing results and avoid unnecessary servlce expense for conditions beyond our control.
Advice on the operation and care of your machine is always available at your nearest Sears Retail Store.
Piease remember, if you have questions about your machine or need parts and service, always mention
the model number and serial number when you inquire.
Kenmore Sewing Machine
Record in space provided below the model number and seriaf
number of this appliance. The modei number and serial number
are located on the nomenclature plate, as identified on Page 6 of
this booklet.
Model No. 385. Serial No.
Retain these numbers for future reference.
THIS MODEL IS A CENTER NEEDLE, LOW BAR SEWING MACHINE.
SECTION
SECTION
KNOW YOUR MACHINE
A Portable Case or Cabinet is Available ....... 4
Locate and Identify the Parts .............. 5_6
Identify the Accessories ................... 6
PREPARE YOUR MACHINE FOR SEWING
2.
Set Up the Machine .................. 7_11
• Plug m the Machine and Switch on the Power . . 7
Set the Foot Control ................. 8
• Check the Feed Balance Dial ............ B
• Set the Pressure Adjusting Lever ........... 8
• Adjust the Presser Foot Lever .... 9
• Thread Cutter .............. 9
o Accessory Storage Box .... 10
• Free-Arm Sewing: the Removabte
Extension Tabfe ................ 1O--11
Know What the Presser Feet Will Do . t 2_I5
• Foot Storage Compartment ........ 12
, Presser FootTypes ............... 13_15
A. Zigzag Foot ................ 13
C, Overedge Foot .................. 13
D, Quilter ..... 13
E. Zipper Foot ................ 13
F Satin Stitch Foot ................ 13
G, Blind Hem Stitch Foot ......... 14
H, Stratght Stitch Foot .............. 14
J. Sliding Buttonhole Foot ........ 14
N, Automatic Buttonhole Foot ............ 14
• Cheek the Presser Foot ................ 15
Change the Presser Foot .............. 15
Choose the Needle and Thread ............ 16_17
, Check the Needle .................. 16
• Fabric, Needle, Thread and Stitch Length Chart .... 17
• To Change the Needle ................. 17
Prepare the Bobbin ..................... 18_20
o To Remove the Bobbin from the Machine ........ 18
• Horizontal Spool Pin ............... 18
Additional Spool Pin ................... 18
o Wind the Bobbin ..................... 19
• Insert the Bobbin into the Bobbin Holder ...... 20
Prepare the Top Thread ................... 21_24
Thread the Needle ................... 21
• Pick Up the Bobbin Thread .............. 22
• Adjust the Top Thread Tension ............ 23_24
SECTION 3.
SECTION 4.
SECTION 5.
For Straight Stitch .................. 23
For Zigzag Stitch .................... 24
LEARN TO USE THE CONTROLS
Main Function of Buttons ............... .... 25
• Reverse Stitch Button ................. 25
• Auto-Lock Button .................... 25
Up/Down Needle Position Button ............... 25
Control Panel .................... -- 26
Display Sharpness Adjusting Knob ............ 26
, Mode Button ............................ 27
- Pattern Selection Buttons ................... 27
• Direct Entry Stitch Buttons ................ 27
• Memory Button ........................ 28
J Mirror Image Button ................... 28
• Clear Button .................. 28
• Twin Needle Button .................... 29
o Editing Button ....................... 29
• Stitch Width Control Button ............ 29
o Stitch Length Control Button .............. 29
Message Button .................... 30
PRACTICE COMMON STITCHING SKILLS
Use the Seam Guides .................... 31
Turn a Square Corner ................... 31
Sewing on Heavy Fabrics ................... 32
Dropping the Feed Dogs ................ 32
Basting [] ......................... 33
Darning [] ...................... 34
Sew a Button .......................... 35
Put in a Zipper .................... 36 _ 38
LEARN THE STITCHES
Chart of Sewing Functions ................. 39
Stitch Pattern Chart ..................... 40_46
Straight Stitches [] _ _], [] and [] .... 47_56
• Straight Stitch ................. ....... 47
Topstitching ..................... 48
• Position the Needle for Topstitching ......... 49
Pintucking ............................ 50
• Quilting ............................ 51
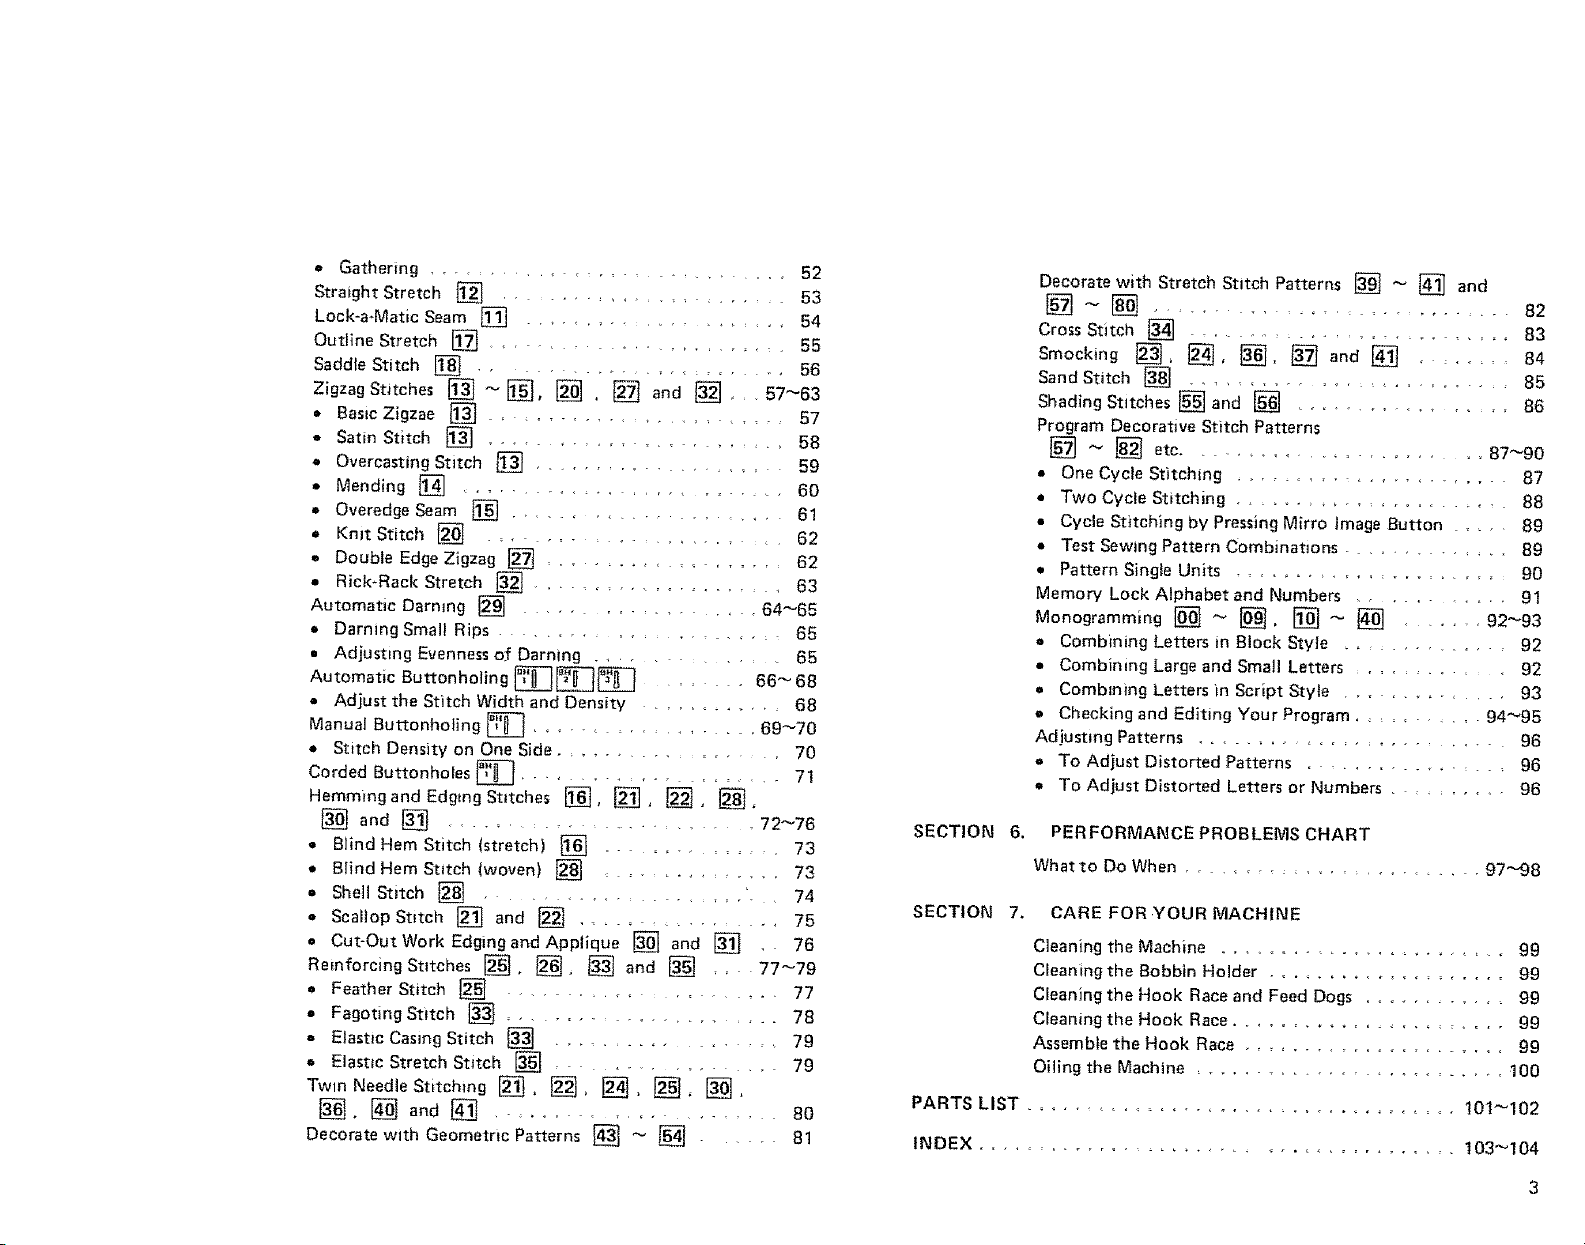
• Gathering...................... 52
StraightStretch[] ..................... 53
Lock-a-MaticSeam[] .................... 54
OutlineStretch[] ..................... 55
SaddleStitch[] ....................... 56
ZigzagStitches[] _[], [] , [] and_], 57_63
• Basic Zigzae _ .................. 57
• Satin Stitch _] ..................... 58
a Overcasting Stitch [] .................. 59
• Mending [] ..................... 60
• OveredgeSeam [] ................... 61
• KnitStitch [_ ................... 62
e Double Edge Zigzag [] ................... 62
• Rick-RackStretch [] ................... 63
Automatic Darning [] ............... 64_65
• Darning Small Rips ................... 65
• Adjusting Evenness of Darmng ........... 65
Automatic Buttonholing _ _ .... 66_68
• Adjust the Stitch Width and Density .......... 68
Manual Buttonholing _] ................ 69_70
• Stitch Density on One Side ................. 70
Corded Buttonholes _ ................... 71
Hemmmg andEdgmgSt,tches [], [], [_, [],
[] and [] ..................... 72_76
• Blind Hem Stitch (stretch) [] ......... 73
• Blind Hem Stitch (woven) [] ............. 73
• Shell Stitch [] ................ '- . 74
• Scallop Stitch _ and _ ............ 75
• Cut-Out Work Edging and Applique [] and [] , 76
RmnformngSt_tches _. _, _ and _] _, 77_79
• Feather Stitch [] ................. 77
• Fagoting Stitch [] .................... 78
a Elastic Casing Stitch [] ............. 79
Elastic Stretch Stitch [_ ............. 79
Tw,n Needle Stitching [], [2-2], _, _, _,
[] and[] ................ 8O
Decorate with Geometric Patterns _ _ [] .... 81
Decorate with Stretch Stitch Patterns _ _ [] and
Cross Stitch [] ......................... 83
Smocking ond[] ...... 84
Sand Stitch [] ......................... 85
Shading Stitches [] and [] ................ 8_
Program Decorative Stitch Patterns
[] _ [] ere .................... B7--9C
• One Cycle Stitching .................... 87
• Two Cycle Stitching ...................... 8E
• Cycle Stitching by Pressing Mirro Image Button 8£
• Test Sewing Pattern Combinations ........... 8_
• Pattern Single Units ...................... 90
Memory Lock Alphabet and Numbers .......... 91
Mooogremm ng[]~ [] [] ...... e2-93
• Combining Letters in Block Style ............. 92
• Combining Large and Small Letters ........... 92
• Combining Letters _n Script Style ............. 93
Checking and Editing Your Program ....... g4_95
Adjusting Patterns .................... 96
To Adjust Distorted Patterns .............. 96
e To Adjust Distorted Letters or Numbers ...... 96
SECTION 6. PERFORMANCE PROBLEMS CHART
What to Do When .................. 97_98
SECTION 7. CARE FOR ,YOUR MACHINE
Cleaning the Machine ....................... 99
CEeaning the Bobbin Holder .................... 99
Cleaning the Hook Race and Feed Dogs ........... 99
Cleaning the Hook Race ........................ 99
Assemble the Hook Race ...................... 99
Oiling the Machine ....................... 100
PARTS LIST .................................... 10t_I02
INDEX ..................................... 103_104
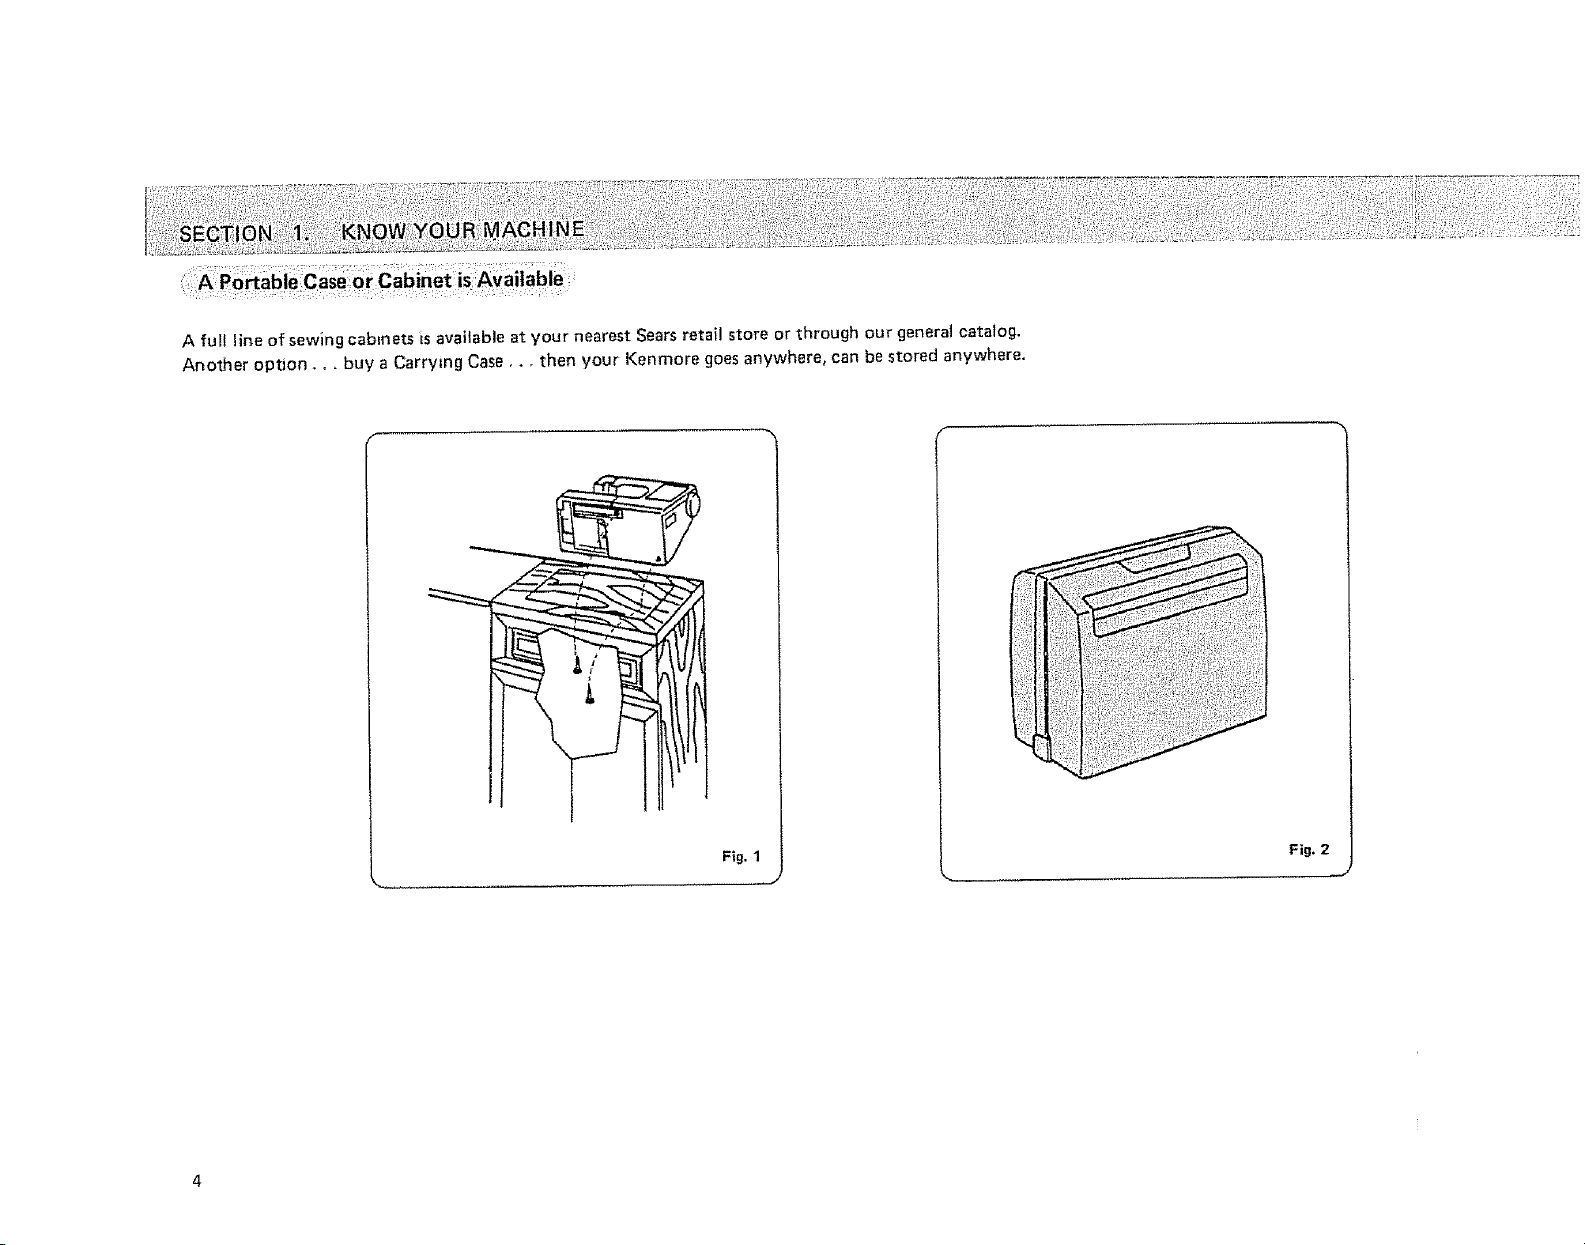
AfulllineofsewingcabEnetsisavailableatyournearestSearsretailstoreorthroughourgeneralcatalog.
Anotheroption..,buyaCarryingCase,,•thenyourKenmoregoesanywhere,canbestoredanywhere.
Fig. 1
Fig. 2
.J
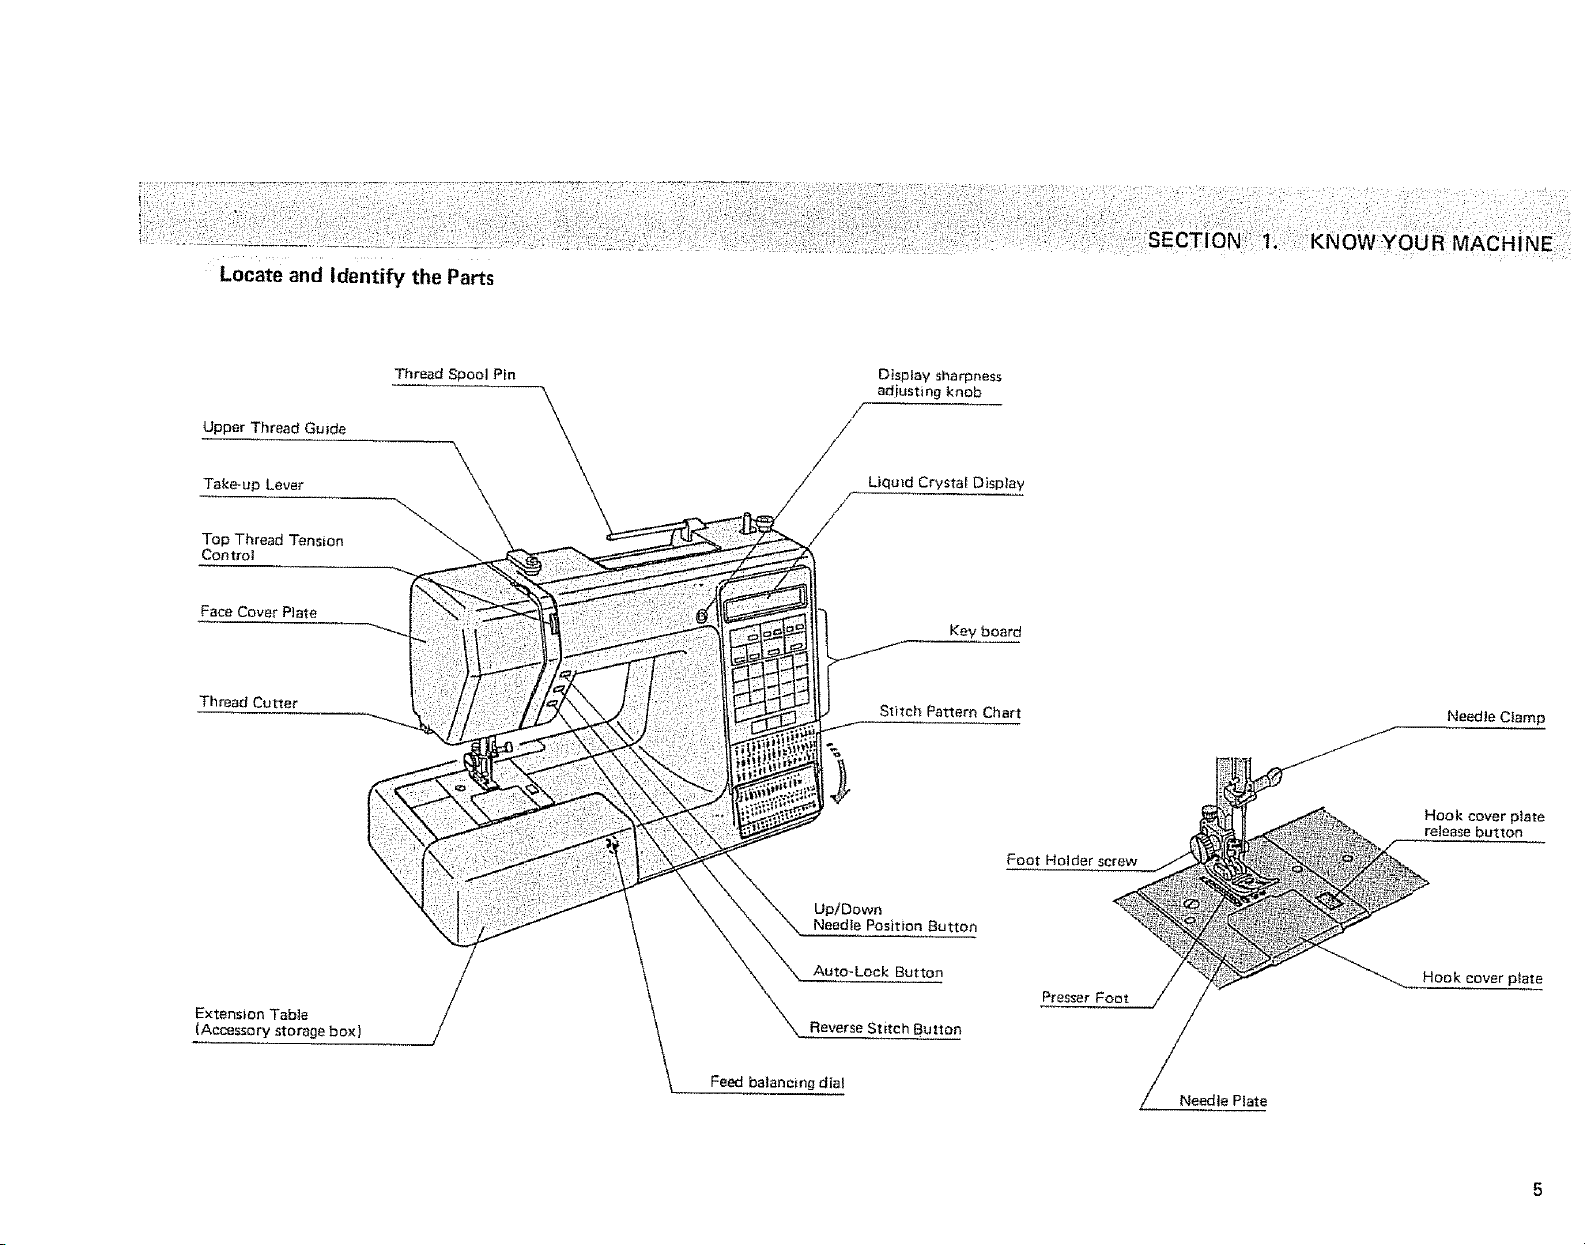
Locate and Identify the Parts
;SECTION KNOW YOt
Upper Th read Gu ide
Take-up Lever
Top Thread Tension
Control
Face Cover Plate
Thread Cotter
Extension Table
{Acc'esso ry storage b ox)
Thread Spool Pin
J
\
\
\
Display sharpness
adiosting knob
/
/
Liquid Crystal Display
f
_St_t Key board
ch Pattern Chart
Needle Position Button
Auto-Lock Button
Reverse Stitch Button
Needle Clamp
_ Hook cover plate
release button
Foot Holder screw
_ cover p_ate
Presser Foot J
Feed balancing dial
Needle Plate

Locate and Identify the Parts (Continued)
Carrying Handle
Bobbin winder spmdfe
Bobbin w_ nder stopper
Hand Wheel
Light and Power Switch
Machine sockets
Bobbin
Hole for additional
spoo] pin
Large spool holder
\
Nomenclature Plate
Foot Control
Prasser Foot Lever
\
Large screw dr_ver
Small screw driver
Free Arm
Drop teed lever
Additional spool pin
__Lint brush
Small spool hoider
Power supply cord,,,/
Quilter
Twin needle
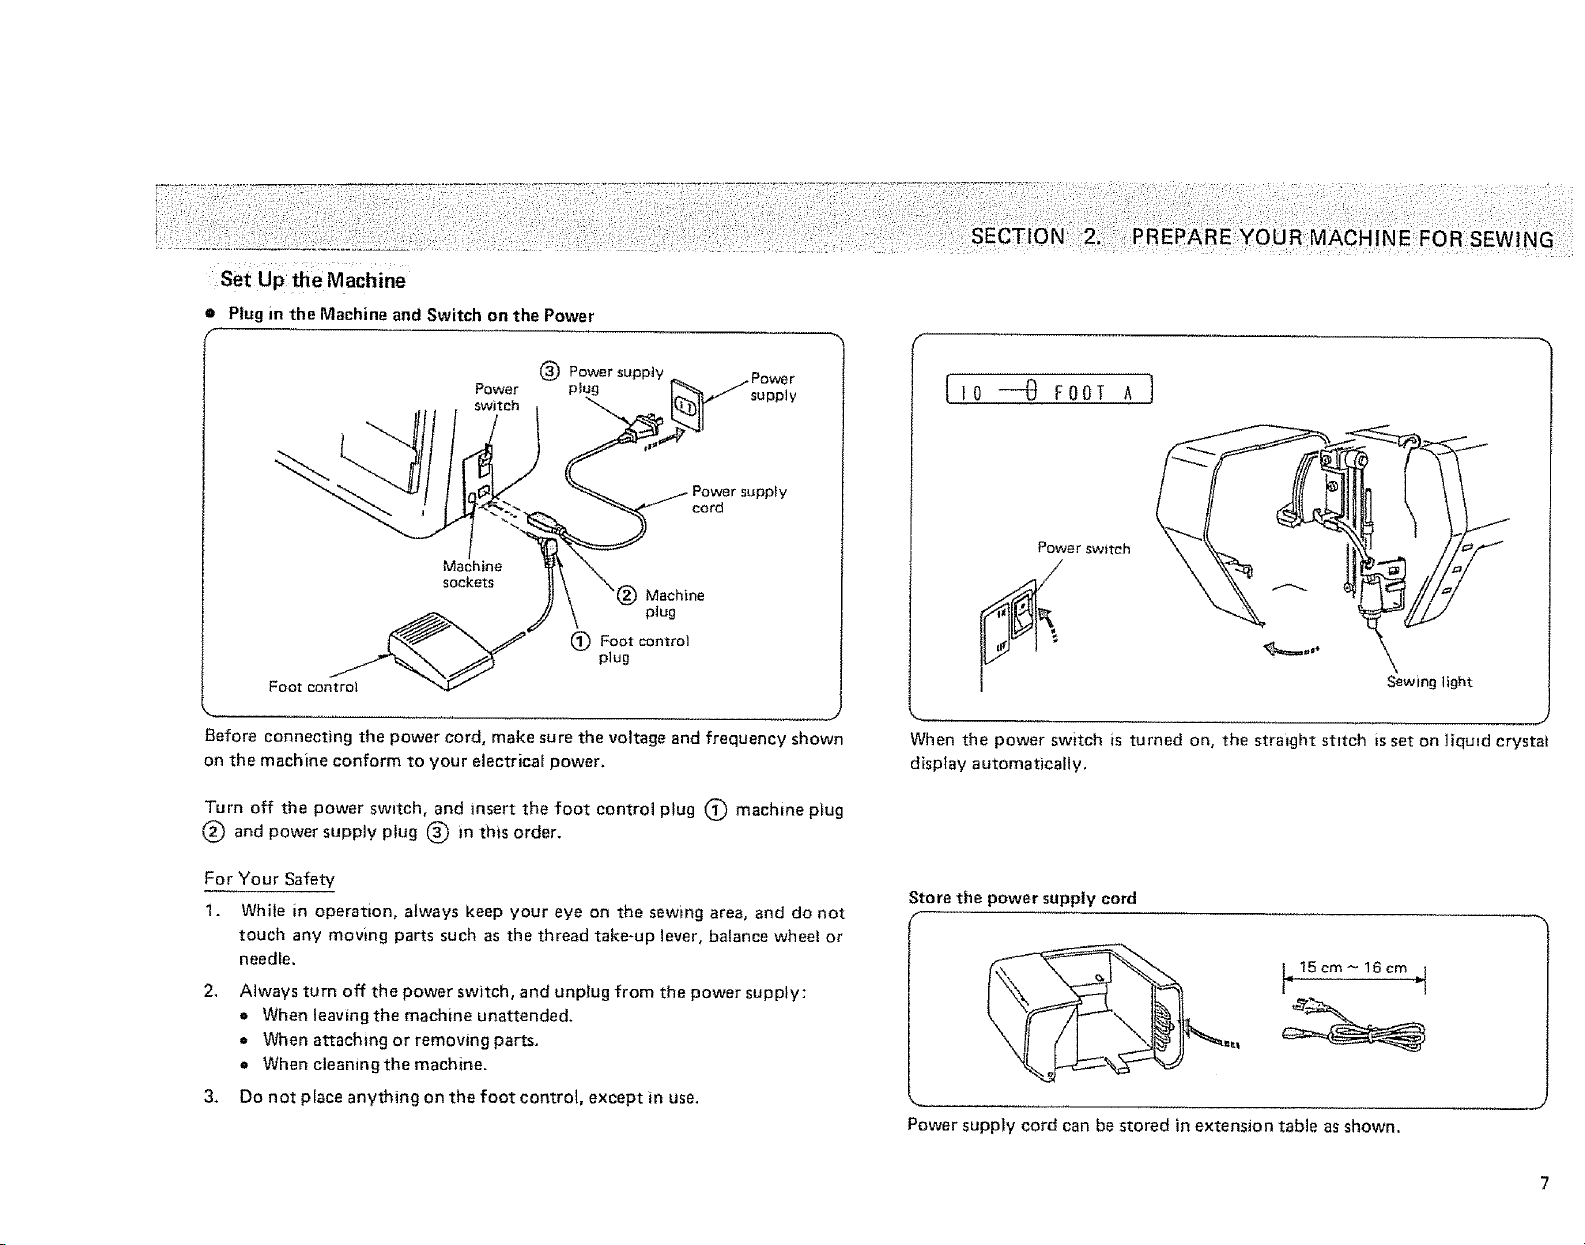
Set Up the Machine
e Plug in the Machine and Switch on the Power
ACHINEF(
Power
switch
Machine
sockets
Foot control
Before connecting the power cord, make sure the voltage and frequency shown
on the machine conform to your electrica_ power.
Turn off the power switch, and insert the foot control plug (_ machine plug
(_ and power supply plug (_) in thts order.
For Your Safetv
1. While in operatLon, always keep your eye on the sewing area, and do not
touch any moving parts such as the thread take-up lever, balance wheel or
needle.
2, Always turn off the power switch, and unplug from the power supply:
• When leaving the machine unattended.
When attaching or removing parts.
• When cleaningthe machine.
3. Do not place anything on the foot control, except in use.
(_ Power supply
I_) Foot control
plug
Machine
plug
cord
supply
ppfy
[ 0-4 Foot^)
Power switch
f,
Sewing light
When the power switch is turned on, the straight stitch is set on liquid crystal
display automatically.
Store the power supply cord
L 15cm_ 16cm =i
Power supply cord can be stored in extension table as shown,
I
:SetUp the Machine (Continued)
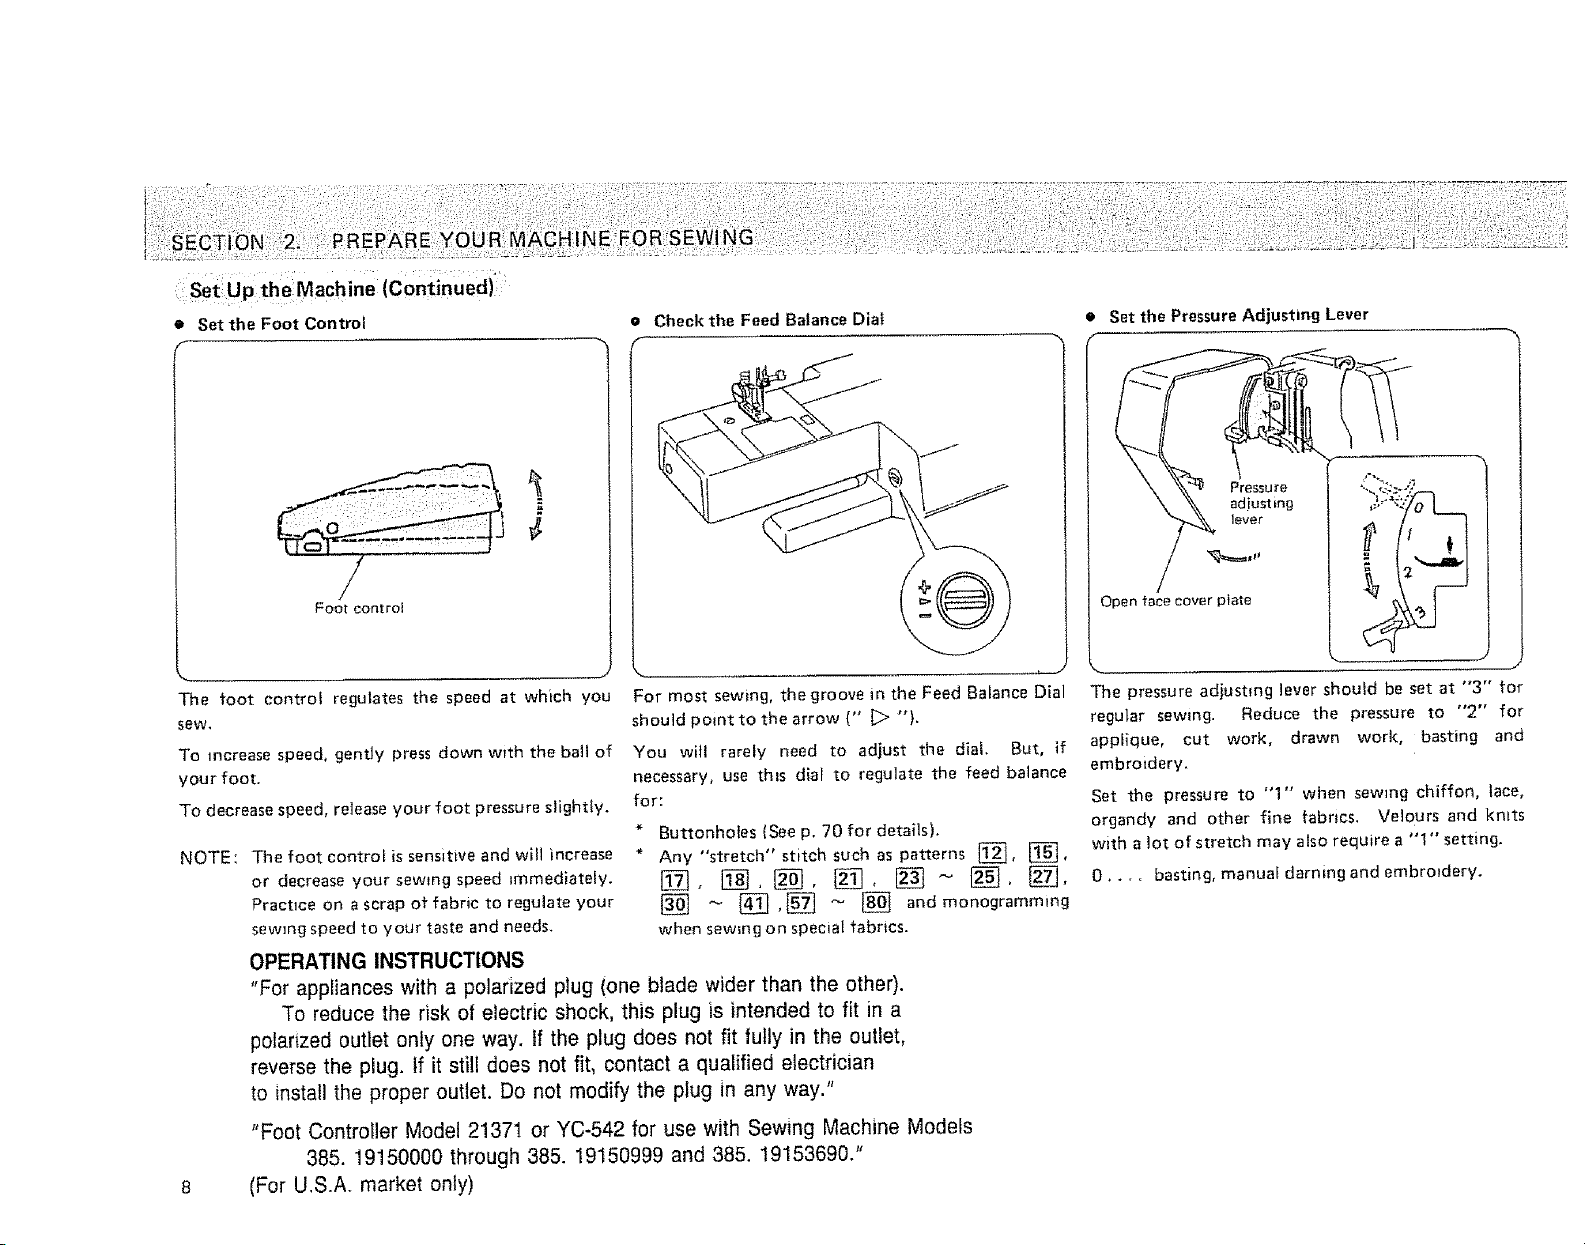
• Set the Foot Control
e Check the Feed Balance Dial
f
• Set the Pressure Adjusting Lever
Pressu re
adjustin#
lever
Foot control
The foot controi regutates the speed at which you
Sew.
"To increase speed, gently press down with the bail of
your foot.
To decrease speed, release your foot pressure slightly.
NOTE:
The foot control is sensitive and will increase
or decrease your sewing speed immediately.
Practice on a scrap of fabric to regulate your
sewing speed to your taste and needs.
OPERATING INSTRUCTIONS
"For appliances with a polarized plug (one blade wider than the other).
To reduce the risk of electric shock, this plug is intended to fit in a
polarized outlet only one way. If the plug does not fit fully in the outlet,
reverse the plug. If it still does not fit, contact a qualified electrician
to install the proper outlet. Do not modify the plug in any way."
"Foot Controller Model 21371 or YC-542 for use with Sewing Machine Models
385. 19150000 through 385. 19150999 and 385. 19153690."
(For U.S.A. market only)
For most sewing, thegroove in the Feed Balance Dial
should point to the arrow (" _ ").
You wifl rarely need to adjust the dial. But, if
necessary, use this dial to regulate the feed balance
for:
Buttonholes (See p. 70 for details).
Any "stretch" stitch such as patterns _[_, [],
[] _ _ ,[_ _ [_ and monogramm,ng
when sew_ng on special fabrtcs.
Open race cover plate
The pressure adjusting lever should be set at "3" for
regular sewing. Reduce the pressure to "2" for
applique, cut work, drawn work, basting and
embroidery.
Set the pressure to "1" when sewing chiffon, lace,
organdy and other fine fabrics. Velours and knits
with a lot of stretch may also require a "1" setting.
0 .... basting, manual darning and embroidery.
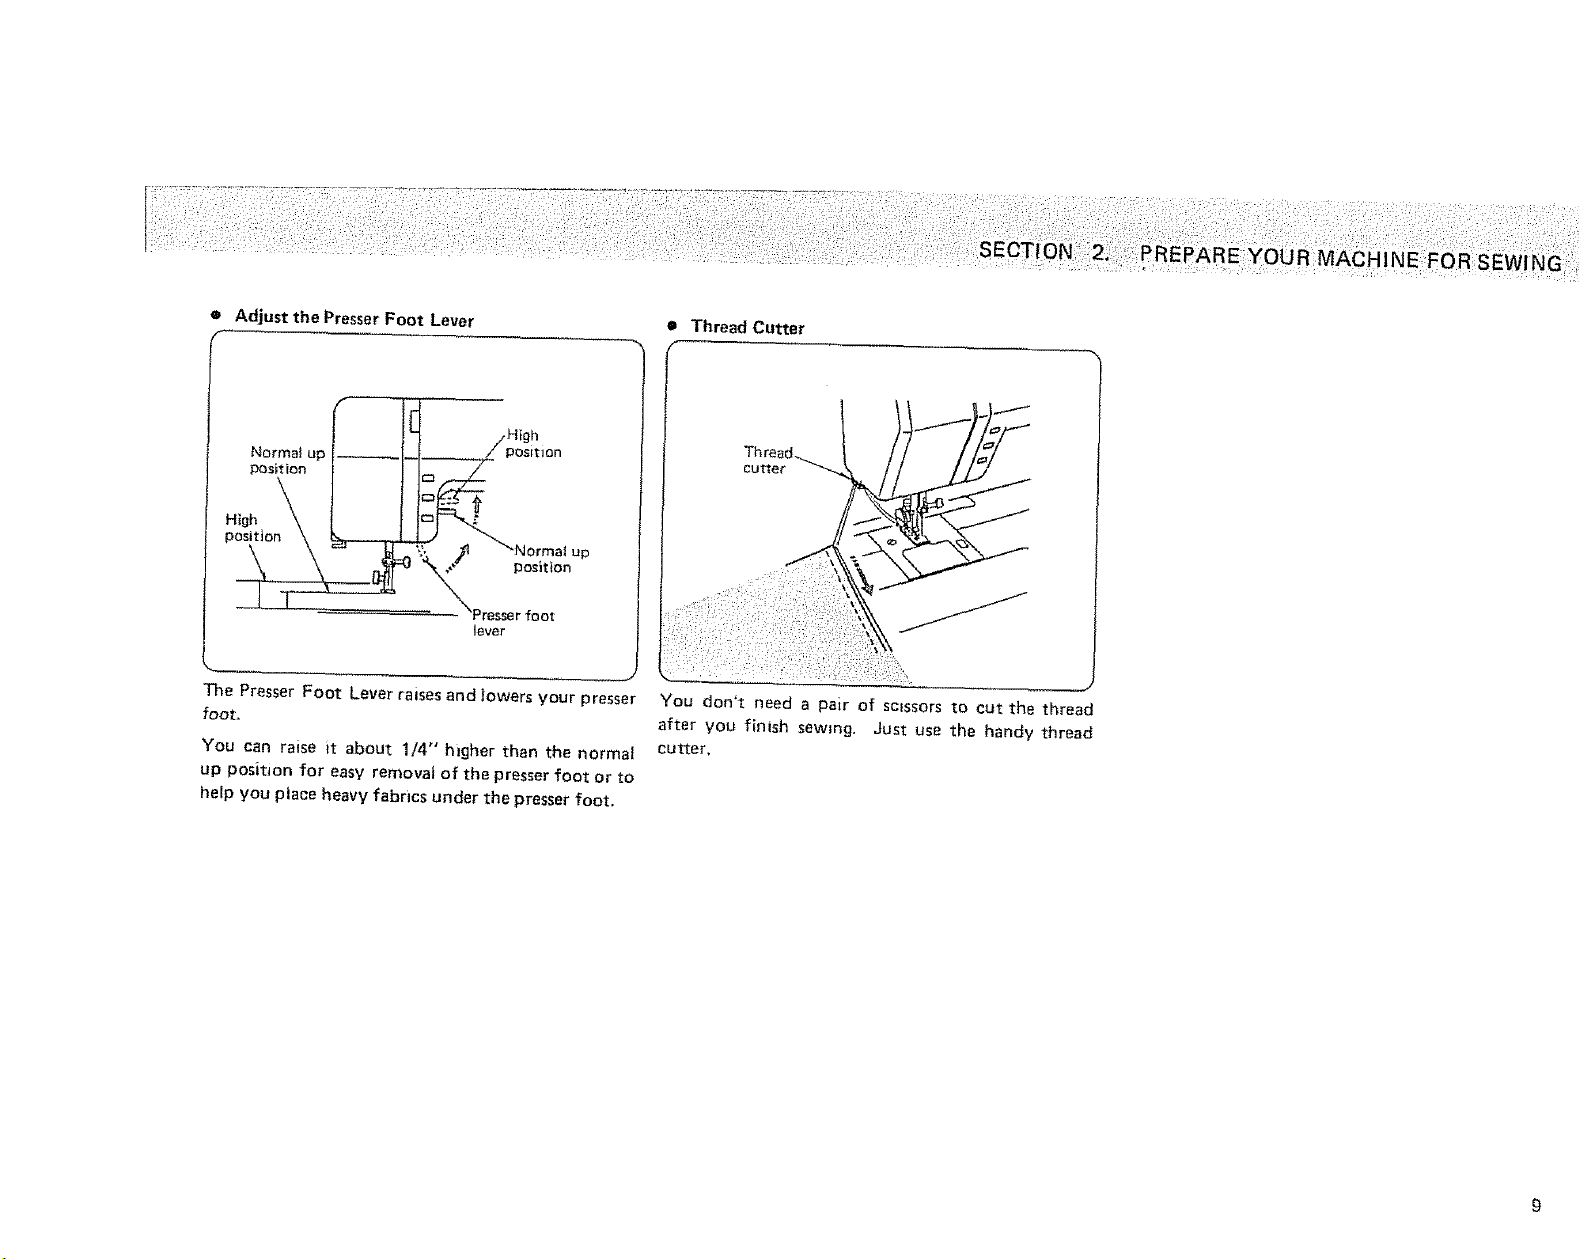
• Adjust the Presser Foot Lever
RE YOURMACHINE FOR SEWING
posit_on
position
:OOt
lever
The Presser Foot Lever ra+ses and lowers your presser
foot+
You can raise it about 1/4" h}gher than the normal
up posit+on for easy removal of the presser foot or to
help you place heavy fabr+cs under the presser foot,
You don't need a pair of smssors to cut the thread
after you finish sewing, Just use the handy thread
cutter,
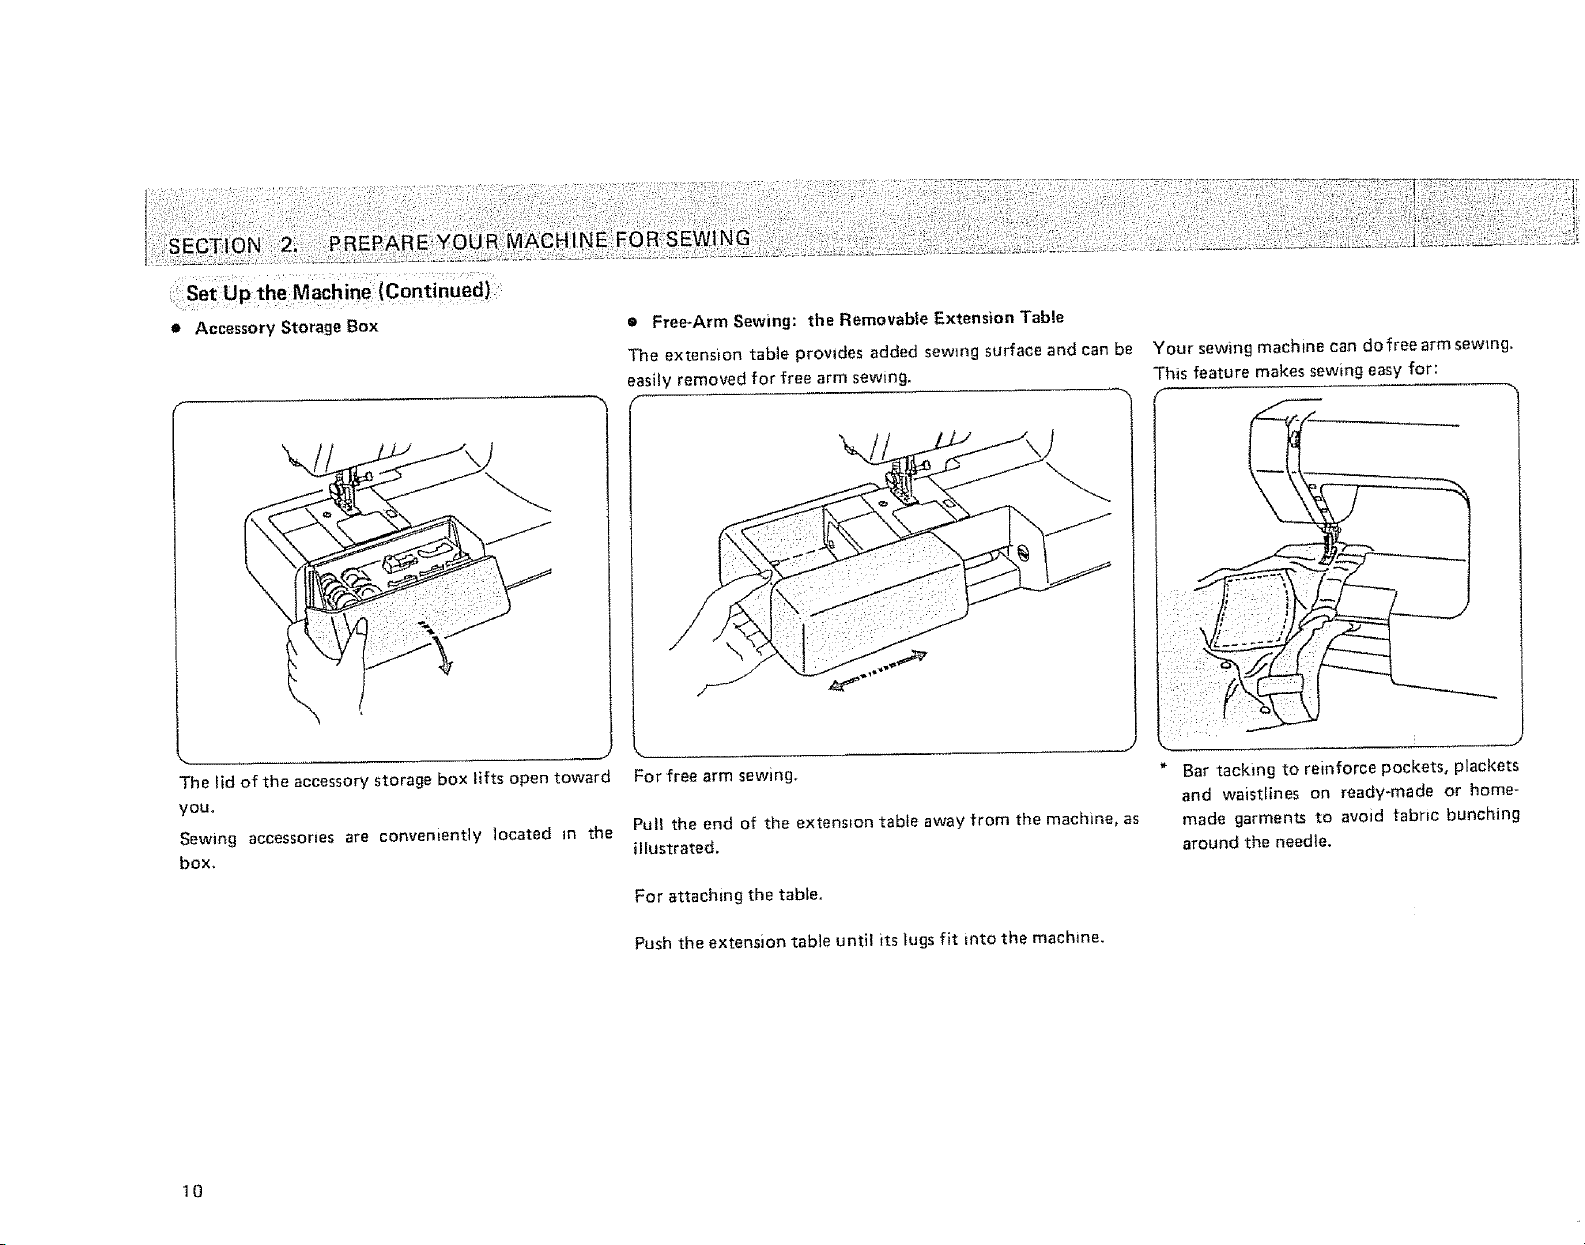
e Accessory Storage Box
• Free-Arm Sewing: the Removab|e Extension Table
The extenston table provides added sewing surface and can be
easily removed for free arm sewing.
Your sewing machine can dofree arm sewtng.
This feature makes sewing easy for:
\
The iid of the accessory storage box lifts open toward
you.
Sewing accessones are conveniently located in the
box.
\
For free arm sewing,
Pull the end of the extension table away from the machine, as
illustrated,
For attaching the table.
Push the extension table until its lugs fit into the machine.
Bar tacking to reinforce pockets, plackets
and wabttines on ready-made or home-
made garments to avoid fabric bunching
around the needle,
10
::8
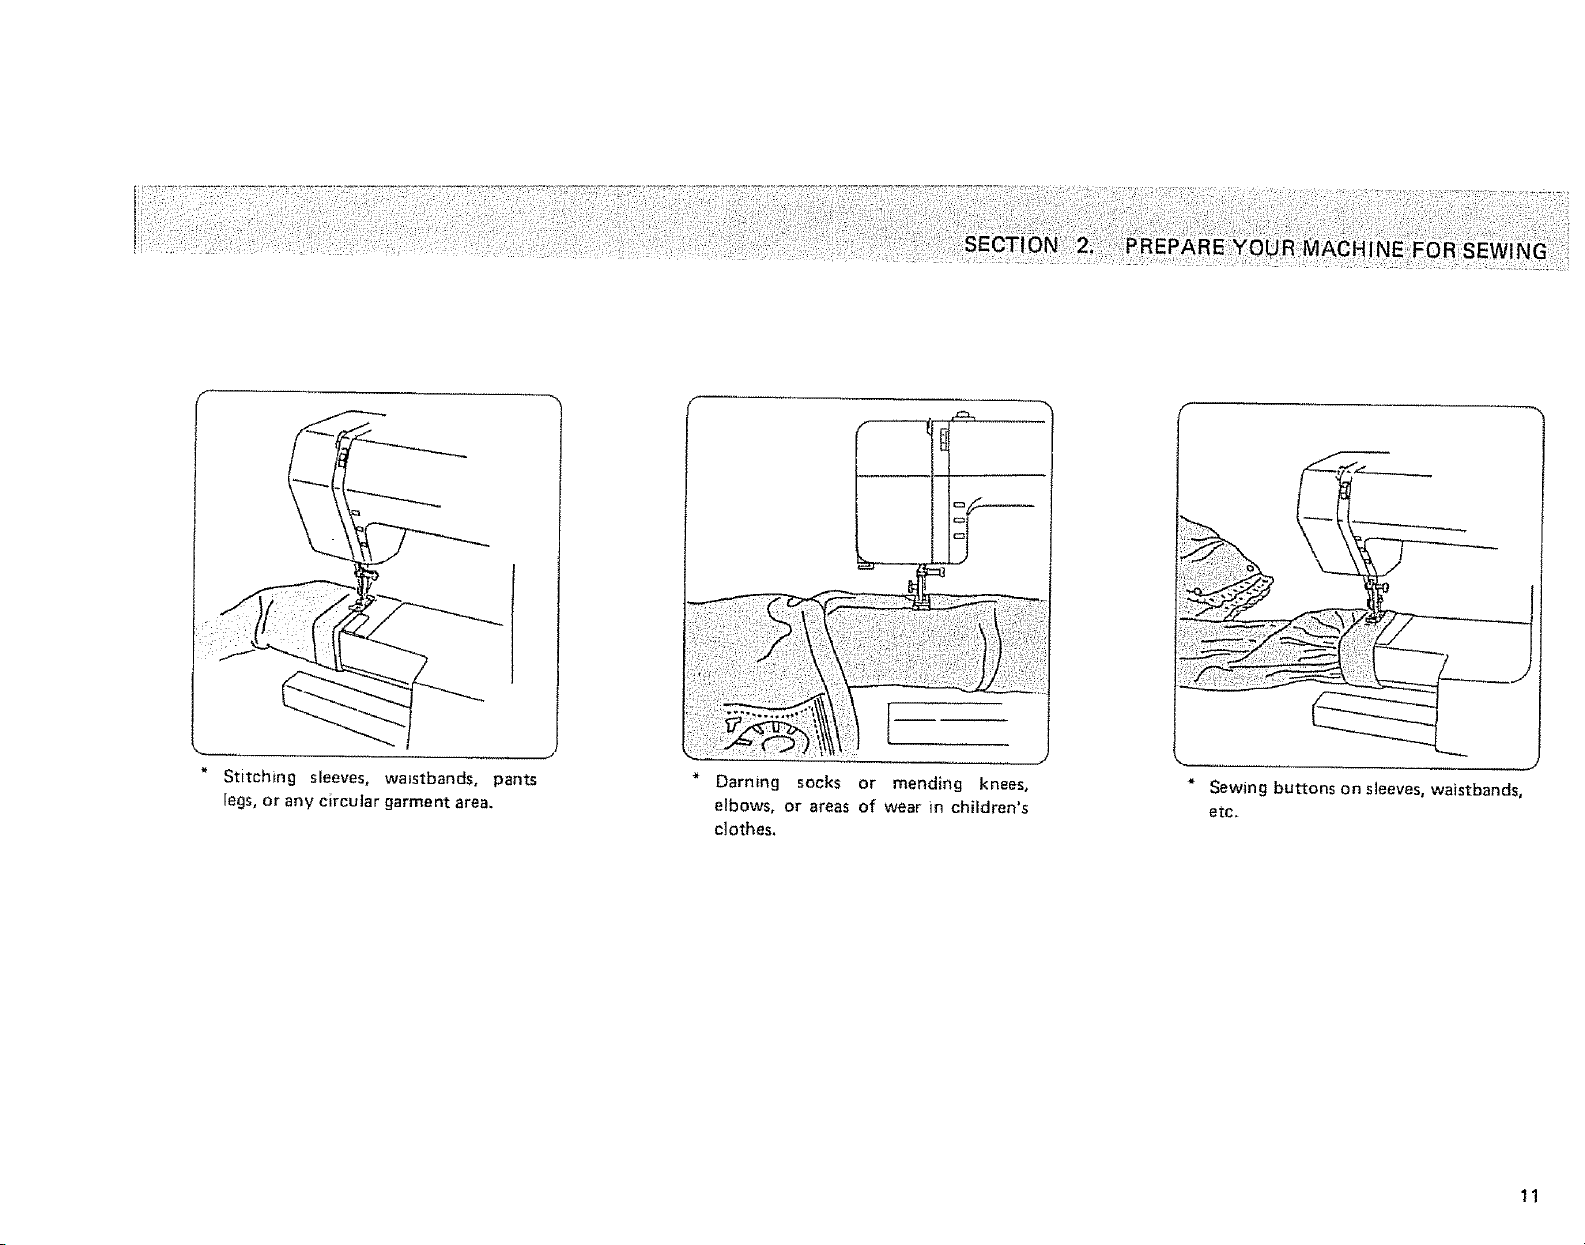
Stitching sfeeves, waistbands, pants
legs, or any circular garment area.
Darning socks or mending knees,
elbows, or areas of wear in children's
clothes,
* Sewing buttons on sJeeves, waistbands,
etc.
11
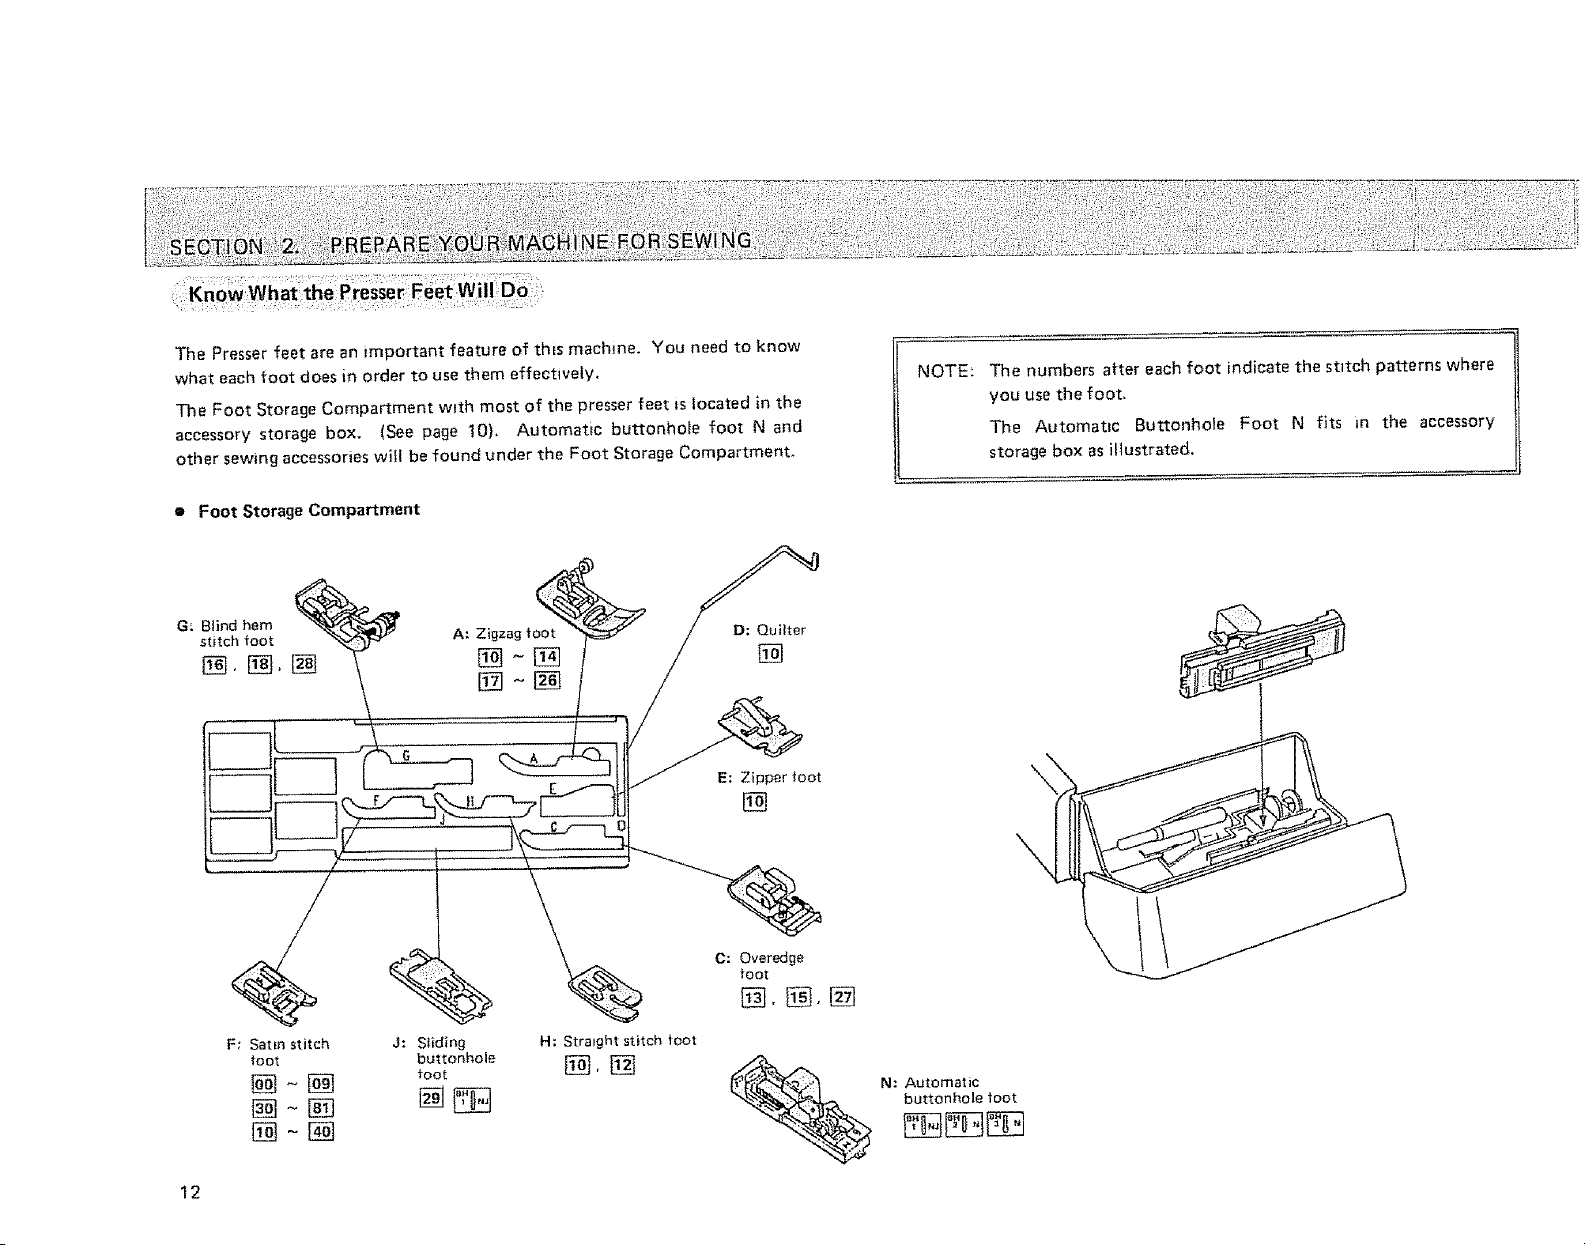
The Presser feet are an important feature of this machine. You need to know
what each foot does in order to use them effective|%
The Foot Storage Compartment with most of the presser feet is located in the
accessory storage box. (See page 10), Automatic buttonhole foot N and
other sewing accessories wifl be found under the Foot Storage Compartment,
e Foot Storage Compartment
NOTE: The numbers after each foot indicate the stitch patterns where
you use the foot,
The Automatic Buttonhole Foot N fits in the accessory
storage box as il]ustrated.
G: Blind hem
_t_tch foot
F: Sat=n stitch
toot
12
J: Sliding
buttonhole
foot
H: Straight stitch foot
D: Quilter
[]
E: Zipper foot
C: Overedge
foot
\
N: Automatic
buttonhole foot
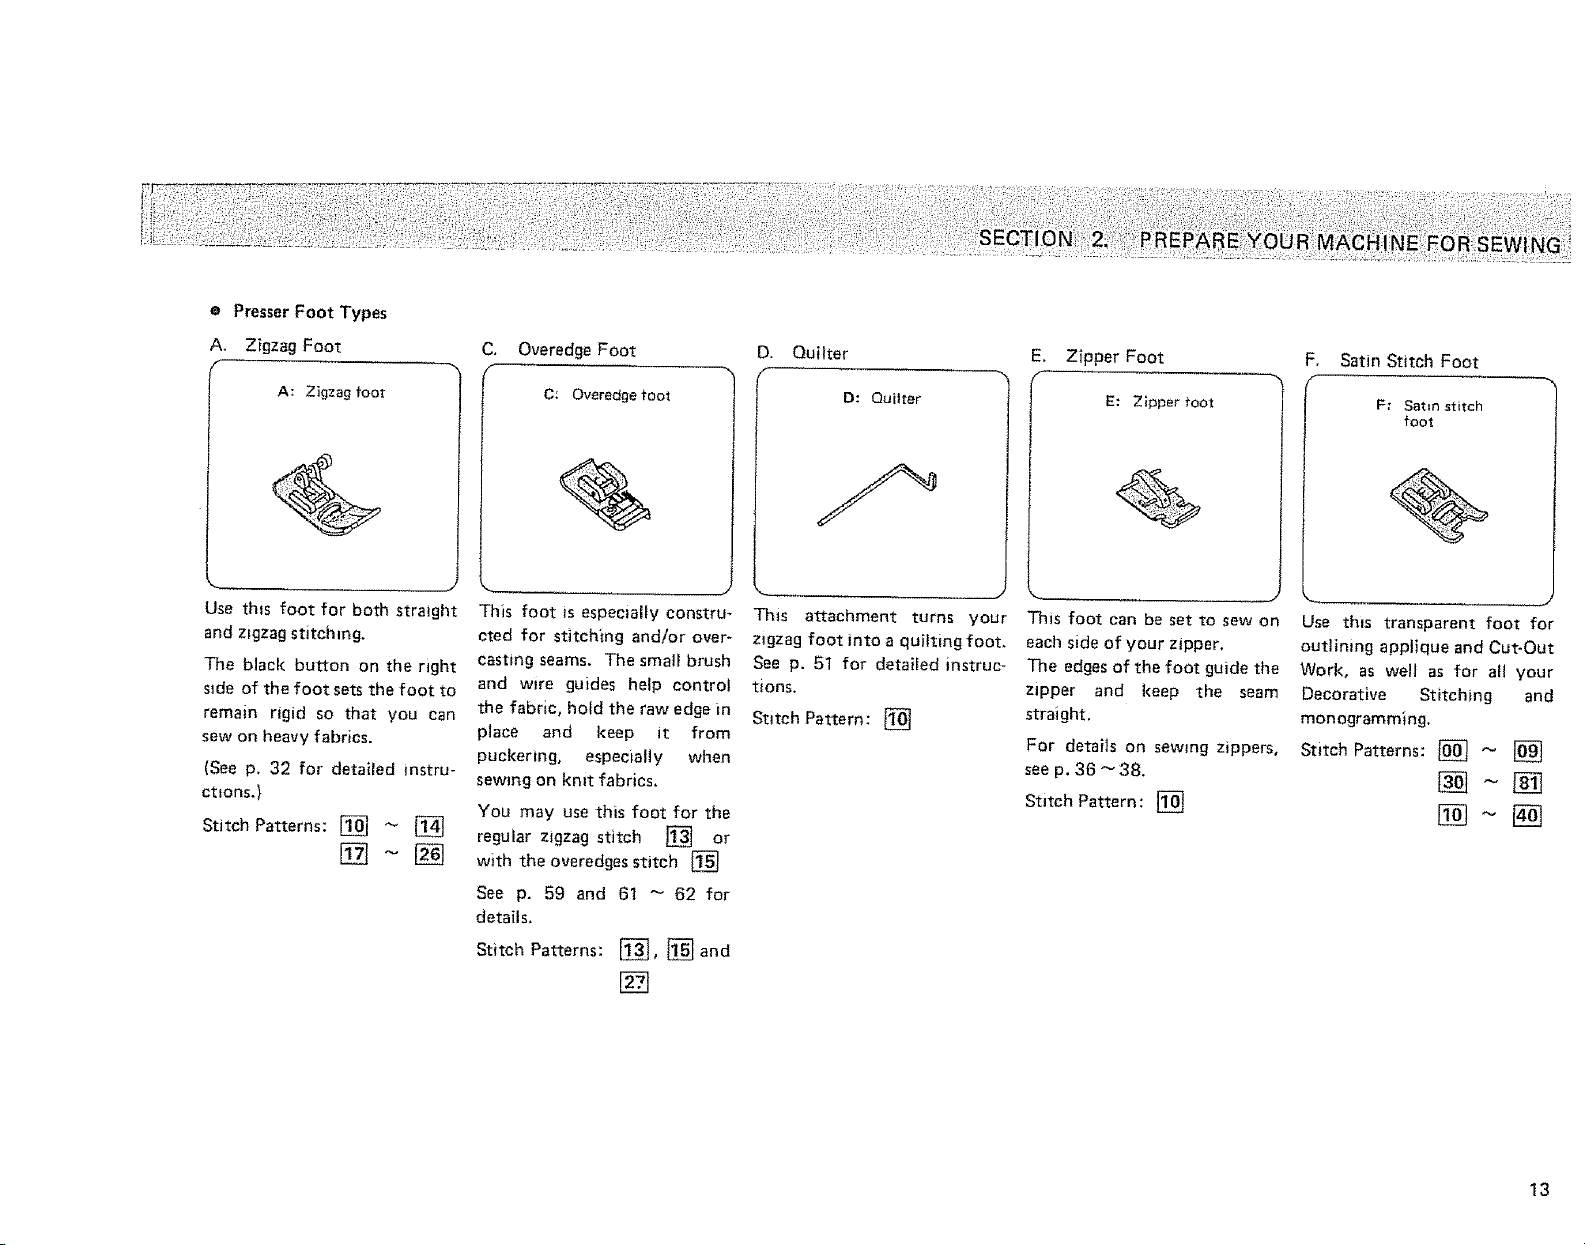
• Presser Foot Types
A. Zigzag Foot
C, Overedge Foot
D. Quilter
E. Zipper Foot
F, Satin Stitch Foot
A: Zigzag foot
Use this foot for both straight
and zigzag stitching.
The black button on the right
stde of the foot sets the foot to
remain rigid so that you can
sew on heavy fabrics.
(See p, 32 for detailed instru-
ctsons.)
Stitch Patterns: [] _ []
C; Overedge toot
This foot is especially constru-
cted for stitching and/or over*
casting seams. The smell brush
and wire guides help control
the fabric, hold the raw edge in
p_ace and keep it from
puckering, especially when
sewing on knit fabrics.
You may use this foot for the
regular zigzag stitch [] or
with the overedges stitch []
See p. 59 and 61 _ 62 for
deta;Is_
Stitch Patterns: _, [] and
[]
D: Quilter
This attachment turns your
zigzag foot into a quilting foot.
Sea p. 51 for detailed instruc-
tions.
Stitch Pattern: []
E: Zipper foot
This foot can be set to sew on
each side of your zipper,
The edges of the foot guide the
zipper and keep the seam
straight.
For details on sewing zippers,
see p. 36 _ 38.
Stitch Pattern: []
F: Satin stitch
foot
Use this transparent foot for
outlining applique and Cut-Out
Work, as well as for aH your
Decorative Stitching and
monogramming.
Stitch Patterns: [] _ []
13
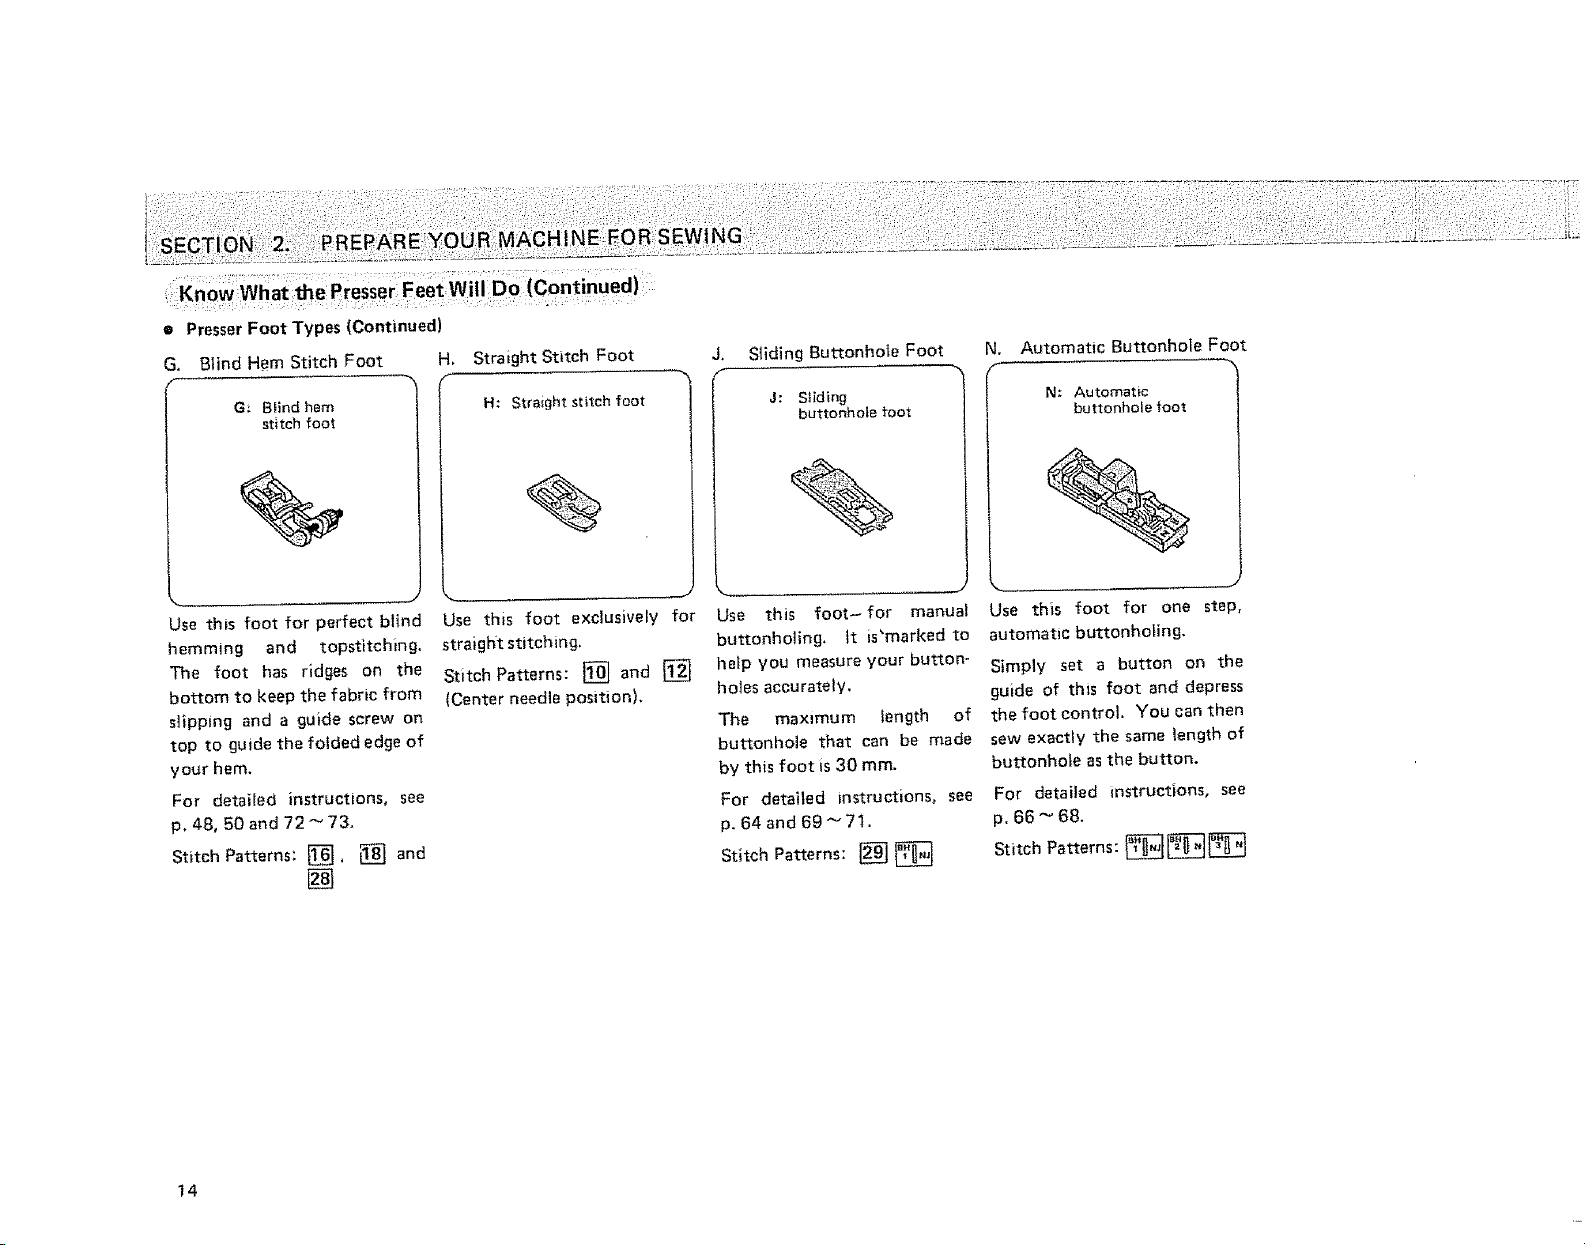
• Presser Foot Types (Continued)
G. Blind Hem Stitch Foot H.
Straight Stitch Foot
J.
Sliding Buttonhole Foot
N. Automatic Buttonhole Foot
G:' B_ind hem
stitch foot
Use this foot for perfect blind
hemming and topstltching.
The foot has ridges on the
bottom to keep the fabric from
slipping and a guide screw on
top to guide the folded edge of
your hem,
For detailed instructions, see
p. 48, 50 and 72 _ 73.
Stitch Patterns: _]. _ and
[]
H: Straight stitch foot
Use this foot exclusively for
straight stitching.
Stitch Patterns: [] and []
(Center needle position).
J: Siid}ng
buttonhole toot
%
Use this foot- for manual
buttonholing, tt is'marked to
help you measure your button-
holes accurately.
The maximum length of
buttonhole that can be made
by this foot is 30 ram.
For detailed instructions, see
p, 64 and 6g _ 7I.
Stitch Patterns: []
N: Automatic
buttonhole foot
Use this foot for one step,
automatic buttonholing,
Simply set a button on the
guide of this foot and depress
the foot control. You can then
sew exactly the same length of
buttonhole as the button.
For detailed instructions, see
p. 66 "_ 68.
Stitch Patterns: __
!4
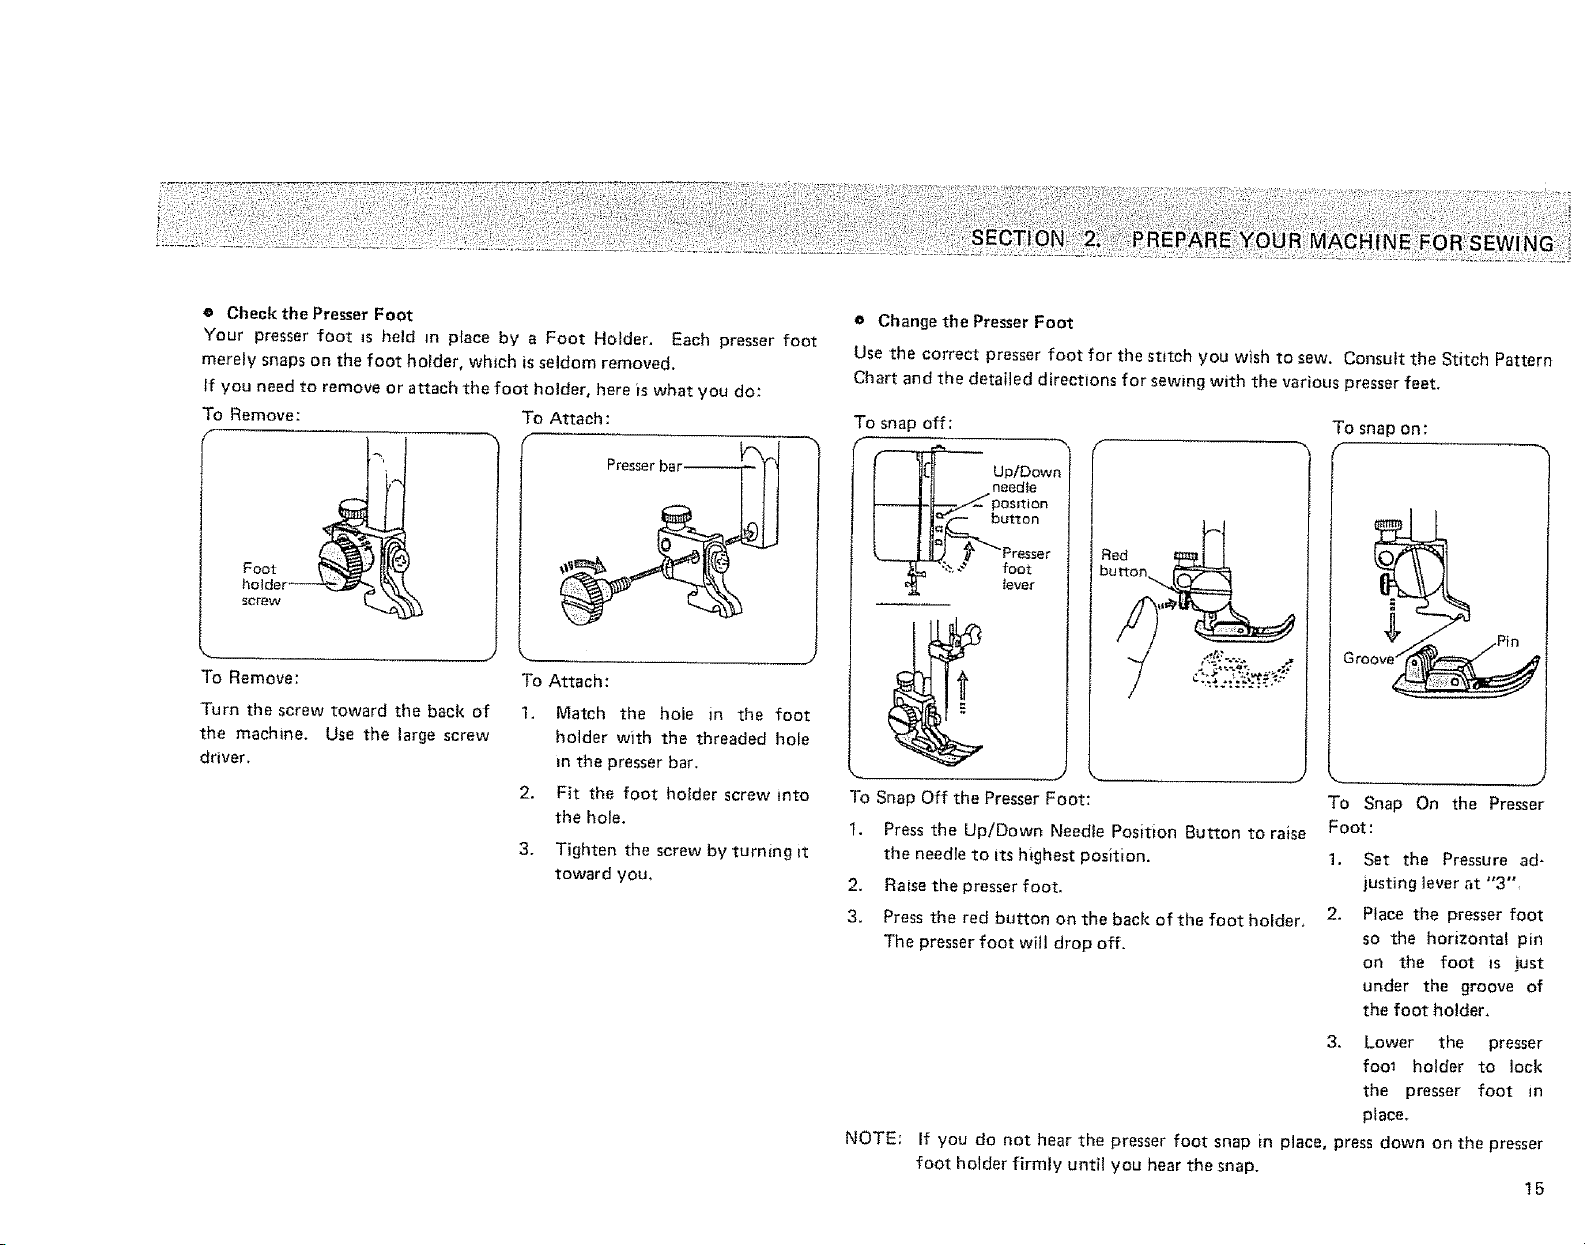
e Check the Presser Foot
Your presser foot _s held m place by a Foot Holder. Each presser foot
merely snaps on the foot holder, which is seldom removed.
If you need to remove or attach the foot hoJder, here is what you do:
To Remove:
To Attach:
Presser bor_
Foot
screw
o Change the Presser Foot
Use the correct presser foot for the stitch you wish to sew. Consult the Stitch Pattern
Chart and the detailed directions for sewing with the various presser feet.
To snap off:
To snap on:
UPiDow_
needle
position
utton
Presser
foot
lever
burton_
To Remove:
Turn the screw toward the back of
the machine. Use the large screw
driver.
To Attach:
1. Match the hote in the foot
holder with the threaded hole
m the presser bar.
2. Fit the foot holder screw into
the hole.
3. Tighten the screw by turning It
toward you.
To Snap Off the Presser Foot:
t. Press the Up/Down Needle Position Button to raise
the needle to its highest position.
2. Raise the presser foot.
3. Press the red button on the back of the foot holder,
The presser foot will drop off.
NOTE:
If you do not hear the presser foot snap in place, press down on the presser
foot holder firmly until you hear the snap.
J
,- _j
To Snap On the Presser
Foot:
1. Set the Pressure ad-
justing ]ever at "3",
2. Place the presser foot
so the horizontal pin
on the foot is just
under the groove of
the foot holder.
3, Lower the presser
fool holder to lock
the presser foot in
place,
15
• .=
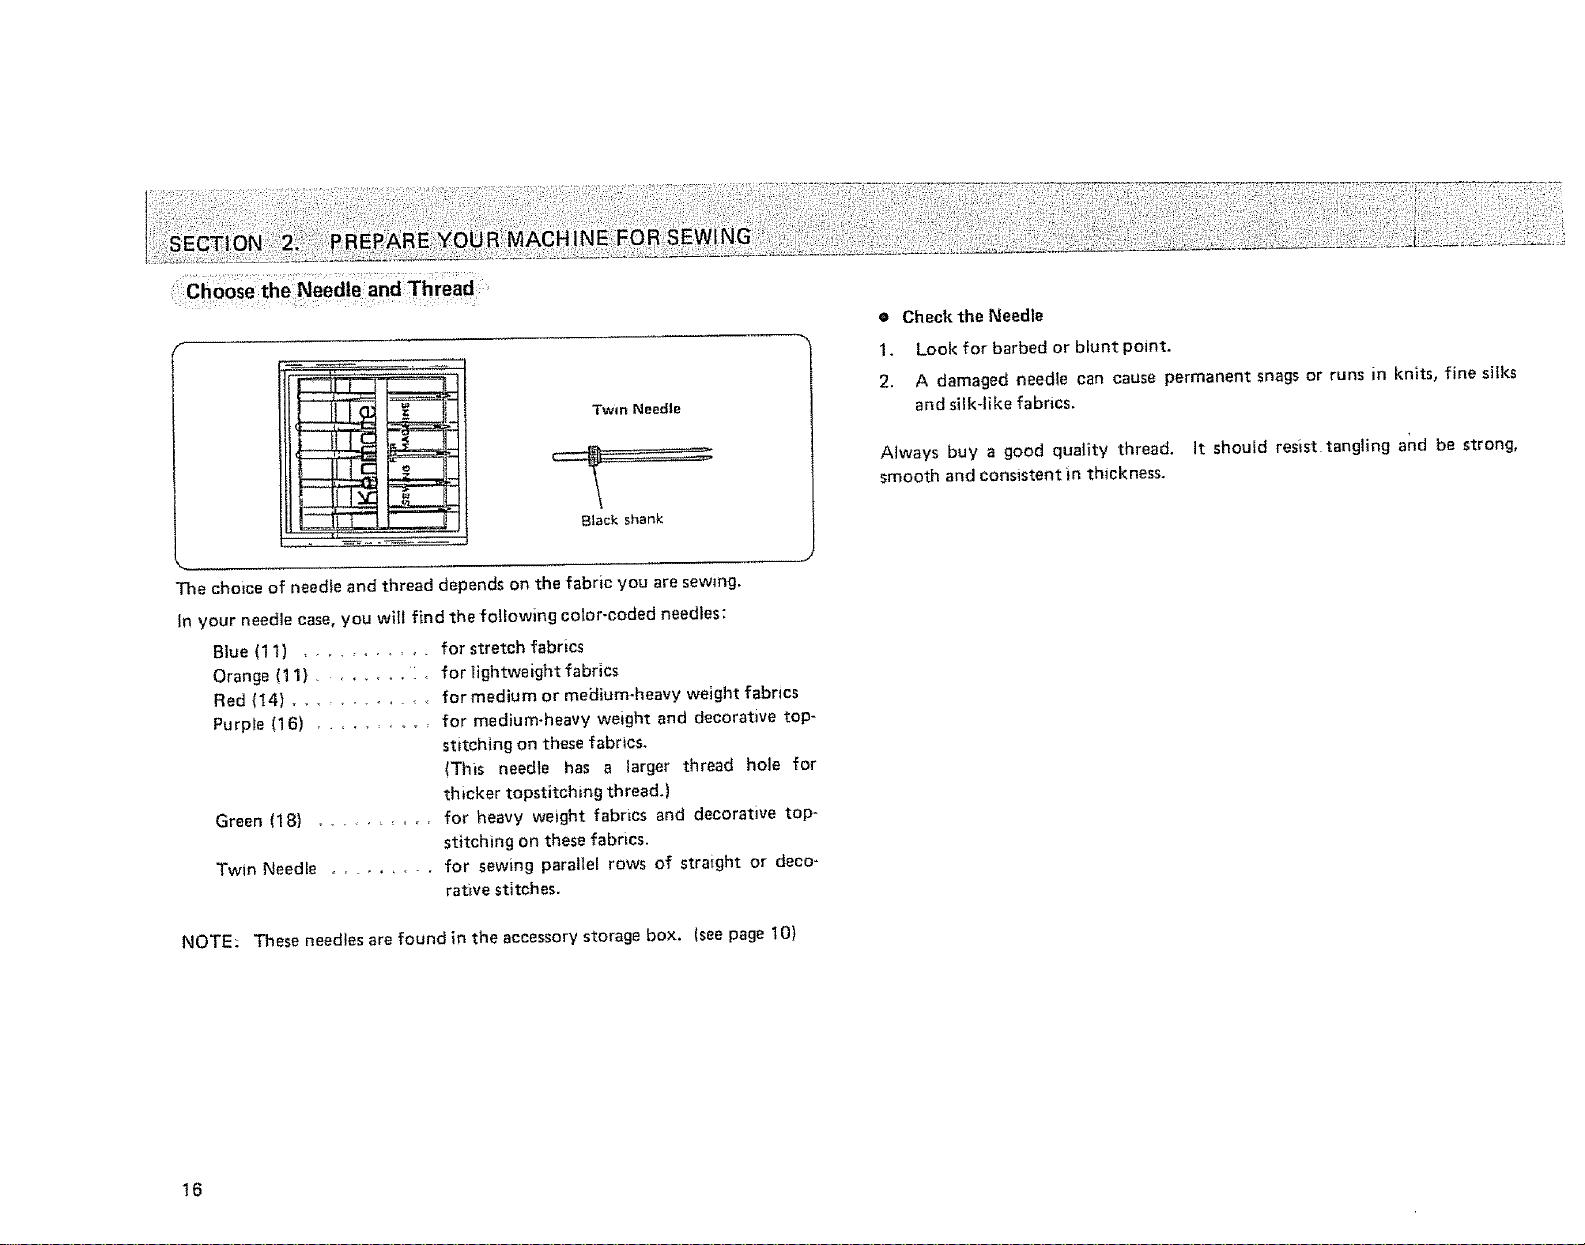
Twin Needle
e Checkthe Needle
1. Look for barbed or blunt point.
2. A damaged needle can cause permanent snags or runs in knits, fine silks
and silk-like fabrics.
Always buy a good quality thread, it should resist tangling and be strong,
smooth and consistent in thickness.
,,,_r
Black shank
The choice of needle and thread depends on the fabric you are sewing.
In your needle case, you will find the following color-coded needles;
Blue (1 1) .......... for stretch fabrics
Orange (11} ........ _ for Iightweight fabrics
Red (14) .......... for medium or meElium-heavy weight fabrics
Purpie (16) ......... for medium-heavy weight and decorative top-
stitching on these fabrics.
(This needle has a larger thread hole for
thicker topstitching thread.)
Green 118) ....... for heavy weight fabrics and decorative top-
stitching on these fabrics.
Twin Needle ........ for sewing parallet rows of straight or deco-
rative stitches.
NOTE: These needles are found in the accessory storage box. isee page 10)
16
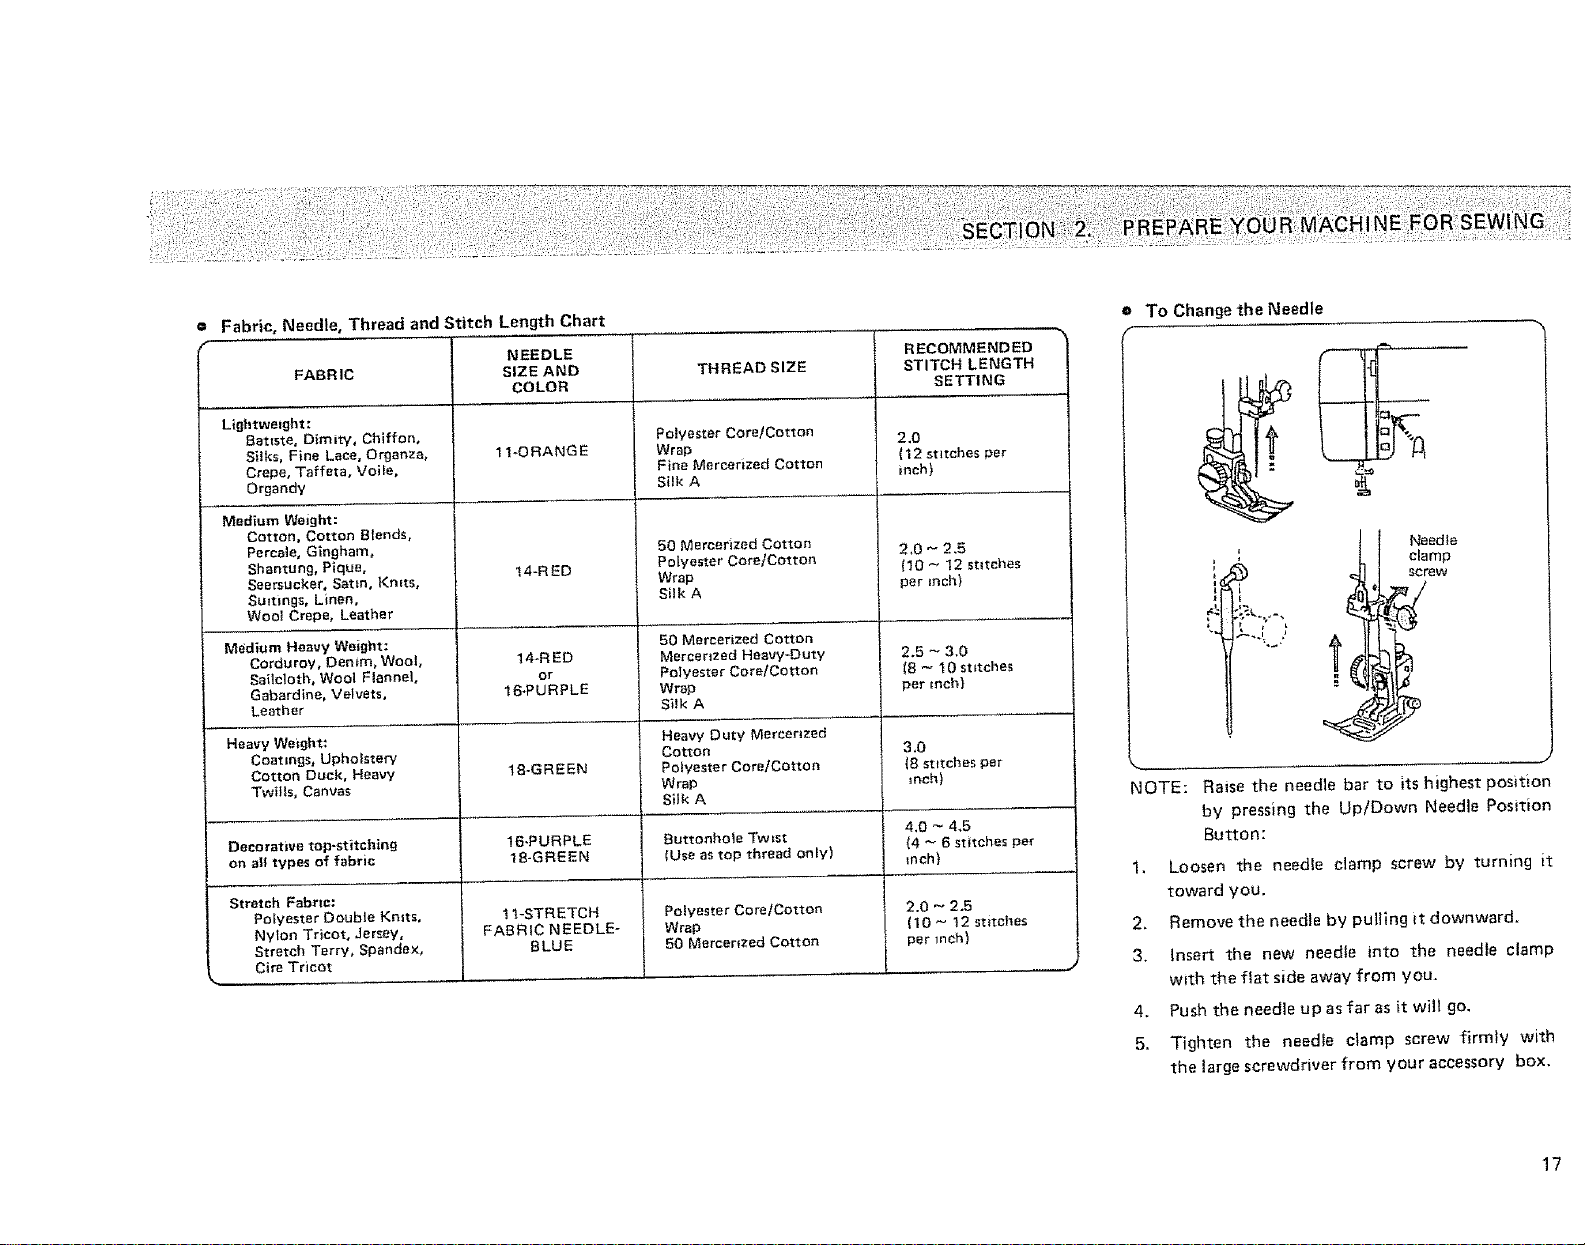
e Fabric, Needle, Thread and Stitch Length Chart
f
FABRIC
Lightweight:
Battste, Dimity, Chiffon,
Silks, Fine Lace, Organza,
Crepe, Taffeta, Voile,
Organdy
Medium Weight:
Cotton, Cotton Blends,
Percale, Gingham,
Shantung, Pique,
Seersucker, Satin, Kmts,
Su_tings, Linen,
Woo] Crepe, Leather
M_dium Heavy Weight:
Corduroy, Denim, Wool,
Sailcloth, Wool Flannel,
Gabardine, Velvets,
Leather
Heavy Weight:
Coatings, Upholstery
Cotton Duck, Heavy
Twills, Canvas
Decorative top-stitching 16-PURPLE Buttonhole Twist (4 _ 6 stitches per
on all types of fabric 1B-GREEN IUse as top thread only) inch}
Stretch Fabric:
Polyester Double Kntts, 1 1-STRETCH Polyester Core/Cotton 2.0 _ 2.5
Nylon Tricot, Jersey, FABRIC NEEDLE- Wrap 110 _ t2 stitches
Stretch Terry, Spande×, BLUE S0 Mercerized Cotton per inch)
Cire Tricot
NEEDLE
SIZE AND
COLOR
1 !_O RANG E
!4-RED
14-RED
or
16-PURPLE
18-GREEN
THREAD SIZE
Polyester Core/Cotton
Wrap
Fine Mercerized Cotton
Silk A
50 Mercerized Cotton
Polyester Core/Cotton
Wrap
Silk A
50 Mercerized Cotton
Mercerized Heavy-Duty
Polyester CorelCotton
Wrap
Silk A
Heavy Duty Mercerized
Cotton
Polyester Core]Cotton
Wrap
Silk A
RECOMMENDED
STITCH LENGTH
SETTING
2.0
(12 stitches per
inch}
2.0 _ 2,5
110 _ 12 stitches
per inch)
2.5 ~ 3,0
(8 _ 10 st=tches
par inch}
3.0
(8 stitches per
mnh)
4.0 _ 4_5
e To Change the Needle
Needle
I
I
NOTE: Raise the needle bar to its highest position
by pressing the Up/Down Needle Position
Button:
1, Loosen the needle clamp screw by turning it
toward you.
2. Remove the needle by pulling it downward.
3, Insert the new needle into the needle clam_
with the flat side away from you.
4. Push the needle up as far as it wilt go.
5, Tighten the needle clamp screw firmly wit_
the large screwdriver from your accessory box,
clamp
SCrew
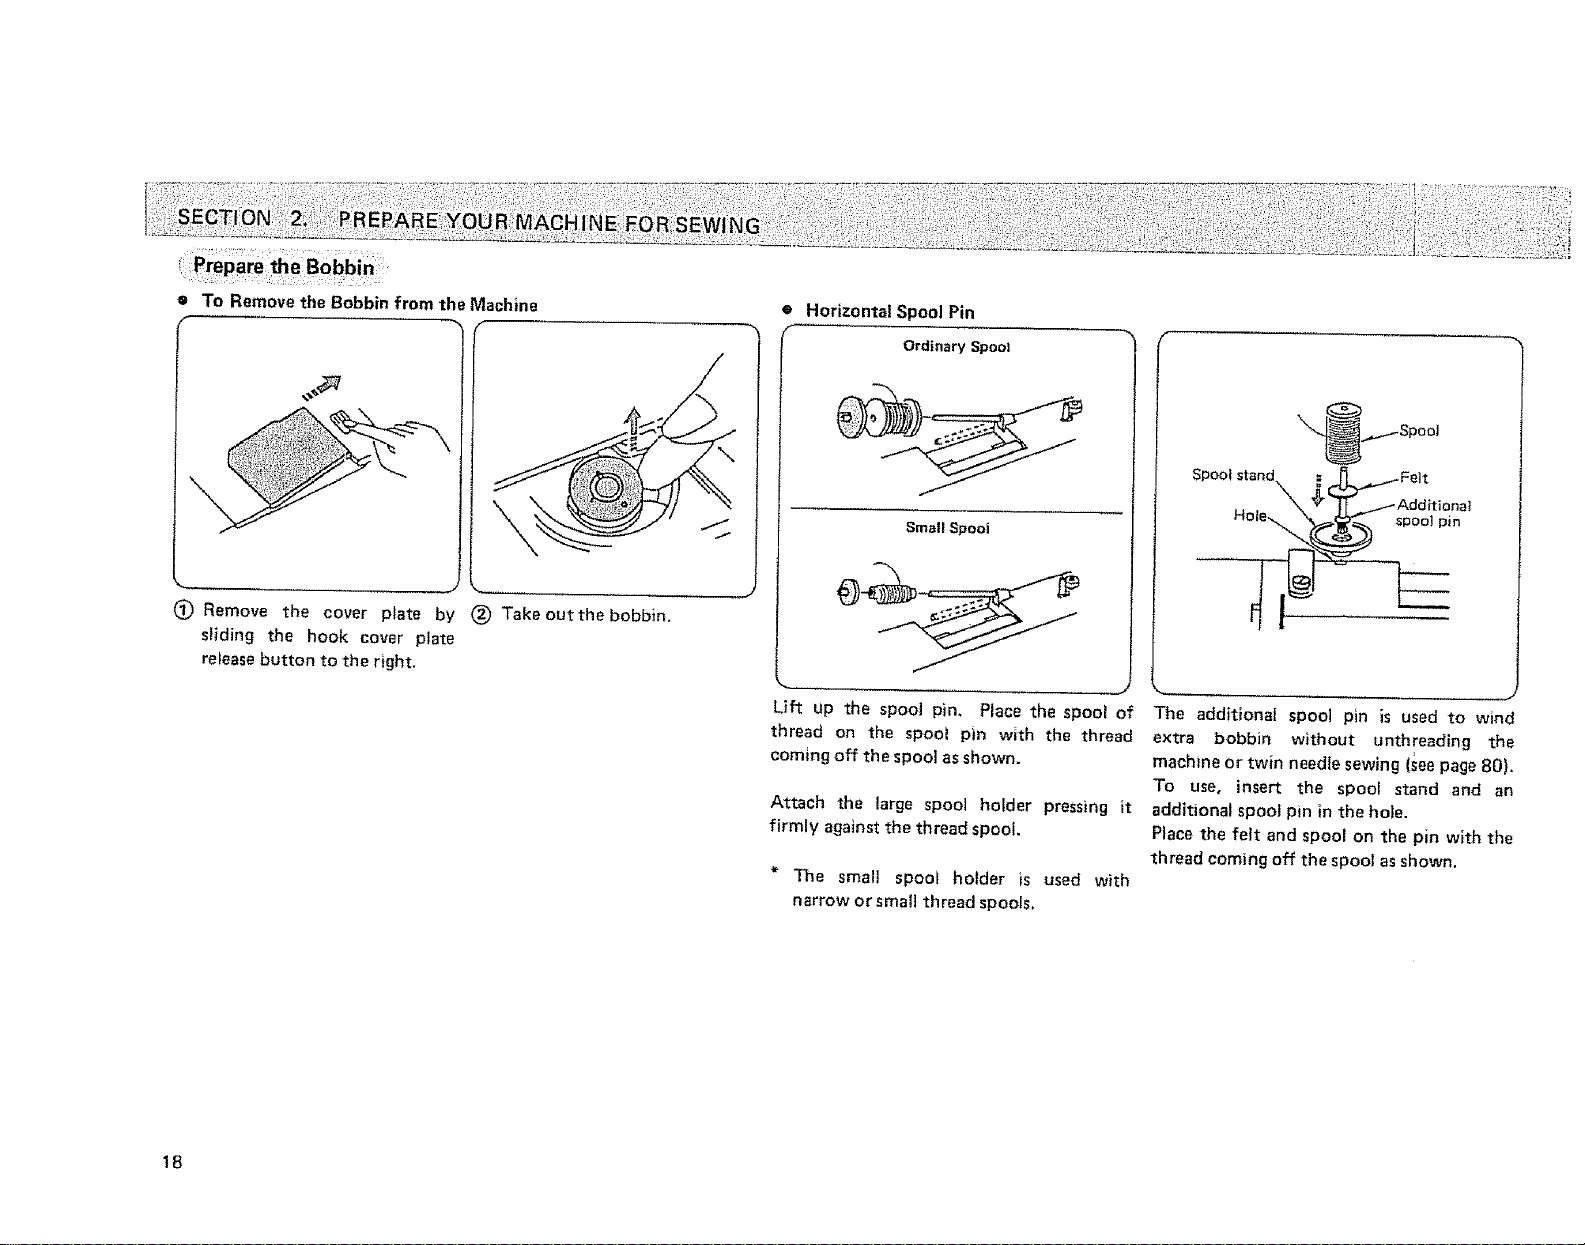
• To Remove the Bobbin from the Machine
J
(_) Remove the cover plate by (_)Takeoutthebobbin.
sliding the hook cover plate
release button to the right.
• Horizontal Spool Pin
Ordinary Spool
Small Spool
Spootstand. _ r_ . _-Felt
_ _'_ Additional
Hole _ spoolpin
18
Lift up the spool pin, Place the spool of
thread on the spool pin with the thread
coming off the spool as shown.
Attach the large spool holder pressing it
firmly against the thread spool.
* "Fne small spool holder is used with
narrow or small thread spoo|s.
The additional spool pin is used to wind
extra bobbin without unthreading the
machine or twin needle sewing (see page 80).
To use, insert the spool stand and an
additional spool pin in the hole.
Piece the felt and spool on the pin with the
thread coming off the spool as shown.
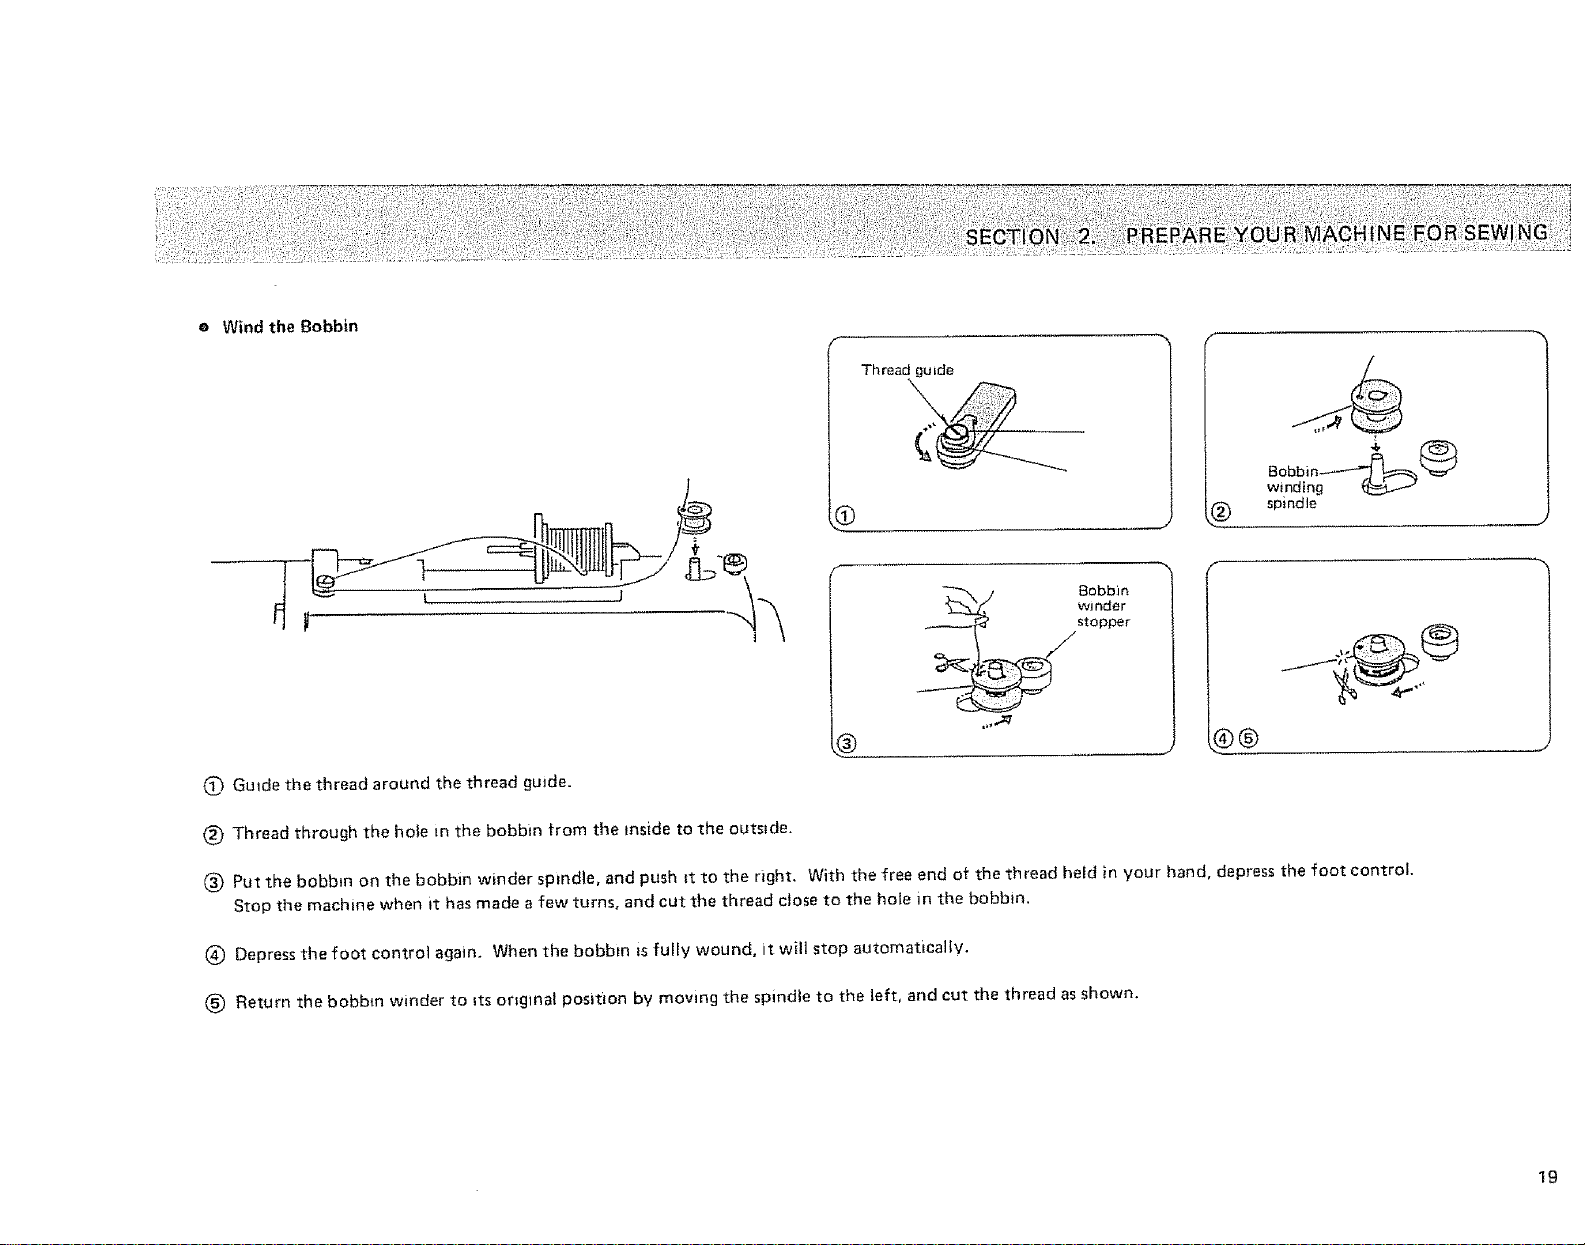
e Wind the Bobbin
Th read gu ide
jD
wJnder
stopper
Bobb]n
winding
spindle
#®
0 Guide the thread around the thread guide.
(_) Thread through the hole in the bobbin from the inside to the outstde.
(_) Put the bobbin on the bobbin winder spindle, and push _t to the right. With the free end of the thread he_d in your hand, depress the foot control.
Stop the machine when it has made a few turns, and cut the thread close to the hole in the bobbin,
(&) Depress the foot controt again. When the bobbin is fully wound, it will stop automatically.
_) Return the bobbin winder to its original position by mowng the spindle to the left, and cut the thread as shown.
, .J
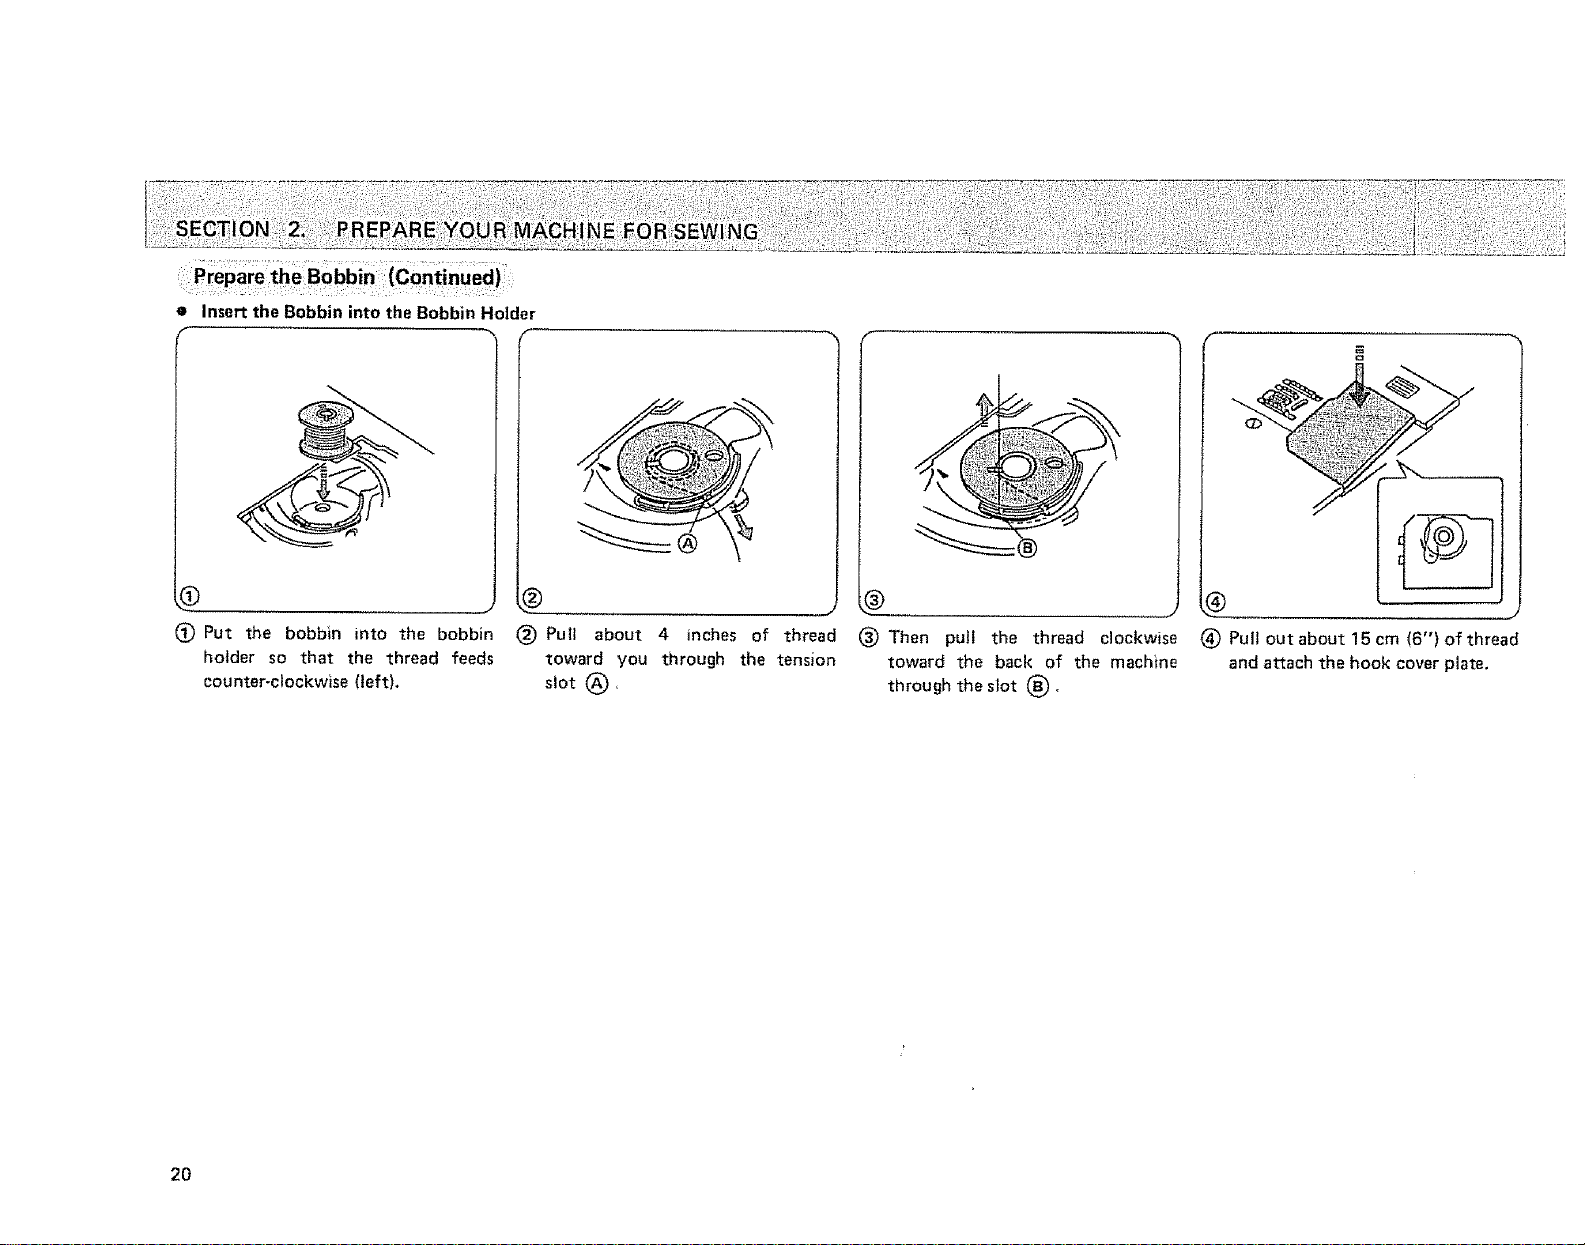
• Insert the Bobbin into the Bobbin Holder
(_ Put the bobbin into the bobbin
holder so that the thread feeds
counter-clockwise (left).
2O
(_) Pull about 4 inches of thread
toward you through the tension
slot (_),
(_ Then pull the thread clockwise
toward the back of the machine
through the slot (_,
(_) Pull out about 15 cm (6") of thread
and attach the hook cover plateo
7_ ¸ -- : i ¸ ! .... ....
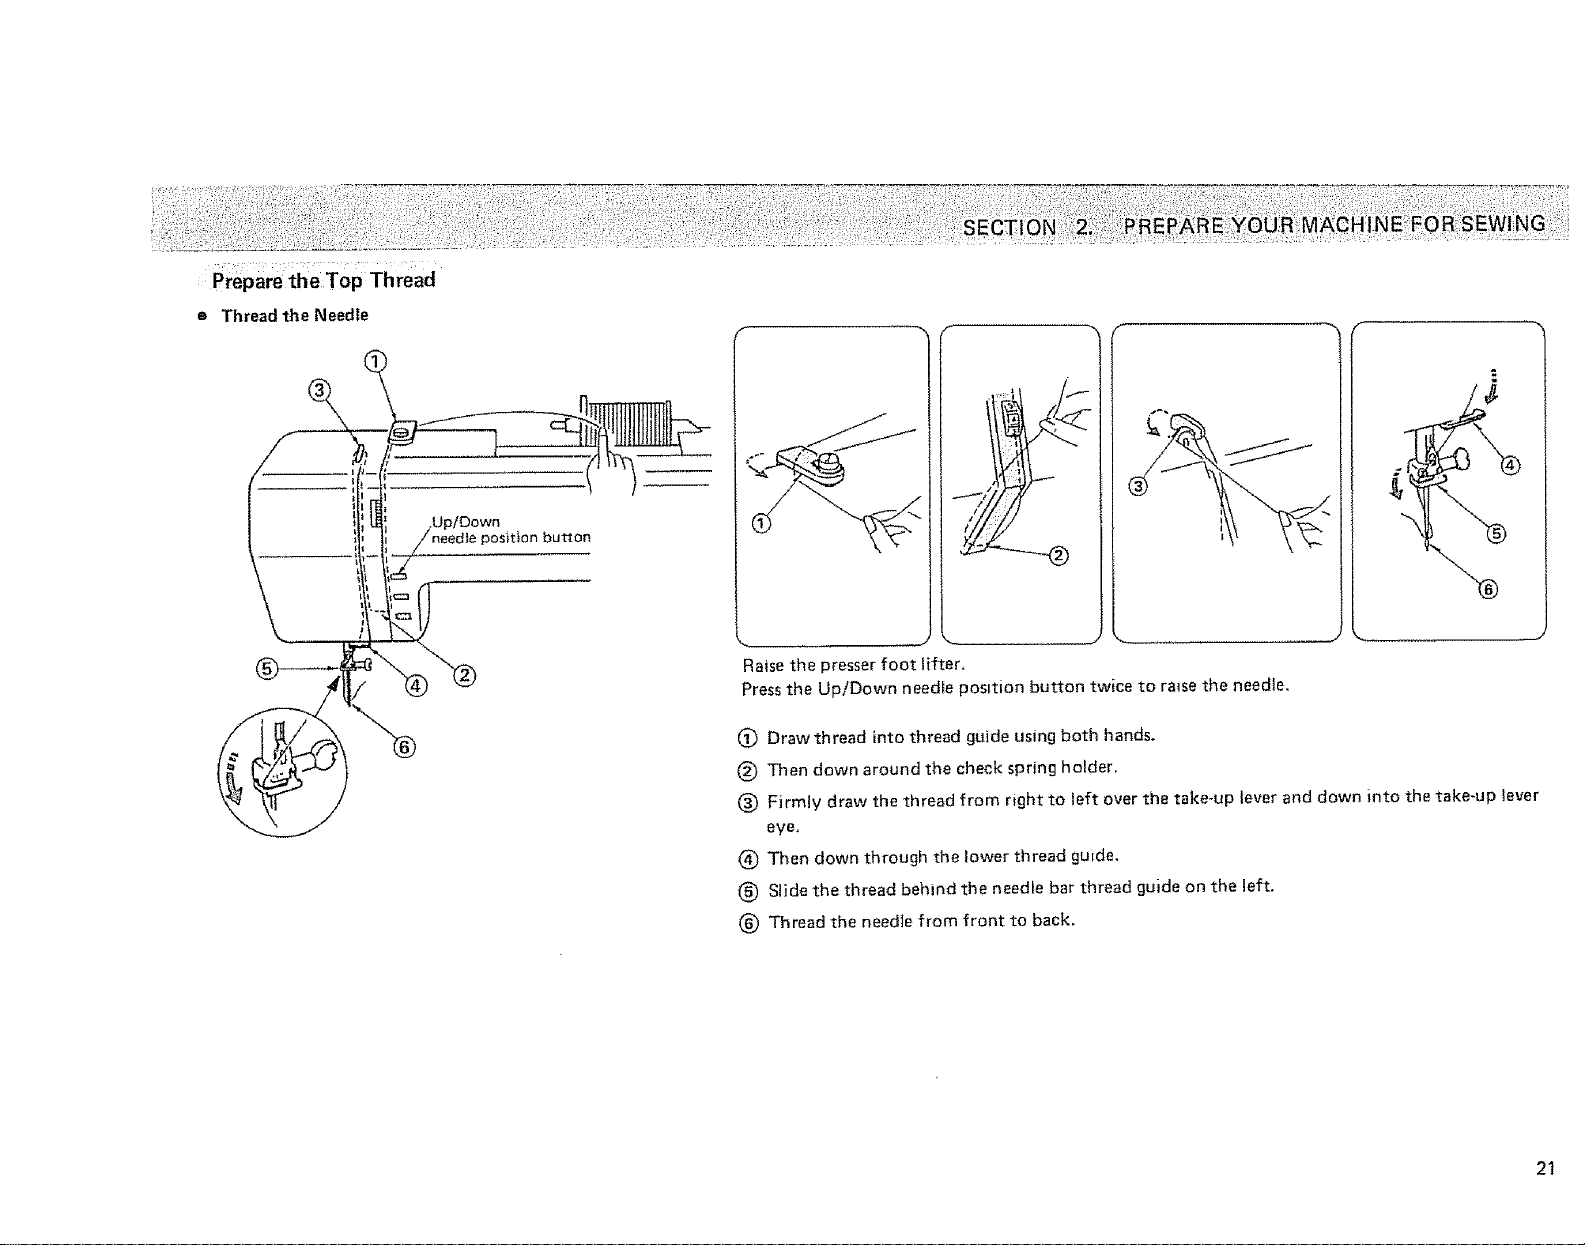
Prepare the Top Thread
e Thread the Needle
®
Raise the presser foot lifter,
Press the Up/Down needle position button twice to rinse the needle.
(&) Draw thread into thread guide using both hands.
(_ Then down around the check spring holder.
(_) Firmly draw the thread from right to left over the take-up lever and down into the take-up lever
eye,
(_ Then down through the lower thread gurde.
(_) Slide the thread behind the needle bar thread guide on the left.
(_ Thread the needJe from front to back.
21
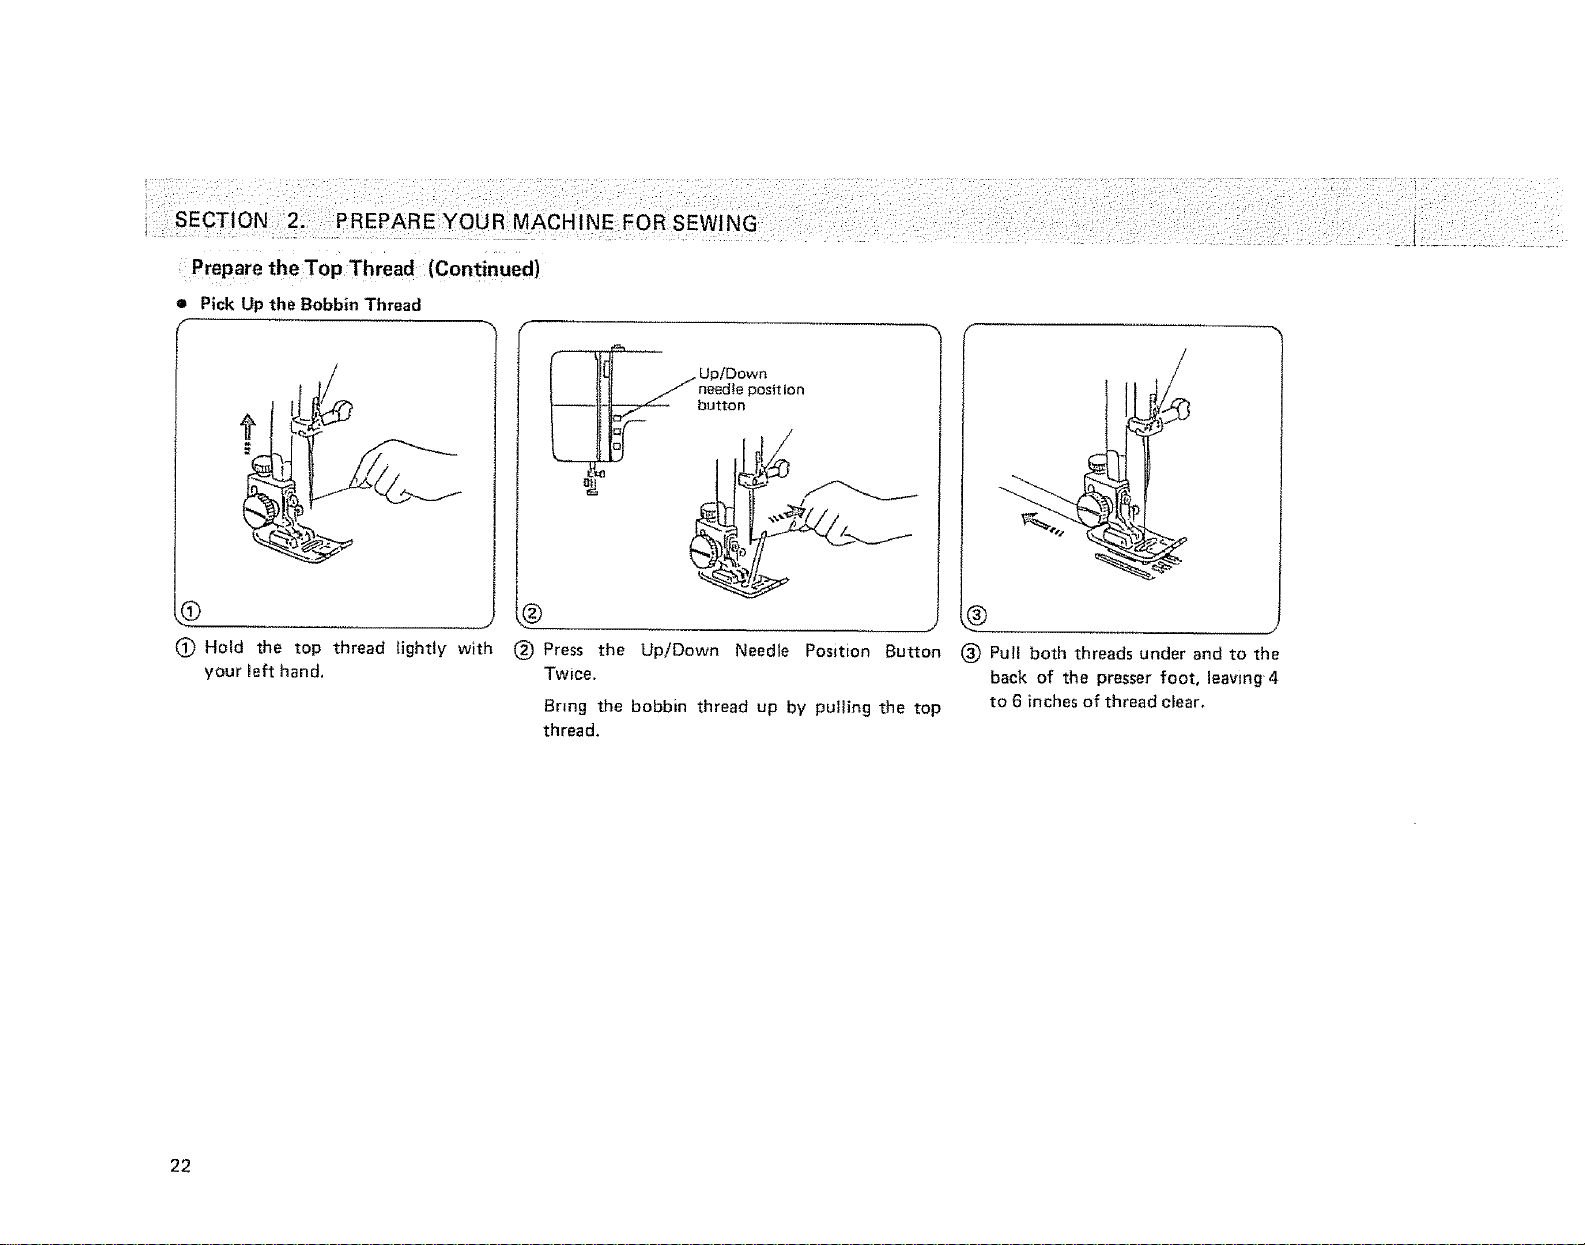
PreparetheTop Thread (Continued)
• PickUp the BobbinThread
| tlU / n_dle posit ion
.....i_._/ button
t_) Hold the top thread _ightly with
your left hand.
22
._) , J
(_ Press the Up/Down Needle Position Button
Twice.
Bring the bobbin thread up by pulling the top
thread.
....... J
(_ Pull both threads under and to the
back of the presser foot, leaving 4
to 6 inches of thread c_ear.
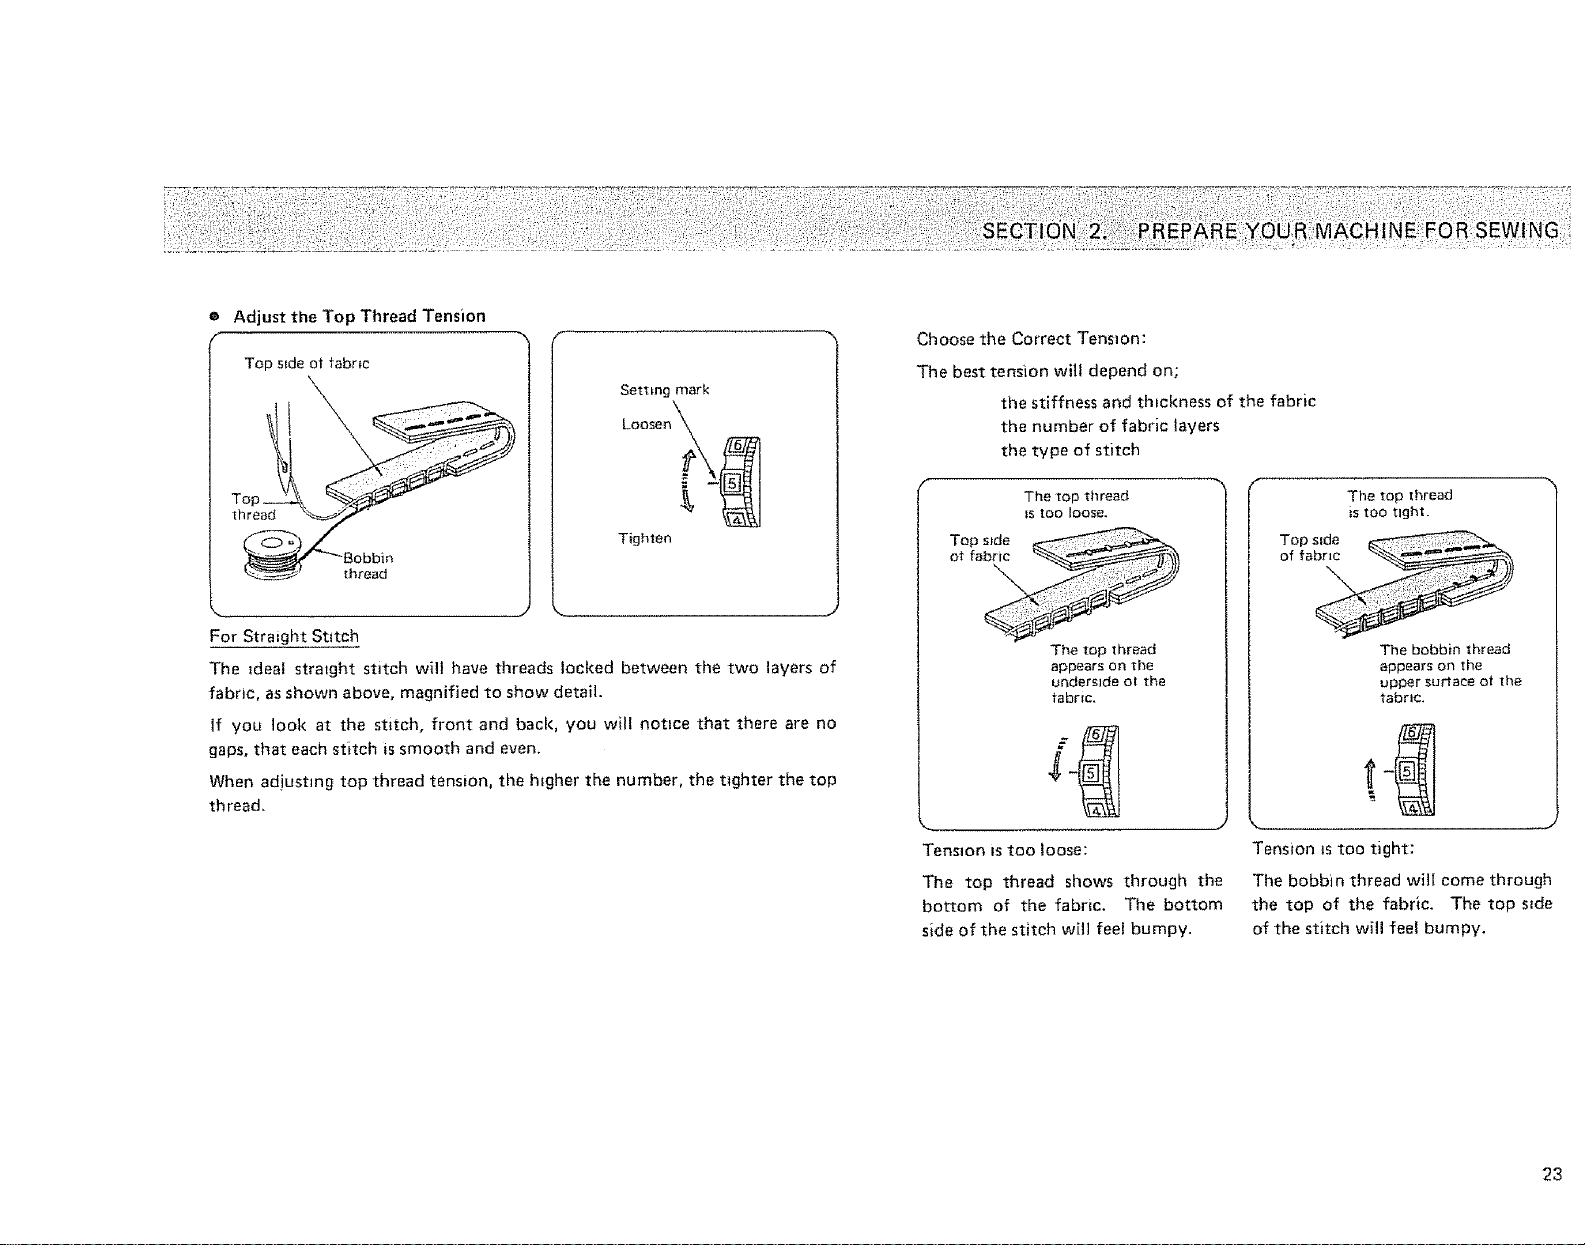
® Adjust the Top Thread Tension
Top s_de ot fabric
Setting mark
Choose the Correct Tension:
The best tenmon wi]l depend on;
the stiffness and thtckness of the fabric
the number of fabric layers
the type of stitch
Top
thread
thread
Loosen__
Tighten
For Straight Sotch
The _deal stratght stitch will have threads locked between the two layers of
fabric, as shown above, magnified to show detail.
If you look at the stitch, front and back, you will notice that there are no
gaps, that each stitch is smooth and even.
When adjusting top thread tension, the h_gher the number, the t_ghter the top
th read.
The top thread
_s1oo [oosa.
Top side
of fa
]'he top thread
appears on the
underside ol the
tabrlc.
Tension Lstoo loose:
The top thread shows through the
bottom of the fabric. The bottom
side of the stitch will feel bumpy.
The top thread
is too tight.
Top stde
of fa
The bobbin thread
appears on the
upper surface ot the
tabr_c.
Tension _stoo tight:
The bobbin thread will come through
the top of the fabric. The top side
of the stitch will feel bumpy.
23
: PreparetheT0pThrea d (Continued)
• Adjust the Top Thread Tension (Continued)
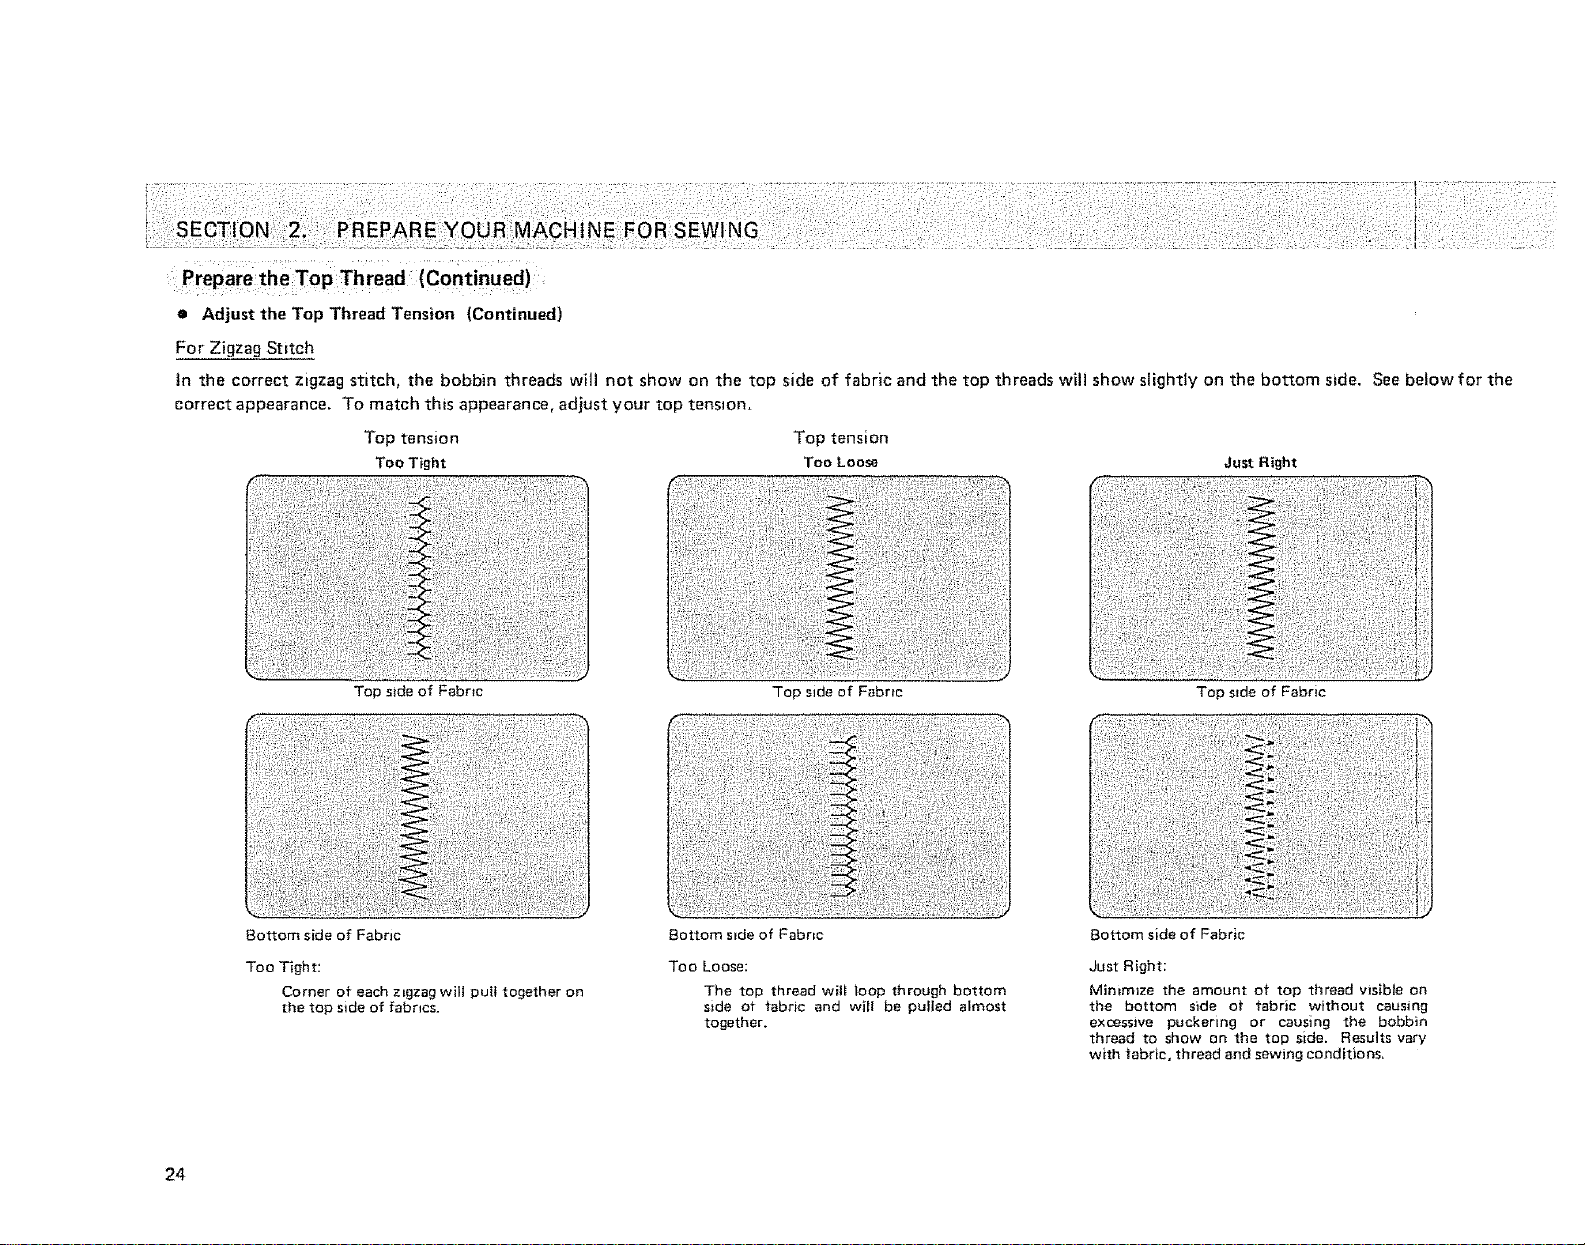
For Zigzag Stitch
tn the correct zigzag stitch, the bobbin threads will not show on the top side of fabric and the top threads will show slightly on the bottom side. See below for the
correct appearance. To match this appearance, adjust your top tension.
Top tension Top tension
Too Tight Too Loose Just Right
24
Top side of Fabric
Bottom side of Fabric
Too Tight:
Corner of each z_gzag will pult together on
the top side of fabrics.
Top side of Febr_c
Bottom s=de of FabrEc
Too Loose:
The top thread will loop through bottom
side of fabric and will be puIled almost
together.
Top side of Fabric
Bottom side of Fabric
Just Right:
MimmJze the amount of top thread visible on
the bottom side of fabric without causing
exo_sswe puckering or causing the bobbin
thread to show on the top side. Results YaW
with _abrlc, thread and sewing conditions,
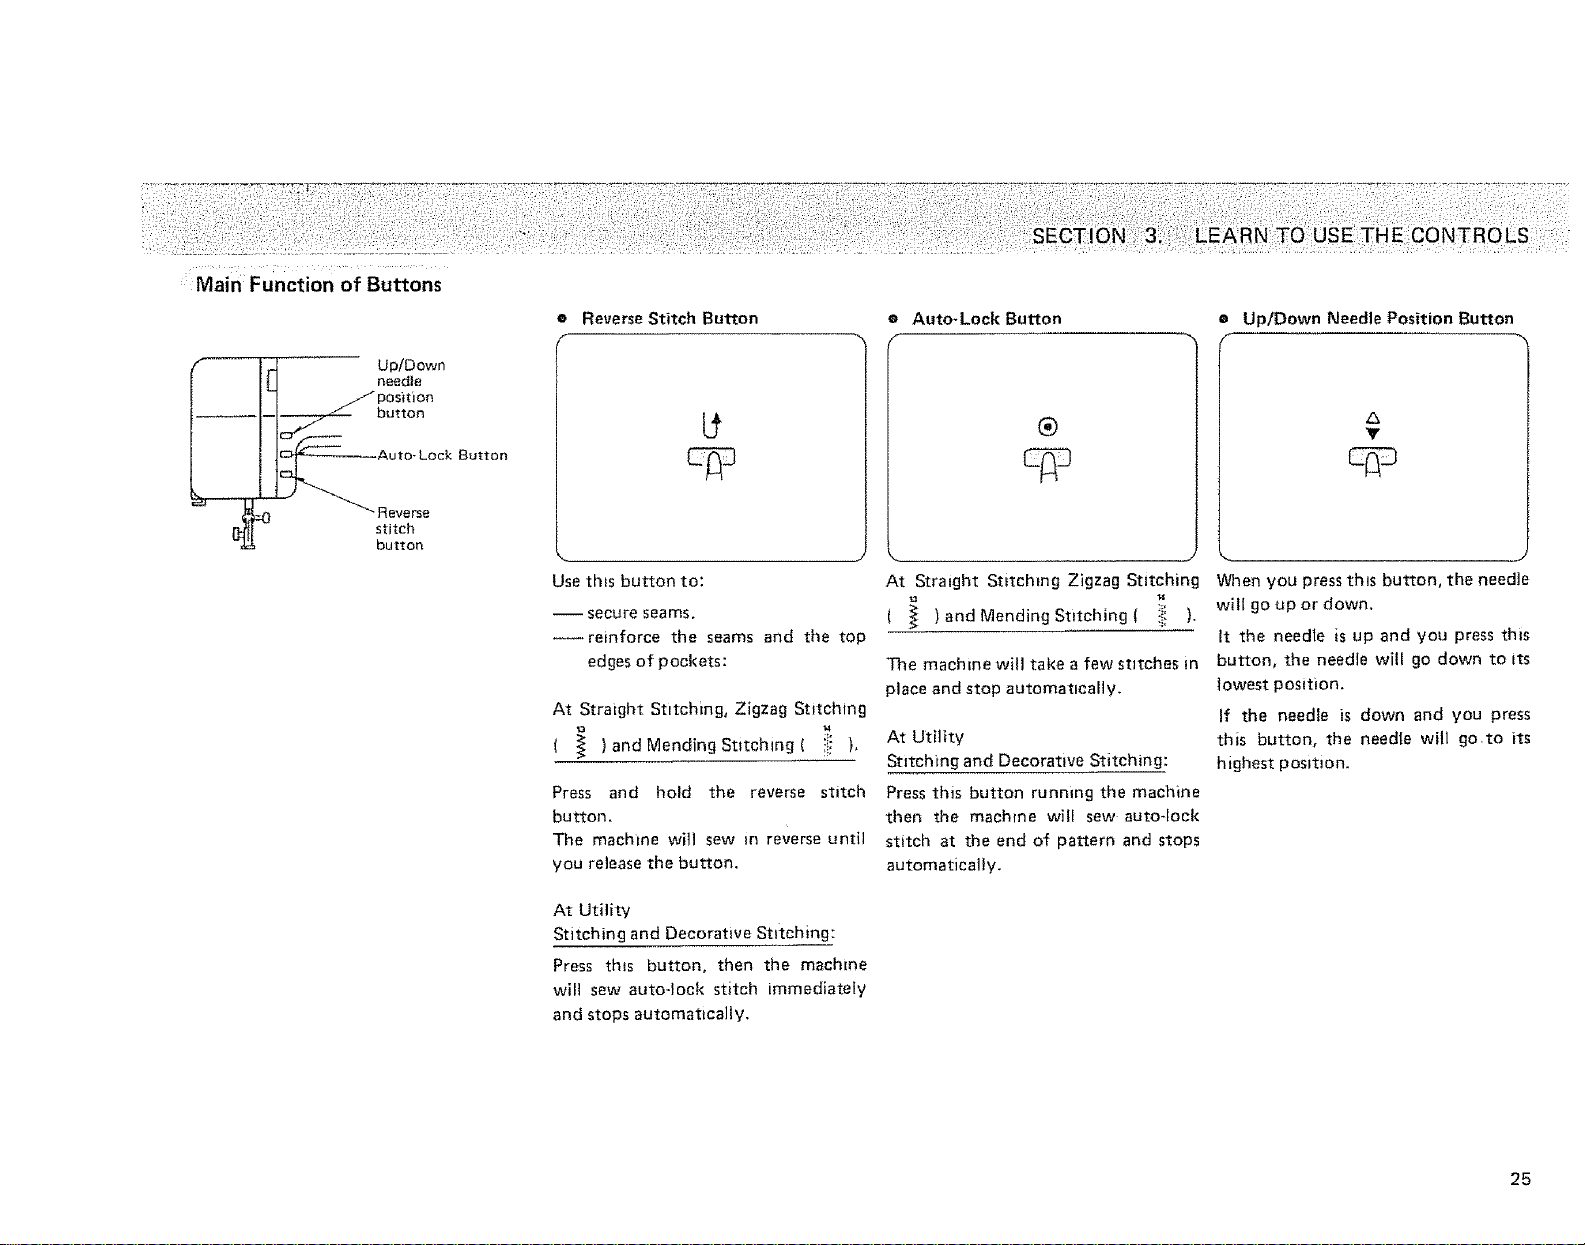
Main Function of Buttons
r_ Up/Down
U needle
q _" POsition
11 ,o,,oo
Reverse
stitch
button
e Reverse Stitch Button
Use th_s button to:
-- secure seams.
--reinforce the seams and the top
edges of pockets:
At Straight Stitching, Zigzag Stitching
( -_ )and Mending Stitching ( i}_i ),
Press and hold the reverse stitch
button.
The machine will sew in reverse until
you release the button.
e Auto-Lock Button
®
At Straight Stitching Zigzag Stitching
( ) and Mending Stitching ( !ii ).
The machine will take a few stitches in
place and stop automatically.
At Utility
Stitching and Decorative Stitching:
Press this button running the machine
then the machine will sew auto-lock
stitch at the end of pattern and stops
automatically.
• Up/Down Needle Position Button
"m
Z3
Y
J
When you press this button, the needle
will go up or down,
It the needle is up and you press this
button, the needle will go down to its
lowest position.
If the needle is down and you press
this button, the needle will go.to its
highest position.
At Utility
Stitching and Decorative Stitching:
Press this button, then the machine
will sew auto-lock stitch immediately
and stops automatically,
25
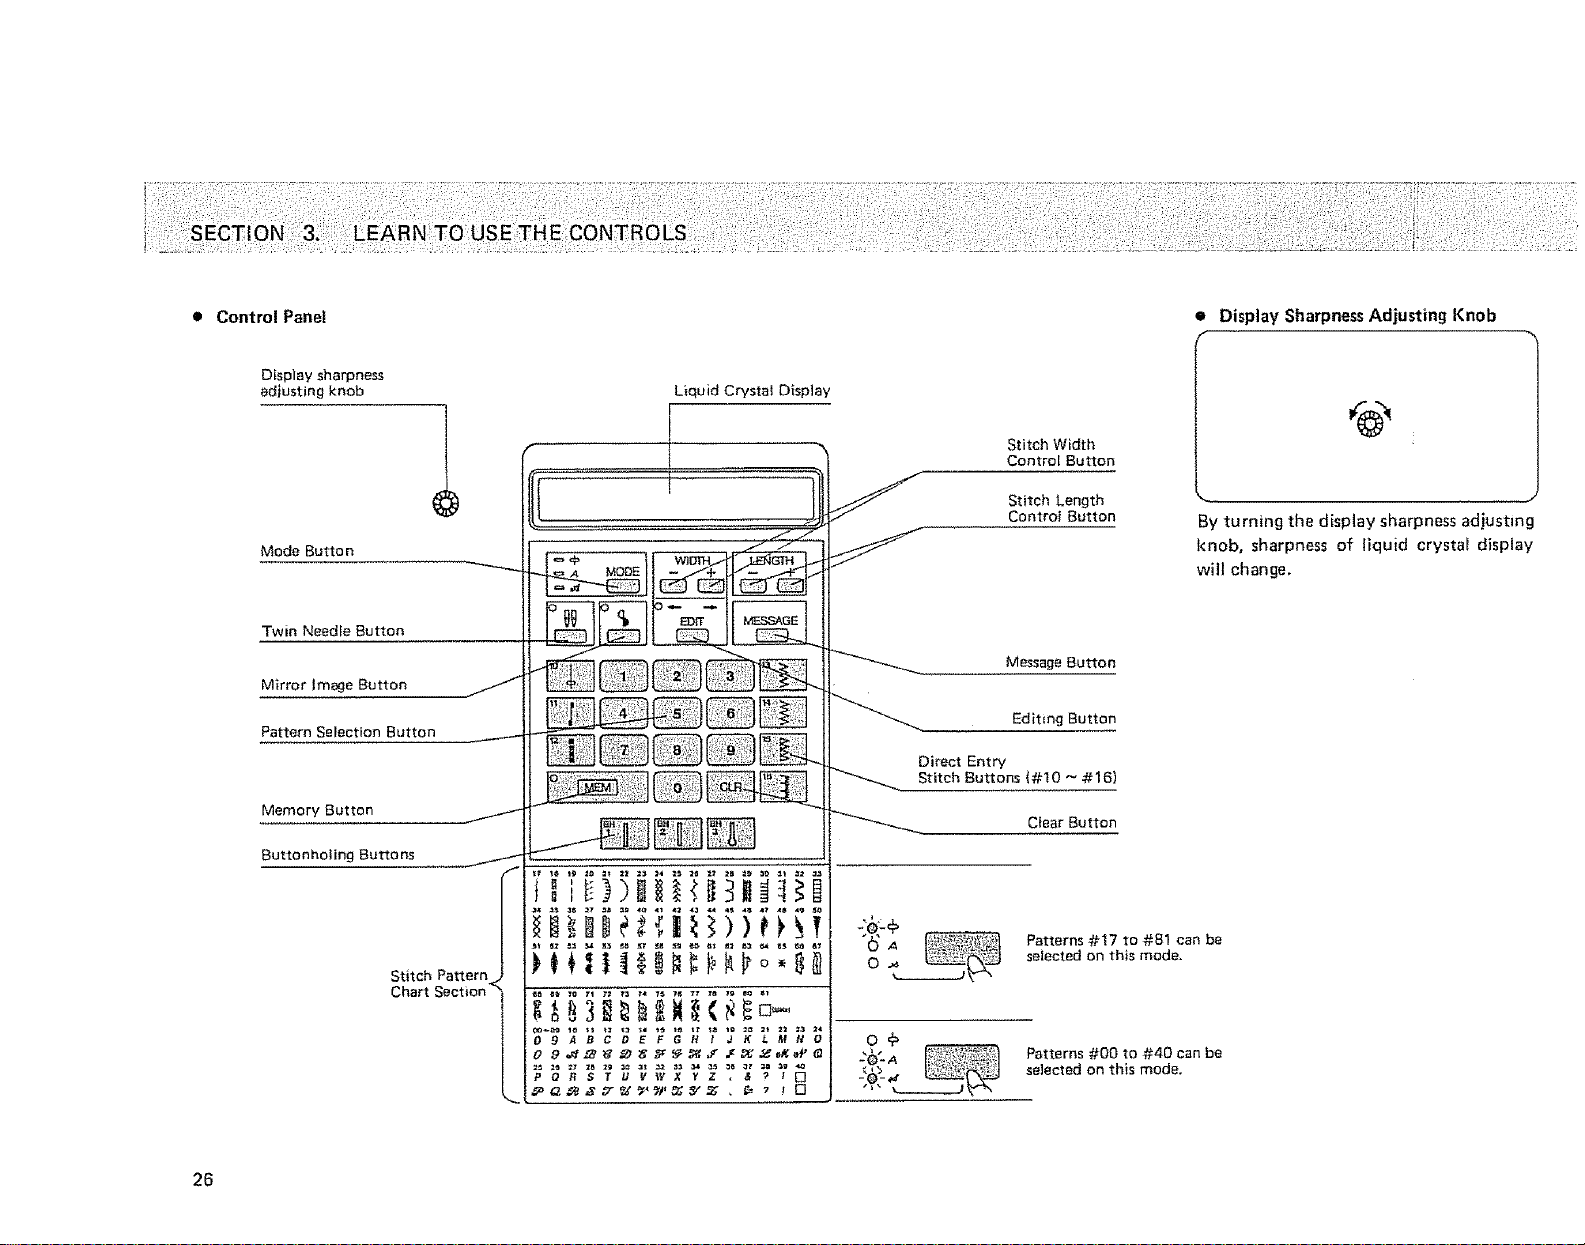
Control Panel
Display sharpness
adjusting knob
• Display Sharpness Adjusting Knob
Liquid Crystal D_splay
Mode Button
Twin Need}e Button
Mirror Image Button
Pattern Selection Button
Memory Button
Buttons
Stitch Pattern
Chart
[
Stitch Width
Control Button
Stitch Length
Control Button
Message Button
Editmg Button
Direct Entry
Stitch Buttons (#10 _ #16)
Clear Button
0 selected on th}s mode,
"_ Patterns #17 to #81 can be
...... /
By turning the display sharpness adjusting
knob, sharpness of liquid crystal display
will change,
26
Patterns #OO to #40 can be
selected on this mode.
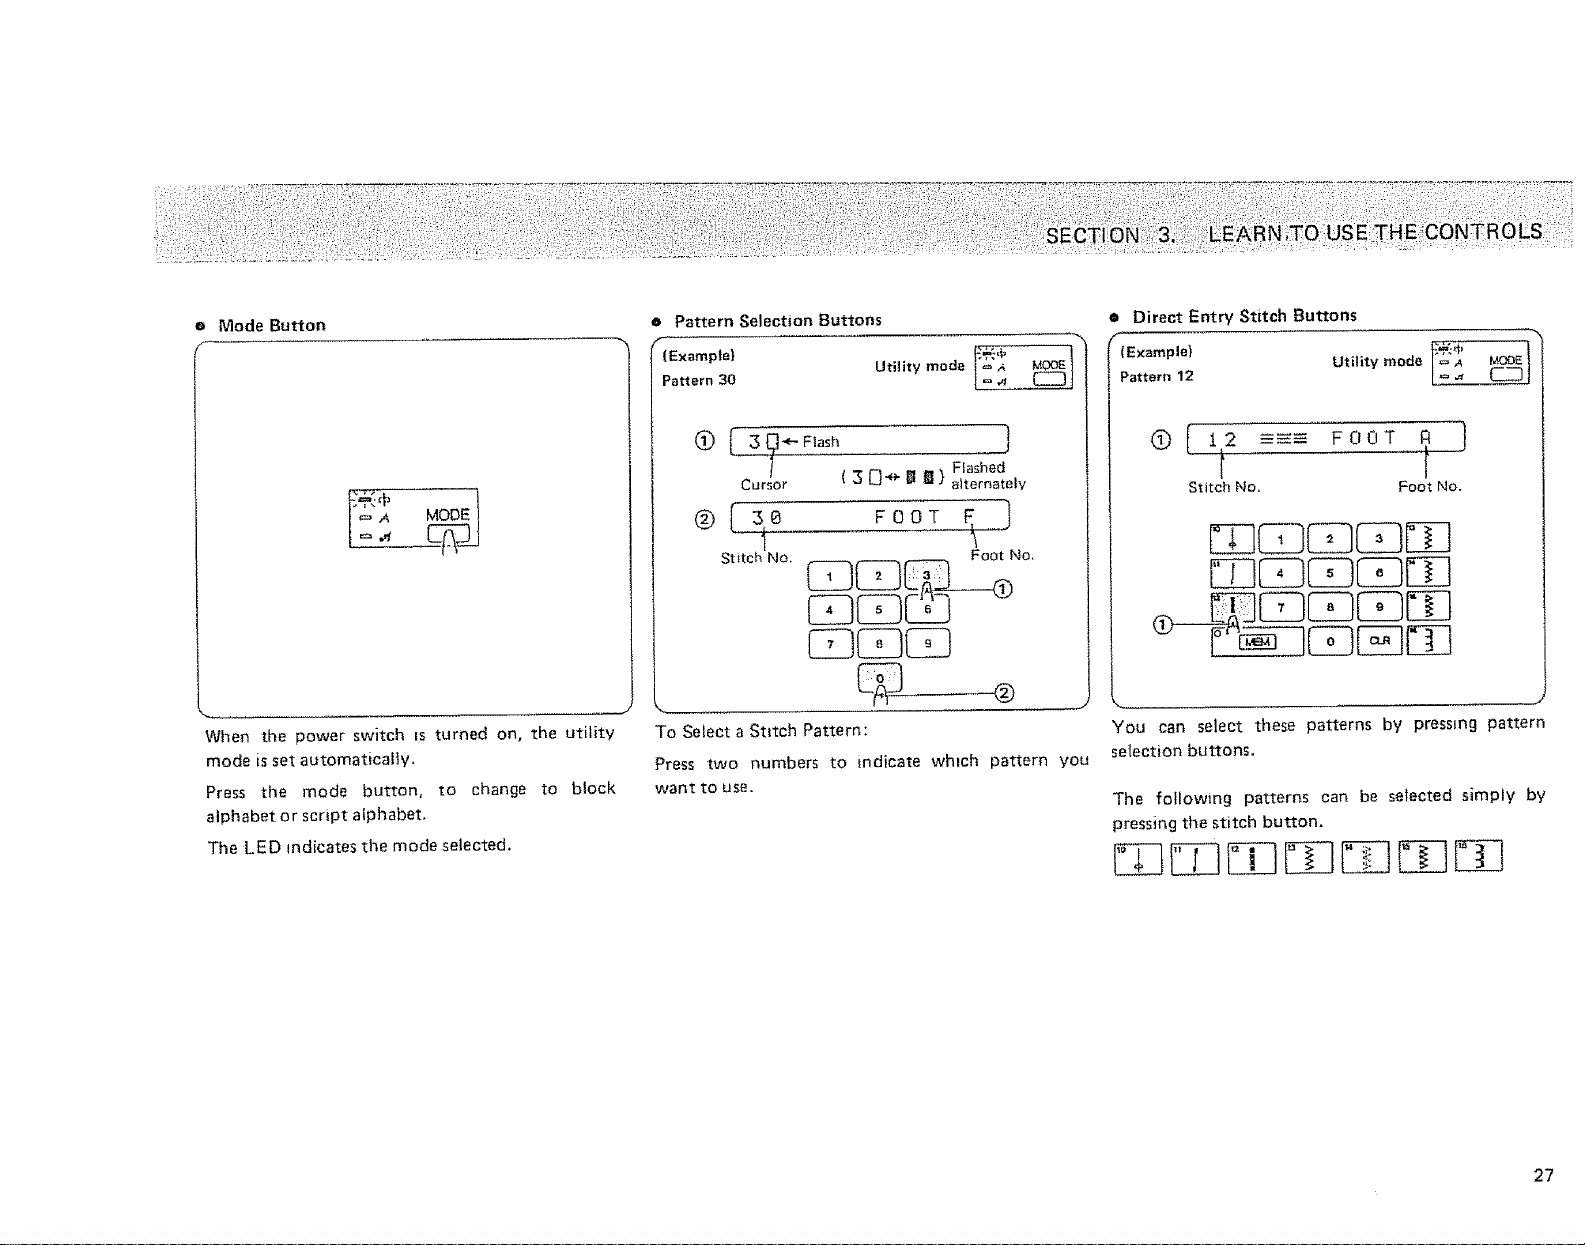
e Mode Button
e Pattern Selection Buttons
f
• Direct Entry Stitch Buttons
F--
When the power switch Is turned on, the utility
mode is set automatically.
Press the mode button, to change to block
alphabet or script alphabet,
The LED indicates the mode selected.
Pattern 30 Utility mode i'_
® {-T_÷Flooh 1
7
' ( :3 0 "e" _ _ ) alternately
Cursor
Ftashed
0OT
Stitch No, Foot No,
To Sefect a Stitch Pattern:
Press two numbers to indicate whch pattern you
want to use.
Pattetn(Example)12 Utility mode _
® [ !2--- Foot A }
f [
Stitch No, Foot No.
CZ;CDCDC
CD CDI
You can select these patterns by pressing pattern
setection buttons.
The following patterns can be selected simply by
pressing the stitch button.
27
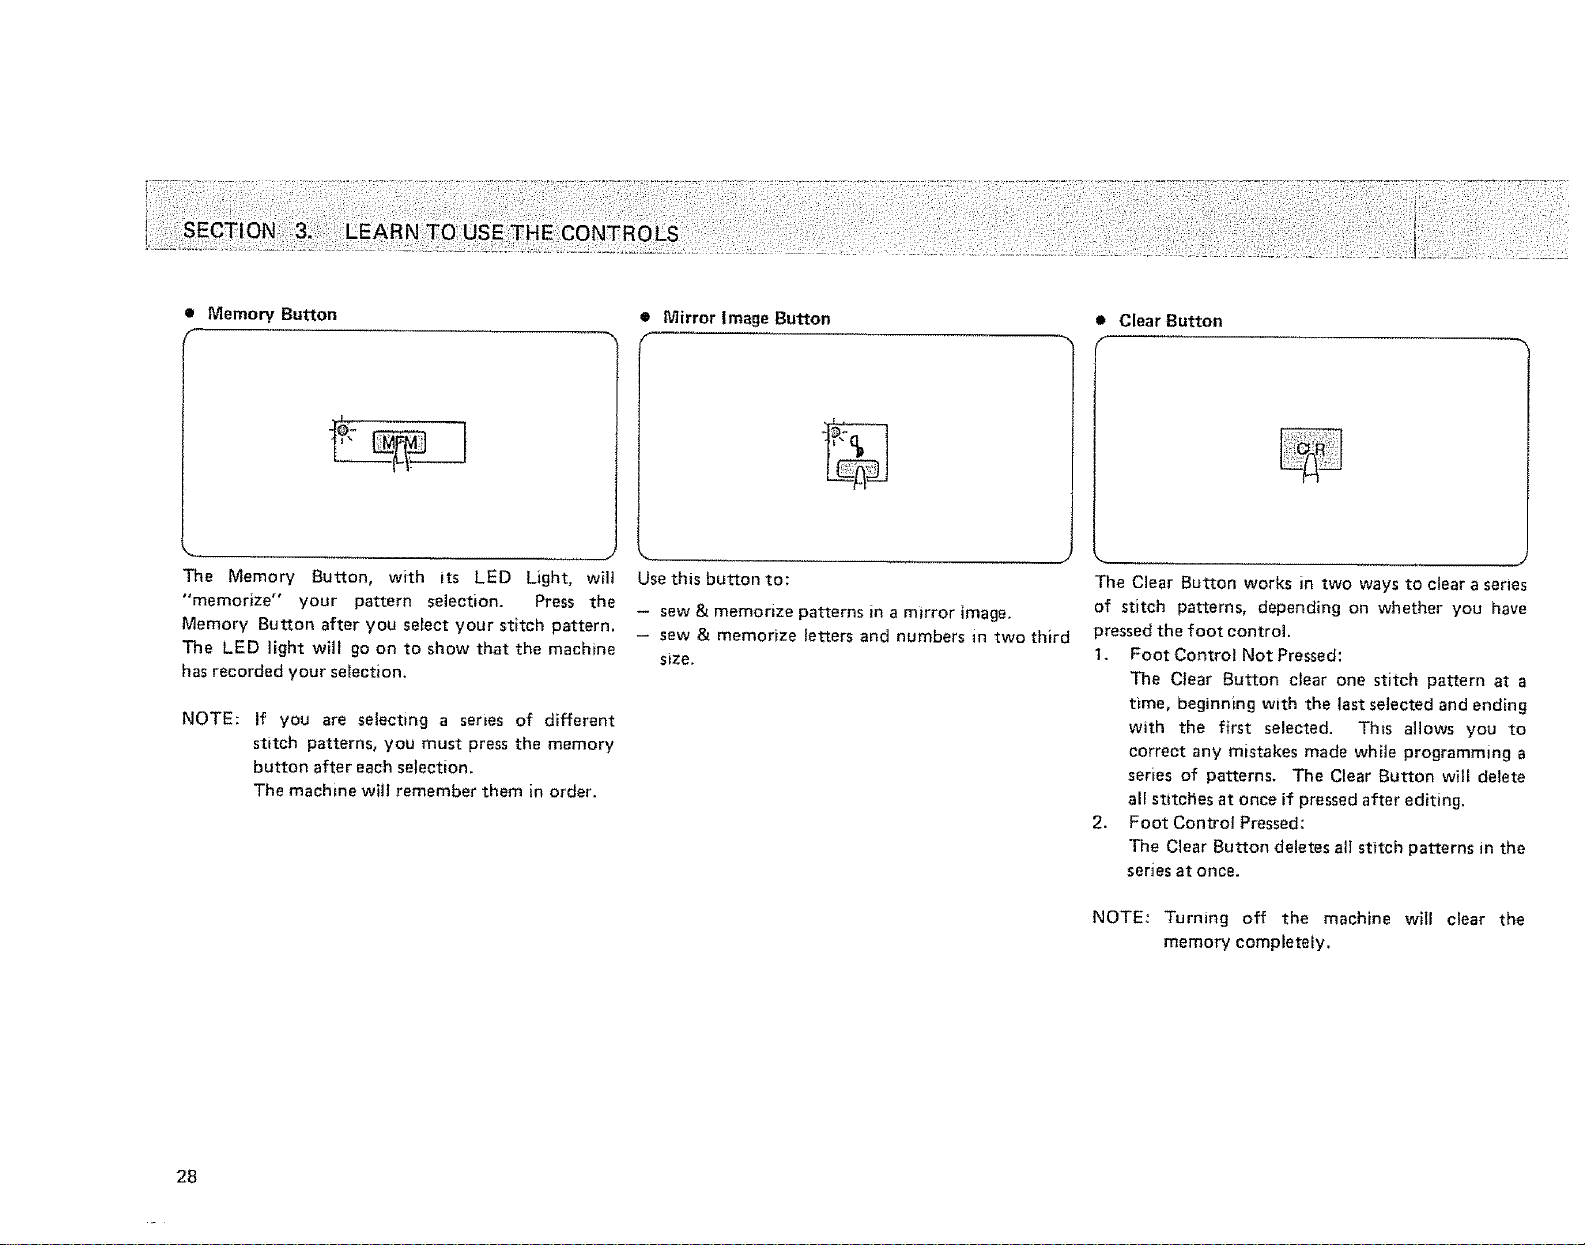
Memory Button
• Mirror Image Button • Clear Button
The Memory Button, with its LED Light, wilt
"memorize" your pattern selection. Press the
Memory Button after you select your stitch pattern.
The LED light wlll go on to show that the machine
has recorded your selection.
NOTE:
If you are selecting a series of different
stitch patterns, you must press the memory
button after each selection.
The machine will remember them in order.
Use this button to:
- sew & memorize patterns in a mirror image.
- sew & memorize letters and numbers in two third
size.
The Clear Button works in two ways to clear a series
of stitch patterns, depending on whether you have
pressed the foot control.
1, Foot Control Not Pressed:
The Clear Button clear one stitch pattern at a
t_me, beginning with the last selected and ending
with the first selected. This allows you to
correct any mistakes made wh_ie programming a
series of patterns. The Clear Button will delete
elf stitches at once if pressed after editing.
2. Foot Control Pressed:
The Clear Button deletes all stitch patterns in the
series at once.
NOTE: Turning off the machine will clear the
memory completely.
28
 Loading...