

Kenmore 38512814490, 38511608490 Owner’s Manual
OWN ER'S MAN UAL
MANUEL D'INSTR UCTIONS
MANUAL DE INSTRUCCIONES
MODELS
i "LES 385. 11608
: ::MODE .1
MODELOS 385 2814
SEARS, ROEBUCKANDCO.
Dear Customer:
You have just invested in a very fine zigzag sewing machine. Before using your new Kenmore machine,
please pause for a moment and carefully read this booklet which contains instructions on how to operate
and care for your machine.
Specific instructions are given on threading, tenskon adjustments, cleaning, oiling, etc. This willhelp you
obtain the best sewing results and avoid unnecessary service expense for conditions beyond our control.
Advice on the operation and care of your machine is always available at your nearest Sears Retail Store.
Please remember, if you have questions about your machine or need parts and service, always mention
the model number and serial number when you inquire.
Kenmore Sewing Machine
Record in space provided below the model number and serial
number of this appliance. The model number and serial number
are located on the nomenclature plate, as identified on Page 4 of
this booklet.
Model No. 385. ,Serial No.
Retain thesenumbers for future reference.
THIS MODEL 1SA CENTER NEEDLE, LOW BAR SEWING MACHINE.
nMPORTANTSAFETY
UNSTRUCTt!ONS
Your sewing machine is designed and constructed only for HOUSEHOLD use.
Read all instructions before using this sewing machine.
DANGER --To reduce the risk of electric shock:
1. A sewing machineshould never be left unattended when plugged in. Always
unplug this sewing machine from the electric outlet immediately after using
and before cleaning.
2. Always unplug before replacing sewing machine bulb. Replace bulb with
same type rated 15 Watts.
3. Do not reach lora sewing machine that has laflen into water. Unplug
immediately,
4. Do not place or store sewing machine where it can tall or be pulled into a tub
or sink. Do not place or drop into water or other liquid.
WA RN NG -Toreducethe,s,ofbu.os.,re.elecfricshook.or ory
to persons.
1. Do not allow to be used as a toy. Close attention is necessary when this
sewing machine is used by or near children.
4. Never operate the sewing machine wilh any alropening blocked. Keep ventilation
openings of the sewing machine arid foot controller free from accumulation
of lint, dust, and loose cloth.
5. Never drop or insert any obiect into any opening.
6. Do not use outdoors.
7. Do net operate where aerosol (spray) products are being used or where
oxygen is being administered.
8. To disconnect, turn all controis to the off _"0") position, then remove plug
from outlet.
9. Do not unplug by pulling on cord. To unplug, grasp the plug, not the cord.
10. Keep fingers away from all moving parts. Special care is required around
the sewing machine needle.
11. Always use the proper needle plate. The wrong plate can cause the needle
to break.
12. Do not use bent needles.
13. De not pull or push fabric while stitching, tt may deflect the needle causing it
to break.
14. Switch the sewing machine off ("0 °') when making any adjustment in the
needle area, such as threading needle, changing needle, threading bobbin,
or changing presser foot, and the like.
15. Always unplug the sewing machine from the electrical outlet when
removing covers, lubricating, or when making any other adjustments
mentioned in the instruction manual
2. Use this sewing machine only for itsintended use as described inthis manual
Use only attachments recommended by the manufacturer as contained in
this manual.
3. Never operate this sewing machine ifit has a damaged cord or plug, if it is not
working properly, if it has been dropped or damaged, or dropped into water.
Return the sewing machine to the nearest authorized dealer orservice center for
examination, repair, electrical or mechanical adiustment.
SAVE THESE UNSTRUCTIONS
" TABLE OF CONTENTS
SECTION 1. KNOW THE MACHINE
A Portable Case or Cabinet is Available ...................................... 4
Locate and Identify the Pads ....................................................... 4
fdenSfy the Accessories ............................................................... 5
SECTION 2. PREPARE THE MACHINE FOR SEWING
Set Up the Machine ...................................................................... 6
• Plug in the Machine and Switch on the Power ........................ 6
- Foot Control Use ..................................................................... 6
• Setting Spool Pins ................................................................... 8
• Adiust the Presser Foot Lever ................................................. 8
• Thread Cutter .......................................................................... 8
• Free Arm Sewing: the Removable Extension Table ................ 9
• Accessories Storage Box ........................................................ 9
• Changethe Presser Foot ........................................................ 9
Choose the Needle and Thread ................................................... 9
• To Changethe Needle ............................................................ 9
• Checkthe Needle .................................................................. 12
• Fabric, Needle, Thread and Stitch Length Chart ................... 12
Prepare the Bobbin .................................................................... 15
• To Remove the Bobbin Case from the Machine ................... 15
• Wind timeBobbin ............................................................ I5 - 17
Insert the Bobbin into the Bobbin Case ................................. 18
Prepare the Top Thread ............................................................. 19
• Thread the Needle ................................................................. t9
Pick Up the Bobbin Thread .................................................... 2I
Adjust the Top Thread Tension ............................................ 23, 26
Reverse Stitch Control ............................................................... 26
Stitch Selector ............................................................................ 29
Stitch Length Control ................................................................. 30
Adiusting Stretch Stitch Balance (Model 127t4 only) ................ 30
Starting To Sew .......................................................................... 32
SECTION 3. LEARN THE STITCHES
Straight Stitches ......................................................................... 35
• Straight Stitch ........................................................................ 35
• Use the Seam Guides ........................................................... 35
• Turn aSquare Corner ............................................................ 35
• Topstitching ........................................................................... 38
• Left Needle Position .............................................................. 38
• Sew in a Zipper ......................................................... 39 - 40, 43
• Use the Darning Plate ........................................................... 44
• Darning .................................................................................. 44
Zigzag Stitches ................................................................... 47 - 58
• Basic Zigzag .......................................................................... 47
• Satin Stitch ............................................................................ 49
• Applique ................................................................................ 50
• Bar Tacking ........................................................................... 50
• Sew a Button ......................................................................... 51
• Overcasting Stitch ................................................................. 53
• Three-Step Zigzag ................................................................ 54
• Lace Wod< ............................................................................. 55
• Blind Hemming ...................................................................... 56
• Shell Stitching ........................................................................ 58
Stretch Stitches (Model 12814 only) ......................................... 59
• Straight Stretch (Model 12814 only) ...................................... 59
• Rick-Rack Stretch (Model 12814 only) .................................. 60
. Overcast Stretch Stitching (Model 12814 only) ..................... 6!
. Serging or Pine Leaf Stretch Stitching (Model 12814 only) ........ 63
Buttonholes .......................................................................... 64, 67
• Feather Stitch (Model 12814 only) .......................................... 68
- Decorate with Geometric Patterms ....................................... 69
SECTION 4. PERFORMANCE PROBLEMS CHART
What to Do When ....................................................................... 70
SECTION 5. CARE FOR THE MACHINE
Replacing the Light Bulb ............................................................ 73
Cleaning the Machine ................................................................ 73
• Clean the Feed Dogs ............................................................ 73
• Clean the Shuttle Race ......................................................... 75
Oiling the Machine ..................................................................... 77
• Oil Behind the Face Cover Plate and Under .......................... 77
• Oil the Underside ................................................................... 77
PARTS LIST .................................................................................................... 80
KNOW THE MACHINE CONNAISSEZ VOTRE MACHINE
A Portable Case or Cabinet is
Available
A tuH line ot sewing cabinets is available at
your nearest Sears retail store or through our
general catalog,
Another option .... buy a Carrying
Case ..... then your Kenmore goes
anywhere, can be stored anywhere.
Mallette de transport et nteuble de
machine h coudre
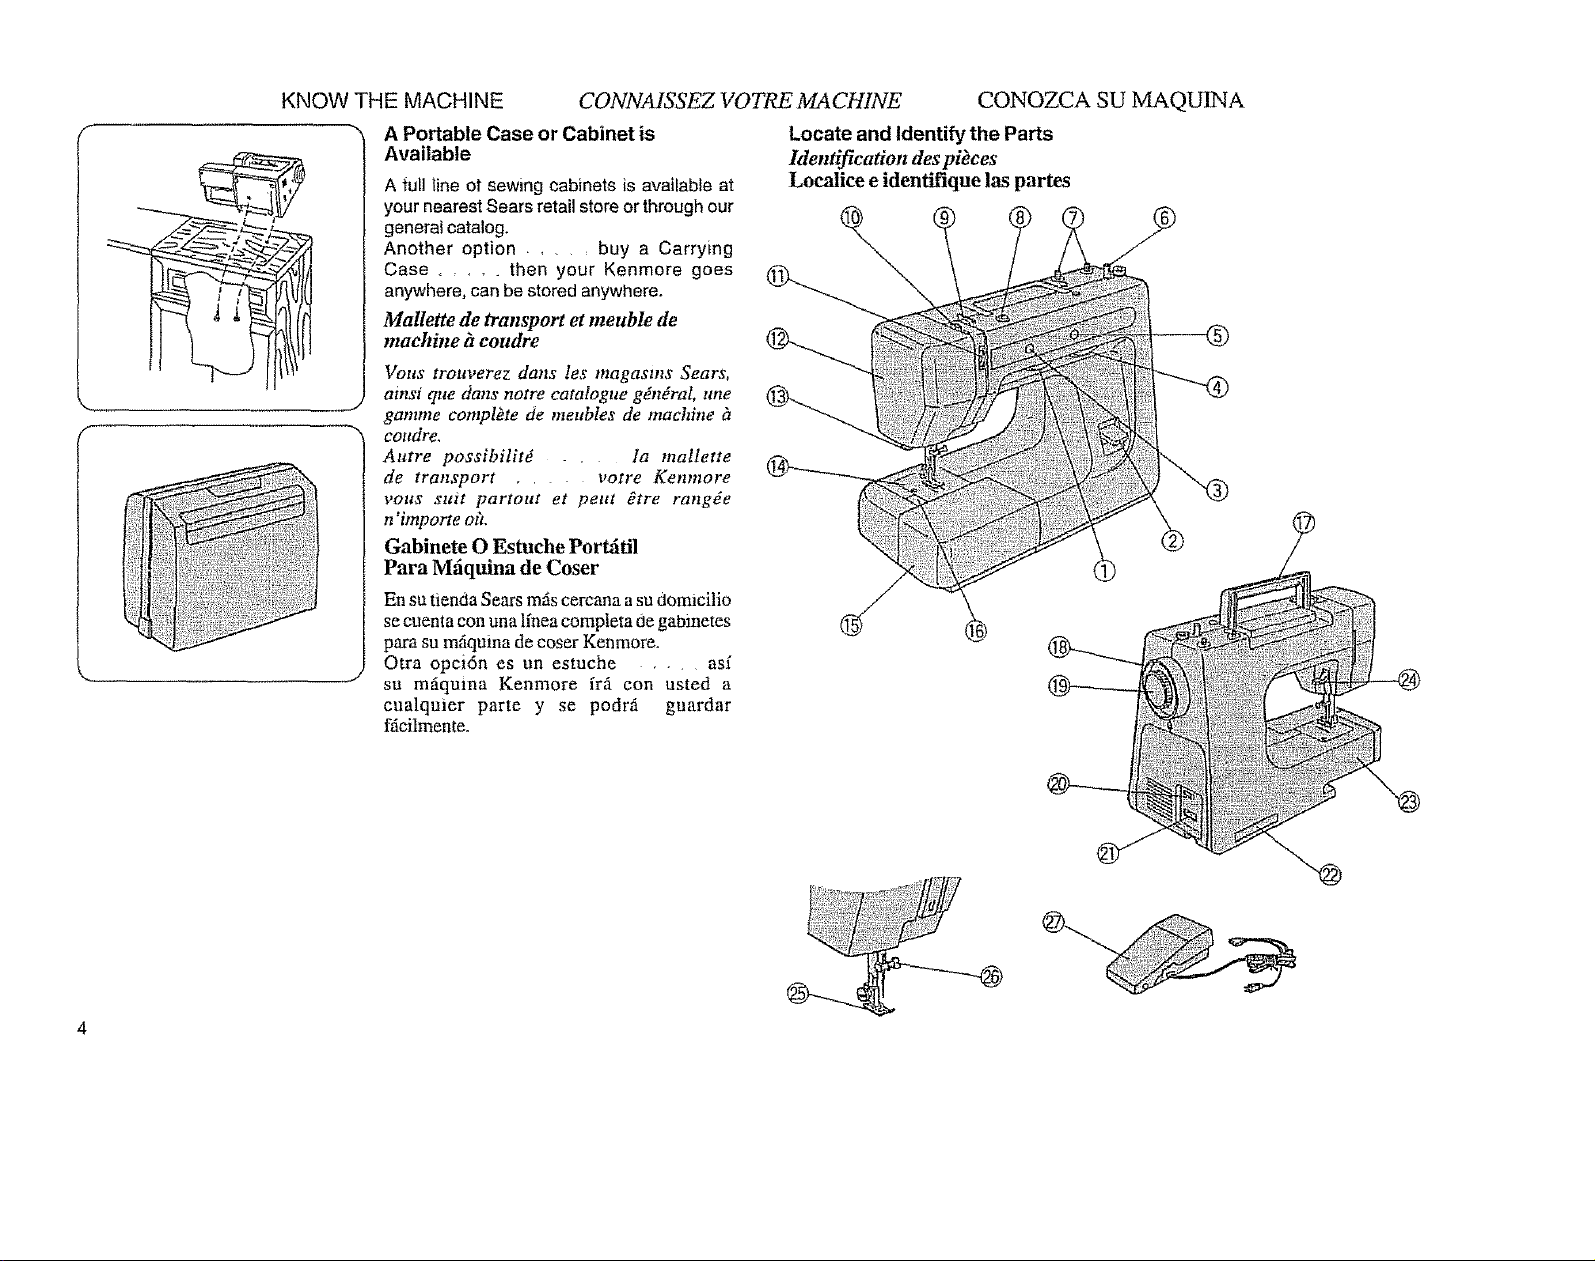
Locate and Identify the Parts
Identification des pibces
Loealice e identifique las partes
Vous trouverez dans les mogasms Sears,
ainsi que dans notre catalogue g_n_raL une
gamme complete de meubIes de machine h
coudre.
Autre possibilitd . la mallette
de transport . , votre Kenmore
$;OltS suit partout et pettt _tre rangde
n'importe oft.
Gabinete O Estuche Por_til
Para M_iquina de Coser
En su tienda Sears m_s cercana a su dormcilio
se cuenta con una lfnea completa degabinetes
para su m_quina de coser Kenmore.
Otra opci6n es un estuche .... asi
su m_tquma Kenmore fr_i con usted a
cualquier parte y se pedro1 guardar
fficilmente.
CONOZCA SU MAQUINA
1 Stitch Selector
2 Reverse Stitch Controf
3 Stitch Pattern Setting Window
4 Stitch Length Control
5 Stitch Length Setting Window
6 Bobbin Winding Spindle
7 Thread Spool Pins
8 Bobbin Winding Tension Disc
9 Upper Thread Guide
10 Take-up Lever
1! Top Thread Tension Control
12 Face Cover Plate
13 Thread Cutter
14 Needle Ptate
15 Extension Table (Accessory storage box)
16 Shuttle Cover
17 Car_ing Handle
t8 Hand Wheel
t9 Clutch Knob
20 Light and Power Switch
21 P]ug Connector
22 Nomenclature Plate
23 Free Arm
24 Presser Foot Lever
25 Presser Foot
26 Needle Clamp Screw
27 Foot Control
1 Sdlecteur de point
2 Piquage en arri_re
3 FertOtre da S_lecteur des poims
4 R_glage de longueur du point
5 Fen_tre du Longueur des points
6 Bobineuse de maniOre
7 Broches a bobines
8 Bobineuse a disque de tension
9 Guide-ill superior
10 Releveur-tendear de fil
11 Tension da fil de dessus
12 Cot¢vercie de tote
13 Coupe-ill
i4 Platme d'algaitle
15 Table d' e:_'tenston (Belie a accessoires)
16 Logement dE navette
17 Potgnke de transport
18 Volant a main
19 Boalott de vofant attlot_tattque
20 laterrupteur eclairage et moteur
21 Logement de fiche
22 plaque slgnaldtique
23 Bras libre
24 Relevage da pied-de-biche
25 Pied normal a potnt zigzag
26 Vis de pmce-atguilte
27 P6dale de vitesse
1 Selector de puntada
2 Control puntada de reverse
3 Ventana de patr6n de puntada
4 Control largo de puntada
5 Ventana de largo de puntada
6 Husillo dei devanador
7 Pens carretes de bile
8 Guia-hilos del hilo de fa aguja
9 Gu_a del hilo superior
t0 Palanca Tirahilo
11 Control de tensi6n del bile superior
12 Plancha cubierta frontal
13 Cortador de bile
14 Plancha de aguja
15 Mesa de extensi6n (Caja pars guardar accesolos)
16 Taps de la ianzadera
17 Ass trasportadora
18 Volante manual
19 Embrague Oprima-haie
20 Interrupter EncendidolApagado
21 Enchufe conector
22 Placa de nomenclatura
23 Braze fibre
24 Palanca dot pie prensateiss ias
25 Pie prensateias
26 Sujetador de ta aguja
27 Pedal
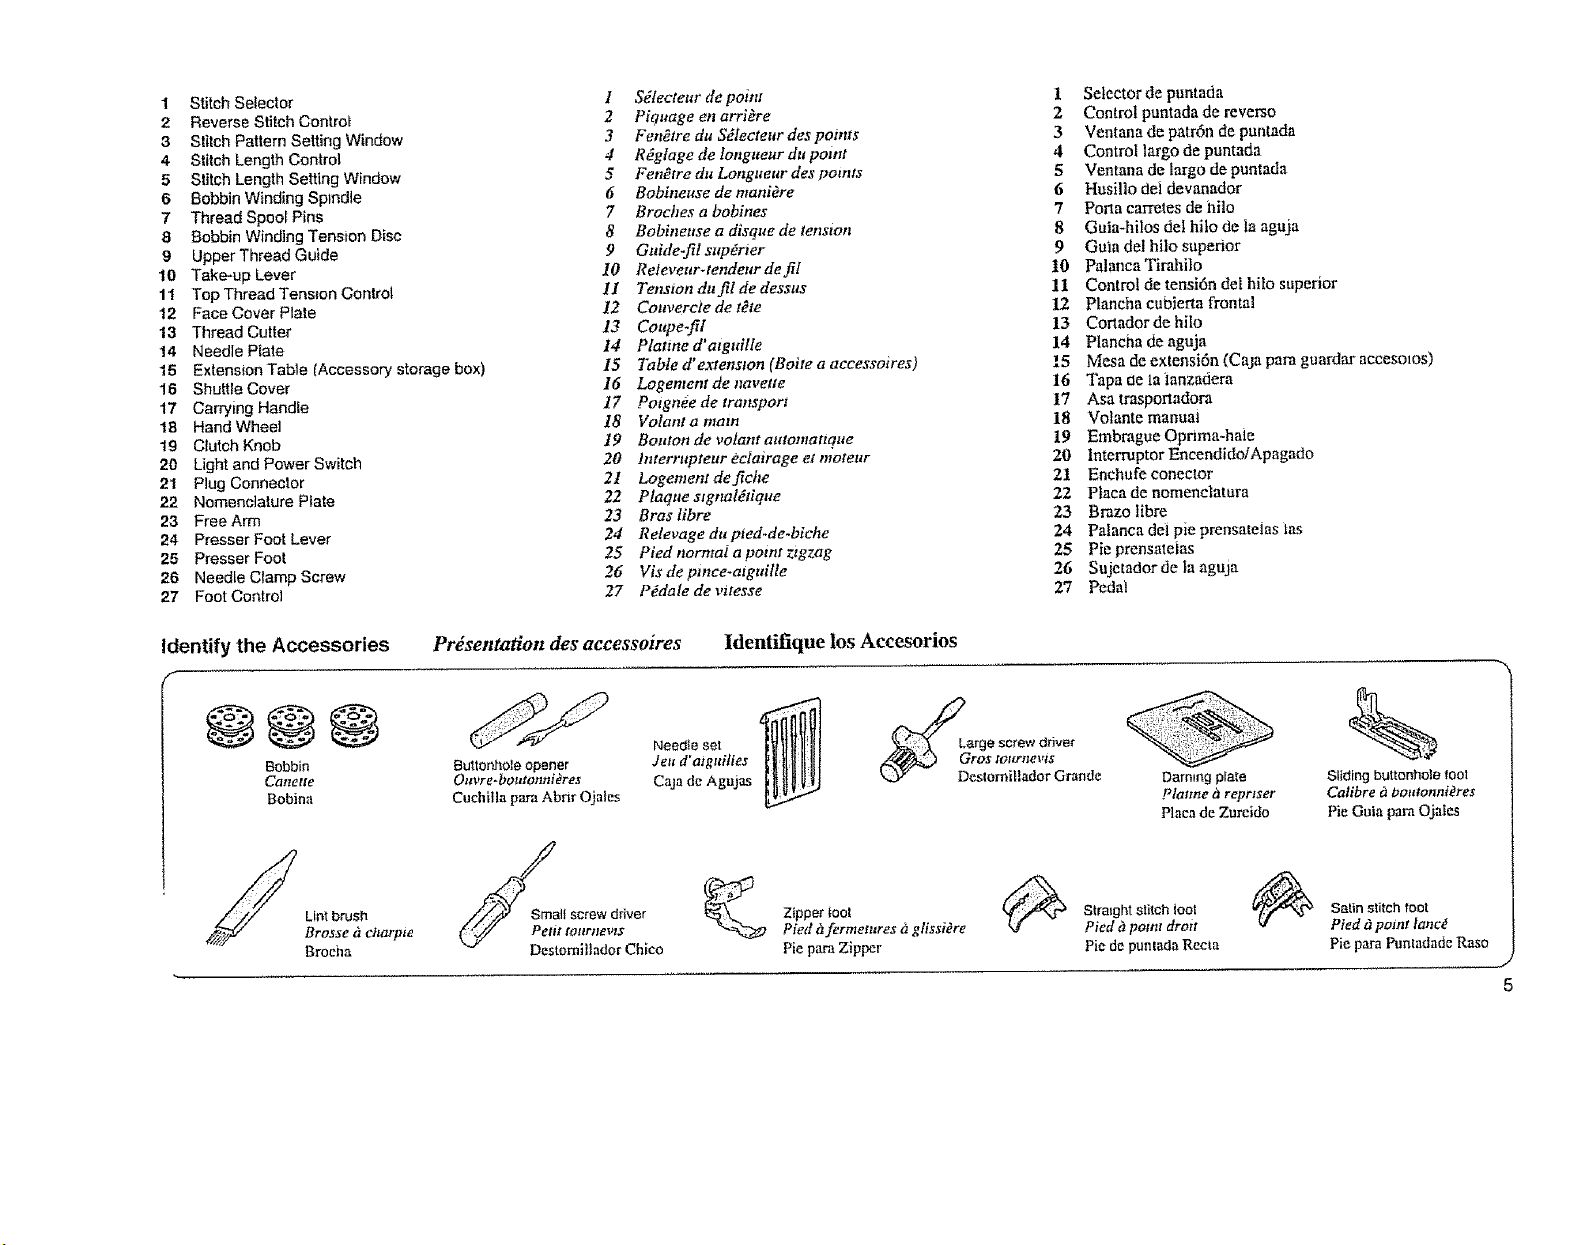
Identify the Accessories
Bobbin
Canelte
Bobina
Lint brush
Brosse &cttarpte
Broths
Presentation des accessoires Identifique los Accesorios
Needle sol
Buttonhole opener
Ouvre-boutonnidres
Cuehilla pars Abnr Oja|es
ll screw driver
t [onrnew$
omiltador Chico
Jett d'aigurTies
Caja de Agujas
Pie pars Zipper
Darning plme
Platme a reprtser
Placa de Zurcido
Straight stilch tool
Pied h paint droit
Pie de puntada Recta
Sliding buttonhole too!
Calibre _ boutannidres
Pie Guia pars Ojales
Satin stitch foot
Pied t_point lanc_
Pie pars Punladade Raso
/
J
5
PREPARE THE MACHINE FOR SEWING PI_PARATION DE LA MACHINE A COUDRE
Powersupplyplug
Cordon Electrique
suppJy
tse de
CoIIrQ#II
Plug connector Machine plug
Fiche encastree _'che de DEdafe
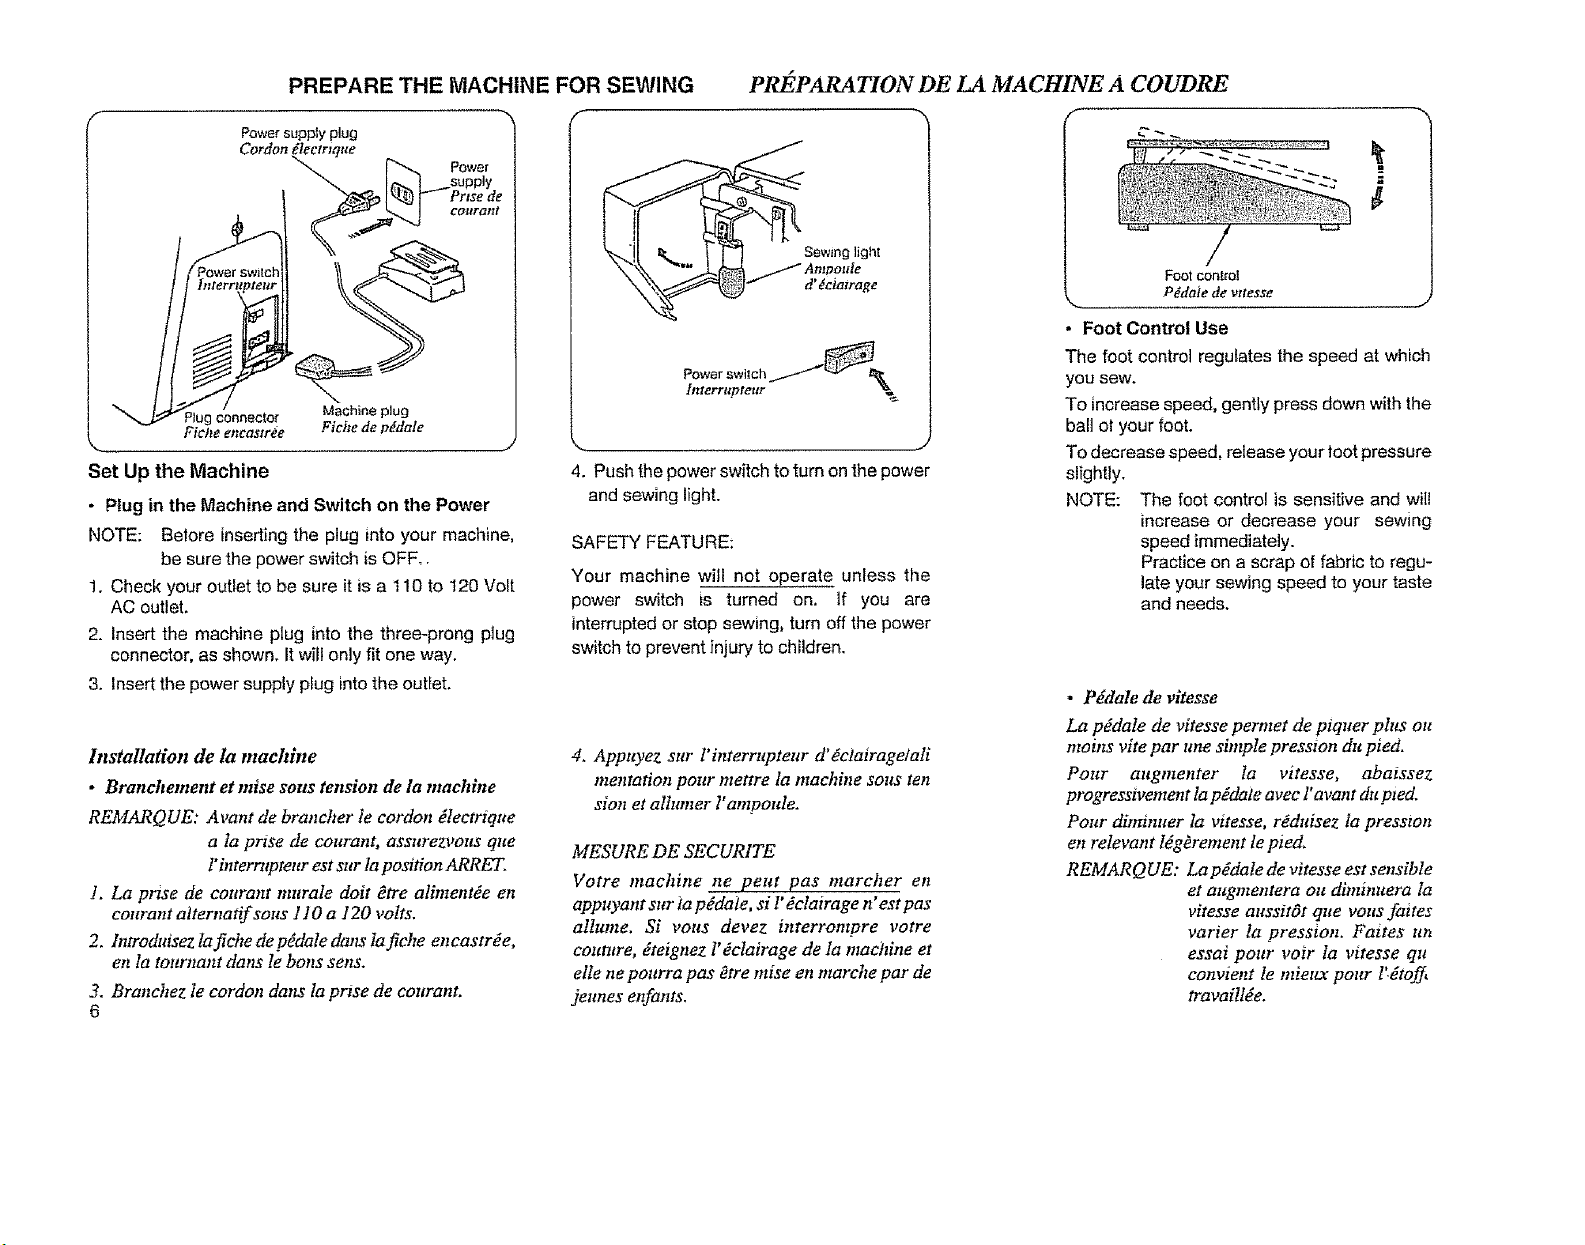
Set Up the Machine
- Plug in the Machine and Switch on the Power
NOTE: Before inserting the plug into your machine,
be sure the power switch is OFF°.
1. Check your ouUet to be sure it is a 110 to 120 Volt
AC outlet.
2. Insert the machine plug into the three-prong plug
connector, as shown. It will only fit one way.
3. Insert the power supply plug into the outlet.
Installation de la machine
• Branchement et raise soils tension de ta ntachine
REMARQUE: Avant de brancher te cordon dlectrtque
a la prise de courant, assurezvous qne
l'hzterrttpteur est sur la position ARRET.
1. La prise de courant murale dolt _tre alimentde en
courant alternafif sous t10 a 120 volts.
2. h_troduisez lafiche de pddale dans Iafiche encastrde,
en la tournant dans le hens sens.
3. Branchez Ie cordon clans la prise de coltrant.
6
__/Sewing ligh!
AmDoule
d'dcJatrage
%
,_, .J
4. Push the power switch to turn on the power
and sewing light.
SAFETY FEATURE;
Your machine will not operate unless the
power switch is turned on. if you are
interrupted or stop sewing, turn off the power
switch to prevent injury to children.
4, Appuyez sur l' interrupteur d' #ciairagetali
mentation pour mettre la machine sous ten
sion et alhuner Fampoule.
MESURE DE SECUR1TE
Votre machine ne peut pas marcher en
appuyant sur ta pEdaie, si I"_clairage n' est pas
alhtme. Si vous devez interrompre votre
couture, Eteignez l' dclairage de la machine et
elle ne pourra pas Otre raise en marche par de
jeunes enfants.
/
Foot controt
Pdda_ede vttesse
• Foot Control Use
The foot control regulates the speed at which
you sew.
To increase speed, gently press down with the
ball ot your foot.
To decrease speed, release your toot pressure
slightly.
NOTE: The foot control is sensitive and will
increase or decrease your sewing
speed immediately.
Practice on a scrap e[ fabric to regu-
late your sewing speed to your taste
and needs.
. PMale de vitesse
La pEdale de vitesse permet de piqner pins ou
ntoins vlte par une simple presston du pied.
Pour attgmenter la vitesse, abaissez
progressivement la pddaie avec l°avant du pied.
Pour diminuer la vttesse, r_duisez Ia pression
en relevant ldg_rement le pied.
RElffARQUE: Lapddale de vitesse est sensible
et aztgmentera ou diminuera la
vitesse attssit_t que votts faites
varier la pression. Faites un
essai pour voir Ia vitesse qu
convient le mieux pour ltdtoff,
travaill_e.
_ija
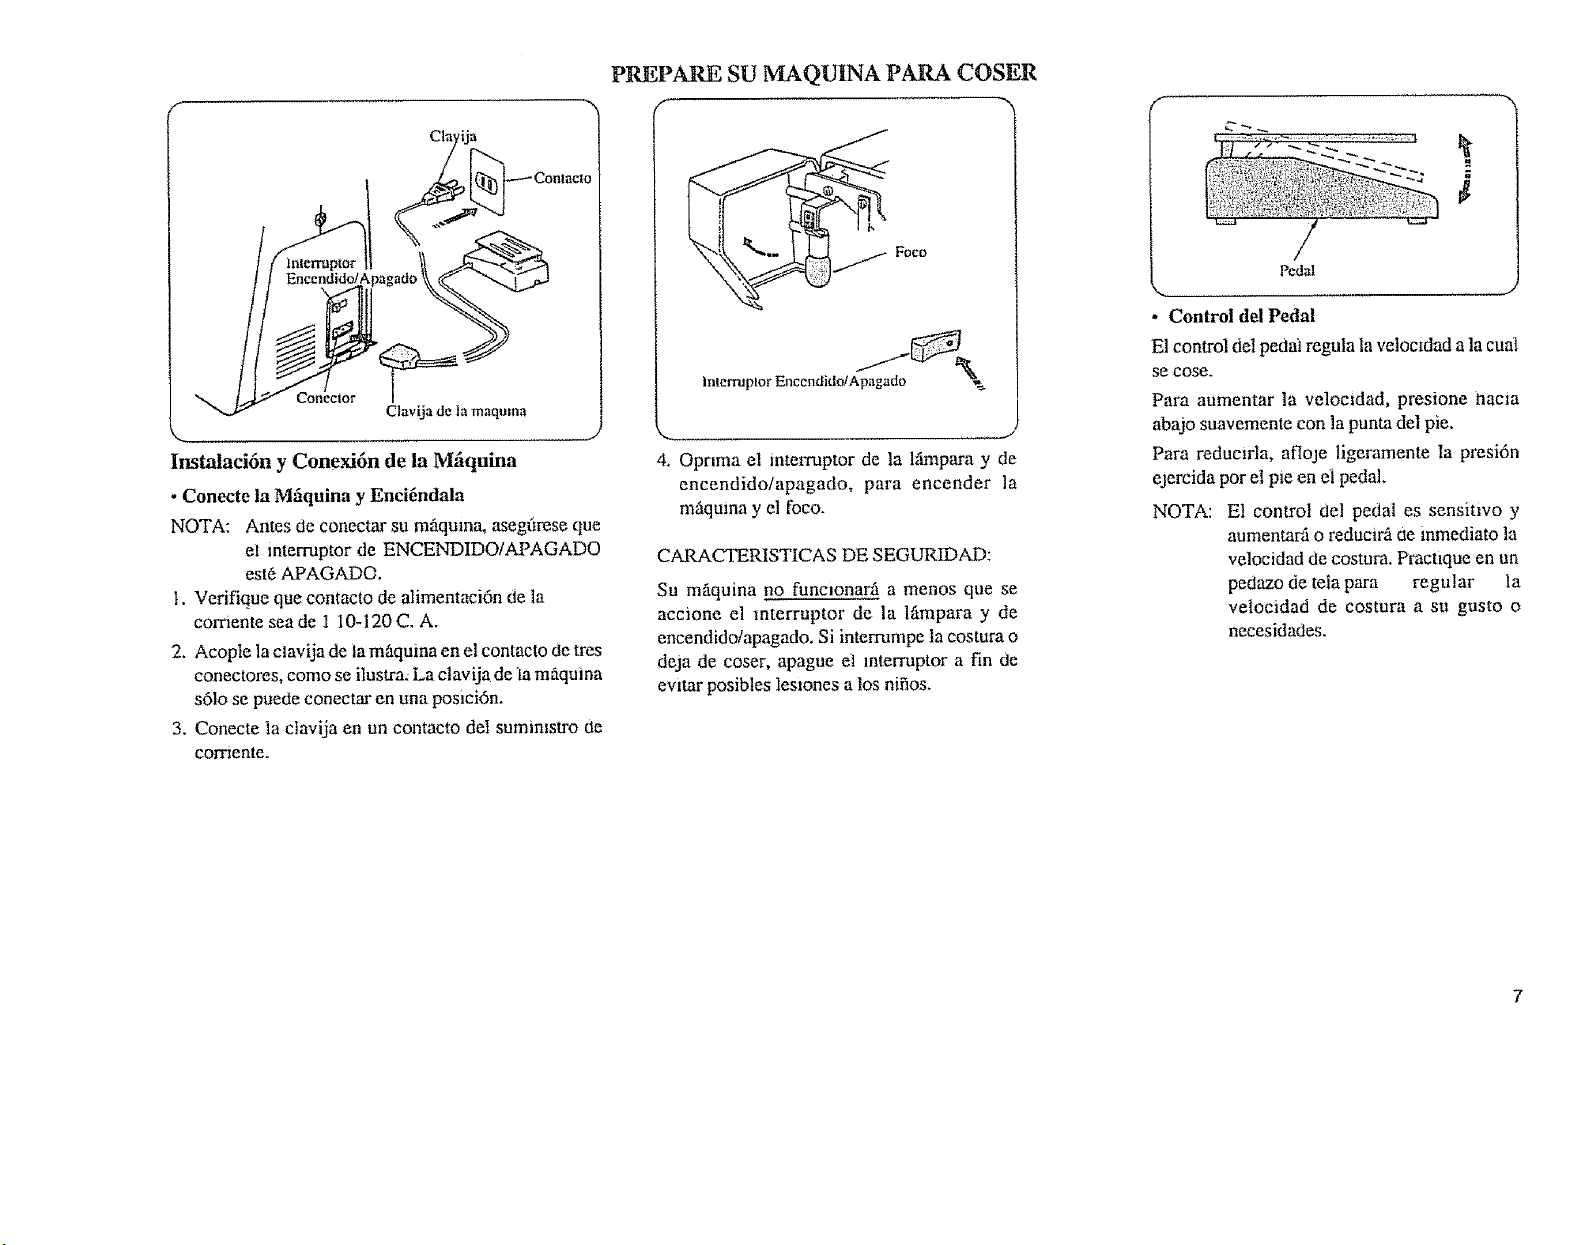
Instalaci6n y Conexidn de la Mfiquina
- Conecte la Mfiquina y Encidndala
NOTA: Antes de conectar su m_quma, asegfirese que
et interruptor de ENCENDIDO/APAGADO
est_ APAGADO.
I. Verifique que contacto de alimentaci6n de la
comente seade I I0-120C. A.
2. Acople la ciavija de ia m,Squinaenel contacto de tres
conectores, cored se ilustra. Laclavija de la mfiquina
s61ose puede conectar en una posici6n.
3. Conecte la ctavija en un contacto de1sumimstro de
COiTlente.
PREPARE SU MAQUINA PARA COSER
Inmrruptor EnecndidolApagado
........ J
4. Opnma el interruptor de la lfimpara y de
encendidoiapagado, para encender la
mfiquina y el foco.
CARACTERISTICAS DE SEGURIDAD:
Su m_quina no funcionarg a mends que se
accione el mterruptor de la lfimpara y de
encendido/apagado. Si interrumpe ta costura o
deja de coser, apague et mterruptor a fin de
evltar posibtes lesiones a los nifios.
a
u
/
Pedal
• Control del Pedal
E1control del pedro regula la vetoc_dad a la cual
Se cote.
Para aumentar la velocidad, presione nacre
abajo suavemente con la punta del pie.
Para reduewla, afloje ligeramente la presi6n
ejercida pot el pmen ei pedal.
NOTA: E1 control del pedal es sensitwo y
aumentara o reducirfi fiemmediato la
velocidad de costura. PractNue en un
pedazo de teta para regular la
vetocidad de costura a su gusto o
necesidades.
f
F----
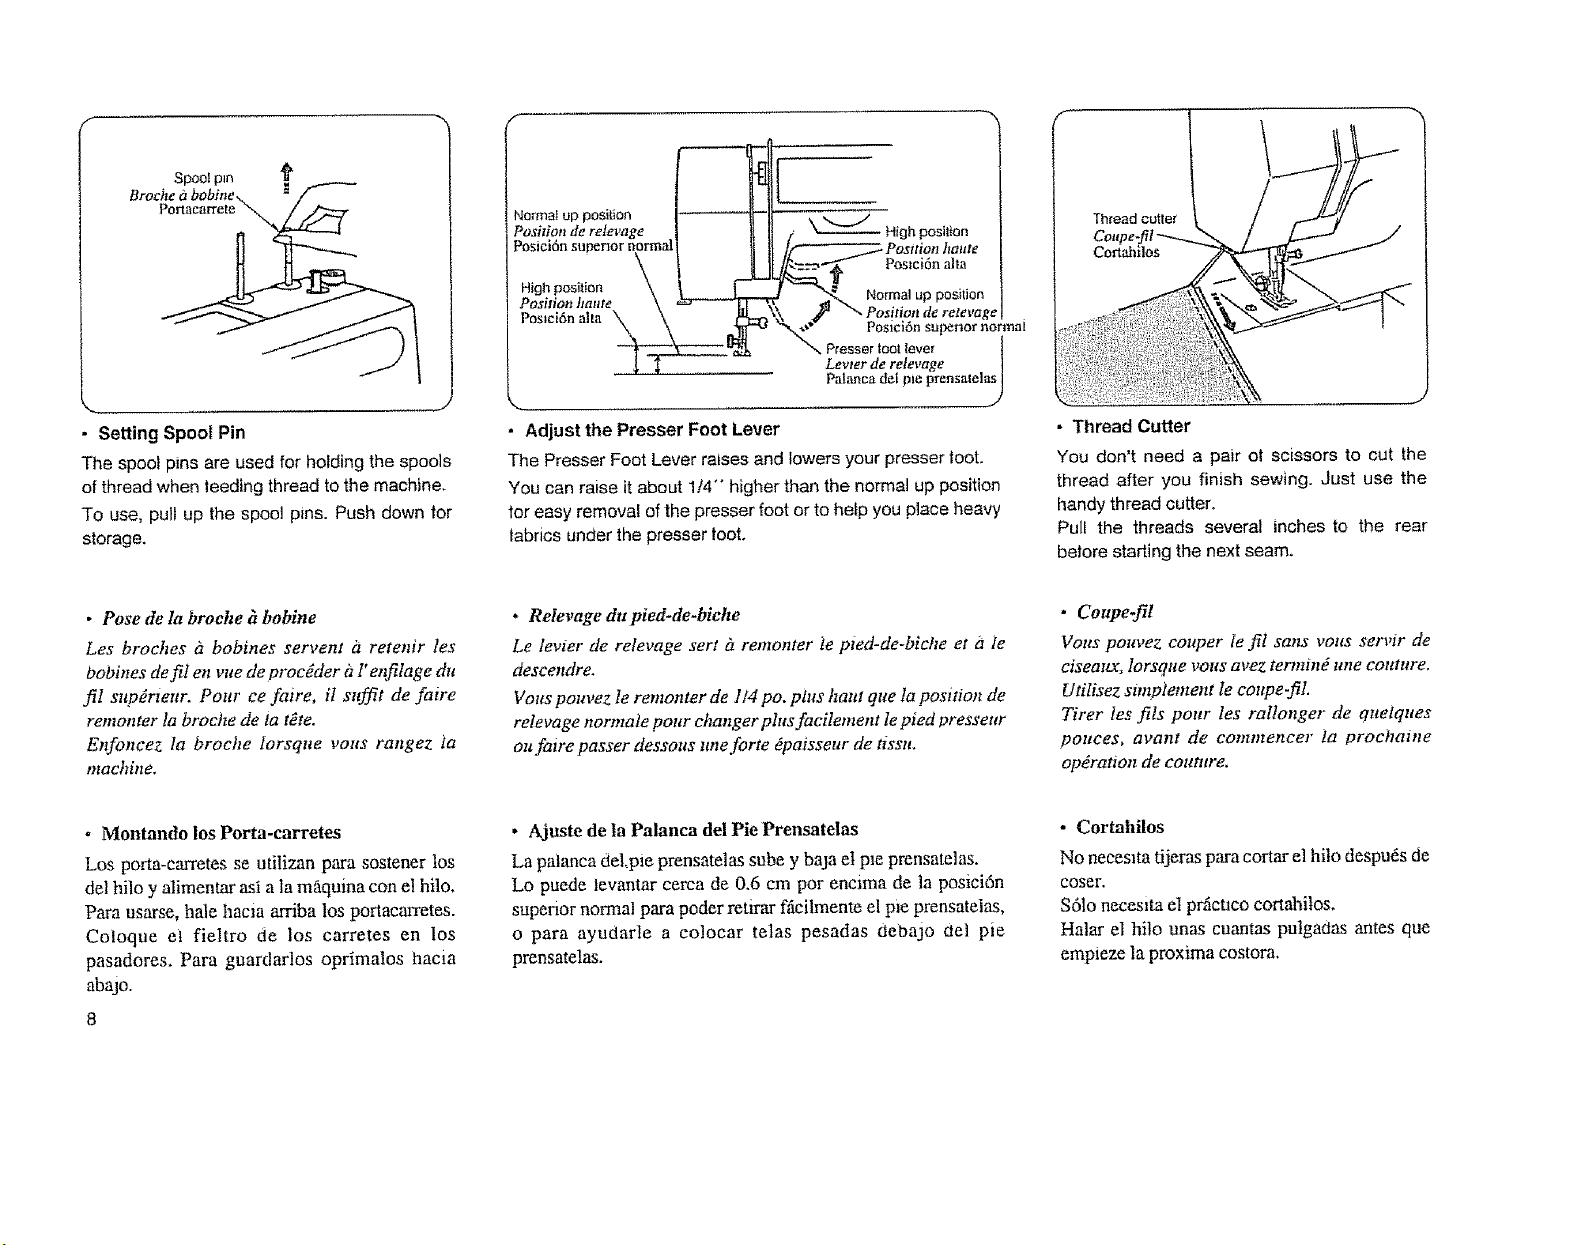
• Setting Spool Pin
The spoo! pins are used for holding the spools
of thread when |eeding thread to the machine.
To use, pull up the spool pins. Push down tar
storage,
• Pose de la broche h bobine
Les broches it bobines servent h retenir les
bobines de fil en vue de proc_der izl' el_lage du
fiI sup_rleur. Pour ee faire, it sttffit de faire
fomenter la broche de la t_te.
Enfoncez Ia broche Iorsque vous rangez ta
machine.
Normalup position
Positionde retevage I
Posiei6nsuperior normal]
High position _ 1 _"
Position haute \
Posmi6nalia _ \ 1
• Adjust the Presser Foot Lever
The Presser Foot Lever raises and lowers your presser toot.
You can raise it about 1/4°° higher than the normal up position
toreasy removal of the presser foot or to help you place heavy
fabrics under the presser toot.
. Refevage du pied-de-biehe
Le levier de relevage sert ?zremonter ie pted-de-biche et ii ie
descendre.
Vous pouvez le remonter de 1/4 po. plus haut que la position de
relevage normale pour changer plus facilement le pied presseur
ou faire passer dessous une forte dpaisseur de tissu.
il:y._ k_-_ High position
PosUion]tt_ttle
U_ "_- Posmi6naha
__\ ._a _'. Position de relevag,
:O _¢ P'-"" :" -osmi6n superiorrtonnat
_ Normal up position
_. Presser toot lever I
Levter de retevage
" Pah'mcadei I_ieprensatelas I
)
• Thread Cutter
You don't need a pair at scissors to cut the
thread after you finish sewing. Just use the
handy thread cutter.
Pull the threads several inches to the rear
before starting the next seam.
• Coupe-j_l
Vous pom,ez couper le fil sans vous servir de
cisemoq lorsque vous avez temniud une COllfure.
Utilisez si,_piemeut te coupe-ill.
Tirer tes ills pour les rallonger de quelques
pouces, avant de commencer ta proehaiue
opdration de couture.
. Montando los Porta-carretes
Los porta-carretes se utilizan para sostener los
del hilo y alimentarasia la mf_quina con el hilo_
Para usarse, hale hacia arriba los portacarretes.
Coloque el fie|tro de los carretes en los
pasadores, Para guardarlos oprimalos hacia
abajo.
8
• Ajuste de la Palanea del Pie Prensatdas
La palanca del,pie prensatelas sube y baja et pie prensatelas.
Lo puede levantar cerca de 0.6 cm per encima de la posici6n
superior normal para peder retirar fficilmente el pie prensatelas,
o para ayudarle a eolocar telas pesadas debajo del pie
prensatelas.
• Cortahilos
No neees_ta tijeras para cortar el hito despufs de
coser.
$6to necesita el prfictlco cortahitos.
Halar el hilo unas cuantas pulgadas antes que
empieze la proximo costora.
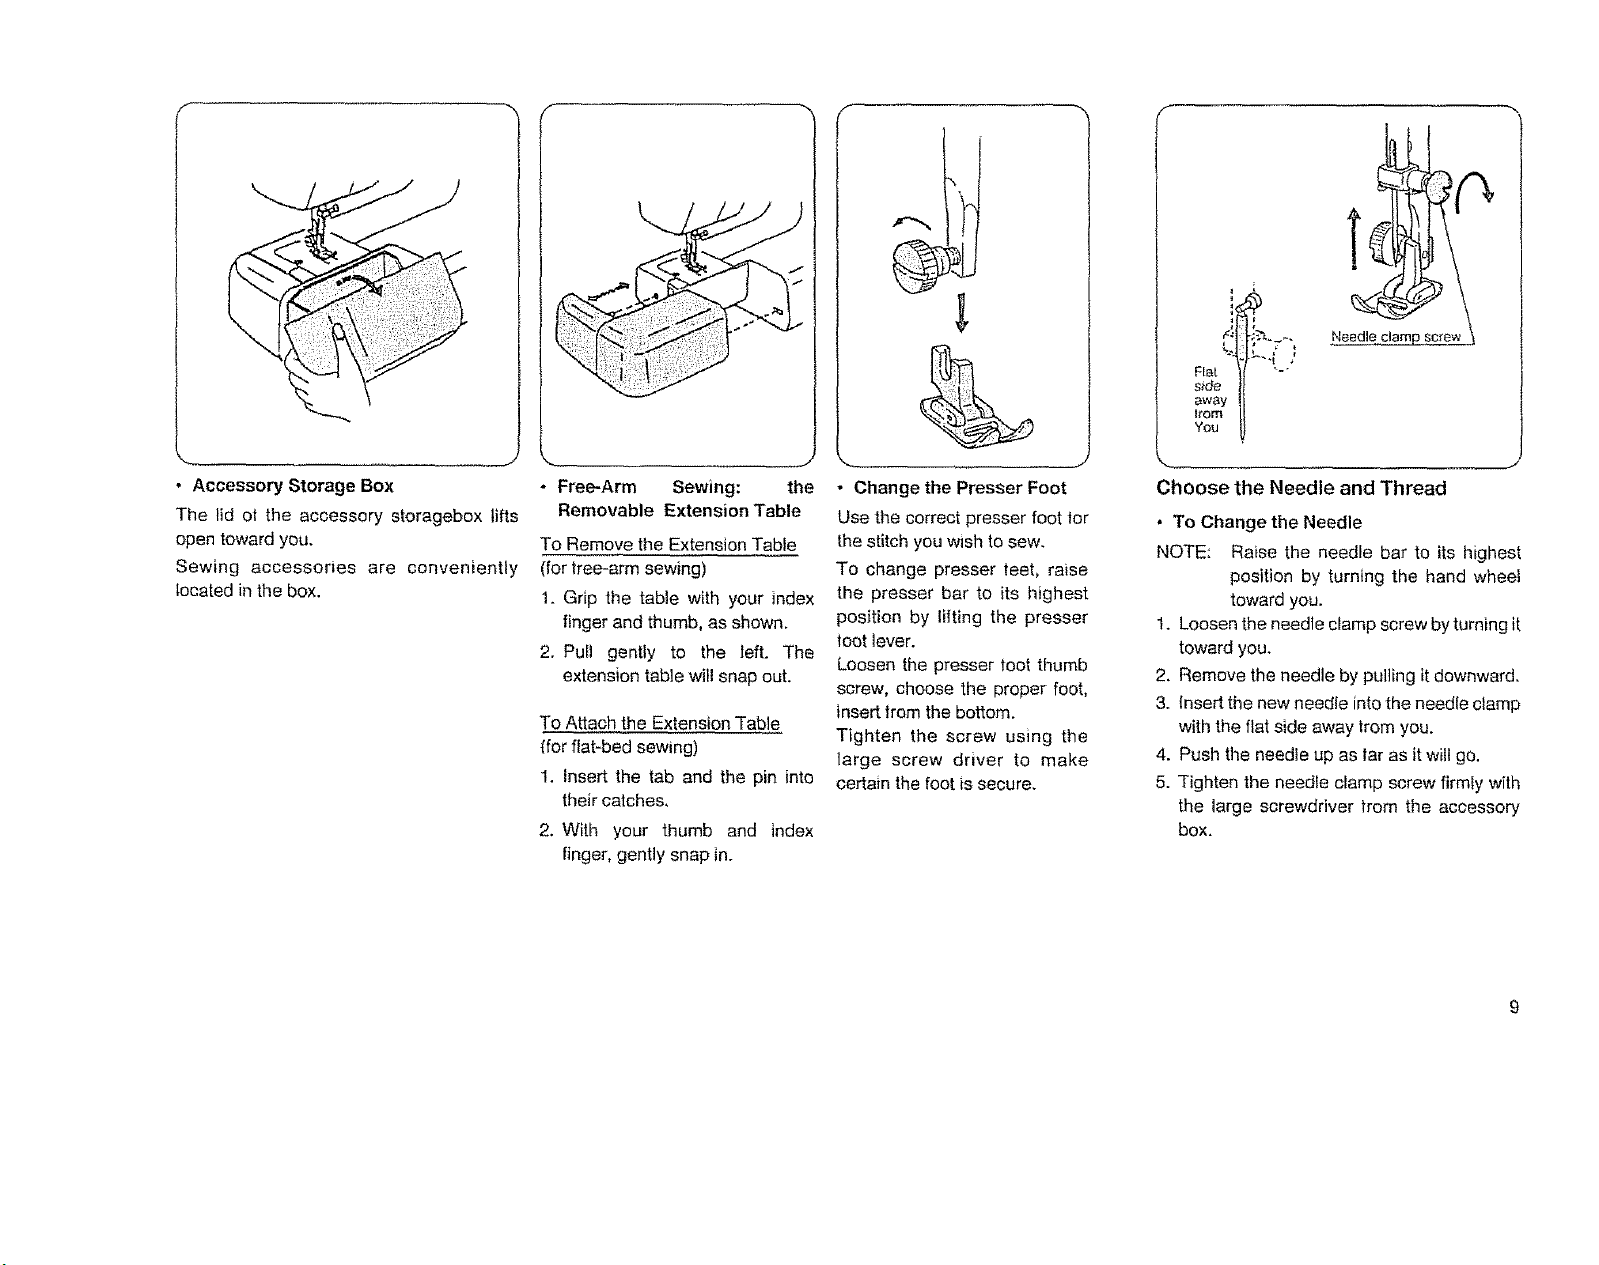
• Accessory Storage Box
The lid ot the accessory storagebox lifts
open toward you.
Sewing accessories are conveniently
located in the box.
%. ........ J
• Free-Arm Sewing: the
Removable Extension Table
To Remove the Extension Table
(for tree-arm sewing)
1. Grip the table with your index
finger and thumb, as shown.
2. Pull gently to the left. The
extension table will snap out.
To Attach the Extension Table
(for flat-bed sewing)
1. insert the tab and the pin into
their catches,
2. With your thumb and index
finger, gently snap in.
f--,,,
.... J
• Change the Presser Foot
Use the correct presser foot lor
the stitch you wish to sew+
To change presser leet, raise
the presser bar to its highest
position by lilting the presser
toot lever.
Loosen the presser toot thumb
screw, choose the proper foot,
insert item the bottom.
Tighten the screw using the
large screw driver to make
certain the foot is secure.
Needle clamp screw--
FLat "" `[_-++'
s+<:_e
away
Lrom
You
Choose the Needle and Thread
• To Change the Needle
NOTE: Raise the needle bar to its highest
position by turning the hand wheel
toward you.
1+ Loosen the needle clamp screw by turning it
toward you+
2. Remove the needle by pulling it downward.
3. insert the new needle into the needle clamp
with the flat side away from you.
4. Push the needle up as lar as it will go.
5. Tighten the needle clamp screw firmly with
the large screwdriver from the accessory
box.
0
L part_e
U ptate du
U talon vers
v Farri_re
Visde
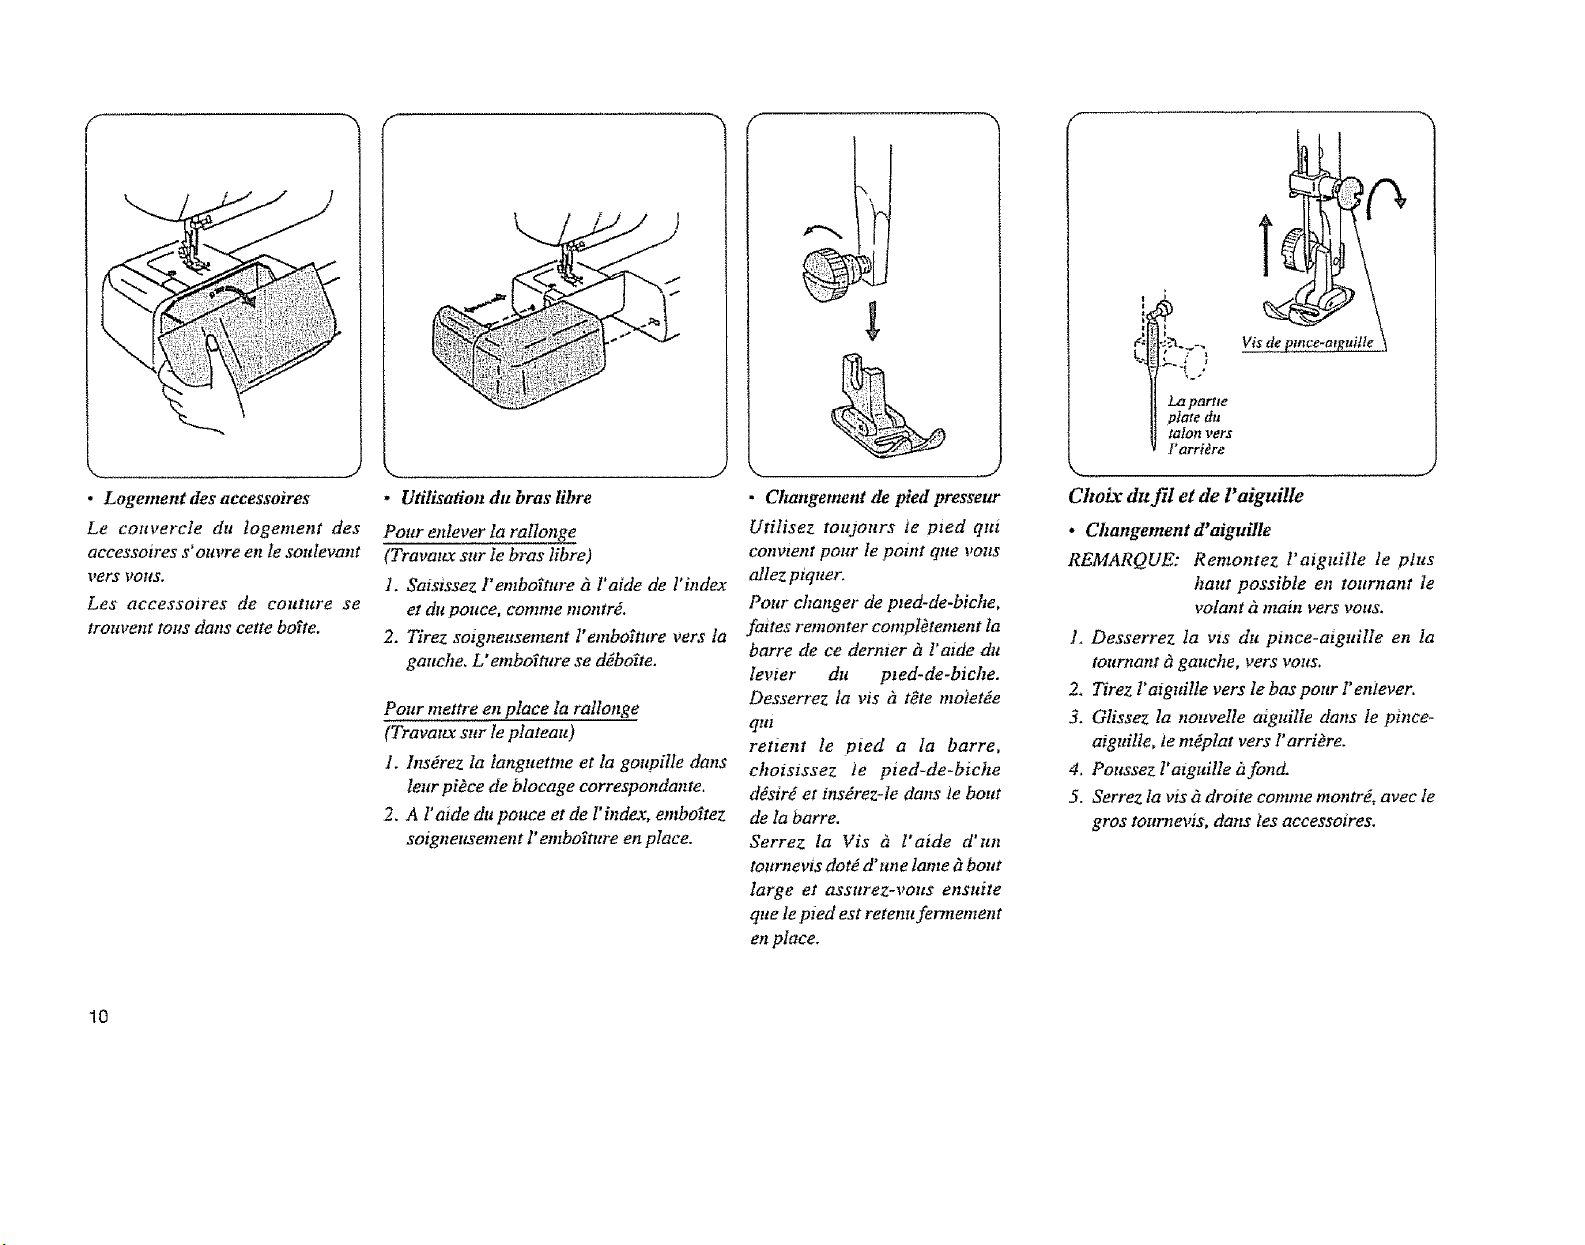
• Logement des accessoires
Le couvercle du logement des
accessoires s' ouvre en le soulevant
vers rol!s.
Les accessolres de cottttlre se
trouvettt toils dOllS cette bo_te.
10
• Utilisation du bras fibre
Pour enIever la rallonge
(TravmLr_ sur ie bras libre)
1. Saisissez I' embo_tlo'e _ l°aide de l'index
et du pouce, comme montr_.
2. Tirez soigneusement l' embo_tttre vers la
gauche. L" embo_ture se ddbo_te_
Pour mettre en place la raltonge
(Travat_x sur le plateau)
I. Insdrez la Ianguettne etla goupilIe dans
leur pidce de blocage correspondante.
2. A l' atde du pouce et de I' hrd_r, embo?tez
soignettsement l"embo_ture en place.
• Changement de pied presseur
Utilisez toujours ie pied qm
convteut pour le point que volts
aJlez piquet.
Pour changer de pted-de-biche,
faites remonter compt_tement la
barre de ce dernter h !'aide du
Ievter du pted-de-biche.
Desserrez la vis d t£te motetde
qta
retient le pied a Ia barre,
choisissez ie pied-de-biche
ddsird et insdrez-te dans ie bout
de la barre.
Serrez la Vis & l'aide d'un
tournevis dotd d'une lame _tbout
large et assurez-vous ellsuite
que le pied est retenu fermement
en place.
Chaix du fil et de l'aiguille
• Changement d'aiguille
REMARQUE: Remontez l'aiguitle le plus
haul possible en tournant Ie
volant h main vers volts.
1. Desserrez ta vis du pince-aiguilIe en la
tournant h gauche, vers vous.
2_ Tirez l'a_gtdlle vers le bas pour l' eniever.
3. Glissez la nouvelle a_guille clans le pince-
atguille, ie mdplat vers l'arridre.
4. Poussez l'alguille h fond.
5. Serrez la vis h droite comme montrd, avec le
gros tournev_s, clans les accessoires.
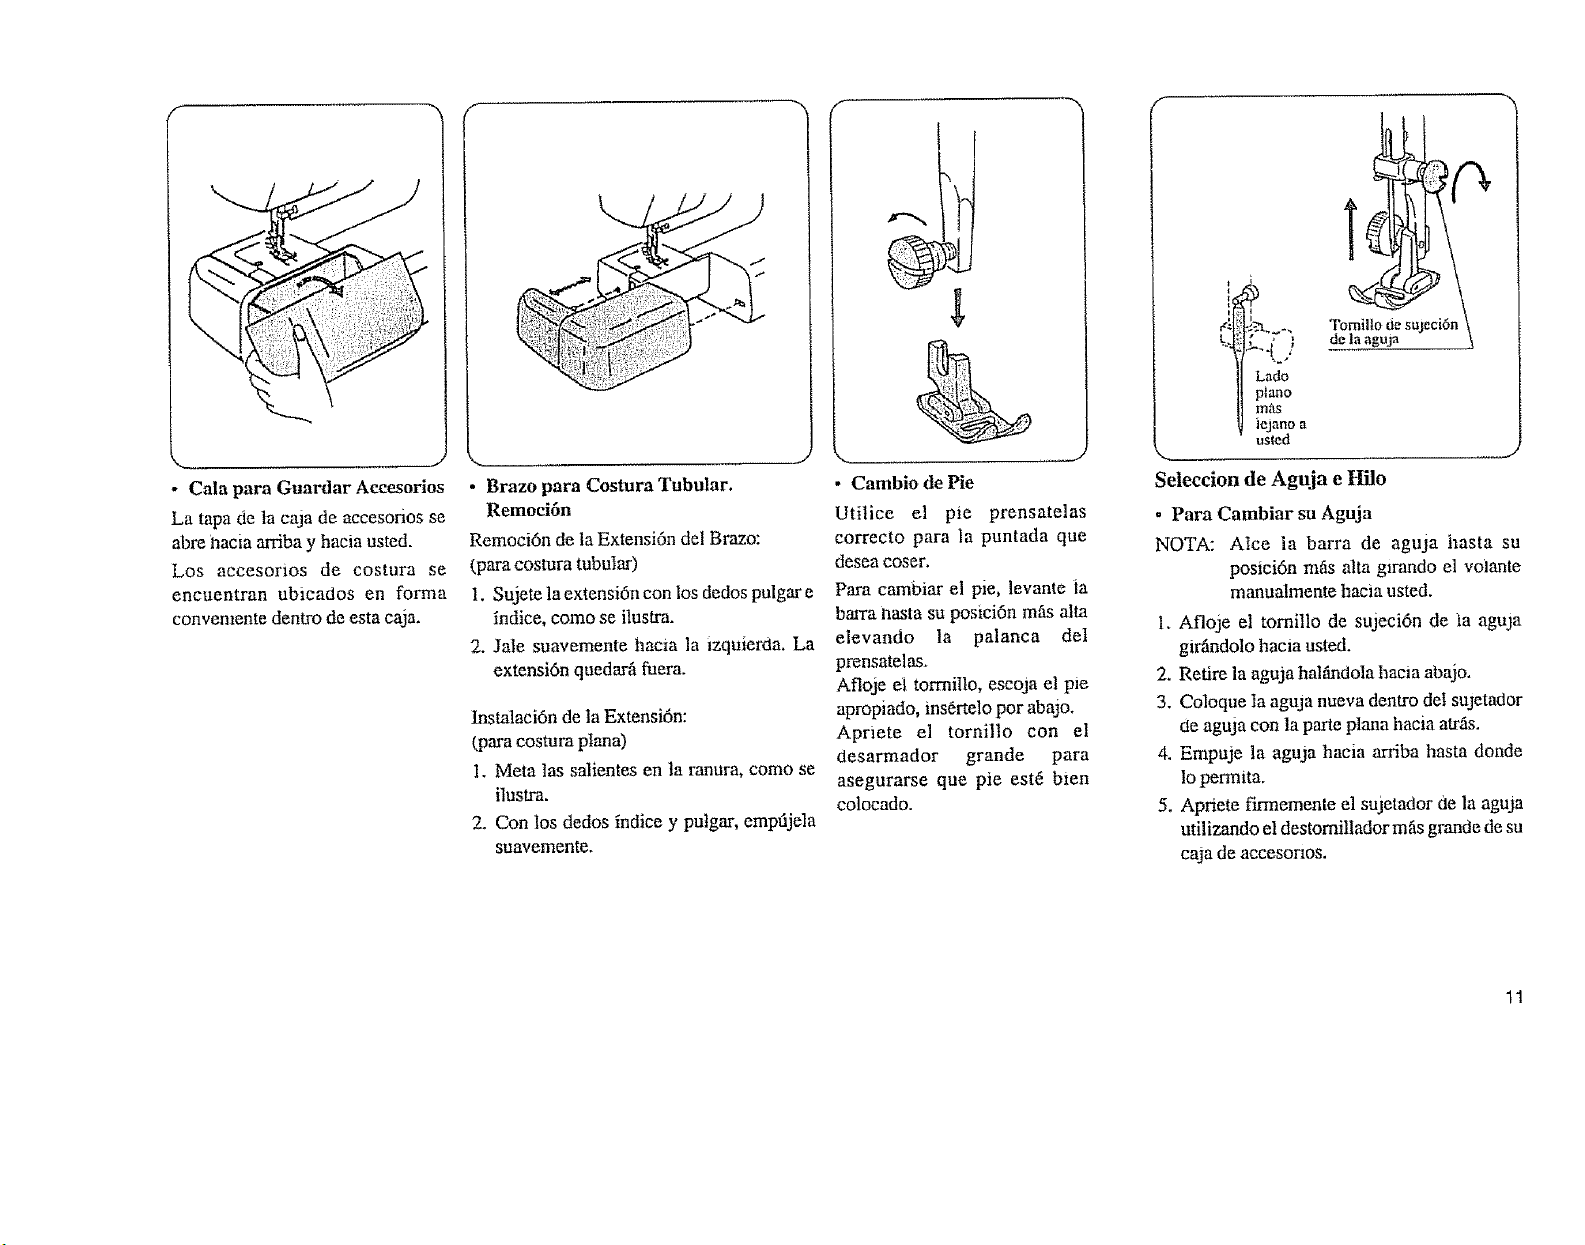
- Cala para Guardar Accesorios
La tapa de la caja de accesonos se
abre hacia arriba y hacia usted.
Los accesorios de costura se
encuentran ublcados en forma
convemente dentro de esta caja.
J
• Brazo para Costura Tubular.
Remoci6n
Remoci6n de ta Extensi6n del Brazo:
(para costura tubular)
1. Sujete la extensi6n con los dedos pulgar e
indice, como se ilustra.
2. Jale suavemente hacia la izquierda. La
extensi6n quedarfi fuera.
!nstalaci6n de ]a E×tensi6n:
t.paracostura plana)
I. Meta las salientes en ta ranura, como se
ilustra.
2. Con los dedos indice y putgar, empfijela
suavemente.
@
,..________._ J
• Cambio de Pie
Utilice el pie prensatelas
correcto para la puntada que
desea coser.
Para cambiar el pie, levante Ja
barra nasta su posici6n mils alta
elevando la palanca det
prensatelas.
Afloje el torrnillo, escoja el pie
apropiado, ins6rtelo pot abajo.
Apnete el tornitlo con el
desarmador grande para
asegurarse que pie est_ blen
colocado.
i
Tomillo de sujeci6n
de ta aguja
Lado
piano
m_
iejano a
usled
J
Seleccion de Aguja e Hilo
* Para Cambiar su Aguja
NOTA: Alce la barra de aguja hasta su
posici6n mils alta glrando el voiante
manualmente hacia usted.
1. Afloje el tomillo de sujeci6n de ta aguja
gir4ndolo hacia usted.
2. Retire la aguja halfindola hacia abajo.
3. Coloque Ia aguja nueva dentro deI sujetaOor
de aguja con la pane plana hama atris.
4. Empuje la aguja hacia arriba hasta donde
Iopermita.
5. Apriete fmnemente el sujetador 0e la aguja
utilizando el destomiltador mils grande de su
caja de accesonos.
tl
I .....
.z._ --¸ •
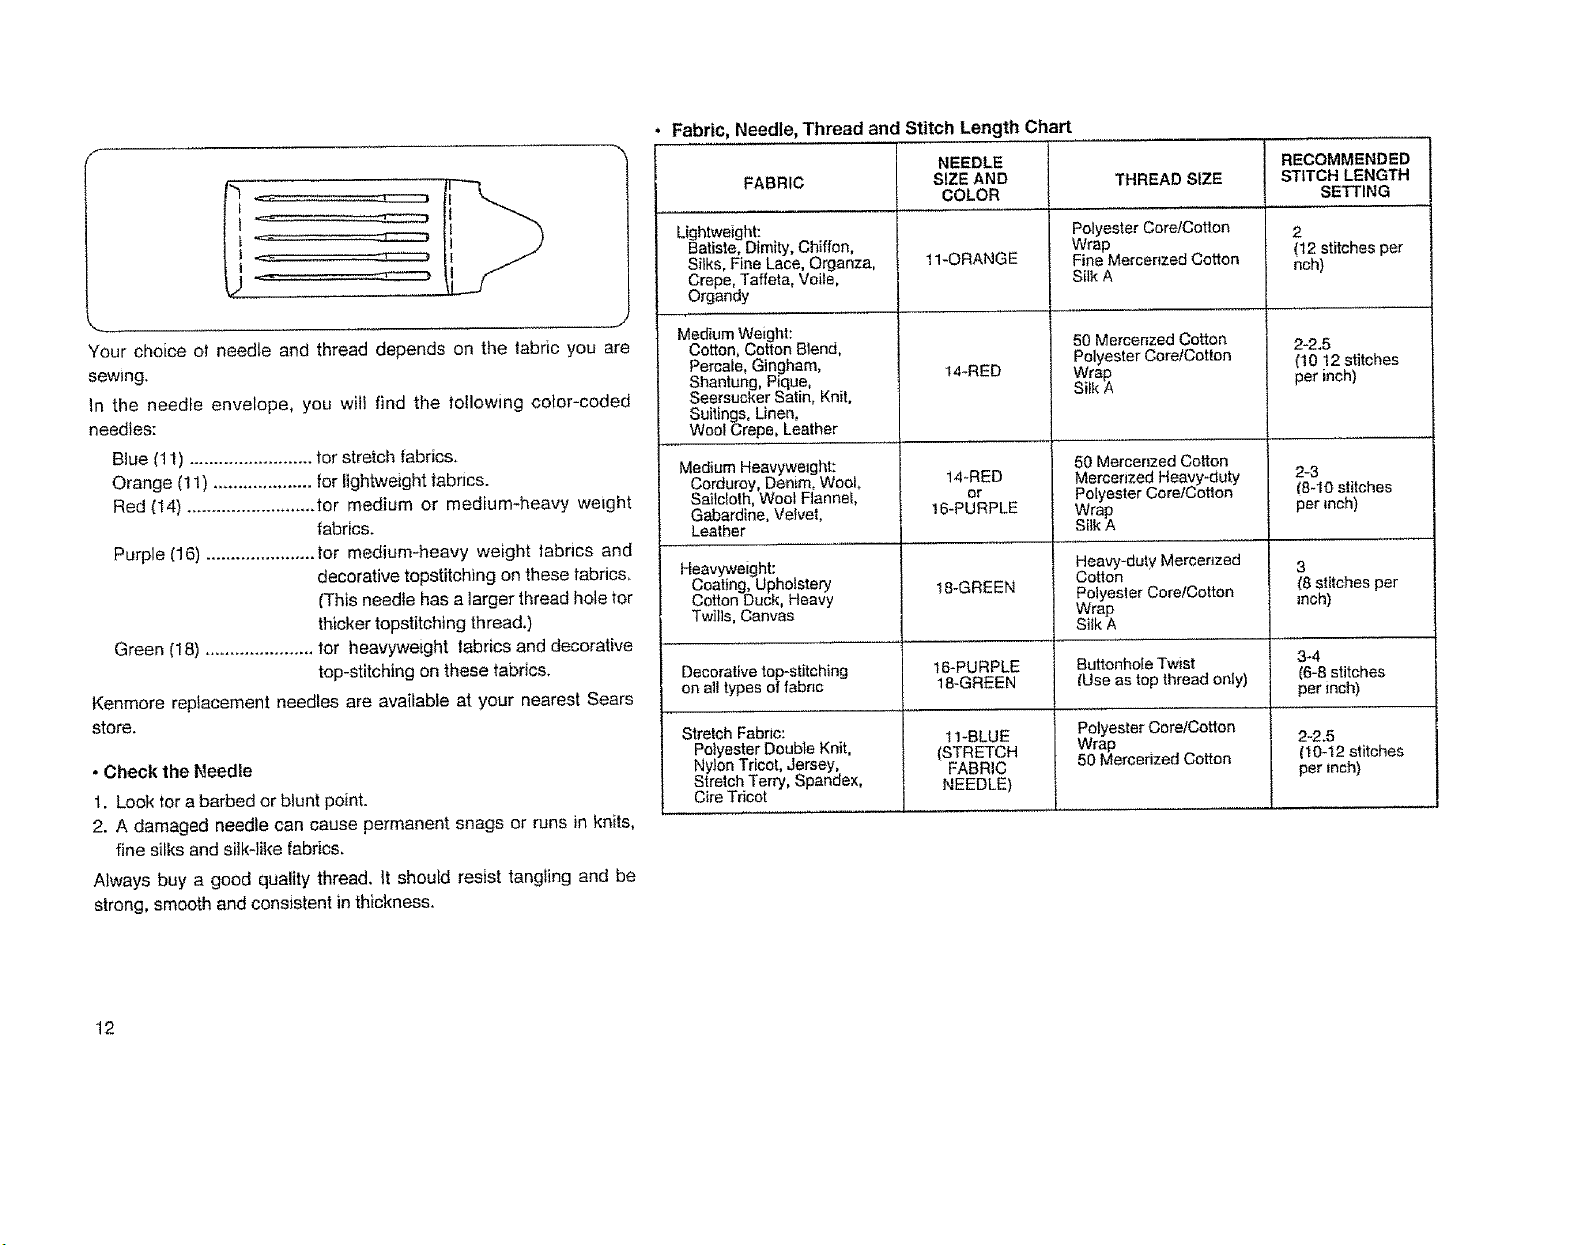
Fabric, Needle, Thread and Stitch Length Chart
NEEDLE
FABRIC
Lightweight:
Batiste, Dimity, Chiffon,
Silks, Fine Lace, Organza,
SIZE AND
COLOR
11-ORANGE
Crepe, Taffeta, Voile,
Organdy
THREAD SIZE
Polyester Core!Cotton
Wrap
Fine Mercerized Cotton
Silk A
RECOMMENDED
STITCH LENGTH
SETTING
2
('12 stitches per
nch)
Your choice ol needle and thread depends on the labfic you are
sewing,
In the need}e envelope, you wili find the following color-coded
needles:
Blue _11) ......................... tot stretch fabrics.
Orange (11) .................... for lightweight fabrics.
Red {14) .......................... for medium or medium-heavy weight
fabrics.
Purple (16) ...................... tor medium-heavy weight fabrics and
decorative topstitching on these tabncs.
CThis needte has a larger thread hole for
thicker topstitching thread.)
Green [18) ...................... tot heavyweight labrics and decorative
top-stitching on these tabrics.
Kenmore replacement needles are available at your nearest Sears
store.
• Check the Needle
t, Look for a barbed or blunt point.
2. A damaged needle can cause permanent snags or runs in knits,
fine silks and silk-like fabrics,
Always buy a good quality thread, It should resist tangling and be
strong, smooth and consistent in thickness.
Medium Weight:
Cotton, Cotton Blend,
Percale, Gingham,
Shantung, Pique,
Seersucker Satin, Knit,
14-RED
50 Mercenzed Cotton
Polyester CorefCotton
Wrap
Silk A
2-2.5
{10 12 stitches
per inch)
Suitings, Linen,
Wool Crepe, Leather
Medium Heavyweight:
Corduroy Denim, Woot.
Sailcloth, Wool Fannei,
Gabardine, Velvet,
Leather
Heavyweight:
Coating, Upholstery
Cotton Duck, Heavy
Twills, Canvas
14-RED
or
16-PURPLE
18-GREEN
50 Mercerized Cotton
Mercerized Heavy-duty
Polyester CorelCoUon
Wrap
Sitk A
Heavy-duty Mercenzed
Cotton
Polyester CorelCotton
Wrap
Silk A
2-3
(8-10 stitches
per inch)
3
('8stitches per
inch)
Decorative top-stitching 16-PURPLE Buttonhole Twist 3-4
on alt types of fabnc 18-GREEN _Use as top thread only) f6-8 stitches
per inch)
Stretch Fabric: 1I-BLU E Polyester CoretCotton
Polyester Double Knit, {STRETCH Wrap 2-2.5
Nylon Tricot, Jersey, FABRIC 50 Mercerized Cotton _t0-12 stitches
Stretch Terry', Spandex, NEEDLE)
Cire Tricot
per inch)
12
I .................. '_ii_i' iii .,
::ZZ2ZZ_
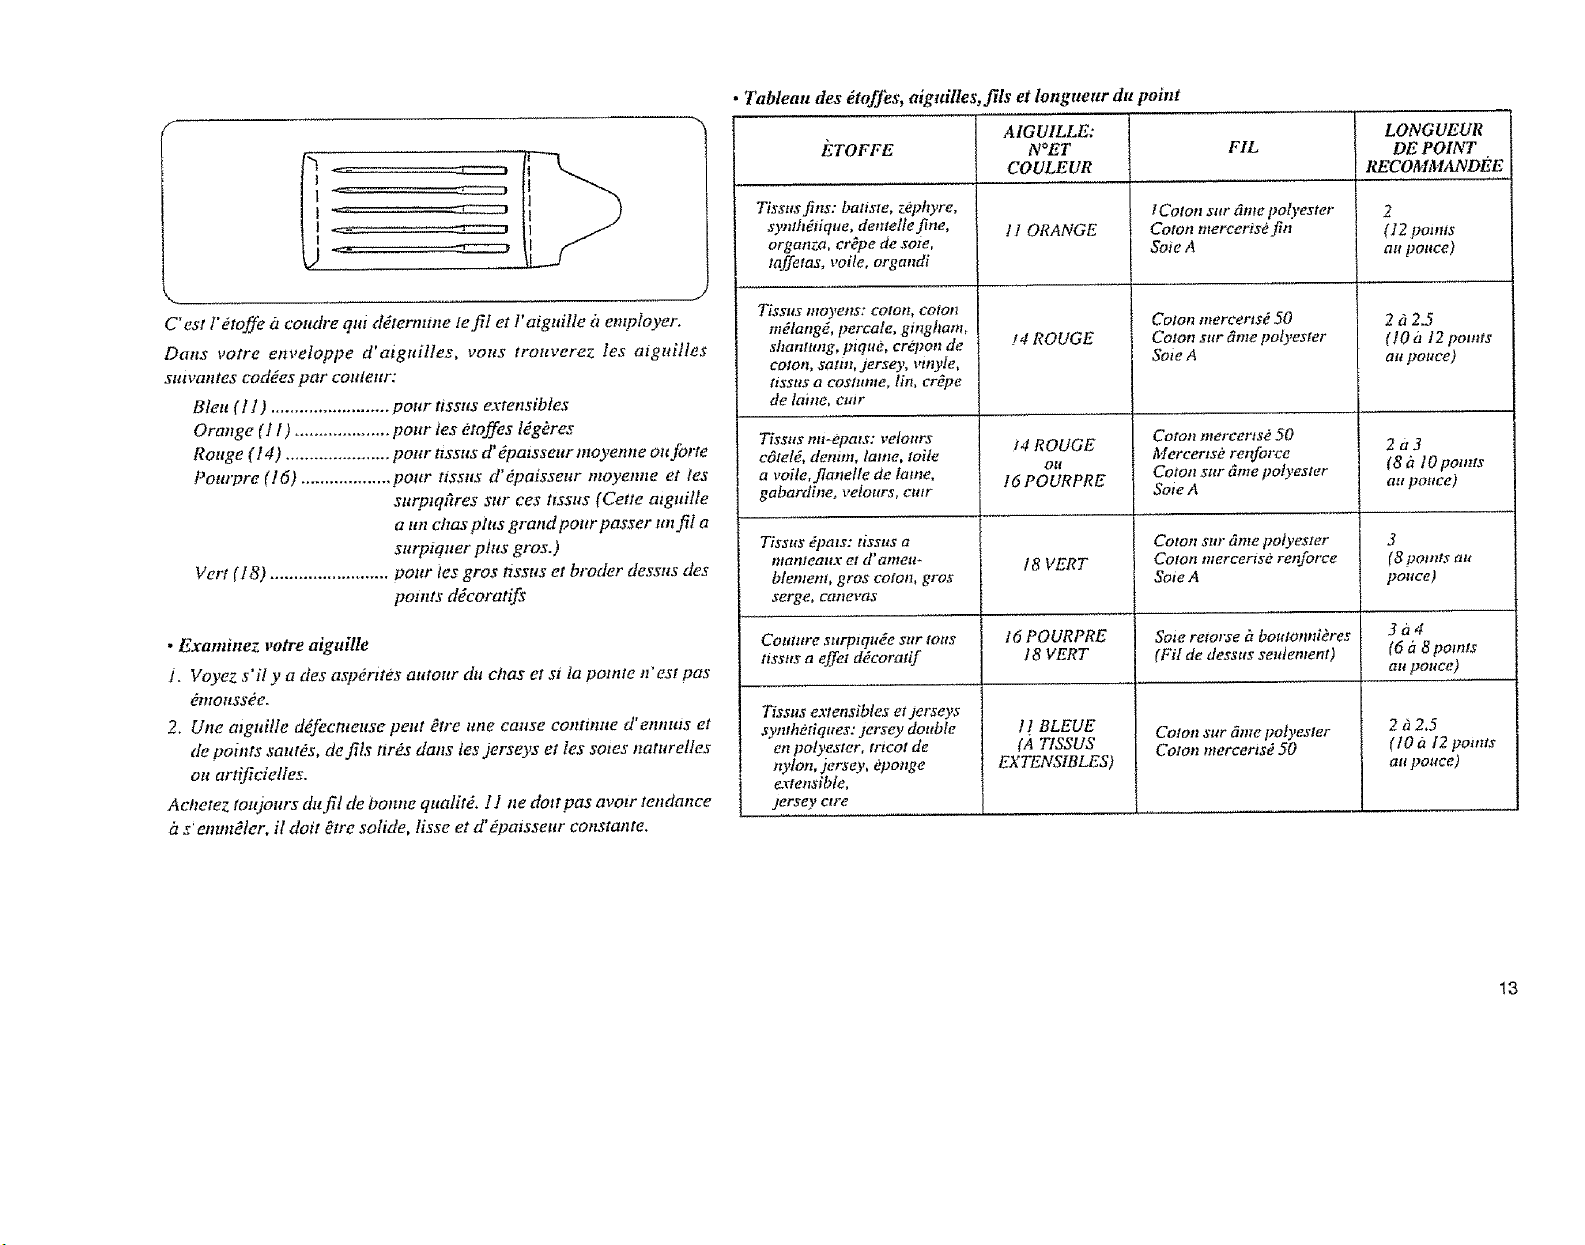
• Tableau des _toffes, aiguilles, ills et longueur du point
E'TOFFE
Tissus fins: batisle, zephyre,
synth_tique, demelte fine,
organza, cr_pe de .vote,
taffetas, voile, organdi
AIGUtLLE:
NOET
COULEUR
! t ORANGE
lCoton sur _me polyester
Co¢on mercerisd fin
Soie A
FIL
LONGUEUR
DE POINT
I_, CO MMANDE" E
I 2
(12 points
au pouee)
C'est t'Otoffe it coudre qni ddternUne tefit et l' aiguille h employer.
Dans votre enveIoppe d'aiguilles, volts troaverez les aigui!les
stttvatltes coddes par cotttetlr:
Bleu (l 1) ......................... pott r tissus extensibles
Orange (1 l) .................... pottr les eloffes t_g_res
Rouge (14) ...................... pour nssus d' dpatsseur moyenne ou forte
Pourpre (16) ................... pour tissus d'Opaisseur ntoyenne et les
sttrplqFtres stir ces ttssus (Cette atguilte
a un chas plies grand pottr passer until a
sarpiquer plus gros.)
Vert (!8) ......................... poltr ies gros ltsstts et broder desstts des
points ddcoratifs
• Examlnez votre aiguille
1. Voyez s'it y a des aspOrttos atttour du chaset s_ ta pomte West pas
_tnoassee.
2. Une algui!le d_fecttteuse peut _tre ttne cause continue d'ennuts et
de points sautOs, de ilts tiros dans ies jerseys et les sates naturelles
ou artificielles,
Aelwtez toujours du fit de bonne qualitO. 1I ne dolt pas avotr tendance
it s' emmYler, il dolt Otre solide, lisse et d' Opaisseur constante.
Tissus moyetts: cotott, color1
tnOlang_, percale, gmghan_
shantung, pique, crepon de
eolott, satfti, jersey, vtnyfe,
_tSSIIS a eoslltttle, lin, cr_pe
de lame, cmr
Tissus mt-epals: velours
eOtetd, denim, lame, toite
a voile,flanelle de lame,
gabardine, velours, cutr
Tissus _pats: lisstts a
OfatlfeallX el d'antelt*
blemem, gros colon, gros
.verge, eallev(ts
Collitlre sllrplqllOe sat lOllS
liSSUS a effet dOcoratif
Tissus extensibles et derseys
syntheliques: jersey double
en polyester, lEtCOt de
nylon, jerse),, Oponge
e.rlensibte,
jersey clre
!4 ROUGE
_4 ROUGE
Ol_
16 POURPRE
18 VERT
16 POURPRE
18 VERT
11 BLEUE
(A TISSUS
EXTENSIBLES)
Colon mercertsd 50
Colon slit" 6me polyester
Soie A
Colon mercertsd 50
Mercerlse renforee
Colon sur dine polyester
Soie A
Colon sur dine polyester
Colon mercerise re_lforee
Sole A
Sate retorse gtboutonnieres
(Fil de dessus seMement)
Cotoa sur Qllte polyester
Colon mercerts_ 50
232.5
(10 a 12 points
au pouce)
2a3
(8 h 10 points
au pouce)
3
(8 points au
pouee)
3a4
(6 h 8points
au pouee)
2h2.5
( tO a 12 points
au police)
13
_) _ /_r'-_---"-'__
................ J
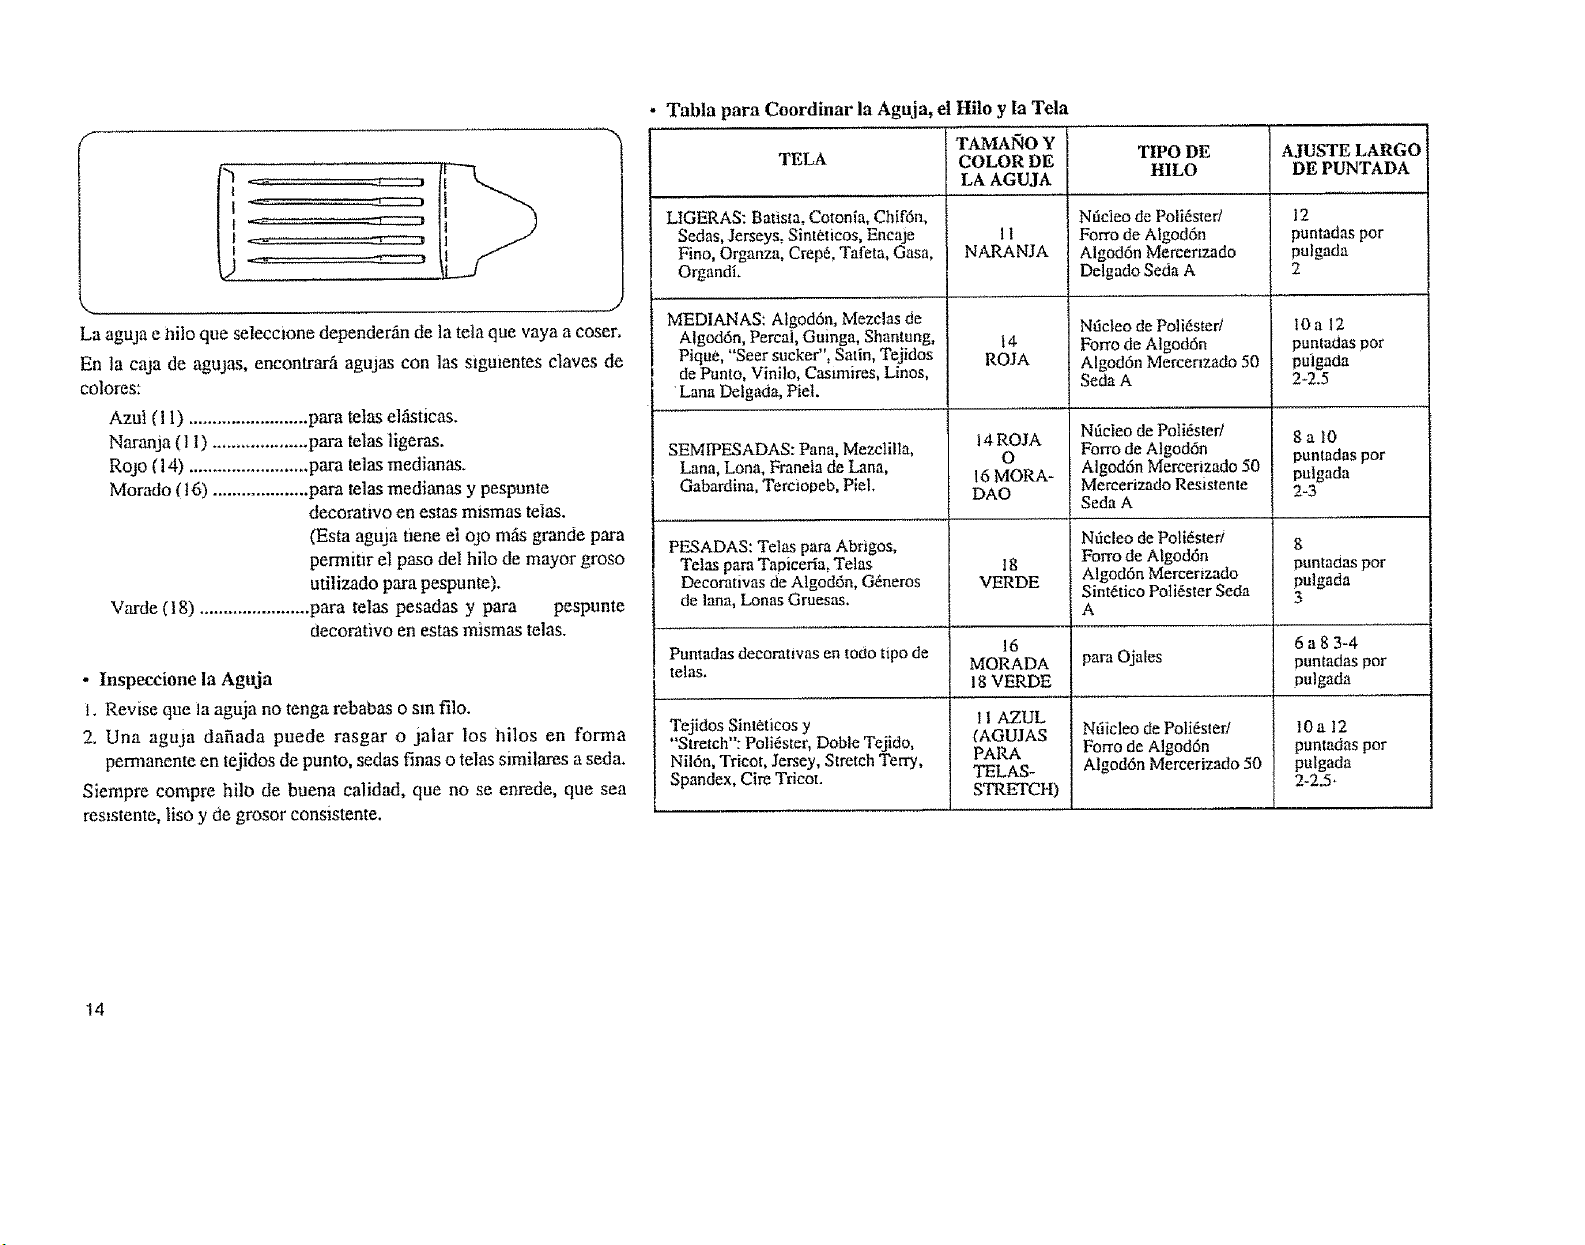
La aguja e hilo que seleccione dependerfin de la tela que vaya a coser.
En la eaja de agujas, encontrar/t agujas con las sigutentes eIaves de
colores:
AzuI (I 1) ......................... para telas e|_ticas.
Naranja (1t) .................... para telas ligeras.
Rojo (14) ......................... para telas medianas.
Morado (16) .................... para telas medianas y pespunte
decorauvo en estas mismas telas.
(Esta aguja tiene el ojo mils grande para
perrnitlr el paso del him de mayor groso
utilizado para pespunte).
Varde (I8) ....................... para telas pesadas y para pespunte
aecorativo en estas mismas telas.
• Inspeeeione la Aguja
t. Revise que la aguja no tenga rebabas o sm filo.
2. Una aguja dafiada puede rasgar o jalar los hilos en forma
pem_anente en tejidos de punto, sedas finas o telas similares a seda.
Siempre compre hilb de buena calidad, que no se enrede, que sea
res_stente, liso y de grosor consistente.
- Tnbla para Coordinar la Aguja, el Hiio y la Tela
TELA
TAMAlqO Y
COLOR DE
LA AGUJA
LIGERAS: Batista, Cotonia, Chif6n,
Sedas, Jerseys, Sintt:ticos, Encaje
Fino, Organza, Crep_,Tafeta, Gasa,
11
NARANJA
Organdi.
MEDIANAS: Algod6n, Mezclas de
Algod6n, Percal, Guinga, Shantung,
Pique, "Seer sucker": Satin, Tejidos
de Punto, Vinilo, Castmires, Linos,
Lana Delgada, Piel.
SEMtPESADAS: Pana, Mezclilla,
Lana, Lona, Franeia de Lana,
Gabardina, Terciopeb, PieL
PESADAS: Telas para Abrigos,
Telas para Tapicerla. Telas
Decorativas de Algod6n, Grneros
de lana, Lonas Gruesas.
Puntadas deeorativas en todo tipo de
telas.
Tejidos Sinleticos y
"Stretch": Poli_ster, DoNe Tejido,
Nildn, Tricot, Jersey, Stretch Terry,
Spandex, Cire Tricot.
I4
ROJA
14ROJA
O
16MORA-
DAO
18
VERDE
16
MORADA
18 VERDE
I 1 AZUL
{AGUJAS
PARA
TELAS-
STRETCH)
TIPO DE
HILO
Nficieo de Poli6ster/
Forro de Algodrn
Algod6n Mercenzado
Delgado Seda A
Nficleo de Polirsteri
Forrode Algoddn
Algod6n Mercenzado 50
Seda A
Nticleode Polirster!
Forrode Algod6n
AlgoddnMereerizado50
MercerizadoResistente
SedaA
Ndcleo de Poli_ster/
Forro de A|god6n
Algod6nMercerizado
Sintrtico Potirster Seda
A
para Ojales
Nfiicleo de Poli6s{er!
Forro de Algod6n
Algodrn Mercefizado 50
AJUSTE LARGO
DEPUNTADA
12
puntadas por
pulgada
2
10a 12
puntadaspor
puigada
2-2.5
8a10
puntadas por
pulgada
2-3
8
puntadas por
pulgada
3
6a83-4
puntadas por
!_ulgada
10a 12
puntadas por
pulgada
2-2.5+
14
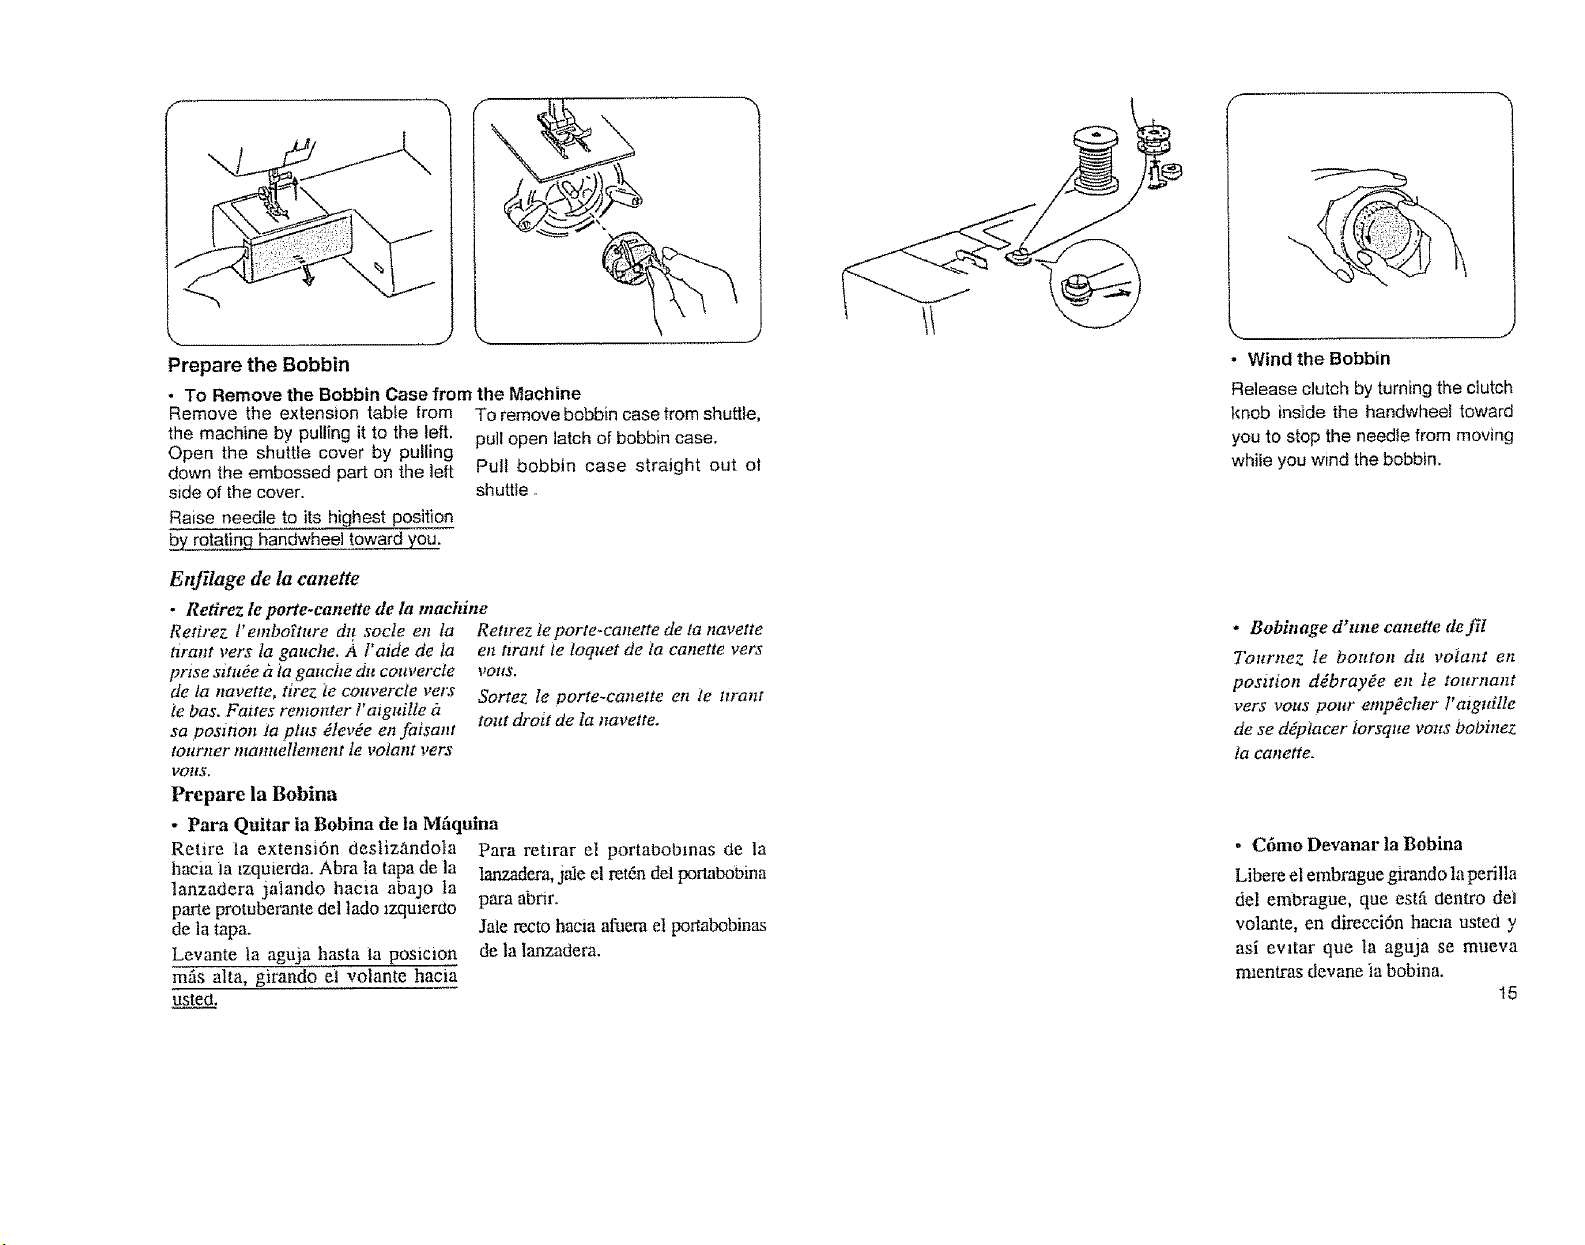
Prepare the Bobbin
• To Remove the Bobbin Case from the Machine
Remove the extension taNe from
the machine by pulling it to the left.
Open the shuttle cover by pulling
down the embossed part on the left
side of the cover.
Raise needle to its highest position
by rotat!ng handwheel toward you.
Enf!lage de ta canette
• Retirez te porte-cauette de la machine
Retirez l'embo_ture du socle en ta
tirant vers la gauche. _t l'aide de la
prtse situ_e dia gauche du cotlvercle
de la navette, tirez 2ecom'ercle vet's
le has. Facies remonter l' aiguitle it
sa positron ta pills dlev_e en faisant
tottrtzer matlltellement le votant pets
volts.
To remove bobbin case trom shuttle,
pull open latch of bobbin case.
Putl bobbin case straight out ot
shuttle •
Rettrez te porte-canette de ta navette
en tlrant te toquet de ia canette vers
VOltS.
Sortez Ie porte-canette en te twant
tout drolt de la navette.
Prepare la Boblna
*Para Quitar la Bobina de la Mfiquina
Retire la extensi6n desliz_mdola
hacia ia lzquierda. Abra la tapa de la
lanzadera jalando hacla abajo la
parle promberante del lado lzqmerdo
de la tapa.
Levante la aguja hasta ia posicmn
Para retirar el portabobmas de la
lartzadera,3ale el retdn del portabobina
para abrir.
Jate recto haem afaem el portabobinas
de la lanzadera.
mils alta, girando el volante hacia
usted.
, Wind the Bobbin
Release clutch by turning the clutch
knob inside the handwhee[ toward
you to stop the needle from moving
while you wind the bobbin.
. Bobinage d'une canette defil
Tournez le bouton dtt volant en
postt_on d_bray#e en le tournant
vers vous pour emp_cher t'aigtdlle
de se d_p_acer torsque volts bobinez
ta canette.
. Cdmo Devanar la Bobina
Libere el embrague girando la perilla
del embrague, que estfi dentro det
volante, en direcci6n hacm usted y
asl evltar que la aguja se mueva
m_entras devane ia bobina,
15
..................._
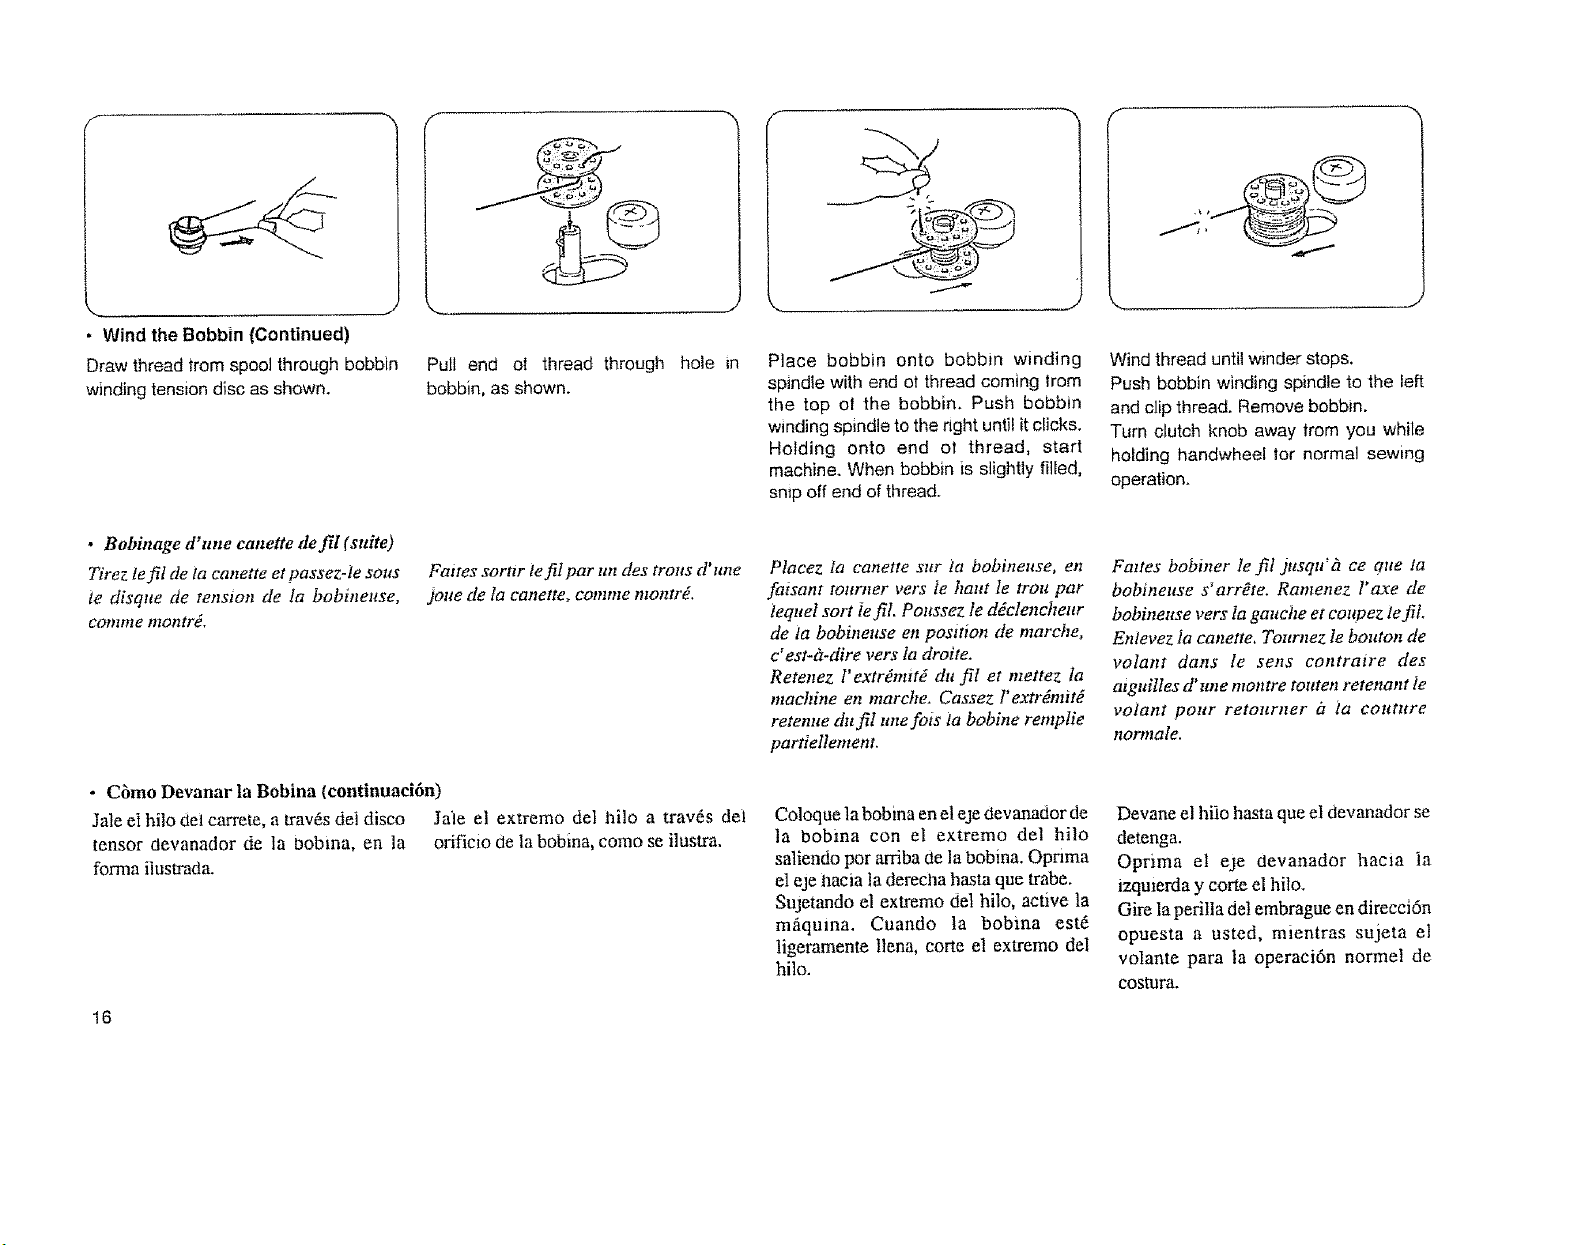
• Wind the Bobbin (Continued)
Draw thread from spool through bobbin
winding tension disc as shown.
• Bobinage d'une eanette defil (suite)
Tirez te fil de ia canette el passez-te sons
ie disque de tenston de la bobineuse,
comme montrd.
Pull end o! thread through
bobbin, as shown.
Fattes sorttr ie fil par ttn des trotls d' une
jone de ]a eanette, eomme montr_.
hole in
• Cbmo Devanar la Bobina (continuaci6n)
Jale e1hilo det carrete, a trav_s dei disco Jaie el extremo de| hilo a trav6s del
tensor devanador de la boblna, en la orificio de la bobina, como se ilustra.
forma iiustrada.
16
7
Place bobbin onto bobbin winding
spindle with end ot thread coming lrom
the top o! the bobbin. Push bobbin
winding spindle to the right until it clicks.
Holding onto end ot thread, start
machine. When bobbin is slightly filled,
stop off end of thread.
Placez la canette sur ia bobineuse, en
fatsant tottrner vers ie haut te trou par
tequeI sort ie fil. Poussez le ddcleneheur
de la bobinense en position de marche,
c' est-h-dire vers la droite.
Retenez l'extr_nutd du fiIet mettez la
machine en marche. Cassez t'extrdmit_
retenue du fi! tree fois ia bobine rempIie
partiellement.
Coloque ta bobina en el eje devanador de
la bobma con el extremo del hilo
saliendo por arriba de la bobina. Opnma
el eje imcia la derecha hasta que trabe.
SuJetando el extremo del hilo, active la
m_quma. Cuando la bobina est5
ligeramente llena, corte el extremo de!
hilo.
,,,J
Wind thread until winder stops.
Push bobbin winding spindle to the left
and clip thread. Remove bobbin.
Turn clutch knob away trom you while
homing handwheel lor normal sewing
operation.
Fattes bobiner le fil jusqu' fi ce que la
bobineuse s'arrYte. Ramenez l'axe de
bobineuse vet's Ia gauche et coupez le fiL
Enlevez ia eanette, Tournez le bouton de
volant dans Ie sens contraire des
alguilles d'une montre tottten retenam ie
volant pour retottrner it ia couture
nornlale.
Devane el hiio hasta que el devanador se
detenga.
Oprima el eje devanador hacia ia
lzquierda y corte el hilo.
Gire la perilla del embrague en direcci6n
opuesta a usted, mientras sujeta et
volante para la operaci6n normel de
cosRlra,
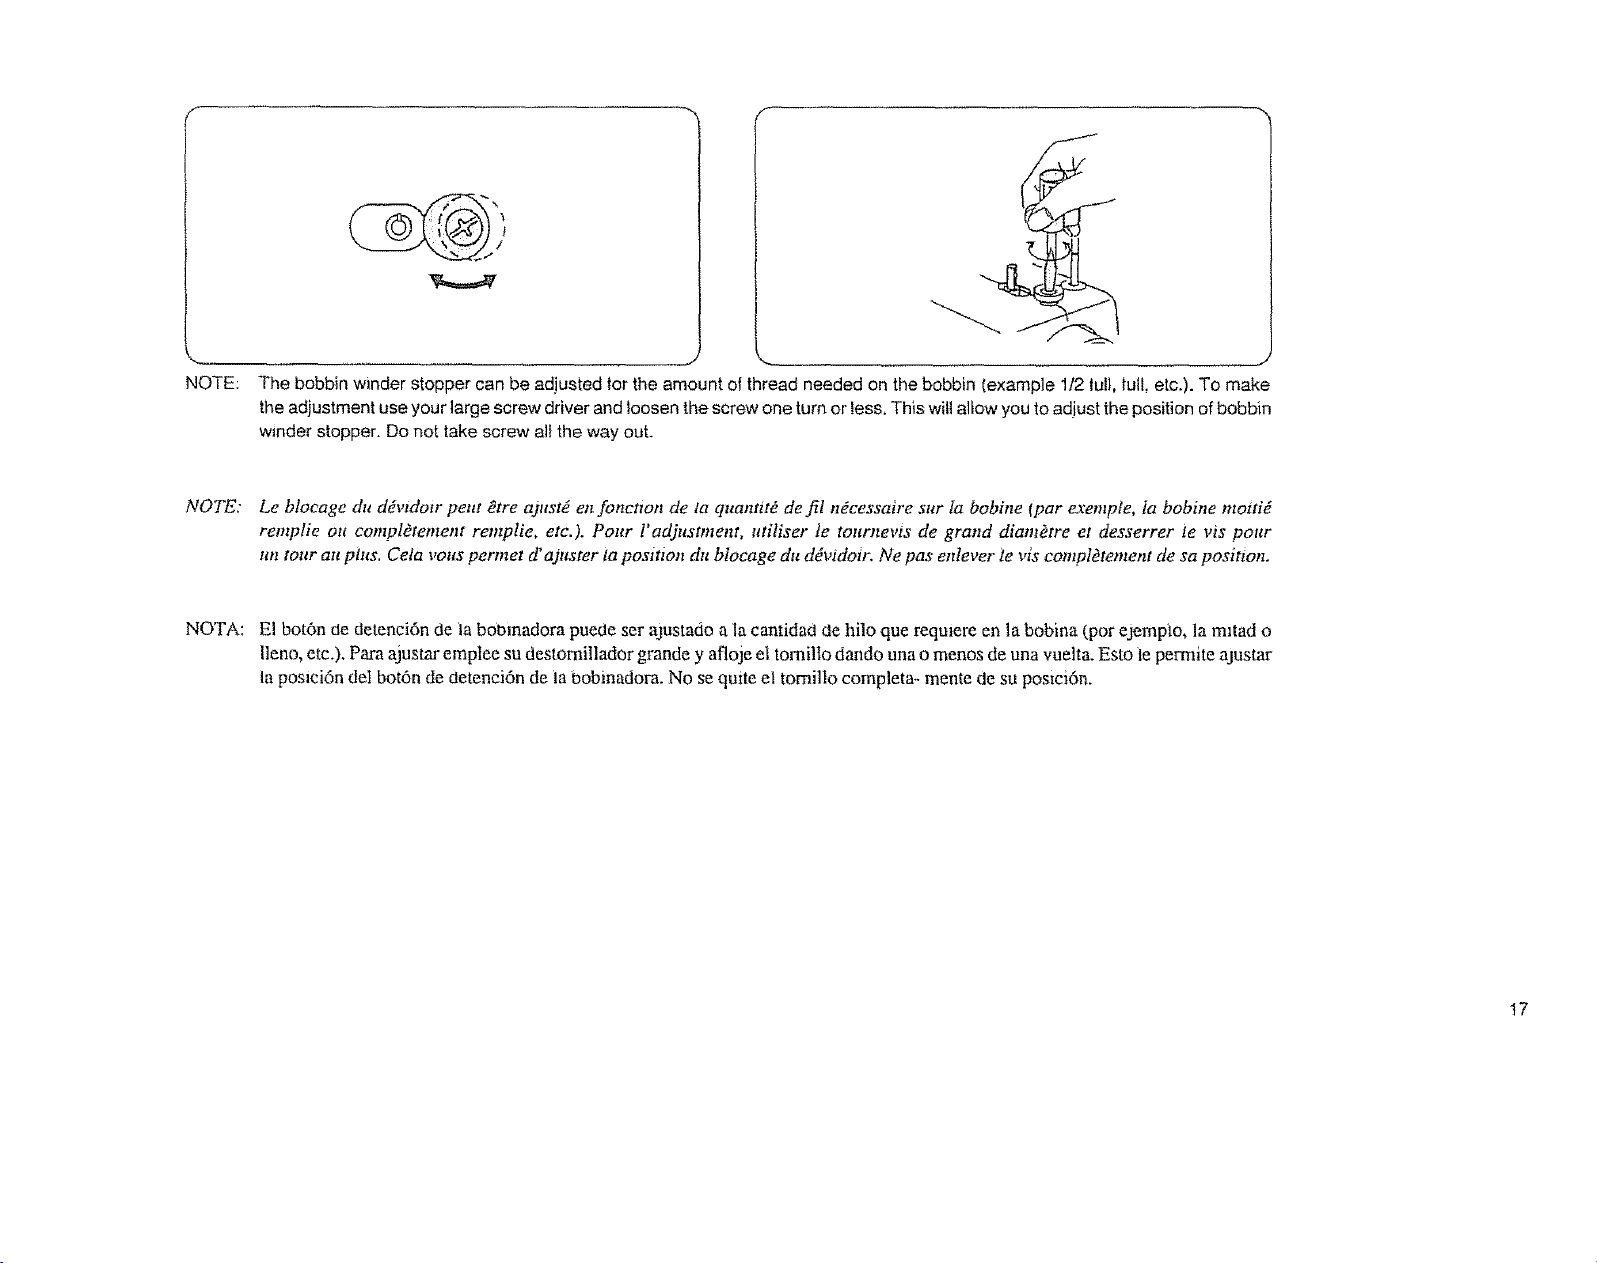
NOTE:
NOTE: Le blocage du ddvtdo_r peut £tre ajust_ en fonct_on de la quantitO de fil n_cessaire sur ta bobine (par _emp/e, ta bobine motti_
NOTA: E1 botOn de detenci6n de ta bomnadora puede ser ajustado a la cantidad de hilo que reqmere en la bobina _,por ejemplo, la m_tad o
The bobbin winder stopper can be adjusted tor the amount of thread needed on the bobbin (example 1/2 lull, full, etc.). To make
the adjustment use your large screw driver and loosen the screw one turn or less, This will allow you to adjust the position of bobbin
winder stopper. Do not take screw all the way out.
remplie ou compl_tement remplie, etc.). Pour l'adjustment, utiliser te tournevzs de grand diamOtre et desserrer le vis pour
un tour au plus. Cela vous permet d' ajuster la position du blocage du ddvidoir. Ne pas enlever levis complOtement de sa posit_on.
lleno, etc.), Para ajustar emptee su destomillader grande y afloje el tomilto dando una o menos de una vuelta. Esto le permite ajustar
ta posici6n det bot6n de detenci6n de ia bobinadora, No se quite el tomilto completa- mente de su poslci6n.
17
........ J M-
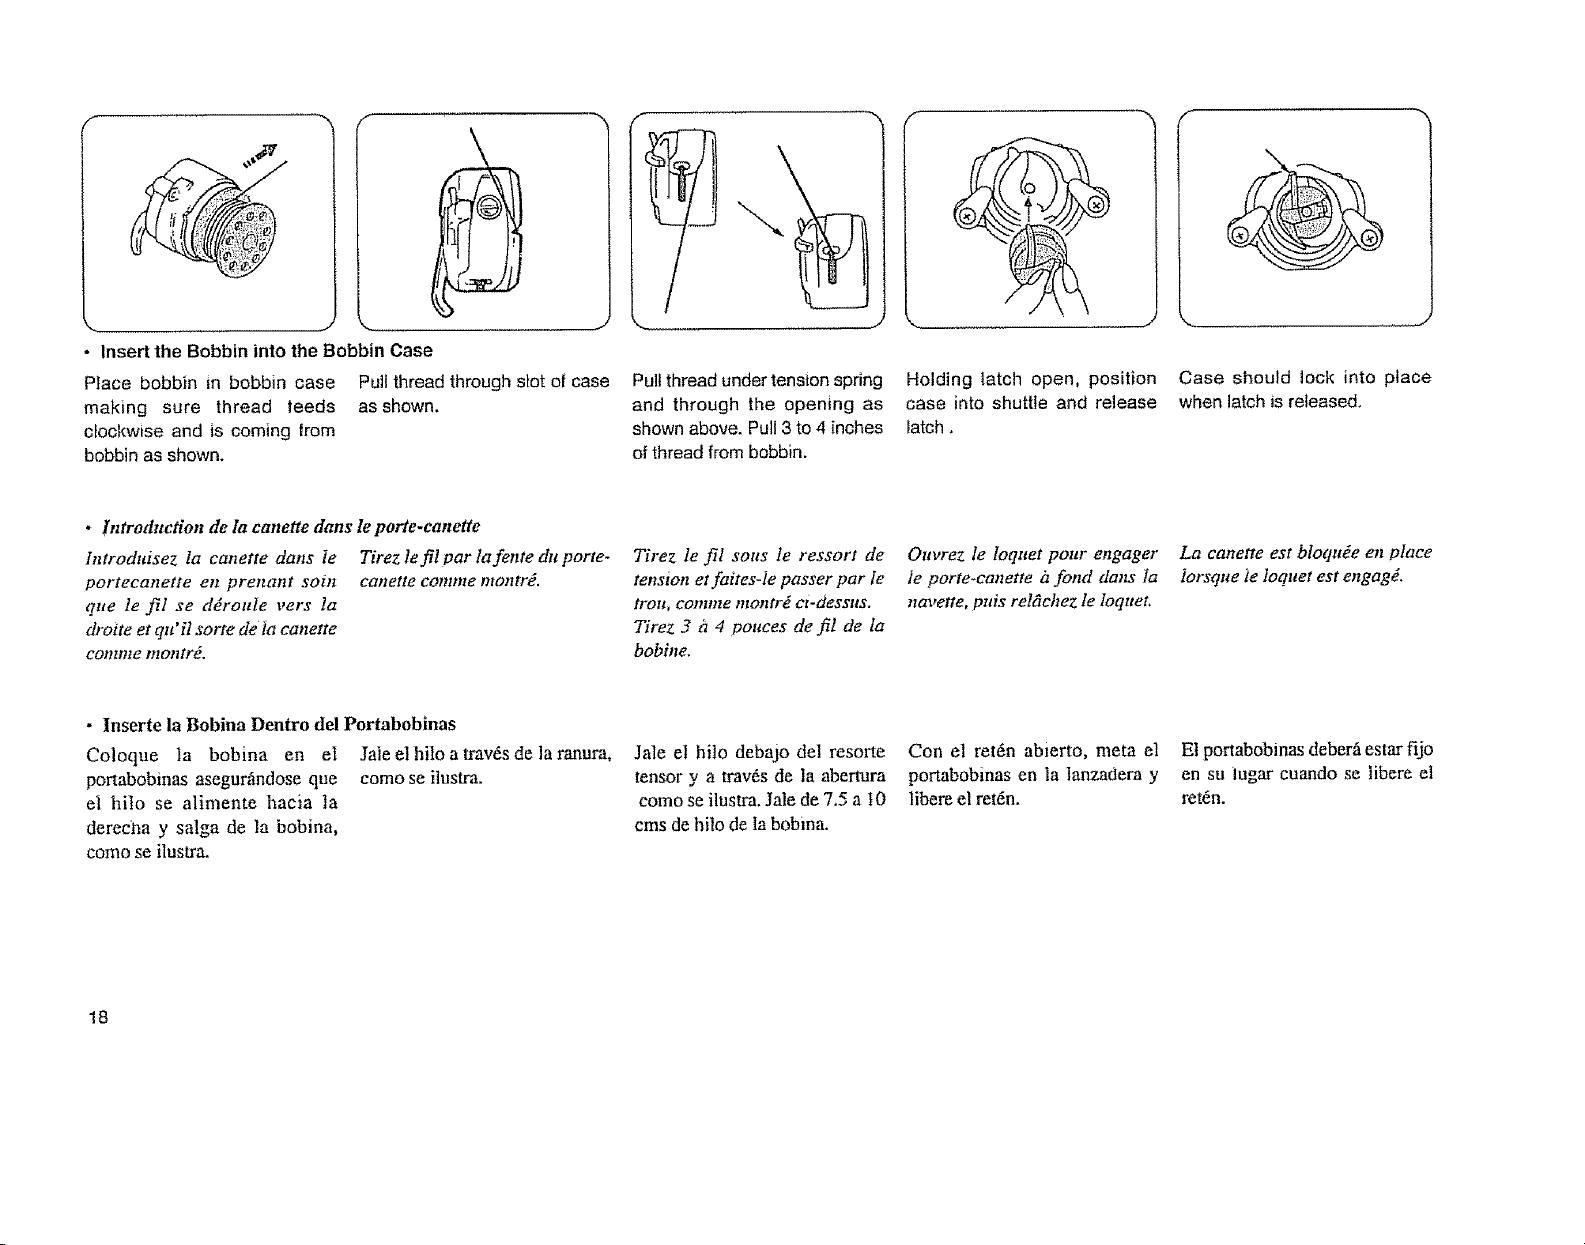
• Insert the Bobbin into the Bobbin Case
PIace bobbin in bobbin case
making sure thread |eeds
clockwise and is coming from
bobbin as shown.
• Introduction de la canette darts le porte.canette
tntroduisez la canette clans Ie Tirez le fil par la fente du porte-
portecanette en prenant soin canette comme montrd.
que le fil se ddroule vers la
droite et qxt' H sorte de ia canette
commc montr#.
Pull thread through slot of case
as shown.
• lnserte ia Bobina Dentro del Portabobinas
Coloque Ia bobina en el Jaie el hilo a trav5s de la ranura,
portabobinas asegurfindose que como se ilustra.
el hilo se alimente hacia ]a
derecha y salga de Ia bobina,
como se ilustra.
Pull thread under tension spring
and through the opening as
shown above. Pull 3 to 4 inches
of thread from bobbin.
Tirez le fil sous le ressort de
tension et faites-fe passer par le
troll, colu#ze illOtlfre ci-dessus.
Tirez 3 iz 4 pouces de fil de la
bobine.
Jale el hilo debajo del resorte
tensor y a tray,s de la abertura
como se ilustra. Jale de 7.5 a I0
cms de hilo de Ia bobina.
\
%...................
Holding tatch open, position
case into shuttle and release
latch.
Ouvrez le loquet pour engager
le porte-canette it fond dans la
navette, puis retglchez le loquet.
Con el ret_n abierto, meta el
portabobinas en la lanzadera y
libere el ret6n.
....... J
Case should lock into place
when latch is released,
La canette est bIoqu_e en place
iorsque _teloquet est engagd.
El portabobinas deberfi estar fijo
en su iugar cuando se libere el
ret6n.
18
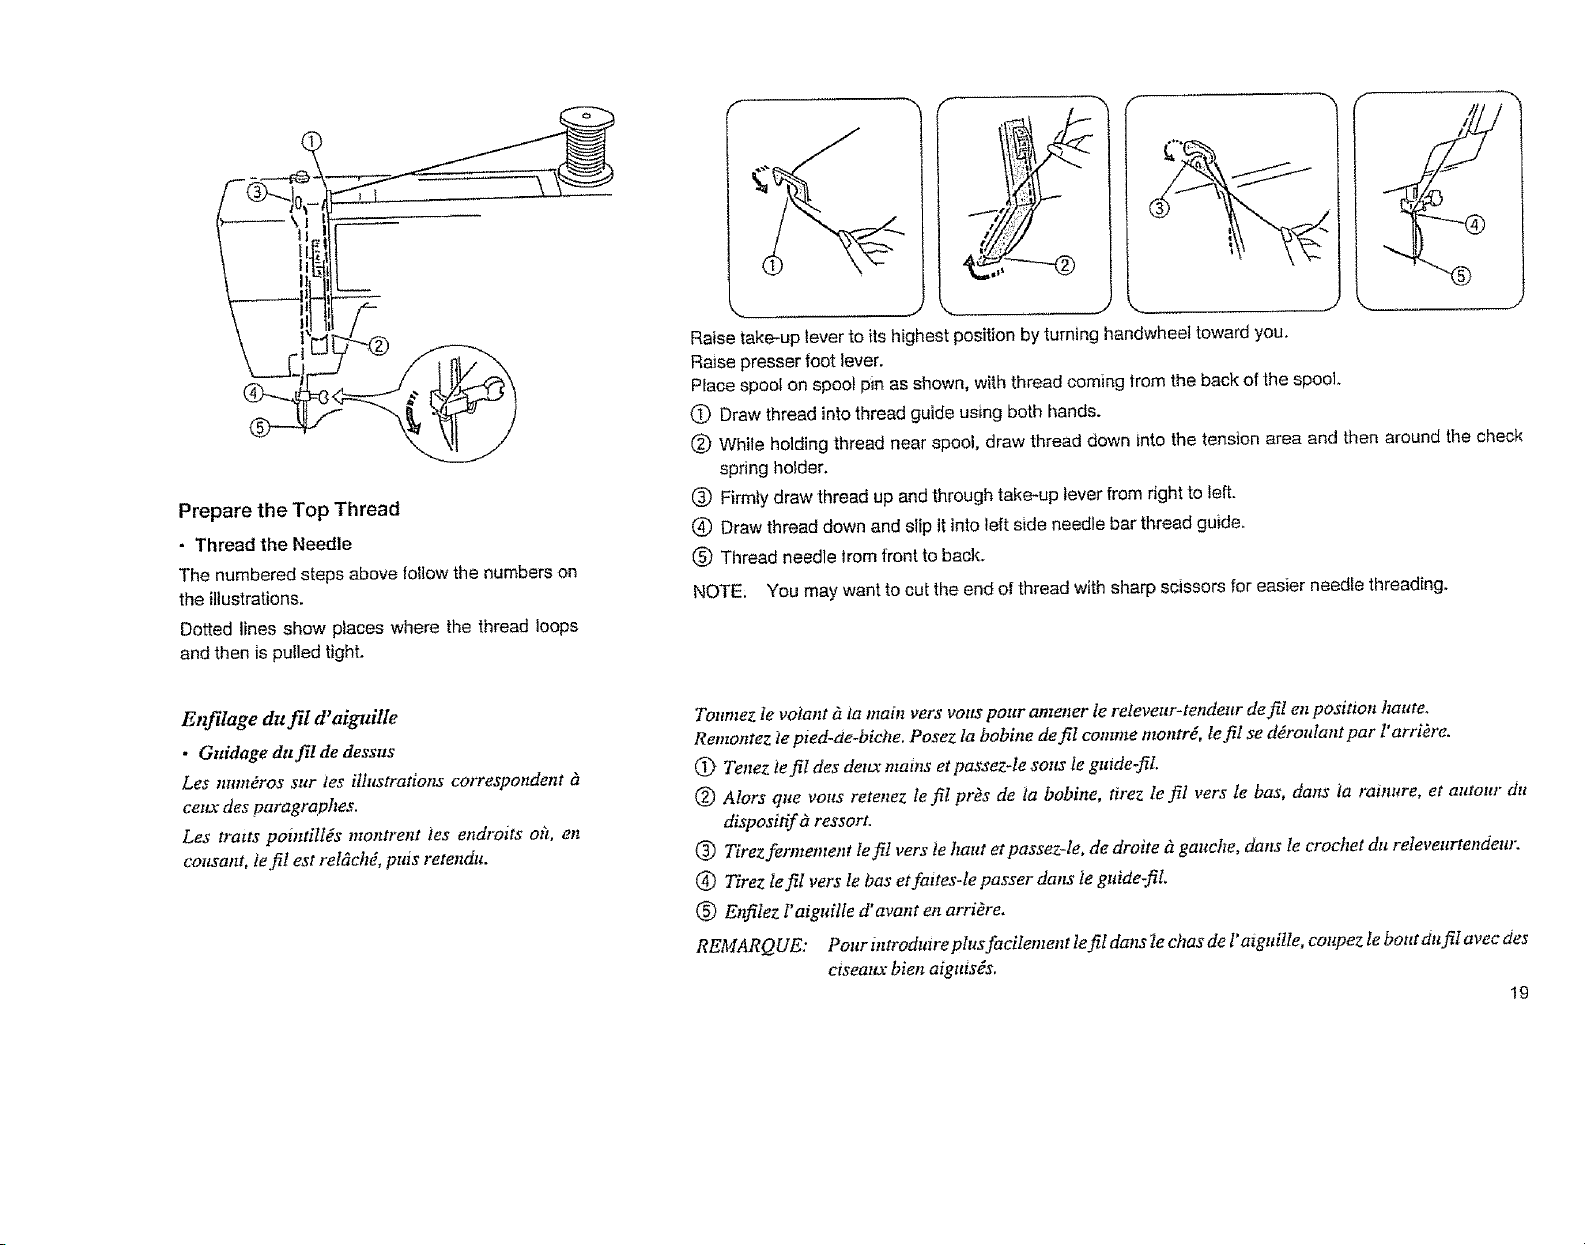
Prepare the Top Thread
• Thread the Needle
The numbered steps above follow the numbers on
the illustrations.
Dotted lines show places where the thread loops
and then is pufled tight.
Raise take-up lever to its highest position by turning handwheel toward you.
Raise presser foot lever.
Place spool on spool pin as shown, with thread coming from the back of the spool.
(_ Draw thread into thread guide using both hands.
(_ While holding thread near spool, draw thread down into the tension area and then around the check
spring holder.
(_ Firmly draw thread up and through take-up lever from right to left.
(_) Draw thread down and slip it into left side needle bar thread guide.
Thread needle Jrom front to back.
NOTE You may want to cut the end of thread with sharp scissors for easier needle threading.
Et_tage dufil d'aiguille
• Guidage dufilde dessus
Les mm_#ros sur ies illustratiot_ correspondent &
ceu_" des paragraphes.
Les tratts pointill_s motttrent les endroits oh, en
coltsant, te fil est retdch_, puis retendu.
Tonmez le volant ?zta main vers votts pour amener te releveur-tendeur defil enposition haute.
Remontez le pied-de-biche. Posez la bobine de fil comme montrd, te fil se ddroulant par I' arrikre.
Q) Tenez tefil des dettx mares et passez-Ie sous te guide-ilL
_) Alors que vous retenez te fil pros de _a bobine, tirez le fil vers le has, dens ta ramure, et atttoter dt¢
dispositif gt ressort.
_) Tirez fermement lefil vers ie haut et passez-le, de droite ?z gauche, dens le crochet du reteveurtendet_t:
(_ Tirez le fil vers Ie has et faites-le passer dans le guide-ilL
(_) E1_iez ["aiguille d'avant en arridre.
REMAR QUE: P_ur intr_duwe plus faci_ement1e fi_ dans1e chas de l_azg_ille_ c_upez _e b_ttt cht_l avec des
ciseaux bien aiguts_s.
19
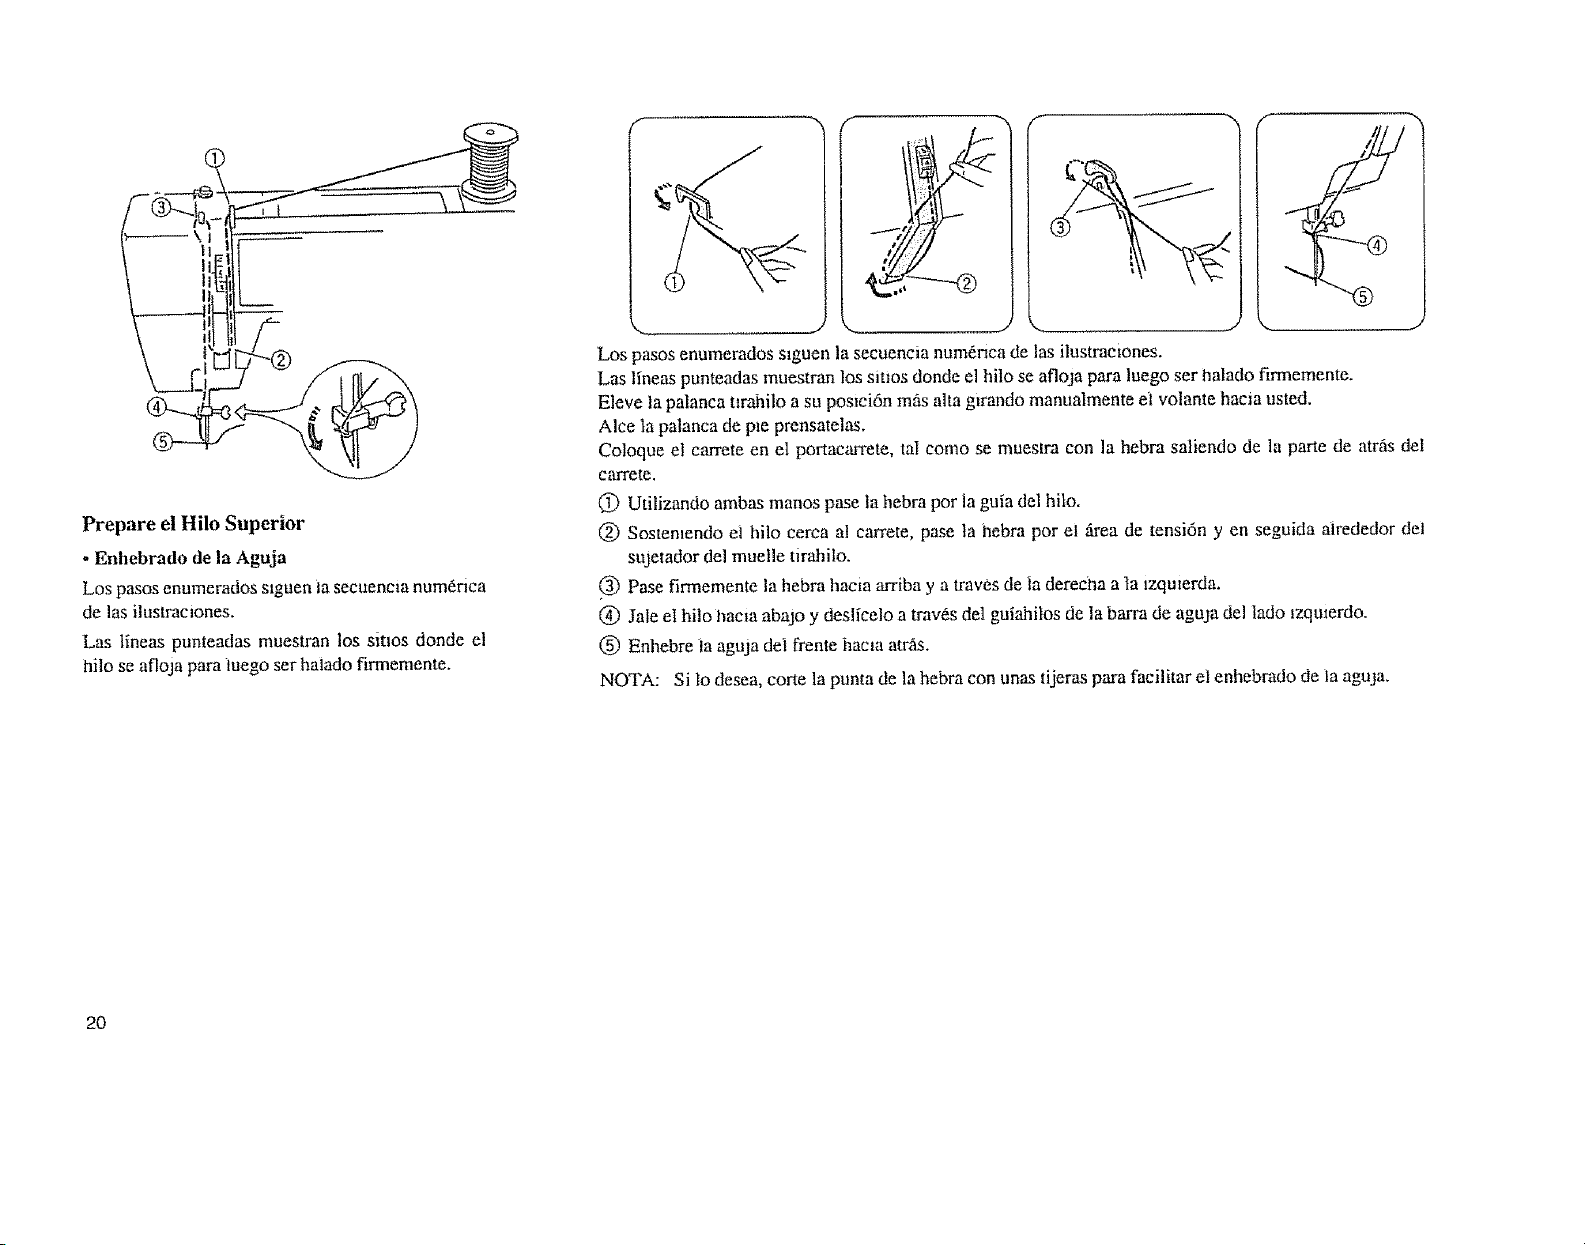
Prepare el Hilo Superior
, Enhebrado de la Aguja
Los pasos enumerados s_guen la secuencm num0.rica
de las ilustraciones.
Las lineas punteadas muestran los sitios donde el
hilo se aflo]a para iuego set haiado firmemente.
f "_ f "N r
S
i. .... _, M.__ J "--......
Los pasos enumerados s_guen la secuencia num_nca de las ilustrae_ones.
Las lineas punteadas muestran los sinos donde el hilo se afloja para luego ser halado firmemente.
Eleve la palanca tirahilo asu posici6n mAsalta girando manualmente el volante hacia usted.
Alce la palanca de pie prensatelas.
Coloque el carrete en el portacarrete, taI como se muesira con la hebra saliendo de la parte de atrfis del
CfilTeIe,
_) Utilizando ambas manos pase la hebra por la guia del hilo.
(_) Sostemendo el hilo eerca al cmTete, pase ta hebra por el irea de tensi6n yen seguida Nrededor dei
sujetador del muelle tirahilo.
Pase firmemente la hebra hacia arriba y a traves de la dereeha a la lzquierda.
@ Jale el hilo hacla abajo y desgcelo a tray, s del guiahilos de la barra de aguja del lado lzqmerdo.
(_) Enhebre ia aguja dei frente hacia atr_,s.
NOTA: Si lo desea, corte la punta de la hebra con unas tijeras para faeilitar el enhebrado de ta aguja.
20
F
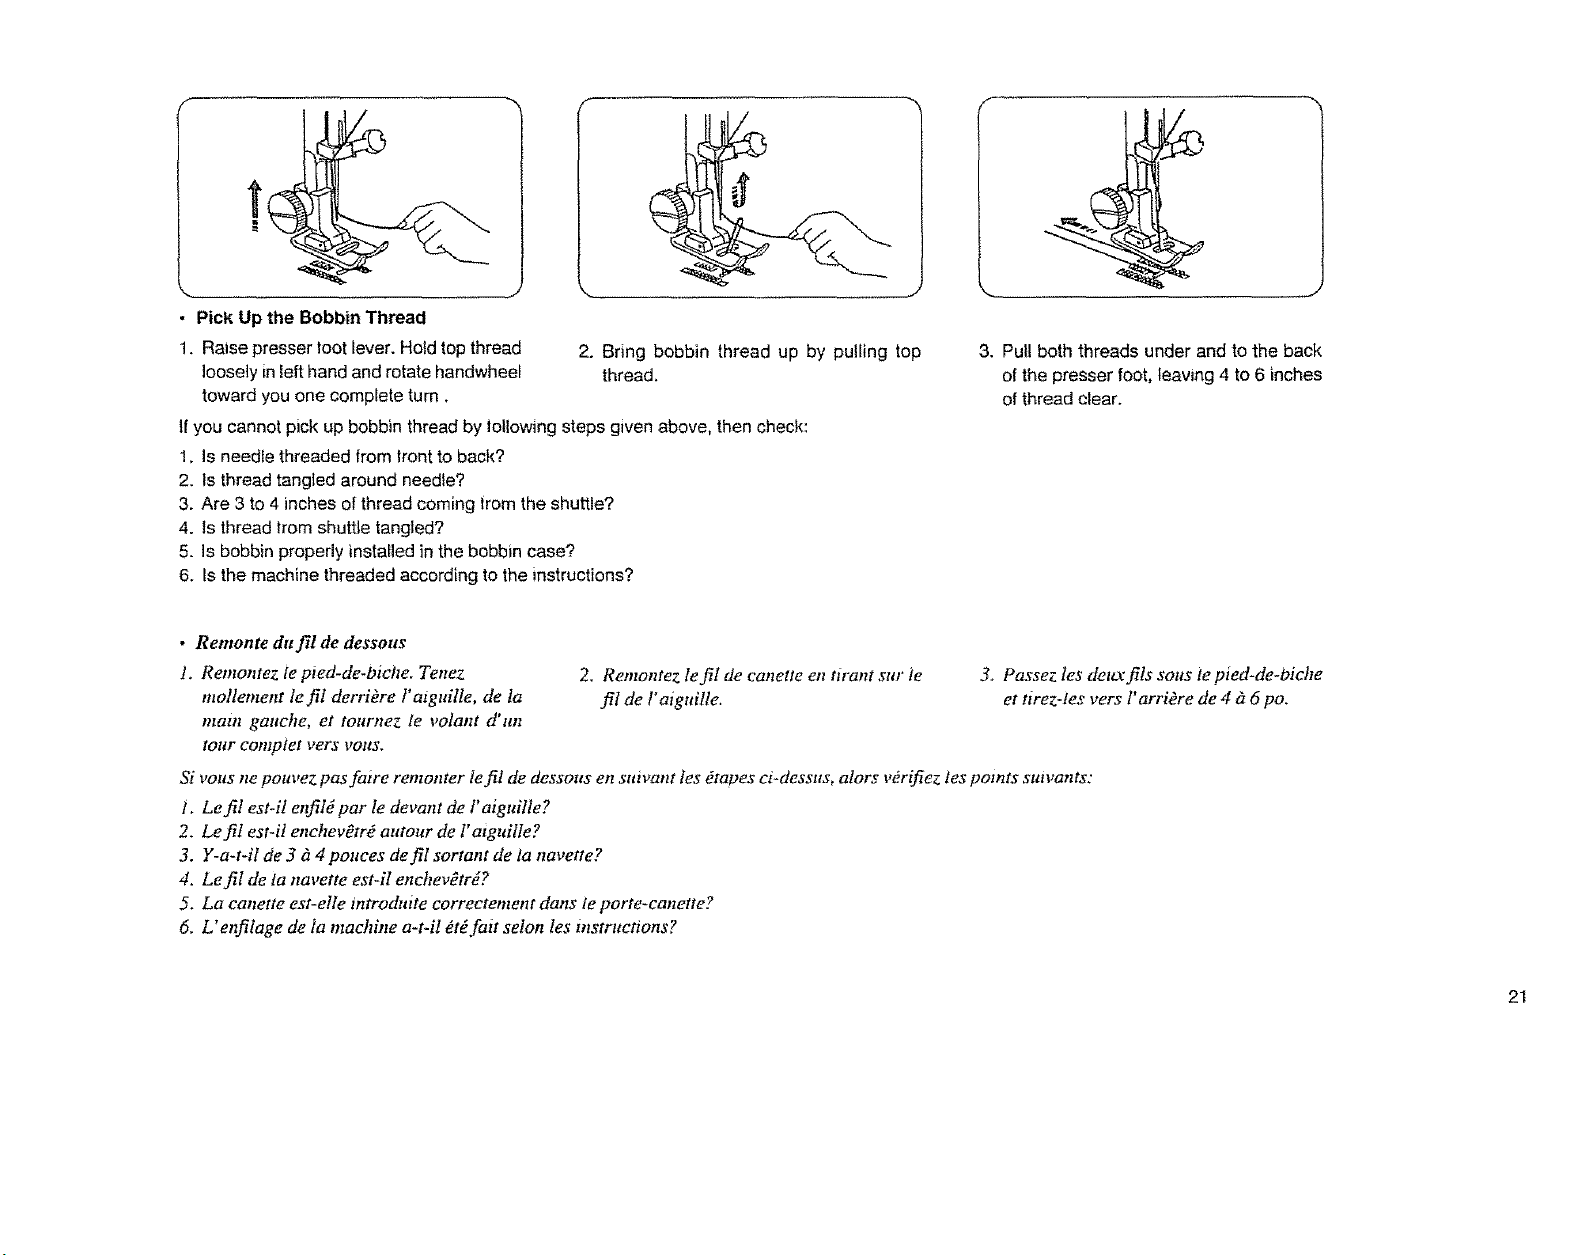
• Pick Up the Bobbin Thread
1. Raise presser toot lever. Hold top thread
loosely in left hand and rotate handwhee[
toward you one complete turn,
If you cannot pick up bobbin thread by lotlowing steps given above, then check:
1, Is needle threaded from trent to back?
2. ls thread tangled around needle?
3. Are 3 to 4 inches of thread coming trom the shuttle?
4. ]s thread from shuttle tangled?
5. is bobbin properly installed in the bobbin case?
6. ts the machine threaded according to the instructions?
• Remonteduf!lde dessous
1. Remontez te pied-de-biclle. Tenez 2. Remontez lefil de canette en tu'ant sur ie
mollement le fil derriere t'atguille, de Ia fil de l'aiguilte.
maitt gallche, et tournez le volatlt d'un
tour cottlptel vers VOltS.
Si vous ne pottvez pas faire remonter fe fil de dessotts en sttivattt Ies #tapes ci+desstts, alors v#rifiez les potl,zts stttvattts:
t, Le fil est-il enfil# par le devant de l'aiguilte?
2. Le fil est-il enchev#tr# atttour de l' atguille?
3. Y-a-t+it de 3 gl4 pmtces de f!l sortant de la navette?
4. Le fiI de la navette est-iI enchev#trd?
5, La canette est-elle mtroduite correctement clans fe porte-canette?
6, L' et_lage de ia machine a-t-il _t_ fait selon Ies instructions?
2. Bring bobbin thread up by pulling top
thread.
3. Pull both threads under and to the back
of the presser foot, leav+ng 4 to 6 inches
of thread clear.
3. Passez Ies det_ fils SOilStepied-de-Oiche
et tirez-ies vers l'arrikre de 4 _ 6 po.
....J
21
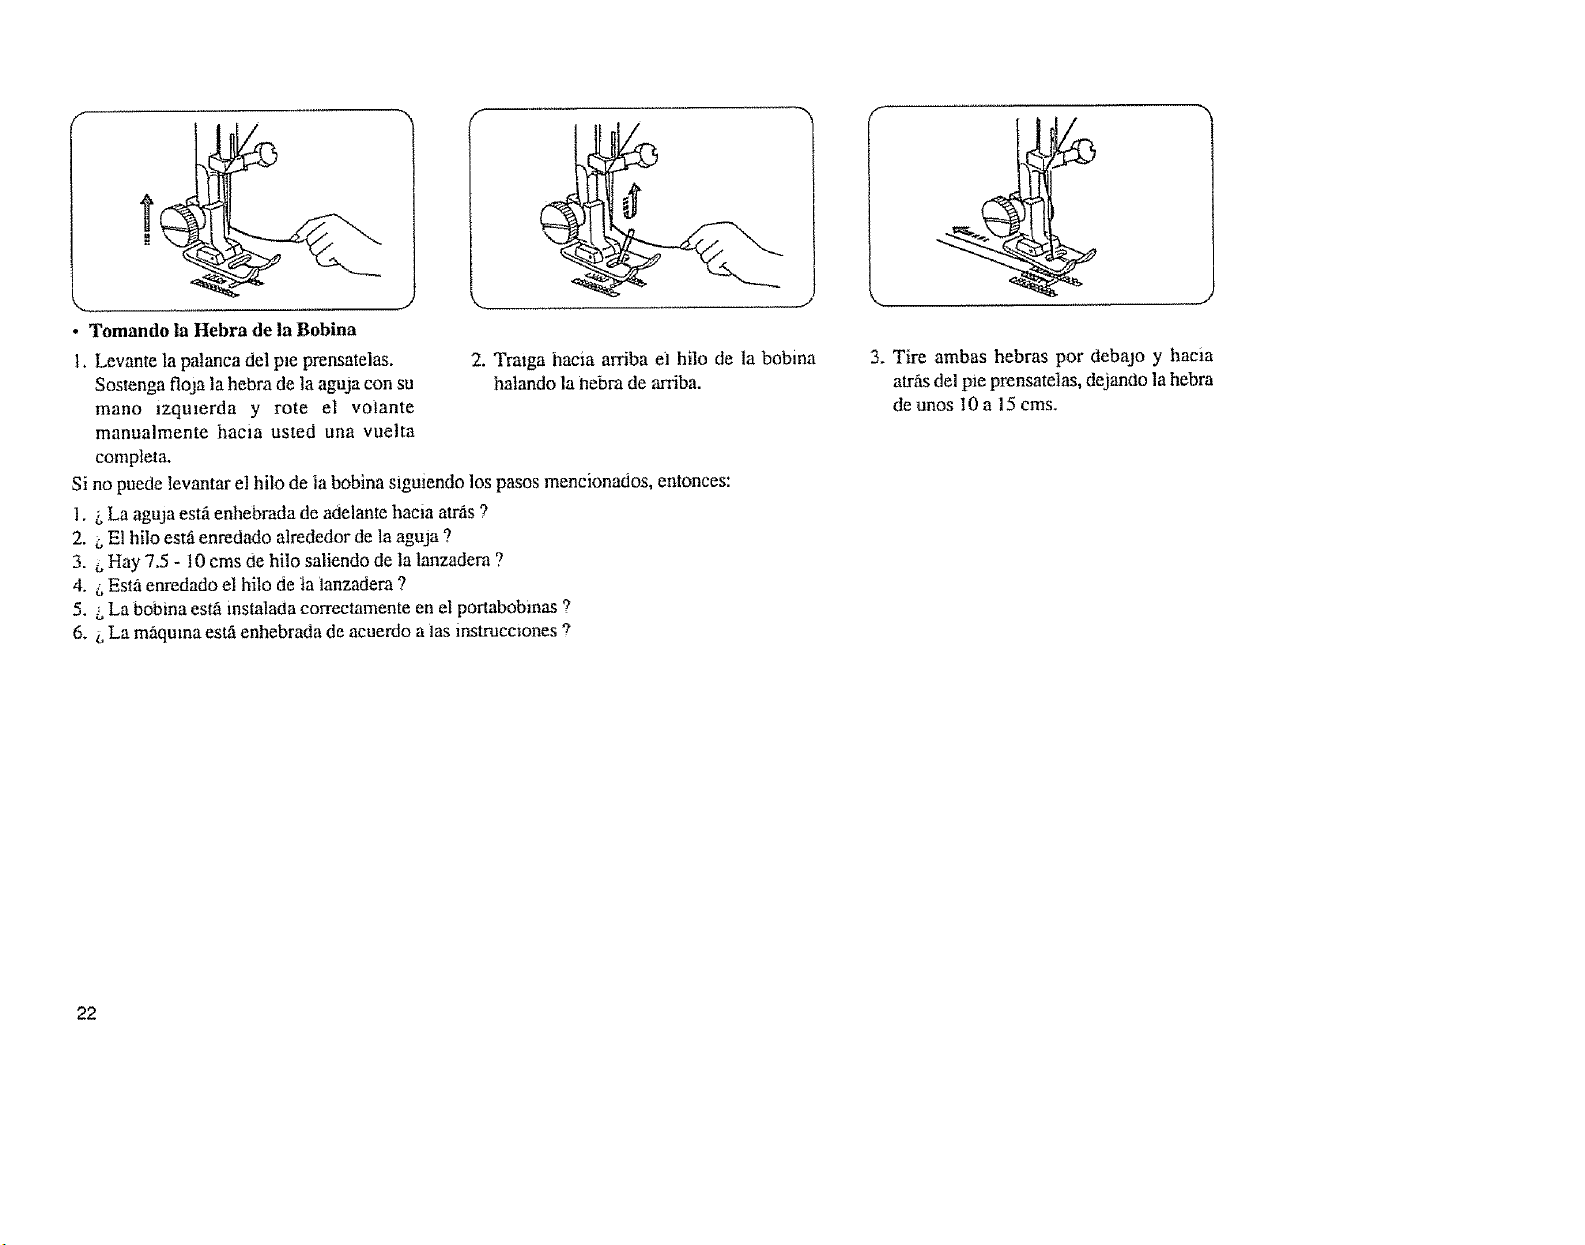
• Tomando la Hebra de ia Bobina
1. Levante la palanca del pie prensatelas.
Sostenga floja la hebra de la aguja con su
mano _zqulerda y rote el volante
manualmente hacia usted una vuetta
completa.
Si no puede levantar el hilo de la bobina siguiendo los pasos mencionados, entonces:
1. LLa aguja estfi enhebrada de a0elante haeia arras ?
2. _,E1hflo est_ienredado alrededor de la aguja ?
3. _,Hay 7.5 - 10 cms de hilo saliendo de la lanzadem ?
4. _,Est:i enredado el hito de ta lanzadem ?
5. LLa bobina es_ instalada correctamente en el portabobinas ?
6. _,La m_quma est,5,enhebrada de acuerdo aias instrucclones 'r
2. Traiga hacia arriba el hflo de la bobina
hatando la hebm de arriba.
3. Tire ambas hebras por debajo y hacia
atrfisdel pie prensateias, dejando la hebra
de unos I0 a 15 cms.
22
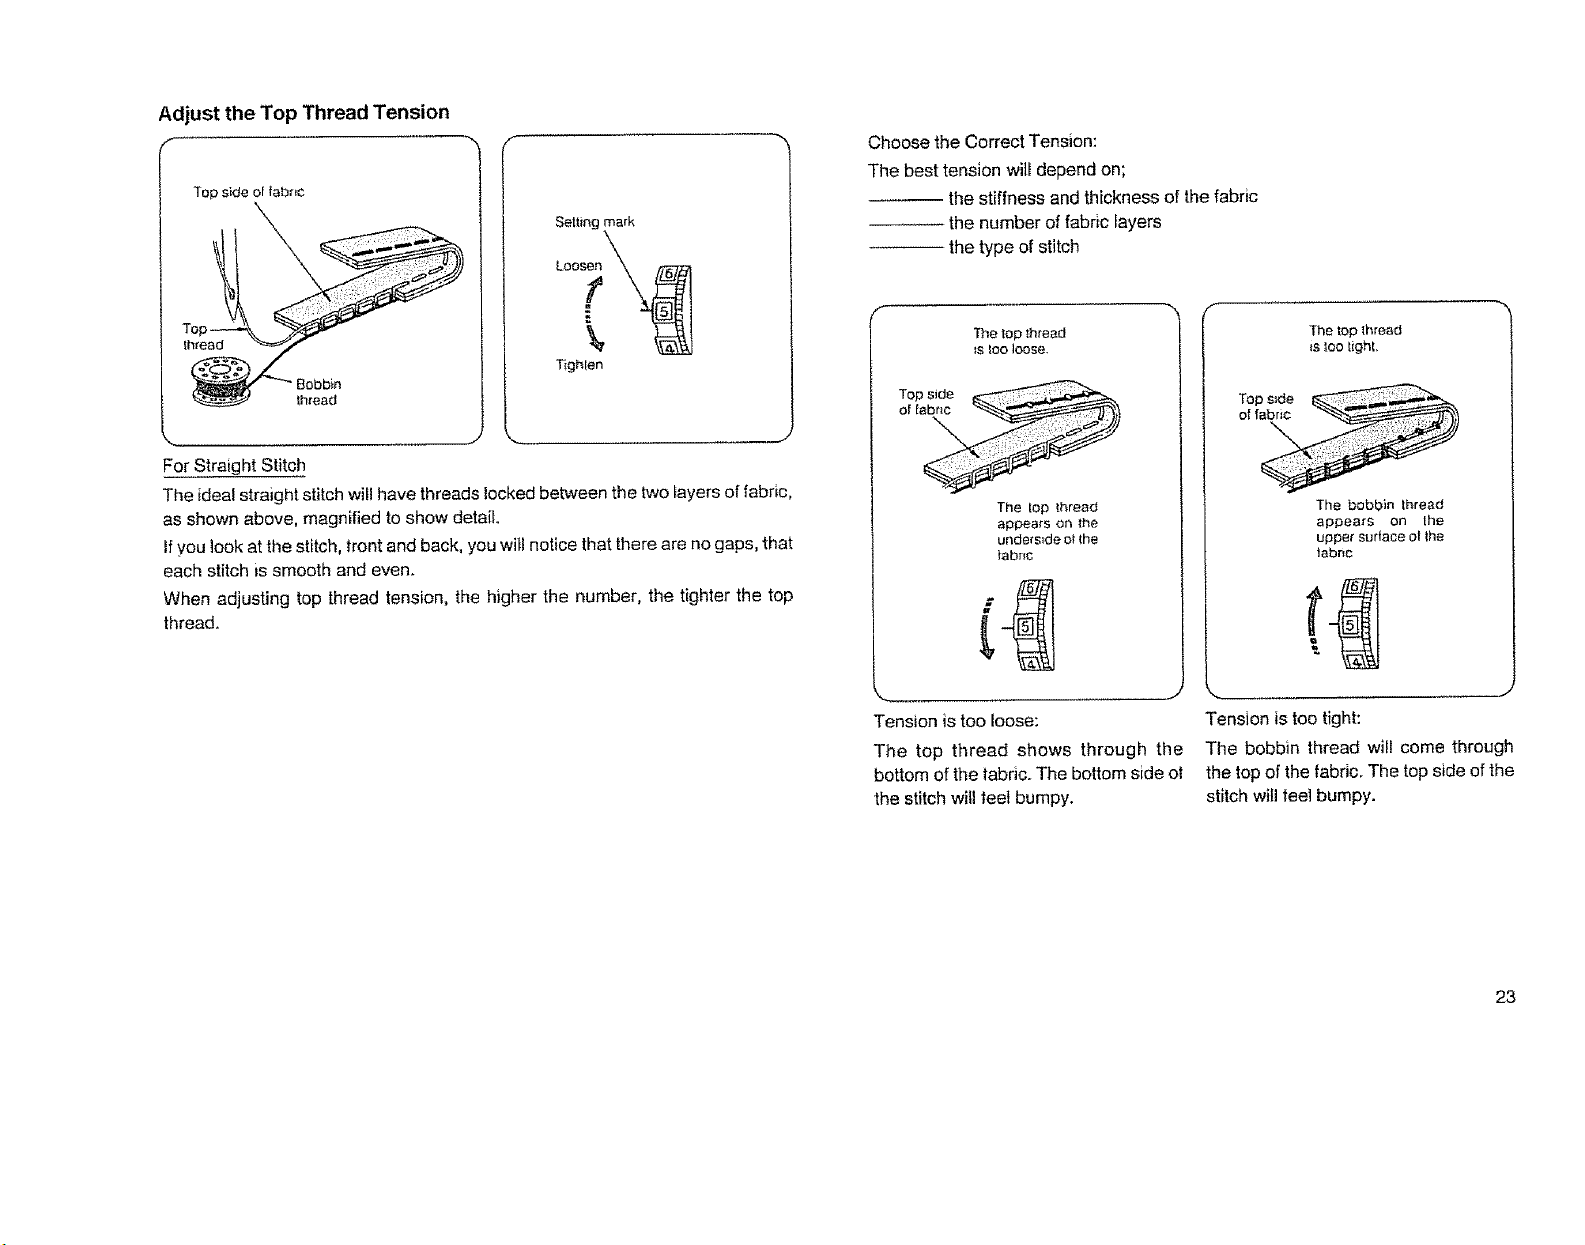
Adjust the Top Thread Tension
r "h F
Top s}de of fabric
Set|ing mark
Choose the Correct Tension:
The best tension wili depend on;
the stiffness and thickness of the fabric
the number of fabric iayers
the type of stitch
Too \
Loo__
thread
T{ghlen
lh[ead
For Straight Stitch
The ideal straight stitch will have threads locked between the two layers of fabric,
as shown above, magnified to show detail.
ifyou look at the stitch, tront and back, you witl notice that there are no gaps, that
each stitch is smooth and even.
When adjusting top thread tension, the higher the number, the tighter the top
thread.
f
The lop lhread
_${oo loose.
The top thread
appears on the
underside ot the
labnc
Tension is too loose:
The top thread shows through the
bottom of the fabric. The bottom side ol
the stitch will feet bumpy,
The top thread
_sloo tight,
The bobbin lhread
appeers on the
upper surtace ot _he
tabric
k,, j
Tension is too tight:
The bobbin thread wiil come through
the top of the fabric, The top side of the
stitch will feel bumpy.
23
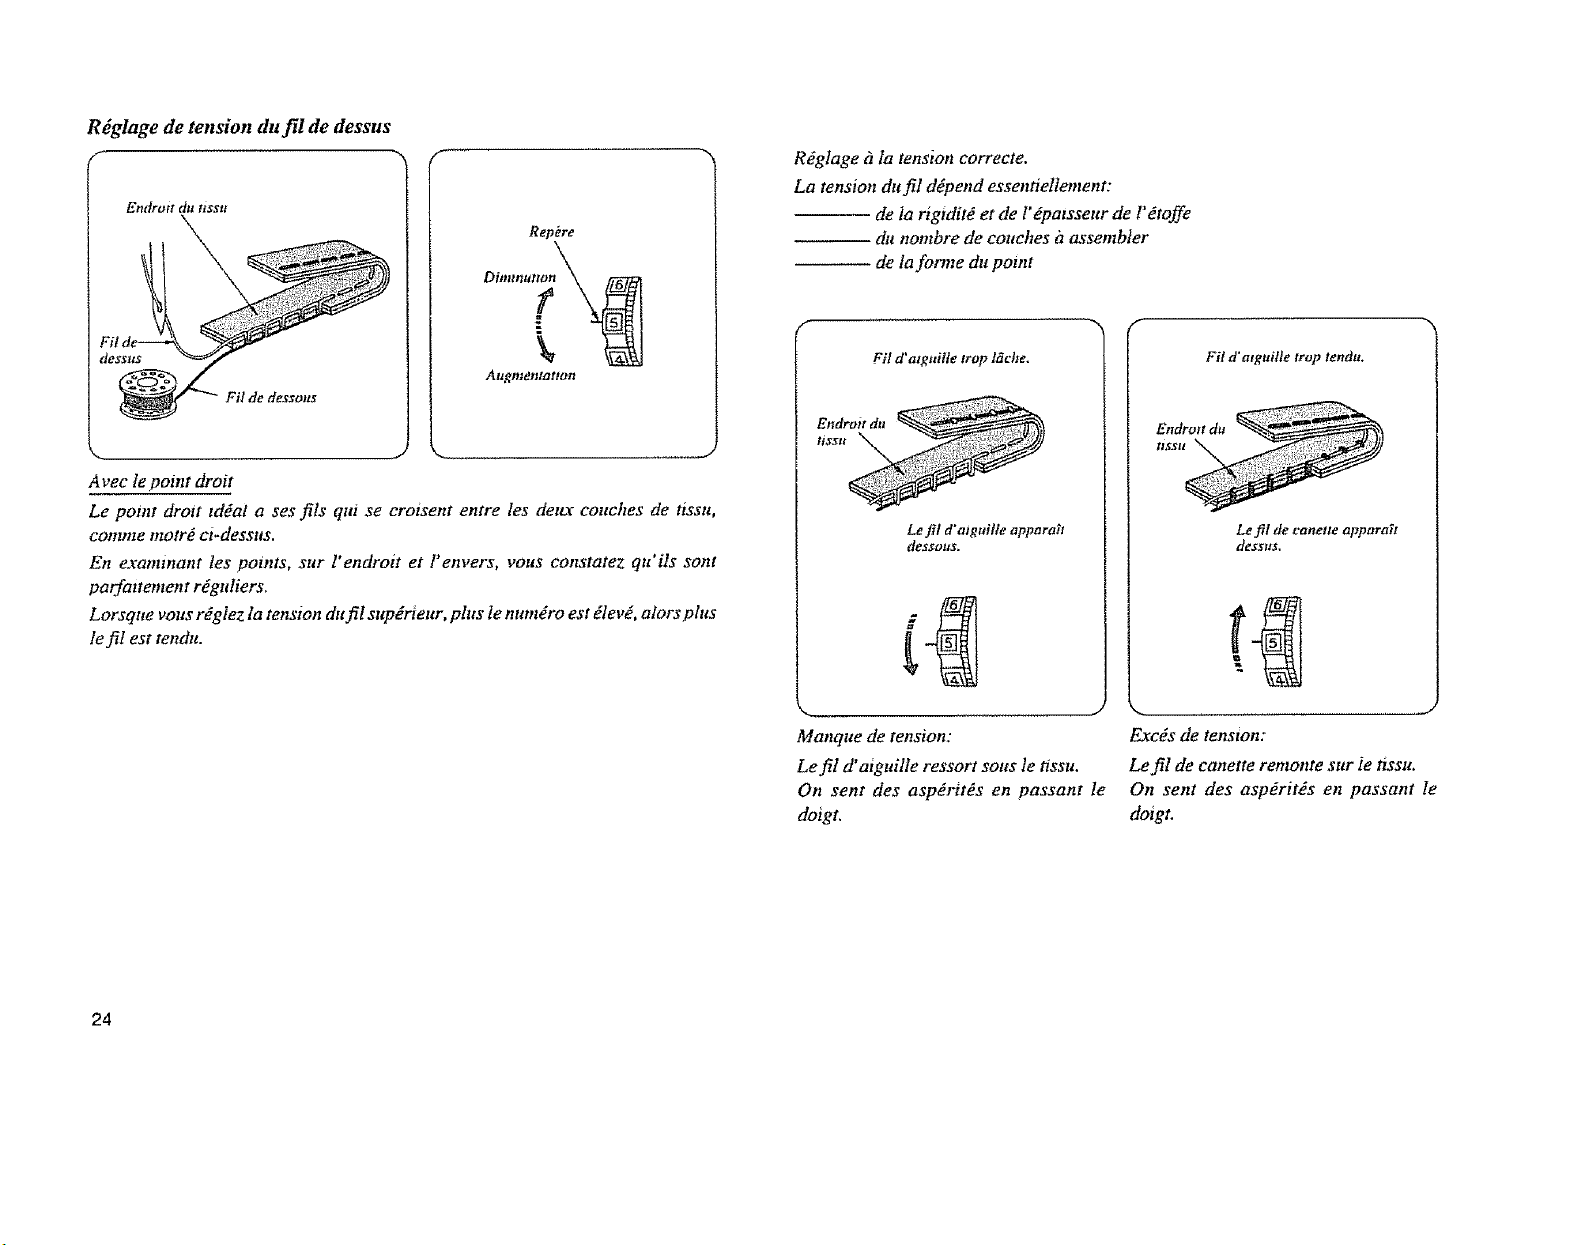
Rdglage de tension du fil de dessus
Endrott du tissn
Repbre
RYglage h la tension correcte.
La tension du fil d_pend essentiellement:
de la rigidity et de l'_palsseur de FYtoffe
du nombre de couches i_assembler
de la fonne du point
Avec le point droll
Le point drott tddal a ses ills qtti se eroisent entre les deter couches de tissu,
comme morro cl-dessus.
En examinant tes points, sur !"endroit et l'envers, VOltS constatez qu "ils sont
parfattement rdguliers.
Lorsqtte volts rYgiez la tension du fiI supdrieur, phts le numYro est dlev_, alors plus
le fil est tendu.
Fit d'atguille trop t6che.
Lefil d'aiguilte appara_t
dessous.
Manque de tension:
Le fil d'alguille ressort sous le tissu.
On sent des aspdrit_s en passant le
doigt.
Fi! d'atguille lrop tendu,
Le fil de canene apparai!
dessus,
ExcYs de tenston:
Le fil de canette remonte sur ie ttssu.
On sent des asp_ritds en passant Ie
doigt,
24
 Loading...