

Kenmore 303.14601 Owner's Manual
Kenmore 1700
11 GALLON
CENTRAL HUMIDIFIER
Installation
Maintenance
Repair Parts
Troubleshooting
Sears, Roebuck and Co., Hoffman Estates, IL 60179 U.S.A.
contents
WARRANTY ........................................... 2
BEFORE YOU START
Rules for Safe Installation
and Operation ................................... 2
Tools and Materials Needed .................. 2
introduction
Please read the instructions before you install and use your humidifier. This will help you obtain the full value from the humidifier. It will
also help you avoid any needless service cost, if the problem is something we cannot control and cannot cover in our Warranty.
FULL ONE YEAR WARRANTY ON HUMIDIFIER
If, within one year from the date of purchase, this humidifier fails due to a defect in material or workmanship, Sears will
repair it, free of charge.
WARRANTY SERVICE IS AVAILABLE BY SIMPLY CONTACTING THE NEAREST SEARS STORE OR SERVICE
CENTER IN THE UNITED STATES.
This warranty gives you specific legal rights, and you may also have other rights which vary from state to state.
This warranty DOES NOT cover the replacement media pad.
Sears, Roebuck and Co,, Dept, 817WA, Hoffman Estates, IL 60179
DO-IT-YOURSELF CHECK LIST
Ifyou feel the following operations are within your skills, you should
have no difficulty installing this humidifier.
I Cutting and drilling sheet metal.
Using hand tools: screwdriver, wrench, etc.
I Hooking up low voltage electrical connections.
SEARS INSTALLATION POLICY
All installation labor arranged by Sears will be performed in a neat,
workmanlike manner in accordance with generally accepted trade
practices. Further, all installations will comply with all local laws,
codes, regulations, and ordinances. The customer will also be
protected, during installation, by insurance relating to property
damage, Workman's Compensation, and public liability.
UNDERSTANDING HUMIDITY .............. 3
SELECTING A LOCATION ..................... 4
DISASSEMBLY/CONVERSION ............. 4
INSTALLATION ...................................... 5
WATER SUPPLY ................................... 6
You must realize that the wrong use of any tool can be danger-
ous. Be sure you know how to use the tools and equipment to
avoid any possible hazards. If you have any doubt we ask that
you contact your Sears salesperson. They will arrange for profes-
sional installation.
SEARS INSTALLATION WARRANTY
in addition to any warranty extended to you on the Sears mer-
chandise involved, which warranty becomes effective the date
the merchandise is installed, should the workmanship of any Sears
arranged installation prove faulty within one year, Sears will, upon
notice from you, cause such faults to be corrected at no addi-
tional cost to you.
HUMIDISTAT .......................................... 8
OPERATION .......................................... 9
MAINTENANCE ..................................... 9
SERVICE HINTS .................................. 10
REPAIR PARTS .................................... 11
before you start
RULES FOR SAFE INSTALLATION & OPERATION
1. Read these rules and the instructions carefully. Failure to fol-
low the rules and instructions could cause bodily injury and/
or property damage.
2. Check your local building codes and utility standards. The
installation must comply with their rules.
3. Always shut off the furnace blower before installing or servic-
ing the humidifier.
4. Always wear safety glasses when installing or servicing.
5. HUMIDIFIER MUST NOT BE INSTALLED IN AREAWHERE
FREEZING IS POSSIBLE OR LEAKING WOULD CAUSE
WATER DAMAGE.
6. Follow a regular service and maintenance schedule.
7. Always shut off electricity and water to the humidifier before
servicing.
8. When the furnace blower is used for air-conditioning, the hu-
midifier damper should be closed, and the humidistat should
be turned to the minimum humidity setting.
9. NEVER OIL ANY PART OFTHE HUMIDIFIER.
10. To prevent over humidification, humidifier must not be oper-
ated above humidistat high position or above the +20
position (whichever applies) except briefly to test op-
eration after installation or servicing.
TOOLS AND MATERIALS NEEDED
• Safety Glasses
• Straight edge ruler
Pencil or grease pencil
Hand drill or grounded
electric drill
Drill bits, 5/32", 1/8"
• Tin snips or metal
cutting saw
2
• Screwdriver (flat point,
medium size)
• File
• Level
• Hammer
• Small adjustable wrench
• Center punch
THANK YOU?
Thank you for selecting a Sears Humidifier. It will provide years of service if you give it a little care,
UNDERSTANDING HUMIDITY
Humidity can be puzzling, it cannot be seen, heard, touched,
smelled or tasted. Many people do not understand what a humidi-
fier will or will not do.
Probably the best way to judge whether the humidity is too high,
too low or about right is to watch your windows. If they are heavily
fogged you most likely have too much. If there is no moisture on
TYPICAL QUESTIONS ASKED
them at all, especially in the corners, you have too little. (NOTE:
Moisture will not normally form on thermopane or when storm win-
dows are used.) If there is some moisture in the window corners
and along the edges, the humidity is just about right. This is a good
rule of thumb if you do not have an expensive piece of testing equip-
ment. Your comfort is another good check.
1. Why do moisture requirements vary from home to home?
Requirements depend on the amount and dryness of air to be
humidified. The larger and more loosely constructed the home,
the greater the quantity of moisture required.
2. How can I best check my home's relative humidity?
First give your humidifier time to build up the humidity to an
acceptable level. Instruments are available to measure relative
humidity, but from a practical standpoint, your comfort is the
best guide. You cannot depend on table top or wall hung dial
gauges.
3. How long will it take my humidifier to build up the
humidity in my home?
Much depends on the outside temperature, time of year, home
construction, and how dried out the home has become. In some
cases, it may take a week or more.
4. What ere some of the common things that cause higher
than average air leakage in the home, therefore causing
low humidity?
A. Jalousie windows
B. Open fireplace dampers
C. Cracks around windows and doors
D. Open doors and windows
E. Unusually large attic or foundation vents
F. Range hoods and bath fans
5. What else causes static shock besides low humidity?
Some types of carpets tend to create more static than others.
While the proper humidity level will reduce the static level, it
may not eliminate static entirely.
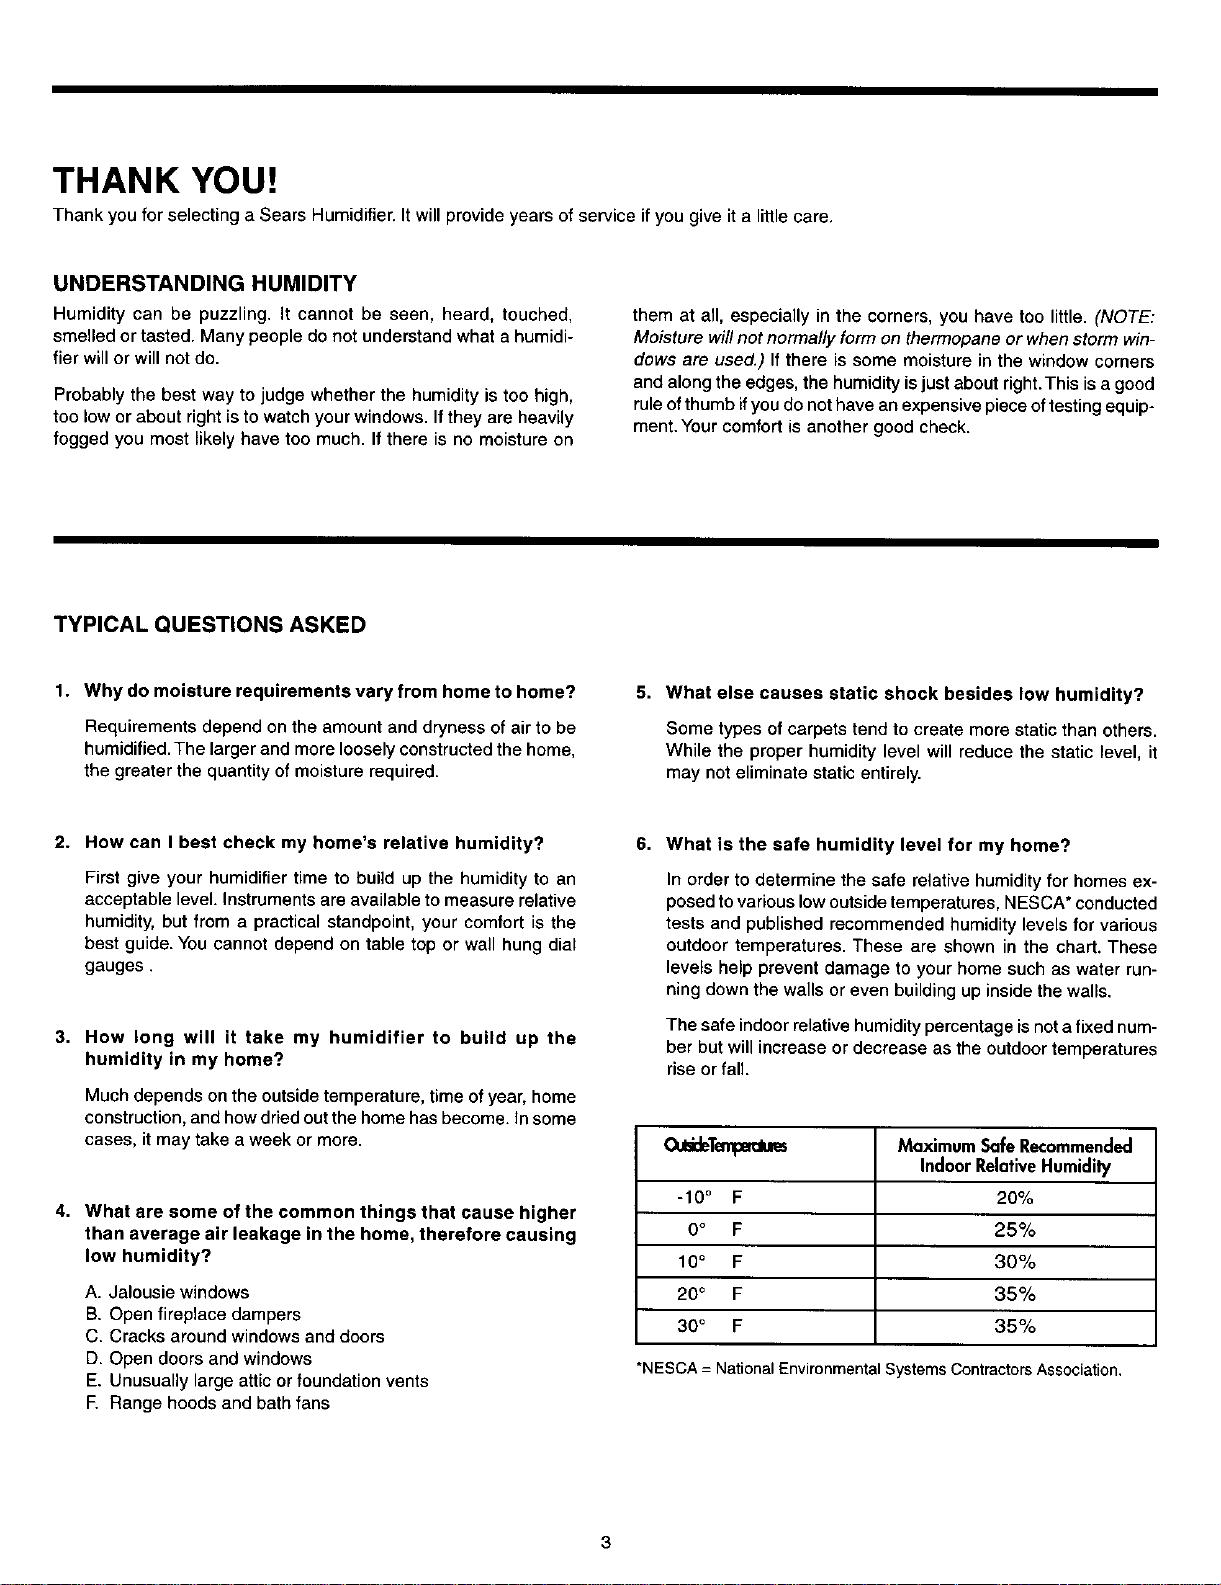
6. What is the safe humidity level for my home?
In order to determine the safe relative humidity for homes ex-
posed to various low outside temperatures, NESCA* conducted
tests and published recommended humidity levels for various
outdoor temperatures. These are shown in the chart. These
levels help prevent damage to your home such as water run-
ning down the walls or even building up inside the walls.
The safe indoor relative humidity percentage is not afixed num-
ber but will increase or decrease as the outdoor temperatures
rise or fall.
Ou_deT_ Maximum Safe Recommended
Indoor RelativeHumidity
-10 ° F 20%
0o F 25%
10° F 30%
2O° F 35%
30 ° F 35%
*NESCA = National Environmental Systems Contractors Association,

selecting a location
Consider these points as you choose the location for your hu-
midifier.
Locate humidifier on supply air plenum (Fig. 1) or return air
plenum. If the humidifier is installed on the return air plenum,
the flexible hose, round opening, is connected tothe supply air
plenum.
If furnace is equipped with air conditioning, humidifier should
be mounted above or at slope side of "A" coil to avoid possible
splashing (Fig. 2) of water in reservoir.
Humidifier should be installed so that if the humidifier or any
other connections should leak, the resulting flow of water will
not cause damage. Under no condition is Sears and the manu-
facturer to be held liable for any water damage in connection
with this humidifier. Never install humidifier in attic or crawl space
where freezing may occur or leaking
Ifholes between supply air plenum and return air
be located more than 36 inches apart (Fig. 1),
round pipe and fittings (not supplied)
section of flexible tube No. 281152-05
through the Sears
type installation are available at Sears.
)urchased
for this
9 inch minimum Air
36 inch maximum using flex Plenum
hose provided* (Warm to
*Purchase additional During
hose for greater spans. Heating
Return Air
Plenum
Place Humidifier
Supply
Plenum
Air Conditioner Coil
Supply
Touch
Furnace
Duct
inspection
This humidifier is a_molea
with the bypass d_t" on the left
side (Fig. 3)._is is suitable
for install p_on as shown in
Fig. l:._is issuitable for your
inst_ation, remove parts as
_wn under Disassembly.
f_Sl_lp conversion steps A, B,
f_ and IX Start your installation
with C and then skip to [] 1.
If you require the bypass duct
on the right (Fig. 4), remove
parts as shown under Disas-
sembly and start with A.
disassembly
Remove front cover. Lift top cover to lock position.
Pull pivot pin and remove float assembly from valve.
Lift out media wheel.
"-U
Bypass Duct
AS RECEIVED
(Left Hand Flange)
AS CONVERTED
(Right Hand Flange)
MT Bypas
l l otor
I=l[e'l.3
-Wire Bearing Support -- Pull Up
Motor Bracket Top Flange- Pull Up--7
,Top Cover _
/
Remove water reservoir.
conversion- (,frequired- see "inspection" above)
A Pull motor bracket and wire bearing support to remove
from lances (Fig. 5).
-Lances
4
Wire Support
 Loading...