

Page 1
Kenmore
12,000 BTU Portable Air Conditioner, Dehumidifier & Heater with Remote Control
Use & Care Guide
Model: 35132
FOR HOUSEHOLD USE ONLY
1
Page 2

Congratulations on purchasing your Kenmore Air-Conditioner, Dehumidifier & Heater unit.
Your air-conditioner has been developed and manufactured in accordance with standards of state of the art technology.
Please read the operating instructions carefully before connecting your unit to the power supply in order to prevent damage from improper
use. Pay special attention to the safety instructions. If you pass this unit on to a third party, you should also include these operating
instructions. Please keep these operating instructions in a safe place for any questions which may arise in future.
Thank you for showing confidence in our product. We hope you enjoy a pleasant room climate with your Kenmore air-conditioner.
PLEASE READ THIS MANUAL CAREFULLY AND THOROUGHLY BEFORE INSTALLING AND OPERATING YOUR
AIR CONDITIONER.
PLEASE RETAIN THIS OWNER’S MANUAL FOR FUTURE REFERENCE.
IMPORTANT SAFEGUARDS
To prevent injury to the user or other people and property damage, the following instructions must be followed.
Use this appliance only as described in this manual. As with any electrical appliance, the instructions aim to cover as many
eventualities as possible. Caution and common sense should be used when operating and installing this air conditioner.
This appliance has been manufactured to cool, heat and dehumidify domestic environments and should not be used for other
purposes.
The appliance should not be installed where the atmosphere may contain combustible gases, oil or sulphur, or near heat sources.
Always install the portable air conditioner properly. Incorrect assembly or installation may cause failure to operate including injury,
fire and electric shock hazards.
Do not place the power cord near a heater. It may cause fire or electric shock.
Do not use the power cord near flammable gas or combustibles such as gasoline, benzene, thinner, etc. It may cause explosion or
fire.
Do not operate or stop the unit by inserting or pulling out the power plug. It may cause fire or electric shock.
Do not damage or use an unspecified power cord. It may cause electric shock or fire.
Do not modify the length of the power cord. It will cause electric shock or fire due to heat generation.
Use the air conditioner on a single outlet circuit. Do not share the outlet with other appliances. It may cause circuit failure.
Changing the outlet without making the appropriate wiring changes will create an unsafe condition that could result in fire or
electrical shock. Refer all such work to a licensed and qualified electrician.
WARNING: This appliance must be properly grounded. The power cord of this appliance is equipped with a three-prong LCDI
plug. To minimize the risk of electric shock, use the plug with a standard three-slot grounding wall power outlet. If the power outlet
does not include a grounding slot, have a qualified electrician replace the outlet before you use the room air conditioner. Do not
cut or remove the grounding prong from the power plug. If you have doubt whether the air conditioner is properly grounded, have
the wall receptacle and circuit checked by a qualified electrician.
Do not disassemble or modify this appliance. Doing so may cause failure and electric shock.
TEMPORARY USE OF AN EXTENSION CORD. We strongly discourage the use of an extension cord due to potential safety hazards.
For temporary situations, use only CSA and UL certified 3-prong grounded extension cords designed and approved specifically for
air conditioners.
To prevent injury from handling sharp objects, do not touch the metal parts of the unit when removing the filter
Do not block the air inlet or air outlet. It may cause failure of the appliance.
Always store and transport the air conditioner upright to maintain the compressor in a proper condition. Prior to installation, allow
air conditioner to stand upright for 12 hours.
Only operate the unit on a horizontal surface to ensure no water leaks.
The appliance is not intended for use by persons (including children) with reduced physical, sensory or mental capabilities, or lack
of experience and knowledge, unless they have been given supervision or instruction concerning use of the appliance by a person
responsible for their safety. Children should be supervised to ensure that they do not play with the appliance.
Do not use in the socket if it is loose or damaged. It may cause fire and electric shock.
Unplug the unit if strange sounds, odors or smoke come from it.
Hold the plug by the head when unplugging the unit. Do not yank on the cord.
Unplug the air conditioner if it will not be used for a long period to prevent accidental startup and the possibility of injury.
Do not place heavy objects on the power cord and take care so that cord will not be damaged.
Clean the air filters regularly. Contaminated air filter reduces capacity.
2
Page 3

Use a soft cloth to clean. Do not use wax, thinners or a strong detergent. The appearance of the air conditioner may deteriorate,
change color or develop surface flaws.
Do not use water to clean inside the air conditioner. Exposure to water can destroy the insulation, leading to possible electric shock.
When water enters the product, turn off the power switch of the main body of the appliance. For repair and maintenance, contact
an Authorized Service Centre. For warranty, refer to the warranty page for details and contact the service center 1-800-4-MYHome.
Being exposed to direct airflow for an extended period of time could be hazardous to your health.
Do not use this air conditioner for non-specified refrigeration purposes (e.g. preserving precision devices, food, pets, plants, and
art objects.) Such usage could cause damages to them.
Due to the possibility of oxygen deficiency, ventilate the room when used together with stoves or other heating devices.
The air conditioner is a consumer comfort appliance, not a precision climate control system.
Always insert the filter securely. Never operate without a filter.
Do not drink water drained from air conditioner. It contains contaminants that may make you sick.
When using the A/C in conditions where the temperature may fall below 10°, the unit must be moved to an area where
temperatures are higher than 10°. Failure to do so can cause severe damage to the unit.
3
Page 4
1. Place the unit in the correct upright position before unpacking.
2. Cut the two packing straps.
3. Slide the carton in an upwards motion and it will release from the base.
(We recommend that you retain the packaging for off season storage)
4. Grip the carry handles located on either side of the unit and carefully lift until it slides
out of the foam base.
5. Disconnect the tie-in inside the exhaust tube and take out
the exhaust tube.
UNPACKING INSTRUCTIONS
Remove the air conditioner from the packing carton. It is recommended to keep the carton and packing material for storage or
transportation of the unit.
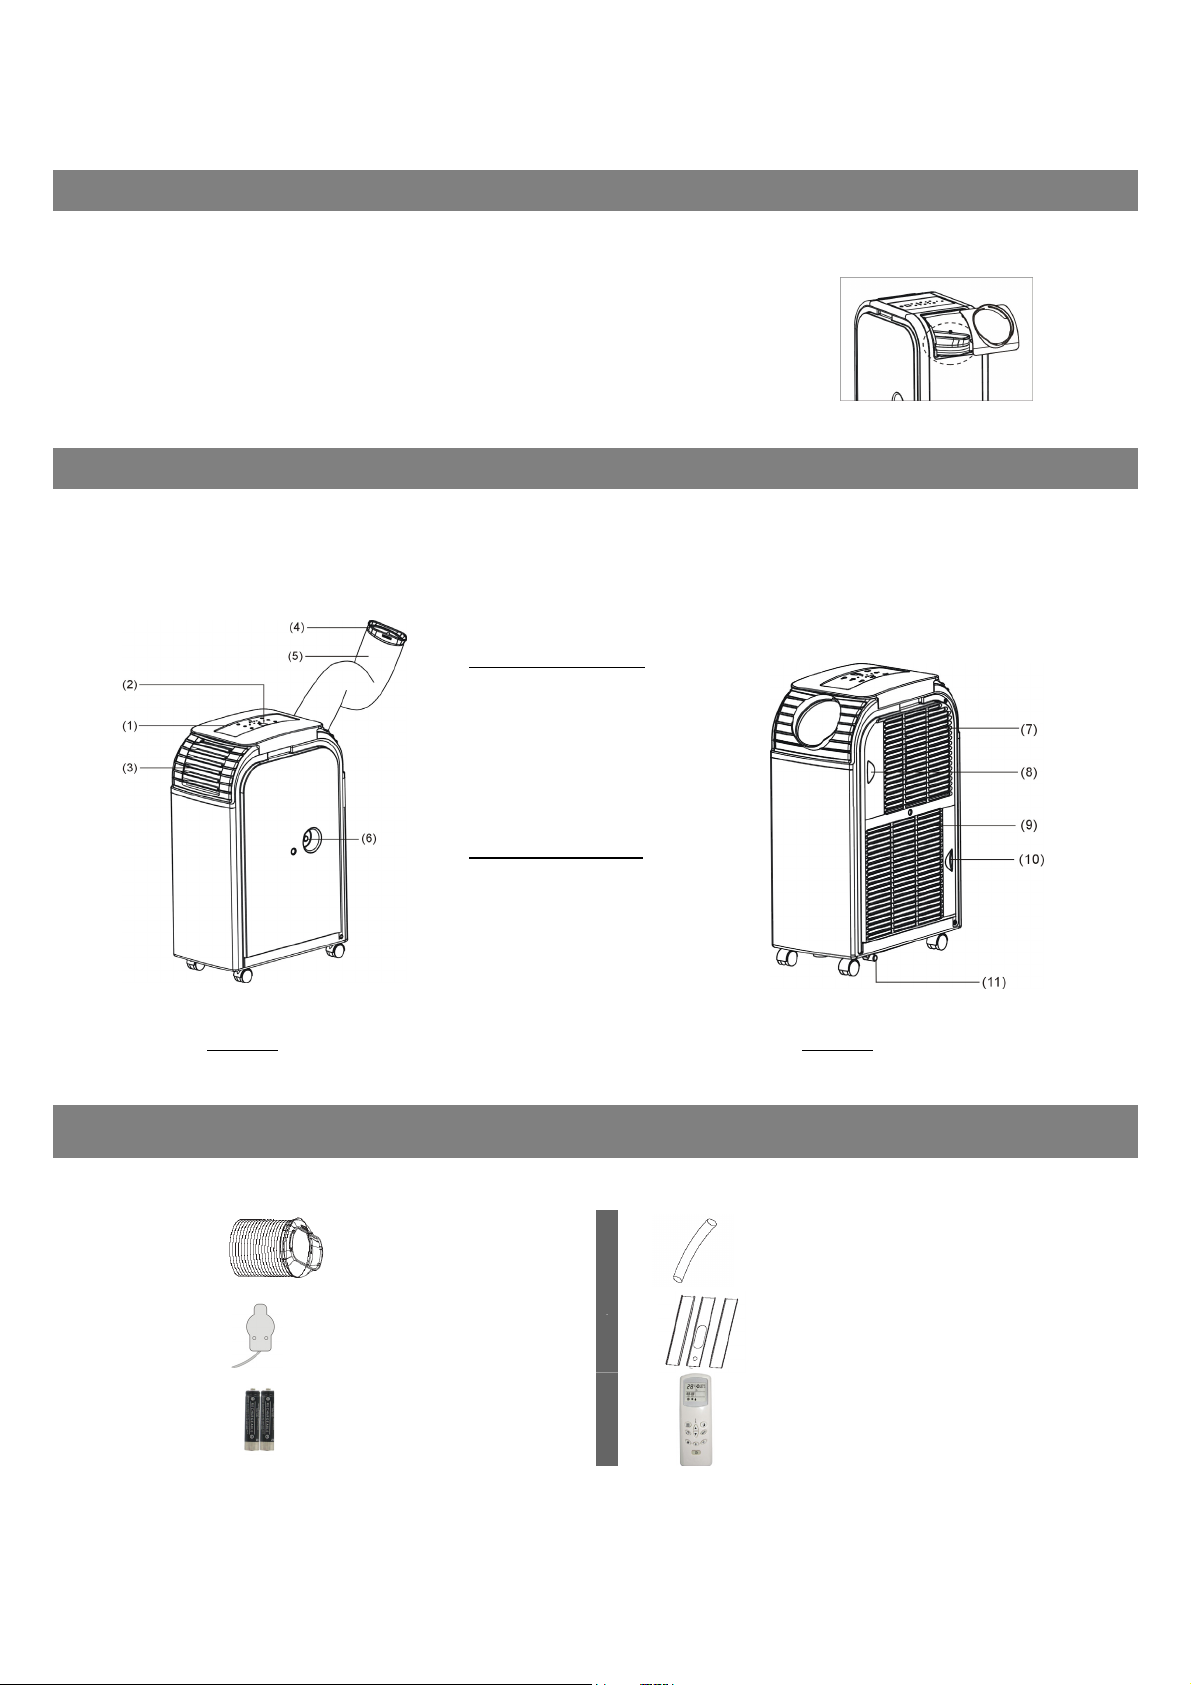
PARTS OF THE AIR CONDITIONER
Front of Unit (Figure 1)
1. Control panel
2. Remote receiver
3. Adjustable air vent
4. Hose joint
5. Exhaust hose
6. Upper drain outlet
Rear of Unit (Figure 2)
7. Cool air inlet
8. Cool air filter
9. Warm air inlet
10. Warm air filter
11. Drain outlet
Figure 1 Figure 2
ACCESSORIES
Upon unpacking the air conditioner, check to ensure these following accessories are included:
Drain hose
Hose
Remote sensor kit
(used only in out of room
cooling mode)
2 AAA batteries
For continuous
drainage
Window slider kit
(3pcs)
Remote Control
4
Page 5
INSTALLATION
Prior to installing the unit, check for the following:
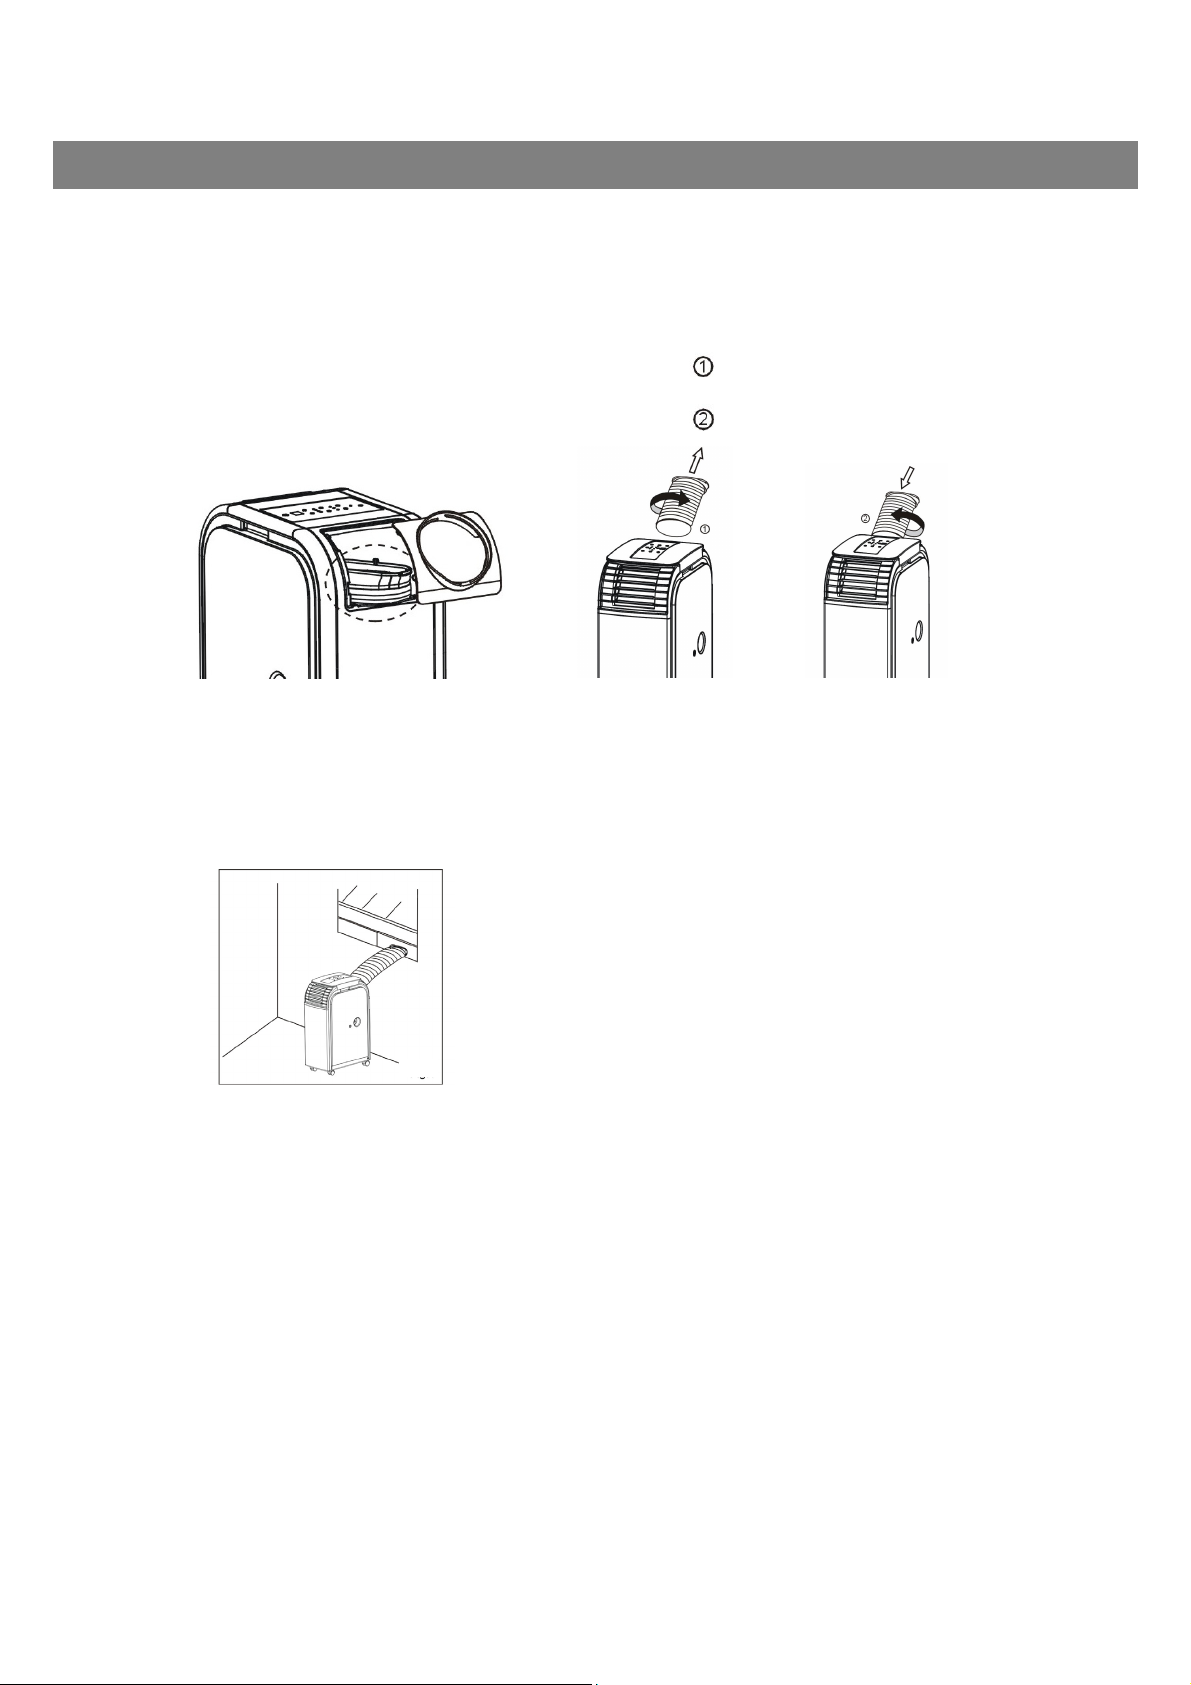
1. To avoid damage, place the unit in an upright position for at least 12 hours before initial set-up.
2. Release the exhaust hose holder in the unit and take out the exhaust hose.
3. Fasten the exhaust hose before turning the unit on.
4. Expand the exhaust hose, then turn in the direction of the arrow displayed and remove it from the
unit.
5. Expand the exhaust hose, then turn in the direction of the arrow displayed and connect it to the unit.
1. Plug the unit into a 120V~60Hz grounded electrical outlet. DO NOT USE A REGULAR EXTENSION
CORD. If it is necessary to use an extension cord with this unit, use an approved air conditioner
extension cord only.
LOCATION OF THE PORTABLE AIR CONDITIONER (Figure 1)
1. Select a location near a window and electrical outlet.
2. Install the Portable Air Conditioner in a flat, spacious location
where the air outlets will not be covered up. Ensure there is a
minimum clearance of 30cm from the appliance to the wall or
other obstacles such as furniture. The plug should be easily
accessed after the appliance is positioned.
3. If the unit is to be placed outside of the room to be cooled, you
should try to position the unit on a flat solid surface and in an
area protected from rain and sun exposure such as sunroom,
veranda or hallway. You should not operate the unit in moist
areas, such as e.g. saunas or similar areas.
WINDOW KIT INSTALLATION
The Window Kit (included) has been designed to fit most standard vertical and horizontal windows. It may
be necessary to improvise some aspects of the installation procedures for certain types of windows.
Note: If the window opening is less than the mentioned length of the window slider kit, make the Window
Slider Kit shorter by cutting it on the side with a hole to fit the window opening, be careful not to cut off the
hole.
The hose must be attached to the correct side of the unit for the given installation (see operating instructions).
To change the hose to the other side of the unit, gently lift upwards the output vent cover, move hose unit to
the other side then replace the output vent cover on the other side hose was just removed from.
5
Page 6
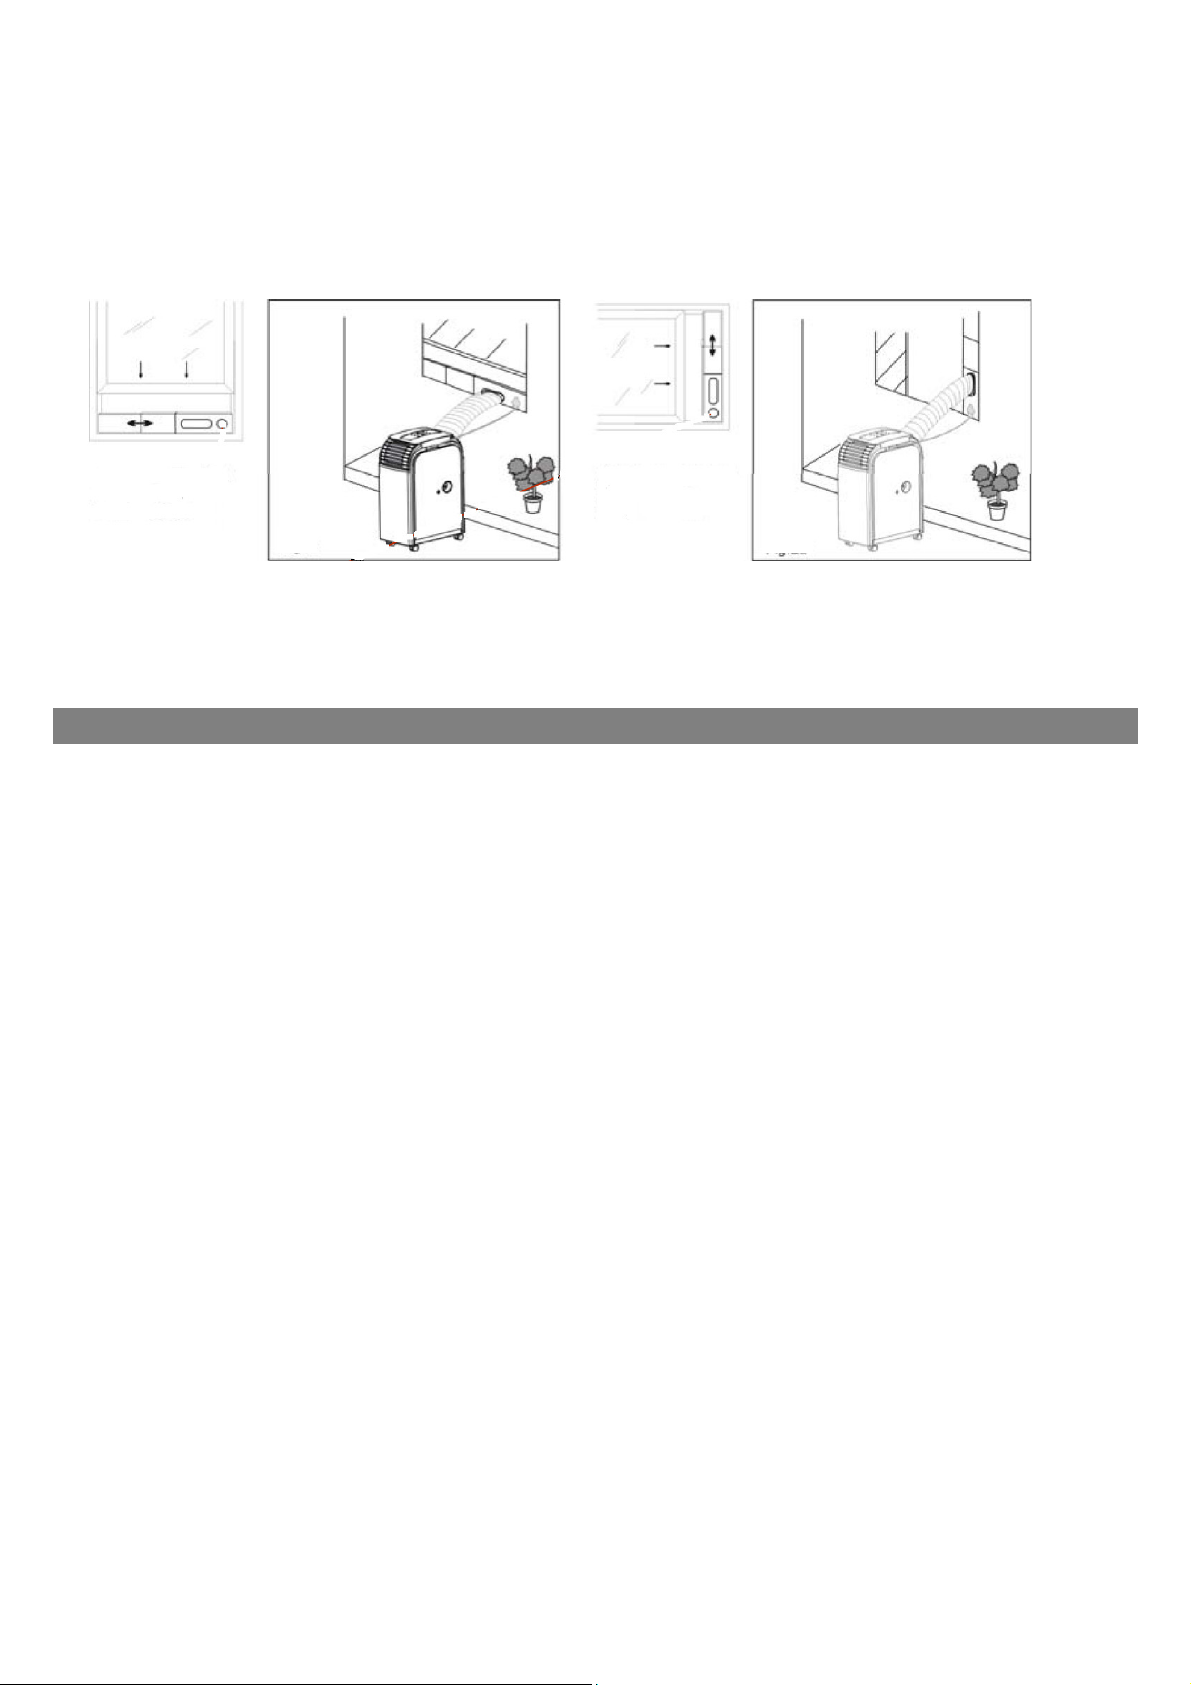
Figure 1 Figure 1a
Window slider kit
Min: 55 cm
Max:127cm
The appliance is equipped with an LCDI safety plug to protect the unit. If power is cut off, unplug from the
socket and make sure the power cable is undamaged. If the cable is damaged, call the service center
immediately. If power cuts off frequently and the power cable is undamaged, contact qualified electrician.
TO TEST THE SAFETY PLUG
1. Connect the power plug to an electrical outlet.
2. The power plug has two buttons located on the top. One button is marked “TEST” and the other is
3. Press the “RESET” button; you will hear a click as the button engages.
4. The power supply cord is now energized and supplying electricity to the air conditioner (it is
Window slider kit
Min: 55 cm
Vertical
Window
Max:127cm
Horizontal
Window
SAFETY PLUG
marked “RESET”. Press the “TEST” button; you will hear a click as the “RESET” button pops out.
indicated by a light on the plug head).
Under no circumstances should this device be used to turn the unit on or off.
The “RESET” button must always be pushed in (engaged) for correct operation.
The power supply cord must be replaced if it fails to reset when the “TEST” button is
pushed in.
6
Page 7
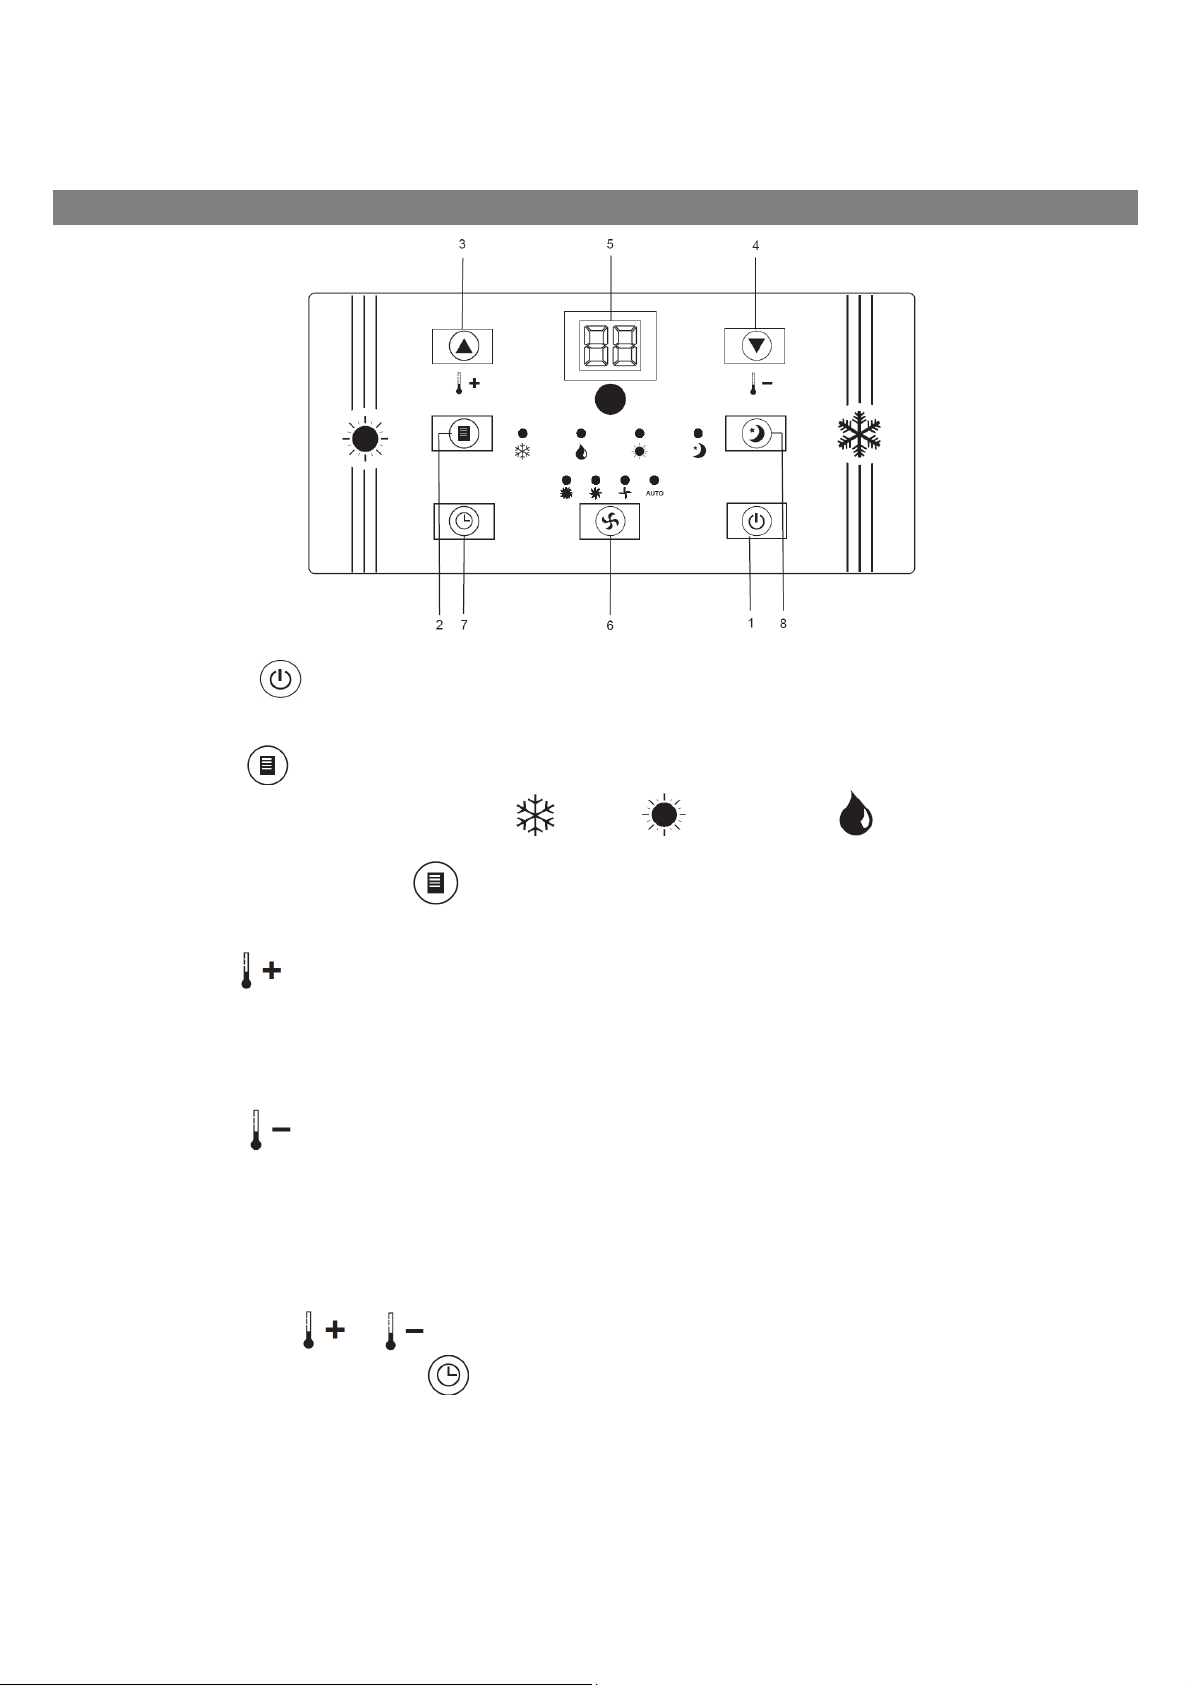
CONTROL PANEL
1. POWER
Press this button to switch the unit on or off
2. MODE
Press this button to select between Cooling (
3. REMARKS: PRESS [MODE]
NO DISPLAY ON THE PANEL) FOR 10 SECONDS TO SWITCH DISPLAY BETWEEN FAHRENHEIT AND
CELSIUS.
TEMP+
Pressing this button in cooling mode adjusts the required room temperature by 1°C up to a
Pressing this button in heating mode adjusts the required room temperature by 1°C up to a
4. TEMP-
Pressing this button in cooling mode adjusts the required room temperature by 1°C to a minimum
Pressing this button in heating function adjusts the required room temperature by 1°C to a minimum
5. LED-DISPLAY
The display shows the current ambient temperature in operation.
), Heating ( ) or Dehumidifying ( ) mode
IN STANDBY MODE (UNIT IS PLUGGED IN BUT NOT IN OPERATION,
maximum temperature of 30°C.
maximum temperature of 25°C.
temperature of 17°C.
temperature of 15°C
By pressing the [
When pressing the timer button [
shutdown. After each setting, the display automatically shows the current ambient temperature again. In the
dehumidifying mode, “dH” (or “HP” upside-down) is shown on the display.
Error messages are also shown in the display.
] or [ ] buttons, the required target temperature is displayed.
], the number of hours is shown until delayed start up or delayed
7
Page 8

6. SPEED
Pressing this button sets the ventilation speed to “
(Automatic)”. If “AUTO” is selected, the ventilator operates at temperature differences larger than 9
degrees at top speed. If the temperature reduces to a difference smaller than 4 degrees, the ventilator
switches to middle blower position. If the temperature reduces further until the target temperature, the
ventilator switches to the lowest blower position.
7. TIMER
Programmable timer button for delayed start up or delayed shutdown
How to program a delayed start up
This function is used to set the number of hours delay before the appliance comes on. Proceed as follows:
Press [TIMER]
Select the required function (cooling, heating, and dehumidification), wait until the unit displays the
After the set number of hours has expired, the unit starts automatically.
If you press the [POWER]
the unit turns on and can be operated in the required operating mode.
How to program a delayed shutdown
This function is used to set the number of hours delay before the appliance goes off. Proceed as follows:
Start the unit in required function (cooling, heating or dehumidifying)
(low)”, “ (medium)”, “ (high)” or “AUTO
button in Stand-by mode (unit is plugged in but not in operation, no display on
the panel), to set the number of hours delay before the appliance comes on.
ambient temperature, and then set the desired temperature.
button before the time has expired, the delayed start up will be cancelled,
Press the [TIMER]
before the appliance goes off.
After the flashing of the number of hours on the LED has stopped, can select the required
temperature.
After the set number of hours has expired, the unit shuts down automatically.
If you press the [POWER]
8. SLEEP
This function is ideal for the night as it gradually reduces operation of the appliance. The sleep function
maintains the room at optimum temperature and with silent operation.
When you use the sleep function, first set the timer as described in the functions.
Delayed start and delayed shutdown: Press the [TIMER]
display. After the hour display, the display switches automatically to the previous set temperature display.
To change the temperature, press the [TEMP+]
the temperature increases or decreases by 1°C.
button during operation and enter the required number of hours delay
button before the time has expired, the unit shuts down.
button until the required hours appear on the
or [TEMP-] buttons. With each press on the button,
8
Page 9
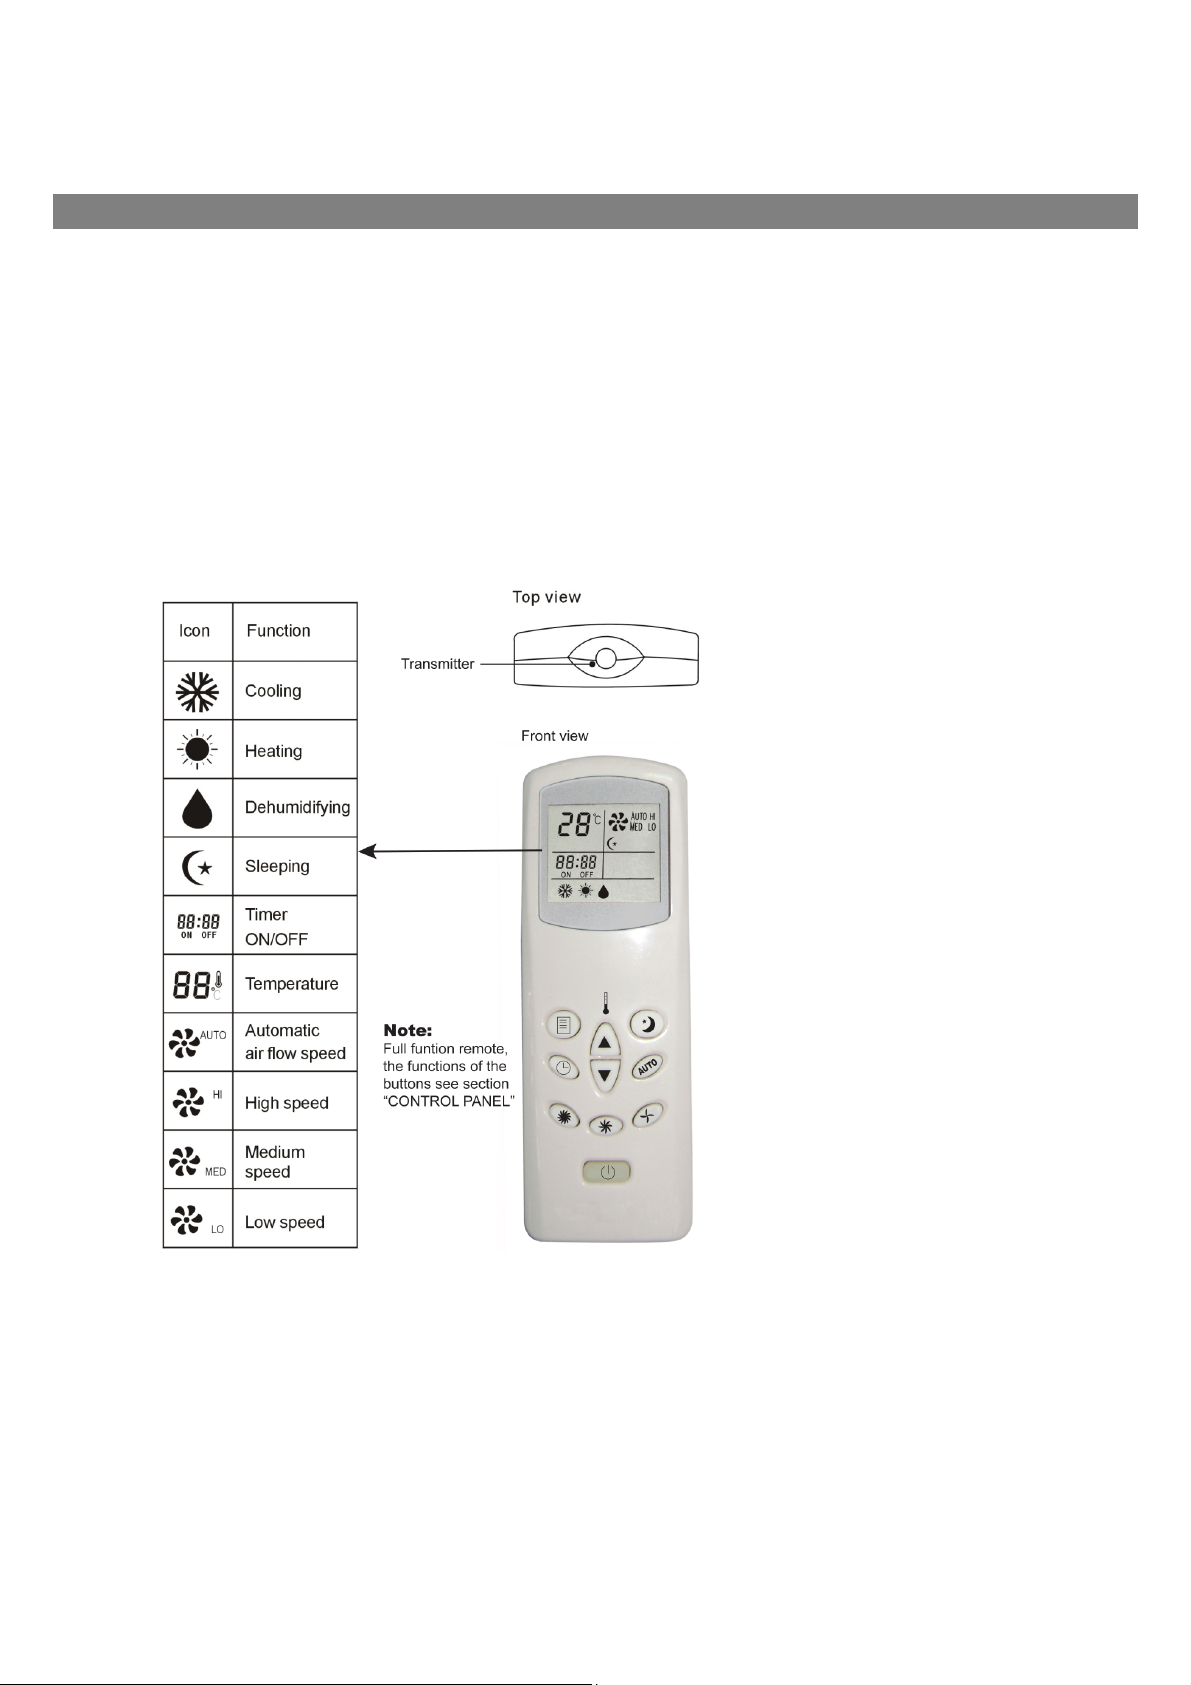
REMOTE CONTROL
INSERTING OR REPLACING THE BATTERIES
- This remote control uses two AAA batteries.
Remove the back cover of the remote control.
Insert two “AAA” 1.5V batteries, making sure they are in the correct position (see instructions inside
the battery compartment)
Replace the cover.
Do Not Mix Old And New Batteries. Do Not Mix Alkaline, Standard (Carbon - Zinc), or Rechargeable (Nickel Cadmium) Batteries.
Dispose of old batteries properly. Do not leave batteries in the remote if it will not be used for longer than
2 months.
SOME IMPORTANT INFORMATION ABOUT USING THE REMOTE:
- The remote control needs to stay
within 5 meters from the receiver
on the appliance. Reception is
confirmed by a beep from the
main unit.
- The remote control will not
operate if curtains, door or other
material block the signal from
the receiver to the remote
control.
- Prevent any liquid from falling
into the remote control. Do not
expose the remote control to
direct sunlight or heat- if the
infrared signal receiver on the
indoor unit is exposed to sunlight,
the air conditioner may not
function properly.
- If other electrical appliances
react to the remote control, move
them out of the way.
- When using the unit in out of
room air conditioning mode point
the remote control to signal box
located in the window kit.
Reception is confirmed by LED
flash from the remote receiver
kit.
- Do not store the remote control
outside of the recommended
temperature range of -5°C60°C
or -41°F/140°F.
9
Page 10
OPERATING INSTRUCTIONS
Note: After switching the unit on, the ventilator operates, but the compressor only
starts after the control lamp has flashed for 3 minutes. Cooling effect may require a
further 5 minutes. This is done as a protection mechanism to prolong compressor life.
Further information is available in the “Troubleshooting” section.
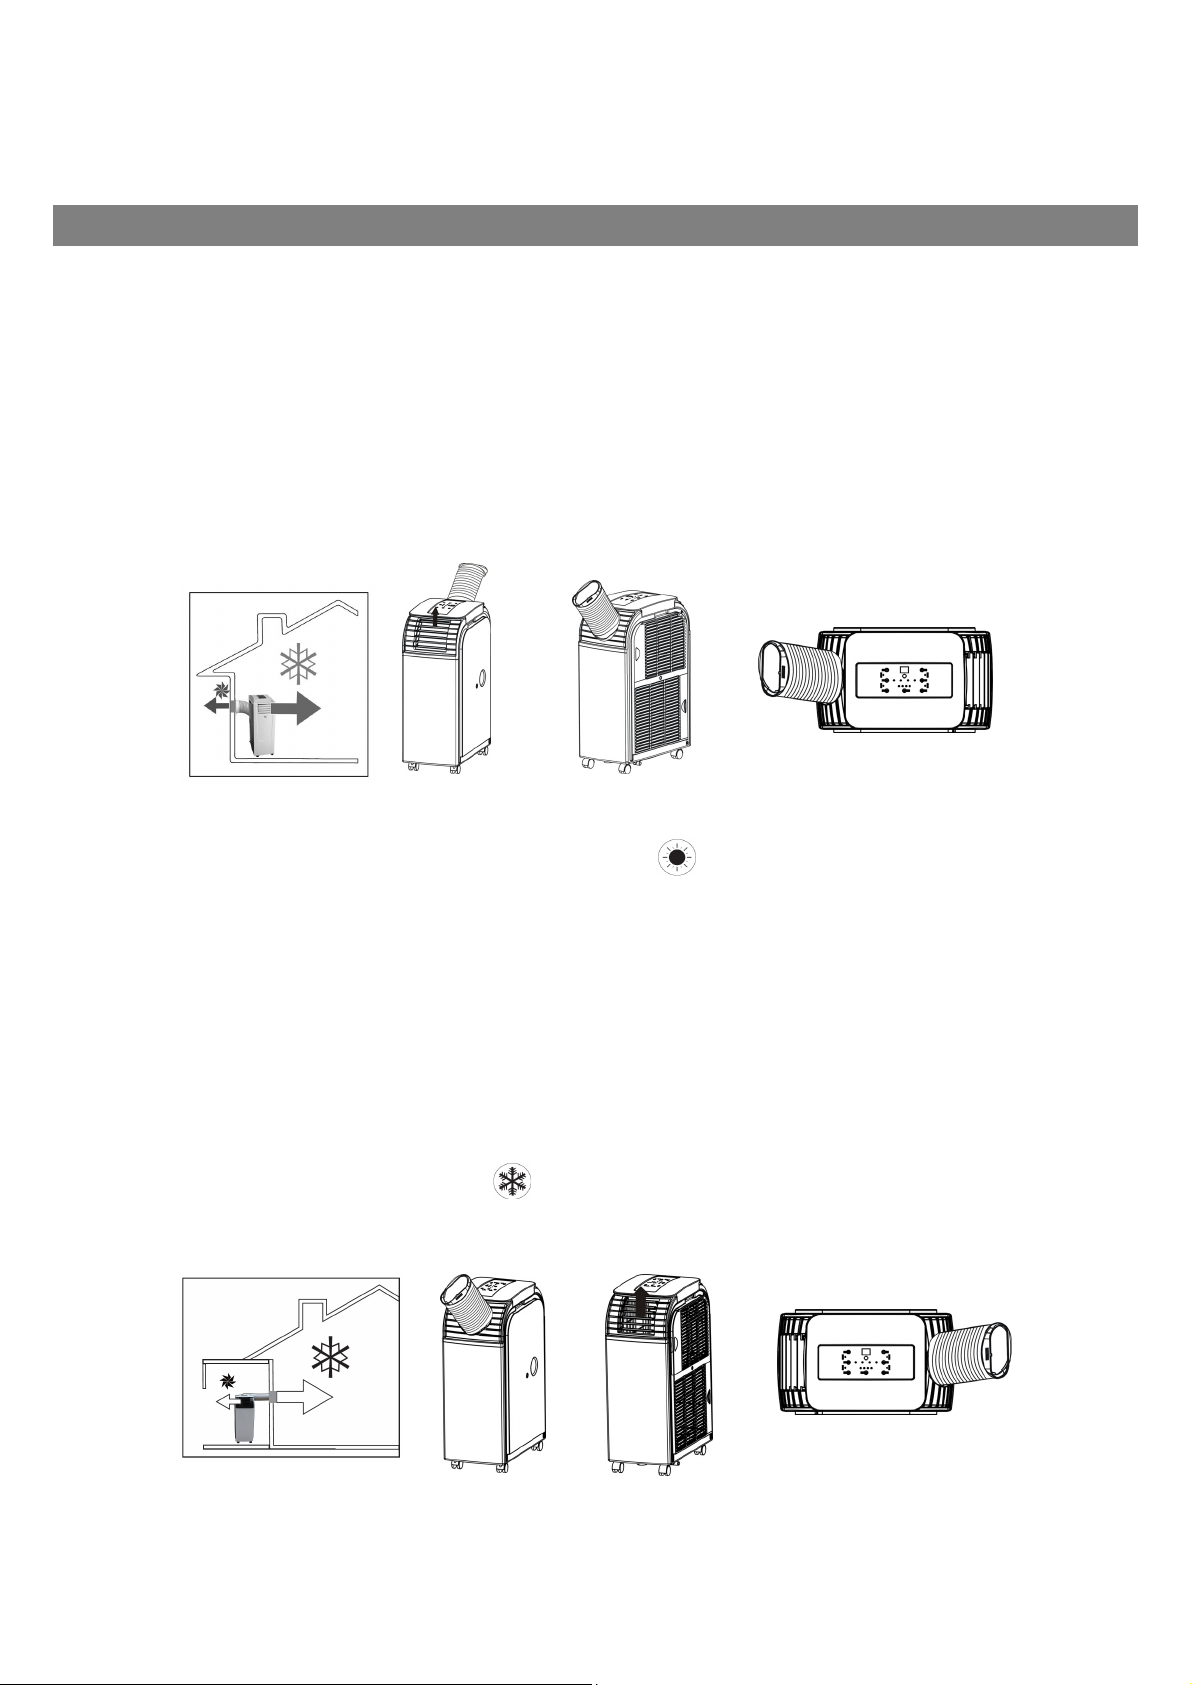
AIR CONDITIONING MODE – IN ROOM OPERATION
We recommend starting your unit early in the morning on warm days for maximum effect.
This unit has a self-evaporation system for condensation water; there is no water tank to empty. The
drainage hose MUST NOT be connected for INDOOR air conditioning mode. Please make sure that the
water outlet is closed with the rubber cap during operation.
The unit stands in the room to be cooled.
Connect the exhaust hose and the air outlet grid to the unit as displayed in the illustration. The hose
must be connected on the side with the warm air icon
from the room via the exhaust hose. Make sure that no warm outside air can enter the room. For
effective cooling, we recommend our selection of various accessories which reduce or prevent entry
of warm air into the room.
Set the function to “COOLING“. Set the target temperature using the temperature control. The
target temperature can range between 17°C and 30°C (65°F and 90°F). The unit can only be used
in an ambient temperature of maximum 32°C (92°F).
. The warm extract air must be emitted
AIR CONDITIONING MODE – OUT OF ROOM OPERATION
The unit is outside the room to be cooled, such as adjacent room, hallway
etc.
Connect the air hose and the air outlet grid to the unit as displayed in the illustration; hose must be
connected to the side with the COOL icon
we recommend that a drainage hose for condensation water be connected to the bottom water outlet for
effective cooling and additional moisture removal.
If the unit is working in conditions of high humidity it may display an E4 error code. See troubleshooting.
. If the unit is placed out or room during high humidity periods,
10
Page 11
If the unit is to be placed outside of the room to be cooled, you should try to position the unit on a
flat solid surface and in an area protected from rain and sun exposure such as sunroom, veranda
or hallway. You should not operate the unit in moist areas, such as e.g. saunas or similar areas.
The colour of the unit can change slightly due to direct solar radiation.
The unit is equipped with a special thermal deactivation. This protects the unit from overheating in
extreme ambient conditions.
Please place the unit so that the air inlet is not impeded, e.g. by furniture or curtains, since this can
negatively effect the capacity.
Place the unit in the shade if possible and in a cool place in order to increase efficiency and to avoid
overheating. If the ambient temperature is over 32°C the unit may shut down. If this occurs repeatedly, we
recommend moving the unit to a cooler location out of direct sunlight.
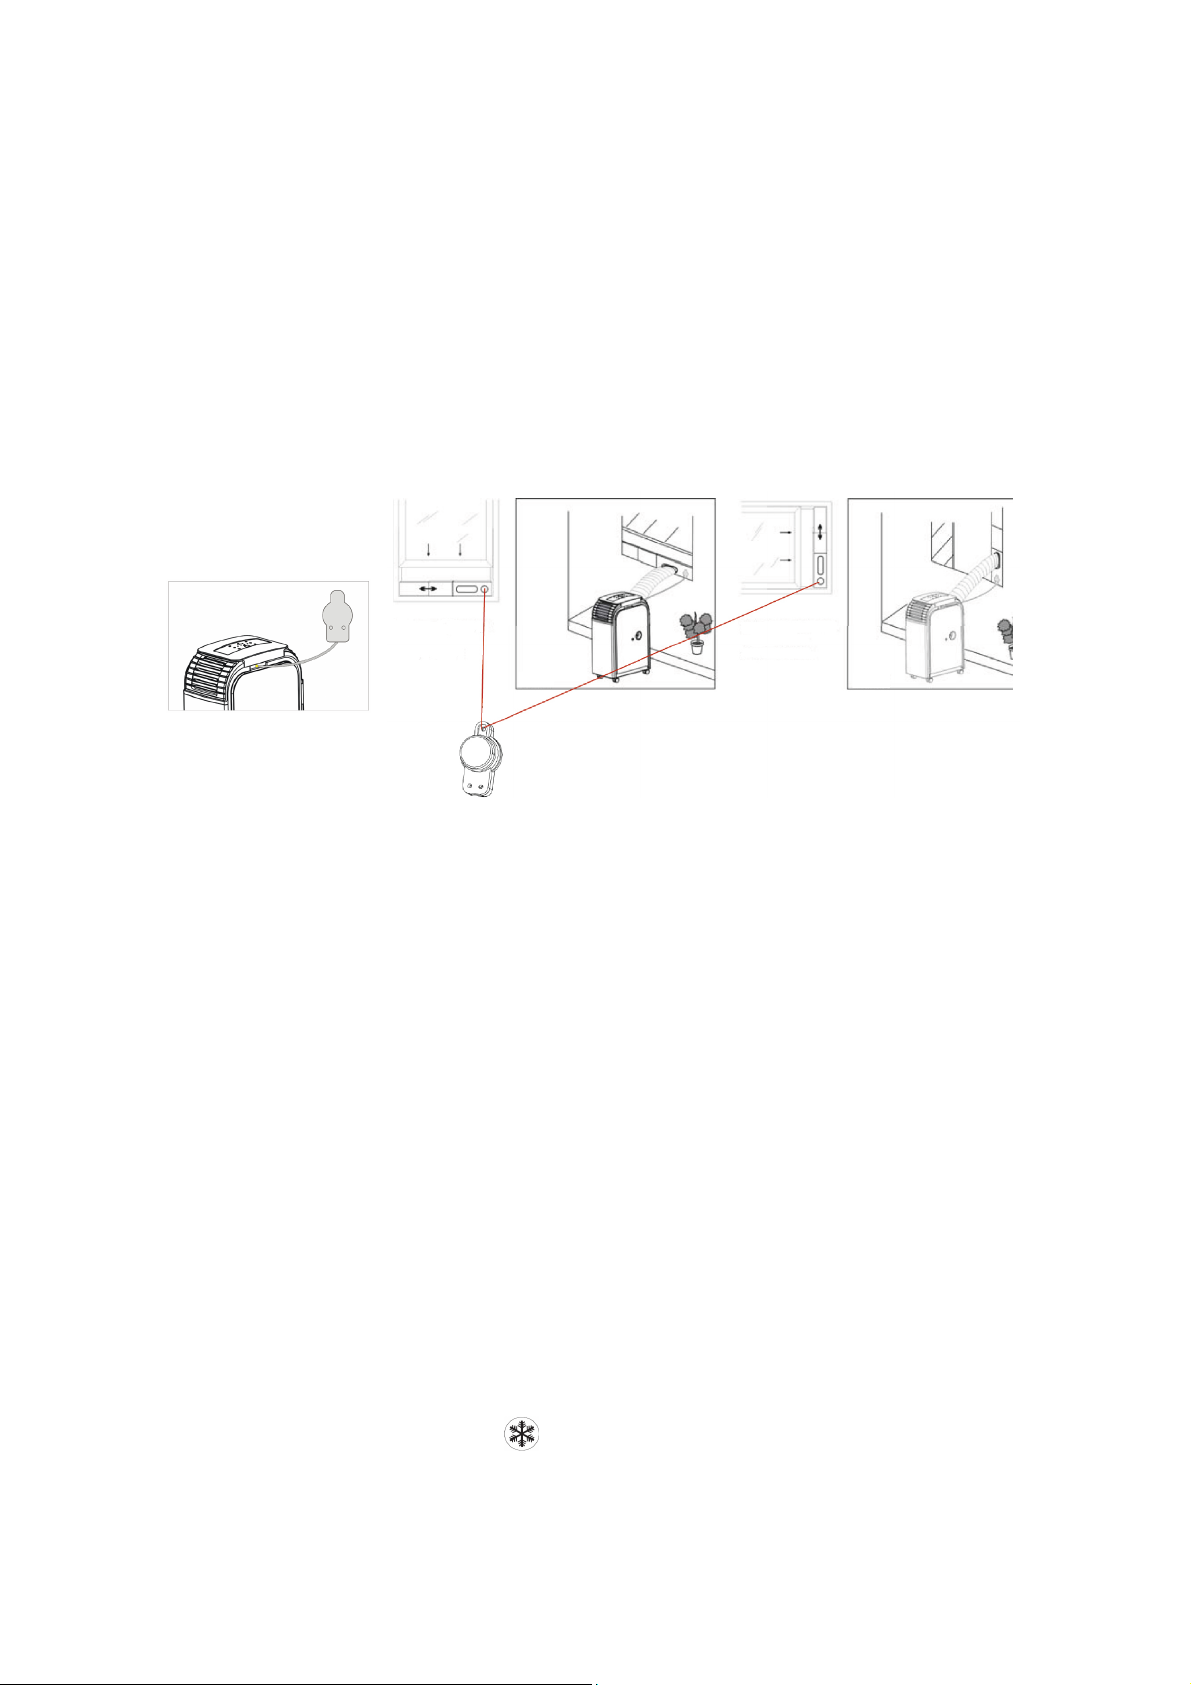
RECIEVER INSTALLATION
To enable operation of the remote control while the machine is not in the room being cooled, you must install
the remote sensor that came with the unit. The remote sensor is placed in the window kit.
1) Remove the plastic cover from the small hole in the window kit. Keep it for later use.
2) Position the remote sensor from the rear of the window kit (outside the room being cooled), by pushing it
into the hole. The sensor must face the room being cooled and be positioned above the air outlet.
3) Remove the plastic cover from the remote sensor jack on the main body of the unit, found near the top
of the front of the unit. Keep it for later use.
4) Attach the end of the supplied cable to the jack on the main unit. Organize the wire so it will not get
damaged, stepped on or pinched.
When using the remote to control the unit, point the remote to the receiver installed on the window kit, when
the remote signal received by the main unit, a green LED on the receiver will flash. DO NOT BLOCK THE
RECEIVER, THE ROOM TEMPERATURE SENSOR IS ALSO IN THIS RECEIVER.
Set the function to “COOLING“. The target temperature can range between 17°C and 30°C (65°F and
90°F).
Make sure that no warm outside air can enter the room. You can also control the unit from inside using the
remote control, aimed at the sensor on the window kit.
HEATING MODE ***UNIT MUST BE USED IN ROOM FOR HEAT MODE***
On cold days it is recommendable to start the unit early in order to get a warm room.
The heating function of the unit must not be operated at a room temperature less than 15°C.
Disassemble the subassembly of outlet and the subassembly of exhaust pipe as arrow direction Fig.01 and
then exchange the two subassemblies to install. The finished illustration is as Fig.03.
Connect the air hose and the air outlet grid to the unit as displayed in the illustration. The hose must be
connected to the side with the COOL icon [
].
11
Page 12
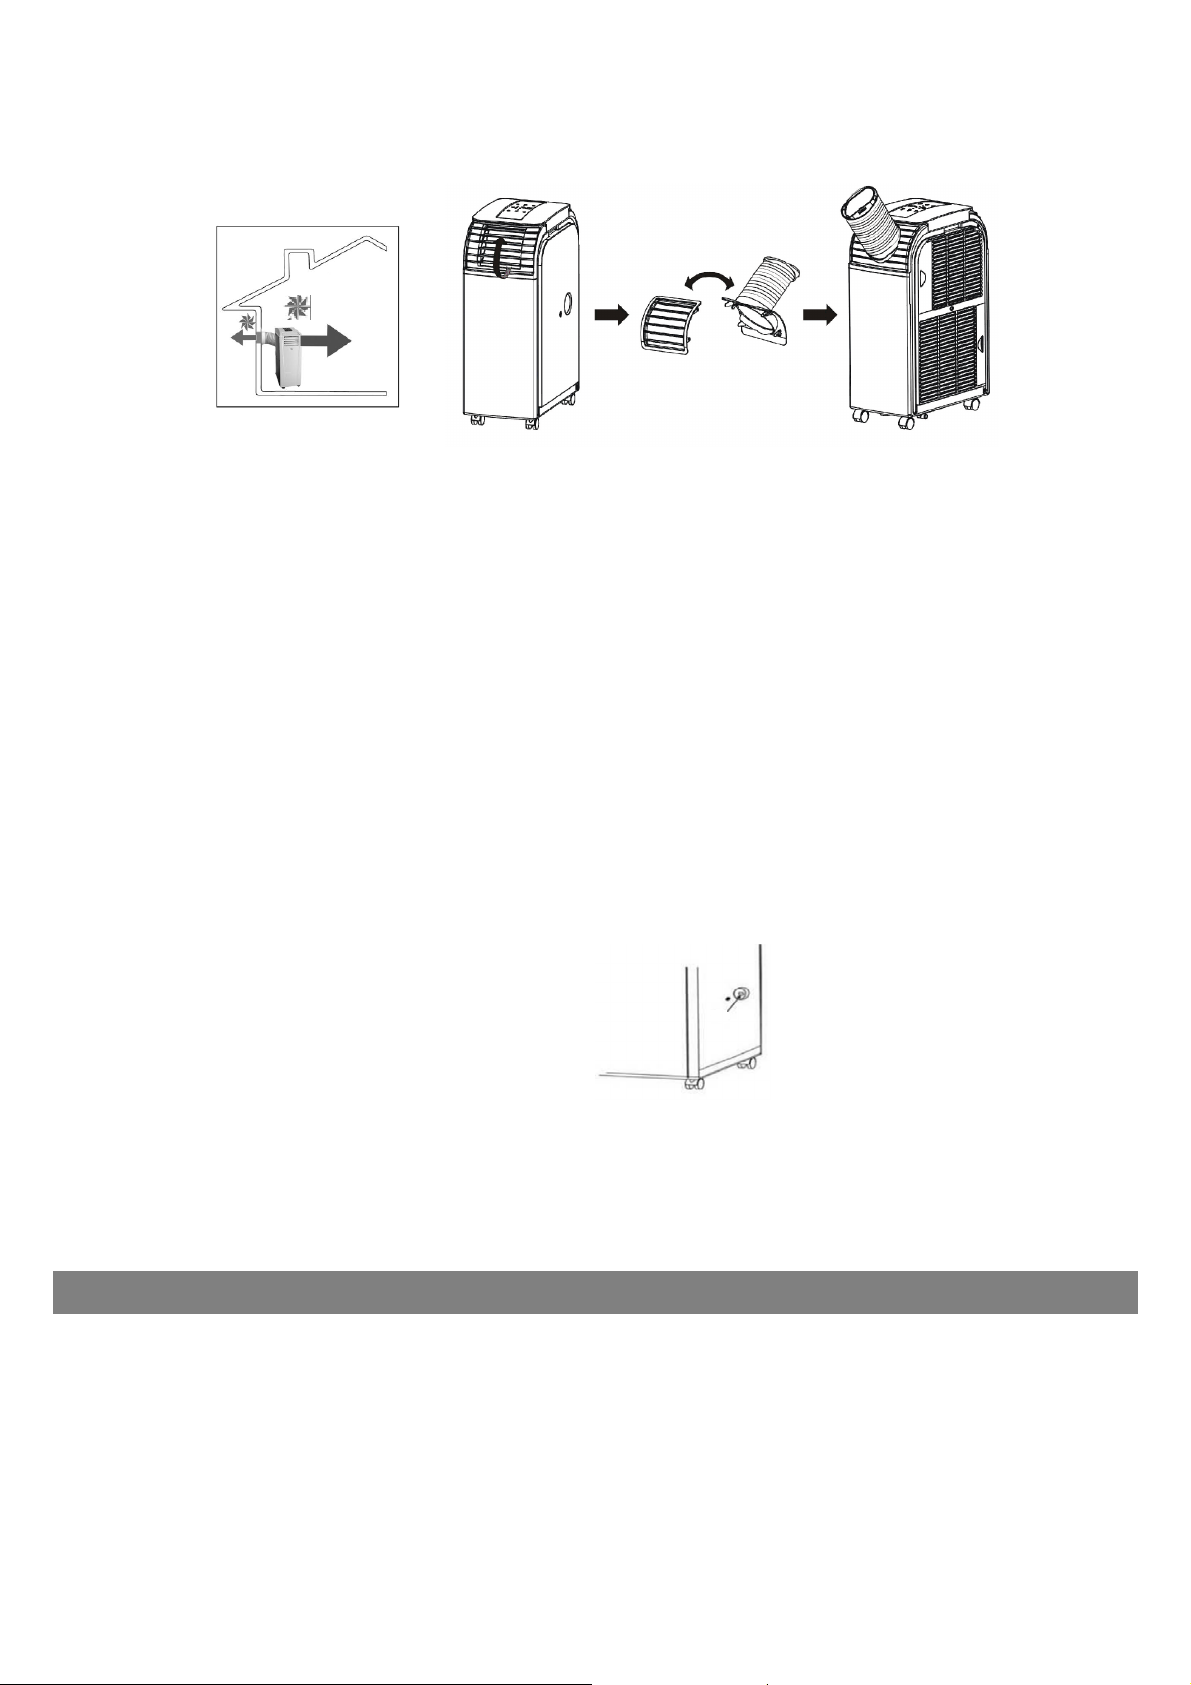
The cold extract air has to be vented out of the room via the air hose. This can be executed via a tilted
window, a door or wall aperture. Make sure that no cold outside air can enter the room.
Set the function to “HEATING“. The settable temperature range is between 15°C and 25°C. You can set this
using the temperature control.
Note: In the heating mode, the ventilation level is already preset to ensure efficient heating of ambient
air. You will not be able to adjust the fan speed.
DEHUMIDIFYING MODE
Humidity is extracted from the air, collected in the water tank and discharged via the condensation water
outlet.
Set the function to “Dehumidify”.
Remove the rubber plug of the condensation water outlet (shown on picture below) on the side of
the unit and attach the drainage hose.
Allow water to flow out continuously into a bucket or floor drain in order to achieve higher
dehumidification capacity. In the dehumidify mode, you must not feed the room air outside with the
extract air hose.
Note: In the dehumidify mode, the ventilation level is already preset to ensure efficient
dehumidification of ambient air. You will not be able to adjust the fan speed.
IF A FLOOR DRAIN IS UNAVAILABLE TURN THE UNIT OFF AND PLACE A POT OR PAN DIRECTLY
BENEATH THE LOWER DRAIN OUTLET. DO NOT LEAVE THE UNIT UNATTENDED WHILE IT IS DRAINING
IN CASE THE POT OR PAN FILLS AND NEEDS TO BE REPLACED.
A) IMPORTANT
Be sure to turn the unit OFF and unplug the unit before cleaning or servicing.
Do not use gasoline, thinner or other harsh chemicals to clean the unit.
Never wash the unit directly under a tap or with a hose.
Do not allow water to enter into the air conditioner.
CLEANING & MAINTENANCE
12
Page 13

B) CLEANING THE FILTER
Clean the air filter once every two weeks to remove dust build-up and keep the fan in top performance.
Remove the filter: Pull out the filter cover and remove the air filter from the filter cover.
Cleaning: Wash the air filter by immersing it in lukewarm water with a mild detergent. Rinse the filter
and dry it in a dark place. Do not put in direct sunlight.
Replace the filter: Attach the filter to the filter cover using the attachment hooks on the inner surface of
the cover. Put the filter cover back to the unit.
C) CLEANING THE EXTERIOR
Moisten a soft cloth with mild detergent and water to wipe the unit clean. Be sure not to use a soaking wet
cloth.
D) DRAINAGE/EXTENDED PERIOD OF NON-USE
If the air conditioner will not be used for a long period of time, remove the
bottom rubber plug from the back hole and attach a section of the Continuous
Drain Hose and completely drain the unit of water.
STORAGE
Follow cleaning instructions A-D.
Perform reverse Installation Instructions.
Repack the unit in its original package and store upright in a cool dry place.
Important: Always store and transport the air conditioner upright to maintain the compressor in a
proper condition.
TECHNICAL SPECIFICATIONS
MODEL 35132
VOLTAGE 120V~60Hz
POWER CONSUMPTION
COOLING
HEATING
COOLING CAPACITY
HEATING CAPACITY
DEHUMIDIFYING CAPACITY (30°C, RH80%)
1400W
1200W
12,000BTU/h
12,000BTU/h
60L/Day
NOISE LEVEL (Indoor use) 53dB(A)
AIR CIRCUALTION (m³/h) 450
COOLING AGENT R410A
REMOTE CONTROL INCLUDED
TIMER 0-24h
DIMENSIONS (WxDxH) 30cmx50.5cmx77.8cm / 12”x20.2”x31.12”
NET WEIGHT 29.5 kg / 65Lbs
13
Page 14
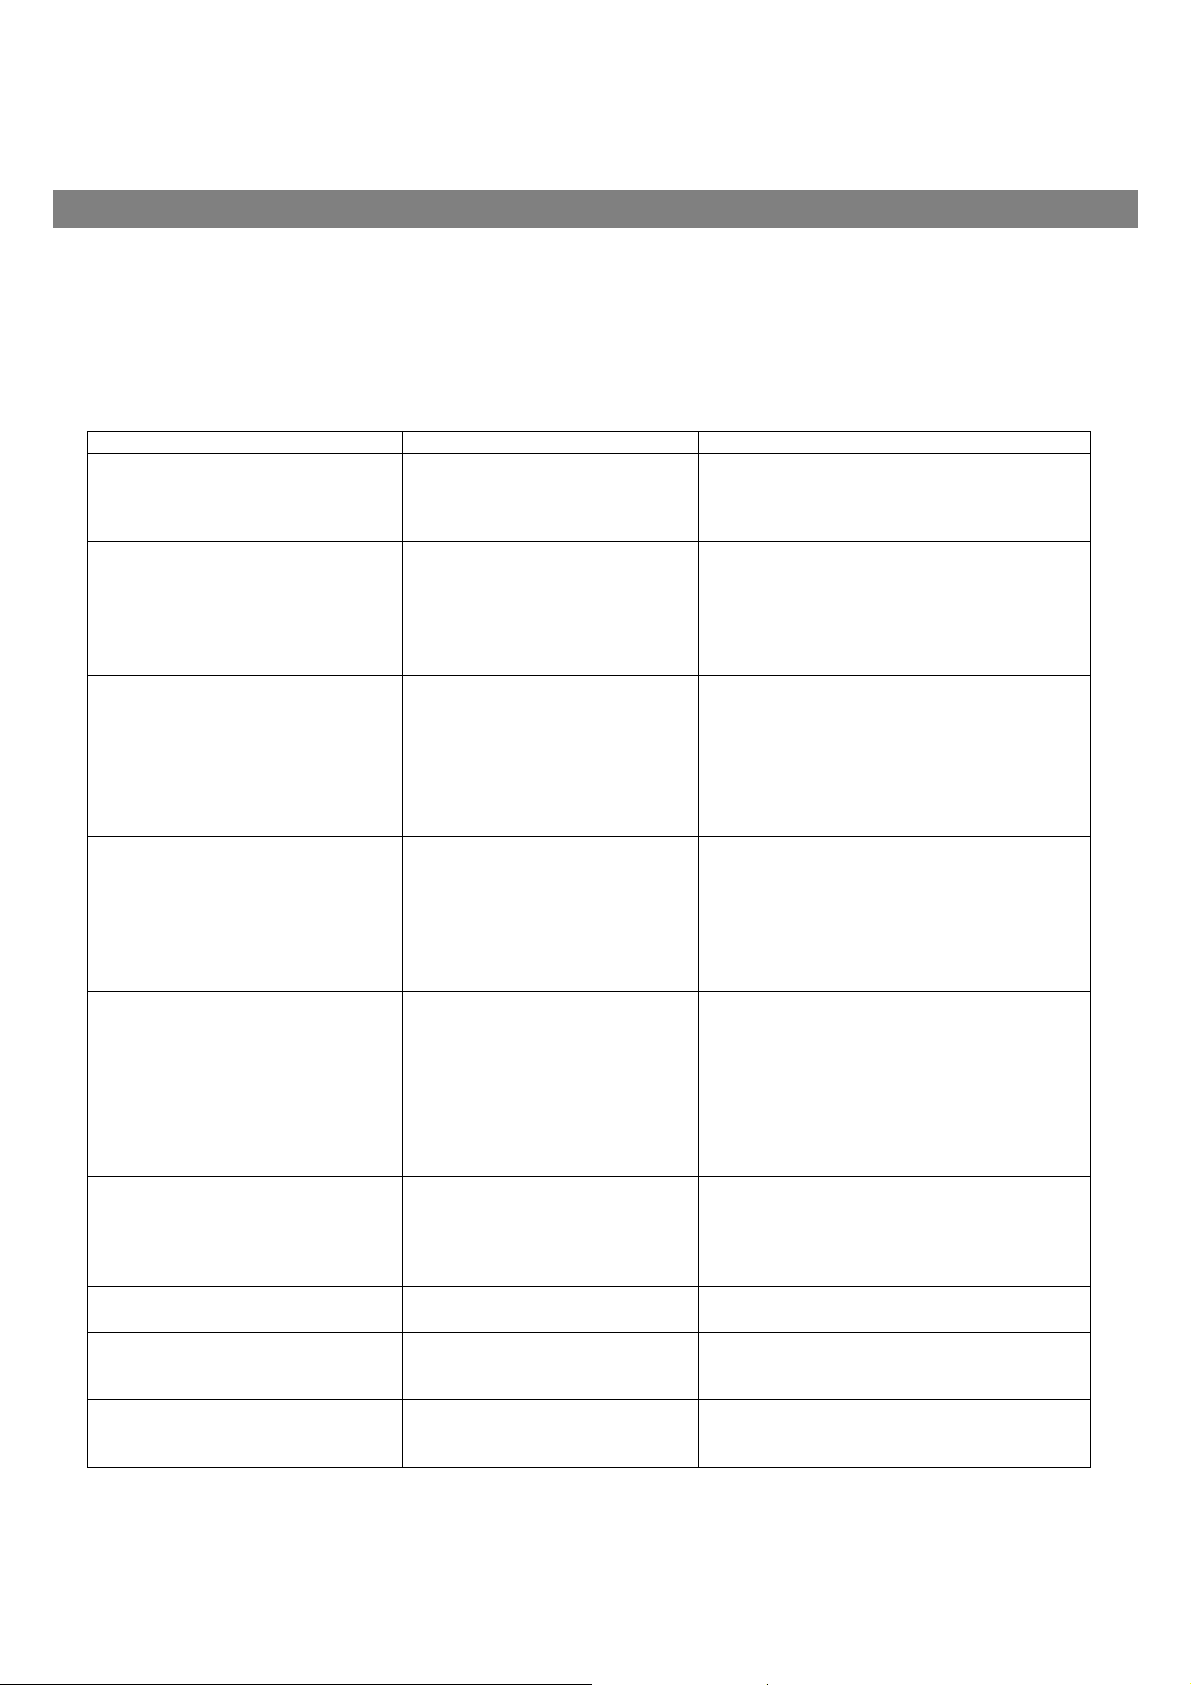
If your air conditioner fails to operate, please follow these procedures prior to contacting customer
service.
PLEASE DO NOT ATTEMPT TO OPEN OR REPAIR THE AIR CONDITIONER YOURSELF. DOING SO
COULD VOID THE WARRANTY AND CAUSE DAMAGE OR PERSONAL INJURY.
PROBLEM POSSIBLE COUSE
Can I turn the unit on immediately
after unpacking it?
Unit does not start when pressing
power button
The air conditioner does not come
on
The air conditioner works for a short
time only
Room is not cool enough
The air conditioner does not operate
for about three minutes after
restarting it
Noise or vibrations
Gurgling sound
When turning the unit on I sense a
smell. What should I do?
TROUBLESHOOTING
Room temperature is higher
than the set temperature
(heating mode).
Room temperature is lower
than the set temperature
(cooling mode)
No electricity
It is not plugged into the socket
The internal safety device has
tripped
The safety device of the plug
has tripped
There are bends or kinks in the
air exhaust hose
Something is preventing the air
from being discharged
Windows/doors in room are
open.
There are heat sources nearby.
Exhaust air duct is not
connected or is blocked
Temperature setting is too
high.
Air filter blocked by dust.
The internal compressor safety
device prevents the appliance
from being restarted until
three minutes have elapsed
since it was last turned off
The floor level is not in level or
the unit is on an incline.
The sound come from the
flowing of refrigerant inside
the air conditioner
First use or incorrect storage of
unit at e.g. dusty areas.
SOLUTION
No. The unit must be placed upright for at
least 12 hours after every transport.
Otherwise the compressor may be
damaged and there is no capacity.
Reset the temperature
Restore electricity
Plug into socket
Wait 30 minutes, if the problem persists,
contact your service center
Reset the safety plug
Position the air hose correctly, keeping it as
short and free of curves as possible to
avoid bottlenecks
Check and remove any obstacles
obstructing air discharge
Close all windows/doors
Remove heat source if possible
Connect the air duct and make sure it can
function properly
Decrease the set temperature
Clean the air filter
Wait. This delay is part of normal
operation
Place the unit on a flat, level surface.
This is normal
Odor development can arise on first use
and after a longer period of non-use by
storing in unsuitable areas (e.g. dusty
14
Page 15
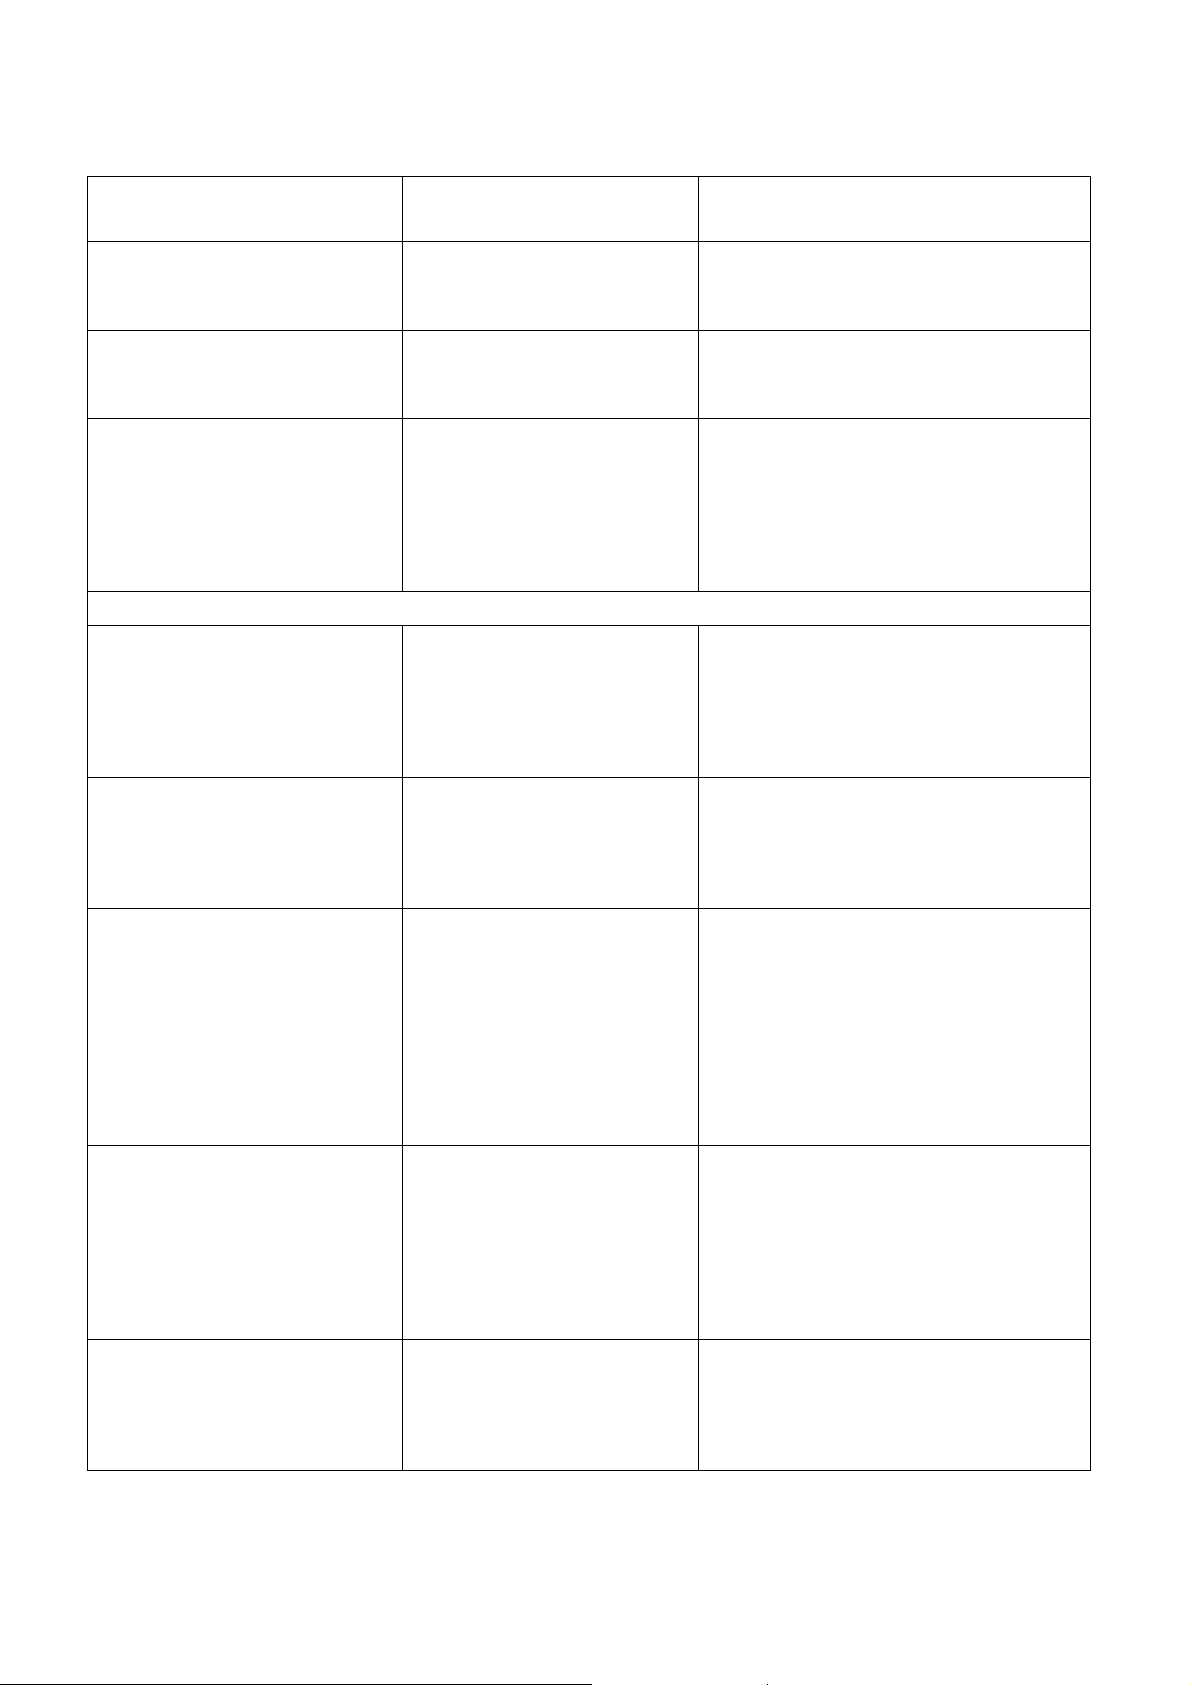
Compressor does not activate
The unit deactivates
The unit does not cool correctly
ERROR CODES
E1
E2
E3
E4
DF
Room temperature outside the
function range:
Room temperature inside the
function range:
Temperature of the cooling
agent lines too high or too low
Incorrect signal
Water tank full
De-icing mode
areas). Run the unit for ½ a day. The smell
will disappear after a while. In the case of
intensive odor development air the room.
Depending on ambient temperatures and
unit type it may take approx. 10 minutes
after starting the compressor until the
cooling/heating capacity is reached.
On reaching the set required temperature,
the unit switches off automatically. Check
manual setting of the required temperature
as well as the TIMER setting.
You achieve the most effective and
economical cooling comfort if you already
cool the room to be cooled when the room
temperature is not yet heated up. Air
conditioners operate more effectively if the
temperature is maintained. To drastically
cool the air in a fully heated room requires
much more time and energy.
Observe all data in these operating
instructions concerning function range.
Temporary error of start temperature.
Please switch the unit off and start it again
after approx. 30 minutes. If the error
occurs continuously, the unit requires
qualified inspection.
Temporary error on measuring output
temperature. Please switch the
TRANSFORM unit off and start it again
after approx. 30 minutes. If the error
occurs continuously, the unit requires
qualified inspection.
This error message in the cooling function
refers to too high ambient temperatures
and in the heating function to too low
ambient temperatures. Please observe the
instructions relating to ideal operation of
the unit. This may also be a temporary
error measurement between the start and
output temperature. Please switch the unit
off and start it again after approx. 30
minutes. If the error occurs continuously, the
unit requires qualified inspection.
If the water tank is full, the warning sign
"E4" appears in the display. To restart
operation of the unit, please remove the
plug of the condensation water outlet to
allow water to leak out. Please use an
appropriate collection tank. When the
water has been completely removed,
please start the unit again. The unit can
now be used as usual.
This procedure is completely normal and
protects the system from icing and failure.
The unit starts automatically after approx.
15 minutes again (depending on the
function setting). This procedure repeats
itself regularly.
15
Page 16

1-YEAR WARRANTY (PARTS/LABOUR)
5-YEAR WARRANTY (COMPRESSOR ONLY)
VALID ONLY WITH ORIGINAL PURCHASE RECEIPT
Warranty: We warrant this product against defects in any parts or workmanship for a period of 1 year
(parts/labor) and 5 years (compressor only) from the original purchase date. Parts that prove to be
defective during the 1- year period will either be repaired or replaced at our option. No charge will
be made for such repair or replacement. The right is reserved by the manufacturer to replace the
whole product in lieu thereof. This product warranty covers only the original consumer purchaser of the
product.
Warranty Coverage This warranty is void if the product has been damaged by accident, neglect,
improper handling or operation, shipping damage, abuse, misuse, unauthorized repairs made or
attempted, alterations, improper assembly/installation or maintenance, commercial use or other causes
not arising out of defect in materials or workmanship. This warranty does not extend to any units which
have been altered or modified or to damage to products or parts thereof which have had the serial
number removed, altered, defaced or rendered illegible.
Warranty Period:
1 Year (parts/labor)
5 Years (compressor only)
Implied Warranties: Any implied warranties which the purchaser may have are limited in duration
to 1- year (for parts) and 5 years (for the compressor only) from the date of purchase. This limited
warranty is in lieu of all other warranties expressed or implied, including warranties of merchantability
and fitness for a particular purpose and excludes all liability for incidental or consequential damages
for any cause whatsoever.
Warranty Performance: During the above warranty period, a product with a defect will either be
repaired or replaced with a reconditioned comparable model when the product is returned to the
Repair Center. The repaired or replacement product will be in warranty for the balance of the
warranty period. No charge will be made for such repair or replacement.
Technical inquiries: Our friendly, HIGHLY trained, technical support team will be happy to assist you
with any concerns regarding your new Kenmore portable air-conditioner. Call: 1-800-465-5660
Monday - Friday 8:30am - 5:00pm.
How to Obtain Service and Repair: If you need service, first read the “Troubleshooting” instructions
under the Owner’s Manual. Further assistance can be obtained by calling Customer Service 1-800-4-
MY-Home with product information on hand (Item Description and Model Number).
SOLD BY: SEARS CANADA INC.
TORONTO, ONTARIO M5B 2C3
SAVE THIS FOR YOUR RECORD
MODEL #: ………………………………………….
SERIAL#:………………………………………….....
DATE OF PURCHASE:……………………………….
16
 Loading...