

Page 1

K&nm<*r&
Upright Freezer
Full One-Year Warranty on Freezer
For one year from the date of purchase, when this freezer
is operated and maintained according to instructions
attached to or furnished with the product. Sears will repair
this freezer, free of charge, if found defective in material
or workmanship.
Model No. 28702
7.5 cu. ft. Capacity
Read This Manual!
It will tell you how to operate and care for your freezer.
It also offers tips on how to get the best and lowest
cost performance.
If you prefer installing your own parts, use the parts list
provided in this manual to find the part number, do not
use the illustration number.
In the space provided below, record the model and
serial number of your freezer. Each is printed on the
model numberplate located in the upper corner of the
freezer back. Use these numbers when calling for
service.
Both can be found on the model number plate located
on the rear of the freezer. This information will be
required when calling for parts or service.
Model No.
Date Purchased
Serial No.
Full Five-Year Warranty on Sealed Refrigeration System
For five years from the date of purchase, when this freezer is
operated and maintained according to instructions attached to
orftimished with the product, Sears will repair the sealed
system (consisting of refrigerant, connecting tubing, and
compressor motor) free of charge, if found defecfive in
material or workmanship.
The above-warranty coverage applies only to a freezer which
is used for storage of food for private household purposes.
WARRANTY SERVICE IS AVAILABLE BY CONTACTING
THE NEAREST SEARS SERVICE CENTER/DEPARTMENT
IN THE UNITED STATES.
Installation
Inspection
When your new freezer is delivered, check thoroughly for
shipping damage and missing parts. If you find either, please
notify Sears at once.
Location is important
Your new freezer will work best in a dry, ventilated place,
where the temp^ture falls between 65 and 110 F. Extreme
tanperatures can shorten the freezer's life. Very high
temperatures (such as m an unventilated garage in summer)
also will make your freezer cycle often, increasing its
operating cost.
Manual Contents:
• Warranty
• Installation
• Operation
• Maintenance
• Troubleshooting
• Parts
Sears, Roebuck and Co., Hoffman Estates, IL 60179 U.S.A.
Part No. 8336460157510
(HF7517SW)
Your freezer must be allowed enough space for proper ar
circulation, this freezer is designed for FREESTANDING
INSTALLATION ONLY and should not be recessed or built-in.
Allow 3 inches of space on each side including the rear and 4
inches on Ihe top of the crfjinet. This is particularly important
in hotter climates.
Pick a spot where the floor wili support the weight of the
freezer fully loaded. It is best to keep your fifeezer away from
an oven or oiher heat source. Pick a safe place, indoors,
away from fiammables such as gasoline.
Sears, Roebuck and Co., U.S.A.
303095
Page 2
Leveling the Freezer
To ensure proper door seal and optimum performance,
level freezer using the leveling leg located on its bottom
front corner.
• Once your freezer is in the desired location, use a
carpenter's level and adjust the leveling leg as
necessary to make sure the cabinet is level side-toside.
• Adjust the leg to achieve a 1/4 inch slope from
frdnt-to-back (1/2 bubble on a carpenter's level) to
provide easy door closure and proper door seal.
• If the rear corners need to be raised, use shims
made of wood or other hard material. Cardboard
and other soft materials will not work.
Electrical Requirements
• 120 Volts, 60 Hz (60 cycles AC), 15 amps
• DO NOT use an extension cord.
• Select an electric wall outlet that cannot be turned
off by a switch or pull chain. Be sure that the elec
tric outlet you select does not need a ceiling drop
cord.
• Use a fuse or circuit-breaker protected circuit that
will not become overloaded when the freezer is
installed.
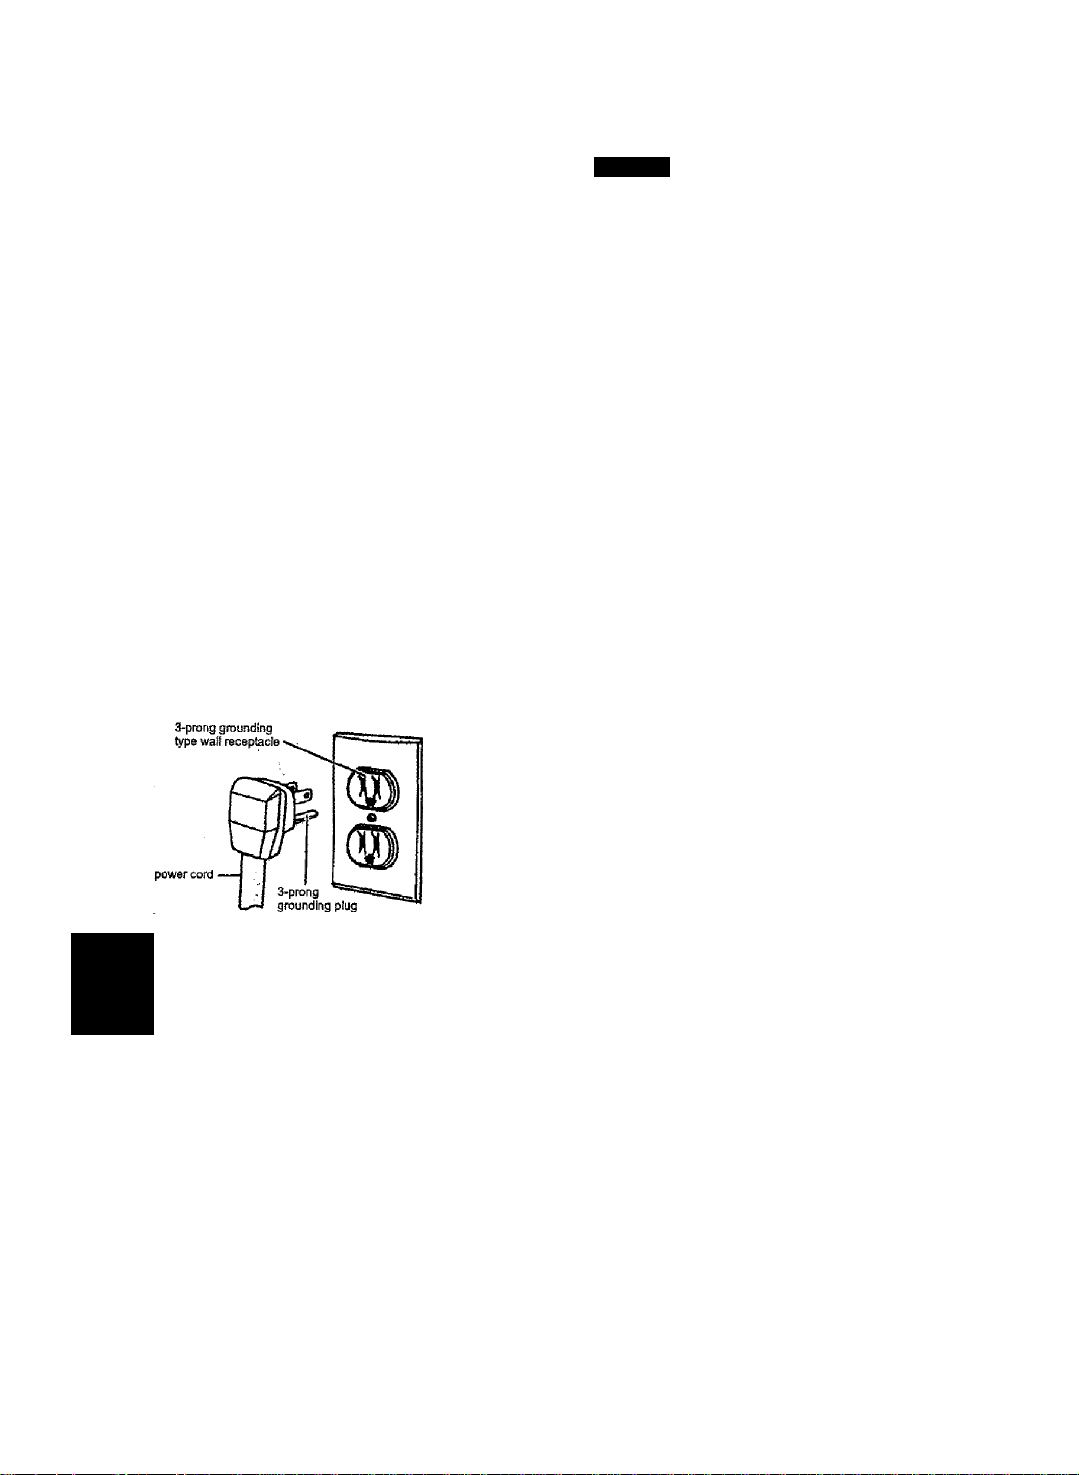
Electrical Grounding
Your freezer comes with a three-prong plug and must
be Inserted into a three-prong, grounded wall outlet.
WARNING; Unless the grounding method
described above is followed, you are not
protected against severe or lethal shock in
A
the event of the short circuit of the freezer's
wiring or electrical components.
Operation
starting
The freezer temperature is preset to maintain the
ideal temperature for food storage. The evaporator
forms the storage shelves of the unit which provides
consistent freezing temperatures throughout the freezer.
Freezer temperature will vary depending on the quan
tity of food stored and on the frequency of door open
ings.
Maintenance
Defrosting
DANGER: Electrical Shock Hazard. Disconsnect power before defrosting.
You should defrost your freezer when the frost be
comes 1/4 inch thick. Further accumulation will reduce
operating efficiency. How often you have to defrost
depends on the type and amount of food you freeze,
the temperature and humidity and the number of times
you open and close the freezer. The period between
defrosting can be extended by scraping frost every so
often with a plastic scraper.
Defrostijng Steps
1. Unplug power supply cord.
2. Remove all food and place it in cardboard boxes or
wrap it in several layers of newspaper. This action
will allow food to remain safely frozen while you
defrost and clean your freezer.
3. Leave door open and wait for frost to soften. Place
pans of hot water on the shelves or use an electric
fan blowing into the freezer to speed defrosting. Do
not use electric defrost devices as they can damage
the plastic parts of your freezer.
4. Remove softened frost with a plastic or wooden
scraper, or a cloth or sponge. CAUTION; NEVER
USE SHARP OBJECTS TO REMOVE FROST. They
could puncture freezing coils and severely damage
the refrigeration system.
5. Defrost water will accumulate at the bottom of the
interior cabinet which can be absorbed with a
sponge or towel.
6. Clean the inside of the freezer. Cleaning instruct
ions are described below and on the permanent
use and care label on the Inside of the freezer door.
7. Plug freezer in and replace frozen foods..
Cleaning
• Use only mild soapy water to clean door gaskets.
• Turn off the freezer and remove foods. Wash interior
liner with a solution of warm water and two table
spoons baking soda per one quart of water. Rinse
and wipe clean. DO NOT use soaps, detergents,
scouring powder, spray cleaner, or the like for the
liner. They may create unwanted odors in the freezer.
• Wash the exterior with detergent or soap and water.
Rinse well and wipe dry,
• DO NOT use scouring powders or pads. Never use
acids, chemical thinner, gasoline, benzene, or the
like for cleaning any part of the freezer. Boiling water
and benzene may defoitn and damage plastic parts.
Wait 4 hours before loading the freezer. It takes time to
reach storage temperature. During this time the freezer
may run constantly.-
Page 3
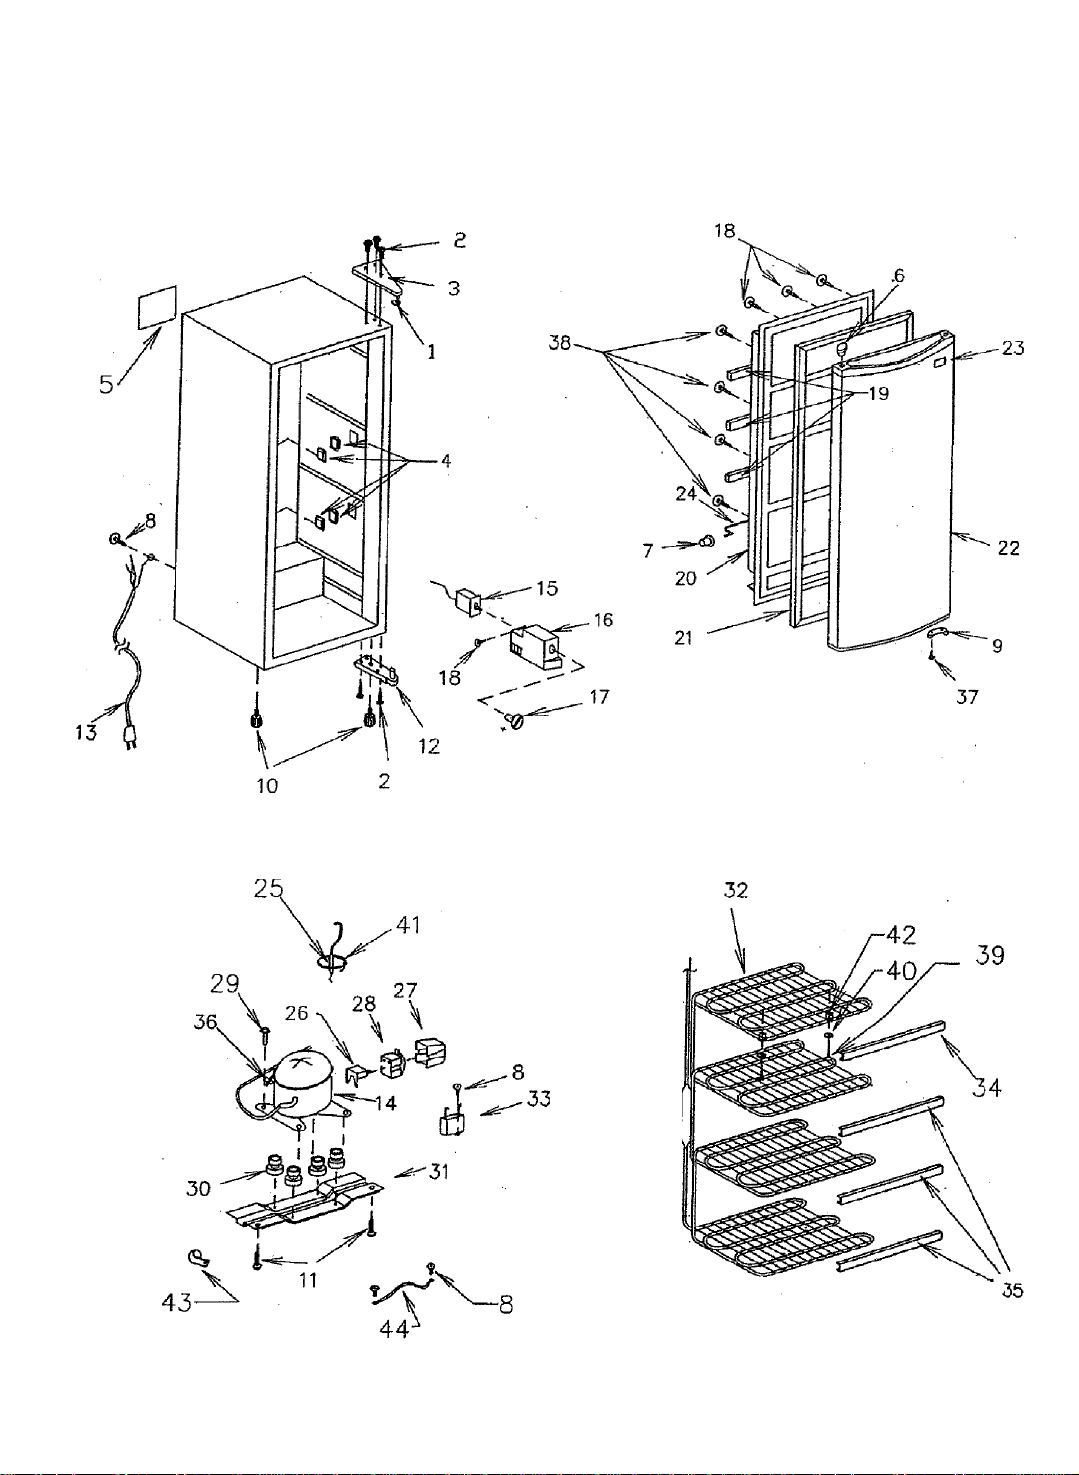
Parts List
(HF7517SW)
Model: 564.28702700
Page 4

Parts List
Model: 564.28702700 (HF7517SW)
CAUTION: Use Ken more part numbers on all orders, not the illustration numbers.
illus. No.
1
2
3 302985
4 301719
5
6
7 300499 Door Shelf Bushing
8 301991
9 300864 Stop Door
10 300885
11 302009 #119 Bolt
12 303026
13 302525 Power Cord SPT-3 36
14 302744 Compressor SF43C72RAU6
15 302134 Thermostat
16
17 302175 Thermo Knob 40
18 300308 #023 Screw 41
19 302432 Trim Shelf Door
20 302250 Door Liner
21
22 302489 Foamed Door Assembly
23 302340 Mascot, Kenmore
Part No.
302378
303076 Silver Chrome Bolt
302760 Wiring Diagram
302388 Cap Grommet
#026 Machine Screw
Leg (2) 33 302759
Hinge Bottom, Injection 35
302253 Thermostat Panel 39 302369
303100 Door Gasket Assembly
Description
Nylon Washer
Top Hinge, Injection
Trim Evap. Bushing
Illus. No.
24
25
26
27
28
29
30
31 303059 Plate Cabinet Base
32 303031 Evaporator Assembly, White
34 302491 Trim. Evap,, Upper
37
38
42 303097 Evap. Bracket
43 302822 Nylon Clamp
44 303064 Green Wire W/Eyelef
Part No.
302431 Pansl Guard, Lowar
302259 Dryer
302732 Overload Relay
302987 Relay Cover
302626
300413 #194 Bolt
■ 303060 Comp. Mtg. Grommet #10195
302492
303098
303102
302317 #159 Screw
302370 #116 Steel Washer
302904 Nylon Tie 6"
PTC Relay PTH7M6R8MD3
Running Capacitor 12MF
Trim Evap., Lower (3)
Bushing Clip
#006 Machine Screw
#115 Screw
Description
Parts Not Illustrated
Part No. Description
303095
302758
Owner's Manual
Technical Sheet
Page 5

Loading the Freezer
To prepare food for freezing, use only containers and
wrapping materials made especially for freezers. For
fast efficient freezing DO NOT freeze more than three
pounds of UNFROZEN food per cubic foot capacity of
your freezer. For example, if the capacity of your
freezer is 10 cubic feet, do not freeze more than 30
pounds of unfrozen food at one time. DO NOT place
hot food in the freezer.
Power Failure
If electrical power fails and will remain off for less
than 24 hours: Keep the freezer door closed so its
contents will remain frozen, ,
If power will remain off for more than 24 hours, do
one of the following:
• Remove food and place in a frozen food locker.
• Place dry ice in the freezer. First cover food
packages with newspaper or cardboard. Then
spread dry ice over this covering. Be careful that
dry ice is not directly touching the food packages
as it could "bum" the food.
• If locker storage space is not available, or you
cannot get dry ice, use perishable food immedi
ately.
Food Loss Coverage Limitatiori-
If promptly reported to your nearest Sears Store or
Service Center, Sears will reimburse you up to a total
of $100.00 for the value of food, as verified by Sears,
lost while stored in the freezer when used for private
household purposes, as a result of:
• Defects that occur during the first year following
date of purchase,
• Failure of the sealed system (including refriger
ant, connecting tubing and compressor motor)
due to defects that occur during the second
through fifth year after purchase.
If freezer is used for other than private household
purposes, Sears will not be responsible for any food
loss. Food losses resulting from other than the above
stated defects, such as: natural spoilage, power
interruption, inadequate power, manual disconnect of
power supply, fire damage, water damage, theft, etc.,
are beyond our control and are not covered by Sears.
Some states do not allow the exclusion or limitation
of incidental or consequential damages, so the above
limitation or exclusion may not apply to you.
This warranty gives you specific rights and you may
also have other rights which vary from state to state.
Sears, Roebuck and Co., D/817WA, Hoffman Es
tates, IL 60179.
When Is It Safe To Refreeze Food?
If food still contains ice-crystals, it may be safe to
refreeze if although its quality may suffer slightly.
Refrozen food "should be used as soon as possible.
If food is completely defrosted but still cold to touch
(lower than 40* F), use if immediately or cook (bod
and then freeze for Mure use. If there is any question
about whether food is good or not, dispose of it.
Vacation/Moving
If you shut the freezer off for a period of time (more
than 24 hours) or are moving the freezer:
Remove all its contents and unplug the freezer.
Clean thoroughly per Cleaning instructions above.
Prop door open so air can circulate to prevent odor
and mold growth. CAUTION; To help prevent acci
dents, do not allow small children to have access to
the freezer when its door is open.
• Before moving freezer fake out all removable
. shelves, baskete or bins and tape or lock door
shut to prevent accidental damage.
• Ship freezer in upright position. Do not lay freezer
on any at its sides.
• Make sure new location can support the weight of
the loaded freezer.
• Level freezer at"new location as previously
described to ensure proper door seal.
Troubleshooting
My Freezer Is Too Warm...
• Make sure the door is fully closed.
• Level the freezer to ensure proper door seal.
• Clean the condenser coils on the back to improve
function.
Moisture Collects on the Outside...
• Reduce the time the door Is open. Frequent door
openings in humid conditions will cause this
condition.
• Make sure the door seal is tight and level freezer
to ensure proper door seal.
My Freezer Is Noisy...
• Make sure the cabinet is resting squarely oathe
floor on all four corners without touching a wall or
other surfaces.
• Some noises, such as the refrigerant gurgling as
it passes through tubes and the compressor hum
clicking on and off, are normal.
There Is an Odor In My Freezer...
• Check for spoiled food.
• Clean interior per Cleaning instructions.
Page 6
mi
For repair-in your home-of all major brand appliances,
lawn and garden equipment, or heating and cooling system,
no matter who made it, no matter who sold it!
For the replacement parts, accessories and
owner's manuals that you need to do-it-yourself.
For Sears professional installation of home appliances
and items like garage door openers and water heaters.
1-800-4-MY-HOME® (i-8oo-469-4663)
Call anytime, day or night (U.S.A. and Canada)
www.sears.comwww.sears.ca
Our Home
For repair of carry-in items like vacuums, lawn equipment,
and electronics, call or go on-line for the location of your nearest
Sears Parts & Repair Center.
1-800-488-1222
Call anytime, day or night (U.S.A. only)
www.sears.com
To purchase a protection agreement on a product serviced by Sears:
1 -800-827-6655 (U.S.A.) 1 -800-361 -6665 (Canada)
Para pedir servicio de reparación
a domicilio, y para ordenar piezas:
1-888-SU-HOGAR®“
Printed in Mexico
Au Canada pour service en français:
1-888-LE-FOYER*
ww.sears.ca
(1-888-784-6427)
® Registered Trademark/™ Trademark/”*-Service Mark of Sears, Roebuck and Co.
©-Marca Registrada/™ Marca de Fábrica/“ Marca de Servicio de Sears, Roebuck and Co.
" “Marque commerce/" “Marque déposée de Sears, Roebuck ahd Co.
© Sears, Roebuck and Co.
(4/16/07)
 Loading...