

Page 1
KenmorG
Side by Side Refrigerator
Refrigerador de dos puertas
Réfrigérateur cote a cote
2220698
Sears Roebuck and Co., Hoffman Estates, IL 60179 U.S.A.
Sears Canada, Inc., Toronto, Ontario, Canada MSB 2B8
www.sears.com
www.sears.ca
Page 2

TABLE OF CONTENTS WARRANTY
WARRANTY.........................................................................................2 ONE-YEAR FULL WARRANTY ON REFRIGERATOR
REFRIGERATOR SAFETY
■acPiaincDATnia ikiqtai i ATinw a operated and maintained according to instructions attached to or
I innnriiinn A furnished with the product, Sears will repair this refrigerator, free
, ”................................................................................... ^ of charge, if defective in material or workmanship.
Location Requirements.................................................................4
Electrical Requirements...................................................................5 WARRANTY ON SEALED REFRIGERATION
Base Grille
Door Removal
nnnr riincinn ...................................................................................R operated and maintained according to owner's instructions
\A/ow o, Q attached to or furnished with the product. Sears will repair the
water system Preparation
Normal Sounds................................................................................9 workmanship.
REFRIGERATOR USE..
Ensuring Proper Air Circulation
Using the Controls
Water and Ice Dispensers..............................................................10 filter cartridges (if equipped with the filter system). Original and
Interior Water Filtration System
Ice Maker and Storage Bin/Bucket
REFRIGERATOR FEATURES 12 WARRANTY SERVICE IS AVAILABLE BY CONTACTING THE
Refrigerator Shelves......................................................................13 NEAREST SEARS SERVICE CENTER IN THE UNITED STATES
Flip-up Shelf...................................................................................13 CANADA.
Adjustable Flip-up Shelf
Deli Drawer 13 United States or Canada. This warranty gives you specific
Convertible Vegetable/Meat Drawer,'Crisper and Cov^^^^^^ 3 '®9al rights and you may also have other rights which vary
Convertible Vegetable/Meat Drawer Temperature Control
Crisper Humidity Control 14 Warranty terms may vary in Canada. Contact your local Sears
\N\morCrn/BomeRack ZZZZZZZZZZZZu Service Center for complete details.
Utility Bin.......................................................................................14 Sears, Roebuck and Co.
coccTco ccATi loce ^ a Dept. 817WA, Hoffman Estates, IL 60179
Freezer Shelf................................................................................14 Sears Canada, Inc., Toronto, Ontario, Canada MSB 2B8
Freezer Basket or Bin...................................................................15 „ . .
rtrtrtD PEATIIDEQ -IR
Door Rails................................................................................... 15 number, and purchase date. You can find this information on the
Can Racks and Door Bins..............................................................15 rnodel and serial number label located on the inside wall of the
REFRIGERATOR CARE
Cleaning.........................................................................................15 Have this information available to help you obtain assistance or
Changing the Light Bulbs...............................................................16 service more quickly whenever you contact Sears concerning
Power Interruptions........................................................................16 your refrigerator.
Vacation and Moving Care.............................................................17 Model number 106.
TROUBLESHOOTING
SERVICE
IntheU.S.A......................................................................................20 Purchase date
In Canada
Accessories....................................................................................20 reference.
WATER FILTER CERTIFICATIONS
PRODUCT DATA SHEETS
.......................................................................................
................................................................................
o D f ....................................................................................o sealed system (consisting of refrigeration, connecting tubing, and
........................................................................................
......................................................................................
.................................................................
................................................................
....................................................................9 above warranty coverage applies only to refrigerators which
.......................................................
.........................................................................
.....................................................
................................................
.................................................................
..........
3 For one year from the date of purchase, when this refrigerator is
5 SYSTEM
6 years from the date of purchase, when this refrigerator is
9 compressor), free of charge, if defective in materials or
9 are used for storage of food for private household purposes and
10 excludes original and replacement Kenmore Filtered Ice & Water
11 replacement cartridges are warranted for 30 days, parts only.
12 against defects in material or workmanship.
13 This warranty applies only while this product is in use in the
14
Product Record
......................................................................... In the space below, record your complete model number, serial
...................................................................
.....................................................................
..............................................
............................................................
15 refrigerator compartment.
_______________________________________
17 ^ ^
20
21
22
Serial number___________________________________________
___________________________________________
20 save these instructions and your sales receipt for future
Page 3
REFRIGERATOR SAFETY
Your safety and the safety of others are very important.
We have provided many important safety messages in this manual and on your appliance. Always read and obey all
safety messages.
This is the safety alert symbol.
This symbol alerts you to potential hazards that can kill or hurt you and others.
All safety messages will follow the safety alert symbol and either the word “DANGER” or
“WARNING.” These words mean:
You can be killed or seriously injured if you don't
ADANGER
AWARNING
All safety messages will tell you what the potential hazard is, tell you how to reduce the chance of injury, and tell you
what can happen if the instructions are not followed.
IMPORTANT SAFETY INSTRUCTIONS
WARNING: To reduce the risk of fire, electric shock, or injury when using your refrigerator, follow these basic
precautions:
■ Plug into a grounded 3 prong outlet.
Do not remove ground prong.
Do not use an adapter.
Do not use an extension cord.
Disconnect power before servicing.
Replace all panels before operating.
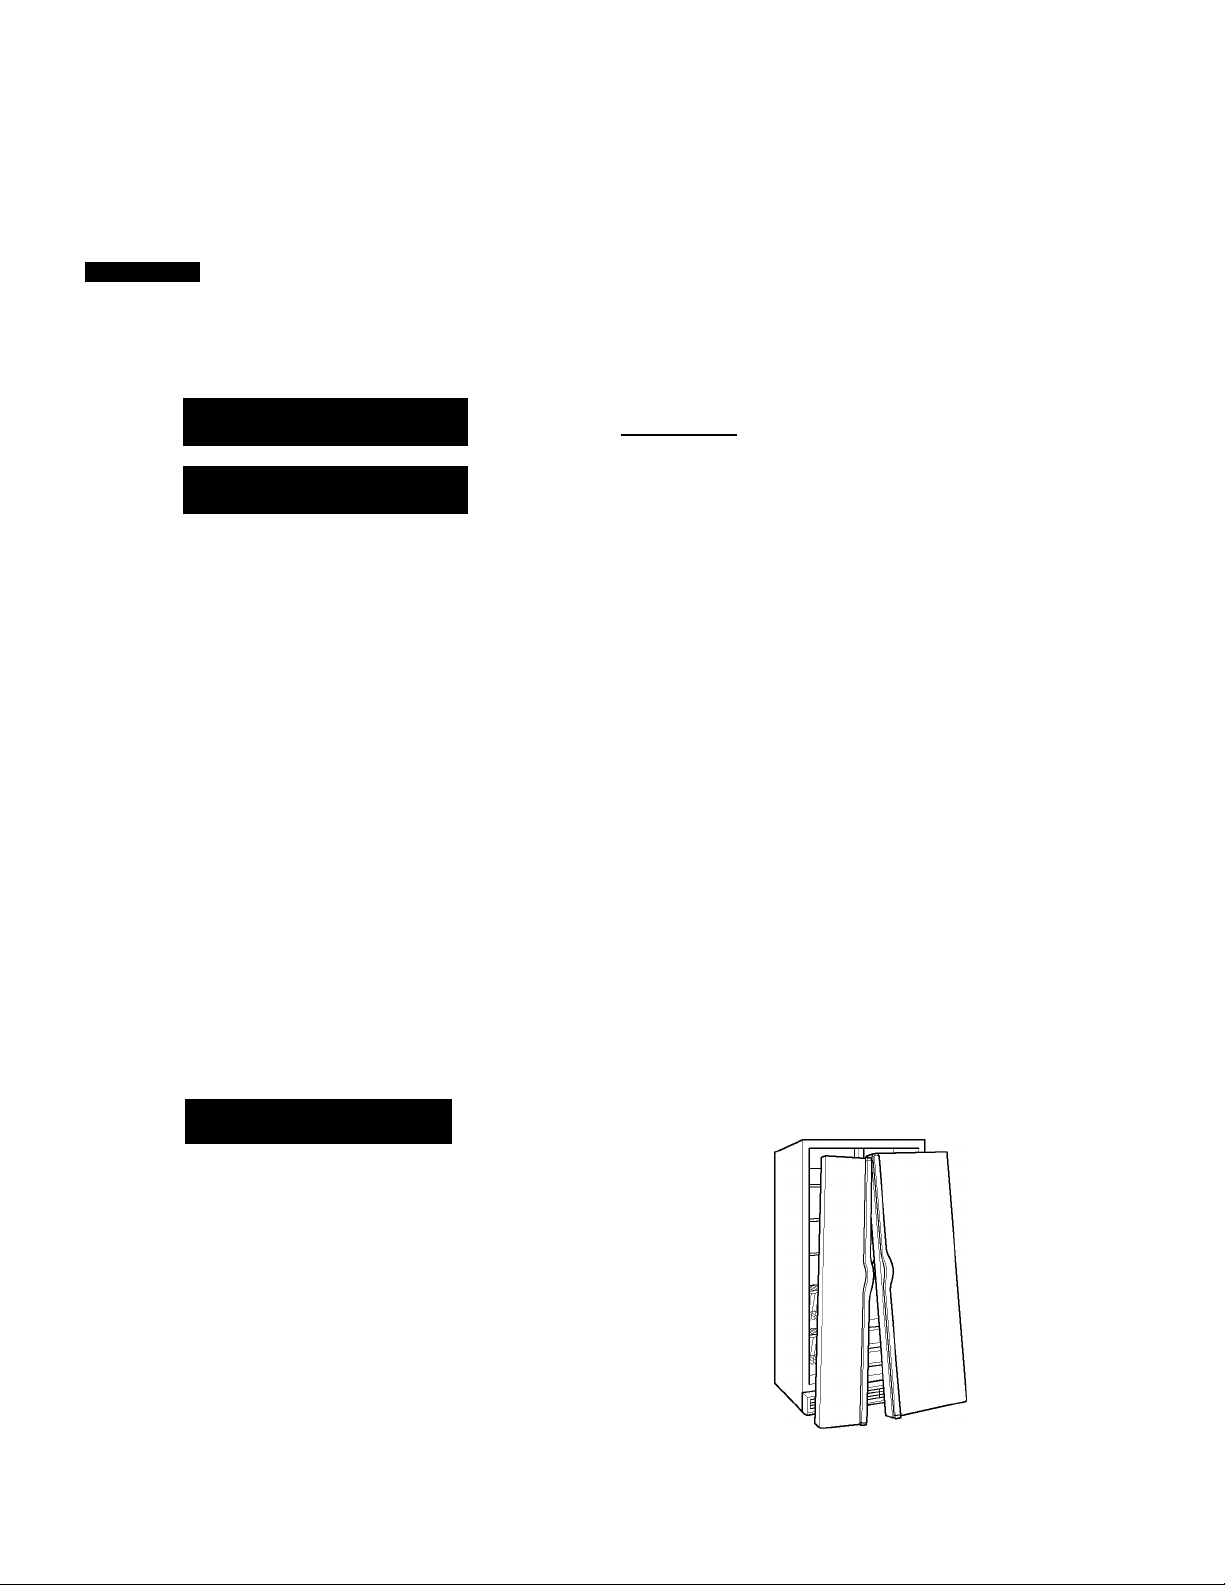
Remove doors from your old refrigerator.
immediately follow instructions.
You can be killed or seriously injured if you don't follow instructions.
Use nonflammable cleaner.
Keep flammable materials and vapors, such as
gasoline, away from refrigerator.
Use two or more people to move and install
refrigerator.
Disconnect power before Installing ice maker (on
ice maker kit ready models only).
Use a sturdy glass when dispensing ice or water
(on some models).
SAVE THESE INSTRUCTIONS
Proper Disposal of
Your Old Refrigerator
AWARNING
Suffocation Hazard
Remove doors from your old refrigerator.
Failure to do so can result in death or
brain damage.
IMPORTANT: Child entrapment and suffocation are not problems
of the past. Junked or abandoned refrigerators are still dangerous
- even if they will sit for “just a few days.” If you are getting rid of
your old refrigerator, please follow these instructions to help
prevent accidents.
Before you throw away your old refrigerator or freezer:
■ Take off the doors.
■ Leave the shelves in place so that children may not easily
climb inside.
Page 4
REFRIGERATOR
ts
INSTALLATION
IJnpackli
AWARNING
Excessive Weight Hazard
Use two or more peopie to move and instaii
refrigerator.
Faiiure to do so can resuit in back or other injury.
Removing packaging materials
■ Remove tape and glue residue from surfaces before turning
on the refrigerator. Rub a small amount of liquid dish soap
over the adhesive with your fingers. Wipe with warm water
and dry.
■ Do not use sharp instruments, rubbing alcohol, flammable
fluids, or abrasive cleaners to remove tape or glue. These
products can damage the surface of your refrigerator. For
more information, see the “Refrigerator Safety” section.
When Moving Your Refrigerator:
Your refrigerator is heavy. When moving the refrigerator
for cleaning or service, be sure to protect the floor.
Always pull the refrigerator straight out when moving it.
Do not wiggle or “walk” the refrigerator when trying to move
it, as floor damage could occur.
AWARNING
Explosion Hazard
Keep fiammabie materiais and vapors, such as
gasoiine, away from refrigerator.
Faiiure to do so can resuit in death, expiosion,
or fire.
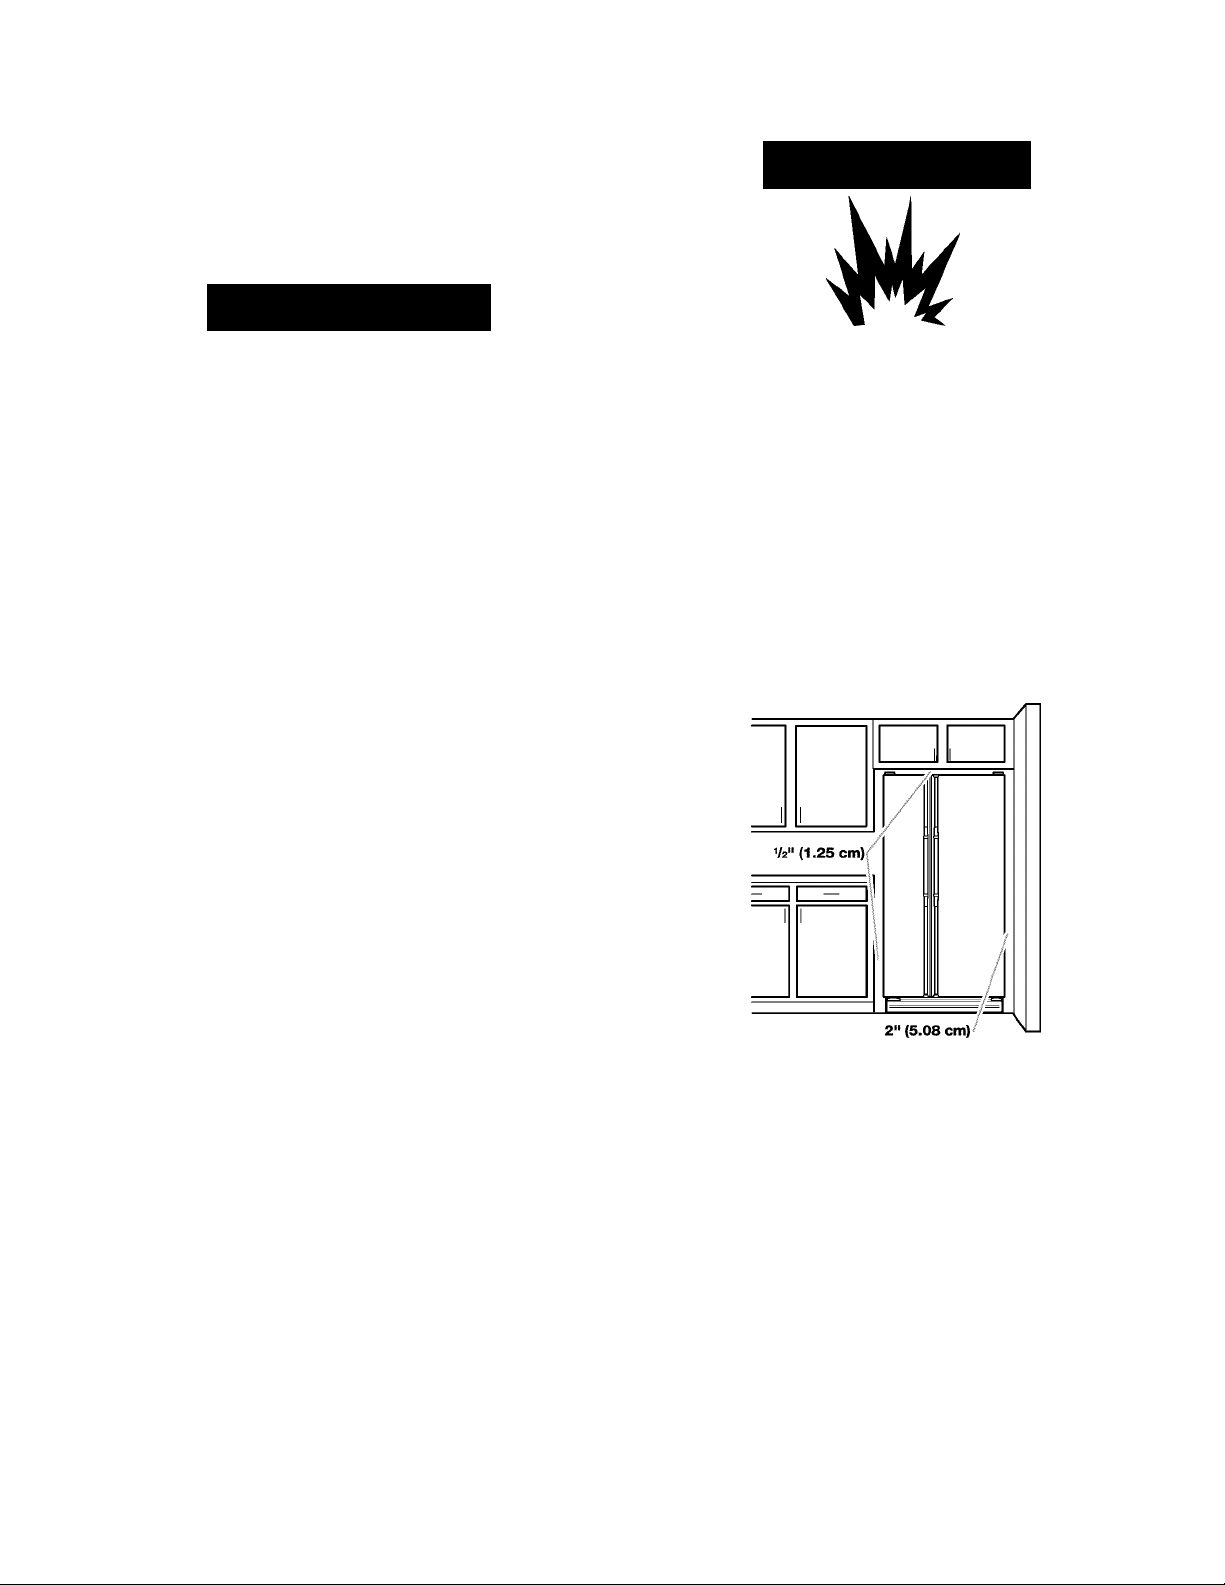
To ensure proper ventilation for your refrigerator, allow for Vi in.
(1.25 cm) space on each side and at the top. When installing your
refrigerator next to a fixed wall, leave 2 in. (5.08 cm) minimum on
each side (depending on your model) to allow for the door to
swing open. If your refrigerator has an ice maker, allow extra
space at the back for the water line connections.
NOTE: Do not install the refrigerator near an oven, radiator, or
other heat source, nor in a location where the temperature will fall
below 55°F(13°C).
Cleaning before use
After you remove all of the packaging materials, clean the inside
of your refrigerator before using it. See the cleaning instructions
in the “Refrigerator Care” section.
Important information to know about glass shelves
and covers:
Do not clean glass shelves or covers with warm water when
they are cold. Shelves and covers may break if exposed to
sudden temperature changes or impact, such as bumping.
For your protection, tempered glass is designed to shatter
into many small, pebble-size pieces. This is normal. Glass
shelves and covers are heavy. Use special care when re
moving them to avoid impact from dropping.
Page 5
▲WARNING
>•
Electrical Shock Hazard
Plug into a grounded 3 prong outlet.
Do not remove ground prong.
Do not use an adapter.
Do not use an extension cord.
Failure to follow these instructions can result in
death, fire, or electrical shock.
Before you move your refrigerator into its final location, it is
important to make sure you have the proper electrical
connection:
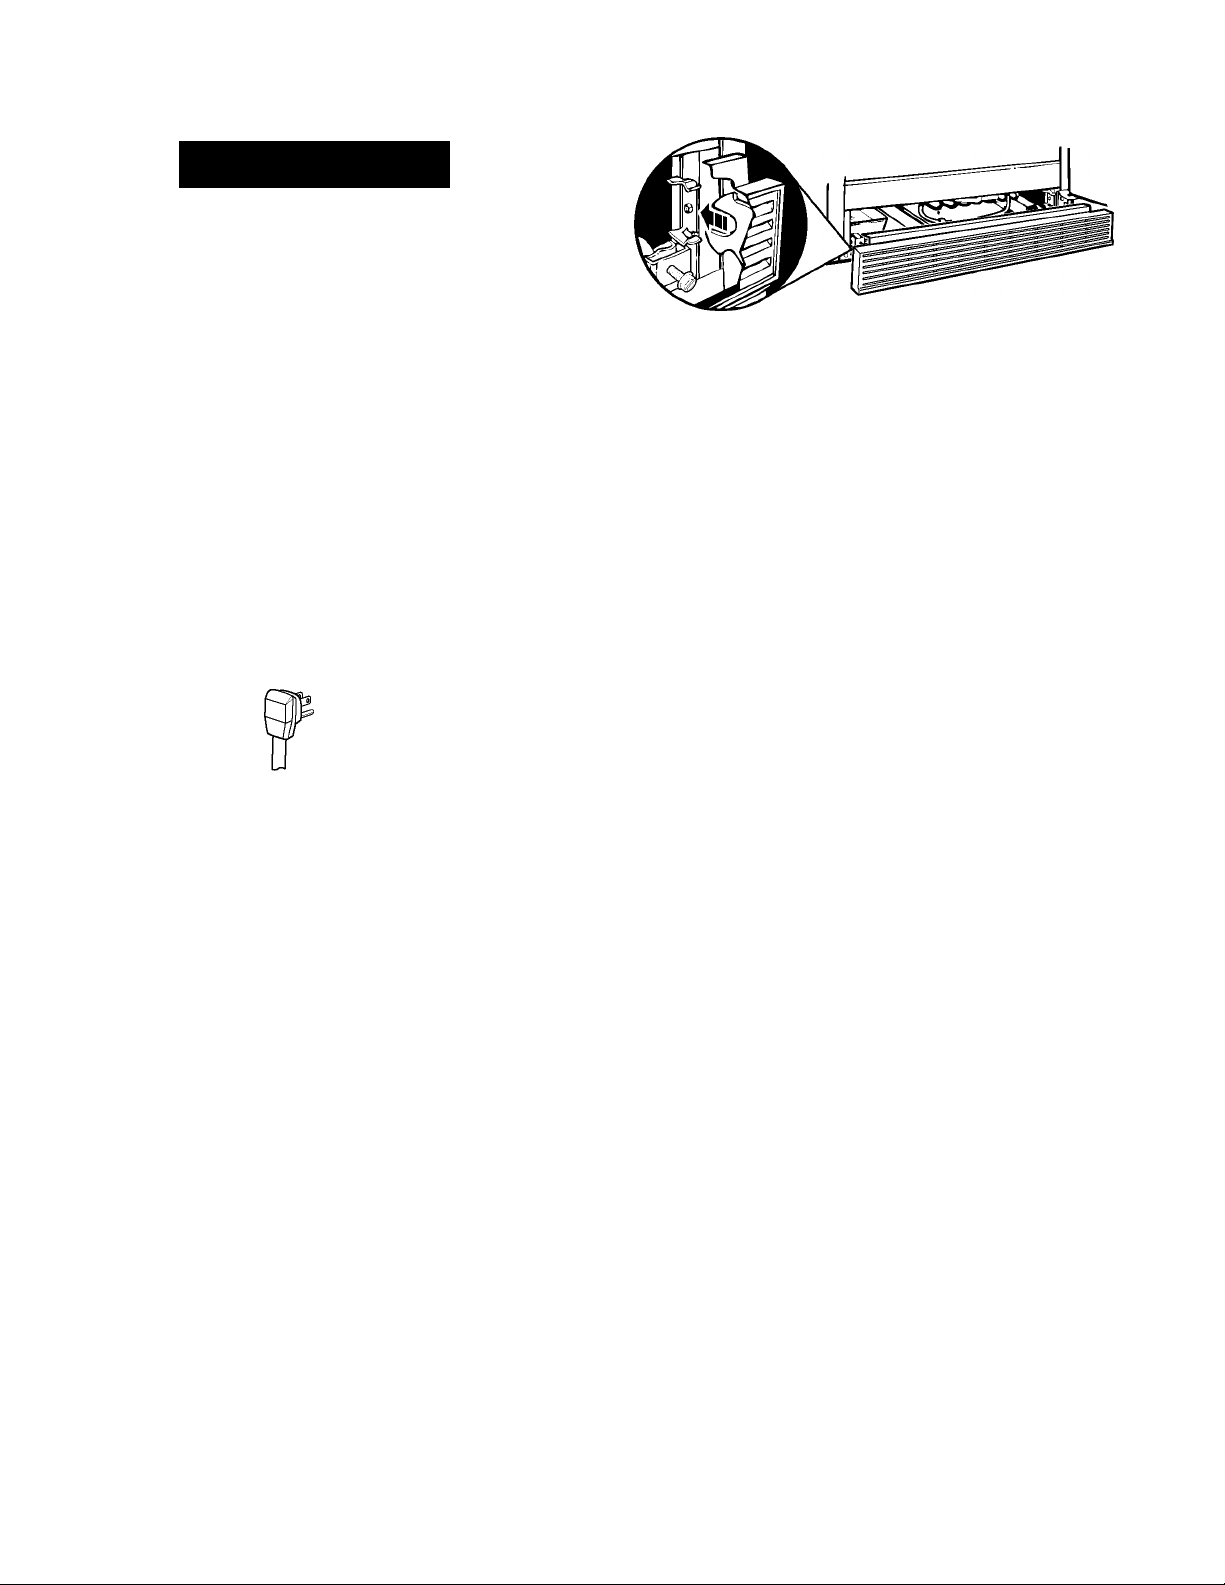
To remove the base grille:
1. Open both refrigerator doors.
2. Place hands along the ends of the grille, with your thumbs
along the top. Push in with your thumbs and pull up on the
bottom.
NOTE: Be sure to refasten the Tech Sheet behind the base grille
after cleaning.
To replace the base grille:
1. Open the doors.
2. Line up the grille support tabs with the metal clips.
3. Push the grille firmly to snap it into place.
Recommended grounding method
A 115 Volt, 60 Hz., AC only 15 or 20 ampere fused, grounded
electrical supply is required. It is recommended that a separate
circuit serving only your refrigerator be provided. Use an outlet
that cannot be turned off by a switch. Do not use an
extension cord.
NOTE: Before performing any type of installation, cleaning, or
removing a light bulb, turn the control (Thermostat, Refrigerator
or Freezer Control depending on the model) to OFF and then
disconnect the refrigerator from the electrical source. When you
are finished, reconnect the refrigerator to the electrical source
and reset the control (Thermostat, Refrigerator or Freezer Control
depending on the model) to the desired setting.
Page 6
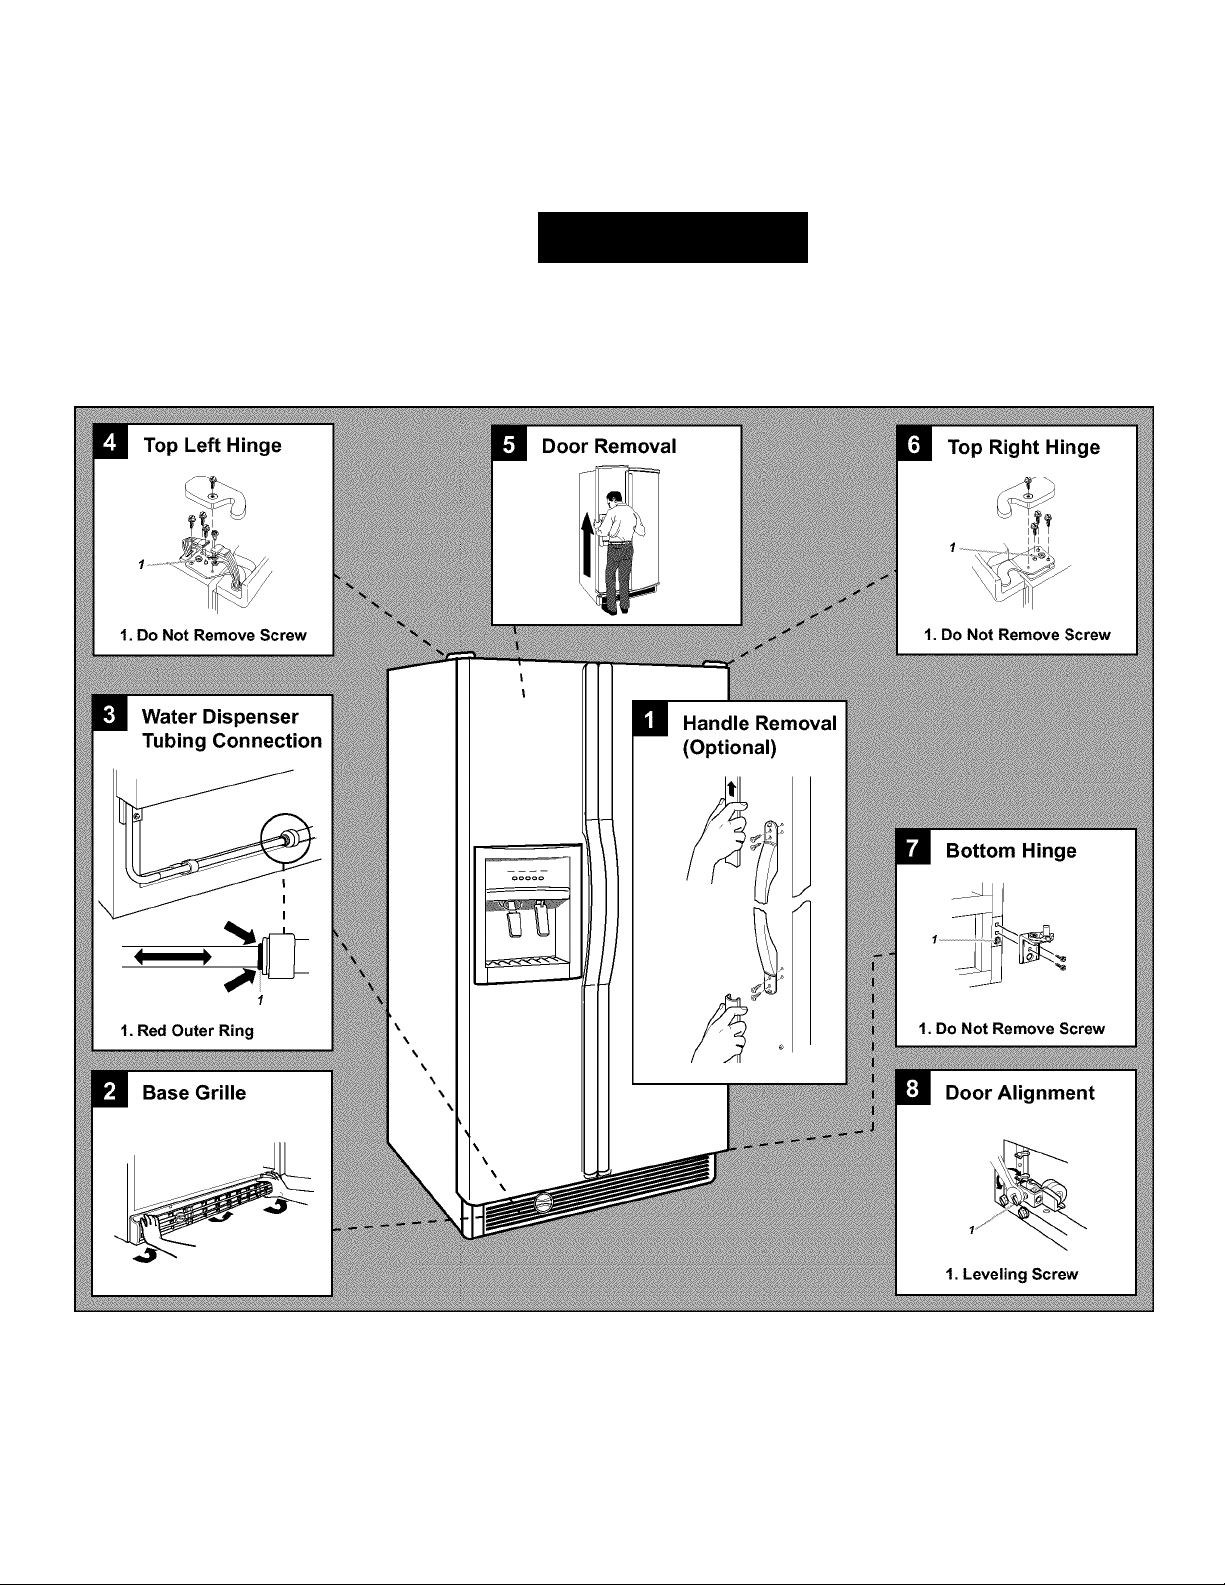
TOOLS NEEDED: Va in., Vi in., and Yie in. hex-head socket wrenches, a flat-head screwdriver and a Phillips screwdriver.
IMPORTANT: Before you begin, turn the refrigerator control OFF, unplug refrigerator or disconnect power. Remove food and any
adjustable door or utility bins from doors.
A WARNING
Electrical Shock Hazard
Disconnect power before removing doors.
V
Reconnect both ground wires before operating.
Failure to do so can result in death or electrical shock.
NOTE: It may only be necessary to remove either the door handle or the doors to get your product through the doorway of your
residence. Measure the door opening to determine whether to remove the refrigerator handles or the doors.
Page 7
Handle Removal (optional) Door and Hinge Replacement
1. Apply firm pressure with your hand on the face of trim. Slide
top trim up and bottom trim down away from handle. Lift trim
pieces off shoulder screws (see Graphic 1).
NOTE: Some models include accent pieces between the handle
and the handle trim. If your model includes the accents, you will
need to carefully remove them with a flat-head screwdriver
before removing the handle screws. The accent pieces are
optional and can be reinstalled or left off of the handle assembly.
2. Remove handle screws and handles.
3. Move refrigerator into place. Replace handles as shown (see
Graphic 1).
Door Removal
^WARNING
Electrical Shock Hazard
Disconnect power before removing doors.
Failure to do so can result in death or
electrical shock.
1.
Unplug refrigerator or disconnect power.
2.
Open both refrigerator doors. Remove the base grille by
pulling up on the bottom outside corners (see Graphic 2).
3.
Close both doors and keep them closed until you are ready to
lift them free from the cabinet.
4.
If you have a dispenser (ice or water), disconnect the water
dispenser tubing located behind the base grille on the freezer
door side (see Graphic 3).
■ Press the red outer ring against the face of fitting and pull
the dispenser tubing free.
■ On some models, remove tubing from hose clip.
5. Remove top left hinge screw and cover as shown (see
Graphic 4).
6. Disconnect wiring plug and both ground wires from ground
wire screw (on some models) as shown (see Graphic 4).
7. Remove remaining left hinge screws and hinge as shown (see
Graphic 4). Do not remove screw 1.
8. Carefully lift freezer door straight up off bottom hinge (see
Graphic 5). The water dispenser tubing remains attached to
the freezer door and pulls through the bottom left hinge.
Make sure you protect the dispenser tubing from damage.
9. Remove top right hinge cover and screws as shown (see
Graphic 6). Do not remove screw 1.
10. Lift the refrigerator door straight up off bottom hinge.
11. It may not be necessary to remove the bottom hinge to move
the refrigerator through a doorway. Both bottom hinges have
similar construction.
■ Disassemble the hinges as shown (see Graphic 7). Do not
remove screw 1.
1. Replace both bottom hinges, if removed. Tighten screws.
2. Assistance may be needed to feed the water dispenser
tubing through the bottom hinge while reinstalling the freezer
door. Carefully feed the dispenser tubing through the bottom
left hinge before replacing the door on the hinge.
NOTE: Provide additional support for the doors while the top
hinges are being replaced. Do not depend on the door magnets
to hold the doors in place while you are working.
3. Reconnect water dispenser tubing by pushing tubing into
fitting until it stops and black mark touches face of fitting (see
Graphic 3). Cn some models, replace tubing in hose clip.
4.
Align and replace the top left hinge as shown (see Graphic 4).
Tighten screws.
AWARNING
Electrical Shock Hazard
Reconnect both ground wires.
Failure to do so can result in death or electrical shock.
Style 1
Reconnect both ground wires.
Reconnect wiring plug.
(\ji
Style 1
Style 2
■ Reconnect wiring plug.
5. Replace left hinge cover and screws.
6. Replace the refrigerator door by carefully lifting the door onto
the bottom right hinge.
7. Align and replace the top right hinge as shown (see Graphic
6). Tighten screws.
8. Replace hinge cover and screws. Tighten screws.
9. Plug into a grounded 3 prong outlet.
Page 8
Your refrigerator has two front adjustable rollers — one on the
right and one on the left. If your refrigerator seems unsteady or if
you want the doors to close more easily, adjust the refrigerator's
tilt using the instructions below:
1. Move the refrigerator into its final position.
2. The two leveling screws are part of the front roller assemblies
which are at the base of the refrigerator on either side (see
Graphic 8).
3. Use a hex-head socket wrench to adjust the leveling screws.
Turn the leveling screw to the right to raise that side of the
refrigerator or turn the leveling screw to the left to lower that
side. It may take several turns of the leveling screws to adjust
the tilt of the refrigerator (see Graphic 8).
NOTE: Having someone push against the top of the
refrigerator takes some weight off the leveling screws and
rollers. This makes it easier to adjust the screws.
4. Open both doors again and check to make sure that they
close as easily as you like. If not, tilt the refrigerator slightly
more to the rear by turning both leveling screws to the right. It
may take several more turns, and you should turn both
leveling screws the same amount.
5. Replace the base grille.
NOTE: Be sure to refasten the Tech Sheet behind the base grille.
Read all directions carefully before you begin.
IMPORTANT:
■ If you turn the refrigerator on before the water line is
connected, turn the ice maker OFF.
■ All installations must meet local plumbing code requirements.
■ Use copper tubing and check for leaks. Install copper tubing
only in areas where temperatures will remain above freezing.
Tools required: Standard screwdriver, Vie in. and V2 in. open-end
wrenches or two adjustable wrenches, V* in. nut driver and drill
bit, hand drill or electric drill (properly grounded).
NOTE: Your refrigerator dealer has a kit available with a 'A in.
(6.35 mm) saddle-type shutoff valve, a union, and copper tubing.
Before purchasing, make sure a saddle-type valve complies with
your local plumbing codes. Do not use a piercing-type or Vk in.
(4.76 mm) saddle valve which reduces water flow and clogs more
easily.
Cold water supply
Connect the ice maker to a cold water line with water pressure
between 30 and 120 psi. If you have questions about your water
pressure, call your utility company.
Connecting to Water Line
1. Unplug refrigerator or disconnect power.
2. Turn OFF main water supply. Turn ON nearest faucet long
enough to clear line of water.
3. Locate a I/2 in. to 1 'A in. (1.25 cm to 3.18 cm) vertical COLD
water pipe near the refrigerator.
NOTE: Horizontal pipe will work, but drill on the top side of
the pipe, not the bottom. This will help keep water away from
the drill and normal sediment from collecting in the valve.
4.
Determine the length of copper tubing you need. Measure
from the connection on the lower left rear of refrigerator to the
water pipe. Add 7 ft. (2.1 m) to allow for cleaning. Use Vi in.
(6.35 mm) O.D. (outside diameter) copper tubing. Be sure
both ends of copper tubing are cut square.
Using a grounded drill, drill a Vi in. hole in the cold water pipe
5.
you have selected.
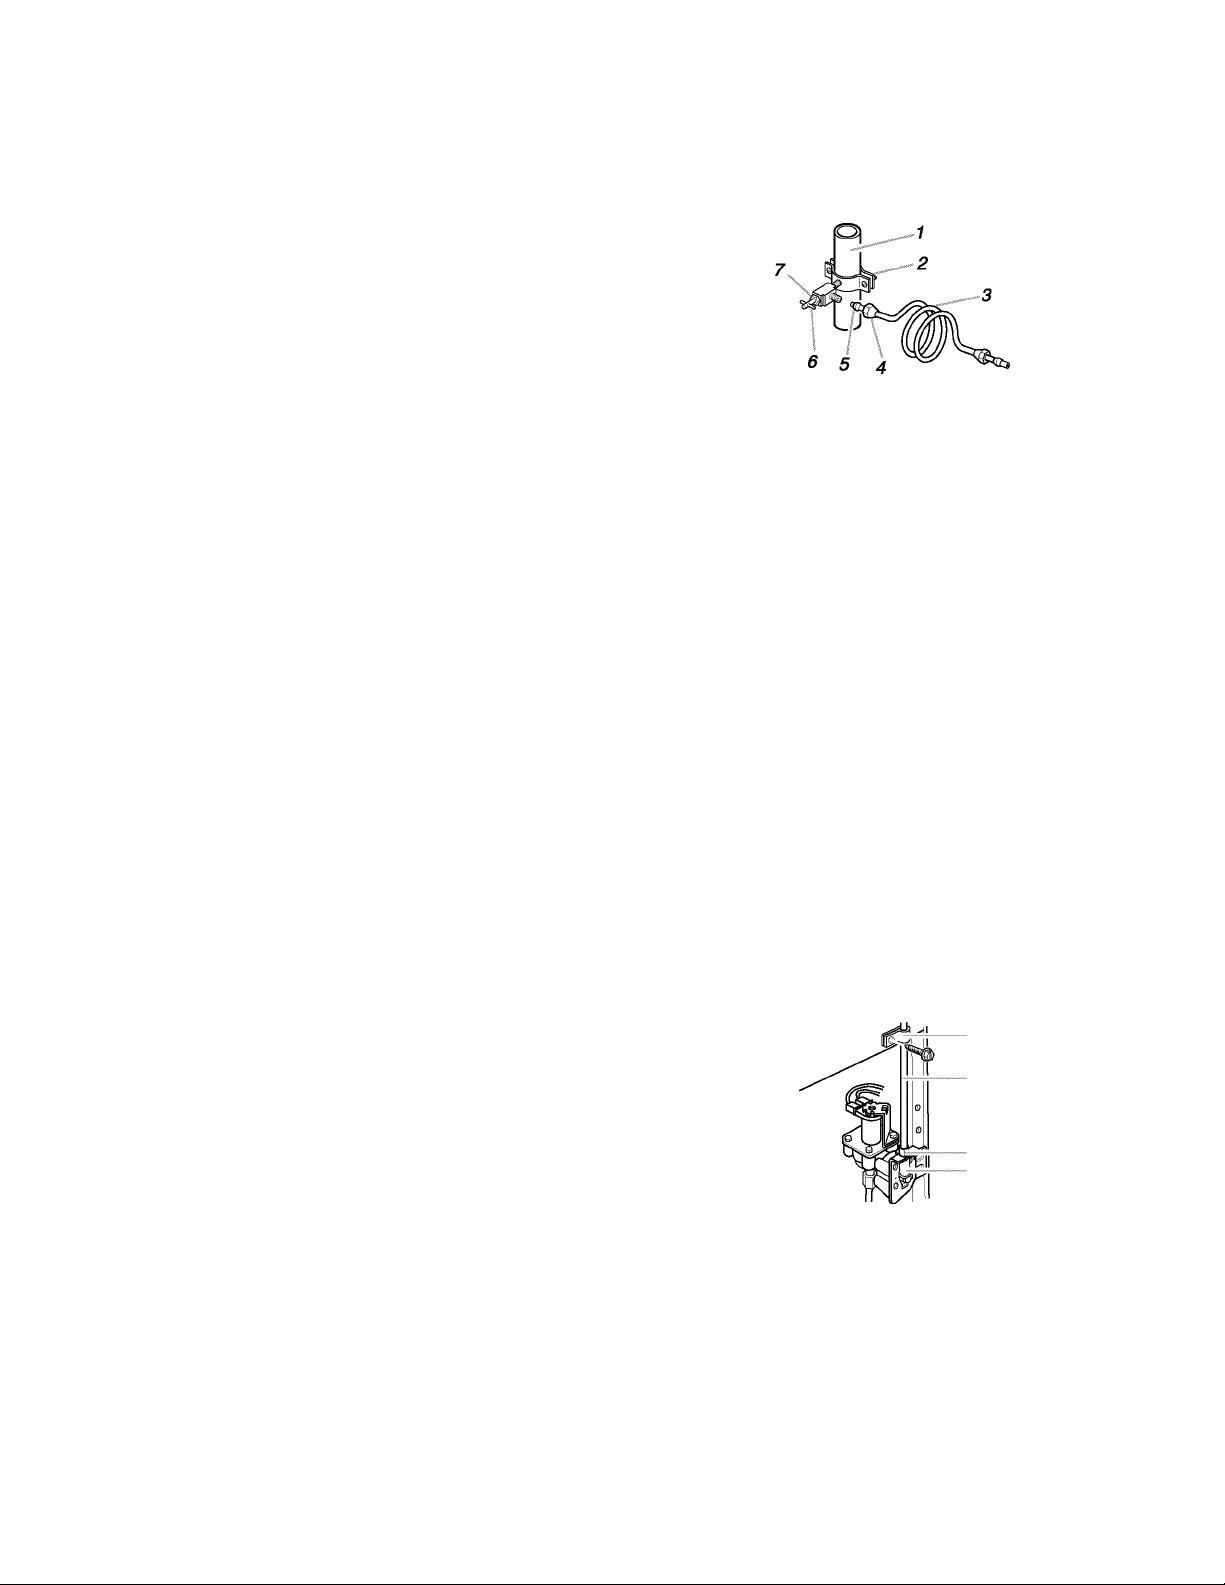
1. Cold Water Pipe
2. Pipe Clamp
3. Copper Tubing
4. Compression Nut
6.
Fasten the shutoff valve to the cold water pipe with the pipe
5. Compression Sleeve
6. Shutoff Valve
7. Packing Nut
clamp. Be sure the outlet end is solidly in the Vi in. drilled hole
in the water pipe and that the washer is under the pipe clamp.
Tighten the packing nut. Tighten the pipe clamp screws
carefully and evenly so washer makes a watertight seal. Do
not overtighten or you may crush the copper tubing.
7.
Slip the compression sleeve and compression nut on the
copper tubing as shown. Insert the end of the tubing into the
outlet end squarely as far as it will go. Screw compression nut
onto outlet end with adjustable wrench. Do not overtighten.
8.
Place the free end of the tubing in a container or sink, and
turn ON the main water supply. Flush the tubing until water is
clear. Turn OFF the shutoff valve on the water pipe. Coil the
copper tubing.
Connecting to Refrigerator
1.
Attach the copper tube to the valve inlet using a compression
nut and sleeve as shown. Tighten the compression nut. Do
not overtighten. Use the tube clamp on the back of the
refrigerator to secure the tubing to the refrigerator as shown.
This will help prevent damage to the tubing when the
refrigerator is pushed back against the wall.
2.
Turn shutoff valve ON.
Check for leaks. Tighten any connections (including
3.
connections at the valve) or nuts that leak.
1
3
4
1. Tube Clamp
2. Copper Tubing
4.5.The ice maker is equipped with a built-in water strainer. If
your water conditions require a second water strainer, install
it in the Vi in. (6.35 mm) water line at either tube connection.
Obtain a water strainer from your nearest appliance dealer.
Plug in refrigerator or reconnect power.
3. Compression Nut
4. Valve Inlet
Page 9
Please read before using the water system.
Immediately after installation, follow the steps below to make
sure that the water system is properly cleaned.
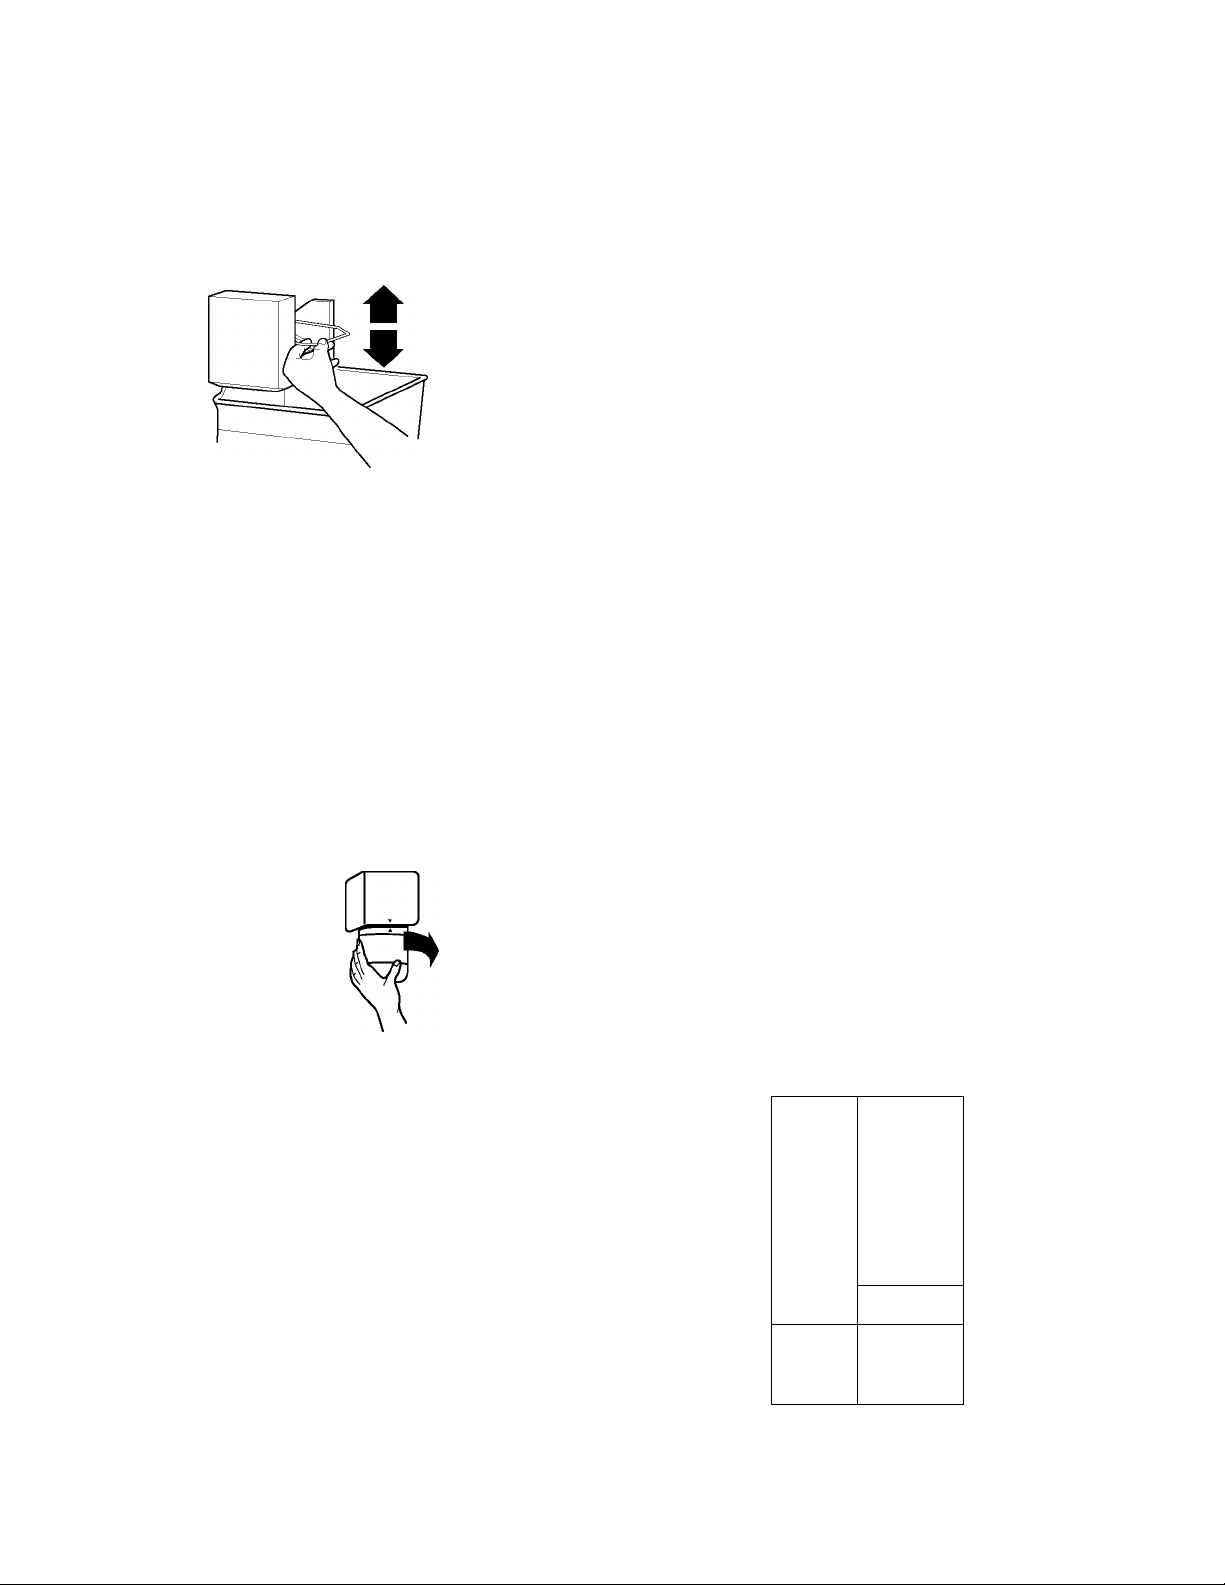
1. Turn off the ice maker by opening the freezer door and lifting
up the wire shutoff arm as shown.
2.
Install the interior water filter cartridge (on some models). The
interior water filter mounting bracket is located in the upper
corner of the fresh food compartment of the refrigerator.
NOTE: Do not use with water that is microbiologically
unsafe or of unknown quality without adequate
disinfection before or after the system.
■ Carefully remove the interior water filter cartridge from its
packaging. Remove the red cap from the cartridge.
■ Apply the appropriate month sticker to the cartridge as a
reminder to replace the cartridge within six months. Then
apply the “Water Filter Replacement Reminder” sticker to
your calendar.
■ Line up the INSTALL mark on the water filter label with the
indicator line that is molded into the filter mounting
bracket cover. Push the cartridge into the filter mounting
bracket. Twist the cartridge Va turn to the right to lock it
into place. The REMOVE mark should be lined up with the
indicator line located on the front cover.
Your new refrigerator may make sounds that your old one didn’t
make. Because the sounds are new to you, you might be
concerned about them. Most of the new sounds are normal. Flard
surfaces, such as the floor, walls, and cabinets, can make the
sounds seem louder. The following describes the kinds of sounds
and what may be making them.
■ If your product is equipped with an ice maker, you will hear a
buzzing sound when the water valve opens to fill the ice
maker for each cycle.
■ Your refrigerator is designed to run more efficiently to keep
your food items at the desired temperatures and to minimize
energy usage. The high efficiency compressor and fans may
cause your refrigerator to run longer than your old one. You
may also hear a pulsating or high-pitched sound from the
compressor or fans adjusting to optimize performance.
■ You may hear the evaporator fan motor circulating air through
the refrigerator and freezer compartments. The fan speed
may increase as you open the doors or add warm food.
■ Rattling noises may come from the flow of refrigerant, the
water line, or items stored on top of the refrigerator.
■ Water dripping on the defrost heater during a defrost cycle
may cause a sizzling sound.
■ As each cycle ends, you may hear a gurgling sound due to
the refrigerant flowing in your refrigerator.
■ Contraction and expansion of the inside walls may cause a
popping noise.
■ You may hear air being forced over the condenser by the
condenser fan.
■ You may hear water running into the drain pan during the
defrost cycle.
&
Use a sturdy container to depress the water dispenser bar
3.
until the water begins to flow. Flush the water system by
dispensing and discarding 2 to 3 gal. (8 to 12 L) of water.
Cleaning the system will take approximately 6 to 7 minutes
and will help clear air from the line. Additional flushing may be
required in some households.
NOTE: As air is cleared from the system, water may spurt out
of the dispenser.
4.
Inspect the filter system for water leaks. If you see water
leaks, see the “Troubleshooting” section.
Turn on the ice maker by opening the freezer door and
5.
lowering the wire shutoff arm as shown. Please refer to the
“Ice Maker” section for further instructions on the operation
of your ice maker.
■ Allow 24 hours to produce the first batch of ice.
■ Discard the first three batches of ice produced.
REFRIGERATOR USE
In order to ensure proper temperatures, you need to permit air to
flow between the two sections. Cold air enters the bottom of the
freezer section and moves up. It then enters the refrigerator
section through the top vent. Air then returns to the freezer as
shown.
**
±i
'l*'
Do not block any of these vents with food such as soda, cereal,
bread, etc. If the vents are blocked, airflow will be prevented and
the temperature controls will not function properly.
;
11
------
Page 10
IMPORTANT: Because air circulates between both sections, any
odors formed in one section will transfer to the other. You must
thoroughly clean both sections to eliminate odors. To prevent
odor transfer from food, wrap or cover foods tightly.
CONDITION/REASON:
FREEZER too cold
Not set correctly for your
conditions
SETTING
ADJUSTMENT:
FREEZER Control one
setting lower
Rotary Controls (on some models)
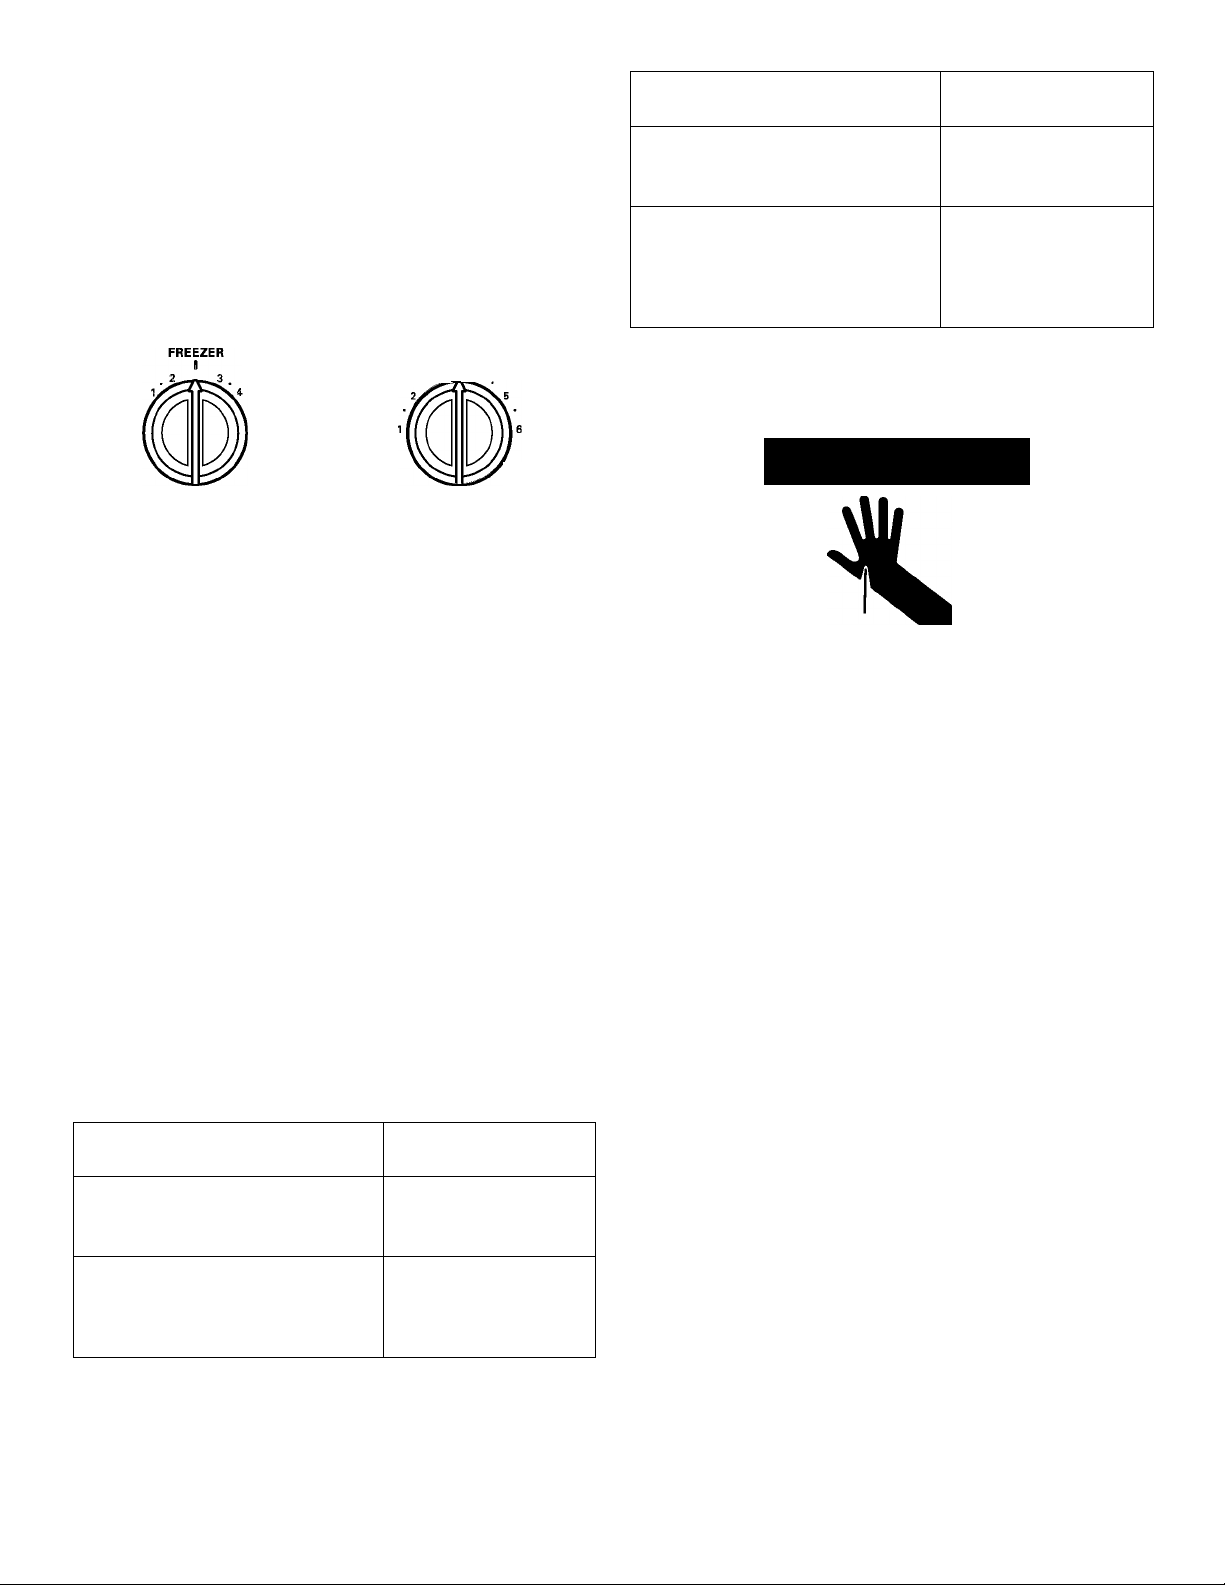
For your convenience, your refrigerator controls are preset at the
factory. When installing your refrigerator, make sure that the
controls are still preset to the “mid-settings” as shown.
REFRIGERATOR
I
3 - 4
oGQS
IMPORTANT
■ Your product will not cool when the REFRIGERATOR Control
is set to OFF.
■ The Refrigerator Control adjusts the refrigerator compartment
temperature. The Freezer Control adjusts the freezer
compartment temperature. Settings to the left of the mid
setting make the temperature less cold. Settings to the right
of the mid-setting make the temperature colder.
■ Wait 24 hours before you put food into the refrigerator. If you
add food before the refrigerator has cooled completely, your
food may spoil.
NOTE: Adjusting the Refrigerator and Freezer Controls to a
higher (colder) setting will not cool the compartments any
faster.
■ The preset settings should be correct for normal household
usage. The controls are set correctly when milk or juice is as
cold as you like and when ice cream is firm.
■ If the temperature is too warm or too cold in the refrigerator or
freezer, first check the air vents to be sure they are not
blocked before adjusting the controls.
Adjusting Rotary Controls
If you need to adjust temperatures, adjust the refrigerator
temperature first.
NOTE: Wait at least 24 hours between adjustments and then re
check the temperatures.
CONDITION/REASON:
SETTING
ADJUSTMENT:
REFRIGERATOR too cold
Not set correctly for your
conditions
REFRIGERATOR too warm
Door opened often, large amount of
food added or room temperature
very warm
REFRIGERATOR
Control one setting
lower
REFRIGERATOR
Control one setting
higher
FREEZER too warm/too little ice
Door opened often, or large amount
of food added or very cold room
temperature (can’t cycle often
enough) or heavy ice usage
FREEZER Control one
setting higher
▲WARNING
Cut Hazard
Use a sturdy glass when dispensing ice or water.
Failure to do so can result in cuts.
Depending on your model, you may have one or more of the
following options: the ability to select either crushed or cubed
ice, a special light that turns on when you use the dispenser, or a
lock option to avoid accidental dispensing.
The ice dispenser
Ice dispenses from the ice maker storage bin in the freezer. When
the dispenser lever is pressed:
■ A trap door opens in a chute between the dispenser and the
ice bin. Ice moves from the bin and falls through the chute.
■ When you release the dispenser lever, the trap door closes
and the ice dispensing stops. The dispensing system will not
operate when the freezer door is open.
Some models dispense both cubed and crushed ice. Before
dispensing ice, select which type of ice you prefer. The button
controls are designed for easy use and cleaning.
■ For cubed ice, press the CUBE button until the red indicator
appears in the window above the CUBE button.
ICE
CRUSH CUBE
■ For crushed ice, press the CRUSFI button until the red
indicator appears in the window above the CRUSFI button.
For crushed ice, cubes are crushed before being dispensed. This
may cause a slight delay when dispensing crushed ice. Noise
from the ice crusher is normal, and pieces of ice may vary in size.
When changing from CRUSFI to CUBE, a few ounces of crushed
ice will be dispensed along with the first cubes.
10
Page 11
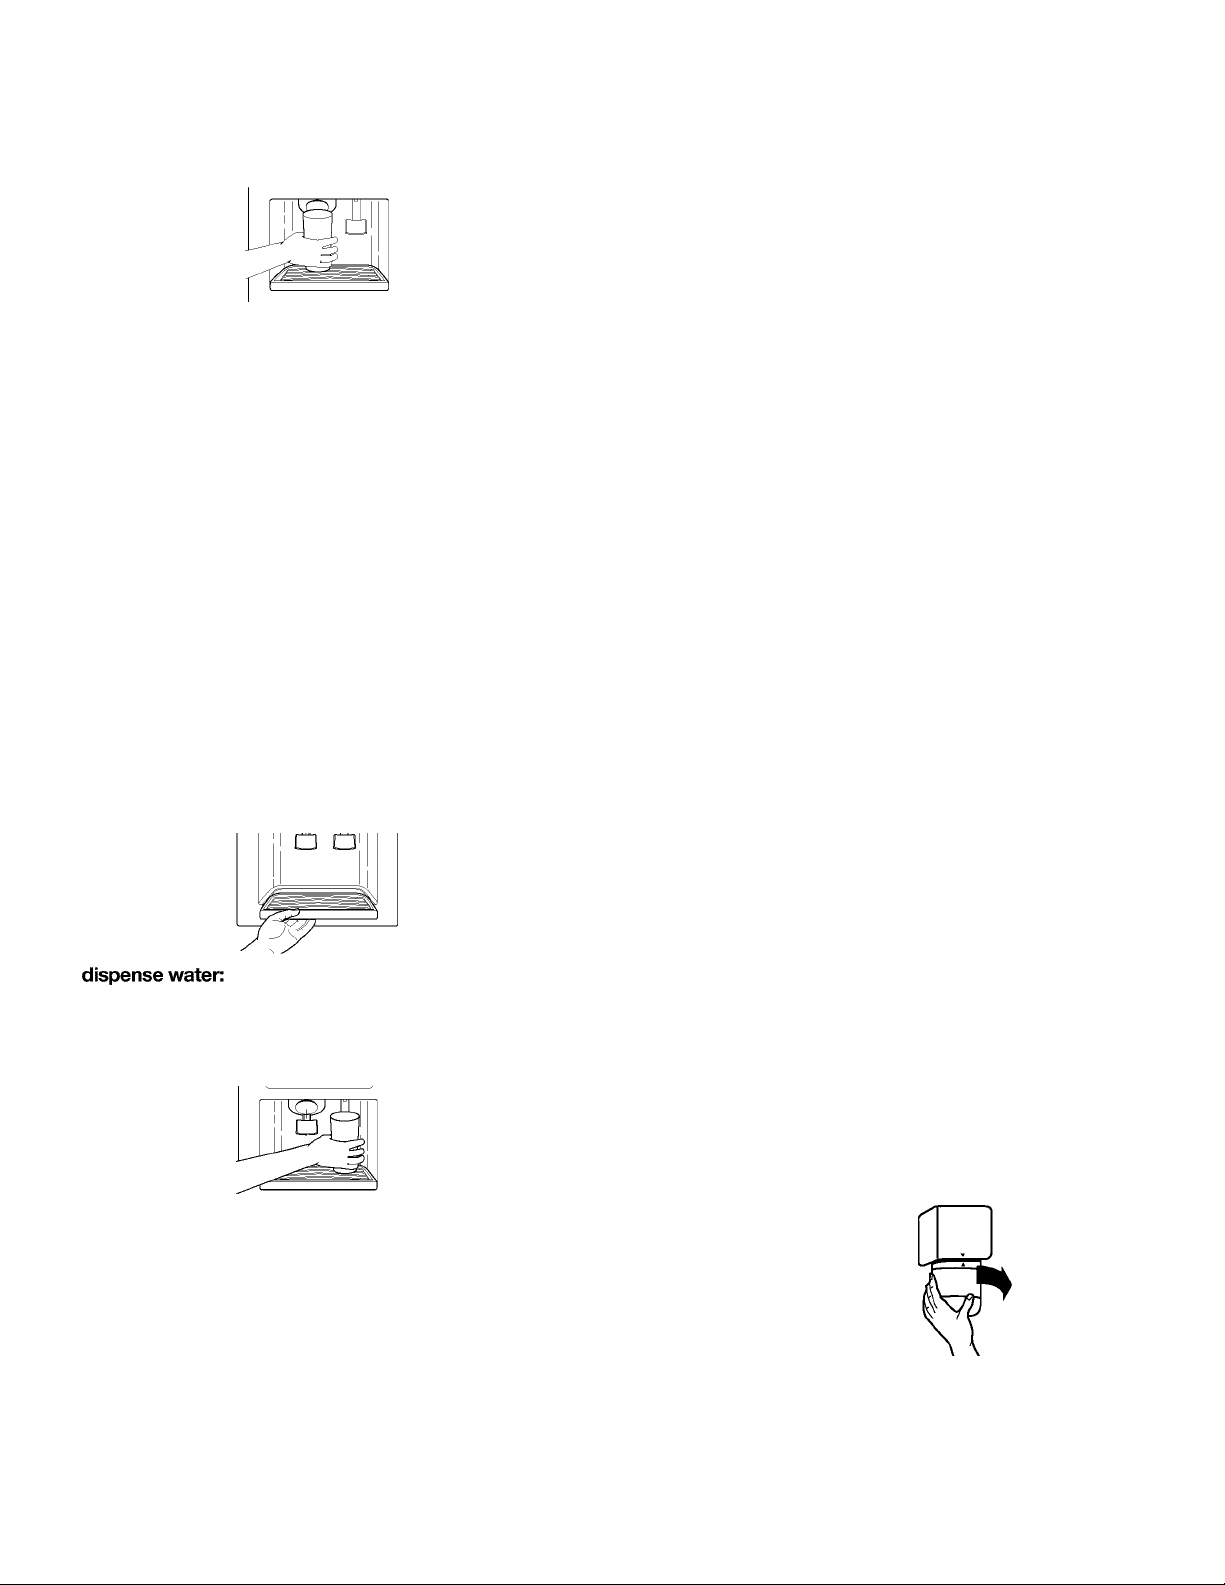
To dispense ice:
1. Press button for the desired type of ice.
2. Press a sturdy glass against the ice dispenser lever. Hold the
glass close to the dispenser opening so ice does not fall
outside of the glass.
IMPORTANT: You do not need to apply a lot of pressure to
the lever in order to activate the ice dispenser. Pressing hard
will not make the ice dispense faster or in greater quantities.
3.
Remove the glass to stop dispensing.
NOTE: The first few batches of ice may have an off-flavor
from new plumbing and parts. Throw the ice away. Also, take
large amounts of ice from the ice bin, not through the
dispenser.
The water dispenser
If you did not flush the water system when the refrigerator was
first installed, press the water dispenser bar with a glass or jar
until you draw and discard 2 to 3 gal. (8 to 12 L) or approximately
6 to 7 minutes of water after water begins dispensing. It will take
3 to 4 minutes for the water to begin dispensing. The water you
draw and discard cleans the system and helps clear air from the
lines. Allow several hours for the refrigerator to cool down and
chill water.
IMPORTANT: Depending on your model, the small removable
tray at the bottom of the dispenser is designed to catch small
spills and allow for easy cleaning. There is no drain in the tray.
The tray can be removed from the dispenser and carried to the
sink to be emptied or cleaned.
1. Press a glass against the water dispenser lever.
2. Remove the glass to stop dispensing.
NOTE: Dispense enough water every week to maintain a fresh
supply.
NOTE: See the “Changing the Light Bulbs” section for
information on changing the dispenser light bulb.
On models without crushed ice, the light switch is a rocker-style
type. Push the switch to turn the light on, and push again to turn
the light off.
The dispenser lock (on some models)
Your dispenser can be turned off for easy cleaning or to prevent
accidental dispensing by small children and pets. To turn off the
dispenser, press the LOCK button. The indicator will appear
above the LOCK button and the ice and water dispensers will not
work. To unlock the dispenser, press the UNLOCK button until
the indicator appears. Then continue to dispense ice or water as
usual.
DISPENSER
LOCK UNLOCK
NOTE: The lock feature does not shut off power to the product,
to the ice maker, or to the dispenser light. It simply deactivates
the dispenser levers.
The interior water filter cartridge is located in the upper corner of
the fresh food compartment of the refrigerator. The interior water
filter cartridge should be replaced every six months or earlier if
the flow of water to your water dispenser or ice maker decreases
noticeably.
Replacing the interior water filter cartridge
1. Twist the interior water filter cartridge 'A turn to the left. The
INSTALL mark will be lined up with the indicator line located
on the filter mounting bracket cover.
2.
Gently pull down on the cartridge to remove it from the filter
mounting bracket assembly. To prevent water from spilling
inside the refrigerator, DO NOT TIP the cartridge. Dispose of
the cartridge.
Install the new interior water filter cartridge. You can run the
3.
dispenser without a water filter cartridge, but your water will
not be filtered.
NOTE: Do not use with water that is microbiologically
unsafe or of unknown quality without adequate
disinfection before or after the system.
■ Carefully remove the interior water filter cartridge from its
packaging. Remove the red cap from the cartridge.
■ Apply the appropriate month sticker to the cartridge as a
reminder to replace the cartridge within six months. Then
apply the “Water Filter Replacement Reminder” sticker to
your calendar as a reminder to replace the cartridge in six
months.
The dispenser light
The dispenser area has a light. It can be turned on manually by
pressing the ON button at the right-hand side of the control
panel. The red indicator above the ON button will appear.
On some models: Whenever you use the dispenser the lever will
automatically turn the light on.
LIGHT
OFF ON
4. Line up the INSTALL mark on the water filter label with the
indicator line that is molded into the filter mounting bracket
cover. Push the cartridge into the filter mounting bracket.
Twist the cartridge 'A turn to the right to lock it into place. The
REMOVE mark should be lined up with the indicator line
located on the front cover.
11
Page 12
5. Use a sturdy container to depress the water dispenser bar
until the water begins to flow. Flush the water system by
dispensing and discarding 2 to 3 gal. (8 to 12 L) of water.
Cleaning the system will take approximately 6 to 7 minutes
and will help clear air from the line. Additional flushing may be
required in some households.
NOTE: As air is cleared from the system, water may spurt out
of the dispenser.
6. Inspect the filter system for water leaks. If you see water
leaks, see the “Troubleshooting” section.
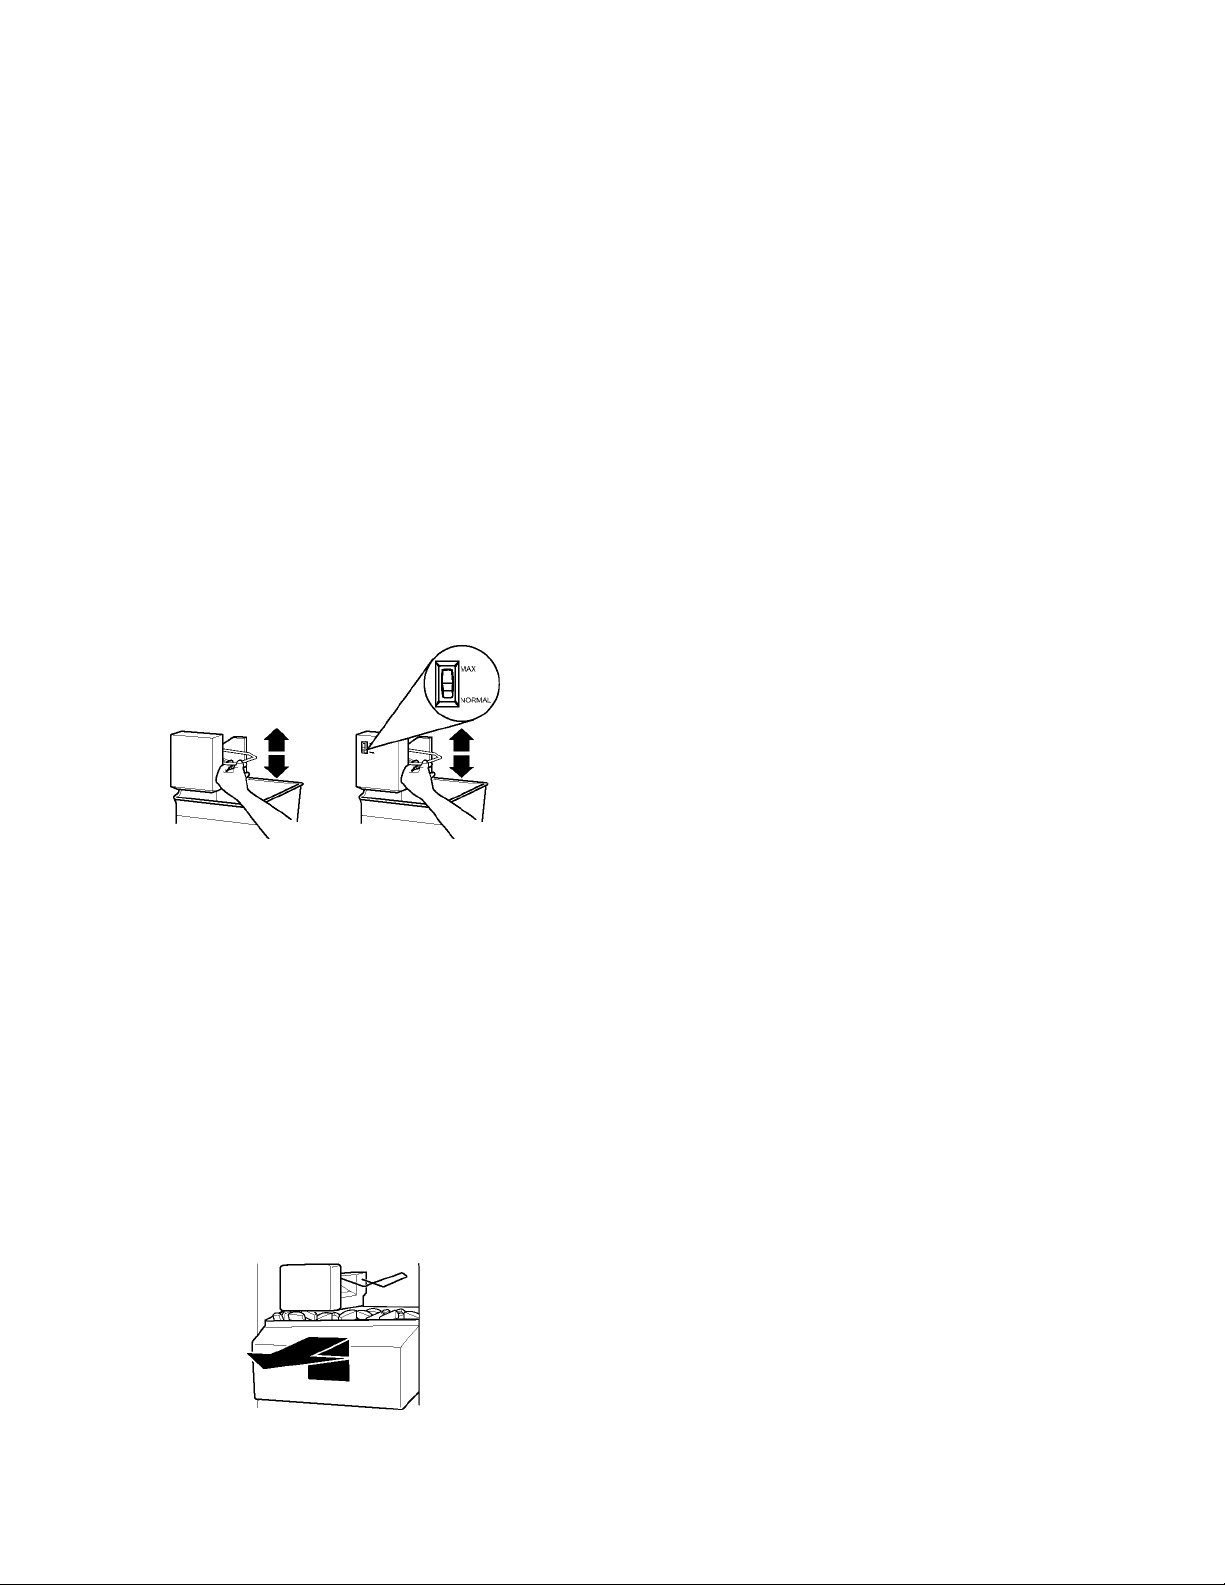
To turn the ice maker on/off:
The on/off switch for the ice maker is a wire shutoff arm located
on the side of the ice maker.
1.2.To turn the ice maker on, simply lower the wire shutoff arm.
NOTE: Your ice maker has an automatic shutoff. As ice is
made, the ice cubes will fill the ice storage bin and the ice
cubes will raise the wire shutoff arm to the OFF (arm up)
position.
To manually turn the ice maker off, lift the wire shutoff arm to
the OFF (arm up) position and listen for the click to make sure
the ice maker will not continue to operate.
4. Replace the bin by pushing it in all the way or the dispenser
will not work. Push the wire shutoff arm down to the ON
position to restart ice production. Make sure the door is
closed tightly.
To care for ice storage bin:
1. Empty the ice bin. Use warm water to melt the ice if
necessary.
NOTE: Never use anything sharp to break up the ice in the
bin. This can cause damage to the ice container and the
dispenser mechanism.
2. Wash ice bin with a mild detergent, rinse well and dry
thoroughly. Do not use harsh or abrasive cleaners or solvents.
REMEMBER:
■ Allow 24 hours to produce the first batch of ice.
■ Discard the first three batches of ice produced to avoid
impurities that may be flushed out of the system.
■ The quality of your ice will be only as good as the quality of
the water supplied to your ice maker.
■ Avoid connecting the ice maker to a softened water supply.
Water softener chemicals (such as salt) can damage parts of
the ice maker and lead to poor quality ice. If a softened water
supply cannot be avoided, make sure the water softener is
operating properly and is well maintained.
■ It is normal for the ice cubes to be attached at the corners.
They will break apart easily.
■ Do not force the wire shutoff arm up or down.
■ Do not store anything on top of the ice maker or in the ice
storage bin.
To increase ice production rate:
■ Normal Ice Production: In normal ice production mode, the
ice maker should produce approximately 7 to 9 batches of ice
in a 24-hour period. If ice is not being made fast enough, turn
the Freezer Control toward a higher (colder) number in half
number steps. (For example, if the control is at 3, move it to
between 3 and 4.) Wait 24 hours between each increase.
■ Maximum Ice Production (on some models): In maximum
ice production, the ice maker should produce approximately
10 to 14 batches of ice in a 24-hour period. If your refrigerator
has the maximum ice production feature, push the switch to
MAX.
To remove and replace the ice bin:
1. Pull the covering panel out from the bottom and then slide it
back toward the rear.
2. Lift the wire shutoff arm so it clicks into the OFF (up) position.
Ice can still be dispensed, but no more can be made.
3. Lift up the front of the storage bin and pull it out.
REFRIGERATOR
FEATURES
Your model may have some or all of these features. Features that
can be purchased separately as product accessories are labeled
with the word “Accessory.” Not all accessories will fit all models.
If you are interested in purchasing one of the accessories, please
call the toll-free number on the cover or in the “Accessories”
section.
Important information to know about glass shelves
and covers:
Do not clean glass shelves or covers with warm water when
they are cold. Shelves and covers may break if exposed to
sudden temperature changes or impact, such as bumping.
For your protection, tempered glass is designed to shatter
into many small, pebble-size pieces. This is normal. Glass
shelves and covers are heavy. Use special care when re
moving them to avoid impact from dropping.
12
Page 13
Your model may have glass or wire shelves. Store similar foods
together and adjust the shelves to fit different heights. This
reduces the time the refrigerator door is open and saves energy.
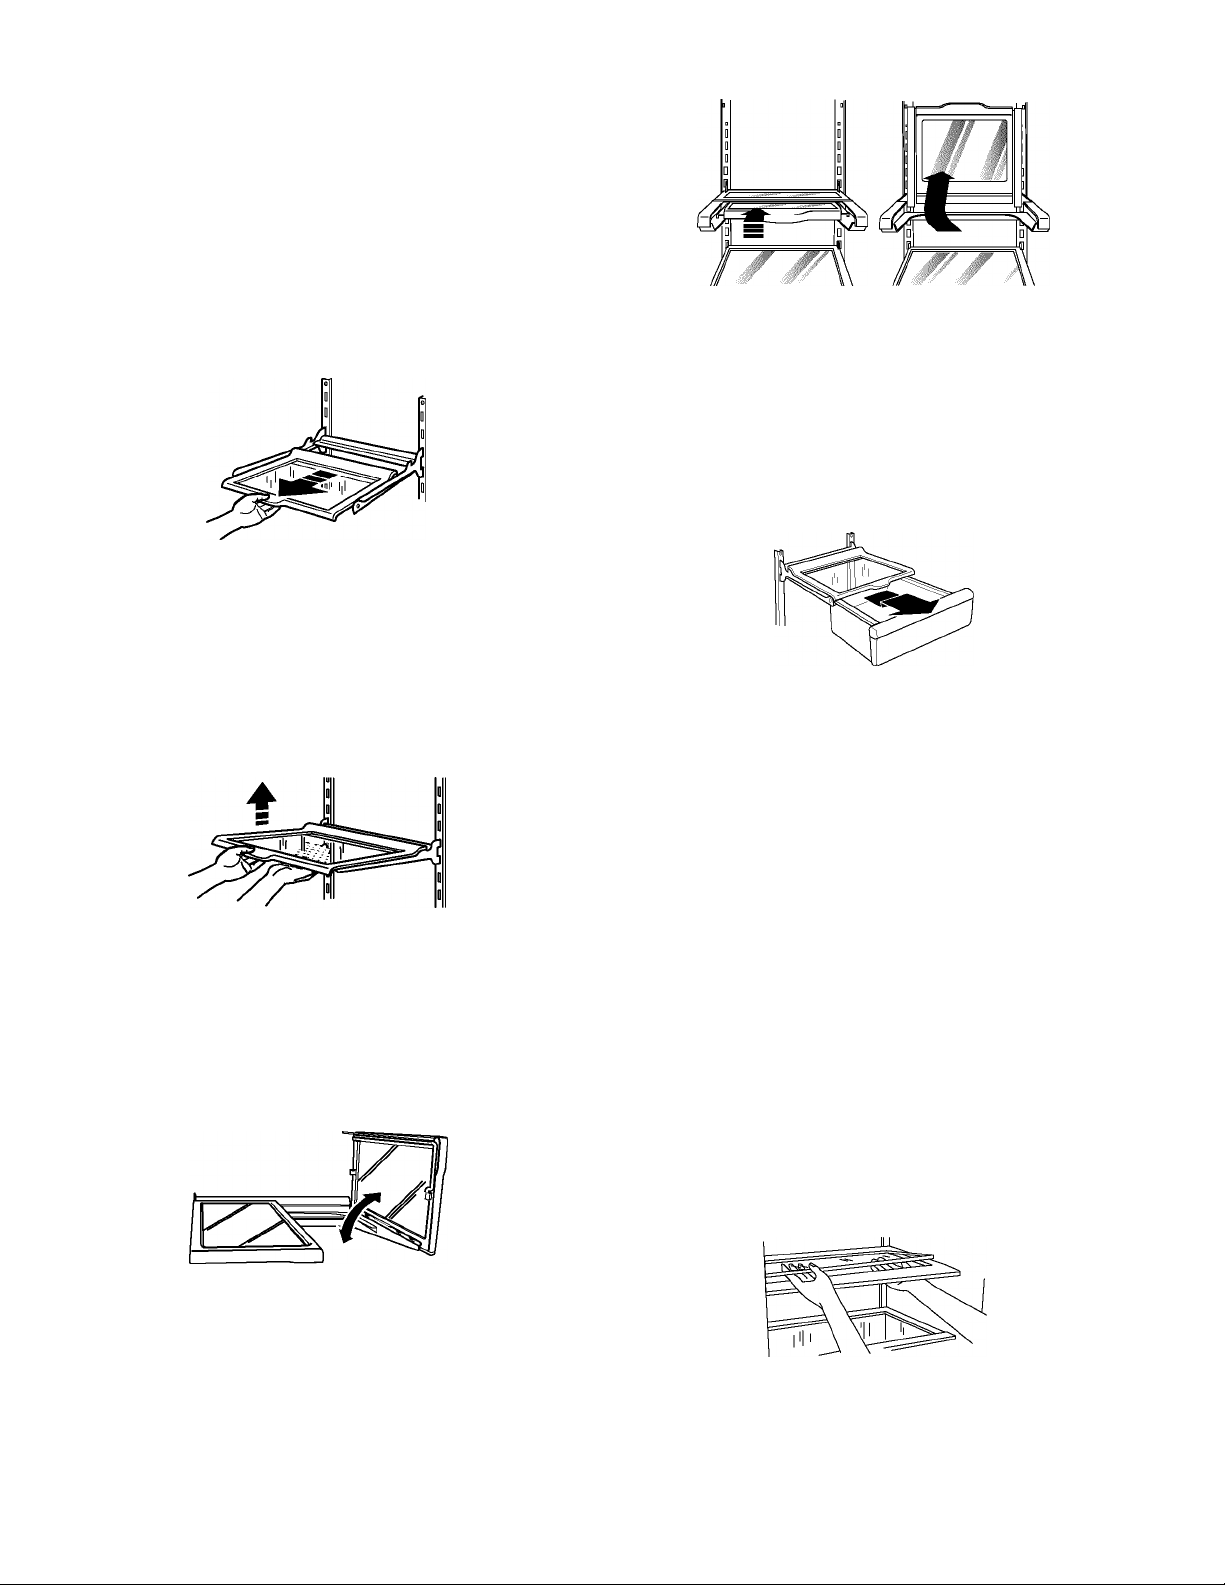
Slide-out Shelves (on some models)
To remove and replace a shelf in a metal frame:
1. Pull the shelf forward to the stop. Tilt the front of the shelf up
and lift it slightly as you pull the shelf from the frame.
2. Replace the shelf by guiding it back into the slots on the
frame and pushing the shelf in past the stop.
Shelves and Shelf Frames
To remove and replace a shelf/frame:
1.
Remove the shelf/frame by tilting it up at the front and lifting it
out of the shelf supports.
2.
Replace the shelf/frame by guiding the rear shelf hooks into
the shelf supports. Tilt the front of the shelf up until rear shelf
hooks drop into the shelf supports. Check to make sure that
the shelf is securely in position.
3. Pull the front of the shelf forward until it fits into place.
t .
The deli drawer stores raisins, nuts, spreads, and other small
items at normal refrigerator temperatures.
To remove and replace the deli drawer:
1.
Remove the deli drawer by sliding it straight out to the stop.
Lift the front and slide the drawer out the rest of the way.
2.
Replace the deli drawer by sliding it back past the stop.
To raise or lower the shelf:
1. Raise the shelf by pulling forward on the lever located at the
bottom front of the shelf and lift until the shelf locks into the
vertical position.
2. Lower the shelf until it is latched securely in place.
To raise or lower the shelf:
1. Raise the shelf by first sliding it back and down to make it
half-width. (You can use the shelf in this position to allow
taller items to be stored on the shelf below.)
2. Lift the front of the shelf until it fits securely in place against
the back wall. Lower the shelf securely back into position.
Crisper and Convertible Vegetable Meat Drawers
To remove and replace drawers:
1. Slide crisper or meat drawer straight out to the stop. Lift the
front of drawer with one hand while supporting the bottom of
drawer with other hand and slide the drawer out the rest of
the way.
Replace the crisper or meat drawer by sliding it back in fully
2.
past the drawer stop.
Crisper or Vegetable/Meat Drawer Covers
To remove and replace covers:
1.2.Remove the crisper and meat drawer. Press up in center of
crisper glass insert until it rises above the plastic frame.
Holding the crisper glass firmly, carefully slide the glass insert
forward to remove.
Lift crisper cover frame and remove. Repeat steps to remove
the meat drawer cover.
3.4.Replace back of meat drawer cover frame into supports or
slides on side walls of the refrigerator and lower or slide the
front of the cover frame into place.
Slide rear of glass insert into cover frame and lower front into
place. Repeat steps to replace the crisper cover.
13
Page 14
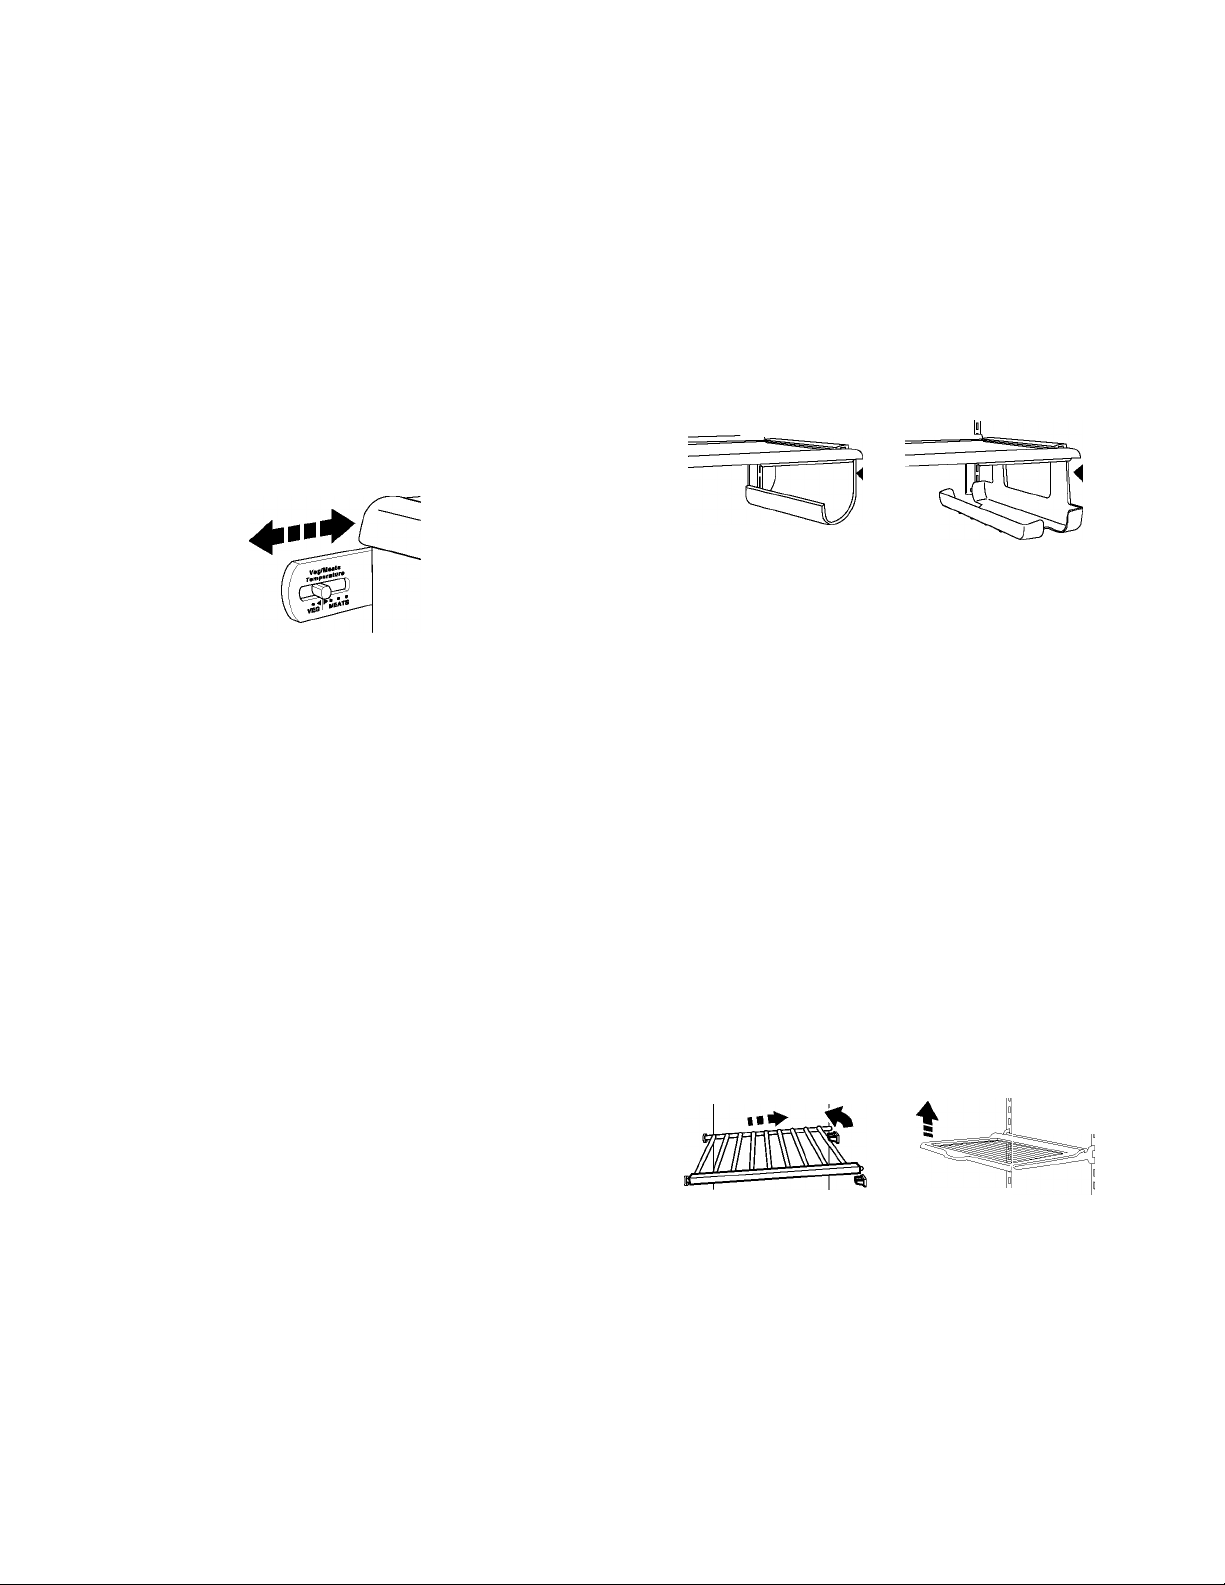
The convertible vegetable/meat drawer can be adjusted to
properly chill meats or vegetables. The air inside the pan is
cooled to prevent “spot” freezing and can be set to keep meats
at the National Livestock and Meat Board recommended storage
temperatures of 28°- 32°F (-2°- 0°C).
IMPORTANT: To extend freshness, wrap meats in airtight,
moisture-proof materials before storing. Always store meat as
recommended.
Adjusting the control
The convertible control comes preset at the lowest meat setting.
To change a control setting: Move the control to the right
(colder) or to the left (less cold) as desired.
To store vegetables: Set the control to VEG (all the way to the
left) to store vegetables at their optimal storage temperatures
(which need to be warmer than those for meat).
Flumidity Control on crisper cover (Style 2 - on right)
Humidity Control
High 5 4 3 2 1 Low
To remove and replace the wine rack (left) or can/bottle rack (right):
1. Remove the rack by pulling it straight out from the shelf.
2. Replace the rack by sliding it in between the shelf and the
wall of the refrigerator.
_U ____________L
IMPORTANT: If food starts to freeze, move the control to the left
(less cold). Remember to wait 24 hours between adjustments.
Doing so gives the temperature of the food time to change.
Meat storage guide
Store most meat in original wrapping as long as it is airtight and
moisture-proof. Rewrap if necessary. See the following chart for
storage times. When storing meat longer than the times given,
freeze the meat.
Fresh fish or shellfish
Chicken, ground beef, variety meat (liver, etc.).............1-2 days
Cold cuts, steaks/roasts
Cured meats................................................................7-10 days
Leftovers - Cover leftovers with plastic wrap, aluminum foil, or
plastic containers with tight lids.
You can control the amount of humidity in the moisture-sealed
crisper. Adjust the control to any setting between LOW and
HIGH.
LOW (open) lets moist air out of the crisper for best storage of
fruits and vegetables with skins.
■ Fruit: Wash, let dry and store in refrigerator in plastic bag or
crisper. Do not wash or hull berries until they are ready to use.
Sort and keep berries in original container in crisper, or store
in a loosely closed paper bag on a refrigerator shelf.
■ Vegetables with skins: Place in plastic bag or plastic
container and store in crisper.
HIGH (closed) keeps moist air in the crisper for best storage of
fresh, leafy vegetables.
■ Leafy vegetables: Wash in cold water, drain and trim or tear
off bruised and discolored areas. Place in plastic bag or
plastic container and store in crisper.
...................
..............................................
use same day as purchased
3-5 days
Humidity control location:
■ Humidity Control on crisper drawer (Style 1 - on left)
NOTE: For long-term storage, place eggs in a covered container
or in their original carton on an interior shelf.
FREEZER FEATURES
Your model may have some or all of these features. Features that
can be purchased separately as product accessories are labeled
with the word “Accessory.” Not all accessories will fit all models.
If you are interested in purchasing one of the accessories, please
call the toll-free number on the cover or in the “Accessories”
section.
To remove and replace the shelf:
1. Lift the shelf off of the supports.
2. Slide it out of the shelf support holes.
3. Replace shelf in the reverse order.
Frozen food storage guide
Storage times will vary according to the quality and type of food,
the type of packaging or wrap used (should be airtight and
moisture-proof), and the storage temperature. Ice crystals inside
a sealed package are normal. This simply means that moisture in
the food and air inside the package have condensed, creating ice
crystals.
Put no more unfrozen food into the freezer than will freeze within
24 hours (no more than 2 to 3 lbs. of food per cubic foot
[907-1,350 g per L] of freezer space). Leave enough space in the
freezer for air to circulate around packages. Be careful to leave
enough room for the door to close tightly.
For more information on preparing food for freezing, check a
freezer guide or reliable cookbook.
14
Page 15
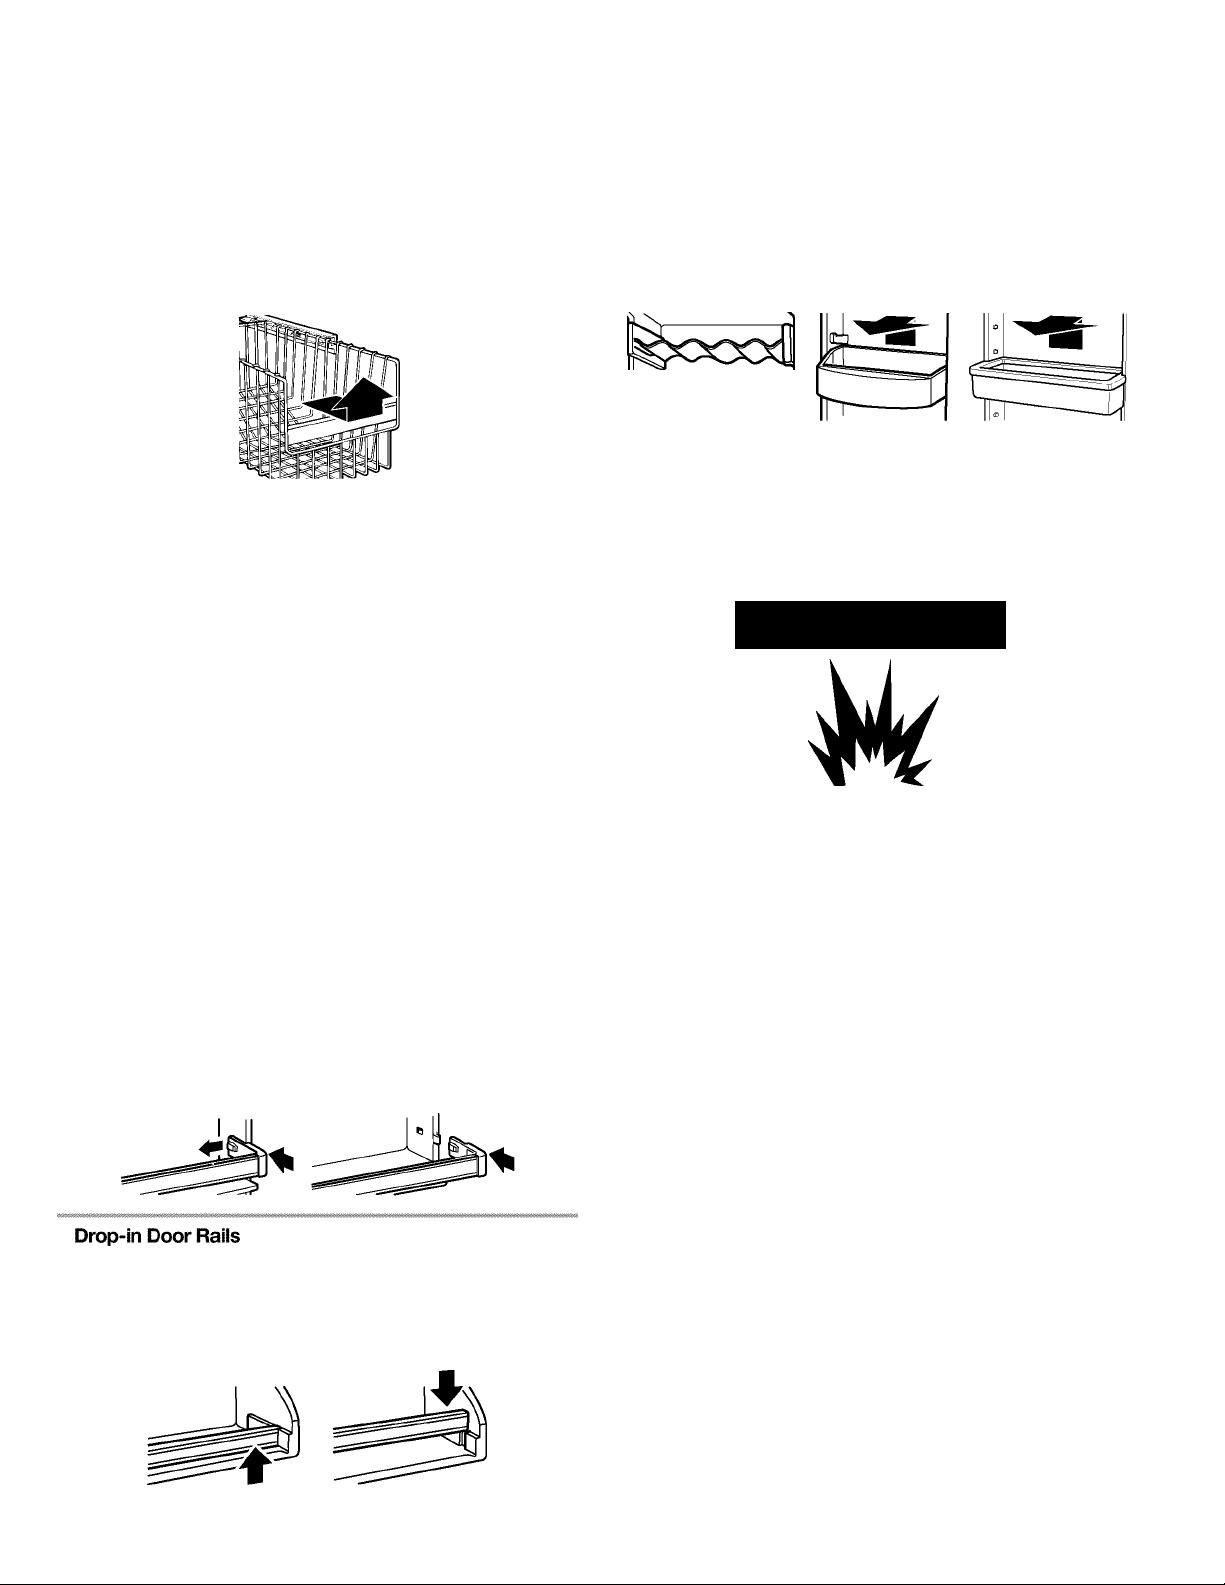
The freezer basket or bin can be used to store bags of frozen
fruits and vegetables that may slide off freezer shelves.
To remove and replace the freezer basket or bin:
1. Remove basket or bin by sliding it out to the stop.
2. Lift the front of the basket or bin and slide it out the rest of the
way.
NOTE: Can racks may be purchased as an Accessory for some
models.
To remove and replace the racks/bins:
1. Remove the rack/bin by lifting it and pulling it straight out.
2. Replace the rack/bin by sliding it in above the desired
support and pushing it down until it stops.
3. Replace the basket or bin by positioning it on the side wall
guide rails. Lift the basket or bin front slightly while pushing it
past the guide rail stops and slide basket or bin in the rest of
the way.
DOOR FEATURES
Your model may have some or all of these features. Features that
can be purchased separately as product accessories are labeled
with the word “Accessory.” Not all accessories will fit all models.
If you are interested in purchasing one of the accessories, please
call the toll-free number on the cover or in the “Accessories”
section.
The door rails may be removed for easier cleaning.
Snap-on Door Rails
To remove and replace the rails:
1. Remove the rails by pushing in slightly on the front of the
bracket while pulling out on the inside tab. Repeat these
steps for the other end of the rail.
2. Replace the rails by aligning the ends of the brackets with the
buttons on the sides of the door liner. Firmly snap bracket
and rail assembly onto the tabs above the shelf as shown.
To remove and replace the rails:
1. Remove the rails by pulling straight up on each end of the rail.
2. Replace the rails by sliding the shelf rail into the slots on the
door and pushing the rail straight down until it stops.
REFRIGERATOR CARE
AWARNING
Explosion Hazard
Use nonflammable cleaner.
Failure to do so can result In death, explosion,
or fire.
Both the refrigerator and freezer sections defrost automatically.
Flowever, clean both sections about once a month to prevent
odors from building up. Wipe up spills immediately.
Cleaning your refrigerator
1. Unplug refrigerator or disconnect power.
2. Remove all removable parts from inside, such as shelves,
crispers, etc.
3. Fland wash, rinse, and dry removable parts and interior
surfaces thoroughly. Use a clean sponge or soft cloth and a
mild detergent in warm water.
■ Do not use abrasive or harsh cleaners such as window
sprays, scouring cleansers, flammable fluids, cleaning
waxes, concentrated detergents, bleaches or cleansers
containing petroleum products on plastic parts, interior
and door liners or gaskets. Do not use paper towels,
scouring pads, or other harsh cleaning tools. These can
scratch or damage materials.
■ To help remove odors, you can wash interior walls with a
mixture of warm water and baking soda (2 tbs. to 1 qt.
[26 g to .95 L] of water).
15
Page 16
4. Wash stainless steel and painted metal exteriors with a clean
sponge or soft cloth and a mild detergent in warm water. Do
not use abrasive or harsh cleaners. Dry thoroughly with a soft
cloth. For additional protection against damage to painted
metal exteriors, apply appliance wax (or auto paste wax) with
a clean, soft cloth. Do not wax plastic parts.
NOTE: To keep your Stainless Steel refrigerator looking like
new and to remove minor scuffs or marks, it is suggested that
you use the manufacturer’s approved Stainless Steel Cleaner
& Polish.
IMPORTANT: This cleaner is for Stainless Steel parts only!
Do not allow the Stainless Steel Cleaner & Polish to come into
contact with any plastic parts such as the trim pieces,
dispenser covers or door gaskets. If accidental contact does
occur, clean plastic part with a sponge and mild detergent in
warm water. Dry thoroughly with a soft cloth. To order the
cleaner, see the “Accessories” section.
5. There is no need for routine condenser cleaning in normal
home operating environments. If the environment is
particularly greasy or dusty, or there is significant pet traffic in
the home, the condenser should be cleaned every two to
three months to ensure maximum efficiency.
If you need to clean the condenser:
■ Remove the base grille (see “Base Grille” or “Door
Removal” section).
■ Use a vacuum with a soft brush to clean the grille, the
open areas behind the grille and the front surface area of
the condenser.
■ Replace the base grille when finished.
6. Plug in refrigerator or reconnect power.
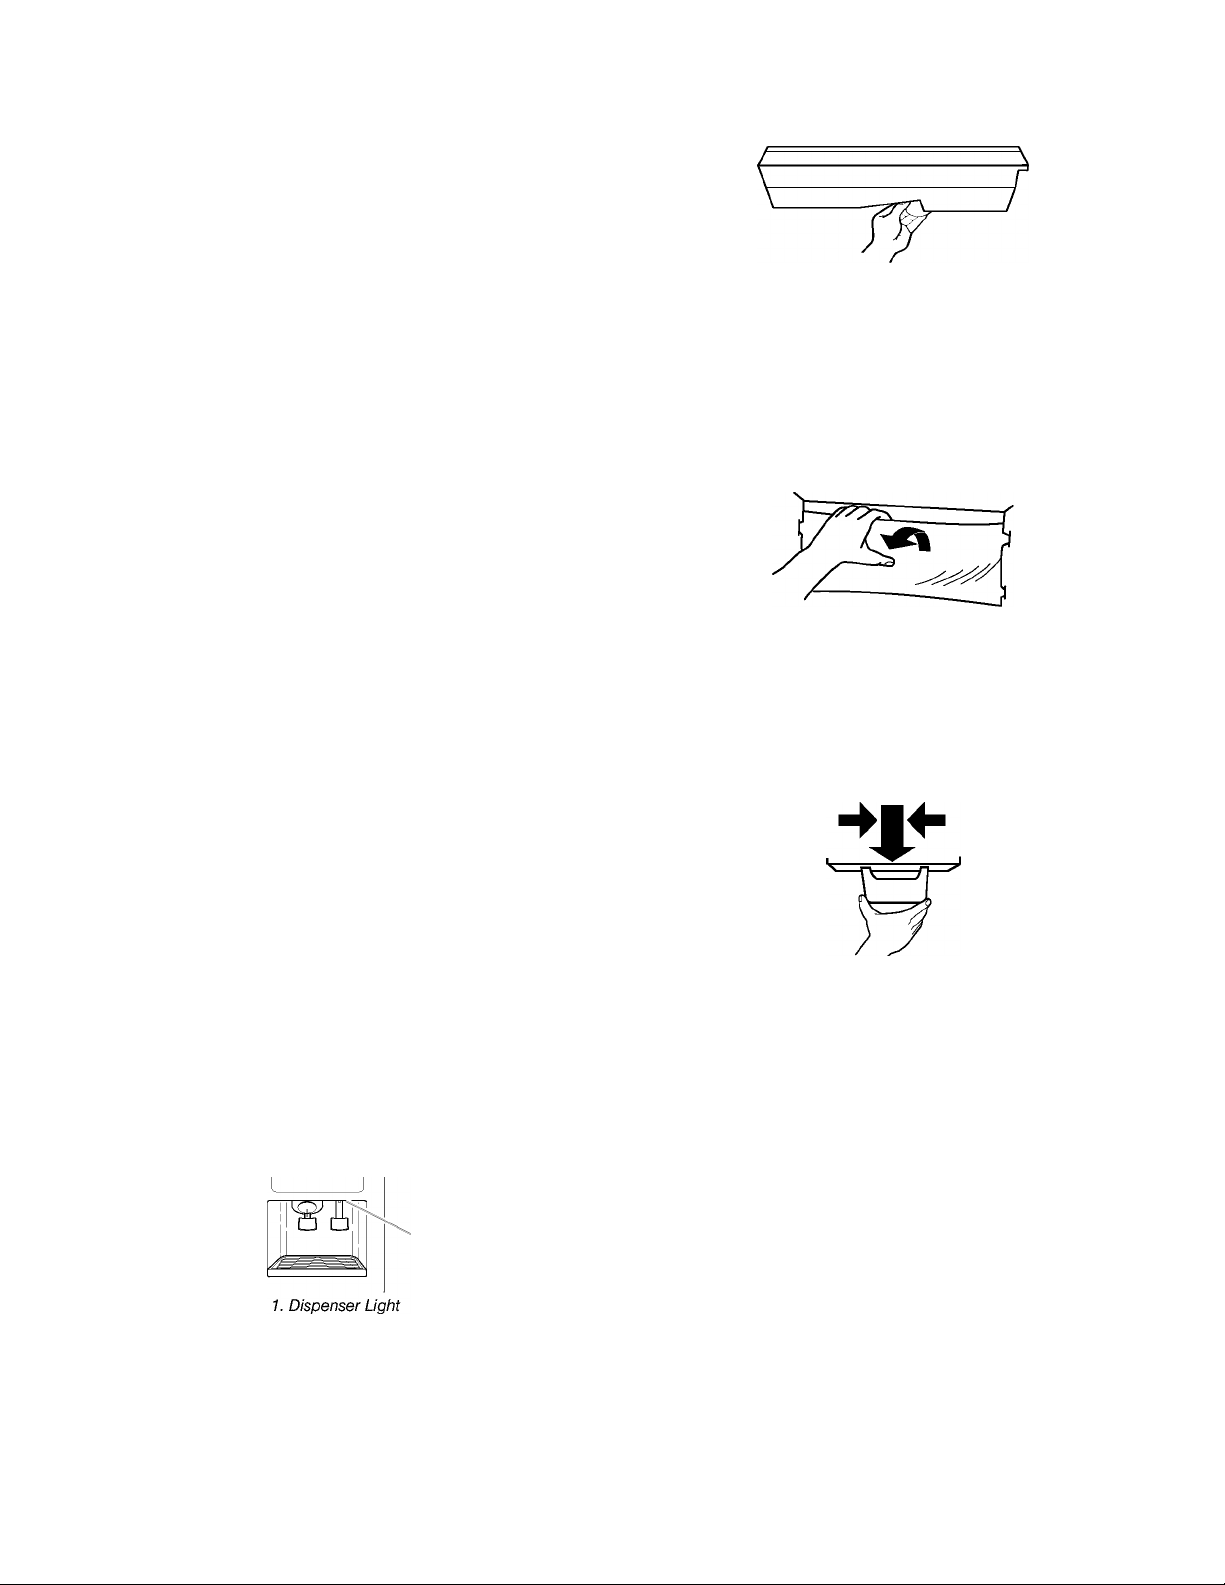
Changing the Light Bulbs
NOTE: Not all appliance bulbs will fit your refrigerator. Be sure to
replace the bulb with one of the same size and shape. The
dispenser light requires a heavy duty 10-watt bulb. All other lights
require a 40-watt appliance bulb. Replacement bulbs are
available from your dealer.
1. Unplug refrigerator or disconnect power.
2. Remove light shield when applicable as shown.
NOTE: To clean the light shield, wash it with warm water and
liquid detergent. Rinse and dry the shield well.
3. Remove light bulb and replace with one of the same size,
shape and wattage.
4. Replace light shield when applicable as shown.
5. Plug in refrigerator or reconnect power.
Dispenser Light (on some models)
Reach through the dispenser area to remove and replace light
bulb.
Refrigerator Control Panel Light
Reach behind the refrigerator control panel to remove and
replace light bulb.
Refrigerator Crisper Light or Upper Freezer Light (on some
models)
■ Remove light shield by grasping the top center of the shield
and pulling forward while turning it slightly to one side. If
necessary, remove top crisper drawer to access crisper light
shield.
■ Replace the light shield by inserting the tabs on one end into
the slotted holes in the refrigerator or freezer liner. Then,
carefully bend the shield at the center to insert the tabs on
the other end.
Lower Freezer Light Beneath Ice Bin (on some models)
■ Remove the light shield by grasping the sides and squeezing
in toward the center. Once the side hooks of shield are free
from the freezer lining, pull down the shield.
■ Replace the light shield by squeezing the sides toward the
center and inserting the side hooks into the slotted holes.
Once the side hooks are in place, snap the front tab into the
slotted hole.
If the power will be out for 24 hours or less, keep both refrigerator
doors closed to help food stay cold and frozen.
If the power will be out for more than 24 hours, do one of the
following:
■ Remove all frozen food and store it in a frozen food locker.
■ Place 2 lbs. (907 g) of dry ice in the freezer for every cubic
foot (28 L) of freezer space. This will keep the food frozen for
two to four days.
■ If neither a food locker nor dry ice is available, consume or
can perishable food at once.
REMEMBER: A full freezer stays cold longer than a partially filled
one. A freezer full of meat stays cold longer than a freezer full of
baked goods. If you see that food contains ice crystals, it may be
refrozen, although the quality and flavor may be affected. If the
condition of the food is poor, dispose of it.
16
Page 17

Vacations
If you choose to leave the refrigerator on while you’re away:
1. Use up any perishables and freeze other items.
2. If your refrigerator has an automatic ice maker:
■ Raise wire shutoff arm to OFF (up) position or move the
switch to the OFF (right) setting.
■ Shut off water supply to the ice maker.
3. Empty the ice bin.
If you choose to turn the refrigerator off before you leave:
1. Remove all food from the refrigerator.
2. If your refrigerator has an automatic ice maker:
■ Turn off the water supply to the ice maker at least one day
ahead of time.
■ When the last load of ice drops, raise the wire shutoff arm
to the OFF (up) position or move the switch to the OFF
(right) setting.
3. Depending on your model, turn the Thermostat Control or
Refrigerator Control to OFF. See the “Setting or Using the
Control(s)’’ section.
4. Clean refrigerator, wipe it, and dry well.
5. Tape rubber or wood blocks to the tops of both doors to prop
them open far enough for air to get in. This stops odor and
mold from building up.
Moving
IROUBLESHOOTING
Try the solutions suggested here first in order to avoid the cost of an unnecessary service call.
Your refrigerator will not operate
Is the power supply cord unplugged? Plug into a grounded
3 prong outlet.
Has a household fuse or circuit breaker tripped? Replace
the fuse or reset the circuit breaker.
Is the refrigerator or freezer control turned to the OFF
position? Refer to the “Setting or Using the Controls”
section.
Is the refrigerator defrosting? Recheck to see if the
refrigerator is operating in 30 minutes. Your refrigerator will
regularly run an automatic defrost cycle.
Is the refrigerator not cooling? For models with digital
controls, turn the unit CFF then CN again to reset. See the
“Setting or Using the Controls” section. If this does not
correct the problem, call for service.
The lights do not work
Is the power supply cord unplugged? Plug into a grounded
3 prong outlet.
Is a light bulb loose in the socket or burned out? See the
“Changing the Light Bulb(s)” section.
When you are moving your refrigerator to a new home, follow
these steps to prepare it for the move.
1. If your refrigerator has an automatic ice maker:
■ Turn off the water supply to the ice maker at least one day
ahead of time.
■ Disconnect the water line from the back of the
refrigerator.
■ When the last load of ice drops, raise the wire shutoff arm
to the OFF (up) position or move the switch to the OFF
(right) setting.
2. Remove all food from the refrigerator and pack all frozen food
in dry ice.
3. Empty the ice bin.
4. Depending on your model, turn the Thermostat Control or
Refrigerator Control to OFF. See the “Setting or Using the
Controls” section.
5. Unplug the refrigerator.
6. Empty water from the defrost pan.
7. Clean, wipe, and dry thoroughly.
8. Take out all removable parts, wrap them well, and tape them
together so they don’t shift and rattle during the move.
9. Depending on the model, raise the front of the refrigerator so
it rolls more easily OR screw in the leveling legs so they don't
scrape the floor. See the “Door Closing” or “Leveling Your
Refrigerator” section.
10. Tape the doors shut and the power cord to the refrigerator
cabinet.
When you get to your new home, put everything back and refer to
the “Refrigerator Installation” section for preparation instructions.
Also, if your refrigerator has an automatic ice maker, remember to
reconnect the water supply to the refrigerator.
There is water in the defrost drain pan
Is the refrigerator defrosting? The water will evaporate. It is
normal for water to drip into the defrost pan.
Is it more humid than normal? When it is humid, expect that
the water in the defrost pan will take longer to evaporate.
The motor seems to run too much
Is the room temperature hotter than normal? The motor
will run longer under warm conditions. At normal room
temperatures, expect your motor to run about 40% to 80% of
the time. Under warmer conditions, it will run even more.
Has a large amount of food just been added to the
refrigerator? Adding a large amount of food warms the
refrigerator. The motor normally will run longer to cool the
refrigerator back down.
Are the doors opened often? The motor will run longer
when this occurs. Conserve energy by getting all items out at
one time, keeping food organized, and closing the door as
soon as possible.
Are the controls not set correctly for the surrounding
conditions? Refer to the “Setting or Using the Controls”
section.
Are the doors not closed completely? Close the doors
firmly. If they do not close completely, see “The doors will not
close completely” later in this section.
Are the condenser coils dirty? This prevents air transfer and
makes the motor work harder. Clean the condenser coils.
Refer to the “Cleaning” section.
17
Page 18

Are the door gaskets not sealed all the way around?
Contact a technician or other qualified person.
NOTE: Your new refrigerator will run longer than your old one
due to its high-efficiency motor.
The refrigerator seems to make too much noise
The sounds may be normal for your refrigerator. See the
“Normal Sounds” section.
The ice maker is not producing ice or not enough ice
Has food in the freezer or refrigerator been wrapped
properly? Use airtight, moisture-proof packaging to help
prevent odor transfer to stored food.
Does the water contain minerals (such as sulfur)? A filter
may need to be installed to remove the minerals.
Is there a water filter installed on the refrigerator? Gray or
dark discoloration in ice indicates that the water filtration
system needs additional flushing. Run additional water
through the water dispenser to flush the water filtration
system more thoroughly (at least 2 to 3 gal. [8 to 12 L] or 6 to
7 minutes initially). Discard discolored ice.
■ Has the ice maker just been installed? Wait 72 hours for full
ice production to begin. Once your refrigerator is cooled, the
ice maker should produce 70 to 120 cubes every 24 hours.
■ Is the freezer temperature cold enough to produce ice?
Wait 24 hours after ice maker hook-up for ice production. See
the “Setting or Using the Controls” section.
■ Is the ice maker wire shutoff arm in the OFF (arm up)
position (on some models)? Lower the wire shutoff arm to
the ON (arm down) position. See the “Ice Maker and Storage
Bin/Bucket” section.
■ Is the ice maker switch in the OFF (right) position (on
some models)? Move ice maker switch to the ON (left)
position. See the “Ice Maker and Storage Bin/Bucket”
section.
■ Is the water line shutoff valve to the refrigerator turned
on? Turn on the water valve. See the “Water Supply
Connection” section.
■ Does the ice maker mold have water in it or has no ice
been produced? Make sure your refrigerator has been
connected to a water supply and the supply shutoff valve is
turned on. See the “Water Supply Connection” section.
■ Is an ice cube jammed in the ice maker ejector arm?
For models with an interior ice bin, remove the ice from the
ejector arm with a plastic utensil. For models with an ice
bucket located on the freezer door, access the ice maker by
depressing the ice sensor door on the upper left side of the
freezer interior. While depressing the sensor door, lift the ice
maker service door and remove the ice from the ejector with
a plastic utensil. See the “Ice Maker and Storage Bin/Bucket”
section.
■ Has a large amount of ice just been removed? Allow 24
hours for ice maker to produce more ice.
■ Are the controls set correctly? See the “Setting or Using
the Controls” section.
■ Is there a water filter installed on the refrigerator? The
filter may be clogged or installed incorrectly. Check the filter
installation instructions to ensure that the filter was installed
correctly and is not clogged. If installation or clogging is not a
problem, call a technician or other qualified person.
NOTE: If not due to any of the above, there may be a problem
with the water line. Call for service.
Off-taste, odor or gray color in the ice
Are the plumbing connections new, causing discolored or
off-flavored ice? Discard the first few batches of ice.
Have the ice cubes been stored too long? Throw old ice
away and make a new supply.
Does the freezer and ice bin or bucket need to be
cleaned? See the “Cleaning” or “Ice Maker and Storage Bin/
Bucket” section.
The ice dispenser will not operate properly
Is the freezer door closed completely? Push the door firmly
shut. If it will not shut all the way, see “The doors will not
close completely” later in this section.
Is the ice bin or bucket installed correctly? For models
with an interior ice bin, push the ice bin in all the way. If the
ice bin does not go in all the way, it may not be put in straight.
Pull it out and try again. For models with an ice bucket
located on the freezer door, the bucket should sit level. To
remove the bucket, press the release button on the right side
of the bucket and lift straight up. Replace the bucket in the
door making sure it is properly aligned and snapped securely
into place. Refer to the “Ice Maker and Storage Bin/Bucket”
section.
Has the wrong ice been added to the bin or bucket? Use
only cubes produced by the current ice maker. If other cubes
have been added, remove all cubes and check to see that
none have become stuck in the delivery chute.
Has the ice frozen in the ice bin or bucket? Shake the ice
bin or bucket to separate cubes. If cubes do not separate,
empty bin or bucket and wait 24 hours for ice to restock.
Has the ice melted around the auger (metal spiral) in the
ice bucket? Dump the ice cubes and clean the ice bucket
completely. Allow 24 hours for the ice maker to restock. Do
not try to remove the melted ice with a sharp object. You
could damage the ice bucket.
Is ice stuck in the delivery chute? Clear the ice from the
delivery chute with a plastic utensil. Do not use anything
sharp to remove the ice. You could cause damage.
Is the ice dispenser stalling while dispensing “crushed”
ice? Stop dispensing ice. Change the ice button from
“crushed” to “cubed.” Depress the ice dispenser arm using a
sturdy glass. If cubed ice dispenses correctly, depress the
button for “crushed” ice and begin dispensing again. Refer to
the “Water and Ice Dispensers” section.
Is there ice in the bucket? See “The ice maker is not
producing ice” earlier in this section.
Has the dispenser arm been held in too long? Release
dispenser arm. Ice will stop dispensing when the arm is held
in too long. Wait three minutes for dispenser motor to reset
before using again. It is best to take large amounts of ice
directly from the ice bin or bucket, not through the dispenser.
Ice bucket difficult to remove
Is the ice bucket difficult to remove (on some models)?
For models with an ice bucket located on the freezer door,
select “cubed” ice. Using a sturdy glass, quickly depress and
release the ice dispenser arm. Open the freezer door, depress
the release button on the ice bucket and lift upward. Refer to
the “Ice Maker and Storage Bin/Bucket” section.
18
Page 19

The water dispenser will not operate properly
Temperature is too warm
Has the water system not filled? The water system needs
to be filled the first time it is used. Use a sturdy container to
depress the water dispenser bar until the water begins to
flow. Flush the water system by dispensing and discarding
2 to 3 gal. (8 to 12 L) of water. Cleaning the system will take
approximately 6 to 7 minutes and will help clear air from the
line. Additional flushing may be required in some households.
See the “Water and Ice Dispensers” section.
Is the water shutoff valve not turned on or the water line
connected at the source? Make sure the water shutoff valve
is turned on and the water source is connected to the
refrigerator. See the “Water Supply Connection” section.
Is the water shutoff valve clogged or incorrectly installed?
See the “Water Supply Connection” section. If clogging or
installation is not a problem, call for service or contact a
plumber.
Is there a kink in the home water source line? If you find or
suspect a kink in the water line, call for service.
Is there a water filter installed on the refrigerator? The
filter may be clogged or incorrectly installed. First, check the
filter installation instructions to ensure that the filter was
installed correctly and is not clogged. If installation or
clogging is not a problem, call for service.
Water or ice is leaking from the dispenser
Is the glass not being held under the ice dispenser long
enough, causing the ice to spill? Field the container under
the ice chute for two to three seconds after releasing the
dispenser lever. Water or ice may continue to dispense during
this time.
Is an ice cube stuck in the chute and holding the trap
door open? Remove the cube.
Is there a water filter installed on the refrigerator? The
water filtration system may have air in the lines, causing water
to drip. Additional flushing may help clear air from the lines.
Normal dispenser use should flush air from the lines within 24
to 72 hours.
Are the air vents blocked in either compartment? This
prevents the movement of cold air from the freezer to the
refrigerator. Remove any objects from in front of the air vents.
See the “Ensuring Proper Air Circulation” section for the
location of air vents.
Are the door(s) opened often? The refrigerator will warm
when this occurs. Keep the refrigerator cool by getting all
items out at one time, keeping food organized, and closing
the door as soon as possible.
Has a large amount of food just been added to the
refrigerator or freezer? Adding a large amount of food
warms the refrigerator. It can take several hours for the
refrigerator to return to the normal temperature.
Are the controls set correctly for the surrounding
conditions? See the “Setting or Using the Controls” section.
Is the refrigerator not cooling? For models with digital
controls, turn the unit OFF then ON again to reset. See the
“Setting or Using the Controls” section. If this does not
correct the problem, call for service.
There is interior moisture buildup
Are the air vents blocked in the refrigerator? Remove any
objects from in front of the air vents. See the “Ensuring
Proper Air Circulation” section for the location of air vents.
Are the door(s) opened often? Avoid humidity buildup by
getting all items out at one time, keeping food organized, and
closing the door as soon as possible.
Is the room humid? It is normal for moisture to build up
inside the refrigerator when the room air is humid.
Is the food packaged correctly? Check that all food is
securely wrapped. Wipe off damp food containers before
placing in the refrigerator.
Are the controls set correctly for the surrounding
conditions? See the “Setting or Using the Controls” section.
Was a self-defrost cycle completed? It is normal for
droplets to form after the refrigerator self-defrosts.
Water flow from the dispenser decreases noticeably
Is there a water filter installed on the refrigerator?
The filter may be full or incorrectly installed. Remove the
water filter cartridge (see the “Water Filtration System”
section). Operate the dispenser. If the water flow increases
noticeably, replace the filter.
The dispenser water is not cool enough
Has the refrigerator been newly installed? Allow 24 hours
for the refrigerator to cool completely.
Has a large amount of water been recently dispensed?
Allow 24 hours for the water to cool completely.
Has water not been recently dispensed? The first glass of
water may not be cool. Discard the first glass of water.
The divider between the two compartments is warm
The warmth is probably due to normal operation of the
automatic exterior moisture control. If still concerned, call for
service.
The doors will not close completely
Are food packages blocking the door open? Rearrange
containers so that they fit more tightly and take up less
space.
Is the ice bin or ice bucket out of position? For models
with an interior ice bin, push the ice bin in all the way. If the
ice bin does not go in all the way, it may not be put in straight.
Pull it out and try again. For models with an ice bucket
located on the freezer door, the bucket should sit level. To
remove the bucket, press the release button on the right side
of the bucket and lift straight up. Replace the bucket in the
door making sure it is properly aligned and snapped securely
into place. See the “Ice Maker and Storage Bin/Bucket”
section.
Are the pans, shelves, bins, or baskets out of position?
Put the crisper cover and all pans, shelves, bins, and baskets
back into their correct positions. See the “Crisper and Crisper
Covers” section for more information.
Are the gaskets sticking? Clean gaskets according to the
directions in the “Cleaning” section.
19
Page 20

Does the refrigerator wobble or seem unstable? Level the
refrigerator. See the “Door Closing” or “Leveling Refrigerator”
section, depending on your model.
Were the doors removed during product installation and
not properly replaced? Remove and replace the doors
according to the “Door Removal” section on some models, or
call a qualified service technician.
The doors are difficult to open
Are the gaskets dirty or sticky? Clean gaskets according to
the directions in the “Cleaning” section.
Computer Troubleshooting (on some models)
See the “Computer and Software User Guide” for information
regarding your computer system.
Sears Installation Service
For Sears guaranteed professional installation of home
appliances and items like garage door openers and water
heaters, in the U.S.A. call 1-800-4-MY-HOME®.
Your purchase has added value because you can depend on
Sears HomeCentral® for service. With over 2,400 Service
Technicians and access to over 900,000 parts and accessories,
we have the tools, parts, knowledge and skills to back our
pledge: We Service What We Sell.
Sears Maintenance Agreements
Your Kenmore® appliance is designed, manufactured and tested
to provide years of dependable operation. Yet any major
appliance may require service from time to time. The Sears
Maintenance Agreement offers you an outstanding service
program, affordably priced.
SERVICE
ii
Master Protection Agreements
Congratulations on making a smart purchase. Your new
Kenmore® appliance is designed and manufactured for years of
dependable operation. But like all products, it may require
preventive maintenance or repair from time to time. That’s when
having a Master Protection Agreement can save you money and
aggravation.
Purchase a Master Protection Agreement now and protect
yourself from unexpected hassle and expense.
The Master Protection Agreement also helps extend the life of
your new appliance. Here’s what’s included in the Agreement:
✓ Expert service by our 12,000 professional repair specialists
✓ Unlimited service and no charge for parts and labor on all
covered repairs
✓ “No-lemon” guarantee - replacement of your covered
product if more than three product failures occur within twelve
months
✓ Product replacement if your covered product can’t be fixed
✓ Annual Preventive Maintenance Check at your request - no
extra charge
✓ Fast help by phone - non-technical and instructional
assistance on products repaired in your home, plus convenient
repair scheduling
✓ Power surge protection against electrical damage due to
power fluctuations
✓ Rental reimbursement if repair of your covered product
takes longer than promised
Once you purchase the Agreement, a simple phone call is all that
it takes for you to schedule service. You can call anytime day or
night, or schedule a service appointment online.
Sears has over 12,000 professional repair specialists, who have
access to over 4.5 million quality parts and accessories. That’s
the kind of professionalism you can count on to help prolong the
life of your new purchase for years to come. Purchase your
Master Protection Agreement today!
Some limitations and exclusions apply. For prices and
information call 1-800-827-6655.
The Sears Maintenance Agreement
■ Guarantees tomorrow’s service at today’s price.
■ Eliminates repair bills resulting from normal wear and tear.
■ Covers non-technical and instructional service calls.
■ Provides an annual Preventive Maintenance Check, at your
request, to ensure that your appliance is in proper running
condition.
Some limitations apply. For information concerning Sears
Home Central® Maintenance Agreements, call
1-800-361-6665.
i s
Replacement Parts
To order stainless steel cleaner or replacement filters please
reference the service numbers located on the back page of this
manual and ask for the appropriate part number listed below or
contact your authorized Kenmore dealer.
Stainless Steel Cleaner & Polish:
Order Part #D22 M40083 R
Interior water filter cartridge:
NOTE: Do not use with water that is microbiologically unsafe
or of unknown quality without adequate disinfection before
or after the system.
Cyst Cartridge:
Order Part #9002 (NLCS200)
20
Page 21

WATER FILTER
CERTIFICATIONS
State of California
Dq>artm^t of Health Services
Water Treatment Device
Certificate Number
99-1410
Date Issued: December 14,1999
Trademark/Model Designation
WF1-NLCS200
Manufacturer: Sears Roebuck and Company
The water treatment device(s) listed on this certificate have met the testing requirements pursuant to
Section 116830 of the Health and Safety Code for the following health related contaminants:
Microbiological Contaminants and Turhldltv
Cysts (protozoan)
Turbidity ’
Organic Contaminants
None f
Rated Service Capacity: 200 gallons
Do not use where water is microbiologically unsafe or with water of unknown quality, except that
systems claiming cyst reduction may be used on water containing cysts.
Replacement Elements
NLCS200
Inornanlc/Radlologlcal Cnntamlnanta
Lead
Rated Service Flow: O.S gpm
21
Page 22
PRODUCT DATA SHEETS
Cyst Interior Water Filtration System Model WFI-NLCS200/NLCS200
Tested and certified by NSF International against ANSI/NSF Standard
42 for the reduction of Chlorine (Class I) Taste and Odor and against
ANSI/NSF Standard 53 for the reduction of Lead, Cysts and Turbidity.
Capacity; 200 gallons (757 liters),
Service fiow rate: 0.5 GPM (1.89 tVmin.) @ 60 psi.
Substance Reduction U.S. EPA Average
Aesthetic Effects
Chlorine Taste/Odor N/A
Particulate
MCL Influent
1.9 mg/L
N/A 108,667/mL* N/A 45/mL N/A
Contaminant U.S. EPA Average
Reduction MCL Influent
Cyst
Turbidity N/A
Lead: @ pH 6.5
Lead: @ pH 8.5
99.95%**
0.015 mg/L 0.160 mg/L***
0.015 mg/L 0.158 mg/L***
157,750/mL 55/mL 1.0/mL 99.9987%
26 NTU 0.5 NTU 0.1 NTU 98.9% 99.5% 994710
Maximum
Average
Effluent Effluent
N/A
Maximum
0.06 mg/L
Average
Effluent Effluent
0.011 mg/L 0.001 mg/L 93.5%
0.011 mg/L 0.001 mg/L
Minimum %
Reduction Reduction Number
N/A 97% 994707
Minimum %
Reduction Reduction Number
92.1%
Average % NSF Test
99.96%
994711
Average % NSF Test
99.9996% 994710
99.4%
99.3% 994709
994708
It is essential that operational, maintenance, and filter
replacement requirements be carried out for this product to
perform as advertised.
Model NLCS200 Change the cartridge at least every 6-9
months. Use replacement cartridge NLCS200, part# 9002.
2001 suggested retail price of $39.95 U.S.A./$49.95 Canada.
Prices are subject to change without notice.
The product is for cold water use only.
Do not use with water that is microbiologically unsafe or of
unknown quality without adequate disinfection before or after
the system. Systems certified for cyst reduction may be used
on disinfected water that may contain filterable cysts.
‘Test requirement is at least 100,000 particles/ml of AC Fine Test Dust. “Cyst performance is % reduction based on NSF Standard 53. ***Test
requirement is 0.15 mg/L± 10%. These contaminants are not necessarily in your water supply. Performance may vary based on local water conditions.
® NSF is a registered trademark of NSF International.
Refer to the “Front cover” or “Assistance or Service” section
for the Manufacturer’s name, address and telephone number.
Refer to the “Warranty” section for the Manufacturer’s limited
warranty.
Application Guidelines/Water Supply Parameters
Water Supply
Water Pressure
Water Temperature
30- 120 psi (207 - 827 kPa)
City or Well
33°-100°F(0.6°-37.8° C)
22
Page 23

Get it fixed, at your home or ours!
Your Home
For repair-in your home-of all major brand appliances,
lawn and garden equipment, or heating and cooling systems,
no matter who made it, no matter who sold it!
For the replacement parts, accessories and
owner’s manuals that you need to do-it-yourself.
For Sears professional installation of home appliances
and items like garage door openers and water heaters.
1-800-4-MY-HOME® (1 -800-469-4663)
Call anytime, day or night (U.S.A. and Canada)
www.sears.com www.sears.ca
Our Home
For repair of carry-in items like vacuums, lawn equipment,
and electronics, call or go on-line for the location of your nearest
Sears Parts & Repair Center.
1-800-488-1222
Call anytime, day or night (U.S.A. only)
www.sears.com
To purchase a protection agreement on a product serviced by Sears:
1-800-827-6655 (U.S.A.) 1-800-361-6665 (Canada)
Para pedir servicio de reparación
a domicilio, y para ordenar piezas:
1-888-SU-HOGAR®“
(1-888-784-6427)
Au Canada pour service en français:
1-800-LE-FOYER“^
(1-800-533-6937)
www.sears.ca
2220698
© Sears, Roebuck and Co.
® Registered Trademark / ™Trademark / ®''*Service Mark of Sears, Roebuck and Co.
) Marca Registrada / ^''^Marca de Fábrica / ^''^Marca de Servicio de Sears, Roebuck and Co.
“‘^Marque de commerce / “^Marque déposée de Sears, Roebuck and Co.
5/02
Printed in U.S.A.
Impreso en EE. UU.
Imprimé aux É.-U.
 Loading...