

Kenmore 587.1522, 970D1532, 1546, 1547 Use & Care Manual

Use & Care Guide
Guide d’utilisation et d’entretien
English / Français
Models/Modèles: 587.1522*,970D1532*,1546*,1547*
P/N 807749201RevD
Artwork:807749201Rev004
Sears Brands Management Corporation
Hoff man Estates, IL 60179 U.S.A.
www.kenmore.com
www.sears.com
Sears Canada Inc.
Toronto, Ontario, Canada M5B 2C3
®
Kenmore
Dishwasher
Lave-Vaisselle
* = Color number, le numéro de couleur
®
2
Record Model/Serial
Numbers
Please read and save these
instructions
This Use & Care Guide provides specifi c
operating instructions for your model.
Use your unit only as instructed in this
guide. These instructions are not meant
to cover every possible condition and
situation that may occur. Common sense
and caution must be practiced when
installing, operating, and maintaining any
appliance.
Please record your model and serial
numbers below for future reference. This
information is found on the serial plate
located inside the Dishwasher.
Model Number:
Serial Number:
Purchase Date:
Record Model/Serial Numbers ............2
Important Safety Instructions...........2-3
Warranty Information .......................4
Sears Service ...................................5
Master Protection Agreements ...........6
Models at a Glance ...........................7
Features at a Glance .........................8
Operating Instructions...................9-11
Preparing and Loading Dishes......12-14
Dishwasher Dispenser & Detergents ...15
Factors Affecting Performance ...........16
Care & Cleaning ..............................17
Solutions to Common Dishwashing
Problems ..................................18-20
Service Numbers ..................Back Cover
Table of Contents
587. or 970D
Safety Precautions
Do not attempt to install or operate
your unit until you have read the safety
precautions in this manual. Safety items
throughout this manual are labeled with
a Danger, Warning, or Caution based on
the risk type.
Defi nitions
This is the safety alert symbol. It is
used to alert you to potential personal
injury hazards. Obey all safety messages
that follow this symbol to avoid possible
injury or death.
Important Safety
Instructions
IMPORTANT
Indicates installation, operation, or
maintenance information which is
important but not hazard-related.
CAUTION
CAUTION indicates a potentially
hazardous situation which, if not avoided,
may result in minor or moderate injury.
WARNING
WARNING indicates a potentially
hazardous situation which, if not avoided,
could result in death or serious injury.
DANGER
DANGER indicates an imminently
hazardous situation which, if not
avoided, will result in death or serious
injury.
3
For Your Safety
• Read all instructions before using the
dishwasher.
• Use your dishwasher only as instructed
in this Use and Care Guide.
• Use only detergents or rinse agent
recommended for use in a dishwasher,
and keep them out of reach of children.
• When loading items to be washed:
• Locate sharp items and knives
so that they are not likely to
damage the door seal or tub.
• Load sharp items and knives with
the handles up to reduce the risk
of cut-type injuries.
• Do not wash plastic items unless marked
“dishwasher safe” or the equivalent.
Check with manufacturer for
recommendations, if not marked. Items
that are not dishwasher safe may melt
and create a potential fi re hazard.
• Do not touch the heating element
during or immediately after use.
• Do not operate your dishwasher unless
all enclosure panels are properly in
place.
Important Safety Instructions
• If the dishwasher drains into a food disposer,
maker sure disposer is completely empty
before running dishwasher.
• Disconnect electrical power to dishwasher
before servicing.
• Do not tamper with controls.
• Do not let children abuse, sit, stand or play on
door or racks of a dishwasher.
• Keep young children and infants away from
dishwasher when it is operating.
• Under certain conditions, hydrogen gas may
be produced in a hot water system that
has not been used for two weeks or more.
HYDROGEN GAS IS EXPLOSIVE. If the hot
water system has not been used for such a
period, before using the dishwasher turn on
all the hot water faucets and let the water
fl ow from each for several minutes. This will
release any accumulated hydrogen gas. As
the gas is fl ammable, do not smoke or use an
open fl ame during this time.
• Remove the door to the washing
compartment when removing an old
dishwasher from service or discarding it.
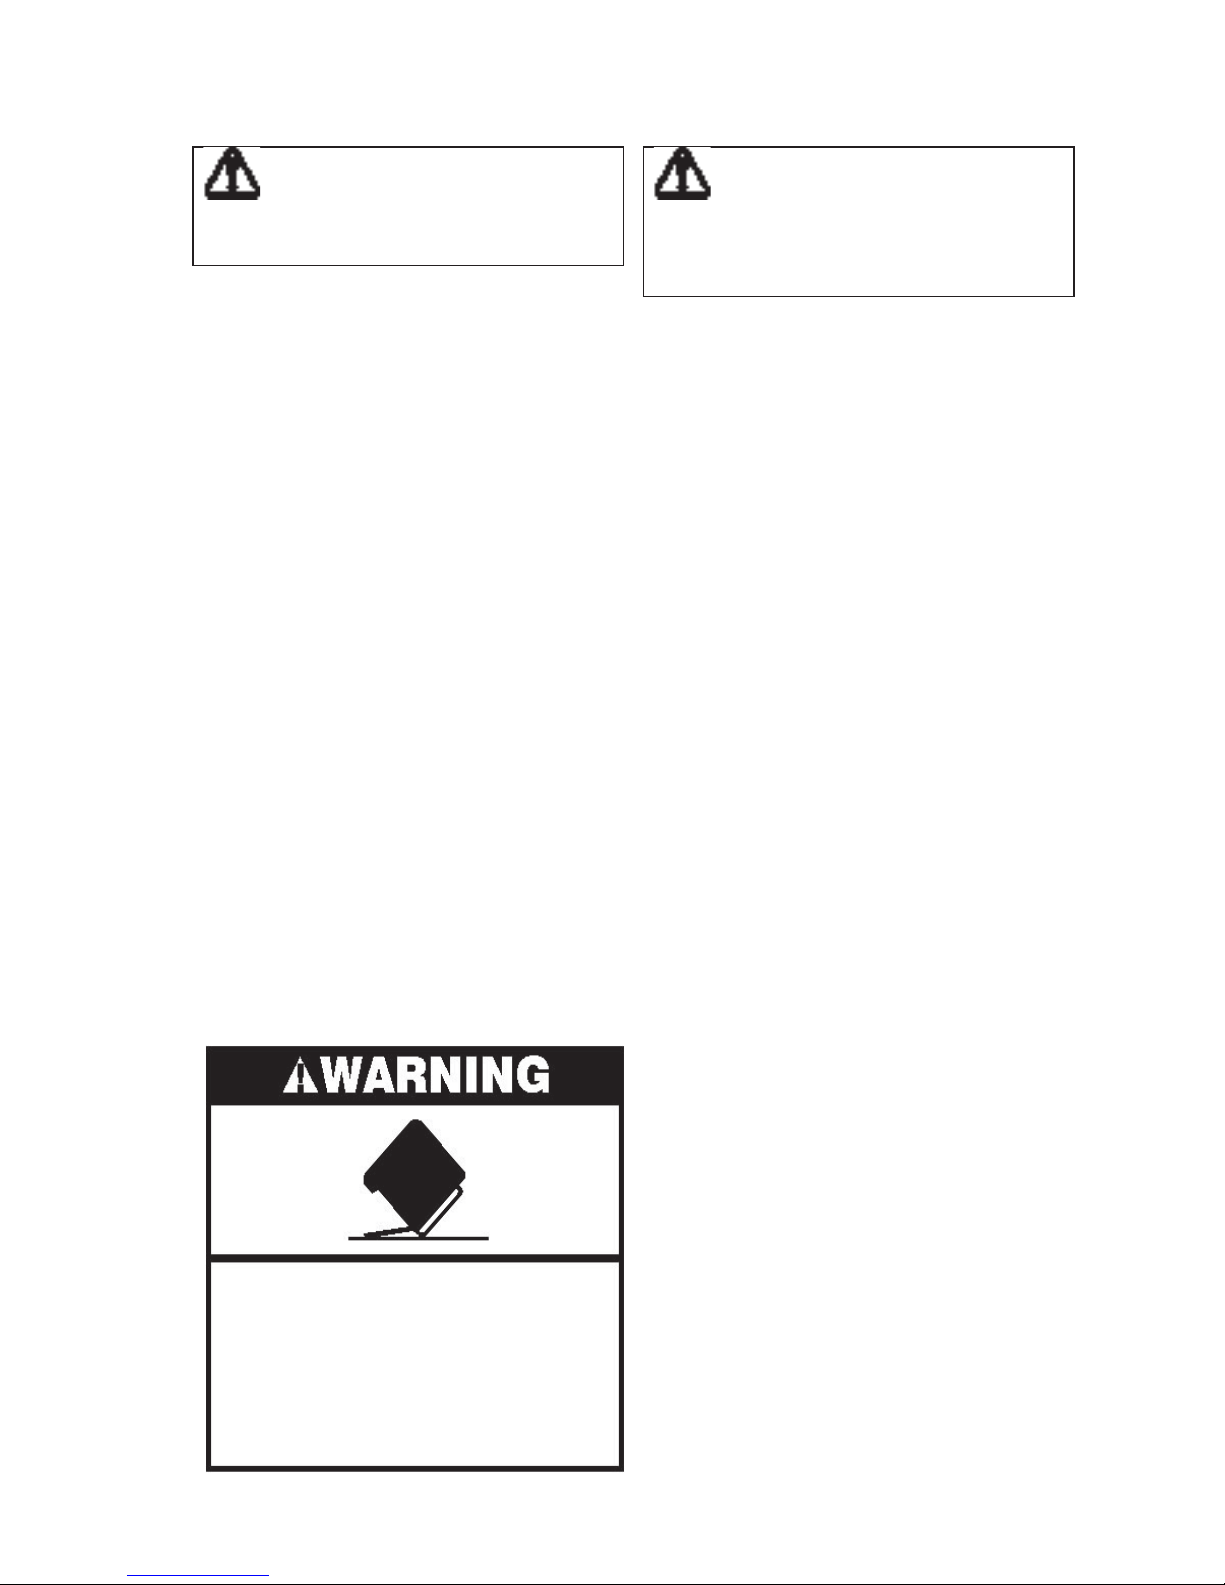
WARNING
Please read all safety instructions
before using your new appliance.
WARNING
These guidelines must be followed to
ensure that safety mechanisms in this
unit will operate properly.
Tip Over Hazard
Do not use dishwasher until
completely installed.
Do not push down on open door.
Doing so can result in serious injury or
cut.

4
Warranty Information
KENMORE APPLIANCE WARRANTY
One Year Limited Warranty
When installed, operated and maintained according to all instructions supplied with
the product, if this appliance fails due to a defect in material or workmanship within
one year from the date of purchase, call 1-800-4-MY-HOME
®
to arrange for free
repair.
If this appliance is used for other than private family purposes, this warranty applies
for only 90 days from the date of purchase.
This warranty covers only defects in material and workmanship. Sears will
NOT pay for:
1. Expendable items that can wear out from normal use, including but not limited to
fi lters, belts, light bulbs and bags.
2. A service technician to instruct the user in correct product installation, operation
or maintenance.
3. A service technician to clean or maintain this product.
4. Damage to or failure of this product if it is not installed, operated or maintained
according to all instructions supplied with the product.
5. Damage to or failure of this product resulting from accident, abuse, misuse or use
for other than its intended purpose.
6. Damage to or failure of this product caused by the use of detergents, cleaners,
chemicals or utensils other than those recommended in all instructions supplied
with the product.
7. Damage to or failure of parts or systems resulting from unauthorized
modifi cations made to this product.
Disclaimer of implied warranties; limitation of remedies
Customer’s sole and exclusive remedy under this limited warranty shall be product
repair as provided herein. Implied warranties, including warranties of merchantability
or fi tness for a particular purpose, are limited to one year or the shortest period
allowed by law. Sears shall not be liable for incidental or consequential damages.
Some states and provinces do not allow the exclusion or limitation of incidental
or consequential damages, or limitations on the duration of implied warranties of
merchantability or fi tness, so these exclusions or limitations may not apply to you.
This warranty applies only while this appliance is used in the United States and
Canada*.
*In Canada, in-home repair service is not available in all areas, nor will this warranty
cover user or servicer travel and transportation expenses if this product is located in
a remote area (as defi ned by Sears Canada Inc.) where an authorized servicer is not
available.
This warranty gives you specifi c legal rights, and you may also have other rights which
vary from state to state.
Sears Brands Management Corporation, Hoff man Estates, IL 60179
Sears Canada Inc., Toronto, Ontario, Canada M5B 2C3
5
Sears Parts and Repair Services
WE’RE THERE FOR YOU LONG AFTER THE SALE
*Select product assortment sold online; for full product availability please call the number provided.
To purchase replacement parts and product accessories, call 1.800.4.MY.HOME
TM
(1.800.469.4663), visit Sears.ca/parts, or visit your nearest Sears Parts and Repair store.
Delivery to your home is available.
We recommend the following accessories to help extend the life of your product while saving you time and money.
In-home or in-shop service is available for all major brands.
Call 1.800.4.MY.HOME
TM
Sears.ca/parts_
MAJOR APPLIANCES:
And a whole lot more! We have access to over 1 million parts and accessories!
REFRIGERATORS
Water & Air Filters
Ice Maker Stainless Steel Water Line
Thermometers
Environmentally Friendly Appliance Cleaners
VACUUMS:
Bags
Belts
Hoses
Wands, Brushes & Nozzles
Filters
LAWN & GARDEN:
Tune-up Kits, Oil & Fuel Stabilizers
Filters
Blades
Belts
Spark Plugs, Shear Bolts & Shear Pins
HEATING & COOLING:
Furnace & Air Conditioning Filters Humidifier Media Pads
Thermostats Durasept Humidifier Cleaner
DISHWASHERS
Stainless Steel Hoses
Clamps & Dishwasher Fittings
Dishwasher Installation Kits
LAUNDRY
Rubber & Stainless Steel Hoses
Ducts, Clamps, Vent Kits & Dryer Vent Cleaning
Brushes
Filters & Heating Elements
STOVES
Range Hood Filters
Elements
Bulbs
Smooth Top Cleaning Kits
Sears Service
I

6
Master Protection Agreements
Congratulations on making a smart purchase. Your new Kenmore® product is
designed and manufactured for years of dependable operation. But like all products,
it may require preventive maintenance or repair from time to time. That’s when
having a Master Protection Agreement can save you money and aggravation.
The Master Protection Agreement also helps extend the life of your new product.
Here’s what the Agreement* includes:
• Parts and labor needed to help keep products operating properly under normal
use, not just defects. Our coverage goes well beyond the product warranty. No
deductibles, no functional failure excluded from coverage – real protection.
• Expert service by a force of more than 10,000 authorized Sears service technicians,
which means someone you can trust will be working on your product.
• Unlimited service calls and nationwide service, as often as you want us, whenever
you want us.
• “No-lemon” guarantee – replacement of your covered product if four or more
product failures occur within twelve months.
• Product replacement if your covered product can not be fi xed.
• Annual Preventive Maintenance Check at your request – no extra charge.
• Fast help by phone – we call it Rapid Resolution – phone support from a Sears
representative on all products. Think of us as a “talking owner’s manual”.
• Power surge protection against electrical damage due to power fl uctuations.
• $250 Food Loss Protection annually for any food spoilage that is the result of
mechanical failure of any covered refrigerator or freezer.
• Rental reimbursement if repair of your covered product takes longer than promised.
• 25% discount off the regular price of any non-covered repair service and related
installed parts.
*CONDITIONS IN CANADA MAY DIFFER. PLEASE CALL 1-800-4-MY-HOME for
more details.
Once you purchase the Agreement, a simple phone call is all that it takes for
you to schedule service. You can call anytime day or night, or schedule a service
appointment online.
The Master Protection Agreement is a risk free purchase. If you cancel for any
reason during the product warranty period, we will provide a full refund. Or, a
prorated refund anytime after the product warranty period expires. Purchase your
Master Protection Agreement today!
Some limitations and exclusions apply. For prices and additional information in the
U.S.A. call 1-800-827-6655.
* Coverage in Canada varies on some items. For full details call Sears Canada at
1-800-361-6665.
Sears Installation Service
For Sears professional installation of home appliances, garage door openers, water
heaters, and other major home items, in the U.S.A. or Canada call 1-800-4-MYHOME
®
.
®
7
1522 and 1532 Models
Light
1546 Model
1547 Model
Models At A Glance
Read these instructions carefully before using the Dishwasher. For best results in the
use and operation of your dishwasher fi nd your model below. Detailed instructions for
each Cycle and Option follow later in the Use and Care Guide.
Wash System
Your Kenmore dishwasher fi lters 100% of the water for optimum cleaning. The wash
system uses alternating arms to save water and energy and includes a heavy duty
stainless steel food disposer that grinds up large food particles.
How the wash system works
1. Load the dishwasher ( See preparing and Loading Dishes).
2. Hot water enters the dishwasher, covers the fi lter, and rises to the bottom of the
heater clips.
3. Detergent is dispensed at the appropriate time and mixed with the hot water. This
mixture is pumped through the lower spray arm and sprays against the soiled
surfaces of the dishes to remove food particles.
4. Water passes through the fi ne mesh primary fi lter where food soil is removed and
the clean water is then recirculated.
5. Ports under the lower wash arm direct the food soil through a secondary fi lter into
a collection chamber.
6. Food soil is held in the collection chamber until it is fl ushed away during the drain
cycle.
7. Clean, hot water enters the dishwasher and the sequence is repeated.
8. Beginning with the third water fi ll, the wash action switches between the lower
spray arm and middle spray arm in 90 second intervals. You may notice a change
in sound as the wash action pauses and switches to the other arm.
9. The diswhasher may pause during the cycle while water is being heated. Wash
action will continue during this time.
10. Rinse aid is automatically dispensed in the fi nal rinse to aid in drying.
8
Features may vary according to model
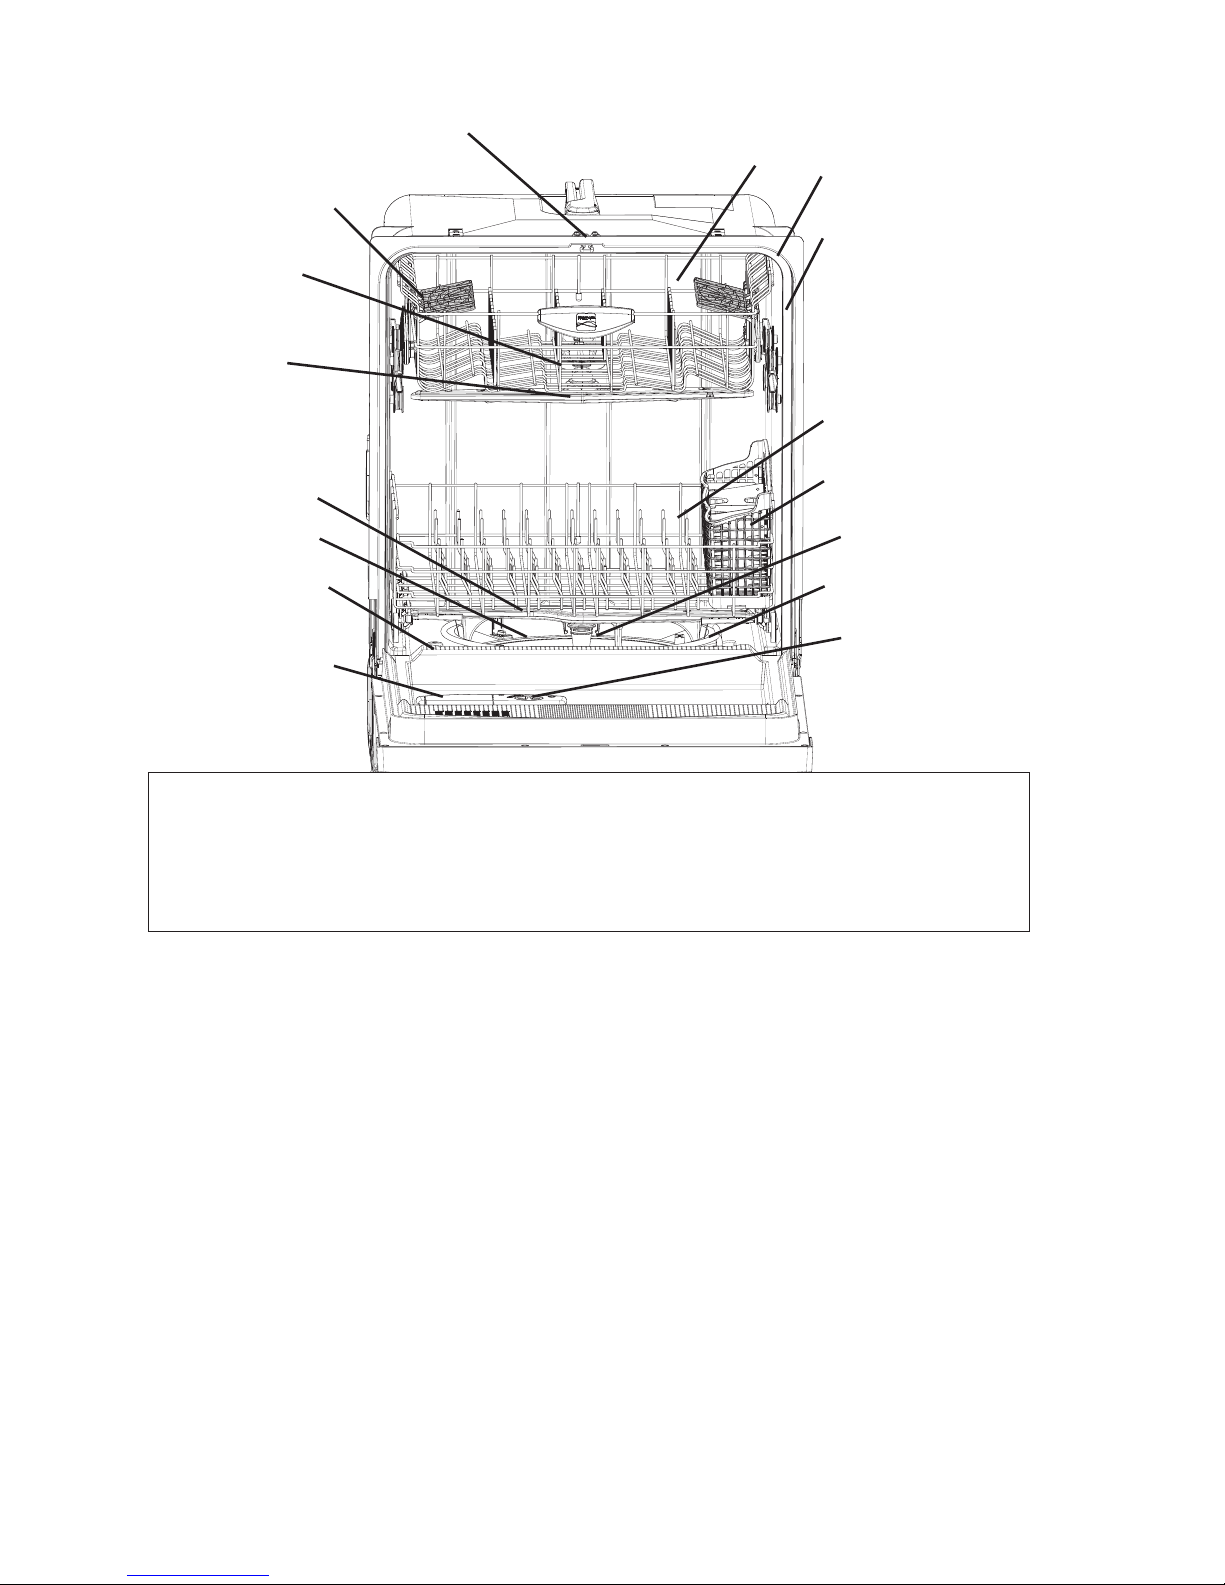
Features At A Glance
NOTE
The dishwasher is programmed to remember your last cycle so you do not have to
reset each time. To start the dishwasher using the same cycle and options selected
on the previous wash, just press the START/CANCEL pad.
Cup Shelves
(on some models)
Nozzle or Spray Arm
Top Rack
Serial Label
(located on right
side of tub)
Bottom Rack
Silverware Basket
Glass Trap
Heating Element
Rinse Aid
Dispenser
Detergent
Dispenser
Overfi ll
Protector
Lower Spray Arm
Middle Spray Arm
Your dishwasher cleans by spraying a mixture of hot water and detergent through the
spray arms against soiled surfaces. First, the dishwasher fi lls with water covering the
fi lter area. Water is then pumped through the spray arms. Soil Particles go through
and across the fi lters, and down the drain as the water is pumped out. This series of
steps are repeated as needed. The number of water fi lls will vary with the cycle being
used.
GETTING STARTED
1. Load dishwasher (See Preparing and Loading Dishes).
2. Add detergent (See Dishwasher Dispenser & Detergents).
3. Add rinse aid, if needed (See Rinse Aid).
4. Close Door to Latch.
5. Select desired CYCLE (See Cycle Chart). The indicator light above the pad will glow
when selected.
6. Select desired OPTION (See Energy Option). The indicator light above the pad
will glow when selected.
7. Run hot water faucet nearest dishwasher until water is hot. Turn water off .
8. To start, press START/CANCEL pad.
Bowl Tines
Self-Cleaning Filter
Tub Gasket

9
Operating Instructions
Option Selections (available on select models)
Hi-Temp Wash
When HI-TEMP WASH option is selected,
the dishwasher heats water in the main
wash to approximately 140
0
F (600C).
This increase in water temperature helps
dishwasher detergent remove food grease
and soil from dishes more eff ectively and
aids in drying. HI-TEMP WASH option
can be used with all cycles except RINSE
ONLY. HI-TEMP WASH is automatically
provided when the HEAVY WASH cycle is
selected.
When HI-TEMP WASH option is selected,
the light above the pad will come on and
remain on until end of cycle. To turn off
the HI-TEMP WASH option, press the pad
a second time. The light above the pad
will turn off .
Heat Dry
The HEAT DRY option in combination with
rinse aid will enhance drying performance.
The energy required to use the HEAT DRY
option costs pennies per cycle. You may
choose not to select the HEAT DRY option;
however you will have items in your dish
load that will not be completely dry at the
end of the cycle.
Delay Start
The DELAY START option allows you
to automatically delay starting your
dishwasher from 1-10, 1-24, 2-4-6 or 6-4-2
hours depending on your model.
On models with 1-10 or 1-24 hour delay,
press the DELAY START pad until the
desired delay time shows in the STATUS
window. A light will come on indicating
the delay start hours and will remain on
unitl cycle start.
On models with 2-4-6 hour delay, press the
pad once for a 2 hour delay, twice for 4
hours and 3 times for 6 hours. A light will
come on indicating the delay start hours
and will remain on until cycle starts.
On models with 6-4-2 hour delay, press the
pad once for a 6 hour delay, twice for 4
hours and three times for 2 hours. A light
will come on indicating the delay start
hours and remain on until cycle starts.
To cancel the DELAY START option and
begin the cycle before the delay period is
over, press the START/CANCEL pad.
Sanitize or Sani Rinse Option
To sanitize your dishes and glassware,
select the SANITIZE or SANI RINSE option.
When selected, the light above the pad
will come on and remain on until end
of cycle. The water temperature in the
fi nal rinse will be raised to 1550F (680C)
and will maintain that temperature for 9
minutes. This option is available in HEAVY
and NORMAL WASH cycles. Only these
sanitizatin cycles have been designed to
meet NSF requirements.
The cycle time will be extended until the
proper water temperature is reached.
Washing action will continue during the
water heating delay. For best results, the
incoming water temperature should be at
least 1200F (490C).
The sanitize criteria may not be satisfi ed
if there is an interruption of the cycle,
power failure or if the incoming water
temperature is below 1200F (490C).
To turn off the SANITIZE or SANI RINSE
option, press the pad a second time. The
light above the pad will turn off .
Air Dry
The unit defaults to heated dry when it
is started with any cycle selected. This
drying uses a combination of heated dry
with rinse aid that achieves enhanced
drying performance. If you prefer to only
have AIR DRY for dishes, you will select
AIR DRY and the unit will not energize the
heating element. This will reduce energy
consumption, but also reduces drying
performance.

10
Status Indicator Lights
The WASHING light comes on at the
beginning of cycle and remains on until the
end of the main wash.
Whether heated or unheated dry is
selected the DRYING light will come on
during the drying portion of the cycle.
When the SANITIZE option is selected,
the SANITIZED light will glow when
the SANITIZE cycle is fi nished. If the
dishwasher did not properly sanitize the
dishes, the light will not come on. This can
happen if the cycle is interrupted. The light
will remain on until the door is opened.
The CLEAN light will come on at end of
cycle and remain on until door is opened.
Child Lock Controls
To prevent children from accidently
changing the dishwasher cycle or starting
the dishwasher, lock the dishwasher controls
by pressing and releasing the RINSE ONLY
pad (some models) or NO HEAT DRY pad
(some models) or AIR DRY (some models)
for 3 seconds while the door is latched.
An indicator light on the lock graphic pad
will illuminate when the controls are locked
and no new selections can be made until
the lock is released. To unlock the controls,
press the same pad, RINSE ONLY, NO
HEAT DRY or AIR DRY, again for 2 seconds
until the indicator light goes out.
Operating Instructions
Cycle Chart
Cycle
To Select Cycle Water
(approx.)
Time *
(Hours)
Washes/
Rinses
Heavy Wash/Pots & Pans
For pots, pans casseroles and
dinnerware with dried-on or
baked-on soils
Normal Wash Hi-Temp and
Sanitize
For heavier, greasy soils and
for Sanitize.
Normal Wash
For regularly soiled dishes and
silverware.
Select HEAVY WASH/
POTS&PANS and desired
OPTIONS. HI-TEMP WASH
will automatically be provided
SANITIZE optional.
Select NORMAL WASH and
desired OPTIONS including
SANITIZE or HI-TEMP
WASH.
Select Normal WASH and
desired OPTIONS. Selecting
HI-TEMP ON or SANITIZE
will result in a longer cycle.
2
3 Washes
2 Rinses
9.2 gal.
7.7 imp gal.
34.8 liters
2
1
/
2
2 1/
2
4 Washes
4 Rinses
5 Washes
2 Rinses
Light Wash/Eco Wash
For Lightly soiled and pre-rinsed
dishes and silverware.
Select LIGHT WASH/
ECO WASH and desired
OPTIONS.
1
1
/
2
2 Washes
2 Rinses
Top Rack/Upper Rack
For lightly soiled or pre-rinsed
dishes and silverware when you
do not have a full load.
Select TOP RACK, or
UPPER RACK and desired
OPTIONS.
1
1
/
4
2 Washes
1 Rinses
Rinse Only
For rinsing dishes that will be
washed later.
Select RINSE ONLY. DO
NOT USE detergent.
1
/
4
2 Rinses
Not all cycles available on all models
To Cancel a cycle
You can cancel a cycle anytime during the
cycle. Press START/CANCEL pad and the
dishwasher will start a 90 second drain. At
the end of the drain, select the next desired
cycle.
8.1 gal.
6.7 imp gal.
30.7 liters
4 gal.
3.4 imp gal.
15.5 liters
4.6 gal.
3.8 imp gal.
17.4 liters
3.6 gal.
3.0 imp gal.
13.6 liters
2.3 gal.
1.9 imp gal.
8.7 liters
11
Preparing and Loading Dishes
Loading the Top Rack
Features and appearance of racks and
silverware basket may vary from your model.
The upper rack is designed for fl exibility in
loading a wide variety of items including cups,
glasses, stemware, small plates, bowls, etc.
Load glasses in top rack only. Damage may
occur if placed in bottom rack.
Load plastic items in top rack only. Melting
may occur if placed in bottom rack.
Load items with open ends facing down for
better cleaning adn draining.
Damage may occur if delicate items touch
each other during dishwasher operation.
Long-handled knives and utensils can be
placed in top rack.
Be sure nothing protrudes through the bottom
of the rack to block rotation of middle spray
arm.
10 place settings standard loading pattern
12 place settings standard loading pattern
Some models have a fold-down cup shelf or
a cup shelf/stemware holder. They can be
used to load two levels of cups, juice glasses,
and other short items. Stagger items on
upper level so that water can reach all inside
surfaces. Fold up to load tall glasses.
Upper Rack
The UPPER RACK option can be used to wash
a wide assortment of items when you don’t
have a full load. Also, when the upper rack
fi lls up with glasses and the lower rack is still
empty, you don’t have to wait anymore for
clean glasses.
STEMWARE HOLDER/CUPSHELF not
available on all models.
DISH PREPARATION
Scrape away large pieces of food, bones, pits,
toothpicks, etc. The continuously fi ltered wash
fl uid will remove remaining food particles.
Burned-on foods should be loosened before
loading. Empty liquids from glasses and cups.
• Load racks so that large items do not
prevent the detergent dispenser from
opening.
• If the dishwasher drains into a Food
Disposer, be sure disposer is completely
empty before starting dishwasher.
• Check manufacturer’s recommendations
before washing items in question.
Foods such as mustard, mayonnaise, vinegar,
lemon juice and tomato based products may
cause discoloration of stainless steel and
plastics if allowed to sit for a long period of
time. Unless the dishwasher is to be operated
at once, it is best to pre-rinse or use the rinse
only cycle to rinse off these food soils.
12
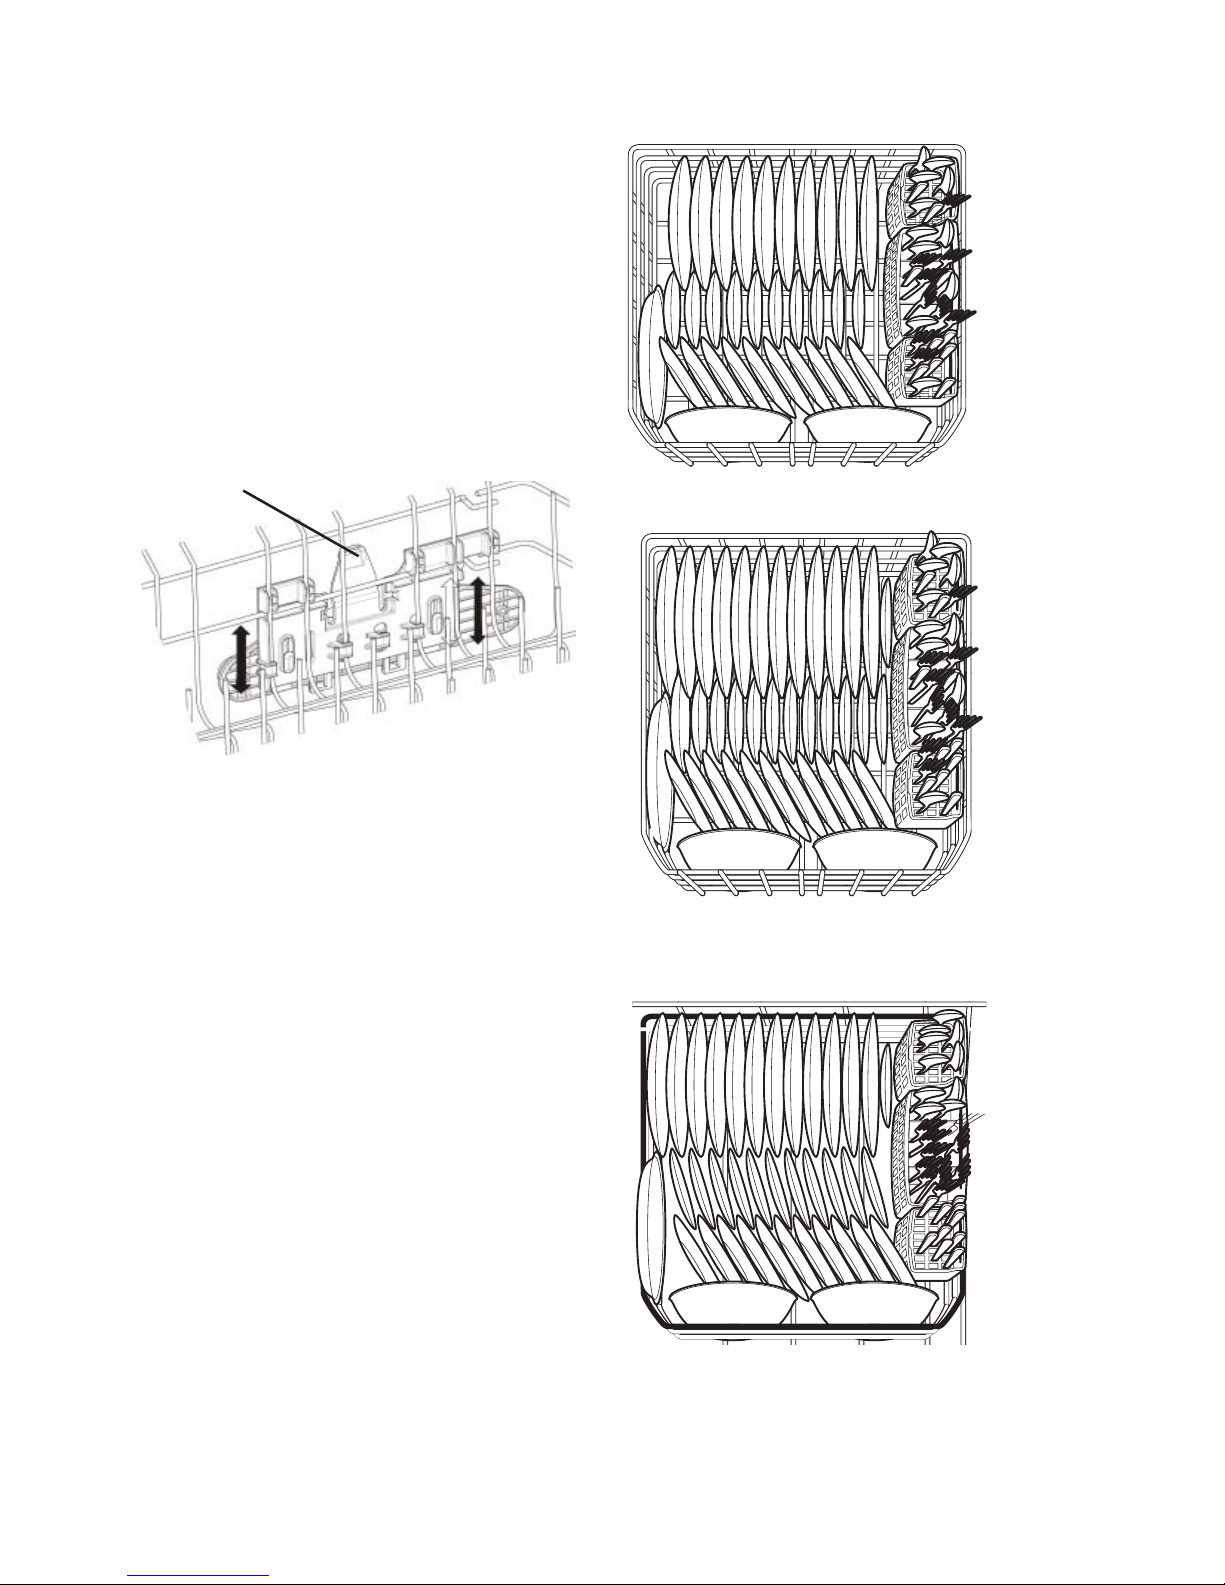
Preparing and Loading Dishes
Features and appearance of racks and
silverware basket may vary from your model.
The lower rack is best for plates, saucers,
bowls, and cookware. Large items should be
placed along the edge so they do not block
the spray arm rotation. For best results, place
bowls, casseroles, and sauce pans with soiled
surface facing down or toward the center. Tilt
slightly for better drainage.
Make sure tall items do not block spray arm
rotation.
Be sure pan handles do not protrude through
the bottom of the rack and block the spray
arm rotation.
10 place settings standard loading pattern.
12 place settings standard loading pattern on
select models (Fold down tines)
Loading the Bottom Rack
Adjustable Upper Rack (available
on select models)
To raise the upper rack, refer to the fi gure
below.
Press the lever toward the center of the rack
and pull straight up on the rack.
To lower the upper rack, press the
lever and push down on the rack.
Lever
12 place settings standard loading pattern on
select models (Fixed Tines).
 Loading...