

I!i_
Safety instructions ........................................................ 2
What Your Dishwasher Needs to Do Its Job .............. 3
Important Parts of Your Dishwasher ........................... 4
Special Tips .................................................................... 5
Proper Loading ........................................................ 6,7,8
Detergent and Rinse Agent Dispensers ...................... 9
Portable Dishwasher Information ......................... 10,11
Door Panels .................................................................. 11
User Maintenance Instructions ............................. 12,13
Problems and Solutions ........................................ 14,15
Sears Service, Warranty ............................... Back Cover
Read and Save These instructions
Fig in these spaces:
Model and Serial
Number Plate
Model No.-
Serial No.:
Purchase Date:

WARNING: Please follow basic precautions, including the following:
Read al! INSTRUCTIONS before using DO NOT touch heating element during
dishwasher, or immediately after use. Allow time to
cool.
For best results use fresh granular au-
tomatic dishwashing detergent and a
rinse agent recommended for use in a
dishwasher.
Store detergents in a cool, dry place Load sharp items and knives so they
OUT OF CHILDREN'S REACH. won't damage door seal.
Load sharp or pointed tableware with
handles up (points down) to avoid injury
when reaching into dishwasher.
DO NOT tamper with controls.
DO NOT operate dishwasher unless all
enclosure panels are properly in place. DO NOT allow children to play in or on
ALWAYS disconnect electrical power
to dishwasher before attempting to
service.
REMEMBER, use dishwasher for
intended function only.
DO NOT wash plastic items unless
marked "Dishwasher Safe" or equiva-
lent. If unmarked, check manufacturer's
recommendations.
To avoid risk of electrical shock, the
dishwasher must be electrically
grounded before it is operated.
DO NOT sit or stand or abuse
dishwasher door or dishracks.
dishwasher.
When discarding old dishwasher,
ALWAYS remove door to prevent
accidental entrapment.
WARNING: Under certain conditions,
hydrogen gas may build up in a hot
water system that has not been used for
two weeks or more. HYDROGEN GAS
IS EXPLOSIVE. To prevent injury or
damage, before using dishwasher, turn
on all hot water faucets and allow water
to run for several minutes. This will allow
gases to escape. As the gas is
flammable, DO NOT smoke or use an
open flame near faucets while they are
open.
Built-In models - see Installation
CZC]___
Instructions book.
@
Portable models-see portable
dishwasher information included in
this book.
DO NOT install dishwasher on carpeted
floor.
Save These instructions
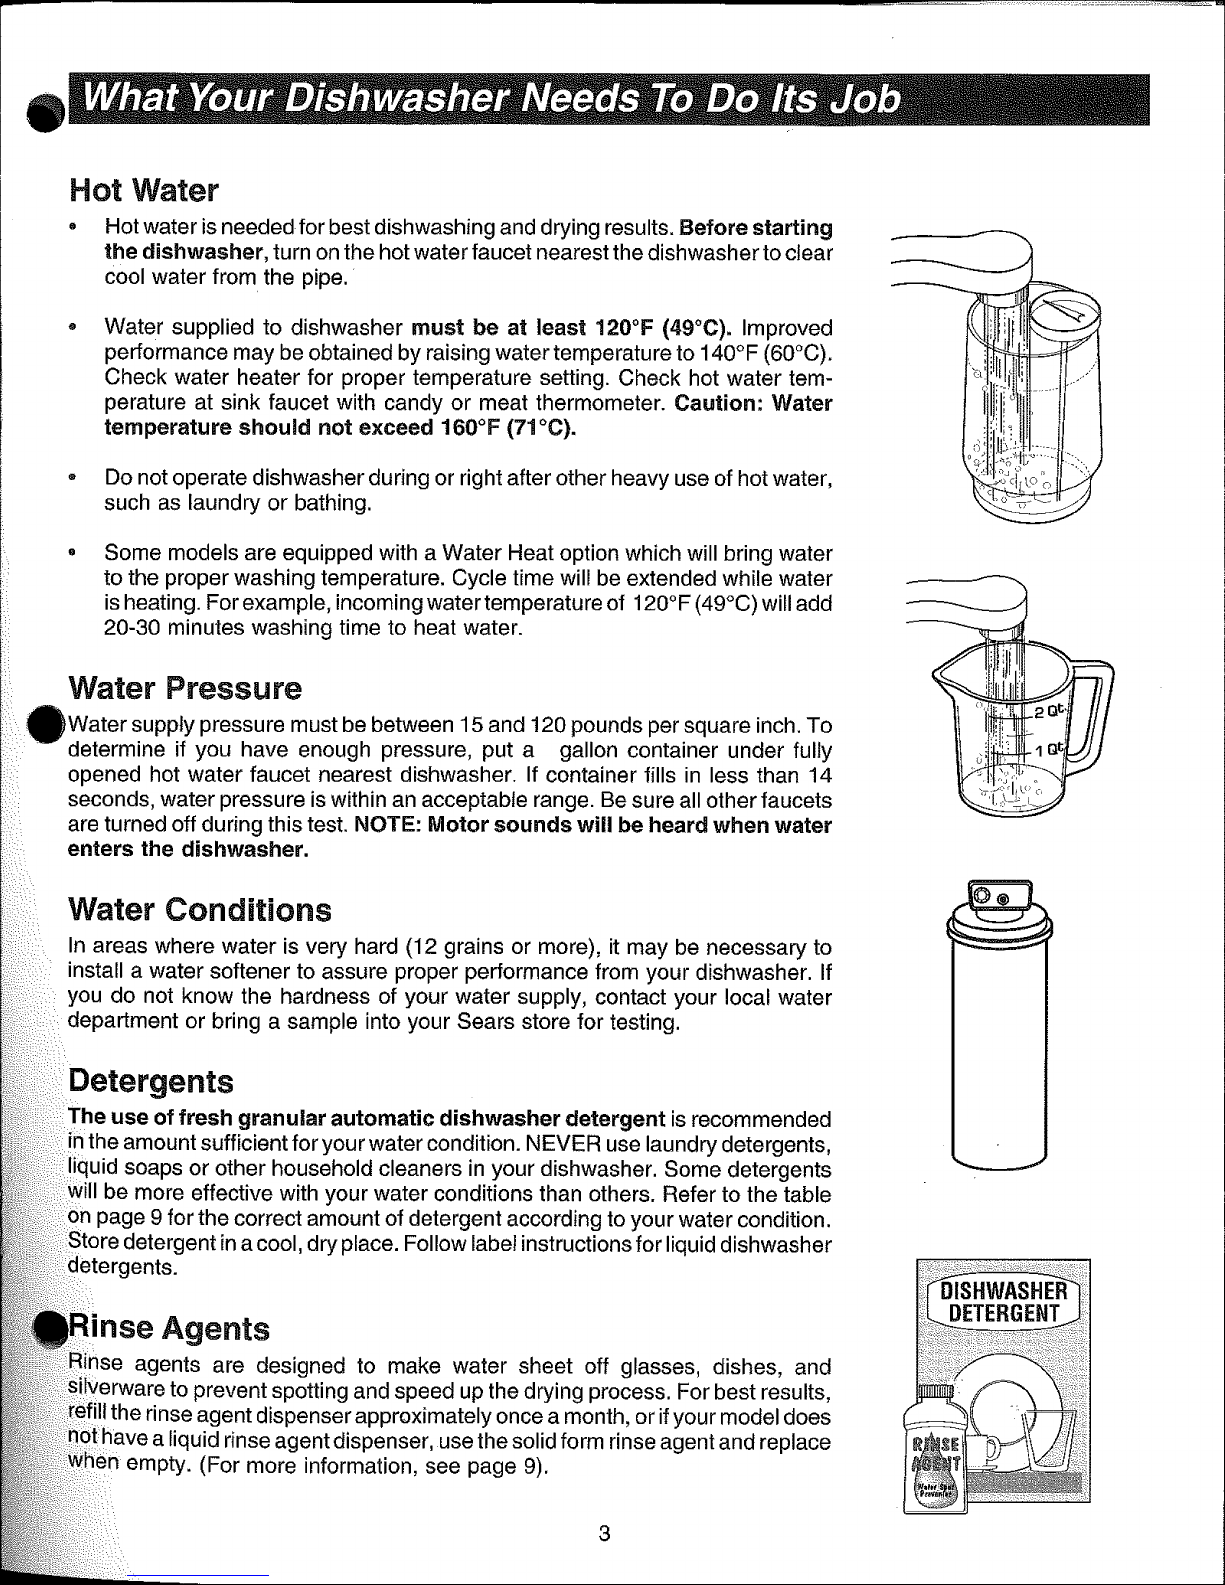
Hot Water
o Hot water isneeded for best dishwashing and drying results. Before starting
the dishwasher, turn on the hot water faucet nearest the dishwasher to clear
cool water from the pipe.
Water supplied to dishwasher must be at least !20°F (49°C)o Improved
performance may be obtained by raising water temperature to 140°F (60°C).
Check water heater for proper temperature setting. Check hot water tem-
perature at sink faucet with candy or meat thermometer. Caution: Water
temperature should not exceed 160°F (71 °C).
Do not operate dishwasher during or right after other heavy use of hot water,
such as laundry or bathing.
Some models are equipped with a Water Heat option which will bring water
to the proper washing temperature. Cycle time will be extended while water
is heating. For example, incoming water temperature of 120°F (49°C) will add
20-30 minutes washing time to heat water.
Water Pressure
Water supply pressure must be between 15 and 120 pounds per square inch. To
determine if you have enough pressure, put a gallon container under fully
opened hot water faucet nearest dishwasher. If container fills in less than 14
seconds, water pressure is within an acceptable range. Be sure all other faucets
are turned off during this test. NOTE: Motor sounds will be heard when water
enters the dishwasher.
Water Conditions
In areas where water is very hard (12 grains or more), it may be necessary to
install a water softener to assure proper performance from your dishwasher. If
you do not know the hardness of your water supply, contact your local water
or bring a sample into your Sears store for testing.
Detergents
use of fresh granular automatic dishwasher detergent is recommended
in the amount sufficient for your water condition. NEVER use laundry detergents,
liquid soaps or other household cleaners in your dishwasher. Some detergents
be more effective with your water conditions than others. Refer to the table
page 9 for the correct amount of detergent according to your water condition.
detergent in a cool, dry place. Follow label instructions for liquid dishwasher
etergents.
Agents
Rinse
agents are designed to make water sheet off glasses, dishes, and
to prevent spotting and speed up the drying process. For best results,
rinse agent dispenser approximately once a month, or if your model does
liquid rinse agent dispenser, use the solid form rinse agent and replace
empty. (For more information, see page 9).
3
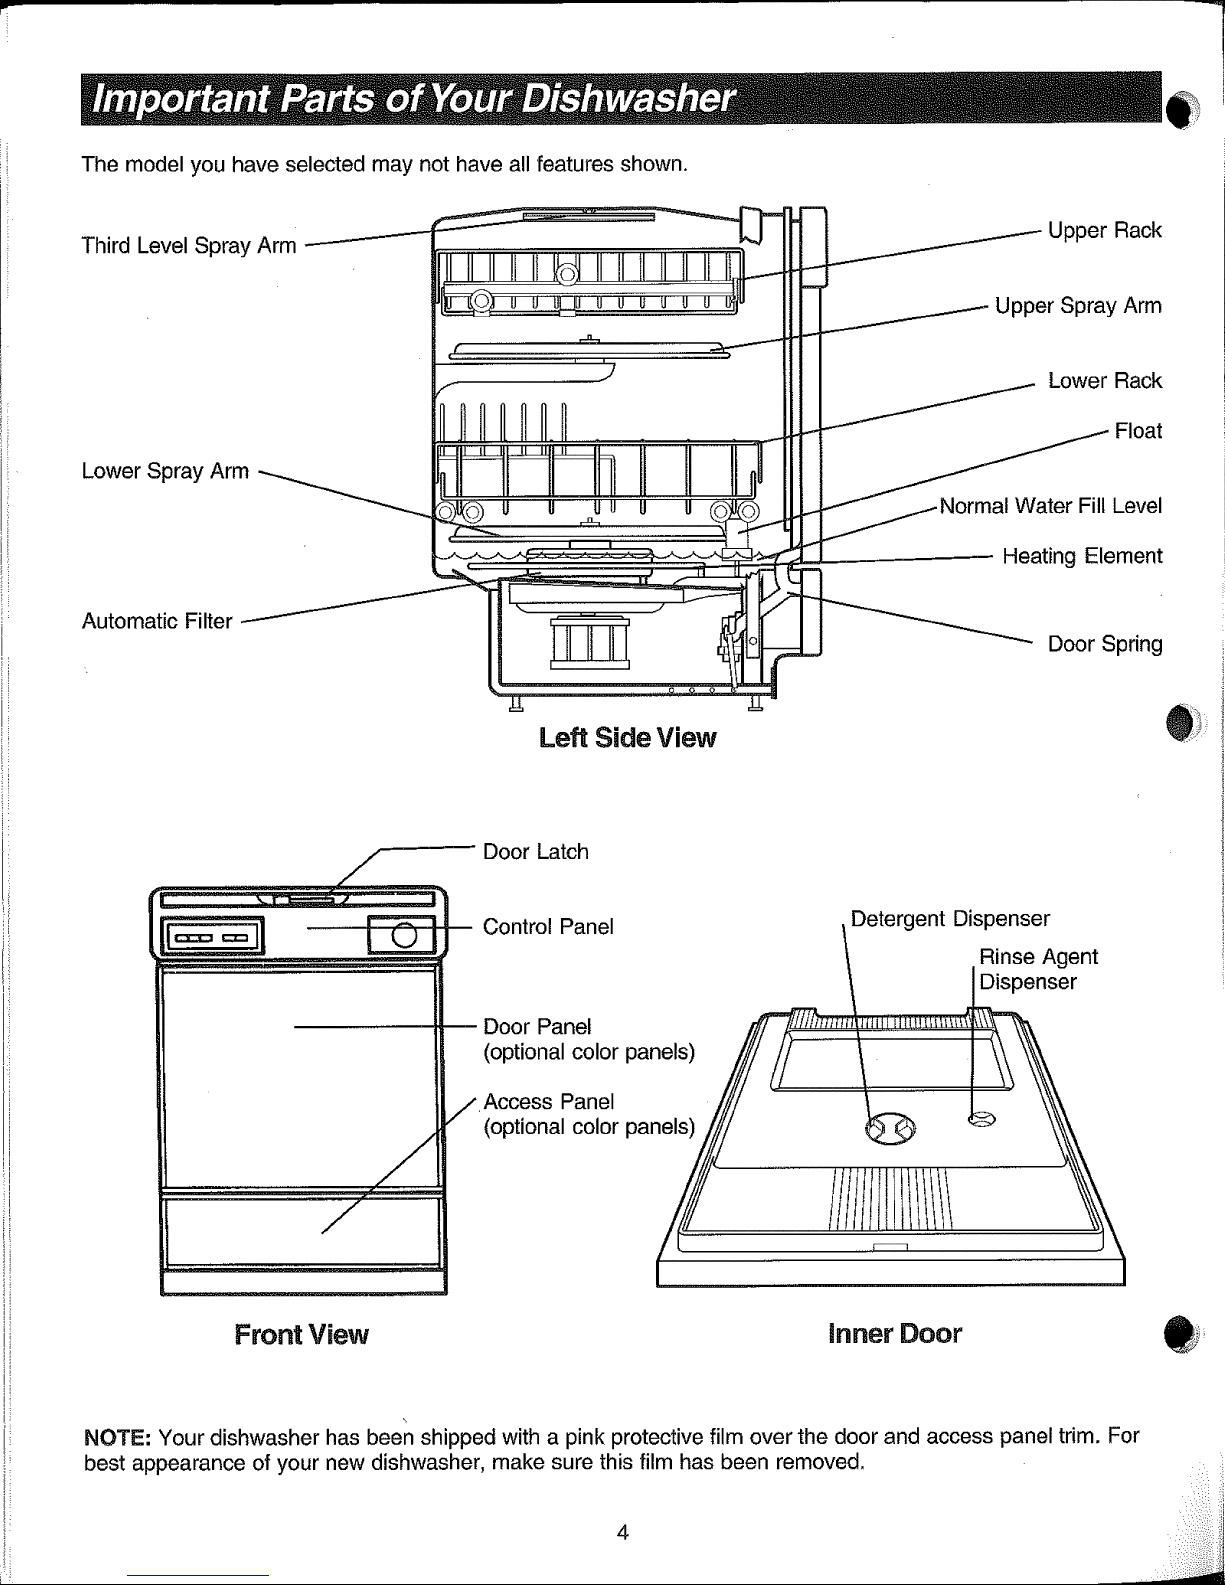
Themodelyouhaveselectedmaynothaveallfeaturesshown.
ThirdLevelSprayArm--------------
LowerSprayArm
Automatic Filter
"......""" IIIIII
t',
re-1 _
Left Side View
Upper Rack
m
Upper Spray Arm
.I.1. Lower Rack
..._--
i
m
_ Heating Element
E
m
.....---
Door Spring
Door Latch
.. _ Control Panel \Detergent Dispenser
\ Rinse Agent
Dispenser
Door Panel _,,,_,,,_llJliii=lli_l_l___ _"_.
(°pti°nalc°l°rpanels) f7 ...i/...__........ _'_--_\
j Access Panel
/ (optional color panels)/i/_// _ _ _\
Front View
NOTE" Your dishwasher has been shipped with a pink protective film over the door and access panel trim. For
best appearance of your new dishwasher, make sure this film has been removed.
inner Door
4
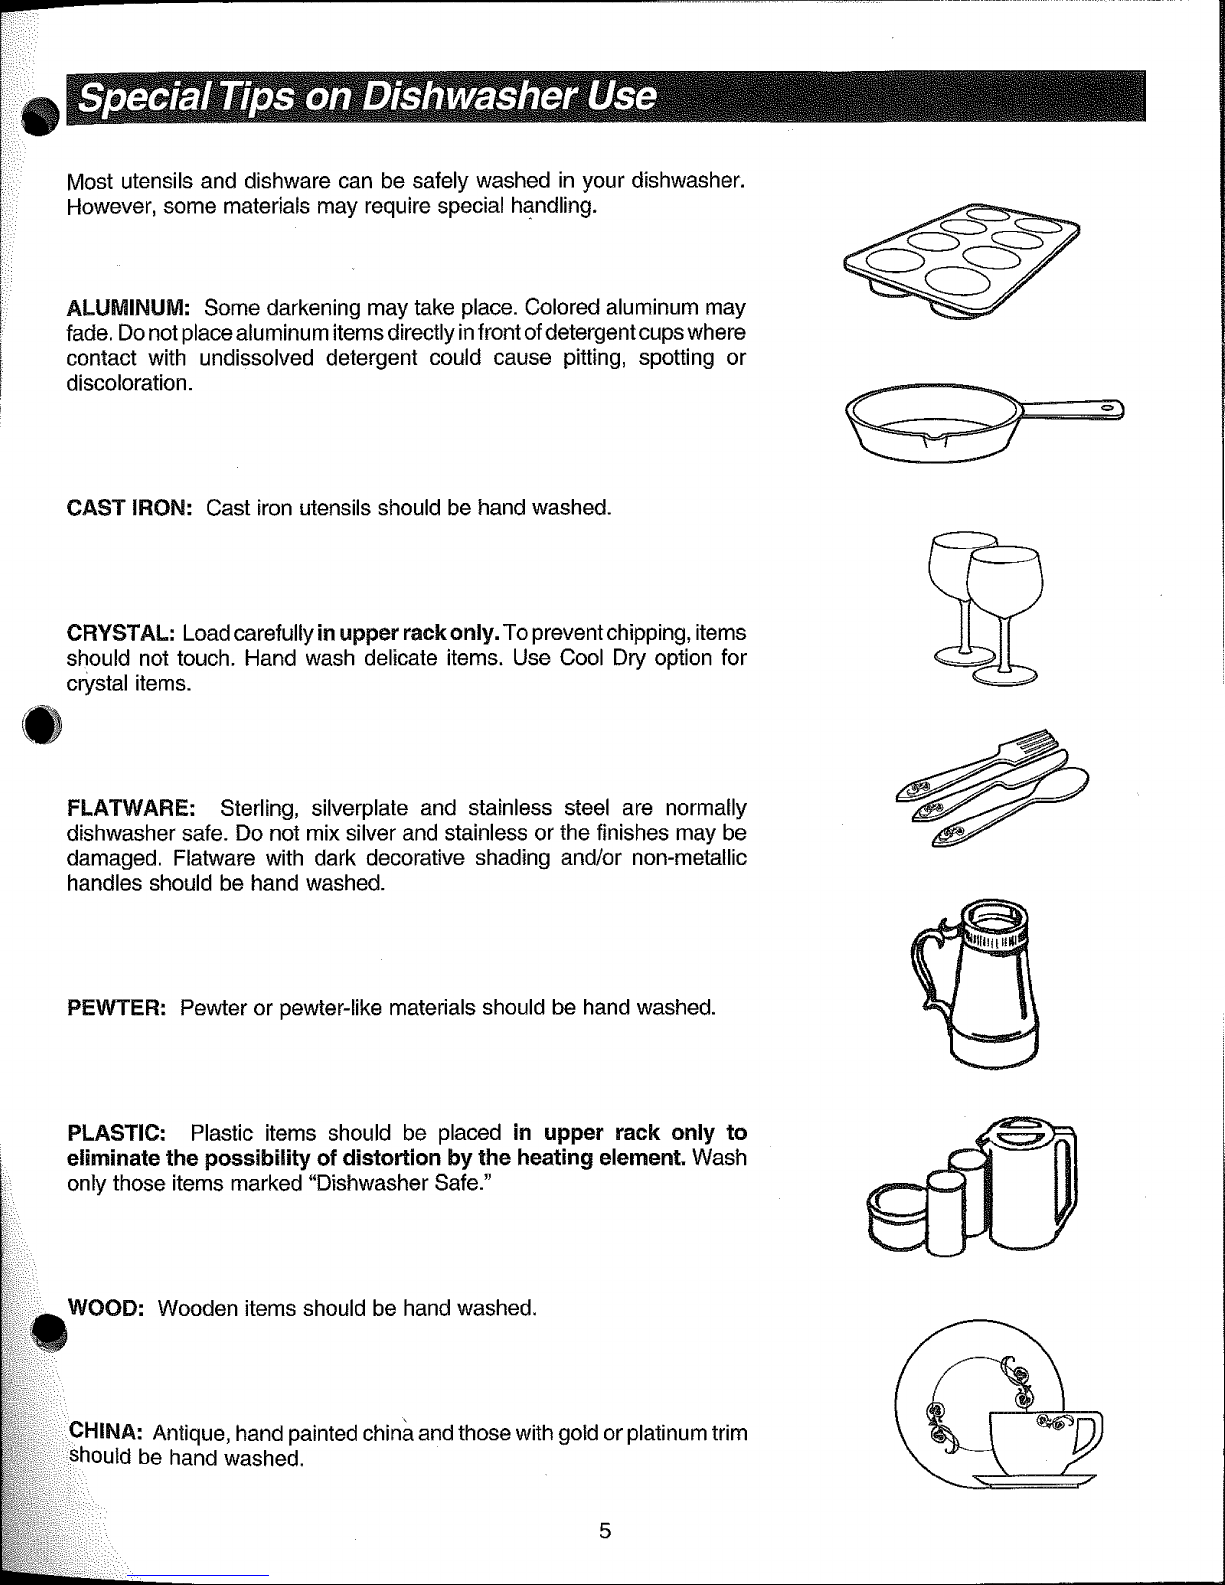
Mostutensilsanddishwarecanbe safelywashedinyourdishwasher.
However,somematerialsmayrequirespecialhandling.
ALUMINUM:Somedarkeningmaytakeplace.Coloredaluminummay
fade.Donotplacealuminumitemsdirectlyinfrontofdetergentcupswhere
contactwith undissolveddetergentcould cause pitting,spottingor
discoloration.
CASTIRON: Castironutensilsshouldbe handwashed.
CRYSTAL:Loadcarefullyinupperrackonly.Topreventchipping,items
shouldnot touch.Handwashdelicateitems.UseCoolDry optionfor
crystalitems.
FLATWARE: Sterling,silverplateand stainlesssteel are normally
dishwashersafe.Donot mixsilverandstainlessorthe finishesmaybe
damaged.Flatwarewith darkdecorativeshadingand!ornon-metallic
handlesshouldbehandwashed.
PEWTER: Pewter or pewter-like materials should be hand washed.
PLASTIC: Plastic items should be placed in upper rack only to
eliminate the possibility of distortion by the heating element. Wash
only those items marked "Dishwasher Safe."
WOOD: Wooden items should be hand washed.
Antique, hand painted china and those with gold or platinum trim
be hand washed.

Dishesdonotneedto bepre-rinsedbeforeloading.Simplyscrapeawayexcessfood,bones,pits,etc.Burned-on
foodshouldbeloosenedbeforeloading.Emptyliquidsfromglassesandcups.
Always load dishes so spray reaches soiled surfaces. Water must drain off completely for best results.
Lower Rack
• Make sure pot handles and other items do not
stop rotation of spray arms or block center wash
tower from extending upward.
• Load cookie sheets, cake pans and other large
items at sides. Do not block the detergent dis-
penser.
° Items should be loaded with soiled surfaces facing
inward.
• Place plates, soup bowls, etc. between prongs
and facing inward.
o Place heavily soiled cookware in lower rack.
24" Models 24" Models
Tower Models
NOTE: On tower models, do not block the center
area of lower rack when loading. The center wash
tower extends through this area. Blockage may
result in poor cleaning. (Select models)
Do not block center area.
42

Upper Rack
• Glassware should not touch other items. Damage
may occur.
o Place items in rows between prongs. Putting items
over prongs could cause breakage and wear of vinyl
rack coating.
• Load plastic items in upper rack only. They may melt
in lower rack. Wash only items marked "Dishwasher
Safe."
o Be sure lightweight items are held firmly in place.
,, Load glasses and cups in upper rack only in rows
between prongs. Breakage may occur if loaded in
lower rack.
,, Small bowls, pans and other utensils can be placed
in upper rack.
° Place open ends face down for cleaning and drain-
ing.
18" Models
Fold Down Fence
Available on some models
A nylon coated fence in the upper rack can be positioned
to allow loading versatility, To load glasses, lift fence and
slide toward front of dishwasher into locking position. To
load plates and bowls, slide fence toward back of
dishwasher and fold down.
24" Models
Fold Down Shelf
Available on some models
A shelf on the side of the upper rack can be folded down
over short items (juice glasses, cups, etc.) for more
loading space.
7

Utensil Basket
Available on some models.
Lift lids and snap gates flat against sides to load long
knives and utensils.
Close gates at each end to form compartments to
hold small items such as baby bottle nipples or
measuring spoons. Snap lids shut.
If your dishwasher does not have this basket, it can be
ordered from Sears Service Center-Part No. 809105.
Silverware Basket
Load silverware so items are mixed in each section
and do not "nest" together. Water spray cannot
clean nested items.
o Be sure no items protrude through holes in basket
or extend high enough to stop rotation of spray
arms.
° Load sharp items with points down.
•• •_•• • ••_••••••••_/••_••,_•_••_•_••,••••__••ii!i!•!ii_i•_!i!•¸i_i••i_i!iiilii_!_
How to Add an item During a Cycle
You can add items anytime before the wash portion of the cycle.
° Make sure there is a full cycle yet to be completed.
,, Unlatch door to stop cycle.
Open door and add item.
Latch door to resume cycle.

Donotadddetergentuntilyouarereadyto startthe
cycle.Usefreshgranularautomaticdishwasherdeter-
gent.
Thedispenserwillautomaticallyreleasedetergentat
thecorrecttimesduringthecycle.
Light Wash Cycle
1. Fill cups #1 and #3.
2. Turn lid counterclockwise to covercups #1 and #3
completely.
3. Do not fill open cups #2 and #4.
Normal Wash, Pots Pans, and Water Miser Cycles
1. Fill cups #1 and #3.
2, Turn lid counterclockwise to cover cups #1 and #3
completely.
3. Fill open cups #2 and #4_
IMPORTANT: Always turn lid to cover cups #1 and #3 completely before starting dishwasher. Cups #2 and
#4 will be open. For best dishwashing results, use proper amount of detergent according to your water
condition. Refer to table shown below.
Cycles
Soft water
(o to 3 grains)
Light Wash
.n
tVloderately
Hard Water
(4 to 8 grains)
Normal Wash
Pots Pans
Water Miser
1 tablespoon in
cup #1
1 tablespoon in
cups #1 and #2
Fill cup #1
Fill cups #1 and #2
To prevent water spotting and to speed drying, we
recommend the use of a rinse agent.
Hard Water
(9 to 12grains)
i
Fill cups #1
and #3
Fill all four cups
Very Hard Water
(over 12 grains)
__r ....................
Detergent alone may
not be enough.
Water softener
recommended.
Detergent aJone may
not be enough.
Water softener
recommended.
The model you have selected may have a liquid rinse
agent dispenser. To fill:
• Turn dispenser cap turn counterclockwise and lift
out.
Pour in rinse agent until liquid touches white cross
at bottom of fill opening. Re-insert cap.
- Refill the rinse agent dispenser approximately once
a month.
For models without a rinse agent dispenser, you may
use the solid form. To use:
° Clip basket of solid rinse agent onto front corner of
the upper rack.
Hang basket inside rack.
° Replace immediately when empty.
9
!i
f

important: Always be sure door is latched before moving dishwasher.
The power cord, faucet coupler and hoses are located in a covered
compartment on the top back of the dishwasher.
A special adapter (included) must be installed on the faucet before you can
connect the dishwasher.
1. Remove adapter from coupler by pressing down on the collar (see
Figure B). Washer
2. Unscrew the sink faucet aerator.
3. Check faucet spout to see if threads are inside or outside. Adapter
• If threads are inside, screw adapter onto faucet spout along
with washer. Figure A
- tf threads are outside, remove threaded bushing from
adapter and screw adapter onto faucet spout.
Connecting the Portable Dishwasher
1. Run water at faucet until it is hot. Turn faucet off.
2. Pull hoses out of covered compartment.
3. Push collar down and slip faucet connector onto faucet adapter.
4. When connector snaps into place, release collar.
5. Slowly turn hot water all the way on.
6. Plug power cord into grounded outlet.
Disconnecting the Portable Dishwasher
1. When cycle has finished, turn off hot water.
2. Press red button on coupler to release water pressure.
3. Press down on collar to release coupler.
4. Empty remaining water from coupler and return it to
compartment.
5. Unplug power cord and return it to covered compartment.
covered Button
Faucet
Adapter
Collar
Red
Only
CAUTION: A sink spray hose can burst due to constant water pressure Fig ure B
while the dishwasher is being used. if installed on the same water line
as the dishwasher, disconnect sink spray hose and plug hole.
Electrical Connection for a Portable Dishwasher 3-Prong Polarized
An electrical supply of 120 volts, 60 Hz, AC only, 15 amps is required. For Grounding Plug
your personal safety, the dishwasher must be grounded. In the event of a
malfunction or breakdown, grounding will reduce the risk of electrical shock
by providing a path of least resistance for electrical current. This appliance
has a power cord with a 3-prong polarized grounding plug. It must be
plugged into a mating 3-prong grounding type receptacle (see Figure C),
installed and grounded in accordance with the National Electrical Code and
local codes and ordinances.
Cord
DANGER: Improper connection of the power cord can result in a risk of
electrical shock. Check with a qualified electrician if you are in doubt as to
whether the appliance is properly grounded. DO NOT modify the plug
provided with the dishwasher. If it will not fit the outlet, have a proper outlet
installed by a qualified electrician.
• DO NOT use an extension cord.
® DO NOT remove the power cord grounding prong.
10
3-Prong
Grounding Type
Receptacle
Figure C

Convert a Portable IVlodelto a Built-in
r portable dishwasher can be installed under the counter. A
,rsion kit is required and is available at your local Sears
Center - Part No. 808927 (18" width).
NING: DO NOT use the portable water supply hose for
1anent installation. It may burst, Complete instructions
in the conversion kit,
models are equipped with reversible door and access panel inserts in
ond and black. Some models also come with a white base door and access
installed on the dishwasher. If your model does not have a white
door and access panel, you may order both panels at no additional charge
the order card enclosed in your literature pack. To change color exposed,
',eed as follows:
To prevent electrical shock, disconnect electrical power
supply to dishwasher before changing panels.
Handle panels carefully to avoid injury.
I
---___
--.___
insert Panel
Frame
Strips
Remove frame strips on both sides of door panel. Flex insert
panel out in middle to clear console panel. Lift insert panel
out of bottom frame. Select desired color and reverse
procedure to install.
Remove frame strip on one side of access panel. Loosen,
but do not remove screws in other frame strips.
Slide insert panel out of frame. Put color panel of choice to
outside and replace panel in frame. Depending upon your
model, a white base panel will be exposed, or order one at
no additional charge with the enclosed card.
Be sure edges of insert panels are under frame strips on
opposite side. Press strips tightly against panel before
securing screws. Replace frame strips.
panel of up to 1/4 inch thickness may be used in place of furnished color panels. Cut panels of your choice to the
dimensions:
18" Width 24" Width
Panel: 17 _/ " 17"
- -16 x 23 11/18"x 17"
Door Panel
Loosen All Screws
Access Panel
Panel: 17 7/16x 6 1/._,, 23 !1/16"x 6 !/2"
will need a wood door decorator trim kit which is available at Sears Service Center - Part no. 809977.
!!:;!:
Door springs will need to be adjusted to balance weight of panels. See the Installation Instructions.
11

Care of Surfaces
• Wash exterior with mild non-abrasive detergent and water. Rinse and
dry.
• Interior is self-cleaning with normal use. If hard water causes lime build-
up, clean as follows:
• Operate dishwasher on Normal Wash cycle. Do not use detergent.
• After dishwasher begins to fill, open door.
- Pour 2 cups of white vinegar into empty dishwasher. Do not use
detergent.
° Close door and allow dishwasher to complete cycle.
,, If you feel it is necessary to clean interior further, do not use cleansers
or other abrasive cleaners. General household cleaners such as 409®
or Fantastic@ are recommended.
Care of Racks
Nicks and cuts in vinyl rack covering can be repaired with a liquid vinyl
material which is available at Sears Service Center - Part No. 5300809114.
!l,,
Cleaning the Pump and Spray Arms
Your dishwasher will flush away all normal food soils. However, bones, fruit pits, etc., may collect in openings and
should be removed to avoid clogging the drain system.
Caution: Allow dishwasher heating element to cool before cleaning,
Tower Models (Select Models) Spray Arm Models
Spray Arm Tower Base
Bolt
Spray Arm Bolt
o4_ ill ....... 1
t
__J
Pump Openings
1. Hold spray arm and turn tower base counterclockwise to
unscrew.
2. Lift out tower and remove spray arm bolt. Remove spray
arm. Clean out spray holes.
3. Clean in and around pump openings.
4. Replace spray arm on bearing. Replace spray arm bolt.
Replace tower base and tighten securely. Spray arm and
tower should rotate freely.
Remove Particles
Collected Here
12
Pump Openings
1. Remove plastic bolt.
2. Lift out spray arm. Clean out spray holes.
3. Clean in and around pump openings.
4. Replace spray arm. Tighten bolt securely.
Spray arm should rotate freely.
Remove Particles
Collected Here

Cleaning the Roat
Clean the float to prevent it from sticking. The float controls the water level in the
dishwasher; sticking may cause an overflow or no water fill. When removing float
to clean, pull up firmly until it snaps out. To replace float, push down until float
locks into place. This will activate the float switch.
Important: The small locking tabs are used to hold the float in place during
shipping. If these tabs break off during removal, no harm is done. The float
will still function properly.
Clean and
Remove
Particles
Collected
Here
Locking
Tabs
Care of Drain Air Gap
If a drain air gap was installed for your built-in dishwasher, check to make
sure it is clean, so the dishwasher will drain properly. Drain air gaps are
usually mounted on the countertop and can be inspected by removing the
cover, The drain air gap is not part of your dishwasher and is not
covered by Sears warranty.
l! ! =l l,
Storage or Seasonal Use
tf dishwasher is to remain idle for an extended period of time in...
gTemperatures
,, Shut off water and electrical power.
Remove access panel.
• Disconnect water lines from fill valve. Drain into a flat pan.
• Disconnect hoses from pump. Drain into a flat pan.
° Reconnect water lines to valve and hoses to pump.
= Pour 1 quart of non-toxic, RV (Recreational Vehicle)-type antifreeze into
empty dishwasher.
Drain Air Gap
Warm Temperatures
° Pour 1 quart of non-toxic, RV-type antifreeze into empty dishwasher to _-
prevent pump seals from drying out and sticking.
Caution: Before using dishwasher again, operate empty machine on Normal Wash cycle with detergent
in all cups.
,!!l ii ..... Hl l
Preparation for Moving
° Disconnect electrical power,
• Tape racks in place.
Turn off water supply.
Disconnect water and drain lines.
• Close door securely and tape shut.
- Wrap with blankets.
- If using a hand truck, lift dishwasher from side in upright position only.
13

PROBLEM
Dishwasher will not start.
Dishwasher will not fill with
water.
Dishwasher leaks.
Dishes not clean.
CAUSED BY SOLUTION
Dishwasher not receiving elec- Check electrical connection, house fuse or circuit breaker.
tricity.
Dialnot in correct positionfor cycle Make sure dial is turned far enough, cycle button is fullypushed in and
selected, door is latched.
No water supply. Makesure water supply valve under sink is fullyturned on. Clean float,
Water inletvalve clogged. Check water valve supply line - may be clogged with sediment. Clean
,,,,, ,,,,,,, ,, _ _. ......................................... _ ................. llll,
Dishwasher not level. Level dishwasher as described in Installation Instructions for built-in
Too much sudsing. Improper detergent or improper amount used. Refer to table on page
..... ,,,,, ,,, ............... ,,,,,
Float sticking. Clean float.
Water is not hot_ Raise water heater thermostat to 60°C(!40°F), if necessary, Use
Improper loading. Make sure dishes are loaded so spray reaches all surfaces and
out.
dishwashers. Do not place dishwasher on carpet.
9. Use fresh automatic dishwasher detergent only or try a different
brand.
If hand dishwashing detergentis used by mistake, pour one measuring
cup of vegetable oil in bottom of tub and run dishwasher through a
complete Normal Wash cycle with recommended amount of automatic
dishwasher detergent.
Water Heat option, if available. Do not use dishwasher during or right
after other heavy hot water use (bathing, laundry).
......ll,i, =.....
items drain properly. Do not overload. Do not nest items.
Spray arms not turning freely. Be sure a utensil has not blocked SpraY-arm. _,
Household water pressure too tow, If water pressure is low,do not use water for other purposes(bathing,
Spray arm plugged. Clean out holes in spray arms, See page 12.
Old detergent, Use only fresh automatic dishwasher detergent. Store tightly closed in
, ,,,,,,,, _ , ii
Dishwasher odor.
Soiled dishes held too tong in Use Rinse Hold cycle if dishes will not be washed at end of day,
dishwasher.
Vinyl rack coating. Plastic odor will be gone after several weeks use.
Soil build-up aroundfloat and below Check and clean periodically. See User Maintenance section.
door,
Dishware chipped or broken. Improper loading.
Dishes and interior of dishwasher
Iron or manganese in water,
brown or yellow.
Bronze tarnish on silverplate.
Silverplate worn off exposingbase
metal-takes on bronze hue.
Silverware stained,
Undissolved detergent contacting
wet silverware.
iii i i!l illl!
laundry) while dishwasher is running.
,,ll'"M
a cool, dry place. Discardold, lumpyor separated detergent. Do not fill
detergent cups until ready to wash.
Do not overload. Load glasses"in upperrack only. Place items in rows
between prongs. See Proper Loading section for tips.
!,
Install an iron or manganesefilter in home water supply.
Remove tarnish with silver polish. Replete silver.
Avoid spilling dry detergent on wet silverware. Clean with silverpolish.
Acidic or salty food soils.
Detergent cup does not open. Detergen!cup lid positionedwrong
at start of cycle.
14
Use Rinse Hold cycle. Certain foods left on silverware for exte
..................... _,
periods of time may cause pitting.
Use detergent dispenser instructions,

CAUSED BY
Hard water.
SO LUTiO N
, _ i _ _ _:::
Fill detergent cups to capacity. Use dishwasher detergent with highest::
available phosphorous content. May be necessary to install a water
softener.
water is not hot. Raisewaterheaterthermostatto 140°F (60°C), if necessary. Use Water
Heat option if available.
Cool Dry selected. Drying without heat may cause some spotting. Select Hot Dry.
Not enough or poor quality Use more automatic dishwasher detergent. Use detergent with highest
detergent, available phosphorous content, especially if you have hard water,
Old detergent. Use only fresh granular automatic dishwasher detergent, Store tightly
closed in a cool dry place. Discard old lumpyor separated detergent. Do
not fill detergent cups until ready to wash.
No rinse agent. Refill rinseagent dispenser approximatelyonce a monthor replace solid
form rinse agent basket when empty.
NOTE: To remove spots or film from dishes:
1. Load dishware into dishwasher (no metal items)
2. Put 2 cups white vinegar in a container on lower rack.
3. Run dishwasher through a complete Normal Wash cycle. Vinegar
will splash out during washing.
Etching-permanentfilming
whichCannotbe removed.
Dishes not dry.
Cycle takes too long.
J ,,,,,,
Water left in bottom of tub.
Too much detergent in soft Reduce amount of dishwasher detergent. Use detergent with lower
water, phosphorous content.
Improper loading.
Make sure dishes and glassware are loaded properly to permit water
spray to rinse all surfaces, Do not overload,
Water is not hot. Raise water heater thermostat to 140°F (60°C), if necessary.
No rinse agent. Refill liquid rinse agent dispenser approximately once a month or
replace solid form rinse agent basket when empty.
Cool Dry selected. Select Hot Dry for better drying.
improper loading. Load dishes so itemsdrain properly.
Water Heat option selected (if
available).
Heating water takes approximately one minute for each degree of
temperature rise.Times given in cycle description do not include water
heating time,
Normal amount of water.
It is normalfor a small amount of clean waterto remain inbottomof tub
after each cycle.
Drain hose loop too low.
Drain hose kinked.
__ !!
Drain air gap blocked.
Drain hose should have approximately 32 inches high loop from floor.
Reposition drain hose to eliminate kink.
Clean the drain air gap. See User Maintenance Instructions.
Checkvalve not installed indrain
hose.
marks ondishes,
Metal utensils rubbing against
dishes during wash.
Filmbuild-up onlowerfront
tub.
Some detergentdid not dissolve.
See Installation Instructions for check valve information.
Load metal utensilsso theydo not rub againstdishes. Black marks may
be removed with mild abrasive cleanser and plastic scouring pad.
,
Use fresh, automatic dishwasher detergent. Usedetergent with highest
available phosphorouscontent, especially if you have hard water. Raise
water heater thermostatto 140°F(60°C), if necessary,Run water atsink
until hot before starting dishwasher and use Water Heat option if
available, Remove film with dishwasher detergent and warm water.

S _A/FRS
SearsService,Easy... Convenient... Everywhere
"We Service What We Sell" is our assurance you
depend on Sears for service.., and Sears service is nationwide.
Your dishwasher has added value when you consider that Sears
has service units nationwide, staffed with professional
technicians specifically trained on Sears appliances and having
part, tools and equipment to insure that we meet our pledge to you
•.. "We Service What We Sell."
Sears Maintenance Agreement
Maintain the value of your Kenmore® dishwasher with a
Sears Maintenance Agreement. Sears dishwashers are
designed, manufactured, and tested for years of dependable
operation. Yet, any modern appliance may require service from
time to time.
The Sears Maintenance Agreement
Is your way to buy tomorrow's service at today's price.
, Eliminates repair bills resulting from normal use.
, Allows for as many service calls as required.
• Provides for service by professional Sears-trained
technicians.
o Offers an annual preventive maintenance check-up at your
request.
This maintenance agreement does not cover original
installation, reinstallation, or damage resulting from external
causes such as acts of God, abuse, theft, fire, flood, wind,
lightning, freezing, power failure, power reduction, etc. Please
ask a salesperson to see the agreement for all of the terms and
conditions.
Furl One-Year Warranty on Dishwasher
For one year from the first day of use in your home, Sears will repair, free of charge, defects in material or workmanship which
appear in this dishwasher.
Ultra LifeTM Tub Models
Full Ten-Year Warranty Against Leaks in the Tub and inner Door Panel
For ten years from the first day of use inyour home, if a leak should occuras a result of failure of the Ultra LifeTM tub or inner
door panel due to cracking, chipping, orpeeling, Sears will replace, free of charge, the tub or innerdoor panel.
Nylon Coated Rack Models
Limited Five-Year Warranty
For five years from the first day of use inyour home, if a leak should occur as a resultof failure of the porcelain enamel tub due
to rust or corrosion, or if a leak should occur as a resultof failure ofthe polypropylene inner door panel due to cracking, chipping,
or peeling, Sears wit!replace, free of charge, the tub orinner door panel.
Porcelain Tub Models
Limited Ten-YearWarranty Against Leaks
After five years and through ten years, Jfa leak should occur as a result of failure of the porcelain enamel tub due to rust or
corrosion, or if a leak should occur as a resultoffailure of the polypropylene inner door panel due to cracking, chipping,or
peeling, Sears will furnish, free of charge, a replacement tub or inner door panel. You pay for labor.
If the dishwasher is subjected to other than private family use, the above warranty coverage iseffective for only 90 days.
Warranty service is available by contacting the NEAREST SEARS SERVICE CENTER!DEPARTMENT in the United States.
This warranty applies only while this product is in use in the United States.
This warranty gives you specific legal rights, and you may have other rights which vary from state to state.
SEARS, ROEBUCK and CO., Dept. 7310R-W Sears Tower, Chicago, IL 60684
PRINTED IN U,S.A. 154092901B
 Loading...