

Kenmore 1252 Instructions Manual

DPX55016
INSTRUCTIONS
MODEL I252 o ZIGo ZAG SEWING MACHINE
iiiiiiiiiii!iiiiiiiiiiiiiiiiiiiiiiiii!iiiiiiiiiiiiiii!ili!ill
iiiiiiiii_i!iiiii_Kii_iiii!iiiiii_iiiii!i!_i_ili!ii!!!ii_
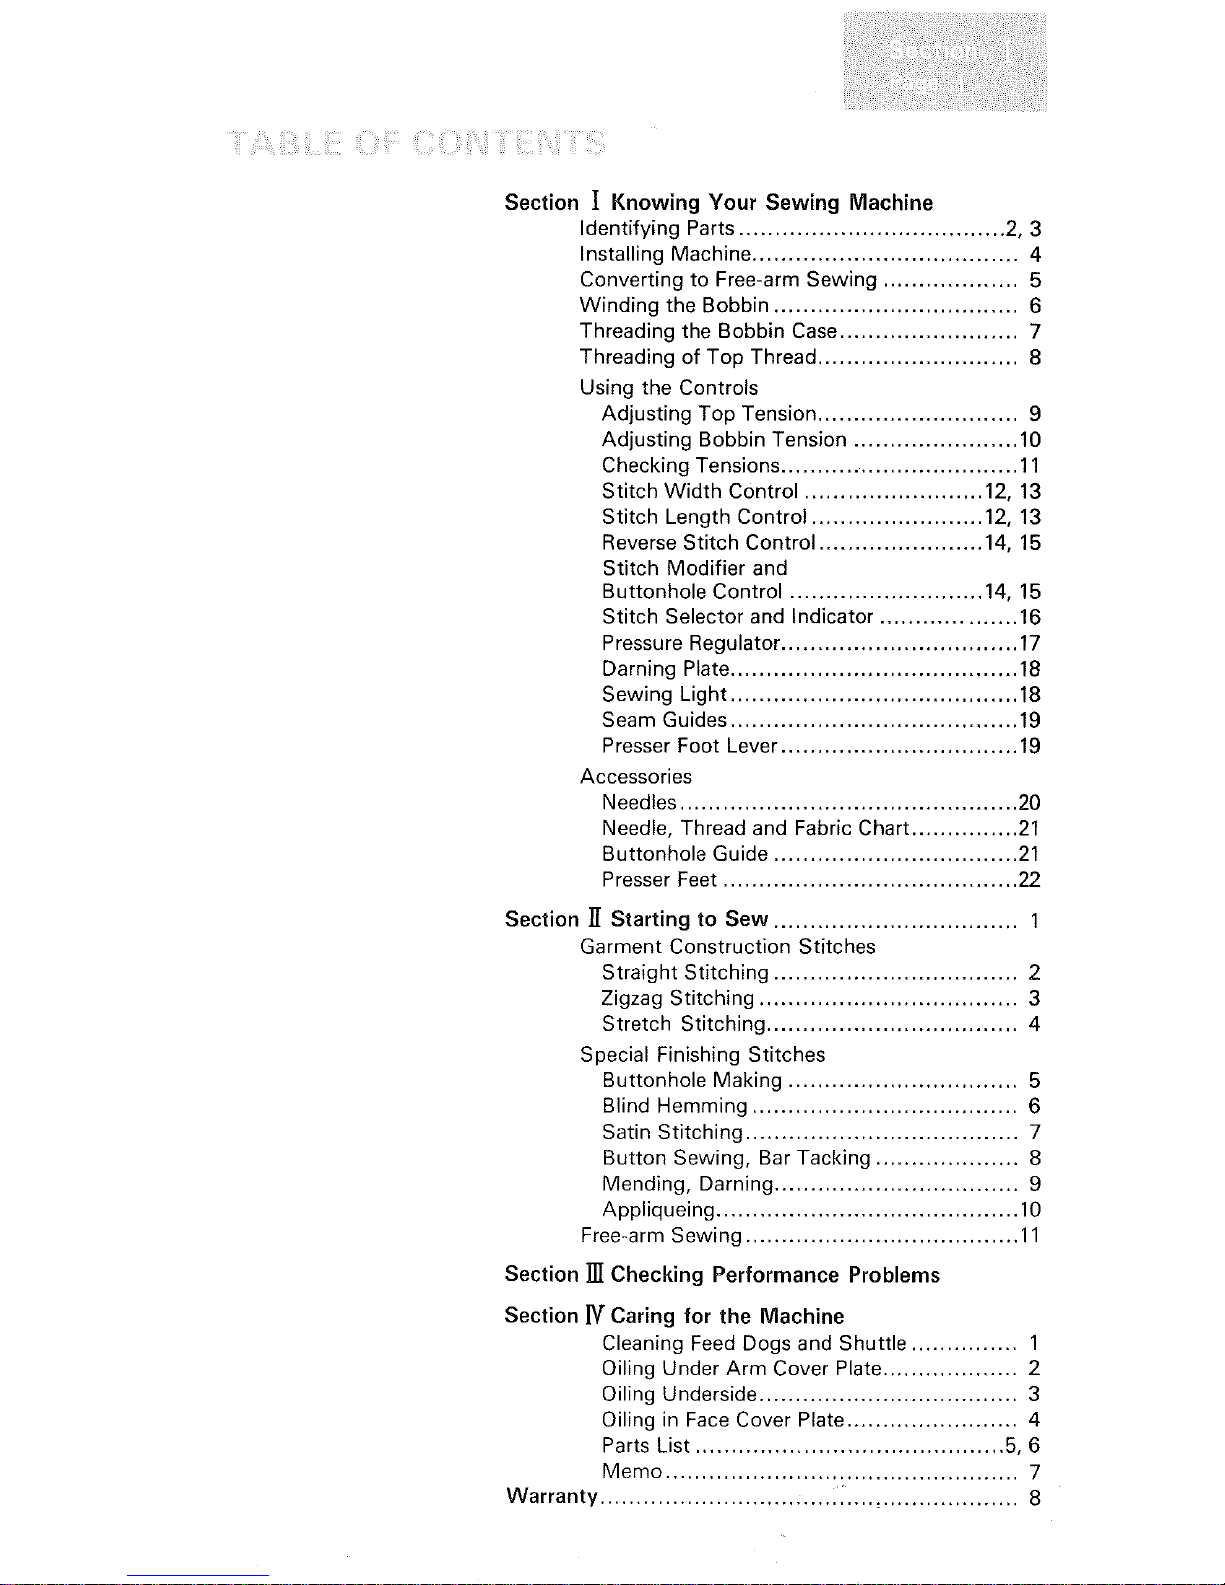
Section I Knowing Your Sewing Machine
Identifying Parts ..................................... 2, 3
Installing Machine ..................................... 4
Converting to Free-arm Sewing ................... 5
Winding the Bobbin .................................. 6
Threading the Bobbin Case ......................... 7
Threading of Top Thread ............................ 8
Using the Controls
Adjusting Top Tension ............................ 9
Adjusting Bobbin Tension ....................... 10
Checking Tensions ................................. 11
Stitch Width Control ......................... 12, 13
Stitch Length Control ........................ 12, 13
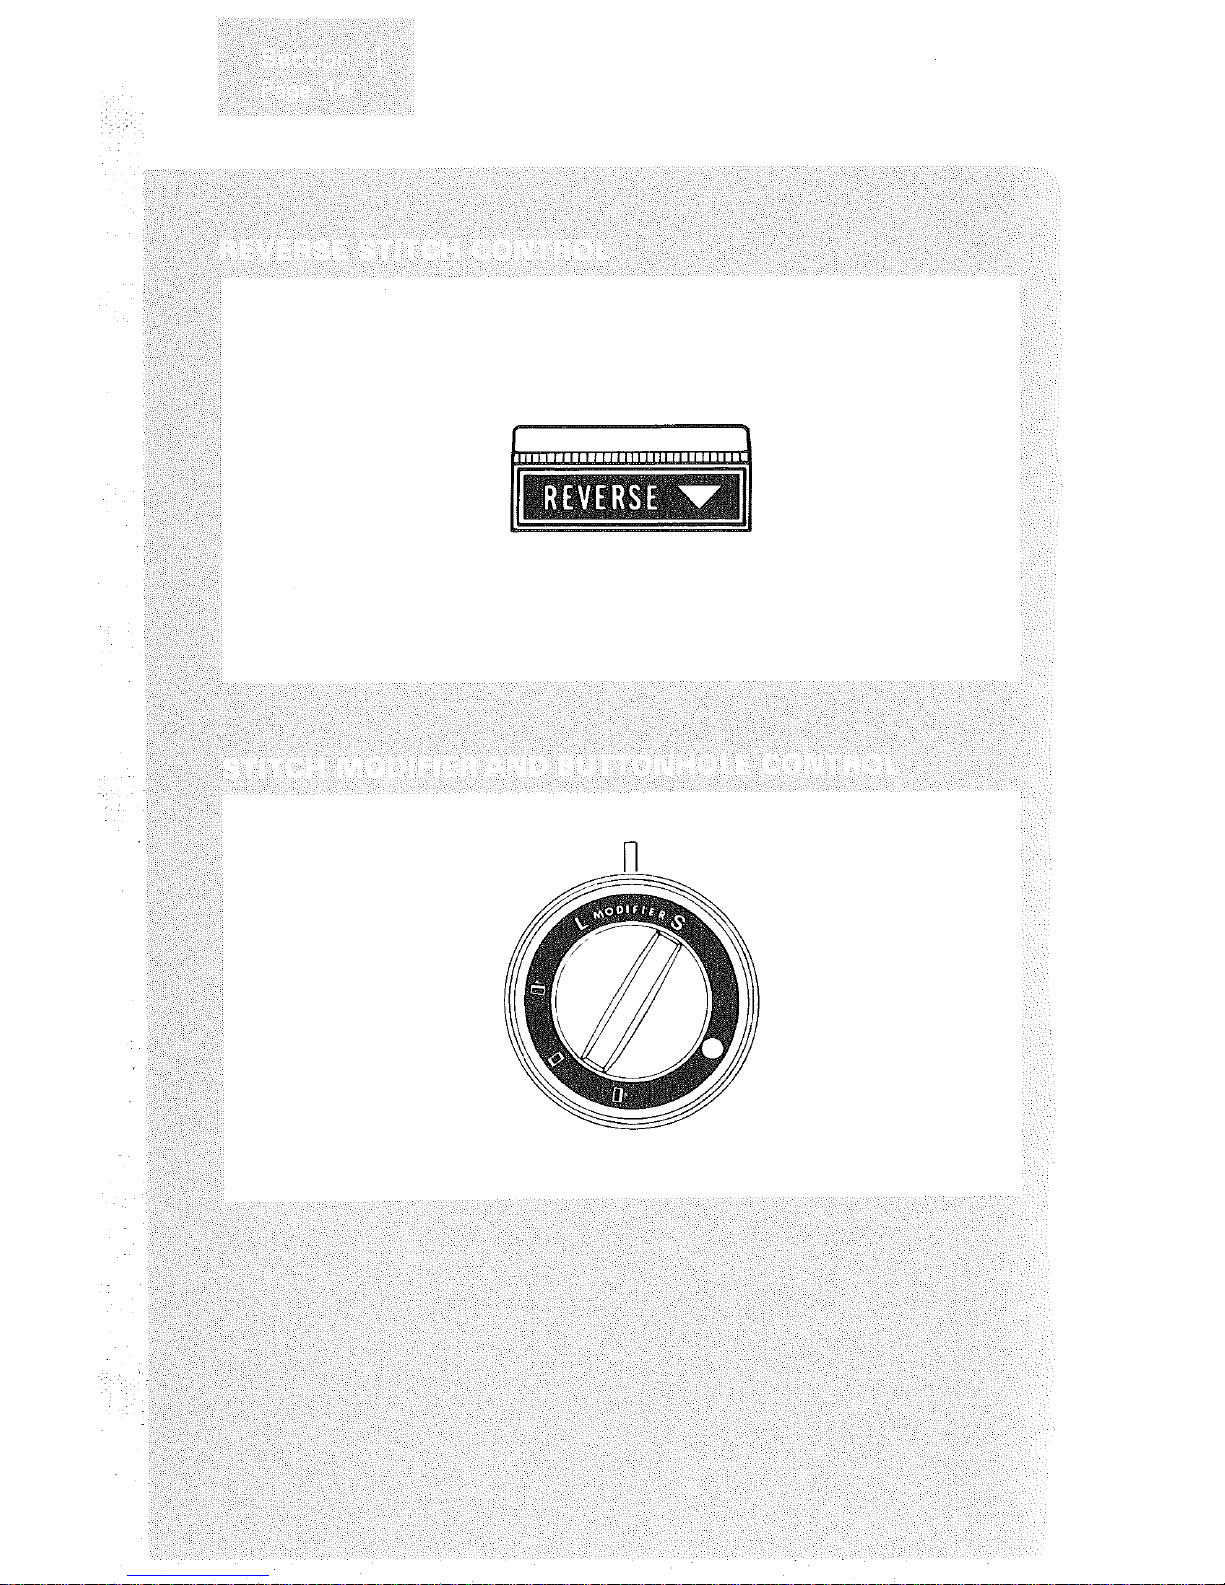
Reverse Stitch Control ....................... 14, 15
Stitch Modifier and
Buttonhole Control ........................... 14, 15
Stitch Selector and Indicator ................... 16
Pressure Regulator ................................. 17
Darning Plate ........................................ 18
Sewing Light ........................................ 18
Seam Guides ........................................ 19
Presser Foot Lever ................................. 19
Accessories
Needles ............................................... 20
Needle, Thread and Fabric Chart ............... 21
Buttonhole Guide .................................. 21
Presser Feet ......................................... 22
Section ]_ Starting to Sew .................................. 1
Garment Construction Stitches
Straight Stitching .................................. 2
Zigzag Stitching .................................... 3
Stretch Stitching ................................... 4
Special Finishing Stitches
Buttonhole Making .............................. 5
Blind Hemming ................................... 6
Satin Stitching .................................... 7
Button Sewing, Bar Tacking .................. 8
Mending, Darning ................................ 9
Appliqueing ........................................ 10
Free-arm Sewing .................................... 11
Section ]]] Checking Performance Problems
Section IV Caring for the Machine
Cleaning Feed Dogs and Shuttle ............... 1
Oiling Under Arm Cover Plate ................... 2
Oiling Underside .................................... 3
Oiling in Face Cover Plate ........................ 4
Parts List ........................................... 5, 6
Memo ................................................. 7
Warranty ........................... :.... iJ........................ 8
@ @
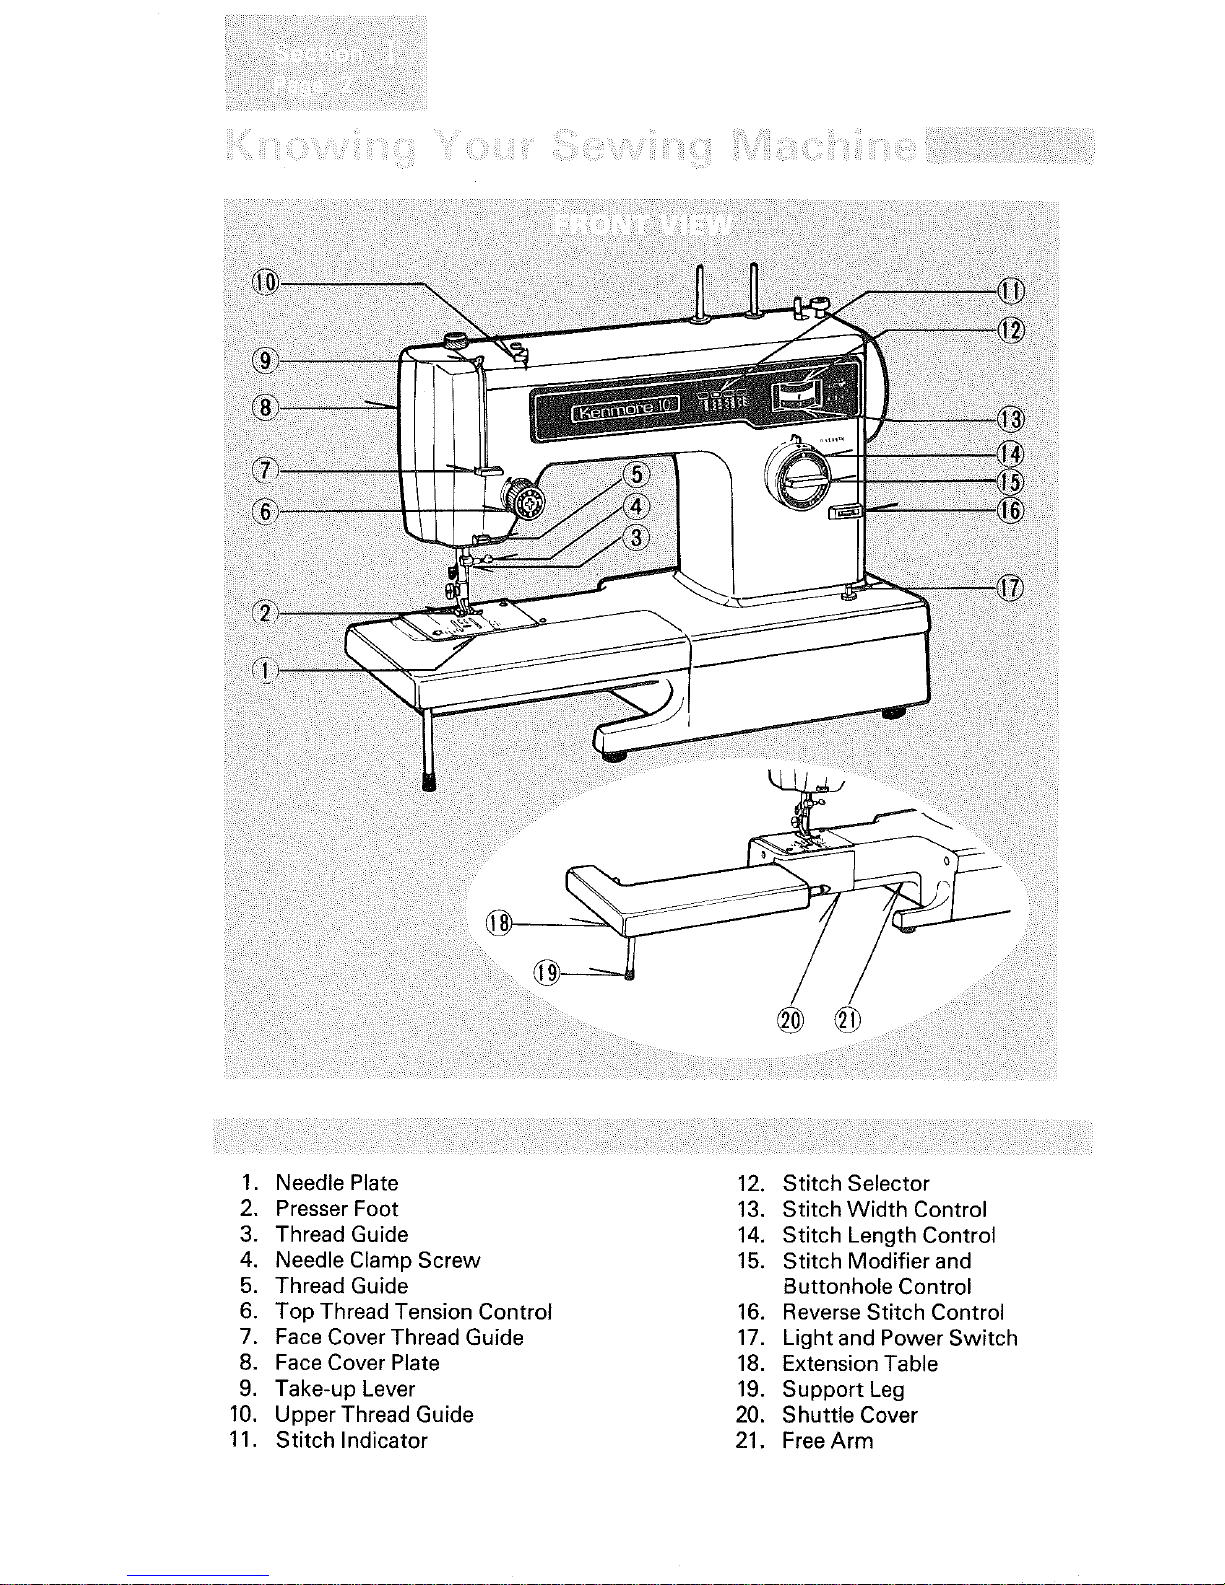
1. Needle Plate 12. Stitch Selector
2, Presser Foot 13. Stitch WidthControl
3. Thread Guide 14. Stitch Length Control
4. Needle Clamp Screw 15. Stitch Modifier and
5. Thread Guide Buttonhole Control
6. Top Thread Tension Control 16. Reverse Stitch Control
7. Face Cover Thread Guide 17. Light and Power Switch
8. Face Cover Plate 18. Extension Table
9. Take-up Lever 19. Support Leg
10. Upper Thread Guide 20. Shuttle Cover
11. Stitch Indicator 21, Free Arm
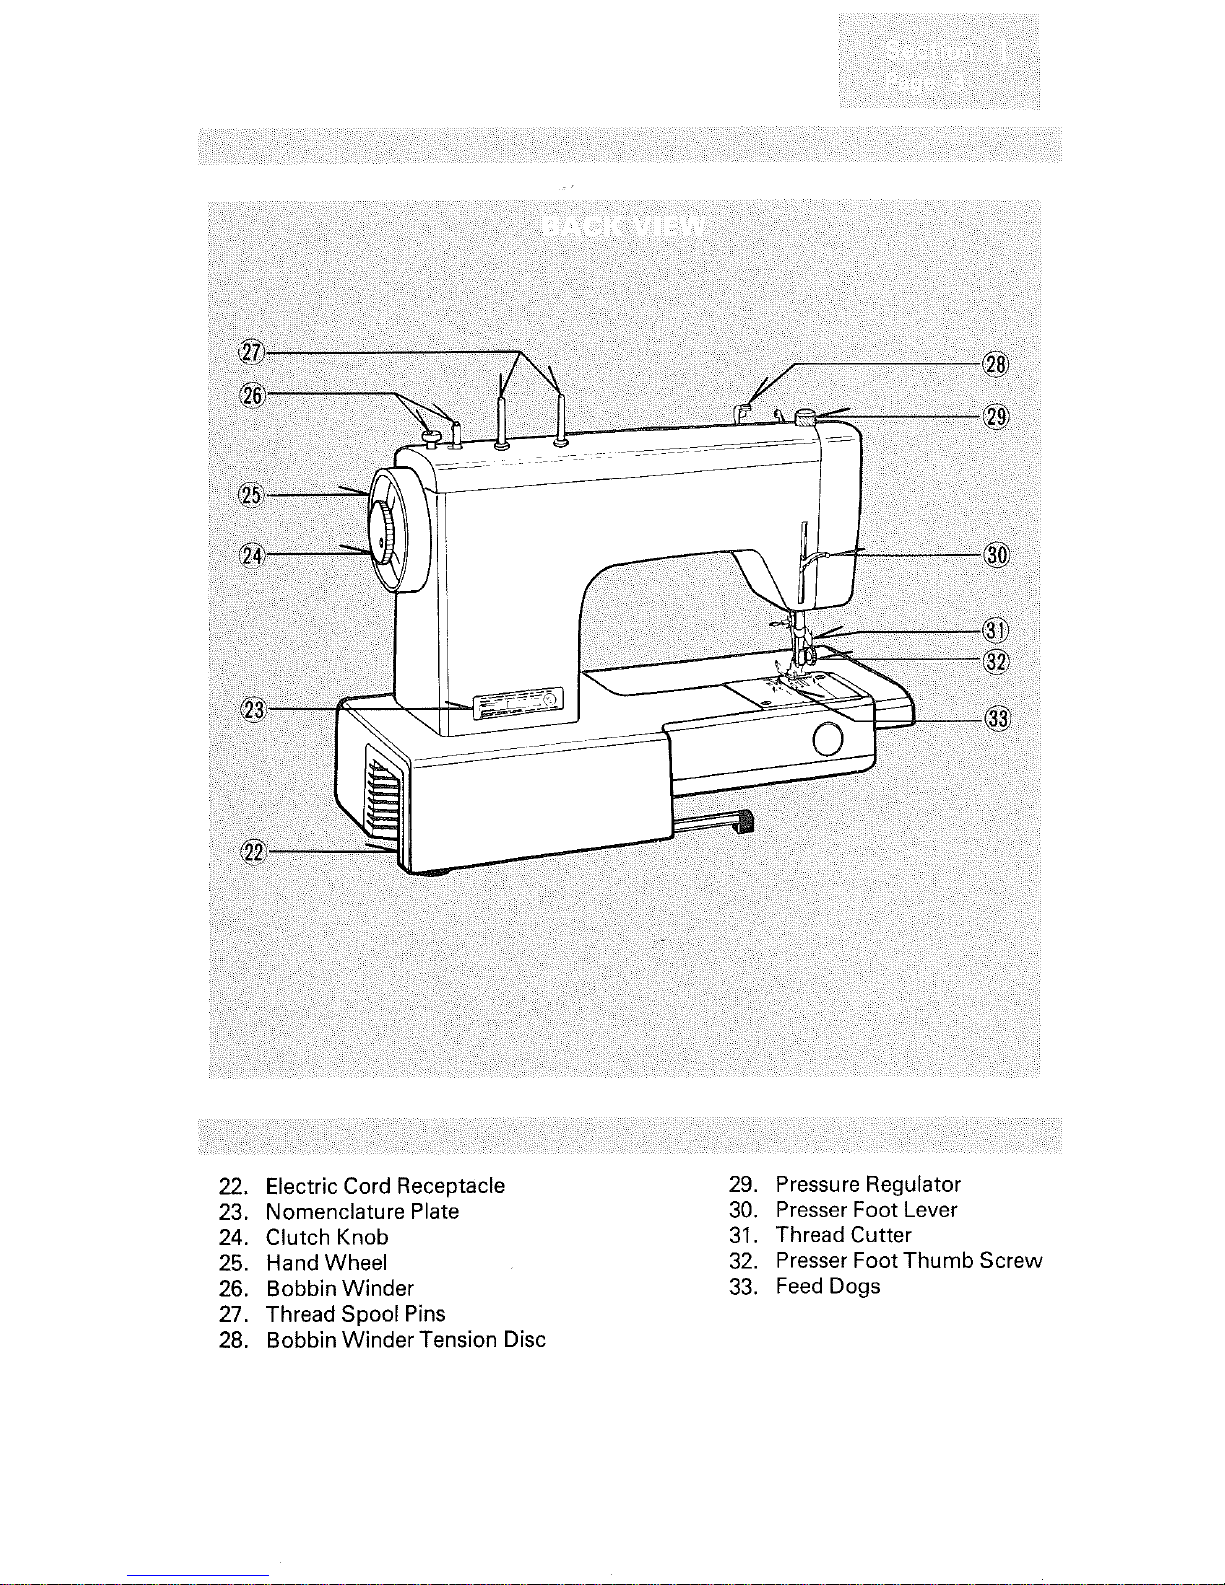
22.ElectricCordReceptacle
23.NomenclaturePlate
24.ClutchKnob
25.HandWheel
26.BobbinWinder
27.ThreadSpoolPins
28.BobbinWinderTensionDisc
29.PressureRegulator
30.PresserFootLever
31.ThreadCutter
32.PresserFootThumbScrew
33.FeedDogs
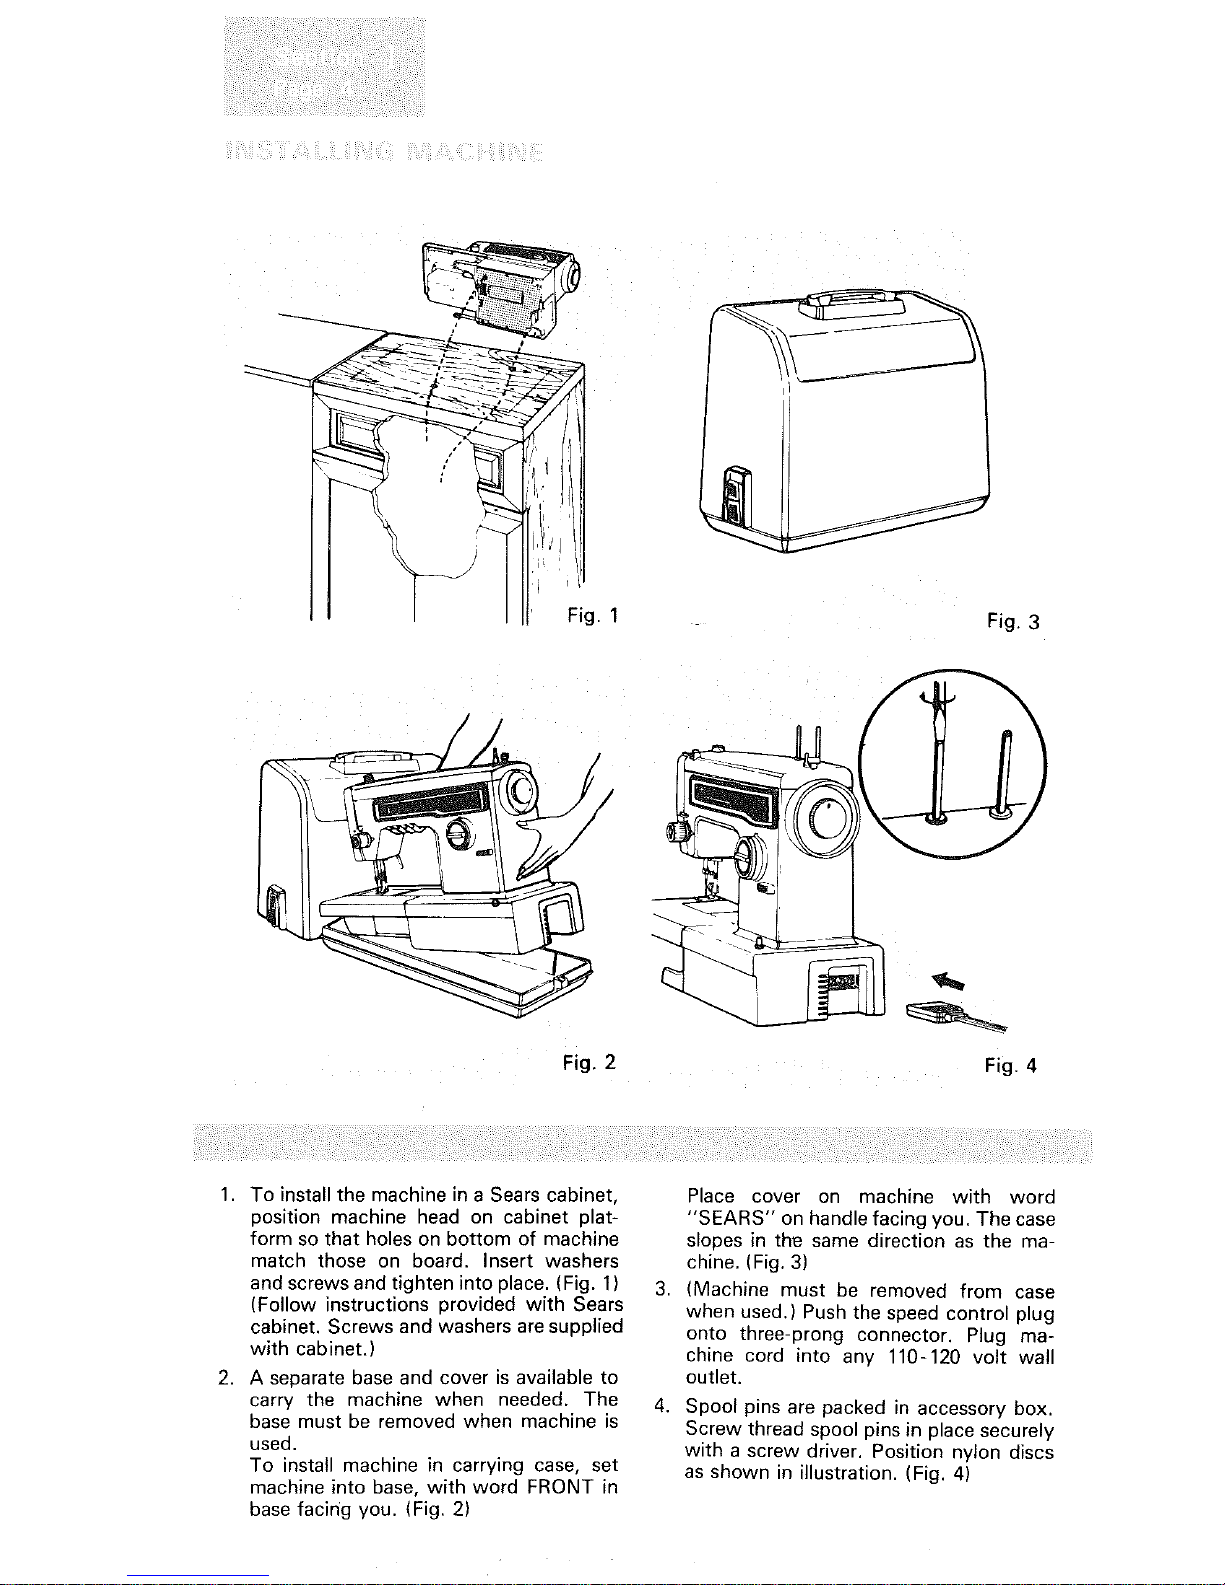
Fig.1
Fig. 2
Fig. 3
Fig. 4
1. To install the machine in a Sears cabinet,
position machine head on cabinet plat-
form so that holes on bottom of machine
match those on board. Insert washers
and screws and tighten into place. (Fig. 1)
(Follow instructions provided with Sears
cabinet. Screws and washers are supplied
with cabinet.)
2. A separate base and cover ts available to
carry the machine when needed. The
base must be removed when machine is
used.
To install machine in carrying case, set
machine into base, with word FRONT in
base facing you. (Fig, 2)
3,
4,
Place cover on machine with word
"SEARS" on handle facing you. The case
slopes in th_ same direction as the ma-
chine. (Fig, 3)
(Machine must be removed from case
when used.) Push the speed control plug
onto three-prong connector. Plug ma-
chine cord into any 110-120 volt wall
outlet.
Spool pins are packed in accessory box,
Screw thread spool pins in place securely
with a screw driver, Position nylon discs
as shown in illustration. (Fig, 4)
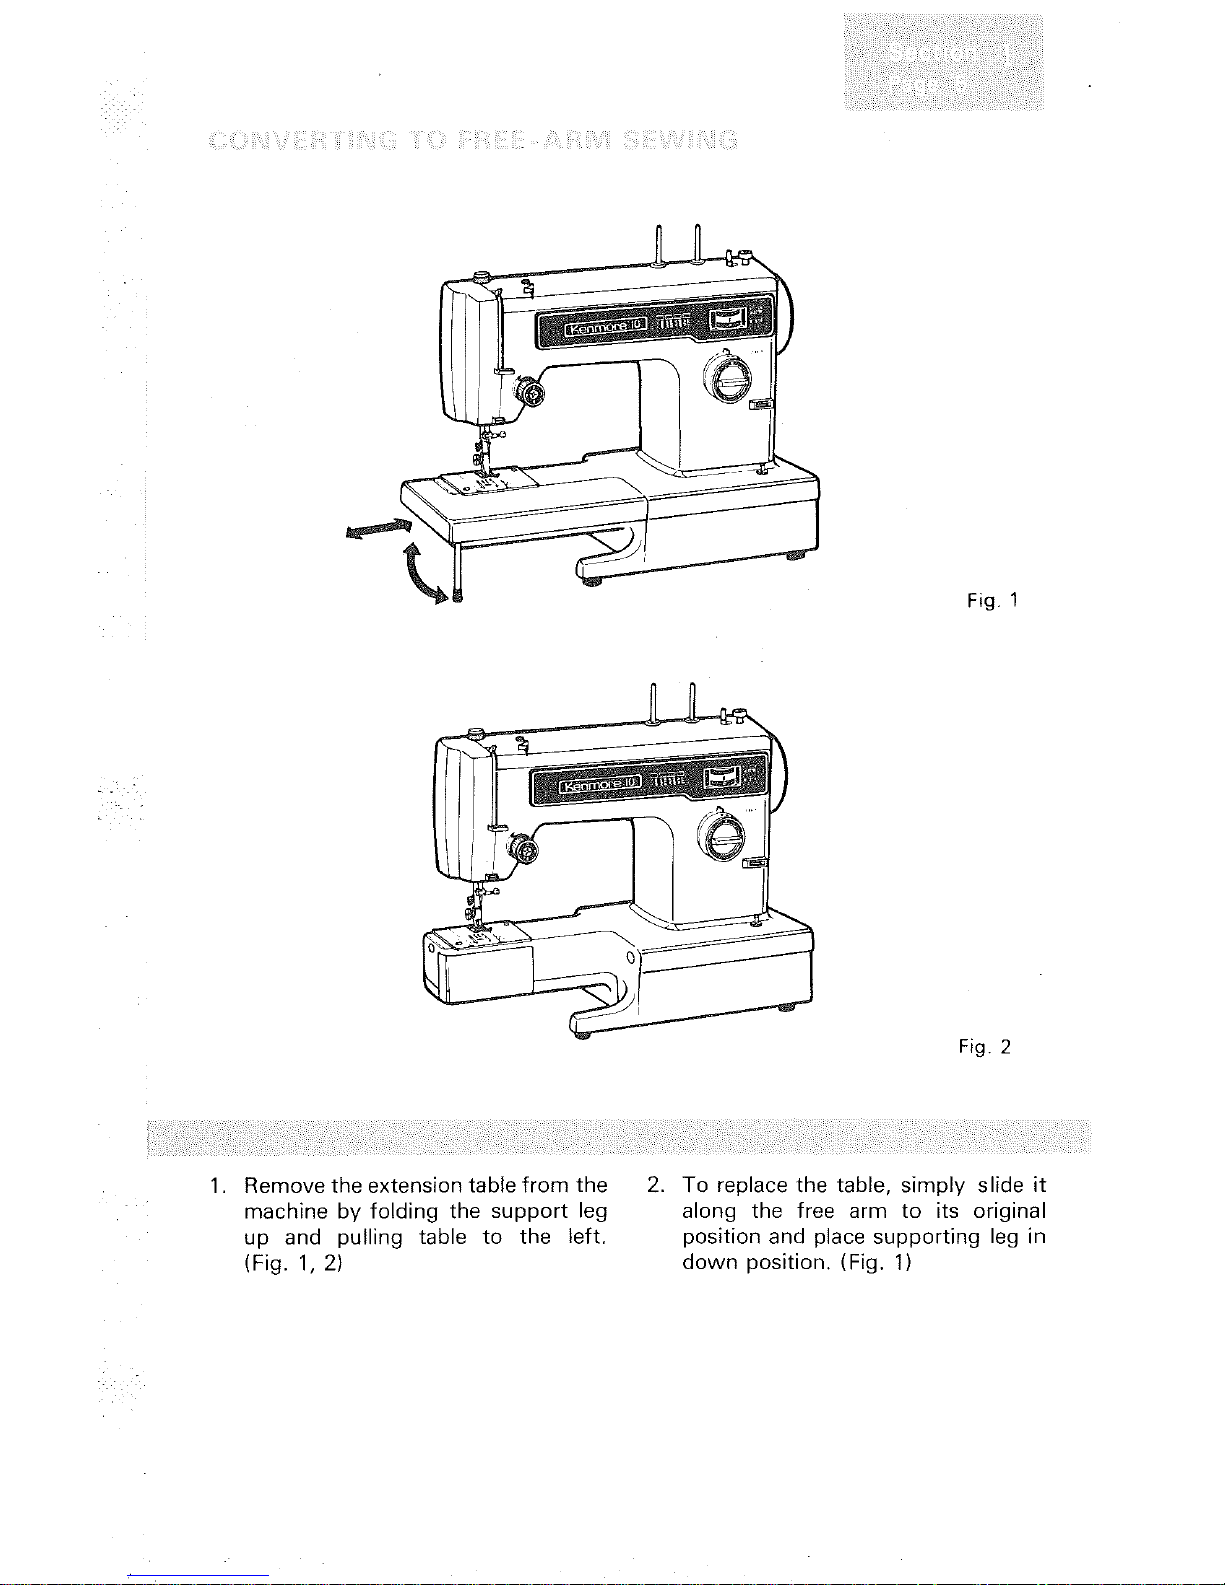
Fig.1
Fig. 2
1. Remove the extension table from the
machine by folding the support leg
up and pulling table to the left,
(Fig. 1, 2)
2. To replace the table, simply slide it
along the free arm to its original
position and place supporting leg in
down position. (Fig. 1)
\
®
1,
2.
3.
4.
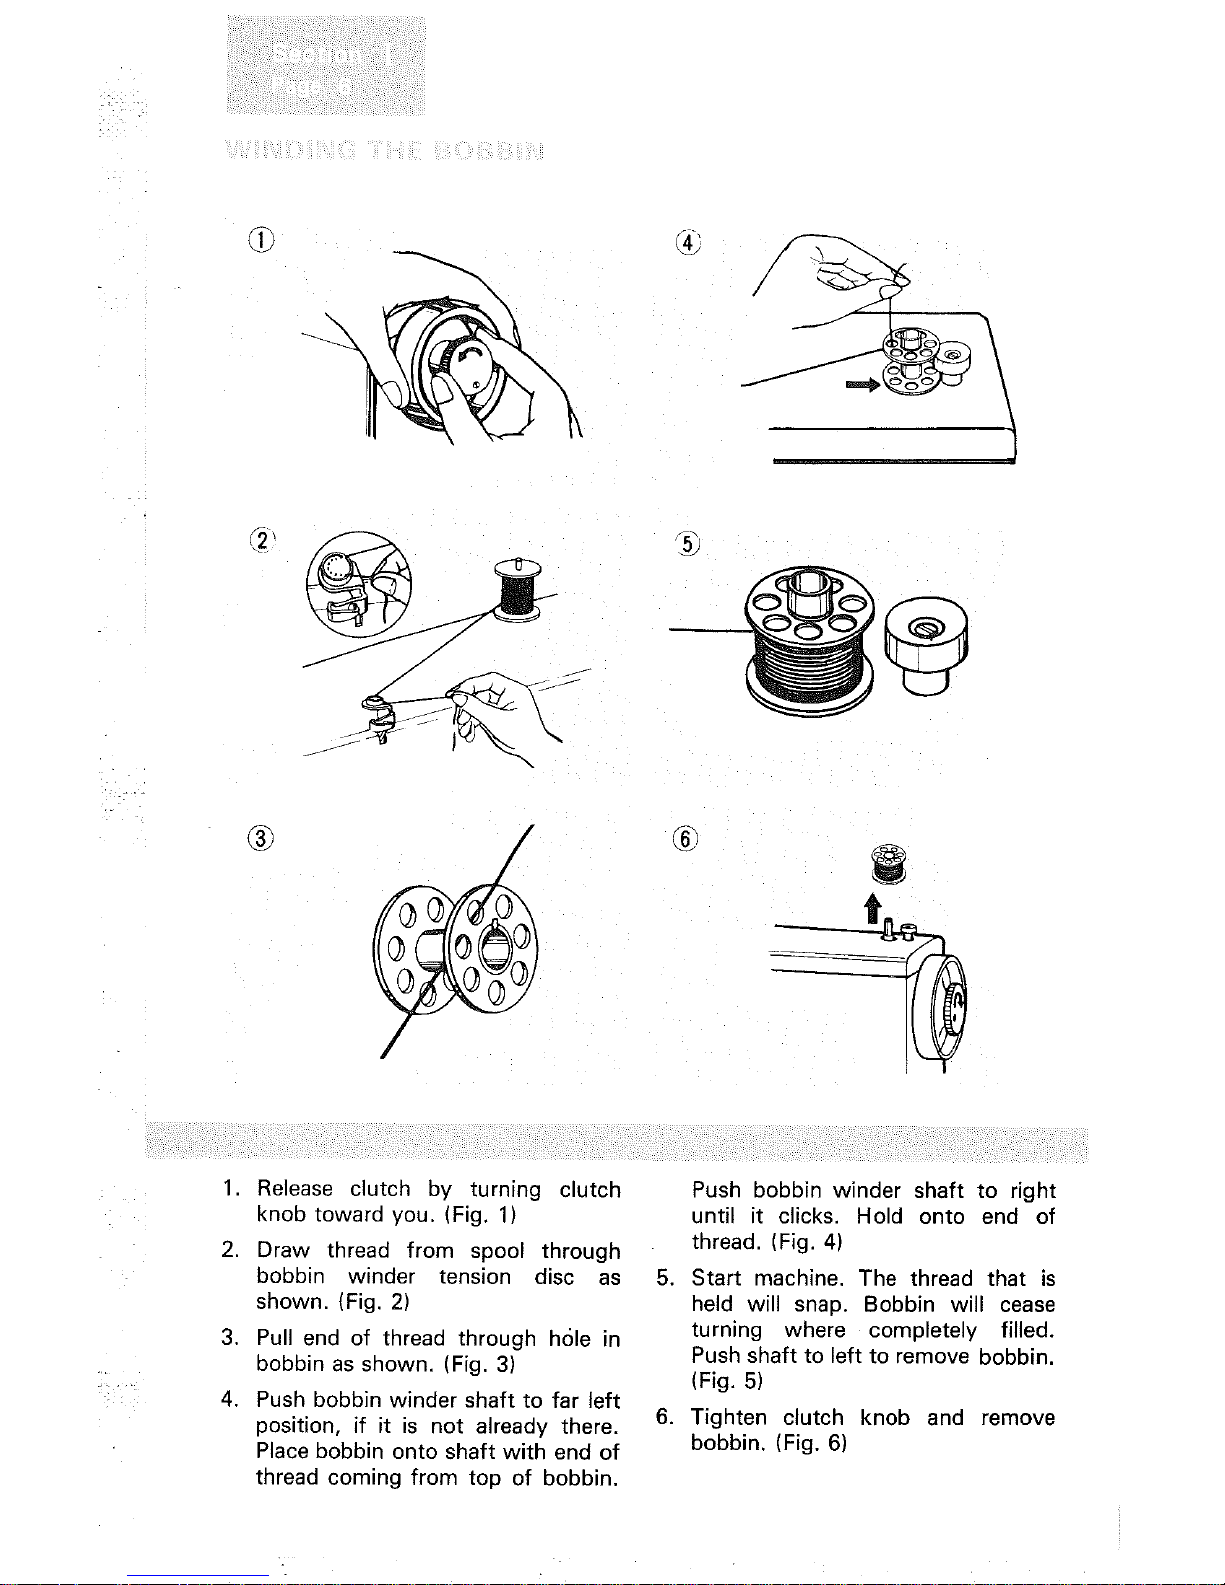
Release clutch by turning clutch
knob toward you. (Fig. 1)
Draw thread from spool through
bobbin winder tension disc as
shown. (Fig. 2)
Pull end of thread through hole in
bobbin as shown. (Fig. 3)
Push bobbin winder shaft to far left
position, if it is not already there.
Place bobbin onto shaft with end of
thread coming from top of bobbin.
Push bobbin winder shaft to right
until it clicks. Hold onto end of
thread. (Fig. 4)
5. Start machine. The thread that is
held will snap. Bobbin will cease
turning where completely filled.
Push shaft to left to remove bobbin.
(Fig. 5)
6. Tighten clutch knob and remove
bobbin. (Fig. 6)
i_i__i_il_
• i/
® (# ®
®
\
f \
® ®
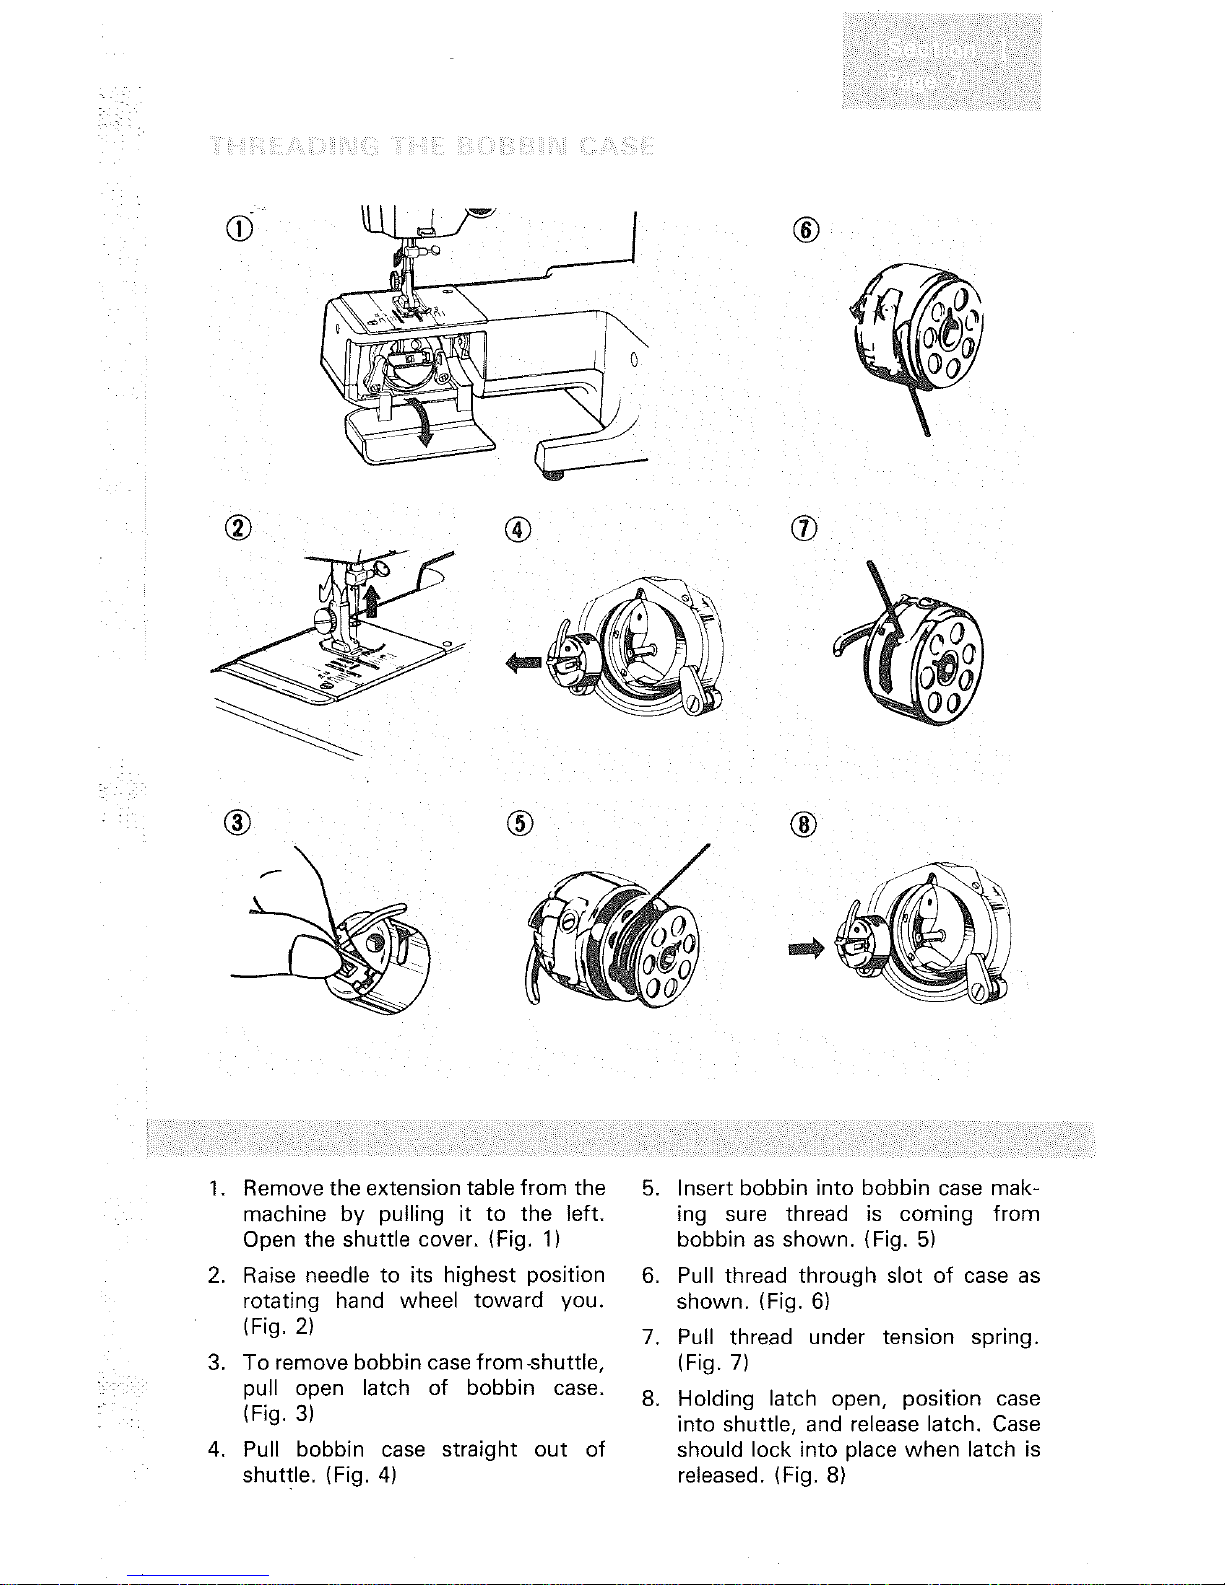
1. Remove the extension table from the
machine by pulling it to the left.
Open the shuttle cover. (Fig. 1)
2. Raise needle to its highest position
rotating hand wheel toward you.
(Fig. 2)
3. To remove bobbin case from-shuttle,
pull open latch of bobbin case.
(Fig. 3)
4. Pull bobbin case straight out of
shuttle. (Fig. 4)
5, Insert bobbin into bobbin case mak-
ing sure thread is coming from
bobbin as shown. (Fig. 5)
6. Pull thread through slot of case as
shown (Fig. 6)
7. Pull thread under tension spring.
(Fig, 7)
8, Holding latch open, position case
into shuttle, and release latch. Case
should lock into place when latch is
released. (Fig. 8)
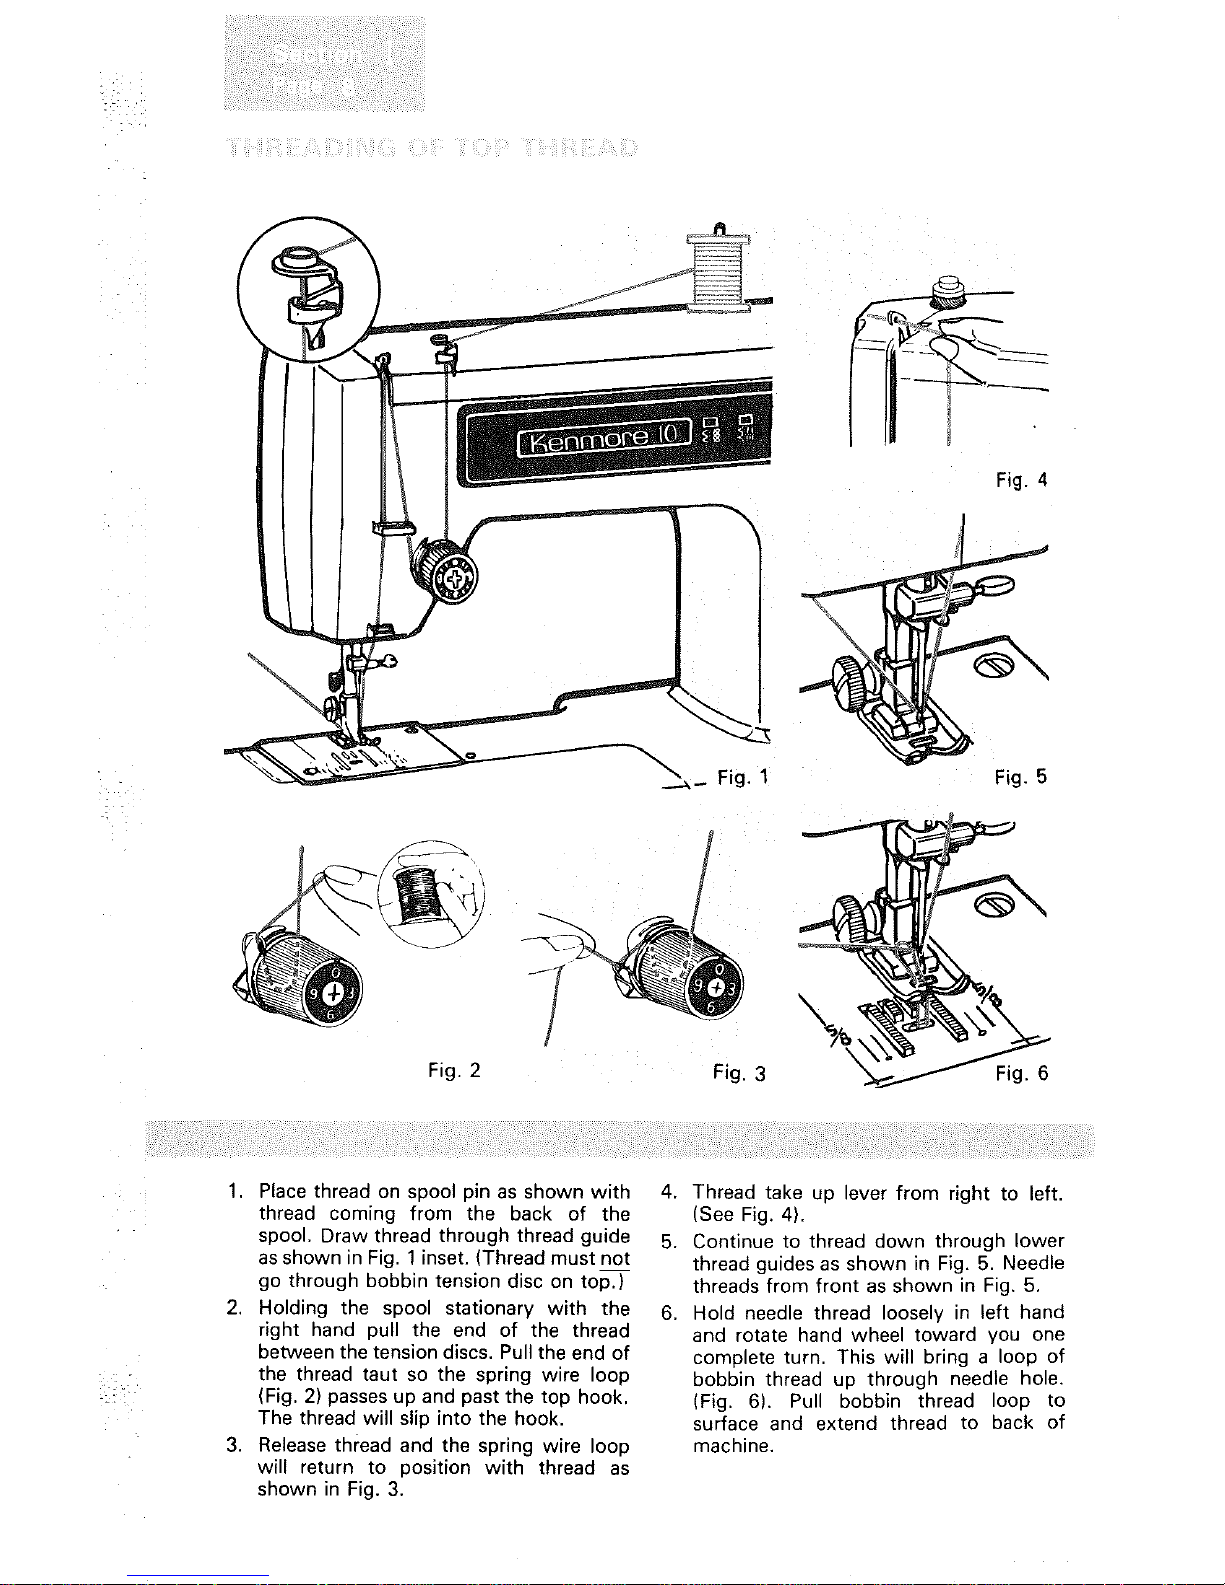
Fig2
Fig.4
Fig.5
1. Place thread on spool pin as shown with
thread corn ng from the back of the
spool. Draw thread through thread guide
as shown in Fig. 1 inset. (Thread must not
go through bobbin tension disc on top.)
2. Holding the spool stationary with the
right hand pull the end of the thread
between the tension discs. Pull the end of
the thread taut so the spring wire loop
(Fig. 2) passes up and past the top hook.
The thread will slip into the hook.
3. Release thread and the spring wire loop
will return to position with thread as
shown in Fig. 3.
4. Thread take up lever from right to left.
(See Fig. 4).
5. Continue to thread down through lower
thread guides as shown in Fig. 5. Needle
threads from front as shown in Fig. 5,
6. Hold needle thread loosely in left hand
and rotate hand wheel toward you one
complete turn. This will bring a loop of
bobbin thread up through needle hole.
(Fig. 6). Pull bobbin thread loop to
surface and extend thread to back of
machine.
_ ii!_i!!!i__i_i Uii!il,ij_i _ii,ii i_¸ _i! !_!i i!__ii _!i__
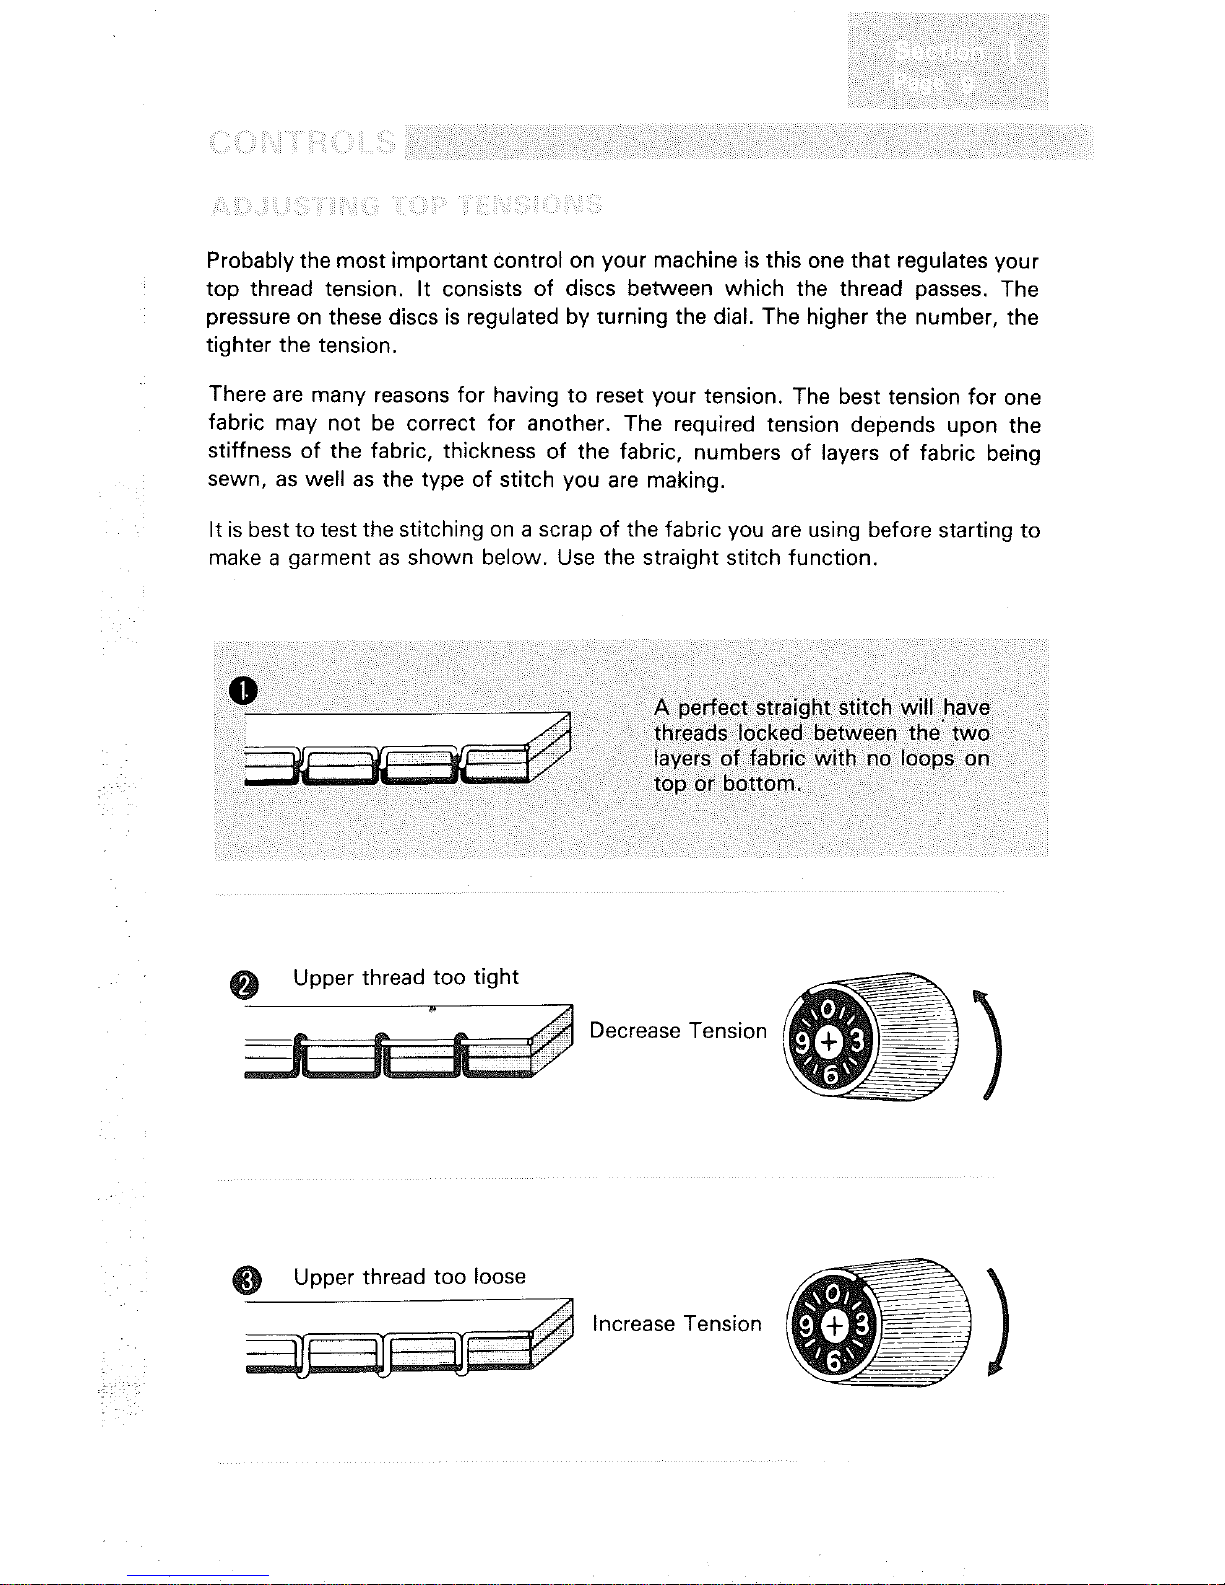
Probably the most important control on your machine is this one that regulates your
top thread tension. It consists of discs between which the thread passes. The
pressure on these discs is regulated by turning the dial. The higher the number, the
tighter the tension.
There are many reasons for having to reset your tension. The best tension for one
fabric may not be correct for another. The required tension depends upon the
stiffness of the fabric, thickness of the fabric, numbers of layers of fabric being
sewn, as well as the type of stitch you are making.
It is best to test the stitching on a scrap of the fabric you are using before starting to
make a garment as shown below. Use the straight stitch function.
O Upper thread too tight
Decrease Tension
O Upper thread too loose
Increase Tension
?_ _ii_i_ill!i_iii___i_?!iii!i_i_!i!!i i_i ji i_i?
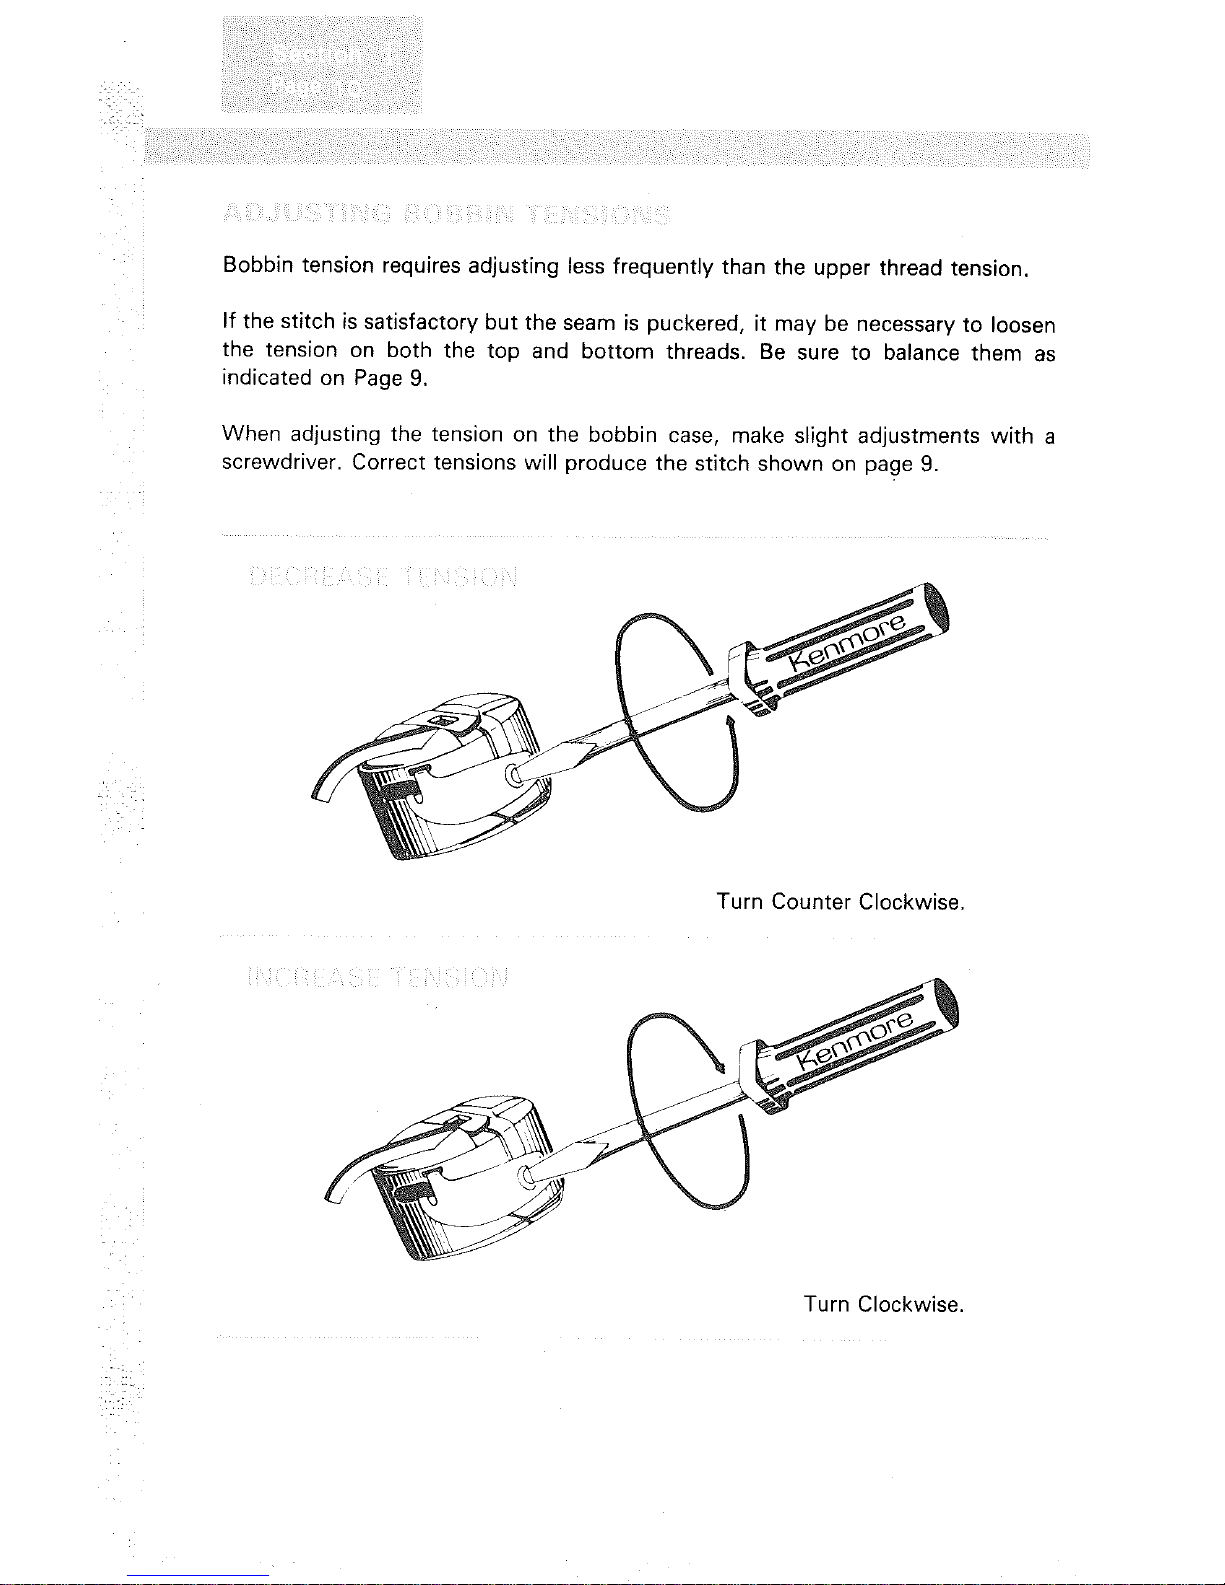
Bobbintensionrequiresadjustinglessfrequentlythantheupperthreadtension.
Ifthestitchissatisfactorybuttheseamispuckered,itmaybenecessarytoloosen
thetensiononboththetopandbottomthreads.Besureto balancethemas
indicated on Page 9.
When adjusting the tension on the bobbin case, make slight adjustments with a
screwdriver. Correct tensions will aroduce the stitch shown on page 9.
Turn Counter Clockwise.
Turn Clockwise.
_iilli__!_iiiiill¸_iill!iii!i,liiiiii_!iii!i_iiiiiili:_ii_¸¸¸ili¸'ii!
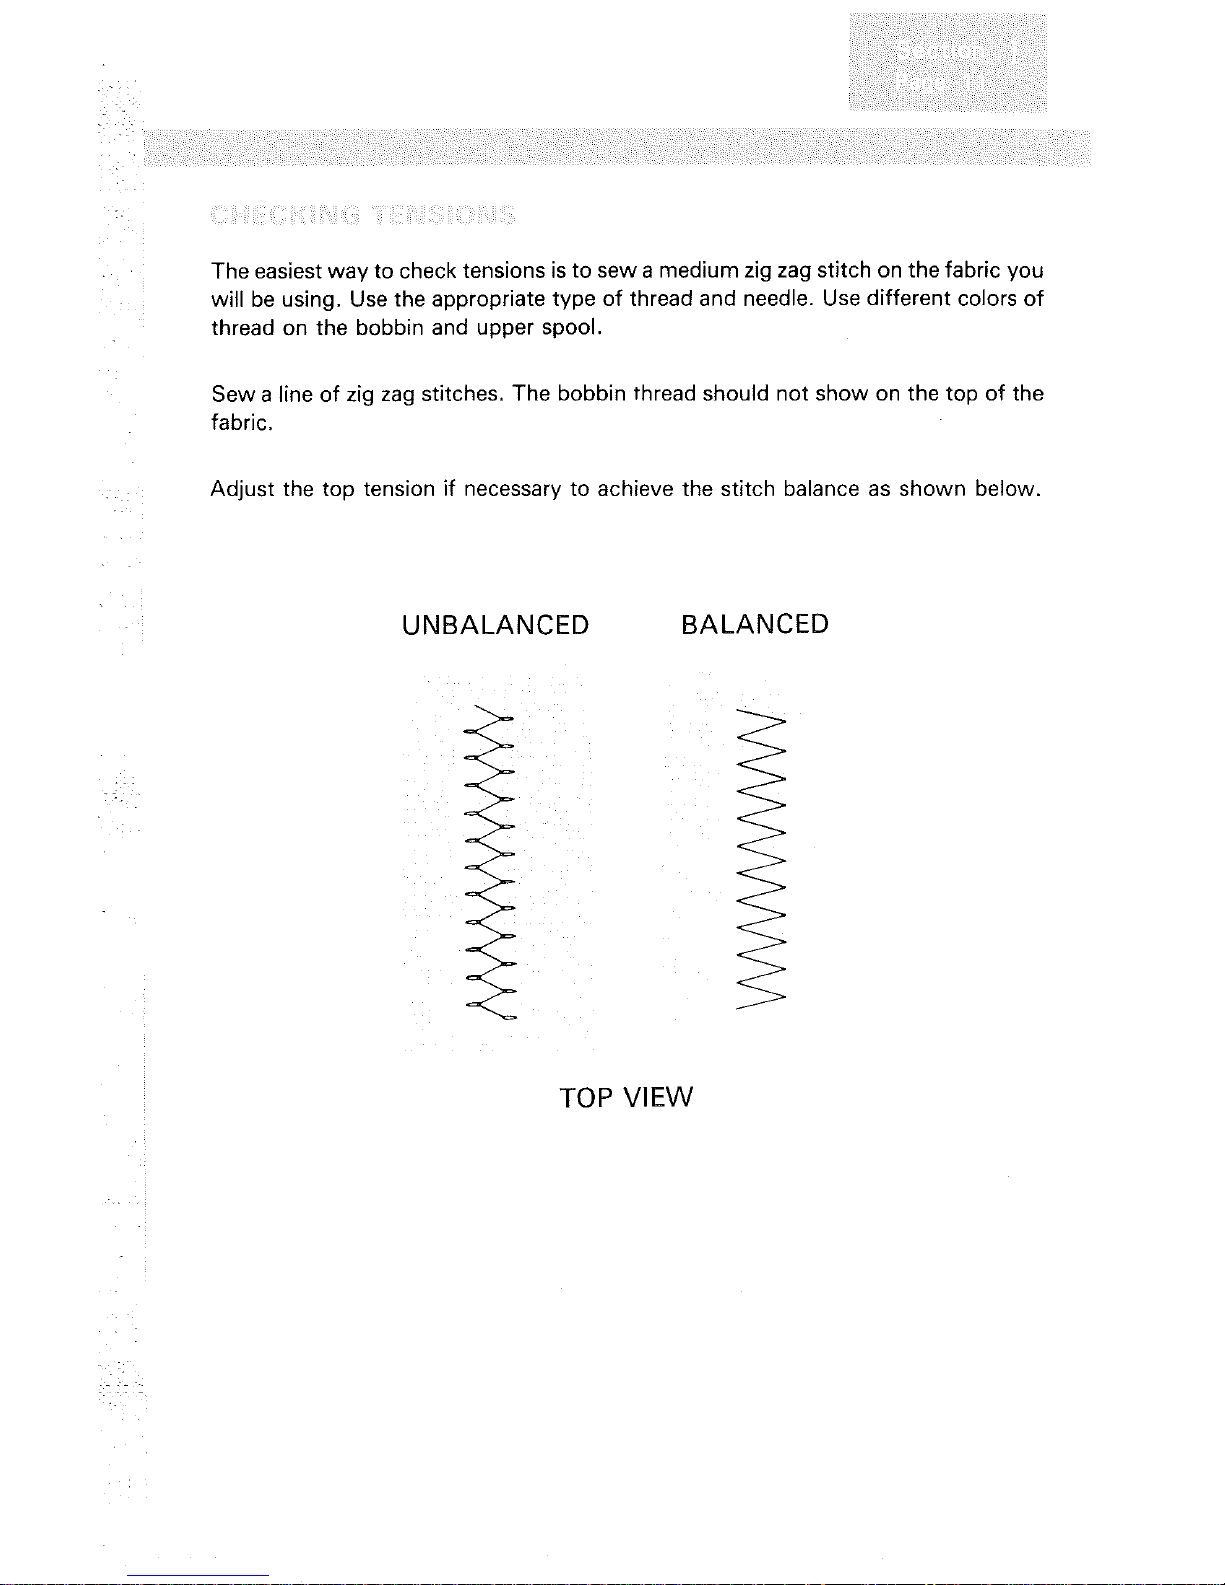
Theeasiestwaytochecktensionsistosewamediumzigzagstitchonthefabricyou
willbeusing.Usetheappropriatetypeofthreadandneedle.Usedifferentcolorsof
threadonthebobbinandupperspool.
Sewalineofzigzagstitches.Thebobbinthreadshouldnotshowonthetopofthe
fabric.
Adjustthetoptensionifnecessarytoachievethestitchbalanceasshownbelow.
UNBALANCED BALANCED
TOP VIEW


FRONT VIEW SIDE VIEW
 Loading...