

Kenmore 12510341 Owner’s Manual

Use & Care Guide
Manual de Uso y Cuidado
Kenmore
®
18 Volt C or dless
2-in-1 Stick Vacuum
Aspir adora de v arilla 2 en 1
inalámbrica, de 18 Volts
Model/Modelo: 125.10341
Vacuum Cleaner Help Line:
1-877-531-7321
8:00am-5:00pm EST, M-F
Sears Brands Management Corporation
Hoffman Estates, IL 60179 USA
www.kenmore.com

TABLE OF CONTENTS
Before Using Your New Vacuum Cleaner ........................................................................2
Packing List .....................................................................................................................2
Kenmore Vacuum Cleaner Warranty ...............................................................................3
Important Safety Instructions ........................................................................................4-5
Parts and Features ...........................................................................................................6
Assembly Instructions ...................................................................................................7-8
Operating Instructions ................................................................................................9-10
Vacuum Cleaner Maintenance and Care .....................................................................11-12
Troubleshooting ..............................................................................................................13
BEFORE USING YOUR NEW VACUUM CLEANER
Please read this guide. It will help you assemble and operate y our ne w Kenmore vacuum cleaner in the
safest and most effective w ay.
Use the space below to record the model number of your new K enmore vacuum cleaner.
Model No.____________________________________________
Date of Purchase ______________________________________
Keep this book and your sales check (r eceipt) in a safe place f or future refer ence.
PACKING LIST
Your KENMORE 18V Cordless 2-in-1 Stick Vacuum is packaged with the following parts
and components included separately in the carton:
1 Handle
1 Main Body
1 Hand Vacuum
1 Motorized Brush
1 Charger Base
1 Vacuum Support
- 2 -
1 Charging Adapter
1 Combination Tool
1 Manual

KENMORE VACUUM CLEANER WARRANTY
KENMORE LIMITED WARRANTY
FOR ONE YEAR from the date of sale, this product is warranted against defects in
material or workmanship when it is assembled, operated and maintained according to all
supplied instructions.
WITH PROOF OF SALE, a defective appliance will be replaced free of charge.
For warranty coverage details to obtain free replacement, visit the web page:
www.kenmore.com/warranty
This warranty does not cover filters or belts, which are expendable parts that can wear
out from normal use within the warranty period.
This warranty is void if this product is ever used for other than private household purposes.
This warranty gives you specific legal rights, and you may also have other rights which
vary from state to state.
Sears Brands Management Corporation, Hoffman Estates, IL 60179
- 3 -

IMPOR TANT SAFETY INSTRUCTIONS
When using your Kenmore vacuum, basic precautions should always be followed,
including the following:
READ ALL INSTRUCTIONS BEFORE USING THIS VACUUM CLEANER.
WARNING:
To reduce the risk of fire, electric shock, or injury:
• Do not use or charge outdoors or on
wet surfaces.
• Do not allow to be used as a toy. Close
attention is necessary when used by or
near children, pets or plants.
• Use only as described in this manual.
Use only manufacturer’s recommended
attachments.
• Do not use with damaged cord or plug.
If appliance is not working as it should,
has been dropped, damaged, left
outdoors, or dropped into water, return
it to a service center.
• Do not pull or carry by cord, use cord
as a handle, close a door on cord,
or pull cord around sharp edges or
corners. Do not run the vacuum over
the charging adapter cord. Keep cord
away from heated surfaces.
• Do not unplug by pulling on cord. To
unplug, grasp the plug, not the cord.
• Do not handle charger, including
charger plug, and charger terminals
with wet hands.
• Do not put any object into openings. Do
not use with any opening blocked; keep
free of dust, lint, hair, and anything that
may reduce air flow.
This vacuum cleaner creates suction and
•
has a revolving brush roll. Keep hair, loose
clothing, fingers, and all parts of body
away from openings and moving parts.
• Use extra care when cleaning on stairs.
• Do not use to pick up flammable or
combustible liquids, such as gasoline, or
use in areas where the y may be present.
• Switch off the appliance before
connecting the accessories.
• Do not pick up anything that is burning
or smoking, such as cigarettes, matches,
or hot ashes.
• Do not pick up toxic liquids such as
chorine bleach, ammonia or drain
cleaner.
• Do not use without dust cup and filter in
place.
• Do not charge the unit outdoors.
• Do not attempt to use the charging
adapter with any other product nor
attempt to charge this product with
another charging adapter.
• To recharge vacuum, use only the
charging adapter model 30004 listed
in the Replacement Parts table.
• Do not incinerate the appliance even
if it is severely damaged. The batteries
inside this product may explode or leak
in a fire.
• Do not immerse vacuum or charging
adapter in water or other liquids.
• Always turn the vacuum off before
connecting or disconnecting the
motorized brush.
• Store the cordless vacuum indoors. Put
the cordless vacuum away after use to
prevent accidents.
• Use only manufacturer recommended
cleaning attachments.
• Keep your work area well lit.
• Keep the vacuum moving over the
carpet surface at all times to avoid
damaging the carpet fibers.
• Do not vacuum any liquids.
- 4 -
• Do not use in an enclosed space where
vapors are present from paint, paint
thinner, moth-proofing substances,
flammable dust or other explosive or
toxic materials.
• Do not pick up hard or sharp objects
such as glass, nails, screws or coins that
could damage the vacuum.
• To avoid excessive heat and damage
to unit or batteries, do not operate the
vacuum while charging.
NOTE:
and found to comply with the limits for
a Class B digital device, pursuant to
Part 15 of the FCC Rules. These limits
are designed to provide reasonable
protection against harmful interference in
a residential installation. This equipment
generates, uses and can radiate radio
frequency energy and, if not installed and
used in accordance with the instructions,
may cause harmful interference to radio
communications.
This equipment has been tested
• Do not use extension cords or outlets
with inadequate current carrying
capacity.
• DO NOT MUTILATE OR INCINERATE
BATTERIES AS THEY WILL EXPLODE AT
HIGH TEMPERATURES.
• Leaks from battery cells can occur
under extreme usage or temperature
conditions. If the liquid gets on skin,
wash quickly with water. If liquid gets
into the eyes, flush them immediately
with clean water for a minimum of 10
minutes. Seek medical attention.
• While there is no shock hazard from
electrical terminals located on the
vacuum, a burn could result from metal
objects being inserted into the terminal
areas. Vacuum cleaner terminals should
always be kept free of objects.
• Store charger indoors in a cool, dry
area, not exposed to weather to avoid
electrical shock and/or damage to the
vacuum cleaner.
• Changes or modifications to this unit
not expressly approved by the party
responsible for compliance could void
the user’s authority to operate the
equipment.
However, there is no guarantee that
interference will not occur in a particular
installation. If this equipment does cause
harmful interference to radio or television
reception, which can be determined
by turning the equipment off and on,
the user is encouraged to try to correct
the interference by one or more of the
following measures:
• Reorient or relocate the receiving
antenna.
• Increase the separation between the
equipment and receiver.
• Connect the equipment into an outlet
on a circuit different from that to which
the receiver is connected.
• Consult the dealer or an experienced
radio/TV technician for help.
Product Disposal
This product contains an internal Lithiumion battery pack formulated from
environmentally sensitive materials. This
product must be disposed of properly
with due care for the environment. Do
not dispose of product with household
garbage. Consult your local waste
authority for information regarding
available recycling or disposal options.
This device complies with part 15 of the FCC Rules. Operation is subject to the
following two conditions: (1) this device may not cause harmful interference,
and (2) this device must accept any interference received, including
interference that may cause undesired operation.
SAVE THESE INSTRUCTIONS
Household use only.
- 5 -
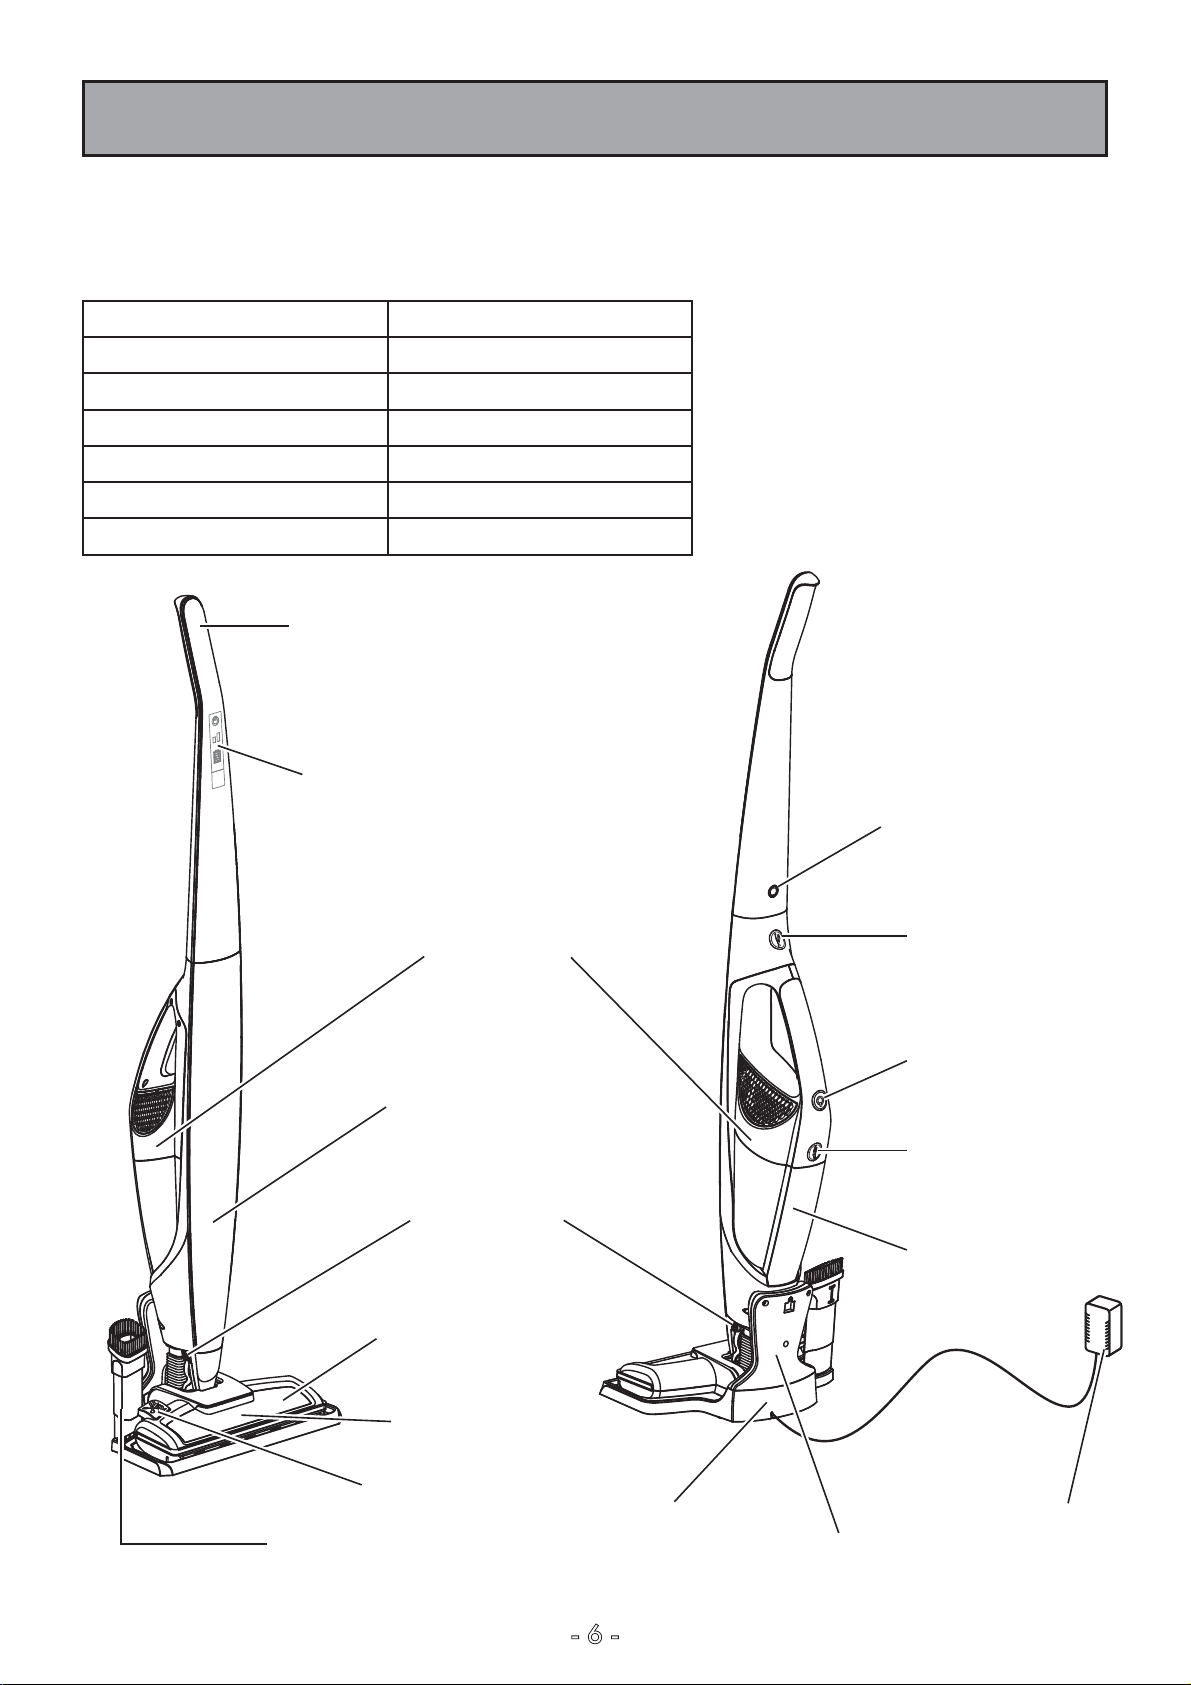
PARTS AND FEATURES
It is important to know your 18V Cordless 2-in-1 Stick Vacuum's parts and features to
assure its proper and safe use. Review these before using your vacuum.
REPLACEMENT PARTS
Item Part No.
Filter 57004*
Filter Basket 30003
Charging Adaptor 30004
Charger Base 30005
Vacuum Support 30006
Brush roll 561004104
Handle
Touch Control Panel
or call 1-844-553-6667.
*Available online only at
www.sears.com.
Lock Button
Hand Vacuum
Main Body
Release Button
Motorized Brush
Powerhead
LED Lights
Easy-Cut Button
Combination Tool
Hand Vacuum
Release Button
Hand Vacuum
Power Switch
Dust Cup Release
Button
Dust Cup
(Filter inside)
Charging AdapterCharger Base
Vacuum Support
- 6 -
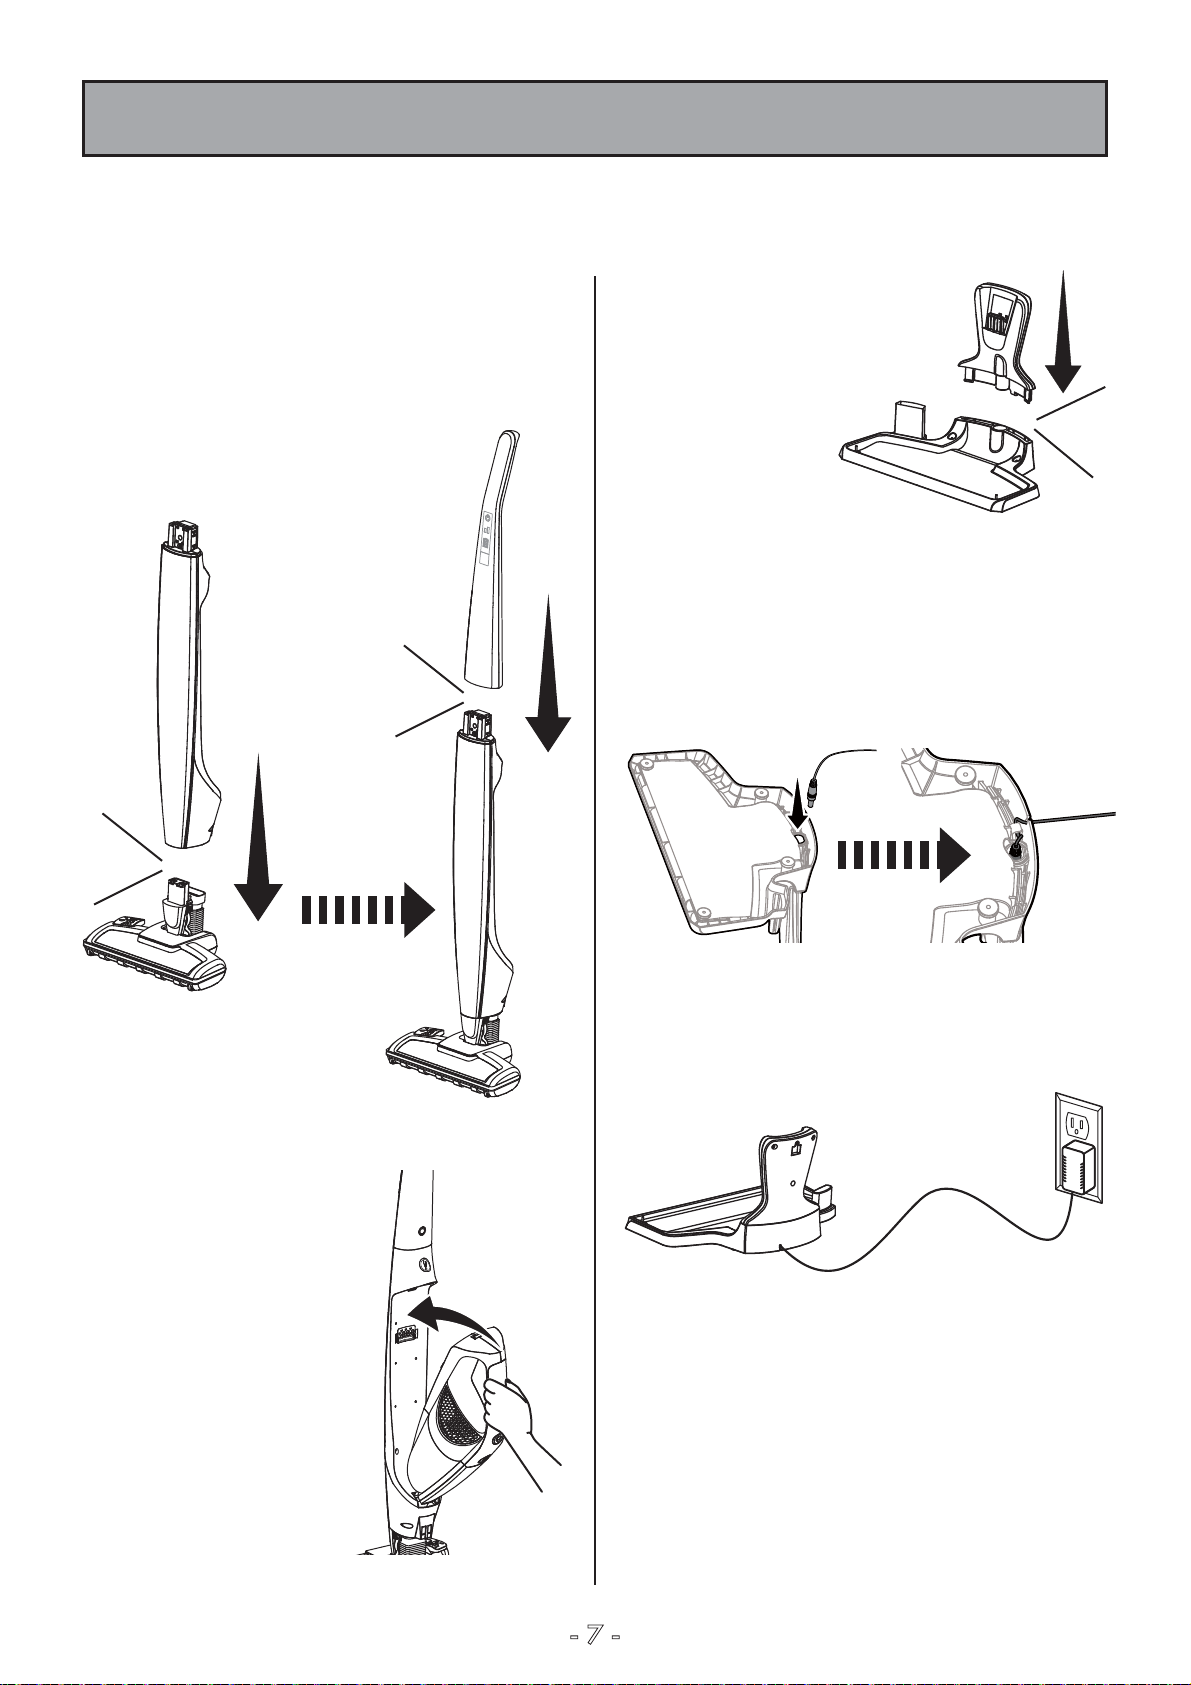
ASSEMBLY INSTRUCTIONS
Before assembling the vacuum, check the PACKING LIST (Page 2). Use this list to verify
that you have received all the components of your new Kenmore Cordless 2-in-1 Stick
Vacuum.
1. Fit the vacuum body into the motorized
brush powerhead and lock into place.
2. Insert the handle into the top of the main
body, as illustrated, and lock into place.
Click!
4. Insert vacuum support
into charger base and
lock into place.
Click!
5. The charging adapter plug will fit into
the charger base only one way. Insert the
charging adapter plug into the charging
port on the bottom of the charger base
and thread the cord out as illustrated.
Click!
3. Insert the hand
vacuum into the
main body as shown
and lock into place.
Ensure that the dust
cup is secure in
place.
6. Plug the adapter into a wall outlet.
- 7 -
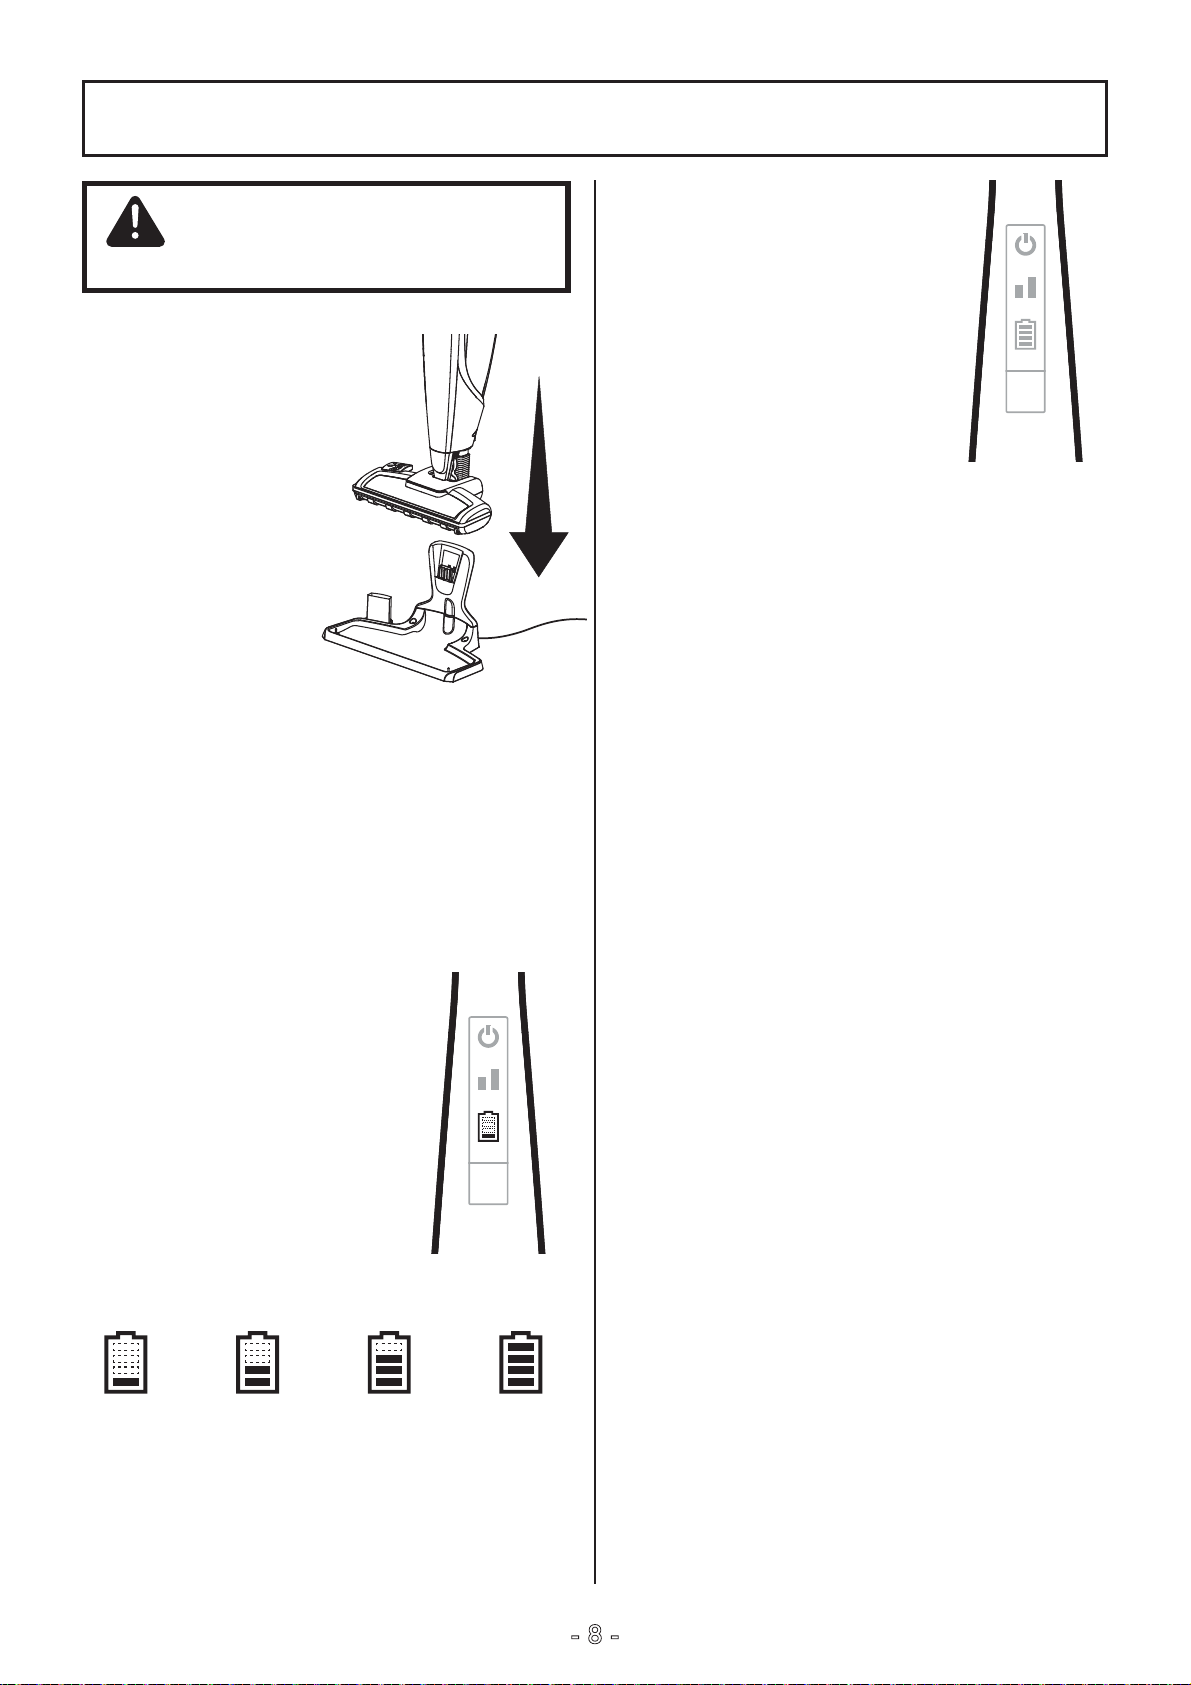
CHARGING
WARNING
Before charging, make sure unit is OFF.
1. Plug the charging
adapter into an
outlet. Insert the
vacuum cleaner onto
the charger base as
shown.
2. Make sure the vacuum cleaner is fully
charged before using for the first time. The
vacuum may take up to 5 hours to charge
completely if fully discharged.
4. When the vacuum has
reached full charge (100%),
the battery charge indicator
will remain lit with four
(4) bars illuminated for 3
seconds then go to dormant
mode with no illuminated
lights showing.
NOTE: If the battery charge indicator does
not illuminate when charging, ensure the
following:
• That the vacuum cleaner is seated
properly onto the charger base.
• That the charging adaptor is plugged into
the outlet properly.
• That the adaptor power plug is connected
properly on the charger base.
3. The battery charge
indicator will flash
continuously until vacuum
is fully charged.
Battery Charge Indicator:
25% 50% 75% 100%
NOTE: For improved battery performance,
always keep the vacuum cleaner on the
charger base while not in use
.
- 8 -
 Loading...