

Kenmore 12332 Owner's Manual

Kenm
SEWING MACHINE 1.2332
\
OWNER'S
Sears, Roebuck and Co.
Dear Homemaker:
You have just invested in a very fine zigzag sewing machine.
Before using your new Kenmore machine, please pause for a
moment and carefully read this booklet which contains
instructions on how to operate and care for your machine.
Specific instructions are given on threading, tension
adjustments, cleaning, oiling, etc. This will help you obtain
the best sewing results and avoid unnecessary service expense
for conditions beyond our controt.
Advice on the operation and care of your machine is always
available at your nearest Sears Retail Store. Please remember,
if you have questions about your machine, always mention the
model number and serial number when you inquire.
Kenmore Sewing Machine
Record in space provided below the model
number and serial number of this appliance.
The model number and serial number are
located on the nomenclature plate, as identified
on Page 2 of this booklet.
Model No.385. Serial No.
Retain these numbers for future reference.
KNOWING YOUR SEWING MACHINE
Machine identification .................... 2
Accessories .................. , ........ 4
Setting spool pins ....................... 5
Installing extension table .................. 5
Pressure regulator, Presser foot lever ........... 6
Presser feet, Speed control plug .............. 7
Light and power switch, Sewing light .......... 8
Foot control, Seam guides, Darning plate ....... 9
Needle, thread and fabric chart .............. I 0
Needles, Placement of needle ............... ! I
Winding the bobbin ....................... !2
Threading the bobbin case .................. 13
Threading top thread ..................... 14
Picking up bobbin thread .................. t5
Adjusting top thread tensions ................ 16
Adjusting bobbin tensions ................. 16
SIMPLE SEWING
Straight stitching ....................... ! 7
Fastening a seam, Turning a square corner ..... 18
Zigzag stitching ........................ 19
Checking tensions, Overcasting,
Interfacing darts ...................... 20
STRETCH AND UTILITY STITCH SEWING
Stretch stitching ........................ 21
Adjusting stretch stitch balance .............. 21
Straight stretch stitching .................. 22
Rick-rack stretch stitching ................. 23
Buttonhole making ...................... 24
Adjusting buttonhole stitch balance ........... 26
Satin stitching, Appliqueing ................ 27
Zipper application ...................... 28
Darning ............................. 29
Button sewing, Bar tacking ................. 30
Free-arm sewing ......... •............... 3t
CHECKING PERFORMANCE PROBLEMS ...... 32
CARING FOR THE MACHINE
Cleaning feed dogs and shuttle .............. 34
Oiling under arm cover plate ................ 35
Oiling underside ........................ 36
Oiling in face cover plate .................. 37
Parts list ............................. 38
USING PORTABLE CASE OR CABINET ....... 40
KNOWnNG YOUR SEWSNG MACHINE _ __I
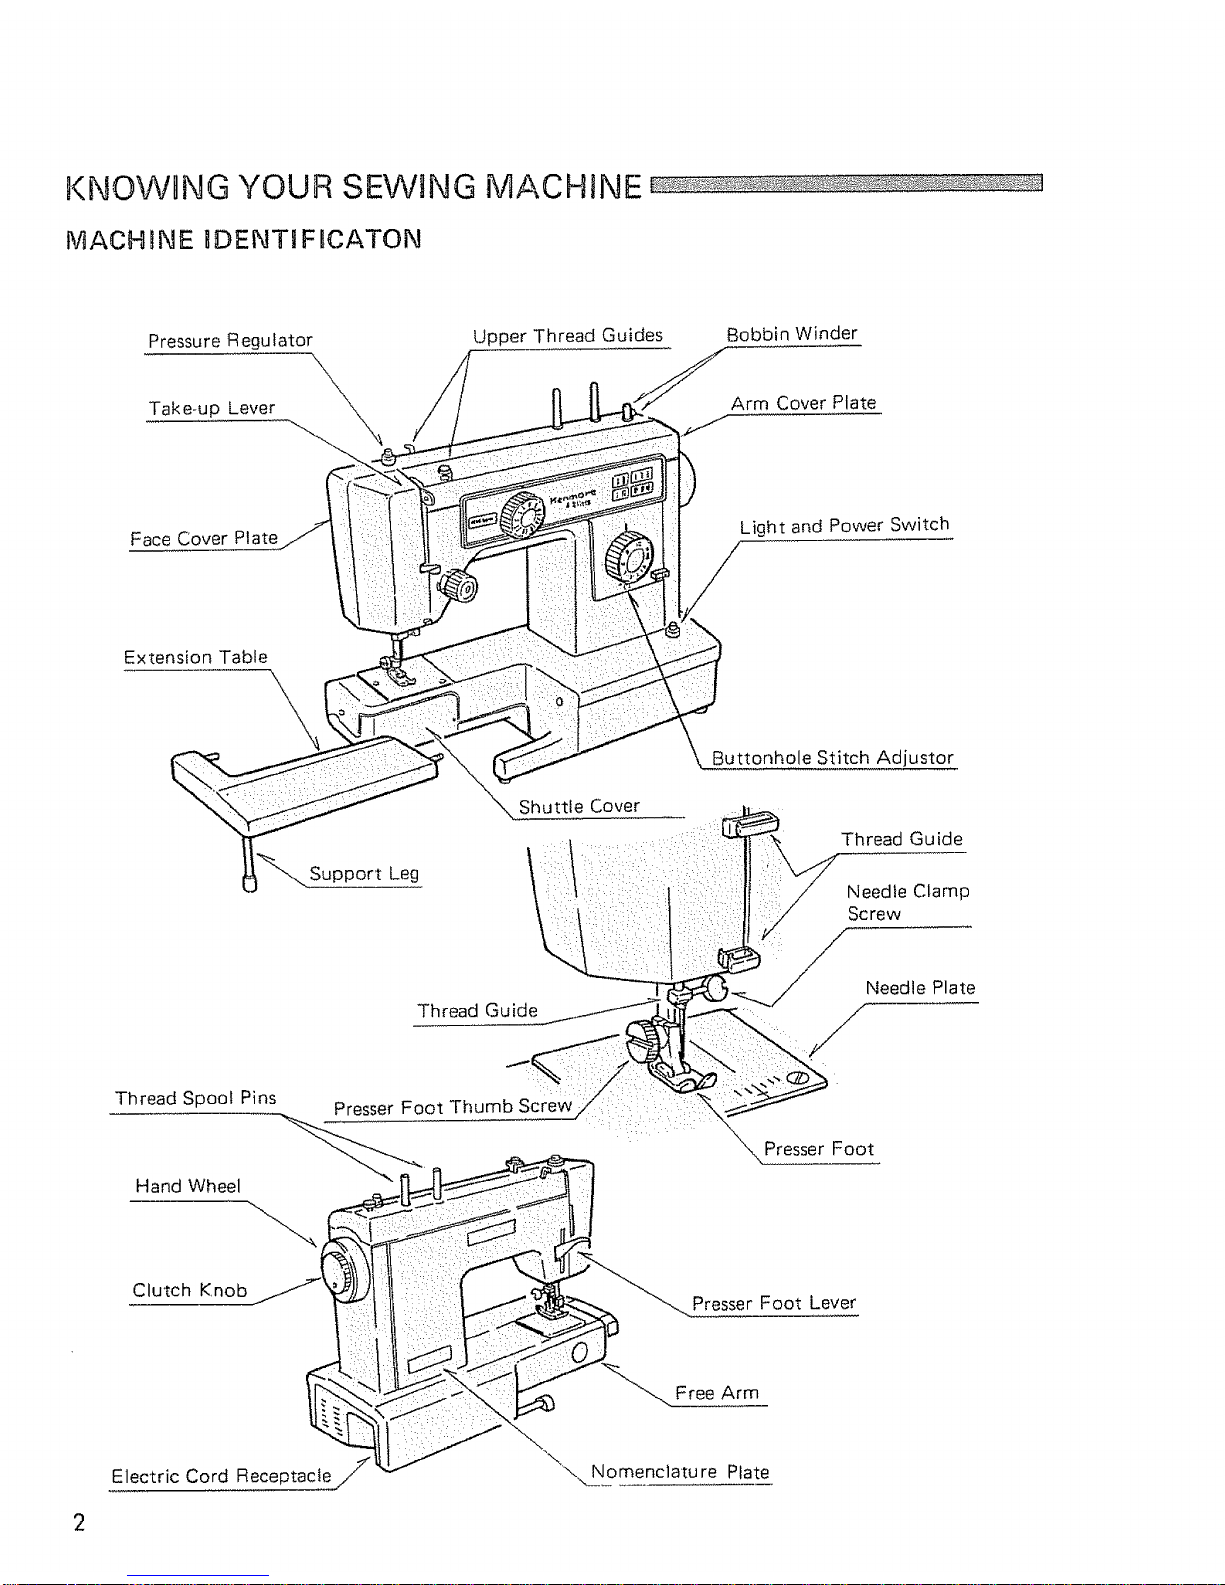
MACHINE 1DENTt FmCATON
Pressure Regulator
Upper Thread Guides
Bobbin Winder
Take-up Lever
Arm Cover Plate
Face Cover Plate
Light and Power Switch
Extension Table
Buttonhole Stitch Adjustor
Thread Spoot Pins
Hand Wheel
Support Leg
Thread Guide
Presser Foot Thum_:Z :: :
Thread Guide
Needte Clamp
Screw
Needle Plate
Presser Foot
Clutch Knob
Presser Foot Lever
Electric Cord Receptacle /
Free Arm
"_Nomenclatu re Plate
2
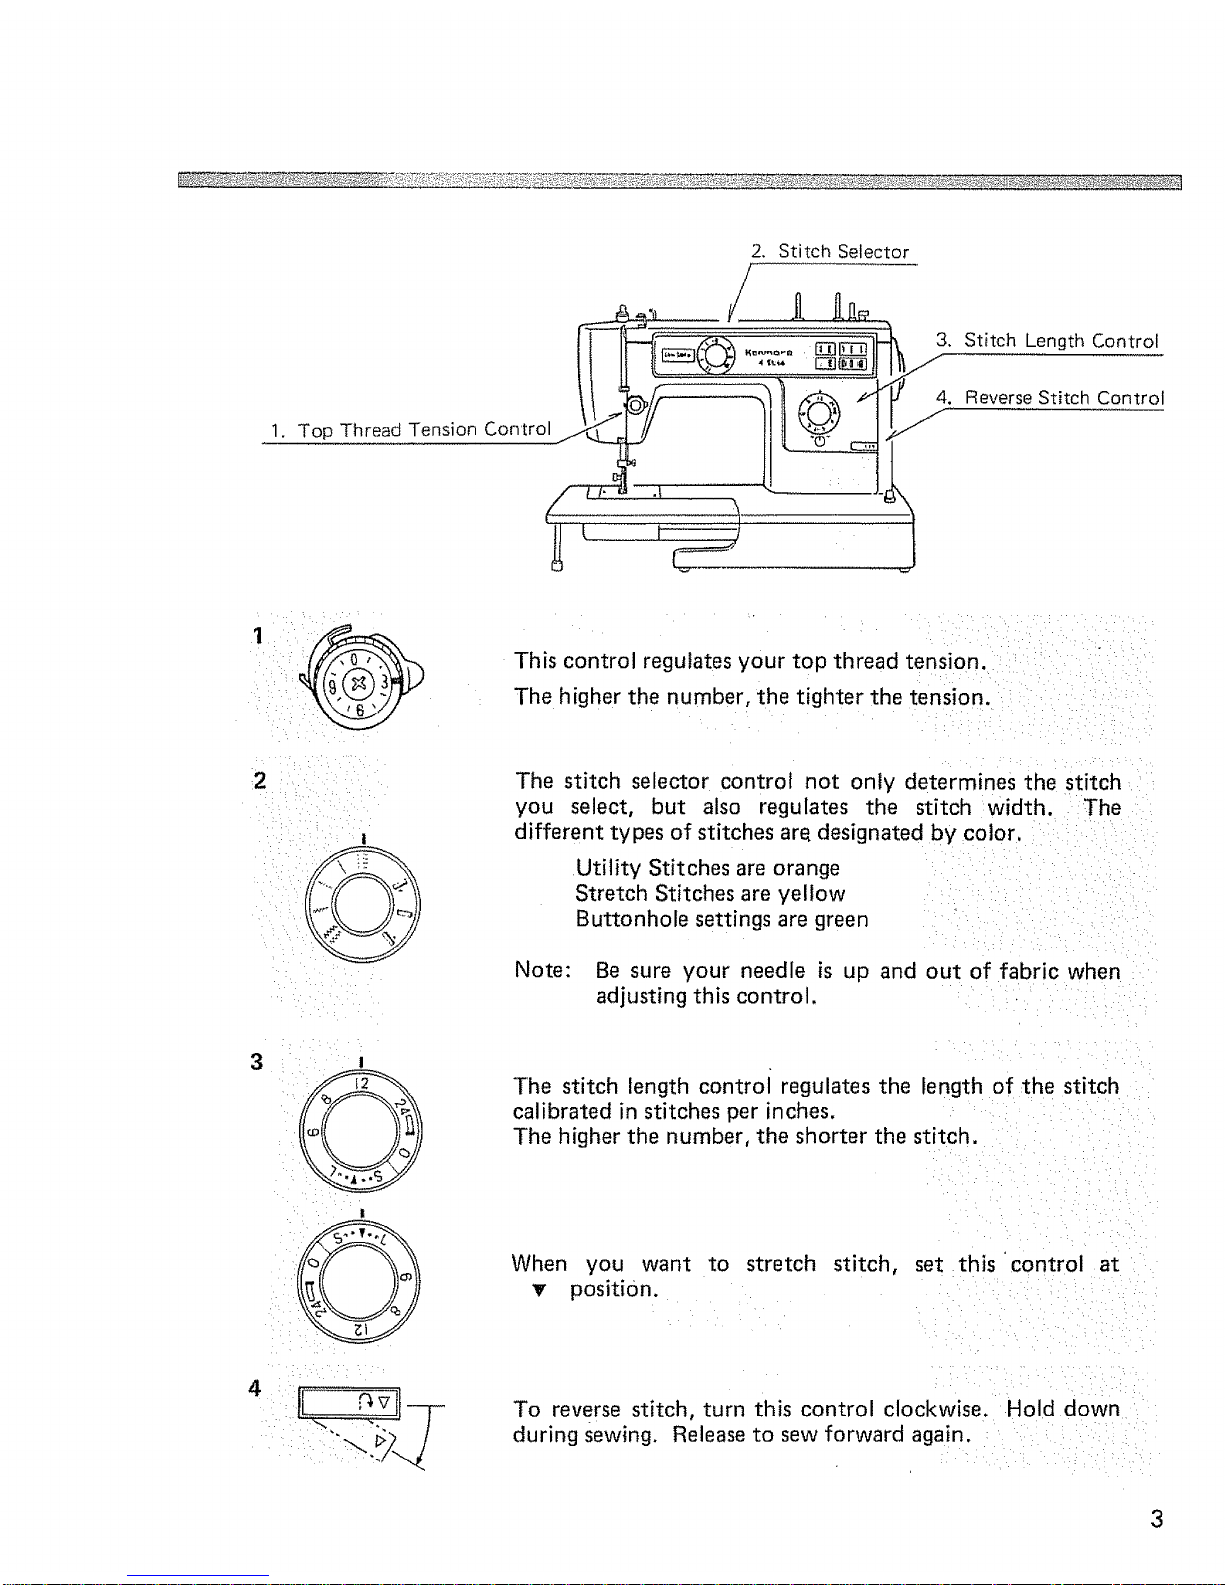
2. Stitch Selector
1. Top ThreadTension Control
[
\
3. Stitch Length Control
4. Reverse Stitch Control
J
•• •: _!
• :7! : :: -•_/
:,iii ::_ i ,,/_
3
This control regulates your top thread tension.
The higher the number, the tighter the tension.
The stitch selector control not only determines the stitch
you select, but also regulates the stitch width. The
different types of stitches are, designated by color.
Utility Stitches are orange
Stretch Stitches are yellow
Buttonhole settings are green
Note: Be sure your needle is up and out of fabric when
adjusting this control.
The stitch length control regulates the length of the stitch
calibrated in stitches per inches.
The higher the number, the shorter the stitch.
When you want to stretch stitch, set this control at
_r position.
To reverse stitch, turn this control clockwise. Hold down
during sewing. Release to sew forward again.
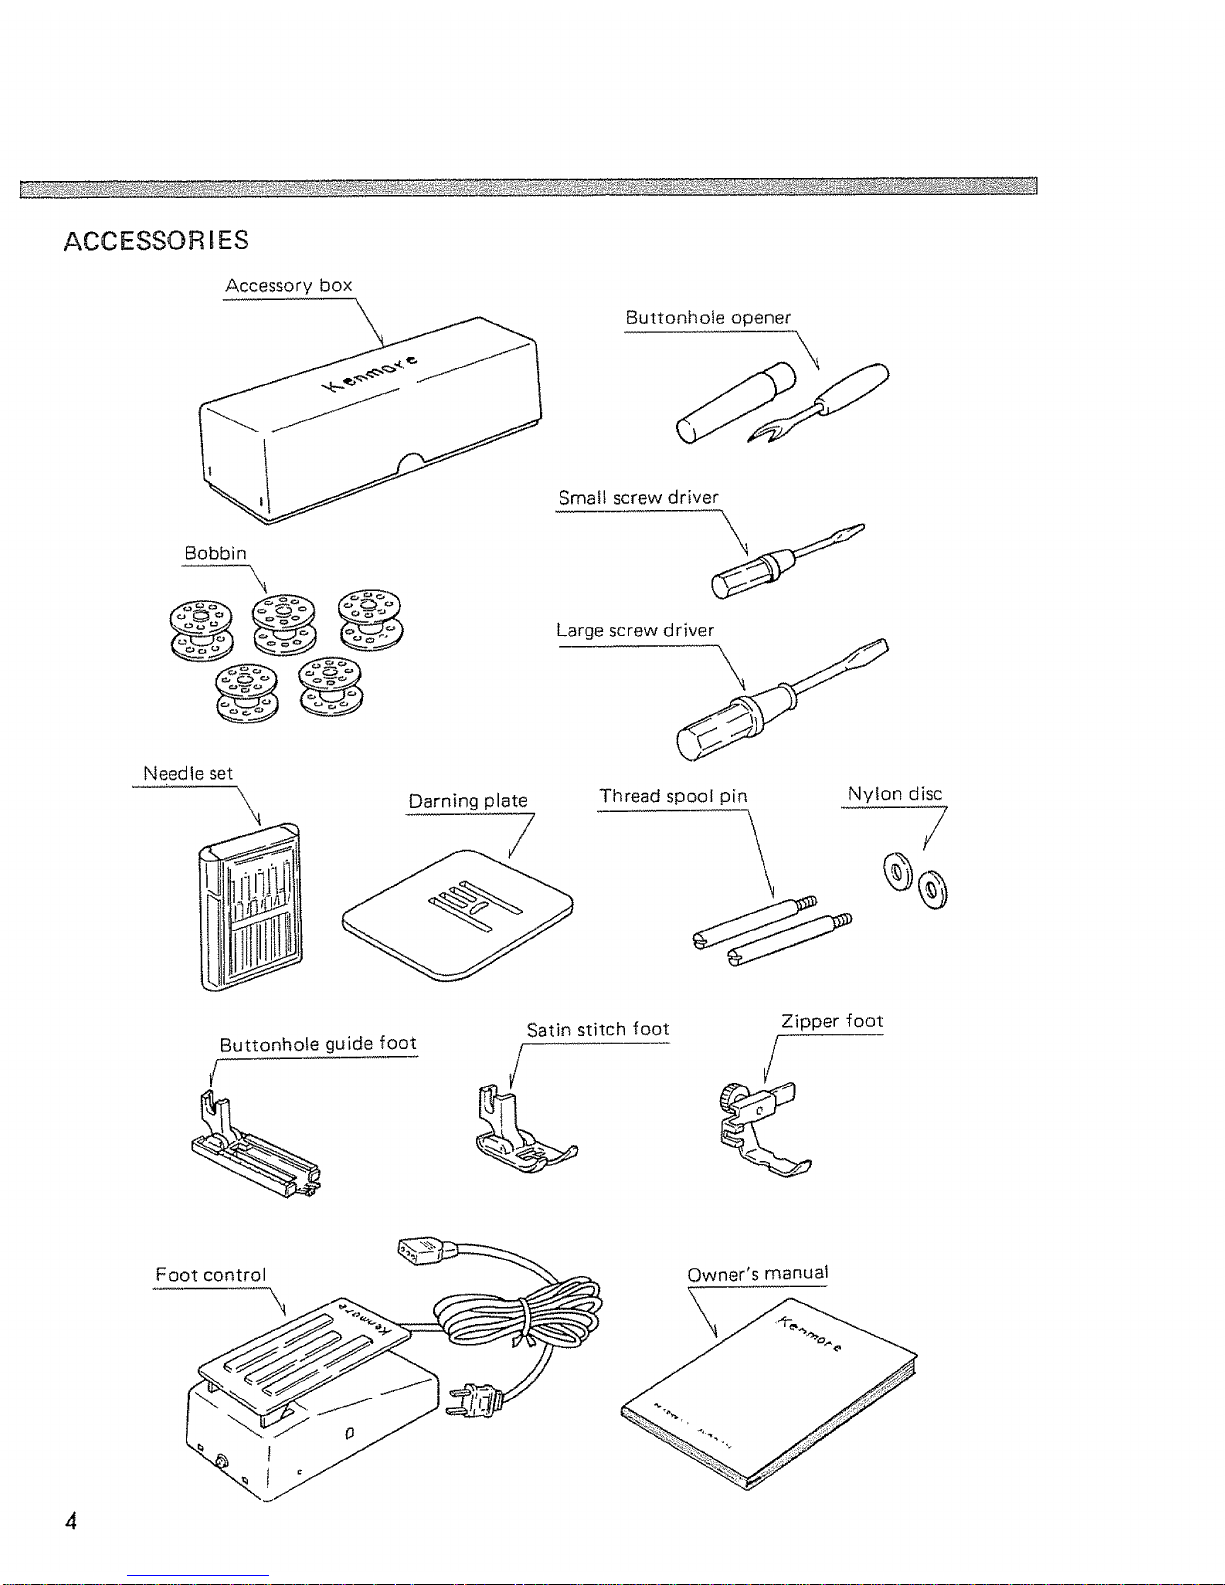
Buttonhole opener
Small screw driver
Bobbin
Large screw driver
Needle set
Darning plate Thread spoof pin
Nylon disc
/
Buttonhole guide foot
Satin stitch foot
Zipper foot
Foot control Owner's manuat
4
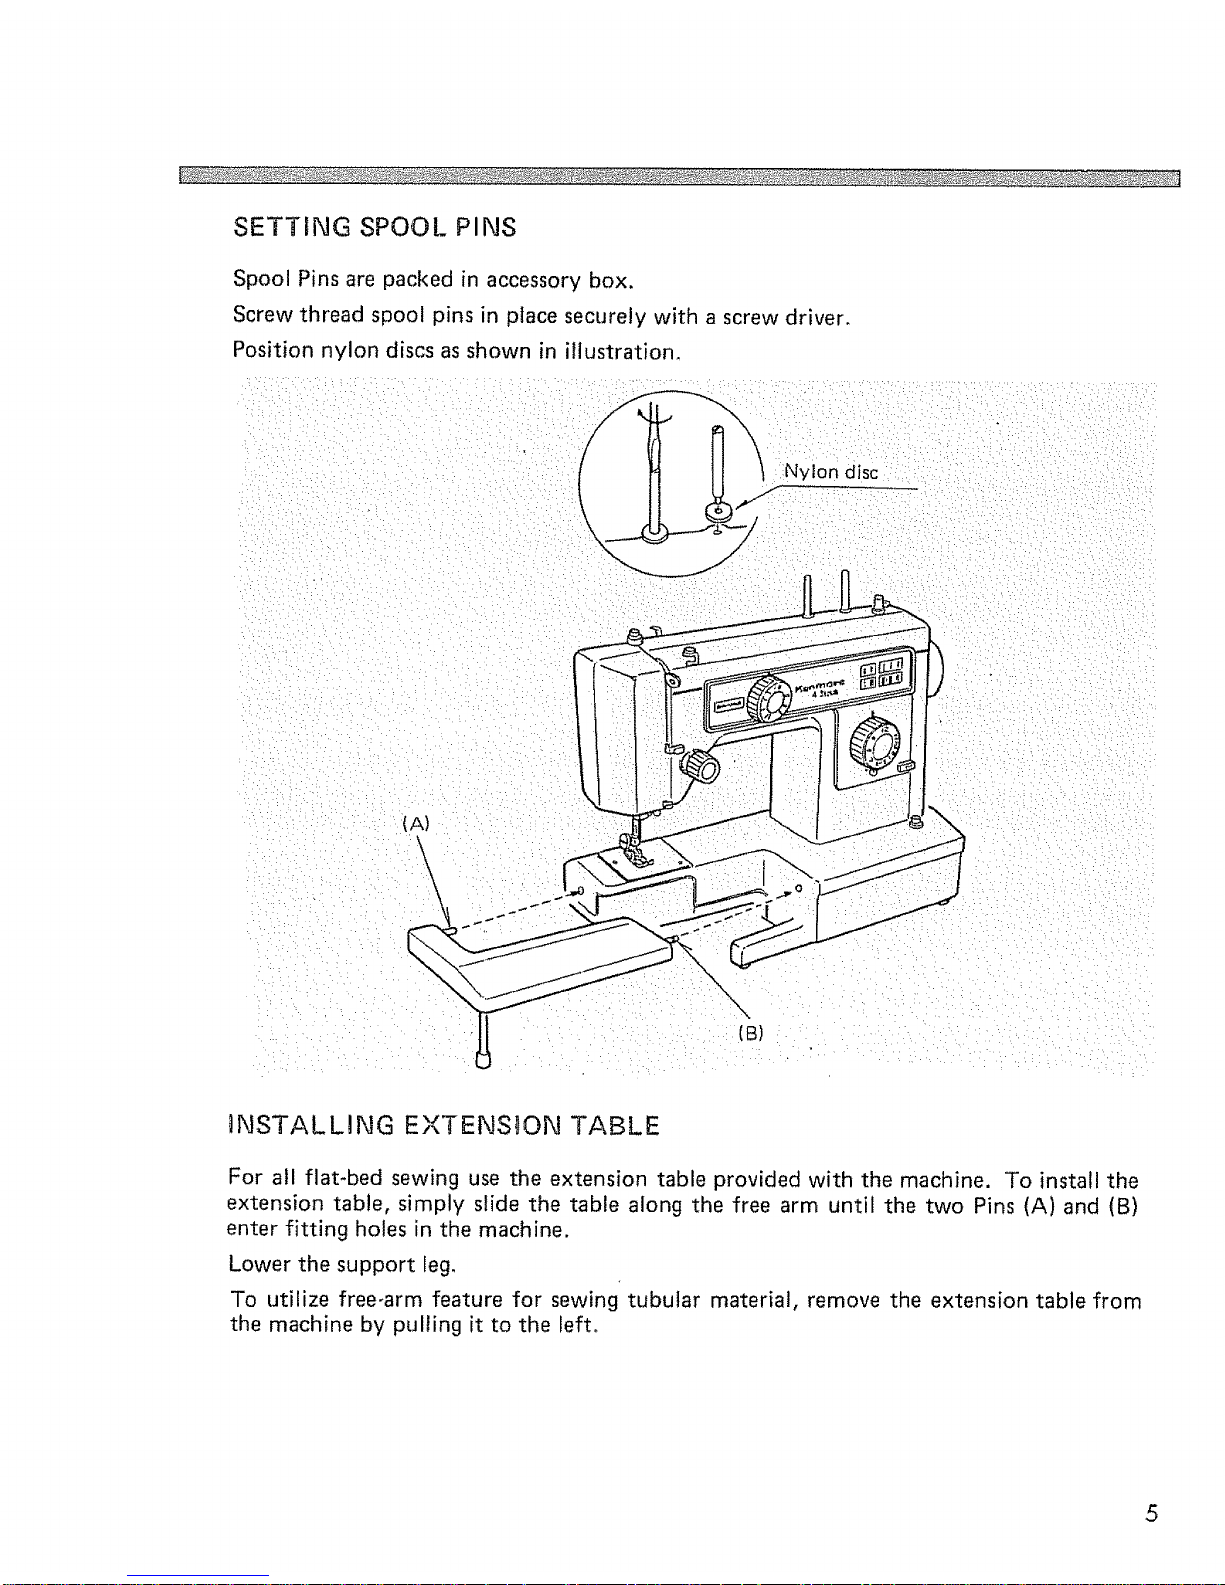
SETTING SPOOL PINS
Spool Pins are packed in accessory box.
Screw thread spool pins in place securely with a screw driver.
Position nylon discs as shown in illustration,
(A)
i
\
\
(B)
_NSTALLING EXTENSION TABLE
For all flat-bed sewing use the extension table provided with the machine. To install the
extension table, simply slide the table along the free arm until the two Pins (A) and (B)
enter fitting holes in the machine.
Lower the support leg,
To utilize free-arm feature for sewing tubular material, remove the extension table from
the machine by pulling it to the left_
5
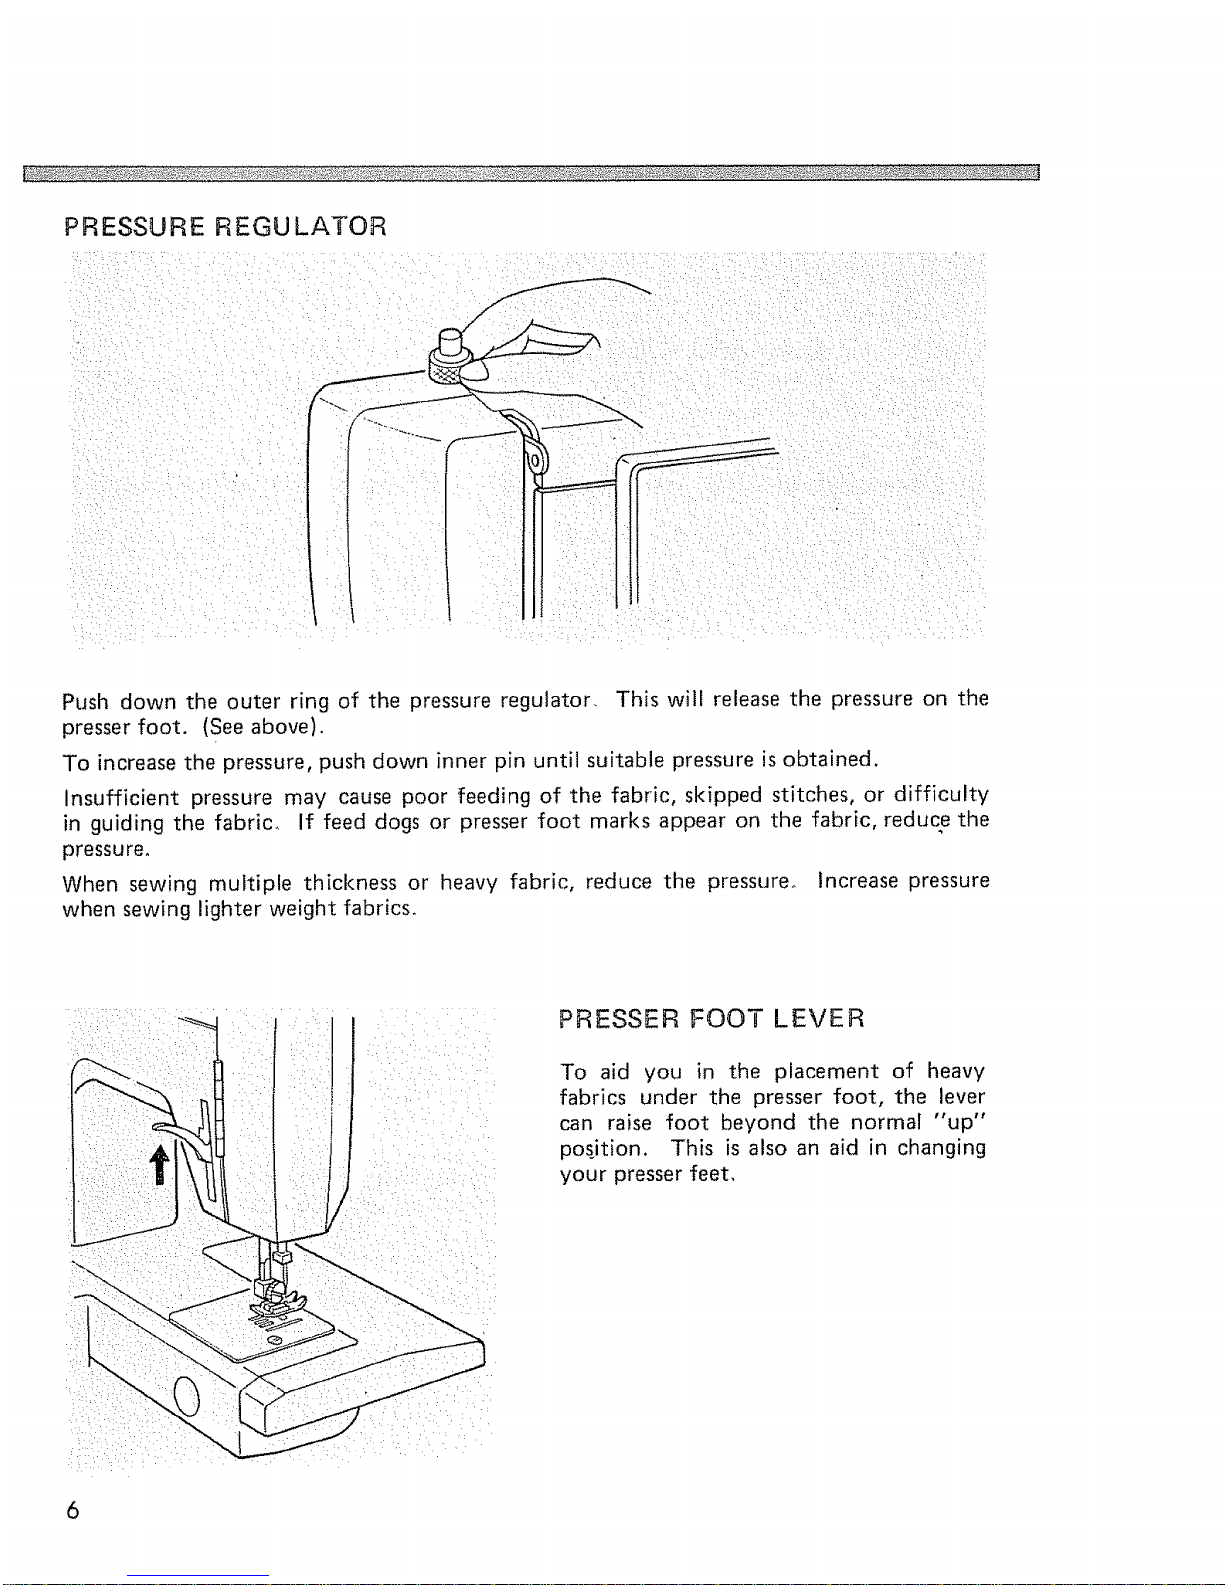
Push down the outer ring of the pressure regulator. This will release the pressure on the
presser foot. (See above).
To increase the pressure, push down inner pin until suitable pressure is obtained,
Insufficient pressure may cause poor feeding of the fabric, skipped stitches, or difficulty
in guiding the fabric° If feed dogs or presser foot marks appear on the fabric, reduce the
pressure.
When sewing multiple thickness or heavy fabric, reduce the pressure° Increase pressure
when sewing lighter weight fabrics.
PRESSER FOOT LEVER
To aid you in the placement of heavy
fabrics under the presser foot, the lever
can raise foot beyond the normal "up"
posjtion. This is also an aid in changing
your presser feet,
6
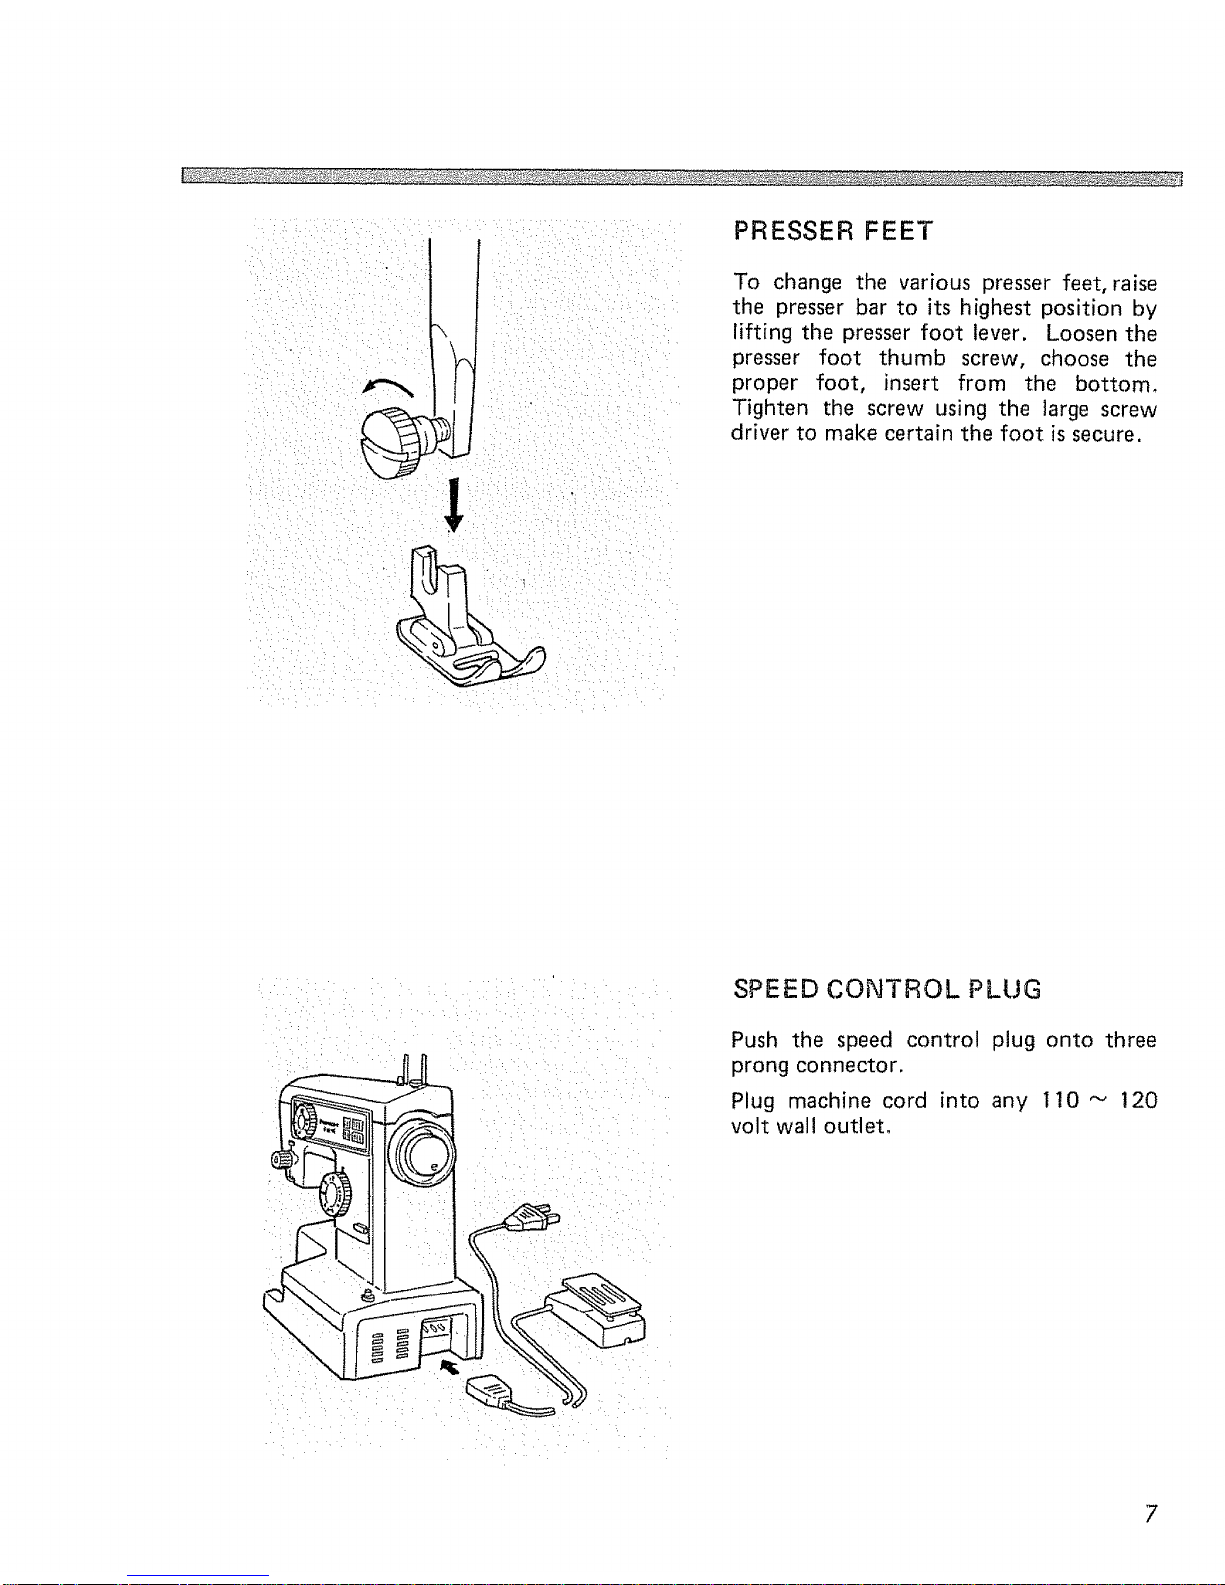
PRESSER FEET
To change the various presser feet, raise
the presser bar to its highest position by
lifting the presser foot lever. Loosen the
presser foot thumb screw, choose the
proper foot, insert from the bottom_
Tighten the screw using the large screw
driver to make certain the foot is secure.
i/i :/ • ii_i ii _
SPEED CONTROL PLUG
Push the speed control plug onto three
prong connector.
Plug machine cord into any 110 "_ 120
volt wall outlet.
7
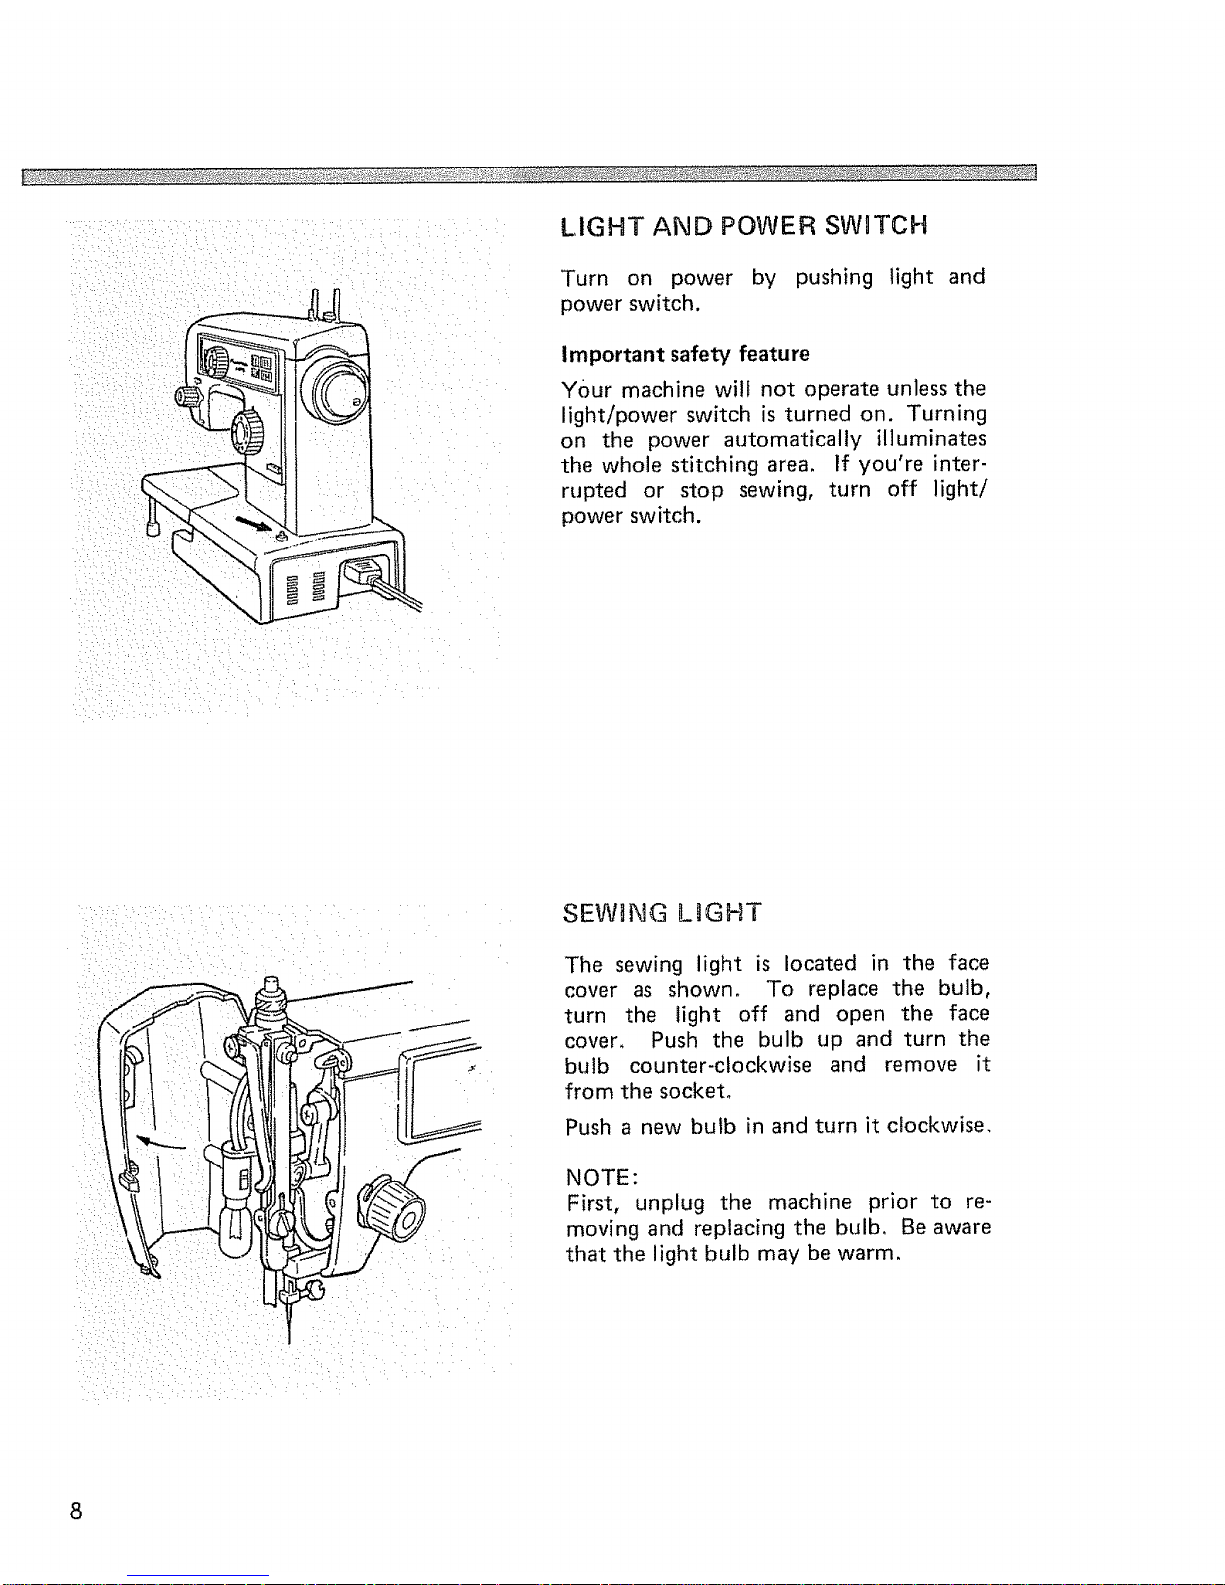
LIGHT AND POWER SWITCH
Turn on power by pushing light and
power switch.
Important safety feature
Your machine will not operate unless the
light/power switch is turned on. Turning
on the power automatically illuminates
the whole stitching area, If you're inter-
rupted or stop sewing, turn off light/
power switch.
:•i¸I::;•_::i•LL_I:•i_••)i:ii•i¸;j:::•) ¸::•••:•i• •
SEWING LIGHT
The sewing light is located in the face
cover as shown. To replace the bulb,
turn the light off and open the face
cover, Push the bulb up and turn the
bulb counter-clockwise and remove it
from the socket.
Push a new bulb in and turn it clockwise.
NOTE:
First, unplug the machine prior to re-
moving and replacing the bulb, Be aware
that the light bulb may be warm,
8

i •¸¸I•••••: i• :•• ii ¸H•••••
FOOTCONTROL
Step on this control to start to sew. The
harder you press on the control, the
faster the machine will sew. Slow down
by reducing foot pressure on the control.
You may want to practice your speed at
different levels when you first use the
machine.
Cornering Guide
SEAM GUIDES
Seam guides are printed on either side of
the needle plate to aid you in guiding
your fabric. THE GUIDE LINE EX-
TENDING ALONG THE RIGHT SIDE
OF THE NEEDLE PLATE IS THE "ALL
IMPORTANT" 5/8" SEAM LINE
The cornering guides are convenient when
turning a square corner 5/8" from the
fabric edge. See next section of this book
for directions.
DARNING PLATE
There are a few times when you want to
control the feeding of the fabric yourself,
Raise needle to its highest position and
raise presser foot. Place darning plate
over needle plate aligning two pins of
darning plate with holes of needle plate.
You may then determine the movement
of the fabric yourself. See page 30 for
button sewing application.
£
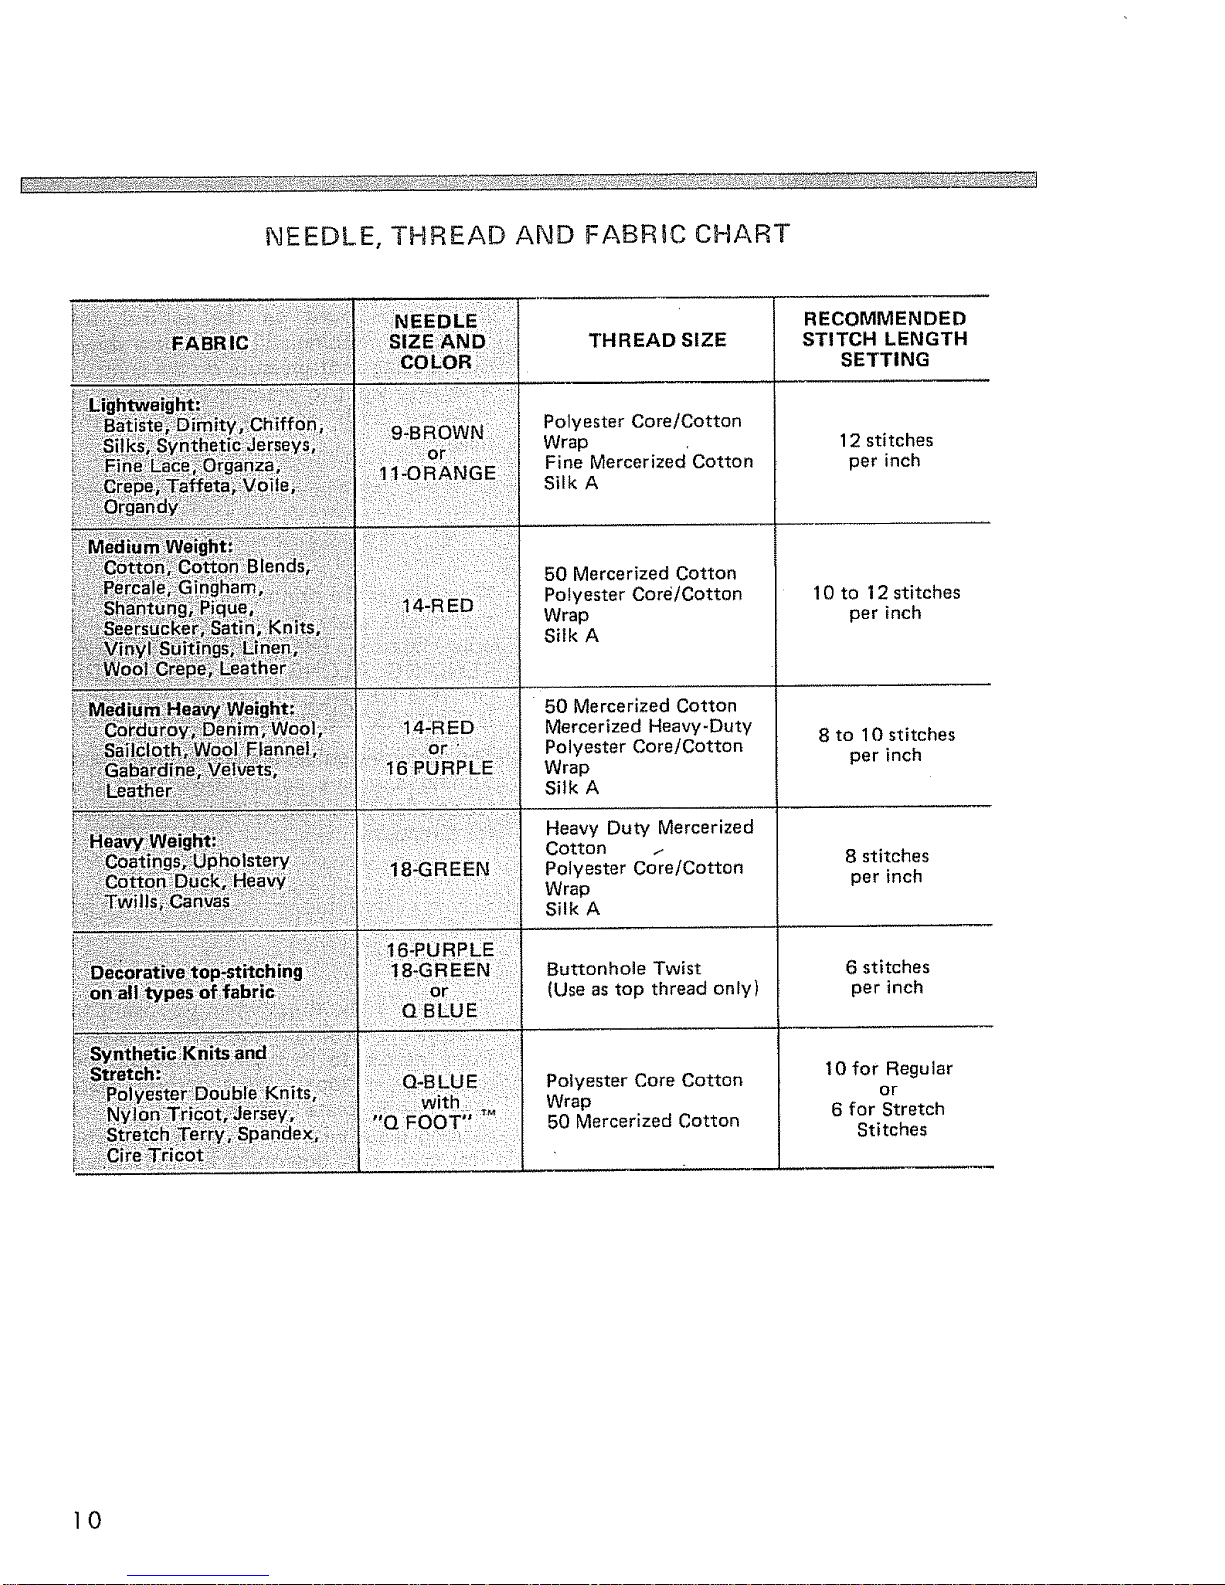
NEEDLE, THREAD AND FABRIC CHART
¸i! iii ii !i,i! iii!ii!
Polyester Core/Cotton
Wrap •
Fine Mercerized Cotton
Silk A
RECOMMENDED
THREAD SIZE STITCH LENGTH
SETTI NG
12 stitches
per inch
50 Mercerized Cotton
Mercerized Heavy-Duty
Polyester Core!Cotton
Wrap
Silk A
Heavy Duty Mercerized
Cotton /
Polyester Core/Cotton
Wrap
Silk A
Buttonhole Twist
(Use as top thread only)
10 to 12 stitches
per inch
8 to 10 stitches
per inch
8 stitches
per inch
6 stitches
per inch
10 for Regular
or
6 for Stretch
Stitches
Polyester Core Cotton
Wrap
50 Mercerized Cotton
]0

NEEDLES
Use KENMORE needles. The size of the
needle should conform with the size of
the thread and both should suit the
fabric. Kenmore needles are color-coded
by size for your convenience (See chart
on facing page),
Never use a bent needle or one with a
dull point.
The exact length of your needle is shown
at left. Be sure you never use one in
your machine that is not this exact
length.
You will find among your accessories a
Q NEEDLE'"with blue shank, This special
needle is to be used when sewing knits
and certain difficult synthetic fabrics, If
you experience skipped stitches in any of
your sewing, use Q NEEDLE'" and
Q FOOT TM *
*Available at most Sears retail stores and
catalog.
I
!
I
I
Flat
side
away
from
you
Needle clamp screw
PLACEMENT OF NEEDLE
Raise needle bar to its highest position by
turning the hand wheel toward you,
Loosen the needle clamp screw. Holding
the needle with the flat side away from
you, slip the needle into the needle bar,
When it is in as far as it will go, tighten
the needle clamp screw with small screw-
driver provided in the accessory box,
11

®
®
J
1. Release clutch by turning clutch knob
toward you.
2. Draw thread from spool through
bobbin winder tension disc as sho_vn.
3. Pull end of thread through hole in
bobbin as shown.
4, Place bobbin onto bobbin winder
shaft with end of thread coming from
the top of the bobbin. Push bobbin
winder shaft to the right until it clicks.
Holding onto end of thread, start
machine. When bobbin is slightly
filled, snip off end of thread.
5, Wind thread until winder stops.
Remove bobbin. Clip thread.
6. Tighten clutch knob.
12
 Loading...