

Page 1
Ш 11 л л ^ ||«|| f ш
»ил i
Manual Del Propietario
Kenmore
Ir CivirftfI ff cicliftr/
Aspiradora
Model, Modelo
116.36932
116.36933
IMPORTANT
Before returning this product-
For replacement parts, please contact
Sears Parts and Repair Center
(1-800-488-1222)
Anytime, day or night
(U,S,A. only)
For any other issue, please contact:
Vacuum Cleaner Help Line
i A СОИ! "ЗГООИ1\
I I “O / I ““Oi5 I “ / OiiC I I
7:30am-4:00pm ESI. M-F
(U.S.A. and Canada)
liLL
Ы. I
CAUTION:
Read and follow all
safety and operating
instructions before first
use of this product.
CUIDADO:
Lea y sigue todas las
instrucciones de operación
y seguridad antes def uso
de este producto.
Sears, Roebuck and Со., Hoffman Estates, IL 60179 U.S.A. www.sears.coiTi
Part No. C01ZCSR30U00-KC01ZCSRZ0U0
í:-: ■■
i.
m
.Чл|:]
Printed in Mexico
Impreso en Mexico
Page 2

TABLE OF CONTENTS
Before Using Your New
..
.. . . 2
..
. , 10
11-12
OUR ^
3
4
,S
.6-7
., 7
, ,8
, 8
, , ,9
10
,, 13
Vacuum Cleaner ..........
...........
Kenmore Vacuum Cleaner Warranty
Important Safety Instructions
Parts and Features ,
Assembly Instructions
Operating Instructions
Cord Release
Releasing the Handle
Touch Control
inteliClEAN
Gentle Sweep Function
Pile Height Selection and Setting
Attachments
Attachment Use Table . , , ,,
................. ..............
......................
.........................................
................
..............
........
.....................
. ^.
..............
BEFORE USINGY
Please read this gutde It Wiil heip you assemble and operate your new Kenmore vacuum
cleaner in the safest and most effective way
For more information about vacuum cleaner care and operation, call your nearest Sears store
You will need the complete model and serial numbers when requesting information Your vacu
um cleaner's model and serial numbers are located on the Mode! and Serial Number Plate
Use the space below to record the model number and serial number of your new Kenmore
vacuum cleaner
Model No.
Vacuuming Tips.............................. .. 13
Performance/Safety Features
Vacuum Cleaner Care .,
Vacuum Cleaner Storage , , , . 16
Cleaning Exterior and Attachments 16
Dust Bin Cleaning
Primary Filter Removal
and Cleaning
Exhaust Filter Replacement - , - - 19
Light Bulb Replacement - 20
Agitator Cleaning..................... . - . 21
Clog Removal
Troubleshooting
.......
...
.
..........................
.............
..........
.............
..................
.................. 21
Requesting Assistance
Or Service
........
...................
lEWVACUUM CLEANER
14-15
..
- - 18-19
pa^s
back
. 16
, 17
22
Serial No
Date of Purchase
Keep this book and your sales check (receipt) In a safe place for future reference
Page 3

KENMORE VACUUM CLEANER WARRANTY
One Year Limited Warranty . .
When assembied, operated and maintained according to all instructions supplied with
the product, if this vacuum cleaner fails due to a defect in material or workmanship within
one year from the date of purchase, return it to any Sears store, Sears Parts & Repair
Center or other Kenmore outlet for free repair
If this vacuum cleaner is used for other than private family purposes, this warranty __
applies for only 90 days from the date of purchase.
This warranty covera only defects in material and workmanship. Sears wilt NOT
pay for:
1. Expendable items that can wear out from normal use, Including but not limited to
filters, belts, light bulbs, and bags.
2 A service technician to instruct the user In correct product assembly, operation or u
maintenance,
3, A service technician to clean or maintain this product
4, Damage to or failure of this product if It is not assembied, operated or maintained
according to all instructions supplied with the product
5, Damage to or failure of this product resulting from accident, abuse, misuse or use for
other than its intended purpose
6 Damage to or failure of this product caused by the use of detergents, cleaners,
chemicals or utensils other than those recommended in all instructions supplied with
the product ^
7, Damage to or faiiure of parts or systems resulting from unauthorized modifications
made to this product
C.L
Disclaimer of implied warranties; limitation of remedies
Customer’s sole and exclusive remedy under this limited warranty shall be product repair
as provided herein . Implied warranties, including warranties of merchantability or fitness
for a particular purpose, are limited to one year or the shortest period allowed by iaw.
Sears shall not be liable for Incidental or consequential damages. Some states and
provinces do not allow the exclusion or limitation of incidental or consequential damages,
or limitations on the duration of implied warranties of merchantability or fitness, so these
exclusions or limitations may not apply to you.
This warranty applies only white this vacuum cleaner is used in the United States and
Canada,
This warrant gives you specific legal rights, and you may also have other rights which
vary from state to state.
Sears, Roebuck and Co., Hoffman Estates, IL 60179
Sears Canada Inc.,Toronto, Ontario, Canada MSB 2B8
Page 4

MPORTANT SAFETY INSTRUCTIONS
I
Your safety ts Important to us. To reduce the risk
AwARNING:
Read ail instructions in this manual before
assamblirrg or using your vacuum cleaner.
Use your vacuum cleaner only as
described in this manual. Use only with
Sears recommended attachments.
Disconnect elecirical supply before servic
ing or cleaning out the brush area. Failure
to do so Gouid result in electrical shock or
the brush suddenly starling.
Do not leave vacuum cleaner when
plugged in. Unpfug from outlet when not in
use and before performing maintenance.
To reduce the risk of etectnca! shock - Do
not use outdoors or on wet surfaces.
Do not allow to be used as a toy. Close
attention IS necessary when used by or
near children.
Do not use with a damaged cord or plug. If
vacuum cleaner is not working as it should,
has been dropped, damaged, left outdoors,
or dropped ¡n water, return it to a Sears
Service Center.
Do not puli or cany by card, use cord as a
handle, close a door an cord, or pull cord
around sharp edges or corners. Do not run
vacuum cleaner over cord. Keep cord away
from heated surfaces.
Do not unplug by pulling on cord. To
unplug, grasp the plug, not the cord.
Do not handle plug or vacuum cleaner with
wet hands.
Do not put any objects into openings.
Do not use with any opening biooked; keep
free of dust, lint, hair, and anything that may
reduce air tew.
of fire, electrical shock, injury to persons or
damage when using your vacuum cleaner, follow
basic safety precautions including the following:
Keep heir, loose clolhliig, fìngere, and ail
parts of body away from openings and ;
moving parts.
Turn off all controls before unplugging.
Use extra care when cleaning on stairs.
Do not put on chairs, tables, etc. Keep on
floor.
Do not use vacuum cleaner to pick up
flammable or combustible liquids {gasoline,
cleaning fluid, perfumes, etc.), or use in
areas where they may be present. The
fumes from these substances can create a
fire hazard or explosion.
Do not pick up anything that is burning or
smoking, such as cigarettes, matches, or
hot ashes.
Do not use vacuum cleaner without dust
bin and/or filters in place.
Always clean the dust bln after vacuuming
carpet cleaners or freshener, powders, and
fine dust. These products clog the filters,
reduce airflow and can cause damage to
the vacuum cleaner. Failure to clean the
dust bln could cause permanent damage to
the vacuum cleaner.
Do not use the vacuum deaner to pick up
sharp hard objects, small toys, pins, paper
clips, etc. They may damage the vacuum
cleaner or dust bin.
Unplug before connecting Handhmate Jr.®
You are responsible for making sure that
your vacuum cleaner is not used by anyone
unable to operate it properly.
Proper assembly and safe use of your vacuum cleaner are your responsibilities. Your vac
SAVE THESE INSTRUCTIONS
uum cleaner is intended for Household use. Read this Owner's Manual carefully for
important use and safety information. This guide contains safety statements under warn
ing and caution symbols.
Page 5
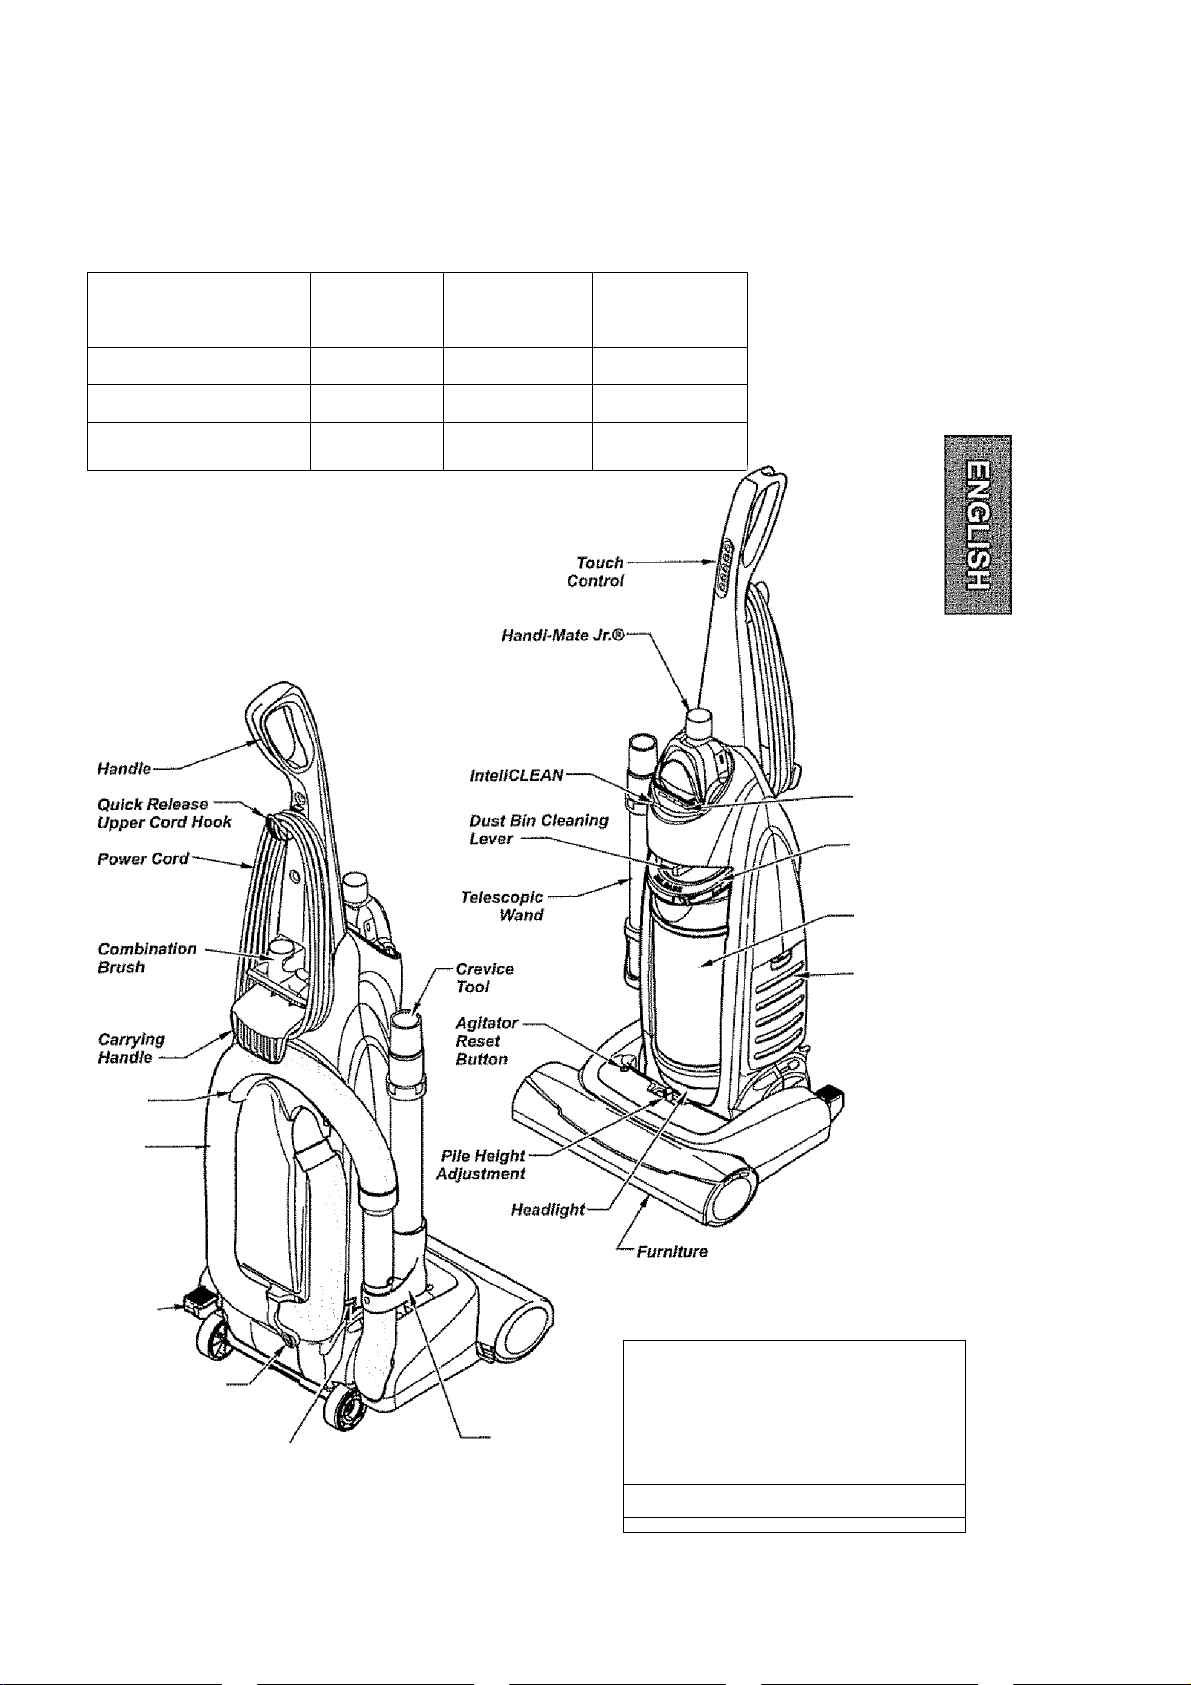
PARTS AND FEATURES
It is important to know your vacuum cleaner’s parts and features to assure its proper and safe
use- Review these before using your vacuum cleaner.
Object
Headlight Bulb
Exhaust Filter
Primary Filter
Style No.
EF-1
p{jp_2
Part No.
in USA
20-5248
20-86889
OA OOA^ O
zu-ozy IZ
Part No.
in Canada
—
20-40324
20-40335
Dirt
Sensor
Oust Bln
Release
Handle
Upper Hose
Hook
Extension
Hose
Handle
Release
Pedal
Extension Hose
Release lever
Motor Protector
{Behind Hose)
Wand Holder
Guard
— Nozzle
Floor—F
Brush
^ Wand
______
0
........................................
Dust Bln
Exhaust
Filter Cover
(Filter Inside)
/
J
Page 6
Please pay special attention to these hazard alert boxes, and follow any instructions
given WARNING statements alert you to such dangers as fire, electric shock, burns
and personal injury, CAUTION statements alert you to such dangers as persona!
injury and/or property damage.
ASSEMBLY INSTRUCTIONS
WARNING
Electrical Shock Hazard
Do not plug into the electrical supply
until the assembly is complete. Failure
to do so could result in electrical
shock or injury.
Before assembling the vacuum cleaner,
check the PACKING LIST on the cover of
the separate REPAIR PARTS LIST. Use
this list to verily that you have received ail
the components of your new Kenmore
vacuum cleaner.
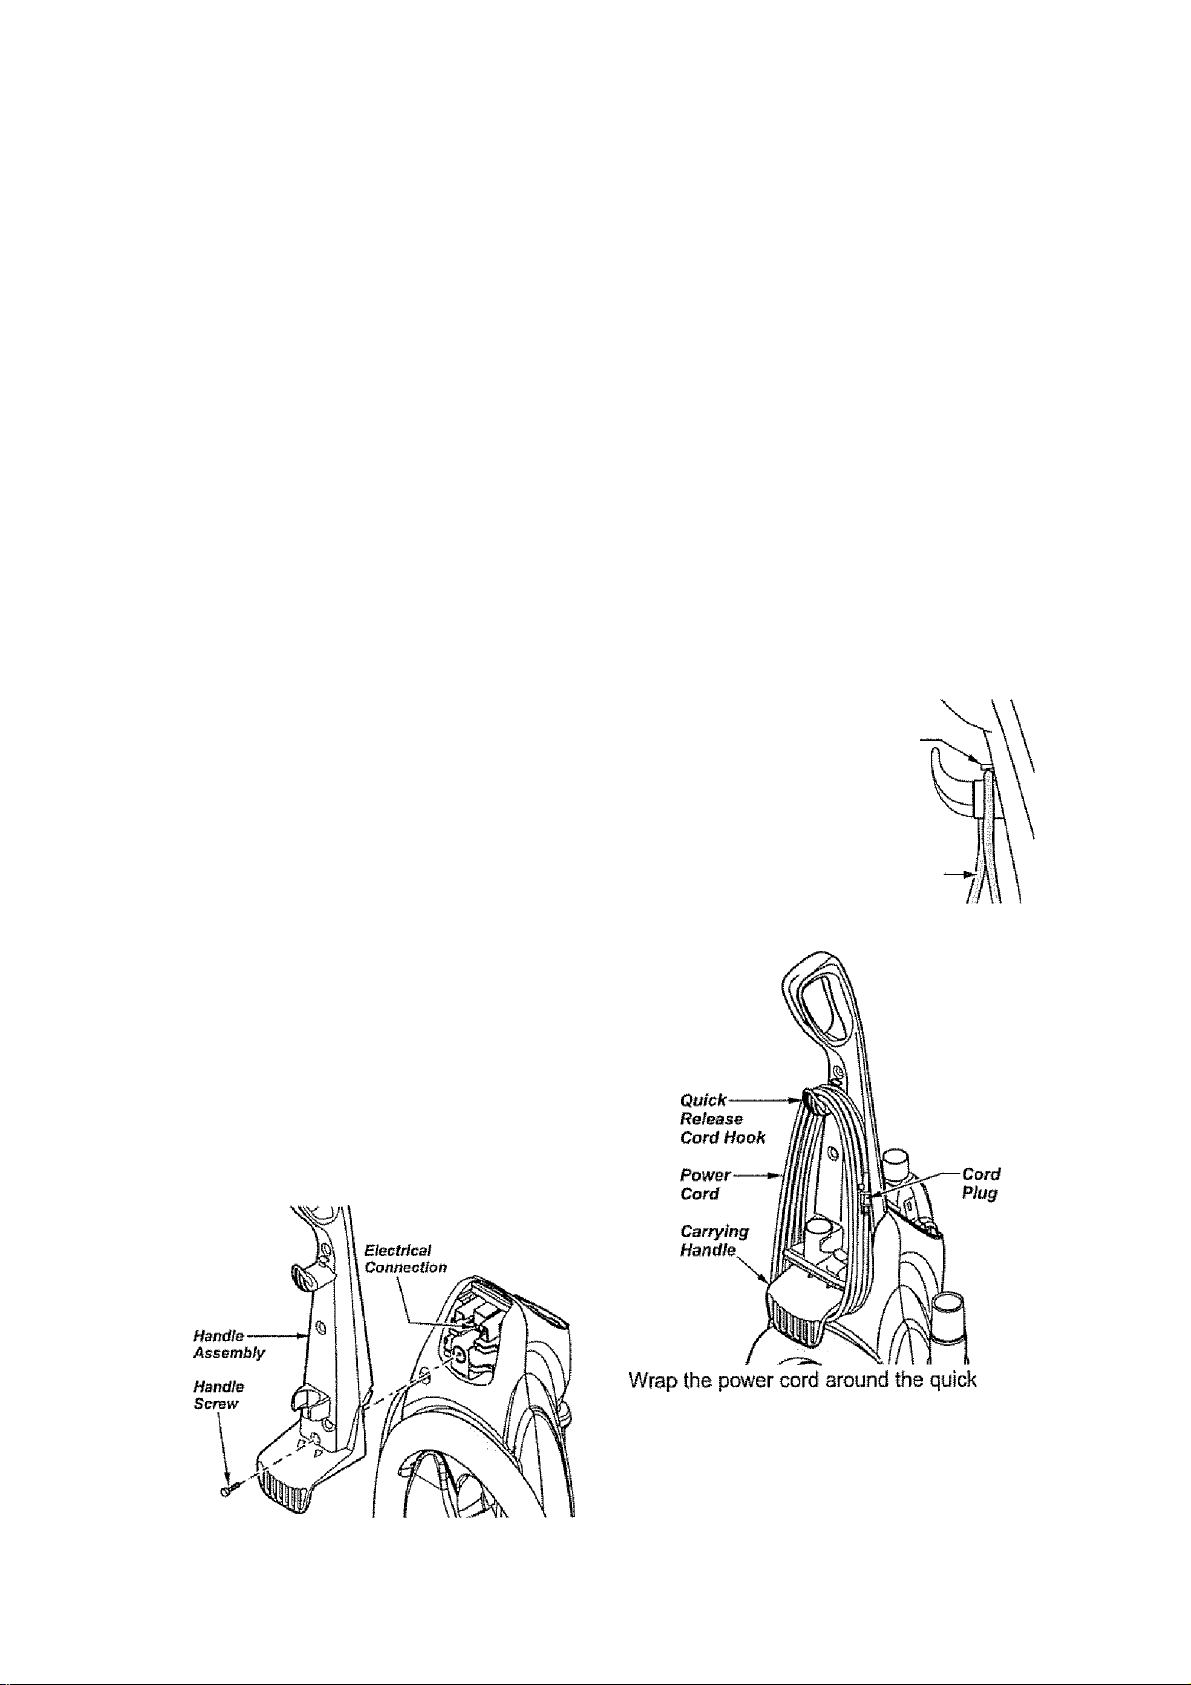
HANDLE ASSEMBLY
Remove the combination brush from
the handle to expose the handle mount-
ino hole
Remove the handle screw from the body
of the vacuum cleaner.
Position the handle assembly as shown in
the illustration below.
CAUTION
Do not overtighten.
Overtightening could strip the screw
holes.
Do not operate the vacuum cleaner
without the screw in place.
r*ODri ACCCAIiDIV
UL/I\U AOOlIIVlol_i
Make sure the quick release upper cord
hook is in the upright position. Remove
the wire tie from the power cord
Make sure the
power cord is
placed into the lock
ing notch on the
body as shown This
helps keep the
power cord out from
under the vacuum
cleaner agitator.
endidura
e fijación
Cordón
eléctrico
When installing the handle, firmly press
the handle onto the body Secure with
handle screw provided.
Begin to tighten the screw with your fin
gers, It may be necessary to adjust the
handle slightly
Using a screwdriver, tighten handle screw.
Reinstall combination brush.
release cord hook and the carrying handle
Lock the power cord plug onto the power
cord.
Page 7
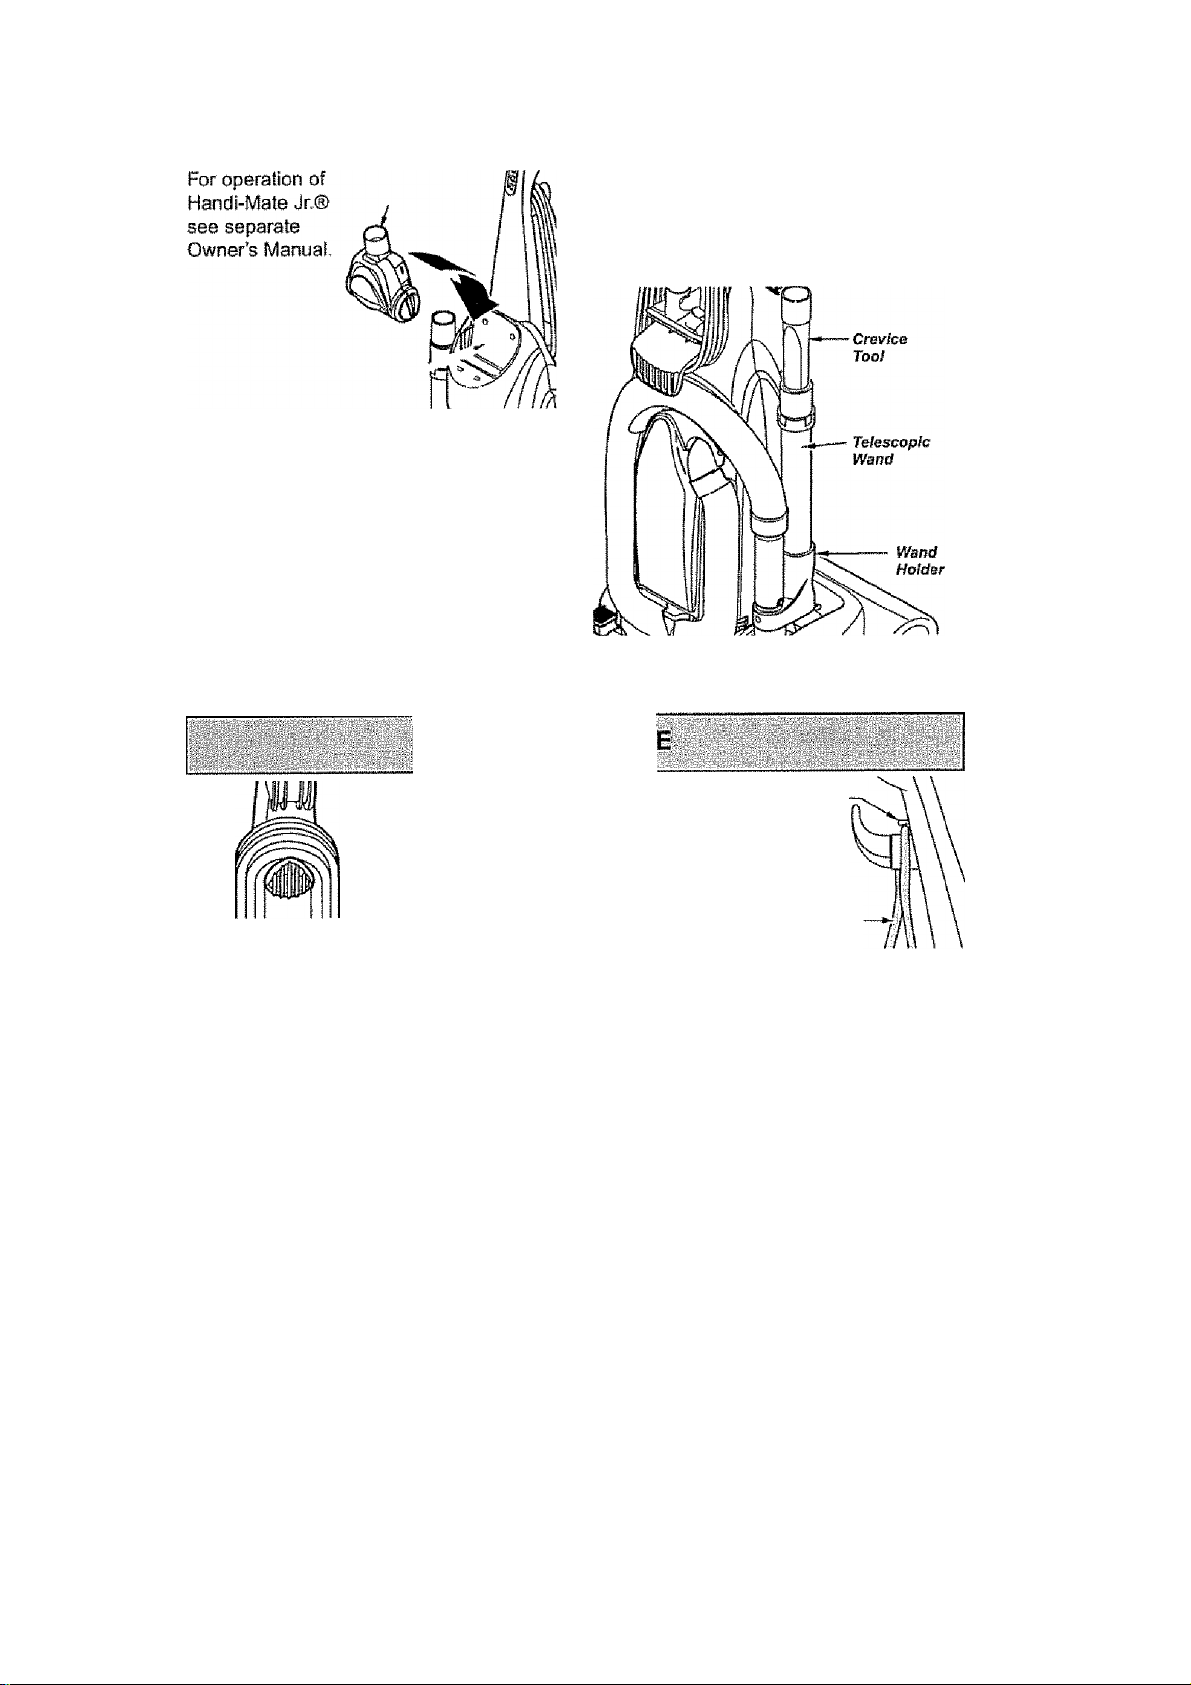
HANDI-MATE JR.®
TO INSERT HANDl-WIATE JR®
Place Handi-Male Jr.® into the storage
compartment.
TELESCOPIC WAND
PLACEMENT
Place the telescopic wand in the wand
holder Place the crevice tool in the top of
the telescopic wand.
Rotate the Handi-Mate Jr.® back until it
snaps into place.
TO REMOVE HANDI-MATE JR.®
Rotate Handi-Mate Jr,® out of the storage
compartment
OPERATING INSTRUCTIONS
,I
CORD RELEAS
1. Turn the quick
release upper
cord hook to
either side and
down to release
the power cord.
WARNING
A
• To reduce the risk of electric shock,
this vacuum cleaner has a polar
ized plug (one blade is wider than
the otherl-
• The plug will fit in a polarized outlet
only one way. If the plug does not
fit fully In the outlet, reverse the
plug. If it still does not fit, contact a
qualified technician to install the
proper outlet. Do not change the
plug in any way.
[3 ds oh iieoilliSifro
power cord plug cfe ajadùn
from the power cord
and puli the cord off
the quick release
upper cord hook
8e sure the power
cord is still locked
into the locking notch of the upper cord
hook.
3, Plug the polarized power cord into a 120
Volt outlet located near the floor,
4. To replace cord, turn upper cord hook to
the up position, then wrap cord
Gofúofi
eléctrico
WARNING
A
Persona! Injury and Product Damage
Hazard
. DO NOT place hands or feet under
the vacuum cleaner at any time.
• DO NOT use outlets above coun
ters, Damage from cord to items In
surrounding area could occur.
ííf?'
Page 8
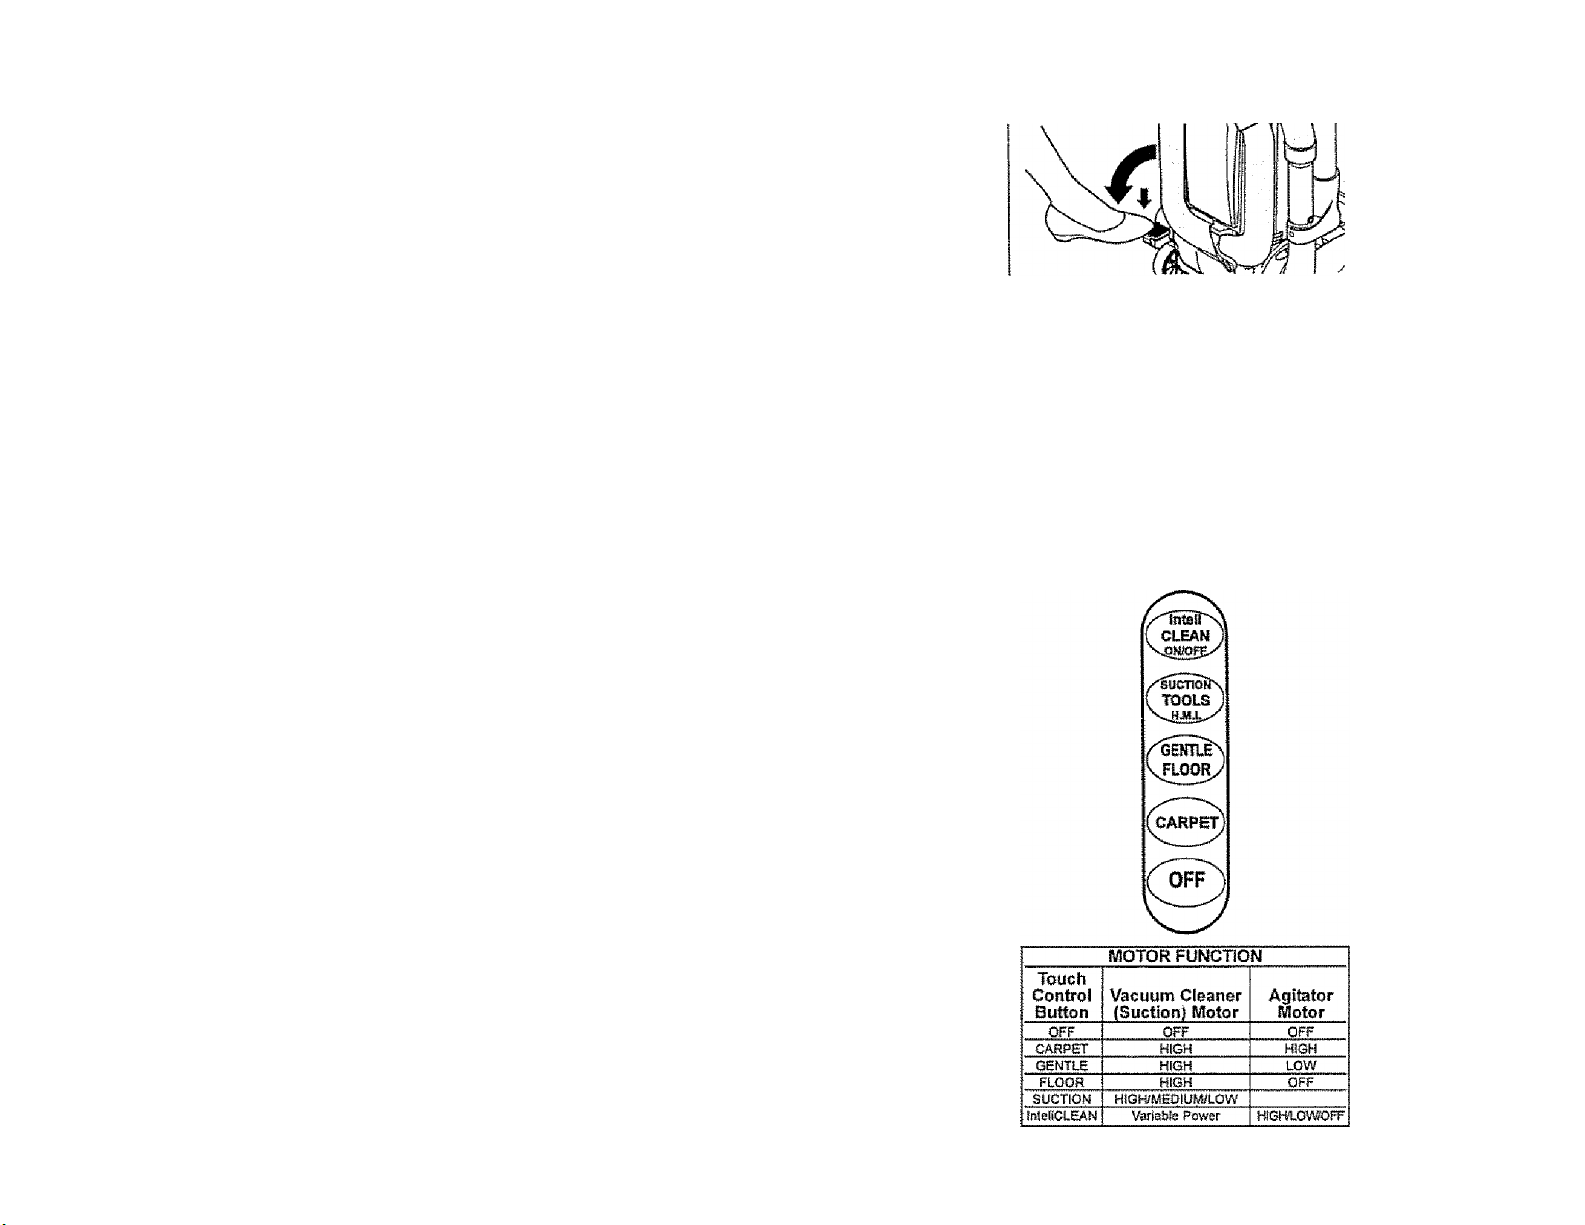
RELEASING THE HANDLE
Release the handle hy pressing dawn on
the handle reteesa pedal with your foot and
puling back and down on the handle with
your hand.
Note: The agitator does not rotate when the
vacuum cleaner is in the upright position.
TOUCH CONTROL
inteliCLEAN - Turns ON the vacuum
cleaner in inteliCLEAN mode.
SliCTIONfTOOLS - Changes the suction
level of the vacuum cleaner motor, if the
vacuum cleaner Is OFF and locked in the
upright position pressing the SUCTION
button turns ON only the vacuum cleaner
motor to HIGH for cleaning of most car
pets, rugs and fabrics. The agitator starts
(in HIGH speed) when the vacuum cleaner
IS lowered into the operating position.
Pressing the SUCTION button cycles the
vacuum cleaner motor through suction levels.
H.M.L. = HIGH, MEDIUM, LOW
GENTLE/FLOOR - Turns ON the vacuum
cleaner motor to HIGH suction level and
the agitator motor to LOW speed level for
gentle cleaning of most delicate carpets
and rugs. Pressing the GENTLE/FLOOR
button a second lime turns OFF the agita
tor motor for cleaning bare floors. In order
to gel MEDIUM and LOW suction levels for
cleaning, press the SUCTION button to
cycle the vacuum cleaner motor through
MEDIUM, LOW, and HIGH suction levels
respectively.
CARPET - Turns ON the vacuum cleaner
motor to HIGH suction level and the agita
tor motor to HIGH speed level for cleaning
of most carpets and rugs. In order to get
MEDIUM and LOW suction levels for
cleamng, press the SUCTION button to
cycle the vacuum cleaner motor through
MEDIUM, LOW, and HIGH suction levels
respectively,
OFF - Turns OFF vacuum cleaner.
Page 9
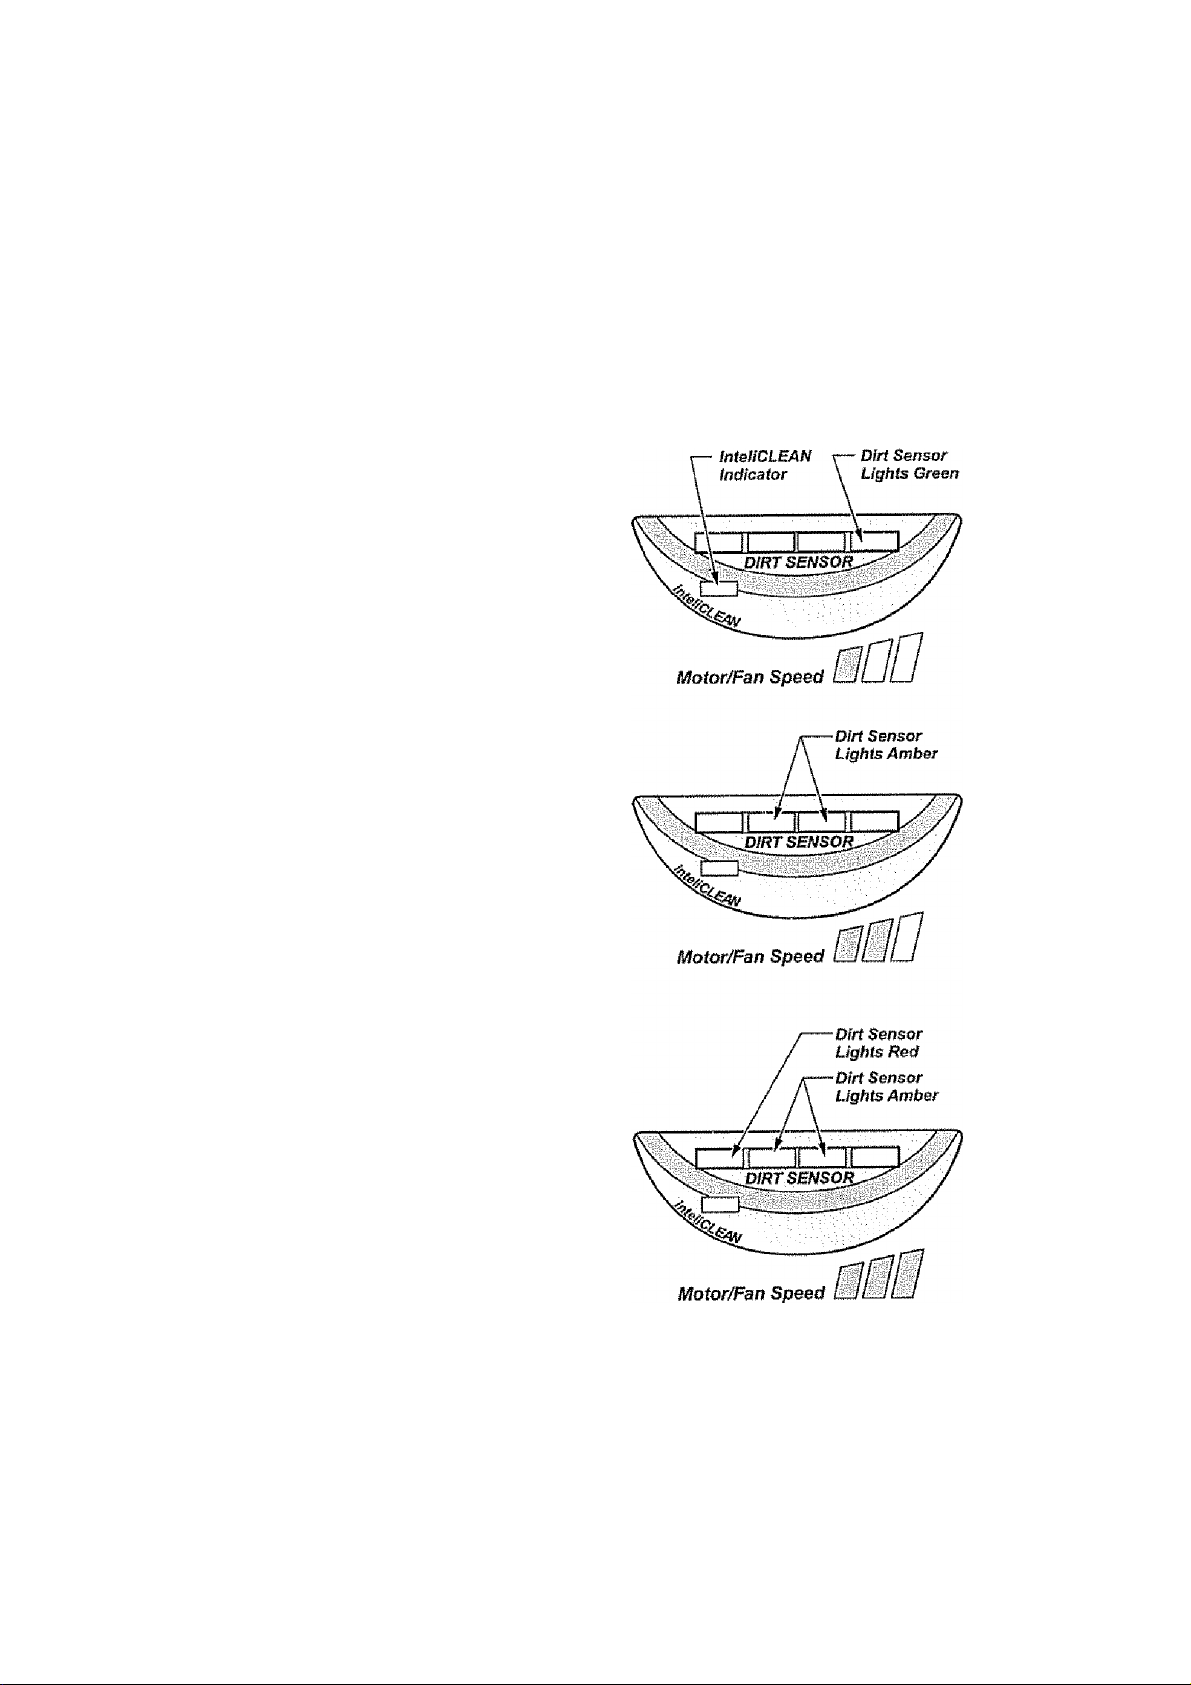
Your Kenmore vacuum cleaner is equipped v^lth the latest technology in floor care. The
Kenmore inteliCLEAN automatically chooses the right cleaning power for any cleaning
need.
Medium power for everyday pickup, High power for normal dirt, and Maximum
power for deep cleaning high traffic areas.
When inteliCLEAN mode is activated the inteliCLEAN indicator is green.
To turn OFF or de-activate inteliCLEAN press the inteliCLEAN button or TOOLS button
When there is little or no dirt present the dirt
sensor is green, indicating that inteliCLEAN
power is at MEDIUM. At MEDIUM power the
vacuum cleaner operates at low energy con
sumption and noise levels,
•7^' I
'¿1/. I
=ri:
With normal dirt concentration the dirt sen
sor is amber, indicating that inteliCLEAN
power is at HIGH Energy consumption
and noise levels increase
With heavy dirt concentration the dirt sen
sor is amber and red, indicating that
inteliCLEAN power is at MAXIUM. The
vacuum cleaner operates at its highest
energy consumption and noise levels.
Page 10
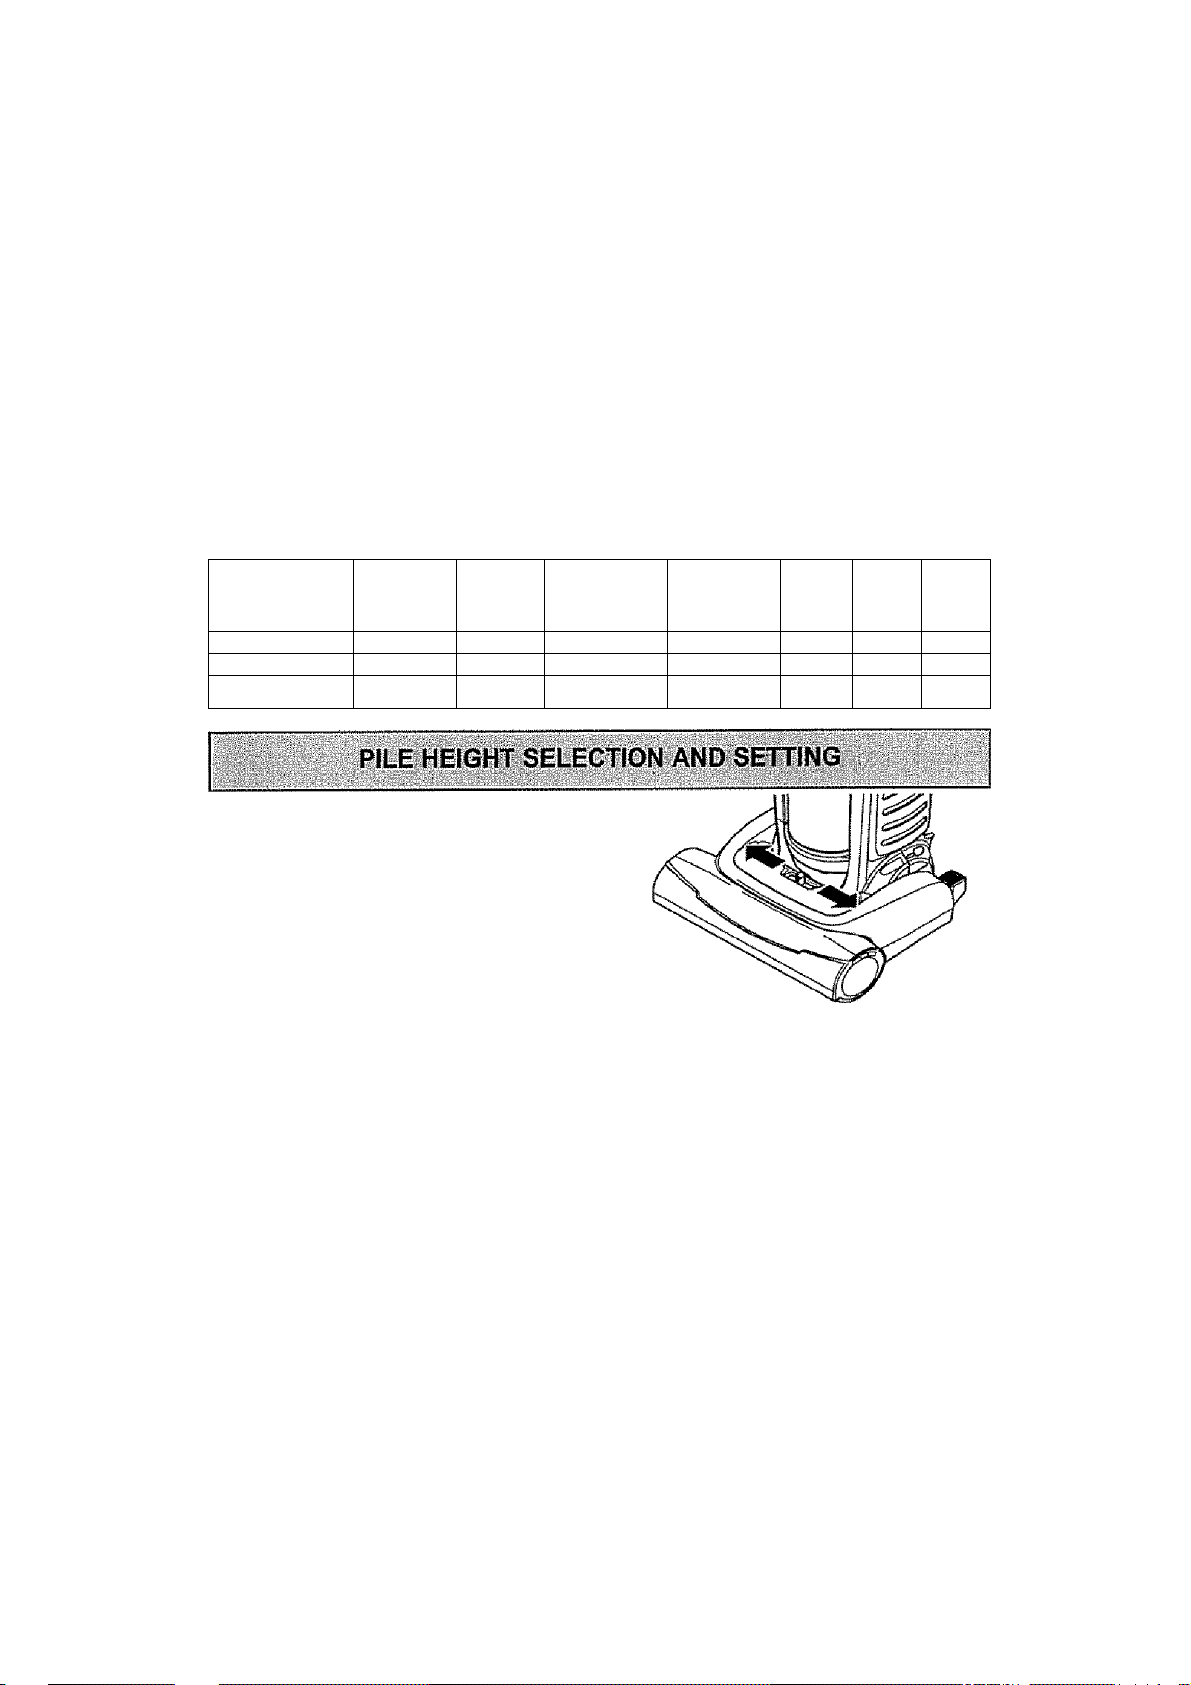
GENTLE SWEEP FUNCTION
Your Kenmore Vacuum Cleaner features a
two (2) speed, direct drive agitator for
oSeaning a variety of floor surfaces. Please
review the table below before using your
vacuum cleaner
1, Do not use the CARPET setting (high
speed) for cleaning barber style car
pet. The high agitator speed could
damage the carpet or cause excessive
carpet wear
Touch Control
Setting
Carpet {1j
Gentle (2)
Floor (3)
Agitator
^ |«rvK\7v4
High
Low
Off
Bare
Floor
Commercial
or Low Pile
2. Use the GENTLE setting (low speed)
ONLY for berber or delicate pile car
peting. The agitator may slow down or
stop on thick carpeting, area rugs or
throw rugs, if agitator stops and does
not restart, see AGITATOR MOTOR
OVERLOAD PROTECTOR
3. The FLOOR setting may be used for
all indoor bare floors including wood,
tile, linoleum, slate etc.
Berber
or Delicate
Carpet
✓
✓
Plush Shag
Area
Rug
To select a pile height setting:
Turn off vacuum cleaner. Select a pile
height setting by tilting the vacuum
cleaner back until front wheels are lifted
slightly off the floor
Slide the adjustment lever to the correct
setting.
There are four (4) pile height settings on
the vacuum cleaner. Use the LOW setting
for most low-pile carpets and bare floor
cleaning (with agitator OFF), and the
HIGH setting for high-piie carpets iike
shag carpet, scatter rugs, etc. Use the
other settings as needed for carpet
heights in between.
A CAUTION
Do not allow vacuum cleaner to remain
In one spot for any length of time
when the agitator is turning. Damage
to carpet may occur. _______________
10
Page 11
Combimtion
8rv$h
Carrying
Handle
Handl-Mate JrM
Crevice
Tool
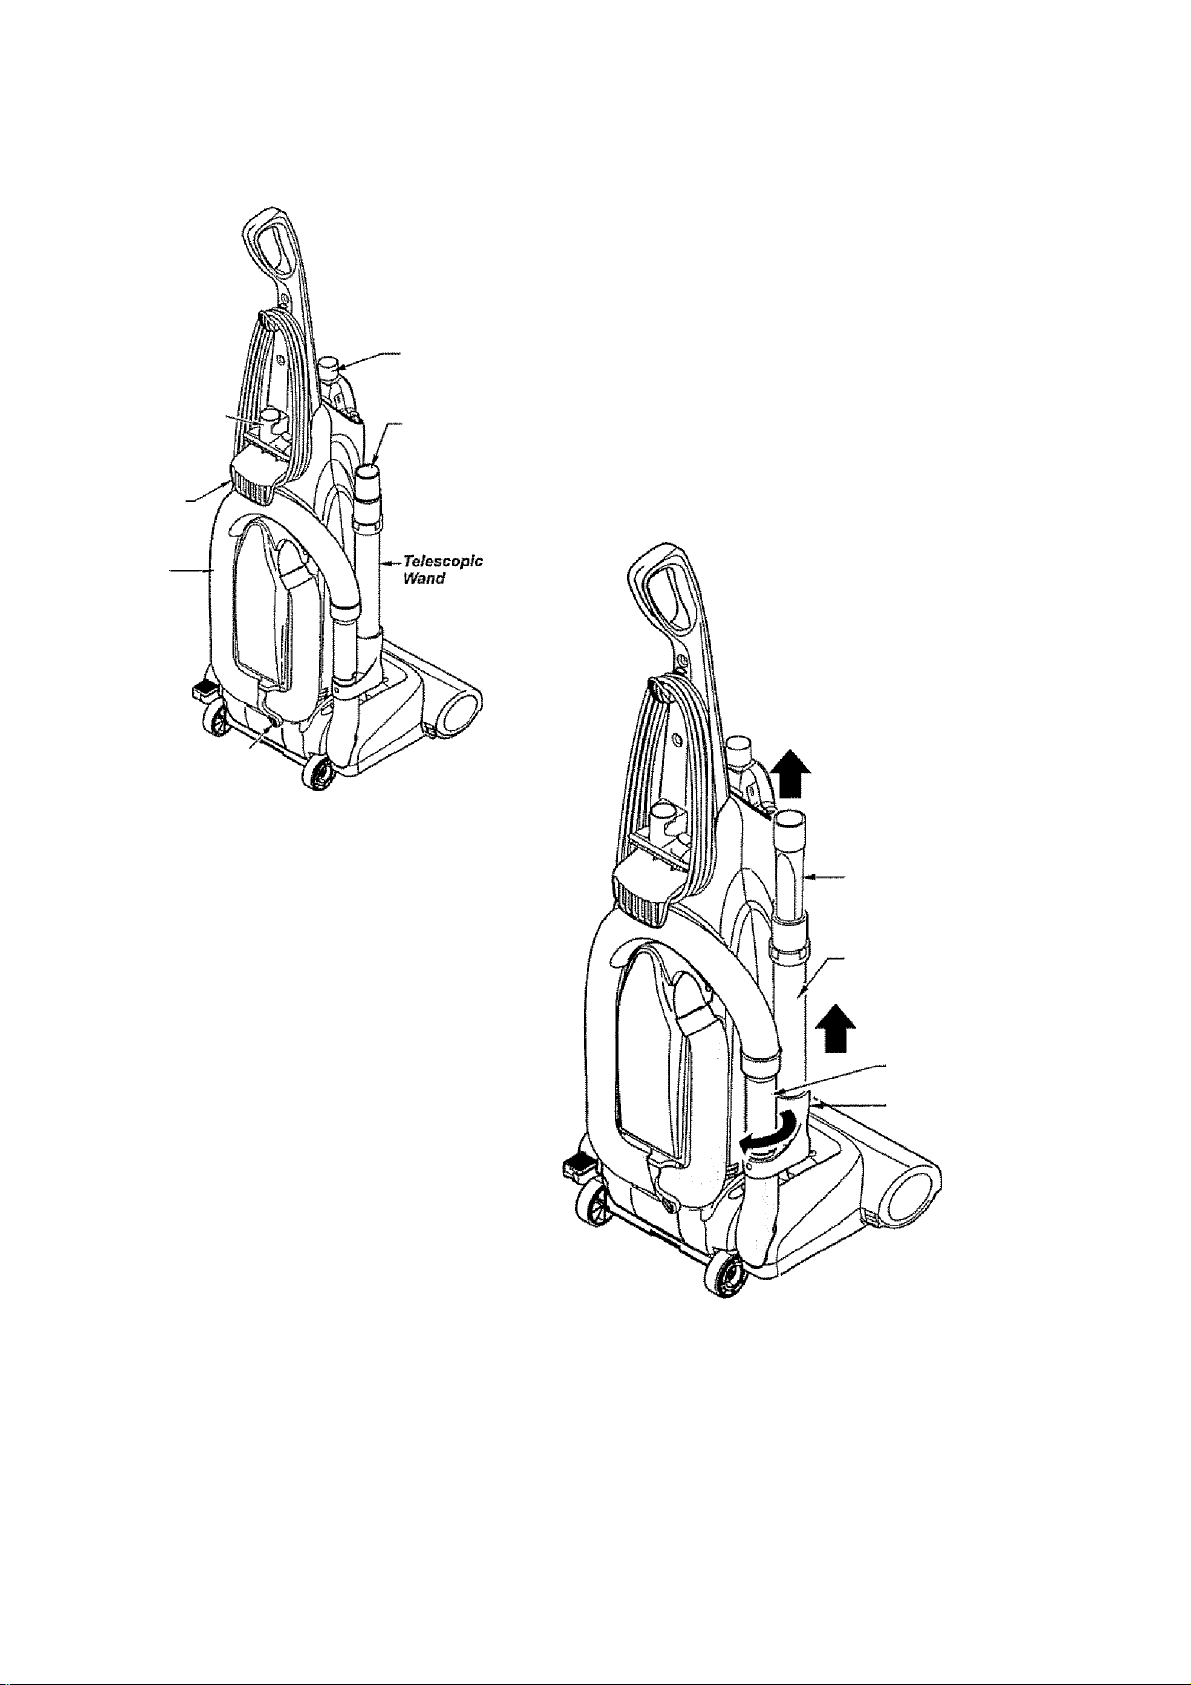
TELESCOPIC WAND WITH
SUCTION CONTROL SLIDE
1. Remove the lower end of the extension
hose from the wand holder by grasping
the hose collar, twisting, and pulling
straight up.
2. Remove the telescopic wand from the
wand holder.
3. Remove the crevice tool from its stor
age position in the wand. Turn the lock
ing ring to the UNLOCK position.
■ n r ■“
■-= i=t
■jrr
Extension
Hose
Extension Hose
Hefease bevor
TO USE ATTACHMENTS
Remove the lower end of the extension
hose from the v^and holder by grasping the
hose collar, twisting, and pulling straight up.
Rotate the extension hose release lever
down if maximum reach is needed.
Note: The motor protector may open when
using attachments or when cleaning new
carpet, due to reduced airflow caused by the
attachments themselves or caused by new
carpet lint filling the dust bin quickly. See
the TROUBLESHOOTING section.
‘M)
3. Crevice
roof
2. Telescopic
Wand
1. Hose
Collar
Wand
Holder
A WARNING
Electrical Shock And Personal Injury
Hazard
Disconnect electrical supply before ser
vicing or cleaning the vacuum cleaner.
Failure to do so could result in electrical
shock or personal Injury from vacuum
cleaner suddenly starting.
11
Page 12
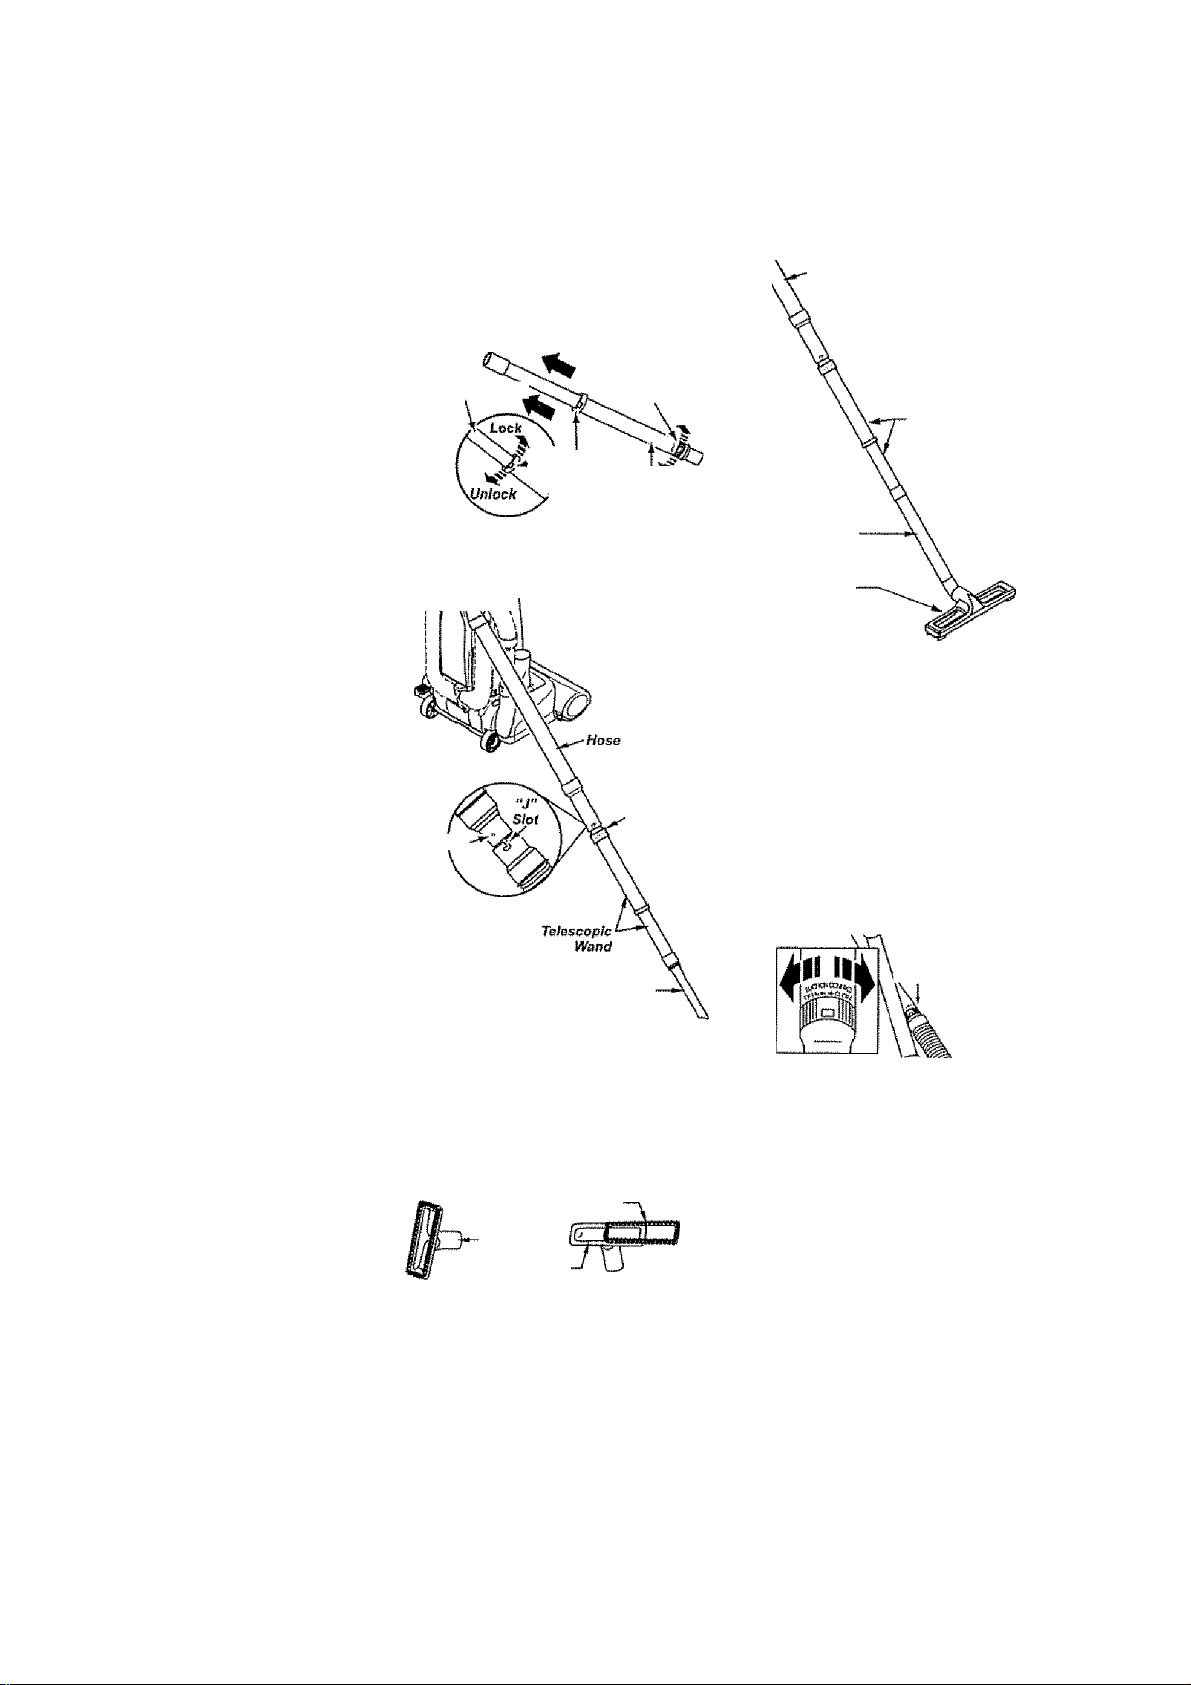
Extend the wand to its fuK length Turn the
iocking ring to the LOCK position. Attach
the wand onto the open end of the hose.
-Hose Attach floor brush directly to
extension wand
Lower
Wand-"~~^^
Wiind
\ locking Ring "
Align the labs on the wand with the “J”
slots in the hose Push the wand into the
hose and twist to the right to lock
/ irw n.
Raised
Tab
To achieve maximum reach with the
attachments, add the crevice looi to the
end of the wand by inserting and twisting
slightJy
The combination brush can be attached
directly to the wand.
Combination
Brush
Brush
Haider
Use the brush holder without the brush for
greater suction on furniture cushions or
stairs. Use brush holder with brush for
cleaning loose surfaces such as drapes,
Suction
Control Slide
Crevice-
Tool
Brush
Upper
Wand
Suction
Slide Control
Tetescopic
Wend
Extension
Wand
Floor
Brush
Use the floor brush for cleaning of floors
or stairs-
TO OPERATE SUCTION CONTROL SLIDE
Telescopic Wand
When using attachmerUs for cleaning
draperies, small rugs with low pile and other
delicate items, twist the suction control slide
to the open position This slide is located on
the telescopic wand, close to the hose.
This wi reduce suction for ease of deanlng.
Suction
Note: Return
Control
iSt/de
suction control
slide to the dosed
position for normal
cleaning.
^CAUTION
When using attachments, be careful
not to overextend the stretch hose
when reaching. Trying to reach beyond
the hose stretch capability could cause
the vacuum cleaner to tip over.
12
Page 13

Remove the combinatrati brush. Snap into
appropriate storage iacation.
Remove crevice too! from the want! by twist
ing. Lay aside,
Remove the letescoptc wand from the hose.
Twist the wand to the left and pull from the
hose end.
Unlock the wand by turning the wand locking
iirig to the UNLOCK position.
Slide the tower wand Into the upper wand.
Turn the wand locking ring to the LOCK posi
tion.
Place the crevice tool down into the com
pressed wand. Place the telescopic wand in
the wanct holder
ik CAUTION
DO NOT pull the vacuum cleaner
around the room by the hose.
Property damage or personal injury
could result.
m
r
ATTACHMENT USE TABLE
CLEANING AREA
ATTACHMENT
CREVICE TOOL
COMBINATION BRUSH ** ^
FLOOR BRUSH 1
Hand!*Male Jr.® ^
' Always dean attachments before usmg on fabrics. / = Applicable
“■Use the brush holder with out the brush for greater suciior! on furniture cushions or stairs. Use
brush hoider with brush for deanlng loose surfaces such as drapes.
Fumiture*^
Between
Cushions* Drapes* Stairs
/ / /
/
/
/
VACUUMING TIPS
Carpet edges
Guide either side or the front of the noz
zle along a baseboard.
Stairs
Set handle in full upright position. Agitator
stops rotating. Use the crevice tool, com
bination brush or Handi-Mate Jr.®.
Vacuum cleaner Tipping
When using the attachments keep the
extension hose release lever in the locked
position when possible. This helps to keep
the vacuum cleaner from tipping over
when stretching the hose. If additional
hose is needed then unlock the release
lever and puli out additional hose. Use
caution not to ftp over vacuum cleaner.
^WARNING
Personal Injury Hazard
Use care if vacuum cleaner is placed on
stairs, if it falls, personal injury or prop
erty damage could result.
For best cleaning results, keep the airflow
passage clear.
Unpiug the vacuum cleaner from the outlet
before checking.
13
•Ivn
Ftoors
/
/ /
/
Page 14
PERFORWfANCE/SAFETY FEATURES
MOTOR PROTECTION SYSTEM
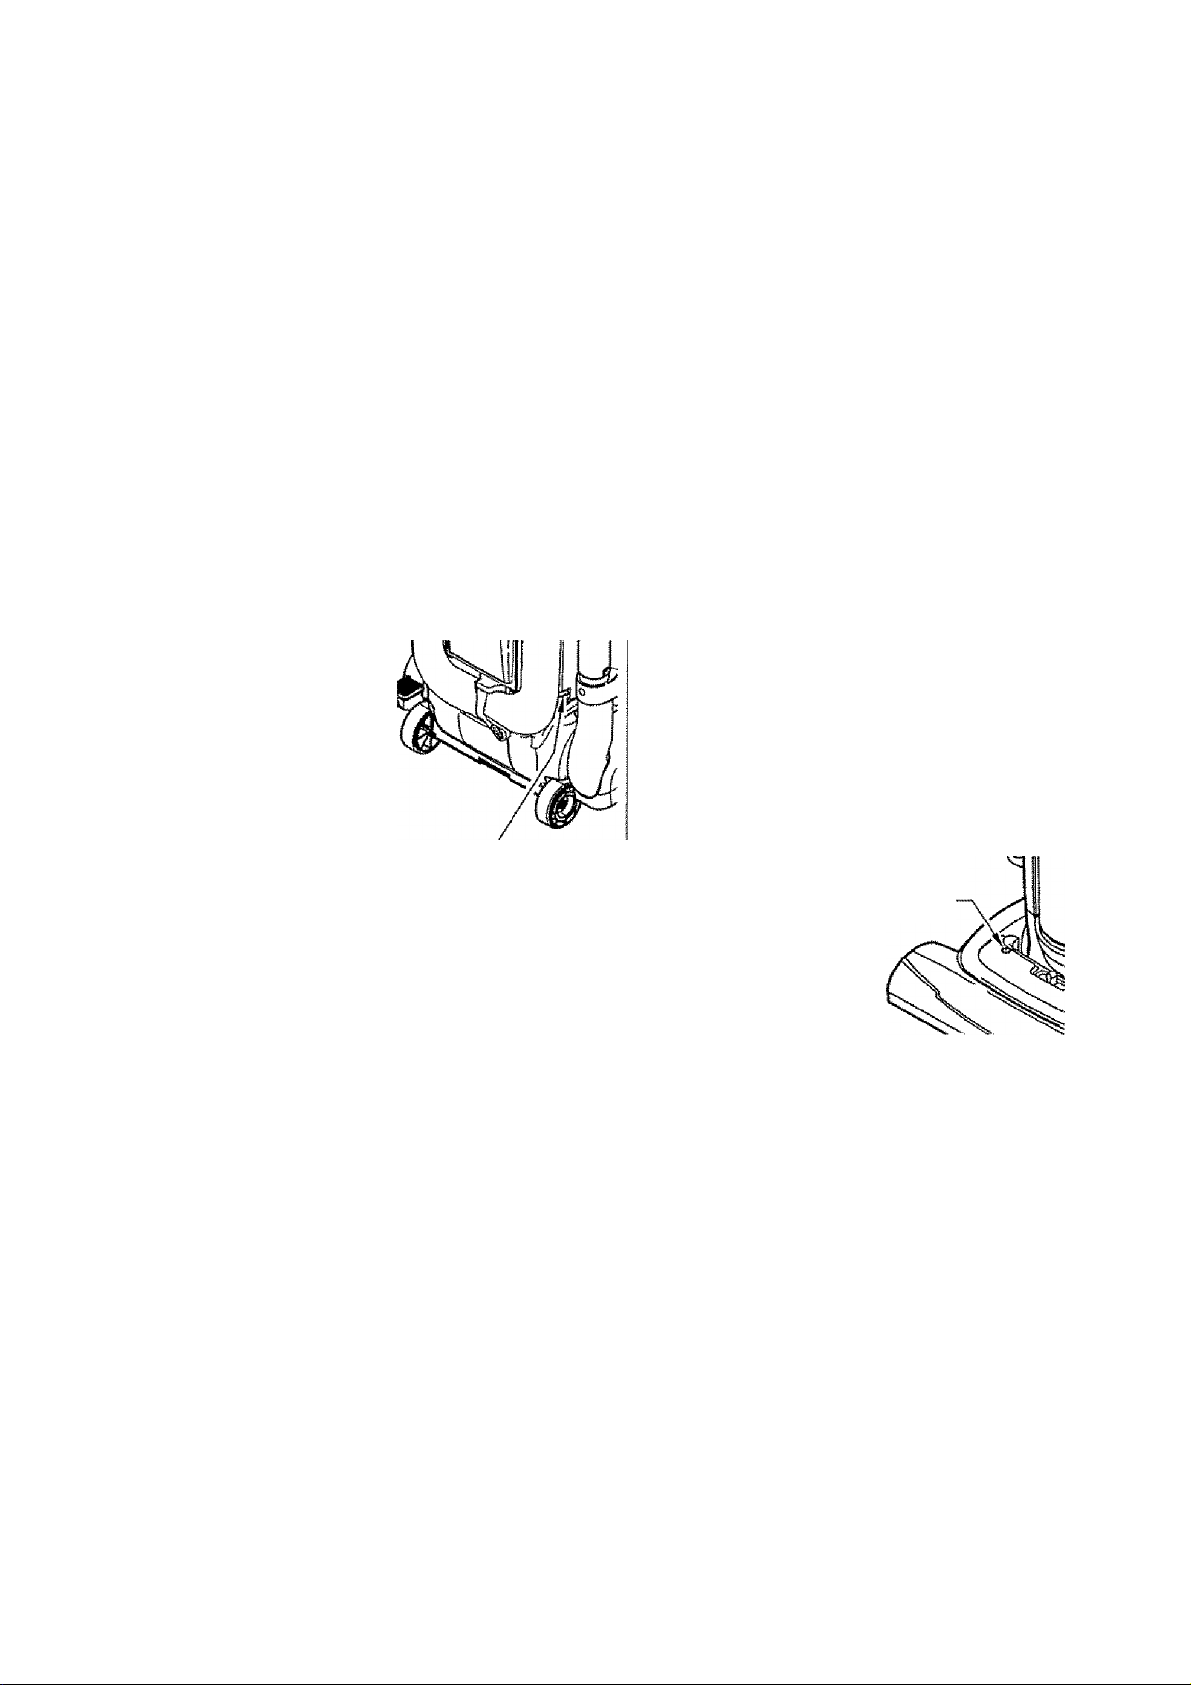
Motor Protector
This vacuum cleaner has a motor protector
by-pass vaive which automatically opens to
provide cooling air to the vacuum cleaner
motor when a clog prevents the normal
flow of air to the motor. If the by-pass valve
opens to prevent motor overheating and
possibie damage to the vacuum cleaner,
you will notice a change of sound as air
rushes through the valve opening.
To correct problem empty the dust bin*
If using attachments, adjust to allow for
greater air flow.
NOTE: The motor
protector may open
when using
attachments or
when cleaning new
carpet, due to
reduced airflow
caused by the
attachments
themselves or by
new carpet lint filling the dust bin quickly.
To correct problem empty the dust bin.
If using attachments, adjust to allow for
greater air flow.
Motor Protector
(Behind Hose)
To correct problem: Turn the vacuum
cleaner off and unplug the power cord from
the outlet to allow the vacuum cleaner to
coo! and the thermal protector to reset.
Check for and remove clogs, if
necessary. See CLOG REMOVAL
section. Also check and replace any
clogged filters. Wait approximately thirty
(30) minutes before restarting vacuum
cleaner.
AGITATOR MOTOR
OVERLOAD PROTECTOR
The agitator motor has built-in protection
against motor damage should the agitator
jam. If the agitator stows down or stops, the
agitator overload protector shuts off the
agitator motor. The vacuum cleaner motor
will continue to run
To correct problem; Turn off and unplug
vacuum cleaner, remove obstruction, then
press Agitator Motor reset button.
If the problem
persists, have the
vacuum cleaner
serviced by a
Sears or other
qualified
technician.
Agitator Motor
Reset Button
Note: Do not block motor protector.
Thermal Protector
This vacuum cleaner has a thermal
protector, which automatically trips to
protect both the vacuum cleaner and the
agitator motor from overheating. If a clog
prevents the normal flow of air to the motor,
the thermal protector turns the motor off
automatically. This allows the motor to coot
in order to prevent possibie damage to the
vacuum cleaner.
14
Page 15
DIRT SENSOR
The elecironic dirt sensor is a feature
which will detect particles as they pass
through the vacuum cleaner.
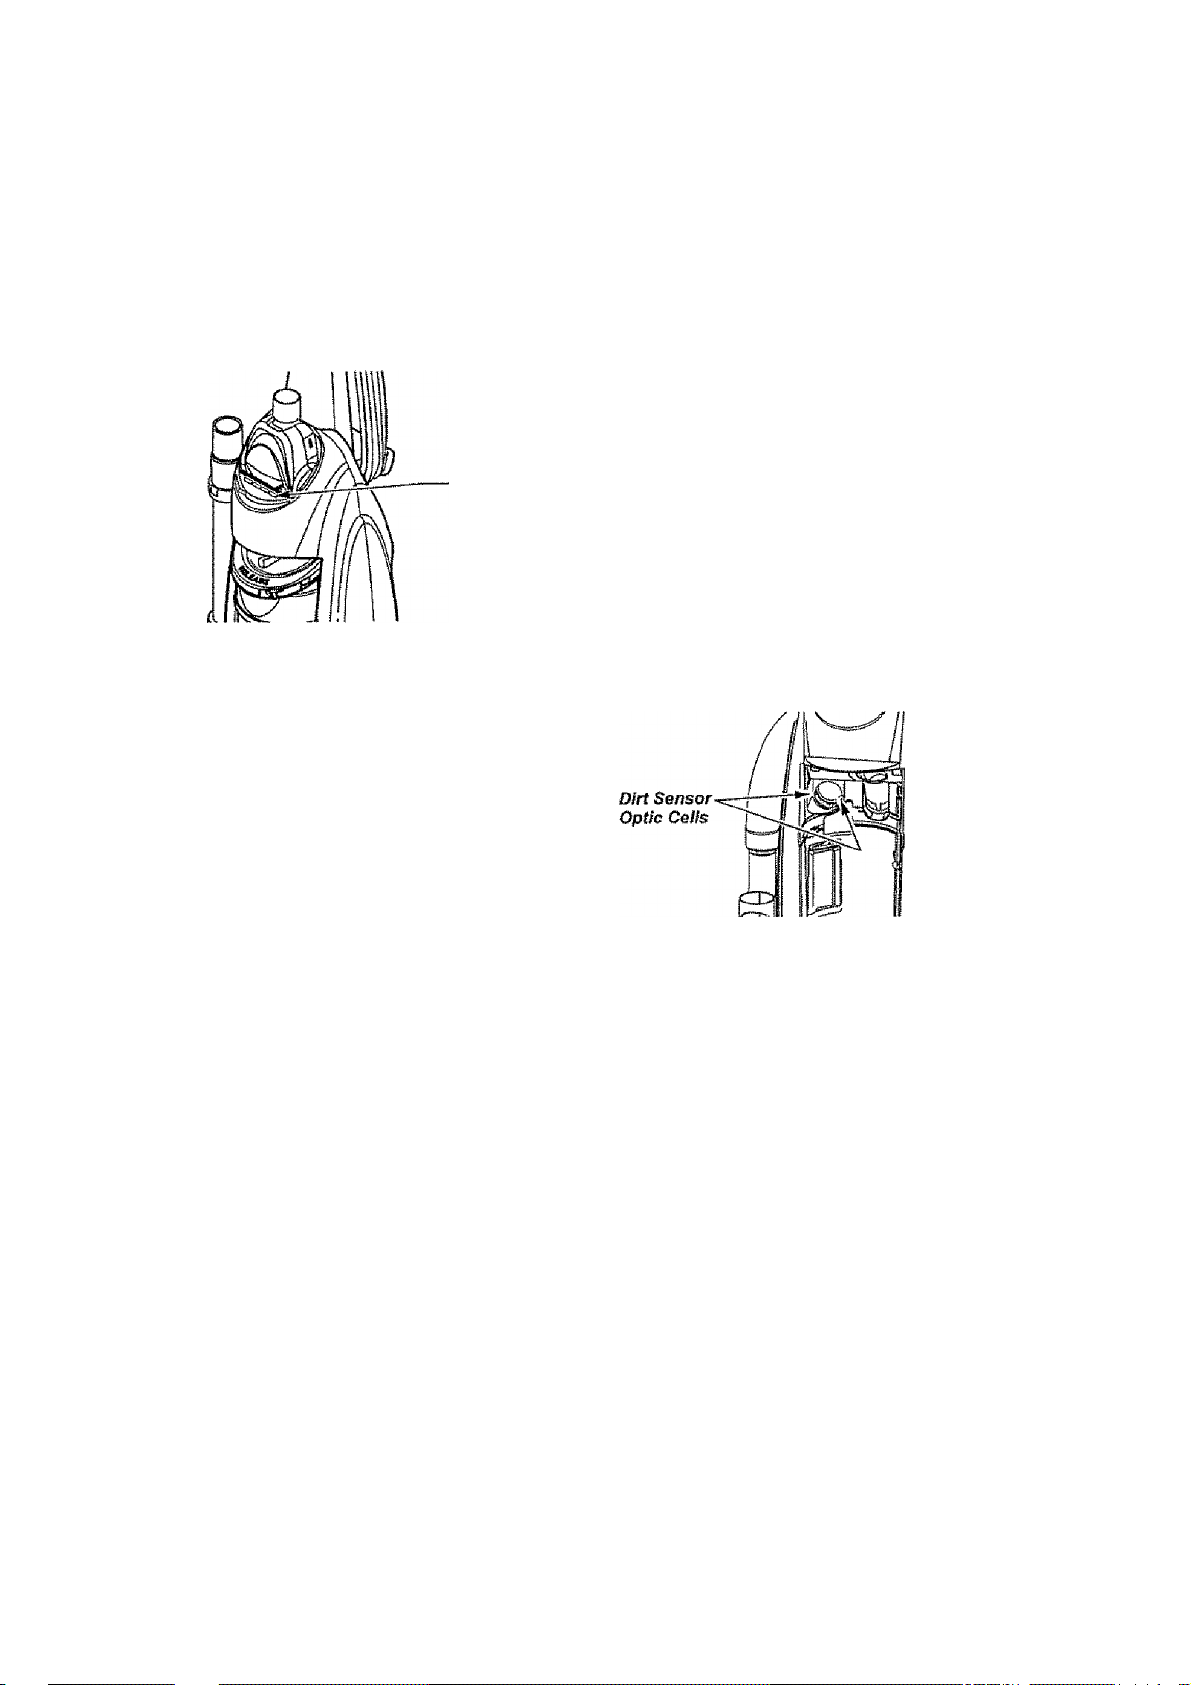
The dirt sensor indicators are located on
the front of the vacuum cleaner above the
dust bin.
Dirt
Sensor
When little or no dirt is present the dirt
sensor is green.
With medium dirt concentration the dirt
sensor is amber.
With heavy concentration the dirt
sender is red and amber.
OPERATION
As you vacuum, the amber and red
indicator lights will come on and stay on as
long as the sensor detects a high
concentration of particles passing through
the vacuum cleaner.
TO CLEAN DIRT SENSOR OPTICS
The dirt sensor optics consist of two optic
cells located inside the dust bin port.
Occasionaliy, it may become necessary to
clean the two optic celis to assure
maximiim performance.
It is recommended the optic ceils be
cleaned:
• When the red light stays on
continuously. ..
• When dirt or dust adheres to the
optic ceils.
• Whenever the dust bin is emptied.
ÜLII
>-г'.
I'
I
A WARNING
lElectrical Shock And Personal Injury
¡Hazard
Disconnect electrical supply before per
forming maintenance to the vacuum
cleaner. Failure to do so could result in
electrical shock or personal injury from
vacuum cleaner suddenly starting.
To clean the sensor, wipe the optic cells
with a soft, dry cloth. Never use cleaners
or liquids as they can help speed the
recoating of the optic cells and make it
necessary to clean them much sooner than
normal. The dirt sensor area can be
reached by removing the dust bin.
15
Page 16
VACUUM CLEANER CARE
Always follow all safety precautions when
performing maintenance to the vacuum
cleaner.
VACUUM CLEANER STORAGE
Gather the cord and wrap it loosely around
the upper and lower card hooks. Lock power
cord plug onto the power cord.
Store the vacuum
cleaner in a dry,
indoor area, on
the floor with the
handle locked in
the upright posi
tion.
CLEANING EXTERIOR AND ATTACHMENTS
^WARNING
Electrical Shock And Personal injury
Hazard
Disconnect electrical supply before
servicing or cleanirrg the vacuum
cleaner. Failure to do so could result in
electrical shock or pesonal injury from
vacuum cleaner suddenly starting.
^WARNING
Electrical Shock And Personal injury
Hazard
Wrapping the cord too tightly puts stress
on the cord and can cause cord damage.
A damaged cord is an electrical shock
hazard and could cause personal injury
or damage.
Unplug cord from wall oullel. DO NOT drip
water on vacuum cleaner.
Clean exterior using a clean, soft cloth that
has been dipped in a solution of mild liquid
detergent and water, then wrung dry. Wipe
dry after cleaning.
To reduce static electricity and dust build
up, wipe outer surface of vacuum cleaner
and attachments.
Wash attachments in warm soapy water,
rinse and air dry. Do not dean in dish
washer.
A CAUTION
Do not use attachments if they are
wet. Attachments used in dirty areas,
such as under a refrigerator, should
not be used on other surfaces until
they are washed. They could
marks*
16
leave
Page 17
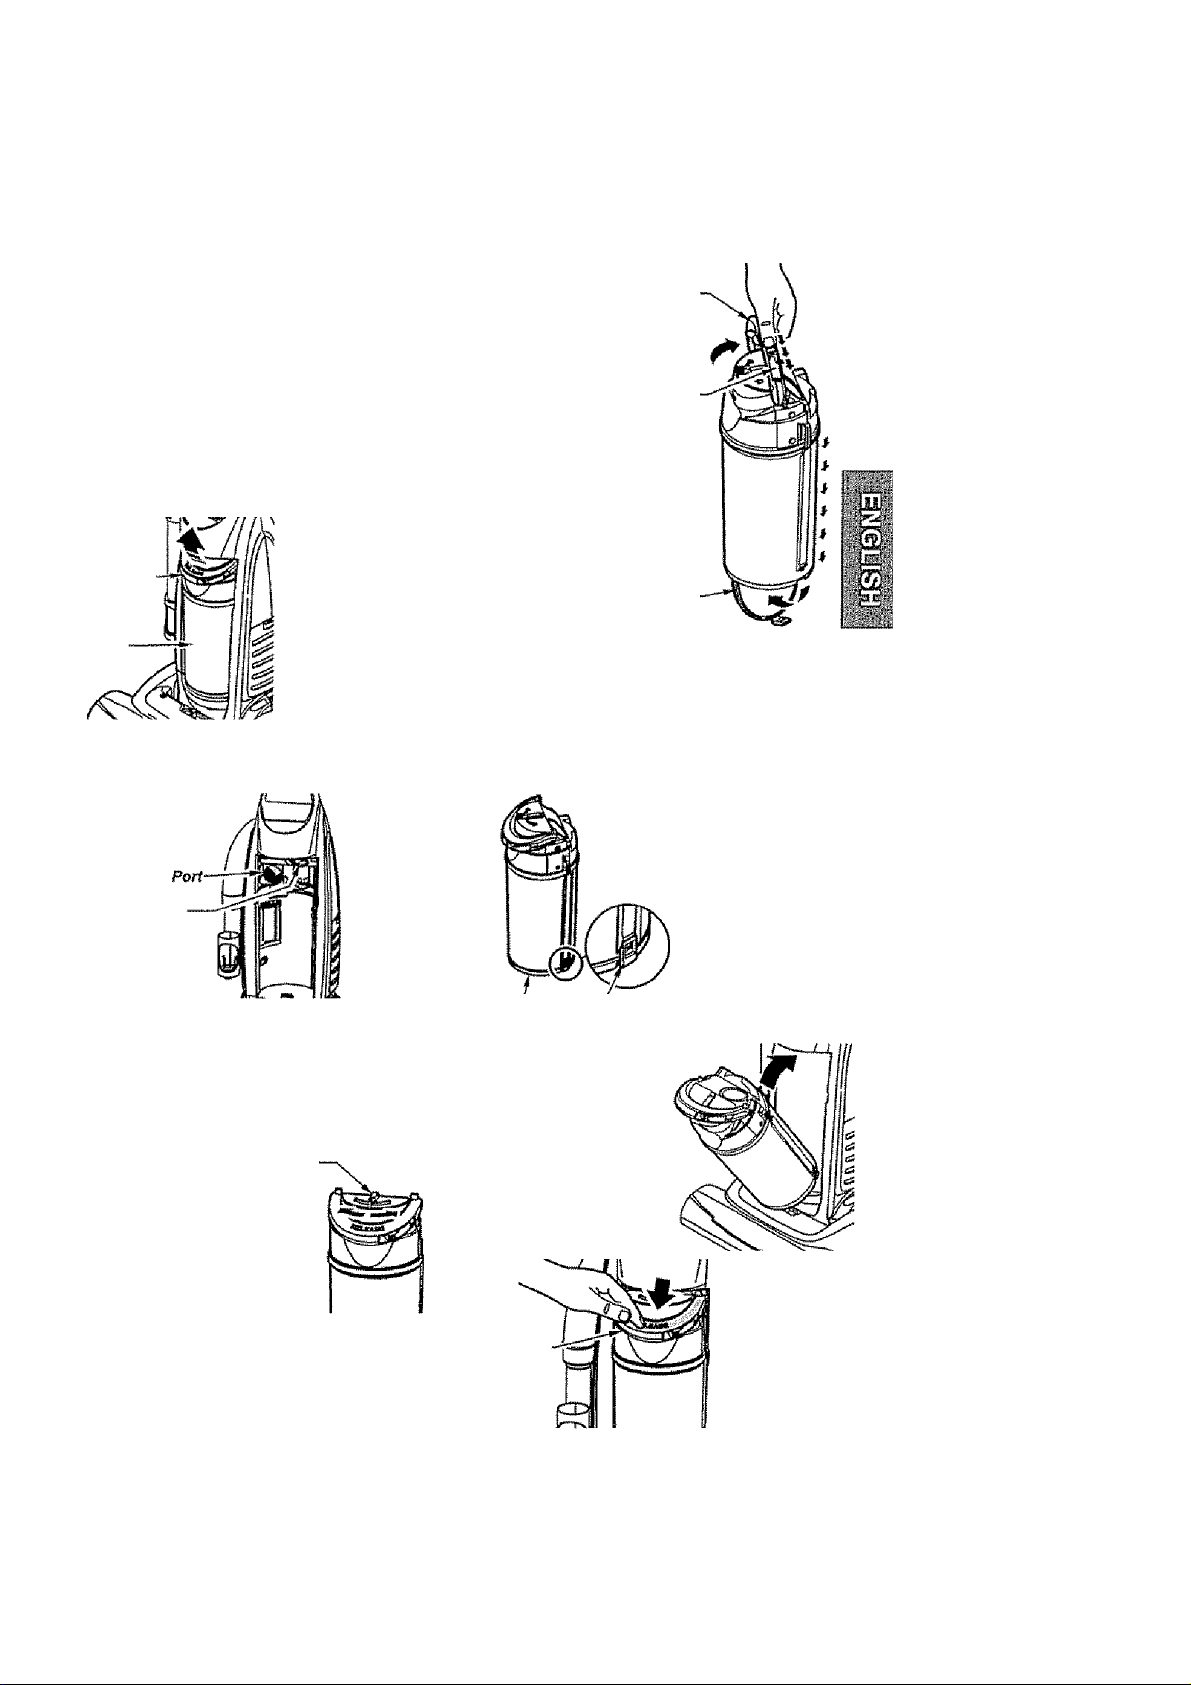
^^VVARNING
Always unplug power cord from elec<
trical outlet before performing any ser
vice on vacuum cleaner.
TO REMOVE DUST BIN
Lift dust bin handle located at the top of
the dust bin .
Pull the handle up
ûust Bln
Hmd/e
and lift dust bin up
and out of the vac
uum cleaner.
Dust
Bin
Hold dust bin
over a trash
Dust Bln
Handle
container.
Press the dust
bin door
release button
downward to
release the
Dust Bin
Door
Release
Button
door.
The door will
swing open
and the debris
Will fail into the „ ^
. , , . Dust Bin -
trash container. Emptying
Door
Shake the dust bin to release any debris
that might hang In the filter element
Remove any ciogs that might be located in
the suction port or filter port area.
Suction
Filter Port
TO EMPTY DUST BIN
Before removing debris from dust bin it is a
good idea to move the dust bin filter clean
ing fever back and forth several times.
Moving the lever
back and forth
loosens the dust
and debris that
Dust Bln
Filter
Cteming
Lever
has attached
itself to the filter
element inside
the dust bin,
Rotate dust bin handle to the vertical posi
tion
Note; See PRIMARY FILTER REMOVAL
AND CLEANING section
After the dust bin is
empty of debris,
firmly close the
door. Make sure
you hear a “click”
sound to indicate
that the door is fully
latched.
Door Door
L^ich
TO REPLACE
DUST BIN
Place dust bin back
into vacuum cleaner
by inserting the bot
tom first and tilting
back with the dust bin
handle raised
¡Lower the dust
bin handle to
lock dust bin in
place.
Oust Bln
Handle
A noticeable
“oiick” should
be heard.
17
Page 18
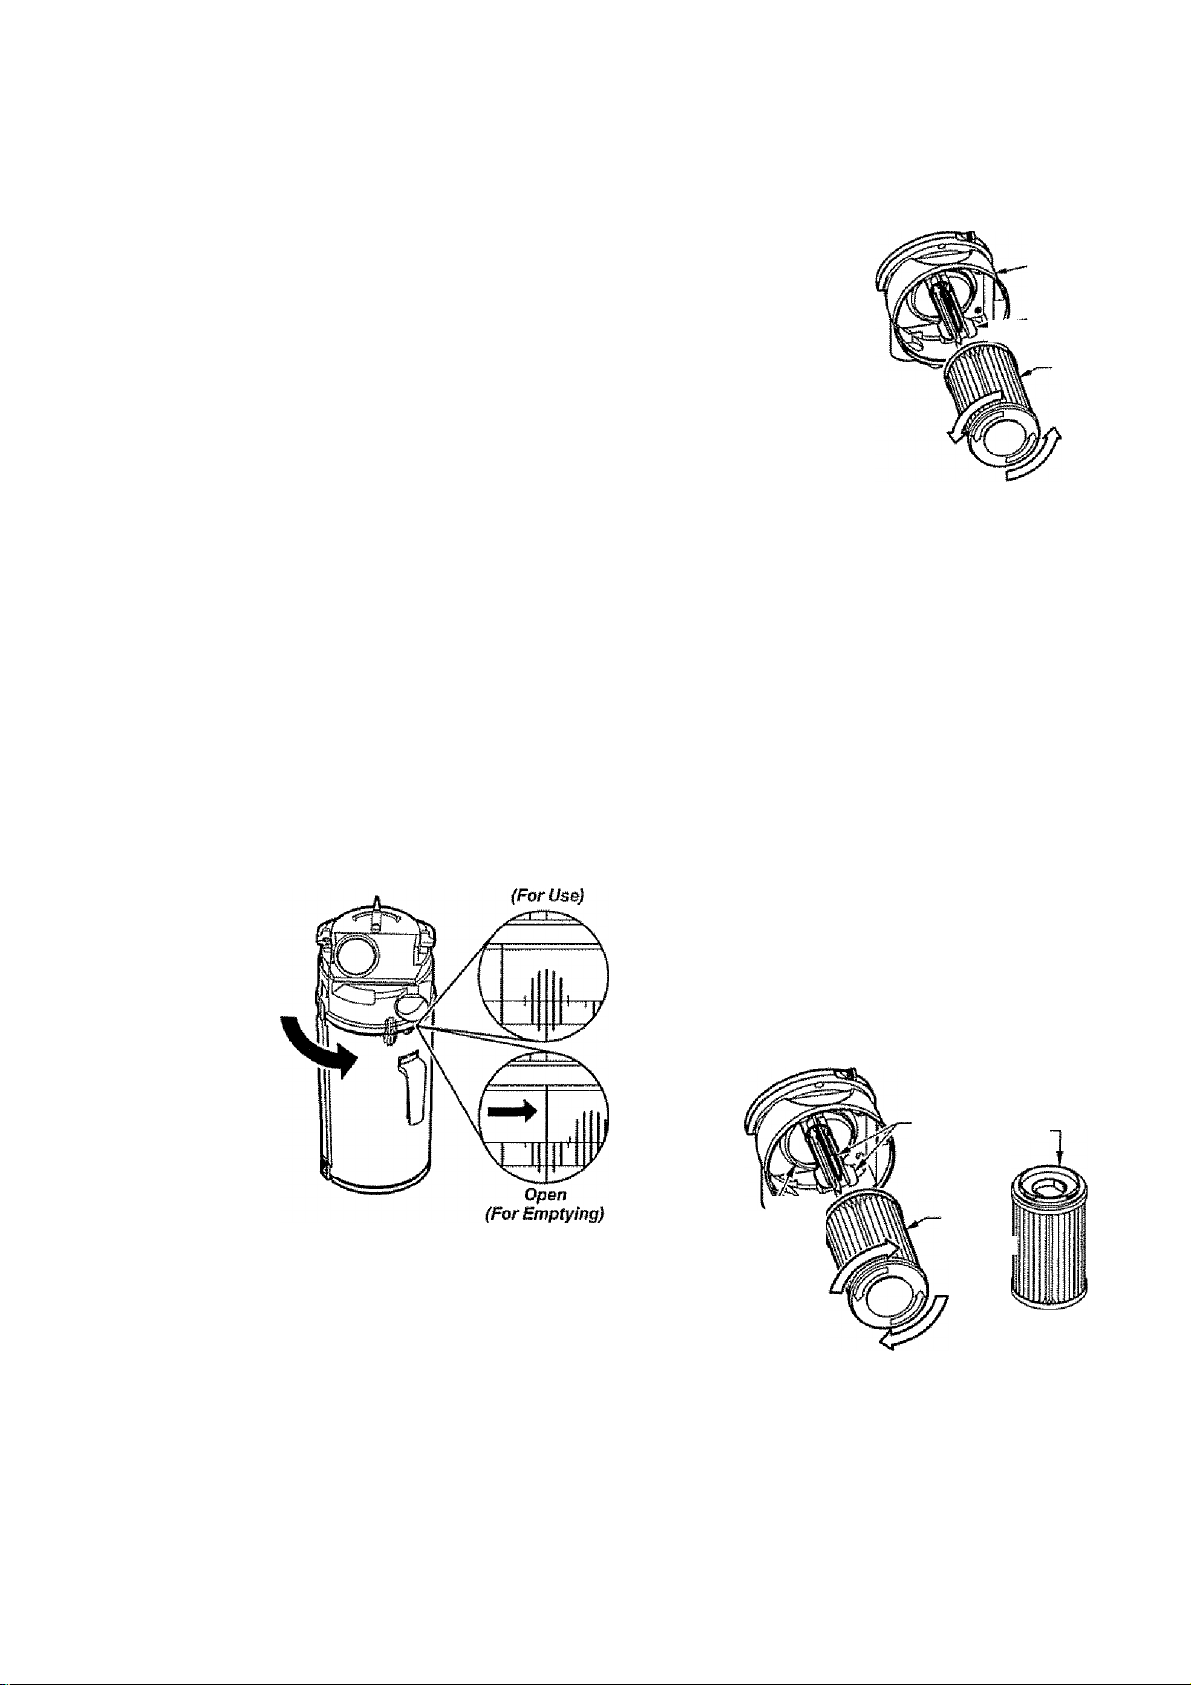
PRIMARY FILTER REMOVAL AND CLEANING
^WARNING
Electrical Shock And Personal Injury
I I CZhiOI M
Unplug power cord from electrical out
let. Do not operate the vacuum cleaner
without the primary or exhaust fiiters. Be
sure the fiiters are properly installed to
prevent motor failure and or electrical
shock.
Remove primary
filter by turning
it counterclock
wise and pulling
out (See arrows
on bottom of fil
ter). Rinse with
water only as
needed, do not
use any deter
gent or soap.
,0-
Dust Bin
Lid
Cleaning
Filler
PRIMARY FILTER
Check primary filter frequently and clean
when dirty.
TO REMOVE PRIMARY FILTER
Remove the dust bin assembly as outlined
in the DUST BIN CLEANING section.
Make sure dust bin is free of debris before
removing lid and filter. Rotate dust bin lid
assembly counterclockwise as indicated on
the lid and lift off.
Turn This Direction
To Open For Emptying
Closed
Allow the filter to dry for 24 hours before
putting it back into the vacuum cleaner.
When cleaning the filter no longer restores
vacuum cleaner's suction to full power you
need to replace the filter.
Note: See PARTS AND FEATURES
for the filter number.
TO REPLACE PRIMARY FILTER
To replace filter, insert it over cleaning
cams as far as it will go. Make sure rubber
seal at top of filter is flush against filter sup
porter, then turn filter clockwise to secure
into place. Filter will click and snap when it
is secured into place.
Note: Under normal use and care, your fil
ter can be expected to last up to 5 years.
While holding dust bin lid over a trash con
tainer grasp primary filter, rotate counter
clockwise and lift off.
Clean primary fitter by gently tapping over a
trash container. Tap on several sides to
ensure best cleaning.
. Rubber
denning Seal-
Cems
Filter-^
Supporter/ '
Dust Bin
Lid
Fitter
Filter—»
Re-assemble dust bin lid to dust bin, see To
py31" m|i4 yy
18
Page 19
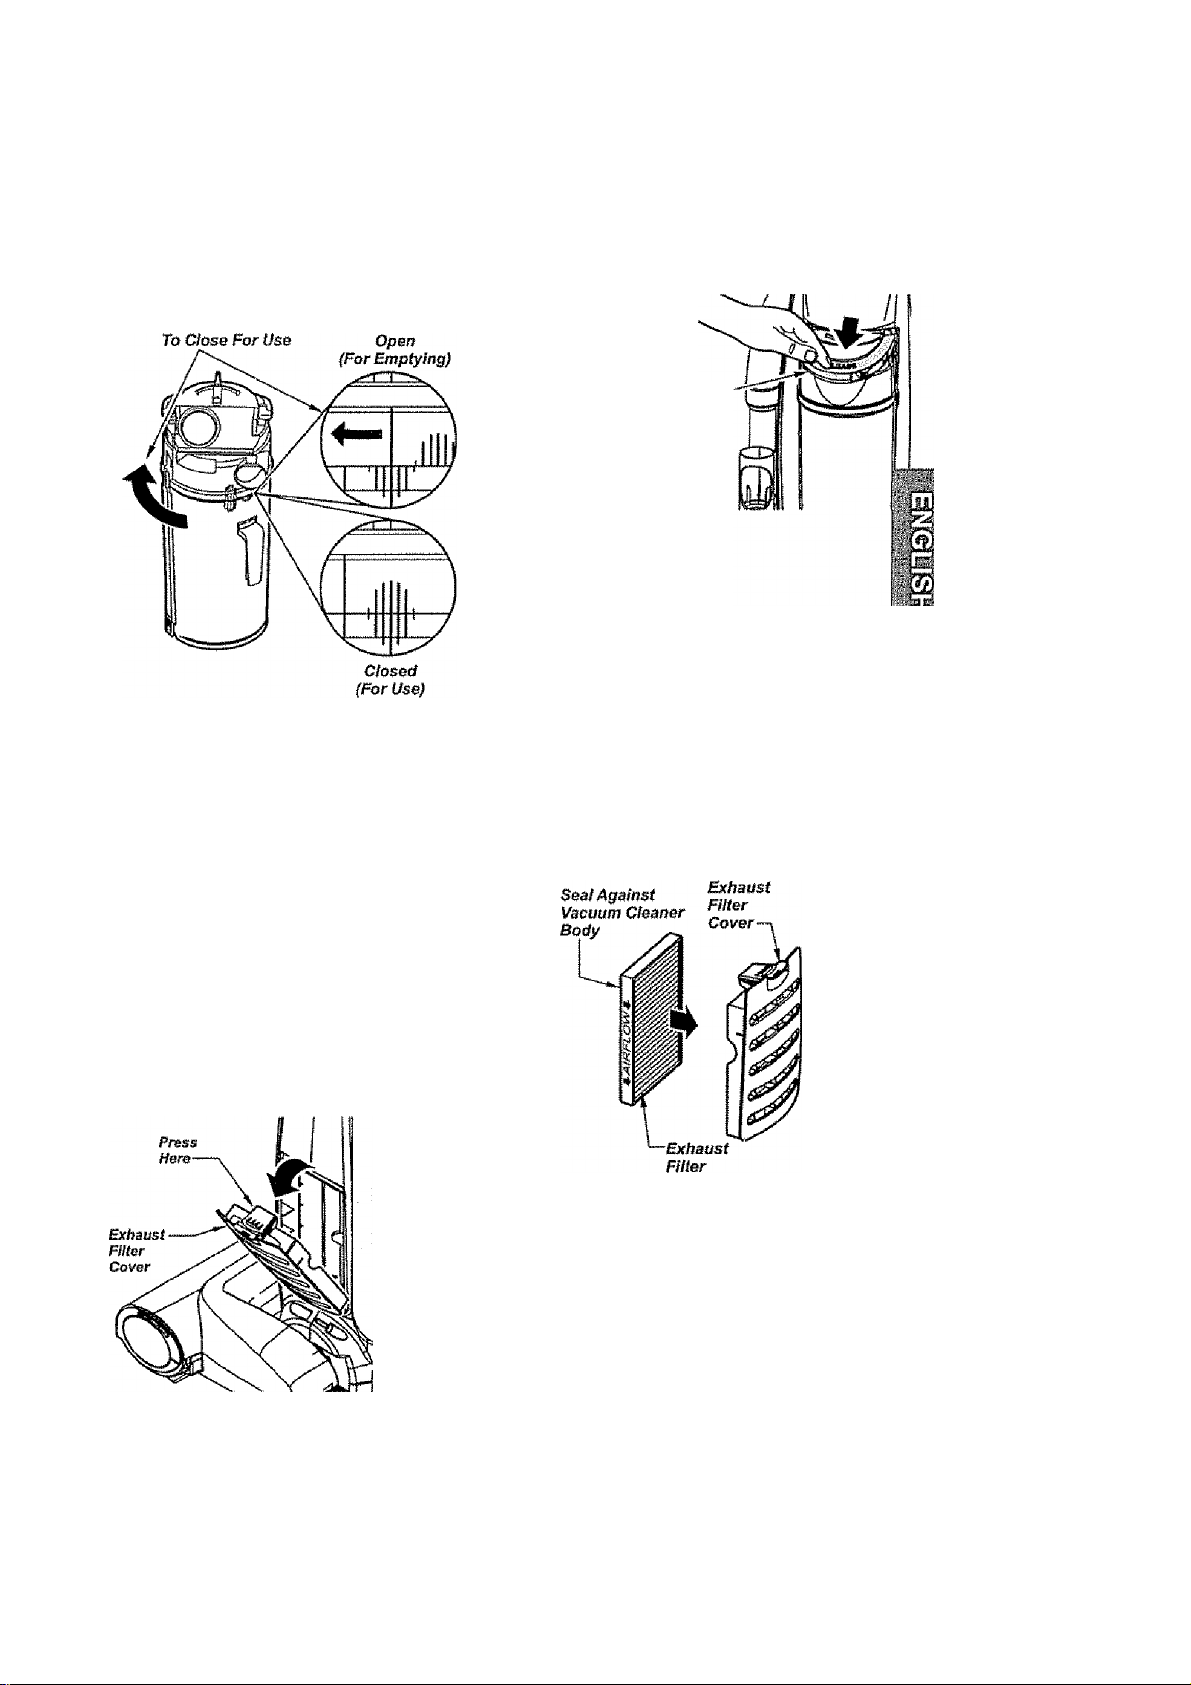
TO REPLACE DUST BIN LID
Rspisc© dust bin lid asssmbly by placing
back on dust bin with marks on the lid
aligned as shown under Open (For
Emptying) on the back of the dust bin.
Turn This Pirection
Rotate clockwise while pressing downward
so marks align as shown above dosed
(For Use).
Insert dust bin
into vacuum
cleaner.
EXHAUST FILTER REPLACEMENT
The HEPA exhaust filter must be replaced
when dirty. It should be replaced regularly
depending on use conditions
The filter CANNOT be washed as it will
lose its dust trapping ability«
Note: See PARTS AND FEATURES
for the exhaust filter number.
Lower the dust
bin handle to
Dust Bin
Handle
lock dust bin In
place.
A noticeable
"click" should
be heard.
Place the foam seal of the filter should
be placed against the vacuum cleaner
body.
Remove exhaust filter cover by pressing
the release tab on the cover and rotating
out from vacuum cleaner
Remove
the filter
cartridge
from cover
Place new filter cartridge into cover making
sure that airflow arrow on side of cartridge
points into cover.
Replace the exhaust filter cover by placing
bottom tabs in slots and rotating in until
cover snaps into place.
19
Page 20
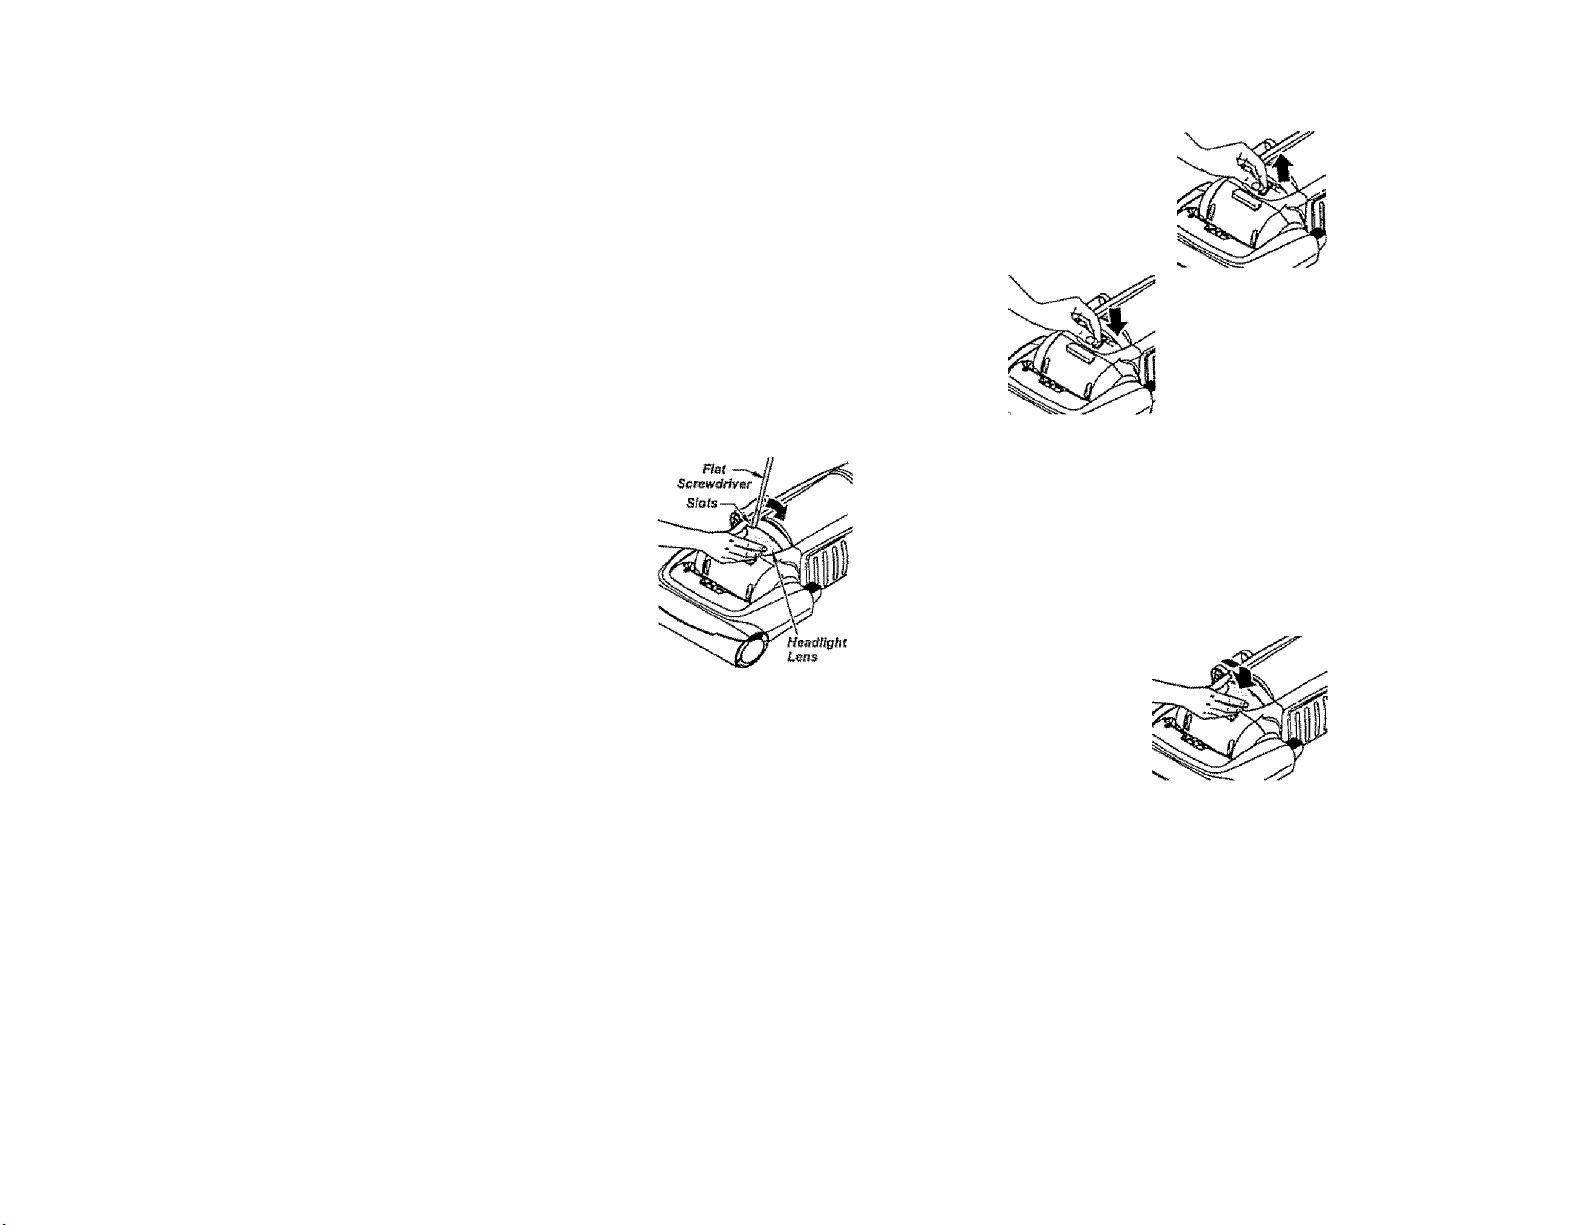
TO REPLACE LIGHT BULB
WARNING
Electrical Shock Or Personal Injury
Hazard
Disconnect eiectrical supply before
performing maintenance to the
vacuum cleaner. Failure to do so
could result in electrical shock or
personal injury from the vacuum
cleaner suddenly starting.
TO REMOVE LIGHT BULB
1, Disconnect power cord from eleofricai
outlet.
4. Remove the light
bulb by pulling
straight out.
5. Carefully insert
new light bulb fully
mlo slot.
2. Press han
dle release
pedal and lay
vacuum clean
er back.
3. Pry tight
lens out af
slots as shown
on bolh sides.
Rotate lens up
and lift off.
CAUTION
Do not USB a bulb rated over 9W (13V).
During extended use, heat from the
bulb could overheat surrounding plas
tic parts.
Note: See PARTS AND FEATURES for
bulb number.
^caution
Do not plug In or turn on until the vacu
um cleaner is compieteiy reassembled.
6. To replace light
lens, place tab at
front of lens Into
slot. Rotate lens
down and firmly
snap into place.
20
Page 21
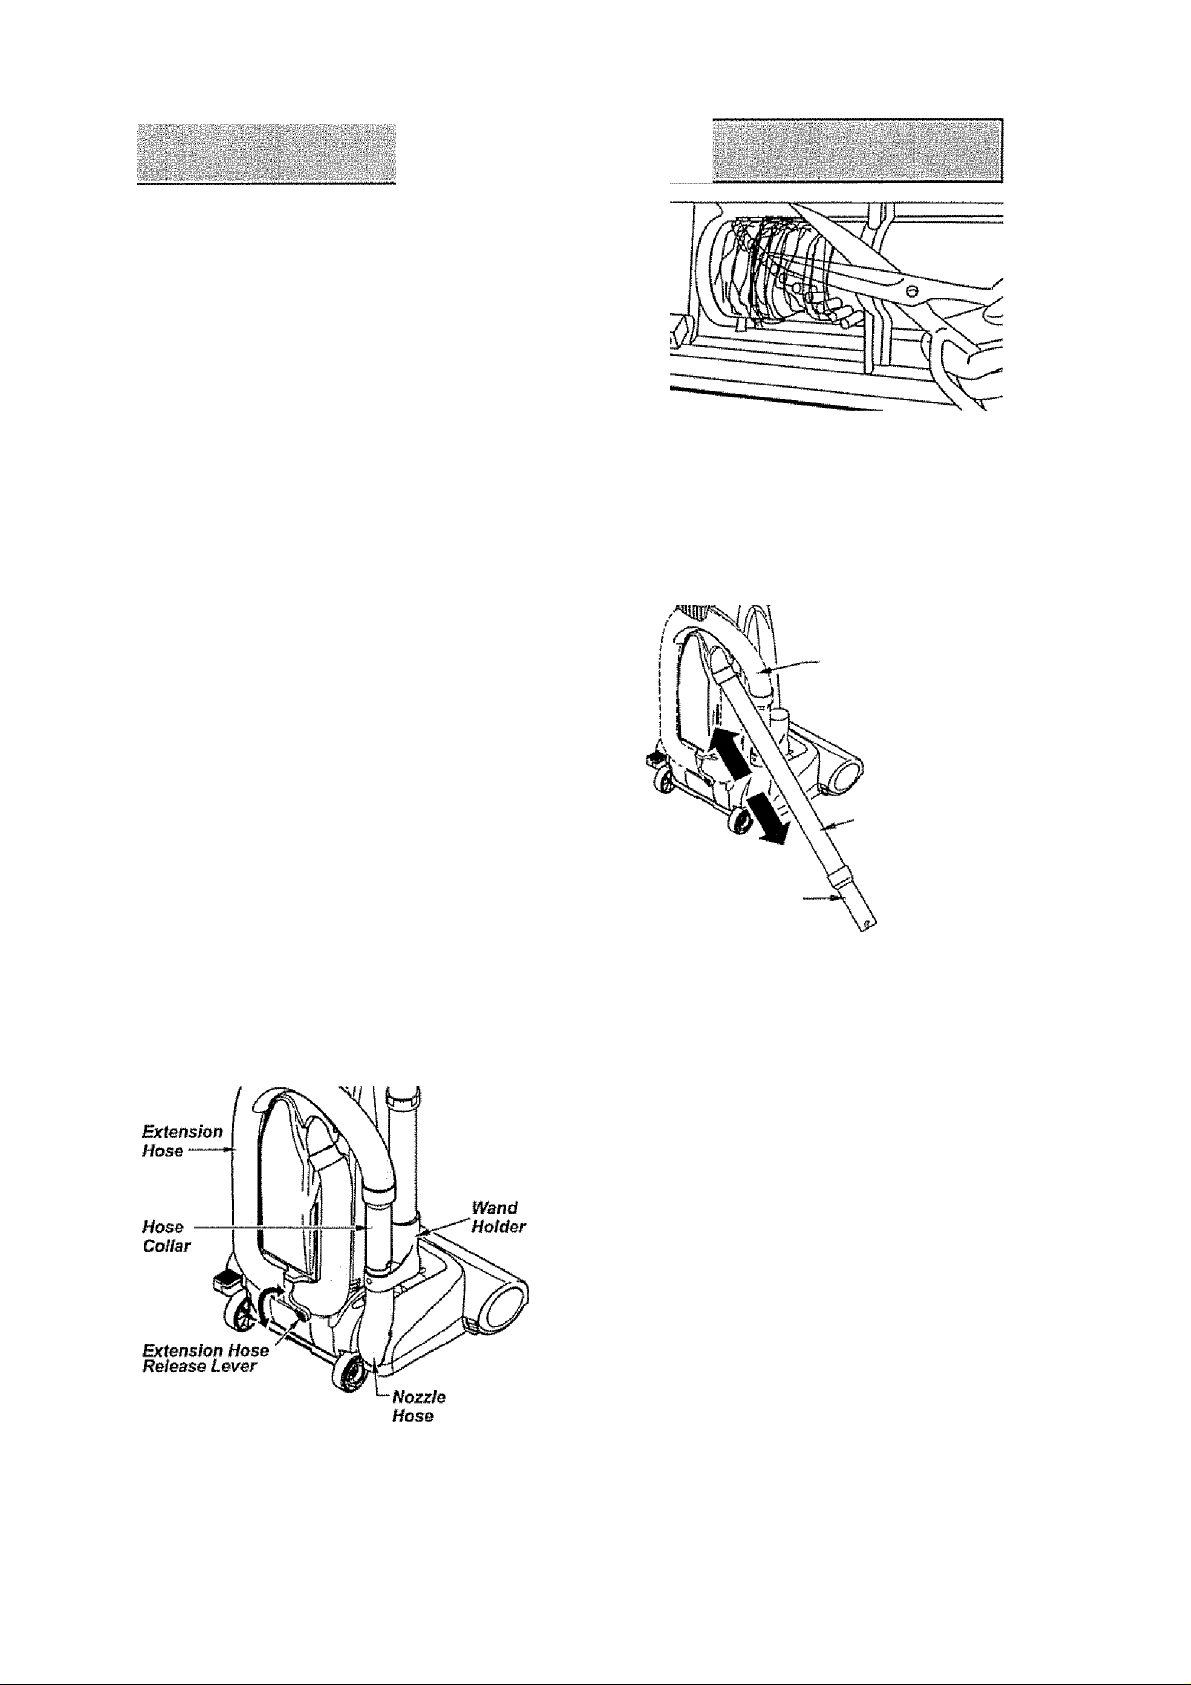
AniTATnR Cl FANINfi
I B I I \ iw n t K p I • ,
To maintain efficient cleaning, the agitator
must be kept free of carpet fiber, string, or
hair build-up. After every 7 to 10 uses,
unplug and turn vacuum cleaner over and
check agitator for fiber and hair build-up.
Use scissors to remove any build-up entan
gled around the agitator.
CLOG REMOVAL
Always follow all safety precautions when per
forming maintenance to the vacuum cleaner.
r rfV % U
A
EBI 0>OU
06j
y . y±2 2 “ '§
" »@t@ ^ ^ Vi> -I »
® ¿Vk 14» »@0^ -±Vit-±
y i « 14®- <c , ±’4J ±®
“ »® ¿ ^ 1|<i^ 1 » ^ ¿y^c«^
V2»¿* '§ - ’ 6
If the vacuum cleaner does not seem to have
adequate suction, first check if the dust bin is
full or if a filter is clogged. See DUST BIN
CLEANING and FILTER REPLACEIWENT.
if the dust bin and fitter areas are free of
clogs, check the extension hose. Rotate the
extension hose release lever counterclock
wise to release extension hose.
Plug in the vacuum cleaner and turn it on.
Stretch the extension hose to maximum
length and then allow the hose to return to its
natural length.
Origimi
Hos0
Storage
Position
Extension
Hose
HoseCoilar
Re-insert the hose into the opening on the
body from which it was removed. Press firmly
to assure connection. Rotate hose release
iever clockwise to the locked position.
If the dust bin and filter areas and the hose
areas are free of dogs, disconnect the noz
zle hose from the wand holder and check the
nozzle for clogging.
Remove the lower end of the extension hose
from the wand holder by grasping the hose
collar, twisting, and pulling straight up.
A WARNING
Persona! Injury Hazard
DO NOT place hands or feet underneath
the vacuum cleaner at any time.
Clean the agitator according to the instruc
tions in the AGITATOR CLEANING section.
Return the vacuum cleaner to the upright
position before plugging into an electrical
outlet
I
!
Page 22

Review this table to find do-it-yourssif solutions for minor performance problems Any service
needed, other than maintenance described in this Owner’s Manual, should be performed by a
Sears or other qualified service agent
A
WARNING:
Disconnect electricai supply before performing maintenance to the vacuum
cleaner» Failure to do so could result in electrical shock or persorral injury.
PROBLEM
Vacuum cleaner
won’t run
Poor Job of dirt
pick-up
Vacuum C! carter picks up
moveabie rugs or
pushes too herd.
Light won't work. Í. Burned out light bulb.
Agitator does not turn. t. HandJe in fyil upright position
AlrtioW restricted
with attachment use.
Sound changes.
blHlciiUy adjusting piio
height setting
Dirt Sensor, will not work
POSSIBLE CAUSE
1. Unplugged at wali outlet
2- Tripped circuit breaker/biown fuse
at household service panai
3. Thermal protector iripped
4. Deied)№ Wall oultet
5. Handle screw not tight.
1. Full or clogged dust birr
2. Wrong pile height setting
3. Worn agllalor
4- Ologgsd nozzle
5. Clogged hose
E„ Hoieinhose.
7. Hose not inseriad fuHy.
8. Motor prolaction system activated
(change of sound)
9. Dirty fillers
1, Wrorrg piia height setting 1. Adjust setting
2, Agitator Oveiioad irlppad
3. Thermal praSeclor tripped
1 Attachment use reslricis aif Oow
2. New carpet iu2i ctogged air path
1. Vacuum clearrer not in proper upright
position
1, Dirty optic cells. 1, Clean optic cells
POSSIBLE SOLUTION
1. Plug In Rrmiy, seiect the desired cei
ling on lha touch conirol.
2 Reset circuit brsakar or replace fuse
3, Allow vacuum cleaner to cool, then
reset thermal protector
4, Check with a good appiiarree/iamp.
have properly serviced
5, Tighten screw.
1. Empty dust bin
2-, Adjust setting
3, Take lo your nearest Sears
Service Center,
4 Check for clogs
5. Check for clogs
6. Take to your nearest Sears
Service Cetïter.
7- insert hose fully
8,, Check for clogs
9, Change filters.
1, Ghanga light bulb.
1, Move handle from upright pasiUon
2. Reset Agilatar Overload
3 Allow vacuum cleaner to cooi. then
reset thermal protector.
t. Check attachments for fuzz, lint,
pel hair or other debris
2. Check for dogs and clean
hose.
t. Place vacuum cleaner in the iocked
upright pcsiiion, tilt the vacuum dean-
or beck slighily and adjust pile height
22
Page 23

Get it fixed, at your home or ours!
■ili
mm
,,, .
Your Home
For repair - in your home - of all major brand appliances,
lawn and garden equipment, or heating and cooling systems,
made it, no matter who sold it!
For the replacement parts, accessories and
owner’s manuals that you need to do-it-yourself.
For Sears professional installation of home appliances
and items like garage door openers and water heaters,
1-80Q-4-MY«HOME® Anytime, day or night
(1-800-469-4663) (U.SA.and Canada)
www.scarSiCom
www.sears.ca
Our Home
For repair of carry-in products like vacuums, lawn equipment,
and electronics, call or go on-line for the nearest
Sears Parts and Repair Center.
1 -800»488“1222 Anytime, day or night (U,S A only)
N’C,;:;
www.sears.com
To purchase a protection agreement (U.S.A.)
or maintenance agreement (Canada) on a product serviced by Sears;
1-800-827-6655 (U SA ) 1-800-361-6665 (Canada )
Ffeira pedir servicio de reparación
a domicilio, y para ordenar piezas;
1-888-SU-HOGAR®
I t#í IV» Vííiir^l\
(1-888-784-6427)
© Sears, Roebudî and Co.
® Registered Trademark / ™ Trademark / Service Mark of Sears Brand, LLC
® Marca Registrada / ™ Marca de Fábrica / Marca de Sarvlcîo de Sears Bra Roebuck ands, LLC
Marque de commerce l Marque déposée de Sears Brands, LLC
Au Ganada pour service en français:
1-BOO-LE-FOYER'-'*^
(1-800-533-6937)
wvw.sears.ca
 Loading...