

Page 1
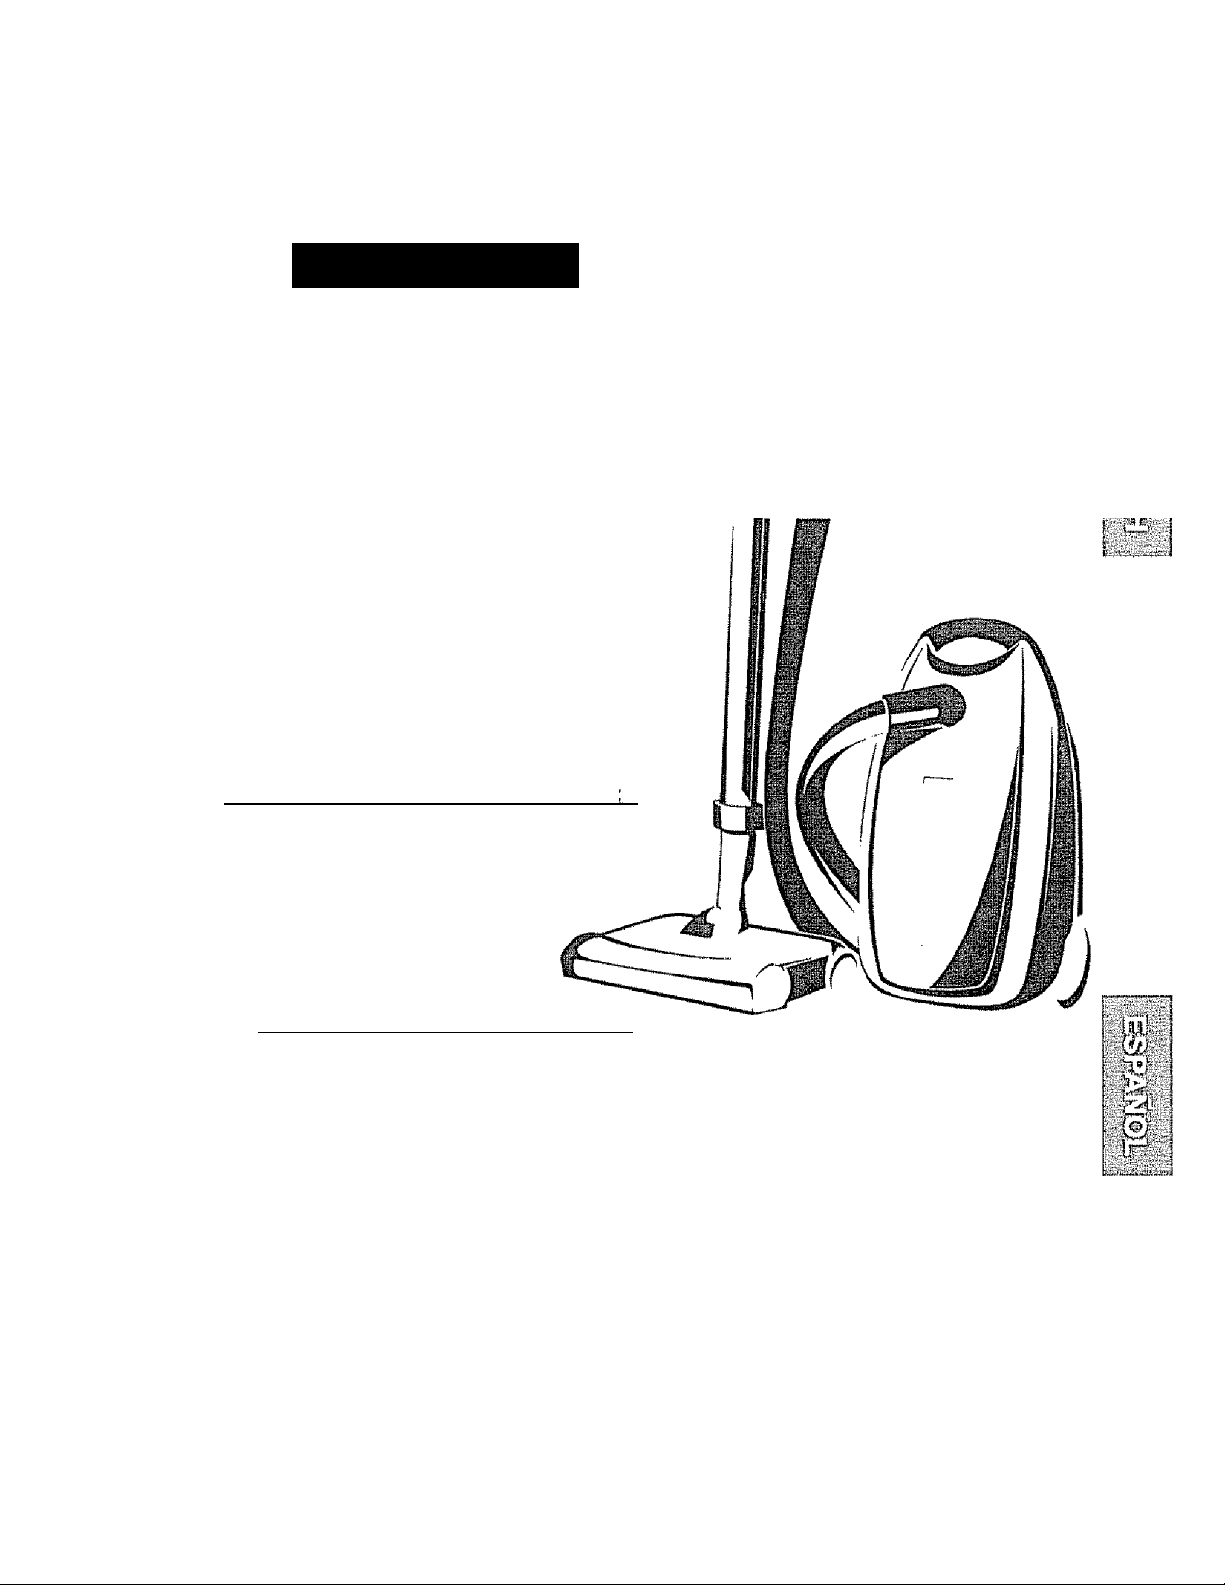
Owner’s Manual
Manual Del Propietario
Kenmore
Vacuum Cleaner
Aspiradora
Model, Modelo 116.28014
116.28015
: r.t.
ic.’
'9
IMPORTANT
Before returning this product
f"0r rsplecernent perts« pieese contecti
Sears Parts and Repair Center
(1-800-4IVIY-HOI\/!E)
(l-aOO-469-4663)
Anytime, day or night
(U.S.A. and Canada}
For any other issue, please contact:
Vacuum Cleaner Help Line
(i-877«531»7321)
8:00am-5:00pm EST, M-F
(U.S.A. and Canada)
CAUTION:
Read and follow ail
safety and operating
instructions before first
use of this product.
CUIDADO;
Lea y siga todas las
inctfiir'f'IA/liaC! Ho Af1Dí*Cír*ÍAn
i I Li ti LlW Ewf i Oü dw w I dO Iw F I
y seguridad antes del uso de
este producto.
Sears, Roebuck and Co,, Hoffman Estates, IL 60179 U.S.A.
www.sears.com
Part No. C01ZDDU00U00-KC01ZDDUZ0U0
Printed in Mexico
Impreso en México
Page 2

TABLE OF CONTENTS
Beiore Using Your New
Vacuum Cleaner.,
Kenmore Vacuum Cleaner Warranty ... 3
Important Safety Instructions
Parts and Features .. 5-6
Assembly Instructions ...............................7-8
Pet PowerMate® Storage
Operating Instructions .... .... — 9
How to Start .......................................9-10
Vacuuming Tips
Suggested Pile Height Settings
Attachments 12
Attachment Use Table ..........................13
Performance Features
How Your Vacuum Cleaner Works .... 15
.
................... *. „ 2
....................
..............................
............................
............
..................
4
8
.. 11
12
14-15
Canister Care
Bag Changing
Cleaning Exterior and Attachments
Motor Safety Filter Changing ,17
Exhaust Fitter Changing 17-18
Dirt Sensor
PowerMate® Care
Beit Changing and Agitator Cleaning ., 19-20
Agitator Servicing ..... 21
Troubleshooting
Master Protection Agreements
Requesting Assistance
Or Service
...............................................
...................................
.........
................................ .18
............................. — .19
.......
............................ 22-23
...................
....................... Back Cover
......
16
IB
16
24
BEFORE USING YOUR NEW VACUUM CLEANER
Please read this guide. It will help you assemble and operate your new Kenmore vacuum
cleaner in the safest and most effective way.
For more information about vacuum cleaner care and operation, call your nearest Sears store.
You will need the complete model and serial numbers when requesting information. Your vacu
um cleaner's model and serial numbers are located on the Model and Serial Number Plate.
Use the space below to record the model number and serial number of your new Kenmore
vacuum cleaner.
Model No..
Serial No.
Date of Purchase
Keep this book and your sales check (receipt) in a safe place for future reference.
Page 3

KENMORE VACUUM CLEANER WARRANTY
One Year Limited Warranty
When assembled, operated and maintained according to al! instructions supplied with
the product, if this vacuum cleaner fails due to a defect in material or workmanship within
one year from the date of purchase, return it to any Sears store, Sears Parts & Repair
Center or other Kenmore outlet for free repair.
If this vacuum cleaner is used for other than private family purposes, this warranty
applies for only 90 days from the date of purchase.
u\
This warranty covers only defects In material and workmanship. Sears will NOT pay fort
1. Expendable ítems that can wear out from normal use, including but not limited to
fiitorcs HoltQ flnht HijIHq janH hfancj
2. A service technician to instruct the user in correct product assembly, operation or
maintenance.
3. A service technician to clean or maintain this product.
4. Damage to or failure of this product if it is not assembled, operated or maintained
according to a!) instructions supplied with the product.
5. Damage to or failure of this product resulting from accident, abuse, misuse or use for
other than its intended purpose.
6. Damage to or failure of this product caused by the use of detergents, cleaners,
chemicals or utensils other than those recommended in ail instructions supplied with
the product.
7. Damage to or failure of parts or systems resulting from unauthorized modifications
made to this product.
- ‘rv!
iJi;
ir'-'--
Disclaimer of implied warranties; limitation of remedies
Customer's sole and exclusive remedy under this limited warranty shall be product repair
as provided herein, implied warranties, including warranties of merchantability or fitness
for a particuiar purpose, are limited to one year or the shortest period aliowed by law.
Sears shatl not be liable for incidental or consequential damages. Some states and
provinces do not allow the exclusion or limitation of incidental or consequential damages,
or limitations on the duration of implied warranties of merchantabiiity or fitness, so these
exclusions or limitations may not apply to you.
This warranty applies only while this vacuum cleaner is used in the United States and
Canada.
This warranty gives you specific legal rights, and you may also have other rights which
vary from state to state.
Sears, Roebuck and Co., Hoffman Estates, IL 60179 Sears Canada Inc., Toronto, Ontario, Canada iVISB 2B8
Page 4

Read all instructions in this manual before assembling or using your vacuum cleaner.
A WARNING
Your safety is important to us. To reduce the risk of fire, electrical shock, injuiy to persons or damage when using your vacuum cleaner, follow basic safety precautions including the following:
Use your vacuum cleaner only as
described In this manual. Use only with
Sears recommended attachments.
Disconnect electrica! supply before
servicing or cleaning out brush area.
Failure to do so could result In elecirical
shock or brush suddenly starting.
Do not leave vacuum cleaner when
plugged in. Unplug from outlet when not in
use and before servicing.
To reduce the risk of electrical shock - Do
not use outdoors or on wet surfaces.
Do not allow to be used as a toy. Close
attention Is necessary when used by or
near children.
Do not use with damaged cord or plug. If
vacuum cleaner is not working as it should,
has been dropped, damaged, left outdoors,
or dropped into water, return It to a Sears
Service Center.
Do not pull or carry by cord, use cord as a
handle, close door on cord, or puli cord
around sharp edges or corners. Do not run
vacuum cleaner over cord, Keep cord away
from heated surfaces.
Do not unplug by pulling on cord. To
unplug, grasp the plug, not the cord
Do not handle plug or vacuum cleaner with
wet hands.
Do not put any objects into openings.
Do not use with any opening blocked; keep
free of dust, lint, hair and anything that may
reduce airflow.
Keep hair, loose clothing, fingers, and all
parts of body away from openings and
moving parts,
Turn off all controls before unplugging.
Use extra care when cleaning on stairs. Do
not put on chairs, tables, etc. Keep on
floor.
Do not use vacuum cleaner to pick up
flammable or combustible liquids (gasoline,
cleaning fluids, perfumes, etc ), or use in
areas where they may be present. The
fumes from these substances can create a
fire hazard or explosion.
Do not pick up anything that is burning or
smoking, sucti as cigarettes, matches, or
hot ashes.
Do not use vacuum cleaner without dust
bag and/or fillers in place.
Always change the dust bag after
vacuuming carpet cleaners or freshener,
powders and fine dust. These products clog
the bag, reduce airflow and can cause the
bag to burst. Failure to change bag could
cause permanent damage to the vacuum
cleaner.
Do not use the vacuum cleaner to pick up
sharp hard objects, small toys, pins, paper
clips, etc. They may damage the vacuum
cleaner or dust bag.
Do not operate vacuum cleaner without the
exhaust niter or exhaust filter door In place
(If applicable).
The hose contains electrical wires. Do not
use when damaged, cut, or punctured.
Replace if cut or worn- Do not pick up
sharp objects
Always turn off and unplug the vacuum
cleaner before connecting or disconnecting
either hose, HandhMate Jr.® (if applicable),
or nozzle.
Hold plug when rewinding onto cord reel.
Do not allow plug to whip when rewinding.
You are responsible for making sure that
your vacuum cleaner is not used by anyone
unable to operate It properly.
SAVE THESE INSTRUCTIONS
carefully for important use and safety information,
statements under warning and caution symbols.
our responsibilities,
his Owner's Manual
I nis guide contains safety
Page 5
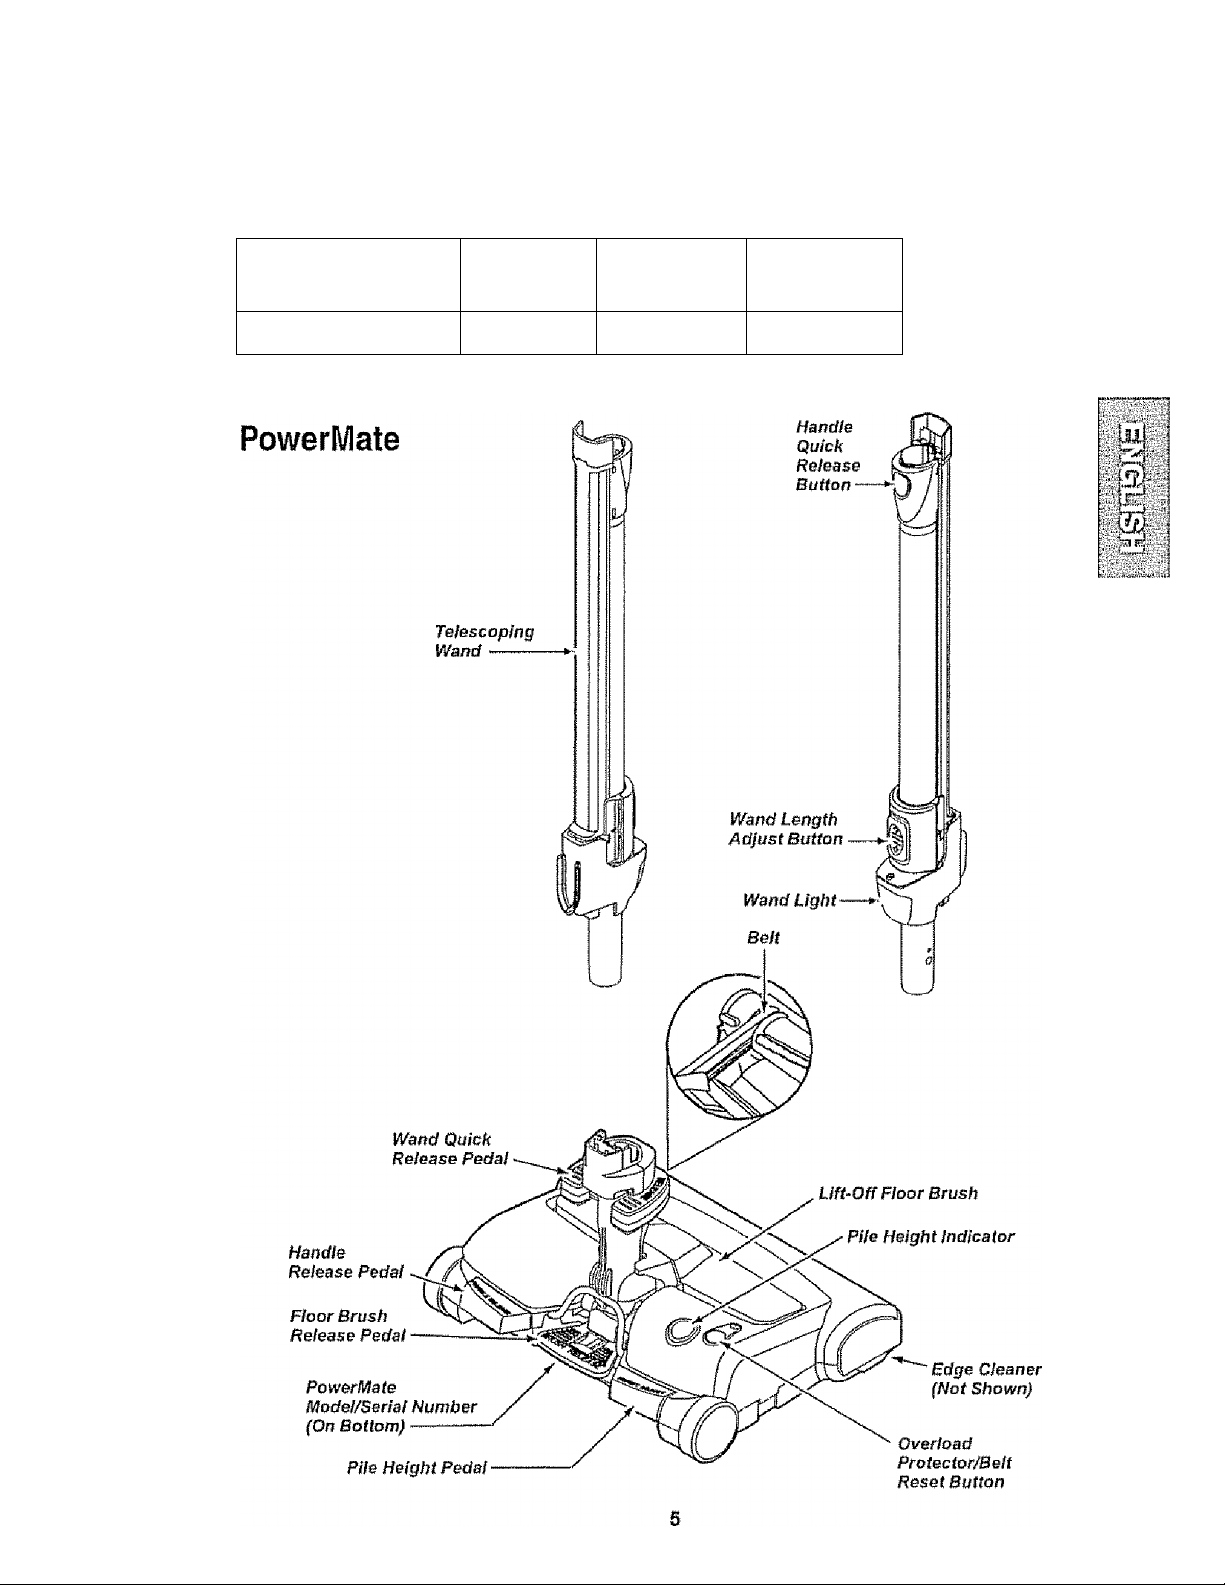
PARTS AND FEATURES
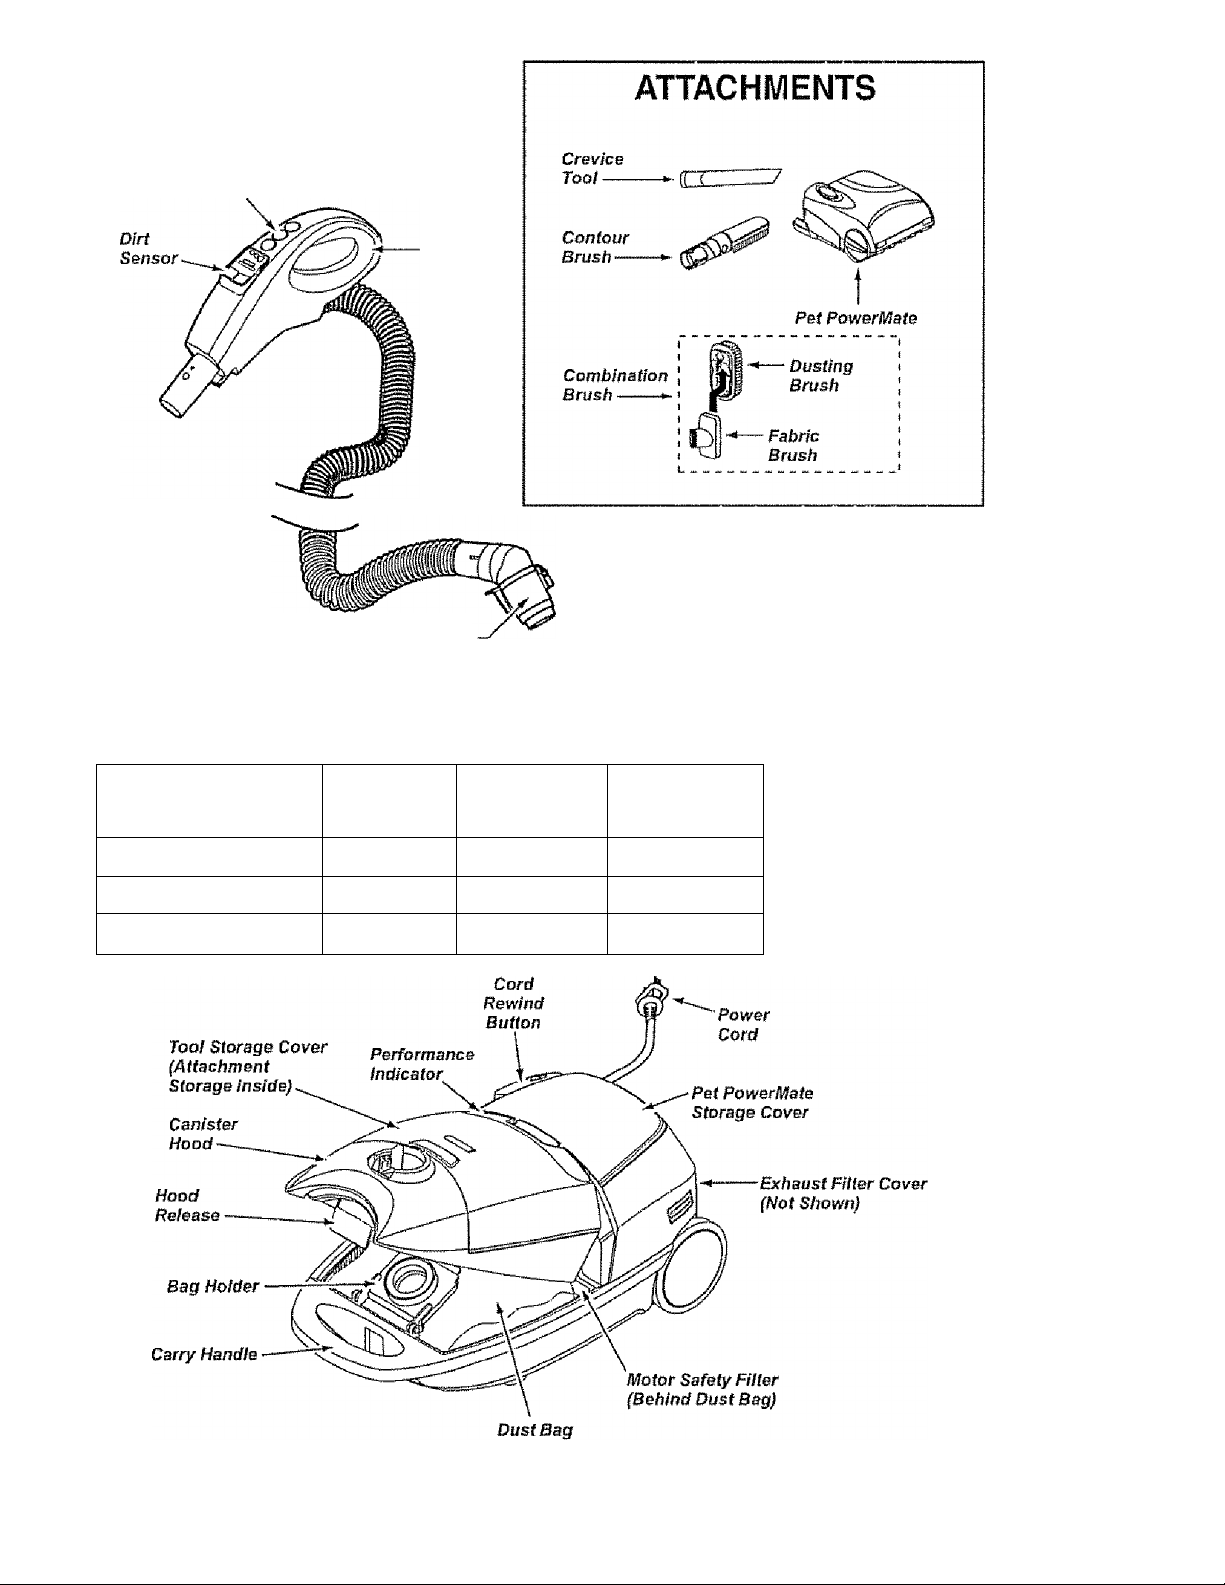
It is important to know your vacuum cleaner's parts and features to ensure its proper and safe
use. Heview these before using your vacuum cleaner.
Object Style No.
Belt CB-6
Part No.
in USA
Part No.
in Canada
Page 6
tJOiSC
nUob
Electronic
Touch Control
HmdiB
Hose Swivel-
CANISTER
Part No.
Object Style No.
Dust Bag
Exhaust Filter
Q 20-50557
EF*1
in USA
on RAARQ
/L.. sj OCfOOy
Motor Safety Filter CF-1 20“'86B83 20-40321
Part No.
in Canada
20-50410
20-40324
Page 7
Please pay special attention to these hazard alert boxes, and follow any instruc
tions given. WARNING statements alert you to such dangers as fire, electric
A
shock, burns and personal injury. CAUTION statements alert you to such dangers
as personal injury and/or property damage.
ASSEMBLY tNSTRUCTIONS
A WARNING
Efectrical Shock Hazard
DO NOT plug Into electrical supply until
assembly Is complete. Failure to do so
could result in electrical shock or
injury.
Before assembling vacuum cleaner, check
the PACKING LIST on the cover of the
separate REPAIR PARTS LIST. Use this list
to verify that you have received all the
components of your new Ken mo re vacuum
cleaner.
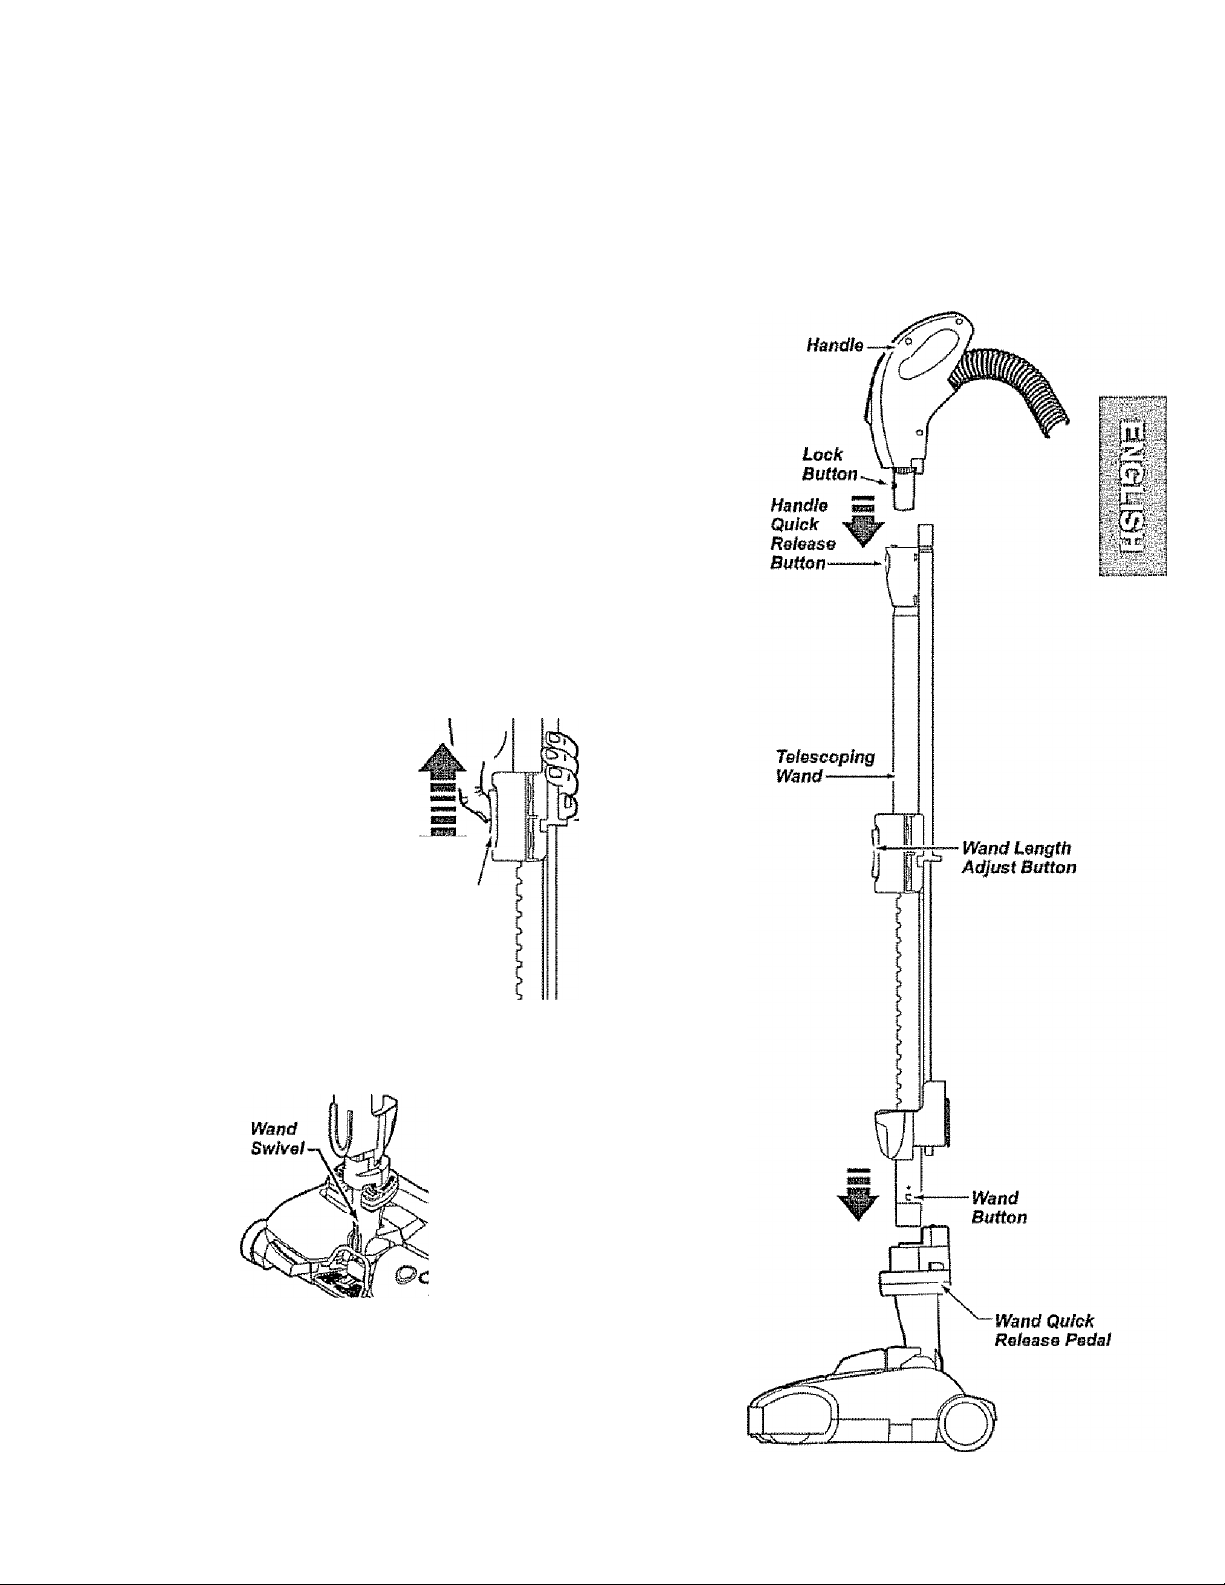
WAND-TELESCOPING
The wand length
is adjustable and
requires no
assembly. To
adjust, simply
push or puli the
wand adjust but
ton and slide the
upper wand to
the desired
height.
When adjusting the wand length you may
have to hold the PowerMate with your hand
or foot.
Wand
Length
Adjust
Button
The swivel, located on
the PowerMate, allows
you to turn the handle
to the left or right side
to reach farther under
low furniture.
-Keep
Hand
Above
This
Tab
PowerWIate
Insert wand into PowerMate until the wand
button snaps into place.
To remove; Step on wand release pedal,
then pull up on wands.
Page 8
CANISTER
1. open the canister hood
2. Check to see that the dust bag is properly
installed See BAG CHANGING for
instructions.
3. Check to see that the motor safety filter is
properly installed. See lylOTOR SAFETY
FILTER CHANGING for instructions,
HOSE
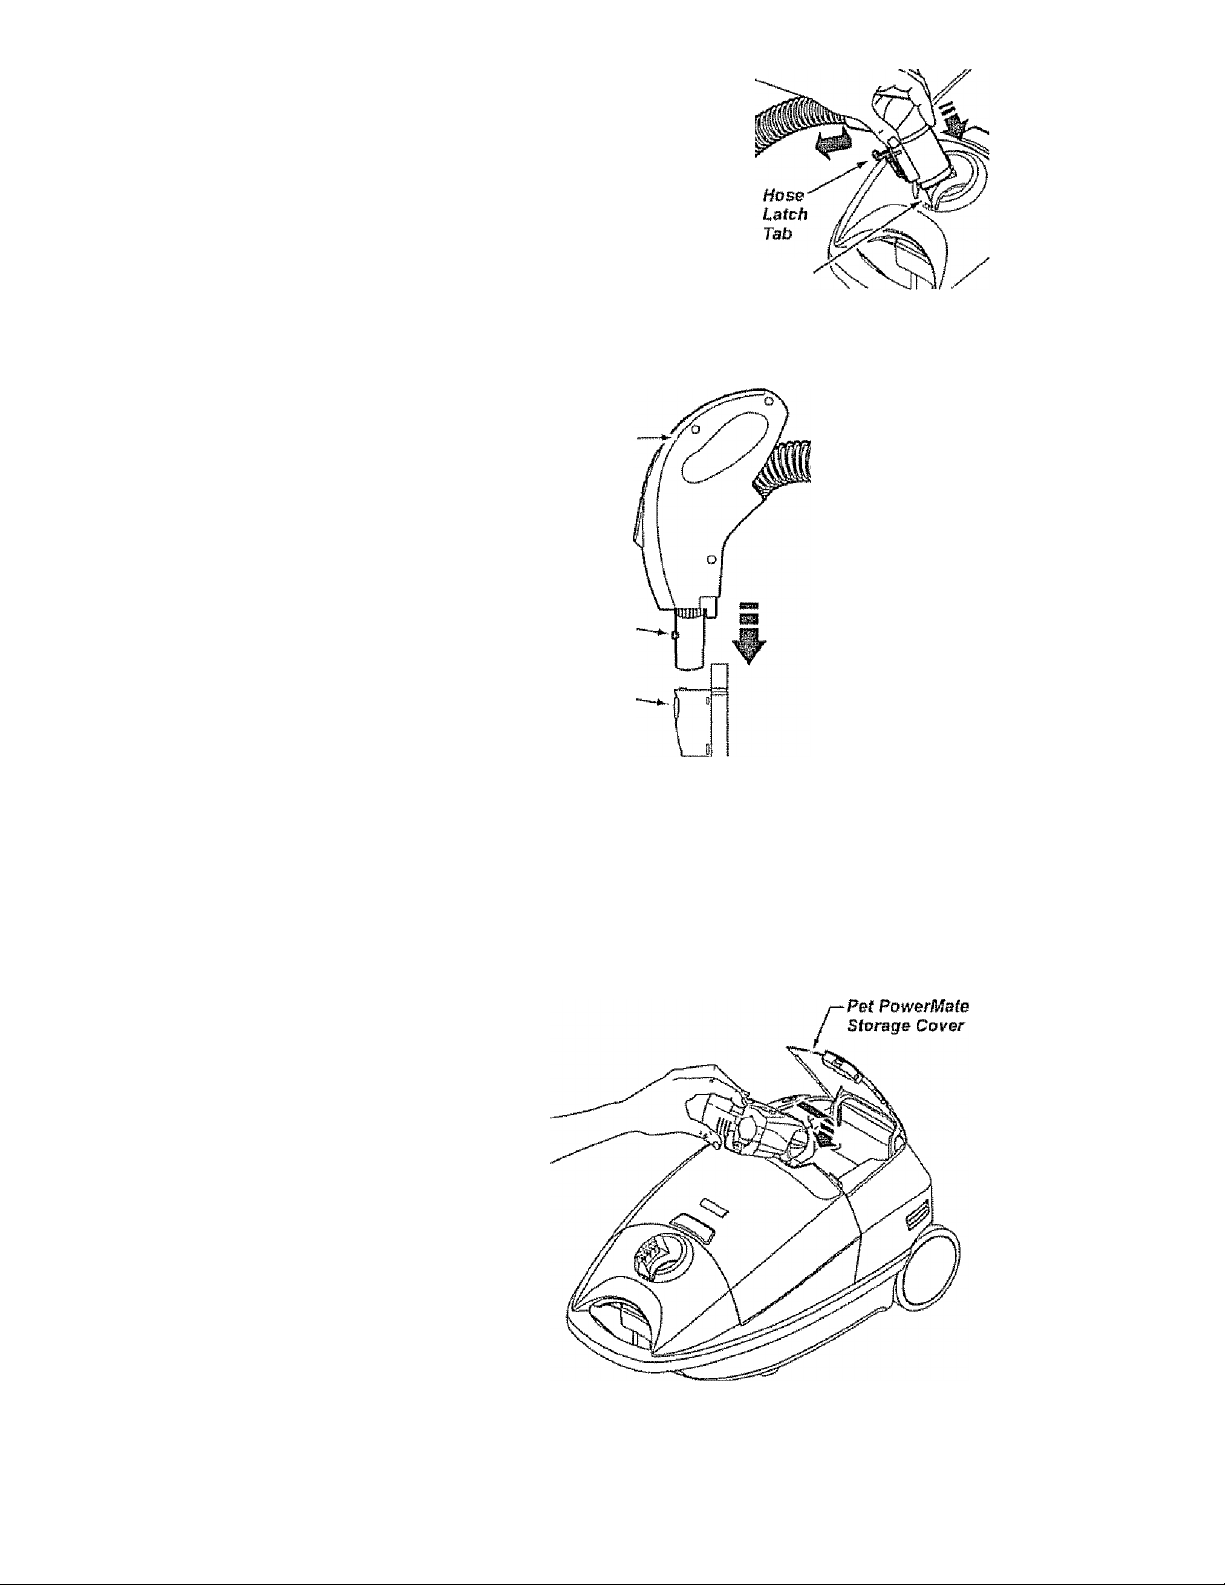
1. Line up the hose
latch tab and notch
in canister hood
and insert hose
into canister until It
snaps into place.
To remove: Do not open hood before
removing hose. With hood closed, iift hose
latch tab upward and pull on hose.
Notch
HOOD AND TOOL
STORAGE COVER
It is norma! for the canister hood and too!
storage cover to come off when opened
further than needed. Line up the hinge slots,
insert the hinges into the slots, and close the
hood and tool storage cover to reinstall,,
A CAUTION
Never open canister hood with the tool
storage cover open. This will help to
prevent damage from occurring to the
canister hood and/or tool storage cover.
PET POWERMATE STORAGE
To store: Disconnect hose form wands and
canister to prevent stress on hose during
storage. Store hose in a loosely coiled
position on the hose covering is not stressed.
Handle
Lock
Button
Handle
Quick
Release
2. Insert handle
into wand until
lock button
snaps in place.
Be sure hose is
not twisted.
To remove;
Press handle
quick release
button and pull
up on handle.
This canister is equipped with an on-board
storage area for a Pet PowerMate
attachment.
To Install;
Open the Pet PowerMate storage cover.
Insert the Pet PowerMate, press down into
place, and close the lid securely.
To Remove;
Open the storage cover. Remove Pet
PowerMate from the storage area and use
as needed (see ATTACHMENTS and
ATTACHMENT USE TABLE).
Page 9
OPERATING INSTRUCTIONS
HOW TO START
WARNING
Personal Injury and Product Damage
ncficcli U
« ALWAYS turn off the vacuum cleaner
before unplugging,
» The cord moves rapidly when
rewinding. Keep children away
and provide a clear path when
rewinding the cord to prevent
personal injury.
* DO NOT use outlets above counters.
Damage from cord to items in
surrounding area could occur.
Cord
Rewind
Button
NOTE: To reduce the risk of electric shock,
this vacuum cieaner has a polarized plug;
one blade is wider than the other. This plug
will fit in a polarized outlet only one way. if
the plug does not fit fully in the outlet,
reverse the plug, if It still does not fit, con
tact a qualified electrician to install the prop
er outlet Do not change the plug in any
way.
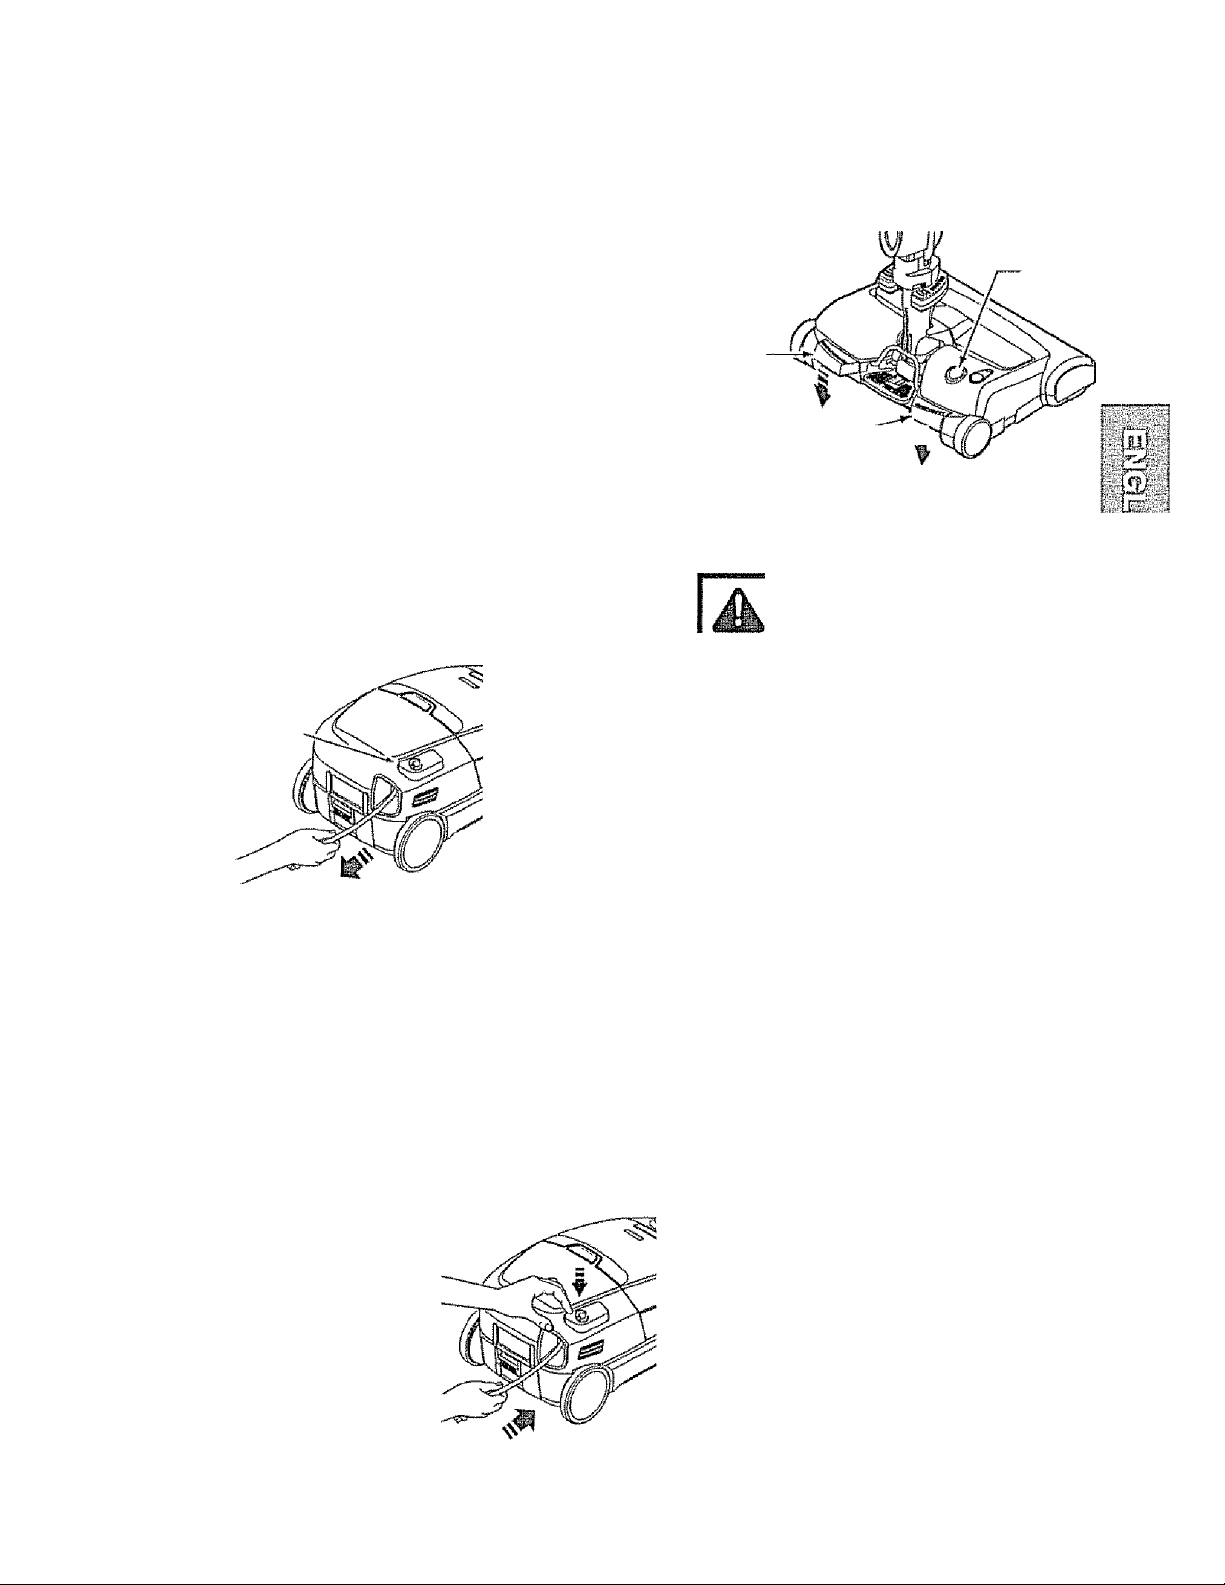
1. Pull cord out
of canister to
desired length.
The cord will not
rewind until the
cord rewind but
ton Is pushed.
Pita Haight
indicator
Handle
Release
Pedal
Pile Height Pedal
3. Lower wand from upright position by
pressing on the HANDLE RELEASE
pedal.
CAUTION
DO NOT leave the PowerMat©
running In one spot in the upright
position for any length of time.
Damage to carpet may occur.
4. Select a pile height setting by pressing
the HEIGHT ADJUST pedal on the rear of
the PowerMate. The pile height setting
shows on the indicator. See SUGGESTED
PILE HEIGHT SETTINGS.
Attention; Refer to your carpet manufac
turers cleaning recommendations. Some
more delicate carpets may require that they
be vacuumed with the PowerMate agitator
turned off to prevent carpet damage.
2. Plug the polarized power cord into a 120
Volt outlet located near the floor.
To rewind; Turn off
and unplug the vac
uum cleaner. Hold
the plug while
rewinding to prevent
damage or injury
from the moving
cord. Push cord
rewind button.
Page 10
ELECTRONIC TOUCH CONTROL
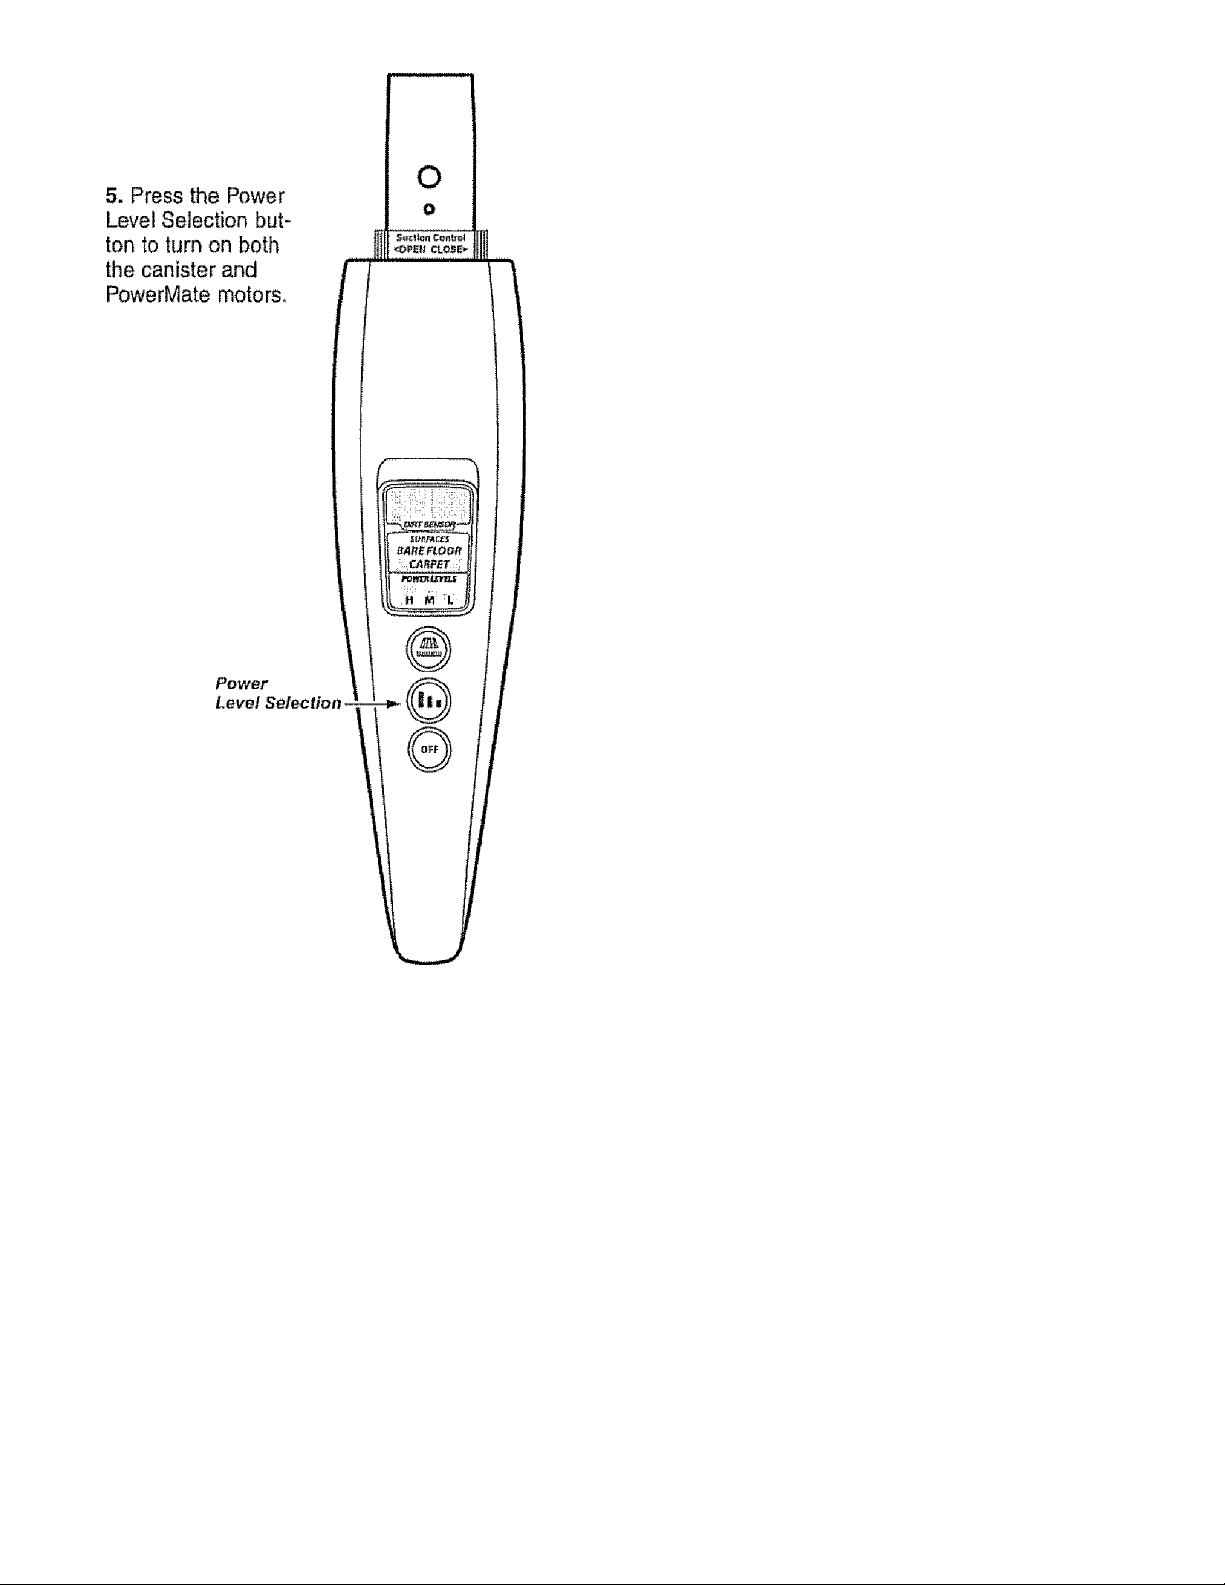
Power Level Selection - turns on both
the Canister and PowerMate. The
button cycles through HIGH, MEDIUM,
and LOW power levels.
The canister motor always starts In HIGH
power, Press the Power Level Selection
button as needed to adjust power level.
POWER LEVELS!
H - when lit indicates the canister motor is
running at HIGH power,
M - when lit indicates the canister motor is
running at MEDIUM power,
L - when lit indicates the canister motor is
running at LOW power.
CARPET/BARE FLOOR - turns the
PowerMate motor on for cleaning of
carpets and off for cleaning of bare
floors. CARPET/BARE FLOOR mode
will be indicated on the handie display,
OFF - turns off canister and
PowerMate motors.
NOTE: When the vacuum cleaner is in
BARE FLOOR mode, the wand light DOES
NOT function since no electricity flows to the
PowerMate.
NOTE: The hose handle display may have a
protective film. This film may be removed,
10
Page 11
VACUUR/IINGTIPS
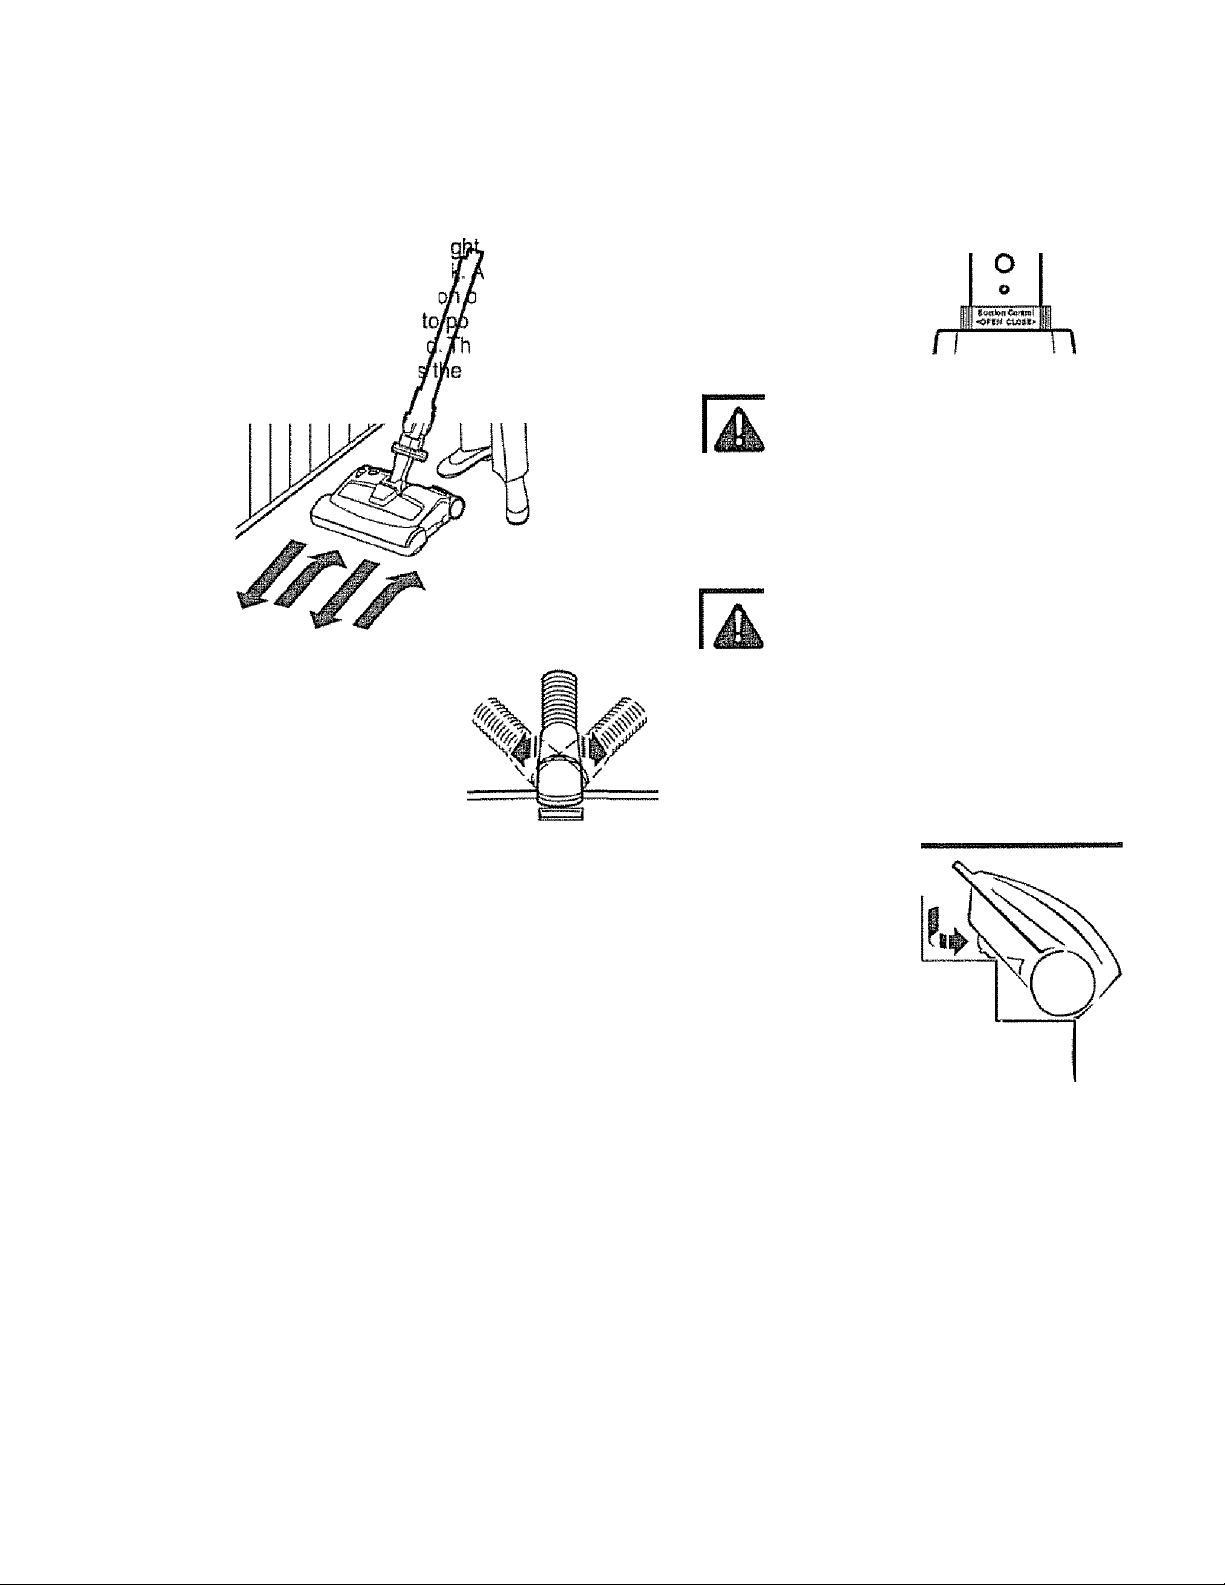
Suggested sweeping pattern.
For best Gleaning action,
should be pushed strai
and pulled straight bad
pull stroke, the directti
should be changed
DC'U'MwII IrU mC? iw
be continued acroa
gliding motions.
The hose swivel allows
the hose to turn
without moving the
canister. This is helpful
for cleaning in small
areas. Check hose for
twisting before pulling
canister.
the PowerMate
away from you
t the end of each
if the PowerMate
ini into the next
is pattern should
carpet with stow.
NOTE:
Fast, jerky
strokes do
not provide
compiete
cleaning.
A CAUTION
Product Damage Hazard
Use care if the PowerMate and wand is
left in the upright position as It may tip
over easily. Property damage can occur
if tipped.
For best
cleaning results,
use Power Level
HIGH and fully
close the suction
control located on
the handle.
WARNING
Persona! Injury Hazard
Use care if canister is placed on
stairs. It may fall, causing personal
Injury or property damage.
CAUTION
Product Damage Hazard
Do not pull on the hose to move the
canister from one stair to the next
When finished cleaning in one area use
the handle grip on the canister to move
the vacuum cleaner to a new iocatlon
for further cleaning.
The stair grip
located on the
caster will aid in
preventing the
canister from
slipping when used
on stairs (see
PERFORMANCE
FEATURES).
•3'
~ ,~-jr
A WARNING
Personal Injury and Product Damage
Hazard
• DO NOT run over power cord with
PowerMate. Personal injury or
product damage could result.
» DO NOT pull plug from wall by
Xfi© |30W6i cord# It XiiOiO iS CI8iii3Q0 xo
the cord or plug, personal injury or
property damage could result
NOTE: Be sure the canister is resting
securely on the stairs and the caster is in a
locked position before using.
I VI dvvX v*lv8r*IIi^ IvvIuilltV} iliw dililwW
passage open. Check each assembly area
in HOW YOUR VACUUM CLEANER
WORKS occasionaliy for dogs. Turn off
and unplug vacuum cleaner from outlet
before checking.
11
Page 12
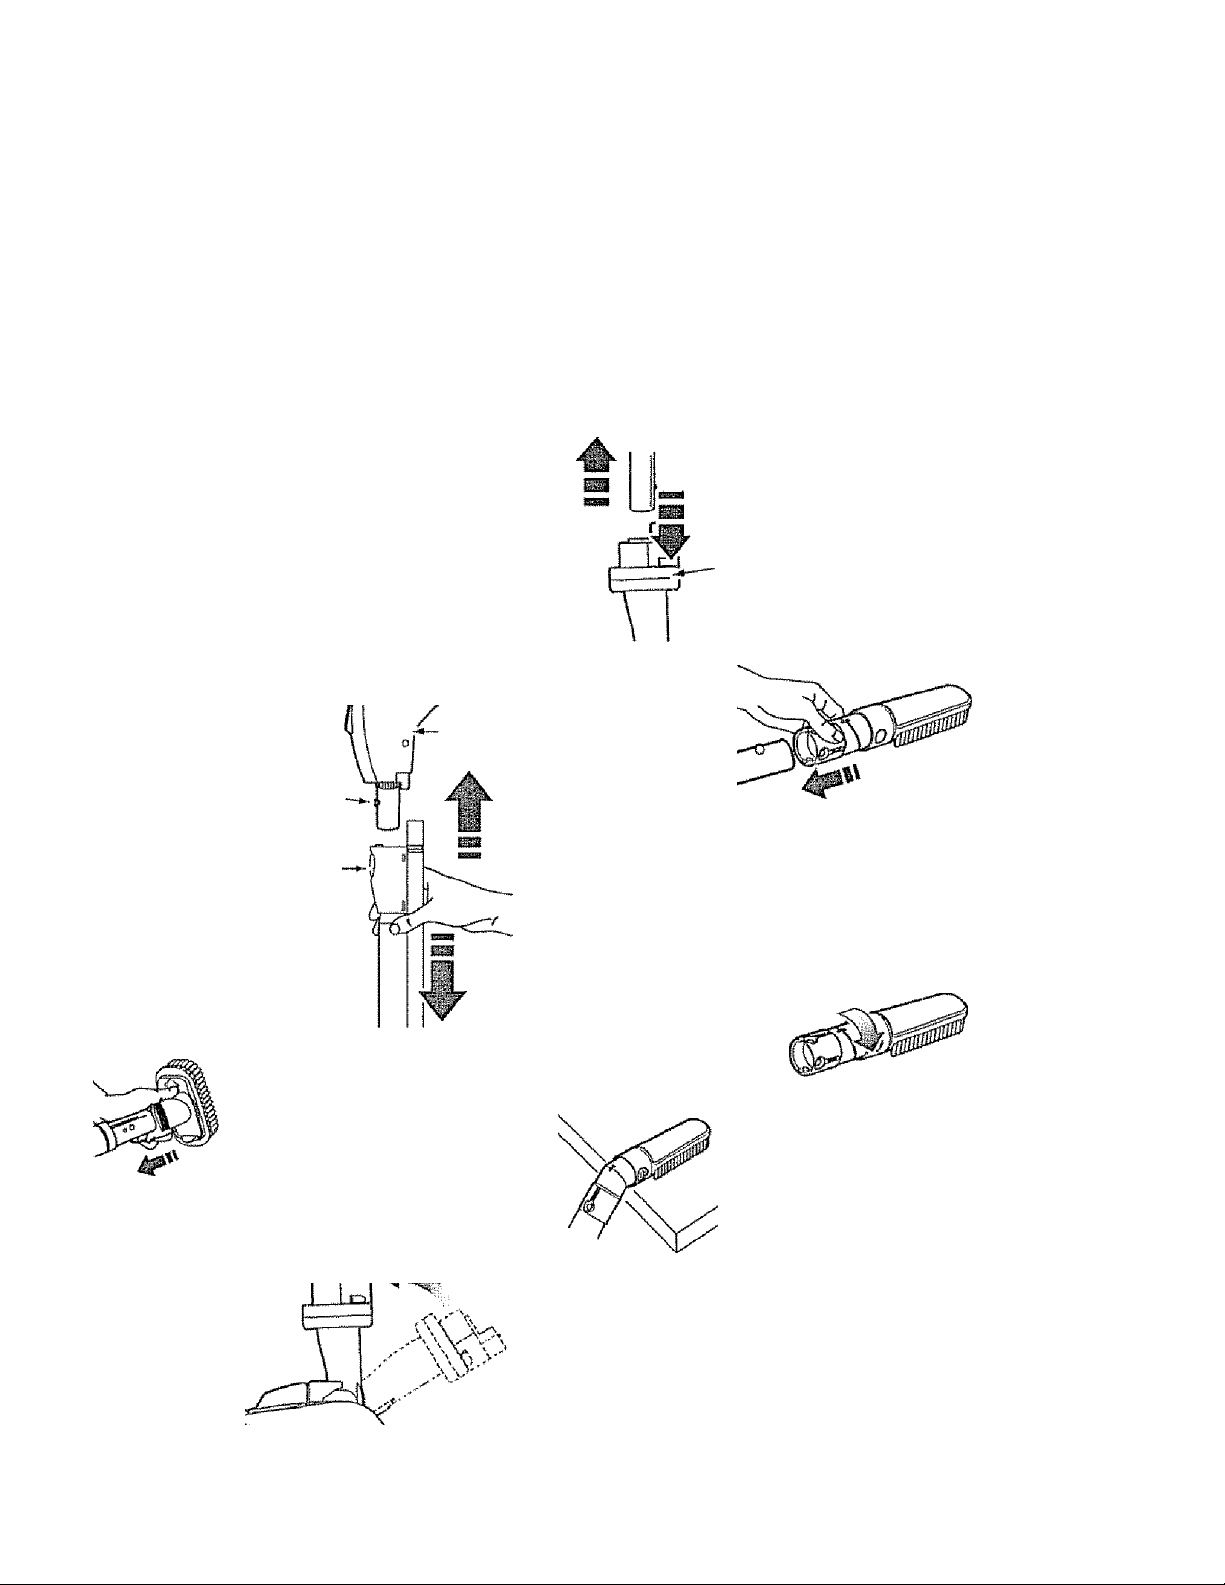
SUGGESTED PILE HEIGHT SETTINGS
For best deep down cleaning, use the XLO
setting. However, you may need to raise the
height to make some jobs easier, such as
scatter rugs and some deep pile carpets,
and to prevent the vacuum cleaner from
shutting off. Suggested settings are:
ATTACHMENTS
CAUTION
DO NOT attach or remove handle or wands while vacuum cleaner is ON.
THiKi ctTkisiflf'lrin fiiiH
I 11vM UIU StlJMi |\ii I^ Oc I vl Ud.!11d
the electrical contacts or electronic
controls.
ATTACHMENTS ON HANDLE
NOTE: If the
PowerMate is
attached, turn
vacuum cleaner
off before
removing handle
from wands.
Lack
Button
Handle
Quick
RsiBBse
1. Press handle
quick reiease
button and pull
up on handle.
2. Slide attachments firmly
on handle as needed. See
ATTACHMENT USE
TABLE.
ATTACHMENTS ON WAND
Handh
HI - Shag, deep pile, or scatter rugs.
MED - Medium to deep pile.
LO - Low to medium pile.
XLO ” Most carpets and bare floors.
MU
2. Press wand
quick release
pedal with foot and
pui! the wand
Wand
Quick
Release
Pedal
straight up and out
of PowerMate.
3. Put attach
ments on wand
as needed. See
J^l jyj gU J
USE TABLE.
CONTOUR BRUSH
The contour brush will attach to the handle
or wand for overhead cleaning of furniture
such as cabinets and shelves.
1. Rotate the contour
brush and lock into
place.
2. Attach the contour
brush to the handle or
wand.
1. To remove
wand from
PowerMate,
lock wand in
straight-up
position.
12
Page 13
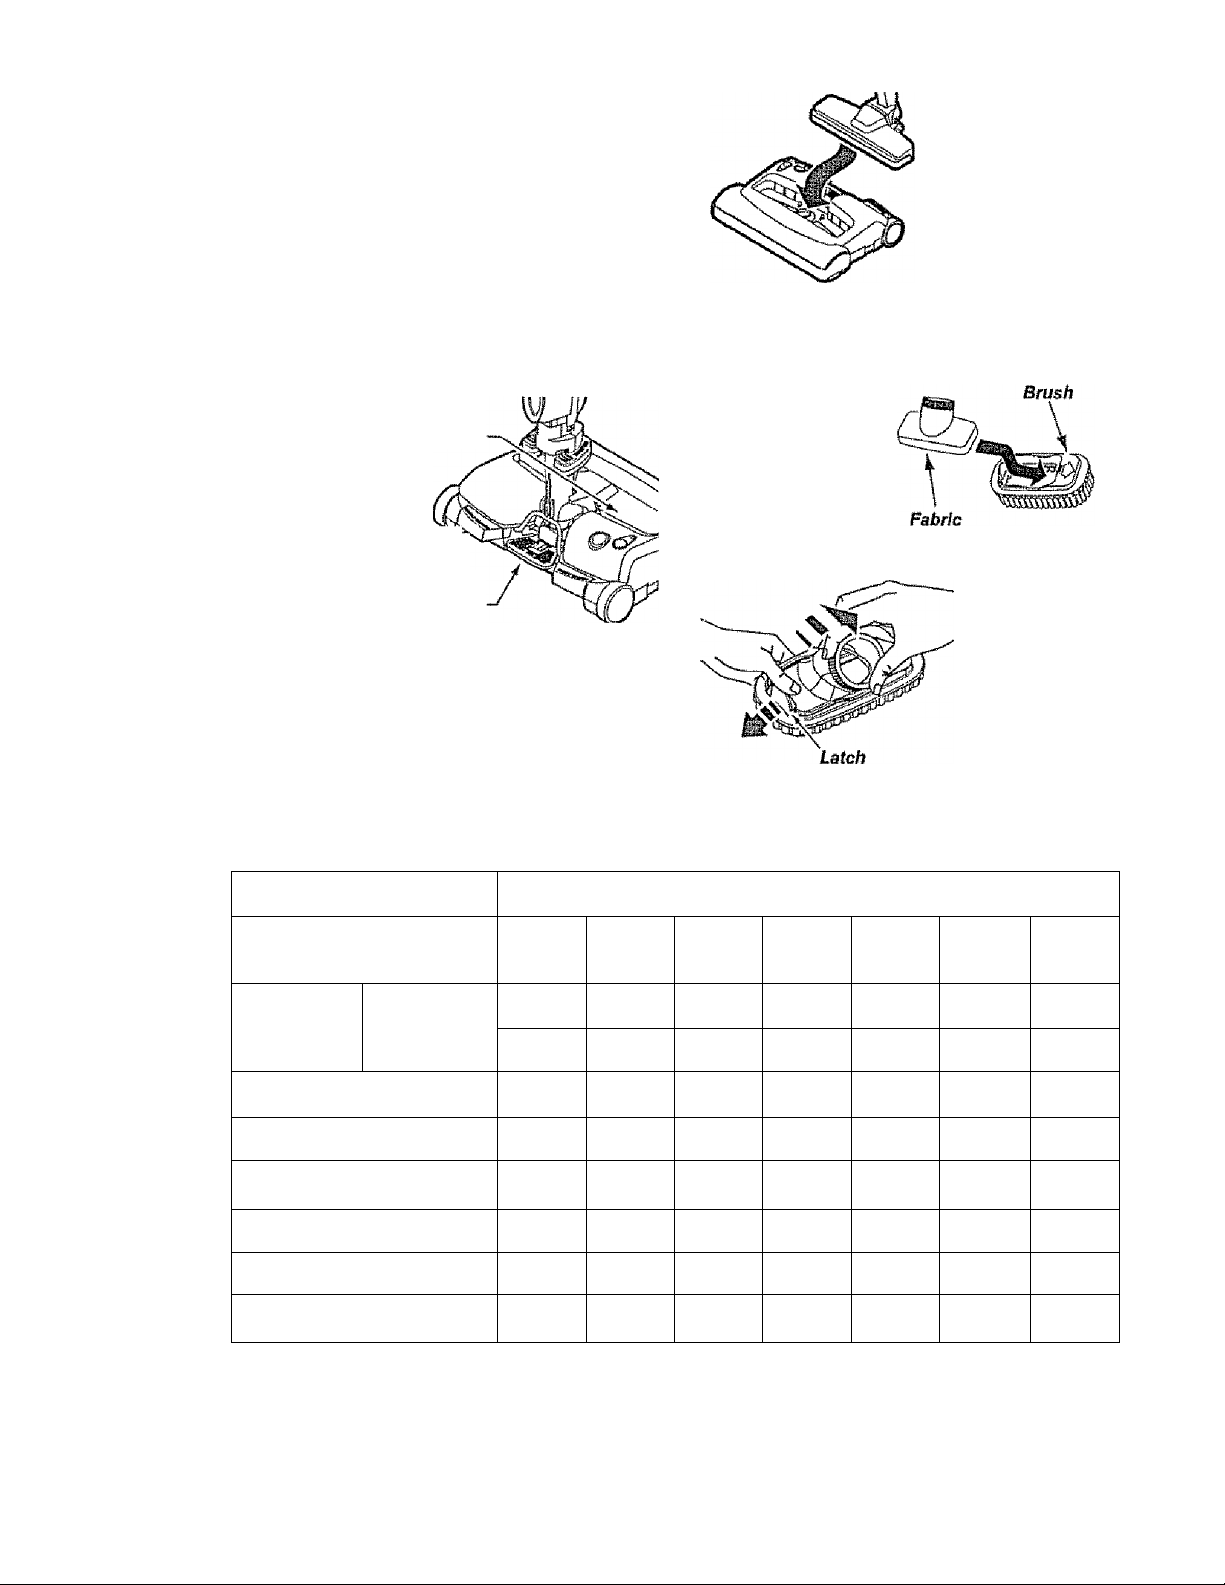
LIFT-OFF FLOOR BRUSH
Electrical Shock Hazard
To reduce the risk of electric shock -
DO NOT use on wet surfaces.
To replace, insert
the floor brush
into the
PowerMate until
floor brush locks
into place.
NOTE: Turn off vacuum cleaner before
removing floor brush from PowerMate.
To remove the
floor brush,
Floor
Brush
press brush
release pedal on
the PowerMate.
Lift floor brush
out of
PowerMate.
(S
Floor
Brush
Refesse
Podal
ATTACHMENT USE TABLE
dusting brush
To assemble
dusting brush,
insert the fabric
brush into the
dusting brush
nozzle and press
into place.
CLEANING AREA
Brush
Dusting
.LP
u
To remove,
press latch
and lift out.
ATTACHMENT
Ousting
Combination
Brush
Crevice Tool
Contour Brush
Floor Brush
PowerMate
Handi-Mate Jr.“^
Pet Powe rMate 3.4
Brush ^
Fabric rt
Brush
Furniture^
✓
✓
✓
✓
✓
✓
Between
Cushions^
✓
Drapes^ Stairs
✓
✓ ✓
✓
✓
Bare
Floors
✓ 2
Carpeted
Floors/Rugs Wails
✓
✓
✓
1.. Always clean attachments before using on fabrics
2. Use BARE FLOOR setting on Electronic Touch Control.
3. Some Models: Handi-mate Jr.® and Pet PowerMate attachment instructions are included
with the products.
4. Pet PowerMate can only be used on the hose handle.
13
Page 14

PERFORMANCE FEATÍIRÉS
WARNING
Persona! Injury Hazard
Always turn off and unplug the vacuum
cleaner before cleaning the agitator area
as agitator may suddenly restart.
Failure to do so can result in personal
injury.
OVERLOAD PROTECTOR
The PowerMate
has built-in
protection against
motor and belt
damage should
the agitator jam. If
the agitator slows
down or stops, the
overload protector
shuts off the
PowerMate and
the red light will come on. The canister
motor will continue to run.
To correct problem: Turn off and unplug
vacuum cleaner, remove obstruction, then
press BELT RESET button.
If the problem persists, have the
vacuum cleaner serviced by a Sears or
other qualified service agent.
iMb ftMr H fMW J|L |L I mm
E
ijiip f^l FДMPR
Overload Protector/
Belt Reset
Button—
PERTOHMANCE INDICATOR
Wheji th^vacuum
clever p running
witl/noTOal airflow,
f ligly on the
irformance
idicalor Is off. The
light mmes on
wh^ver the
airipw becomes blocked. If that occurs,
chfck the disposable dust bag, motor
fly filter and other possible clog
locations shown in HOW YOUR VACUUM
^CLEANER WORKS.
To corr^moblem: See the TROUBLE
SHOOTING tibie.
NOT^S^iB light may come on when using
cerif^ttachmenis, due to reduced airflow
thmim attachment,
Performance
Indicator-
Írivial protector
ftm vacuum cleaner has a thermal
fprllector which automaticaliy trips to protect
№ vacuum cleaner from overheating, If a
*og prevents the normal flow of air to the
lotor, the thermal protector turns the
^motor off automatically. This allows the
' motor to cool in order to prevent possible
damage to the vacuum cleaner.
Active brush edge
cleaners are on both
sides of the
PowerMate- Guide
either side of the
PowerMate along
base »boards or next
to furniture to help
remove dirt trapped
at carpet edges.
To correct problem: Turn off and unplug
vacuum cleaner to allow the vacuum
cleaner to cool and the thermal protector
Check for and remove clogs, If
ne^ssary. Also check and replace any
c^ged filters. Wait approximately
ilrty (30) minutes and plug the vacuum
cleaner In and turn back on to see If the
motor protector has reset.
14
Page 15
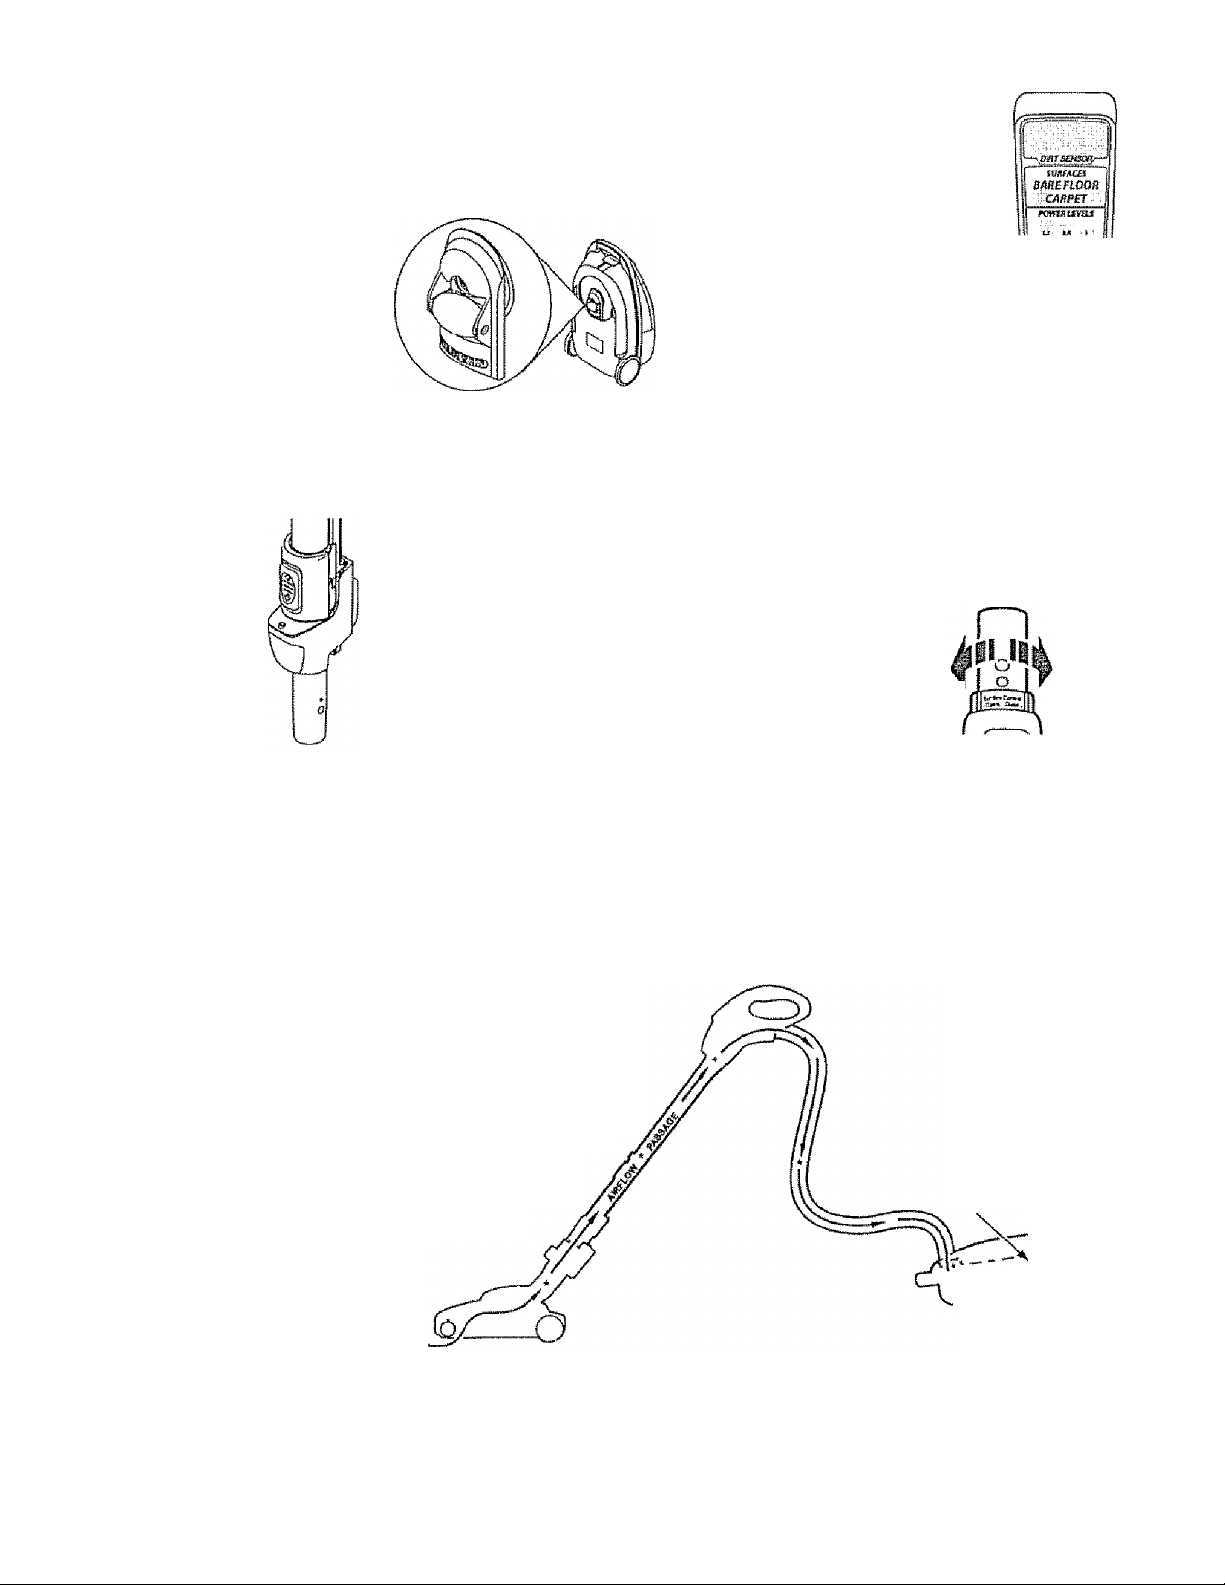
STAIR GRIP
DIRT SENSOR
During normal operation while the canister is
in the horizontal position, the caster wheel
rotates freely aeo“.
The Stair Grip
feature allows
the caster
wheel to lock in
position when
the vacuum
cleaner is
rotated 25“
from horizontal into a vertical position fn
order for the canister to rest on stairs.
WAND LIGHT
This vacuum cleaner is
equipped with a light on the
extension wand. This light
will operate only when the
vacuum cleaner is in
CARPET mode (see HOW
TO START). The light wii!
operate when attached or
not attached to the
PowerMate.
The light can be used lor lighting hard to
reach iocations.
The dirt sensor light system is
mounted on the handle It
consists of a red and a green
light.
Ul H M :'V
IN OPERATION
When the vacuum cleaner is in use, the lights
will change as dirt is being vacuumed. As long
as the red light is on, dirt is passing through
the handle to indicate that the surface still
needs cleaning.
When the sensor light changes to green,
the sensor is not seeing enough dirt to
. ■ *
■‘T‘T
warrant further cleaning of that area,
Qiif^TiriKI PriMTEini
■^r
The suction
control allows
you to change
the vacuum
suction for
different fabrics
Decrease
Suction
Increase
Suction
and carpet
weights. Opening the control decreases
suction for draperies and lightweight rugs,
while dosing the control increases suction
for upholsteries and carpets.
HOW YOUR VACUUM CLEANER WORKS
The vacuum cleaner creates suction that
picks up dirt. Rapidly moving air carries the
dirt to the dust bag through the airflow pas
sages. The dust bag lets the air pass
through, while ft traps the dirt.
For best cleaning results, keep the airflow
passage open. Check the starred areas
occasionally for clogs. Turn off and
unplug vacuum cleaner from outlet
before checking.
Motor
Safety _ ^ ^
/“i/f©!* ^XilSUSt
Filter
pyST III
:211LW
1S
Page 16
CANISTER CARE
BAG CHANGING
For bBst cieaning results, the dust bag
should be changed often. The electronic
performance indicator wiil come on when
the bag needs to be changed or the airflow
is blocked.
NOTE: See PARTS AND peaTURES for
Bag Number.
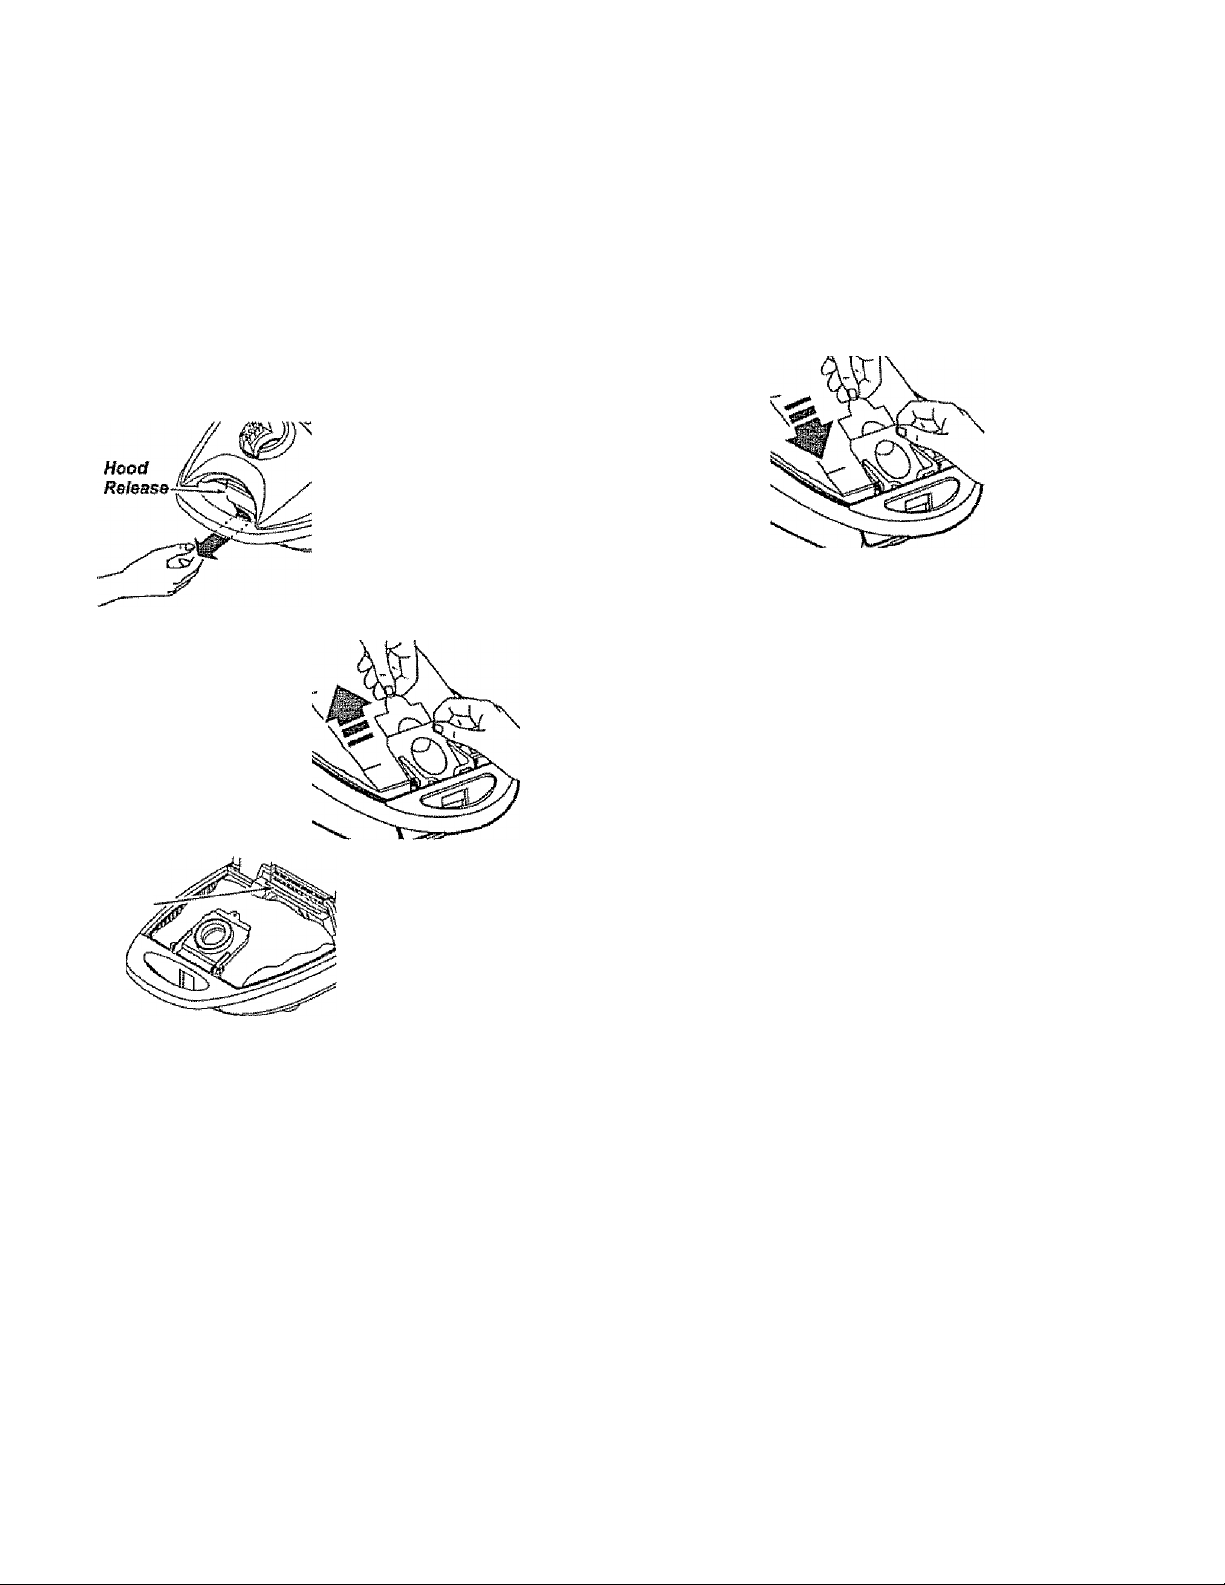
1. Turn off and unplug vacuum cleaner.
2. Remove hose
from canister.
3. Pul! hood
release out and up,
then lift canister
hood.
4. Disengage
cardboard tab from
red bag mount by
pulling away and
lifting up.
5. Pull bag out of the
red bag mount
Motor
Safety
Ffiier
6. Check the
motor safety filter
and replace, if
necessary.
7. The red bag mount will flip forward after
removing bag. This will prevent the hood
from closing until a new bag is installed.
Note: DO NOT bend or crease the middle
of the cardboard when installing the bag
into the bag mount slots.
8. Rotate red bag
mount down and
install bag into slots
per illustration,
pushing down until
the cardboard tab
locks into position
and the holes align.
9. Tuck the bag securely into the bag cavity
so that none of the bag is able to be pinched
by the hood,
10. Close and iafch canister hood.
11. insert hose into canister until it snaps in
place.
12. Plug cord Into wail outlet.
CAUTION
NEVER REUSE A DUST BAG. Very fine
materials, such as carpet freshener,
face powder, fine dust, plaster, soot,
new carpet lint, etc. can clog the bag
and cause It to burst before it is full and
sIRdV mEI:«« 11 mMw iiW if hi Ml 11 9 M i1i7'C41 f
motor. Change bag more often when
vacuuming these materials.
rfiiiYisirtefe fri
CLEANING EXTERIOR AND ATTACHMENTS
1. Turn off and unplug vacuum cleaner. DO
NOT drip water on vacuum cleaner.
2. To clean exterior, or to reduce static eiectricity and dust build-up, wipe outer surface
of vacuum cleaner and attachments. Use a
clean, soft cloth that has been dipped in a
solution of mild liquid detergent and water,
then wrung dry. Wipe dry after cieaning.
16
CAUTION
Do not use attachments if they are wet
Attachments used in dirty areas, such
as under a refrigerator, should not be
used on other surfaces until they are
washed. They could leave marks.
Page 17
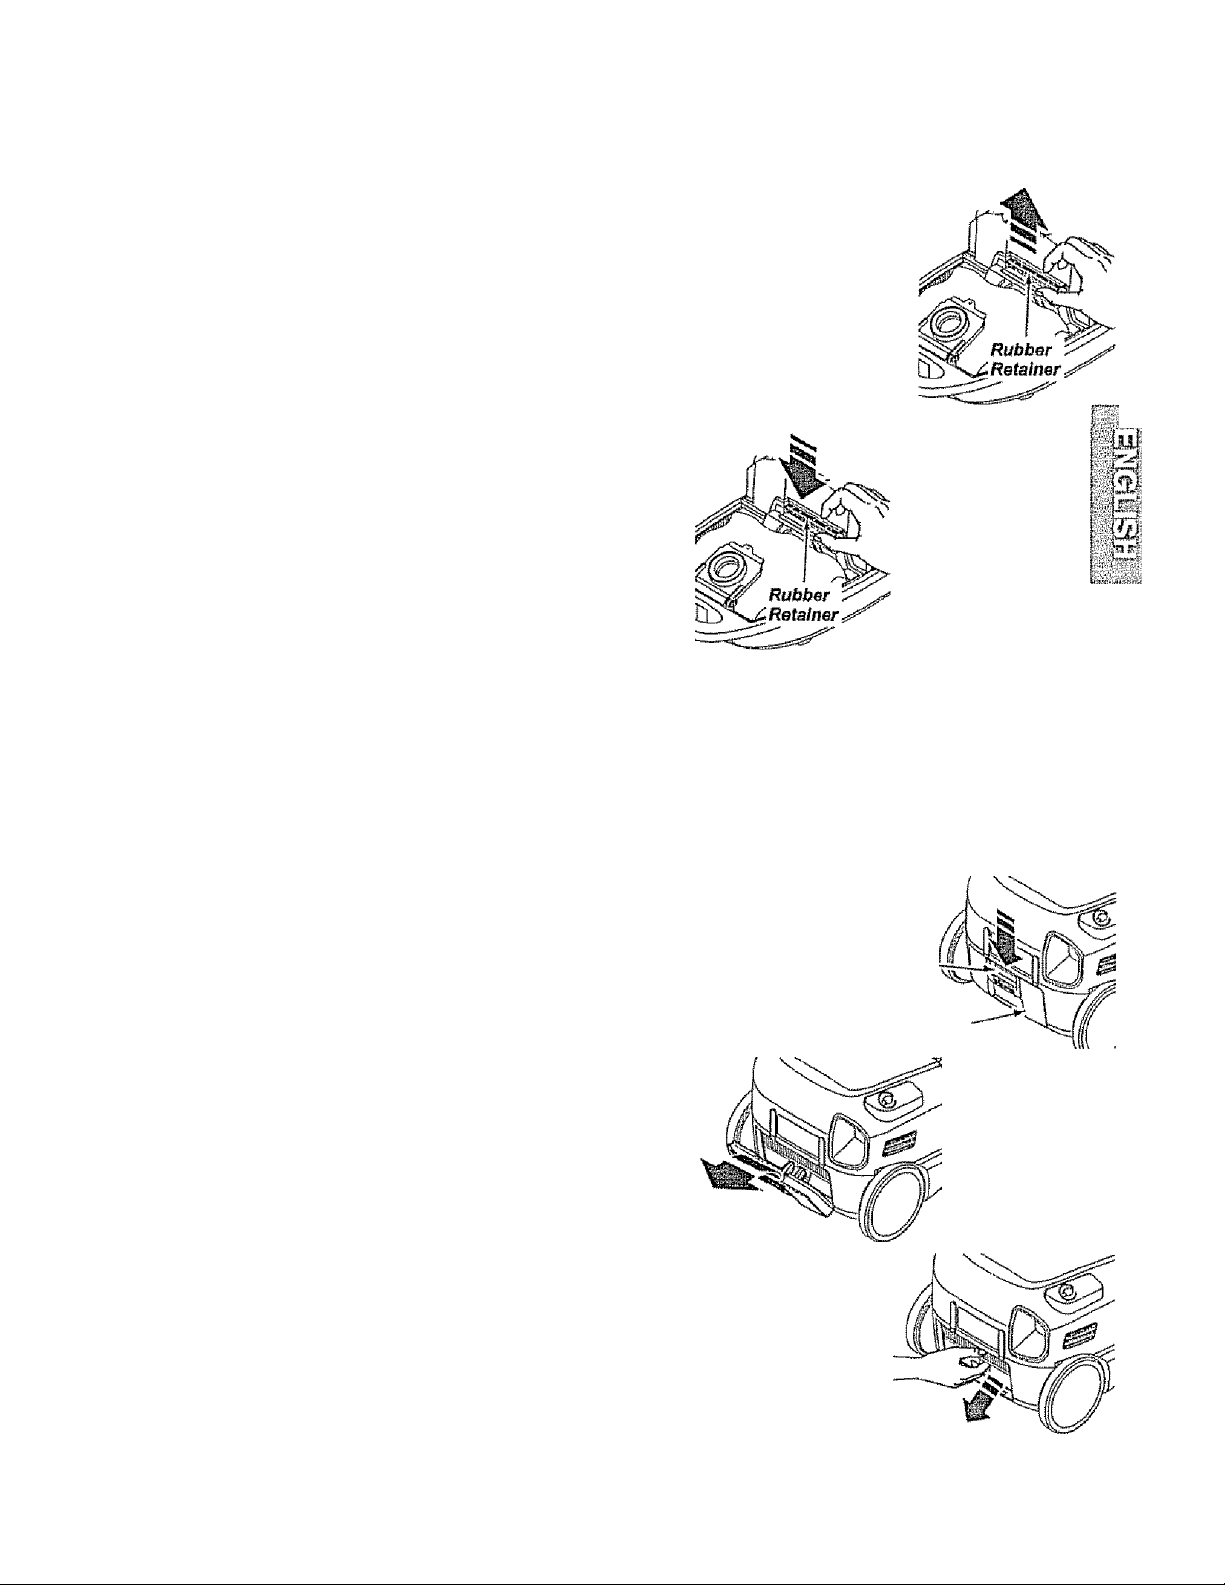
MOTOR SAFETY FILTER CHANGING
A WARNING
t^Wtl i«#mI nCviCinfU
Turn off and unplug vacuum cleaner
from electrical outlet. Do not operate
the vacuum cleaner without the motor
eafptv filtpr Rf> eurA fhp filter ¡q rirv Anri
properly installed to prevent motor
failure and/or electrical shock.
MOTOR SAFETY FILTER
ELECTROSTATIC
This filter must be replaced when dirty. It
should be replaced regularly depending on
use conditions. The filter CANNOT be
washed as it will lose its dust trapping
ability.
NOTE: See PARTS AND FEATURES for
Motor Safety Filter number
1. Remove the bag as outlined in the BAG
CHANGING section,
QHnPir Hi37i4rH
2. Lift the rubber
retainer and pull out
motor safety filter as
shown
3, Replace the fiiter,
white side out,
facing the dust bag,
by sliding it back
into place under the
ribs in the bag
cavity Tuck filter in
so that it fits
completely under the
rubber retainer.
4, Replace the bag as outlined in the BAG
CHANGING section.
EXHAUST FILTER CHANGING
A WARNING
Fire and/or Electrical Shock Hazard
Do not operate with a clogged exhaust
filter or without the exhaust filter
installed. Do not operate without filter
cover installed.
EXHAUST FILTER HEPA
The exhaust fiiter cartridge must be
replaced when dirty. Replace the fiiter when
the entire surface area is covered evenly.
The fiiter CANNOT be washed as it will
lose its dust trapping ability.
NOTE: See PARTS AND FEATURES for
exhaust filter number.
1. Press latch
down to release
the exhaust filter
cover from slot in
canister.
3. Remove the
exhaust filter
using the recess
as shown.
Latch-
FHier
Cover
2. Puli fiiter
cover outward to
remove from
canister.
17
Page 18
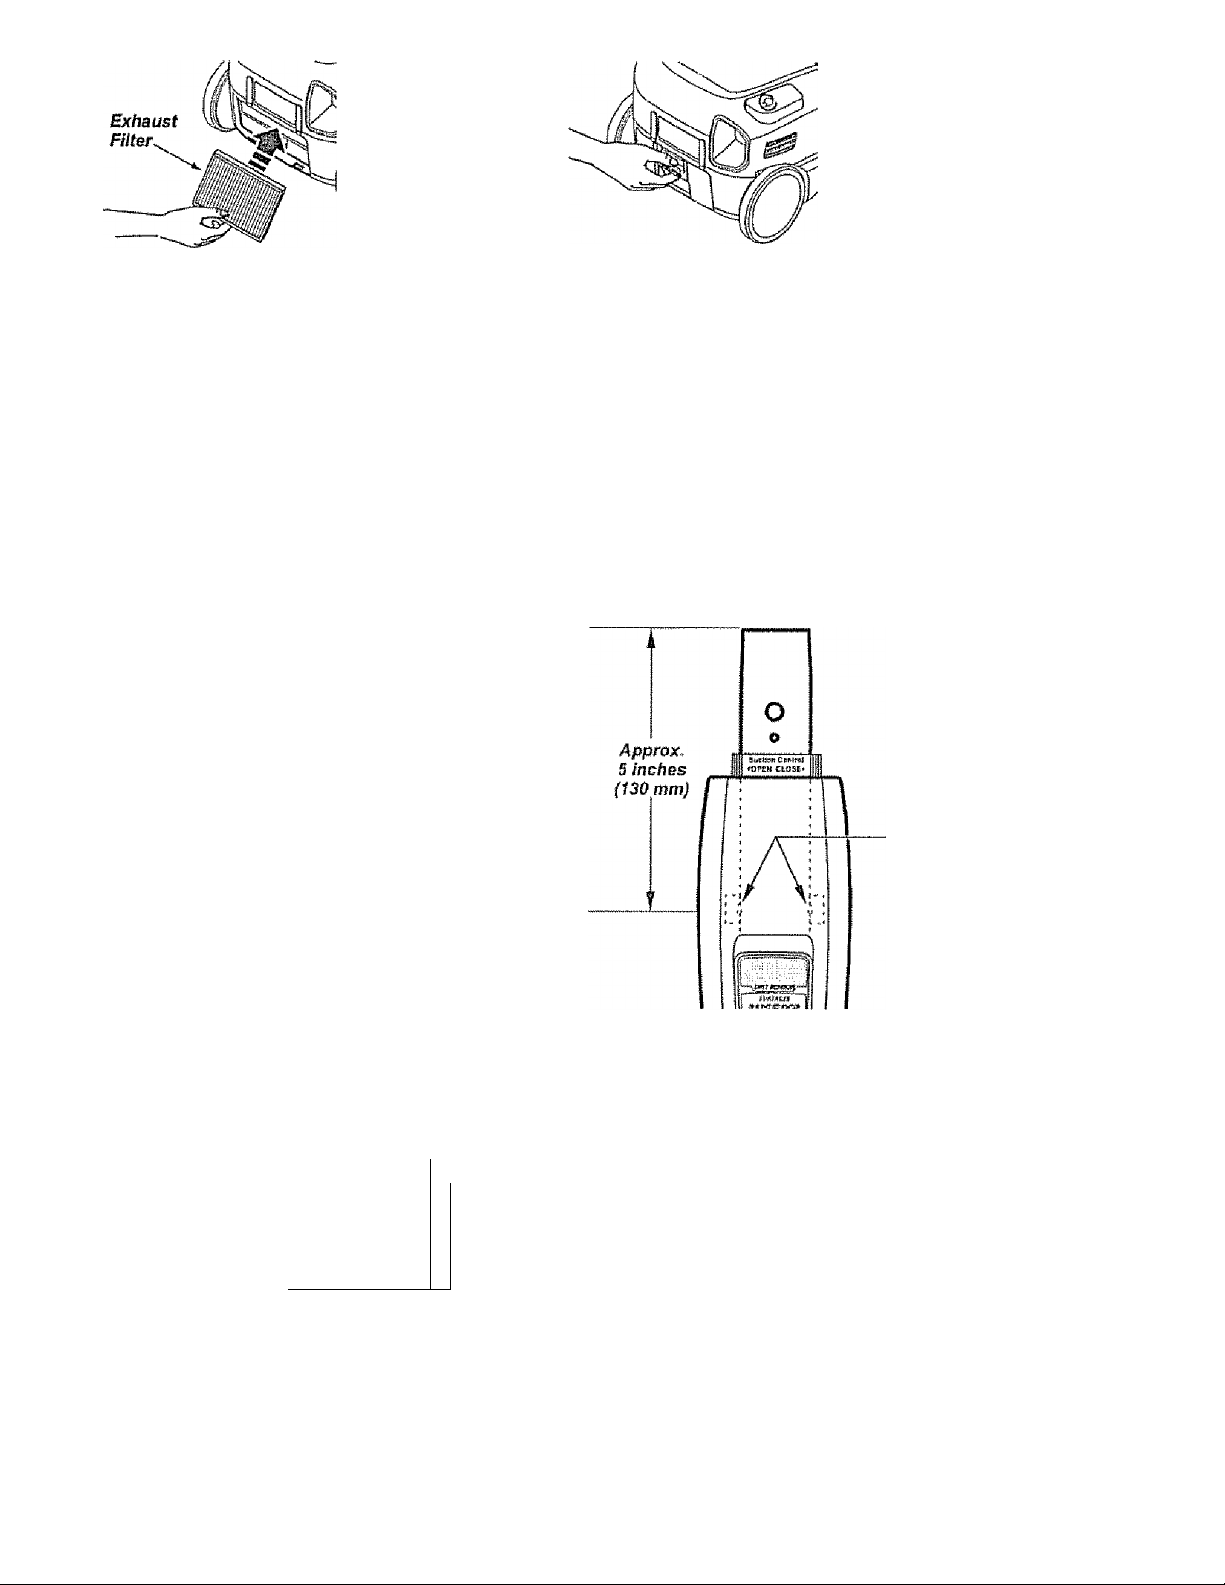
4. Repiace the
exhaust filter
cartridge. Place
the new filter into
the canister with
the foam seal
towards the
canister.
7. Release latch and verify that filter cover
5. To replace the
is locked Into place.
exhaust filter
cover place the y^\^S/ofs
two tabs on the /#k fi^A
filter cover into
the slots on the
canister. ,
Afthough the dirt sensor feature in your
Kenmore canister is designed for years of
trouble free use, the passage of dirt through
the air passage system can coat the lens
causing the green light to come on and stay on
- never switching to red. When this happens
the tenses must be cleaned.
6. While holding
latch down
rotate filter cover
into place.
I CAUTION
Never use water or any cleaning solution
when cleaning the lenses. The residue of
the water or cleaners will accelerate the
recoating of the lenses and make
IIviviioSisdil y inIwrii#Iliii n
TO CLEAN THE LENSES
- Handle
1. Remove the
handle by pressing fiUifOn—K 1
the handle quick
release button.
Quick
iieiesss—
Lock \-L,r
Handle ’—
i
A i
Sensor
Lenses
2. As indicated by the illustration, the two dirt
sensor lenses are located on the inside of the
handle, approximately 5 inches/130 mm down
(note the arrows). These lenses should be
cleaned periodically. To reach the sensor
lenses, use a small brush such as a bottle
brush. Brush each sensor lens several times to
remove dust and dirt.
18
Page 19
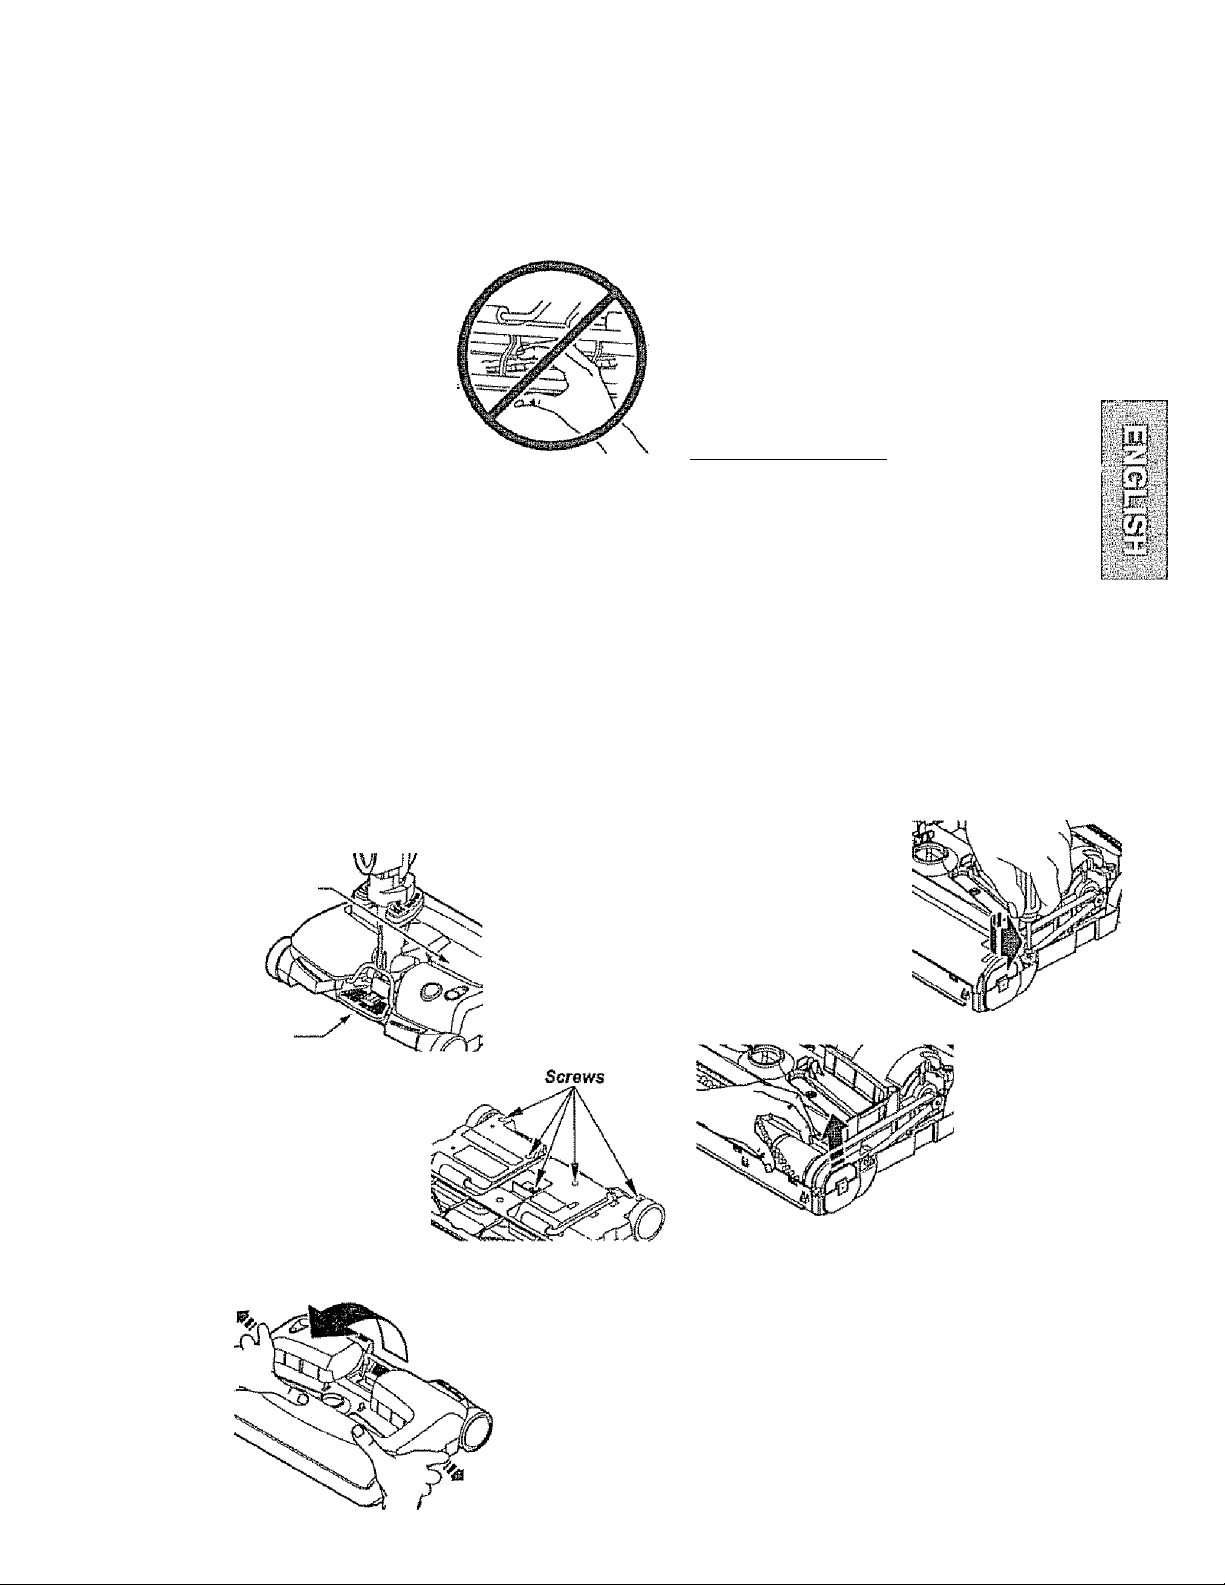
POWERWIATE CARE
Always follow all safety precautions when performing maintenance to the PowerMate.
CAUTION
Moving Parts! To
reduce the risk of
personal injury, DO
NOT touch the
agitator when the
vacuum cleaner is
ON, Contacting the
agitator while It is
rotating can cut,
bruise, or cause other injuries.
Always turn off and unplug vacuum
cleaner from electrical outlet before
servicing.
Use caution when operating this product
near small children.
BELT CHANGING AND AGITATOR CLEANING
WARNING
Electrica! Shock Or Personal Injury
Hazard
Always turn off and unplug vacuum
cleaner before performing maintenance
to the vacuum cleaner. Failure to do so
poiilfl in plpnfrii'iil ehn/'k nr
personal Injury from vacuum cleaner
¡suddenly starting.
TO REMOVE BELT
Floor
Brush
1. Remove floor
brush from the
PowerMate,
Brush
RBÍeaso
Pedal
2. Turn
PowerMate
upside down and
unscrew five {5)
PowerMate cover
screws.
3. Turn PowerMate right side up,
4. To remove
cover, grasp the
side latches and
pul! out.
5. Unscrew two (2)
agitator cover screws
and remove agitator
cover.
6. Lift agitator
assembly out
and remove
worn belt.
7, Check and clean end cap areas. See
AGITATOR ASSEMBLY for picture of
complete agitator assembly
19
Page 20
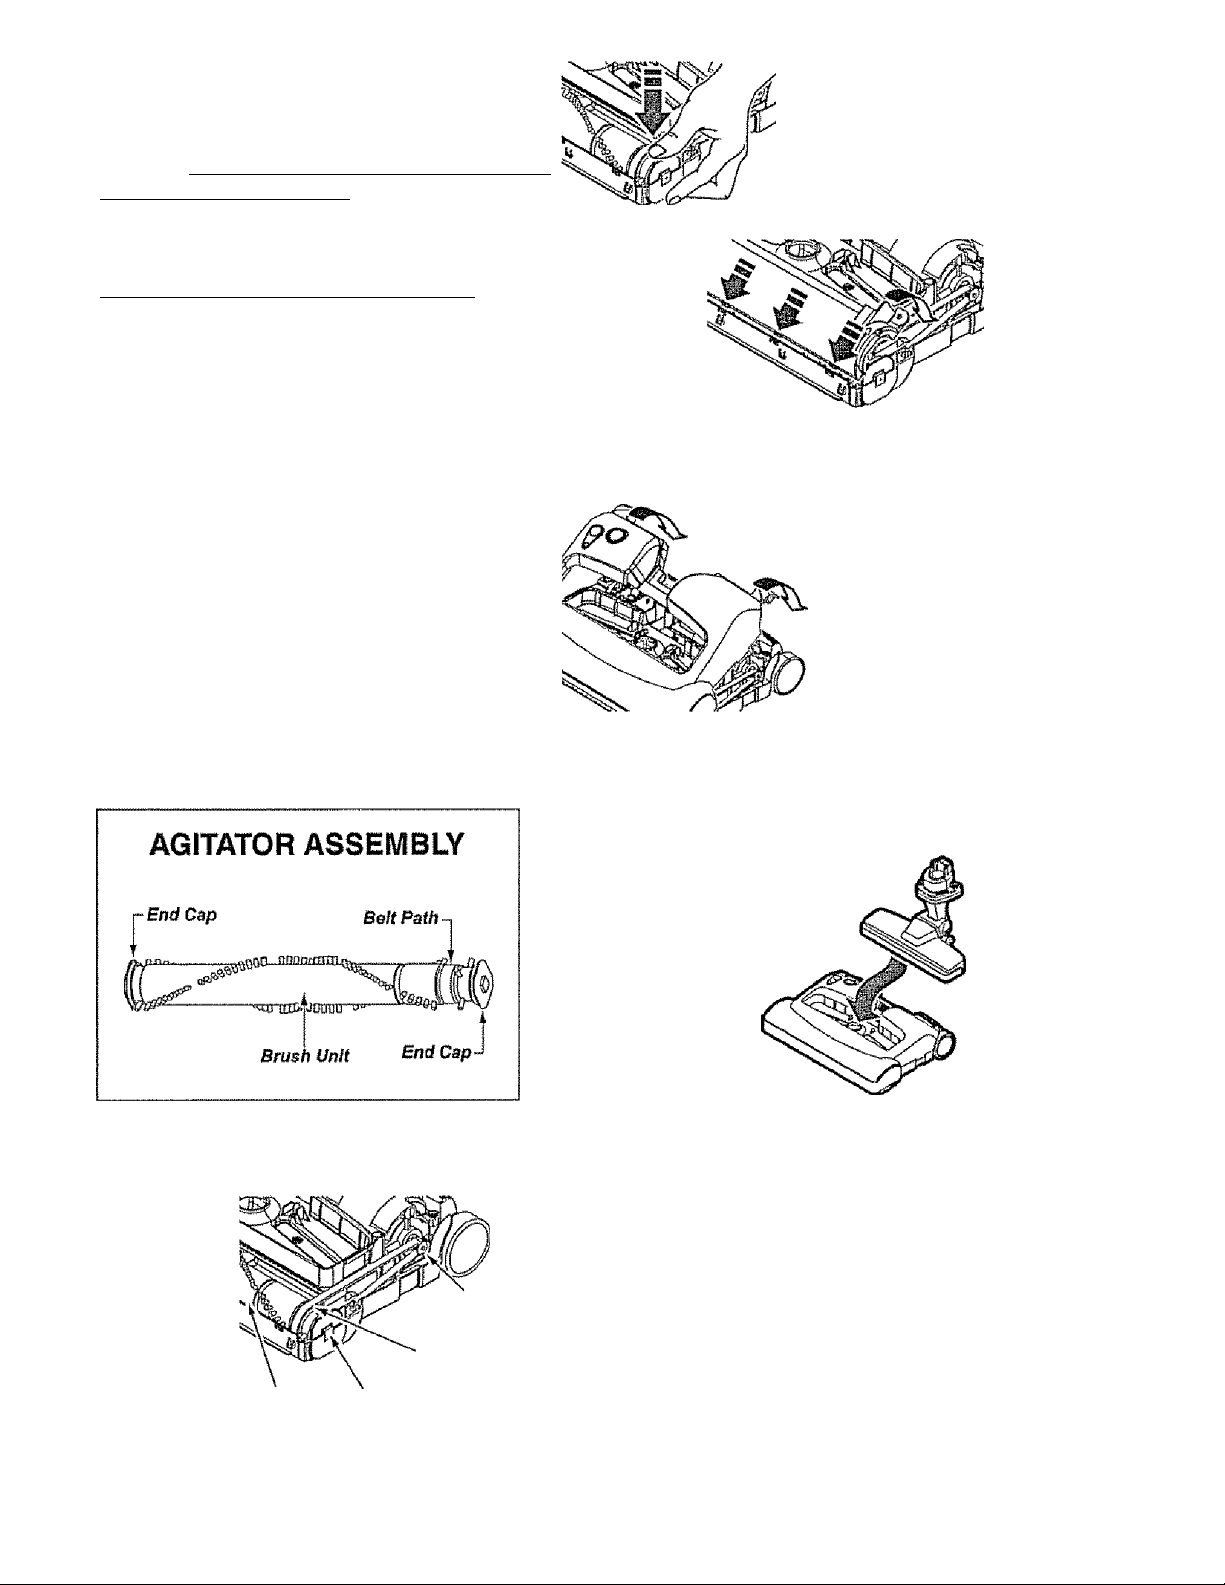
TO CLEAN AGITATOR:
NOTE: in order to keep cleaning efficiency
high and to prevent damage to your vacuum
cleaner, the agitator must be cleaned every
time the belt is changed.
The agitator must also be cleaned accord
ing to the following schedule:
Vacuum Cleaner Use Clean Agitator
HEAVY -
every week
(used daily)
MODERATE -
every month
(used 2-3 times/week)
y .
every 2 months
(used 1 tlme/week)
IMPORTANT
Turn off and unplug vacuum cleaner from
electrical outlet Check and remove hair,
siring and lint build-up frequently in the
PowerMate agitator and end cap areas.
Remove any dirt or debris in the belt path
area or in the brush roller area.
Carefully remove any string or debris
located on the agitator or end caps.
2. Place agitator
assembly back into
PowerMate.
3. Reinstall
agitator
cover and
replace two
(2) screws.
4. Line up front of cover and base. Rest
cover on front edge of base as shown .
5. Rotate cover
back.Press
cover firmly until
side latches
snap into place.
Make sure there is no gap between the
cover and base.
TO REPLACE BELT
1, Install new
belt over
motor drive,
then over
belt path.
Agitator End Cap
6. Turn PowerMate upside down and
replace five (5) cover screws,
7. insert floor
brush into
PowerMate until
floor brush locks
into place.
Motor
Drive
Belt
Path
NOTE: See PARTS AND FEATURES for
Belt number.
20
Page 21
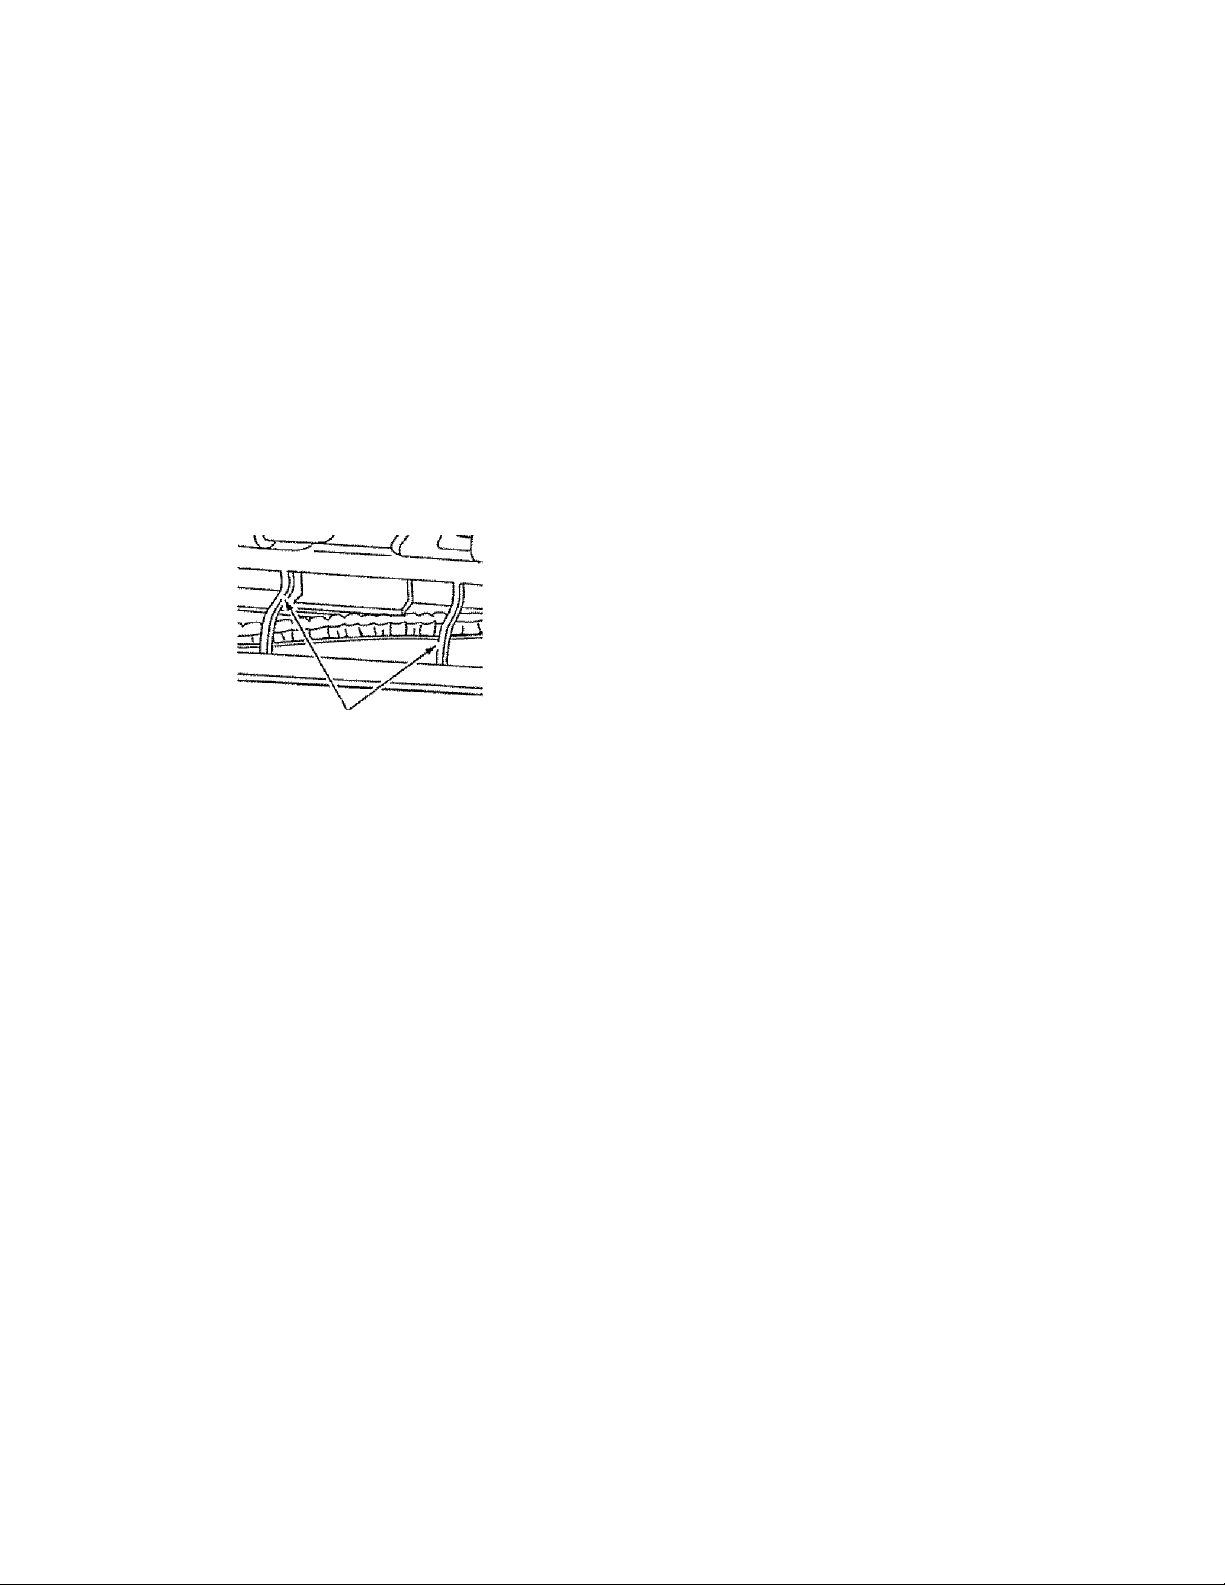
AGITATOR SERVICING
WARNING
Electrical Shock Or Persona! Injury
Hazard
Always turn off and unplug vacuum
cleaner before performing
maintenance to the vacuum cleaner.
Failure to do so could result in electrical
shock or personal injury from vacuum
cleaner suddenly starting.
TO REPLACE AGITATOR
ASSEMBLY
1, Remove the floor brush from the
PowerMate,
2. Remove PowerMate cover, agitator cover,
belt and agitator assembly. See “To Remove
Beif in BELT CHANGING AND AGITATOR
CLEANING.
3. Replace agitator assembly.
TO
Base Support Bars
writlUrv I nil DnUorltlo
When brushes
are worn to the
ieve! of the base
support bars,
replace the
agitator
assembly.
4. Reinstall belt, agitator cover and
PowerMate cover. See 'To replace belt" in
BELT CHANGING AND AGITATOR
CLEANING,
5. insert tioor brush into PowerMate until
floor brush locks into place.
«
21
Page 22

TROUBLESHOOTING
Review this iable to find do-it-yourself solutions for minor performance problems. Any other
service needed, should be performed by a Sears or other qualified service agent.
▲warning
Always turn off and unplug vacuum cleaner before performing maintenance to the vacuum cleaner. Failure to do so could result in electrical shock or personal injury.
PROBLEM
Vaeiium cleaner won’t
start
Poor job of dirt
pick-up.
Vacuum cieaner starts
but shuts off.
POSSIBLE CAUSE
1. Unplugged at wall outlet,
2. Tripped circuit breaksr/blown
fuseai household service panel
3. Loose hose electrical
connections.
1. Fui! or clogged dust bag
2* Clogged airflow passages.
3. Dirty filters.
4. Wrong pile height setting.
5. Wrong power level selected.
6. Hole in hose
7. Worn PowerMale agitator.
8. Worn or broken belt.
9. Dirty agitator or end caps.
10. Canister hood open.
11. Tripped overload protector in
PowerMate.
1. Hose or hood electrical
connections.,
2. Tripped overload protector in
PowerMale.
3. Tripped thermal protector
in canister
' dMb it e>% i'' ip<B ' É i »„npn jj|^ 1^' I''
P OSSJBL E SOLUTiO N
1. Plug in firmly, press ON/OFF switch.
2. Reset circuit breaker or replace fuse.
3. Reconnect hose ends.
1 bRfi
I c VJrc ICii culirf
2. Clear alrllow passages
3. Change fillers.
4. Adjust setting.
5. Adjust control,
B, Replace hose
7. Change agitator.
B & 8. See BELT CHANGING AND
AGITATOR CLEANING
10. Close and latch hood.
11. Remove any items that may be
caught or jammed, then reset If
vacuum cleaner starts and stops
again, dean agitator and end caps,
then reset.
1, Check connections, reconnect hose
ends.
2. Remove any items that may be
caught or jammed, then reset If
vacuum cieaner starts and stops
agairr, clean agitator and end caps,
then reset
3.
Sea PERFORMANCE FEATURES 'Thermal Protector,"
PowerMate will not
run when attached.
1. PowerMate connections
unplugged,
2. Worn or broken belt.
3. Dirty agitator or and caps.
4. Tripped overload protector in
PowerMate.
5. Vacuum cleaner in BARE
FLOOR moda.
22
1. Plug in firmly
2 & 3. See BELT CHANGING AND
AGITATOR CLEANING,
4. Remove any items that may be
caught or jammed, then reset. If
vacuum cleaner starts and stops
again, clean agitator and end caps,
then reset
5. Press CARPET/BARE FLOOR
button to change to CARPET mode.
Page 23

PROBLEM
POSSIBLE CAUSE
POSSIBLE SOLUTION
Constant green light on
in dirt sensor.
No green or red dirt
sensor lights.
PerfornriancB indicator
activates.
Vacuiim cleaner picks
up moveable rugs -or-
PowerMate pushes too
hard.
Red light on
PowerMate.
Cord won’t rewind.
Vacuum cleaner leaves
marks on carpet
1 ■ L^t 11 «-r 0 1
2, Lenses are dirty
1, No power to sensor board
1. Full or clogged dust bag
2. Dirty filters.
3« Blocked airflow passage,
4, Certain attachment tools.
1, Wrong pile height setting.
2. Suction too strong.
1. Tripped overload protector in
PowerMate
1, Dirty power cord
2. Cord jammed.
1. Wrong vacuuming pattern.
1. Check for dogs in air passages,
2. Clean Jenses.
1. Take to your nearest Sears Service
Center,
1. Change bag.
2. Change filters.
3. Clear biockage from airflow passage
4. This is normal. Light should go off
when tool is removed.
1. Adjust setting.
2, Select tower Power Level
1. Remove any items that may be
caught or jammed, then reset If
vacuum cleaner starts and stops
again, clean agitator and end caps,
then reset.
1. Clean the power cord,
2. Pull out cord and rewind.
1. See VACUUMING TIPS,
23
Page 24

Master Protection Agreements
Congratulations on making a smart purchase. Your new Kenmore® product is designed and manu
factured for years of dependable operation. But iike all products, it may require preventive mainte
nance or repair from time to time. That's when having a Master Protection Agreement can save you
money and aggravation.
The Master Protection Agreement also helps extend the life of your new product. Here’s what the
Agreement* includes:
И Parts and labor needed to help keep products operating property under normal use, not just
defects. Our coverage goes well beyond the product warranty. No deductibles, no functional
failure excluded from coverage— real protection.
S3 Expert service by a force of more than 10,000 authorized Sears service technicians, which
means someone you can trust will be working on your product.
3 Unlimited service calls and nationwide service, as often as you want us, whenever you
want us.
И "No-lemon” guarantee replacement of your covered product if four or more product failures
occur within twelve months.
0 Product replacement if your covered product can't be fixed.
0 Annual Preventive Maintenance Check at your request ~ no extra charge.
3 Fast help by phone - we call it Rapid Resolution ~ phone support from a Sears representa
tive on all products. Think of us as a "talking owner's manual,"
3 Power surge protection against eiectricai damage due to power fluctuations.
0 $250 Food Loss Protection annually for any food spoilage that is the result of mechanical fail
ure of any covered refrigerator or freezer.
0 Rental reimbursement if repair of your covered product takes longer than promised,
И 10% discount off the regular price of any non-covsred repair service and related installed
parts.
Once you purchase the Agreement, a simple phone call is all that it takes for you to schedule ser
vice. You can call anytime day or night, or schedule a service appointment online.
The Master Protection Agreement is a risk free purchase, (f you cancel for any reason during the
product warranty period, we will provide a full refund. Or, a prorated refund anytime after the product
warranty period expires. Purchase your Master Protection Agreement today!
Some limitations and exclusions apply. For prices and additional Information In the U.S.A.
call 1-800-827-6655.
* Coverage In Canada varies on some Items. For full details call Sears Canada at 1-800-361
6665.
Sears Installation Service
For Sears professional installation of home appliances, garage door openers, water heaters, and
other major home items, in the U.S.A. or Canada call 1-800-4-MY-HOME®,
24
Page 25

TABLA DE CONTENIDO
Antes de usar su aspiradora nueva
Garantía de la aspiradora
de Kenmore
.
..........................
.
Instrucciones importantes de
seguridad
Piezas y características
.
....................
.
............
...
Instrucciones de
ensaiTtl}lamiento ...............
Almacenaje del Pet PowerMate® ...
Instrucciones de operatidn
Para comenzar ...........................
Sugerencias para aspirar
Sugerencias sobre el ajuste de nivel de
pelo de la alfombra .................
Accesorios
Cuadro de uso de los accesorios
Características de rendimiento ..
Funcionamiento de su aspiradora
................
..
...........
..................
..
. .3
,4-5
.6-7
. .7
. .8
..
8-9
. 10
..
11
.11-12
. . . 12
13-14
... 14
Cuidado del receptáculo 15
WuImLIIu Vjtd ici UwltSu Iv
Limpieza del exterior y de los accesorios 15
Cambio del filtro de seguridad dei motor 16
Cambio del filtro de escape
Detector de tierra
Cuidado de la PowerMate® ..............
Cambio de la correa y limpieza
del agitador .......
Cuidado del agitador............... 20
Hmí Í£i ’I
....... 16-17
...................................
17
18
.............................
.18-19
Reconocimiento de problemas ,, 21-22
Acuerdos maestros de protección .. 23
Información de asslstancia
o servicio .Posterior Cubierta
ANTES DE USAR SU ASPIRADORA NUEVA
Por favor lea esta guia que le ayudara a assemblar y operar su aspiradora nueva de Kenmore en una manera
más segura y effectíva,
Para mas información acerca del cuidado y operación de esta aspirador, llame a su tienda Sears mas cercana.
Cuando pregunte por Irríormación usted necisiiará el número completo ds serie y modelo de la aspiradora que
está locado en la placa de los números de modelo y serte.
Use ei espacio de abajo para registrar ei número de modelo y serie para su nueva aspiradora de Kenmore.
Nùmero de Modelo
Número de Serle
Fecha ds Compra.
Maienga este libro y su recibo en u lugar seguro para referencias futuras
___________
..'■■•J - - n.'..
Ì..3JU
l.'i
I'“
Page 26

GARANTIA DE LA ASPIRADORA DE KENIViORE
Garantía limitada de un año
Si esta aspiradora faüa por un defecto en sus materiales o fabricación en eí período de
un año desde la fecha da compra, cuando se instala, maneja y mantiene siguiendo
todas las instrucciones incluidas con el producto, devuélvala a cualquier tienda Sears,
Sears Parts & Repair Center {Centro de Reparaciones y Piezas Sears) u a otro
distribuidor Kenmore para que reparen el aparato de forma gratuita.
Si esta aspiradora se utiliza para oíros fines que no sea uso familiar privado, esta
garantía es válida solamente durante 90 días desde la fecha de compra.
Esta garantía cubre exclusivamente los defectos de materiales y fabricación.
Sears NO pagará:
1. Los elementos desechadles que puedan desgastarse con un uso normal, incluyendo
sin carácter excluyeníe, filtros, correas, lámparas y bolsas.
2. Un técnico del servicio técnico para que enseñe al usuario a Instalar, manejar o
mantener correctamente ei producto.
3. Un técnico del servicio técnico para limpiar o mantener este producto.
4. Daños o avería de este producto si no se ha instalado, manejado o mantenido
siguiendo todas las instrucciones incluidas con el producto.
5. Daños o avería de este producto originados por accidente, abuso, uso incorrecto u
uso deí producto para otros fines distintos de los indicados.
6. Daños o avería de este producto causados por el uso de detergentes, limpiadores,
productos químicos o utensilios diferentes a los recomendados en todas las
instrucciones que se incluyen con el producto.
7. Daños o avería de las piezas o sistemas causados por modificaciones no
autorizadas que se hayan hecho a este producto.
Limitación de responsabilidad de ias garantías implícitas; limitación de remedios
Éi único y exclusivo remedio del cliente bajo esta garantía limitada será la reparación del
producto según lo indicado en este documento. Las garantías implícitas, incluyendo las
garantías de comerciabilidad o idoneidad para un propósito específico, se limitan a un
año o el período más corto permitido por la ley. Sears no será responsable por daños
incidentales ni consecuenciales. Algunos estados o provincias no permiten la exclusión
o iimitación de daños incideníaies o consecuenciales, ni limitaciones en ia duración de
las garantías implícitas de comerciabiiidad o idoneidad, por lo que estas exclusiones o
limitaciones podrían no aplicar en su caso.
Esta garantía aplica solamente cuando esta aspiradora se utiliza en Estados Unidos o
Canadá.
Esta garantía le otorga derechos legales específicos, y usted podría tener otros
derechos que varían en función de cada estado.
Sears, Roebuck and Co., Hoffman Estates, !L 60179 Sears Canada Inc., Toronto, Ontario, Canada MSB 2B8
Page 27
E SEGURIDAD
Lea las Instrucciones en este manual antes de armar o usar su aspirador,
A ADVERTENCIA
Su seguridad es muyjmporíaníe para nosotros. Para reducir el riesgo de incendio,
_i
--------
i-.íii
------------------------
i -
----
. yt¡|¡2arsu aspiradora, actúe de acuerdo
' eiias:
Use su aspiradora ünloamente en la forma
descrita en este manual. Use únicamente con
accesorios recomendados por Sears.
Oesconecte el cordón eléctrico antes de
componer o limpiar el área de! cepillo. De lo
contrario, el cepillo podría arrancar de form
Imprevista o podría producirse un choque
eléctrico.
No abandone la aspiradora cuando esté
conectada. Desconéctela cuando no la esté
usando y antes de darle servicio.
Para reducir el riesgo de choque eléctrico, no
use su aspiradora ai aire libre ni sobre
Csl IITíCirnr'ííÜlCi ITtrilciHíaíi
bUjJcifnUit:?« fliUJaUaa..
No permite que sea utilizada como juguete.
Se requiere tener mayor cuidado cuando sea
utilizada en la proximidad de niños o por
niños.
No use la aspiradora si el cordón o el enchufe
вЗШ QafiSQO« wl la aSpiroUQia RQ @S13
funcionando adecuadamente o si se ha
expuesta a la intemperie o se ha dejado caer
en agua, devuélvala a un Centro de servicio
de Sears.
No hale ni transporte la aspiradora por el
cordón; no use el cordón como mango; no
cierre puertas sobre ei cordón: no hale e!
cordón sobre rebordes agudos ni esquinas.
No pase la aspiradora sobre el cordón.
Mantenga el cordón alejado de superficies
caiíentes-
No desconecte la aspiradora tirando del
cordón eléctrico. Para desconectarla, hale el
enchufe, no el cordón.
No toque la aspiradora ní el enchufe con las
manos mojadas.
No coloque objetos en las aberturas,
No utilice ía aspiradora si alguna abertura
está bloqueada; manténgala libre de polvo,
pelusa, cabellos y cualquiera cosa que podría
disminuir el flujo de aire*
Mantenga el cabello, ropa suelta, dedos y
todas las partes del cuerpo alejados de las
aberturas y piezas mecánicas.
Apague todos los controles antes de
desenchufar.
Tenga cuidado especial al utilizar la
aspiradora en escalones. No la coloque sobre
sillas, mesas, etc. Manténgala en el piso.
No use la aspiradora para aspirar líquidos
inflamables o combustibles tóasolina, líquidos
para limpieza, perfumes, etc.) ni ia use en
lugares donde éstos podrían estar presentes.
Los vapores de estes sustancias pueden crear
un peligro de incendio o explosión.
No levante ninguna cosa que se esté
quemando o emitiendo humo, como
cigarrillos, cerillos o cenizas calientes.
No use la aspiradora sin tener instalada la
bolsa para polvo y/o los filtros.
Cambie siempre la bolsa para polvo después
de aspirar limpiadores de alfombras o
desodorantes, talcos y polvos finos. Estos
productos atascan la bolsa, reducen el flujo de
aire y pueden causar que éste se rompa. SI
no cambia la bolsa podría ocasionar daño
permanente a ía aspiradora.
No use la aspiradora para levantar objetos
agudos, juguetes pequeños, alfileres,
sujetapapeles, etc. Podrían dañar la
aspiradora o la bolsa para polvo.
No opere sin el filtro de escape ni la cubierta
de! filtro de escape Instalados.
La manguera contiene cables eléctricos. No
la use cuando está dañada, cortada, o
perforada. Reemplace si está cortada o
desgastada. No levante objetos afilados.
Siempre apagué y desconecte la aspiradora
antes de conectar o desconectar la manguera,
Handi-Mate Jr.® {si aplicable), o la boquilla.
Sujete el enchufe con la mano al enrollar el
cordón Biéctrico. Para desconectarla, hale en
enchufa, no e! cordón.
Usted es responsable de asegurar que su
aspiradora no sea utilizada por ninguna
persona que no pueda manejarla
i 1
uui i UvdleaM ttai fLU^.
GUARDE ESTAS INSTRUCCIONES
Eí armado y uso seguro de su aspiradora son su responsabilidad. Esta aspiradora ha sido
diseñada exclusivamente para uso doméstico. La aspiradora deberá almacenarse en un lugar
seco y en ei interior. Lea este Manual del propietario detenidamente, pues contiene
información Importante sobre seguridad y uso. Esta quia contiene información sobre
seguridad debajo de símbolos de advertiencta cuidado.
Page 28
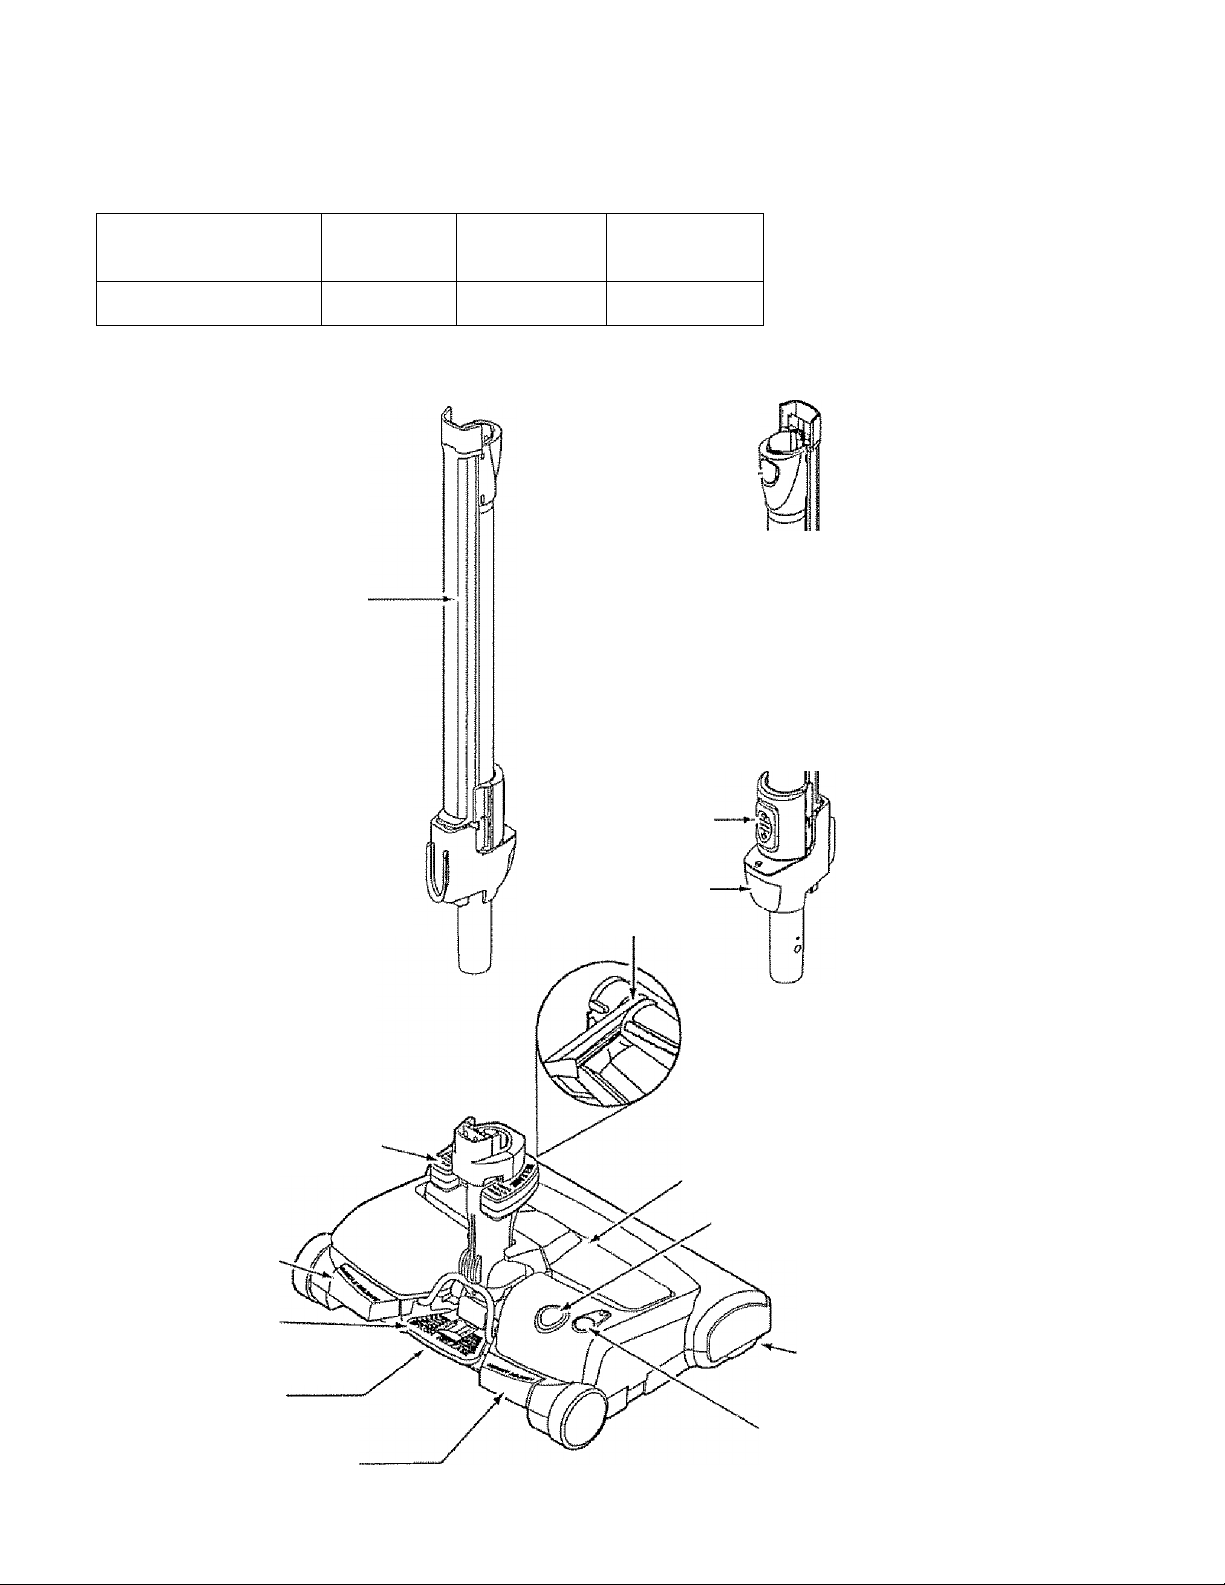
PIIÌ7AQ V f'ARAr'TPRÍQTir'AQ
.1^1 : Y I llvli i\!¡^ 1 i V/jtAw .
Es imporlanle conocer las piezas y características de su aspiradora para asegurar su uso adecuado y seguro.
Examínelas antes de usar su aspiradora
Oijjeto Estilo No.
Correa CB-6
PowerWlate
Tubo
te/oscopíco
Pieza №
sn EUA
— —
Pieza N®
en Canadá
Botón ds
liberación
rápida dei
mango —
Botón do
ajuste de
extensión
Pedal de liberación
rápida del tubo
Pedal de liberación
del mango
Pedal de liberación
del capillo para pisos
Números da serie
y modelo de PowerMato
(Parto Inferior)
Pedal da selección
Luz
Carree
Cepillo para pisas
desmontable
Indicador de nivel
de pelo de la alfombra
Limpiador de orillas
(no mostrado)
Botón do restauración
"Rosot" Profecíor do
sobrecarga
Page 29
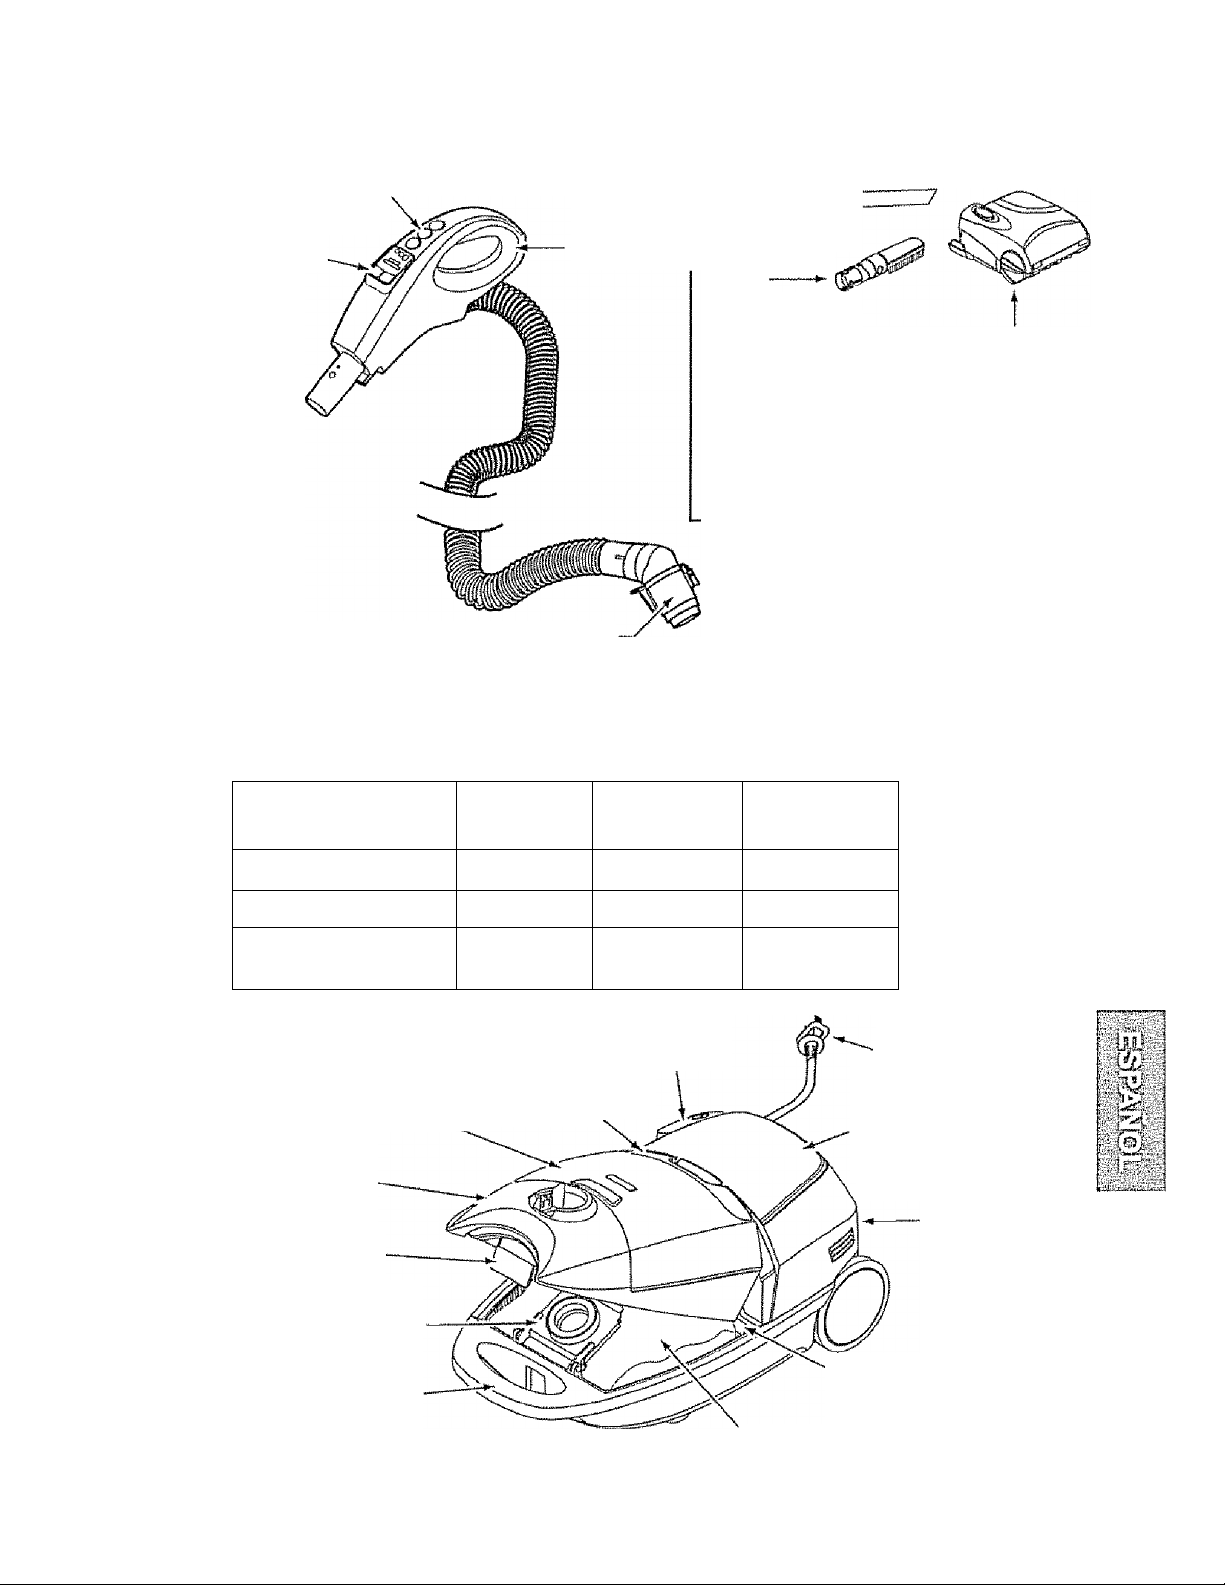
MANGUERA
Control
electrónico
digital
Detector
de polvo
Mango
Herramienta
para
-------------
hendiduras
Cepillo
para
contorno
ACCESORIOS
^ CU
Pet PoWerMate
Dispositivo
giratorio de la
manguera
RECEPTACULO
Objeto Estilo No.
Bolsa para polvo
Filtro de escape
Filtro de seguridad
del motor
Q
wr*“l
CF-1 20-86883 20-40321
Cepillo !
pam ----------------
Pieza №
en EDA
combinación ¡
en Canadá
f
i
Pieza №
20-50557 20-50410
20'86889 20-40324
Cepillo para i
sacudir ¡
• Cepillo pam ¡
telas '
Cubierta de
alma cenamien to
ridi idf*f*€iic:r\irir»fS
faccesorios adentro)
Tapa de la
aspiradora
Pestillo
de la lapa
Sujetador
de la bolsa
Manija de
transportación
Indicador da
funcionamiento
Botón de
cardón
eléctrico
■ Cordón eléctrico
Cubierta de
almacenamiento
para PetPowerMaie
Cubierta del filtro
de escape
(no mostrado)
Filtro de protección
del motor
(detrás de la bolsa de polvo)
Bolsa de polvo
Page 30
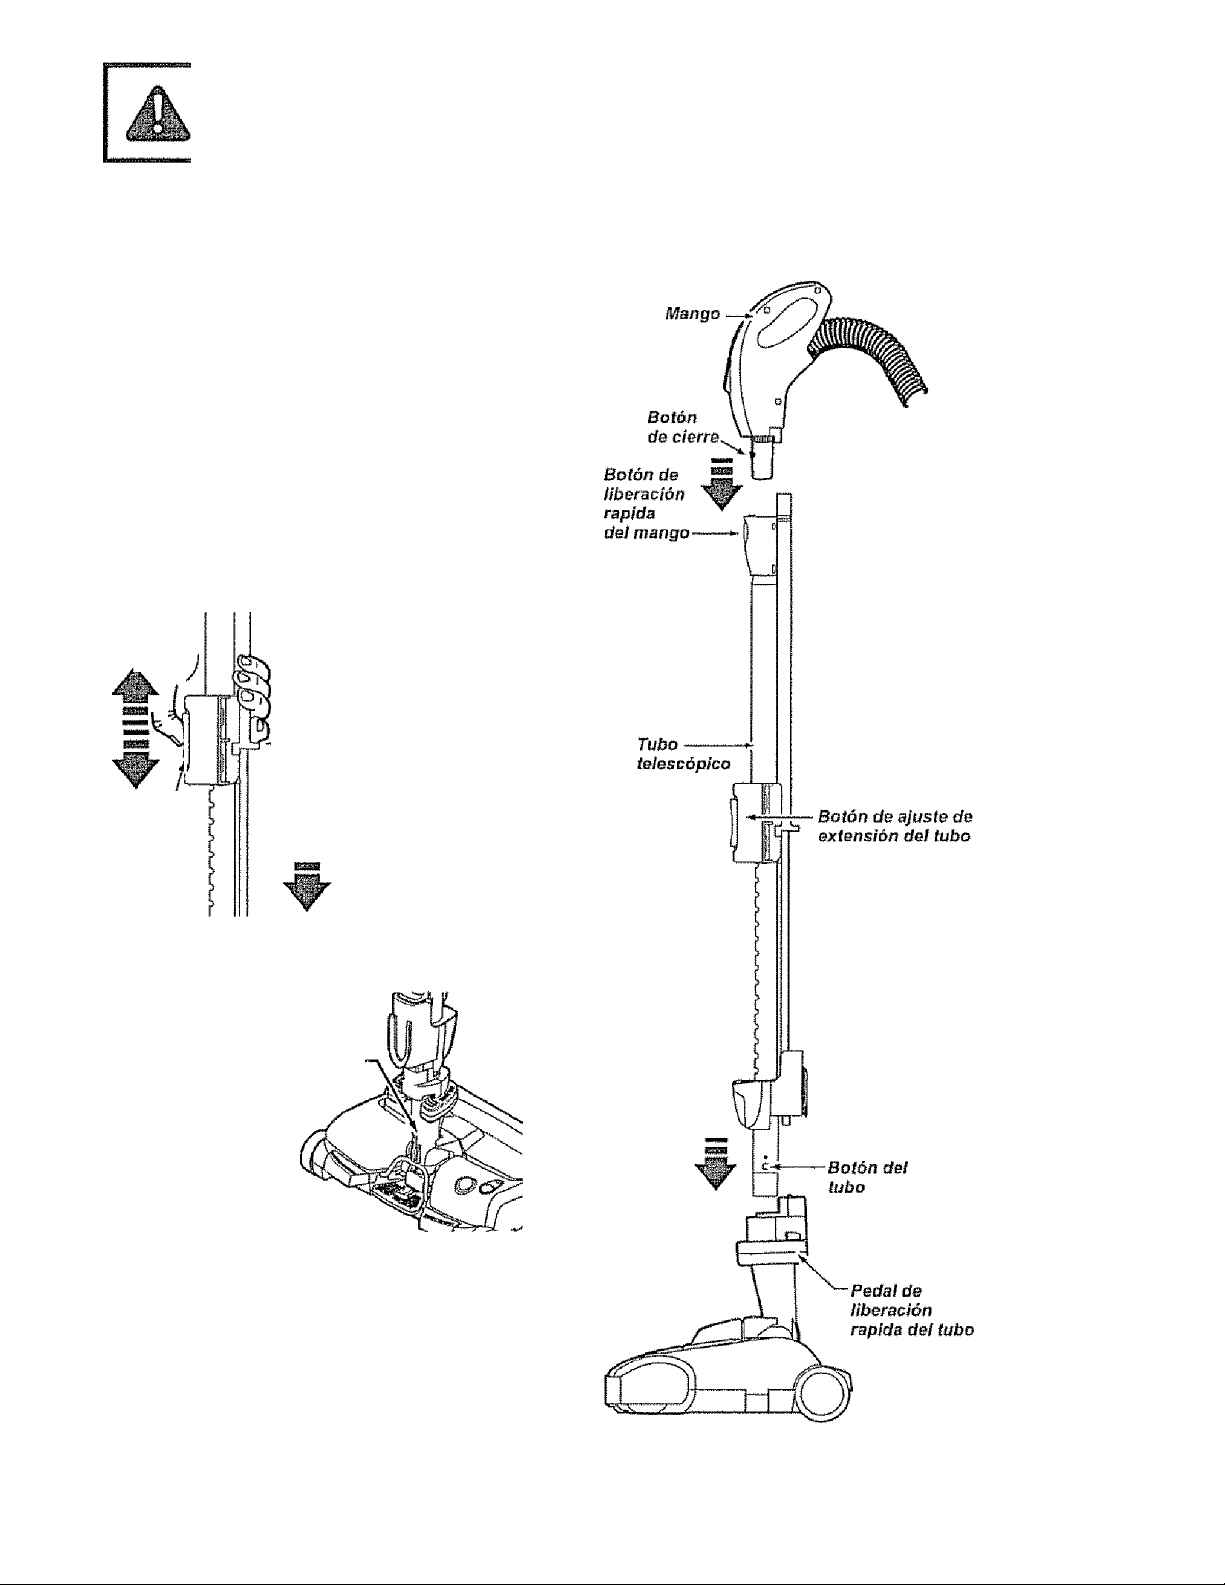
Por favor ponga especial afención a éstos recuadros con alerta de riesgo, Advertencia: Este
información le alertará del peligro da fuego, choques eléctricos, quemadas y lesiones. Cuidado:
Este información Se alertara de peligros como lesiones y daños de propiedad,
INSTRUCCIONES DE ENSAMBLAMiENTO
" I i, t E 1 s t ,V I liv iwir*nklir I i MW I H, I
ADVERTENCIA
¡IT^ImIpV ÜhI i
Peligro ds choque eléctrico
No conecte la aspiradora hasta que termine de
armarla. Ds lo contrario podría causar un
choque eléctrico o lesión corporal.
Antes de armar la aspiradora, chequee ¡a LISTA
DE EMBALAJE en la cubierta separada de la
Lista de Partes para Reparación. Use esta lista
para verificar que ha recibido todas las compo
nentes de su nueva aspiradora Kenmore.
.....
1 i &MKl V 1*^
TUBO TELESCÓPICO
La extensión
r
Control d&
extensión
adjustable
del tubo
-Manténgase
la mano
arriba
esta
lengüeta
del tubo es
ajustable y no
requiere
ensamble.
Para ajustar,
deslice hacía
arriba o abajo
el botón del
tubo y mueva
el tubo superi
or a ía posi
ción deseada
Cuando ajuste la longitud de la vara hay que tener
el PowerMalecon la mano o el pie.
La parte giratoria,
situada en el
PowerMate, le per
mite mover ef mango
a la izquierda para
pasar la aspiradora a
una extensión más
larga debajo de ios
muebles bajos.
Cuando ajuste la
longitud de la vara hay que tener el PowerMatecon
la mano o el pie.
Dispositivo
giratorio
del mango
PowerWlate
Introduzca la vara en la PowerMate hasta que ei
botón del tubo quede lijo en posición
Para quitar: Pise en e! pedal de liberación de ia
vara y jale esta hacia arriba.
Page 31
RECEPTACULO
MANGUERA
1. Afara la tapa del receptáculo.
2. Examine fa bolsa para polvo este Instaiado correcíamante. Consulte las instrucciones de instalación en
la CAR/I8I0 DE LA BOLSA
3. Examine el filtro de seguridad del motor este instal
ado correclamante- Consulte las instrucciones de
instalación en CAMBIO DEL FILTRO DE SEGURI
DAD DEL MOTOR,
C# U I £
Es normal gue la lapa del receptáculo se desprenda
al ser abierta más de lo necesario. Para colocar nue
vamente la tapa, alinee las ranuras de la bisagra, in
sértelas y cierre la tapa
CUIDADO
Nunca debe abrir la capucha del contenedor
estando la tapa abierta. Así se evitará daños a
la capucha del contenedor y/o a la tapa.
AÍíTiciiüa fíj ficjÉítcíñEii
I
» tes L# t cíl í d
de suJeDíón de la
manguera y la ranura
de la cubierta del
recepláculo e intro
duzca la manguera
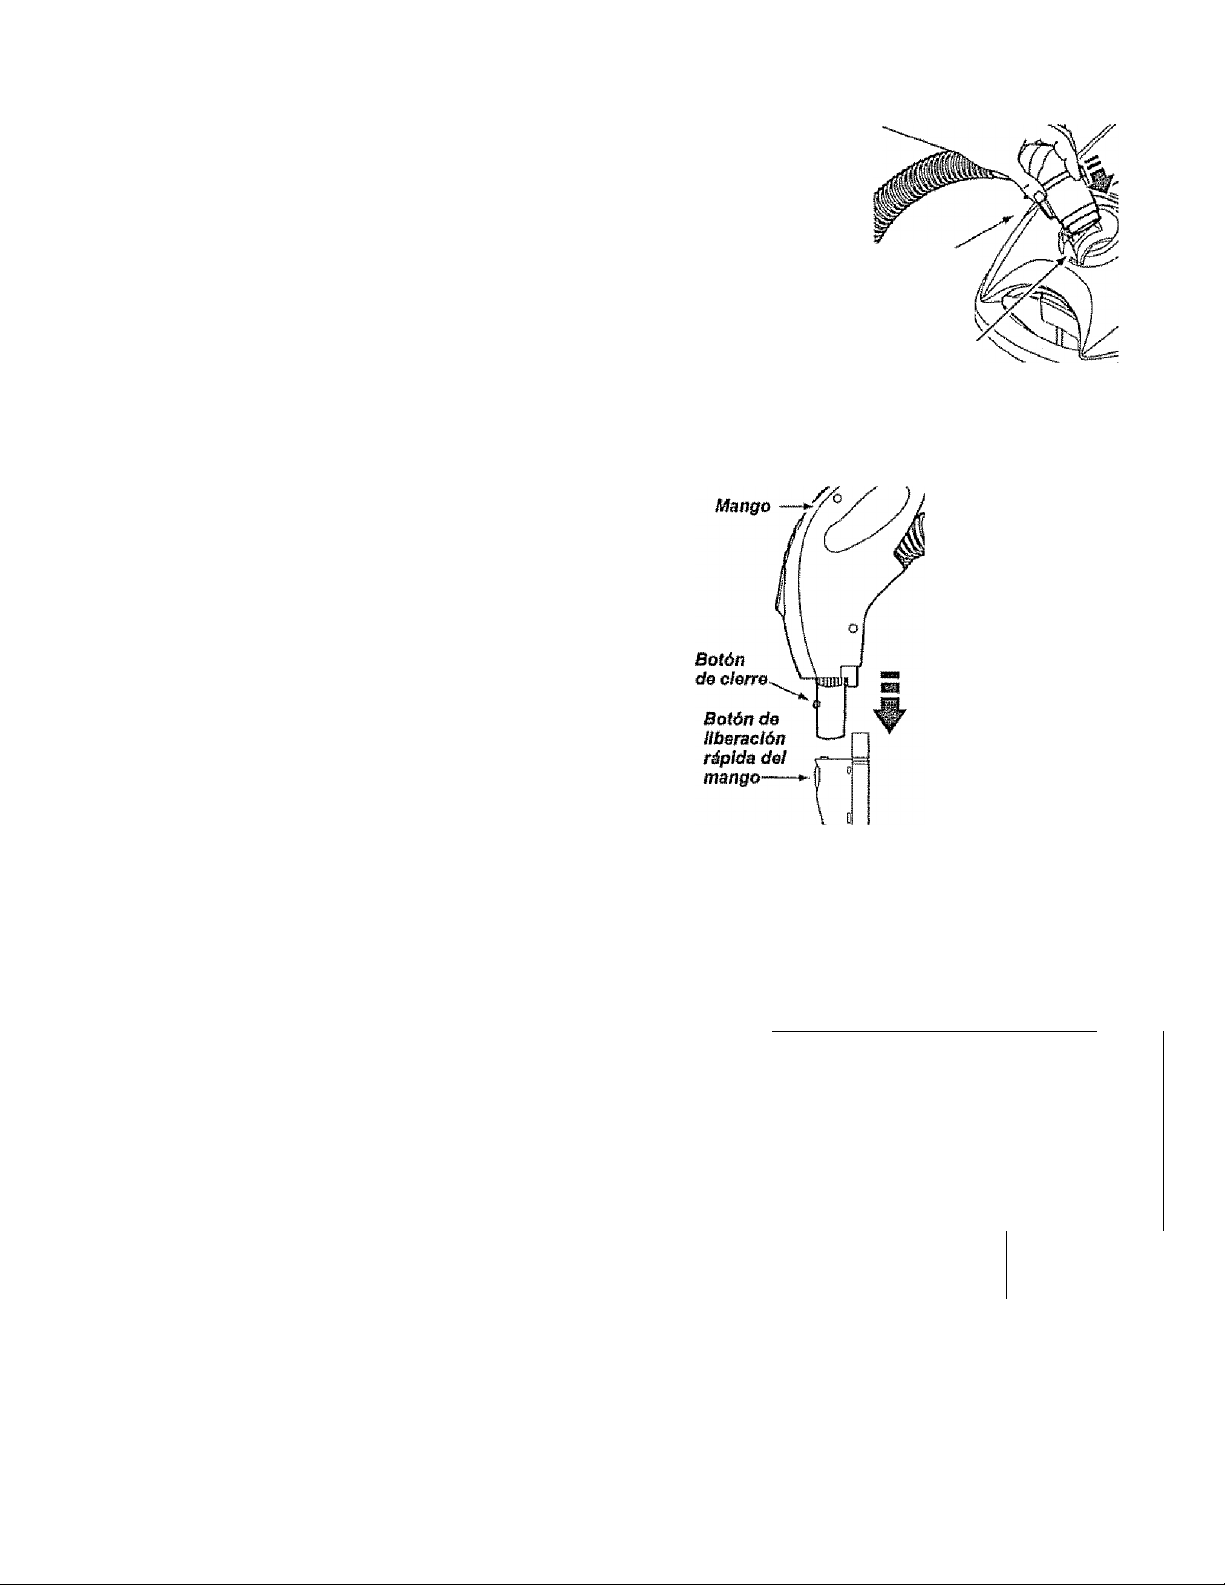
en el receptáculo
hasta que quede fija
Pestaña
de sajeción
de la
manguera
en posición.
Ranura'
Para retirar:
No abra la cubierta antes de desprender la
manguera. Con la cubierta cerrada, tire hacia arriba
la lengüeta de seguridad y jale de la manguera
2. Introduzca el
mango en el tubo
hasta que el botón
quede en posición.
Asegúrese de que la
manguera no esté
torcida.
Para retirar: Oprima
el botón de liberación
rápida del mango
para liberar el mango
y tire del mango hacia
arriba
ALMACENAJE DEL PET POWERMATE
Está aspiradora esta equipada con aímacén
a bordo para e! accesorio Pet PowerMate.
Para instalar:
Abra ia cubierta de almacenaje del Peí
PowerMate. Inserte e! Pet PowerMate, pre-
sióneio en su lugar hacia abajo, y cierre la
cubierta con seguridad.
Para quitar:
Abra la cubierta de aimacenaje. Levante el
Pet PowerMate de su lugar utilícelo como
sea necesario (véase ACCESORIOS y
CUADRO DE USO DE LOS
ACCESORIOS).
Para Guardar: Para prevenir la prectón de la mangua
mientras se guarda, desuna la mangua del tubo de la
aspiradora. Guarde la magua en una posición
enrollada y flojamente de tal manera que la tapa de la
mangua no se estíre
/— Almacenamiento
f para Pet PowerMate
iteli
N
iiiiji
ó:
* i_a
:v
I "
Page 32
INSTRUCCIONES DE OPERATION
A ADVERTENCIA
Peligro de lesión personal y daño al
prodyclo
• SIEMPRE apague ante de desenchufe.
El cordón eléctrico se mueve
rápidamente durante ei enrollamiento.
Mantenga alejados a los niños y
asegure espacio libre suficiente para
evitar lesiones personales al enrollar
el cordón.
NO use ios enchufes localizados sobre
ios muebles. Los objetos cercanos
podrían resultar dañados*
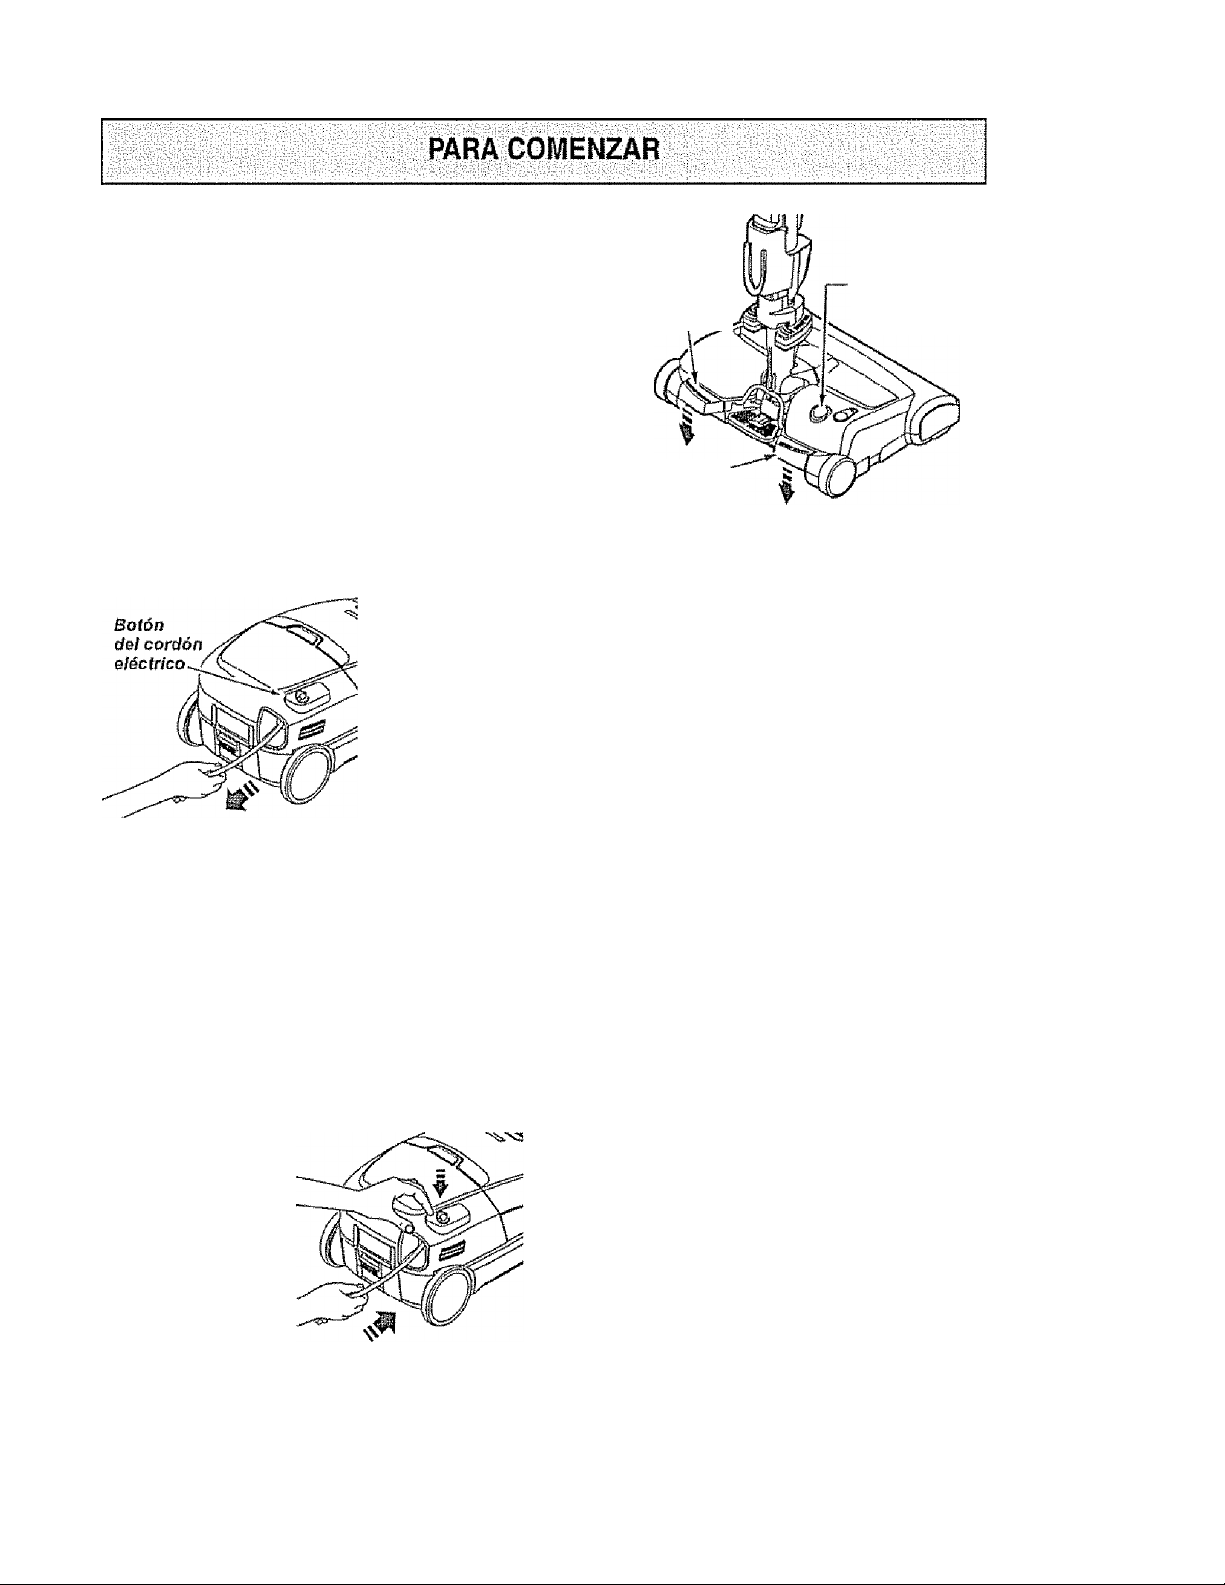
I.Tire del cordón
para sacarlo dei
receptáculo hasta
tener la longitud
deseada. El cor
dón nfi "íp p*nrf>”
^Wi I I iv/ w w> Wf I< W
Hará hasta que
oprima el bolón
para enrollarlo.
NOTA: Para reducir el riesgo de choque eléctrico,
esta aspiradora cuenta con una clavija polarizada,
uno de los contactos es más ancho que el otro. La
clavija sólo puede introducirse de una manera en e!
enchufe. Si la clavija no cabe bien en e! enchufe,
inviértala. Si aún no cabe, llame a urr eleclrlcista
para que instale un enchufe correcto, No altere la
clavija de ninguna manera.
2, Conecte el cordón eléctrico polarizado en un
enchufe de 120 voltios que se encuentre cerca del
piso.
Pedal da salacción
de nivel de pelode la
alfombra
3, Baje el tubo desde la posición vertical pisando el
pedal de liberación de! mango (HANDLE
RELEASE).
CUIDADO
NO deje ia PowerMate funcionando en posición
vertica! en un lugar durante ningún espacio de
tiempo: se puede dañar la alfombra.
4, Seleccione una altura de pelo de la alfombra
usando el pedal pequeño ubicado en la parte poste
rior de la PowerMale. El nivel de pelo ia alfombra
se muestra en el Indicador. Consulte SUGEREN
CIAS SOBRE EL AJUSTE DE NIVEL DE PELO DE
LA ALFOMBRA.
Atención: Refiérase a las recomendaciones del fab
ricante para limpiar su alfombra. Algunas alfombras
mas delicadas pueden requerir el uso de ia aspi
radora con el agitador PowerMate desconectado
para prevenir que la alfombra sea dañada.
Psdal ds
llbetacfón
dal manga
indicador do
nival da palo
de la alfombra
Para enrollar: Apagué
y desconecte la
aspiradora. Sujete el
enchufe mientras
enroíía el cordón para
impedir daño o lesión
corporal por ei movi
miento del cordón
Oprima e! control para
botón el cordón
eléctrico con ia mano
o con ef pie.
Page 33
CONTROL ELECTRONICO DE TACTO
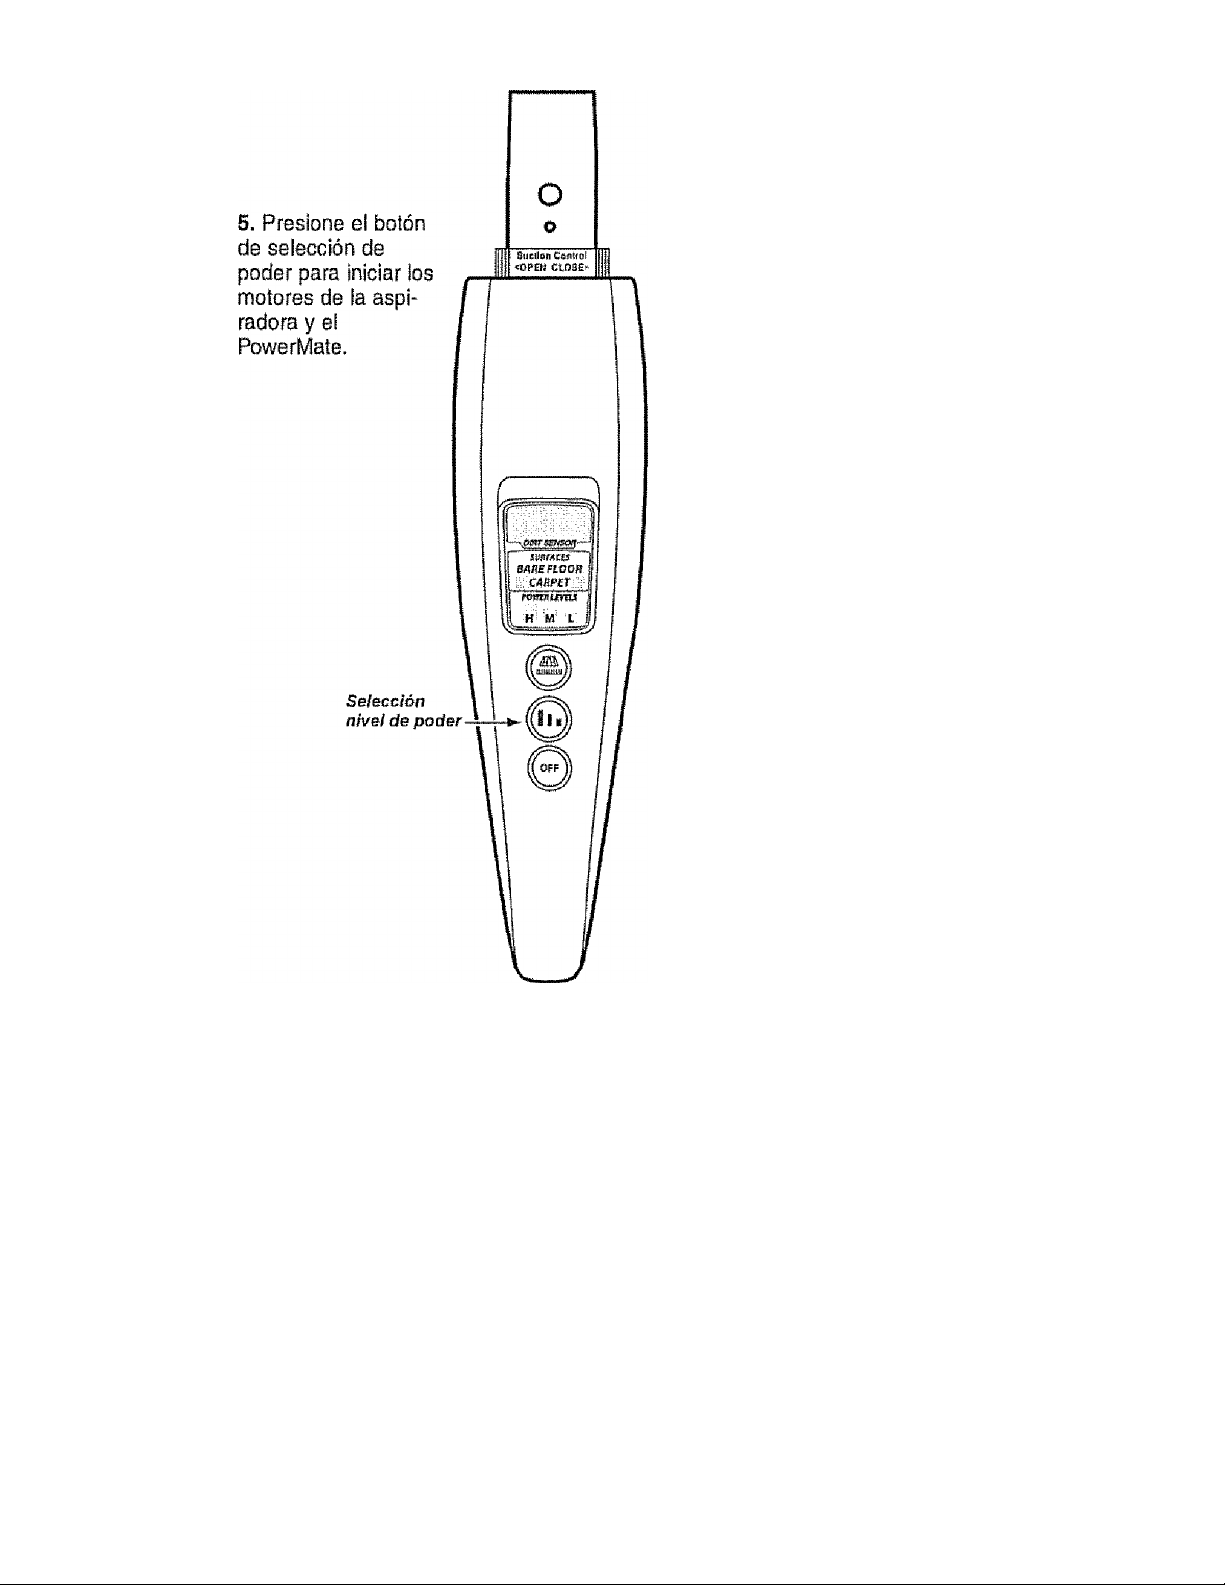
Selección Nivel de Poder - inicia la
aspiradora y e! PowerMate. Este botón
©
cambia ios diferentes niveles de poder
(H) Alto, (M) Medio y (L) Bajo.
El motor de la aspiradora siempre inicia en
poder (H) Alto. Para seleccionar ios
diferentes niveles de poder, presione el botón
nivel de poder.
Niveles de Poder:
H - cuando iluminado, indica que el motor de
la aspiradora esta trabajando en nivel Alto,
M ■ cuando iluminado, indica que ei motor de
la aspiradora esta trabajando en nivel Medio.
L - cuando iluminado, indica que el motor de
la aspiradora esta trabajando en nivel Bajo.
CARPET/BARE FLOOR - encienda el
motor de la PowerMate para limpiar
alfombras y apaga e! motor para
limpiar pisos. c^RPET/BARE FLOOR
modalidad se indicara en {a pantalla
dei mango.
OFF - apaga los motores de la
aspiradora y el PowerMate.
©
NOTA: Cuando la aspiradora es en BARE
FLOOR la luz de! tubo NO enciende debido
que se interrumpe el flujo de corriente.
NOTA: La pantalla en el mango de la
manguera puede tener una película
protectora. Esta película puede ser
removida
ip’i
I ’ I
i í *1, «y 1
Page 34
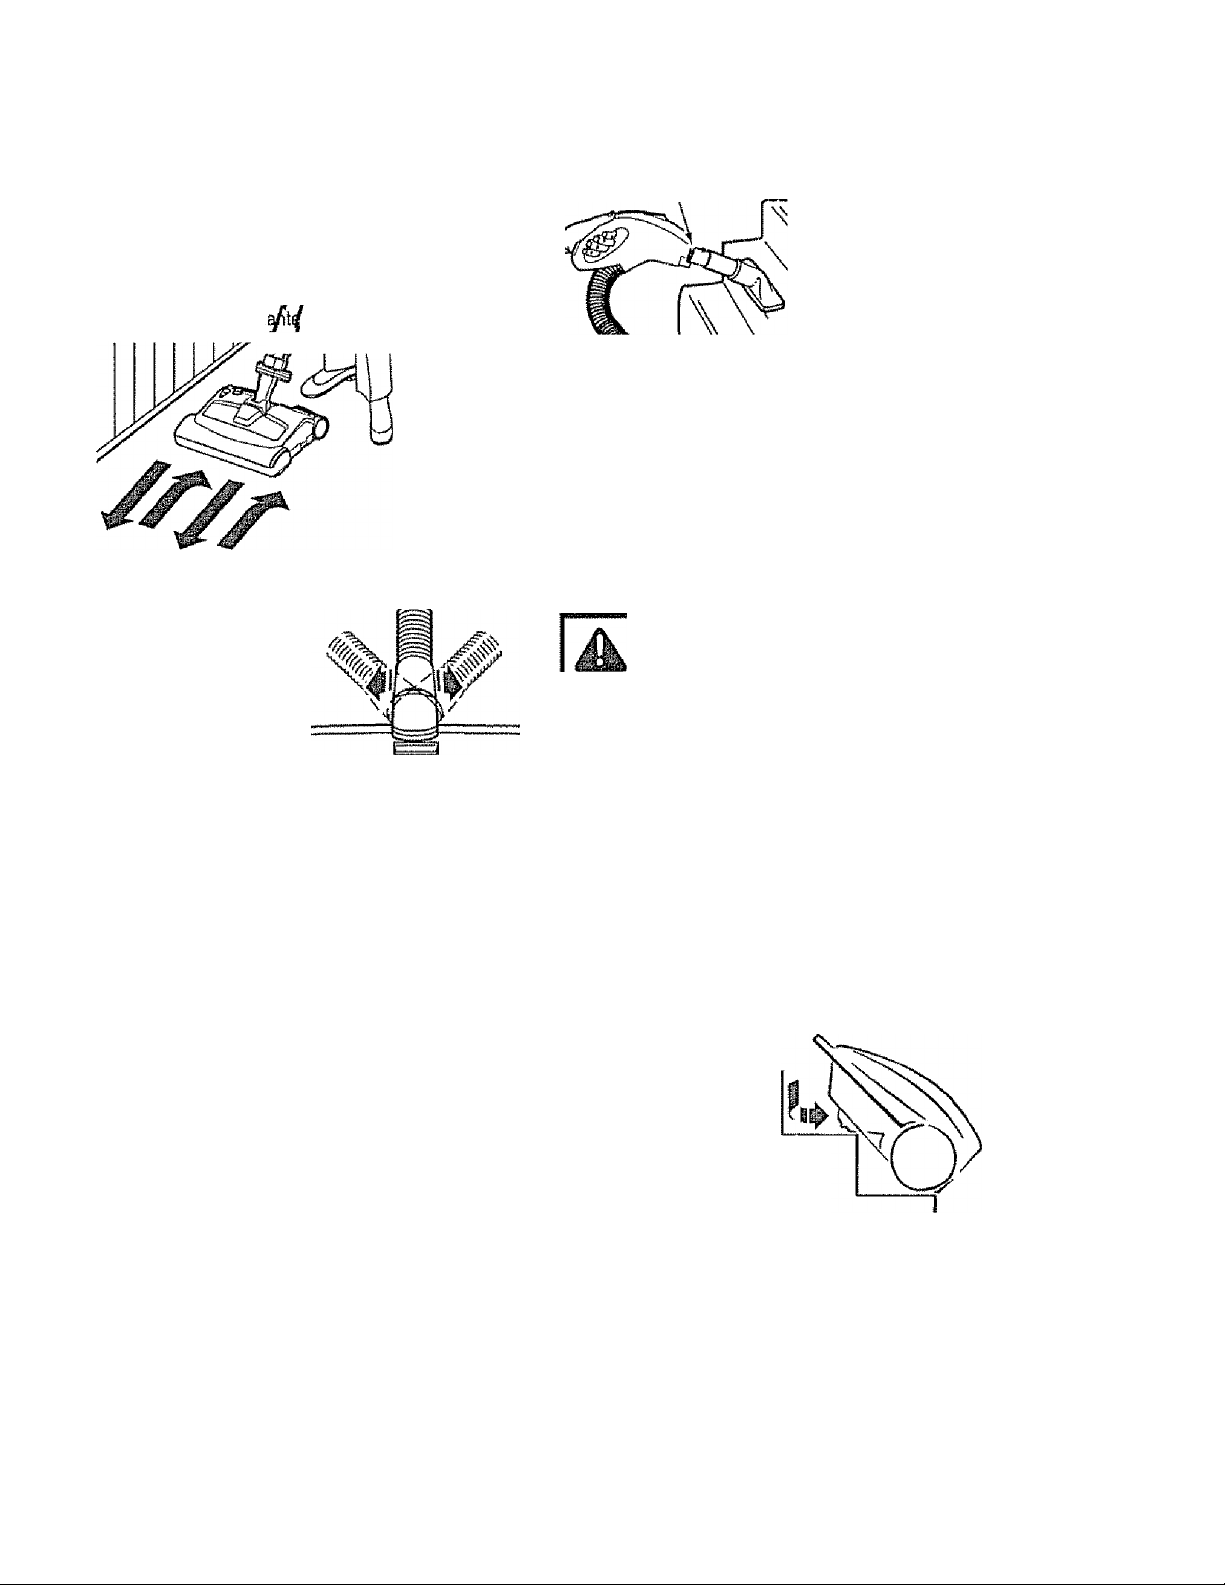
SUGERENCIAS PARA ASPIRAR
Estilo de limpieza sugerido.
Para obíener la me|or acclónT^ limpieza se reco
mienda empujar ia PowerMihí en dirección directa
mente opuesta a usted y mmB. en línea recia, Al
final de cada pasada de ríoreso, cambíe ia dirección
de !a PowerMale hacia lyaguienfe sección a limpiar.
Continúe asi a través d/l/da la alfombra de una
manera lenta y desliz
NOTA: ias
pasadas
Tapidas y
jalonadas no
logran una
limpieza
completa.
El dispositivo giratorio de
la manguera permite que
ésta gire sin necesidad
de mover el receptáculo.
Esto es muy útil para
limpiar en áreas peque
ñas, Asegúrese de que
la manguera no esté tor
cida antes de jaiar e!
receptácuio.
CUIDADO
I V#wi
Control de
aspiración—\
Los escalones alfortt'
brados requieren lim
pieza periódica. Use ei
Nivel de Poder en
HIGH |ALTO) y cierre
por completo el control
de aspiración para
lograr los mejores
resultados de
limpieza,
^ Qy g |^1*g QI ^
Peligro de lesión personal
Tenga cuidado si coloca el receptáculo
sobr0 bscbIohbs^ Sí sg podrís CBUSSí*
lasíóri personal o daño a la propiedad.
CUIDADO
Peiigro de lesión personal y daño al
producto
No jale de la manguera para mover la
aspiradora de un escalón al siguiente.
Guando termine de limpiar una área use
la manija en la aspiradora para moverla
a otro lugar para continuar la limpieza.
Peligro de lesión personal y daño al
producto
Tenga cuidado si el PowerMate y la manguera
se dejan en posición vertical pues peuden
caerse fácilmente. SI se voltean peude haber
daño de propiedad.
ADVERTENCIA
Peligro de lesión personal y daño ai
producto
• No atropelle el cordón eféctrlco con la
PowerMale. Hay un peligro de
lesión corporal o unos daños de
posesiones.
* No tíre del cordón eléctrico de la pared
para desenchufarSo. Si hay danos en
ei cordón eléctrico o el enchufe, hay
un peligro de lesión corporal o unos
danos de posesiones.
El sostén para ia escalera esta situado en el
cuerpo y ayudará a evitar que la aspiradora se
deslice cuando se está utilizado en las escaleras
(véase CARACTERÍSTICAS DE RENDIMIENTO)
NOTA; Asegúrese
nil£k Id
esté descansando
con seguridad
sobre las
escaleras y el
echador está en ia
posición
bloqueada antes de usarla.
Mantenga el paso de aire abierto para lograr
los mejores resultados de limpieza.
Examine de vez en cuando cada una de las
áreas de unión en FUNCIONAMIENTO DE SU
ASPIRADORA para asegurarse de que no
estén bloqueadas. Apagué y desconecté la
aspiradora antes revisar.
10
Page 35
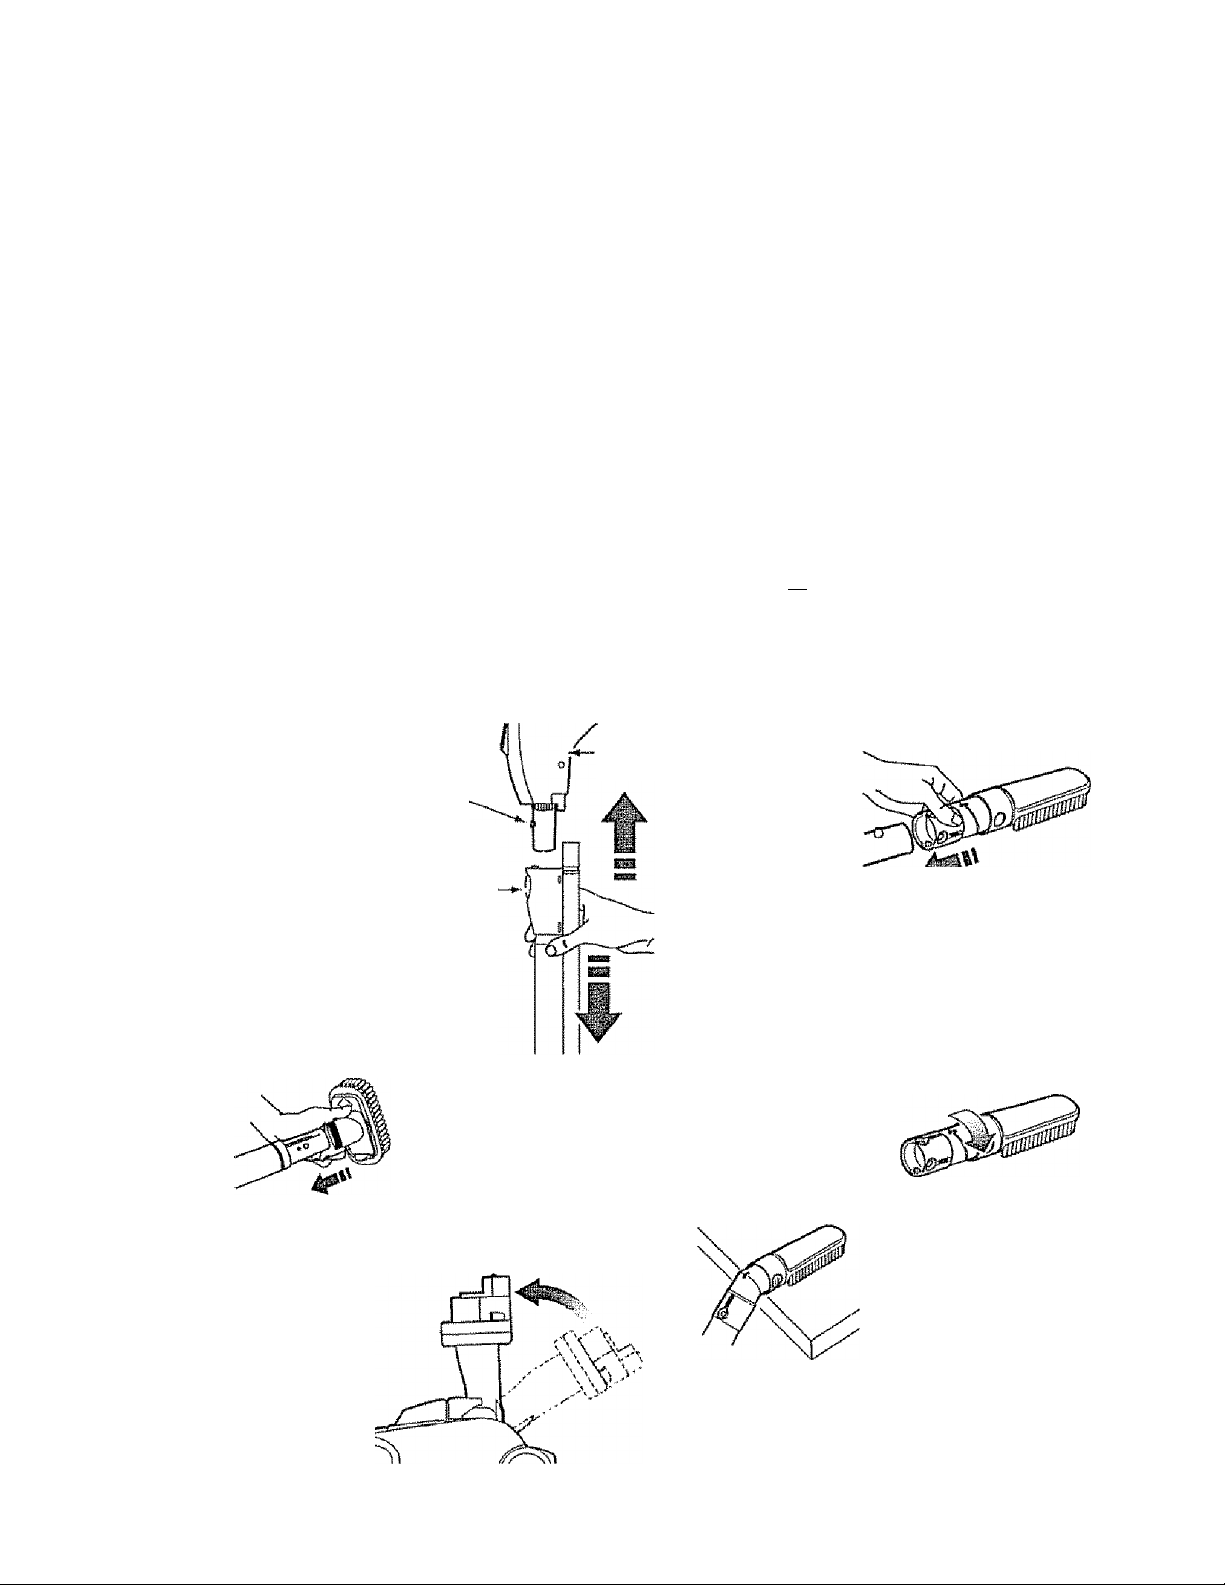
SUGERENCIAS SOBRE EL AJUSTE DE NIVEL DE PELO DE LA ALFOIVIBRA
Use e! ajuste XLO (bajo) para obtener !a mejor lim
pieza a fondo. Por otra parte, quizás se requiera ele
var el nivel para facilitar algunas tareas, como por
ejemplo cuando se trata de tapetes y algunas alfom
bras de pelo largo, y para impedir que la aspiradora
se apague. Se sugieren los siguientes ajustes:
ACCESORIOS
A CUIDADO
NO instale ni retire eí mango ni los tubos
cuando la aspiradora esté encendida. Esto
podría causar chispas y dañar los contactos
eléctricos o control electrónico.
ACCESORIOS DEL MANGO
NOm: St tiene
instalada la
PowerMaie, apague
la aspiradora antes
de quitar e! mango
de los tubos.
1. Oprima el faoíon
de liberación rápida
del mango para
liberar el mango y
tire del mango
hacia arriba,
Boión efe
cierre.
Botón de
iiberactón
ràpide
dei mango
2. Desiiea el accesorio
deseado con firmeza sobre
8i mango. Consulte la
CUADRO DE USO DE
LOS ACCESORIOS
Mango
HI - Pelo muy largo y suelto, tapetes, alfombras
muy aGoJinadasMED - Pelo mediano a largo
LO - Pelo corto a mediano.
XLO - La mayoría da las alfombras y pisos
descubiertos
UM
rw
-Peda/de
liberación
rápida dei
Y
3. Coloque el
accesorio deseado
sobre eí tubo. Con
sulte la CUADRO
DE USO DE LOS
ACCESORIOS
tubo
2, Pise el peda! de
liberación rápida de!
tubo y tire del tubo
hacia arriba para
desprenderlo de la
PowerMaie
CEPILLO PARA CONTORMO
El cepillo para contorno se puede conectar
en el mango o en e! tubo para limpiar
lugares elevados o en muebles como r
gabinetes o estanterías. I
iSl
1
Gire e! cepillo
para contornos y
asegúrelo en su
lugar.
■Y,
ÿ:
•j .
ACCESORIOS DEL TUBO
1. Para retirar
ios tubos de la
PowerMaie,
coióquelos en
la posición ver
tical de blo
queo.
2. Conecte e! cepillo
para contornos ai
mango o al tubo.
11
Page 36
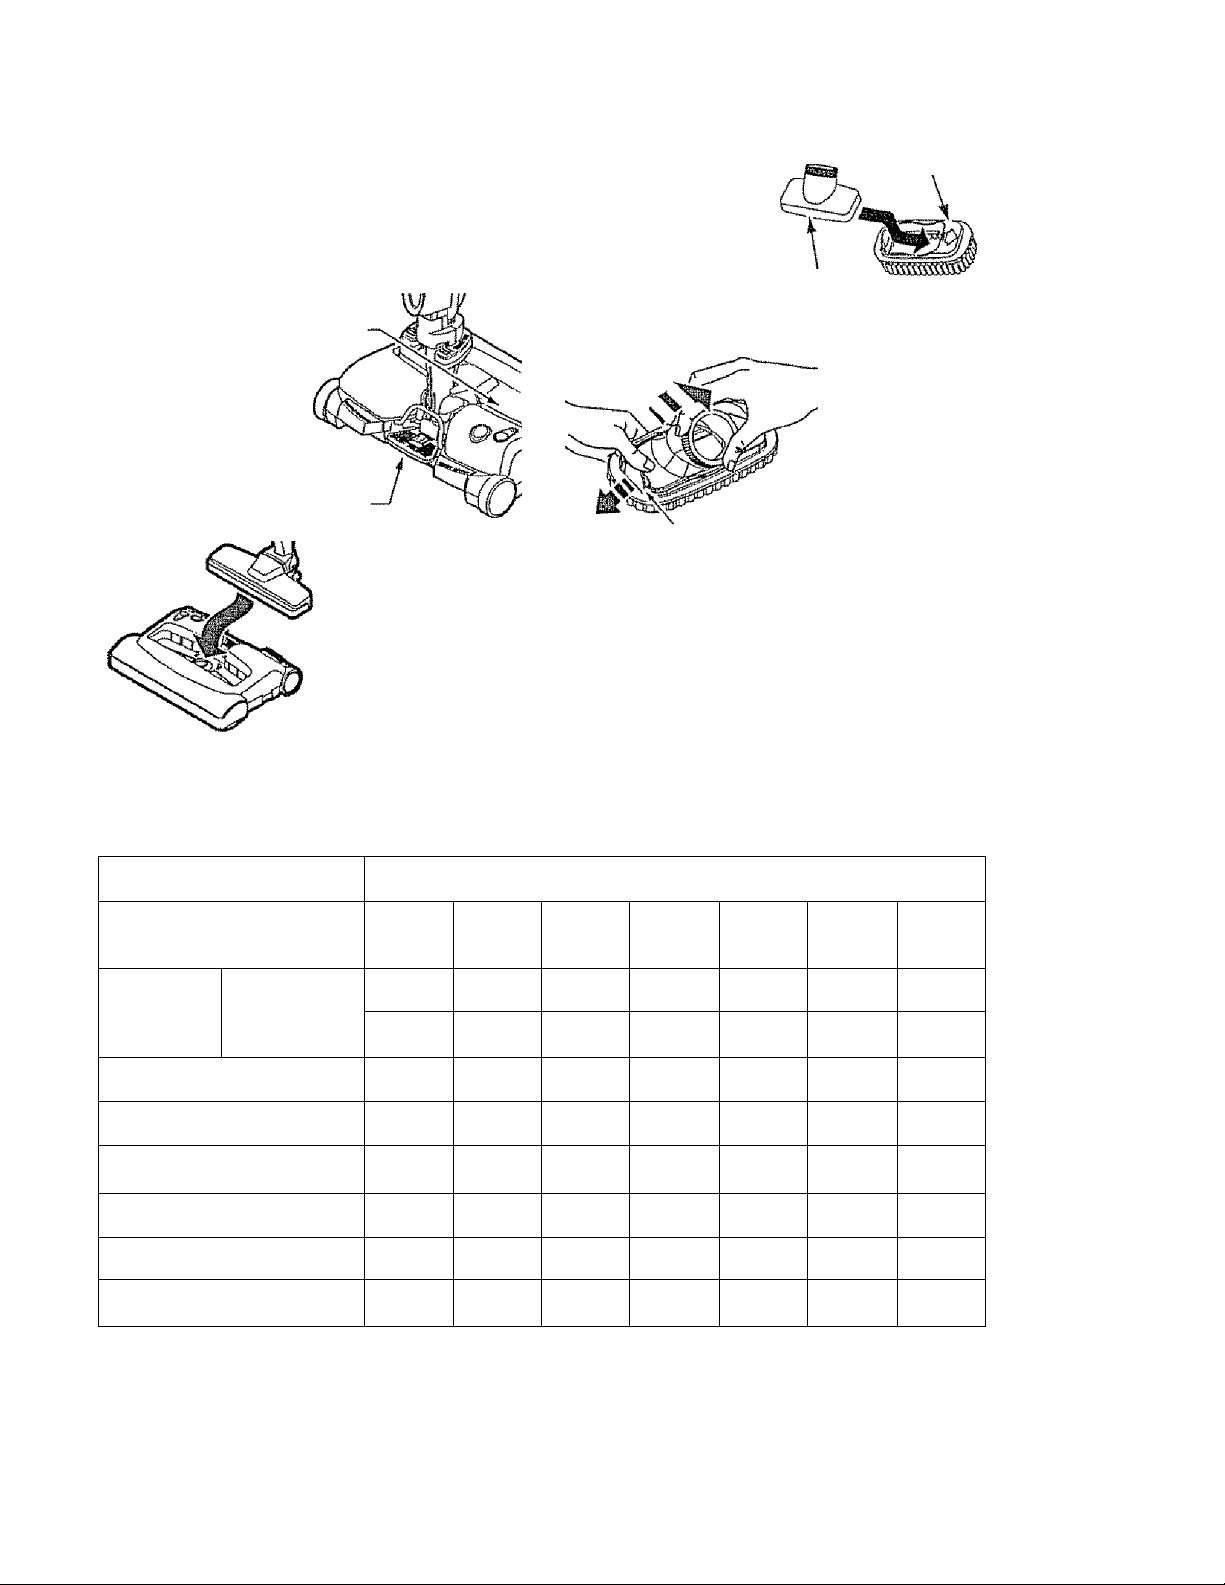
CEPILLO PARA PISO DESMONTABLE
CEPILLO PARA SACUDIR
ADVERTENCIA
Peligro de choque eléctrico
Para reducir el riesgo de choque elétrico ~ NO
USE su aspiradora sobre superficies mojadas.
Para desmontar
el cepillo para
pisos presione
el pedal en el
PowerMate.
Levante el
cepillo para
pisos fuera dei
PowerMate,
espillo
рШГВ píSQS'
Pedal de
liberación
del cepillo
para pisos
Para regresar eí
cepiüo para pisos,
colóqueío sobre el
PowerMate y
presione para
asegurarlo.
Para montar el
cepillo para sacudir
inserte ei cepiilo
para telas dentro de
!a boquilla del
cepillo para sacudir
presione en su
lugar.
Pestillo
Cepillo
para sacudir
Cepillo
para telas
Para quitar,
presionar el
pestillo y
íevaníarse.
CUADRO DE USO DE LOS ACCESORIOS
ÁREA A LIMPIAR
ACCESORIO
Cepillo para Q
Cepillo para
combinación
Herramienta
para hendiduras
Cepillo para contorno
Cepillo para pisos
PowerMate
Handl-Mate Jr.*3 ^
Pet Powe rWI ate ^. 4
1, Siempre limpie los accesorios antes da usar sobre telas.
2- Usar la opción BARE FLOOR de e! control electrónico
3, La HandI-Mate Jr.® y la Pet PowerMate incluyen sus propias instrucciones para uso de accesorios.
4. La Pet PowerMate soio pude ser utilizada en el mango de ia manguera.
sacudir jM
espillo, Л
para telas Ij
Msubies^
cojines^Cortinas^Escalonas
✓ ✓
✓
✓
✓
✓ |/
✓
✓
✓
✓ ✓
1/
✓
Entre
Pisos
tascubisrios
✓ 2
Pisos
alfombrados/
Alíombms
✓
Paradas
✓
✓
12
Page 37

CARACTERISTICAS DE RENDIIWIENTO
ADVERTENCIA
I Iw^ V Ihébc fl K i Imiiii « \i#
Peligro de lesiones personales
Apagué y desconecte siempre la aspiradora
antes de limpiar ias áreas de ia agitador pues
éstos podrían arrancar de manera imprevista.
Ei ho hacerlo, podría resultar en lesiones
personales.
PROTECTOR CONTRA SOBRECARQAS
La PowerMale
cuenta con proteC’
ción incorporada
contra daño det
motor y la correa
en caso de atasca
miento del
agitador. Si el
agitador funciona
más despacio o se
atasca, el protector
de sobrecarga de
la PowerMale se activa y ía luz roja le ^cienc
motor de la aspiradora continuará fincipnando. El
motor del receptáculo continuará f/ncpnando,
Para corregir el problema: Apa/ué/ desconecté ia
aspiradora, limpie la obsíruccióiy y Sspués
presiorre el botón de BELT REfEl/protector de
sobrecarga). Puede necesila^npolígrafo.
Si el problema persiste, buíqu/ un técnico
calificado que haga el sawicw de ¡a aspiradora.
Botón do
BELTRBSET
(Protector contra
sobrecargas)-
LIMPIADOR DÉ ORILLAS
Kive los cepillos limpia-
tes de oriiias a cada
’ la’do de la PowerMale.
JPase la PowerMale junto a
tes o junto a los
mufibles^ra ayudar a eli
minar l§¿erra acumulada
en ig^unüas de la alfom-
bri
LL
indicador de rendimiento
India
rem
la bú!^ para polvo, ei filtro de la seguridad del motor
riíanc ItinsircAc: nriciHísac nAr nacirÍHAC Hta hisctitrs
y
VepB FUNCÍONAIVIiENTO DE SU ASPIRADORA.
“ára corregir el problema: Vease ei diagrama
'RECONOCIMIENTO DE PROBLEMAS,
NoílTE?^í^ie que ¡a luz encienda a! usar ios
accesorios po™e e! flujo de aire es reducido por los
accesorios.
PATCATnia TPDIWi Al
r^wr I ImiVw*' i I EÜl ic IV i A\Imu
P
íta aspiradora tiene un protector termal que
se ajusta automáticaineníe para proteger a la
aspiradora del sobrecalentamiento. St una
obstrucción impide el flujo normal da aire a!
motor, 0í protector termal apaga el motor
automáticamente para permitir que el motor se
enfríe a fin de evitar posibles daños a ia
aspiradora.
Para corregir el problema; Apagué y
desconecté la aspiradora para permitir que la
aspiradora se enfríe y que el protector termal pse reajuste. Busque y saque ias j -
obstrucciones, si es necesario. Examine ■
también y reemptaceflimple cualquier •
filtro obstruido. Espere aproximadamente j'
treinta (30) minutos y enchufe la |
aspiradora y voltéela para ver si el «
protector de! motor se ha reajustado. Ei i
protector del motor no se reajustará si no
se ha apagado la aspiradora aun cuando la
aspiradora se haya enfriado.
Cuando ia aspiradora
esté funcionando con
el flujo normal de aire,
e! indicador de
rendimiento está
apagado Se enciende
la luz cuando el flu|o
de aire esté obstruido
Si esto sucede, revise
fot i
^ I
(o; 'i
N—i
i
j
13
Page 38
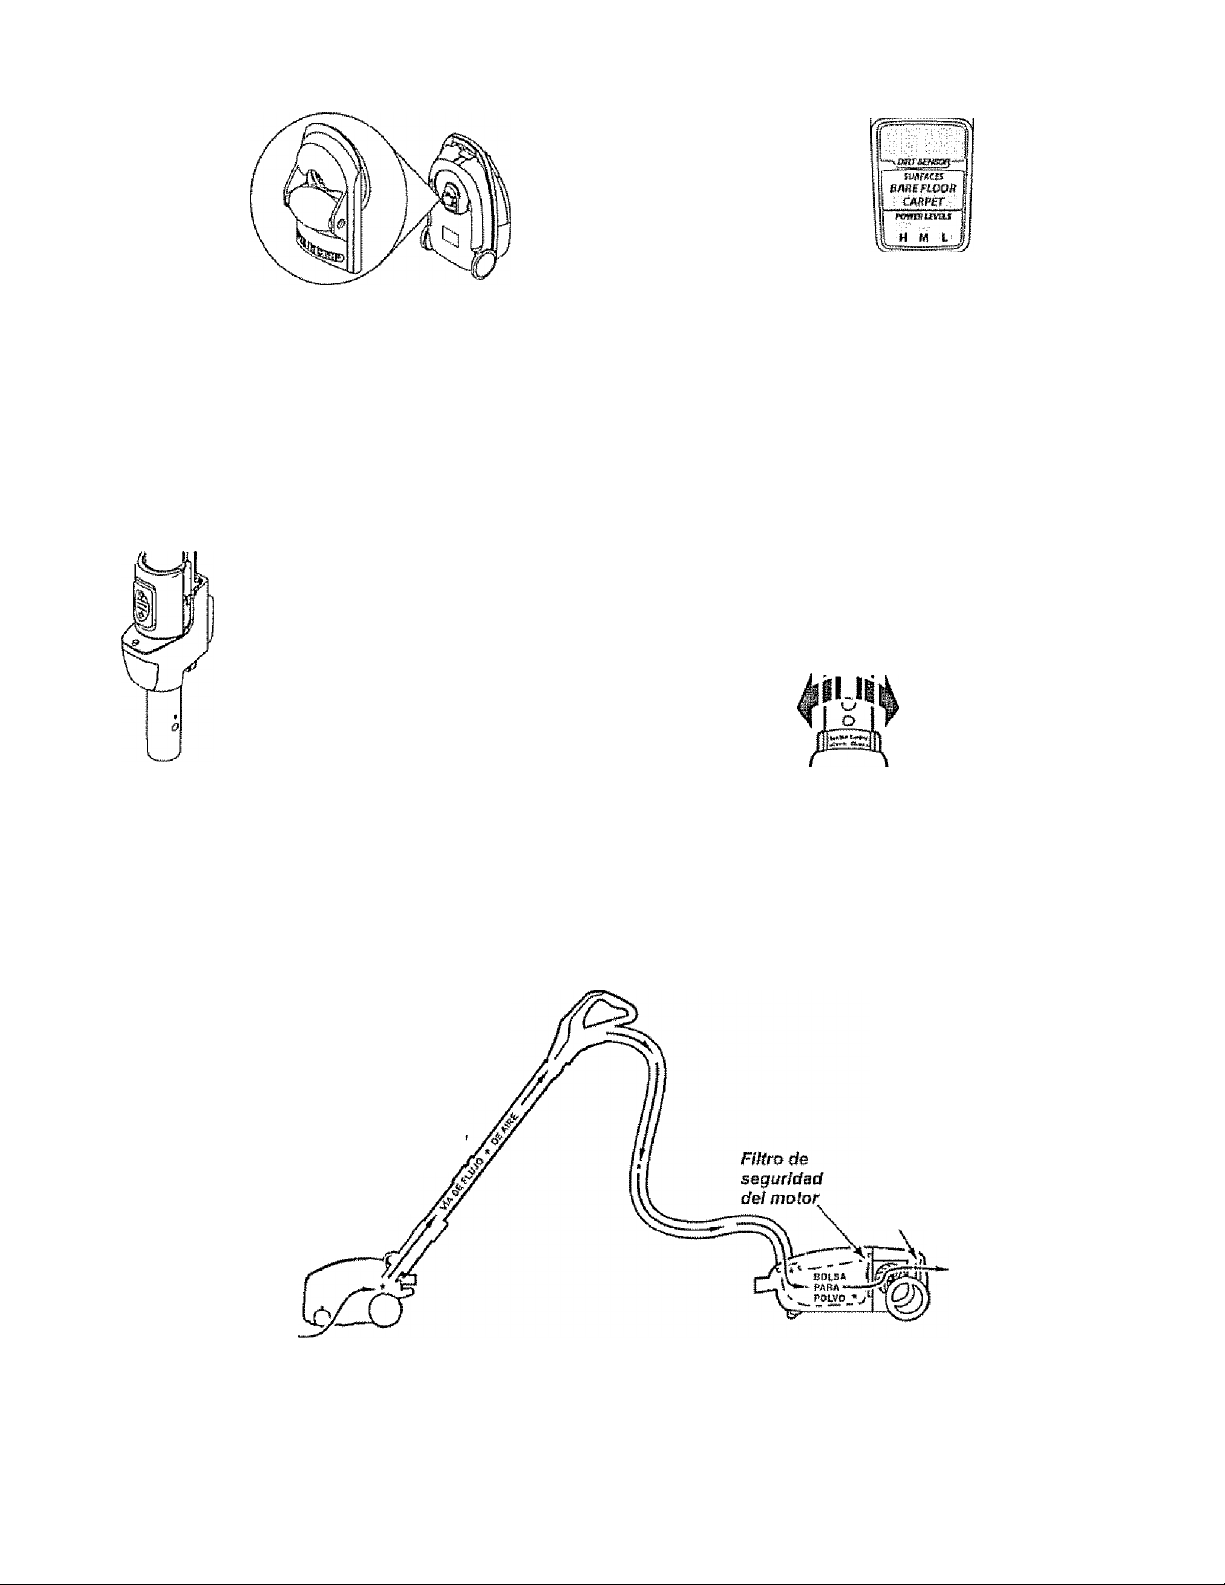
SOSTÉN PARA LA ESCALERA
INDICADOR DE POLVO
Durante la
operación
normal de la
aspiradora
mientras que
está en la
posición
horizontal, ias
ruedas del cuerpo giren libremente 360“.
La característica dei Sosten para la Escalera
permite que las ruedas del cuerpo se traben en
posición cuando la aspiradora gira 25"* da una
CnSÍCiOn hnn/OntRi R VPrtinRl flRTR OIJR ÍR
|„/W CJ bW>w lia 1««/ E BiCmV/í i (£14.1 1,4 V Cirl (I W&4B |4^4,4S U v4Vii^ Ili4
aspiradora descanse con seguridad sobre las
escaleras.
LUZ DEL TUBO
Esta aspiradora asta equipa
con una iuz en e! tubo de
extensión. Esta luz funcionará
solamente cuando la
aspiradora es en modo
CARPET (ALFOMBRA)
(véase PARA COMENZAR)
La luz funcionará cuando está
o no unida a la PowerMate.
la luz se puede utilizar para ía iluminar
Jugares difíciies de afcanzar.
E! sistema de luces del
indicador de polvo se iocaiiza
en si mango, consiste de una
luz roja y una verde.
EN OPERACIÓN
Cuando se utiiiza la aspiradora ias luces
cambiaran, si hay polvo presente y es
aspirado. Mientras la luz roja permanece
encendida, esta indicando que polvo esta
pasando por el mango y la superficie requiere
limpieza.
Cuando ¡a luz indicadora esta en verde, el
sensor no detecta suficiente polvo indicando
que el área no requiere de mas limpieza.
CONTROL DE ASPIRACION
El control de
aspiración le
permite cambiar ¡a
polencia de
aspiración de la
aspiradora
UU|JtíiiUat;iiUÜ Ucl yiUbül Uo la Icid U aiiüiliüia.. L,cx
aspiración se disminuye, para limpiar cortinas y
tapetes ligeros, abriendo el control; para aspirar
muebles y alfombras, si control debe cerrarse para
aumentar la aspiración.
Disminuir
aspiración
HíSil Hís la. a ¡allAíTiHí'ís I o.
Aumentar
aspiración
FÜNClOÑAli/IIENTO DE SU ASPIRADORA
La aspiradora crea succión o aspiración que levanta
la tierra. La tierra es impulsada a través de ¡as vías
de tlujo aíre hasta !a bolsa por una rápida corriente
de aire. La bolsa para polvo permite el flujo de aire,
pero atrapa ía tierra
Para lograr ios mejores resultados de limpieza
mantenga abiertas fas vías de aire. Examine
penodscamente las áreas indicadas con
asteriscos para asegurarse de que no
estén bloqueadas. Desconecte dei
receptáculo de revisarlo
Filtro de
GSC3f)Q
14
Page 39
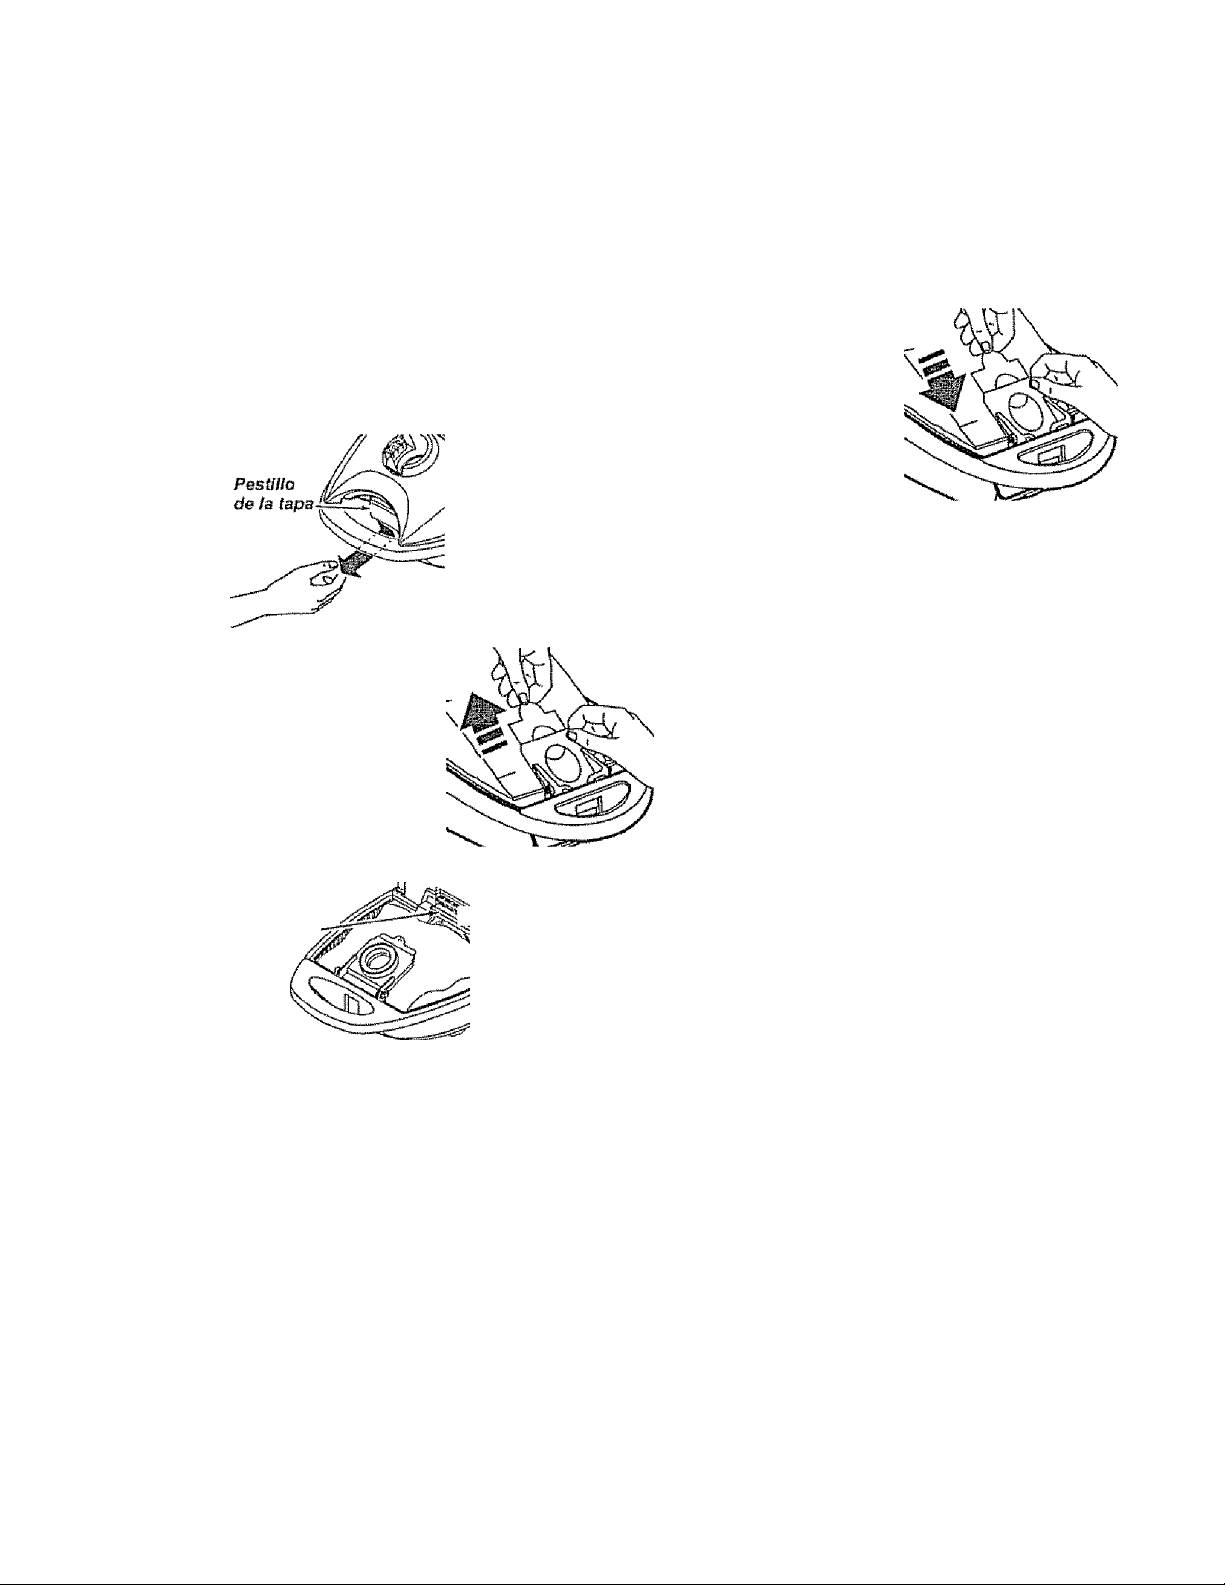
CUIDADO DEL RECEPTÁCULO
CAMBIO DE LA BOLSA
La bolsa debe cambiarse seguido para lograr ¡os
mejores resultados de limpieza El indicador
efectronicode ta boísa o de manguera enciende
cuando se necesita cambiar.
NOTA: Véase PIEZAS Y CARACTERÍSTICAS
para eí número de la boisa.
1. Apagué y desconecté !a aspiradora
2. Quite la manguera
de la aspiradora,
3. Tire del pestillo de
la tapa hacía fuera y
hacia arriba: luego
levante la tapa del
receptáculo.
4. Destrabe la pestaña
de cartón de! montaje
rojo de la bolsa empu
jando hacia afuera y
tirando hacia arriba.
5. Saque la bolsa del
montaje rojo.
NOTA: NO doble ni pliegue el centro del
cartón al instalar la bolsa en las ranuras del
morrtaje de la bolsa.
8. Gire hacia abajo el
soporte para la bolsa
roja y para insertar la
bolsa en las ranuras
enipuje hacia abajo
hasta que las lengüetas
de cartón encierren
seguramente en las
posiciones apropiadas
como se ve en ei diagrama
9. Empuje la bolsa asegurándola dentro de la
cavidad para evitar que sea trabada por la lapa de la
aspiradora.
10. Baje la cubierta del receptáculo y cierre el
pestino
li. introduzca la manguera en el receptáculo hasta
que quede fija en posición
12. Conecte e! cordón eléctrico en la clavija de la
pared.
Filtro do
seguridad
d&t motor-
6. Revise y cambie ei
" filtro de seguridad
del motor, cuando
sea necesario.
7. Eí montaje rojo de !a bolsa se inclinará hacia
adelante después de que retire la bolsa Esto
impedirá que la tapa se cierre antes de instalar una
boísa nueva.
LIMPIEZA DEL EXTERIOR Y DE LOS ACCESORIOS
1. Desconecte ei cordón eléctrico de la clavija de la
pared. NO choree agua sobre la aspiradora.
2, Para limpiar si exterior o reducir la electricidad
estática y acumulación de poivo, [imple ia
superficie exterior de ¡a aspiradora y los
accesorios. Use un trapo suave y limpio, mójelo
en una solución de agua y detergente líquido, y
exprímalo seco. Séquela después de limpiar.
▲ CUIDADO
NUNCA REÜTILICE UNA BOLSA PARA
POLVO. Los materiales muy finos, tales
como desodorantes para alfombras,
talco facial, polvo fino, yeso, hollín,
pelusa de alfombras nuevas, etc., pue*
den atascar la bolsa y causar que se
rompa antes de que esté llena y puede
dañar el motor de la aspiradora. Camble la bolsa más seguido cuando
aspire este tipo de materiales.
A CUIDADO
No use los accesorios si están mojados. Los
accesorios que se utilicen en áreas sucias,
debajo del refrigerador, no deben usarse en
otras superficies sin antes ser lavados. Podrían
dejar marcas.
llU
liti;
j
15
Page 40
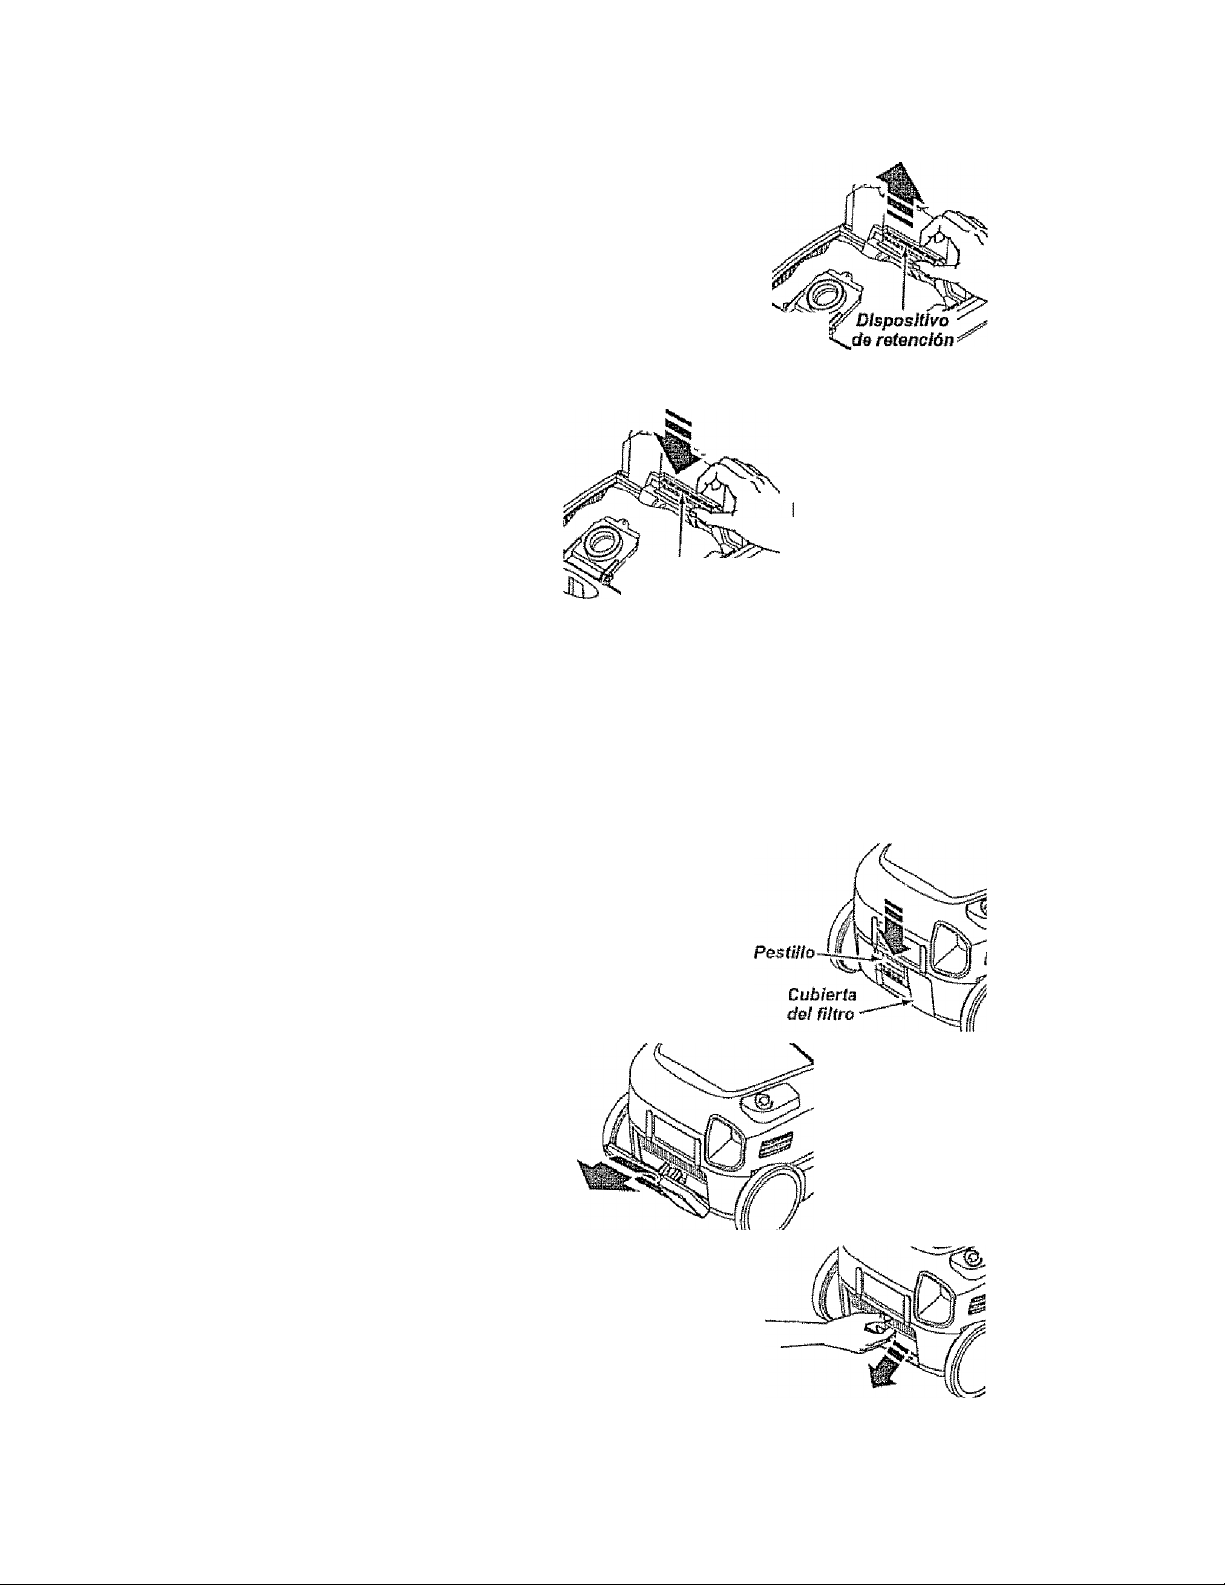
CAMBIO DEL FILTRO DE SEGURIDAD DEL MOTOR
A ADVERTENCIA
Peligro de chogue eléctrico
Apagué y desconecté !a aspiradora. No opere
la aspiradora sin el filtro de seguridad del
motor. Asegéurese de que el filtro esté saco e
Instalado adecuadamente para Impedir que el
motor falle y/o que se produzca un choque
eléctrico.
FILTRO DE SEGURIDAD DEL
MOTOR
^ L. £ OT* FI O 3 *I*/^*T i 0 O
Este {litro se llene que cambiar cuando esté sucio.
Debe cambiarse periódicamente según las condi
ciones de uso. El filtro no se puede lavar pues
perdería su capacidad para atrapar altrapar
polvo.
NOTA: Véase PIEZAS y CARACTERÍSTICAS
para el número del filtro de seguridad dei motor.
1. Para quitar la bolsa, siga ¡as instrucciones en
CAMBIO DE LA BOLSA
2. Levante el dispositivo
de retención de goma y
saque el filtro de seguri
dad como se ve en ei
diagrama.
3. Reemplace el filtro
f^rsn Id (Й1 íf\csfítr*íD К1а1тла
uUii tea aUUCililLrrc;? Uidiiua
en su campo de vista
por correrlo debajo de
las costillas en la
cavidad de la bolsa.,
' w Meta el fiitro para que
quepa por
de gama deDajO dei dispositivo
' de retención de goma.
4. Véase CAMBIO DE LA BOLSA para cambiar ia
bolsa.
CAMBIO DEL FILTRO DE ESCAPE
A ADVERTENCIA
Peiigro de fuego o choque eléctrico
No opere con un filtra de escape bloqueado o
sin ei filtro de escape instalados. No opere sin
la cubierta del filtro de escape instalada.
FILTRO DE ESCAPE
МЕРА
Este cartucho del filtro escape tiene que cambiar
esté sucio. Cambie el filtro cuando el área
superficial esté cubierta por completo. El filtro no
se puede lavar pues perdería su capacidad para
atrapar altrapar polvo.
К1ПТЛ AM-acTs D1P7AC w Г^Л DAf^Tí^DÍCTír^ACS
Nw l/\*Vw3S0 a Iy 1 fc*rílí2í i lL#JrTkW
para ei número del {litro de escape.
1. Presione e!
pestillo hacia abajo
para liberar la
cubierta de! filtro de
escape de la ranura
en la aspiradora.
2. Jale ia
cubierta del filtro
hacia fuera para
removerla de ia
aspiradora.
3. Remover ei filtro
de escape usando la
palanca como se
nuestra.
16
Page 41
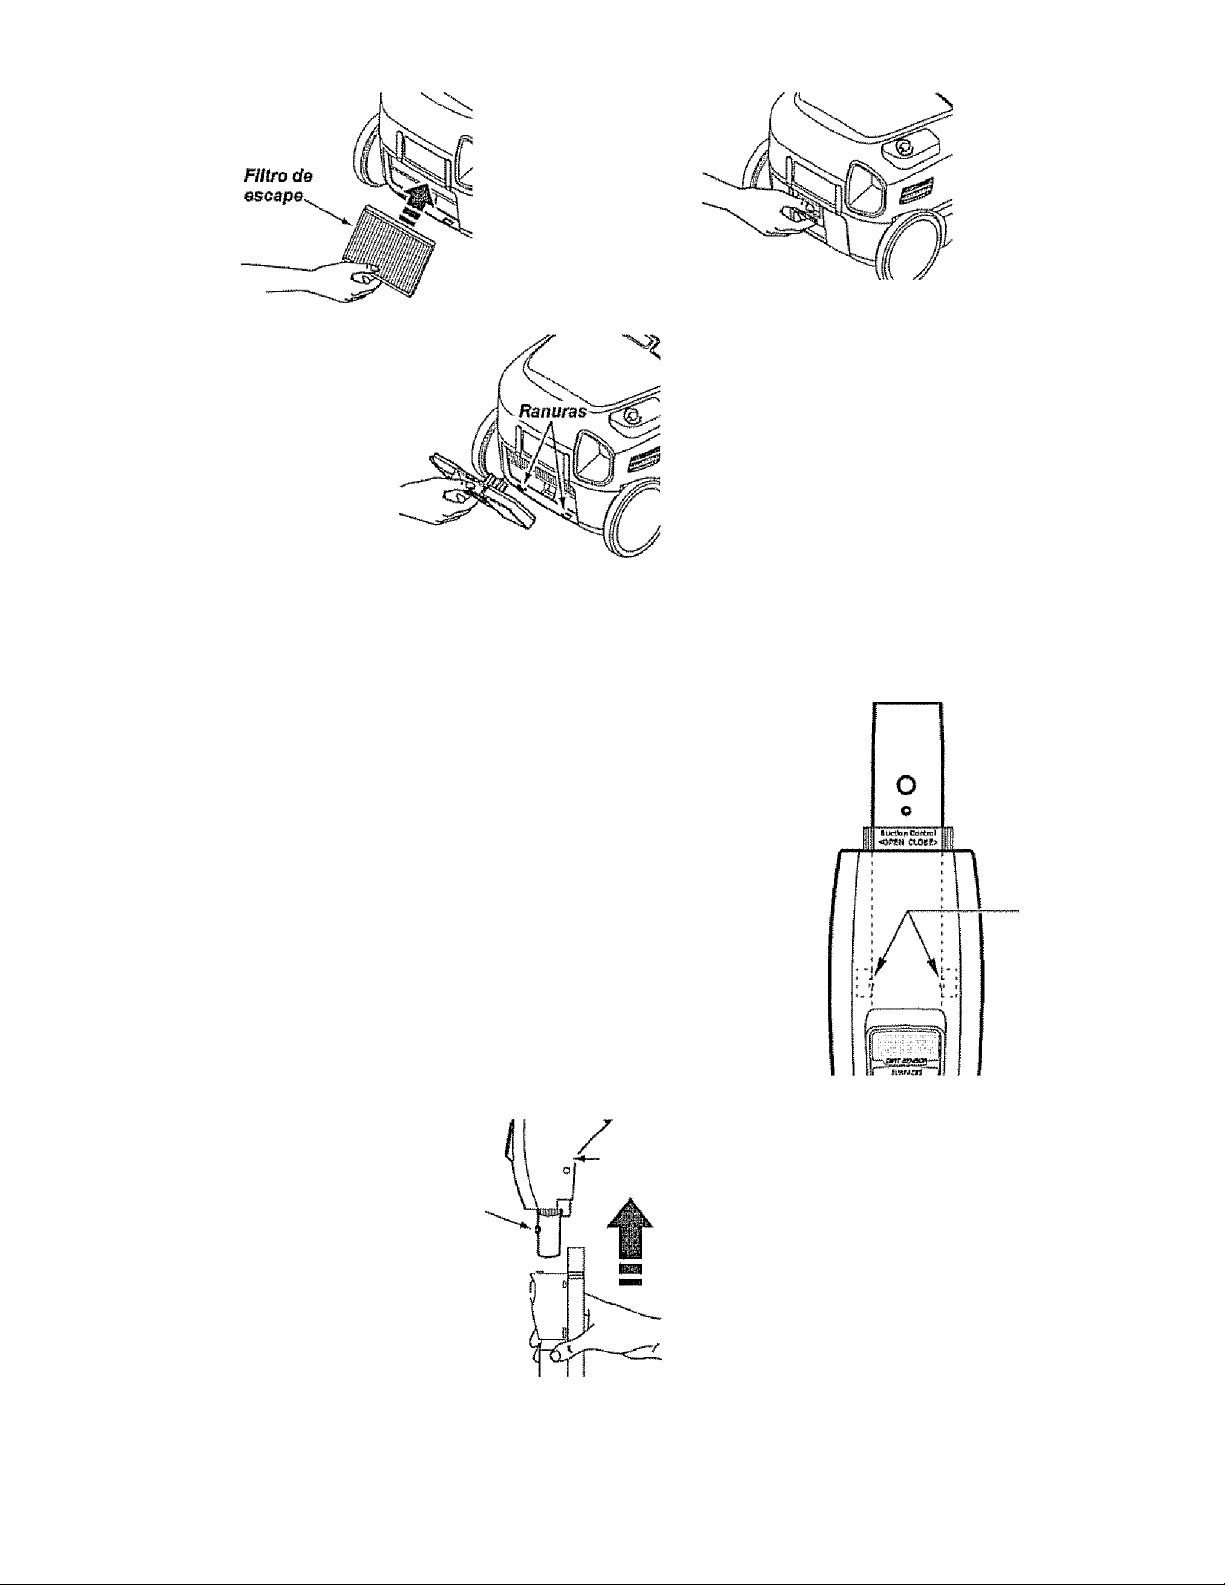
5, Monte la
cubierta del fiítm
de escape
colocando las dos
lengüetas en la
cubierta del filtro
en las ranuras de
la aspirador y gire
en su lugar
4. Reemplace el
cartucho del filtro
del escape.
Coloque el filtro
nuevo en la
aspiradora conei
lado de esponja
en dirección a fa
aspiradora,
7, Suelte el pistilio y confirme que la cubierta
esta segura en su iugar.
DETECTOR DE TIERRA
6, Deslizar el
pesiiiío hacia
abajo para cerrar
ía cubierta dei
filtro Ha ñísoñop
i Ei ii IoICmt W luir
en su iugar
Aunque Sa función de detección de polvo de la
aspiradora Kenmore está diseñada para brindar
muchos anos de funcionamiento interrumpido, e! paso
de polvo a través del sistema de las vías de aire
puede causar una escama en la lente, haciendo que
se encienda y contiríüe encendido e! indicador verde,
sin cambiar nunca a rojo, Cuando esto suceda, se
tienen que limpiar las lentes
CUIDADO
No utilice nunca agua ni solución limpiadora
para limpiar las lentes. El residuo dei agua o
del iimpiador causara que las lentes se cubran
de tierra más rápido, requiriendo limpieza con
mayor frecuencia.
PARA LiMPÍAR LAS LENTES
Manga
1. Retire el mango
oprimiendo el
botón de liberación
rápida y jalando
fuera del tubo.
Botón de
derrs-
Botón da
liberación
rápido
del mango-*-
Approx.
3 pulgadas
(130 mm)
Detectores
de polvo
2. Como se ve en el diagrama ios dos detectores
de polvo están colocados dentro dei mango 5 pul
gadas o 130 mm {Observe ¡as flechas). Los detec
tores deben ser limpiados periódicamente. Para
llegar a los detectores, use un cepio pequeño,
como por ejemplo un cepillo para botelias Cepiüe
cada detector varias veces para eliminar ¡a tierra y
ai polvo
lar
i ÎI
1 >•>
fO’
iiiÜ
17
Page 42
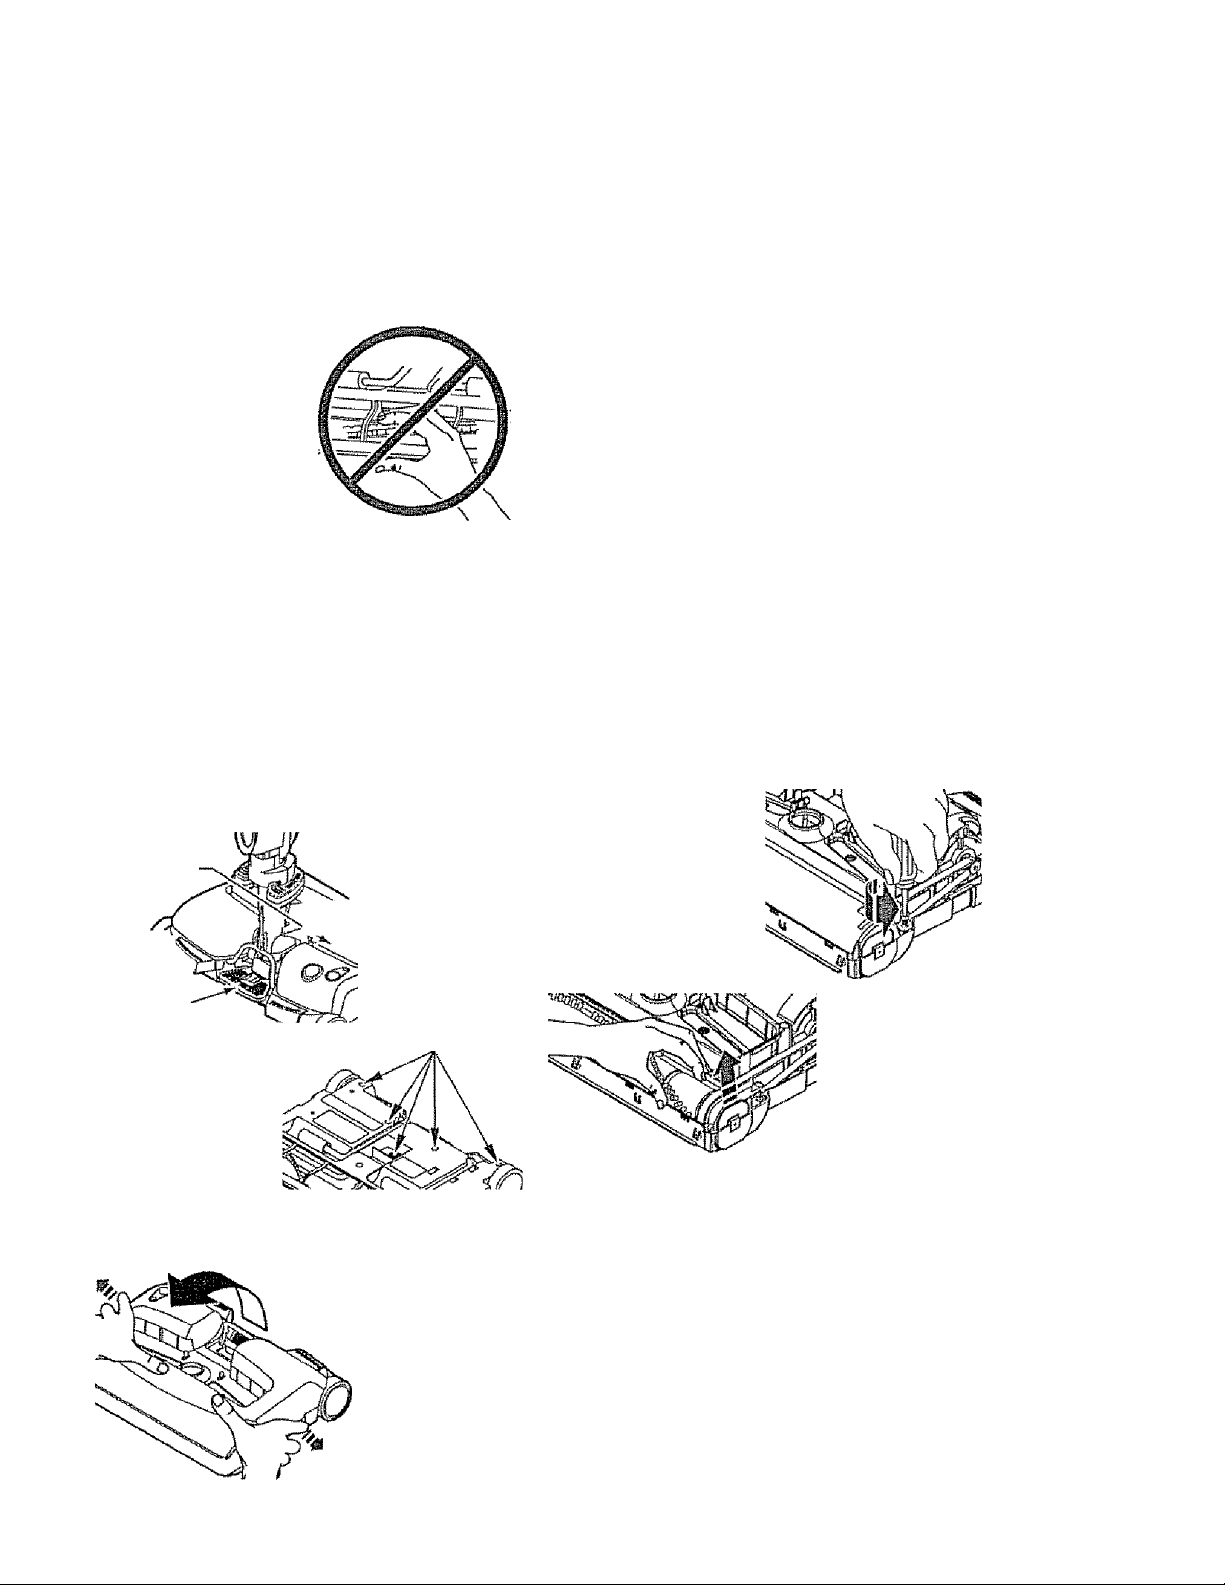
CUIDADO DE LA POWERMATE
Siempre deberán seguirse todas las precauciones de seguridad antes da afectar ai mantenimiento
a la PowerMate,
A CAUTION
¡Partes en movlmlentoí Para reducir el
riesgo de daños corporales, no toque el
cepillo cuando ia
aspiradora está
encendida. El tocar
ei cepillo mientras
que está girando
puede cortar,
contuslonar o
causar otras
ICPwl MI ICrü#«
Apagué y desconecté la aspiradora antes
de dar mantenimiento.
Tenga cuidado al aspirar cerca de niños
pequeños.
CAMBIO DE LA CORREA Y LIMPIEZA DEL AGITADOR
PARA RETIRAR LA CORREA
A ADVERTENCIA
Peligro de choque eléctrico o lesión corporal
Apagué y desconecté la aspiradora antes de
efectuar el mantenimiento a su aspiradora.
De lo contrario podría producirse un choque
eléctrico o causar lesión corporal si la aspira*
dora arranca de manera imprevista.
Cepillo
para pisos
1. Desprenda el
, cepillo para pisos
" de ía PowerMate.
Pedal dd
liberación
del cepillo
para pisos
2. Gire la PowerMale
ri£ir¡3 nrrríCrrQ r Id
pCSitA lu pdiP ití
Tomillos
inferior hacia arriba y
desaiomille cinco (5)
tornillos de la
cubierta,
3. Gire ia PowerMate con la parte superior hada
arriba.
4. Para remover
la cubierta,
sujete ios
pestillos de los
costados y jale
hacia fuera.
5. Desatornille dos (2)
fomiilos de !a cubierta
del agitador y levante la
cubierta del agitador
6. Quite el agitador
y ía correa
ff aci¡3rií3
tj íA es tJ 1¡3¡ *
7. Examine y limpie las áreas de tapa del extremo. En
la ENSAMBLE DEL AGITADOR se proporciona una
ilustración de todo el ensamble del agitador
18
Page 43
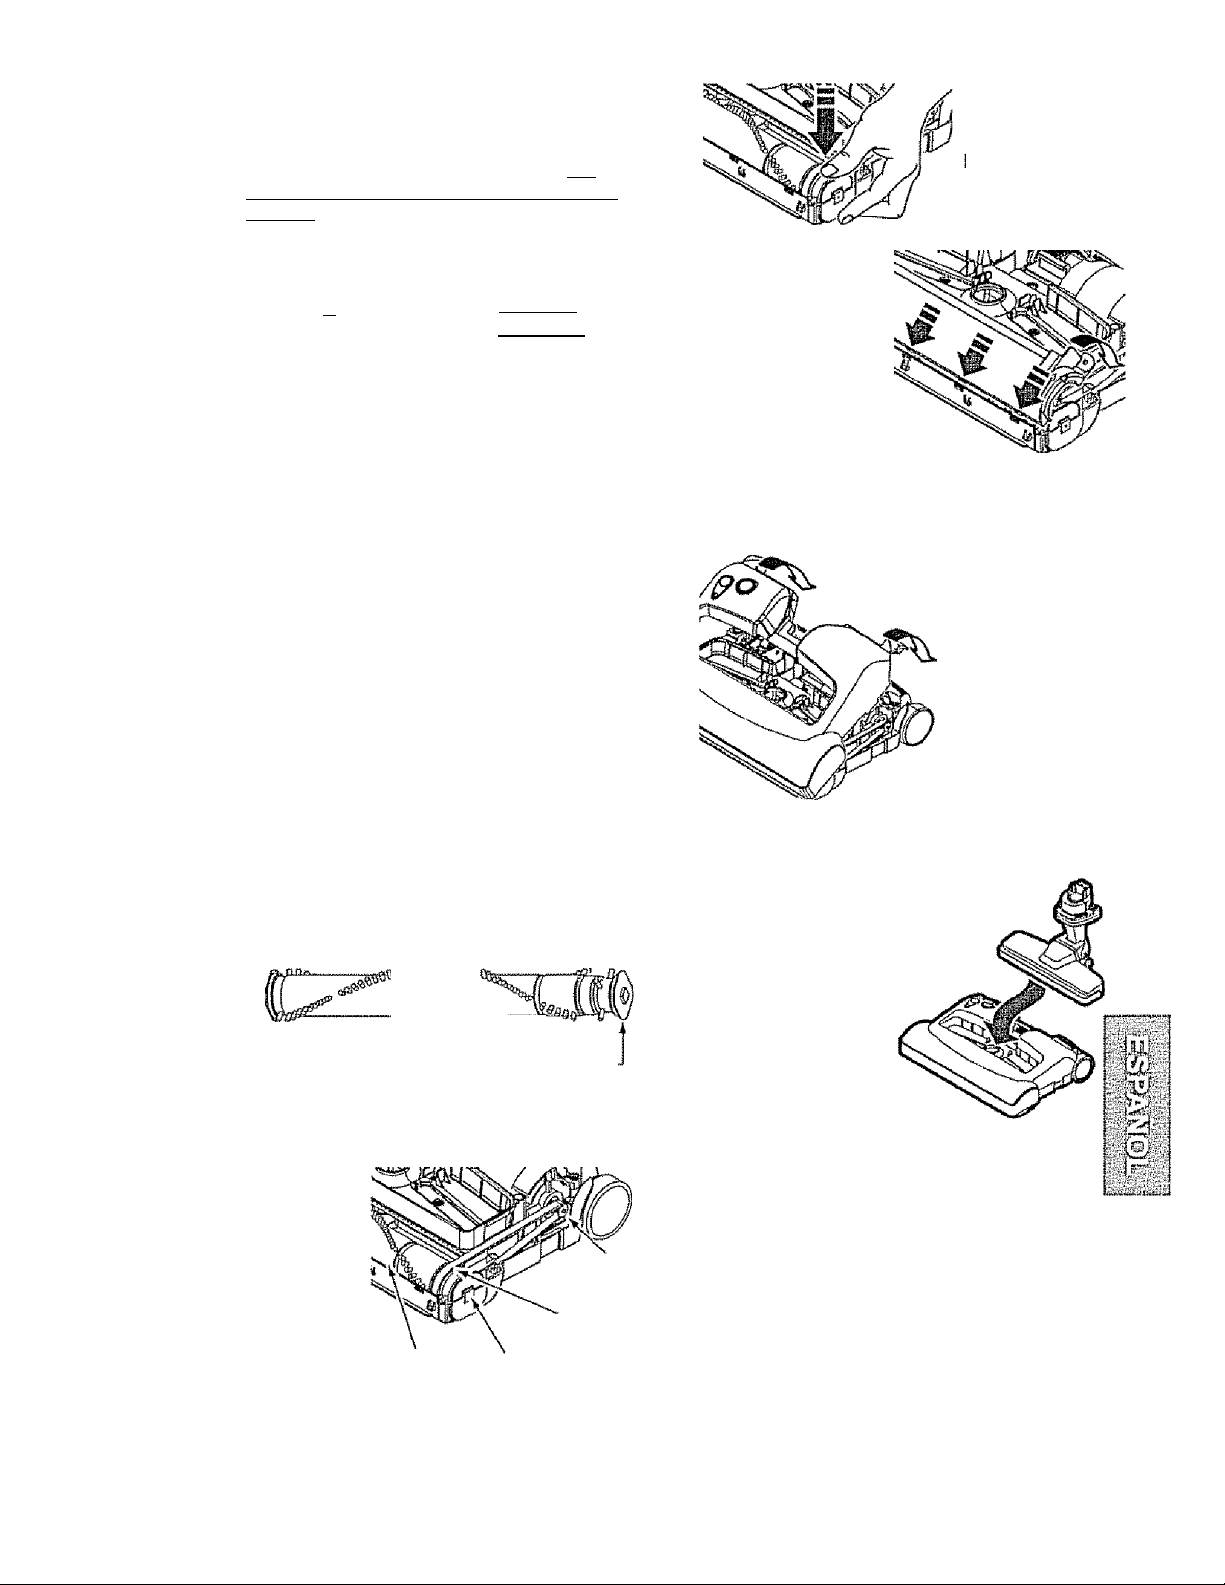
LIMPIEZA DEL AGITADOR
NOTA: Para mantener una alta eficiencia de
limpieza y evitar el daño a la aspiradora, hay
qua limpiar el agitador cada vez que se cambia
la correa.
También hay que limpiar el agitador según el
siguiente horario:
Е1ш,о,.do.ta
aaplmdfíra
Frecuente -
Limpie el
agitador
гузНя яяшяпя
s-fClvíCS üWIMClItCl
(usada dirariaments)
Modpfado -
т^яНя гяоя
(usada 2 o 3 veces
por semana)
Ligero •
cada 2 meses
(usada 1 vez por semana)
IMPORTANTE
Apagué y desconecté ia aspiradora. Examine fre
cuentemente el cepillo y ias áreas de soporte dei
mismo de ía PowerMaíe y elimine todo cabello, hilo
y pelusa acumulada.
Retire todo indicio de basura o suciedad da la
zona de la correa y del rodillo del cepillo.
2. Coloque otra vez
a unidad del agita
dor en la
PowerMaíe.
3. Reinstale ía
Gubieria dei agitador
e inserte los dos (2)
tornillos.
4. Alinee la parte frontal de la cubierta con !a base.
Coloque la cubierta sobre el borde delantero de la
Kíltjfb. CA rytllíbcffta
L/dbc LUiiiU btx
5, Rote la cubierta
hacia atrás. Apriete
con poca fuerza
hasta que las
lengüetas laterales y
traseras encierren
seguramente
Con cuidado quite las tapas y quite el hilo o
los restos ubicados en el agitador, o en los
soportes de! cepillo.
ENSAMBLE DEL AGITADOR
Ваш I ■ IV11ш# Iw вш iigT BUM Вик ш i. К я
Тара del
extremo
ОАО Л EJCTIDAD i А f'ADDIÍA
,gq,
........
■»traTHbfJEJrotrw
Unidad dei
cepillo
fíuta de
fa cofrea ■
ППДпгЯШ
Тара dal
extremo -
1,Instale una
correa nueva
sobre el eje
del motor y
Ili0qo sobfB te
polea del agi
tador.
Agitador
Tapa del
extremo
impulsor
del motor
Ruta de
¡a correa
Cerciórese que no hay espacio entre ia cubierta y
la base.
6. Coloque ia
PowerMaíe con la
parte inferior hacia
arriba e inserte los
cinco (5) tomillos en la
cubierta.
7. Inserte el cepillo
para pisos sobre la
PowerMate hasta que
este segura en su
lugar.
NOTA: Véase PIEZAS Y CARACTERÍSTICAS
para el número de la correa.
19
Page 44
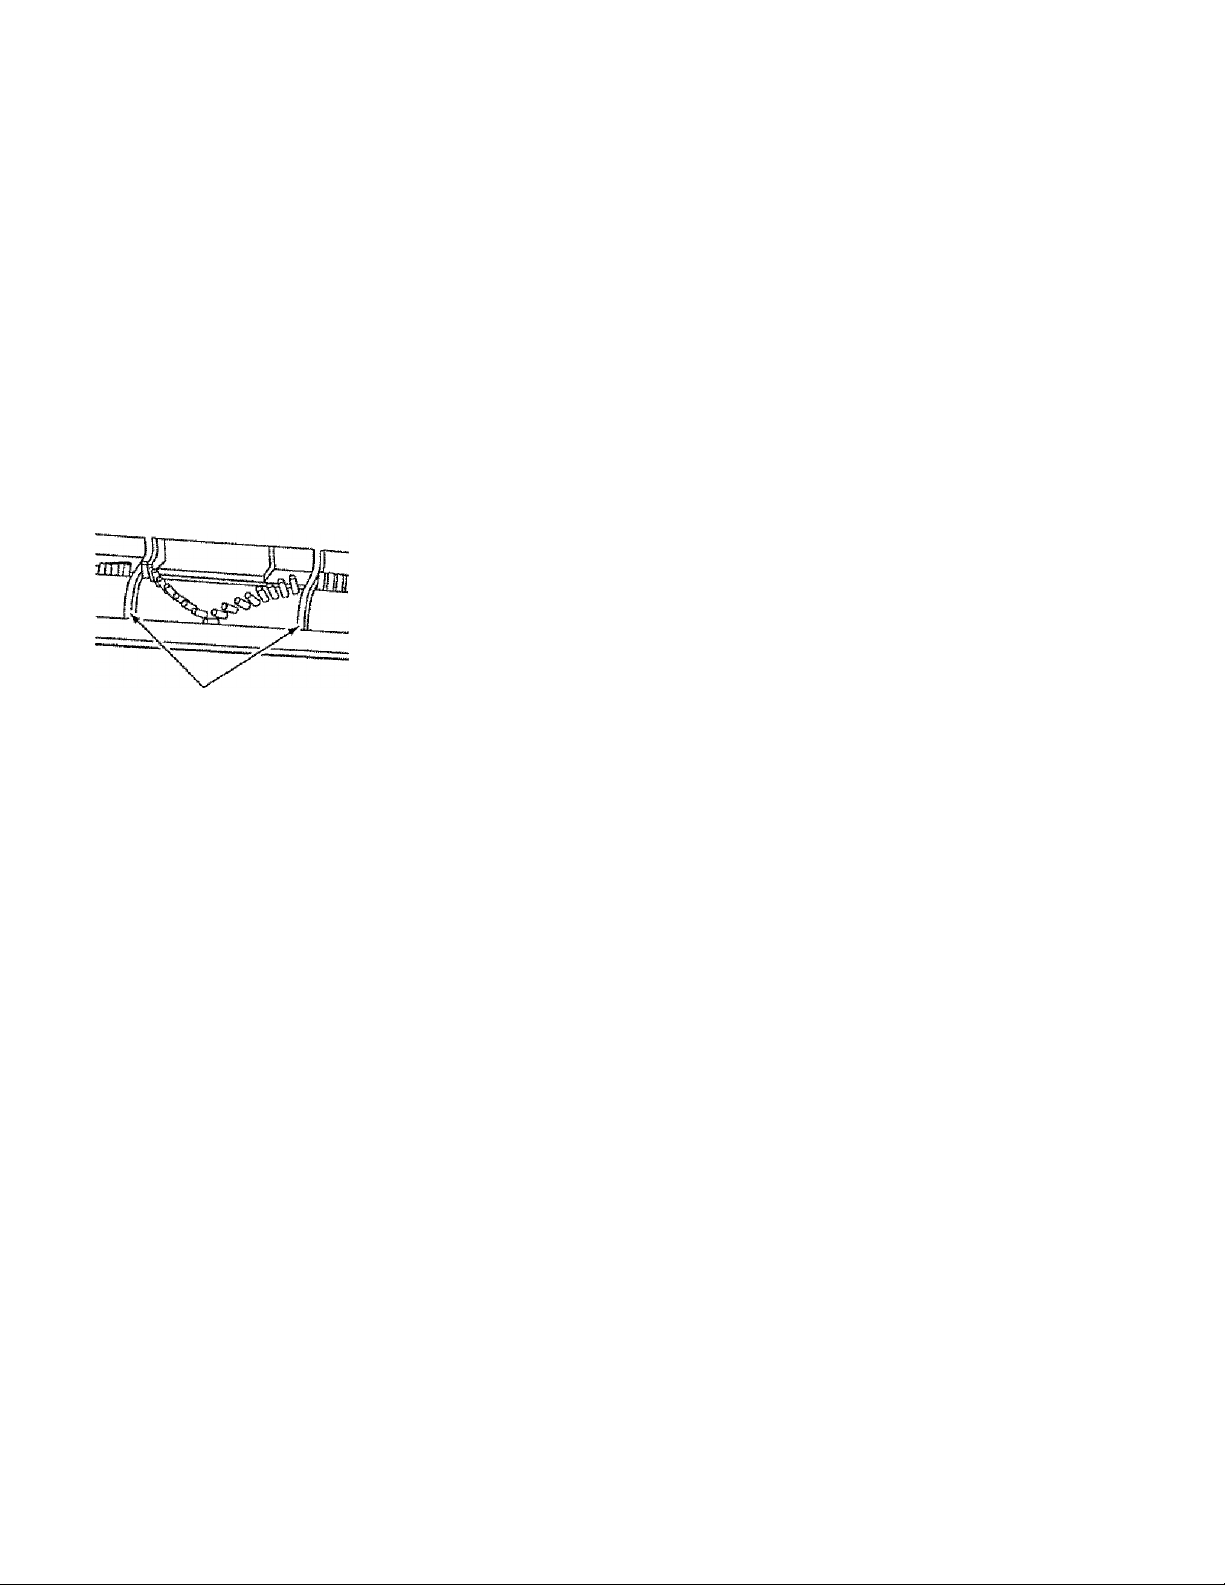
CUIDADO DEL AGITADOR
A ADVERTENCIA
Psiigfo d© chot|U6 slsctrlco o lesión cor"
poral
Apayyé y desconecté le espiradora entes
de efectuar el mantenimiento a su aspi
radora. De lo contrario podría producirse
un choque eléctrico o causar lesión corpo
ral al la aspiradora arranca de manera
Imprevista.
PARA CAMBIAR MAZO DEL
AGITADOR
1. Dasmonte ei cepillo para pisos del
PowerMaíe.
2. Quite la cubierta de la PowerMaíe, ia
cubierta del agitador y el agitador. Véase
CAMBIO DE LA CORREA Y LIMPIEZA DEL
AGITADOR.
3. Reemplace el ensambla del agitador.
PARA REVISAR LA UNIDAD DE |p»C^^5 I Iw
Cuando Eslen yaslados los cepillos a!
nivel de las barras
de soporte en la
base, cambie la
unidad del agita
dor.
Barra da soporta
da la basa
4. Reinstale la correa, la cubierta del agitador, y
la cubierta de la PowerMaíe. Consulte “Para
cambiar la correa" bajo CAMBIO DE LA
CORREA Y LIMPIEZA DEL AGITADOR.
5. Inserte el cepillo para pisos sobre la
PowerMats hasta que este segura en su lugar.
20
Page 45

Revise este recuadro para encontrar soluciones a problemas que puede corregir usted mismo Cualquier otro
servicio debe ser reaiizado por SEARS u otro agente de servicio calificado.
Aadvertencia
Apagué y desconecté la aspiradora antes de efectuar el mantenimiento a su aspiradora. De
lo contrario podría producirse un choque eléctrico o causar leslén corporal.
PROBLEMA
U aspiradora tro arranca.
No aspira
satisfactoriamenle.
La aspiradora arranca,
pero se apaga.
La PowsrMale no funciona
cuando está Instalada,
CAUSA POSIBLE
1, Está desconectada
Z. Cortacircuitos botado o fusible
quemado en ei tablero de servicio
de !a residencia
3. Conexiones eléctricas de !a
manguera sueltas
1. Bolsa para polvo llena o atascada,
2. Vías de ftu)o de aire alascadas-
3. Filtros sucios
4. Ajuste incorrecto de nivel de
peiode laallombra.
5. Incorrecta selección de nivel de poder
6. Manguera rota.
7. Agitador de la PovirerMals desgastados
8. Correa desgastada o rola
9. Agitador o tapas deí extremo de éste
SUCIOS
10. Tapa del receptáculo abierta11, Protector contra sobrecargas de la
PowerMatB botado
1. Conexiones eléctricas de la manguera
o de la tapa
2- Protector contra sobrecargas de la
PowerMate botado
3. Protector termal botado
en el reospfáouto
1. Conexiones da la PowerMate
desconectadas
2. Correa desgastada o rota-
3. Agitador o tapas del extremos de
éste sucios.
4. Protector contra sobrecargas de la
PowarMaís bolado
5. Aspiradora en modalidad BARE
FLOOR
8 & 9. Consulte CAMBIO DE LA CORREA Y
2&3. Consulte CAMBIO DE LA CORREA Y
SOLUCIÓN POSIBLE
1. Conecte bien, presione al bolón
ON/OFF.
Z. Restablezca el cortacircuitos o
cambíe el fusible,
3. Vuelva a conectar los extremos de
la manguera
1. Cambie la bolsa,
Z. Limpie tas vías ds flujo de aire
3. Cambie el (litros.
4. Ajuste ai nivel.
5. Ajuste et control.
6. Cambie la manguera
7. Cambie la agitador
LIMPIEZA DEL AGITADOR
10, Cierra biso la lapa
11. Retire cualquier objeto atorado o
atascado, luego rasiablszca. Si la
aspiradora arranca pero se vuelve a
apagar, limpie ei agitador y los tapas
del extremos de éste, luego restablezca.
Examine las conexiones eléctricas,
vuelva a conectar los extremos
de Ib manguara
Retire cualquier objeto atorado o
atascado, luego restablezca.Si la
aspiradora arranca pero se vuelve a
apagar, limpíe a! agitador y los tapas dal
extremos de éste, luego restablezca,
Cofrsuite CARACTERÍSTICAS DE
RENDIMIENTO - “ProtectorTermal."
1. Conecte bien.
LIMPIEZA DEL AGITADOR.
4. Retire cualquier objeto atorado o
atascado, luego restablezca. Si la
aspiradora arranca pero se vuelve a
apagar, limpie el agitador y los tapas
del extremos de éste, luego restablezca.
5. Presione al botón CARPET/BARE
FLOOR para cambiar a la modalidad
CARPET
!i
’¿ir
21
Page 46

PROBLEMA
CAUSA POSIBLE SOLUCIÓN POSIBLE
Indicador verde
encendido continuamente
en el detector da tierra.
No se encienden los
indicadoras verde o rojo
de detección de tierra.
Ei indicador rendemiento
funciona
La aspiradora ievanta
tapetes-o~ es difícil
empujar a PowerMate,
La luz roja de la
PowerMate se prende.
El cordón no se enrolla.
La aspiradora deja
marcas en la alfombra.
1. La vía de paso de tierra o la boisa de
poívo està bloqueada,
2. Lente sucia-.
!. No hay sunistro de energía al
tablero detector
t. Bolsa para polvo llena o atascada.
2. Filtros sudo,
3. Vías de flujo de aire atascadas
4. Ciertos accesorios
1, Ajusta incorrecto da nivel de
pslode la alfombra.
2. Aspiración demasiado potente.
1. Protector contra sobrecargas de la
PowerMals botado
1. Cordón eléctrico sucio
2. Cordón atascado.
1. Estilo de limpieza incorrecta
1, Determine si están bloqueadas las
vías de aire,
2. Limpie las lentes.
1. Acuda ai Centro da Servicio de
Qíiarí* EYtáe f*ar
MldU? vcl LdilU.
1. Cambie la bolsa
2. Cambie el (ifíros
3. Desbloquee las vías de flujo da aire
4. Esto es normal E! indicador debe ser
normal cuando la herramienta eslá
quitada,.
1. Ajuste el nivel
2. Seleccionar nivel de poder bajo en
el control electrónico.
1, Retire cualquier objeto atorado 0
atascado, luego restablezca Si la
aspiradora arranca pero sa vueíve a
apagar, limpíe ei agitador y los tapas
del extremos de éste, luego restablezca.
1, Limpie el cordón eléctrico
2. Tire del cordón y después enróllelo
1. Consulte SUGERENCIAS PARA
ASPIRAR
22
Page 47

cl0 IProt^ociór?
Enhorabuena por hacer una compra inteligente^ Su nuevo producto Kenmore® está diseñado y fabri
cado para ofrecerle años de funcionamiento confiable. Pero ai igual que todos los productos pueden
precisar un mantenimiento preventivo o alguna reparación de vez en cuando. Por este motivo, tener
un Acuerdo Maestro de Protección puede ahorrarle dinero e inconvenientes.
El Acuerdo Maestro de Protección también le ayuda a prolongar la vida útil de su nuevo producto. A
continuación indicamos lo que el Acuerdo* incluye:
0 Partes y mano de obra necesarios para ayudar a que estos productos funcione correctamente
bajo condicionales normales de uso, no simplemente defectos. Nuestra cobertura va mucho
más allá de la garartlfa del producto. Ningún deducibie, ninguna avería funcional queda exclu
ida de ia cobertura- protección real.
0 Servicio experto ofrecido por una lista de más de 10.000 técnicos autorizados del servicio
técnico de Sears, lo que significa que alguien en quien usted puede confiar estaré trabajando
en su producto.
0 Número lilmitado de llamadas al servicio técnico y servicio en toda la nación, tan continuo
como usted nos lo solicite, sin importar donde esté,
0 Garantía serla de sustitución del producto. La sustitución de su producto cubierto si se pro
ducen cuatro o más averías en doce meses.
0 Sustitución del producto por otro nuevo sí su producto cubierto no puede repararse.
0 Revisión y mantenimiento anual preventivo siempre que lo desee y sin cargo alguno.
0 Ayuda rápida por teléfono - Nosotros lo llamamos Resolución rápida. Soporte telefónico de
un representante de Sears en todos los productos. Piense en nosotros como un "manual del
usuario parlante".
0 Protección contra subidas de tensión que provoquen daños eléctricos causados por las fluc
tuaciones de la corriente.
0 $250 de protección contra la pérdida de alimentos anualmente en caso de que se estropee
algún alimento como resultado de una avería mecánica de cualquier congelador o refrigerador
cubierto.
И Reembolso del alquiler si la reparación de su producto cubierto toma más tiempo del prometi
do.
0 10% de descuento en el precio regular de cualquier servicio de reparación no cubierto y de las
piezas instaladas relacionadas.
L/Mei Ухз£т L|Llc3 Owlllpit? Ш oUiU L/cioIcUg Lilla Ъ11||р|с1 ildiHciUcI IdldlUiiiwa pala ЦУо pUaUd plwyia*^
mar un servicio. Puede llamar a cualquier hora del dfa o de la noche, o concertar una cita de servicio
en línea.
El Acuerdo maestro de protección es una compra libre de riesgos. Si por cualquier razón cancela
durante el período de garantía del producto, le devolveremos todo eí dinero. O, un reembolso pror
rateado después del período de vencimiento de la garantía. ¡Compre su Acuerdo maestro hoy!
Aplican algunas limitaciones y exclusiones. Para precios y más Información en EE.UU., llame
al 1-800-627-8655.
* La cobertura en Canadá varía en algunos artículos. Para obtener todos los detalles, llame a
Sears Cañada al 1-800-361-6665.
Servicio dÍ6 Instoilscion do Sooirs
Para la instalación profesional por parte de Sears de electrodomésticos, abridores de puertas de gara
jes, calentadores de agua y otros artículos principales para el hogar, en EE.UU. o Canadá llame al 1-
8Q0-4-MY-HOME®.
Page 48

Get it fixed, at your home or ours!
I VrlrJIi ■
For expert troubleshooting and home solutions advice:
manage home
www.rnanageniyhorns.coni
For repair - In your home - of all major brand appliances,
fawn and garden equipment, or heating and cooling systems,
no matter who made it, no matter who sold it!
For the replacement parts, accessories and
owner’s manuals that you need to do-it-yourself
For Sears professional installation of home appliances
and items like garage door openers and water heaters
1 -800-4«iyiY-HOWlE® can anytime, day or night
(1-800-469-4663) (U,S.A. and Canada)
www.sears.comwww.sears.ca
Our Home
For repair of carry-in ítems like vacuums, lawn equipment,
and electronics, call anytime for the location of the nearest
Sears Parts & Repair Service Center
1-800-488-1222 (U.S.A.) 1-800-4694663 (Canada)
www,sears.com www.sears.ca
To purchase a protection agreement on a product serviced by Sears:
1-800-827-665S (USA) 1-800-361 -6665{Canada)
Para pedir servicio de reparación
a domicilio, y para ordenar piezas:
1-888-SÜ-HOGAR®
(1-888-784-6427)
© Sears Brands, LLC
® Registsfed Trademark / ™ Trademark / Service Mark oí Sears Brands, LLC
® Marca Registrada / ™ Marca de Fábrica / Marca de Servicio de Sears Brands, LLC
*^®Marque cíe commerce / Marque dáposée de Sears Brands, LLC
Au Canada pour service en français:
1-800-LE“FOYER*^'^
(1-600-533-8937)
WWW sears ca
 Loading...