

Page 1

Owner’s Manual
KenmoFG
Vacuum Cleaner
Model 116.20512
116.21513
CAUTION:
Read and foliow ail
safety and operating
instructions before first
use of this product.
Sears, Roebuck and Co., Hoffman Estates, IL 60179 U.S.A.
www.sears.com
Part No. C01ZAXV30U00-8175162
Printed in U.S.A.
Page 2

T'AGI C r^/^KITCMTO
IAdLc Ur vwN I fcN i O
Before Using Your New Vacuum .... 2
Kenmore Vacuum Cleaner Warranty 2
Important Safety instructions
Parts and Features
Assembly Instructions
Use ..
..........................................
How to Start
Vacuuming Tips...........................
Suggested Pile Height Settings
Attachments
Attachment Use Chart . .
Performance Features -. ,,..
.................................
..........................
...........
....
.. -
...........
...................
How Your Vacuum Works
..........
..................
4-5
6-7
3
.8
10
10
11
12
Canister Care
Bag Changing
Cleaning Exterior and Attachments
Motor Safety Filter Changing ...
Exhaust Filter Changing
8
9
9
Power-Mate® Care
Light Bulb Changing
Belt Changing and Brush Gleaning , ,. 15-16
Brush Servicing
Brush Assembly
................. .
..................................
..................
.................................
.................................
..........................................
.......................................
Troubleshooting..............................—18
Requesting Assistance Or Service 19
12
12
13
13
14
14
15
17
17
BEFORE USING YOUR NEW VACUUIVI
Please read this guide. It wiil help you assemble and operate your new Kenmore vacuum in
the safest and most effective way.
For more information about vacuum cleaner care and operation, cai! your nearest Sears store.
You will need the complete model and serial numbers when requesting information. Your vacu
um’s mode! and serial numbers are located on the Model and Serial Number Plate.
Use the space below to record the mode! number and serial number of your new Kenmore
vacuum.
Model No,_
Serial No.
Dale of Purchase
Keep this book and your sales check (receipt) in a safe place for future reference.
KENMORE VAGUUy CLEANER WARRANTY
limited one YEAR warranty ON KENMORE VACUUM CLEANER
This warranty is for one year from the date of purchase, and includes only private household
vacuum cleaner use. During the warranty year, when this vacuum cleaner is operated and
maintained according to the owner’s manual instructions. Sears will repair any defects in
material or workmanship free of charge.
This warranty excludes vacuum bags, belts, light bulbs, and fiiters, which are expendable parts
and become worn during normal use.
For warranty service, return this vacuum cleaner to the nearest Sears Service Center In
the United States.
This warranty applies only while this product is in use in the United States. This warranty gives
you specific legal fights, and you may also have other rights which vary from state to state.
Sears, Roebuck and Co., D/817 WA, Hoffman Estates, IL 60179
Page 3

WARNING
Your safety is important to us. To reduce the risk of fire, electrical shock, injury to
persons or damage when using your vacuum cleaner, follow basic safety precau
tions including the following:
Read this manual before assembling or
using your vacuum cleaner
Use your cleaner only as described In this
manual. Use only with Sears recommended
attachments.
To reduce the risk of electrical shock - Do
not use outdoors or on wet surfaces.
Disconnect electrical supply before servic
ing or cleaning out brush area. Failure to do
so couid result in electrical shock or brush
suddenly starting.
Always turn cleaner off before connecting or
disconnecting the hose or Power-Mate*
Always turn cleaner off before unplugging.
Do not unplug by pulling on cord. To unplug,
grasp the plug, not the cord.
Hold plug when rewinding onto cord reel
Do not allow plug to whip when rewinding.
Do not use with damaged cord or plug, if
cleaner is not working as it should, has been
dropped, damaged, left outdoors, or dropped
into water, return it to a Sears Service
Center.
Do not pull or carry by cord, use cord as a
handle, close door on cord, or pull cord
around sharp edges or corners. Do not run
cleaner over cord. Keep cord away from
heated surfaces.
Do not leave cSeaner when plugged in
Unplug from outlet when not in use and
before servicing.
Do not allow to be used as a toy. Close
attention is necessary when used by or near
children.
Do not handle plug or cleaner with wet
hands.
Do not put any objects into openings.
Do not operate the cleaner with a punctured
hose. The hose contains electrical wires.
Replace if cut or worn, Avoid picking up
sharp objects.
Do not use with any opening blocked; keep
free of dust, lint, hair and anything that may
reduce air flow.
Keep hair, loose clothing, fingers, and all
parts of body away from openings and mov
ing parts.
Do not use cleaner without dust bag and/or
filters in place.
Always change the dust bag after vacuum
ing carpet cleaners or freshener, powders
and fine dust These producís clog the bag,
reduce airflow and can cause the bag to
burst Failure to change bag could cause
permanent damage to the cleaner.
Do not use the cleaner to pick up sharp hard
objects, small toys, pins, paper clips, eic,
They may damage the cleaner or dust bag.
Do not pick up anything that is burning or
smoking, such as cigarettes, matches, or hot
ashes.
Do not use cleaner to pick up flammable or
combustible liquids (gasoline, cleaning fluids,
perfumes, etc.), or use in areas where they
may be present. The fumes from these sub
stances can create a fire hazard or explo
sion
Use extra care when cleaning on stairs. Do
not put on chairs, tables, etc. Keep on floor.
You are responsible for making sure that
your vacuum cleaner is not used by anyone
unable to operate it properly.
Do not operate without exhaust filter or
exhaust filter cover installed.
SAVE THESE INSTRUCTIONS
Proper assembly and safe use of your vacuum cleaner are your responsibiiiiles Your cleaner
is intended only for household use. Read this Owner's Manual carefully for important use and
safely information. This guide contains safety statements under warning and caution symbols.
Please pay special attention to these boxes and follow any instructions given. WARNING
statements alert you to such dangers as fire, electrical shook, burns and personal injury. CAU
TION statements alert you to such dangers as personal injury and/or property damage.
Page 4

PARTS AND FEATURES
It is important to know your vacuum cleaner’s parts and features to assure its proper and safe
use. Review these before using your cleaner.
Cord and
Plug Holder
Upper
Wand
Cord and
Cord Holder
Power-Mats’^
Power Cord
Wand Swivel
(Some Modela)
Handle Quick
Release
(Some Models)
Upper
Wand
Wand Quick
Release Pedal
(Some Models)
Power-Mate^
Model/Serial Numbers
(On Bottom)
Handle
Release
Pedal
Fife Height Pedal
(Same Models)
POWER-MATE
Headlight and Lens
(Some Models)
Bulb
In US, #20-5240
In Canada #596iS1
Light Cover
(Some Models)
Edge Cleaner
(Not Shown)
Overload Protector
(Reset Button)
(Si
Page 5

HOSE
3-lVay Oa/Off Switch
Off/Floor/Carpet
(Some Ufoc/els)
Handle
Hose Swivel
MOTE: All models have one set of
attachments in the canister Some
models have an additional set,
v/hich can be kept in the accessory
bag lor garage use,
CANISTER
Page 6
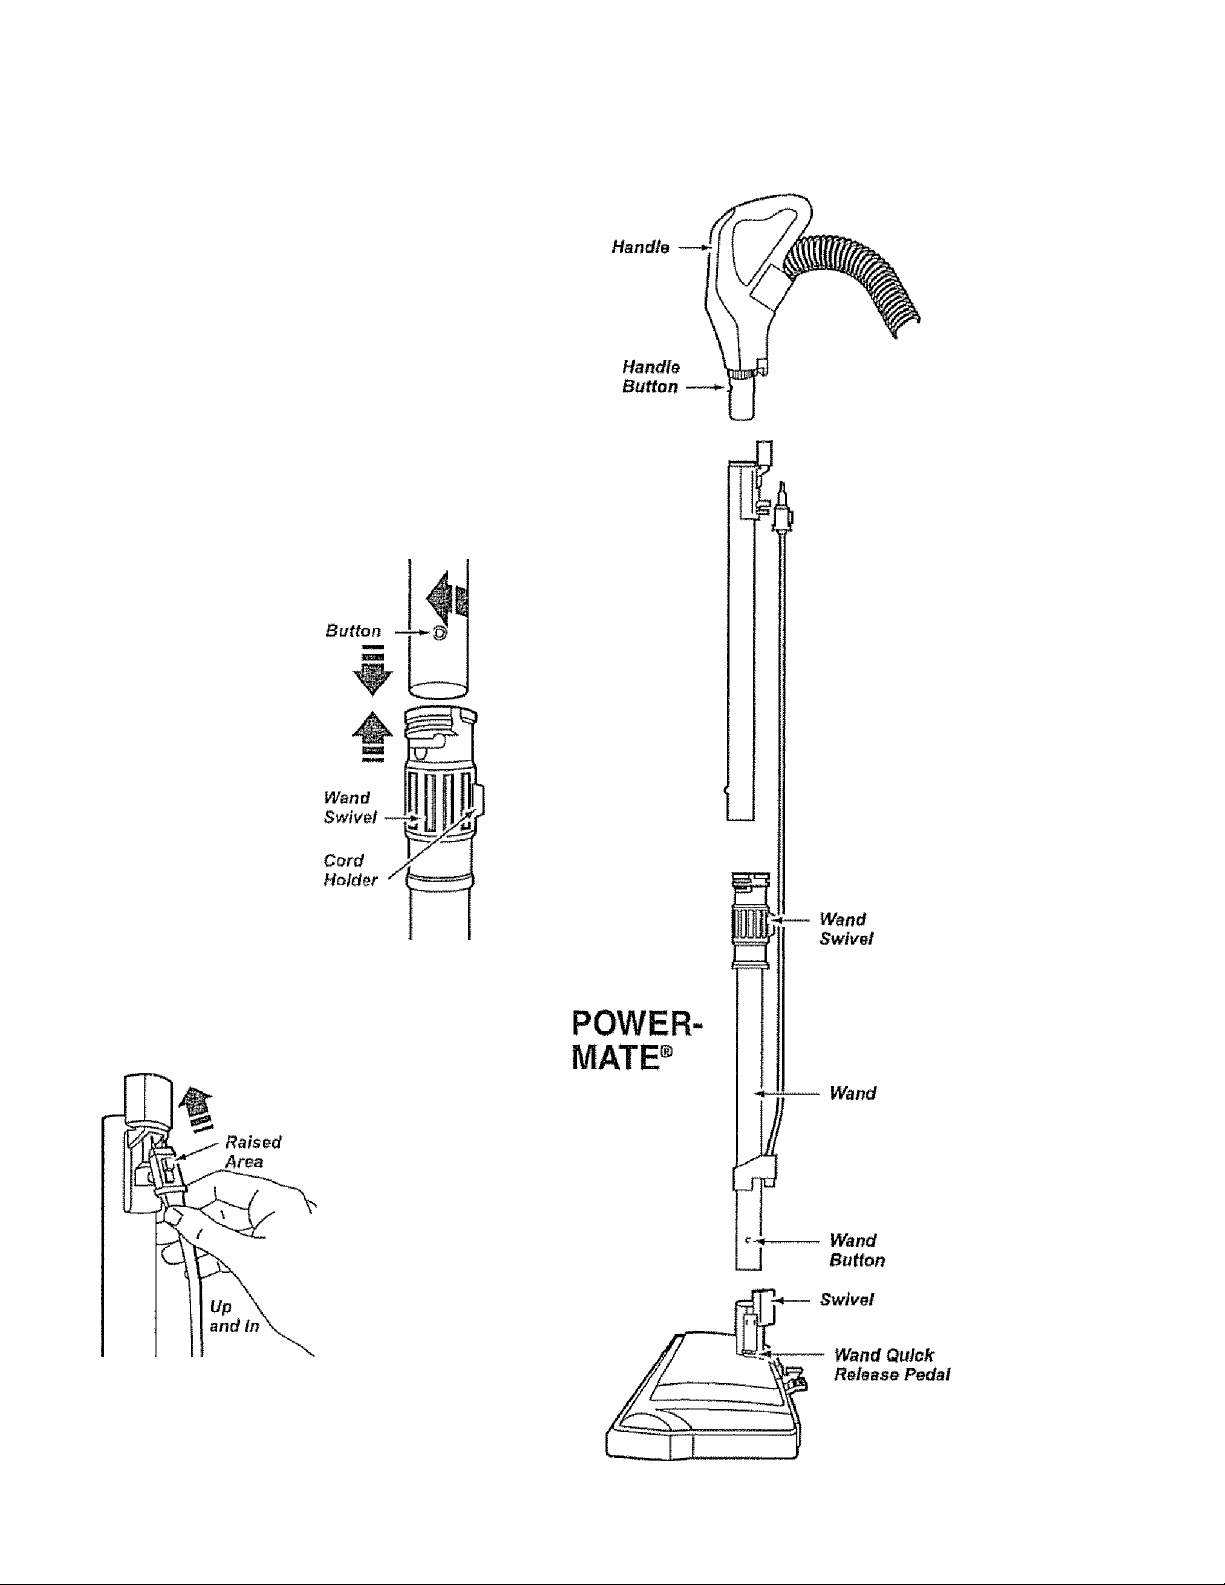
ASSEMBLY INSTRUCTIONS
WARNING
Electricai Shock Hazard
DO NOT plug into electricai supply
until assembly is complete. Failure
to do so could result in electrical
shock or injury,
Before assemblirrg vacuum, check the
PACKING LIST on the cover of the separate
Repair Parts List. Use this list to verity that
you have received all the components of
your new Kenmore vacuum.
WANDS
Slide wands
together until
wand button
snaps into place.
Turn wand button
to the slotted area
of the wand swiv-
The swivel allows
you to turn the
handle to the left
side to reach far
ther under low
furniture.
POWER-MATE®
1, insert wands into Power-Mate* until the
wand buttons snaps into place.
2. Connect PowerMate^plug and
cord as shown
DO NOT force.
Raised area of
plug must be
toward hand.
3. Secure cord into
cord holder on
wand swivel.
To remove: Disconnect cord and step on
wand release pedal, then pull up on wands.
Page 7

CANISTER
1. Open the canister hood,
2. Check to see that the dust bag is proper
ly installed. See BAG CHANGING for
instructions.
3. Check to see that the motor safety filter is
properly installed. See MOTOR SAFETY
FILTER CLEANING for instructions.
HOOD
it is normal for the canister hood to come off
when opened further than needed, Line up
the hinge slots, insert them, and close the
hood to replace it
2. Insert
handle into
wand until
lock button
snaps in
place Be
sure hose
is not
twisted.
To remove:
Press han
dle release
button and
pull up on
handle.
HOSE
1. Line up the
hose latch tab
and notch in
canister hood
and insert hose
into canister until
it snaps in place.
To remove: Lift
hose latch tab
upward and pull
up on hose.
To store: Disconnect hose from wands and
canister to prevent stress on hose during
storage Store hose In a loosely coiled
position so the hose covering is not
stressed.
Hood
Release
Attachment
Storage
Dust Bag
Page 8

HOW TO START
WARNING
Personal Injury and Product Damage
Hazard
» DO NOT plug in if switch is in ON
position. Personal injury or
damage could resuit,
* The cord moves rapidly when
rewinding. Keep children away
and provide a clear path when
rewinding the cord to prevent
personai injury.
* DO NOT use outlets above
counters. Damage from cord to
items in surrounding area
could occur.
USE
3. Lower wand from upright position by
pressing on the handle release pedal.
CAUTION
DO NOT leave the Power*il/iate®
running in one spot in the upright
position for any length of time.
Damage to carpet may occur.
1. Puli cord out of
canister to desired
length. The cord
will not rewind until
the cord rewind
button is pushed.
NOTE; To reduce the risk of electric shock,
this vacuum cleaner has a poiarized plug,
one blade is wider than the other. This plug
will fit in a polarized outiet only one way If
the plug does not fit fully in the outlet,
reverse the plug, if it still does not fit, con
tact a qualified electrician to install the prop
er outlet Do not change the plug in any
way
2, Plug the poiarized power cord into a 120
Volt outlet located near the floor.
To rewind; Unplug the cleaner Hold the
plug while rewinding to prevent damage or
injury from the moving cord. Push cord
rewind bar.
4. Select a pile height setting by pressing
the small pedal on the rear of the Power
Male®. The pile height setting shows on the
indicator. See SUGGESTED PILE HEIGHT
SETTINGS.
Attention; Refer to your carpet manufac
turers cleaning recommendations. Some
more delicate carpets may require that they
be vacuumed with the Power-Mate® agitator
turned off, to prevent carpet damage
Select a switch
position on the
handie.
OFF
FLOOR - turns on the canister motor only
CARPET - turns on both the canister and
the Power-Mate* motors.
Page 9

VACUUMING TIPS
Suggested sweeping pattern.
For best cleaning action, the Power-Mate®
should be pushed straight away from you
and pulled straight back. At the end of each
pull stroke, the direction of the Power-Mate®
should be changed to point into the next
section to be cleaned. This pattern should
be continued across the rug with slow, glid
ing motions.
NOTE: Fast,
jerky strokes do
not provide
complete clean
ing.
The hose swivel
allows the hose to
turn without moving
the canister. This is
helpful tor cleaning
in small areas.
Check hose for
twisting before
pulling canister
Carpeted stairs need to be vacuumed reg
ularly. For best cleaning results, fully close
the suction control,
WARNING
Personal Injury Hazard
Use care if canister is placed on
stairs. If it fails, personal injury or
property damage could result.
For best cleaning results, keep the airflow
passage open. Check each assembly area
in HOW YOUR VACUUM WORKS occasion
ally for clogs Unplug from outlet before
checking.
T!
CAUTION
SUGGESTED PILE HEIGHT SETTINGS
For best deep down cleaning, use the XLO
setting. However, you may need to raise the
height to make some jobs easier, such as
scatter rugs and some deep pile carpets,
and to prevent the vacuum cleaner from
shutting off Suggested settings are:
To prevent tip over, never leave
Power-Mate® on or in the upright
position.Turning the handle to one
side will make the Power-Mate® more
stable and less likely to tip over.
HI “ Shag, deep pile, or scatter rugs
MED - Medium to deep pile.
LO ~ Low to medium pile.
XLO “ Most carpets and bare floors.
Page 10

CAUTION
ATTACHMENTS
attachments on wands
DO NOT attach or remove handle or
wands while cleaner is ON„ This
could cause sparking and damage
the electrical contacts.
ATTACHMENTS ON HANDLE
NOTE: If the
Power-Mate® is
attached, turn
cleaner off
before removing
handle from
wands.
1. Press fock
button, then pull
to remove han
dle from wand-
If your model
has the optional feature of a handle release,
press it In similarly
Slide attachments firm
ly on handle as needed.
See chart below.
1. To remove
wands from
Power-Mate®,
lock wands in
straight-up posi
tion.
2. Press wand
release pedal
with foot and
pull the wands
straight up out of
Power-Mate®,
The Power-Mate® plug and cord do not have
to be removed to use attachments on the
wands.
3. Put attach-ments on
wands as needed. See
chart below.
ATTACHMENT USE CHART
CLEANING AREA
attachment
Combination Brush
(Some Models)
Crevice Tool
(Some Models)
Floor Brush
(Some Models)
Furniture’
h
H
X
X X
Between
Cushions*
Drapes* Stairs
X
X
X X
Power-Mate®
(Some Models)
Handi-MateJr.*
(Some Models)**
Power-Mate Jr.®
(Some Models)**
‘Always dean altachments before using on fabrics *" 3-way On/OfI switch should be in FLOOR position
••• Handl-Mate Jr “ and Power-Male Jr® attachmen! instructions are inoluded with the products *“ ¡Some Models)
Power-Mate® switch should be in OFF pos'ttbrt
X
X
X
X
NOTE: When separating wands, depress lock button completely before pulling wands apart If
wand lock button is difficult to depress, push the two wands more tightly togetner to line up
the lock button with the hole. Depress lock button and then pull wands apart.
Bars
Floors
VitrAlv
l^k
Carpeted
Floorsfflugs
X
Walls
X
X
10
Page 11

PERFORMANCE FEATURES
EDGE CLEANER
Active brush edge
cleaners are on both
sides of the Posnbt-
Mate* Guide either
side of the Power
Mate® aiong base
boards or next to
furniture to help
remove dirt trapped at
narript prifipc
OVERLOAD PROTECTOR
The Power-Mate® has
built-in protection against
motor and belt damage
should the brush jam. If
the brush slows down or
stops, the overload
protector button pops up
and shuts off the Power
Mate®, The canister motor
WÜ! continue to run
To correct problem: See
TROUBLESHOOTING.
To reset: Push in the overload protector
button.
SUCTION CONTROL
performance indicator
SOME MODELS
If the performance indi
cator turns entirely red
check for a full dust bag,
or a clog in the vacuum.
See HOW YOUR VACUUM WORKS.
NOTE: The performance indicator may turn
red when using attachments or when cieaning new carpet, due to reduced airflow by
the attachments themselves or new carpet
fuzz filling the bag quickly,
power-mate®storage
SOME MODELS
The tower wand has a “U” shaped flange in
the area where the power cord attaches.
The base has a “U" shaped slot near the
front caster
The slot allows the
wands and Power
Mate® to be stored
with the canister to
conserve storage
space. The canister
must be stored on
end for this feature
to be used.
The suction
O
Decrease
SucHon
and carpet weights. Opening the control
decreases suction for draperies and
iightweight rugs, while closing the control
increases suction for upholsteries and
carpets.
Increase
Sucl/on
control allows
you to change
the vacuum
suction for
different fabric
WARNING
Personal Injury Hazard
Always unplug the vacuum cleaner
before cleaning the brush area as
brush may suddenly restart Failure
to do so can result in personal
injury.
The wand will slip out of the slot as it is lift
ed up for use and will slide into the slot as it
is towered for storage.
THERMAL PROTECTOR
This vacuum has a thermal protector which
automalically trips to protect the vacuum
from overheating. The thermal protector
turns the motor off automatically to allow the
motor to cool in order to prevent possible
damage to the vacuum.
To reset: Turn off and unplug the vacuum
from the outlet to allow the vacuum to cool
Check for and remove any clogs. Also
check and replace any clogged filters.
Wait approximately 50 minutes and plug
the vacuum in and turn back on to see if
the thermal protector has reset. In some
cases, the unit may suddenly restart DO
NOT leave unattended.
11
Page 12

HOW YOUR VACUUM WORKS
The vacuum cleaner creates suction that
picks up dirt. Rapidly moving air carries
the dirt to the dust bag through the
airflow passages. The dust bag lets
the air pass through, while it traps
the dirt
For best cleaning results, keep
the airflow passage open
Check the starred areas
occasionally for clogs.
Unplug from outlet
before checking
CANISTER CARE
Motor
Safetf
Fiiter £if?i3 us
Filter
BAG CHANGING
For best cleaning results, the dust bag
should be changed often . The performance
indicator (some models) will specify when
the dust bag needs to be changed or the
airflow is blocked. NOTE: See PARTS AND
FEATURES for Bag Number
1. Unplug cord from
wall outiet.
2. Remove hose
from canister.
3. Puli hood release
out and up, then lift
canister hood.
4. Disengage
cardboard tab trom
red bag mount by
pulling away and
lifting up
5. Pull bag out of
the red bag mount.
Motor
Safety
Fitter
Red Bag
Mount
6. Check and
replace, if
necessary, the
motor safety
filter,
7. The red bag mount will flip forward after
removing bag,
8. Rotate red bag
mount down and
install bag into
slots per
int ructions
pushing down untii
the cardboard tab
locks into position
and the holes
align. Tuck the bag
securely into the bag cavity so that none of it
is able to be pinched by the hood,
9. Replace and latch canister hood.
10. insert hose into canister.
11. Plug cord into wall outlet.
NEVER REUSE A DUST BAG. Very
fine materials, such as carpet fresh*
ener, face powder, fine dust, plaster,
SDot, new carpet lint, etc. can clog
the bag and cause It to burst before
It IS Tuii anci may cause damage to
vacuum motor. Change bag more
often when vacuuming these materi
als.
12
Page 13

CLEANING EXTERIOR AND ATTACHMENTS
1. Unpiug cord from wall outlet. DO NOT
drip water on cleaner.
2. Clean exterior using a clean, soft cloth
that has been dipped in a solution of mild
liquid detergent and water, then wrung dry.
Wipe dry after cleaning.
3. To reduce static etectricity and dust butidup, wipe outer surface of cieaner and
attachments.
MOTOR SAFETY FILTER CHANGING
Check motor safety filter occastonaily and
change when dirty.
WARNING
Electrical Shock Hazard
Unplug power cord from electrical
outlet Do not operate the cleaner
without the motor safety filter. Be
sure the filter is dry and properly
installed to prevent motor failure
and/or electrical shock.
Remove the bag as outlined in the BAG
CHANGING section,
MOTOR SAFETY FILTER
CAUTION
Do not use attachments if they are
wet. Attachments used in dirty
areas, such as under a refrigerator,
should not be used on other
surfaces until they are washed,They
could leave marks.
1. Lift the rubber
retainer and pull
out motor safety
filter as shown.
2. Replace the fil
ter, white side out,
by sliding it back
into piace under
the ribs in the bag
cavity. Tuck filter in
so that it fits com
pletely under the
rubber retainer
This white and grey filter must be replaced
when dirty. It should be replaced regularly
depending on use conditions.
C/^NNOT be washed as it will lose its
dust trapping ability.
The filter
3. Replace the bag as outlined In the BAG
CHANGING section.
CAUTION
NEVER REUSE A DUST BAG. Very
fine materials, such as carpet fresh
ener, face powder, fine dust, plaster,
soot, new carpet lint, etc. can clog
the bag and cause it to burst before
it is full. Change bag more often
when vacuuming these materials.
13
Page 14

EXHAUST FILTER CHANGING
warning
Fire and/or Electrical Shock Hazard
Do not operate with a clogged
exhaust filter or without the exhaust
filter or exhaust filter cover installed.
EXHAUST FILTER
ELECTROSTATIC
The electrostatic filter must be replaced
when dirty. Replace the filter when the
entire surface area is covered evenly. The
filter CANNOT be washed as it will lose
its dust trapping ability.
Replacement exhaust filters are availabie
through Sears Service Center under part
no, 817S258. See "Requesting Assistance
or Service"
1. PuH out and up
on the exhaust filter
cover to remove
from the motor
cover and lay aside
3, Piace the new
filter into the motor
cover with the
white side down.
Tsb
V Slot
2. When the
exhaust filter
becomes dirty,
remove it by
pulling straight up.
Exhaust
4, Reinstall the
exhaust filter
cover by insert
ing the tab into
the slot in the
motor coven
Press firmly to
snap exhaust fil
ter cover into
lAr*o
P
I-
POWER-MATE® GÄRE
Always follow all safety precautions when
cleaning and servicing the Power-Mate®
14
warning
Electrical Shock Or Persona!
Hazard
Disconnect electrical supply before
servicing or cleaning the unit
Failure to do so could result In elec
trical shock or personal injury from
cleaner suddenly starting.
Injury
Page 15
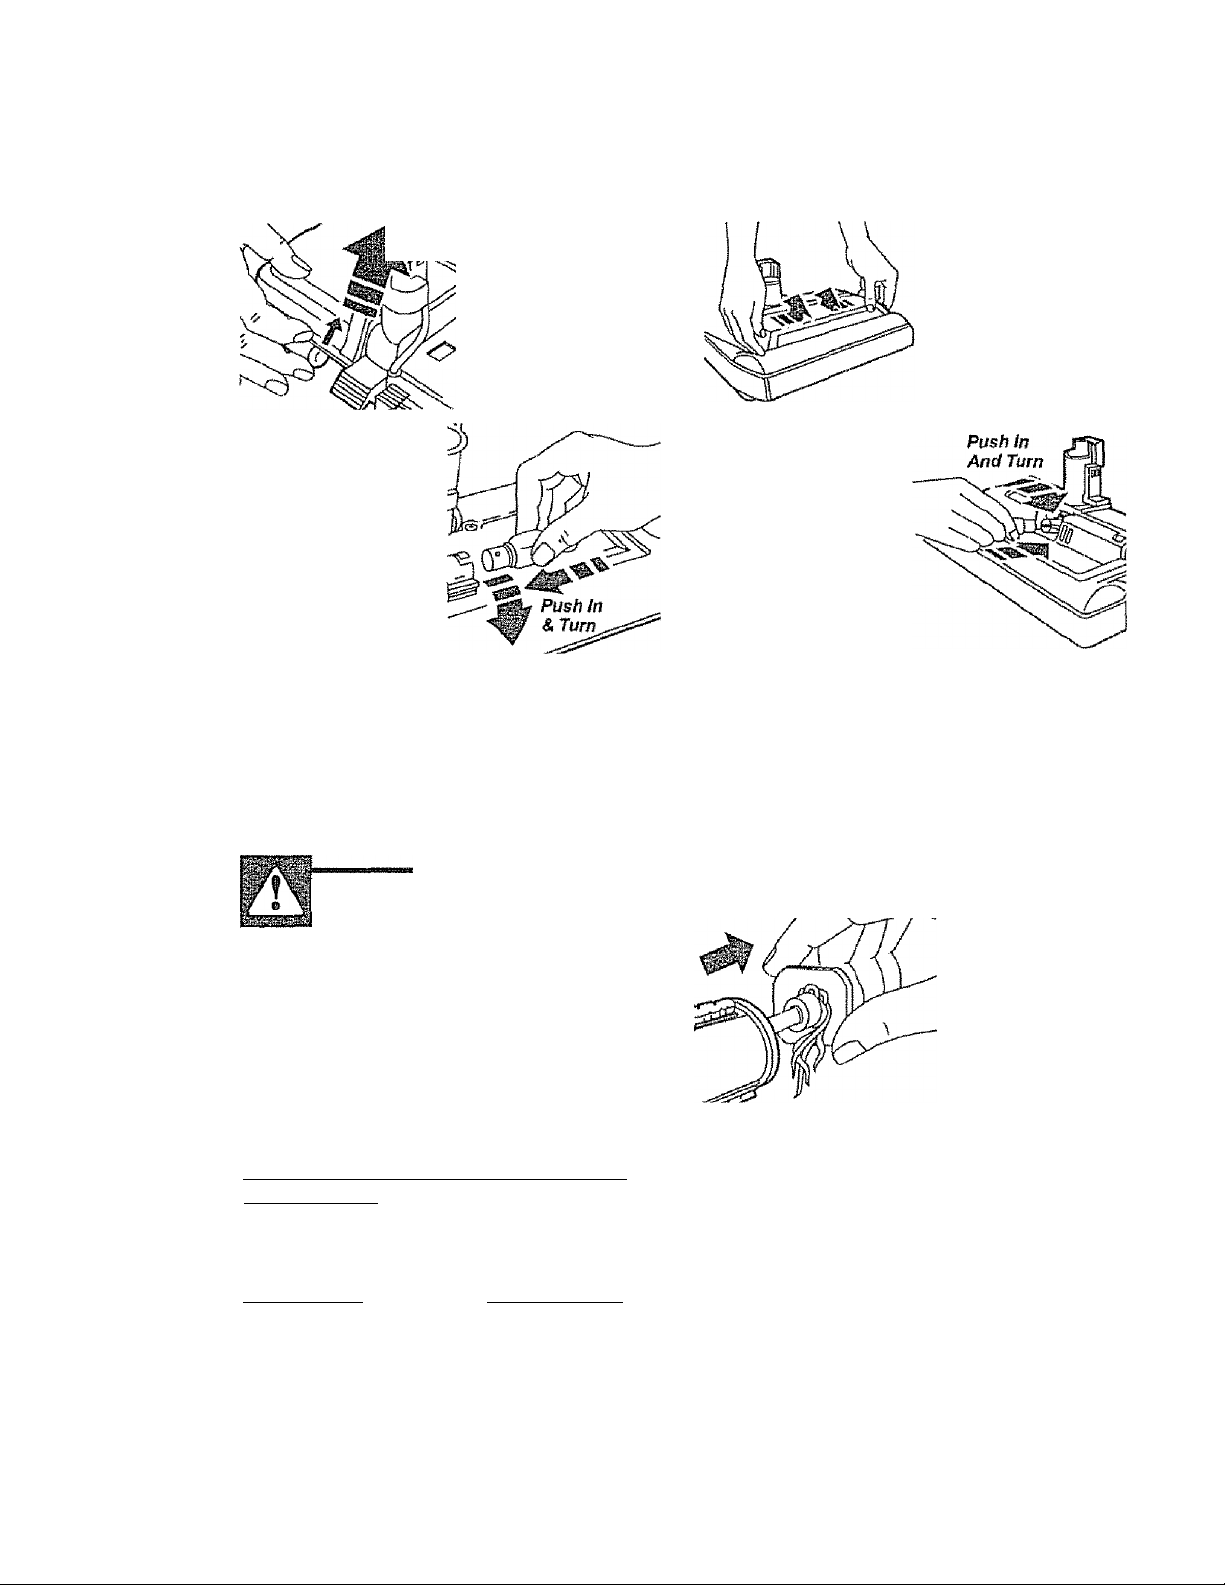
LIGHT BULB CHANGING
HALF LIGHT POWER-WIATE®
1. Remove Sight
cover by lifting at
arrov/ as shown.
2, Push in and turn
bulb counterclock
wise to remove,
3. Replace the
bulb. Bulb must not
be higher than 15
Watts(130V).
Close light cover
until it snaps in
place
NOTE: See PARTS AND FEATURES for
Bulb number.
FULL LIGHT POWER-MATE®
1, Remove light
cover by pressing
in and lifting both
sides as shown.
2. Push in and turn
bulb counterclock
wise to remove.
3. Replace the
bulb Bulb must not
be higher than 15
Watts (130V).
Close light cover
until it snaps in
place
NOTE: See PARTS AND FEATURES for
Bulb number.
BELT GHANGING AND BRUSH CLEANING
CAUTION
When you remove the end caps, a
small metal washer on each end
may come off. DO NOT lose these
two metal washers.
TO CLEAN AGITATOR:
NOTE: In order to keep cleaning efficiency
high and to prevent damage to your vacuum,
the agitator must be cleaned every time the
belt is changed.
The agitator must aiso be cleaned according
to the following schedule;
Vacuum Use
HEAVY -
(used daily)
MODERATE -
(used 2-3 tlmes/week)
LIGHT -
(used 1 time/week)
Clean Agitator
every week
every month
every 2 months
Remove any dirt or debris in the belt path
area or in the brush roller area.
Carefully remove
any string or
debris located on
the agitator, end
caps, washers or
agitator shaft.
IMPORTANT
Replace the washers and the end caps.
See the exploded view for correct
assembly.
Disconnect cleaner from electrical outlet.
Check and remove hair, string and lint build
up frequently in the Power-Mate® agitator
and end cap areas, II build-up becomes
excessive, disconnect Power-Mate® from
wand and follow the steps below.
15
Page 16

DSí'RilPl^/C DCTI T
TO
il mm I w I \f £*H EwiF Im«« lnNi I
1. Remove light cover
and light bulb as shown
under LiGHT BULB
CHANGING.
2. Unscrew the Power
Mate* cover screws.
3. Turn
Power-Mate®
over. To
remove cover,
insert
screwdriver at
cover tabs on
both sides
and twist to
release tabs.
5. Carefully
insert and
lift
screwdriver
at each
brush
support to
free brush
from base
Brush
Support
6. Remove
worn beit.
4. Turn Power
Mate® right side
up. Press handle
jp^Q£;!a rjpripl
re
and iower the
swive! Rotate
cover forward
from back until
front snaps free.
TORFPi APF RFI T
c 1 MBa» § Immi mf mm Imh X
1. Slide washers and brush supports onto
brush assembly.
2. install
new belt
over motor
drive, then
over brush
sprocket.
NOTE: See
PARTS AND
FEATURES
Support
for Belt number.
3, Snap brush
supports into
piacB on base.
Be sure brush
supports are
not upsidedown.
4. Line up
front of cover
and base.
Rest cover
on front edge
of base as
shown.
7. Slide brush
supports off to
check and clean
brush support
areas See
BRUSH
ASSEMBLY for
picture of
compietB brush
assembly.
5. Rotate cover
back. Press
cover firmly until
side tabs snap
into piace,
Reptace cover
screws, light
bulb and light
cover,,
16
Page 17

A
WARNING
Electrical Shock Or Personal Injury
Hazard
Disconnect electrical supply before
servicing or cleaning the unit
Failure to do so could result in elec
trical shock or personal injury from
cleaner suddenly starting.
TO CHECK BRUSHES
BRUSH SERVICING
TO REPLACE BRUSH DOWEL
1. Remove Power-Mate® cover, belt and
brush assembly, See "To Remove Belt" in
BELT CHANGING AND BRUSH
GLEANING.
2. Remove brush supports, washers,
screws, end brush, brush sprocket pieces
from ends of brush assembly.
3. Reassemble brush assembly. To line up
screw holes in dowei, sprocket and end
brush, be sure the brush portion of end
brush lines up with brushes on brush dowel
When brushes
are worn to the
level of the base
support bars»
replace the
brush dowel.
BRUSH ASSEMBLY
4. Replace belt, brush assembly, Power
Mate® cover, light bulb and Jighi cover. See
"To replace belt” in BELT CHANGING AND
BRUSH GLEANING.
Brush
Page 18

Review this chart to find do-it-yourself solutions for minor performance problems Any service
needed, other than those described in this owner’s manual, should be performed by a Sears
authorized service representative.
WARNING
Disconnect electrica! supply before servicing or cleaning the unit.
Failure to do so could result in electrical shock or personal Injury.
PROBLEM
Cleaner won’l start
Poor job of dirt
pick-up.
Cleaner starts but
cuts off.
Power-Mate* win not
run when attached.
Performance l/idicatar,
SQiTie TtiodelSj Is ted.
Cteaner picks up moveable
rugs -or- Power-Mate'
pushes too hard,
Light won’t work.
Cord won't rewind.
Cleaner ¡eaves marks
on carpet
Electrloal Shock Hazard
POSSIBLE CAUSE
1, Unplugged at wail ouliel
2. Tripped clFcuit breaker/blown fuse
at household service panel,
3., Loose hosa eléctrica! connections
4. Tripped thermal prolsctor in
canister.
1. FulJ Of dogged dust bag.
2. Clogged alrllow passages
3. Dirty fitters
4. Wrong pile height setting
5. Open suction control
6. Hole in hose
7. Worn Power-Mate® brushes,
B, Worn or broken beii
9.. Dirty brush or brush supports
10. Canister hood open
1. Hose or hood elactrlcal connections
2. Tripped overload protector in
Power-Mate®
3. Tripped thermal protector
in canister
t. Power-Male® connedions
unplugged
2. Worn or broken belt
3. Dirty brush or brush supports
4. Tripped overload protector in
Powar-Mate'“
1. Full or clogged dust bag
2. Dirty filters
3. Clogged airflow passage
4. Certain attachment tools
1, Wrong pile heigh! setting
2, Suction too strong
1. Burned out light bulb
1. Dirty power cord,
2, Cord jammed
1. Wrong vacuuming pattern
POSSIBLE SOLUTION
1. Plug in (irmiy, push ON/OFF switch to ON.,
2. Reset circuit breaker or replace fuse
3- Reconnect hose arrds, (page 7)
4. Reset thermal protector, (page 111
1 Change bag, (page 13).
2, Clear airflow passages, (page 13),
3, Clean/change filters, (page 14,15)
4, Adjust setting, (page 9)
5, Adjust control, (page 12}
6, Replace hose
7,. Change brushes, (page IB)
a & g. See BELT CHANGING AND BRUSH
CLEANING, (pages 16, 17).
10, Close and latch hood
1. Check connections, recannec! hose
ends, (page 7)
2. Remove any ilems tha! may be caught
or jarnmed, then reset. If cleaner starts
and slops again, clean brush and brush
supports, then reset, (pages 16,17).
3. Reset thermal protector, (page 11)
1. Plug in firmly, (page 6)
2 8c 3, See BELT CHANGING AND BRUSH
CLEANING, (pages 16,17)
4. Check brush area for excassive lint
build-up or Jamming Ciean brush and
brush supports, then reset, (pages 16,17)
1. Change bag, (page 13}
2. Clean/change filters, (paga 14,15)
3. Clear clog from airflow passage, (page 13),
4. This is normal,Red should disappear
when tool la removed
1, Adjust setting, (page 9}
2. Open suction control, (page 16)
1. Change tight bulb, (paga 16)
1. Clean Ihe power oord
2, Puil out cord and rewind
1, See VACUUMING TIPS, (page 9)
18
Page 19

Get it fixed, at your home or ours!
For repair of major brand appliances in your own home
no matter who made it, no matter who sold It!
1-800-4-MY-HOME^
(1-800-469-4663)
www.sears.com
Anytime, day or night
(U.S,A. and Ganada)
www.sears.ca
For repair of carry-in products like vacuums, lawn equipment, and
electronics, call for the nearest Sears Parts and Repair Center.
1 -800-488-1222 Anytime, day or night (U.aA. only)
www.sears.com
For the replacement parts, accessories and owner’s manuals
that you need to do-it-yourself, call Sears parts Direct®^!
1-800-366-PART 6 a,m, -11 p.m., 7 days a week
(1-800-366-7278) (U,S.A.only)
www.sears.com/partsdirect
To purchase or inquire about a Sears Service Agreement
or Sears D/laintenance Agreement:
1-800-827-66S5 (U.S A.) 1 -800-361 -6665 (Canada)
7 a,rn. - 5 p.m., CST, Mon. - Sat. 9 a.m. - 8 p.m, EST, M - F, 4 p.m. Sat
Para pedir senecio de reparación a
domicilio, y para ordenar piezas:
1-888-SU-HOGAR®“
(1-888-784-6427)
Au Canada pour service en français;
1 800-LE-FOYER“^
(1-800-533-6937)
wvi/w,sears.ca
HomeCentraP
© Seare, Roebuck and Co,
® Registered Trademark / ™ Trademark / Service Mark of Sears, Roebuck and Co.
® Marca Registrada / ™ Marca de Fábrica / Marca de Servicio de Sears, Roebuck and Go.
McMarque de commerce! Marque déposée de Sears, Roebuck and Co.
19
 Loading...