

Kenmore 110.4443* Owner's Manual

Use & Care Guide
Use & Care Guide
Manual de uso y cuidado
Guide d’utilisation et d’entretien
English / Español / Français
Table of Contents...2 / Índice...27 / Table des matières...53
Models/Modelos/Modèles: 110.44422610
Manual de uso y cuidado
English / Español
Table of Contents...2 / Índice...27
Models/Modelos: 110.4443*
®
Compact Washer
Lavadora compacta
* = Color number, número de color
P/N W11239945A
Sears Brands Management Corporation
Hoffman Estates, IL 60179 U.S.A.
www.kenmore.com
Designed to use only HE High Efciency detergents.
Diseñada para utilizar solamente detergentes de alto rendimiento (HE).
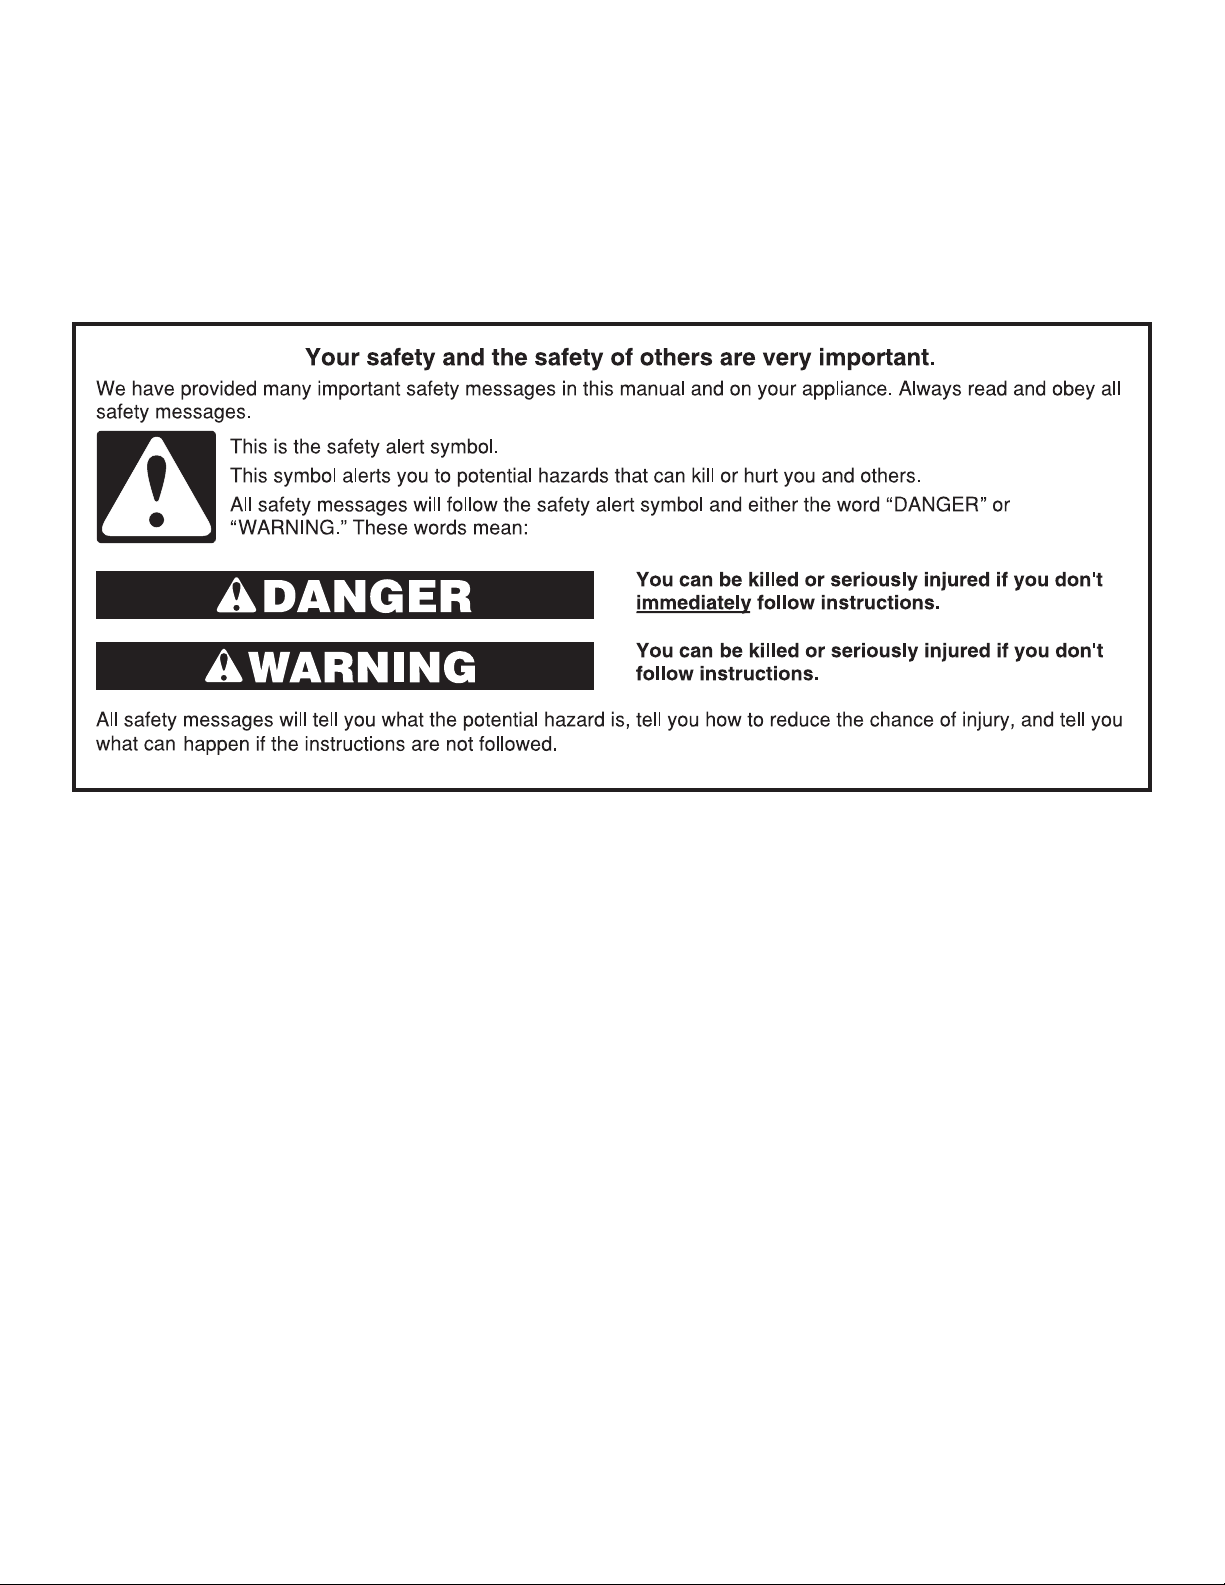
TABLE OF CONTENTS
WASHER SAFETY ..................................................................... 2
INSTALLATION REQUIREMENTS ............................................ 4
PERMANENT INSTALLATION INSTRUCTIONS .................... 7
PORTABLE INSTALLATION INSTRUCTIONS ....................... 11
CONTROL PANEL AND FEATURES ...................................... 14
WASHER SAFETY
USING YOUR WASHER ........................................................ 16
WASHER MAINTENANCE ..................................................... 19
TROUBLESHOOTING ............................................................ 21
WARRANTY ............................................................................. 26
ASSISTANCE OR SERVICE .................................... Back Cover
2
3
INSTALLATION REQUIREMENTS
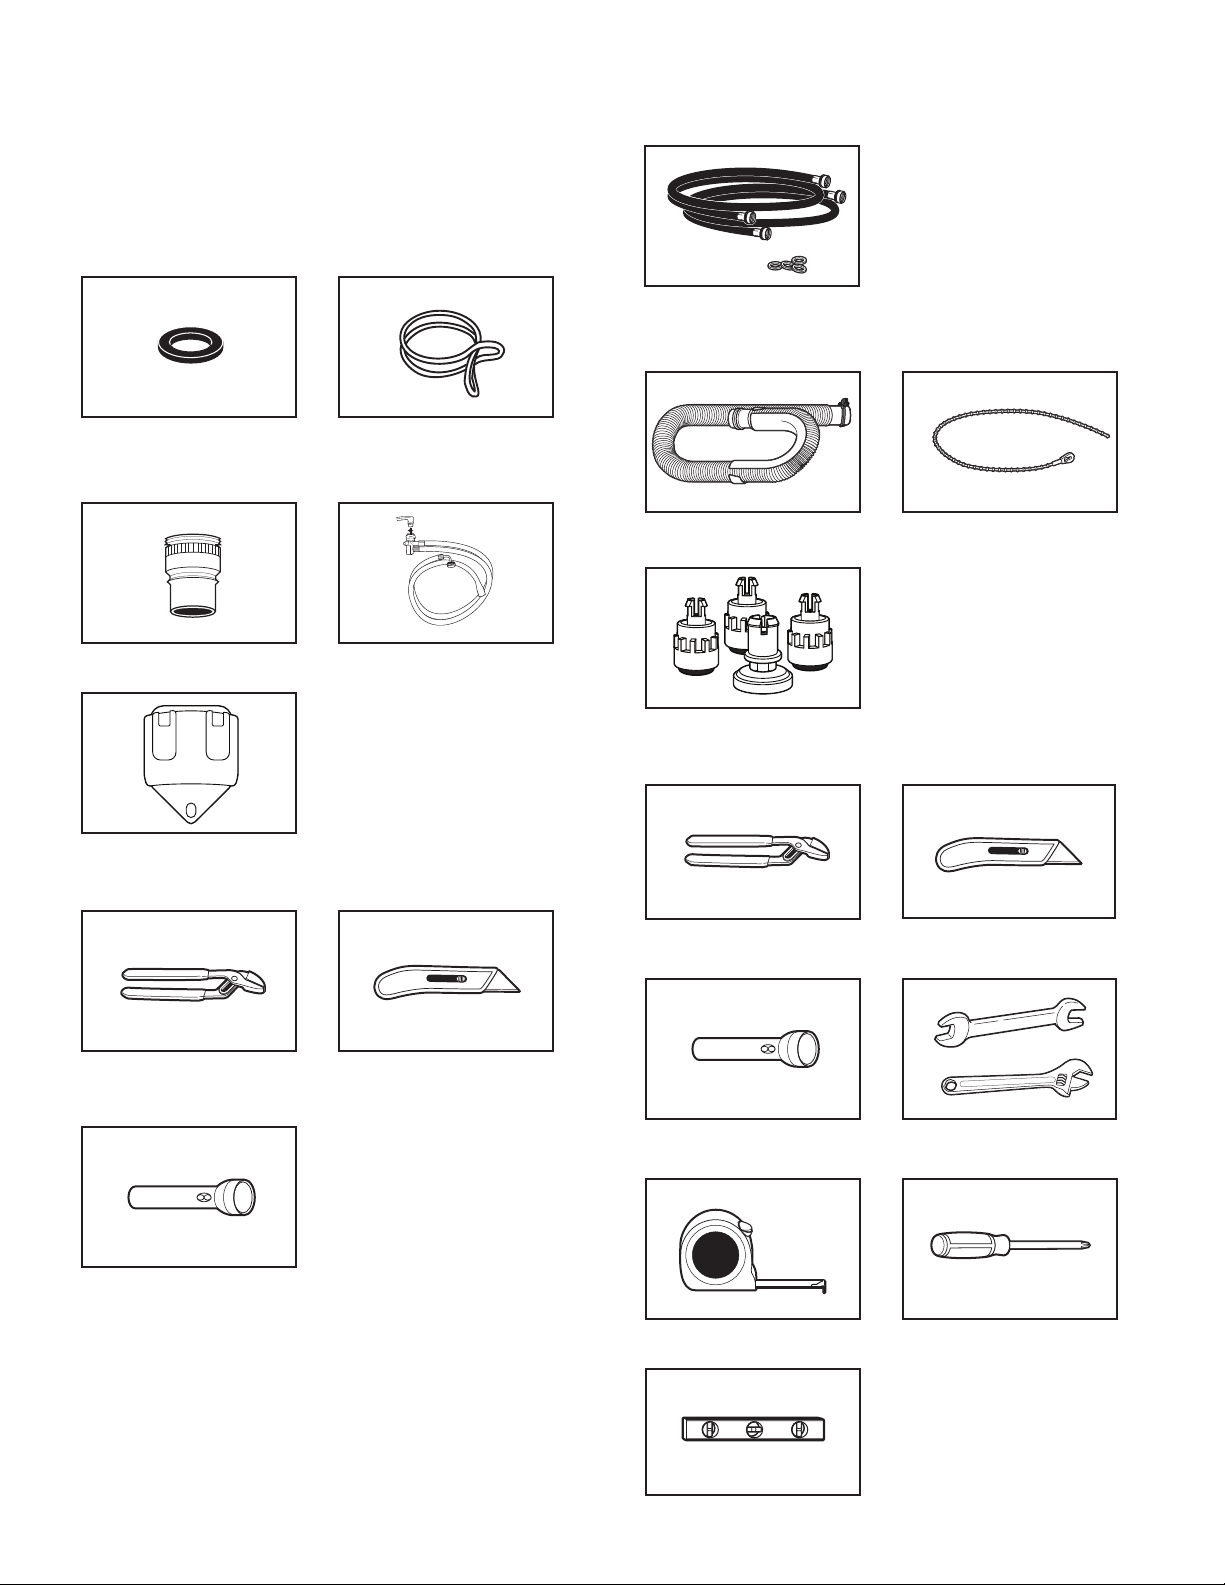
Tools and Parts
Gather the required tools and parts before starting installation.
The parts supplied are in the washer basket.
Portable Installation
Parts supplied:
Permanent Installation
Parts needed (not provided with washer):
NOTE: Replace inlet hoses
after 5 years of use to reduce
the risk of hose failure.
Record hose installation or
replacement dates for future
reference.
Inlet hoses with at washers
Parts supplied:
Flat washers for faucet
adapter and ll hoses
Faucet adapter Fill-and-drain hose
Hose bracket
Silver, double-wire hose
clamp (for bottom of drain
hose)
Tools needed for installation:
Drain hose with clamp
Leveling feet
Tools needed for installation
Pliers that open to
19/16" (3.95 cm)
Cable tie
Utility knife
Pliers that open to
19/16" (3.95 cm)
Flashlight (optional)
4
Utility knife
Flashlight (optional) Adjustable or open-end
wrench 9/16" (14 mm)
Measuring tape Phillips screwdriver
Level
Alternate Parts
Your installation may require additional parts. For information
on ordering, please refer to the back cover of this manual.
If You Have: You Will Need to Buy:
Laundry tub or standpipe
taller than 72" (183 cm)
1" (2.5 cm) diameter
standpipe
Sump pump system
(if not already available)
2" (5 cm) diameter to
1" (2.5 cm) diameter
standpipe adapter,
Part Number 3363920
Overhead sewer Standard 20 gal. (76 L)
39" (990 mm) tall drain tub
or utility sink, sump pump,
and connectors (available
from local plumbing suppliers)
Floor drain Siphon break, Part Number
285320; additional drain
hose, Part Number 3357090
and connector kit,
Part Number 285442
Water faucets beyond reach
of ll hoses
2 longer water ll hoses:
6 ft (1.8 m)
Part Number 76314
10 ft (3.0 m)
Part Number 350008
Drain hose too short Drain hose, Part Number
388423 and hose kit,
Part Number 285442
Drain hose that is too long Hose kit, Part Number
285442
Lint clogged drain Drain protector,
Part Number 367031
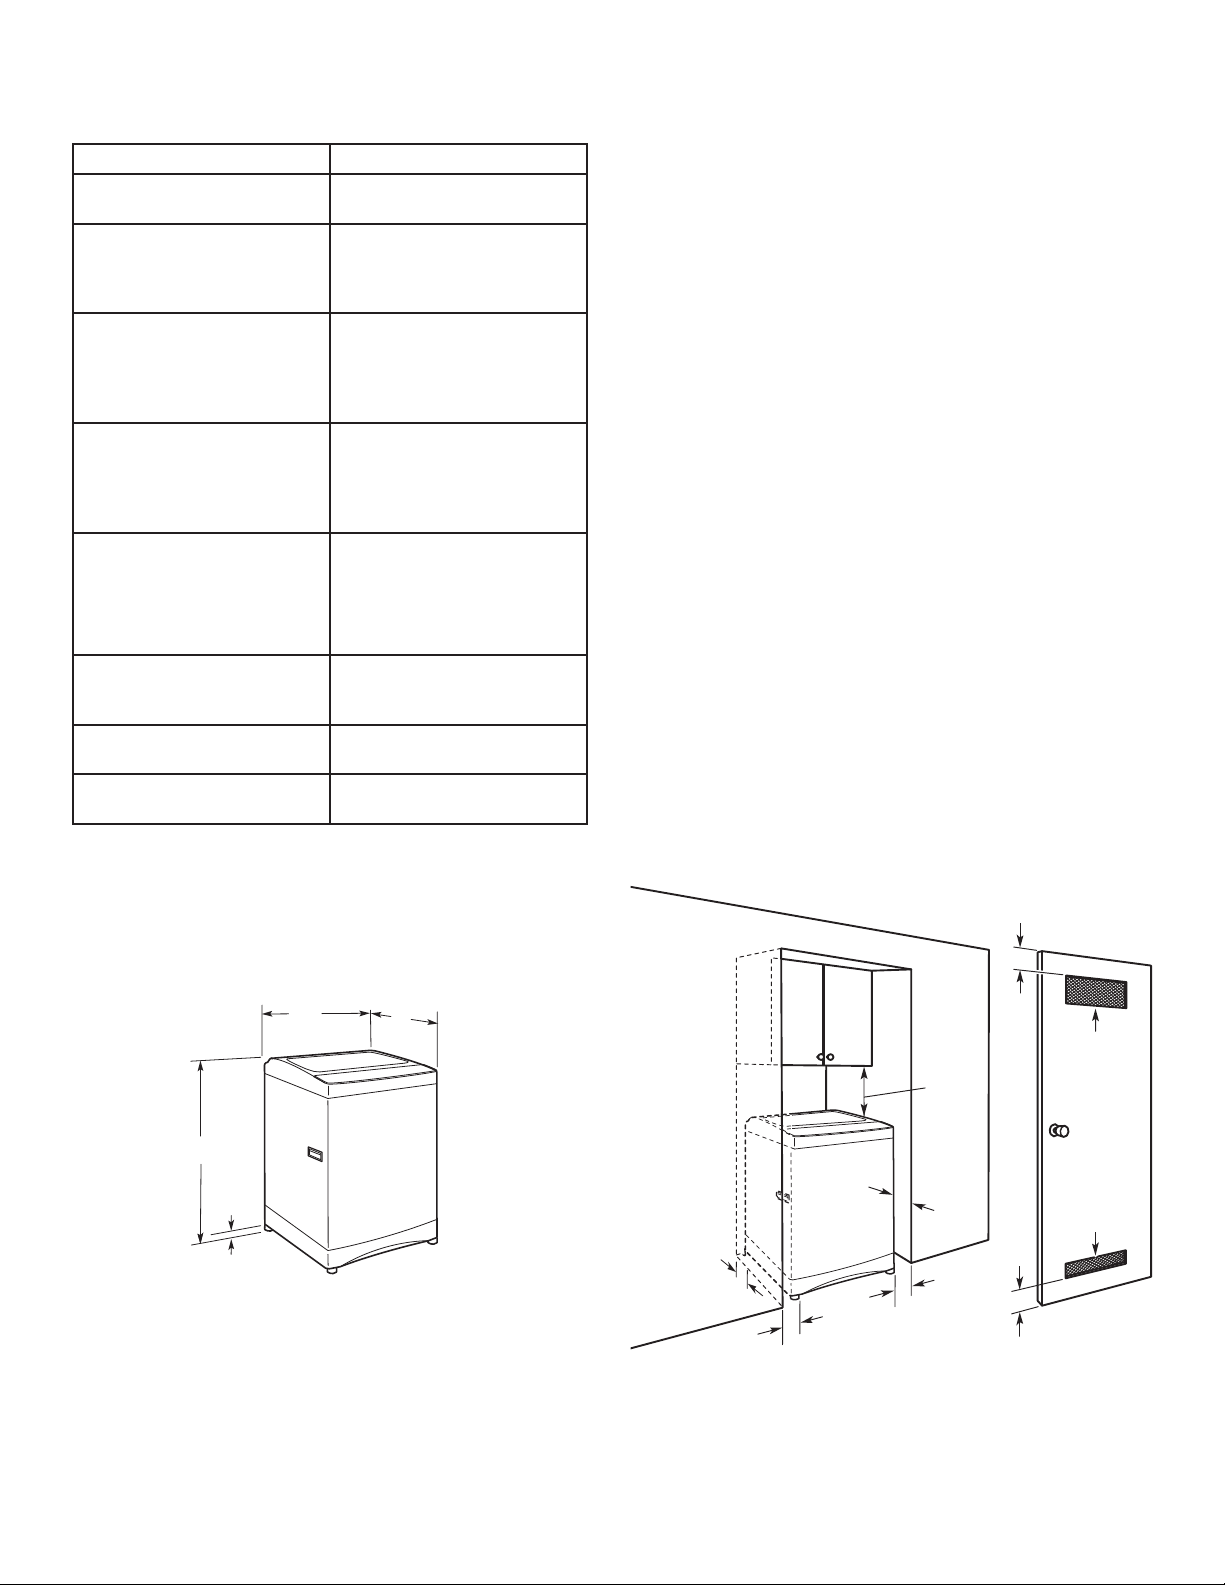
Location Requirements
Selecting the proper location for your washer improves
performance and minimizes noise and possible washer “walk.”
Your washer can be installed in a basement, laundry room,
closet, or recessed area. See “Drain System.”
Washer Dimensions
21"
(533 mm)
23"
(584 mm)
You will need:
■ A water heater set to deliver 120°F (49°C) water to
the washer.
■ A grounded electrical outlet located within 5 ft (1.5 m) of
where the power cord is attached to the back of the washer.
See “Electrical Requirements.”
■ Hot and cold water faucets located within 3½ ft (1.1 m)
of the hot and cold water ll valves, and water pressure of
5–100 psi (34.5–690 kPa).
■ A level oor with a maximum slope of ¾" (1.9 cm) under
entire washer. Installing the washer on carpeting is not
recommended.
■ A sturdy oor to support the washer weight (washer, water,
and load) of 225 lbs (102 kg).
Do not store or operate your washer in temperatures at or
below 32°F (0°C). Some water can remain in the washer and
can cause damage in low temperatures. See “Washer Care”
for winterizing information.
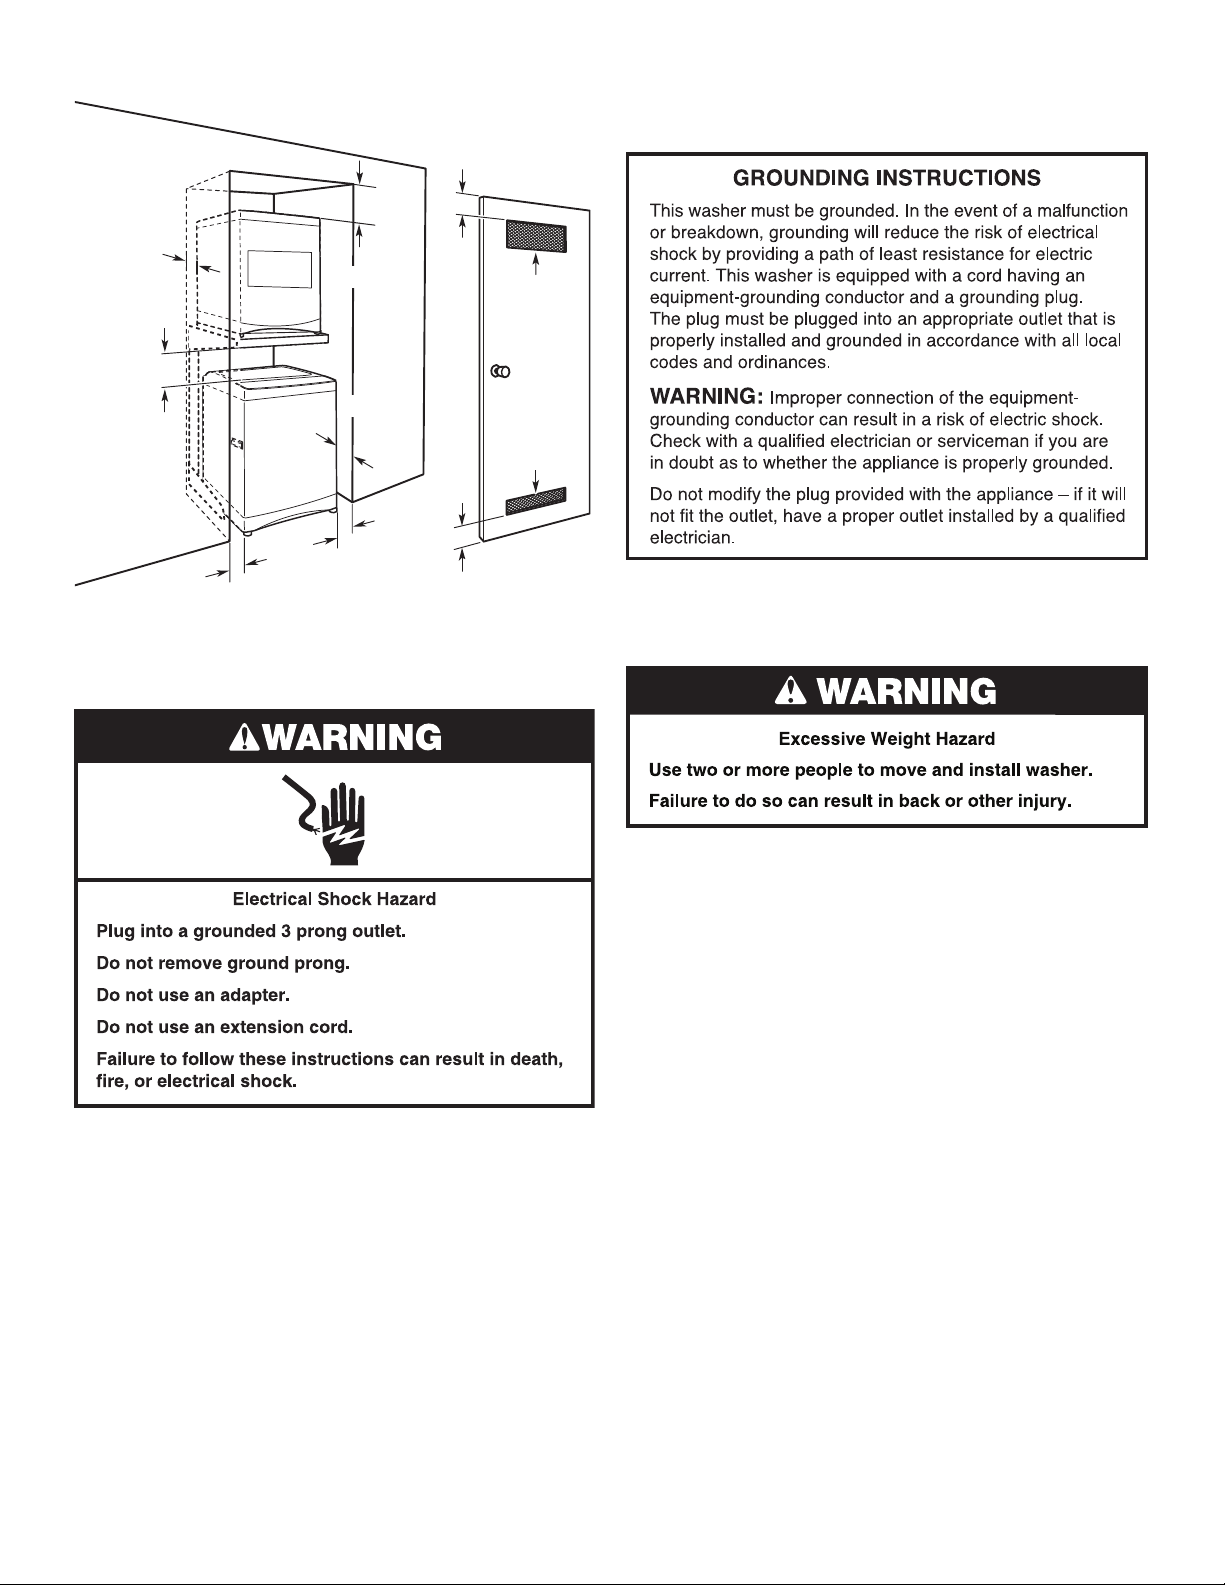
Recessed area or closet installation
The dimensions shown are for the recommended spacing
allowed, except the closet door ventilation openings. The
dimensions shown for the closet door ventilation openings
are the minimum required.
■ Additional spacing should be considered for ease of
installation and servicing.
■ Additional clearances may be required for wall, door,
and oor moldings.
■ Additional spacing of 1" (2.5 cm) on all sides of the washer
is recommended to reduce noise transfer.
■ If a closet door is installed, the minimum air openings
in the top and bottom of the door are required. Louvered
doors with air openings in the top and bottom are
acceptable.
■ Companion appliance spacing should also be considered.
Washer Only
3"
(76 mm)
2
48 in.
(310 cm2)
12"
(305 mm)
37"
(940 mm)
3
/4"
(19 mm)*
*Minimum measurement with leveling feet installed.
IMPORTANT: Do not install or store the washer where it will
be exposed to the weather.
Proper installation is your responsibility.
4"
(102 mm)
1"
(25 mm)
Recessed area
1"
(25 mm)
1"
(25 mm)
(76 mm)
Closet door with vents
3"
2
24 in.
(155 cm2)
5
Stacked
(76 mm)
(305 mm)
3"
12"
1"
(25 mm)
Recessed area
12"
(305 mm)
DRYER
WASHER
1"
(25 mm)
1"
(25 mm)
3"
(76 mm)
2
48 in.
(310 cm2)
2
24 in.
(155 cm2)
3"
(76 mm)
Closet door with vents
■ Check with a qualied electrician if you are not sure the
washer is properly grounded.
■ Do not have a fuse in the neutral or ground circuit.
Remove Shipping Material
Before you install your washer, remove all shipping material.
Electrical Requirements
■ A 120 V, 60 Hz., AC only, 15 or 20 A, fused electrical
supply is required. A time-delay fuse or circuit breaker is
recommended. It is recommended that a separate circuit
serving only this appliance be provided.
■ This washer is equipped with a power supply cord having
a 3 prong grounding plug.
■ To minimize possible shock hazard, the cord must be plugged
into a mating, 3 prong, grounding-type outlet, grounded in
accordance with local codes and ordinances. If a mating
outlet is not available, it is the personal responsibility and
obligation of the customer to have the properly grounded
outlet installed by a qualied electrician.
■ If codes permit and a separate ground wire is used, it is
recommended that a qualied electrician determine that
the ground path is adequate.
■ Do not ground to a gas pipe.
To avoid damaging oor, use a large at piece of cardboard
from the washer carton. Place cardboard under entire back
of the washer.
Firmly grasp the body of the washer and gently lay it on the
corner posts.
Remove plastic foam packaging from underneath the washer.
Stand the washer up.
Remove tape from washer lid. Open washer lid and remove
foam shipping piece, parts bag, and hoses from washer basket.
Close the lid.
6
Drain System
(114 mm)
(114 mm)
The washer can be installed using the standpipe drain system
(oor or wall), the laundry tub drain system, or the oor drain
system. Select the drain hose installation method you need.
See “Tools and Parts.”
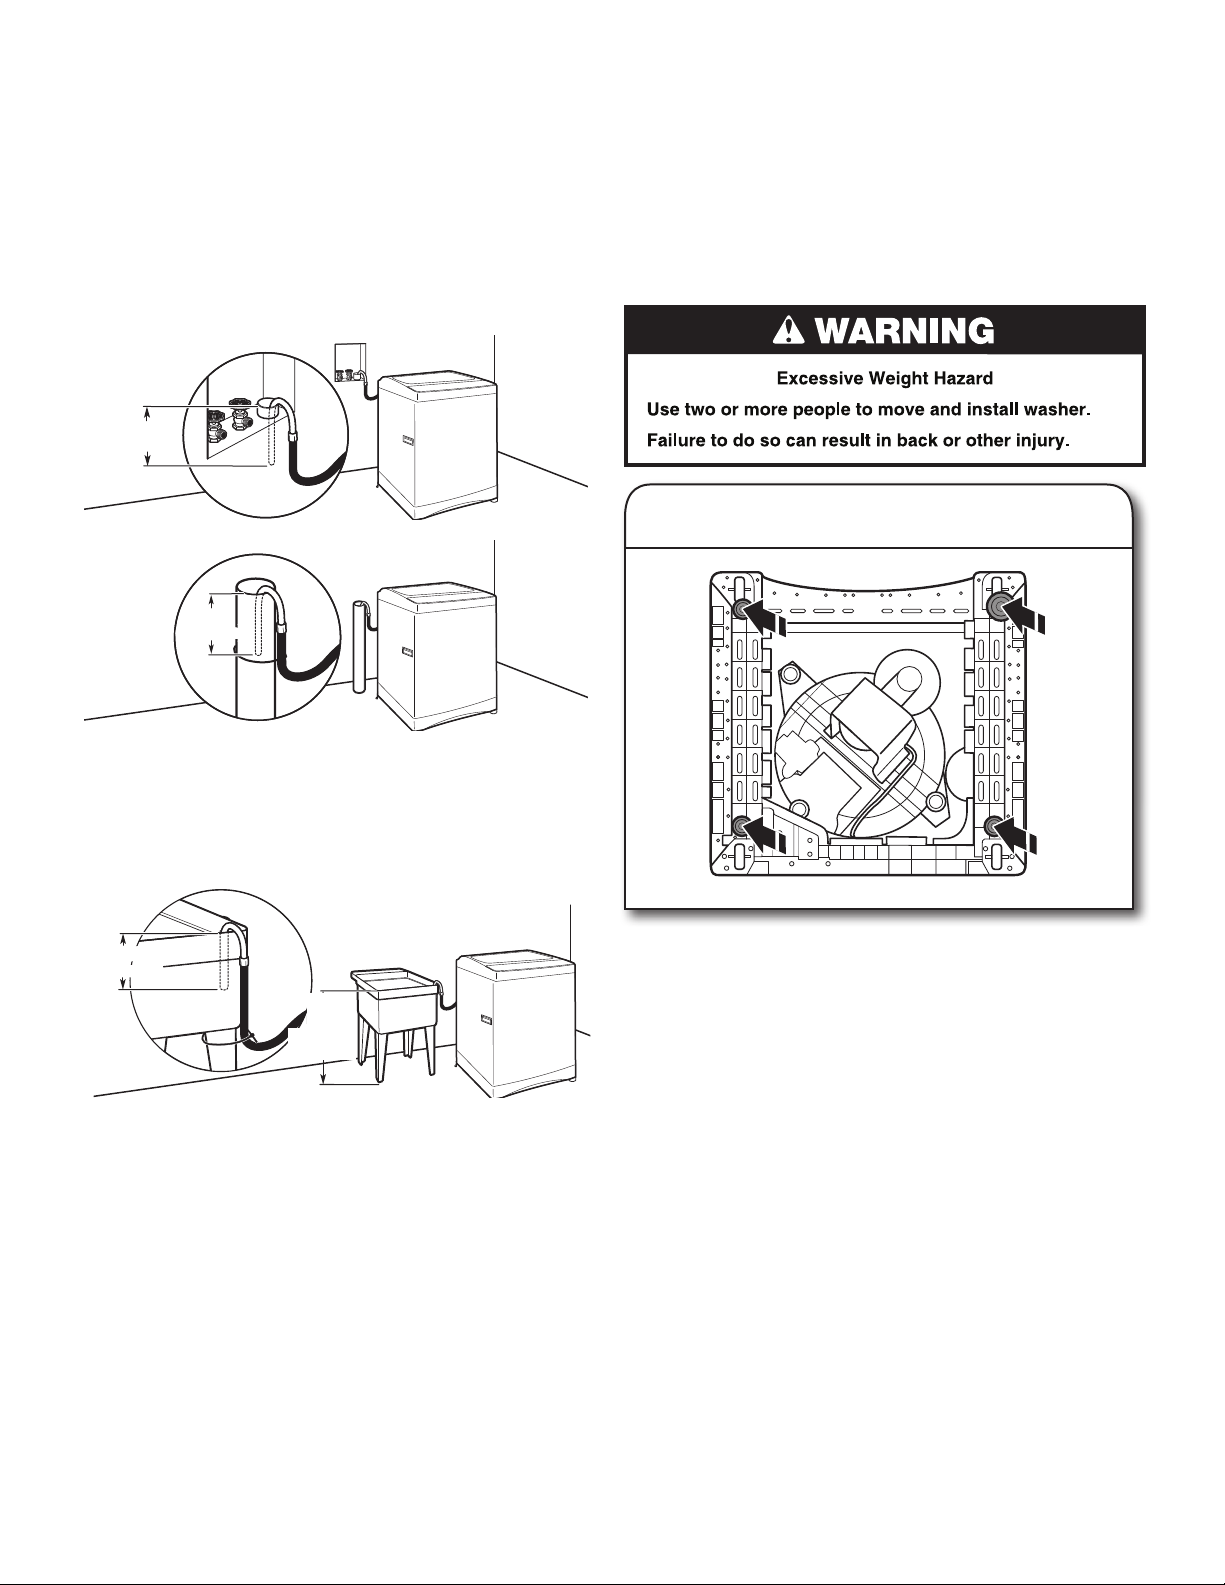
Standpipe drain system – wall or floor (views A & B)
The standpipe drain requires a minimum diameter standpipe
of 2" (50 mm). The minimum carry-away capacity (for permanent
installations) can be no less than 17 gal. (64.5 L) per minute.
The top of the standpipe must be at least 39" (990 mm) high
and no higher than 72" (183 cm) from the bottom of the washer.
4.5"
(114 mm)
PERMANENT INSTALLATION
INSTRUCTIONS
Install Leveling Feet – Optional
(for permanent installation only)
IMPORTANT: Installation of the leveling feet is permanent.
Once the leveling feet are installed into the base of the washer,
they cannot be removed and the washer wheels will no longer be
able to roll.
A
4.5"
4.5"
(114 mm)
(114 mm)
B
Laundry tub drain system (view C)
The laundry tub requires a minimum carry-away capacity
of 17 gal. (64.5 L) per minute (for permanent installations).
The top of the laundry tub must be at least 39" (990 mm) above
the oor and no higher than 72" (183 cm) from the bottom of
the washer.
4.5"
4.5"
min.
min.
39"
30"
(990 mm)
(762 mm)
C
1. Install leveling feet
Front
Large
black
rubber
foot
Lay washer on its back. Push in to snap the large black rubber
foot into the right front corner of the washer base. Repeat to
install the remaining leveling feet on the other 3 corners.
7
■ To avoid damage to the oor, set the washer onto
cardboard before moving across oor.
■ Move the washer to within approximately 3 ft (900 mm)
of the nal location.
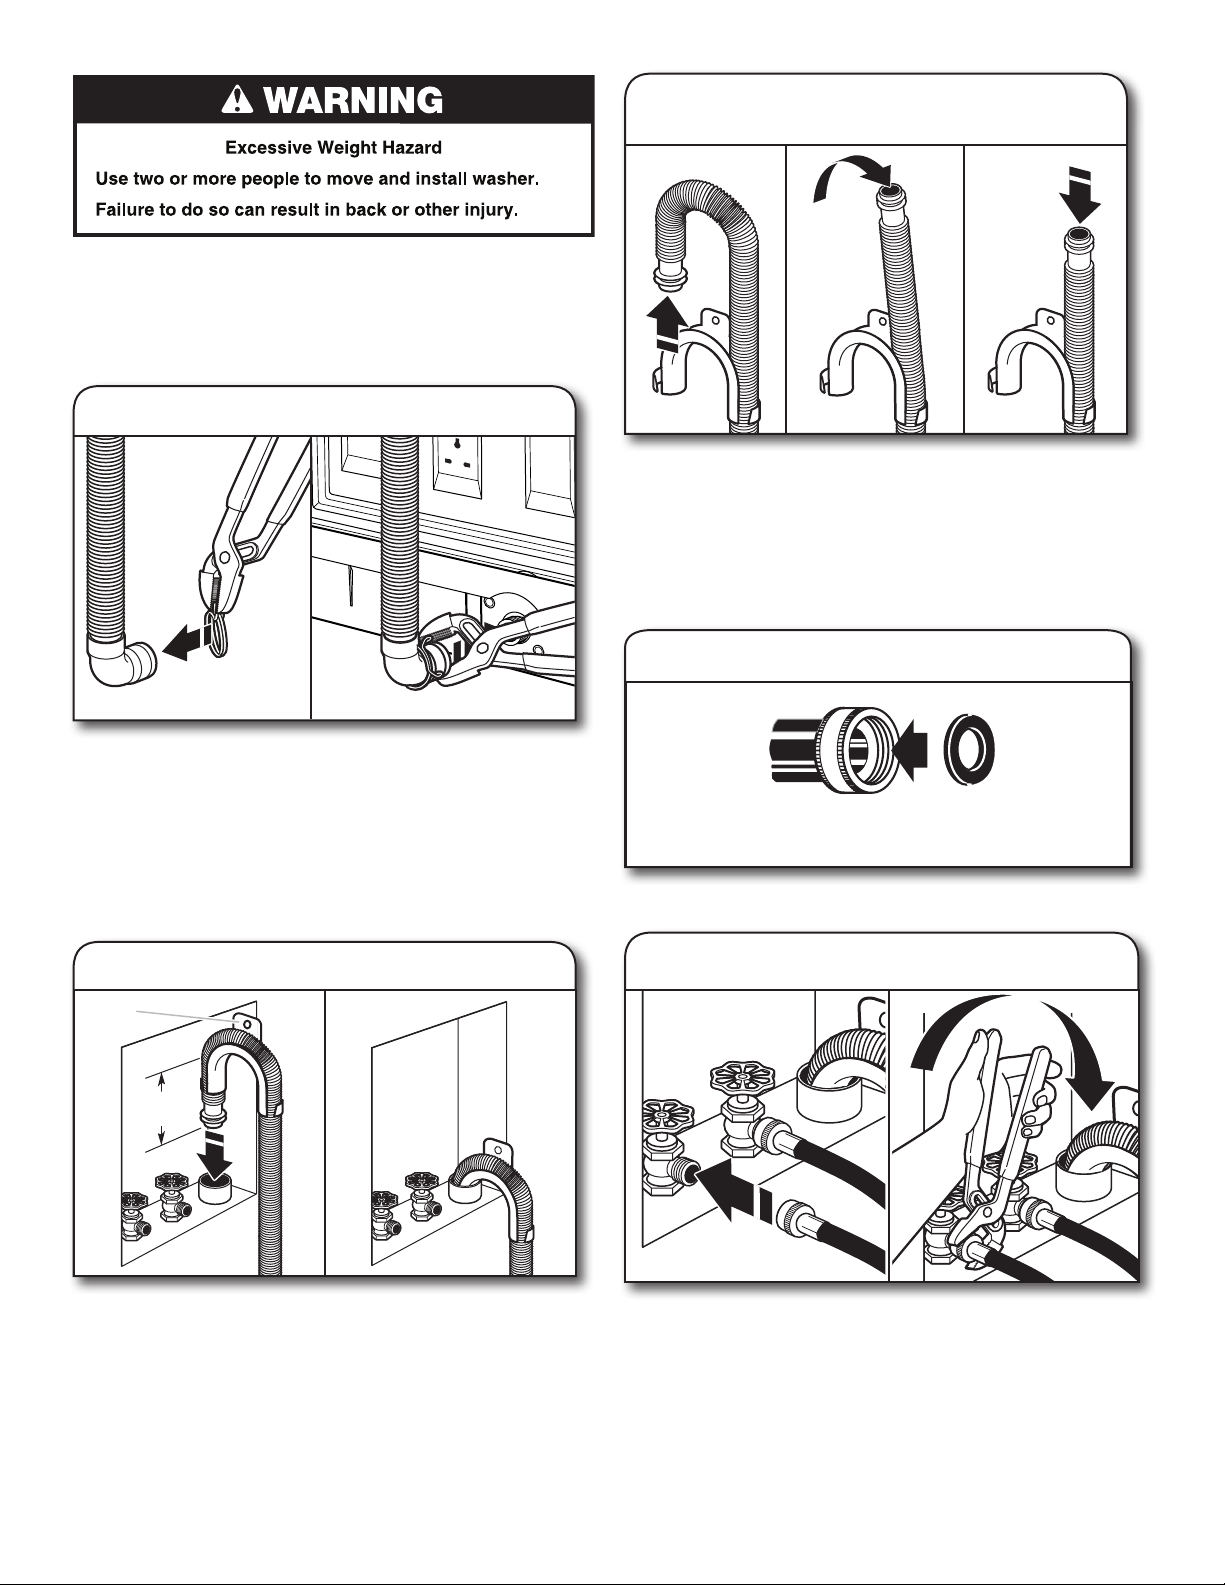
Connect Drain Hose
2. Attach drain hose to drain port
4. Remove drain hose form
(Floor drain installations only)
For oor drain installations, you will need to remove the drain hose
form from the end of the drain hose. You may need additional parts
with separate directions. See “Tools and Parts.”
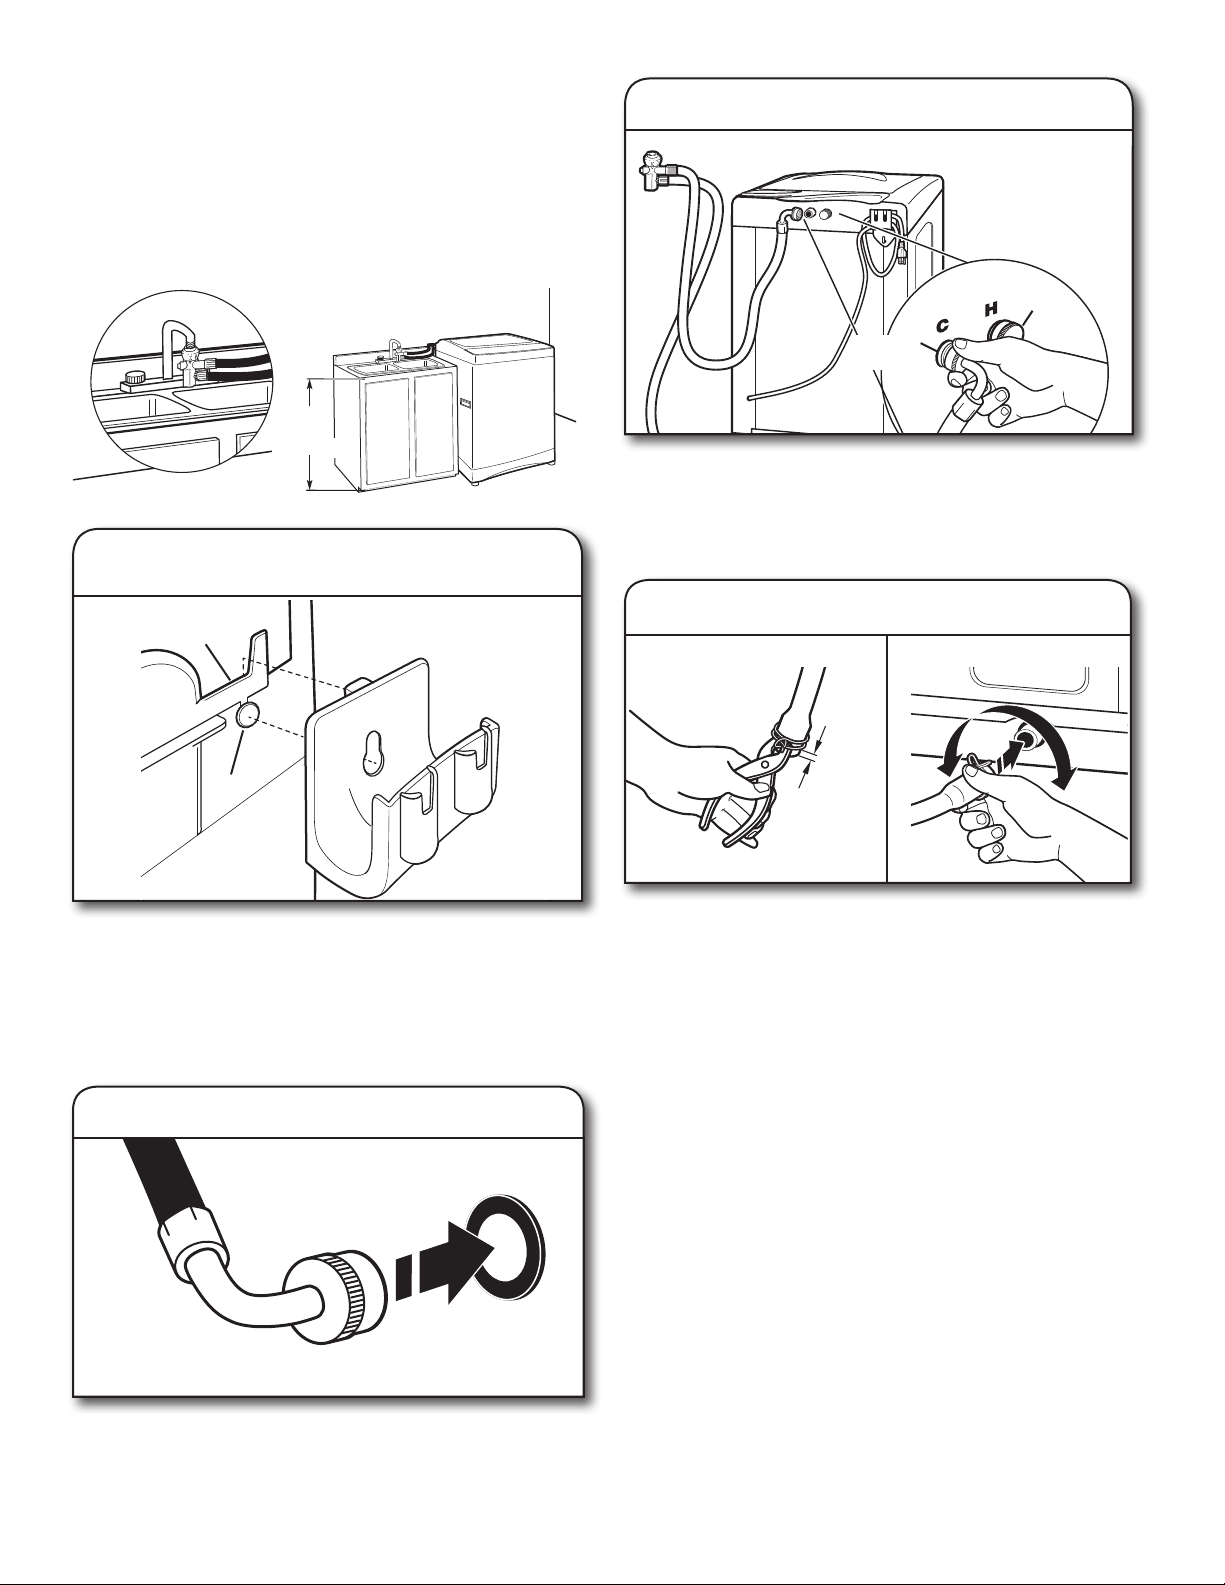
Connect Inlet Hoses
The washer must be connected to the water faucets using
new inlet hoses (not provided). Do not use old hoses.
5. Insert new at washers into inlet hoses
If clamp is not already in place on elbow end of drain hose,
slide it over end as shown. Squeeze clamp with pliers and slide
black elbow end of drain hose onto black drain port and secure
with clamp.
For a laundry tub or standpipe drain, go to step 3.
For a oor drain, remove the pre-installed drain hose form
as shown in Step 4.
Install Drain Hose
3. Place drain hose in standpipe
Drain
hose form
4.5"
(114 mm)
Place hose into standpipe (shown in picture) or over side
of laundry tub.
IMPORTANT: 4.5" (114 mm) of drain hose should be inside
standpipe; do not force excess hose into standpipe or lay
on bottom of laundry tub. Drain hose form must be used.
Coupling Washer
Insert new at washers (not provided) into each end of the inlet
hoses. Firmly seat the washers in the couplings.
6. Connect inlet hoses to water faucets
Check that the washer basket is empty.
Attach hose to hot water faucet. Screw on coupling by hand
until it is seated on washer. Use pliers to tighten couplings an
additional 2/3 turn. Repeat this step with second hose
for cold water faucet.
IMPORTANT: Do not overtighten or use tape or sealants on
valve when attaching to faucets or washer. Damage can result.
8
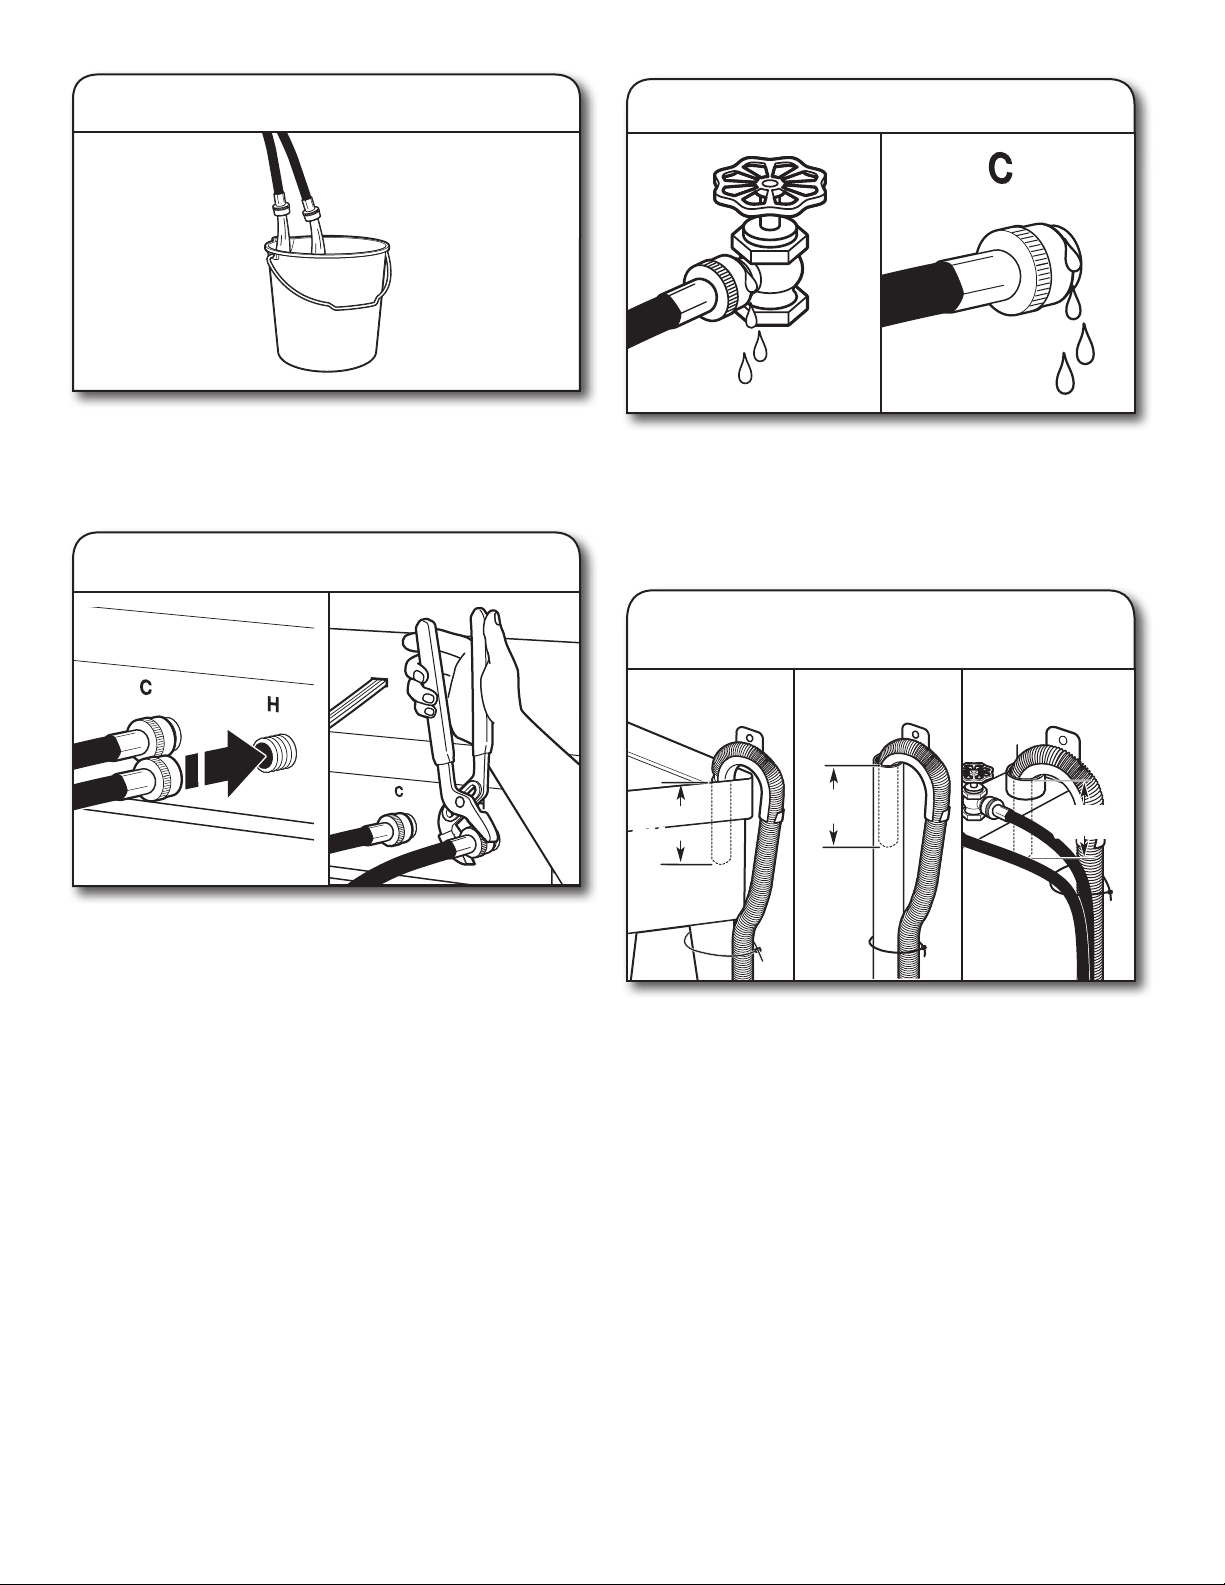
7. Clear water lines
9. Check for leaks
Run water for a few seconds through hoses into a laundry tub,
drainpipe, or bucket to avoid clogs. Water should run until clear.
Make note of which hose is connected to hot water to help
in attaching hoses to washer correctly.
8. Connect inlet hoses to washer
Remove inlet cap and attach hot water hose to hot water (right)
inlet valve. Screw coupling by hand until it is snug. Use pliers
to tighten couplings an additional 2/3 turn. Repeat with cold
water (left) inlet valve.
IMPORTANT: To reduce risk of hose failure, replace the hoses
every 5 years. Record hose installation or replacement dates
for future reference.
■ Periodically inspect and replace hoses if bulges, kinks, cuts,
wear, or leaks are found.
Turn on water faucets to check for leaks. A small amount of
water may enter washer. It will drain later.
■ If you connect only one water hose, you must cap (supplied)
off the remaining water inlet port.
Secure Drain Hose
10. Secure drain hose to laundry tub,
standpipe or wall
Laundry Tub Standpipe Wall
4.5"
4.5"
(114 mm)
(114 mm)
Secure drain hose to laundry tub leg, drain standpipe, or inlet
hoses for wall standpipe with cable tie (provided).
■ Do not force excess drain hose back into the rear of
the washer.
■ To avoid siphoning, do not seal or put more than 4½"
(114 mm) of the drain hose into drainpipe or standpipe.
4.5"
(114 mm)
4.5"
4.5"
(113 mm)
(114 mm)
9
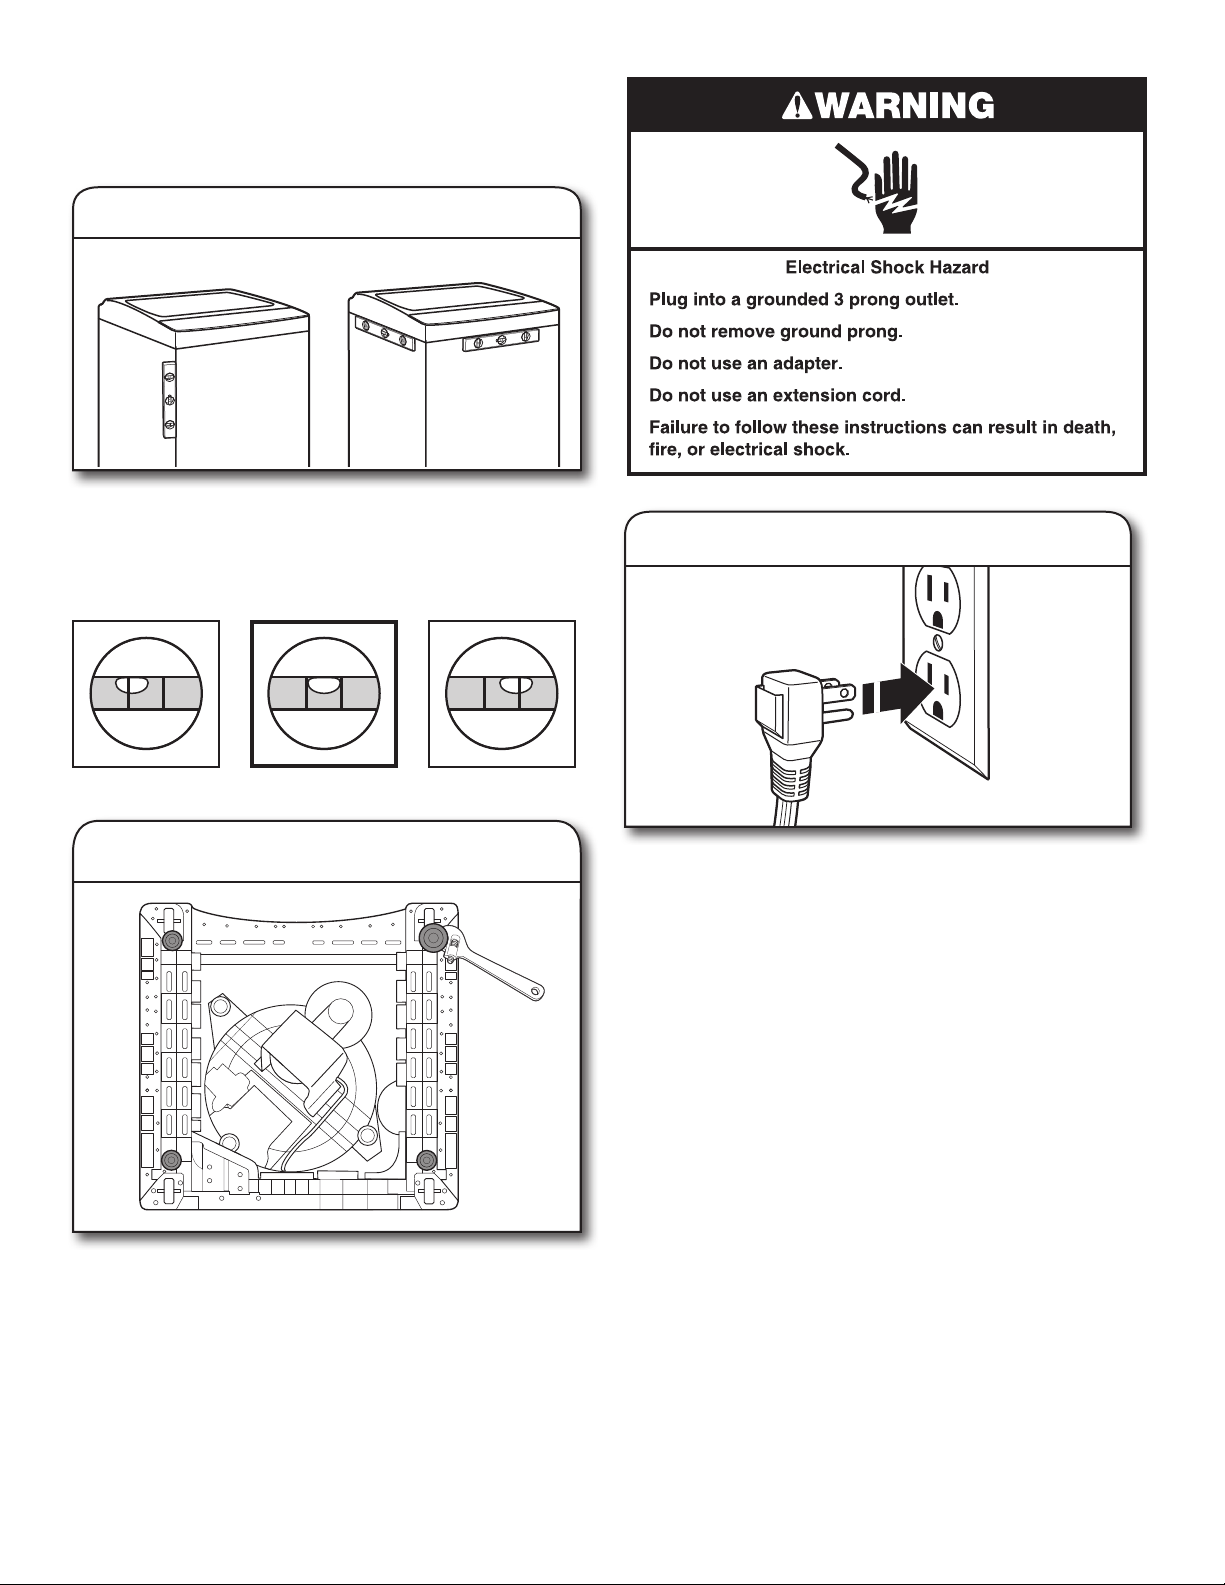
Level the Washer
IMPORTANT: Level washer properly to reduce excess noise
and vibration.
For Permanent Installations:
11. Check levelness of washer
B C
A
Move the washer to its nal location. Place a level even with top
edges of washer (B). Use side seam as a guide to check
levelness
of sides (A). Check levelness of front using lid, as shown (C).
Rock washer back and forth to make sure all 4 feet make
solid contact with oor.
13. Plug into a grounded 3 prong outlet
Not Level LEVEL Not Level
12. Adjust leveling foot
If the washer is not level, lay washer on its back to adjust the
large black rubber leveling foot. If the washer is against a wall,
move the washer out slightly before laying on its back.
Use a crescent wrench to adjust the large black rubber leveling
foot up or down as necessary.
NOTE: The 3 smaller leveling feet are not adjustable.
For Portable Installations:
Check the levelness of the oor. If oor is not level, move washer
to a level oor area.
Complete Installation Checklist
❑ Check electrical requirements. Be sure you have correct
electrical supply and recommended grounding method.
❑ Check that all parts are now installed. If there is an extra
part, go back through steps to see what was skipped.
❑ Check that you have all of your tools.
❑ Check that shipping materials were completely removed
from washer.
❑ Check that water faucets are on.
❑ Check for leaks around faucets and inlet hoses.
❑ Remove protective lm from console and any tape
remaining on washer.
❑ Check that washer is plugged into a grounded
3 prong outlet.
❑ Dispose of/recycle all packaging materials.
❑ Read “Washer Maintenance.”
❑ To test and clean your washer, measure ½ of normal
recommended amount of powdered or liquid detergent
and pour it into washer basket or detergent dispenser
(on some models). Close lid. Select any cycle. Start
washer and allow to complete full cycle.
10
PORTABLE INSTALLATION
INSTRUCTIONS
Drain System
The washer must drain into a sink or laundry tub with
a carry-away capacity of 17 gal. (64.5 L) per minute
(for portable installations). The top of the tub must be
at least 27" (686 mm) above oor and no higher than
48" (121.9 cm) from the bottom of the washer.
min.
27"
(686 mm)
1. Attach hose bracket
Slot
3. Connect ll hose
Cap
Connect
hose
Attach the ll hose to the cold water (left) inlet valve.
Tighten coupling by hand. Use pliers to make an additional
2/3 turn.
NOTE: Do not overtighten. Damage to the valves can result.
Hot water (right) inlet valve is capped. Leave this valve capped.
4. Connect drain hose
Post
Place the hose bracket over the post on the back of the washer
and position the the tab so it will insert into the slot. Push down
to lock into place.
Connect Fill-And-Drain Hose
Proper connection of the ll-and-drain hose will protect your
oors from damage due to water leakage.
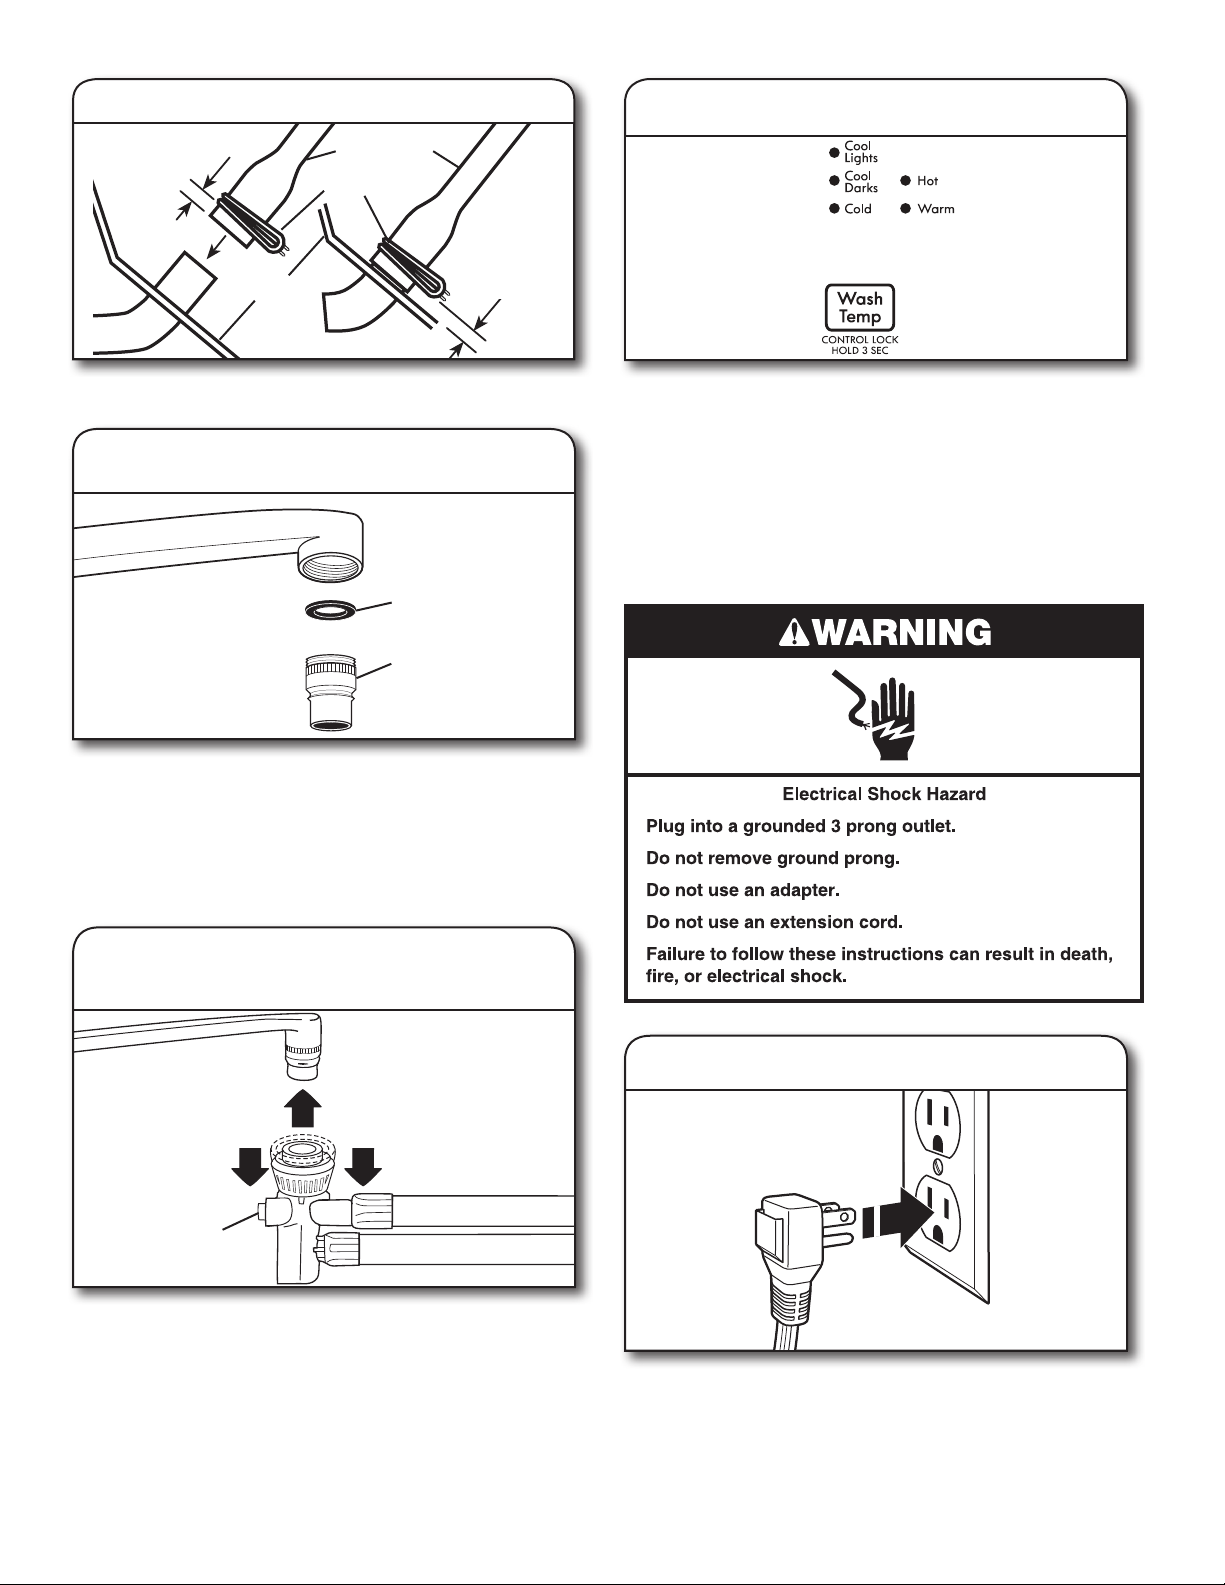
2. Insert new at washer into inlet hose
¼"
(6 mm)
To keep the ll-and-drain hose from leaking, it must be installed
according to the following instructions.
IMPORTANT: To ensure proper installation, this procedure must
be followed exactly.
Wet inside end of the drain hose with tap water.
IMPORTANT: Do not use any lubricant other than water.
Squeeze ears of double-wire clamp with pliers to open. Place
clamp over the straight end of the drain hose ¼" (6 mm) from
the end. Twist hose back and forth while pushing down onto
drain connector at the bottom of the washer. Continue until
hose contacts the cabinet.
Coupling Washer
Insert new at washer (supplied) into the end of the inlet hose.
Firmly seat the washer in the coupling.
11
5. Secure drain hose
¼"
1
⁄4"
(6 mm)
(6 mm)
Cabinet
Drain hose
Clamp
1
¼"
⁄4"
(6 mm)
(6 mm)
8. Set WASH TEMP to Cold
Place clamp over area marked “CLAMP.” Release clamp.
6. Attach faucet kit adapter to faucet
Washer
Adapter
Proper connection of your faucet adapter kit will allow hot
and cold water to enter your washer properly. It also helps
avoid water damage due to leaks.
Attach the faucet adapter kit from the parts bag to your
faucet. A standard faucet adapter and washer are supplied.
Customized adapters are available from traditional plumbing
supply sources.
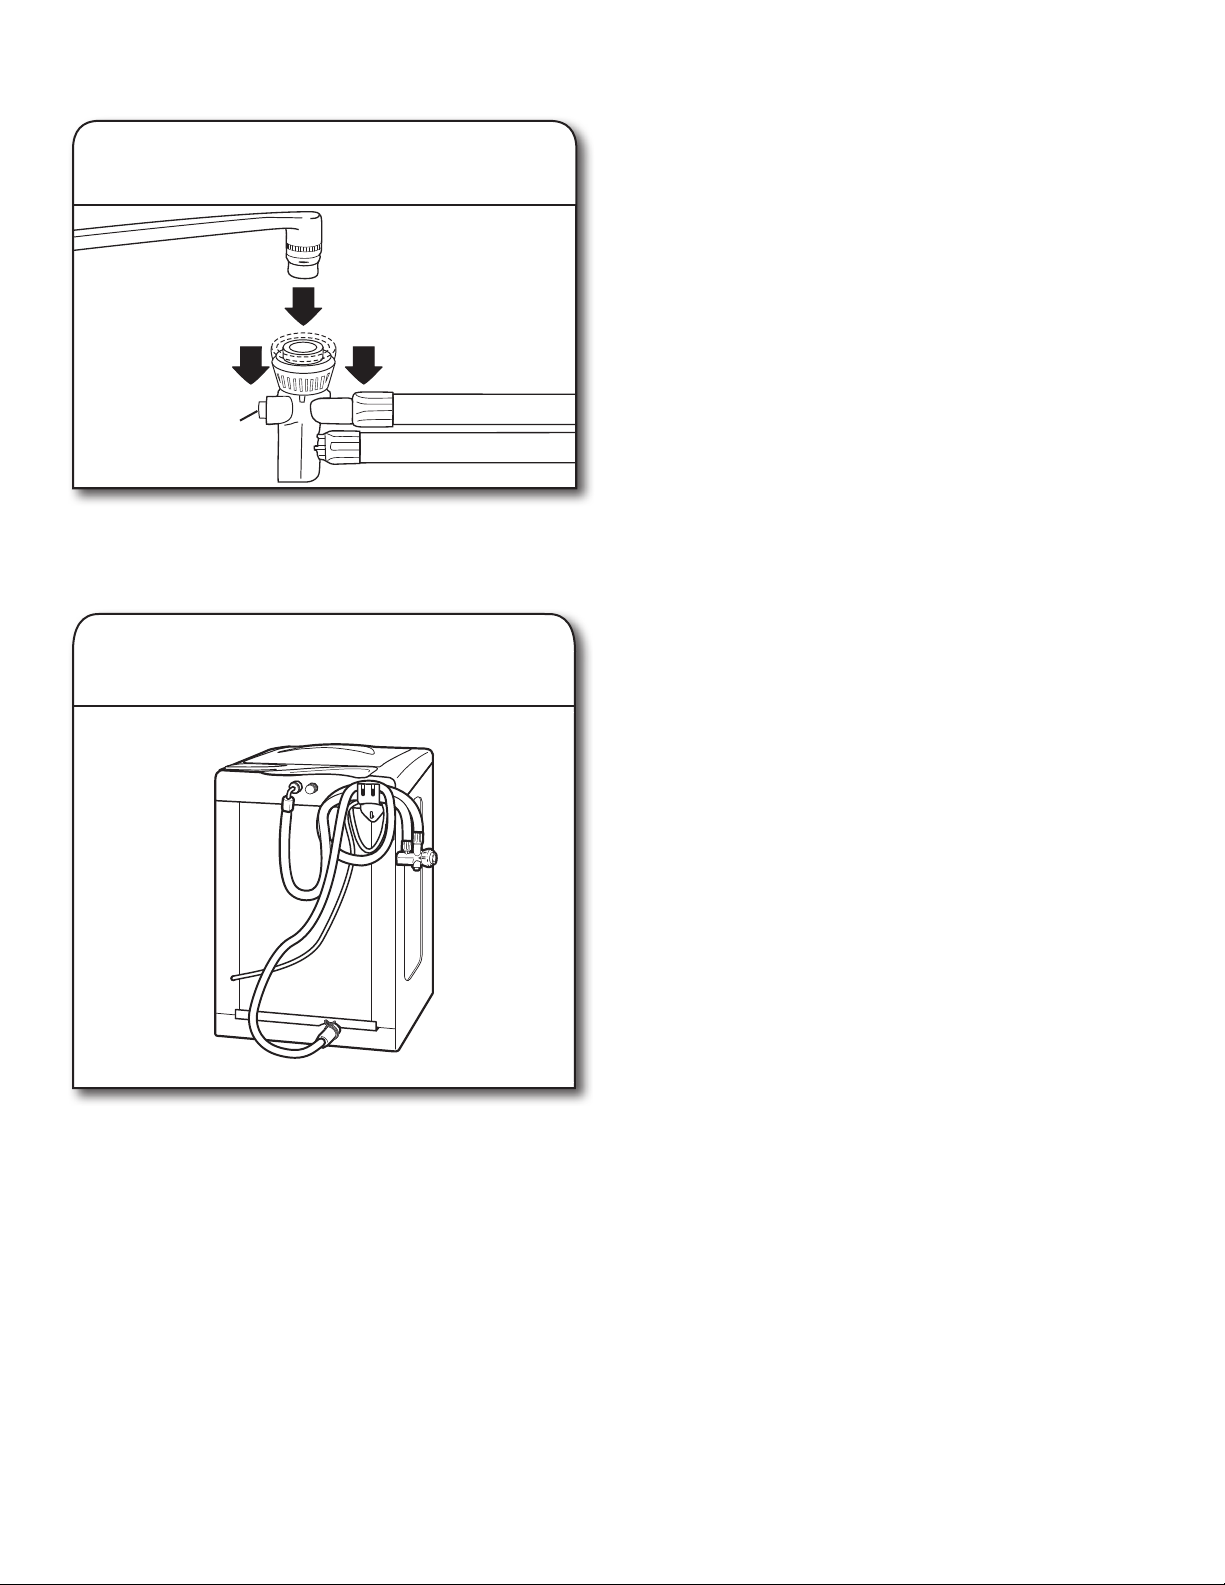
7. Attach ll-and-drain hose connector
to faucet
Set the temperature setting on your washer to Cold. Set
the water temperature for the Wash cycle by adjusting
the Hot and Cold water faucets. The Hot and Warm settings
are inactive with Portable Installation.
To test the water, press the red water-ow button on the hose
connector. Water will be released when the button is pressed,
allowing you to sample the temperature.
NOTE: If desired, you can change the water temperature for
the Rinse cycle by adjusting the Hot and Cold water faucets.
Keep the temperature setting on your washer set at Cold.
Red water-ow
button
Roll washer to sink area. It rolls and operates on wheels.
The wheels do not roll from side to side. Be sure your washer
is on a level oor to help avoid movement during spin.
Attach ll-and-drain hose connector to a single-spout
hot/cold water faucet. Move the locking collar down
while lifting the connector until it snaps into place.
12
9. Plug into a grounded 3 prong outlet
Disconnect Washer
1. Remove ll-and-drain hose connector
from faucet
Red water-ow
button
Turn off water faucets and unplug the power cord. Press the
red water-ow button to release water pressure in the hose.
Pull the locking collar down to remove the connector from
the faucet.
2. Replace ll-and-drain hose on storage
bracket
Complete Installation Checklist
❑ Check electrical requirements. Be sure you have correct
electrical supply and recommended grounding method.
❑ Check that all parts are now installed. If there is an extra
part, go back through steps to see what was skipped.
❑ Check that you have all of your tools.
❑ Check that shipping materials were completely removed
from washer.
❑ Check that water faucets are on.
❑ Check for leaks around faucets and inlet hoses.
NOTE: If the washer is attached to a faucet equipped with
a spray hose, the constant water pressure may cause the spray
hose to leak. To avoid possible failure, the spray hose should
be disconnected or replaced with a high-pressure hose.
❑ Remove protective lm from console and any tape remaining
on washer.
❑ Check that washer is plugged into a grounded 3 prong outlet.
❑ Dispose of/recycle all packaging materials.
❑ Read “Washer Maintenance.”
❑ To test and clean your washer, measure ½ of normal
recommended amount of powdered or liquid detergent
and pour it into washer basket or detergent dispenser
(on some models). Close lid. Select any cycle. Start
washer and allow to complete full cycle.
Pour water out of the ll-and-drain hose connector. Place ll-anddrain hose on the plastic holder in the back of the washer.
13
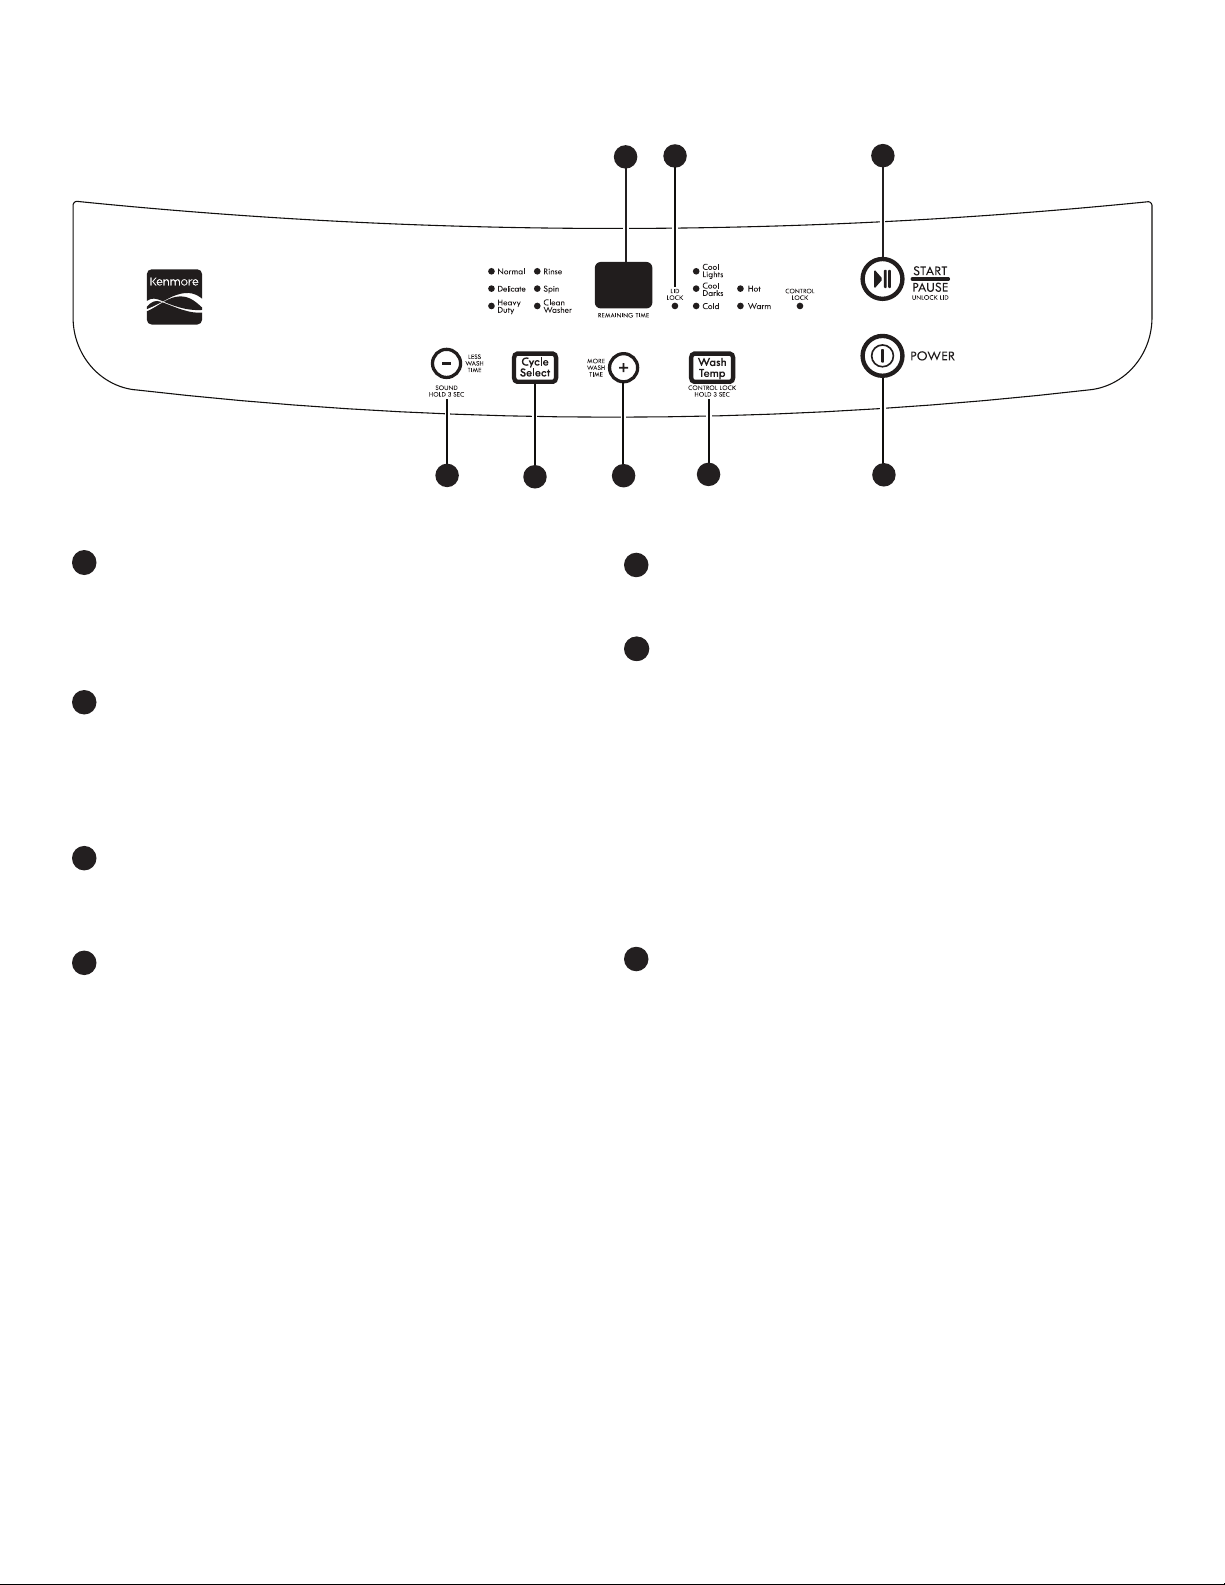
CONTROL PANEL AND FEATURES
2 3
1
4
1
LED TIME/STATUS DISPLAY
The Estimated Time Remaining display shows the time
required for the cycle to complete. Factors such as load size
and water pressure may affect the time shown in the display.
Tightly packed loads, unbalanced loads, or excessive suds
may cause the washer to adjust the cycle time as well.
2
LID LOCK LIGHT
The Lid Lock indicator lights up when the lid is locked and
cannot be opened. If you need to open the lid, touch and
hold START/PAUSE. The lid will unlock once the washer movement has stopped. This may take several minutes if the load
was spinning at high speed. Press START/PAUSE again to
restart the cycle.
3
START/PAUSE
After selecting a wash cycle, press START/PAUSE to start the
cycle. Press once to pause a cycle. The ashing lights indicate
the selected cycle and the current process.
4
CYCLE TIME (+ or -)
■ Press “+” or “-” to adjust the duration of a cycle.
■ LED display will show the time remaining for the cycle
to complete.
■ If an out-of-range adjustment is made, a buzzer will
sound.
End-of-Cycle Signal
Press and hold the plus (-) button for 3 seconds to enable
or disable the end-of-cycle signal.
5
4
5
76
6
7
CYCLE SELECT
Press CYCLE SELECT to select a wash cycle. Choose from
Normal, Delicate, Heavy Duty, Rinse, Spin, or Clean Washer.
WASH TEMP
Select a wash temperature based on the type of fabric and
soils being washed. For best results and following the garment
label instructions, use the warmest wash water safe for your
fabric.
For Portable Installations: If desired, you can change the
water temperature for the Rinse cycle by adjusting the Hot
and Cold water faucets. Keep the temperature setting on
your washer set at Cold.
CONTROL LOCK
Press and hold WASH TEMP for 3 seconds to lock the controls.
Press and hold for 3 seconds to unlock. You may still press
POWER to turn the washer off.
7
POWER
Press POWER to turn the washer on or off. Press once while
a cycle is running to stop the washer.
14
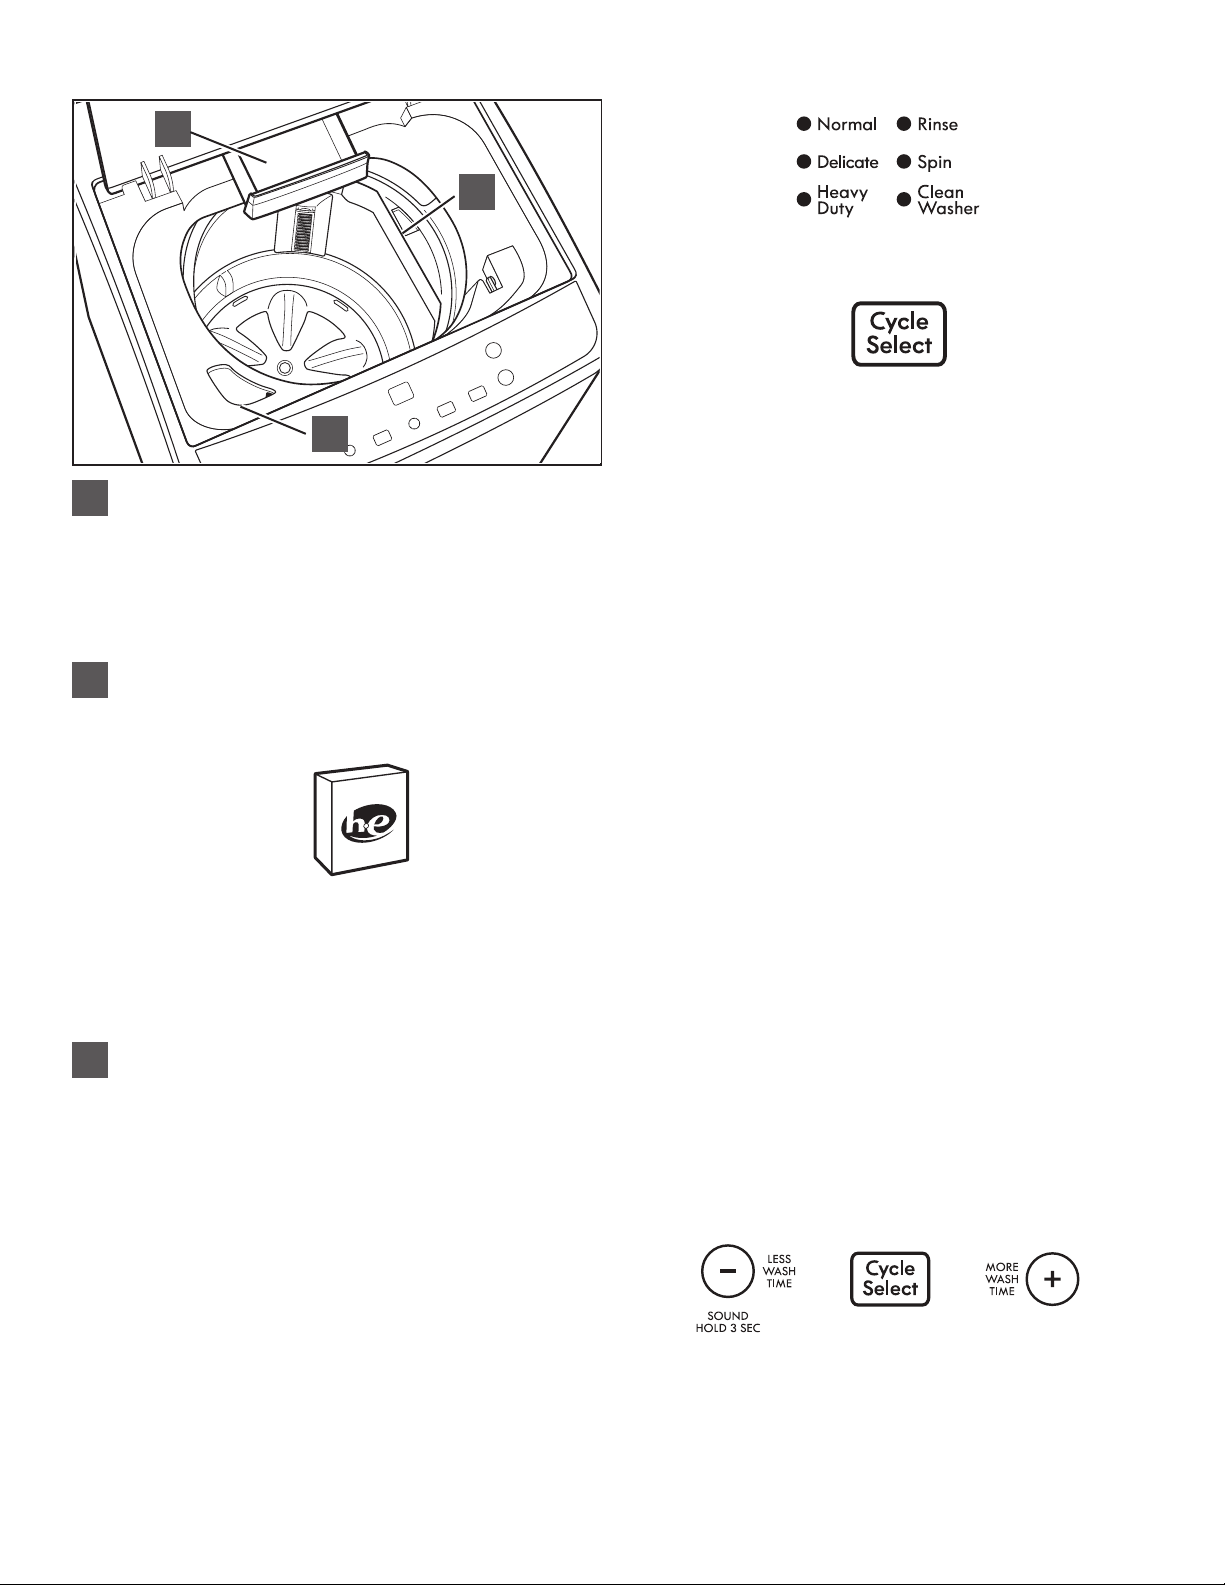
Dispensers
B
A
C
Liquid fabric softener dispenser
A
Pour measured liquid fabric softener into the liquid fabric
softener dispenser if desired. It will dispense automatically
at the optimum time.
Ƀ Use only liquid fabric softener in this dispenser.
NOTE: The fabric softener dispenser rotates around the
wash basket and may not be in the same spot each time.
High Efciency (HE) powdered detergent
B
dispenser
Add only powdered HE detergent product to this dispenser
for your main wash cycle.
Cycle Guide
This section describes the available wash cycles and will help you
make the best cycle selections for your wash loads. Each cycle is
designed for different types of fabric and soil levels. Always read
and follow fabric care labels instructions to avoid damage to your
items.
Normal
Use this cycle for normally soiled cottons and linens. Wash
combines medium-speed agitation and high-speed spin to shorten
drying time.
Delicate
Use this cycle for lingerie and loosely knit items. Wash combines
low-speed agitation for gentle soil removal and high-speed spin
to shorten drying time.
Heavy Duty
Use this cycle for sturdy or heavily soiled loads. Wash combines
high-speed agitation and high-speed spin for maximum soil
removal.
Use only High Efciency (HE) detergent.
NOTES:
■ Follow the manufacturer’s instructions to determine
the amount of detergent to use.
■ Add liquid HE detergent or single-dose packets
to the basket prior to adding laundry.
Liquid chlorine bleach dispenser
C
This dispenser holds up to ¾ cup (180 mL) liquid chlorine
bleach. The bleach will be automatically diluted and
dispensed at the optimum time during the Wash cycle.
This dispenser cannot dilute powdered bleach.
NOTE: Fill dispenser with only liquid bleach.
Choosing the Right Detergent
Use only High Efciency detergents. The package will be marked
“HE” or “High Efciency.” Low-water washing creates excessive
sudsing with a non-HE detergent. Using non-HE detergent will
likely result in longer cycle times and reduced rinsing performance.
It may also result in component failure and, over time, buildup
of mold or mildew. HE detergents should be low-sudsing and
quick-dispersing to produce the right amount of suds for the
best performance. They should hold soil in suspension so it is
not re-deposited onto clean clothes. Not all detergents labeled
as High Efciency are identical in formulation and their ability
to reduce suds. For example, natural, organic, or homemade
HE detergents may generate a high level of suds. Follow the
manufacturer’s instructions to determine the amount of detergent
to use.
Rinse
Use this cycle for additional rinsing of the washer load
or hand-washed items.
Spin
Use this cycle to remove excess water from the washer load
or hand-washed items.
Clean Washer
Use this cycle every 30 washes to keep the inside of your washer
fresh and clean. This cycle uses a higher water level. Use with
washer cleaner tablet or liquid chlorine bleach to thoroughly
clean the inside of your washer. This cycle should not be
interrupted.
IMPORTANT: Do not place garments or other items in the washer
during the Clean Washer cycle. Use this cycle with an empty
washtub.
End-of-Cycle Signal
The End-of-Cycle signal may be turned on and off by pressing
and holding the Cycle “-” button for 3 seconds.
15
USING YOUR WASHER
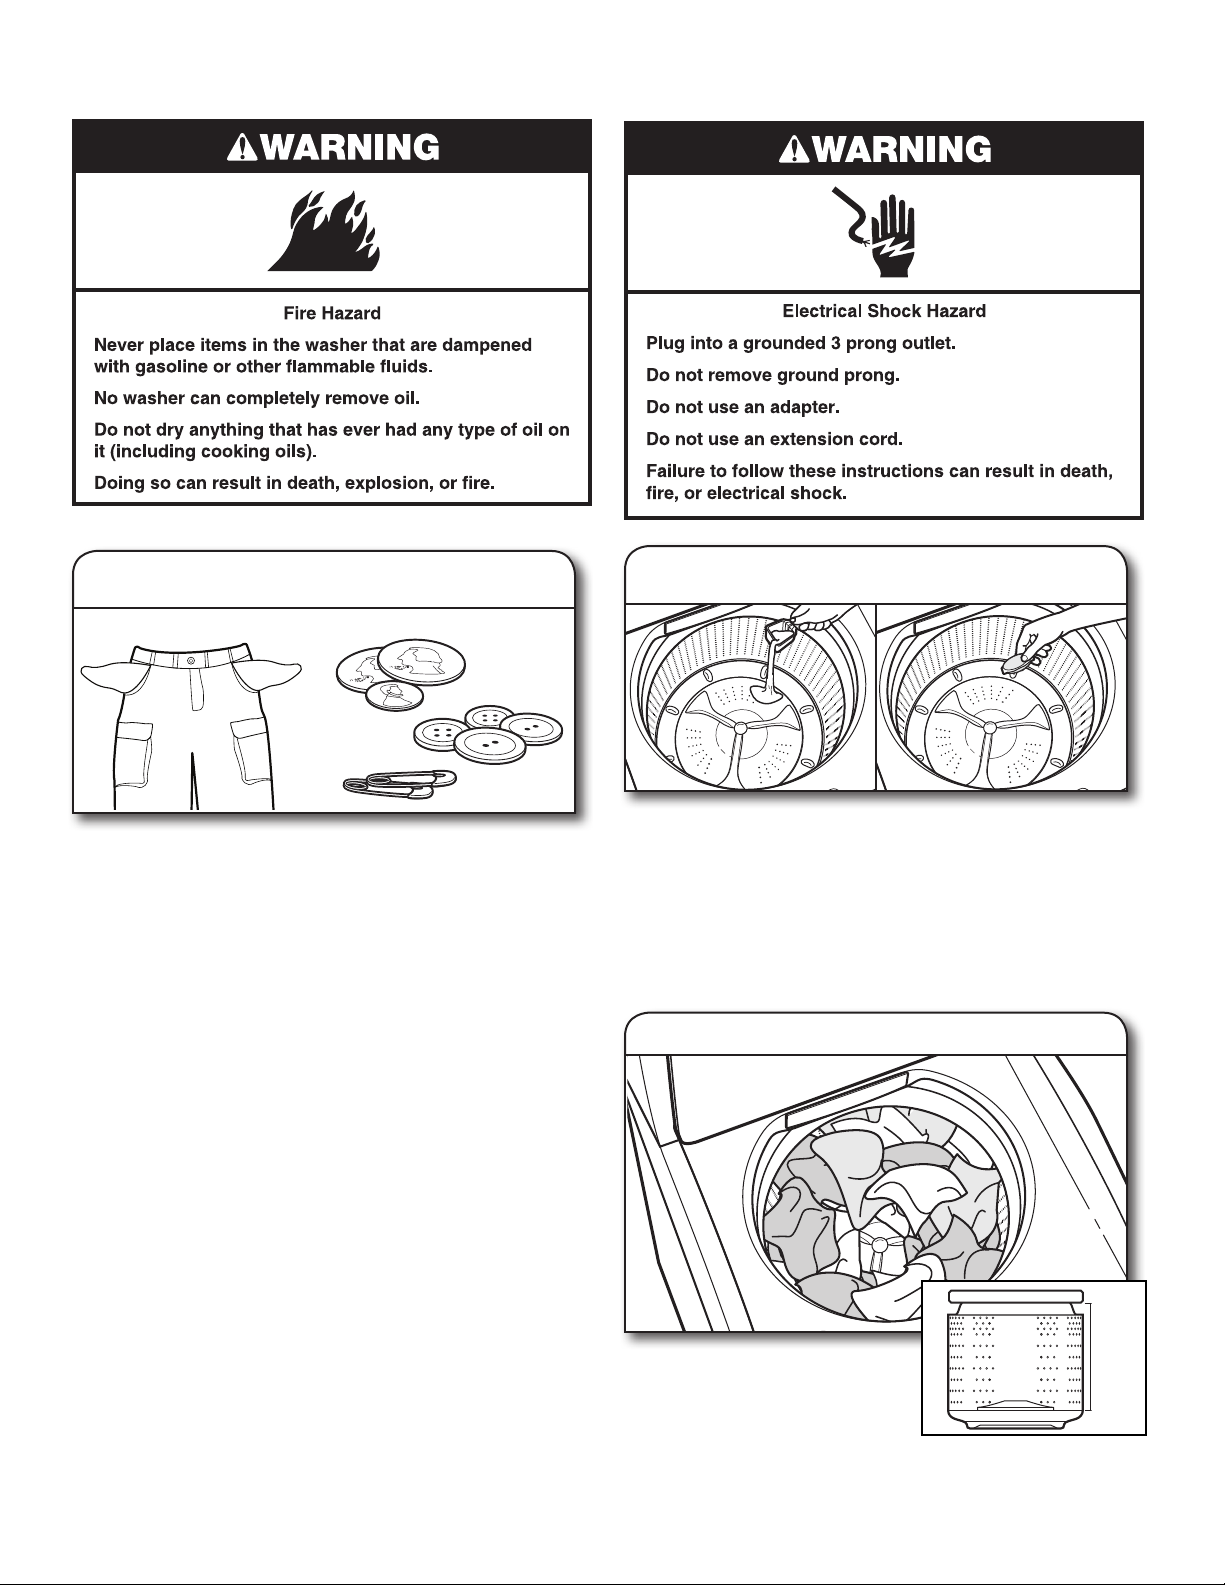
1. Sort and prepare your laundry
■ Empty pockets. Loose change, buttons, or any small
object can pass under the washplate and become
trapped, causing unexpected sounds.
■ Sort items by recommended cycle, water temperature,
and colorfastness.
■ Separate heavily soiled items from lightly soiled.
■ Separate delicate items from sturdy fabrics.
■ Do not dry items if stains remain after washing; heat
can set stains into fabric.
■ Treat stains promptly.
■ Close zippers, fasten hooks, tie strings, and sashes.
Remove non-washable trim and ornaments.
■ Mend rips and tears to avoid further damage to items
during washing.
Helpful Tips:
■ For best performance, use HE liquid detergent when washing
bulky items.
■ When washing waterproof or water-resistant items, load
evenly.
■ Use mesh bags to help avoid tangling when washing
delicate or small items.
■ Turn knits inside out to avoid pilling. Separate lint-takers
from lint-givers. Synthetics, knits, and corduroy fabrics will
pick up lint from towels, rugs, and chenille fabrics.
NOTE: Always read and follow fabric care labels instructions
to avoid damage to your items.
16
2. Add laundry products
IMPORTANT: If you are using the Compact Dryer Stack Stand
(Part Number 49971), pull the washer forward before lifting
the washer lid. Do not permanently install the washer in the
Compact Dryer Stack Stand – doing so will prevent you from
raising the washer lid.
If you are using liquid laundry detergent, single-dose laundry
packets, color-safe bleach, Oxi-type boosters, or fabric softener
crystals, add to the wash basket prior to adding laundry.
NOTE: Always follow manufacturer’s instructions.
3. Load laundry into washer
Max
For best performance, load items
in loose heaps evenly around the
washplate. Try mixing differentsized items to reduce tangling.
IMPORTANT: Items need to move
freely for best cleaning and to reduce wrinkling and tangling.
NOTE: The maximum volume is about 1.52 cubic ft. (4.4 lb max.
load size per cubic ft.).
load
level
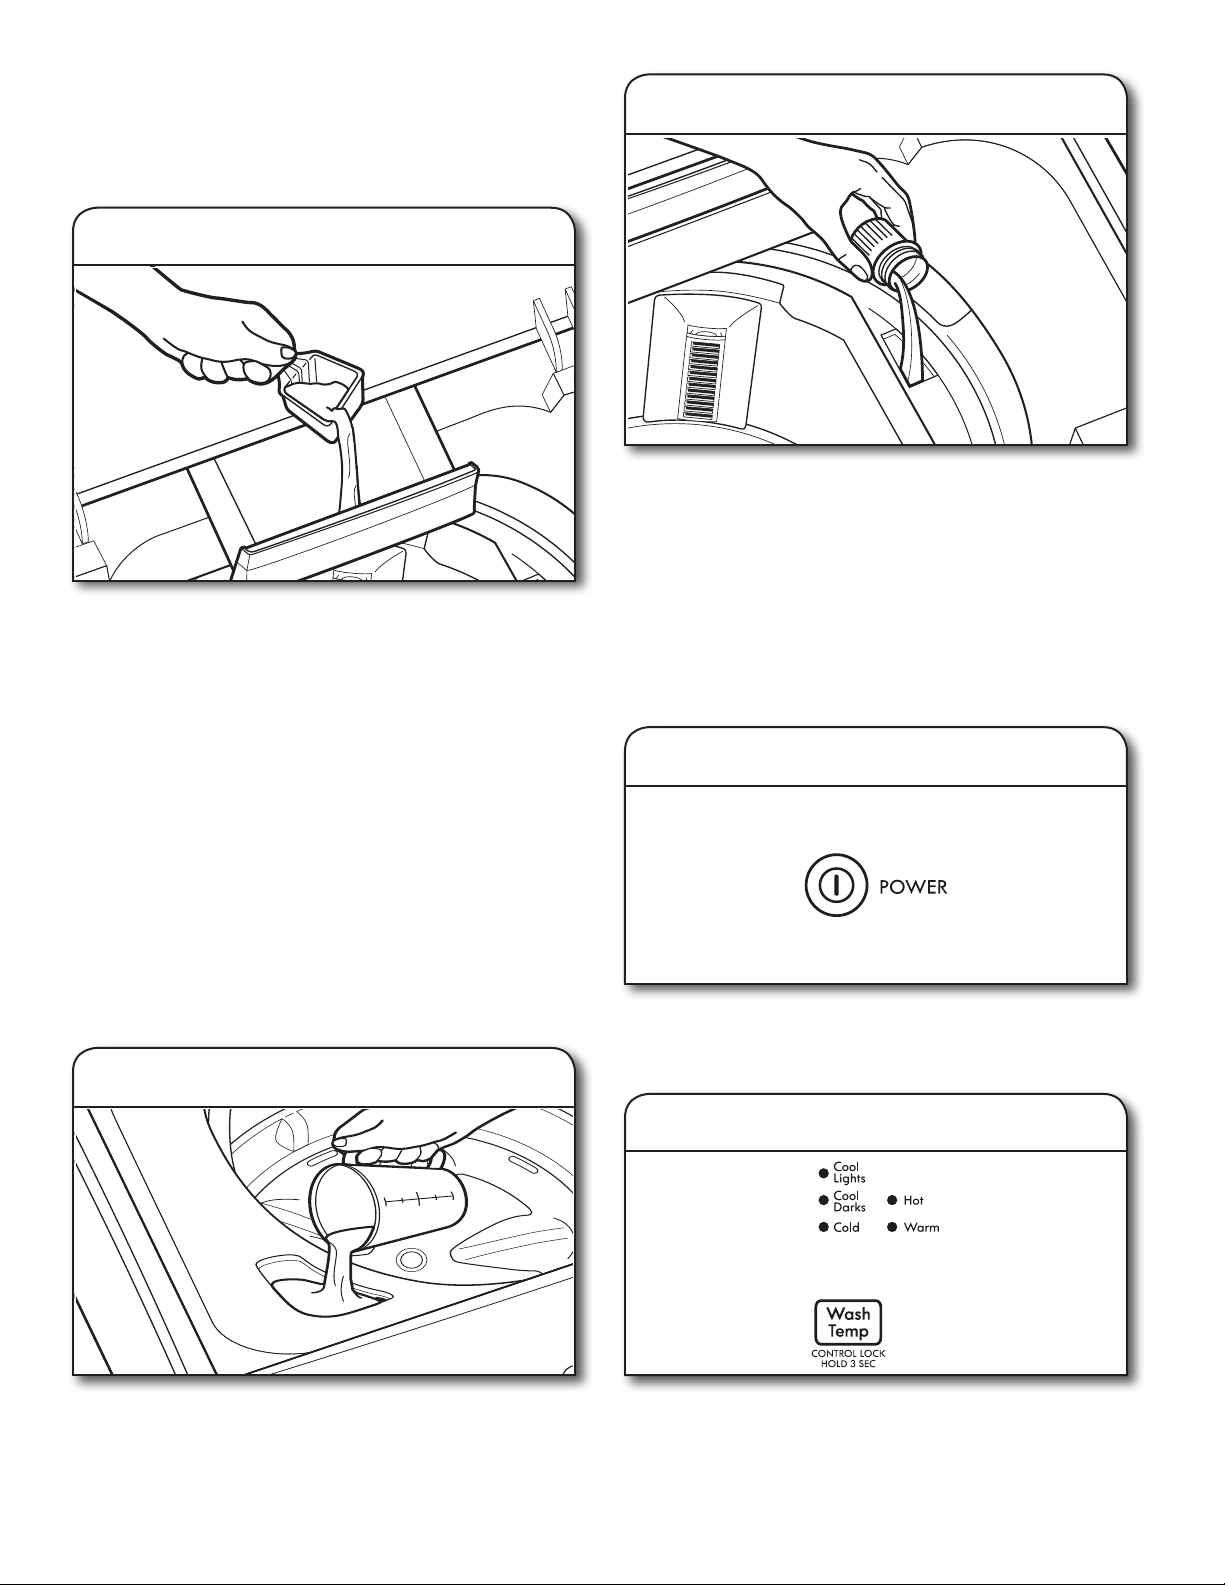
Using Laundry Product Dispensers
NOTE: Do not add liquid laundry detergent, single-dose
laundry packets, color-safe bleach, Oxi-type boosters, or
fabric softener crystals to dispensers. They will not dispense
correctly. Add to the basket prior to adding laundry.
4. Add powdered HE detergent
IMPORTANT: Use only High Efciency detergents. The
package will be marked “HE” or “High Efciency.” Low-water
washing creates excessive sudsing with a non-HE detergent.
Using non-HE detergent will likely result in longer cycle times and
reduced rinsing performance. It may also result in component
failure and, over time, buildup of mold or mildew. HE detergents
should be low-sudsing and quick-dispersing to produce the right
amount of suds for the best performance. They should hold soil
in suspension so it is not re-deposited onto clean clothes. Not all
detergents labeled as High Efciency are identical in formulation
and their ability to reduce suds. For example, natural, organic,
or homemade HE detergents may generate a high level of suds.
Follow the manufacturer’s instructions to determine the amount
of detergent to use.
NOTES:
■ Use only powdered HE detergent in the detergent dispenser.
Add liquid HE detergent or single-dose packets to the
basket prior to adding laundry.
■ See “Washer Maintenance” for information on
recommended method of cleaning washer dispensers.
5. Add liquid chlorine bleach to dispenser
6. Add liquid fabric softener
Pour a measured amount of liquid fabric softener into
dispenser; always follow manufacturer’s directions for correct
amount
of fabric softener based on your load size. Fabric softener
is added during rinse.
IMPORTANT: Do not overll or dilute. Overlling dispenser
will cause fabric softener to immediately dispense into washer.
It is normal for a small amount of water to remain in the
dispenser at the end of a cycle.
NOTE: The fabric softener dispenser rotates around the wash
basket and may not be in the same spot each time.
7. Touch POWER to turn on washer
Close the washer lid. Washer will not ll, agitate, or spin
with the lid open. Make sure the dispenser drawer is closed
completely, then touch POWER to turn on the washer.
Bleach will be dispensed automatically during the wash part
of the cycle. Do not overll, dilute, or use more than 1 cup
(250 mL). Do not use color-safe bleach or Oxi products in
the same cycle with liquid chlorine bleach.
8. Select wash temperature
Set the water temperature for the type of fabric and soils
being washed. Use the warmest wash water safe for fabric.
Follow garment label instructions.
17
 Loading...