


User manual
Foreword
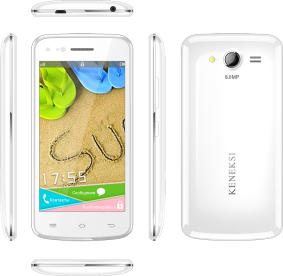
Thank you for purchasing KENEKSI Alfa.
These operational guidelines for the user, to ensure you a quick and convenient to use, read the instructions carefully before use.
KENEKSI Alfa is a top quality product with a series of remarkable functions. KENEKSI continues to provide new functions for the product. While the device
is used as a mobile hard disk, this company is not responsible for the security of files saved in the disk.
Key Functions
Capacitive touch screen, support multi-touch;
Support WIFI, 3G wireless Network;
Dual cameras, front 1.3 mpx, back 8.0 mpx
Support video call;
OS Android 4;
Support auto rotation of the screen (horizontally or vertically);
Support Web browsing, chat online, online video, online games and download etc;
Support lyric;
Support picture browsing, rotation and lantern slide playing;
Support E-book function;
USB2.0 high rate transmission;
Built-in microphone and long time recording;
Support firmware upgrade;
Supporting Micro SD Card;
Support OTG function, can expand storage space.
Basic Operation
Power on
In the shutdown state, long press key " "
"
Power off
In the power on state, long press the " " key 3 seconds then pop-up device options, select " Power off " to shut down.
Sleep
Short press key " ", it will switch off the Screen, press it again to resume in normal mode.
Screen time out
If you do not use the device during the set time, the screen will automatically turn off.
Using the Micro SD card
When you connect the device with the computer, you can find two disks. The first one is the built-in memory disk of this device and the other is the disk for the Micro SD card. If no card is inserted, the second disk can not be opened. The device supports the extension of the Micro SD card from 128MB to 32GB.
Inserting and Pulling out the Micro SD card
Inserting:
Put the Micro SD card face up (side with words), and slightly force the card into the socket of the card.
Pulling:
Slightly push the Micro SD and remove the card.
Caution:
Please perform inserting and pulling operation when power is off! Otherwise, it will lead to the loss or damage to the files!
Battery:
High capacity Li-ion battery is used for this device.
The duration usage of the battery depends on conditions such as: volume, types of playing files and operation of batteries.
Charging:
This device can be recharged by USB port, you can also use DC Charger:
Take out the DC charger, plug it into the wall outlet with AC 220V, then plug in the DC jack into the device DC-in jack.
Warnings for charging:
1.Anew battery may be empty and not charged before you get the device.
2.If the device is not used for long time, it is better to charge it to full capacity every 2 or 3 months during storage.
Charger is a key component of the device, which play a crucial role in keeping the device’s normal work and protecting your security when using the device.
Using unoriginal charger will shorten the life of the device. Using unoriginal charger will also reduce the vocal quality of the device, also may cause combustion and explosion.
Return to main interface
Touch an icon " " to access to the main interface.
Return to priorinterface ormenu
Touch an icon " " to access to return to prior interface or menu.
Points forAttention
1.Do not use the device in cold or hot, dusty, damp or dry conditions.
2.Do not drop it.
3.Please charge your battery when
A.Battery power icon shows an empty icon;
B.The system automatically shuts down and the power is off;
C.There is no response if you operate on any key
4.Please do not disconnect power abruptly when the device is being formatted or in the process of uploading or downloading. Otherwise it may lead to the error in the program.
5.When this device is used as a disk, the user shall store or export files in the proper file management operation method. Any improper operation method may lead to the loss of files, for which the Company will not take any
responsibility.
6.Please do not dismantle this unit by yourself. In any case, please contact the dealer.
7.There will be no separate notice in the case of any change in the functions and performance of this product.
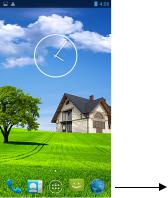
Main interface
 Display current time, battery level, operator signal and so on.
 Slide screen left or right to accomplish to flip file.
Press an icon to start work
Settings menu
Display all functional icon
Short press the  icon will display main menu.
Add window small plugin
The main interface, touch the screen on the right side of the " " control icon, and then click above on the screen " WIDGETS" long according to select small plugin, can add to desktop .
Display the background programs that are running
Any interface, click the "  " icon to the left of the screen, pop up the
background is run the program list, click on the program icon, can switch over to the background of the open programming interface. To right sliding program icon, can close this program in the operation.
Shows notice information
The main interface, click on the lower right corner of the screen the clock
display area, can open notice , notice can show the current USB state, networking
state and the battery power and other information
Delete the desktop icon
Select an icon than long press on the icon.After you selected the icon move it
into Bin.
Move desktop icon
The main interface, long press the icon than move it.
Video Player
In the main menu, select the option of "Gallery" to be able to access video
folder.
File list interface
Function of keys
" ":Shot press it to come back to the main interface "
 ": Short press it to return to the upper interface
Touch & slide screen upward and downward which will accomplish to flip video folder.
Video playing interface
Function of keys
'' /
/  '': play or pause current movie
'' /
/ ": shot press to play the last /next movie, long press for fast rewind / forward;
" /
/ ": press it to volume up or down
" " key: short press it to return to the prior interface: short press it to popup movie setting interface.
Tips:
This device supports "*.SRT" subtitle files (The user can download it from the website).
If there is any subtitle file with the same name in the folder «Video», the player will be able to run subtitle.
It’s supports video playing in multiple formats, high-definition video etc.
Audio Player
In the main menu, select the option of "Music" to be able to access music folder.
Music folder interface
Function of keys
'' '': Return to main interface
'' '': Return to upper interface
Up/down to touch screen, can realize the file list to scroll function Artist: according to the singer classification music files
Album: according to album classification music files
Song: display all music files
Playlist: to displaythe play music files in the list
Now playing: into the background music played interface
Music playing interface
Function of keys
'' '': Return to main interface ''
 '': Return to prior interface
''  /
/  ": shot press to play the last /next music, long press for fast rewind /

forward;
'' '': Click start/stop playing music ''
  " : Click into play lists
" ": Click on open/close songs random play mode "
 " key: short press it to return to the prior interface
Pictures
In the main menu, select the option of "Gallery" to be able to access Photo folder.
Function of keys
'' '': In slide form browse all pictures
'''':Can through this icon, images batch management, For example: delete, Rotate left, Rotate right, you can also according to the location, time, people and tags setting picture group.
'' '': Delete picture
'''': Through you can click on the icon to set and understand pictures information, including: Slideshow, Edit, Rotate left, Rotate right, Crop, Details, Set picture as
Call function
Make a call
Take one of the following to make a call:
In phone tab : Dial the phone numbers and press the green Send key; In call log tab: press the contact in the list and select call option;
In contacts tab: press the contact in the list and select the call option; In favorites tab: press the contact in the list and select the call option;
Answercalls
To answer a call, press the green Send key.
Hang up the phone
Press hang up key to hang up the phone
Contacts
Toviewthe contacts,touchPhoneicon, andthentouchthe Contactstab from thetopof the screen.
TIP:To search a contact, presstheMenu key,touch thesearchitem inthe popup menu. Then touch the input box to open the keyboard, type the name to search, the contact will list belowif it exists.
Add contacts
1.Press the green Send key whenever;
2.Touch the Contacts tab;
3.Press the Menu key;
4.Touch New contact;
5.Type the contact’s information;
6.Touch Done.
Messaging
All the received messages are classified bycontact name.The inbox includesSMS and MMS.
Read messages
1.In the Menu screen, touch the Messaging icon;
2.Touch the message to open.
Send text messages
1.In the Menu screen, touch the Messaging icon;
2.Touch new message;
3.Touch to select the To field, type the phone number that will receive the message;
4.Touch to select the Type to compose field and type the message that will send;
5.Touch Send.
MMS
MMS stands for Multi-media Message Service, it could transmit the message contains Multi-media file, including text, picture, sound etc.
Send MMS
Photos taken by camera are stored on the memory card. Make sure the memory card has been installed before using the camera.
1.TouchAttach symbol from top-right corner of the screen;
2.Select one of the following options:
Pictures
Touch to find and attach one of the existing pictures
Camera picture
Touch to take a new picture to attach
Videos
Touch to find and attach one of the exiting videos files
Capture video
Touch to make a new video file to attach
Audio
Touch to find and attach one of the existing audio file
RecordAudio
Touch to record an audio file to attach
Slideshow
Touch to attach one of existing slideshow.
5.Touch to select theTo field and type the phone number;
6.Touch to select Type to compose field and type message;
7.Touch Send.
Settings
In the main menu, select the option of "Settings" to get access to the System
settings.
Description of functions:
1.WiFi
Wi-Fi: Open/close the wireless connection
Wi-Fi setting: touch the " " icon to get access to the settings
2.Date usage
Display Date usage
3.Sound setting
Volumes: set the Notice, the media and the alarm clock volume.
Default notification: Click to open notification menu.
Touch sounds: After checked, Touch screen will make sound
Screen lock sound: After checked, Touch screen will make sound
4.Display settings
Brightness: Set brightness of the screen
Wallpaper: Choose wallpaper
Font size: Set the font size
5.Storage
check the memory and available storage
6.Apps
Can display and management of the installation applications
7.Security
Settings screen lock.
8.Language & input
Setting language and area, input method etc.
9.Backup & reset
Can backup, restore the machine Settings and data
10. Date & time
Set the date, time, time zone and time display format
11. About device
Check the device software version and other information.
GPS localization
Now you can navigate anywhere in the world thanks to the incorporated GPS receiver. If you want to use the GPS function with this device, open the main menu, click the "Settings" icon, and go to the "Location services".
Connect the computer
You can connect the device to your PC to copy / delete files.
Connect you device to PC. On the screen you will see the notification "USB
already connected".
Click "USB already connected" notification, and choose the "open USB storage
devices", then your PC can recognize memory discs.
3G network Settings
Insert the SIM card into the SIM slot.
Wifi and 3G can’t be used at the same time.
Note
Make sure that you turn off the device before you insert a SIM card.
Sound Recorder
In the main menu, select the icon "Sound Recorder" to get access to the recorder interface.
Keys of functions:
" ": Return to the recorder folder "
 " : Start or pause record
" " : Stop current record and select save the current record.
Clock
In the main menu, touch "Clock" icon to get access to the clock interface.
Factory data reset
If the device doesn’t work properly try to reset it. Select "Settings"-" Privacy ", select " Factory data reset" item, when you confirm it will remove all data.
Updating
If there are any updates you can check it at www.keneksi.com
Руководство пользователя
Предисловие
Благодарим Вас заприобретение телефона KENEKSI Alfa.
Документ является инструкцией по эксплуатации KENEKSI Alfa. Для быстрого и удобного использования внимательно изучите инструкции по эксплуатации.
KENEKSI Alfa – высокотехнологичное устройство, обладающее широким функционалом.
Компания «КЕНЕКСИ» продолжает совершенствовать смартфон
KENEKSI Alfa, увеличивая функциональность и аппаратные характеристики.
При использовании данного устройства в качестве съемного диска,
компания не несет ответственности забезопасность файлов, сохраненных на диске.
Основные функции (характеристики)
Сенсорный экран с функцией - мультикасание;
Поддержка беспроводных сетей WIFI, 3G;
Встроенные камеры: фронтальная 1.3 Мпикс., задняя 8.0 Мпикс.
Функция видеовызов;
Функция фото и видео съемки;
ОС Android 4;
Автоматический поворот экранапо горизонтали или по вертикали;
Поддерживается просмотр страниц в интернете;
Возможность загрузки и установки игр и программ;
Функция синхронного выведения текстапри воспроизведении музыки;
Поддерживается просмотр изображений в различных форматах;
Поддерживается функция чтения электронных книг в различных форматах;
USB2.0;
Функция диктофона во время вызова;
Поддерживается обновление ПО;
Поддержка карт памяти micro SD.
Основные операции
Включение
Для включения нажмите и удерживайте кнопку" "
"
Отключение
Для отключения нажмите и удерживайте кнопку " " в течение 3 секунд,
после появления всплывающего окна выберите «Отключить питание».
Спящий режим
Для включения спящего режима кратковременно нажмите кнопку " ".
".
При повторном нажатии кнопки " ", Вы вернетесь к обычному режиму.
Данная функция может использоваться для уменьшения расходаэнергии.
Перезагрузка
Для перезагрузки нажмите и удерживайте кнопку " ".
".
Экран в режиме ожидания
Если Вы не касаетесь экрана в течение заданного времени и не нажимаете кнопок, сенсорный экран автоматически отключается.
Для выхода из режима ожидания нажмите кратковременно кнопку " ".
".
Для снятия блокировки экрананажмите наиконку«Замок» и протяните влево.
Использование карты памяти Micro SD card
После подключения устройства к ПК, Вы увидите два съемных диска:
1)Память телефона
2)Карта памяти (Если картане вставлена, второй диск открыть нельзя).
Устройство поддерживает карты памяти Micro SD от 128 Мб до 32 Гб.
Установка и извлечение карты памяти Micro SD card
Установка:
Вставьте карту памяти Micro SD лицевой частью вверх и слегка вдавите
картув разъем для карты, т.е. вставьте в устройство
Извлечение:
Слегка надавите на карту памяти Micro SD, она выдвинется из разъема,
после чего ее можно достать.
Внимание!
Пожалуйста, отключите устройство перед установкой или извлечением карты памяти MicroSD! В противном случае, это может привести к уничтожению или повреждению файлов сохраненных на карте. Убедитесь, что карта памяти установлена, в противном случае ПК не сможет выполнить операции по считыванию файлов с карты памяти.
Аккумулятор (батарея):
Вустройстве используется литий ионный аккумулятор (батарея).
Длительность работы аккумулятора (батареи) зависит от уровня интенсивности использования устройства, т.е. воспроизведение файлов, уровень громкости,
выбор режимаиспользования устройства и т.д.
Для экономии заряда аккумулятора (батареи), Вы можете изменить настройки устройства.
Зарядка:
Устройство можно заряжать при помощи сетевого зарядного устройства.
Достаньте зарядное устройство, подключите к источнику питания (сеть переменного тока 220В), затем вставьте штекер в разъем питания на устройстве.
Устройство можно заряжать через USB-порт.
Меры предосторожности при зарядке:
Новый аккумулятор (батарея) может быть не заряжен до покупки Вами устройства.
Если устройство не используется длительное время, необходимо зарядить
аккумулятор (батарею) до полной емкости.
Использование нестандартного зарядного устройства значительно сокращает срок эксплуатации аккумулятора(батареи) устройства.
Использование нестандартного зарядного влияет на функционирование устройства и может нанести вред.
Возврат в главное меню
Для перехода в главное меню из любого окна, нажмите на кнопку " ".
".
Возврат в предыдущее окно или меню
Для перехода в предыдущее окно или меню из любого окна, нажмите на кнопку " ".
".
Вход в главное меню
Для входа в главное меню нажмите на кнопку " ".
".
Поиск
Для поиска необходимого Вам документа, файла, приложения, контакта и т.д.
нажмите кнопку" "
"
Внимание!
Не используйте устройство в очень холодных, жарких, пыльных, а так же влажных условиях.
Не роняйте устройство.
Заряжайте устройство, если
A.Индикатор уровня заряда аккумулятора(батареи) отображает пустой значок;
B.Система автоматически отключается после того, как Вы попытались включить устройство;
C.При нажатии на любые кнопки действия не выполняются.
Не отключайте питание в процессе форматирования, а также при передаче
 Loading...