

Page 1
FreshAir
Flow Control
Operating manual
Brugsanvisning
Gebrauchsanweisung
Manual de instrucciones
Käyttöohje
Manuel d’utilisation
Manuale d’uso
Gebruiksaanwijzing
Bruksanvisning
Instrukcja obsługi
Manual de utilização
Инструкции по эксплуатации
Bruksanvisning
操作手册
EN
DA
DE
ES
FI
FR
IT
NL
NO
PL
PT
RU
SV
ZH
Page 2

Page 3

OPERATING MANUAL
English
EN
3© Kemppi Oy / 1309
3© Kemppi Oy / 1309
Page 4

EN
CONTENTS
1. Introduction ......................................................................... 5
1.1 General ...................................................................................... 5
1.2 About FreshAir Flow Control system ....................................... 5
1.3 Manufactured by ...................................................................... 6
2. Preconditions for use ........................................................ 6
3. Unpacking and Assembly ............................................... 7
3.1 Unpacking ................................................................................. 7
3.2 Assembly ................................................................................... 8
4. Usage ...................................................................................... 8
4.1 Inspection before every use .................................................... 8
4.2 Air ow test ............................................................................... 8
4.3 Using the FreshAir Flow Control .............................................. 8
4.4 Checking the battery state ..................................................... 9
4.5 Checking the lter ..................................................................10
5. Maintenance.......................................................................10
6. Spare parts ..........................................................................10
6.1 About the lters ......................................................................10
6.2 Changing the lter .................................................................11
6.3 About the batteries ...............................................................12
6.4 Charging the battery ..............................................................12
6.5 Changing the battery .............................................................13
7. Troubleshooting ...............................................................14
8. Storage .................................................................................15
9. Warranty ...............................................................................15
10. Technical data ....................................................................16
11. Ordering codes ..................................................................17
4 FreshAir Flow Control
4 FreshAir Flow Control
Page 5

1. INTRODUCTION
1.1 General
Congratulations on choosing the FreshAir Flow Control respiratory system.
Used correctly, Kemppi products can signicantly increase the productivity
of your welding, and provide years of economical service.
This operating manual contains important information on the use,
maintenance and safety of your FreshAir Flow Control respiratory system.
The technical specications of the equipment can be found at the end of the
manual.
Please read the operating manual and other instructions carefully before
using the equipment for the rst time.
For more information on Kemppi products, contact Kemppi Oy, consult an
authorised Kemppi dealer, or visit the Kemppi web site at www.kemppi.com.
The specications presented in this manual are subject to change without
prior notice.
Important notes
Items in the manual that require particular attention in order to minimise
damage and personal harm are indicated with the ’NOTE!’ notation. Read
these sections carefully and follow their instructions.
1.2 About FreshAir Flow Control system
FreshAir is a respiratory protective system, which is based on the principle
of circulated pressurized air in the hood. The belt-mounted blower unit
delivers air through a lter and via an air hose into a headpiece. The supply
of ltered air creates positive pressure inside the headpiece, which prevents
the external contaminated air from entering the user’s breathing zone.
The supply of air also ensures the user comfortable breathing without
having to overcome the resistance of lters.
FreshAir Flow Control respiratory system meets the European standard
EN 12941, when used with Beta/Delta 90 FreshAir helmets.
It provides protection against non-toxic and toxic particles, solid and liquid
aerosols.
EN
Disclaimer
While every eort has been made to ensure that the information contained
in this guide is accurate and complete, no liability can be accepted for any
errors or omissions. Kemppi reserves the right to change the specication of
the product described at any time without prior notice. Do not copy, record,
reproduce or transmit the contents of this guide without prior written
permission from Kemppi.
5© Kemppi Oy / 1309
5© Kemppi Oy / 1309
Page 6

EN
1.3 Manufactured by
Manufactured for and on behalf of Kemppi Oy by:
CleanAir Ltd.
2. PRECONDITIONS FOR USE
FreshAir Flow Control respiratory system can be used for protection against
solid and liquid particles in breathing air in welding and similar processes.
Do not use it against toxic gases and vapours.
Before you can use the system correctly and safely, you must fully
understand all of the following precautions.
• Oxygen concentration in the surrounding area must not drop under
17%.
• Type and concentration of the contaminants in the working place
must be known to the user.
• The FreshAir respiratory system must not be used in unventilated
areas such as tanks, pipes, channels etc.
• The FreshAir respiratory system must not be used in areas with danger
of explosion.
• The respiratory system must only be used with the blower unit
switched on.
• The air ow must be checked before use.
• If the blower unit stops working for any reason, the user must leave
the contaminated area immediately.
• If the blower unit is switched o, the respiratory system gives little or
no respiratory protection. There is also a risk of high concentration of
carbon dioxide (CO₂) and of oxygen reduction inside the headpiece.
NOTE! During a period of really hard work when user’s breathing
becomes very intense, pressure may decrease inside the hood and thus
the protective eect can decrease.
• The headpiece must t the user´s face perfectly, only then the
eciency of the system is sucient. The protective eect of the
complete system is reduced, if the seal of the headpiece is not tted
properly, for example, due to beards or long hair breaking the seal.
• It must be ensured that the air hose does not make a loop and does
not get caught or trapped in the surroundings.
• Respiratory system FreshAir Flow Control is restricted for protection
against solid and liquid particles only. Do not use it against toxic gases
and vapours.
• It is essential to choose the correct type of lter according to the type
of contamination.
• A particle lter must not be used for protection against gases.
• A gas lter must not be used for protection against particles.
6 FreshAir Flow Control
6 FreshAir Flow Control
Page 7

• If the breathing air in the workplace contains both particle and gas
contamination, an adequate combined lter must be used.
• When using lters protecting against gases, which are dicult to
identify by smell or other senses, special rules depending on the
current conditions must be followed.
• Immediately replace the lter(s) as soon as the contaminant can be
smelt.
• Use only original lters certied for the particular respiratory system.
NOTE! If the recommendations stated in this manual are ignored,
the warranty is automatically invalidated and the level of personal
protection may not meet the designated standards.
3. UNPACKING AND ASSEMBLY
3.1 Unpacking
Check that the package is complete and that no part has been damaged in
transit or for other reasons.
A package with the complete system including accessories
contains:
1. Blower unit including battery 1 pc
2. Belt 1 pc
3. Flexi hose 1 pc
4. Air ow indicator 1 pc
5. Battery charger 1 pc
6. Operating manual 1 pc
EN
The powered unit FreshAir Flow Control is supplied includin the lter PSL R.
7© Kemppi Oy / 1309
7© Kemppi Oy / 1309
Page 8

EN
3.2 Assembly
1. Attach the respiratory unit onto the belt. Make sure that the lter or lters
are tted properly.
2. Connect the air hose to the blower unit via a bayonet connector.
3. Connect the air hose to the headpiece and hand tighten.
4. USAGE
4.1 Inspection before every use
Do the following checks always before you start using the equipment:
• Check that all components are in good condition with no visible
damage. Replace any damaged or worn parts. Carefully examine the
air hose, seals and the facepiece.
• Check that there is a good connection between the air hose and the
headpiece as well as the blower unit
• Ensure that there is sucient air ow as explained in section "Air ow
test".
• Check that the air is supplied through the whole respiratory system
from the blower to the hood.
Fully charge the battery before rst use.
4.2 Air ow test
Before every use, you should conduct an air ow test on the equipment as
follows:
1. Disconnect the air hose from the hood.
2. Cover the disconnected end of the air hose with your hand. The
blower starts to run faster after about 20 seconds, the audible alarm
activates and the LED diodes on the control panel start blinking.
3. Remove your hand . The blower speed should decrease.
If the blower speed does not change, it is necessary to check the unit.
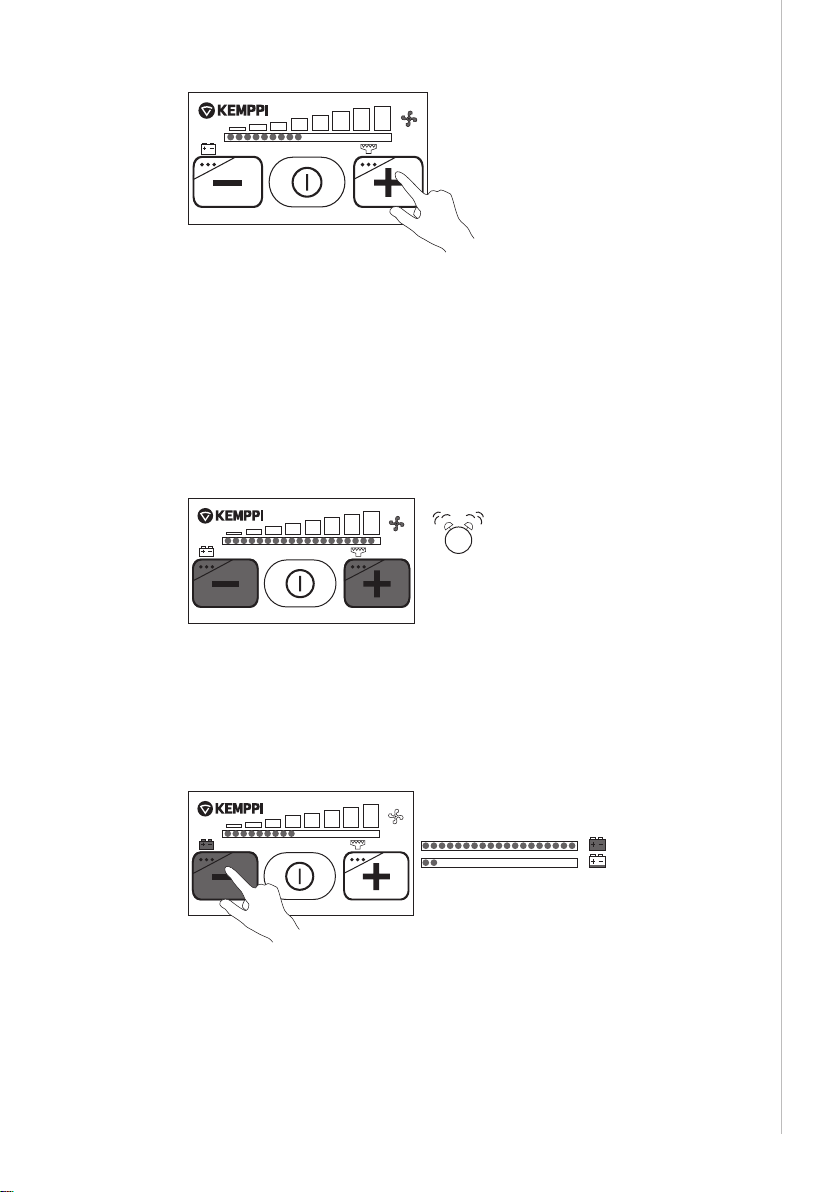
4.3 Using the FreshAir Flow Control
Switch on the unit by pressing the ON/OFF button on the control panel.
The airow can be adjusted by plus and minus buttons (+ and –) from 140 l/
min up to 210 l/min. The number of lit green LED diodes displays the airow
level.
8 FreshAir Flow Control
8 FreshAir Flow Control
Page 9
The unit ensures a constant supply of air. The microprocessor inside the unit
automatically regulates the motor speed to compensate the lter clogging
and the battery state.
If the microprocessor cannot maintain the adjusted airow, an acoustic
alarm signal can be heard and the LED diodes display RED in colour. If
possible, the microprocessor automatically reduces the airow to the next
lower level.
When the airow falls below the minimum level, the alarm intensies. Then
the user must stop working at once and change the lter or recharge/
change the battery.
To check the alarm function, perform the air ow test as explained in section
4.2: "Air ow test".
4.4 Checking the battery state
Press and hold the left button (–) for more than 1 second. The more red
coloured LED diodes come on, the higher the remaining battery capacity is.
EN
!
> 1 s
9© Kemppi Oy / 1309
9© Kemppi Oy / 1309
Page 10

4.5 Checking the lter
Press and hold the right button (+) for more than 1 second. The more yellow
LED diodes come on, the more clogged the lter is.
> 1 s
EN
After releasing the buttons, the LED diodes return to the green light state
indicating the current airow.
5. MAINTENANCE
It is recommended to clean the respiratory system after each use. Also
inspect all parts and replace any which are damaged or worn.
• Always clean the respiratory unit in a ventilated room or outside. Be
aware of harmful dust settled on any parts of the unit.
• Never use ammable cleaning liquids or abrasive cleaners!
• The outer surface of the blower unit can be cleaned with a soft cloth
and mild detergent solution. The unit must be completely dry before
assembling the ller and cover.
• Ensure that no water or detergents enter the blower unit!
• The air hose itself, detached from the blower unit and the headpiece,
can be rinsed in clean water.
6. SPARE PARTS
6.1 About the lters
The respiratory power unit is equipped with a high eciency particle lter of
class PSL R.
The lter must be checked regularly and replaced when necessary. See
section 4.2: "Air ow test".
Make sure that the new lter is within its expiry date, unused and not
noticeably damaged.
From the hygienic point of view the maximum working time of a lter is 180
hours and should not be exceeded.
Never clean the lter by any procedure!
10 FreshAir Flow Control
10 FreshAir Flow Control
Page 11

The particle lter can be used with a Pre-lter to prolong the main lter life,
or with an Odor lter which removes unwanted odors.
6.2 Changing the lter
Remove the lter cover:
Have the orange lter cover facing you and do the following:
1. Put your index ngers and middle ngers into the gaps between the
body of the unit and the lter cover on both sides.
2. Rest your thumbs on the top of the orange lter cover.
3. Pull your ngers placed in the gaps outwards lifting the lter cover o
the unit.
NOTE! Never use any tools to uncover the lter.
Remove the lter:
EN
1. Hold, gently rotate and pull away from the main body.
2. Remove any dust with a soft cloth.
11© Kemppi Oy / 1309
11© Kemppi Oy / 1309
Page 12

EN
Insert a new lter:
1.
1. If you are using a prelter or an odor lter, place and x it around the
new lter as tightly as possible, sticking the ends together using the
sticky tape located on the ends of the prelter or odor lter.
2. Put the lter back into position using the same rotating motion and
gently push until it ts well onto the body of the unit.
3. Replace the orange lter cover. Ensure you snap the cover into place
on both sides.
6.3 About the batteries
NOTE! Batteries are delivered discharged. All batteries must be charged
before they are used for the rst time. The battery can be charged
separately or on the blower unit.
The charger must not be used for any other purpose than that for which it
was manufactured. Please read the following precautions:
• Do not charge the battery where there is a risk of explosion.
• The battery charger is intended for indoor use only.
• The charger must be protected against damp.
2.
3.
6.4 Charging the battery
1. Check that the voltage of the electrical power supply is correct.
2. Plug the charger into the socket.
3. Connect the battery to the charger. The socket of the battery is
positioned on the back. The charging regime is identied by a red LED
diode light.
4. After charging has been completed, the trickle charging regime is
activated: red LED diode goes out, the green LED diode comes on at
the moment of trickle charging.
5. Disconnect the charger from the power supply.
The charger controls the charging automatically. After the battery has been
charged, the charger switches to the trickle charging regime and keeps the
battery fully charged. A full charging cycle is between 10 and 14 hours.
NOTE! Do not leave the charger in the power supply if not in use !
12 FreshAir Flow Control
12 FreshAir Flow Control
Page 13

6.5 Changing the battery
Remove the battery:
1. Take the blower unit in both hands with the rear side of battery facing
you.
2. Open the battery latch with your thumb. The latch is positioned in the
middle of the battery.
3. Push the battery o the unit using your thumbs.
Mount the new battery:
EN
1. Hold the blower unit in the same position as before.
2. Put the battery on the guide rail and push it back onto the unit until
the latch locks it in the correct positon.
13© Kemppi Oy / 1309
13© Kemppi Oy / 1309
Page 14

EN
7. TROUBLESHOOTING
If there is a sudden change in air supply while using the FreshAir system, do
the following checks:
• Ensure that all parts of the air-supply system are assembled properly.
• Check the battery and its connector.
• Check if the charger is faulty or malfunctioning (if so, the diodes do
not work).
• Check the lters and their level of contamination.
• Ensure that there are no holes in the air hose.
• Ensure that the hood seal is correctly tted and undamaged.
• Check that after a full recharge, the battery holds it's charge and the
eciency has not decreased. If so, replace the battery.
Fault Probable reason Recommendation
The blower unit
does not work at all.
Low airow. Blocked air hose or airduct. Check and remove blockage.
Short operating
time.
Battery cannot be
charged.
Battery cannot be
charged suciently.
Entirely discharged battery.
Verify if the blower unit works with
another charged battery.
Faulty motor, circuit board or
connector.
Leakage. Check all seals, connectors and the
Battery is not suciently charged. Charge the battery.
Blocked Filter. Change the lter.
Clogged Filter. Change the lter.
Battery is not charged properly. Charge the battery.
Battery contact is damaged. Replace the battery.
Charger is faulty. Contact your supplier.
Battery is worn out. Replace the battery.
Charge the battery.
If problem persists, replace the
battery.
Contact your supplier.
air hose. Make sure that air cannot
leak through holes or tears.
If problem persists, replace the
battery.
If problem persists, replace the
battery.
14 FreshAir Flow Control
14 FreshAir Flow Control
Page 15

8. STORAGE
All parts of a FreshAir system must be stored in an environment with
temperature between 0 – 40 °C and humidity between 20 – 80 % Rh. The
storage life is 2 years for the product if stored in its original unopened
package.
NOTE! Batteries get discharged even if not in use. Therefore for long-
term storage it is highly recommended to charge the NiMH batteries
every 12 months.
9. WARRANTY
There is a 12 month warranty covering production defects and a 6 month
warranty for batteries.
The warranty begins from the date of purchase. The claim must be lodged
with the dealer. The paid invoice or receipt must be produced if claiming on
the warranty.
The claiming procedure will be successful only if there were no changes
made on the blower unit including the battery and charger.
If the damage is caused by not changing a clogged lter in time or using
a lter which has been cleaned by the customer, the claim will not be
processed.
Page 16

10. TECHNICAL DATA
FreshAir Flow Control
Airow 140 – 210 l/min
Weight of the blower unit incl. the lter and battery 900 g
Noise level 55 – 61 dB
NiMh battery lifetime 500 – 700 charging cycles
Charging time 10 – 14 hours
Belt size 80 – 100 cm
Recommended temperature range 10 – 40 °C
Recommended humidity range 20 – 80 % Rh
Certication EN 12 941 TH2
Operation time See the following table
Notied body for CE testing:
Výzkumný ústav bezpečnosti práce, v.v.i. – ZL
Testing Laboratory No. 1024
Jeruzalémská 9, 116 52 Praha 1
Authorized Body 235
Notied Body 1024
at 8 adjustable ow rates
Expected operating time of the blower unit after being fully
charged (hours)
Airflow Filter
min. middle max. PSL R
X 10 h
X 6 – 7 h
X 4 – 5 h
NOTE! Operating time can be decreased where lters are clogged or the
battery is undercharged.
Page 17

11. ORDERING CODES
Beta 90 FreshAir with Flow Control (9873065 +
W007513)
Delta 90 FreshAir with Flow Control (9873066 +
W007513)
FreshAir Flow Control with Alarm Complete package W007512
P1700
P1701
Spare parts and consumables
FA Battery charger Euro plug W007485
FA Flow Control Flexi hose W007487
FA Flow Control Flow indicator W007488
FA Comfort belt W007489
FA Basic lter 2 pcs, standard W007490
FA Flow Control Sealing ring for lter W007491
FA Flow Control pre-lter 10 pcs W007492
FA Battery pack NIMH 4.8 V/4.5 AH W007493
FA Basic odour pre-lter 10 pcs W007494
FA Flow Control Filter cover W007495
Optional
FA Flexi hose cover W007788
FA Heavy duty comfort belt W007789
FA Head cover W007827
FA Protective neck cover W007828
Page 18

KEMPPI OY
Kempinkatu 1
PL 13
FI-15801 LAHTI
FINLAND
Tel +358 3 899 11
Telefax +358 3 899 428
export@kemppi.com
www.kemppi.com
Kotimaan myynti:
Tel +358 3 899 11
Telefax +358 3 734 8398
myynti.@kemppi.com
KEMPPI SVERIGE AB
Box 717
S-194 27 UPPLANDS VÄSBY
SVERIGE
Tel +46 8 590 783 00
Telefax +46 8 590 823 94
sales.se@kemppi.com
KEMPPI NORGE A/S
Postboks 2151, Postterminalen
N-3103 TØNSBERG
NORGE
Tel +47 33 346000
Telefax +47 33 346010
sales.no@kemppi.com
KEMPPI DANMARK A/S
Literbuen 11
DK-2740 SKOVLUNDE
DANMARK
Tel +45 4494 1677
Telefax +45 4494 1536
sales.dk@kemppi.com
KEMPPI BENELUX B.V.
Postbus 5603
NL-4801 EA BREDA
NEDERLAND
Tel +31 765717750
Telefax +31 765716345
sales.nl@kemppi.com
KEMPPI (UK) Ltd
Martti Kemppi Building
Fraser Road
Priory Business Park
BEDFORD, MK44 3WH
UNITED KINGDOM
Tel +44 (0)845 6444201
Telefax +44 (0)845 6444202
sales.uk@kemppi.com
KEMPPI FRANCE S.A.S.
65 Avenue de la Couronne des Prés
78681 EPONE CEDEX
FRANCE
Tel +33 1 30 90 04 40
Telefax +33 1 30 90 04 45
sales.fr@kemppi.com
KEMPPI GmbH
Perchstetten 10
D-35428 Langgöns
DEUTSCHLAND
Tel +49 6 403 7792 0
Telefax +49 6 403 779 79 74
sales.de@kemppi.com
KEMPPI SPÓŁKA Z O.O.
Ul. Borzymowska 32
03-565 WARSZAWA
POLAND
Tel +48 22 7816162
Telefax +48 22 7816505
info.pl@kemppi.com
KEMPPI AUSTRALIA PTY LTD.
13 Cullen Place
P.O. Box 5256, Greystanes NSW 2145
SMITHFIELD NSW 2164
AUSTRALIA
Tel. +61 2 9605 9500
Telefax +61 2 9605 5999
info.au@kemppi.com
OOO KEMPPI
Polkovaya str. 1, Building 6
127018 MOSCOW
RUSSIA
Tel +7 495 739 4304
Telefax +7 495 739 4305
info.ru@kemppi.com
ООО КЕМППИ
ул. Полковая 1, строение 6
127018 Москва
Tel +7 495 739 4304
Telefax +7 495 739 4305
info.ru@kemppi.com
KEMPPI, TRADING (BEIJING) COMPANY,
LIMITED
Room 420, 3 Zone, Building B,
No.12 Hongda North Street,
Beijing Economic Development Zone,
100176 Beijing
CHINA
Tel +86-10-6787 6064
+86-10-6787 1282
Telefax +86-10-6787 5259
sales.cn@kemppi.com
肯倍贸易(北京)有限公司
中国北京经济技术开发区宏达
北路12号
创新大厦B座三区420室 (100176)
电话: +86-10-6787 6064
+86-10-6787 1282
传真: +86-10-6787 5259
sales.cn@kemppi.com
KEMPPI INDIA PVT LTD
LAKSHMI TOWERS
New No. 2/770,
First Main Road,
Kazura Garden,
Neelankarai,
CHENNAI - 600 041
TAMIL NADU
Tel +91-44-4567 1200
Telefax +91-44-4567 1234
sales.india@kemppi.com
www.kemppi.com
1918820
1309
 Loading...