

Kawai K-15E ATII Owner's Manual

- 1 -
ANYTIME PIANO
K-15E ATII
Owner's Manual
Notice d'Utilisation
Bedienungsanleitung
Manuale d'Istruzione
Manual de Instrucciones
- 2 -
Read this section carefully before using this product. It contains important safety warnings and cautions,
which must be followed.
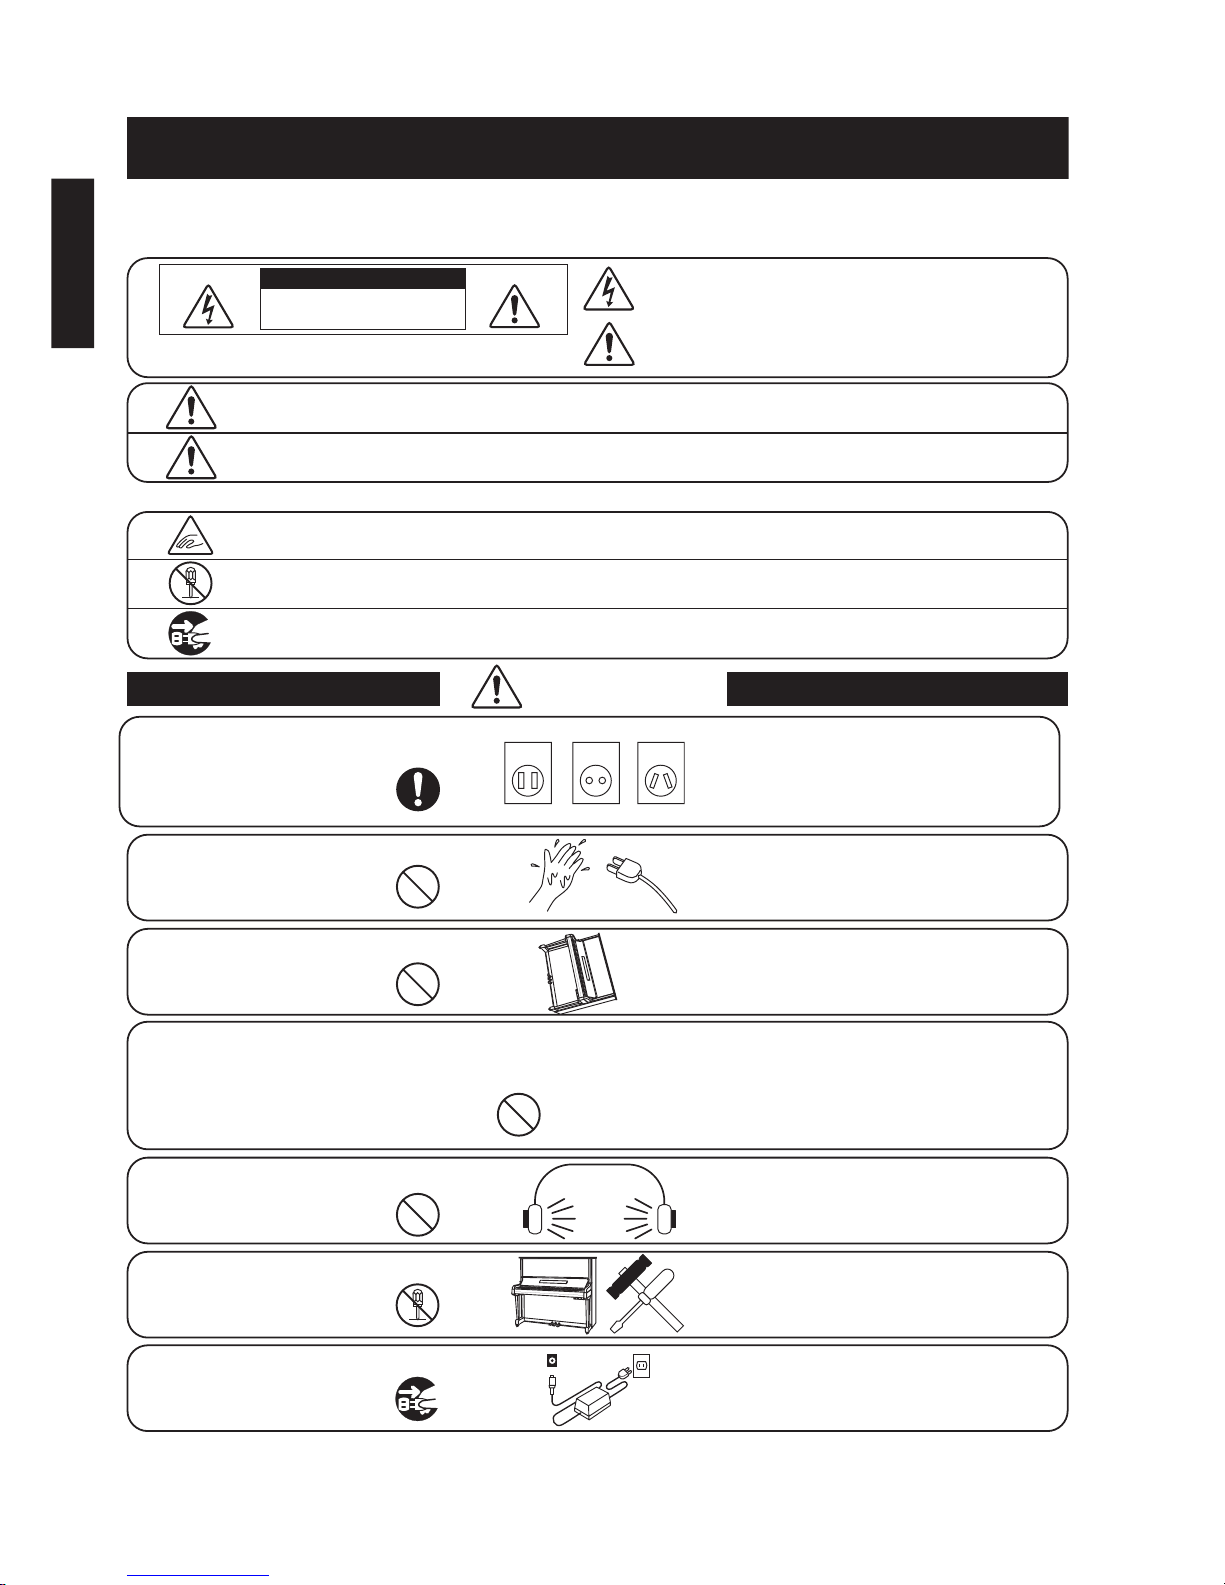
The following symbols are used on the product and their meanings are given below.
Safety Instructions
Please note that the product is heavy and must
be carried by more than two persons.
Dropping the product may result in breakdown.
Take care not to let the product fall down.
If the product will not be used for a long
time, unplug the AC power
cord from the AC outlet.
● Failure to do so may cause fire in case of
lightning.
● Failure to do so may over-heat the product,
resulting in fire.
Do not disassemble, repair or modify
the product.
Doing so may result in product breakdown, electric
shock or short-circuit.
When using the headphones, do not
listen for long periods of
time at high volume levels.
Doing so may result in hearing problems.
The bench must be used properly (it must be
used only when playing the product).
● Do not play with it or stand on it.
● Only one person is allowed to sit on it.
● Do not sit on it during height adjustment.
● Do not sit on it when opening the lid.
Doing so may cause the bench to fall over or your
fingers to be trapped, resulting in injury.
Do not insert or disconnect the power
cord plug with wet hands.
Doing so may cause electric shock.
The product should be connected to
an AC outlet of the specified
voltage.
● Use the AC adapter supplied with the product
or one recommended by KAWAI.
● If you are going to use an AC power cord,
make sure that its has the correct plug shape
and conforms to the specified power voltage.
● Failure to do so may result in fire.
WARNING
denotes that care should be taken.
The example instructs the user to take care not to allow fingers to be trapped.
denotes a prohibited operation.
The example instructs that disassembly of the product is prohibited.
denotes an operation that should be carried out.
The example instructs the user to remove the power cord plug from the AC outlet.
Examples of Picture Symbols
WARNING
Indicates a potential hazard that could result in death or serious injury if the product is
handled incorrectly.
Indicates a potential hazard that could result in injury or damage to the product or other
property if the product is handled incorrectly.
CAUTION
CAUTION: To prevent fire and electric shock, do not
expose the product to rain or moisture.
Risk of electric shock.
Do not open.
Alerts the user to the risk of electric shock.
Alerts the user to the presence of general cautions
and warnings in the instruction manual accompanying
the product.
CAUTION
120V 240V230V
English

- 3 -
Failure to do so may cause breakdown of this
product and other devices.
● Doing so may cause the product to generate
noise.
● If the product generates noise, move the
product sufficiently away from the electrical
appliance or connect it to another AC outlet.
Notes on Repair
Should an abnormality occur in the product, immediately turn the power OFF, disconnect the power cord plug, and then contact
the shop from which the product was purchased.
● Doing so may cause the product to become
deformed or fall over, resulting in breakdown
or injury.
● Doing so may result in discoloration or deformation
of the product.
● When cleaning the product, put a soft cloth in
lukewarm water, squeeze it well, then wipe the
product.
Failure to do so may damage them, resulting in
fire, electric shock or short-circuit.
Doing so may cause the product to fall over,
resulting in injury.
Entry of water, needles or hair pins may result
in breakdown or short-circuit.
Do not wipe the product with benzene
or thinner.
Do not stand on the product or exert
excessive force.
When connecting the AC power cord
and other cords, take care
not to get them tangled.
Do not place the product near electrical
appliances such as TVs and
radios.
Do not lean against the keyboard.
Take care not to allow any foreign
matter to enter the product.
Before connecting cords, make sure
that the power to this product
and other devices is turned
OFF.
CAUTION
OFF
Using the product in such areas may result in
product breakdown.
Closing it roughly may trap your fingers, resulting
in injury.
Do not use the product in the following areas.
● Areas, such as those near windows, where the product is
exposed to direct sunlight
● Extremely hot areas, such as near a heater
● Extremely cold areas, such as outside
● Extremely humid areas
● Areas where a large amount of sand or dust is present
● Areas where the product is exposed to excessive
vibrations
When you close the fallboard,
close it gently.
This product may be equipped with a polarized line plug (one blade
wider than the other). This is a safety feature.
If you are unable to insert the plug into the outlet, contact an
electrician to replace your obsolete outlet.
Do not defeat the safety purpose of the plug.
It is a good practice to have the instrument near the AC outlet and the power cord plug in a position so
that it can readily be disconnected in an emergency because electricity is always charging while the plug
is in the AC outlet even in a power switch off conditiion.
English

- 4 -
Notes on Repair
Should an abnormality occur in the product, immediately turn the power OFF, disconnect the
power cord plug, and then contact the shop from which the product was purchased.
The product should be serviced by qualified service personnel when:
● The power supply cord or the plug has been damaged.
● Objects have fallen, or liquid has been spilled into the product.
● The product has been exposed to rain.
● The product does not appear to operate normally or exhibits a marked change in
performance.
● The product has been dropped, or the enclosure damaged.
CAUTION:
To prevent electric shock, match wide blade of plug to wide slot, fully insert.
ATTENTION:
Pour éviter les chocs électriques, introduire la lame la plus large de la fiche dans la borne
correspondante de la prise et pousser jusqu'au fond.
Instruction for AC power cord (U.K.)
Do not plug either terminal of the power cord to the ground of the AC outlet on the wall.
FCC Information
This equipment has been tested and found to comply with the limits for a Class B digital device, pursuant to Part 15 of the
FCC Rules. These limits are designed to provide reasonable protection against harmful interference in a residential
installation. This equipment generates, uses and can radiate radio frequency energy and, if not installed and used in
accordance with the instructions, may cause harmful interference to radio communications.
If this equipment does cause harmful interference to radio or television reception, which can be determined by turning the
equipment off and on, the user is encouraged to try to correct the interference by one or more of the following measures:
• Reorient or relocate the receiving antenna.
• Increase the separation between the equipment and receiver.
• Connect the equipment into an outlet on a different electrical circuit from the receiver.
• Consult the dealer or an experienced radio/TV technician for help.
Canadian Radio Interference Regulations
This instrument complies with the limits for a class B digital apparatus, pursuant to the Radio Interference
Regulations, C.R.C., c. 1374.
The product should be located so that its location or position does not interfere with its proper
ventilation. Ensure a minimum distance of 5cm around the product for sufficient ventilation.
Ensure that the ventilation is not impeded by covering the ventilation openings with items,
such as newspaper, table-cloths, curtains, etc.
Do not place naked flame sources, such as lighted candles on the product.
An information on Disposal for users
If your product is marked with this recycling symbol it means that, at the end of its
life, you must dispose of it separately by taking it to an appropriate collection point.
You should not mix it with general household waste. Disposing of this product correctly
will prevent potential negative effects on the environment and human health which
could otherwise arise due to inappropriate waste handling.
For further details, please contact your local authority.
(European Union only)
This product should be used only with the stand that is provided by the manufacturer.

- 5 -
FCC Information ( for U.S.A. )
Note: This equipment has been tested and found to comply with the limits for a Class B digital device, pursuant
to Part 15 of the FCC Rules. These limits are designed to provide reasonable protection against harmful
interference in a residential installation. This equipment generates, uses and can radiate radio frequency energy
and, if not installed and used in accordance with the instructions, may cause harmful interference to radio
communications. However, there is no guarantee that interference will not occur in a particular installation. If
this equipment does cause harmful interference to radio or television reception, which can be determined by
turning the equipment off and on, the user is encouraged to try to correct the interference by one or more of the
following measures;
- Reorient or relocate the receiving antenna.
- Increase the separation between the equipment and receiver.
- Connect the equipment into an outlet on a circuit different from that to which the receivers connected.
- Consult the dealer or an experienced radio/TV technician for help.
Canadian Radio Interference Regulations
This instrument has been certified to comply with the limits for a class B digital apparatus, pursuant to the
Radio Interference Regulations, C.R.C., c. 1374,
This musical instrument should be not commercial use but household use.
THE ANYTIME PIANO™
Thank you for purchasing a KAWAI Anytime Piano. The Anytime Piano is a revolutionary new instrument
that combines the capabilities of an acoustic piano and a digital piano. With the Anytime Piano, you can enjoy
the pleasing, expressive tone that only a KAWAI acoustic piano can provide… plus the powerful and exciting
features that can only be found on a digital instrument.
As its name implies, the most compelling aspect of the Anytime Piano is that it can be played literally “anytime”
without disturbing family or neighbours. It will let you enjoy the touch of a fine KAWAI acoustic piano but
still have the privacy and power of built-in digital sound. The Anytime Piano will offer many creative new
possibilities for music-making in your home, school, or recording studio.
To get the most from your Anytime Piano, please read this manual carefully and become familiar with all its
powerful functions and features. We trust that you and your Anytime Piano will be making beautiful music
together (at any time of the day or night) for many years to come.
Thank you for choosing KAWAI!
- 6 -
CONTENTS
Page
Setting Up Your Anytime Piano 6
Enjoy Playing Music In Private With “Anytime” Mode 7
Entering “Setting Mode” 9
1. Selecting a Sound 10
2. Reverb 11
3. Damper Effect 11
4. Tuning 12
5. Transpose 13
6. Metronome 13
Other Advanced Capabilities
1. Using The Anytime Piano With Your Home Audio System 14
2. Using MIDI 16
General Information
1. Parts and Names 20
2. Digital Specifications 21
3. MIDI Implementation Chart 22
SETTING UP YOUR ANYTIME PIANO
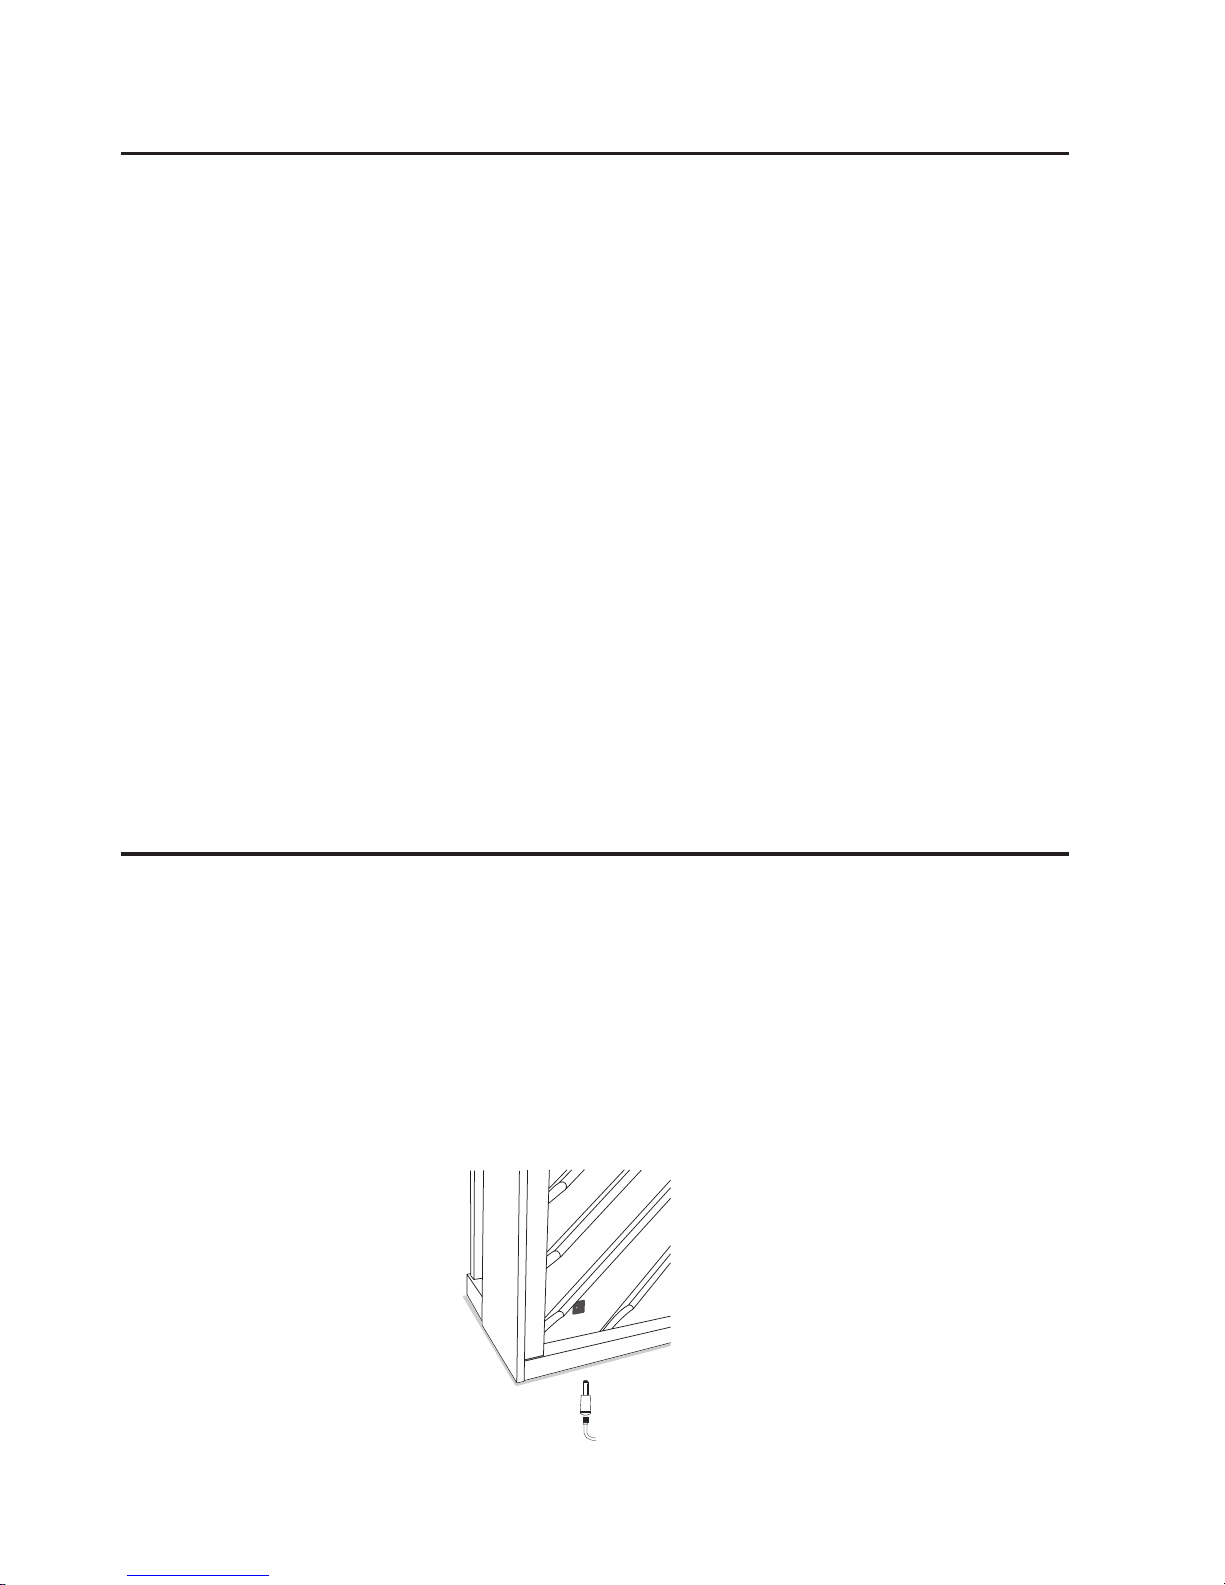
Because it is an acoustic/electronic instrument, the Anytime Piano requires AC power to operate. Place the
Anytime Piano in a location where electricity is available.
The jack labeled DC IN is at the rear of the Anytime piano (bottom left). Find the AC power adaptor (which
is supplied with the instrument) and plug the smaller end into the DC IN jack (see Fig. 1). Then, plug the
larger end of the AC adaptor into your electric wall outlet.
Setup is now complete and your Anytime Piano is ready to play.
Fig 1

- 7 -
Fig. 2
Mute Lever
Normal
mode
Anytime
mode
ENJOY PLAYING IN PRIVATE WITH “ANYTIME” MODE
You’re now ready to activate the “Anytime” capability. This function mutes the acoustic piano sound by stopping
the piano hammers before they hit the strings. With “Anytime” capability, you will never lose the touch and
feel of an acoustic piano. Your playing on the keyboard will activate a digital sound generator so that sound will
only be heard through headphones.
This feature is extremely useful for practice late at night when family members or neighbors are asleep, for
practicing in a room that must be shared with others who desire a quiet environment, or for group music classes
in which several students must practice at the same time. You’ll never have to worry about disturbing anyone!
Here’s how to play in “Anytime” mode:
1. TURN THE POWER ON
The power switch is located on the front panel of the Control Box. When power is on,
the red lamp will be lit. If the red lamp does not light, check to be sure that the small
end of the AC power adaptor is plugged into the DC IN jack at the rear of the Anytime
piano.
2. ACTIVATING ANYTIME MODE
Find the “Mute Lever” which is located
underneath the left side of the keyboard
(see Fig. 2). This lever turns the “Anytime”
mode on and off. Push the mute lever
carefully to the left as far as it will go (only
about 5 cm / 2 inches). This puts you in
Anytime Mode.
In Anytime Mode (with the mute lever
moved to the left), you will not hear
acoustic piano sound, but you will hear
digital piano sound through headphones
when you touch the keys.

- 8 -
IMPORTANT INFORMATION: ( Please read )
• Never leave the Mute Lever halfway between Anytime and Normal modes.
• Never move the Mute Lever while you are playing.
Both of these conditions can cause serious damage to the action mechanism of your Anytime Piano.
• Normal Mechanical Sound
In Anytime Mode, you will not hear acoustic piano sound, but you may hear the normal mechanical noise that
is produced when the keys are struck. All acoustic pianos make this type of noise, but you generally will not be
aware of it when the sound of the piano strings is present. This is not a defect.
3. ADJUSTING VOLUME
Plug headphones into the Headphone Jacks on the front panel of the Control Box. Find the volume knob on
the front panel of the Control Box and adjust the volume appropriately.
Fig 3
Fig 4
CONTROL BOX
Volume Knob
Headphone Jacks
- 9 -
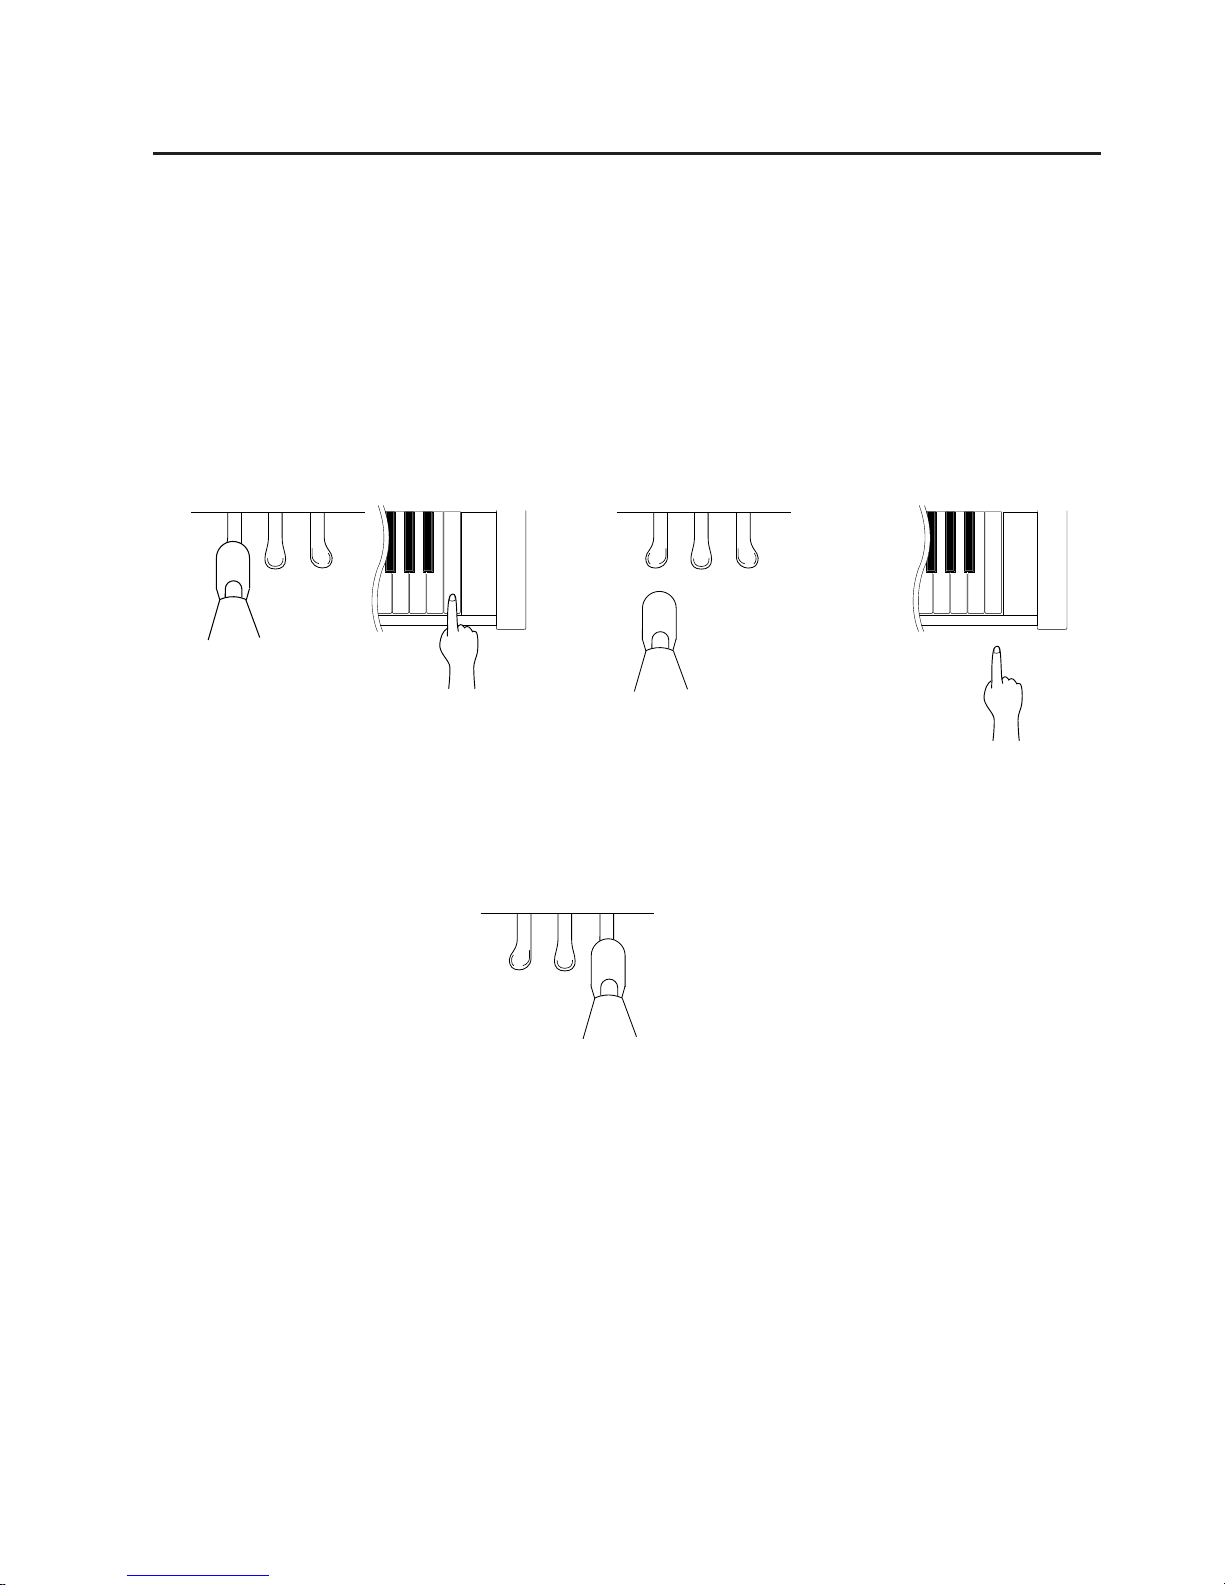
ENTERING “SETTING MODE”
When you adjust the damper effect, pitch of digital sound, or transpose the key, you must enter “setting mode”
first. Make sure to see that the power is on before entering setting mode.
1) Holding down the left pedal, press the highest white key.
2) Holding down the key, release your foot from the pedal.
3) Release your finger from the key. This activates the “setting mode”.
To exit setting mode, depress the right pedal. Then the Anytime Piano will exit the setting mode and you can
play the instrument in the setting you have selected.
Every time you turn the power off, your selected settings for “Transpose” and “Damper Effect” will be lost and
the unit will return to the factory preset. However, the “Tuning” setting you have selected will be memorized
even after power is turned off.
1) 2) 3)
Fig 6
Fig 5

- 10 -
SETTING MODE
1. SELECTING A SOUND
The Anytime Piano has total of thirteen digital sounds; seven piano button sounds and six other assignable
button sounds.
To select the sound, after entering the "setting mode" (see Page 9), press the corresponding white key. The
assignment of the keys and types are shown in the figure above.
1 2 3 4 5 6 7 8 9 10 11 12 13
PIANO BUTTON ASSIGNABLE BUTTON
1 Concert Grand 8 Jazz Organ
2 Concert Grand 2 9 Church Organ
3 Mellow Grand 10 Harpsichord
4 Mellow Grand 2 11 Vibraphone
5 Modern Piano 12 Slow Strings
6 Classic E. Piano 13 Choir
7 Modern E. P.
Reverb
StageOff Room Hall
Damper Effect
Off
Medium
Strong

- 11 -
2. REVERB
Reverb adds a rich ambient effect to the digital sound. There are three reverb types available:
Room Offers a soft reverberation, simulating the sound of a small room
Stage Simulates the sound of playing on stage
Hall Simulates the deep reverberation of a large concert hall
Select the reverb type by using pedal and keyboard in "setting mode" (see Page 9). The assignment of the keys
and types of reverb are shown in the figure (see Page 10).
3. DAMPER EFFECT
When you play the acoustic piano with sustain pedal depressed, not only will the strings for the notes you
played vibrate but also other strings will vibrate in damper effect. The Damper Effect function simulates this
co-vibration of the strings. You can select from three levels of effect.
Off No resonance
Medium Simulates the natural resonance characteristics of an acoustic piano
Strong Produces a more intense resonance
The initial setting of the Damper Effect is set at “Medium”. Every time you turned power off and on again, the
Damper Effect will return to “Medium”.
To select the damper effect level, after entering the “setting mode” (see Page 9), press the corresponding black
key. The assignment of the keys and types are shown in the figure (see Page 10).
After selecting damper effect level, depress the right pedal to exit setting mode.

- 12 -
4. TUNING
You may want to adjust the pitch of the Anytime Piano when playing in an ensemble with other instruments.
Of course, the acoustic side of the Anytime Piano requires the attention of a professional tuner and cannot be
changed digitally. The Anytime Piano’s digital tone generator can be adjusted for pitch, however.
To adjust the pitch, you must enter the “setting mode” (see Page 9). In setting mode, you can change pitch by
pressing the highest white key on the piano to raise the pitch, or the highest black key to lower the pitch (see
figure above). Each time you depress a key, you will change the pitch by about two cents (which is one-fiftieth
of a half-tone). The total range of tuning is one half-tone (one quarter-tone up and one quarter-tone down).
To return to standard pitch, press both the highest black and white keys simultaneously. The pitch will return
to A = 440 Hz.
After finishing your pitch adjustment, hold down the right pedal to exit tuning mode.
Tempo
Tempo 1 down
Tempo 10 down
Metronome Volume
Down
Transpose
Down
Pitch
Lower the pitch
Tempo
Tempo 10 up
Tempo 1 up
Metronome Volume
Up
Metronome
Off 2/4 3/4 4/4
Transpose
Up
Pitch
Raise the pitch

- 13 -
5. TRANSPOSE
The Transpose function is helpful to you when you want to transpose a key up or down without changing your
fingering.
To activate the Transpose function, you must enter the “setting mode” (see Page 9). In the setting mode, you
can transpose a key by pressing the highest “E” key to transpose up or the highest “Eb/D#” key to transpose
down. (see Page 12). Each time you depress a key, you will transpose a key by one half-step.
To return to the initial setting (Key =C), press both highest “E” and “Eb/D#” keys.
To exit setting mode, depress the right pedal.
6. METRONOME
Rhythm is one of the most important elements when learning music. It is important to practice playing the
piano the correct tempo and with a steady rhythm. The Anytime piano's metronome is a tool that helps you to
achieve this by providing a steady beat for you to play along with.
Starting the Metronome
To activate the metronome, you must enter the "setting mode" (see Page 9). The assignment of keys and types
are shown in the figure (see Page 12).
Changing the Tempo
You can increase the tempo, in increments of 10 beats per minute, by pressing the G key and, in 1 BPM
increments, by pressing the A key.
To decrease the tempo, in increments of 10 beats per minute, press the F# key and, in 1 BPM increments, press
the G# key (see Page 12).
The tempo changes within the range of 30 - 300 beats per minute.
Adjusting the Metronome Volume
To adjust the metronome volume, press C# key to decrease the volume and D key to increase the volume (see
Page 12).
- 14 -
OTHER ADVANCED CAPABILITIES
1. USING THE ANYTIME PIANO WITH YOUR HOME AUDIO SYSTEM
The Anytime Piano is equipped with Audio In (AUX IN) and Out (AUX OUT) jacks so that you can connect
it to your home stereo, CD player, Karaoke machine or other device. As an example, you might play your
favorite compact disc song and practice along on the Anytime Piano. The following are examples of advanced
uses for the Anytime Piano.
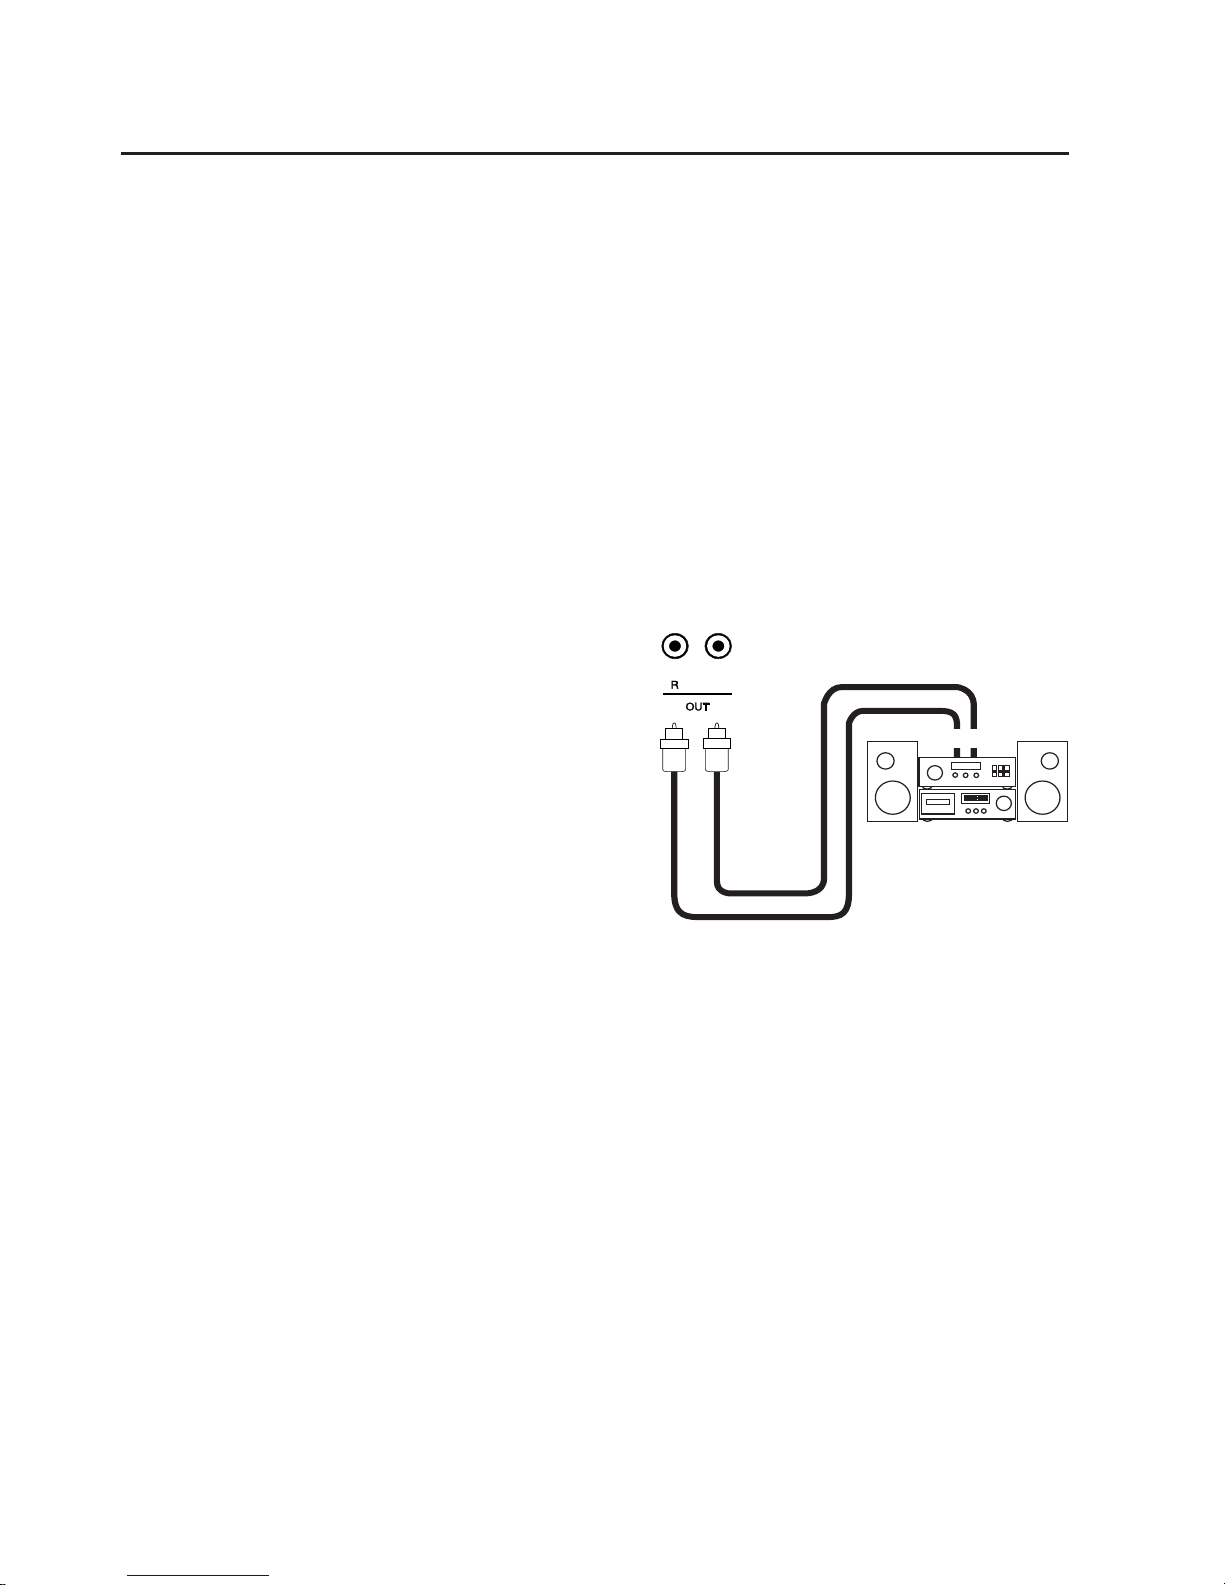
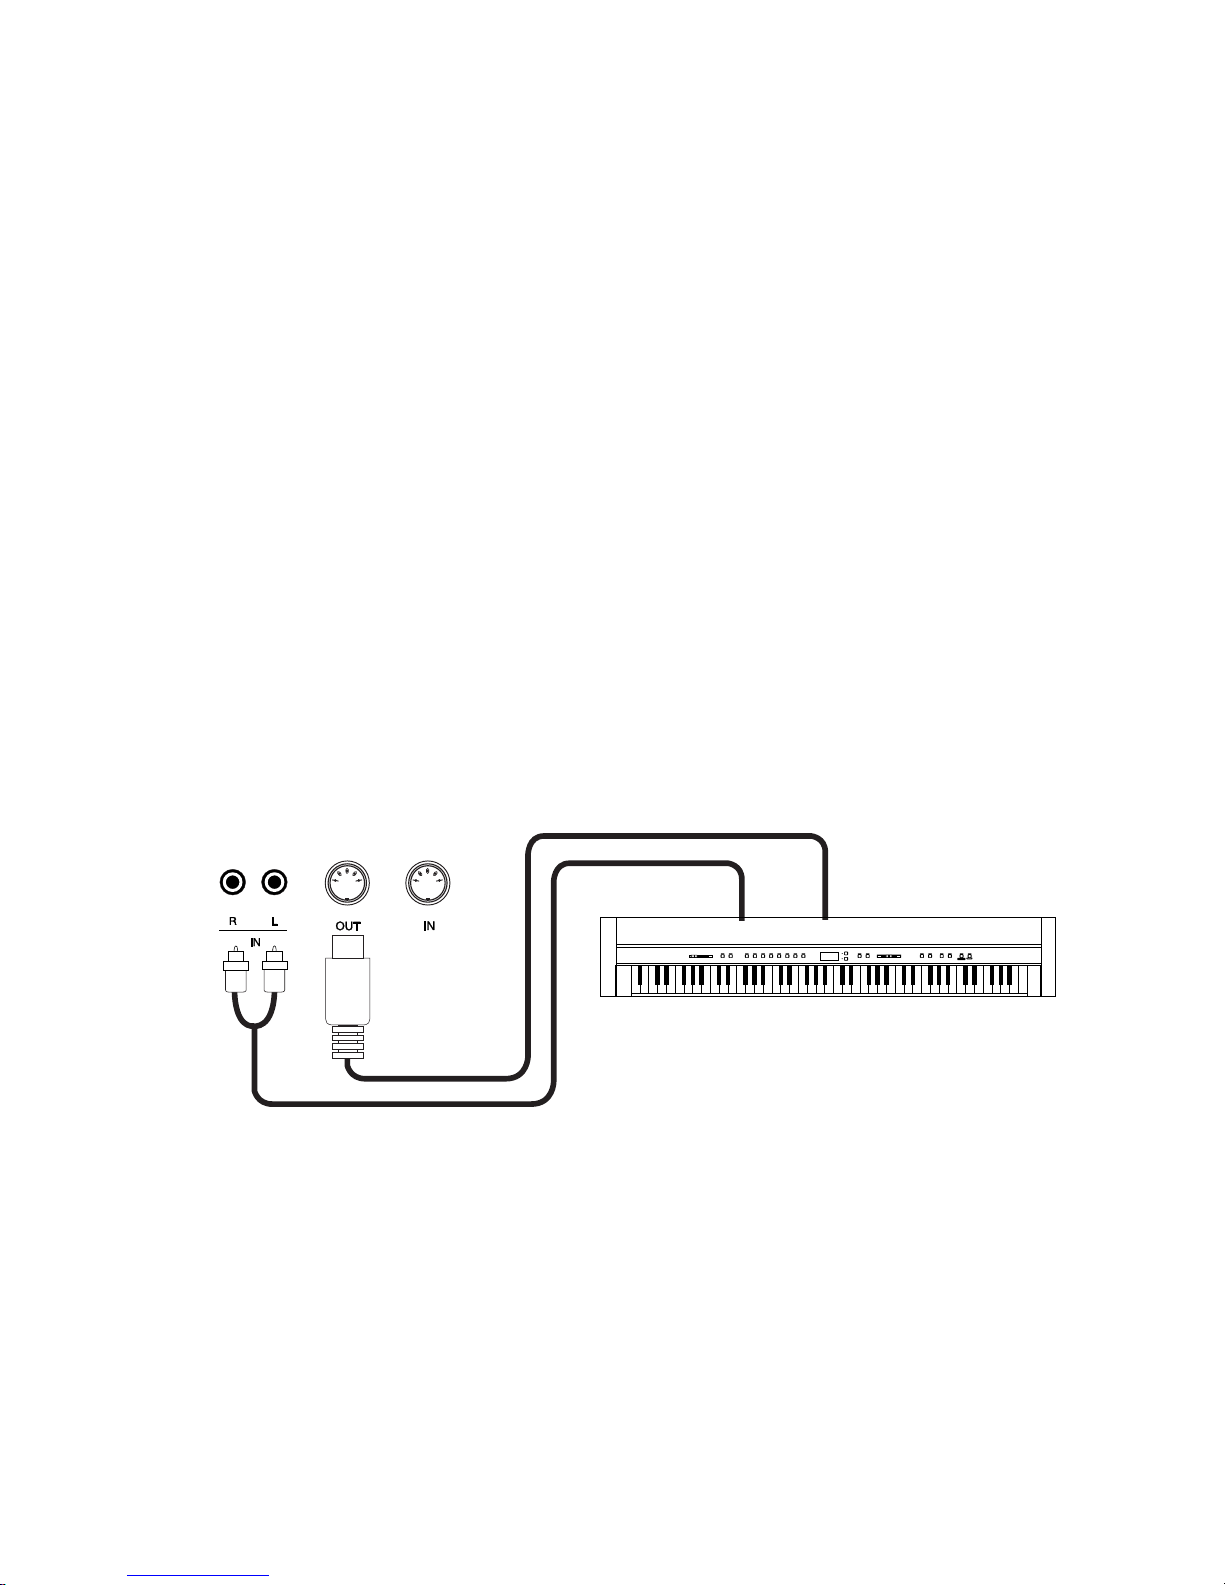
Connecting the Anytime Piano to an External Amplifier and Speakers
To hear the Anytime Piano’s digital sound through
external loudspeakers, connect your home stereo unit
or amplifier and speakers to the Anytime Piano as
shown (see Fig.7). You’ll need an audio cable with
RCA pin plug at one end and plug appropriate for
your equipment at the other. Note that the Anytime
Piano will only produce amplified sound when it is
connected to an amplifier. Speakers alone will not
produce amplified sound (unless they are powered
speakers).
In Normal Mode with amplified speakers connected, you’ll hear both acoustic sound and digital sound layered
together. In this situation, you may notice that the two types of sound are not in tune with each other. This is
because the Anytime Piano’s normal acoustic sound can change over time (due to weather changes and the
normal need for professional tuning). To hear sound that is perfectly in tune, ask your piano tuner to match the
Anytime Piano’s acoustic sound with its digital sound.
You may be able to make a rough adjustment in layered tuning by yourself. The tuning function for the digital
tone generator is described on page 12 of this manual.
LINE IN
L
RCA pin plug
HOME STEREO
Fig 7

- 15 -
Connecting the Anytime Piano to a Home Stereo or Receiver
Using headphones, the Anytime Piano allows you to listen to music played back on your stereo receiver, CD
player or tape recorder along with digital sound of the Anytime Piano itself. You can play the digital piano
sound along with your favorite CD. Connect your external device to the Anytime Piano’s AUX IN jacks. This
will allow you to hear the audio through the Anytime Piano’s headphone jacks.
With amplified speakers connected to the AUX OUT jack of the Control Box, you can hear that same audio
sound through speakers. Just connect your amplifier to the Anytime Piano’s AUX OUT jacks using the
appropriate audio cables.
Record Your Performance on a Cassette Tape / Mini Disc
You can also connect the Anytime Piano to an external tape recorder / mini disc recorder to record your digital
sound performances. This is especially useful for a music student who wants to evaluate his/her playing. You
could also make your own “demo” of a piano piece played along with your favorite CD.
To make a recording, connect the AUX OUT jacks on the Anytime Piano’s Control Box to the “Record In”
jacks on your recorder using appropriate cables (see Fig. 8).
L
LINE IN LINE OUT
RCA pin plug
Terminals
PLAY BACK
RECORD
CASETTE
RECORDER
CD PLAYER
Fig 8

- 16 -
2. USING MIDI
The term “MIDI” is an acronym which stands for the Musical Instrument Digital Interface. MIDI is an
international music standard used for sending music data back and forth between electronic musical instruments
such as digital pianos, synthesizers and sequencers. MIDI allows a performance on one musical instrument to
be heard on several instruments. Further, the data from your performance can be sent to an external sequencer
for editing, overdubbing, and later playback.
While MIDI capability is very common on digital instruments, it is quite rare on acoustic instruments. Because
MIDI capability is built into the Anytime Piano, you can enjoy the varied and extremely powerful features that
MIDI can provide.
MIDI Applications
The types of data that can be sent and received through MIDI will vary from one instrument to another.
The Anytime Piano sends and receives the following MIDI functions:
• Send/receive keyboard note data (i.e. which keys are pressed)
• Send/receive velocity data (determines volume of each note)
• Send/receive sound change data
• Send/receive ON/OFF data for soft pedal and damper pedal
• Receives Local Control ON/OFF data (When Local Control is “off”, no digital sound is heard when keys
are pressed. Sound will only be heard when a MIDI signal is received. Local Control only affects digital
sound.)
MIDI Connections
Musical instruments compatible with MIDI have connector terminals referred to as MIDI IN, MIDI OUT
and MIDI THRU jacks (the Anytime Piano has MIDI IN and MIDI OUT jacks). MIDI cables (available at
most local music stores) must be inserted into these jacks to establish a MIDI connection between instruments.
Below is a description of MIDI jacks and functions:
MIDI OUT: Music data is converted into electrical signals and is sent out through this jack. To establish a
connection with another MIDI-compatible instrument, the MIDI OUT jack should be connected to the
MIDI IN jack of the other instrument using a standard MIDI cable. The sending instrument (with a MIDI
cable inserted in the MIDI OUT jack) will control the sound of the receiving instrument (which has the MIDI
cable inserted into the MIDI IN jack).
MIDI IN: This jack is an input for receiving music data from other MIDI-compatible instruments. To
establish a connection, the MIDI IN jack should be connected to the MIDI OUT or MIDI THRU jacks of
other instruments.
- 17 -
MIDI THRU: Data received through the MIDI IN jack is routed as is from the MIDI IN jack to the MIDI
THRU jack, allowing the data to be sent to another instrument. The MIDI THRU jack is often used to
connect three or more MIDI-compatible instruments (the Anytime Piano does not have MIDI THRU jack).
MIDI Channel
MIDI allows you to select a channel for any given set of data. Once MIDI data is channelized, it can be
transmitted to (or received by) one specific instrument, even though many instruments are receiving the same
data. Most MIDI instruments allow you to select one MIDI channel for transmitting data and another MIDI
channel for receiving data. The MIDI Receive channel is used when an instrument receives data from another
instrument. The MIDI Send channel is used for transmitting data to another instrument.
While the MIDI specification allows up to 16 MIDI channels for sending or receiving data (1 through 16), the
Anytime Piano uses only Channel 1. When you are connecting other MIDI instruments to the Anytime
Piano, make sure that those other instruments are set to send or receive data on MIDI channel 1.
MIDI Connection Examples
1. Connection to another MIDI-compatible keyboard or module
When connected as shown in the illustration (see Fig. 9), MIDI data sent from the Anytime Piano (as notes are
played) will also be played on the digital synthesizer. Also, by connecting the synthesizer’s Audio Out jack to
the AUX IN jack on the Anytime Piano, you can use headphones to hear the digital sound of the Anytime
Piano “layered” over the sound of the synthesizer.
Since most synthesizers allow you to select from a wide array of sounds, you have a tremendous range of
possibilities for layered combinations. You can hear the Anytime Piano’s Piano tone layered with a String tone
from the synthesizer.
MIDI IN
AUX
MIDI
LINE OUT
MIDI Cable
Terminals
MIDI sound module
Fig 9
RCA pin plug

- 18 -
You can also layer the sound module’s tones such as piano, harpsichord and vibraphone, using sound module’s
MULTI TIMBRE function. With this combination of MIDI equipment, it is possible to create very complex
musical arrangements.
When connected as shown in the previous illustration, you can layer sounds shown in example, as well as split
the keyboard into separate sections with a different tone in each section (see Fig. 10 ).
2. Connection to a sequencer and sound generator module
When connected as shown in the
illustration (see Fig. 11), you can record
digital sound songs played on the
Anytime Piano with a sequencer, and
play them back as many times as you
like through the Anytime Piano’s tone
generator. This is very useful feature for
evaluating your own playing.
For more details on operation of the synthesizer, sound module and sequencer, refer to the owner’s manual for
those instruments. There are many instructional books on the subject of MIDI available from a variety of
music publishers. Ask about these books at your local music store.
Anytime's piano sound
Layering & splitting sounds across the keyboard
Synthesizer's sound
(Electric bass, for example)
Synthesizer's sound
(String sound, for example)
Synthesizer's sound
(Electric guitar, for example)
Fig 10
Fig 11

- 19 -
MIDI Local Control On/Off
This function is used to control whether or not the sound from the Anytime Piano’s digital sound will be heard
when you play the keyboard. When MIDI Local Control is set to “ON” you will hear the Anytime Piano’s
digital sound when you play. When MIDI Local Control is set to “OFF” you will not hear the Anytime Piano’s
digital sound when you play, but the Anytime Piano’s keyboard data will be transmitted through the MIDI
jacks to an external MIDI device.
MIDI Local Control is set to ON in the initial setting. To switch MIDI Local Control to OFF, turn power off.
Then, press and hold the lowest two white keys and one black key (see Fig. 12) and turn the power on. MIDI
Local Control setting of the Anytime Piano will be switched to OFF. To return to MIDI Local Control ON,
turn the power off and on again without pressing any key.
Fig 12

- 20 -
GENERAL INFORMATION
1. Parts and Names
Mute Lever
Control Box
Volume Knob
Headphone Jacks Power Switch
AUX OUT Jacks
AUX IN Jacks
MIDI Jacks
CONTROL BOX
DC IN Jack

- 21 -
2. Digital Specifications
Number of polyphony Maximum 96 notes
Number of sounds 7 Piano Sounds (Concert Grand, Concert Grand 2, Mellow Grand, Mellow
Grand 2, Modern Piano, Classic E. Piano, Modern E.P.)
6 Other Sounds (Jazz Organ, Church Organ, Harpsichord, Vibraphone, Slow
Strings, Choir)
Damper Effect Medium, Strong, Off
Reverb Room, Stage, Hall, Off
Metronome Beat: Off, 2/4, 3/4, 4/4 Tempo: 30 - 300 BPM
Jacks Headphones x 2, MIDI IN/OUT, AUX IN ( L, R ), AUX OUT ( L, R )
Power AC Adaptor, DC 12 V, 0.2 A
Accessories Headphones (1), AC power adaptor (1), Owner’s Manual
Specifications are subject to change without notice.

- 22 -
3. MIDI Implementation Chart
Date : April 2007
Version : 1.0
Model: KAWAI Anytime Piano "K-15E ATII"
FUNCTION TRANSMITTED RECOGNIZED REMARKS
Basic Default 1 1
Channel Changes ✕✕
Mode Default ✕ 1
Messages ✕ 1.3
Altered ✻ ✻ ✻ ✻ ✻ ✻ ✻ ✻ ✕
Note 15 - 113 0 - 127 *with transpose
Number True voice ✻ ✻ ✻ ✻ ✻ ✻ ✻ ✻ 0 - 127
Velocity Note ON ❍ 9nH v=1 -127 ❍
Note OFF ✕ 9nH v=0 ✕
After Key ✕✕
Touch Channel ✕✕
Pitch Bend ✕✕
Control 7 ✕❍Volume
Change 64 ❍ ( Right pedal ) ❍ Damper pedal
67 ❍ ( Left pedal ) ❍ Soft pedal
Program ❍ (0 - 12) ❍ (0 - 12) 1 - 13
Change : True # ✻ ✻ ✻ ✻ ✻ ✻ ✻ ✻ 0 - 12 see page 10
System Exclusive ❍❍
Common : Song Position ✕✕
: Song Select ✕✕
: Tune ✕✕
System : Clock ✕✕
Real Time : Commands ✕✕
Auxiliary : Local ON/OFF ✕❍
: All Notes OFF ✕❍
: Active Sense ❍❍
: Reset ✕✕
Notes
Mode 1 : OMNI ON, POLY Mode 2 : OMNI ON, MONO ❍ : YES
Mode 3 : OMNI OFF, POLY Mode 4 : OMNI OFF, MONO ✕ : NO

- 23 -

- 24 -

- 1 -
Français
ANYTIME PIANO
K-15E ATII
Notice d'Utilisation
- 2 -
Français
Lisez attentivement ce chapitre avant d'utiliser cet appareil. Il contient des informations importante sur
les règles de sécurité et les précautions à prendre.
Les symboles suivants sont utilisés sur l'appareil et leurs significations sont indiquées ci-dessous.
Règles de sécurité
L'appareil est lourd, et il doit être porté par plus
de deux personnes. La chute de l'appareil peut
entraîner la panne.
Faites attention de ne pas lâcher
l'appareil.
Vous ne devez pas démonter, réparer
ou modifier l'appareil.
Vous pourriez provoquer une panne, une
électrocution ou un court-circuit.
N'utilisez pas le casque longtemps à
fort volume.
Si vous le faisiez vous pourriez avoir des
problèmes d'audition.
La chaise doit être utilisée convenablement
(elle doit être utilisé seulement pour jouer l'instrument).
●
Ne pas jouer avec ou se mettre debout sur la chaise.
●
Une seule personne doit s'asseoir sur la chaise.
●
Ne pas s'asseoir sur la chaise pendant le réglage de la hauteur.
●
Ne pas s'asseoir sur la chaise lors de l'ouverture du couvercle.
Si vous ne respectiez pas ces instructions vous
pourriez être blessé, car la chaise pourrait
tomber, ou car vos doigts pourraient être coincés.
Ne pas brancher ou débrancher la câble
d'alimentation avec les
mains humides.
Vous pourriez vous électrocuter.
L'appareil doit être branché sur une
prise secteur qui délivre la
tension spécifiée.
● Utiliser l'adaptateur secteur fourni avec l'appareil,
ou un de ceux recommandés par KAWAI.
● Si vous utilisez un câble d'alimentation secteur,
vérifiez que la forme de la prise soit la bonne, et qu'il
soit conforme à la tension d'alimentation spécifiée.
● Le non respect de ces instructions peut causer
un incendie.
AVERTISSEMENT
Indique que des précautions doivent être prises.
L'exemple indique à l'utilisateur qu'il doit faire attention de ne pas se faire coincer les doigts.
Indique une manipulation interdite.
L'exemple indique que le démontage de l'appareil est interdit.
Indique qu'une manipulation doit être effectuée.
L'exemple indique à l'utilisateur qu'il doit débrancher le câble d'alimentation de la prise secteur.
Exemples de symboles graphiques
AVERTISSEMENT
Indique un risque potentiel qui peut entraîner la mort, ou de graves
lésions, si l'appareil n'est pas manipulé correctement.
Indique un risque potentiel qui peut entraîner la détérioration, ou des dommages, pour
l'appareil ou ses propriétés, si celui-ci n'est pas manipulé correctement.
CAUTION
Risk of electric shock.
Do not open.
Met en garde l'utilisateur contre les risques
d'électrocution.
Alerte l'utilisateur de la présence de mises en garde
générales et d'avertissements dans la notice
d'utilisation qui accompagne l'appareil.
CAUTION
120V 240V230V
Si l'appareil ne doit pas être utilisé pendant une
longue période, débranchez
le câble d'alimentation de la
prise secteur.
● Si vous ne le faisiez pas la foudre pourrait
provoquer un incendie.
● Si vous ne le faisiez pas, la surchauffe de
l'appareil pourrait provoquer un incendie.
Lorsque vous débranchez le câble
secteur, faites-le en
maintenant et en tirant la
prise pour la déconnecter.
●
Si vous tiriez sur le câble, vous pourriez
l’endommager en provoquant un incendie, une
électrocution, ou un court-circuit.

- 3 -
Français
L'utilisation de l'appareil dans un de ces lieux
peut entraîner une panne de celui-ci.
Le non respect de cette consigne peut
engendrer la panne de cet appareil, ou des
autres appareils.
● Si vous le faisiez l'appareil pourrait générer du
bruit.
● Si cet appareil génère du bruit, éloignez-le
suffisamment des autres appareillages électriques,
ou branchez le sur une autre prise secteur.
Dépannage
Si quelque chose d'anormal se passe dans l'appareil, éteignez-le immédiatement (position OFF), déconnectez le câble
d'alimentation, et contactez le magasin qui vous a vendu l'appareil.
● Si vous le faisiez, vous pourriez déformer ou
provoquer la chute de l'appareil, en entraînant
une panne ou des blessures.
● L'utilisation de ces produits pourrait entraîner une
décoloration ou une déformation de l'appareil.
● Pour nettoyer cet appareil, utilisez un chiffon
doux imprégné d'eau tiède, essorez le bien,
puis frottez délicatement l'appareil.
Si vous négligiez ceci , il pourrait en résulter un
incendie, une électrocution, ou un court-circuit.
Cela pourrait provoquer la chute de l'appareil,
et engendrer des blessures.
L'introduction d'eau, d'aiguilles ou d'épingles à
cheveux, peut provoquer une panne ou un
court-circuit.
En le fermant brutalement, vous pourriez vous
blesser en vous coinçant les doigts.
Ne pas utiliser l'appareil dans les lieux suivants.
● Lieux exposés aux rayons directs du soleil,
comme la proximité des fenêtres.
● Lieux surchauffés, comme la proximité
des radiateurs.
● Lieux très froid, comme à l'extérieur.
● Lieux très humides.
● Lieux où la présence de poussière ou de sable est importante.
● Lieux où l'appareil est exposé à des vibrations excessives.
Lorsque vous fermez le couvre-clavier,
faites le en douceur.
Ne pas nettoyer l'appareil avec du
benzène ou du diluant.
Ne pas se tenir debout sur l'appareil,
ou le surcharger.
Lorsque vous branchez le câble
d'alimentation et les autres
câbles, faites attention de
ne pas les emmêler.
Ne placez pas l'appareil à proximité
de matériels électriques tels
que les télévisions et les
radios.
Ne pas s'appuyer contre le clavier.
Faite attention de ne pas introduire un
produit étranger à l'intérieur
de l'appareil.
Avant de brancher le câble d'alimentation,
assurez-vous que cet appareil,
et les autres appareils, soient
en position Arrêt (OFF).
ATTENTION
OFF
Il est recommandé de placer I'instrument à proximité de la prise de courant et de positionner le cordon
d'alimentation secteur de telle sorte qu'il puisse être débranché rapidement en cas d'urgence, le courant
électrique étant toujours présent tant que la prise est branchée même si le bouton de mise en marche est
sur la position arrêt.
Il se peut que cet appareil soit équipé avec une fiche secteur polarisée (une languette
plus large que l’autre). C’est une mesure de sécurité.
Si vous ne pouvez pas brancher la fiche dans la prise secteur, contactez un électricien
qui remplacera votre prise.
Ne supprimez pas le détrompeur de la fiche.

- 4 -
Dépannage
Si quelque chose d’anormal se passe dans l’appareil, éteignez-le immédiatement
(position OFF), déconnectez le câble d’alimentation, et contactez le magasin qui vous a
vendu l’appareil.
L’appareil doit être révisé par du personnel qualifié lorsque :
●
Le câble ou la prise d’alimentation sont endommagés.
●
Des objets sont tombés, ou du liquide à été renversé à l’intérieur de l’appareil.
●
L’appareil a été exposé à la pluie.
●
L’appareil ne semble pas fonctionner normalement, ou manifeste un changement marqué
dans ses performances.
●
L’appareil est tombé, ou son meuble est endommagé.
ATTENTION:
Pour éviter les chocs électriques, introduire la lame la plus large de la fiche dans la
borne correspondante de la prise et pousser jusqu
’au fond.
Notez bien:
Cet appareil a été vérifié et accepté en conformité avec les exigences d’un appareil numérique de
Classe B, attenant à la Partie 15 des réglements FCC.
Ces exigences sont conçues pour donner une protection raisonnable contre les interférences
dommageables d’une installation résidentielle. Cet appareil génère, utilise et peut émettre des
fréquences radio; s’il n’est pas installé et utilisé en suivant les instructions, ces fréquences
peuvent causer des interférences dommageables aux communications radio.
Si cet appareil cause des interférences dommageables à la réception des postes de radio et de
télévision, pouvant être déterminées en arrêtant ou en mettant l’appareil en marche, nous
recommandons à l’utilisateur d’essayer de corriger ces interférences en utilisant une ou
plusieurs des mesures suivantes:
-
Ré-orientez ou relocalisez l’antenne de réception.
-
Eloigner l’appareil du récepteur.
-
Branchez l’appareil dans une prise de courant étant alimentée par un circuit différent de celui
du récepteur.
-
Consultez votre concessionnaire ou un technicien exprérimenté en radio/télévision pour obtenir
de l’aide.
Votre piano doit être placé à un endroit tel que sa position n’altère pas sa propre ventilation.
Gardez une distance minimum de 5 cm autour de l’instrument pour une aération suffisante.
Assurez-vous de ne pas obstruer les ouïes de ventilation de votre instrument par des objets,
tels que journaux, napperons, rideaux etc.
Information sur les déchets industriels á destination des usagers
Si votre produit porte le marquage du symbole de recyclage, cela signifie que, à la fin de sa vie,
vous devez le remettre de façon séparée dans un centre de collecte de déchets approprié.
Vous ne devrez pas le remettre avec les déchets ménagers. Remettre ce produit dans un centre
de collecte de déchets approprié évitera de potentiels effets négatifs sur l’environnement et sur la
santé qui pourraient survenir dans le cas contraire du fait d’un traitement des déchets non adapté.
Pour de plus amples détails, merci de contacter les instances locales.
(union européenne seulement)
Cet instrument est conforme aux exigences des appareils numériques de classe B, suivant
les Règlements des Interférences Radio, C.R.C., c. 1374.

- 5 -
Nous vous remercions pour l’achat de votre piano KAWAI de la série « Anytime ». Les pianos de la série «
Anytime » sont un nouveau genre d’instruments qui marient le piano acoustique avec le piano numérique. Avec
votre « Anytime » vous pourrez bénéficier de la sonorité très subtile et expressive que seul le piano acoustique
KAWAI peut générer, mais aussi des fonctions et applications variées offertes par les instruments numériques.
Le piano « Anytime » vous permettra de découvrir de nouvelles possibilités d’utilisation, que se soit à la maison,
à l’école, en studio, ou ailleurs. Pour profiter pleinement des possibilités du piano « Anytime », lisez cette notice
pour que les fonctions et caractéristiques de ce piano vous deviennent familières. Et maintenant, jouez quand
ça vous chante avec votre « Anytime » KAWAI.
Table des Matières
Page
Installation de l’instrument 6
Jouer au casque 7
Comment jouer en mode « Anytime » 7
Utilisation du mode réglage 9
1. Choisir un Son 10
2. Reverberation 11
3. Résonnance 11
4. Accord 12
5. Transposition 13
6. Métronome 13
Utilisation avec votre chaîne Hi-fi 14
Utilisation des fonctions MIDI 16
Informations générales 20
Nom des differents elements 20
Caracteristiques Electroniques 21
MIDI Implementation Chart 22
- 6 -
Installation de l'Instrument
Vous avez besoin d’électricité pour que votre « Anytime Piano » fonctionne, car en plus d’être un instrument
acoustique, c’est aussi un instrument de musique électronique. Vous devez installer le piano près d’une prise de
courant ou dans une pièce pourvue de prises électriques. Demandez à votre livreur de piano de l’installer à
l’endroit désiré.
La prise repérée DC IN est située à l’arrière du piano Anytime (En bas à gauche) Branchez le connecteur de
l’alimentation secteur fournie avec votre piano dans la prise DC IN (Fig. 1). Ensuite branchez la fiche secteur
de l’alimentation dans une prise de courant.
C’est tout ce que vous avez a faire pour l’installation.
Prise DC IN
Fig. 1
 Loading...