

Page 1
Operating Instructions
SMARTair. SMARTair mobile.
Always on the safe side.
Page 2

KaVo Elektrotechnisches Werk GmbH
Wangener Straße 78
D-88299 Leutkirch
Page 3

1
SMARTair. SMARTair mobile.
A 1 User information ................................................................................................................................................................2
A 1.1 Meaning of the pictograms ..........................................................................................................................................2
A 1.2 Important information ..................................................................................................................................................2
A 1.3 Precautions ..................................................................................................................................................................2
A 1.4 Uses and Applications ................................................................................................................................................3
A 1.5 Cleaning and care of the unit ....................................................................................................................................3
A 2 Scope of delivery - Accessories ........................................................................................................................................4
A 2.1 Scope of delivery ........................................................................................................................................................4
A 2.2 Accessories ..................................................................................................................................................................4
A 3 Technical Data ....................................................................................................................................................................5
A 3.1 SMARTair ....................................................................................................................................................................5
A 3.2 SMARTair mobile ........................................................................................................................................................7
A 4 Location ..............................................................................................................................................................................9
A 5 Installation and connection ............................................................................................................................................10
A 5.1 SMARTair ..................................................................................................................................................................10
A 5.2 SMARTair mobile ......................................................................................................................................................12
A 6 Preparing for operation ....................................................................................................................................................14
A 6.1 SMARTair ..................................................................................................................................................................14
A 6.2 SMARTair mobile ......................................................................................................................................................14
A 6.3 Inserting or replacing the adsorption filter in SMARTair ..........................................................................................15
A 6.4 Inserting or replacing the adsorption filter in SMARTair mobile ................................................................................16
A 7 Operation and function elements ....................................................................................................................................17
A 7.1 SMARTair ..................................................................................................................................................................17
A 7.2 SMARTair mobile ......................................................................................................................................................18
A 8 Operation ..........................................................................................................................................................................19
A 8.1 Automatic operation ..................................................................................................................................................19
A 8.2 Manual operation ......................................................................................................................................................19
A 8.3 Operation by footswitch ............................................................................................................................................19
A 8.4 Suction levels ............................................................................................................................................................20
A 8.4.1 Storage of the suction levels - from Software Version 2.0 ....................................................................................20
A 8.5 Fine-tuning for automatic operation ..........................................................................................................................21
A 9 Maintenance ......................................................................................................................................................................22
A 9.1 Changing the filter bag SMARTair ............................................................................................................................22
A 9.2 Changing the filter bag SMARTair mobile ................................................................................................................22
A 9.3 Changing the adsorption filter ..................................................................................................................................22
A 9.4 Installing or changing the micro-filter in SMARTair ................................................................................................23
A 9.5 Installing or changing the micro-filter in SMARTair mobile ........................................................................................25
A 10 Trouble-shooting ..............................................................................................................................................................27
B 1 Important information ......................................................................................................................................................28
B 1.1 Transport and storage ..............................................................................................................................................28
B 1.2 What to do in the event of damage during transport? ..............................................................................................29
B 1.3 Pack weight and marking ..........................................................................................................................................29
Guarantee conditions ..........................................................................................................................................................30
Declaration of conformity ....................................................................................................................................................31
Spare parts SMARTair ........................................................................................................................................................32
Spare parts SMARTair mobile..............................................................................................................................................34
Page 4

2
SMARTair. SMARTair mobile.
A 1.2 Important information
The instructions for use should be
read by the user before starting up the
unit for the first time, in order to avoid
incorrect operation and other damage. If
other language versions are required, please
request these from your responsible KaVo
agent. Duplication and distribution of the
instructions for use (IU) require KaVo's
prior consent.
All technical data, information and properties of the product described in the IU correspond to the state on going to press.
Modifications and improvements to the
product as a result of new technical developments are possible.
This does not imply any right to retrofitting
of existing units.
KaVo assumes no responsibility for damage
arising through:
• external influences (poor quality of the
media or inadequate installation)
• use of incorrect information
• improper use
• improperly performed repairs.
Repair and maintenance work - apart from
the activities described in these instructions
for use - may be performed only by qualified technical personnel.
In the event of modifications by third parties, the approvals become null and void.
KaVo recommends using only original
spare parts for operation and for repair.
A 1.3 Precautions
Safe operation and protection of the unit are
ensured only through proper use in accordance with the instructions for use and
using the tools approved for the purpose.
The following should also be observed:
• the work safety regulations,
• the accident prevention regulations.
In accordance with these requirements, it is
the duty of the user
• to use only flawless materials
• to observe the correct applications
A 1 User information
A 1.1 Meaning of the pictograms
Situations where failure to follow the
instructions may lead to danger,
damage to material or operating faults.
Important information for operator
and engineer.
Automatic mode
Automatic sequence
Close, screw in,
fasten, etc.
Open, release, loosen
+
more, higher
- less, lower
∞ Continuous operation
Time, time sequence
Disconnect mains plug
Page 5
3
SMARTair. SMARTair mobile.
A 1.4 Uses and Applications
Collection and separation of healthdamaging dusts (as not defined in VBG 113
and VBG 119), as well as shavings and
vapours (especially methyl-methacrylate).
For use in dental laboratories, dentists’
practices, and industrial applications
(goldsmiths, hearing-aid techniques, glasscutting, or similar technologies)
The suction units are operated in
conjunction with various extraction
elements, taking into consideration the
principles of ergonomics.
The drawer version, SMARTair, is
primarily operated with removable suction
hoods.
The mobile version, SMARTair mobile, can
be used not only with removable suction
hoods, but also can be connected directly to
small apparatus.
A 1.5 Cleaning and care of the unit
In the case of newly-painted surfaces on
which water still forms droplets, cleaning
with water and nonabrasive, mild cleaning
agents is sufficient.
Paints subjected to stress, detectable from
deteriorating shine and dark indefinite
colours, are first cleaned as described above
and then preserved with commercial paint
care agents.
Apply paint care agents with a fluff-free
cloth and circular movements. Then polish
with a cotton wool pad or a cloth until the
surface shines. Damage to the paint may
occur if other cleaning agents are used.
During cleaning or disinfection
procedures, ensure that no liquid
enters the interior of the unit since this may
lead to faults.
SMA
R
Tai
r
S
M
A
R
T
a
i
r
m
o
b
i
l
e
Page 6
4
SMARTair. SMARTair mobile.
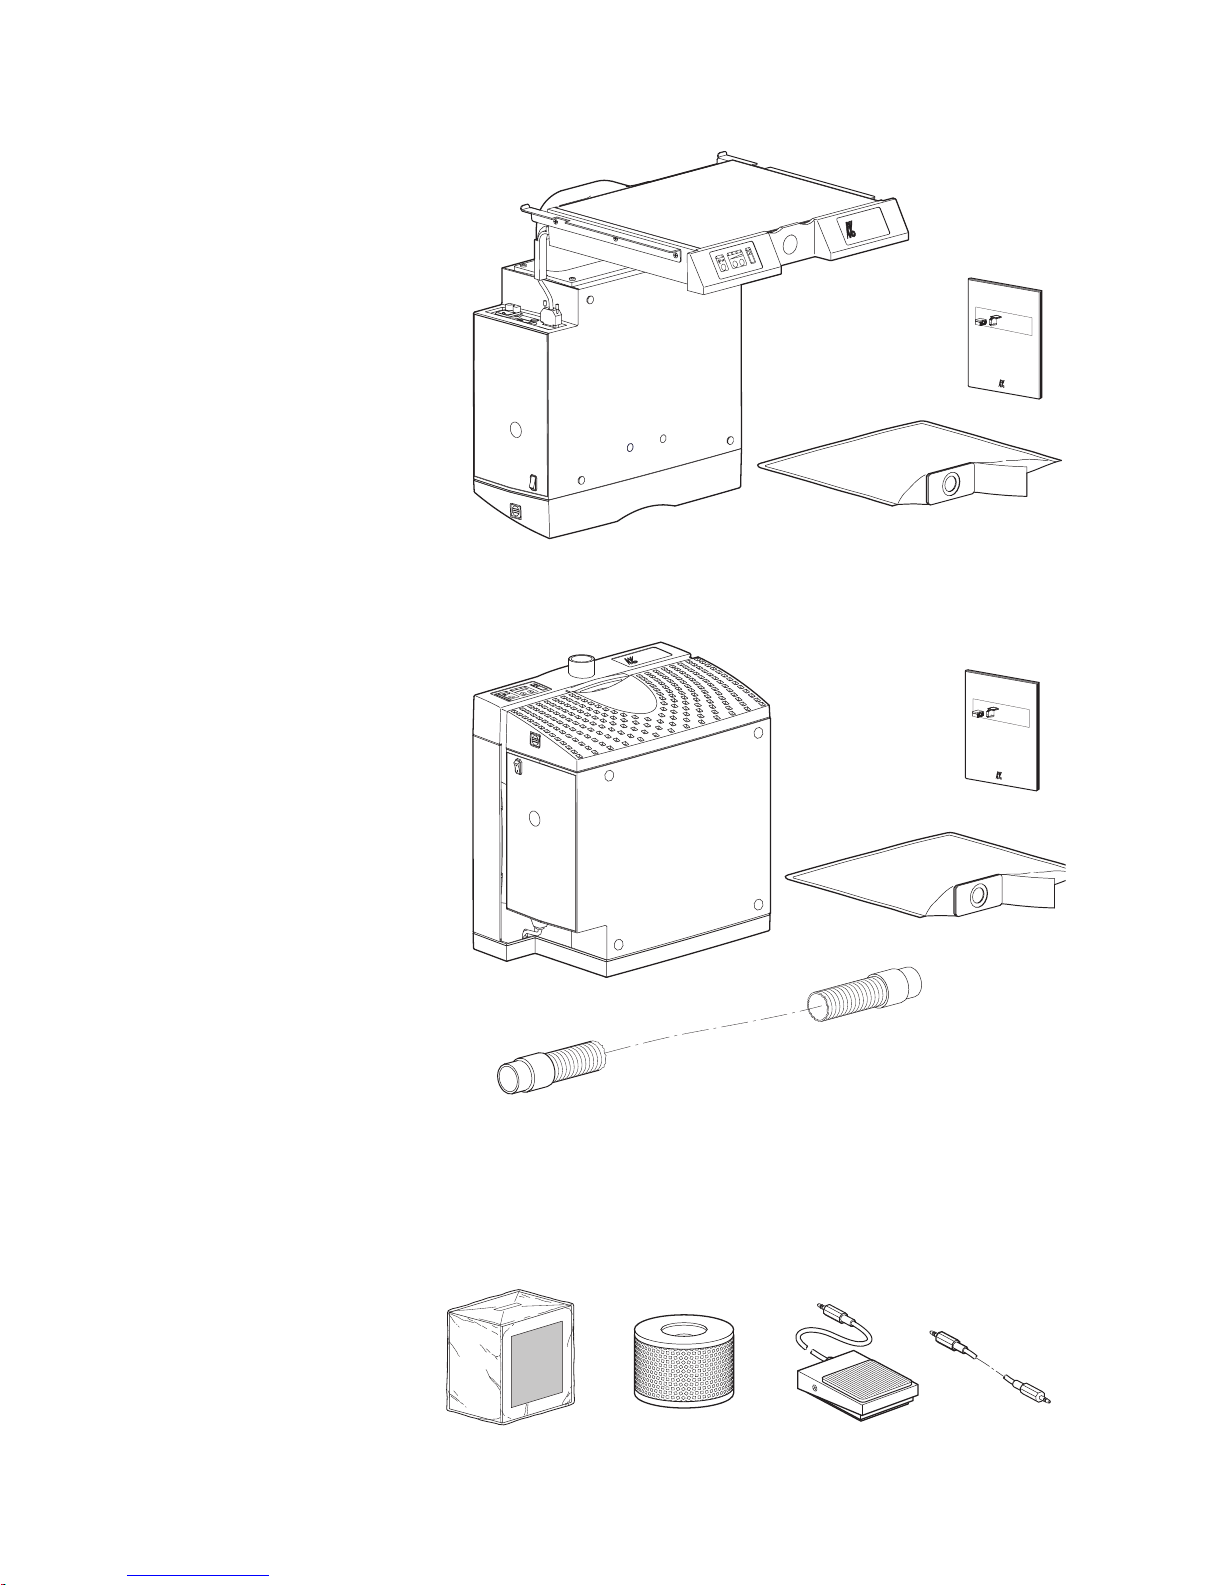
A 2 Scope of delivery - Accessories
A 2.1 Scope of delivery
Check that the delivery is complete:
SMARTair consists of:
Motor–filter drawer
Replacement filter bag
Micro-filter cartridge
Operating instructions 1.001.9704
SMARTair mobile consists of:
Motor-filter housing
Replacement filter bag
Suction hose ø 42 mm with connection
sleeves
Micro-filter cartridge
Operating instructions 1.001.9704
A 2.2 Accessories
Accessories available on request:
Adsorption filter Mat. No. 0.658.1861
Micro-filter Mat. No. 0.658.9802
Footswitch Mat. No. 1.000.3147
Control cable Mat. No. 1.000.7198
S
M
A
R
T
a
i
r
G
e
b
r
a
u
c
h
s
a
n
w
e
i
s
u
n
g
S
M
A
R
T
a
ir
p
l
u
s
S
M
A
R
T
a
i
r
p
l
u
s
m
o
b
i
l
e
K
a
V
o
.
D
e
n
t
a
l
E
x
c
e
l
l
e
n
c
e
S
M
A
R
T
a
i
r
m
ob
i
l
e
SMA
R
Tai
r
S
M
A
R
T
a
i
r
m
o
b
i
l
e
S
M
A
R
T
a
i
r
G
e
b
r
au
c
h
s
an
w
e
is
u
n
g
S
M
A
R
T
a
i
r
p
l
u
s
S
M
A
R
T
a
ir
p
l
u
s
m
o
b
ile
K
a
V
o
.
D
e
n
t
a
l
E
x
c
e
l
l
e
n
c
e
S
M
A
R
T
a
i
r
m
o
b
i
l
e
Page 7
5
SMARTair. SMARTair mobile.
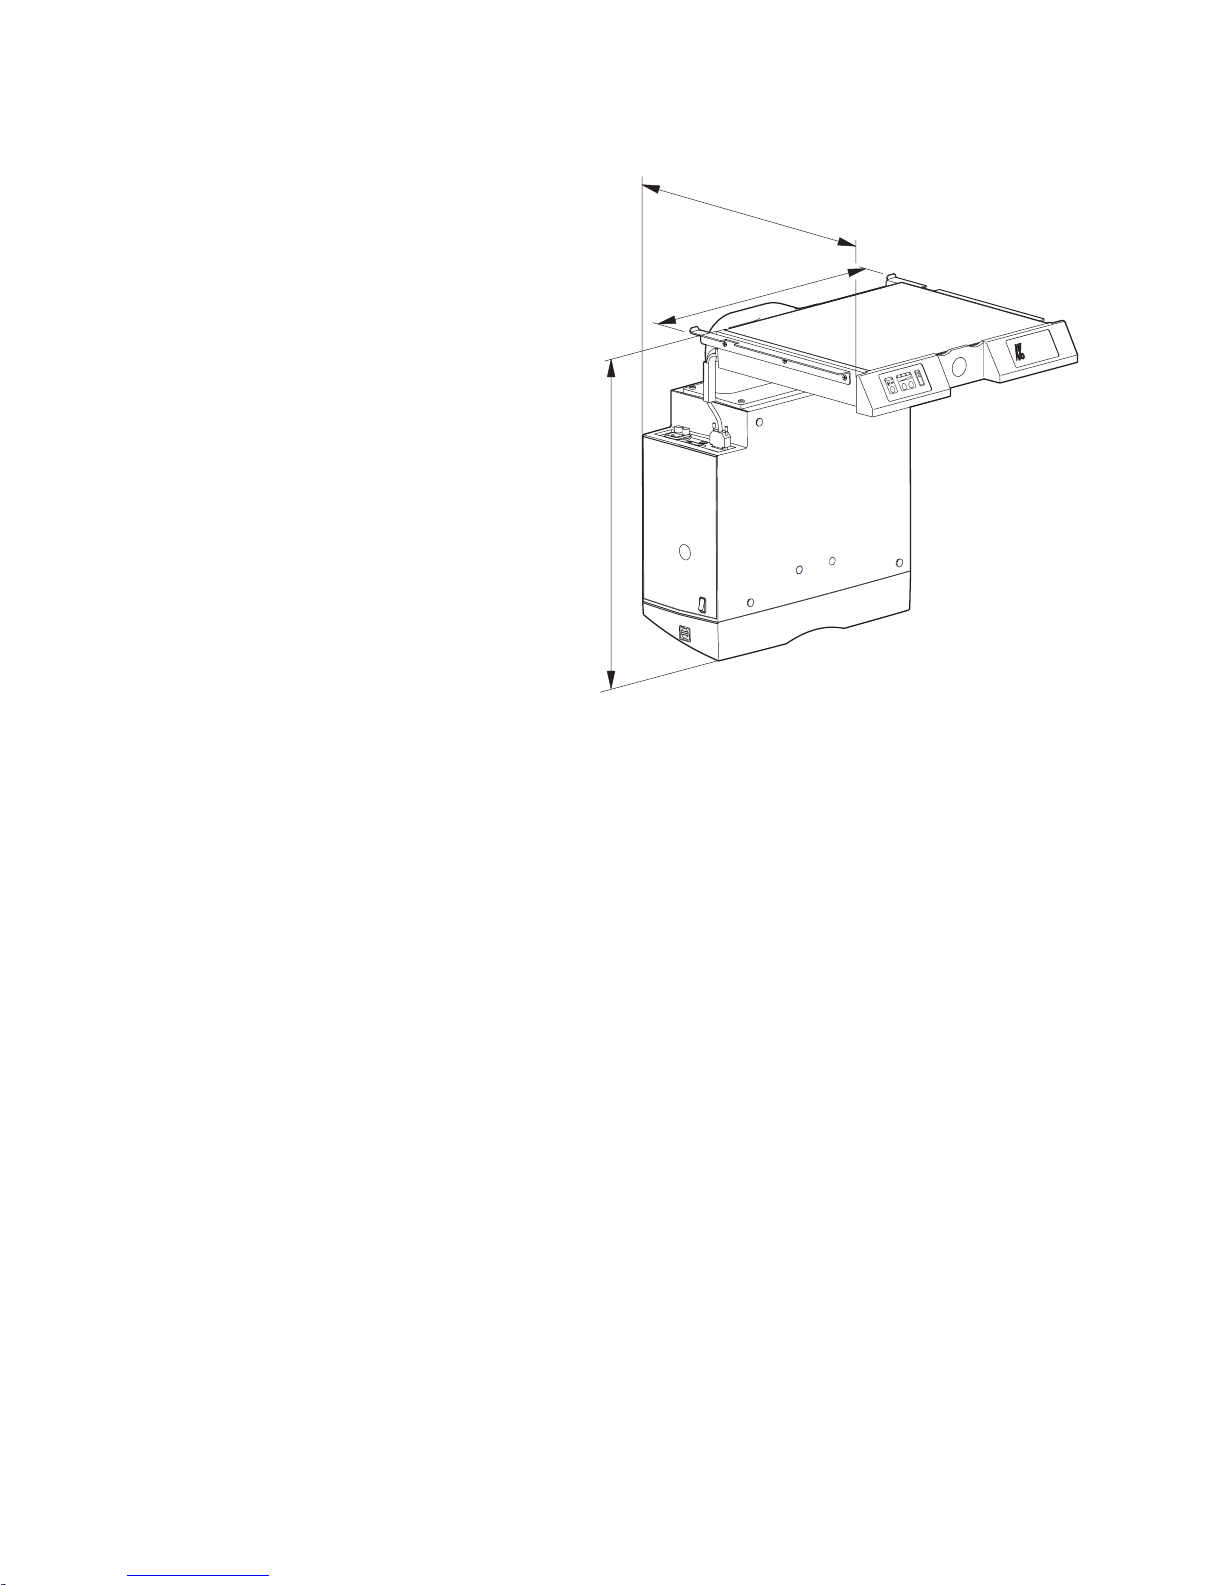
A 3 Technical Data
A 3.1 SMARTair
Measurements:
Width: 450 mm
Depth: 510 mm
Height: 540 mm
Weight: ca. 17,5 kg
Suction capacity: 15-30 L/sec.
max. load for connected unit: 500 W
max. leakage current 0,5 mA
Fuse rating:
mains input 100- 230V T 10A (H) /250 V
fuse ancillary unit
T 4A (L) /250 V stage 1-4
fuse ancillary unit
T 3,15A (L) /250 V stage 2
Ambient conditions:
Suitable for indoor use
Permissible ambient temperature range of
5°C - 40°C
Permissible relative humidity range up to
max. 80 %
Mode of operation
Continuous operation
Degree of soiling: 2
Excess voltage category: II
Protection class: I
Nominal voltage
Check that the mains voltage and frequency
are the same as on the rating plate.
Voltage range: 100/115/230 V 50/60 Hz
Rated power:
Unit consumption max. 1000 W
Disconnection method:
Remove mains plug to disconnect.
Adjustment to national mains voltage:
Set the voltage adjustment switch to
national values (see A 5.1).
SMAR
Tai
r
450
540
510
Page 8

6
SMARTair. SMARTair mobile.
Rating plate SMARTair
Provides information on:
1 Manufacturer
2 Serial number
3 Barcode
4 Attention! – observe accompanying
documents and safety hints.
5 CE-Mark according
6 Fuse rating
7 Consumption
8 Supply voltage for unit
9 Order number (reference number)
0 Unit type
@
2
4
5
6
7
8
9
0
3
Page 9
7
SMARTair. SMARTair mobile.
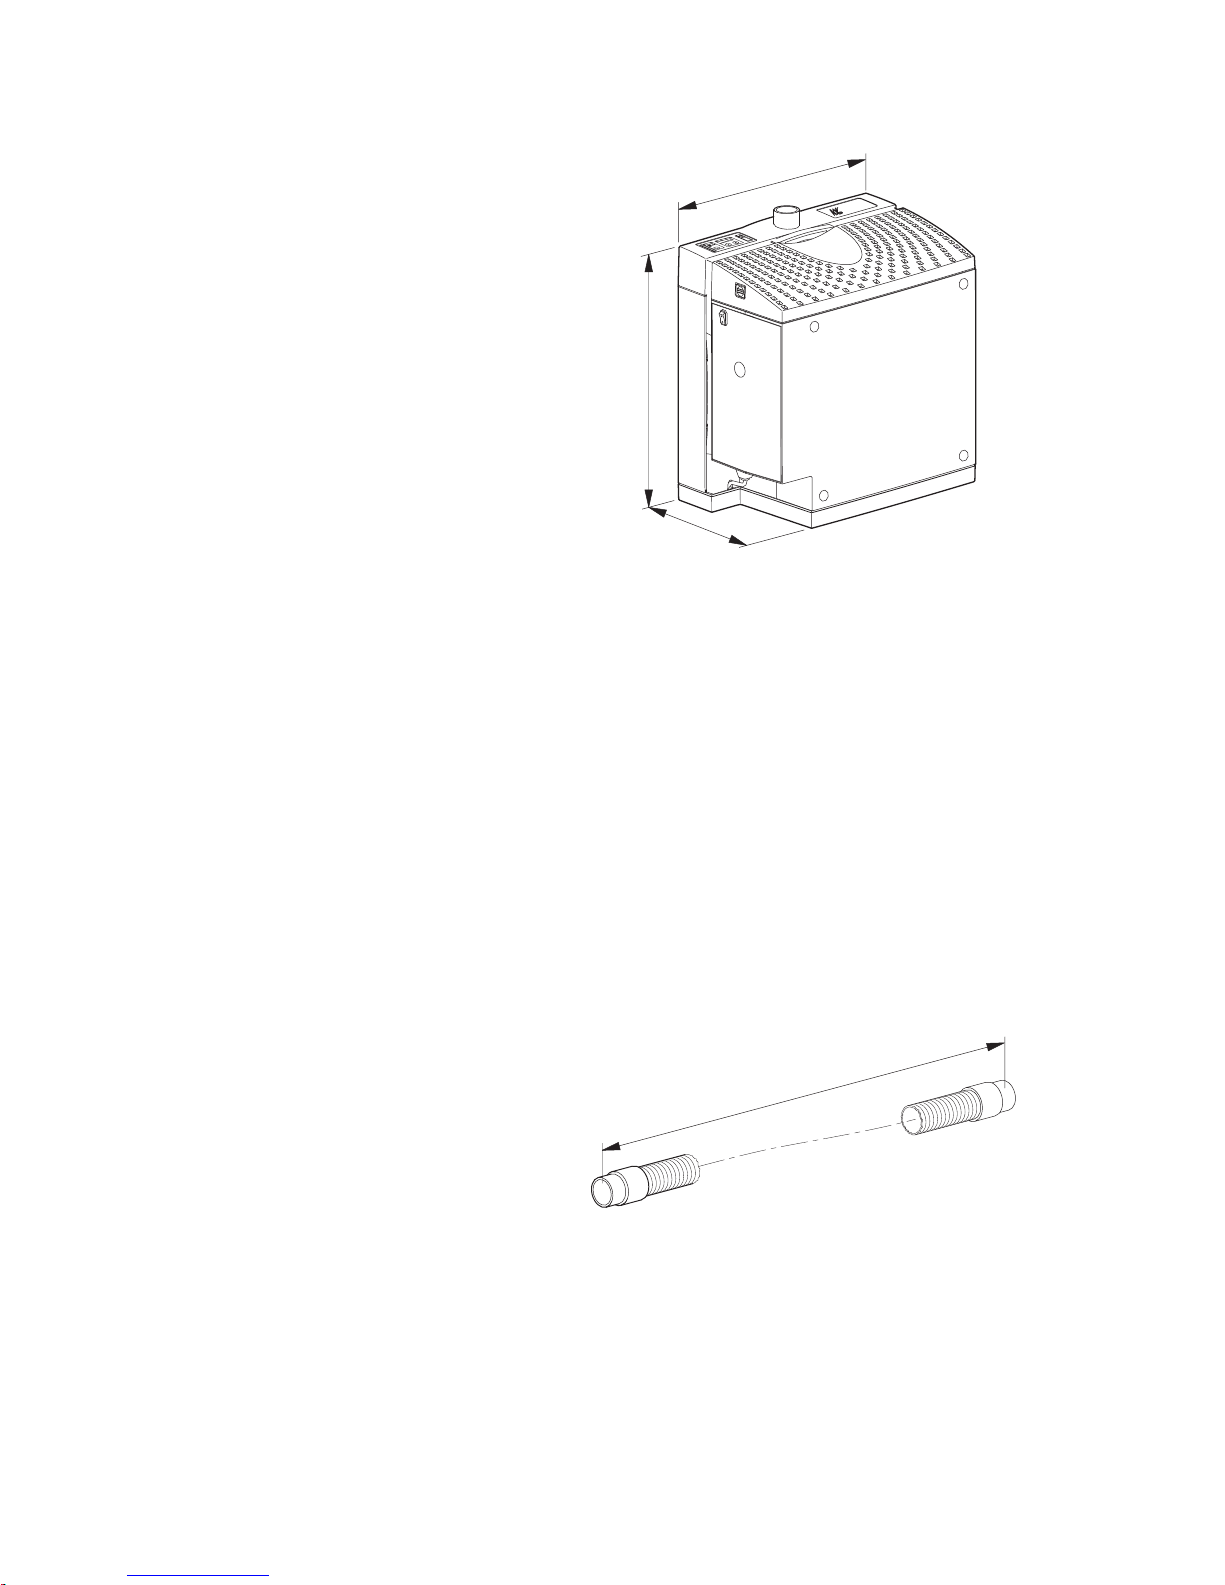
A 3.2 SMARTair mobile
Measurements:
Width: 420 mm
Depth: 270 mm
Height: 430 mm
Weight: ca. 17,5 kg
Suction capacity: 15-30 L/sec.
max. load for connected unit: 500 W
max. leakage current 0,5 mA
Fuse rating:
mains input 100- 230V T 10A (H) /250 V
fuse ancillary unit
T 4A (L) /250 V stage 1-4
fuse ancillary unit
T 3,15A (L) /250 V stage 2
Ambient conditions:
Suitable for indoor use
Permissible ambient temperature range of
5°C - 40°C
Permissible relative humidity range up to
max. 80 %
Mode of operation:
Continuous operation possible
Degree of soiling:2
Excess voltage category: II
Protection class:I
Nominal voltage:
Check that the mains voltage and frequency
are the same as on the rating plate.
Voltage range: 100/115/230 V 50/60 Hz
Rated power:
Unit consumption max. 1000 W
Disconnection method:
Remove mains plug to disconnect.
Adjustment to national mains voltage:
Set the voltage adjustment switch to
national values (see A 5.2).
Suction hose length: 1 200 mm
Suction hose internal: ø 42 mm
S
M
A
R
T
a
i
r
m
o
b
il
e
430
270
420
1200
Page 10
8
SMARTair. SMARTair mobile.
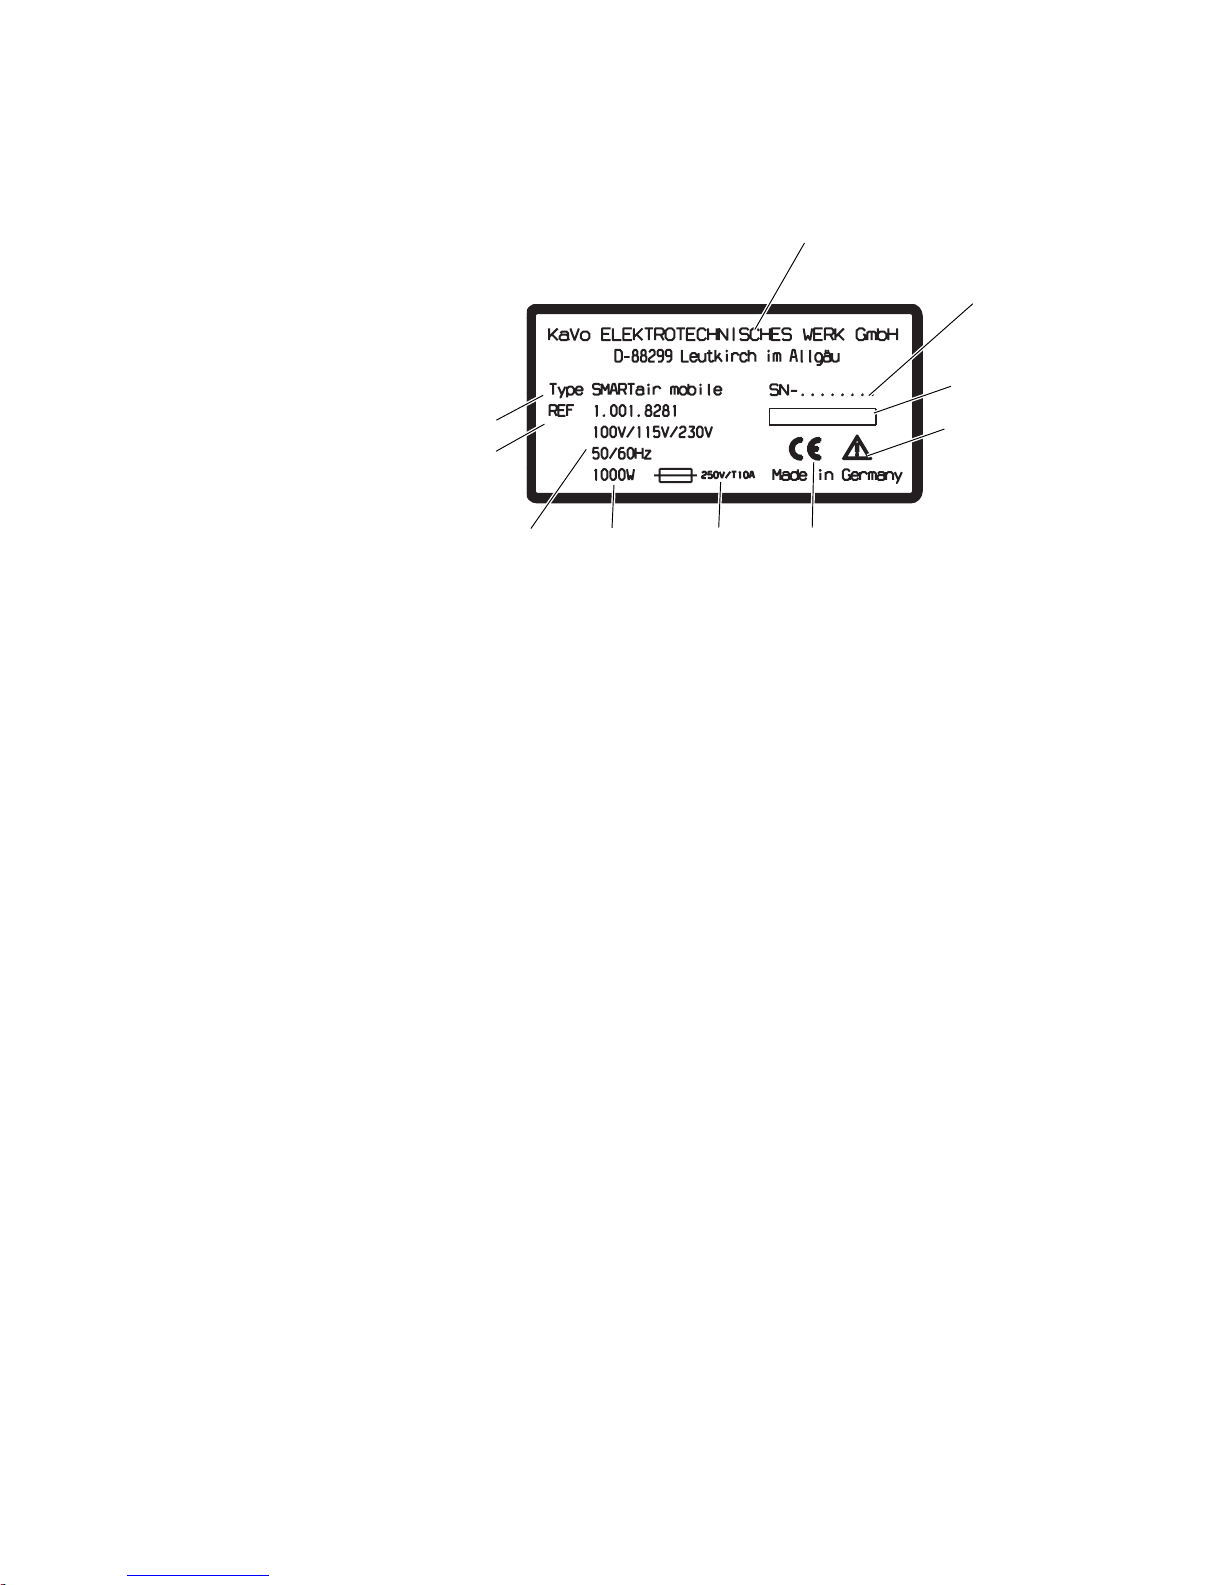
Rating plate SMARTair mobile
Provides information on:
1 Manufacturer
2 Serial number
3 Barcode
4 Attention! – observe accompanying
documents and safety hints.
5 CE-Mark according
6 Fuse rating
7 Consumption
8 Supply voltage for unit
9 Order number (reference number)
0 Unit type
@
2
4
5
6
7
8
9
0
3
Page 11
9
SMARTair. SMARTair mobile.
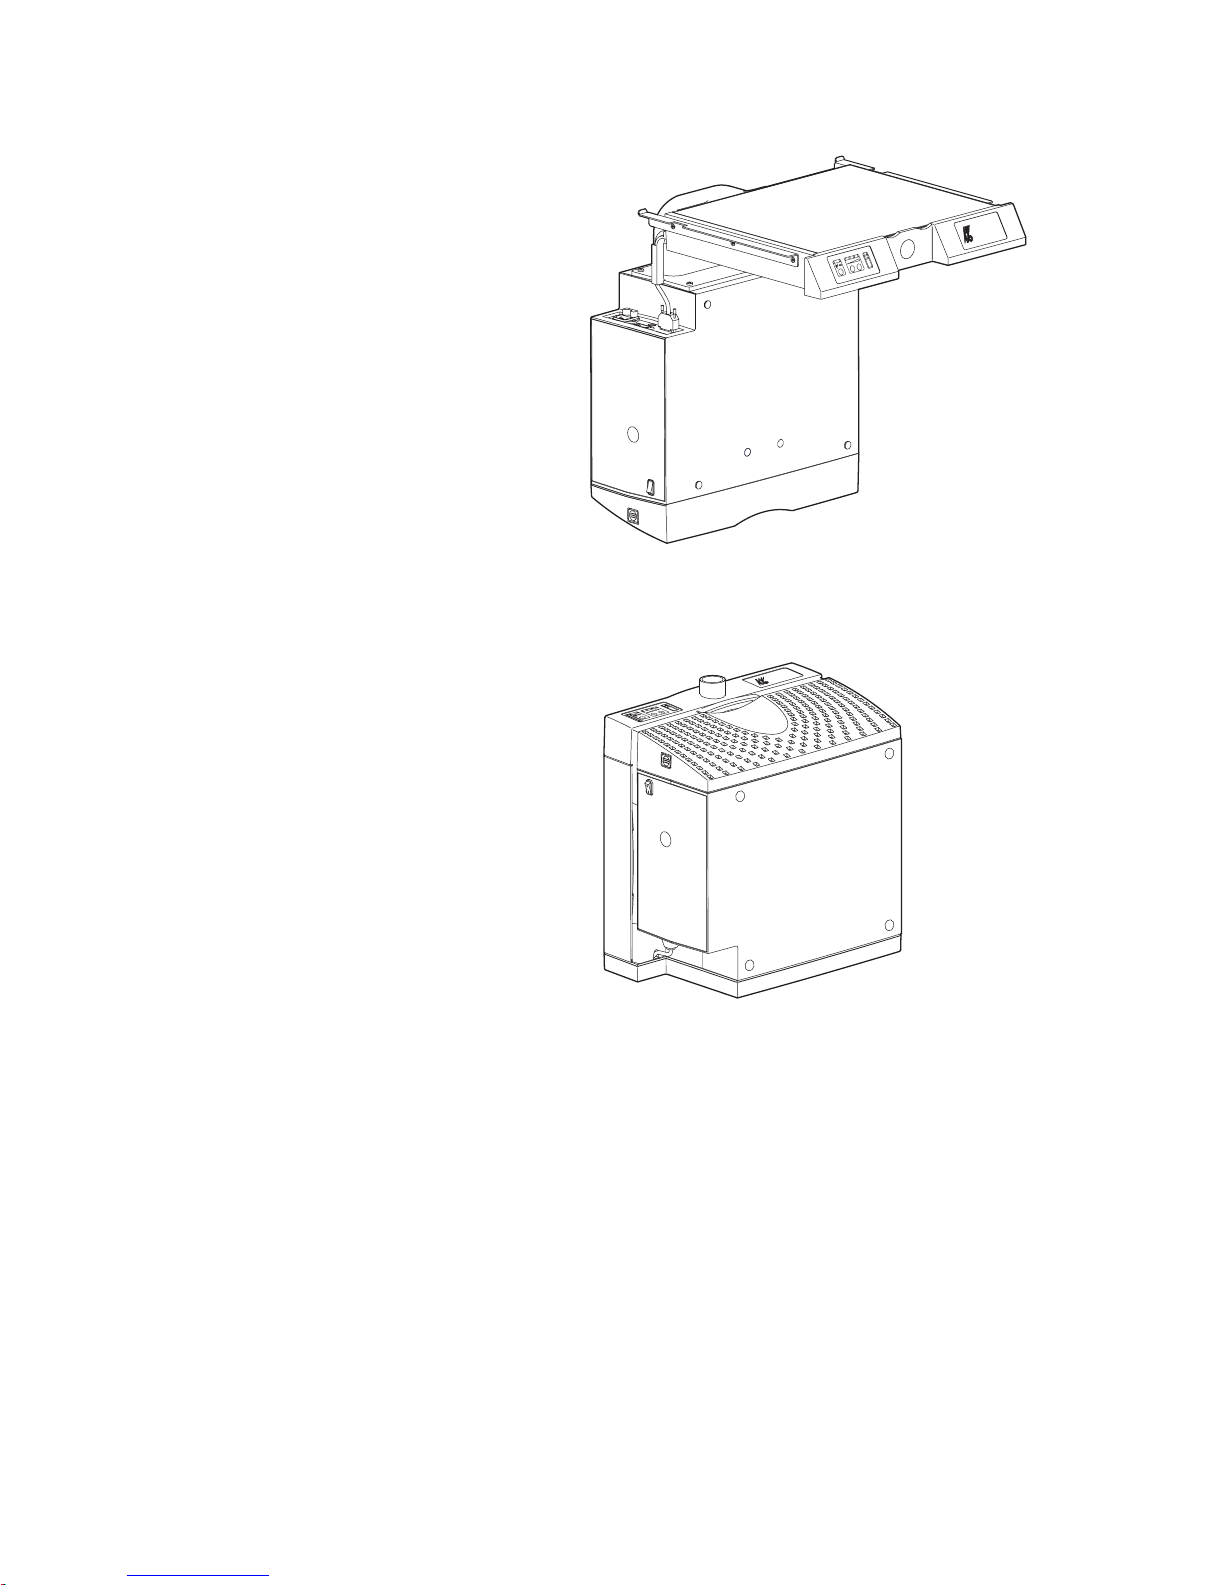
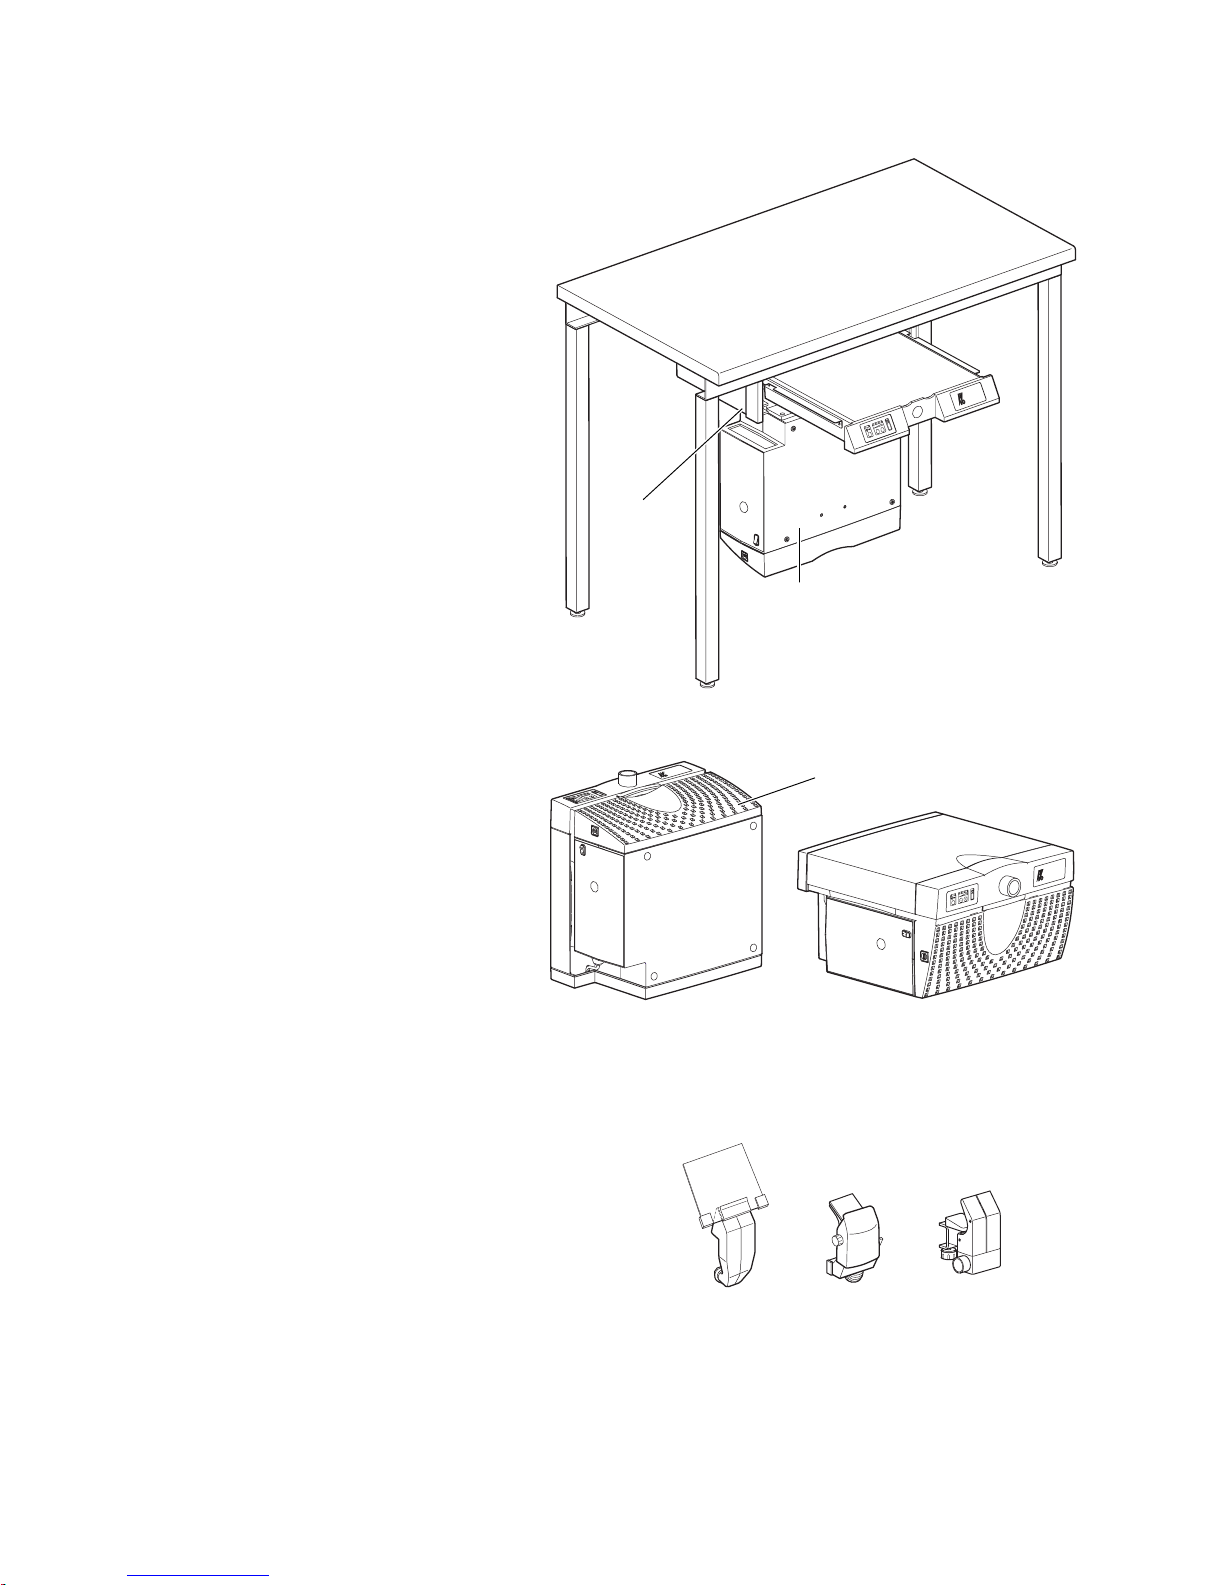
A 4 Location
SMARTair 2 is designed for installation
in EWL Support Frame 1 or EWL System
Basis 5 .
SMARTair mobile 3 can be set up in a
horizontal or vertical position.
Choose a location so that the exhaust
outlet is not blocked.
The drawer version, SMARTair plus, is
primarily operated with removable suction
hoods £.
The mobile version, SMARTair plus
mobile, can be used not only with
removable suction hoods £, but also can
be connected directly to small apparatus.
S
M
A
R
T
a
i
r
m
o
b
i
l
e
S
M
A
R
T
a
ir
m
o
b
i
le
SMAR
Tair
2
3
4
1
Page 12
10
SMARTair. SMARTair mobile.
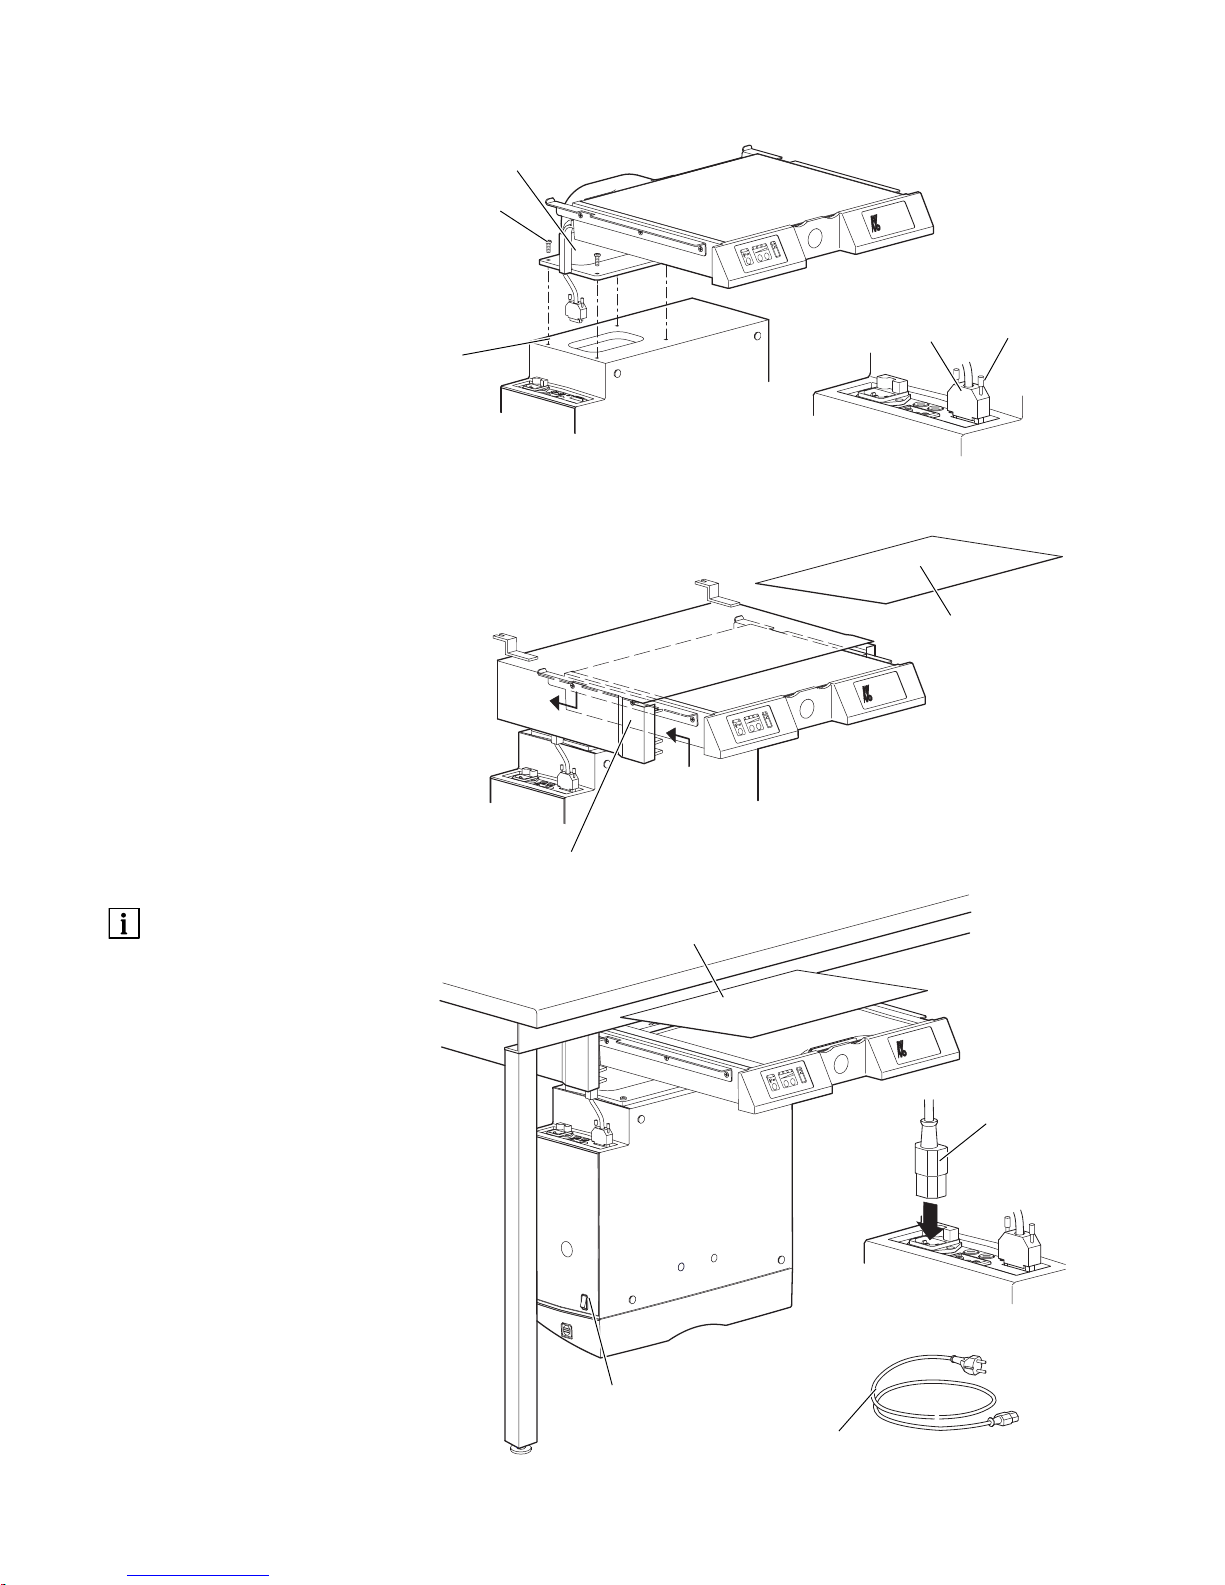
A 5 Installation and connection
A 5.1 SMARTair
Apart from those procedures
described in these operating
instructions, repairs and maintenance must
be carried out only by technically-qualified
personnel.
Preparing SMARTair for operation.
Screw the motor-housing 3 to the flange
1 with four screws 2. Insert Sub-D plug
4 in the provided receptacle on the casing
and fix with the two screws 5.
Remove lid 7 from SMARTair .
Locate SMARTair in EWL support frame 6.
Press mains switch 0 in position ,,0“.
Insert supplied mains cable 9into
the provided connection
8
at
SMARTair, and insert mains plug into a
grounded mains socket which is easy to
reach. (Similarly if using an extension line).
Arrange the mains cable
9
so that
SMARTair can be withdrawn to the
stop without pulling out the plug.
Only equipment with max. 500 watt
consumption can be connected.
Replace lid 7 on SMARTair and push the
unit in the support frame 6 as far as the
stop.
S
MAR
Tair
S
MAR
Tair
SMAR
Tair
7
5
3
9
6
8
4
1
2
0
7
Page 13

11
SMARTair. SMARTair mobile.
Connect ancillary equipment 2 via
connection cable 1 to SMARTair .
Ancillary equipment with a control outlet
(3,5 mm socket) e.g. K-Control, can be
directly coupled to the suction unit by
means of a control cable 3 (Mat. No.
1.000.7198).
In this case, no other connecting
cable and no fine-tuning for
automatic operation is necessary.
When using suction hood 4, the suction
intake opening 5 must be completely
covered by the rubber lip.
If necessary, loosen the screws 6 of the
clamping bar 7 and adjust sideways.
Adjustment to national mains voltage:
Set the voltage adjustment switch 8 to
national values
SM
ARTair
0
3
n
m
a
x
x
1
0
0
0
/
m
i
n
K
cont
r
ol
2
1
3
4
6
5
7
8
Page 14

12
SMARTair. SMARTair mobile.
A 5.2 SMARTair mobile
Apart from those procedures
described in these operating
instructions, repairs and maintenance must
be carried out only by technically-qualified
personnel.
Place SMARTair mobile at the desired
location.
Press mains switch 1 in position “0“.
Insert supplied mains cable 2into
the provided connection
3
at
SMARTair mobile, and insert mains plug
into a grounded mains socket which is easy
to reach. (Similarly if using an extension
line).
Only equipment with max. 500 watt
consumption can be connected.
S
M
A
RT
a
ir
m
ob
i
le
SM
AR
T
air
m
ob
i
le
1
2
3
Page 15

13
SMARTair. SMARTair mobile.
Connect ancillary equipment 2 via
connection cable 1 to SMARTair mobile.
Ancillary equipment with a control outlet
(3,5 mm socket) e.g. K-Control, can be
directly coupled to the suction unit by
means of a control cable 3 (Mat. No.
1.000.7198).
In this case, no other connecting
cable
1
and no fine-tuning for
automatic operation is necessary.
Attach suction hose 4 to nozzle 5 of
SMARTair mobile.
Connect hose to ancillary equipment.
Adjustment to national mains voltage:
Set the voltage adjustment switch 6 to
national values
SMART
air
mob
i
le
0
3
n
m
a
x
x
1
0
0
0
/
m
i
n
K
control
1
2
3
4
5
6
Page 16

14
SMARTair. SMARTair mobile.
A 6 Preparing for operation
A 6.1 SMARTair
Check if filter bag 3 is correctly
positioned:
Pull SMARTair out from the support
frame 1 up to the stop, then remove lid 2.
Push the cardboard frame of filter bag 3
on to nozzle 4, alternatively check for
firm fit.
Replace lid 2 and slide SMARTair in
support frame 1 up to the stop.
A 6.2 SMARTair mobile
Check if filter bag 5 is correctly
positioned:
Lightly pull to and fro using the finger
grips 0 to release the snap-locks, then
remove the housing cover q of
SMARTair mobile.
Filter holder 7 must mesh with the crevice
in nozzle 6 and secure cardboard frame
9 of the filter bag 5 against slipping with
holder 8.
Take care not to damage the filter
bag.
Lay the cover q on the casing, fix and
locate into position.
S
M
A
R
T
a
i
r
S
M
A
RT
air
m
ob
i
le
1
2
3
4
5
0
q
7
6
8
9
Page 17

15
SMARTair. SMARTair mobile.
A 6.3 Inserting or replacing the
adsorption filter in SMARTair
Disconnect the mains plug, and the
connecting cable to the ancillary unit.
Remove SMARTair from support frame
7, or from system basis and lay on the
bench as shown.
Press on the housing cover lock 2, and
remove the cover 1.
Operating the two snap-locks 3, open the
filter flap 4.
Remove sound absorber 5, or expired
adsorption filter 6.
Insert new adsorption filter 6.
Close filter flap 4 (ensure snap-locks
engage).
Replace cover 1.
Hang SMARTair in support frame 7, or
system basis and re-connect (see A 5.1).
The adsorption filter must be
replaced every 6 months.
S
MAR
Tai
r
7
2
1
3
4
5
6
7
Page 18

16
SMARTair. SMARTair mobile.
A 6.4 Inserting or replacing the
adsorption filter in SMARTair mobile
Disconnect the mains plug, and the
connecting cable to the ancillary
unit.
Bring SMARTair mobile into an accessible
position.
Press on snap-locks left and right 1, and
remove cover 2.
Operating the two snap-locks 3, open the
filter flap 4.
Remove sound absorber 5, or expired
adsorption filter 6.
Insert new adsorption filter 6.
Close filter flap 4 (ensure snap-locks
engage).
Place cover 2 on SMARTair mobile, and
re-locate.
Set up SMARTair mobile at desired
location and re-connect (see A 5.2).
The adsorption filter must be
replaced every 6 months.
S
M
A
R
T
a
ir
m
o
b
ile
S
M
A
R
T
a
ir
m
o
b
ile
1
2
3
4
5
6
Page 19

17
SMARTair. SMARTair mobile.
A 7 Operation and function elements
A 7.1 SMARTair
1 Rating plate
2 Lid
3 Filter nozzle
4 Filter bag
5 Suction intake opening
6 Touch pad
7 Housing cover, filter casing
8 Mains switch
9 Lock, housing cover
0 Voltage selector switch
q Finger grip
w Snap-locks, filter flap
e Filter flap
r Filter-motor casing
t + key to increase suction capacity
z – key to reduce suction capacity
u Key - automatic
- continuous operation
∞
i LED green - automatic
o LED green - continuous operation
∞
p 4 LED’s green, displays the suction level
a LED red - filter full (inactiv)
s Sound absorber
d Adsorption filter (optional)
f Micro-filter (optional)
g Fuses (mains input) T 10A (H) /250 V
h Fuse (ancillary unit 3,15A) stage 2
j Fuse (ancillary unit 4A) stage 1-4
k Control cable socket to ancillary unit
l Sub-D socket for connection cable to
touch pad
ö Connection socket for ancillary unit
y Connection socket for mains electrical
supply
x Mains electrical cable (country specific)
c Connection cable to ancillary unit
(country-specific)
v Foot switch (optional)
b Control cable K- Control (optional)
S
MAR
Tair
p
o
a
i
1
3
4
5
6
7
8
9
0
q
w
e
g
h
j
k
ö
b
v
x
c
r
f
d
s
u
z
t
l
y
r
2
Page 20

18
SMARTair. SMARTair mobile.
A 7.2 SMARTair mobile
1 Finger grip
2 Cover filter casing
3 Filter nozzle
4 Filter bag
5 Suction intake opening
6 Transport grip
7 Housing cover
8 Touch-pad
9 Lock, housing cover
0 Mains switch
q Voltage selector switch
w Snap-lock, filter flap
e Filter flap
r Filter-motor casing
t LED red - filter full (inactiv)
z + key to increase suction capacity
u - key to reduce suction capacity
i Key - automatic
- continuous operation
∞
o LED green - continuous operation ∞
p LED green - automatic
a 4 LED’s green displays the suction level
s Micro-filter (optional)
d Sound absorber
f Adsorption filter (optional)
g Fuses (mains input) T 10A (H) /250 V
h Fuse (ancillary unit 3,15A) stage 2
j Fuse (ancillary unit 4A) stage 1-4
k Control cable socket for ancillary unit
l Sub-D socket for connection cable to
touch-pad
ö Connection socket for ancillary unit
y Connection socket for mains electrical
supply
x Mains electrical cable (country-specific)
c Connection cable to ancillary unit
(country-specific)
v Foot switch (optional)
b Suction hose
n Control cable K- Control (optional)
S
M
A
R
T
air
m
o
b
ile
S
M
A
R
T
a
ir
m
o
b
ile
2
a
p
t
o
1
3
5
r
7
8
9
4
q
w
e
g
h
j
k
ö
b
v
x
c
r
f
d
s
i
u
z
l
y
n
0
6
Page 21

19
SMARTair. SMARTair mobile.
A 8 Operation
A 8.1 Automatic operation
Recommended for normal usage.
Press mains switch 1 to position “on“
Press key 8, LED “automatic“ 2
illuminates. In this situation, SMARTair ,
or SMARTair mobile, is automatically
switched on or off together with the
connected ancillary unit.
Switch on the ancillary unit. SMARTair ,
or mobile, also starts automatically.
After switching off the ancillary unit, the
connected suction unit continues to run for
a few seconds and then switches itself off.
see also A 8.5 Fine-tuning for
automatic operation.
A 8.2 Manual operation
When using ancillary units without
electrical connection (e.g. EWL turbine
systems)
Press mains switch 1 to position “on“
Press key 8, LED “continuous operation“
3 illuminates.
Switch on and off using the mains switch
1, or change over 8 to “automatic“.
SMARTair or SMARTair mobile
must only be operated with a filter
bag in place.
A 8.3 Operation by footswitch
A footswitch can be connected to the
socket for the control cable 9.
In the “automatic“ position 8, the suction
unit can be operated by the footswitch.
S
M
A
R
T
a
ir
m
o
b
i
le
S
M
A
R
T
a
i
r
4
3
5
2
8
7
6
1
1
5
Page 22

20
SMARTair. SMARTair mobile.
A 8.4 Suction levels
The suction levels (1 - 4) 3 -
6 can be
selected by pressing the keys (+) 7 and (-)
8 (green LED’s illuminate).
From Software version 2.0, the set
level can be saved and stored in
memory after SMARTair is switched off.
Identifying the software version
9 Switch On
after 2 seconds
3 display of version
(version 2 = flashes twice)
4 connected to 50 Hz
5 with continuity sensor
(model SMARTair plus)
Display status via LED
2
A 8.4.1 Storage of the suction levels
- from Software Version 2.0
Storage:
Hold key “Plus“
7 pressed, then press
mains switch
9 to “ON“.
Wait until the 4 Level-LED‘s 3 -
6
flash, then release key “Plus“ 7.
Storage of the suction levels has now been
activated.
Switch mains switch
9 off, wait 2 seconds
and switch on again.
The selected storage levels are now stored
for future use.
Deletion:
Hold key “minus“
8 pressed, then press
mains switch to “ON“.
Wait until the 4 Level-LED’s 3 -
6
flash, then release key “minus“ 8 .
Storage of the suction levels has now been
de-activated.
Switch mains switch
9 off, wait 2 seconds
and switch on again.
The selected storage levels are no longer
stored for future use.
S
M
A
R
T
a
i
r
S
M
A
R
T
a
ir
m
o
b
i
le
9
9
4
3
5
2
8
7
6
Page 23

21
SMARTair. SMARTair mobile.
A 8.5 Fine-tuning for automatic operation
in automatic position
Switch on at the mains switch 1
1.
In the adjustment mode, press key 8
“Automatic“ / “Continuous operation“ and
hold for about 3 seconds until LED’s 2
and # blink.
Press key 9 at the control Unit.
2.
Tip key (+) 6 until LED’s 4 illuminate,
Tip key (-) 7 until LED’s 4 go out.
Switch on the ancillary unit, at
appr. 5.000 - 8.000 min
-1
.
The LED’s 4 illuminate.
3.
Repeatedly tip key (-) 7 until LED’s 4
go out.
4.
Press key 8 “Automatic“.
The values are then stored, and mode
“normal operation“ is attained.
1.
2.
3.
4.
2
3
7
6
4
7
4
8
8
SMA
RT
air
mobi
le
S
M
A
R
T
a
ir
0
3
n
max
x1
000/min
K
c
o
ntro
l
1
1
9
Page 24

22
SMARTair. SMARTair mobile.
A 9 Maintenance
A 9.1 Changing the filter bag
SMARTair
Press the mains switch 1 to the “OFF”
position.
Pull SMARTair out from the support
frame 2, or system basis, as far as the stop
and remove lid 3.
Carefully remove the filter bag 4 from the
nozzle 5.
Close the full filter bag 6 with the
adhesive flap 7 and dispose in a suitable
place.
Push the new filter bag 8 with cardboard
frame 0 on the nozzle 9, and check for
firm fit.
Replace the lid 3 and slide SMARTair in
support frame 2, or system basis, up to the
stop.
A 9.2 Changing the filter bag
SMARTair mobile
Press the mains switch p to the “OFF“
position.
Place SMARTair mobile in a horizontal
position.
Lightly pull to and fro using the finger
grips a to release the snap-locks, then
remove the housing cover s of
SMARTair mobile.
Carefully remove the bracket q from the
nozzle e and take out the filter w.
Close the full filter bag with the adhesive
flap and dispose in a suitable place.
Carefully push the new filter bag u with
cardboard frame o on the nozzle i,
fasten with the bracket w, and check for
firm fit.
Replace the cover s, and locate into
position.
Re-set SMARTair mobile into the
operational state.
SMARTair mobile must only be operated
with a filter bag in place.
A 9.3 Changing the adsorption filter
see A 6.3
S
M
A
R
T
a
i
r
S
M
A
RT
air
m
ob
i
le
5
4
6
3
2
8
7
p
a
s
0
9
e
w
r
u
t
o
i
q
z
1
Page 25

23
SMARTair. SMARTair mobile.
A 9.4 Installing or changing the
micro-filter in SMARTair
Micro-filter 9can be installed in
SMARTair , as an option.
The micro-filter
0
must be replaced
every two years, for safety reasons.
Press the mains switch 4 to the “OFF“
position.
Disconnect the plug and the connection
cable from the suction to the supplementary
unit.
Remove SMARTair from support frame
5, or system basis, and lay it down on the
bench.
Open the housing cover lock 3 and
remove cover 2 at the filter casing.
Release snap-locks 7 and open the filter
flap 8.
Take out the sound absorber 6 or if
necessary the adsorption filter 9.
Release the two clamps q holding the
micro-filter 0 and fold back.
• Carefully take out the micro-filter
0
from the housing, in an open area when
possible.
• Fine dust particles from the filter must
not get into the housing interior.
• Pack the dirty micro-filter
0
in a nonporous plastic bag, and dispose of it in
accordance with local regulations.
Insert the new filter 1 into the housing,
with the opening facing down.
4
5
6
9
0
8
q
3
2
7
Page 26

24
SMARTair. SMARTair mobile.
Secure the filter 1 by means of the two
clamps 2.
Insert the sound absorber 4 or the
adsorption filter 3.
Close the filter flap 5 (engage the snaplocks 6 ).
Replace cover 7 and adjust into position.
Slide SMARTair up to the stop in support
frame 8, or the system basis.
Reconnect the mains supply and the
connection cable from the suction to the
supplementary unit.
SMAR
Tai
r
1
2
3
4
5
6
8
7
Page 27

25
SMARTair. SMARTair mobile.
A 9.5 Installing or changing the
micro-filter in SMARTair mobile
Micro-filter 9can be installed in
SMARTair mobile, as an option.
The micro-filter
9
must be replaced
every two years, for safety reasons.
Press the mains switch 4 to the “OFF“
position.
Disconnect the plug and the connection
cable from the suction to the supplementary
unit.
Place SMARTair mobile in an accessible
position.
Open the housing cover lock 3 and
remove cover “ at the filter casing.
Release snap-locks 8 and open the filter
flap 7.
Take out the sound absorber 6 or if
necessary the adsorption filter 5.
Release the two clamps 0 holding the
micro-filter 9 and fold back.
• Carefully take out the micro-filter
9
from the housing, in an open area when
possible.
• Fine dust particles from the filter must
not get into the housing interior.
• Pack the dirty micro-filter
9
in a nonporous plastic bag, and dispose of it in
accordance with local regulations.
S
M
A
R
T
a
ir
m
o
b
ile
S
M
A
R
T
a
ir
m
o
b
ile
S
M
A
R
T
a
ir
m
o
b
ile
4
5
6
9
8
0
3
7
2
Page 28

26
SMARTair. SMARTair mobile.
Insert the new filter 1 into the housing,
with the opening facing down.
Secure the filter 1 by means of the two
clamps 2.
Insert the sound absorber 4 or the
adsorption filter 3.
Close the filter flap 6 (engage the snaplocks 5 ).
Replace cover 7 and adjust into position.
Reconnect the mains supply, and the
connection cable from the suction to the
supplementary unit.
Re-set SMARTair mobile into the
operational status.
SM
A
R
T
air
m
ob
ile
S
M
A
RT
air
m
o
b
ile
SM
A
R
T
air
m
ob
i
le
S
M
A
R
T
air
m
ob
ile
S
M
A
R
T
air
m
ob
ile
1
3
4
2
5
6
7
Page 29

27
SMARTair. SMARTair mobile.
A 10 Trouble-shooting
Repairs and maintenance work of the
electrical components of the unit
must be carried out only be technicallyqualified or factory-trained personnel, who
are familiar with the safety regulations.
Before opening parts of the housing,
disconnect the plug to ensure that no
electricity is flowing to the unit.
C• Filter bag 1 is full.
R• Change filter bag 1 (see A 9).
C• Suction pre-select is set at the lowest
level
R• Set a higher level with key (+) 3
C• Suction hose or collection hood is dirty
R• Thoroughly clean suction hose or collec-
tion hood.
C• Potentiometer incorrectly adjusted
R• Adjust potentiometer (see A 8.5 Fine-
tuning automatic operation).
C• Ancillary unit is not connected to the
suction unit.
R• Connect the units together.
C• Fuse 4 for the ancillary unit is defective.
R• Change the fuse and check for technical
problems at the ancillary unit.
C• Fuse 5 for SMARTair plus or
SMARTair plus mobile is defective
R• Change the fuse and check if the mains
voltage and fuse meet the requirements
(see A 3 Technical Data).
C• Filter bag or micro filter 6 (optional) is
full.
R• Change filter bag or micro filter (optio-
nal).
C• Suction hose or collection hood is dirty
R• Thoroughly clean suction hose or
F = Fault C = Cause R = Remedy
F• SMARTair or SMARTair mobile does
not operate, Filter full
F• SMARTair plus or SMARTair plus
mobile does not operate automatically
with the ancillary unit
F • Suction power is insufficient
1
4
3
5
6
4
Page 30

B 1 Important information
B 1.1 Transport and storage
The packaging consists of board, Ethafoam
and Styropor with supercorrugated
cardboard as additional packaging.
Information on transport and unpacking is
printed on the outside. It applies to
transport and storage.
1. Transport upright; the arrow indicates
the top.
2. Protect from impacts.
3. Protect from moisture.
28
SMARTair. SMARTair mobile.
Page 31

29
SMARTair. SMARTair mobile.
B 1.2 What to do in the event of
damage during transport?
Always leave goods and packaging
unchanged and do not use the goods.
Report the damage to the transport
companies.
Contact KaVo, Shipping Department,
within 4 days.
Tel: (0 75 61) 86-0
In order to make any claims for the
damage, KaVo requires the shipping note
with confirmation of damage.
On no account return damaged goods to
KaVo before contacting KaVo.
B 1.3 Pack weight and marking
The weight of the pack differs
depending on the order. Keep the
packaging to use in the event of later
shipment for repair.
SMARTair pack
Length: approx. 668 mm
Width: approx. 409 mm
Height: approx. 510 mm
Weight: approx. 20 kg gross
Weight: approx. 18 kg net
SMARTair mobile pack
Length: approx. 668 mm
Width: approx. 409 mm
Height: approx. 510 mm
Weight: approx. 20,4 kg gross
Weight: approx. 18,4 kg net
Page 32

30
SMARTair. SMARTair mobile.
Guarantee conditions
Under valid KaVo EWL delivery and payment conditions, KaVo EWL gives a guarantee of satisfactory function and freedom from faults in
material and manufacture for the duration of 6 months from the date of sale certified by the vendor. After expiry of the warranty, KaVo gives
a guarantee of another 6 months for damage attributable to deficiencies in the material or in manufacture.
In the case of justifiable complaints, KaVo EWL shall supply spare parts or carry out repairs free of charge. KaVo EWL accepts no liability
for defects and their consequences which have arisen or could have arisen as a result of natural wear, improper handling, cleaning or maintenance, noncompliance with the maintenance, operating and connecting instructions, corrosion, impurities in the air supply or chemical or
electrical influences which are unusual or not admissible in accordance with KaVo's instructions. The guarantee shall become null and void
if defects or their consequences can be attributed to interventions in or modifications to the product. Guarantee claims can only be validated
if they are notified immediately in writing to KaVo EWL.
Page 33

31
SMARTair. SMARTair mobile.
Page 34

32
SMARTair. SMARTair mobile.
1/2
Beachte:
bis 03.2003 Auslieferung der SMARTair mit 1 Sicherung (0.266.4086)
ab 04.2003 Auslieferung der SMARTair mit 2 Sicherungen (0.266.4086)
Ersatzplatinen werden grundsätzlich mit 2 Sicherungen (0.266.4086) ausgeliefert. Ist an Ihrer SMARTair
nur 1 Sicherung vorhanden muß eine Elektronikaufnahme (1.001.2460) mitbestellt werden
1.001.6457
1.001.8290
1.001.8301
1.001.7126
1.001.7712
1.001.7711
0.266.4086
10 A
SMARTair
100
230
115
100
230
115
1.001.2460
0.223.2232
0.223.1046
0.223.2741 3,15 A
0.223.2735 4 A
1.001.0891
1.001.3499
1.001.2455
1.001.2458
1.001.2457
1.001.7714
1.001.2456
1.002.3301
SMARTair plus
1.001.2459
1.001.9102
1.001.6411
Page 35

33
SMARTair. SMARTair mobile.
1.001.8191
0.658.1861
0.658.9802
1.000.7198
1.000.3147
DE 1.002.2525
GB 1.002.2529
CH 1.002.2527
US 1.002.2528
AUS 1.002.2530
DE 1.001.8593
GB 1.001.8597
CH 1.001.8594
US 1.001.8595
AUS 1.001.8598
0.658.2160 (5 Stk.)
Page 36

34
SMARTair. SMARTair mobile.
1/2
1.001.6457
1.001.8290
1.001.8301
1.001.7126
1.001.7712
1.001.7711
0.266.4086
10 A
100
230
11
5
100
230
115
1.001.2460
0.223.2232
0.223.1046
0.223.2741 3,15 A
0.223.2735 4 A
1.001.0891
1.001.2455
1.001.2458
1.001.2457
1.001.7714
1.001.2456
1.001.2465
1.002.3301
SMARTair plus
1.001.3499
SM
A
R
T
air
m
ob
ile
1.001.2469
1.001.2459
1.001.9102
1.001.6411
Beachte:
bis 03.2003 Auslieferung der SMARTair mit 1 Sicherung (3,15A)
ab 04.2003 Auslieferung der SMARTair mit 2 Sicherungen (3,15A + 4A)
Ersatzplatinen werden grundsätzlich mit 2 Sicherungen ausgeliefert. Ist an Ihrer SMARTair
nur 1 Sicherung vorhanden muß eine Elektronikaufnahme (1.001.2459) mitbestellt werden
1.001.2454
1.001.8266 plus
1.001.8265
1.001.2451
1.001.8302
1.001.8302
Page 37

35
SMARTair. SMARTair mobile.
1.001.8191
0.658.1861
0.658.9802
1.000.7198
1.000.3147
DE 1.002.2525
GB 1.002.2529
CH 1.002.2527
US 1.002.2528
AUS 1.002.2530
DE 1.001.8593
GB 1.001.8597
CH 1.001.8594
US 1.001.8595
AUS 1.001.8598
0.658.2160 (5 Stk.)
1.002.1220
0.224.6596
0.695.1402
1,2 m
Page 38

36
K12 4940
1.001.9703
●
RB
●
07/03
●
GB
●
13.01
DD--8888229999 LLEEUUTTKKIIRRCCHH..
TTeelleeffoonn 00 7755 6611//8866--115500 ·· FFaaxx 00 7755 6611//8866--226655
IInntteerrnneett:: wwwwww..kkaavvoo..ccoomm
 Loading...