


KMC_KIT_2_Manual_G09_120903.ai 1 2012/9/4 13:32:03
C |
|
|
M |
TEMPO |
BEAT |
Y |
|
|
CM |
|
KIT |
|
|
|
MY |
|
|
CY |
|
|
CMY |
|
|
K |
|
|
C |
M |
Y |
CM |
MY |
CY |
CMY |
K |
KMC_KIT_2_Manual_G09_120903.ai 2 2012/9/4 13:32:03
INFORMATION FOR YOUR SAFETY!
This device complies with Part 15 of the FCC Rules. Operation is subject to the following two conditions:
(1)this device may not cause harmful interference, and
(2)this device must accept any interference received, including interference that may cause undesired operation.
FCC COMPLIANCE NOTICE
This equipment has been tested and found to comply with the limits for a Class B digital device, pursuant to Part 15 of the FCC rules. These limits are designed to provide reasonable protection against harmful interference in a residential installation. This equipment generates, uses and can radiate radio frequency energy and if not used in accordance with the instructions, may cause harmful interference to radio communications and there is no guarantee that interference will not occur in a particular installation. If this equipment does cause harmful interference to radio or television reception, which can be determined by turning the equipment off and on, the user is encouraged to try to correct the interference by one or more of the following measures: reorient or relocate the receiving antenna, increase the separation between the equipment and receiver, connect the equipment into an outlet on a circuit different from that of the receiver. Consult the dealer or an experienced radio/TV technician if help is needed with interference.
NOTE: FMIC will not be responsible for unauthorized equipment modifications that could violate FCC rules, and/ or void product safety certifications.
CAUTION
The normal function of the product may be disturbed by Strong Electro Magnetic Interference. If so, simply reset the product to resume normal operation by following the owner’s manual. In case the function could not resume, please use the product in other location.
CAUTION
Changes or modifications not expressly approved by the party responsible for compliance could void the user’s authority to operate the equipment.
PRECAUTIONS
PLEASE READ CAREFULLY BEFORE PROCEEDING
Please keep this manual in a safe place for future reference.
Power Supply
Please connect the designated AC adaptor to an AC outlet of the correct voltage.
Do not connect it to an AC outlet of voltage other than that for which your instrument is intended.
Unplug the AC power adaptor when not using the instrument, or during electrical storms.
Connections
Before connecting the instrument to other devices, turn off the power to all units. This will help prevent malfunction and / or damage to other devices.
Location
Do not expose the instrument to the following conditions to avoid deformation, discoloration, or more serious damage:
 Direct sunlight
 Extreme temperature or humidity
 Excessive dusty or dirty location
 Strong vibrations or shocks
 Close to magnetic fields
Interference with other electrical devices
Radios and televisions placed nearby may experience reception interference. Operate this unit at a suitable distance from radios and televisions.
Cleaning
Clean only with a soft, dry cloth.
Do not use paint thinners, solvents, cleaning fluids, or chemical-impregnated wiping cloths.
Handling
Do not apply excessive force to the switches or controls.
Do not let paper, metallic, or other objects into the instrument. If this happens, unplug the AC adaptor from the wall outlet. Then have the instrument inspected by qualified service personnel.
Disconnect all cables before moving the instrument.
2
C |
M |
Y |
CM |
MY |
CY |
CMY |
K |
KMC_KIT_2_Manual_G09_120903.ai 3 2012/9/4 13:32:03
Contents
Panel & Display Description |
|
Front Panel.......................................................................... |
4 |
Rear & Side Panel................................................................ |
5 |
Display................................................................................ |
5 |
Quick Start |
|
Setup |
|
Connecting Pads and Pedals............................................... |
6 |
Connections |
|
Connecting Audio Equipment............................................... |
7 |
Connecting a set of Headphones......................................... |
7 |
Connecting an MP3/CD Player............................................ |
7 |
Connecting a Computer....................................................... |
7 |
Connecting a Midi Keyboard................................................ |
7 |
Power Supply....................................................................... |
7 |
Performing |
|
Selecting a Drum Kit............................................................. |
8 |
Playing the Pads.................................................................. |
8 |
Adjusting the Sensitivity of a Pad......................................... |
9 |
Using the Metronome/Click Feature..................................... |
9 |
Adjusting the Tempo............................................................ |
9 |
Editing and Saving a Drum Kit |
|
Adjusting the Volume of a Drum Kit................................... |
10 |
Switching Reverb On/Off and Setting EQ........................... |
10 |
Selecting the Drum Instrument of the Pad........................ |
10 |
Adjusting the Volume, Pan and Pitch of the Pad............... |
10 |
Setting the Pads to Play Songs.......................................... |
10 |
Saving the Edited Kit.......................................................... |
10 |
Playing Along with Songs |
|
Selecting and Playing Back a Song.................................... |
11 |
Adjusting the Volume of the Accompaniment and Drum.... |
11 |
Muting the Drums in Songs................................................ |
11 |
Using the Pads to Play Songs............................................ |
11 |
Recording Your Performance |
|
Recording Your Performance Quickly................................ |
12 |
Playing Back Your Recorded Performance........................ |
12 |
Making the Settings for Recording..................................... |
12 |
Practicing with Patterns |
|
Selecting a Pattern and Practicing with it............................ |
13 |
Scoring Your Practice........................................................ |
13 |
Playing Back Your Recorded Practice................................ |
13 |
Advanced Use |
|
Creating Your Own Drum Kit |
|
About the Drum Kits........................................................... |
14 |
Selecting a Drum Kit........................................................... |
14 |
Overall Drum Kit Setting..................................................... |
14 |
Selecting the Pad to Edit.................................................... |
14 |
About the Drum Instruments.............................................. |
15 |
Selecting Instruments........................................................ |
15 |
Drum Instrument Setting.................................................... |
15 |
Settings for Other Functions............................................... |
15 |
Saving to a User Drum Kit.................................................. |
15 |
Making the Settings for Pads |
|
About Settings of Pads....................................................... |
16 |
Adjusting the Pad Sensitivity.............................................. |
17 |
Setting the Pad Threshold.................................................. |
17 |
Eliminating Crosstalk between Pads.................................. |
17 |
Selecting the Pad Curve..................................................... |
17 |
Setting Rim Sensitivity on Pads......................................... |
18 |
Adjusting the Hi-Hat Pedal Splash Sensitivity.................... |
18 |
Saving Settings of Pads..................................................... |
18 |
Setting the Metronome |
|
About Click......................................................................... |
19 |
Switching the Click On/Off.................................................. |
19 |
Adjusting the Click Tempo................................................. |
19 |
Setting the Time Signature................................................. |
19 |
Setting the Interval............................................................. |
19 |
Adjusting the Click Volume................................................ |
19 |
Selecting the Click Sound.................................................. |
19 |
Playing Back Songs |
|
About Songs...................................................................... |
20 |
Selecting a Song................................................................ |
20 |
Playing Back a Song.......................................................... |
20 |
Adjusting the Accompaniment Volume............................... |
20 |
Adjusting the Drum Volume................................................ |
20 |
Muting the Drums in Songs................................................ |
20 |
Recording a Song |
|
About Recording................................................................ |
21 |
Recording Pad Performances............................................ |
21 |
Recording Performances Accompanied with a Song......... |
21 |
Playing Back Your Recorded Performance........................ |
21 |
Recording Standby............................................................ |
21 |
Practicing in Learning Mode |
|
About Learning Mode......................................................... |
22 |
Practicing with Beats.......................................................... |
22 |
Practicing with Rhythms..................................................... |
23 |
Practicing with Patterns...................................................... |
23 |
Recording and Scoring Your Practice................................ |
24 |
Playing Back Your Recorded Practice................................ |
24 |
Making the Setting for MIDI |
|
About MIDI......................................................................... |
25 |
Making the MIDI Settings................................................... |
25 |
Connecting with an External Sound Device........................ |
26 |
Using the digital drum as a Sound Module......................... |
26 |
Appendices |
|
Prompt Messages......................................................... |
27 |
Troubleshooting............................................................ |
27 |
Specifications................................................................ |
28 |
Kit/Voice/Song/Pattern/Parameter List.......................... |
29 |
MIDI Implementation Chart............................................ |
39 |
APPENDICES USE ADVANCED START QUICK
3
C |
M |
Y |
CM |
MY |
CY |
CMY |
K |
KMC_KIT_2_Manual_G09_120903.ai 4 2012/9/4 13:32:03
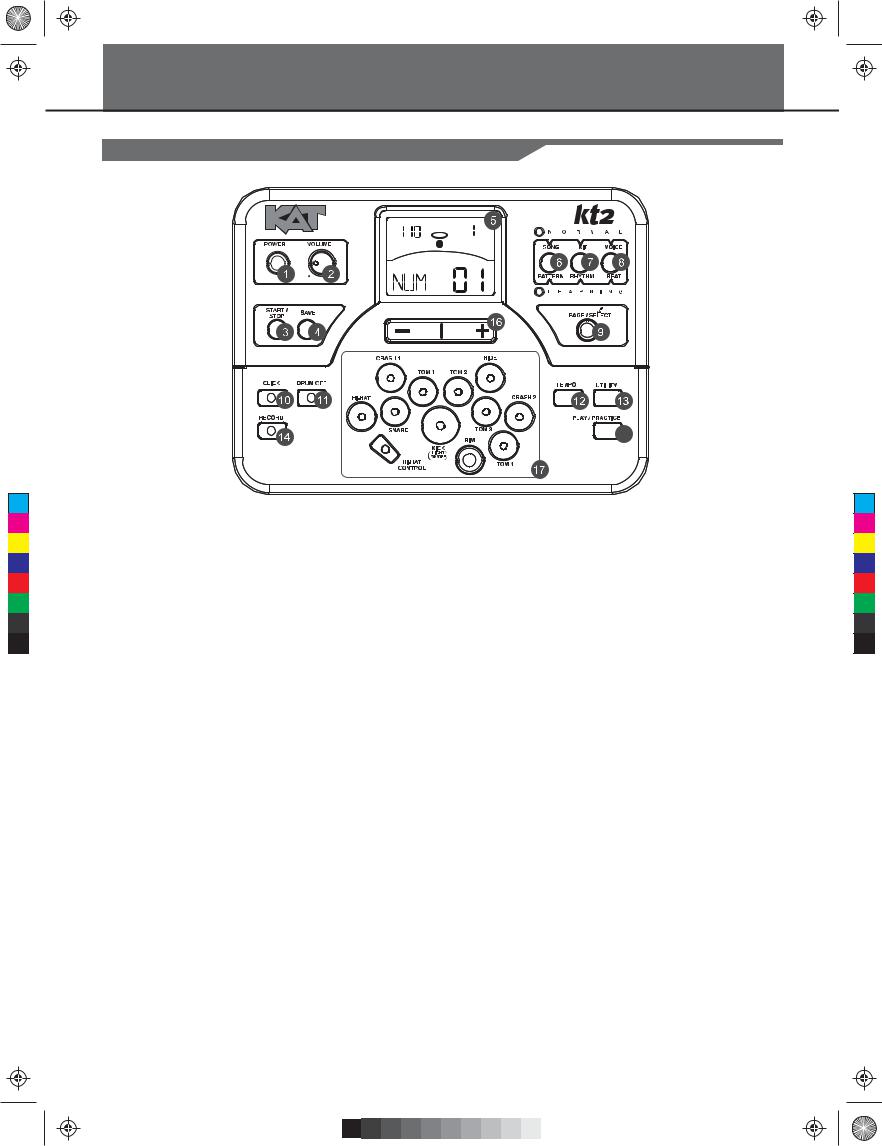
Panel Description
Front Panel
TEMPO |
BEAT |
KIT
15
1. POWER Button
This Button turns the power on and off.
2. VOLUME Knob
Adjust the volume of phone and line output.
3.START/STOP Button
Start or stop playing.
4.SAVE Button
This button is used to save the current kit settings in a user kit and save the trigger settings under the Utility menu pages.
5. LCD Display
Please refer to the LCD Display section.
6. SONG/PATTERN Button
Enter the Song menu in NORMAL mode or enter the Pattern Practice menu in LEARNING mode.
7. KIT/RHYTHM Button
Enter the Kit menu in NORMAL mode or enter the Rhythm Practice menu in LEARNING mode.
8. VOICE/BEAT Button
Enter the Voice menu in NORMAL mode or
enter the Beat Practice menu in LEARNING mode.
9. PAGE/SELECT Button
Scroll through the menu pages. Press and hold it for 1 second to switch modes between NORMAL and LEARNING.
10.CLICK Button
Turn the metronome on or off and enter the Click menu in NORMAL mode.
11. DRUM OFF Button
Mute the drum part of the pattern.
12. TEMPO Button
Adjust the current tempo.
13. UTILITY Button
Enter the Utility menu in NORMAL mode.
14. RECORD Button
Enter the Record menu in NORMAL mode.
15. PLAY/PRACTICE Button
Play back your recording in NORMAL mode. Start practicing following sample practice patterns in LEARNING mode.
Press and hold it for 1 second to play back your practice in LEARNING mode.
16. + Button and - Button
Press the [ + ] button increases and press [ - ] button decreases the current parameter.
17. Pad Select Buttons
These buttons play the pad voices of the current kit. In Voice menu and Utility menu, they select the pad to be edited.
4
KMC_KIT_2_Manual_G09_120903.ai 5 2012/9/4 13:32:03
C |
M |
Y |
CM |
MY |
CY |
CMY |
K |
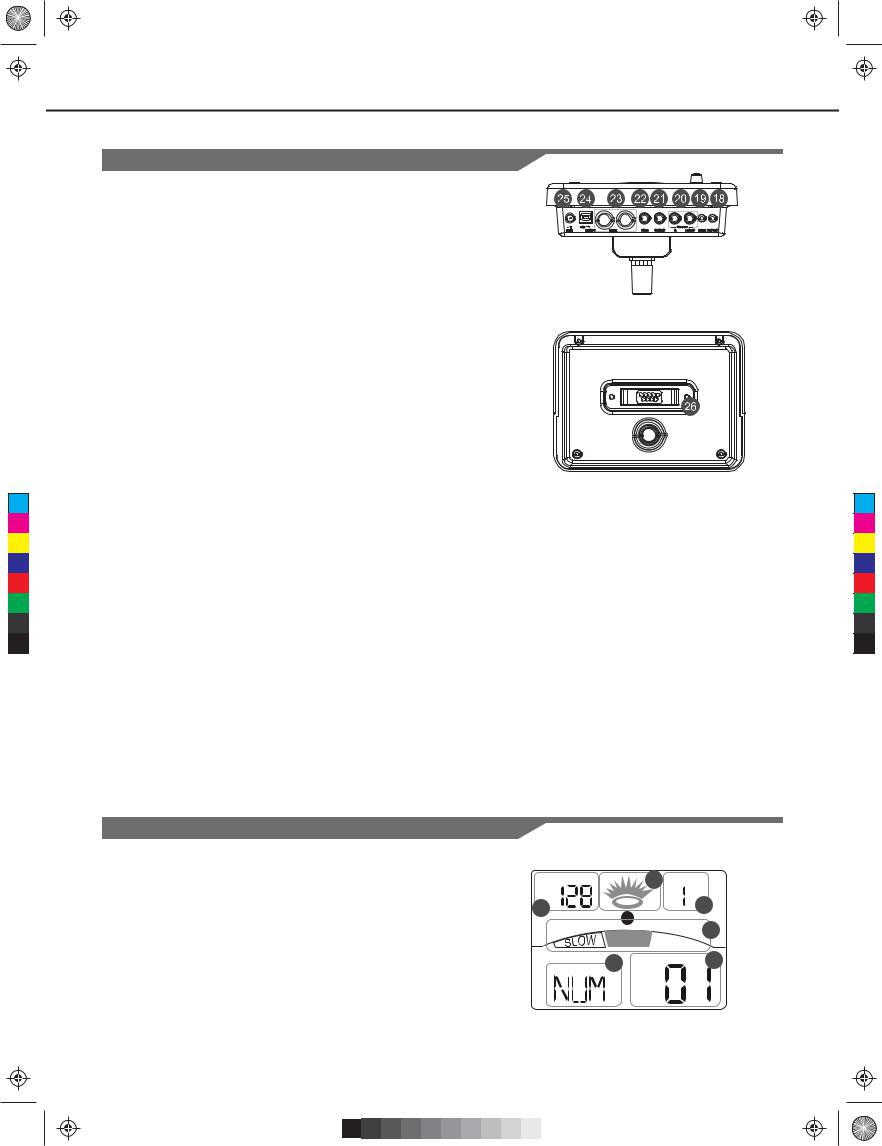
Panel Description
Rear Panel & Side Panel
18. PHONES Jack(1/8”)
This stereo jack is used to connect headphones to the unit.
19. AUX IN Jack(1/8”)
This stereo input jack is for an external sound source, such as an MP3 or CD player.
20. LINE OUTPUT Jacks(1/4”)
Stereo output connection to an audio system or drum amplifier.
21. CRASH 2 Jack(1/4”)
Input connection for Crash 2.
22. TOM 4 Jack(1/4”)
Input connection for Tom 4.
23. MIDI Connectors (IN, OUT)
These ports allow communication with other products equipped with a MIDI interface.
24. USB Connector
This port is used to connect to a computer (MIDI In/Out via USB).
25. DC IN Jack
Connect the included DC 9V power adaptor.
26. PAD Connectors
Input connections for Kick, Snare, Tom,
Cymbal pads and Hi-Hat control pedal.
Display
1.Tempo/Measure
2.Hitting Indicator
3.Beat Count
4.Indicators for Learning
5.Indicators for Menus (Such as UTILITY, REC, etc.)
6.Current Mode and Parameter Display
TEMPO 2 BEAT
1 |
3 |
GOOD |
4 |
|
|
5 |
KIT 6 |
5

C |
M |
Y |
CM |
MY |
CY |
CMY |
K |
KMC_KIT_2_Manual_G09_120903.ai 6 2012/9/4 13:32:04
Setup
Caution!
To prevent electric shock and damage to the device, make sure the power is switched OFF on the drum and all related device before making any connection.
Connecting Pads and Pedals
Standard: KICK, SNARE, TOM1-3, CRASH1, RIDE, HIHAT, HIHAT CONTROL PEDAL Extended: CRASH2, TOM4
Using the provided cable harness, connect with kick, snare, tom1~tom3, ride, crash, hi-hat, hi-hat control triggers. Snare, tom, crash1, crash2 and ride pads are stereo input and support double triggering; crash1, crash2, ride support choke. Hi-hat control pedal is stereo input.
crash1 |
ride |
|
|
|
|
|
|
|
|
|
|
hi-hat 


 tom1
tom1  tom2
tom2 
Drum Module
tom3

 snare
snare

 kick hi-hat control
Note:
For details on assembling the drum stand, attaching the digital drum and connecting pads, refer to the Assembly Instructions.
Bass drum pedal NOT included on some models.
6
C |
M |
Y |
CM |
MY |
CY |
CMY |
K |
KMC_KIT_2_Manual_G09_120903.ai 7 2012/9/4 13:32:05
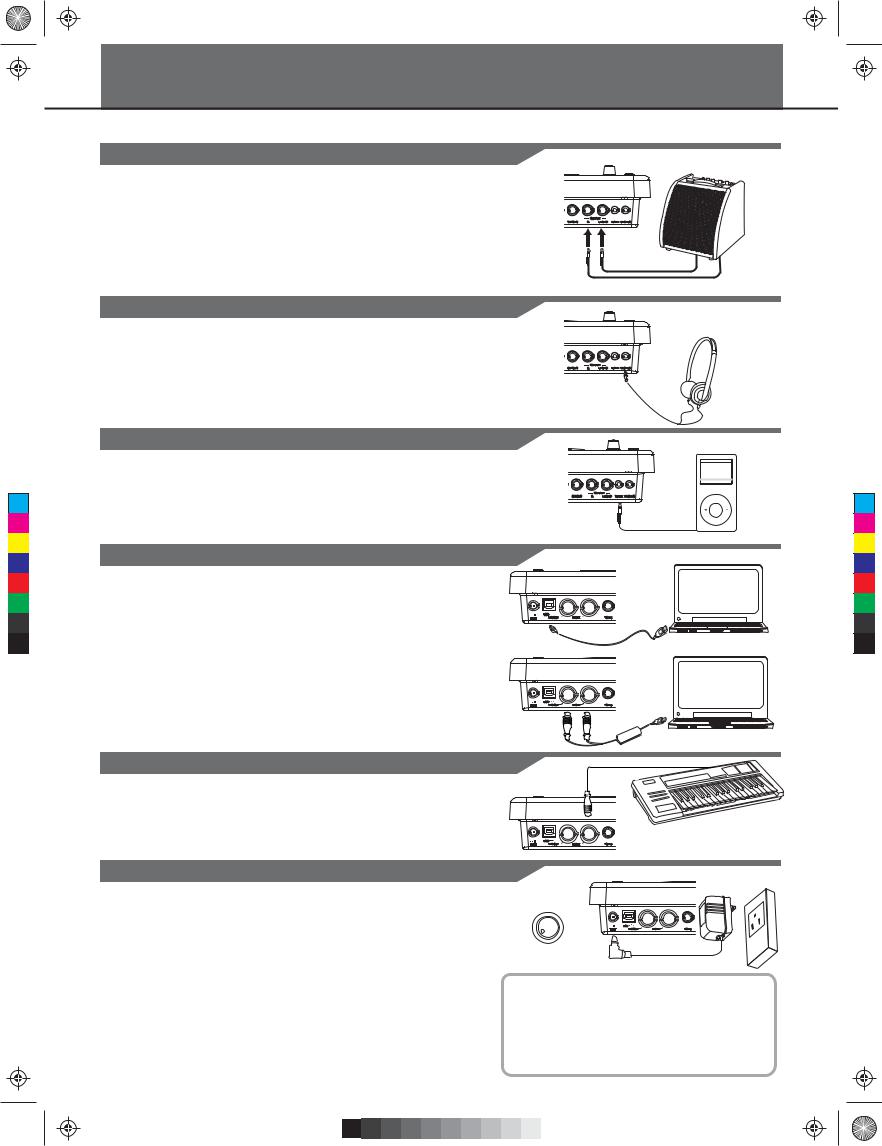
Connections
Connecting Audio Equipment
When using an amplifier, connect the Output L/MONO and R jacks on the rear panel to the input of the amplifier.
Note:
For mono playback, use the L/MONO jack.
For stereo playback, connect both L/MONO and R jacks. The line output volume is controlled by the VOLUME knob.
Connecting a set of Headphones
An optional set of stereo headphones can be connected to the PHONES jack located on the side of the drum module.
The headphones output volume is controlled VOLUME knob, too.
Connecting an MP3/CD Player
Connect the audio output of an MP3/CD player or other audio source to the stereo AUX IN jack on the rear panel.
The input signal is mixed with the drum signal, allowing you to play along.
Connecting a Computer
 Via the USB Connector
This receives and transmits MIDI messages.
 Via the MIDI Connectors MIDI IN Connector
This receives MIDI messages transmitted from an external MIDI device or a computer.
MIDI OUT Connector
Pad performance data is transmitted from this connector to connected computer or MIDI device.
Connecting a Midi Keyboard
MIDI OUT
If you’re using an external MIDI keyboard or pads to control the digital drum, make connections as shown. Here, it is used as a sound module.
Power Supply
Make sure the power is turned OFF. Connect the power adaptor to the DC IN jack on the side panel. After confirming that all connections have been completed, rotate the volume knob to the left (minimum volume level) before powering on the module. Press the [POWER] button to turn on the module. The KIT indicator on LCD will light up and the display will show kit
number 001.
Note:
Make sure the power is turned OFF when connecting the drum module with external devices.
VOLUME
- +
HINT
The module will automatically turn off if there aren't any operations for about 30 minutes except during playing song or metronome, record, MIDI in via USB port from computer and strike pads.
Please press [UTILITY] button repeatedly and enter
"POW" menu for the setting.
7

C |
M |
Y |
CM |
MY |
CY |
CMY |
K |
KMC_KIT_2_Manual_G09_120903.ai 8 2012/9/4 13:32:05
Performing
After powering up, the digital drum will be in KIT menu (KIT indicator ON ). The display should look like this:
1.Use the [ - ] and [ + ] buttons to select the active kit. There are 45 kits in the digital drum:
 30 preset kits (Kits 01-30)
 15 user kits (Kits 31-45), the parameter display area will
display as "U31~U45", with an additional letter "U".
2.Pressing the Pad Select buttons allows you to preview the current kit (fixed velocity).
3.Hit the pads to play the current kit.
Similar to an acoustic drum kit, the digital drum responds differently to various playing techniques and dynamics. All the pads are velocity sensitive. And some voices change timbre depending on the striking force.
Drum Pad Head or Rim shot
The digital drum pad detects head and rim shots (rim shots trigger the rim voice).
Cymbal Bow shot and Rim shot
The digital drum cymbals detect bow and rim shot.
Both Ride and Crash cymbals have cymbal choke. But hi-hat does not have the cymbal choke. Choking the crash/ride edge with the hand immediately after hitting the crash/ride mutes the crash/ride sound.
Hi-Hat
The Hi-Hat sound varies depending on the position of the Hi-Hat pedal:
Open Hi-Hat:
Half-Open Hi-Hat:
Closed Hi-Hat:
Pedal Close:
Splash:
8
TEMPO |
BEAT |
KIT
KICK
Head
Head
Rim
KMC_KIT_2_Manual_G09_120903.ai 9 2012/9/4 13:32:05
C |
M |
Y |
CM |
MY |
CY |
CMY |
K |
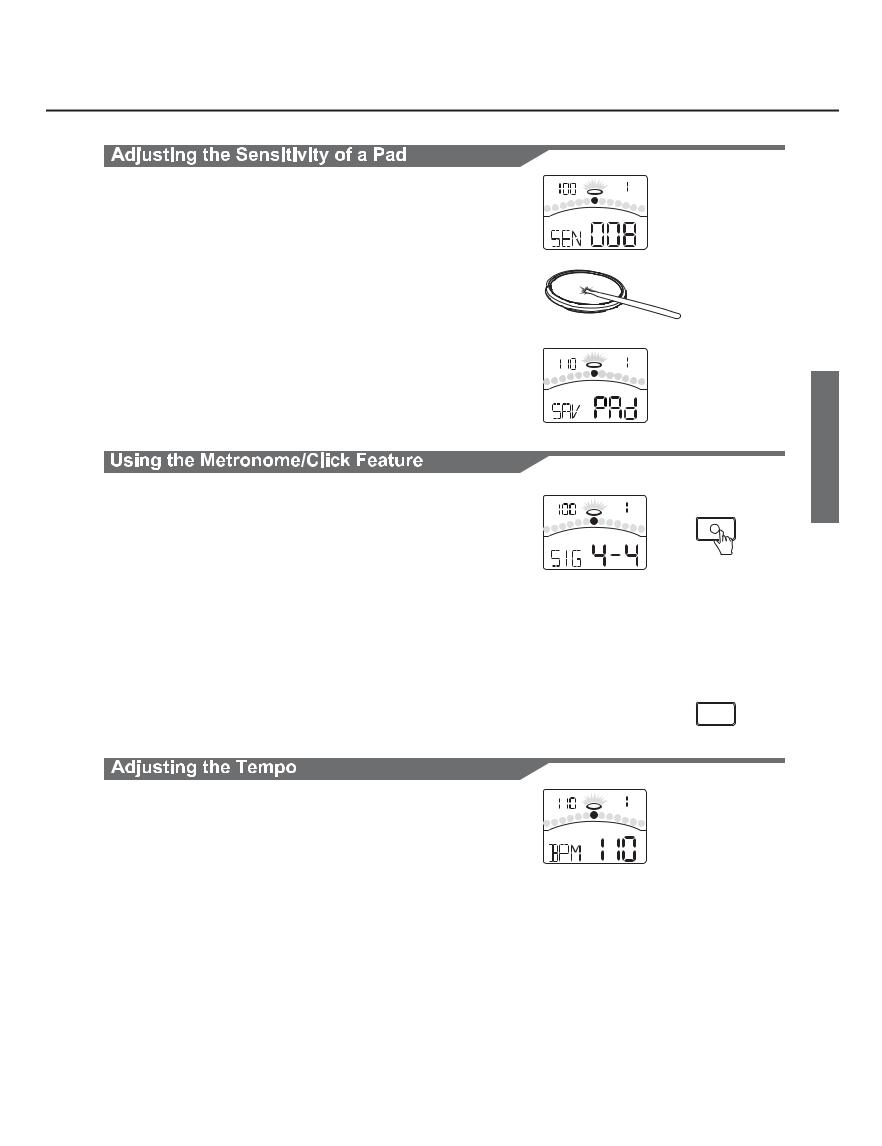
Performing
You may wish to adjust the sensitivity of the pads according to your playing style and desired dynamic range.
1.Press the [UTILITY] button The UTILITY indicator appears.
2.Strike a pad or press a pad select button to select the one whose sensitivity is to be adjusted. The PAD indicator shows the current selected pad.
3.Press the [ - ] or [ + ] button to adjust the sensitivity.
4.Press the [SAVE] button to save the current setting.
For details on pad adjustments, refer to Advanced Use.
You can switch the click sound on and off by pressing [CLICK] button. When the click plays at the current Time Signature and Tempo (displayed in the top left corner of the LCD), the beat indicators will swing accordingly. You can set the time signature and interval, adjust the click volume and select the click sound in the CLICK menu.
1.Press the [CLICK] button.
Start the metronome with click sound.
2.Press the [PAGE] button to select the click menu pages and press the [ - ] or [ + ] button to adjust the parameters.
TEMPO |
BEAT |
UTILITY
TEMPO |
BEAT |
SAVE |
|
|
UTILITY
TEMPO |
BEAT |
CLICK
CLICK
PAGE/SELECT
CLICK
3. Press the [CLICK] button again.
Stop the metronome and exit the click menu.
You can adjust the tempo of the Metronome, the current song, |
TEMPO |
BEAT |
and the current learning pattern. The current tempo always |
|
TEMPO |
|
|
|
displays in the top left corner of the LCD. |
|
SONG |
1. Press the [TEMPO] button.
2. Press the [ - ] or [ + ] button. Adjust the current tempo.
3. Press both [ - ] and [ + ] buttons at the same time, reset the current tempo to its default value.
Note:
If there’s no operation, it will return to the previous menu page automatically after 3 seconds.
9

C |
M |
Y |
CM |
MY |
CY |
CMY |
K |
KMC_KIT_2_Manual_G09_120903.ai 10 2012/9/4 13:32:05
Editing and Saving a Drum Kit
In KIT menu, you can modify the parameters as you like and save to the selected user kit.
1.Press the [KIT] or [PAGE] button. Select the Kit Volume page.
2.Press the [ - ] or [ + ] button. Adjust the kit volume.
1.Press the [KIT] or [PAGE] button.
Select the Global Reverb page and EQ pages.
2.Press the [ - ] or [ + ] button. Switch Reverb ON or OFF.
Set the gain of three-band EQ (high, middle, low)
1.Press the [VOICE] button. Select the Pad Voice page.
2.Press the [ - ] or [ + ] button.
Select the drum instrument of the selected pad. Please refer to Drum Instrument List.
Adjusting the Volume, Pan and Pitch of the Pad
1.Press the [VOICE] or [PAGE] button.
Select the Pad Volume, Pad Pan, and Pad Pitch pages.
2.Press the [ - ] or [ + ] button.
Adjust the corresponding parameter.
1.Press the [VOICE] or [PAGE] button.
Select the Pad Song and Song Number pages.
2.Press the [ - ] or [ + ] button.
Switch the Pad Song function ON or OFF. Select the Song that begins playing when the following pad is struck.
1. Press the [SAVE] button.
The number of user kit will be flashed.
2. Press the [ - ] or [ + ] button.
Select a user kit to save your settings. (No. 31-45)
3. Press the [SAVE] button again.
Save the setting to the selected user kit.
10
KIT
TEMPO |
BEAT |
KIT
KIT
TEMPO |
BEAT |
KIT
VOICE
TEMPO |
BEAT |
VOICE
VOICE
TEMPO |
BEAT |
VOICE
VOICE
TEMPO |
BEAT |
VOICE
TEMPO |
BEAT |
SAVE |
|
KIT
HINT
If the edited kit isn’t saved before selecting another kit, powering down the digital drum, the changes will be lost.
C |
M |
Y |
CM |
MY |
CY |
CMY |
K |
KMC_KIT_2_Manual_G09_120903.ai 11 2012/9/4 13:32:05
Playing Along with Songs
1.Press the [SONG] button. Switch to the SONG menu.
2.Press the [ - ] or [ + ] button.
Select the active song. The digital drum has many kinds of songs. Please refer to Song list.
3.Press the [START/STOP] button.
Start or stop playing back this selected song. When playing back this song, the PAD indicator will display which pads are being played by drum track.
In SONG menu, you can adjust the volume of drum or accompaniment track.
1.Press the [SONG] or [PAGE] button.
Select the ACC Volume or Drum Volume page.
2.Press the [ - ] or [ + ] button. Adjust the corresponding volume.
Muting the Drums in Songs
If you want to mute the drum track of the song, please press the [DRUM OFF] button. The [DRUM OFF] LED will turn on.
This function is available only with electric drum. When you strike the pads that have been set to Pad Song function, they will start the performance of the songs. If you don’t know how to set this function, please return to previous page and review the part “Setting the Pads to Play Songs”.
For Example
Kick: You can play the bass-line (Tap group, refer to Song List) note by note with you kick drum.
Crash: The chords (Hit group, refer to Song List) progress when you strike the pad.
TEMPO |
BEAT |
SONG |
SONG
START/
STOP
TEMPO |
BEAT |
SONG |
SONG
DRUM OFF
HINT
The sounds in the Tap song are played back one by one when you pressing the [START/STOP] button or hitting the "pad song" pad.
11
C |
M |
Y |
CM |
MY |
CY |
CMY |
K |
KMC_KIT_2_Manual_G09_120903.ai 12 2012/9/4 13:32:06
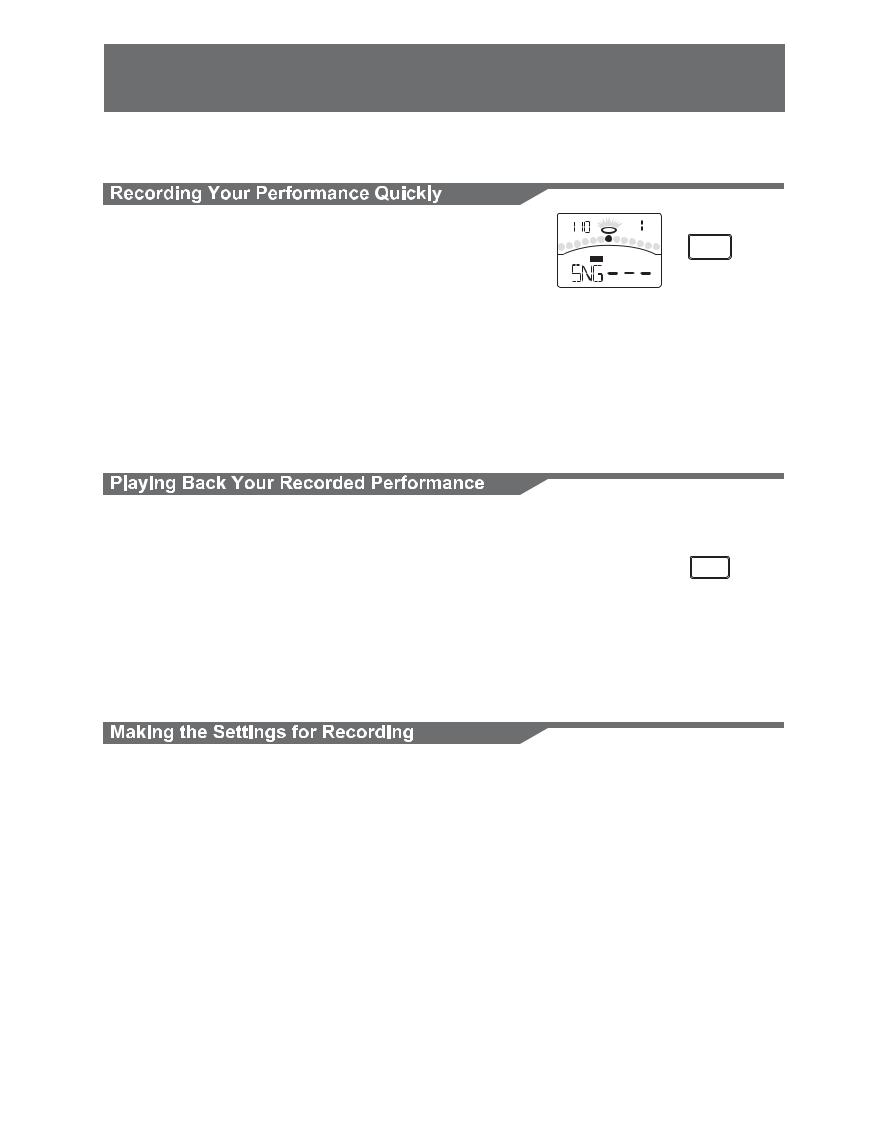
Recording Your Performance
In RECORD menu, you can record pad performances and the song as accompaniment.
1.Press the [RECORD] button.
The [RECORD] LED will flash. The Metronome will be turned on automatically.
The display will show:
2.Press the [START/STOP] button or strike the pad. Recording will start.
The [RECORD] LED will turn on.
3.Press the [START/STOP] button again, or press the [RECORD] button.
Stop recording, the [RECORD] LED will turn off. Your performance has been recorded.
1.Press the [PLAY] button. Play back your recording. The display will show:
2.Press the [PLAY] button again.
Stop playing back your performance.
If you are not satisfied with your recording, please press the [RECORD] button to restart the recording progress.
You can make the settings for recording on Record Standby.
1.Press the [PAGE] button.
Select the Record Setting pages.
2.Press the [ - ] or [ + ] button.
Adjust the parameters about recording.
For details on record setting, refer to Advanced Use.
TEMPO |
BEAT |
|
RECORD |
MEAS |
BEAT |
|
START/ |
|
STOP |
MEAS |
BEAT |
PLAY/PRACTICE
PAGE/SELECT
12
 Loading...