

Page 1
KMC_KIT_2_Manual_G09_120903.ai 1 2012/9/4 13:32:03KMC_KIT_2_Manual_G09_120903.ai 1 2012/9/4 13:32:03
C
BEAT
TEMPO
M
Y
CM
MY
CY
CMY
K
TEMPO
BEAT
KIT
KIT
Page 2
KMC_KIT_2_Manual_G09_120903.ai 2 2012/9/4 13:32:03KMC_KIT_2_Manual_G09_120903.ai 2 2012/9/4 13:32:03
INFORMATION FOR YOUR SAFETY!
This device complies with Part 15 of the FCC Rules.
PRECAUTIONS
Operation is subject to the following two conditions:
(1) this device may not cause harmful interference, and
PLEASE READ CAREFULLY BEFORE PROCEEDING
(2) this device must accept any interference received,
including interference that may cause undesired
Please keep this manual in a safe place for future reference.
operation.
Power Supply
Please connect the designated AC adaptor to an AC outlet of
FCC COMPLIANCE NOTICE
This equipment has been tested and found to comply with the
limits for a Class B digital device, pursuant to Part 15 of the
the correct voltage.
Do not connect it to an AC outlet of voltage other than that for
which your instrument is intended.
FCC rules. These limits are designed to provide reasonable
protection against harmful interference in a residential
installation. This equipment generates, uses and can radiate
Unplug the AC power adaptor when not using the instrument,
or during electrical storms.
radio frequency energy and if not used in accordance with the
instructions, may cause harmful interference to radio
communications and there is no guarantee that interference
will not occur in a particular installation. If this equipment does
cause harmful interference to radio or television reception,
Connections
Before connecting the instrument to other devices, turn off the
power to all units. This will help prevent malfunction and / or
damage to other devices.
which can be determined by turning the equipment off and on,
C
M
Y
CM
MY
CY
CMY
K
the user is encouraged to try to correct the interference by one
or more of the following measures: reorient or relocate the
receiving antenna, increase the separation between the
equipment and receiver, connect the equipment into an outlet
on a circuit different from that of the receiver. Consult the
dealer or an experienced radio/TV technician if help is needed
with interference.
NOTE: FMIC will not be responsible for unauthorized
equipment modifications that could violate FCC rules, and/ or
void product safety certifications.
Location
Do not expose the instrument to the following conditions to
avoid deformation, discoloration, or more serious damage:
Direct sunlight
Extreme temperature or humidity
Excessive dusty or dirty location
Strong vibrations or shocks
Close to magnetic fields
Interference with other electrical devices
Radios and televisions placed nearby may experience
reception interference. Operate this unit at a suitable distance
from radios and televisions.
CAUTION
The normal function of the product may be disturbed by
Strong Electro Magnetic Interference. If so, simply reset the
product to resume normal operation by following the
owner’s manual. In case the function could not resume,
please use the product in other location.
CAUTION
Changes or modifications not expressly approved by
the party responsible for compliance could void the
user’s authority to operate the equipment.
2
Cleaning
Clean only with a soft, dry cloth.
Do not use paint thinners, solvents, cleaning fluids, or
chemical-impregnated wiping cloths.
Handling
Do not apply excessive force to the switches or controls.
Do not let paper, metallic, or other objects into the instrument.
If this happens, unplug the AC adaptor from the wall outlet.
Then have the instrument inspected by qualified service
personnel.
Disconnect all cables before moving the instrument.
Page 3
KMC_KIT_2_Manual_G09_120903.ai 3 2012/9/4 13:32:03KMC_KIT_2_Manual_G09_120903.ai 3 2012/9/4 13:32:03
Contents
Panel & Display Description
Front Panel..........................................................................4
Rear & Side Panel................................................................5
Display................................................................................5
Quick Start
Setup
Connecting Pads and Pedals...............................................6
Connections
Connecting Audio Equipment...............................................7
Connecting a set of Headphones.........................................7
Connecting an MP3/CD Player............................................7
Connecting a Computer.......................................................7
Connecting a Midi Keyboard................................................7
Power Supply.......................................................................7
Performing
Selecting a Drum Kit.............................................................8
Playing the Pads..................................................................8
Adjusting the Sensitivity of a Pad.........................................9
C
M
Y
CM
MY
CY
CMY
K
Using the Metronome/Click Feature.....................................9
Adjusting the Tempo............................................................9
Editing and Saving a Drum Kit
Adjusting the Volume of a Drum Kit...................................10
Switching Reverb On/Off and Setting EQ...........................10
Selecting the Drum Instrument of the Pad........................10
Adjusting the Volume, Pan and Pitch of the Pad...............10
Setting the Pads to Play Songs..........................................10
Saving the Edited Kit..........................................................10
Playing Along with Songs
Selecting and Playing Back a Song....................................11
Adjusting the Volume of the Accompaniment and Drum....11
Muting the Drums in Songs................................................11
Using the Pads to Play Songs............................................11
Settings for Other Functions...............................................15
Saving to a User Drum Kit..................................................15
Making the Settings for Pads
About Settings of Pads.......................................................16
Adjusting the Pad Sensitivity..............................................17
Setting the Pad Threshold..................................................17
Eliminating Crosstalk between Pads..................................17
Selecting the Pad Curve.....................................................17
Setting Rim Sensitivity on Pads.........................................18
Adjusting the Hi-Hat Pedal Splash Sensitivity....................18
Saving Settings of Pads.....................................................18
Setting the Metronome
About Click.........................................................................19
Switching the Click On/Off..................................................19
Adjusting the Click Tempo.................................................19
Setting the Time Signature.................................................19
Setting the Interval.............................................................19
Adjusting the Click Volume................................................19
Selecting the Click Sound..................................................19
Playing Back Songs
About Songs......................................................................20
Selecting a Song................................................................20
Playing Back a Song..........................................................20
Adjusting the Accompaniment Volume...............................20
Adjusting the Drum Volume................................................20
Muting the Drums in Songs................................................20
Recording a Song
About Recording................................................................21
Recording Pad Performances............................................21
Recording Performances Accompanied with a Song.........21
Playing Back Your Recorded Performance........................21
Recording Standby............................................................21
QUICK START
ADVANCED USE APPENDICES
Practicing in Learning Mode
Recording Your Performance
Recording Your Performance Quickly................................12
Playing Back Your Recorded Performance........................12
Making the Settings for Recording.....................................12
Practicing with Patterns
Selecting a Pattern and Practicing with it............................13
Scoring Your Practice........................................................13
Playing Back Your Recorded Practice................................13
Advanced Use
Creating Your Own Drum Kit
About the Drum Kits...........................................................14
Selecting a Drum Kit...........................................................14
Overall Drum Kit Setting.....................................................14
Selecting the Pad to Edit....................................................14
About the Drum Instruments..............................................15
Selecting Instruments........................................................15
Drum Instrument Setting....................................................15
About Learning Mode.........................................................22
Practicing with Beats..........................................................22
Practicing with Rhythms.....................................................23
Practicing with Patterns......................................................23
Recording and Scoring Your Practice................................24
Playing Back Your Recorded Practice................................24
Making the Setting for MIDI
About MIDI.........................................................................25
Making the MIDI Settings...................................................25
Connecting with an External Sound Device........................26
Using the digital drum as a Sound Module.........................26
Appendices
Prompt Messages.........................................................27
Troubleshooting............................................................27
Specifications................................................................28
Kit/Voice/Song/Pattern/Parameter List..........................29
MIDI Implementation Chart............................................39
3
Page 4

KMC_KIT_2_Manual_G09_120903.ai 4 2012/9/4 13:32:03KMC_KIT_2_Manual_G09_120903.ai 4 2012/9/4 13:32:03
Panel Description
Front Panel
TEMPO
TEMPO
BEAT
BEAT
KIT
KIT
15
C
M
Y
CM
MY
CY
CMY
K
1. POWER Button
This Button turns the power on and off.
2. VOLUME Knob
Adjust the volume of phone and line output.
3. START/STOP Button
Start or stop playing.
10.CLICK Button
Turn the metronome on or off and enter the
Click menu in NORMAL mode.
11. DRUM OFF Button
Mute the drum part of the pattern.
12. TEMPO Button
Adjust the current tempo.
4. SAVE Button
This button is used to save the current kit
settings in a user kit and save the trigger
settings under the Utility menu pages.
13. UTILITY Button
Enter the Utility menu in NORMAL mode.
14. RECORD Button
5. LCD Display
Please refer to the LCD Display section.
Enter the Record menu in NORMAL mode.
15. PLAY/PRACTICE Button
6. SONG/PATTERN Button
Enter the Song menu in NORMAL mode or enter
the Pattern Practice menu in LEARNING mode.
7. KIT/RHYTHM Button
Enter the Kit menu in NORMAL mode or enter
the Rhythm Practice menu in LEARNING mode.
8. VOICE/BEAT Button
Enter the Voice menu in NORMAL mode or
enter the Beat Practice menu in LEARNING mode.
9. PAGE/SELECT Button
Scroll through the menu pages. Press and hold it
for 1 second to switch modes between NORMAL
and LEARNING.
Play back your recording in NORMAL mode.
Start practicing following sample practice
patterns in LEARNING mode.
Press and hold it for 1 second to play back
your practice in LEARNING mode.
16. + Button and - Button
Press the [ + ] button increases and press [ - ]
button decreases the current parameter.
17. Pad Select Buttons
These buttons play the pad voices of the
current kit. In Voice menu and Utility menu,
they select the pad to be edited.
4
Page 5

KMC_KIT_2_Manual_G09_120903.ai 5 2012/9/4 13:32:03KMC_KIT_2_Manual_G09_120903.ai 5 2012/9/4 13:32:03
Rear Panel & Side Panel
18. PHONES Jack(1/8”)
This stereo jack is used to connect
headphones to the unit.
19. AUX IN Jack(1/8”)
This stereo input jack is for an external sound
source, such as an MP3 or CD player.
20. LINE OUTPUT Jacks(1/4”)
Stereo output connection to an audio system
or drum amplifier.
21. CRASH 2 Jack(1/4”)
Input connection for Crash 2.
Panel Description
22. TOM 4 Jack(1/4”)
Input connection for Tom 4.
C
M
Y
CM
MY
CY
CMY
K
23. MIDI Connectors (IN, OUT)
These ports allow communication with other
products equipped with a MIDI interface.
24. USB Connector
This port is used to connect to a computer
(MIDI In/Out via USB).
25. DC IN Jack
Connect the included DC 9V power adaptor.
26. PAD Connectors
Input connections for Kick, Snare, Tom,
Cymbal pads and Hi-Hat control pedal.
Display
1. Tempo/Measure
2. Hitting Indicator
3. Beat Count
4. Indicators for Learning
5. Indicators for Menus (Such as UTILITY, REC, etc.)
6. Current Mode and Parameter Display
TEMPO BEAT
1
1
2
GOOD
5
KIT
3
4
4
6
5
Page 6
KMC_KIT_2_Manual_G09_120903.ai 6 2012/9/4 13:32:04KMC_KIT_2_Manual_G09_120903.ai 6 2012/9/4 13:32:04
Setup
Caution!
To prevent electric shock and damage to the device, make sure the power is switched
OFF on the drum and all related device before making any connection.
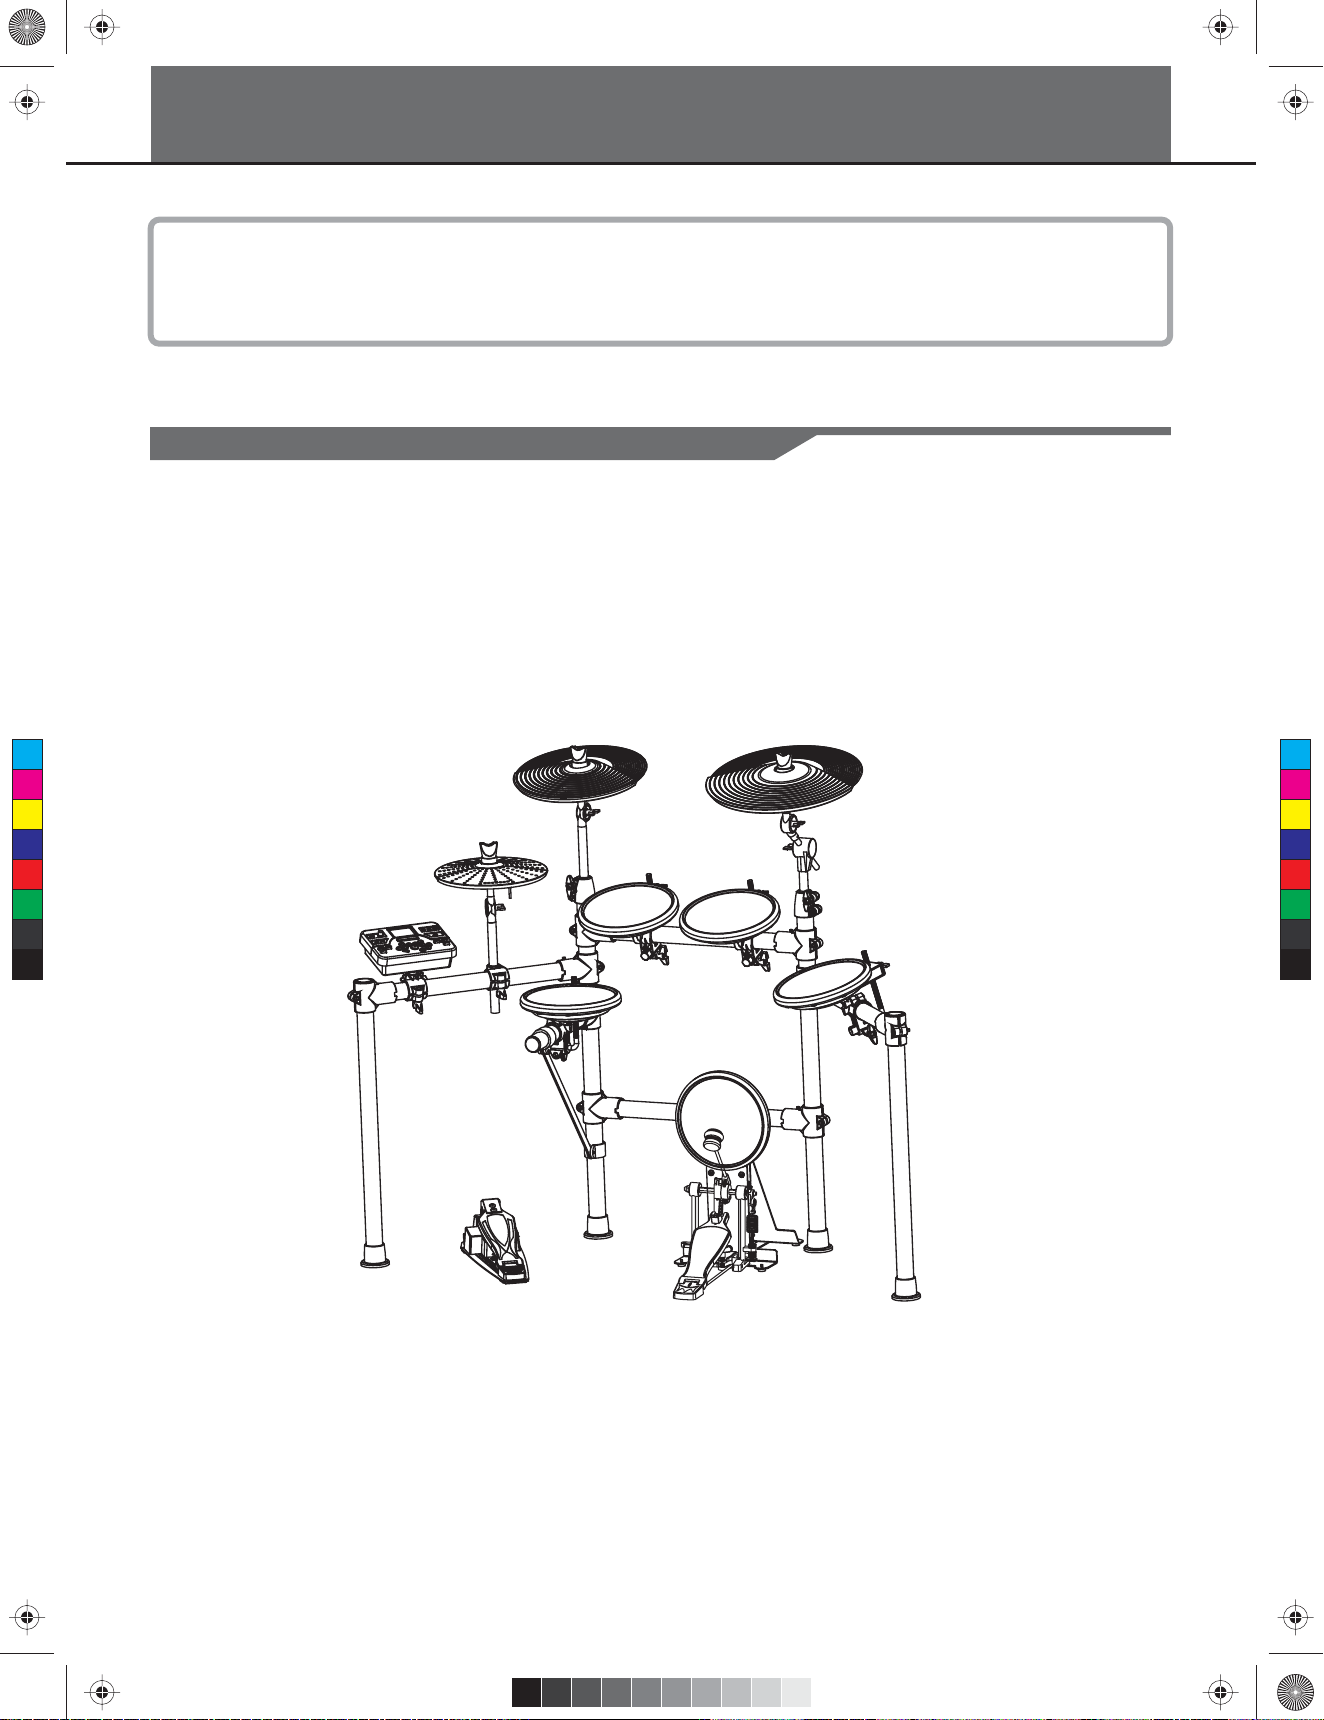
Connecting Pads and Pedals
Standard: KICK, SNARE, TOM1-3, CRASH1, RIDE, HIHAT, HIHAT CONTROL PEDAL
Extended: CRASH2, TOM4
Using the provided cable harness, connect with kick, snare, tom1~tom3, ride, crash, hi-hat, hi-hat control
triggers. Snare, tom, crash1, crash2 and ride pads are stereo input and support double triggering; crash1,
crash2, ride support choke. Hi-hat control pedal is stereo input.
crash1 ride
C
M
Y
CM
MY
CY
CMY
K
Drum Module
hi-hat
hi-hat control
tom1
tom2
tom3
snare
kick
Note:
For details on assembling the drum stand, attaching the digital drum and connecting pads, refer to the Assembly
Instructions.
Bass drum pedal NOT included on some models.
6
Page 7

KMC_KIT_2_Manual_G09_120903.ai 7 2012/9/4 13:32:05KMC_KIT_2_Manual_G09_120903.ai 7 2012/9/4 13:32:05
Connecting Audio Equipment
When using an amplifier, connect the Output L/MONO and R
jacks on the rear panel to the input of the amplifier.
Note:
For mono playback, use the L/MONO jack.
For stereo playback, connect both L/MONO and R jacks.
The line output volume is controlled by the VOLUME knob.
Connecting a set of Headphones
An optional set of stereo headphones can be connected to the
PHONES jack located on the side of the drum module.
The headphones output volume is controlled VOLUME knob,
too.
Connections
Connecting an MP3/CD Player
Connect the audio output of an MP3/CD player or other audio
C
M
Y
CM
MY
CY
CMY
K
source to the stereo AUX IN jack on the rear panel.
The input signal is mixed with the drum signal, allowing you to
play along.
Connecting a Computer
Via the USB Connector
This receives and transmits MIDI messages.
Via the MIDI Connectors
MIDI IN Connector
This receives MIDI messages transmitted from an external
MIDI device or a computer.
MIDI OUT Connector
Pad performance data is transmitted from this connector to
connected computer or MIDI device.
Connecting a Midi Keyboard
If you’re using an external MIDI keyboard or pads to control the
digital drum, make connections as shown. Here, it is used as a
sound module.
MIDI OUT
Power Supply
Make sure the power is turned OFF. Connect the power
adaptor to the DC IN jack on the side panel. After confirming
that all connections have been completed, rotate the volume
knob to the left (minimum volume level) before powering on the
module. Press the [POWER] button to turn on the module. The
KIT indicator on LCD will light up and the display will show kit
number 001.
Note:
Make sure the power is turned OFF when connecting the drum
module with external devices.
VOLUME
- +
HINT
The module will automatically turn off if there aren't
any operations for about 30 minutes except during
playing song or metronome, record, MIDI in via USB
port from computer and strike pads.
Please press [UTILITY] button repeatedly and enter
"POW" menu for the setting.
7
Page 8
KMC_KIT_2_Manual_G09_120903.ai 8 2012/9/4 13:32:05KMC_KIT_2_Manual_G09_120903.ai 8 2012/9/4 13:32:05
Performing
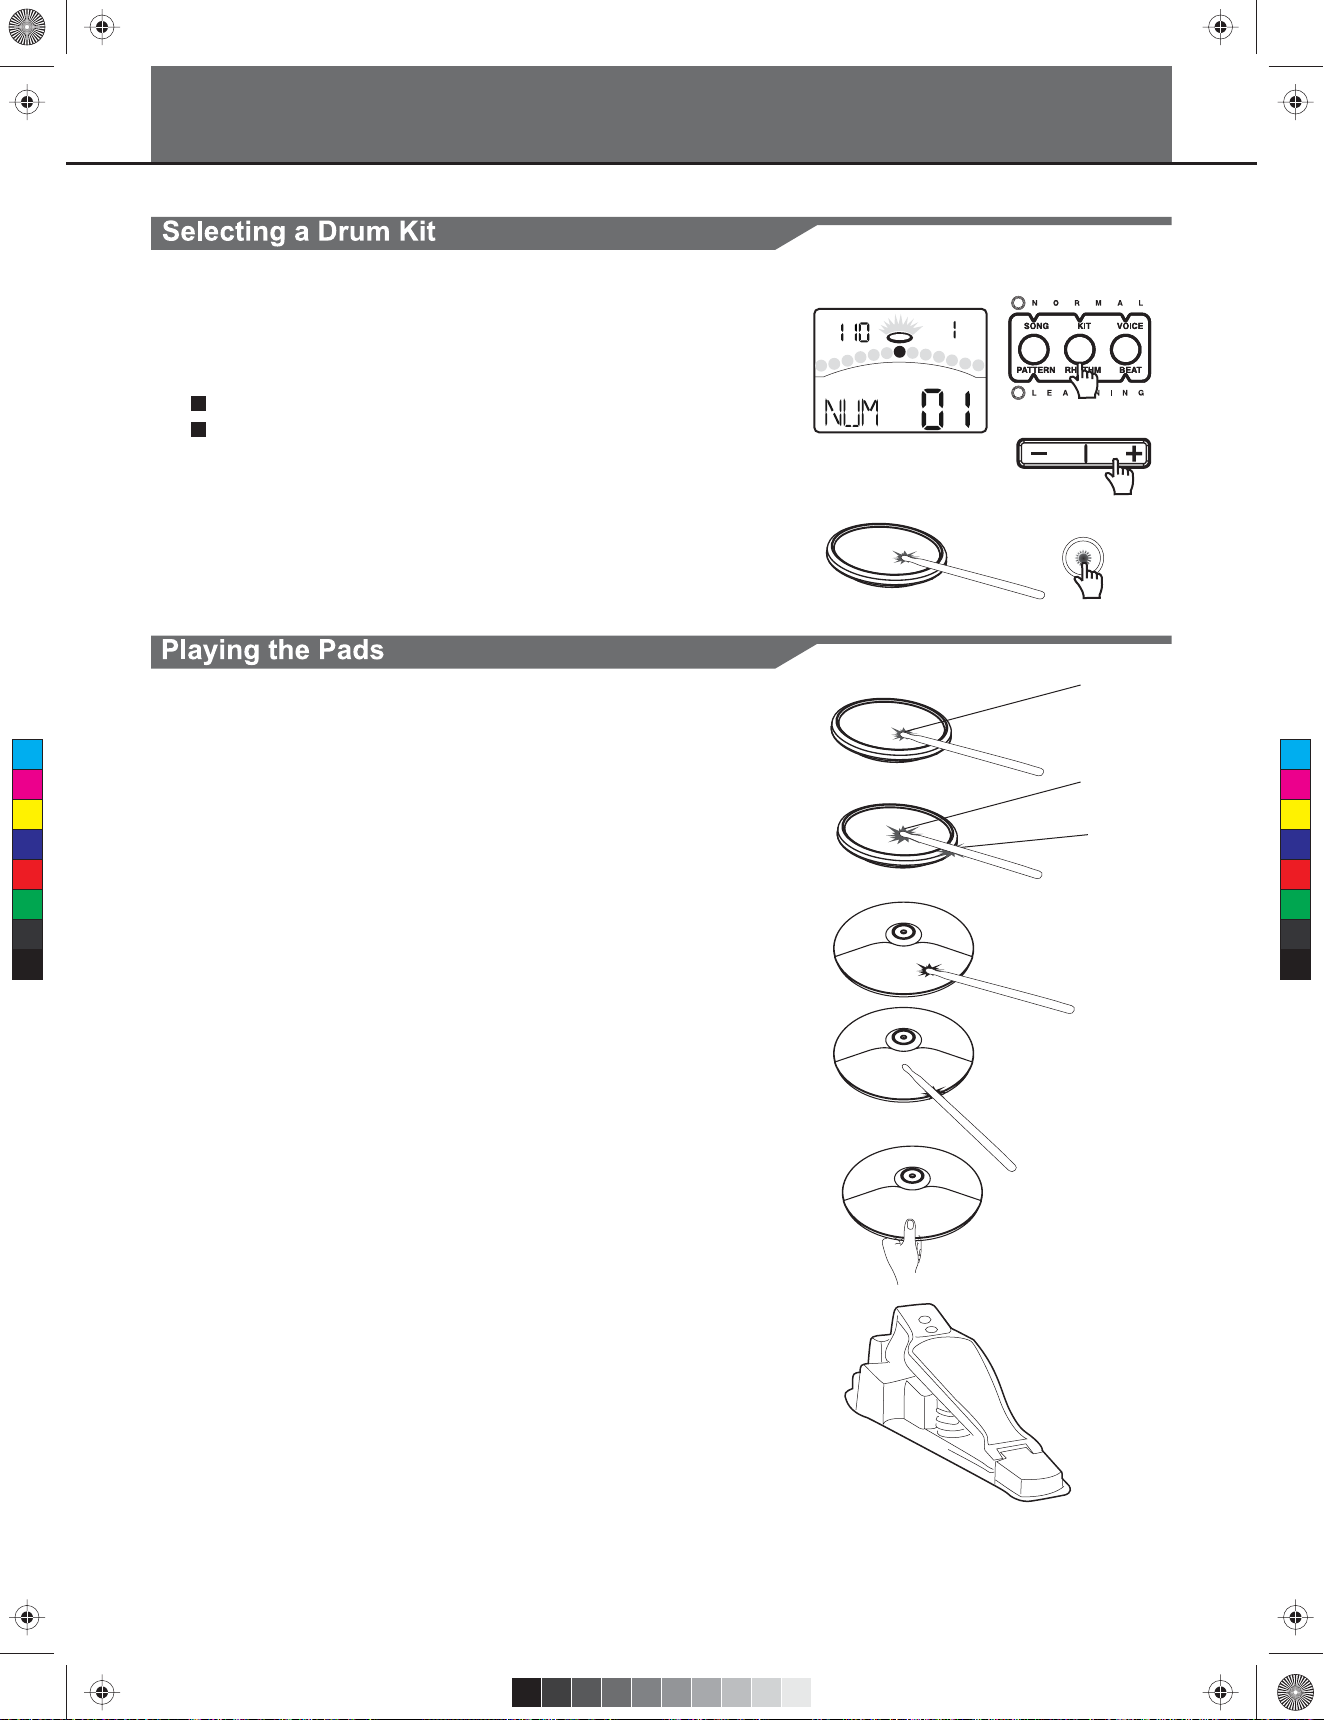
After powering up, the digital drum will be in KIT menu (KIT
indicator ON ). The display should look like this:
Use the [ - ] and [ + ] buttons to select the active kit.
1.
There are 45 kits in the digital drum:
30 preset kits (Kits 01-30)
15 user kits (Kits 31-45), the parameter display area will
display as "U31~U45", with an additional letter "U".
Pressing the Pad Select buttons allows you to preview the
2.
current kit (fixed velocity).
TEMPO
BEAT
KIT
KICK
Hit the pads to play the current kit.
3.
Head
Similar to an acoustic drum kit, the digital drum responds
differently to various playing techniques and dynamics. All the
C
M
Y
CM
MY
CY
CMY
K
pads are velocity sensitive. And some voices change timbre
depending on the striking force.
Drum Pad Head or Rim shot
The digital drum pad detects head and rim shots (rim shots
trigger the rim voice).
Cymbal Bow shot and Rim shot
Head
Rim
The digital drum cymbals detect bow and rim shot.
Both Ride and Crash cymbals have cymbal choke. But hi-hat
does not have the cymbal choke. Choking the crash/ride edge
with the hand immediately after hitting the crash/ride mutes the
crash/ride sound.
Hi-Hat
The Hi-Hat sound varies depending on the position of the
Hi-Hat pedal:
Open Hi-Hat:
Strike the Hi-Hat pad without pressing the
pedal.
Half-Open Hi-Hat:
Closed Hi-Hat:
Pedal Close:
Splash:
8
Strike the Hi-Hat pad with the pedal
pressed halfway down.
Strike the Hi-Hat pad with the pedal
pressed completely down.
Press the pedal completely down without
striking the pad.
Press the pedal completely down and
release it immediately.
Page 9
KMC_KIT_2_Manual_G09_120903.ai 9 2012/9/4 13:32:05KMC_KIT_2_Manual_G09_120903.ai 9 2012/9/4 13:32:05
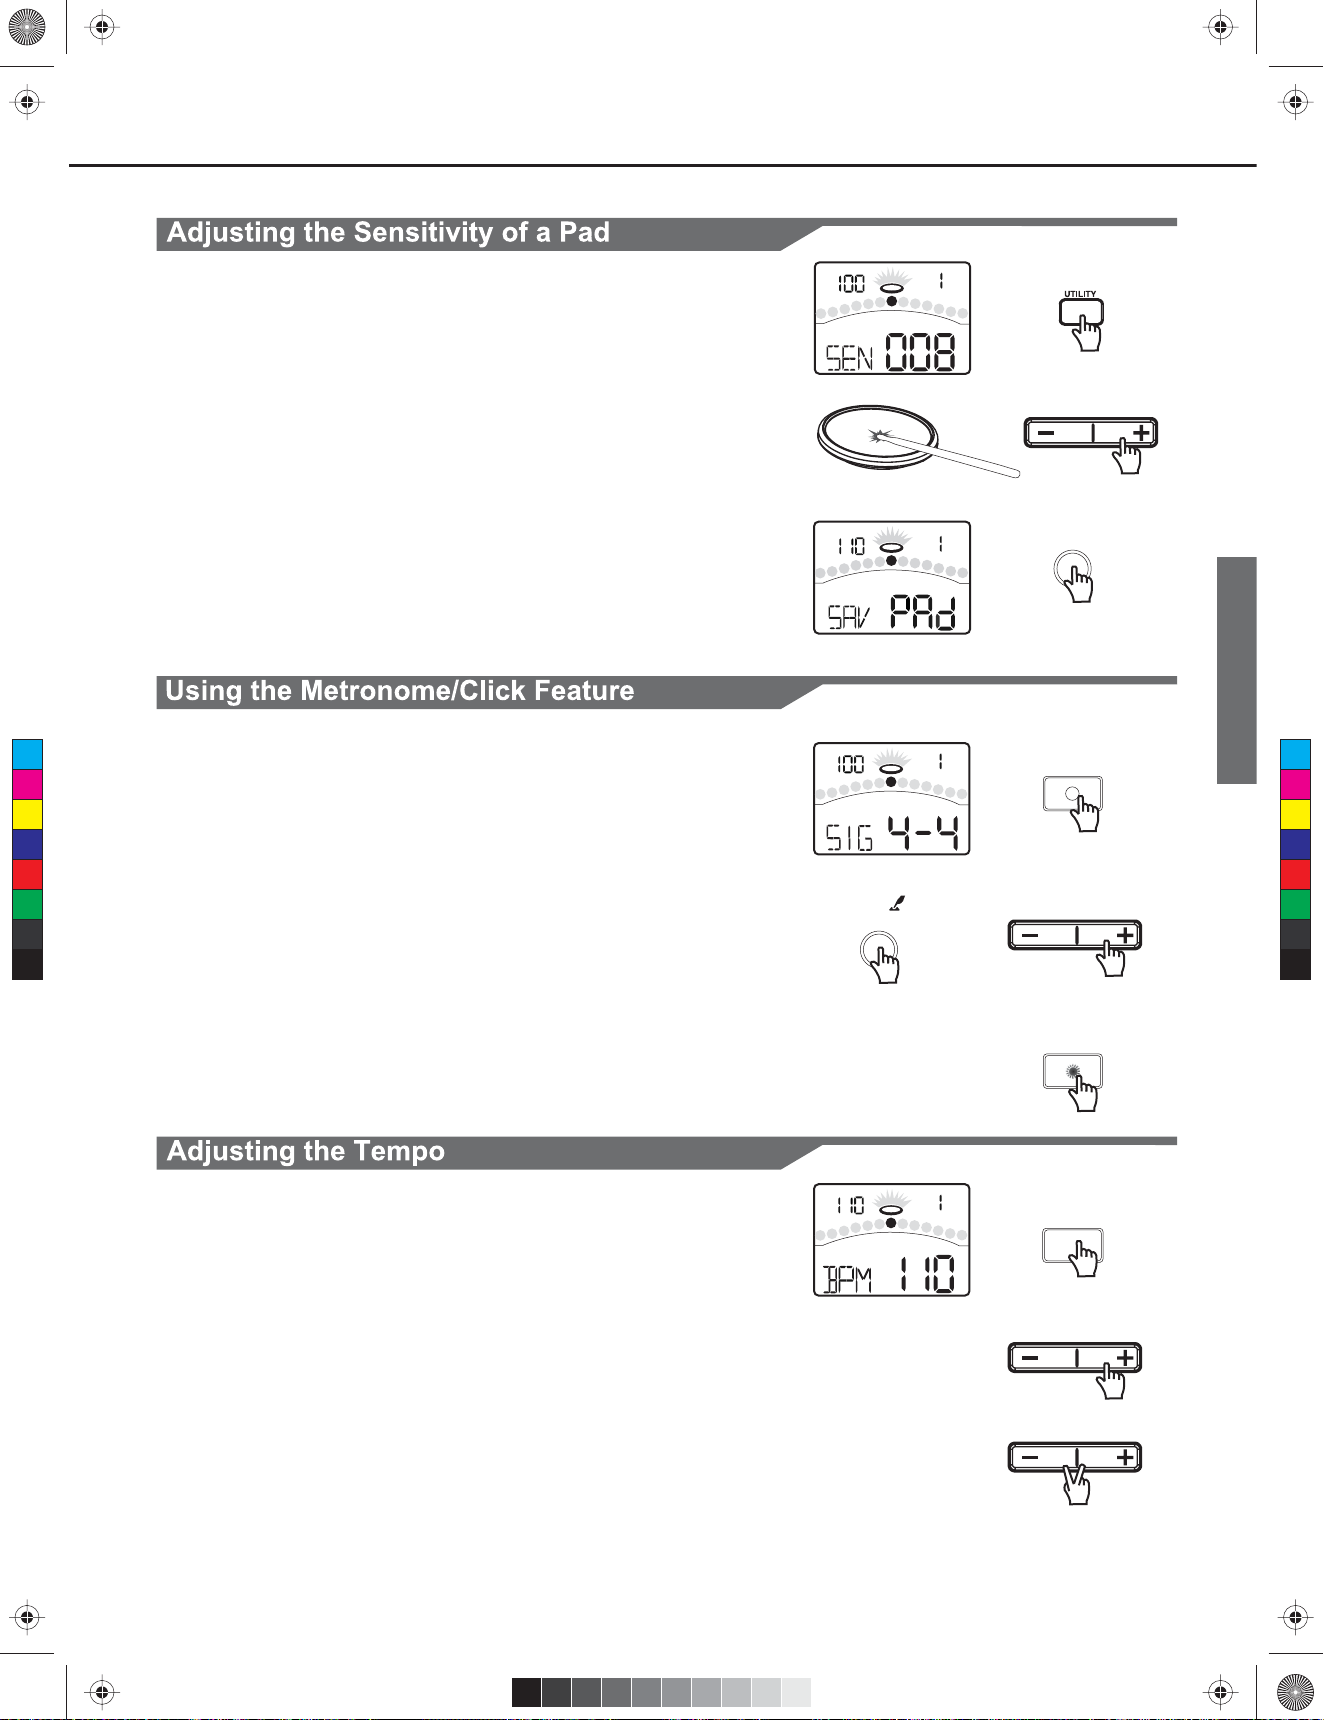
Performing
You may wish to adjust the sensitivity of the pads according to
TEMPO
BEAT
your playing style and desired dynamic range.
UTILITY
Press the [UTILITY] button
1.
The UTILITY indicator appears.
Strike a pad or press a pad select button to select the one
2.
whose sensitivity is to be adjusted. The PAD indicator
shows the current selected pad.
Press the [ - ] or [ + ] button to adjust the sensitivity.
3.
Press the [SAVE] button to save the current setting.
4.
TEMPO
UTILITY
BEAT
SAVE
For details on pad adjustments, refer to Advanced Use.
C
M
Y
CM
MY
CY
CMY
K
button. When the click plays at the current Time Signature and
Tempo (displayed in the top left corner of the LCD), the beat
indicators will swing accordingly. You can set the time signature
and interval, adjust the click volume and select the click sound
in the CLICK menu.
Press the [CLICK] button.
1.
Start the metronome with click sound.
Press the [PAGE] button to select the click menu pages
2.
You can switch the click sound on and off by pressing [CLICK]
TEMPO
CLICK
PAGE/SELECT
BEAT
CLICK
and press the [ - ] or [ + ] button to adjust the parameters.
CLICK
Press the [CLICK] button again.
3.
Stop the metronome and exit the click menu.
You can adjust the tempo of the Metronome, the current song,
and the current learning pattern. The current tempo always
displays in the top left corner of the LCD.
Press the [TEMPO] button.
1.
Press the [ - ] or [ + ] button.
2.
Adjust the current tempo.
Press both [ - ] and [ + ] buttons at the same time, reset the
3.
current tempo to its default value.
Note:
If there’s no operation, it will return to the previous menu page
automatically after 3 seconds.
TEMPO
BEAT
TEMPO
SONG
9
Page 10
KMC_KIT_2_Manual_G09_120903.ai 10 2012/9/4 13:32:05KMC_KIT_2_Manual_G09_120903.ai 10 2012/9/4 13:32:05
Editing and Saving a Drum Kit
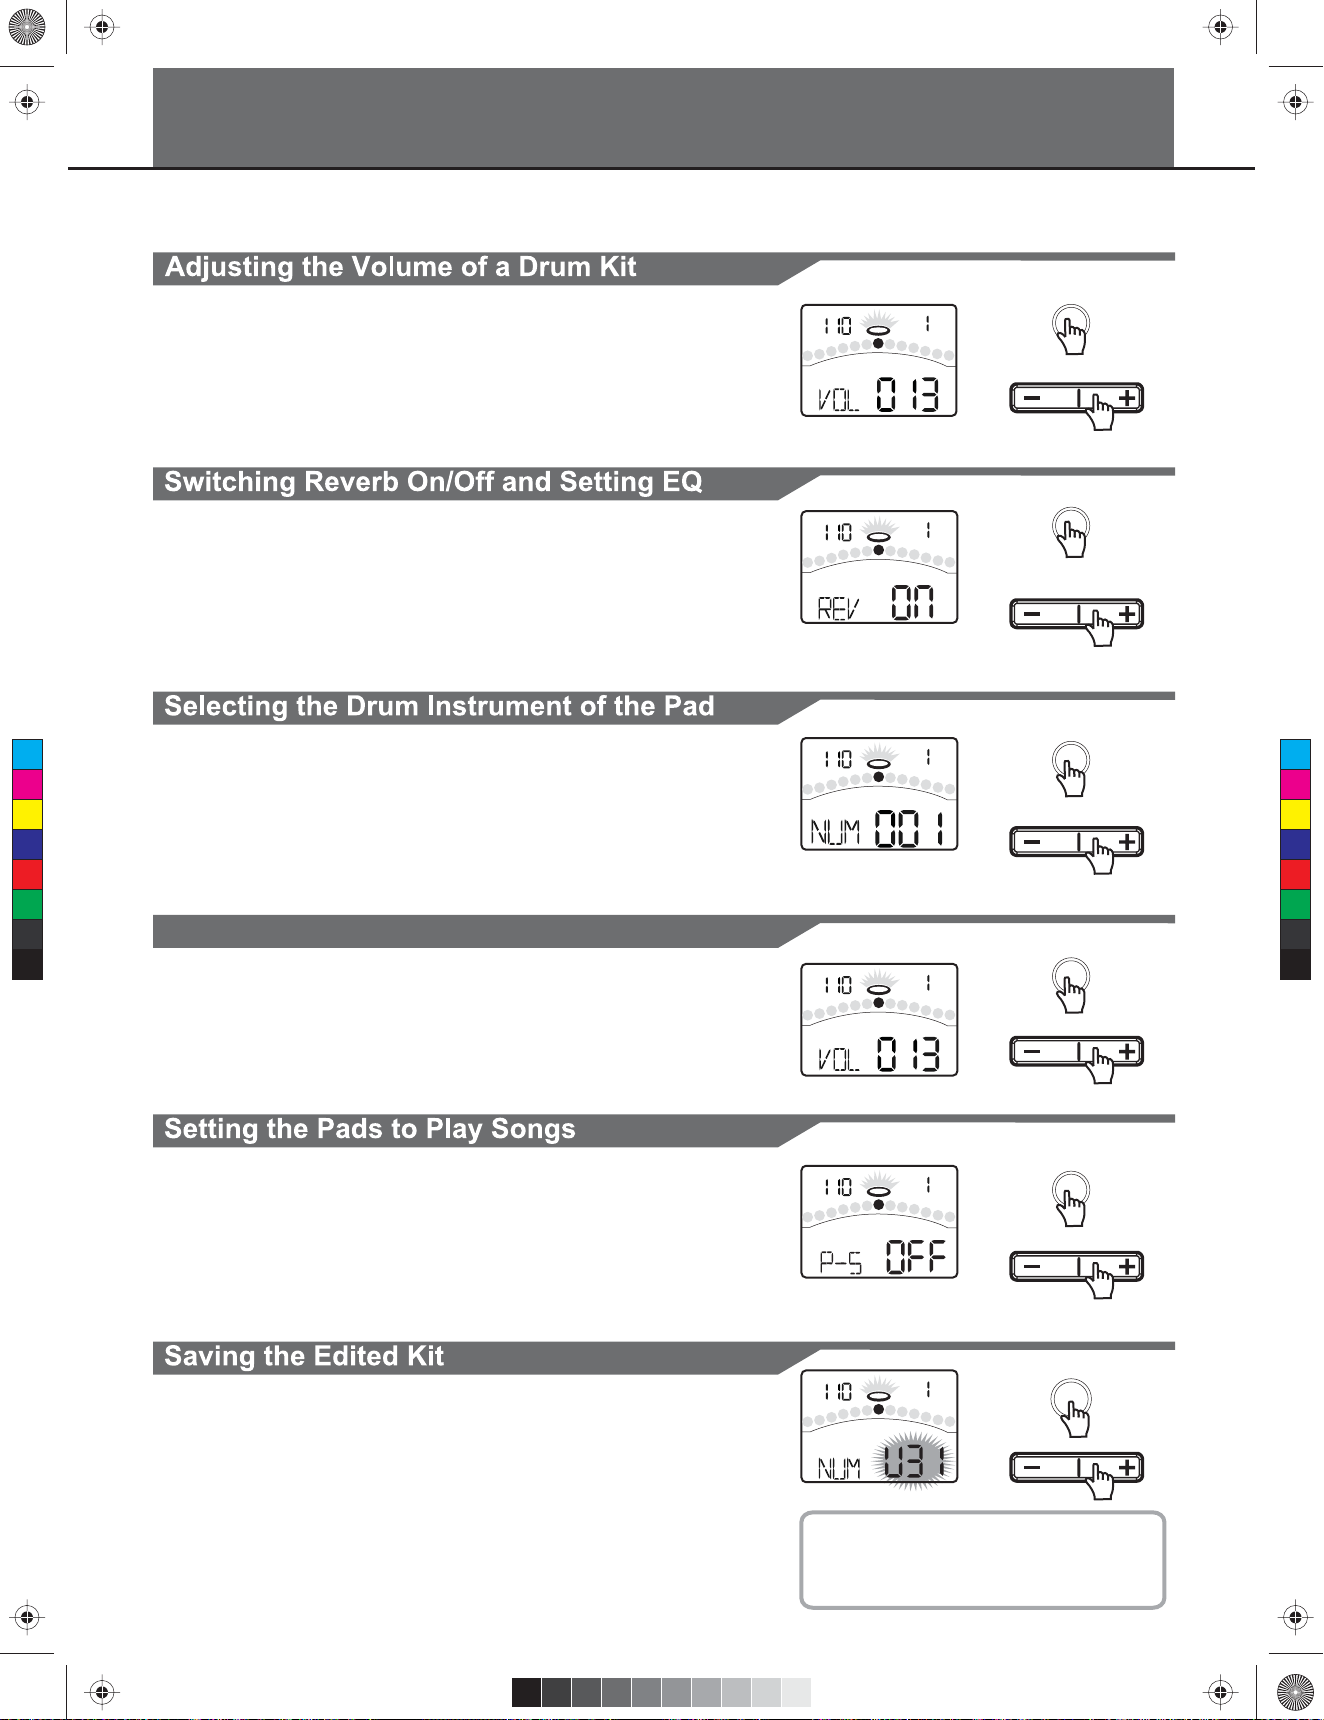
In KIT menu, you can modify the parameters as you like and save to the selected user kit.
Press the [KIT] or [PAGE] button.
1.
TEMPO
BEAT
KIT
Select the Kit Volume page.
KIT
Press the [ - ] or [ + ] button.
2.
Adjust the kit volume.
KIT
Press the [KIT] or [PAGE] button.
1.
TEMPO
BEAT
Select the Global Reverb page and EQ pages.
KIT
Press the [ - ] or [ + ] button.
2.
Switch Reverb ON or OFF.
Set the gain of three-band EQ (high, middle, low)
C
M
Y
CM
MY
CY
CMY
K
Press the [VOICE] button.
1.
Select the Pad Voice page.
Press the [ - ] or [ + ] button.
2.
Select the drum instrument of the selected pad.
Please refer to Drum Instrument List.
Adjusting the Volume, Pan and Pitch of the Pad
Press the [VOICE] or [PAGE] button.
1.
TEMPO
TEMPO
BEAT
VOICE
BEAT
VOICE
VOICE
Select the Pad Volume, Pad Pan, and Pad Pitch pages.
VOICE
Press the [ - ] or [ + ] button.
2.
Adjust the corresponding parameter.
10
Press the [VOICE] or [PAGE] button.
1.
Select the Pad Song and Song Number pages.
Press the [ - ] or [ + ] button.
2.
Switch the Pad Song function ON or OFF. Select the Song
that begins playing when the following pad is struck.
Press the [SAVE] button.
1.
The number of user kit will be flashed.
Press the [ - ] or [ + ] button.
2.
Select a user kit to save your settings. (No. 31-45)
Press the [SAVE] button again.
3.
Save the setting to the selected user kit.
TEMPO
TEMPO
HINT
If the edited kit isn’t saved before selecting
another kit, powering down the digital drum,
the changes will be lost.
BEAT
VOICE
BEAT
KIT
VOICE
SAVE
Page 11
KMC_KIT_2_Manual_G09_120903.ai 11 2012/9/4 13:32:05KMC_KIT_2_Manual_G09_120903.ai 11 2012/9/4 13:32:05
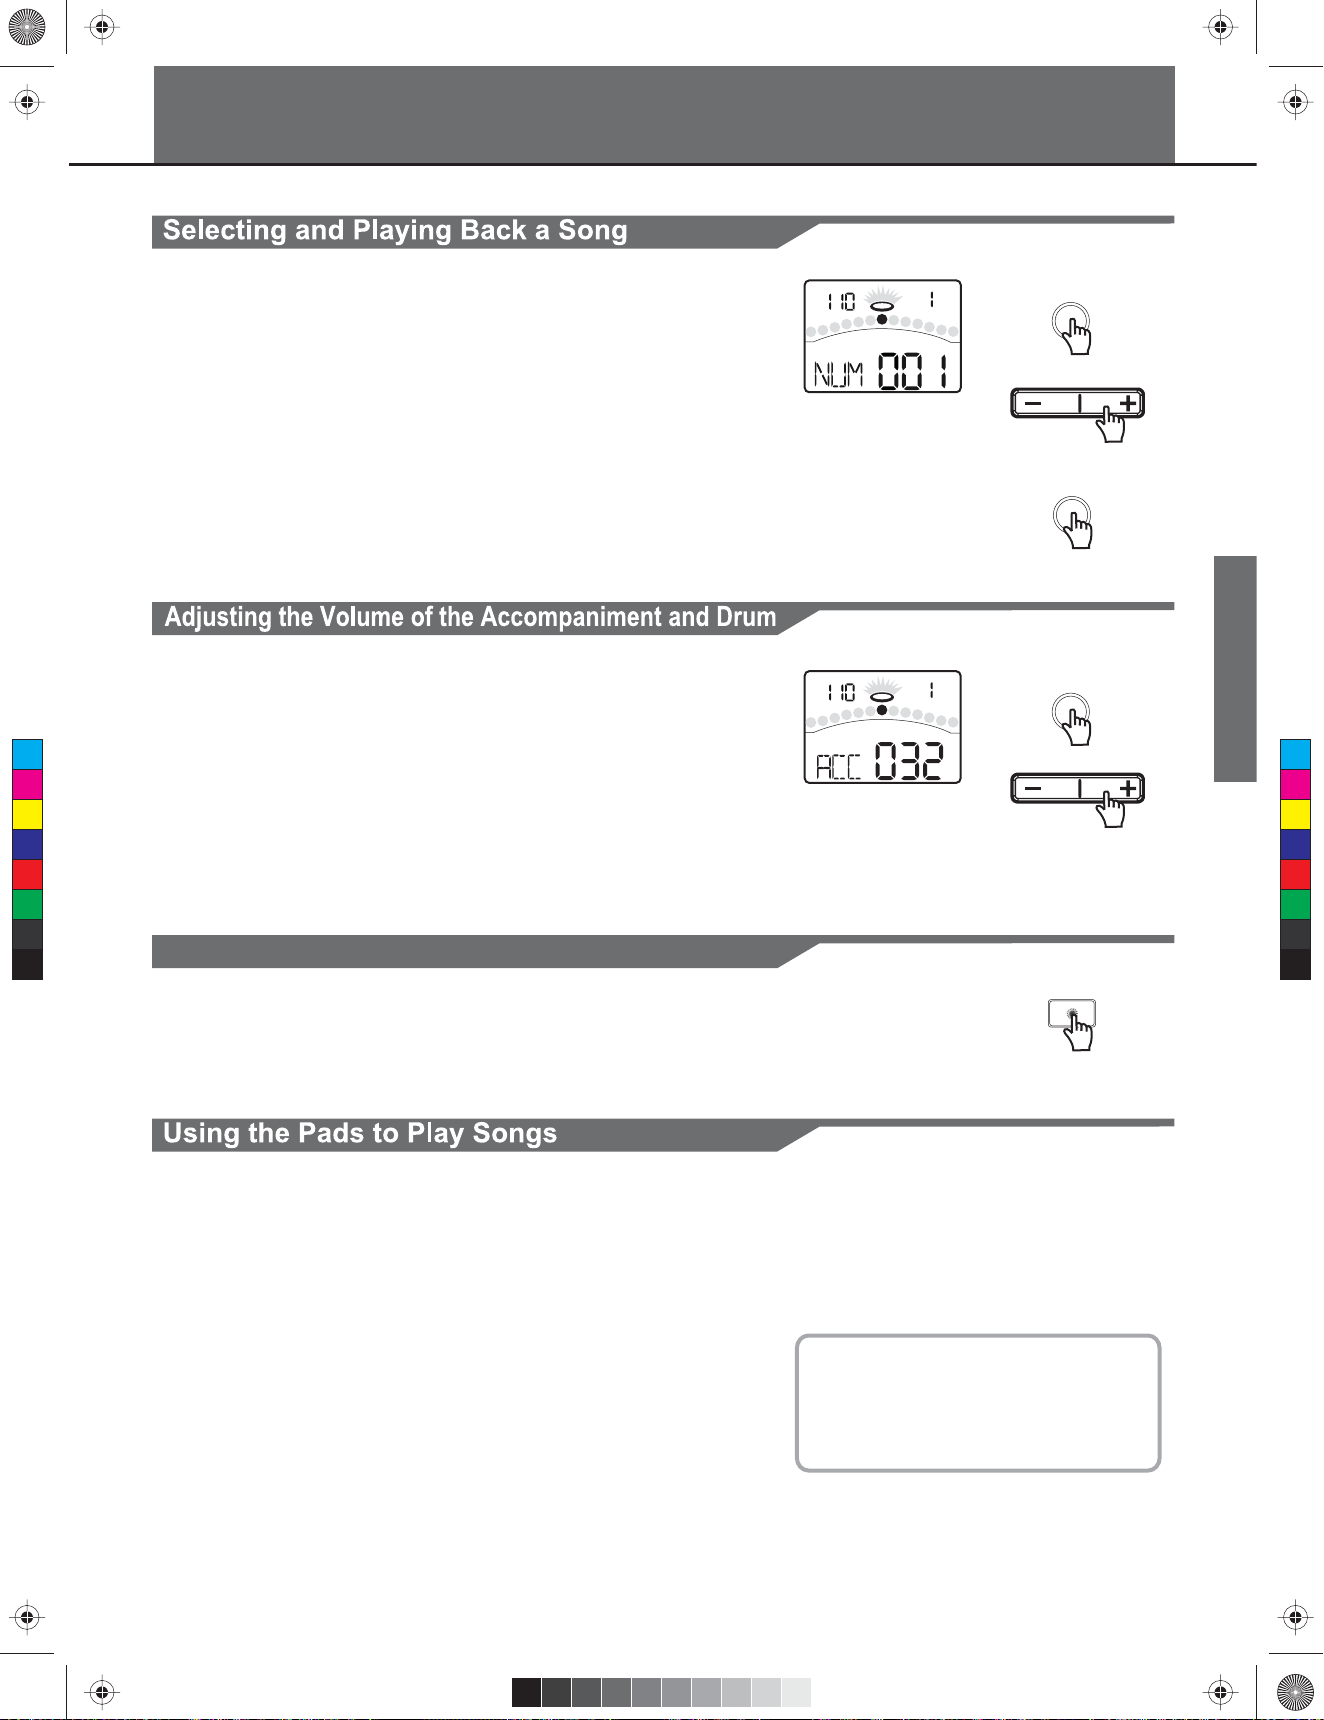
Press the [SONG] button.
1.
Switch to the SONG menu.
Playing Along with Songs
TEMPO
BEAT
SONG
Press the [ - ] or [ + ] button.
2.
SONG
Select the active song. The digital drum has many kinds of
songs. Please refer to Song list.
Press the [START/STOP] button.
3.
Start or stop playing back this selected song. When playing
START/
STOP
back this song, the PAD indicator will display which pads
are being played by drum track.
In SONG menu, you can adjust the volume of drum or
accompaniment track.
Press the [SONG] or [PAGE] button.
1.
C
M
Y
CM
MY
CY
CMY
K
Select the ACC Volume or Drum Volume page.
Press the [ - ] or [ + ] button.
2.
Adjust the corresponding volume.
Muting the Drums in Songs
TEMPO
If you want to mute the drum track of the song, please press the
SONG
BEAT
SONG
DRUM OFF
[DRUM OFF] button. The [DRUM OFF] LED will turn on.
This function is available only with electric drum. When you
strike the pads that have been set to Pad Song function, they
will start the performance of the songs. If you don’t know how to
set this function, please return to previous page and review the
part “Setting the Pads to Play Songs”.
For Example:
Kick:
You can play the bass-line (Tap group, refer to Song
List) note by note with you kick drum.
Crash:
The chords (Hit group, refer to Song List) progress
when you strike the pad.
HINT
The sounds in the Tap song are played back
one by one when you pressing the
[START/STOP] button or hitting the "pad
song" pad.
11
Page 12
KMC_KIT_2_Manual_G09_120903.ai 12 2012/9/4 13:32:06KMC_KIT_2_Manual_G09_120903.ai 12 2012/9/4 13:32:06
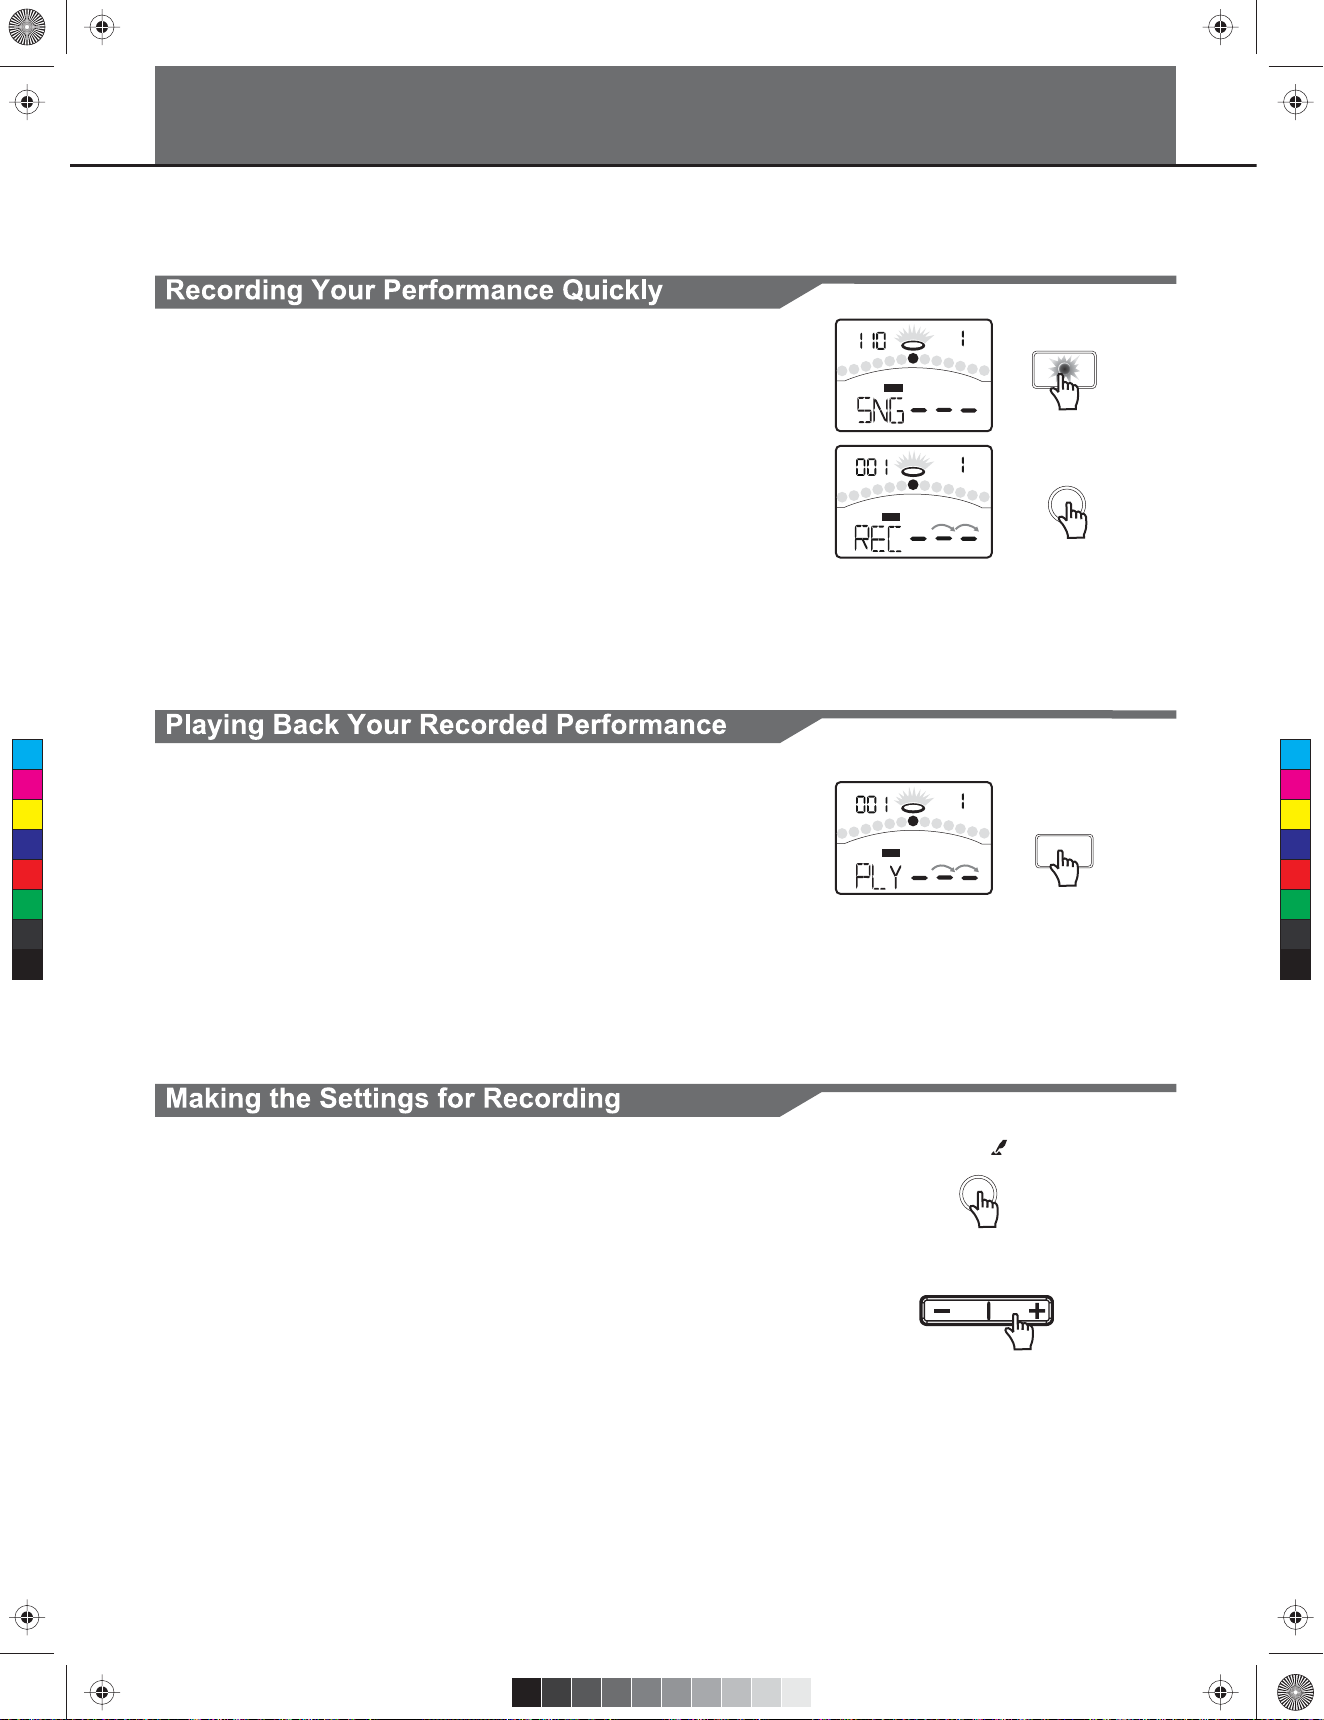
Recording Your Performance
In RECORD menu, you can record pad performances and the song as accompaniment.
Press the [RECORD] button.
1.
TEMPO
BEAT
RECORD
The [RECORD] LED will flash. The Metronome will be
turned on automatically.
REC
The display will show:
BEAT
START/
STOP
Press the [START/STOP] button or strike the pad.
2.
Recording will start.
The [RECORD] LED will turn on.
3.
Press the [START/STOP] button again, or press the
MEAS
REC
[RECORD] button.
Stop recording, the [RECORD] LED will turn off.
Your performance has been recorded.
C
Press the [PLAY] button.
M
Y
CM
MY
CY
CMY
K
1.
Play back your recording.
The display will show:
Press the [PLAY] button again.
2.
Stop playing back your performance.
If you are not satisfied with your recording, please press the
MEAS
BEAT
PLAY/PRACTICE
REC
[RECORD] button to restart the recording progress.
You can make the settings for recording on Record Standby.
Press the [PAGE] button.
1.
Select the Record Setting pages.
Press the [ - ] or [ + ] button.
2.
Adjust the parameters about recording.
For details on record setting, refer to Advanced Use.
12
PAGE/SELECT
Page 13

KMC_KIT_2_Manual_G09_120903.ai 13 2012/9/4 13:32:06KMC_KIT_2_Manual_G09_120903.ai 13 2012/9/4 13:32:06
There are three types of patterns in LEARNING mode.
Beat:
Rhythm:
Pattern:
Snare Practice
Drum Practice
Drum Practice with accompaniment
Practicing with Patterns
When you are in NORMAL mode, please press and hold the
TEMPO
BEAT
[PAGE/SELECT] button for 1 second. The LED of LEARNING
mode will turn on. The display will show:
Press the [BEAT] button.
1.
LEARN
Select the Beat Choosing page.
Press the [ - ] or [ + ] button.
2.
BEAT
Select the beat which you want to practice.
Press the [PRACTICE] button.
3.
Start or stop playing the pattern with your practice. The
PLAY/PRACTICE
PAD indicators will display which pads are being played by
C
M
Y
CM
MY
CY
CMY
K
drum track.
If you want to select the Rhythm or Pattern, please follow the
steps described above.
If you want to check your progress, please press the
MEAS
BEAT
[START/STOP] button. The display will show:
A measure count-in will be inserted before playing back the
pattern so that you can practice in good time. Your practice will
be recorded automatically. When finished playing back the
pattern, the digital drum will score your practice automatically.
The display will show the score.
If you are not satisfied with your score, please press the
[START/STOP] button and try again.
Press and hold the [PLAY/PRACTICE] button for 2
1.
seconds.
The display will show:
You can listen to your recorded practice.
Press the [PLAY/PRACTICE] button again.
2.
Stop playing back the recorded practice.
LEARN
TEMPO
LEARN
LEARN
MEAS
BEAT
BEAT
START/
STOP
PLAY/PRACTICE
13
Page 14

KMC_KIT_2_Manual_G09_120903.ai 14 2012/9/4 13:32:06KMC_KIT_2_Manual_G09_120903.ai 14 2012/9/4 13:32:06
Creating Your Own Drum Kit
About the Drum Kits
In KIT menu, you can select drum kits to play from the pads,
and you can edit voices and their associated parameters, such
as Pitch, Reverb Level, Volume, Pan, MIDI Note, etc.
There are 45 kits in the digital drum:
30 preset kits (Kits 01-30)
15 user kits (Kits U31-U45)
In addition, there are 11 General MIDI preset kits for MIDI/USB
applications, and for MIDI file playback. Please refer to GM
Drum Kit List. Each drum kit contains settings for up to 19
voices, assigned to the 10 pad inputs and 1 pedal controller:
Pad Settings
Kick Head1
Snare
Tom1
Tom2
Tom3
Tom4
Crash1
Crash2
Ride
Hihat
Pedal
Head2 Rim2
Head3
Head4
Head5
Head6
Head7
Head8
Head9
Head10
Rim3
Rim4
Rim5
Rim6
Rim7
Rim8
Rim9
Selecting a Drum Kit
If the digital drum is not yet in KIT menu, press the [KIT] button
C
M
Y
CM
MY
CY
CMY
K
to enter it. The KIT indicator will light up, and the LCD will
display the current kit number.
Press the [ - ] or [ + ] buttons to select a kit. When holding
down [ + ], values increase rapidly. When holding down [ - ],
values decrease rapidly.
Overall Drum Kit Setting
TEMPO
BEAT
KIT
In KIT menu, you can set the overall kit parameters.
Press the [PAGE] or [KIT] button, select Kit volume page.
1.
The parameter adjusts the overall kit volume(0-32).
Press the [PAGE] or [KIT] button, select Reverb Switch
2.
page. The parameter toggles the global reverb Switch
ON/OFF.
Press the [PAGE] or [KIT] button, select EQ gain page.
3.
These parameters adjust the three bands of Master
EQ(-12dB-12dB).
Selecting the Pad to Edit
The current pad to be edited can be selected either by pressing
its Pad Select button, or by striking the pad itself. The PAD
indicator will light up to show which pad is currently selected. If
the rim of a pad is selected, both the PAD indicator and the
RIM indicator will turn on.
Overall Kit Settings
Kit Volume
Reverb on/off
Global
EQ High gain
EQ Middle gain
EQ Low gain
14
Page 15

KMC_KIT_2_Manual_G09_120903.ai 15 2012/9/4 13:32:06KMC_KIT_2_Manual_G09_120903.ai 15 2012/9/4 13:32:06
Creating Your Own Drum Kit
About the Drum Instruments
The digital drum features 510 different drum instruments which are categorized into 9 separate groups, such as
Acoustic Kick, Electric Kick, Acoustic Snare, Electric Snare, Percussion. You can individually adjust the volume,
pan, pitch, reverb settings for instruments set to the pad.
Selecting Instruments
BEAT
VOICE
VOICE
BEAT
If the digital drum is not yet in VOICE menu, press the [VOICE]
button to enter it. The VOICE indicator will light up, and the
LCD will display the current voice number.
Press the [ - ] or [ + ] buttons to change a pad’s Individual
1.
voice (001-491).
TEMPO
TEMPO
If the selected pad is Hi-Hat, an additional option is
2.
VOICE
available: Hi-Hat Combination (001-019).
C
M
Y
CM
MY
CY
CMY
K
Drum Instrument Settings
Press the [PAGE] or [VOICE] button, select Pad Volume
1.
page. The parameter adjusts the volume of the pad.
Press the [PAGE] or [VOICE] button, select Pad Pan page.
2.
The parameter adjusts the pan of the pad.
3.
Press the [PAGE] or [VOICE] button, select Pad Pitch
page. The parameter adjusts the pitch of the pad.
4.
Press the [PAGE] or [VOICE] button, select Pad Reverb
Drum Instrument Settings
Volume(0-32)
Voice
Setting
Settings for Other Functions
Others
Pan(-8-8)
Pitch(-8-8)
Reverb(0-16)
MIDI Note(0-127)MIDI
Pad Song Switch(ON/OFF)
Song Number(1-80)
page. The parameter adjusts the reverb level of the pad.
Settings for Other Functions
Press the [PAGE] or [VOICE] button, select Pad MIDI Note
5.
page. The parameter sets MIDI Note Number for each pad.
Press the [PAGE] or [VOICE] button, select Pad Song
6.
pages. The parameters sets pad song function ON and
choose the song numbers.
HINT
While editing Voice Number, Pitch, Pan,
Volume, and Reverb, you can also preview
the result of the current settings by pressing
the Pad Select button to play the edited voice.
Press the [ - ] or [ + ] buttons to adjust the parameters.
Saving to a User Drum Kit
After change any kit parameter, please press the [SAVE] button
to save the current settings to the user kit (No. 31-45). The
number of user kit will be flashed. Press the [SAVE] button to
save to user kit and return to Kit Select page.
TEMPO
KIT
BEAT
SAVE
BEAT
15
Page 16

KMC_KIT_2_Manual_G09_120903.ai 16 2012/9/4 13:32:06KMC_KIT_2_Manual_G09_120903.ai 16 2012/9/4 13:32:06
Making the Settings for Pads
About Settings of Pads
If the digital drum is not yet in UTILITY menu, press the
[UTILITY] button to enter it.
The UTILITY indicator will light up. You can use the [ - ] or [ + ]
buttons to adjust parameters (as shown to the right ) for each
pad as well as the rim sensitivity of the pad and the splash
sensitivity of the Hi-Hat control pedal.
Pad Settings
Pad
Special
Auto Power off
Sensitivity(1-16)
Threshold(0-16)
Crosstalk(1-16)
Curve(1-6)
Rim Sensitivity(1-16)
Splash Sensitivity(1-9)
Off, 30, 60
The current pad to be edited can be selected either by pressing
its Pad Select button, or by striking the pad itself. The PAD
indicator will light up to show which pad is currently selected. If
the rim of a pad is selected, both the PAD indicator and the
RIM indicator will turn on.
Sensitivity:
Adjust the sensitivity of the pad to regulate the pad
response. Higher settings result in higher sensitivity, so that the
pad will produce a loud volume even when struck softly. You
C
M
Y
CM
MY
CY
CMY
K
can also adjust the sensitivity of the splash in SPLASH
SENSITIVITY.
Threshold:
This setting allows a trigger signal to be received
only when the pad is struck harder than a specified force. This
can be used to prevent a pad from sounding in response to
extraneous vibrations from another pad.
Crosstalk:
When two pads are mounted on the same stand, the
vibration produced by hitting one pad may trigger the sound
from another pad unintentionally (This is called crosstalk). You
can avoid this problem by adjusting Crosstalk Cancel on the
pad that is sounding inadvertently. If the value is set too high,
then when two pads are played simultaneously, the one that is
struck less forcefully will not sound. So be careful and set this
parameter to the minimum value required to prevent such
crosstalk. With a setting of 0 , crosstalk prevention does not
function.
Curve: This setting allows you to control the relation between
the velocity (striking force) and changes in volume (the dynamic
curve). Adjust this curve until the response feels as natural as
possible.
16
Page 17

KMC_KIT_2_Manual_G09_120903.ai 17 2012/9/4 13:32:06KMC_KIT_2_Manual_G09_120903.ai 17 2012/9/4 13:32:06
Adjusting the Pad Sensitivity
Press the [PAGE] or [UTILITY] button, select Pad Sensitivity
page. The display will show:
Changes how a pad responds to your playing. At higher
sensitivities, the pad will generate a louder signal, even when
you play softly. At lower sensitivities, the pad will generate a
quieter signal, even if you play strongly. Adjust according to
your playing style and desired dynamic range.
Setting the Pad Threshold
Press the [PAGE] or [UTILITY] button, select Pad Threshold
page. The display will show:
Making the Settings for Pads
TEMPO
UTILITY
TEMPO
BEAT
BEAT
UTILITY
UTILITY
Changes how forcefully you must strike the pad to generate a
trigger signal. Setting a high threshold requires hitting the pad
UTILITY
very hard to get a sound. This can help cut out transient
responses, such as vibrations from the kit or accidental pad
C
M
Y
CM
MY
CY
CMY
K
taps that you don’t intend to generate sounds. Setting a low
threshold means even light touches will produce sound. Adjust
according to environment and playing style.
Eliminating Crosstalk between Pads
Press the [PAGE] or [UTILITY] button, select Pad Crosstalk
page. The display will show:
TEMPO
UTILITY
BEAT
UTILITY
When two pads are mounted close to each other, hitting one
pad may trigger the sound from another pad unintentionally.
This effect can be eliminated by setting this parameter to a
higher value on the pad that is triggered unintentionally.
Selecting the Pad Curve
HINT
If the value is set too high, then when two
pads are played simultaneously, the one that
is struck less forcefully will not sound. So be
careful and set this parameter to the minimum
value required to prevent such crosstalk.
TEMPO
BEAT
UTILITY
Press the [PAGE] or [UTILITY] button, select Pad Curve page.
The display will show:
UTILITY
Curve refers to how the trigger signal’s dynamic response
relates to your pad hit.
Curve1:
The standard setting, this produces the most natural
correspondence between playing dynamics and
volume change.
Curve2, 3:
Compared to Curve1, strong dynamics produce a
greater change.
Loudness
Striking Force
Curve 1 Curve 2
Loudness
Striking Force
Loudness
Striking Force
Curve 3
17
Page 18

KMC_KIT_2_Manual_G09_120903.ai 18 2012/9/4 13:32:07KMC_KIT_2_Manual_G09_120903.ai 18 2012/9/4 13:32:07
Making the Settings for Pads
Curve4, 5:
Compared to Curve1, a soft playing produces a
Curve 1 Curve 2
Loudness
Loudness
Loudness
Curve 3
greater change.
Curve6:
Very little dynamic response, making it easy to
maintain strong volume levels. If using drum
triggers, these settings help maintain stable levels.
Striking Force
Curve 4
Striking Force
Curve 5
Striking Force
Curve 6
Setting Rim Sensitivity on Pads
You can only set rim sensitivity on Snare, Tom1, Tom2, Tom3,
Tom4. If you select the other pads, this page will not appear.
Press the [PAGE] or [UTILITY] button, select Pad Rim
Sensitivity page. The display will show:
Same as the basic sensitivity feature, except that it relates
specifically to playing the rim.
Note:
This parameter can be adjusted only on SNARE, TOM1,
TOM2, TOM3, TOM4. If you select the other pads on this page,
a horizontal line "---" appears, and you can't make the setting.
TEMPO
UTILITY
BEAT
UTILITY
Auto Power Off
C
M
Y
CM
MY
CY
CMY
K
Press the [PAGE] or [UTILITY] button to select the Auto Power
Off setup page.
The LCD will display
030 and 060:
If there aren't any operations for about 30 or 60 minutes except
during playing song or metronome, record, MIDI in via USB
port from computer and strike pads, the module will turn the
power off automatically.
"OFF": Switch off the auto power off function.
TEMPO
UTILITY
TEMPO
UTILITY
BEAT
BEAT
UTILITY
Adjusting the Hi-Hat Pedal Splash Sensitivity
Press the [PAGE] or [UTILITY] button, select Pedal Splash
Sensitivity page. The display will show:
This Setting controls the sensitivity of the foot splash.
Saving Settings of Pads
After adjusting the trigger settings (sensitivity, Threshold,
crosstalk, curve, rim sensitivity, splash sensitivity), you can
save them into memory. In UTILITY menu, press the [SAVE]
button to store all pad settings.
Note:
If you turn off the power without saving, you will lose the
1.
trigger setting changes you have just made.
These parameters affect all kits.
2.
18
TEMPO
UTILITY
TEMPO
UTILITY
BEAT
BEAT
UTILITY
UTILITY
Page 19

KMC_KIT_2_Manual_G09_120903.ai 19 2012/9/4 13:32:07KMC_KIT_2_Manual_G09_120903.ai 19 2012/9/4 13:32:07
About Click
Setting the Metronome
The digital drum is equipped with a built-in metronome, which
can be used by itself as a rhythm guide for practice, or in
conjunction with the song playback or record functions. If the
digital drum is not yet in CLICK menu, press the [CLICIK]
button to enter it. In CLICK menu, you can use the [ - ] or [ + ]
button to adjust the parameters(as shown to the right).
Click Settings
Time
signature
Interval
Volume
0-9/2, 0-9/4,
0-9/8, 0-9/16
1-2, 3-8, 1-4, 1-8, 1-12, 1-16
0-32
1-5Voice
Switching the Click On/Off
Press the [CLICK] button to start the metronome. The
1.
TEMPO
BEAT
CLICK LED will blink accordingly. The metronome will play
at the current Time signature and tempo (displayed in the
left right corner of the LCD)
Press the [CLICK] button again to stop the metronome. The
2.
CLICK
CLICK indicator will turn off.
Adjusting the Click Tempo
Press the [TEMPO] button, and use the [ - ] and [ + ] buttons to
C
M
Y
CM
MY
CY
CMY
K
adjust the current click tempo.
The current tempo always displays in the top left corner
of the LCD.
Setting the Time Signature
Press the [PAGE] button, select Click Time signature page.
The display will show:
TEMPO
CLICK
TEMPO
CLICK
When the parameter is set to "0", such as 0-2,0-4,0-8,0-16, no
accent is added to the first beat.
BEAT
BEAT
CLICK
CLICK
TEMPO
PAGE/SELECT
Setting the Interval
Press the [PAGE] button, select Click Interval page. The
display will show:
This parameter sets how the sound plays.
Adjusting the Click Volume
Press the [PAGE] button, select Click Volume page. The
display will show:
This parameter adjust the volume of the click sound.
Selecting the Click Sound
Press the [PAGE] button, select Click Voice page. The display
will show:
This parameter choose the sound for the click.
TEMPO
TEMPO
TEMPO
CLICK
CLICK
CLICK
BEAT
BEAT
BEAT
PAGE/SELECT
PAGE/SELECT
PAGE/SELECT
19
Page 20

KMC_KIT_2_Manual_G09_120903.ai 20 2012/9/4 13:32:07KMC_KIT_2_Manual_G09_120903.ai 20 2012/9/4 13:32:07
Playing Back Songs
About Songs
There are 80 preset songs in the digital drum:
50 Looped Patterns
10 Looped Percussion Patterns
5 Hit Songs
15 Tap Songs
Please refer to Song List. In SONG menu, you can select the
song number and adjust the volume of the song’s
accompaniment and drum part.
Song Settings
No.
Number(1-80)
Accomp(0-32)
Drum(0-32)Mix
HINT
The sounds in the tap song are played back
one by one in sequence each time [START]
is pressed or hitting the pad which is
functioned as "pad song".
Selecting a Song
TEMPO
BEAT
SONG
If the digital drum is not yet in SONG menu, press the [SONG]
button to enter it. The SONG indicator will light up, and the LCD
SONG
will Display the current song number.
Press the [ - ] or [ + ] button to select a song. When holding
down [ + ], the song number increase rapidly. When holding
down [ - ], it decrease rapidly.
C
M
Y
CM
MY
CY
CMY
K
Playing Back a Song
Press the [START/STOP] button to start song playback. The
LCD will display the current playing beat. Press the
[START/STOP] button again, stop the song during playback.
During song playback in SONG menu, the PAD indicators will
show which pads of the drum track is triggering.
HINT
If the song number is switched while
playing, the new song won’t start until the
end of the current bar.
SONG
BEAT
START/
STOP
TEMPO
This function can be disabled or enabled by pressing the
[KICK] button while in SONG menu.
Adjusting the Accompaniment Volume
Press the [PAGE] or [SONG] button, select Song
Accompaniment volume page. The display will show:
Use the [ - ] or [ + ] to adjust it. It will be restore to default value
on the next power on.
TEMPO
BEAT
SONG
SONG
Adjusting the Drum Volume
Press the [PAGE] or [SONG] button, select Song Drum volume
page. The display will show:
Use the [ - ] or [ + ] to adjust it. It will be restore to default value
on the next power on.
Muting the Drums in Songs
Press the [DRUM OFF] button to enable and disenable the
drum mute function. When DRUM OFF is enabled, the LED will
turn on.
20
TEMPO
SONG
BEAT
SONG
DRUM OFF
Page 21

KMC_KIT_2_Manual_G09_120903.ai 21 2012/9/4 13:32:07KMC_KIT_2_Manual_G09_120903.ai 21 2012/9/4 13:32:07
About Recording
In NORMAL mode, the digital drum allows you to quickly record
your performance as you play the pads. There are two ways to
start recording a new song:
Press the [START/STOP] button
Hit any pad
On Recording Standby, you can use the [ - ] or [ + ] button to
adjust the parameters(as shown to the right).
Recording Pad Performances
Press the [RECORD] button, enter recording standby. The
1.
[RECORD] LED will flash.
Recording a Song
Record Settings
Song Number
Kit
Tempo
Signature
Interval
Drum Off
Pre Count
MEAS
---/1-60
1-45
30-280
1-9/2, 1-9/4, 1-9/8, 1-9/16
1-2, 3-8, 1-4, 1-8, 1-12, 1-16
---/ON/OFF
ON/OFF
BEAT
RECORD
REC
Press the [START/STOP] button or strike the pad.
2.
Recording will start. The RECORD LED will turn on. After
MEAS
BEAT
START/
STOP
Count-in, the display will show:
Now you will record your performance.
C
M
Y
CM
MY
CY
CMY
K
Press the [START/STOP] button again, or press the
3.
[RECORD] button. Stop recording, the [RECORD] LED will
turn off.
Recording Performances Accompanied with a Song
If you want to record your performance accompanied with a
song, first set the parameters (Song Number and Drum off)
before start to record. The display will be as shown to the right:
TEMPO
REC
REC
BEAT
TEMPO
RECORD
BEAT
REC
For details on setting, refer to Recording Standby. Recording
operations are as mentioned above.
Playing Back Your Recorded Performance
Press the [PLAY] button. Play back your recording. The
1.
display will show:
Press the [PLAY] button again. Stop playing back your
2.
performance.
MEAS
REC
BEAT
PLAY/PRACTICE
Recording Standby
Use the [PAGE] button to scroll through the various record
parameters and the [ - ] or [ + ] button to adjust the value.
Page1:Setting the song accompanied or not
Page2:Selecting the drum kit that you want to record.
Page3:Setting the recording tempo
Page4:Setting the time signature
Page5:Setting the interval
Page6:Setting the drums in songs muted or not
Page7:Setting a measure count-in inserted or not before recording.
PAGE/SELECT
21
Page 22

KMC_KIT_2_Manual_G09_120903.ai 22 2012/9/4 13:32:07KMC_KIT_2_Manual_G09_120903.ai 22 2012/9/4 13:32:07
Practicing in Learning Mode
About Learning Mode
The LEARNING mode is a unique set of exercises specifically designed to help build speed, accuracy and stamina,
as well as develop better drum skills.
There are 42 practices in the digital drum:
20 Beats (Only Snare)
12 Rhythms (Only Drum, from Level1-Level6)
10 Patterns (from Level1-Level5)
You can select appropriate patterns to practice depending on your present skills.
There are 3 states in Learning mode:
Follow me:
Score:
Playback:
Practice with the selected pattern
Record and score your practice
Play back your recorded practice
If the digital drum is not yet in LEARNING mode, press and
TEMPO
BEAT
hold the [PAGE/SELECT] button for 1 second. The LED of
LEARNING mode will turn on. The display will show:
LEARN
In this Learning Mode, after you press the [PRACTICE] or
[START/STOP] to start practicng, your hitting accuracy will
C
M
Y
CM
MY
CY
CMY
K
always be indicated in the middle of the display according to the
current pattern.
DRAGGING:
PERFECT:
RUSHING:
Practicing with Beats
If the digital drum is not yet in BEAT menu, press the [BEAT]
button to enter it. You can adjust the parameters (as shown to
the right).
Press the [ - ] or [ + ] button to select the beat.
1.
2.
Press the [PRACTICE] button to listen to the beat and
follow it. Press it again to stop the beat.
Press the [BEAT] or [PAGE] button to select the Beat Drum
3.
volume page. Press the [ - ] or [ + ] button to adjust the
drum volume of the beat.
22
Beat
Number
TEMPO
LEARN
BEAT
1-20
0-32Drum Volume
BEAT
PLAY/PRACTICE
Page 23

KMC_KIT_2_Manual_G09_120903.ai 23 2012/9/4 13:32:07KMC_KIT_2_Manual_G09_120903.ai 23 2012/9/4 13:32:07
Practicing with Rhythms
Practicing in Learning Mode
If the digital drum is not yet in RHYTHM menu, press the
[RHYTHM] button to enter it. You can adjust the parameters
(as shown to the right).
Press the [ - ] or [ + ] button to select the rhythm.
1.
Press the [PRACTICE] button to listen to the rhythm and
2.
follow it. Press it again to stop the rhythm.
Press the [RHYTHM] or [PAGE] button to select the
3.
Rhythm Level page. Press the [ - ] or [ + ] button to select
the level of the rhythm.
Press the [RHYTHM] or [PAGE] button to select the
4.
Rhythm
Number
Drum Volume
TEMPO
LEARN
TEMPO
LEARN
BEAT
BEAT
1-12
1-6Level
0-32
RHYTHM
PLAY/PRACTICE
Rhythm Drum Volume page. Press the [ - ] or [ + ] button to
adjust the drum volume of the rhythm.
C
M
Y
CM
MY
CY
CMY
K
Practicing with Patterns
If the digital drum is not yet in Pattern menu, press the
[PATTERN] button to enter it. You can adjust the parameters
(as shown to the right).
Press the [ - ] or [ + ] button to select the pattern.
1.
Press the [PRACTICE] button to listen to the pattern and
2.
follow it. Press it again to stop the pattern.
Pattern
Number
Level
Accompany Volume
Drum Volume
TEMPO
LEARN
BEAT
1-10
1-5
0-32
0-32
PATTERN
Press the [PATTERN] or [PAGE] button to select the
3.
Pattern Level page. Press the [ - ] or [ + ] button to select
the level of the pattern.
Press the [PATTERN] or [PAGE] button to select the
4.
Pattern Accompany Volume page. Press the [ - ] or [ + ]
button to adjust the accompaniment volume of the pattern.
Press the [PATTERN] or [PAGE] button to select the
5.
Pattern Drum Volume page. Press the [ - ] or [ + ] button to
adjust the drum volume of the pattern.
TEMPO
LEARN
PLAY/PRACTICE
BEAT
23
Page 24

KMC_KIT_2_Manual_G09_120903.ai 24 2012/9/4 13:32:07KMC_KIT_2_Manual_G09_120903.ai 24 2012/9/4 13:32:07
Practicing in Learning Mode
Recording and Scoring Your Practice
Press the [START/STOP] button, you can enter the score
1.
state. A measure count-in will be inserted before playing
back the pattern so that you can practice in good time.
MEAS
LEARN
BEAT
START/
STOP
When playing back the pattern, your performance will be
recorded automatically. When finished playback, the digital
drum will score your practice automatically.
The display will show the score for 3 seconds.
Press the [START/STOP] button again to stop playing back
2.
TEMPO
LEARN
BEAT
the pattern and recording your practice during the playback
Playing Back Your Recorded Practice
Press and hold the [PLAY/PRACTICE] button for 2
1.
C
M
Y
CM
MY
CY
CMY
K
seconds, you can enter the playback state. The display will
show:
You will listen to your recorded practice.
Press the [PLAY/PRACTICE] button again. Stop playing
2.
back the recorded practice.
MEAS
LEARN
BEAT
PLAY/PRACTICE
24
Page 25

KMC_KIT_2_Manual_G09_120903.ai 25 2012/9/4 13:32:08KMC_KIT_2_Manual_G09_120903.ai 25 2012/9/4 13:32:08
Making the Settings for MIDI
About MIDI
MIDI (Musical Instrument Digital Interface) is a standard that allows performance data and other information to be
exchanged among electronic musical instruments and computers. With a MIDI cable connecting MIDI connectors
equipped device, you can play multiple instruments with a single keyboard, have multiple instruments perform in
ensemble, program the settings to change kits automatically to match the performance as the song progress, and
more.
MIDI Connection
MIDI IN:
MIDI OUT:
USB Connection
The USB connector allows you to connect the digital drum directly to your computer. It can be connected without
installing a driver in Windows XP/Vista/Win7 or MAC OSX environments. The digital drum will be recognized as a
“USB Audio device” to receive and transmit MIDI messages through a single USB cable. The USB port is used
only for MIDI messages (MIDI via USB)
This terminal receives MIDI data from an external
MIDI device.
This terminal transmits data from the digital drum
to other MIDI devices.
C
M
Y
CM
MY
CY
CMY
K
Note:
When the USB port is connected to a computer, all MIDI messages will be received and transmitted via USB.
Making the MIDI Settings
If the digital drum is not yet in UTILITY menu, press The
[UTILITY] button to enter it. Press the [PAGE] or [UTILITY]
button, select Local mode pages. The display will show:
Press the [ - ] or [ + ] button, set local mode to ON or OFF.
Local Mode
Local OFF:
The pads and internal sequencer are
MIDI Settings
Local on/off
TEMPO
UTILITY
BEAT
ON/OFF
ON/OFFGM on/off
UTILITY
disconnected from the digital drum’s internal
sound generator. Striking the pads does not
Trigger Input
cause sound to be produced by the internal sound
generator.
Local ON:
The pads and internal sequencer are connected
to the digital drum’s internal sound generator.
Sounds are produced by the internal sound
generator when the pads are struck.
GM Mode
Press the [PAGE] or [UTILITY] button, select GM mode
TEMPO
MIDI Note
Local On/Off
Sound Module
BEAT
MIDI
OUT
MIDI IN
UTILITY
pages. The display will show:
Press the [ - ] or [ + ] button, set GM mode to ON or OFF.
Refer to
Using the Digital Drum as a Sound Module
.
UTILITY
Sync Mode
Press the [START/STOP] button to start or stop songs
playback, the digital drum will transmit the MIDI system
real-time Message: FA or FC.
START/
STOP
25
Page 26

KMC_KIT_2_Manual_G09_120903.ai 26 2012/9/4 13:32:08KMC_KIT_2_Manual_G09_120903.ai 26 2012/9/4 13:32:08
Making the Settings for MIDI
Connecting with an External Sound Device
The digital drum transmission channel for the drum kit is fixed to Channel 10. It will output MIDI data generated by
the triggers when hitting the pads or stepping on the Hi-Hat control pedal (Note ON/OFF, and Foot messages).
Song playback data and metronome notes are not transmitted.
Recording Your Performance to an External Sequencer
1.
Connect the MIDI OUT of the digital drum to the MIDI IN of your sequencer, and the MIDI OUT of your
sequencer to the MIDI IN of the digital drum. If you are using a software sequencer on a computer, you can
simply connect the USB port of the digital drum to a USB port of your computer using a single USB A-B
cable.
Setup the active track of your sequencer on Channel 10. Activate RECORD on your sequencer.
2.
Play the pads of your digital drum.
3.
Stop recording. Locate your sequencer to the start of your recording.
4.
5.
Playback the recorded sequencer.
Setting MIDI Note Number to be Transmitted/Received by Each Pad
Each drum kit can have it’s own set of MIDI note to be transmitted/received by each pad, useful for advanced
purpose. Normally, you’ll never need to change them, but if you want to change, please follow these step:
C
1.
M
Y
CM
MY
CY
CMY
K
Press the [VOICE] button in NORMAL mode, enter the VOICE menu.
2.
Press the [PAGE] or [VOICE] button, select Pad MIDI Note page.
Press the [ - ] or [ + ] button, change the MIDI Note Number for each pad. Hit the pad you wish to set or press
3.
the related Pad Select button.
Press the [SAVE] button twice to save to user kit.
4.
Trigger MIDI Note Trigger MIDI Note Trigger MIDI Note Trigger MIDI Note Trigger MIDI Note
Kick
Snare
Snare R
Tom1
Tom1 R
36
38
40
48
50
Tom2
Tom2 R
Tom3
Tom3 R
Tom4
45
47
43
58
41
Tom4 R
Ride
Ride R
Crash1
39
51
53
49
Crash1 R
Crash2
Crash2 R
Hi-Hat O
55
57
52
46
Hi-Hat HO
Hi-Hat C
Hi-Hat P
Splash
23
42
44
21
Using the Digital Drum as a Sound Module
Connecting an external keyboard or sequencer to the MIDI Input allows you to use the digital drum as a multi-part,
polyphonic sound module to play various instrument parts in addition to your drums (for instance, Piano on
Channel 1, Bass on Channel 2, Strings on Channel 3, etc). The voices on each MIDI channel are selected using
MIDI Program Change messages (refer to GM Backing Instrument List ).
The MIDI system in the digital drum has 16 reception channels numbered from 1-16. Each of the channels is
responsible for a voice. When the instrument receives MIDI information from an external device, the active channel
is determined by the control message. Channel 10 is reserved for Drums. The digital drum has two options for
Channel 10: GM ON or OFF, as selected in MIDI UTILITY menu.
When GM Mode is ON,Channel 10 will play the GM percussion kits.
When GM Mode is OFF, Channel 10 will play the digital drum internal kits.
Note:
For more information on received MIDI messages, refer to MIDI implementation chart.
26
Page 27

KMC_KIT_2_Manual_G09_120903.ai 27 2012/9/4 13:32:08KMC_KIT_2_Manual_G09_120903.ai 27 2012/9/4 13:32:08
Display Meaning Action
Prompt Messages
Resetting the digital drum has failed.
Please call your dealer for
evaluation.
TEMPO
REC
TEMPO
REC
TEMPO
C
M
Y
CM
MY
CY
CMY
K
LEARN
BEAT
BEAT
BEAT
There isn’t data in the digital drum’s
memory.
The internal memory is full. You
cannot record any data.
You didn’t record your practice in the
Learning mode.
Please record your performance,
and then play it.
If you want to record another song,
please restart recording and replace
it.
Please press the [START/STOP]
button to score your practice, and
then play back your practice.
Troubleshooting
Problem Possible Cause and Solution
1) Rotate the [VOLUME] knob to be sure that the volume isn’t down.
No Sound
No Sound from Pads
No Click Sound 1) To be sure not set the volume of the click is not set to 0.
Sound is Distorted 1) Turn down the volume.
2) Be sure that Local Mode should be set to “ON”.
1) Be sure that the pad is connected correctly.
2) Be sure not set the volume of the pad is not set to 0.
27
Page 28

KMC_KIT_2_Manual_G09_120903.ai 28 2012/9/4 13:32:08KMC_KIT_2_Manual_G09_120903.ai 28 2012/9/4 13:32:08
Specifications
Maximum Polyphony
64
Connectors
9 Trigger Input Jack, Phone Jack(1/8”, stereo), Aux In
Jack(1/8”, stereo),
Drum kits
Drum Kits: 45(30 preset kits + 15 user kits)
2 External Trigger Input Jack(1/4”, Tom4, Crash2),
Output(1/4”, L/Mono, R), USB, MIDI IN, MIDI OUT
General MIDI Kits: 11 GM Kits
Control Buttons
Instruments
Drum Instruments: 510 (Drums, Percussion, SFX)
19 Hi-Hat Combos
Effect
Reverb,3 Band Equalizer
Sequencer
Normal: Song 80
Learning: Beat 20, Rhythm 12, Pattern 10
Resolution:120 ticks per quarter note
Recording Method: Real-time
Maximum Note Storage:approx.1600 Notes
Tempo
30~280
C
M
Y
CM
MY
CY
CMY
K
Display
Backlit Segment LCD
Power on/off switch, Volume, Start/Stop, Save, Song, Kit,
Voice, Page/Select, INC/DEC, Click, Drum off, Record,
Tempo, Utility, Play/Practice
Pad Select Buttons
12 Pad Select Buttons
Kit Configuration
Snare: 9”dual zone pad.
Tom1~tom3:9”dual zone pad.
Crash1:12” dual zone cymbal with choke.
Ride:14” dual zone cymbal with choke.
Hihat: 10”single zone cymbal without choke.
Power Supply
DC 9V
Dimensions
190(W) X 140(H) X 120(D) mm
Weight
0.5 kg
* All specifications and appearances are subject to change without notice.
28
Page 29

KMC_KIT_2_Manual_G09_120903.ai 29 2012/9/4 13:32:08KMC_KIT_2_Manual_G09_120903.ai 29 2012/9/4 13:32:08
Drum Kit List
NO. PRESET KIT
1
2
3
4
5
6
7
8
9
10
11
12
13
14
15
C
M
Y
CM
MY
CY
CMY
K
16
17
18
19
20
21
22
23
24
25
26
27
28
29
30
Standard 1
Pop Country
Standard 2
Funk 1
Funk 2
Fusion 1
Power Rock
Jazz Brush
Rock
Pop Rock
Fusion 2
Vintage
Latin Rock
Arena Rock
Banda
Ballad Rock
Disco
Prog Rock
Mambo
Songo
Beat Box 1
Hip Hop 1
Electro House
Break Beat
DubStep 1
Rap 1
Old Skool
Beat Box 2
DubStep 2
DrumNBass
NO. DEFAULT USER KIT
31
32
33
34
35
36
37
38
39
40
41
42
43
44
45
Standard 1
Pop Country
Standard 2
Funk 1
Funk 2
Fusion 1
Power Rock
Jazz Brush
Rock
Pop Rock
Fusion 2
Vintage
Latin Rock
Arena Rock
Banda
29
Page 30

KMC_KIT_2_Manual_G09_120903.ai 30 2012/9/4 13:32:08KMC_KIT_2_Manual_G09_120903.ai 30 2012/9/4 13:32:08
Drum Instrument List
NO. NAME
KICK
Standard Kick 1
1
Standard Kick 2
2
Classic Kick 1
3
Classic Kick 2
4
Camco Kick 1
5
Camco Kick 2
6
Rock Kick 1
7
Rock Kick 2
8
Rock Kick 3
9
Room Kick 1
10
Room Kick 2
11
Jazz Kick 1
12
Jazz Kick 2
13
Big Band Kick 1
14
Big Band Kick 2
15
Funk Kick 1
16
Funk Kick 2
17
Funk Kick 3
C
M
Y
CM
MY
CY
CMY
K
18
HipHop Kick 1
19
HipHop Kick 2
20
HipHop Kick 3
21
HipHop Kick 4
22
1969 Kick
23
1971 Kick
24
1976 Kick
25
Power Kick
26
R&B Kick
27
Voice Kick
28
Acoustic Kick 1
29
Acoustic Kick 2
30
Acoustic Kick 3
31
Acoustic Kick 4
32
Orchestra Kick
33
Step Kick
34
Teckno Kick
35
Drum & Bass Kick
36
Junkyard Kick
37
Noise Kick
38
Industry Kick
39
Lowfi Kick
40
Disco Kick
41
808 Kick
42
909 Kick
43
House Kick 1
44
House Kick 2
45
Electronic Kick 1
46
Electronic Kick 2
47
Electronic Kick 3
48
Electronic Kick 4
49
Electronic Kick 5
50
Electronic Kick 6
51
Electronic Kick 7
52
Electronic Kick 8
53
SNARE
Standard Snare 1
54
Standard Snare Rim 1
55
Standard Snare 2
56
Standard Snare Rim 2
57
Standard Snare 3
58
Standard Snare Rim 3
59
Standard Snare 4
60
Standard Snare Rim 4
61
R&B Snare
62
R&B Snare Stick
63
506 Snare
64
506 Snare Rim 1
65
506 Snare Rim 2
66
Classic Snare 1
67
Classic Snare Rim 1
68
Classic Snare 2
69
Classic Snare Rim 2
70
Acoustic Snare 1
71
Acoustic Snare Rim
72
Acoustic Snare 2
73
Rock Snare 1
74
Rock Snare Rim 1
75
Rock Snare 2
76
Room Snare 1
77
Room Snare 2
78
Room Snare 3
79
Steel Snare
80
Steel Snare Rim
81
Jazz Snare 1
82
Jazz Snare Rim 1
83
Jazz Snare 2
84
Jazz Snare Rim 2
85
Jazz Latin Snare
86
Big Band Snare
87
Camco Snare
88
Camco Snare Rim
89
Brush Snare 1
90
Brush Snare 2
91
Brush Snare Rim
92
Funk Snare
93
Funk Stick
94
Funk Band Snare
95
Funk Band Snare Rim
96
Funk Band Snare Stick
97
Fusion Snare
98
Fusion Snare Stick
99
Ringo Snare
100
Ringo Snare Rim
101
Snare Stick
102
Power Snare
103
HipHop Snare 1
104
HipHop Snare 2
105
1969 Snare
106
1969 Snare Rim
107
1971 Snare
108
1971 Snare Rim
109
1976 Snare
110
1976 Snare Rim
111
Step Snare
112
Step Snare Stick
113
House Snare 1
114
House Snare 2
115
House Snare 3
116
Teckno Snare 1
117
Teckno Snare 2
118
808 Snare
119
909 Snare
120
Drum & Bass Snare 1
121
Drum & Bass Snare 2
122
606 Snare
123
Electronic Snare 1
124
Electronic Snare 2
125
Electronic Snare 3
126
Electronic Snare 4
127
Electronic Snare 5
128
Noise Snare
129
TOM
Classic Tom 1
130
Classic 1 Tom Rim 1
131
Classic Tom 2
132
Classic 1 Tom Rim 2
133
Classic Tom 3
134
Classic 1 Tom Rim 3
135
Classic Tom 4
136
Classic 1 Tom Rim 4
137
Classic Tom 5
138
Classic 1 Tom Rim 5
139
Classic Tom 6
140
Classic 1 Tom Rim 6
141
Acoustic Tom 1
142
Acoustic Tom Rim 1
143
Acoustic Tom 2
144
Acoustic Tom Rim 2
145
Acoustic Tom 3
146
Acoustic Tom Rim 3
147
Acoustic Tom 4
148
Acoustic Tom Rim 4
149
Acoustic Tom 5
150
Acoustic Tom Rim 5
151
Acoustic Tom 6
152
Acoustic Tom Rim 6
153
Standard Tom 1
154
Standard Tom Rim 1
155
Standard Tom 2
156
Standard Tom Rim 2
157
Standard Tom 3
158
Standard Tom Rim 3
159
Standard Tom 4
160
Standard Tom Rim 4
161
Standard Tom 5
162
Standard Tom Rim 5
163
Standard Tom 6
164
Standard Tom Rim 6
165
Camco Tom 1
166
Camco Tom 2
167
Camco Tom 3
168
Camco Tom 4
169
Camco Tom 5
170
Camco Tom 6
171
Rock Tom 1
172
Rock Tom 2
173
Rock Tom 3
174
Rock Tom 4
175
Rock Tom 5
176
Rock Tom 6
177
Standard Tom 1
178
Standard Tom 2
179
Standard Tom 3
180
Standard Tom 4
181
Standard Tom 5
182
Standard Tom 6
183
Room Tom 1
184
Room Tom 2
185
Room Tom 3
186
Room Tom 4
187
Room Tom 5
188
Room Tom 6
189
Funk Tom 1
190
Funk Tom 2
191
Funk Tom 3
192
Funk Tom 4
193
Funk Tom 5
194
Funk Tom 6
195
Fusion Tom 1
196
Fusion Tom 2
197
Fusion Tom 3
198
30
Page 31

KMC_KIT_2_Manual_G09_120903.ai 31 2012/9/4 13:32:08KMC_KIT_2_Manual_G09_120903.ai 31 2012/9/4 13:32:08
Drum Instrument List
606 Crash
Fusion Tom 4
199
Fusion Tom 5
200
Fusion Tom 6
201
1969 Tom 1
202
1969 Tom 2
203
1969 Tom 3
204
1969 Tom 4
205
1971 Tom 1
206
1971 Tom 2
207
1971 Tom 3
208
1971 Tom 4
209
1976 Tom 1
210
1976 Tom 2
211
1976 Tom 3
212
1976 Tom 4
213
HipHop Tom 1
214
HipHop Tom 2
215
HipHop Tom 3
216
HipHop Tom 4
217
HipHop Tom 5
218
C
M
Y
CM
MY
CY
CMY
K
HipHop Tom 6
219
Jazz Tom 1
220
Jazz Tom 2
221
Jazz Tom 3
222
Jazz Tom 4
223
Jazz Tom 5
224
Jazz Tom 6
225
Brush 1 Tom 1
226
Brush 1 Tom 2
227
Brush 1 Tom 3
228
Brush 1 Tom 4
229
Brush 1 Tom 5
230
Brush 1 Tom 6
231
Brush 2 Tom Rim 1
232
Brush 2 Tom 2
233
Brush 2 Tom Rim 2
234
Brush 2 Tom 3
235
Brush 2 Tom Rim 3
236
Brush 2 Tom 4
237
Brush 2 Tom Rim 4
238
Brush 2 Tom 5
239
Brush 2 Tom Rim 5
240
Brush 2 Tom 6
241
Brush 2 Tom Rim 6
242
Tom Rim 1
243
Tom Rim 2
244
Tom Rim 3
245
Tom Rim 4
246
Timpani 1
247
Timpani 2
248
Timpani 3
249
Timpani 4
250
Step Tom 1
251
Step Tom 2
252
Step Tom 3
253
"Tom Rim"
254
606 Tom 1
255
606 Tom 2
256
606 Tom 3
257
606 Tom 4
258
606 Tom 5
259
606 Tom 6
260
808 Tom 1
261
808 Tom 2
262
808 Tom 3
263
808 Tom 4
264
808 Tom 5
265
808 Tom 6
266
Noise Tom 1
267
Noise Tom 2
268
Noise Tom 3
269
Electronic Tom 1
270
Electronic Tom 2
271
Electronic Tom 3
272
Electronic Tom 4
273
Electronic Tom 5
274
Electronic Tom 6
275
909 Tom 1
276
909 Tom 2
277
909 Tom 3
278
909 Tom 4
279
Junkyard Tom 1
280
Junkyard Tom 2
281
Junkyard Tom 3
282
RIDE
Standard 20” Ride
283
Standard 21” Ride
284
Standard 22” Ride
285
Standard Ride Bell
286
Standard 22” Ride Rim
287
Junkyard Break
288
Junkyard Metal
289
Dry Ride Bell
290
Light Flat Ride
291
Classic Ride
292
Classic Ride Rim
293
Classic Ride Bell
294
Acoustic Ride
295
Acoustic Ride Rim
296
Acoustic Ride Bell
297
Standard 19” Ride
298
Vintage Ride
299
Teckno Ride 1
300
Teckno Ride 2
301
Jazz Ride Bell
302
Brush Ride
303
Brush Ride Rim
304
Brush Ride Bell
305
Rock Ride 1
306
Rock Ride 2
307
Clean Pop Ride
308
Ride Edge 1
309
Ride Edge 2
310
Mute Ride Bell
311
Clean Pop Ride Bell
312
Flat Ride
313
60’s Ride
314
808 Ride
315
Voice Hi-hat Pedal
316
CRASH
Classic Crash 1
317
Classic Crash Rim 1
318
Classic Crash 2
319
Classic Crash Rim 2
320
Classic Crash 3
321
Standard Crash 1
322
Standard Crash Rim 1
323
Standard Crash 2
324
Standard Crash 3
325
Standard Crash 4
326
Rock Crash 1
327
Rock Crash 2
328
Rock Crash 3
329
Rock Crash 4
330
Rock Splash
331
Splash
332
Brush Crash 1
333
Brush Crash 2
334
China 1
335
China 2
336
China 3
337
China 4
338
Orchestra Crash
339
Orchestra Hit 1
340
Orchestra Hit 2
341
HipHop Crash
342
Junkyard Cymbal 1
343
Junkyard Cymbal 2
344
Cymbal Effect 1
345
Cymbal Effect 2
346
Drum & Bass Crash 1
347
808 Crash 1
348
808 Crash 2
349
808 Crash 3
350
351
Electronic Crash
352
606 Hi-hat Open
353
Industrial Short
354
Industrial Long
355
Standard Hi-hat Open 1
356
Standard Hi-hat Open 2
357
Classic Hi-hat Open
358
Pop Hi-hat Open
359
Rock Hi-hat Open 1
360
Rock Hi-hat Open 2
361
Jazz Hi-hat Open 1
362
Jazz Hi-hat Open 2
363
Brush Hi-hat Open
364
Mini Hi-hat Open
365
Junkyard Hi-hat Open
366
Noise Hi-hat Open
367
Electronic Hi-hat Open
368
808 Hi-hat Open 1
369
808 Hi-hat Open 2
370
909 Hi-hat Open
371
House Hi-hat Open
372
606 Hi-hat Open
373
Standard Half Open
374
Pop Half Open 1
375
Pop Half Open 2
376
Rock Half Open
377
Classic Half Open Rim
378
Jazz Half Open 1
379
Jazz Half Open 2
380
Brush Half Open
381
Mini Half Open
382
Junkyard Half Open Rim
383
Standard Hi-hat Close 1
384
Standard Hi-hat Close 2
385
Pop Hi-hat Close 1
386
Pop Hi-hat Close 2
387
Rock Hi-hat Close 1
388
Rock Hi-hat Close 2
389
Classic Hi-hat Close
390
Jazz Hi-hat Close
391
Brush Hi-hat Close
392
Mini Hi-hat Close
393
Junkyard Hi-hat Close
394
395
Noise Hi-hat Close
396
Electronic Hi-hat Close
397
808 Hi-hat Close 1
398
808 Hi-hat Close 2
399
909 Hi-hat Close
400
House Hi-hat Close
401
606 Hi-hat Close
402
Standard Hi-hat Pedal 1
31
Page 32

KMC_KIT_2_Manual_G09_120903.ai 32 2012/9/4 13:32:08KMC_KIT_2_Manual_G09_120903.ai 32 2012/9/4 13:32:08
Drum Instrument List
Standard Hi-hat Pedal 2
403
Classic Hi-hat Pedal
404
Pop Hi-hat Pedal
405
Rock Hi-hat Pedal 1
406
Rock Hi-hat Pedal 2
407
Jazz Hi-hat Pedal 1
408
Jazz Hi-hat Pedal 2
409
Brush Hi-hat Pedal
410
Mini Hi-hat Pedal
411
Junkyard Hi-hat Pedal
412
Noise Hi-hat Pedal
413
Electronic Hi-hat Pedal
414
808 Hi-hat Pedal 1
415
808 Hi-hat Pedal 2
416
House Hi-hat Pedal
417
606 Hi-hat Pedal
418
Standard Hi-hat Splash
419
Splash
420
Pop Splash
421
Rock Hi-hat Splash
C
M
Y
CM
MY
CY
CMY
K
422
Classic Splash 1
423
Classic Splash 2
424
Mini Splash
425
Mute
426
PERCUSSION
Metronome Bell
427
Metronome Click
428
Scratch
429
Scratch Push
430
DJ FX
431
High Q Zap
432
Ding Bell
433
Finger Snaps
434
Standard Clap
435
Tambourine
436
Agogo High
437
Agogo Low
438
Bell Tree
439
Bongo High
440
Bongo Low
441
Shaker
442
Conga Slap High
443
Conga Slap Mid
444
Conga Low
445
Open Conga
446
Conga Slap
447
Cowbell
448
Timbale High
449
Timbale Low
450
Timpani High
451
Timpani Low
452
Open Tabla High
453
Open Tabla Low
454
Slap Tabla
455
Mute Slap Tabla
456
Maracas
457
Short Whistle
458
Short Guiro
459
Long Guiro
460
Claves
461
Wood Block 1
462
Wood Block 2
463
Muted Cuica
464
Open Cuica
465
Muted Triangle
466
Open Triangle
467
Open Surdo
468
Cowbell 1
469
Cowbell 2
470
Cowbell 3
471
Cowbell 4
472
Cowbell 5
473
Cowbell 6
474
DJ 1
475
DJ 2
476
DJ 3
477
DJ 4
478
DJ 5
479
DJ 6
480
DJ 7
481
DJ 8
482
DJ 9
483
DJ 10
484
FX 1
485
FX 2
486
FX 3
487
FX 4
488
FX 5
489
FX 6
490
FX 7
491
HIHAT
Standard A
492
Standard B
493
Pop A
494
Pop B
495
Rock A
496
Rock B
497
Classic
498
Jazz A
499
Jazz B
500
Brush
501
Mini
502
Junk
503
Dirty
504
Electron
505
808 A
506
808 B
507
909
508
House
509
606
510
32
Page 33

KMC_KIT_2_Manual_G09_120903.ai 33 2012/9/4 13:32:09KMC_KIT_2_Manual_G09_120903.ai 33 2012/9/4 13:32:09
GM Drum Kit List
Note No. Standard 1 (bank 0 ) Standard 2 (bank 4 ) Room (bank 09 ) Rock (bank 16 )
27-D#1
28 E1
29-F1
30-F#1
31-G1
32-G#1
33-A1
34-A#1
35-B1
36-C2
37-C#2
38-D2
39-D#2
40-E2
41-F2
42-F#2
43-G2
44-G#2
45-A2
46-A#2
47-B2
48-C3
C
M
Y
CM
MY
CY
CMY
K
49-C#3
50-D3
51-D#3
52-E3
53-F3
54-F#3
55-G3
56-G#3
57-A3
58-A#3
59-B3
60-C4
61-
C#4
62-D4
63-D#4
64-E4
65-F4
66-F#4
67-G4
68-G#4
69-A4
70-A#4
71-B4
72-C5
73-C#5
74-D5
75-D#5
76-E5
77-F5
78-F#5
79-G5
80-G#5
81-A5
82-A#5
83-B5
84-C6
85-C#6
86-D6
87-D#6
High Q
Slap
Scratch Push
Scratch Pull
Sticks
Square Click
Metronome Click
Metronome Bell
Acoustic Bass Drum
Standard 1 Bass Drum
Side Stick
Standard 1 Snare
Hand Clap
Standard 1 Snare Rim
Standard 1 Tom 6
Standard 1 Hi-hat Close
Standard 1 Tom 5
Standard 1 Hi-hat Pedal
Standard 1 Tom 4
Standard 1 Hi-hat Open
Standard 1 Tom 3
Standard 1 Tom 2
Standard 1 Crash 1
Standard 1 Tom 1
Standard 1 Ride
Chinese Cymbal 1
Ride Bell
Tambourine
Splash Cymbal
Standard 1 Cowbell
Standard 1 Crash 2
Vibra-slap
Ride Cymbal
Hi Bongo
Low Bongo
Mute Hi Conga
Open Hi Conga
Low Conga
High Timbale
Low Timbale
High Agogo
Low Agogo
Cabasa
Maracas
Short Whistle
Long Whistle
Short Guiro
Long Guiro
Claves
Hi Wood Block
Low Wood Block
Mute Cuica
Open Cuica
Mute Triangle
Open Triangle
Shaker
Jingle Bell
Bell Tree
Castanets
Mute Surdo
Open Surdo
<<<<<<<<<Standard 2 Bass Drum
<Standard 2 Snare
<Standard 2 Snare Rim
Standard 2 Tom 6
Standard 2 Hi-hat Close
Standard 2 Tom 5
Standard 2 Hi-hat Pedal
Standard 2 Tom 4
Standard 2 Hi-hat Open
Standard 2 Tom 3
Standard 2 Tom 2
Standard 2 Crash 1
Standard 2 Tom 1
Standard 2 Ride
<<<<Standard 2 Cowbell
Standard 2 Crash 2
<<<<<<<<<<<<<<<<<<<<<<<<<<<<<<-
<<<<<<<<Room Bass Drum 1
Room Bass Drum 2
<Room Snare
<Room Snare Rim
Room Tom 6
Room Hi-hat Close
Room Tom 5
Room Hi-hat Pedal
Room Tom 4
Room Hi-hat Open
Room Tom 3
Room Tom 2
Room Crash 1
Room Tom 1
Room Ride
<Room Ride Bell
<Room Splash Cymbal
Room Cowbell
Room Crash 2
<<<<<<<<<<<<<<<<<<<<<<<<<<<<<<-
<<<<<<<<Rock Bass Drum 1
Rock Bass Drum 2
<Rock Snare
<Rock Snare Rim
Rock Tom 6
Rock Hi-hat Close
Rock Tom 5
Rock Hi-hat Pedal
Rock Tom 4
Rock Hi-hat Open
Rock Tom 3
Rock Tom 2
Rock Crash 1
Rock Tom 1
Rock Ride
<Rock Ride Bell
<Rock Splash Cymbal
Rock Cowbell
Rock Crash 2
<<<<-
<<<<<<<<<<<<<<<<<<<<<<<<<<-
33
Page 34

KMC_KIT_2_Manual_G09_120903.ai 34 2012/9/4 13:32:09KMC_KIT_2_Manual_G09_120903.ai 34 2012/9/4 13:32:09
GM Drum Kit List
Note No. Funk (bank 17 ) Electronic (bank 24 ) 808 (bank 25 ) House (bank 28 )
27-D#1
28 E1
29-F1
30-F#1
31-G1
32-G#1
33-A1
34-A#1
35-B1
36-C2
37-C#2
38-D2
39-D#2
40-E2
41-F2
42-F#2
43-G2
44-G#2
45-A2
46-A#2
47-B2
48-C3
C
M
Y
CM
MY
CY
CMY
K
49-C#3
50-D3
51-D#3
52-E3
53-F3
54-F#3
55-G3
56-G#3
57-A3
58-A#3
59-B3
60-C4
61-C#4
62-D4
63-D#4
64-E4
65-F4
66-F#4
67-G4
68-G#4
69-A4
70-A#4
71-B4
72-C5
73-C#5
74-D5
75-D#5
76-E5
77-F5
78-F#5
79-G5
80-G#5
81-A5
82-A#5
83-B5
84-C6
85-C#6
86-D6
87-D#6
<<<<<<<<Funk Bass Drum 1
Funk Bass Drum 2
<Funk Snare
<Funk Snare Rim
Funk Tom 6
Funk Hi-hat Close
Funk Tom 5
Funk Hi-hat Pedal
Funk Tom 4
Funk Hi-hat Open
Funk Tom 3
Funk Tom 2
Funk Crash 1
Funk Tom 1
Funk Ride
<<<<<Funk Crash 2
<<<<<<<<<<<<<<<<<<<<<<<<<<<<<<-
<<<<<<<<Electronic Bass Drum 1
Electronic Bass Drum 2
<Electronic Snare
<Electronic Snare Rim
Electronic Tom 6
Electronic Hi-hat Close
Electronic Tom 5
Electronic Hi-hat Pedal
Electronic Tom 4
Electronic Hi-hat Open
Electronic Tom 3
Electronic Tom 2
<Electronic Tom 1
<<<<<<<<<<<<<<<<<<<<<<<<<<<<<<<<<<<<<-
<<<<<<<<808 Bass Drum 1
808 Bass Drum 2
<808 Snare
<808 Snare Rim
808 Tom 6
808 Hi-hat Close
808 Tom 5
808 Hi-hat Pedal
808 Tom 4
808 Hi-hat Open
808 Tom 3
808 Tom 2
808 Crash 1
808 Tom 1
<<<<<<808 Crash 2
<<<<808 Mute Hi Conga
808 Open Hi Conga
808 Low Conga
<<<<<808 Maracas
<<<<808 Claves
<<<<<<<<<<<<-
<<<<<<<<House Bass Drum 1
House Bass Drum 2
<House Snare
House Hand Clap
House Snare Rim
House Tom 6
House Hi-hat Close
House Tom 5
House Hi-hat Pedal
House Tom 4
House Hi-hat Open
House Tom 3
House Tom 2
<House Tom 1
<<<<<<<<<<<<-
<<<<<<<<<<<<<<<<<<<<<<<<<-
34
Page 35

KMC_KIT_2_Manual_G09_120903.ai 35 2012/9/4 13:32:09KMC_KIT_2_Manual_G09_120903.ai 35 2012/9/4 13:32:09
GM Drum Kit List
Note No.
27-D#1
28 E1
29-F1
30-F#1
31-G1
32-G#1
33-A1
34-A#1
35-B1
36-C2
37-C#2
38-D2
39-D#2
40-E2
41-F2
42-F#2
43-G2
44-G#2
45-A2
46-A#2
47-B2
48-C3
C
M
Y
CM
MY
CY
CMY
K
49-C#3
50-D3
51-D#3
52-E3
53-F3
54-F#3
55-G3
56-G#3
57-A3
58-A#3
59-B3
60-C4
C#4
61-
62-D4
63-D#4
64-E4
65-F4
66-F#4
67-G4
68-G#4
69-A4
70-A#4
71-B4
72-C5
73-C#5
74-D5
75-D#5
76-E5
77-F5
78-F#5
79-G5
80-G#5
81-A5
82-A#5
83-B5
84-C6
85-C#6
86-D6
87-D#6
Jazz (bank 32 )
<<<<<<<<Jazz Bass Drum 1
Jazz Bass Drum 2
<Jazz Snare
<Jazz Snare Rim
Jazz Tom 6
Jazz Hi-hat Close
Jazz Tom 5
Jazz Hi-hat Pedal
Jazz Tom 4
Jazz Hi-hat Open
Jazz Tom 3
Jazz Tom 2
<Jazz Tom 1
Jazz Ride
<<<<<Chinese Cymbal 2
<<<<<<<<<<<<<<<<<<<<<<<<<<<<<<-
Brush (bank 40 )
<<<<<<<<Brush Bass Drum 1
Brush Bass Drum 2
<Brush Snare
<Brush Snare Rim
Brush Tom 6
<Brush Tom 5
<Brush Tom 4
<Brush Tom 3
Brush Tom 2
Brush Crash 1
Brush Tom 1
Brush Ride
<<<<<Brush Crash 2
<<<<<<<<<<<<<<<<<<<<<<<<<<<<<<-
Orchestra (bank 48 )
Concert Hi-hat Close
Concert Hi-hat Pedal
Concert Hi-hat Open
Concert Ride
<<<<Concert Bass Drum 1
Concert Bass Drum 2
<Concert Snare 1
Castanets
Concert Snare 2
Timpani F
Timpani F#
Timpani G
Timpani G#
Timpani A
Timpani A#
Timpani B
Timpani C
Timpani C#
Timpani D
Timpani D#
Timpani E
Timpani F
<<<Concert Crash 1
<Concert Crash 2
<<<<<<<<<<<<<<<<<<<<<<<<<<<<-
35
Page 36

KMC_KIT_2_Manual_G09_120903.ai 36 2012/9/4 13:32:09KMC_KIT_2_Manual_G09_120903.ai 36 2012/9/4 13:32:09
GM Backing Instrument List
PIANO
1 Acoustic Grand Piano
2 Bright Acoustic Piano
3 Electric Grand Piano
4 Honky-Tonk Piano
5 E.Piano 1
6 E.Piano 2
7 Harpsichord
8 Clavi
MALLET
9 Celesta
10 Glockenspiel
11 Music Box
12 Vibraphone
13 Marimba
14 Xylophone
15 Tubular Bells
16 Dulcimer
C
M
Y
CM
MY
CY
CMY
K
ORGAN
17 Drawbar Organ
18 Percussive Organ
19 Rock Organ
20 Church Organ
21 Reed Organ
22 Accordion
23 Harmonica
24 Tango Accordion
GUITAR
25 Nylon Guitar
26 Steel Guitar
27 Jazz Guitar
28 Clean Guitar
29 Muted Guitar
30 Overdriven Guitar
31 Distortion Guitar
32 Guitar Harmonics
BASS
33 Acoustic Bass
34 Finger Bass
35 Pick Bass
36 Fretless Bass
37 Slap Bass 1
38 Slap Bass 2
39 Synth Bass 1
40 Synth Bass 2
STRINGS
41 Violin
42 Viola
43 Celloi
44 Contrabass
45 Tremolo Strings
46 Pizzicato Strings
47 Orchestral Harp
48 Timpan
STRINGS ENSEMBLE
49 Strings Ensemble 1
50 Strings Ensemble 2
51 Synth Strings 1
52 Synth Strings 2
53 Choir Aahs
54 Voice Oohs
55 Synth Voice
56 Orchestra Hit
BRASS
57 Trumpet
58 Trombone
59 Tuba
60 Muted Trumpet
61 French Horn
62 Brass Section
63 Synth Brass 1
64 Synth Brass 2
REED
65 Soprano Sax
66 Alto Sax
67 Tenor Sax
68 Baritone Sax
69 Oboe
70 English Horn
71 Bassoon
72 Clarinet
PIPE
73 Piccolo
74 Flute
75 Recorder
76 Pan Flute
77 Blown Bottle
78 Shakuhachi
79 Whistle
80 Ocarina
LEAD
81 Lead1 (square)
82 Lead2 (sawtooth)
83 Lead3 (calliope)
84 Lead4 (chiff)
85 Lead5 (charang)
86 Lead6 (voice)
87 Lead7 (fifths)
88 Lead8 (bass & Lead)
PAD
89 Pad1 (newage)
90 Pad2 (warm)
91 Pad3 (Polysynth)
92 Pad4 (choir)
93 Pad5 (bowed)
94 Pad6 (metallic)
95 Pad7 (halo)
96 Pad8 (sweep)
EFFECTS
97 FX1 (rain)
98 FX2 (soundtrack)
99 FX3 (crystal)
100 FX4 (atmosphere)
101 FX5 (brightness)
102 FX6 (goblins)
103 FX7 (echoes)
104 FX8 (sci-fi)
ETHNIC
105 Sitar
106 Banjo
107 Shamisen
108 Koto
109 Kalimba
110 Bagpipe
111 Fiddle
112 Shanai
PERCUSSIVE
113 Tinkle Bell
114 Agogo
115 Steel Drums
116 Wood Block
117 Taiko Drum
118 Melodic Tom
119 Synth Drum
120 Reverse Cymbal
SOUND EFFECTS
121 Guitar Fret Noise
122 Breath Noise
123 Seashore
124 Bird Tweet
125 Telephone Ring
126 Helicopter
127 Applause
128 Gunshot
36
Page 37

KMC_KIT_2_Manual_G09_120903.ai 37 2012/9/4 13:32:09KMC_KIT_2_Manual_G09_120903.ai 37 2012/9/4 13:32:09
Song List
No.
1
2
3
4
5
6
7
8
9
10
11
12
13
14
15
C
M
Y
CM
MY
CY
CMY
K
16
17
18
19
20
21
22
23
24
25
26
27
28
29
30
31
32
33
34
35
36
37
38
39
40
Name
Drum Intro
Drum Main A
Drum Main B
R&B
Modern Dance
Cool Jazz
Modern Pop
Fusion 1
Funk 1
Big Band 1
Funk 2
Pop Funk 1
Fusion 2
Funk 3
Fusion 3
Funk 4
Fusion 4
Pop Funk 2
Electronic&Funk
Drum & Bass 1
Break Beat
Dance
Drum & Bass 2
Latin Dance 1
Latin Dance 2
Swing 1
Latin Jazz 1
Big Band 2
3/4 Jazz
Jazz 1
Latin Jazz 2
Swing 2
6/8 Ballad
Pop Ballad
Pop Bossa
16 Beat Pop
Pop Shuffle
Ballad
Samba 1
Latin Pop 1
Type
Loop
Loop
Loop
Loop
Loop
Loop
Loop
Loop
Loop
Loop
Loop
Loop
Loop
Loop
Loop
Loop
Loop
Loop
Loop
Loop
Loop
Loop
Loop
Loop
Loop
Loop
Loop
Loop
Loop
Loop
Loop
Loop
Loop
Loop
Loop
Loop
Loop
Loop
Loop
Loop
No.
41
42
43
44
45
46
47
48
49
50
51
52
53
54
55
56
57
58
59
60
61
62
63
64
65
66
67
68
69
70
71
72
73
74
75
76
77
78
79
80
Name
Mambo
Latin Rock 1
Latin Pop 2
Guitar Bossa
Country Blues
Rock
Reggae 1
60's Rock
Blues
World 1
World 2
Latin
Bossa
Samba 2
3/4 Pop
Pop
Jazz 2
Reggae 2
Reggae 3
Latin Rock 2
Fifths
Synth string
Brightness
Atmosphere
Chorused Piano
Bass Tap 1
Chorus Piano tap
Brightness Tap
Bass Tap 2
Pad Tap 1
Vibraphone
Bass Tap 3
Rain Tap
Pizzicato Strings
Bass Tap 4
Crystal
Xylophone
Bass Tap 5
Pad Tap 2
Glockenspiel Tap
Type
Loop
Loop
Loop
Loop
Loop
Loop
Loop
Loop
Loop
Loop
Loop
Loop
Loop
Loop
Loop
Loop
Loop
Loop
Loop
Loop
Hit
Hit
Hit
Hit
Hit
Tap
Tap
Tap
Tap
Tap
Tap
Tap
Tap
Tap
Tap
Tap
Tap
Tap
Tap
Tap
37
Page 38

KMC_KIT_2_Manual_G09_120903.ai 38 2012/9/4 13:32:09KMC_KIT_2_Manual_G09_120903.ai 38 2012/9/4 13:32:09
Pattern List
BEAT
No.
1
2
3
4
5
6
7
8
9
10
11
12
13
14
15
16
17
18
C
M
Y
CM
MY
CY
CMY
K
19
20
RHYTHM
No.
1
2
3
4
5
6
7
8
9
10
11
12
Name
Kit Bank
Beat 1
Beat 2
Beat 3
Beat 4
Beat 5
Beat 6
Beat 7
Beat 8
Beat 9
Beat 10
Beat 11
Beat 12
Beat 13
Beat 14
Beat 15
Beat 16
Beat 17
Beat 18
Beat 19
Beat 20
Name
Kit Bank
Funk 1
Funk 2
HipHop 1
HipHop 2
Jazz 1
Jazz 2
Latin 1
Latin 2
Pop Rock 1
Pop Rock 2
Rock
6/8 Pop Rock
0
0
0
0
0
0
0
0
0
0
0
0
0
0
0
0
0
0
0
0
0
0
0
0
0
0
0
0
0
0
0
0
Beat
4/4
4/4
4/4
4/4
4/4
4/4
4/4
4/4
4/4
4/4
4/4
4/4
4/4
4/4
4/4
4/4
4/4
4/4
4/4
4/4
Beat
4/4
4/4
4/4
4/4
4/4
4/4
4/4
4/4
4/4
4/4
4/4
6/8
Tempo
100
100
100
100
100
100
100
100
100
100
100
100
100
100
100
100
100
100
100
100
Tempo
110
90
90
113
157
187
190
200
105
97
100
125
Measure
4
4
4
4
4
4
4
4
4
4
4
4
4
4
4
4
4
4
4
4
Measure
4
4
4
4
4
4
4
4
4
4
4
4
38
PATTERN
No.
1
2
3
4
5
6
7
8
9
10
Name
Funk
HipHop
Latin Jazz
6/8 Ballad
Bossanova
R&B
3/4 Jazz
Reggae
Rock
Fusion
Kit Bank
17
25
40
8
17
25
40
0
0
0
Beat
4/4
4/4
4/4
6/8
4/4
4/4
3/4
4/4
4/4
4/4
Tempo
120
110
130
96
82
86
120
78
100
103
Measure
4
4
8
4
8
4
10
4
4
4
Page 39

KMC_KIT_2_Manual_G09_120903.ai 39 2012/9/4 13:32:09KMC_KIT_2_Manual_G09_120903.ai 39 2012/9/4 13:32:09
NORMAL MODE
Parameter List
KIT
Parameter
Kit Number
Kit Volume
Reverb
EQ High
EQ Middle
EQ Low
Abbreviation
NUM
VOL
REV
EQH
EQM
EQL
Value
1—45
0—32
ON / OFF
-12 -- +12
-12 -- +12
-12 -- +12
SONG
Parameter
Song Number
Accomp Volume of Song
Drum Volume of Song
Abbreviation
NUM
ACC
DRM
Value
1—80
0—32
0—32
UTILITY
C
M
Y
CM
MY
CY
CMY
K
Parameter
Pad Sensitivity
Pad Threshold
Crosstalk
Curve
Rim Sensitivity
Splash Sensitivity
Local on/off
GM on/off
Abbreviation
SEN
THR
CRO
CUR
R-S
S-S
LOC
GM
Value
1—16
0—16
1—16
1—6
1—16
1—9
ON/OFF
ON/OFF
TEMPO
Parameter
TEMPO
Abbreviation
BPM
Value
30—280
VOICE
Parameter
Voice Number
Voice Volume
Voice Pan
Voice Pitch
Voice Reverb
MIDI Note
Pad Song Switch
Pad Song Number
CLICK
Parameter
Signature
Interval
Click Volume
Click Voice
RECORD
Parameter
Song Number
Kit
Tempo
Signature
Interval
Drum Off
Pre Count
Abbreviation
NUM/H-C
VOL
PAN
PIT
REV
MID
P-S
P-N
Abbreviation
SIG
INT
VOL
VOC
Abbreviation
SNG
KIT
BPM
SIG
INT
DRM
PRC
Value
1—510/ 1—19
0—32
-8 -- +8
-8 -- +8
0—16
0—127
ON / OFF
1—80
Value
0–9/2, 0–9/4, 0–9/8, 0–9/16
1–2, 3–8, 1–4, 1–8,1-12, 1-16
0—32
1—5
Value
---/1—60
1—45
30—280
1–9/2, 1–9/4, 1–9/8, 1–9/16
1–2, 3–8, 1–4, 1–8,1-12, 1-16
---/ON/OFF
ON/OFF
LEARNING MODE
BEAT
Parameter
Beat Type
Drum Volume
RHYTHM
Parameter
Rhythm Type
Level
Drum Volume
Abbreviation
Abbreviation
BEA
DRM
RHM
LEV
VOL
Value
1--20
0--32
Value
1--12
1--6
0--32
PATTERN
Parameter
Pattern Type
Level
Accompany Volume
Drum Volume
Abbreviation
PTN
LEV
ACC
DRM
Value
1--10
1--5
0--32
0--32
39
Page 40

KMC_KIT_2_Manual_G09_120903.ai 40 2012/9/4 13:32:10KMC_KIT_2_Manual_G09_120903.ai 40 2012/9/4 13:32:10
MIDI Implementation Chart
Function
Basic
Channel
Mode
Note
Number
Velocity
After
Touch
Pitch Bend
Control
Change
C
M
Y
CM
MY
CY
CMY
K
Program
Change
System Exclusive
System
Common
System
Real Time
Aux
Messages
Default
Changed
Default
Messages
Altered
: True Voice
Note On
Note Off
Key’s
Ch’s
0
1
5
6
7
10
11
64
65
66
67
80
81
91
93
120
121
123
: True Number
: Song Position
: Song Select
: Tune
: Clock
: Commands
: Local On/off
: All Notes Off
: Active Sensing
: Reset
Transmitted
10 ch
×
×
×
***********
0—127
***********
99H,V=1-127
×(99H,V=0)
Ч
Ч
Ч
Ч
Ч
Ч
Ч
Ч
Ч
Ч
Ч
Ч
Ч
Ч
Ч
Ч
Ч
Ч
Ч
Ч
Ч
Ч
ЧЧЧЧЧЧЧ
Ч
Ч
Ч
Ч
×
×
×
×
Recognized
1-16
×
×
×
***********
0-127
0-127
×
×
0-127
×
×
×
×
×
×
×
×
Remarks
Bank Select
Modulation
Portamento Time
Data Entry
Volume
Pan
Expression
Sustain Pedal
Portamento On/Off
Sostenuto Pedal
Soft Pedal
Reverb Program
Chorus Program
Reverb Level
Chorus Level
All Sound Off
Reset All Controllers
All Notes Off
Start And Stop Only
KIT_2_G09
 Loading...