

Page 1
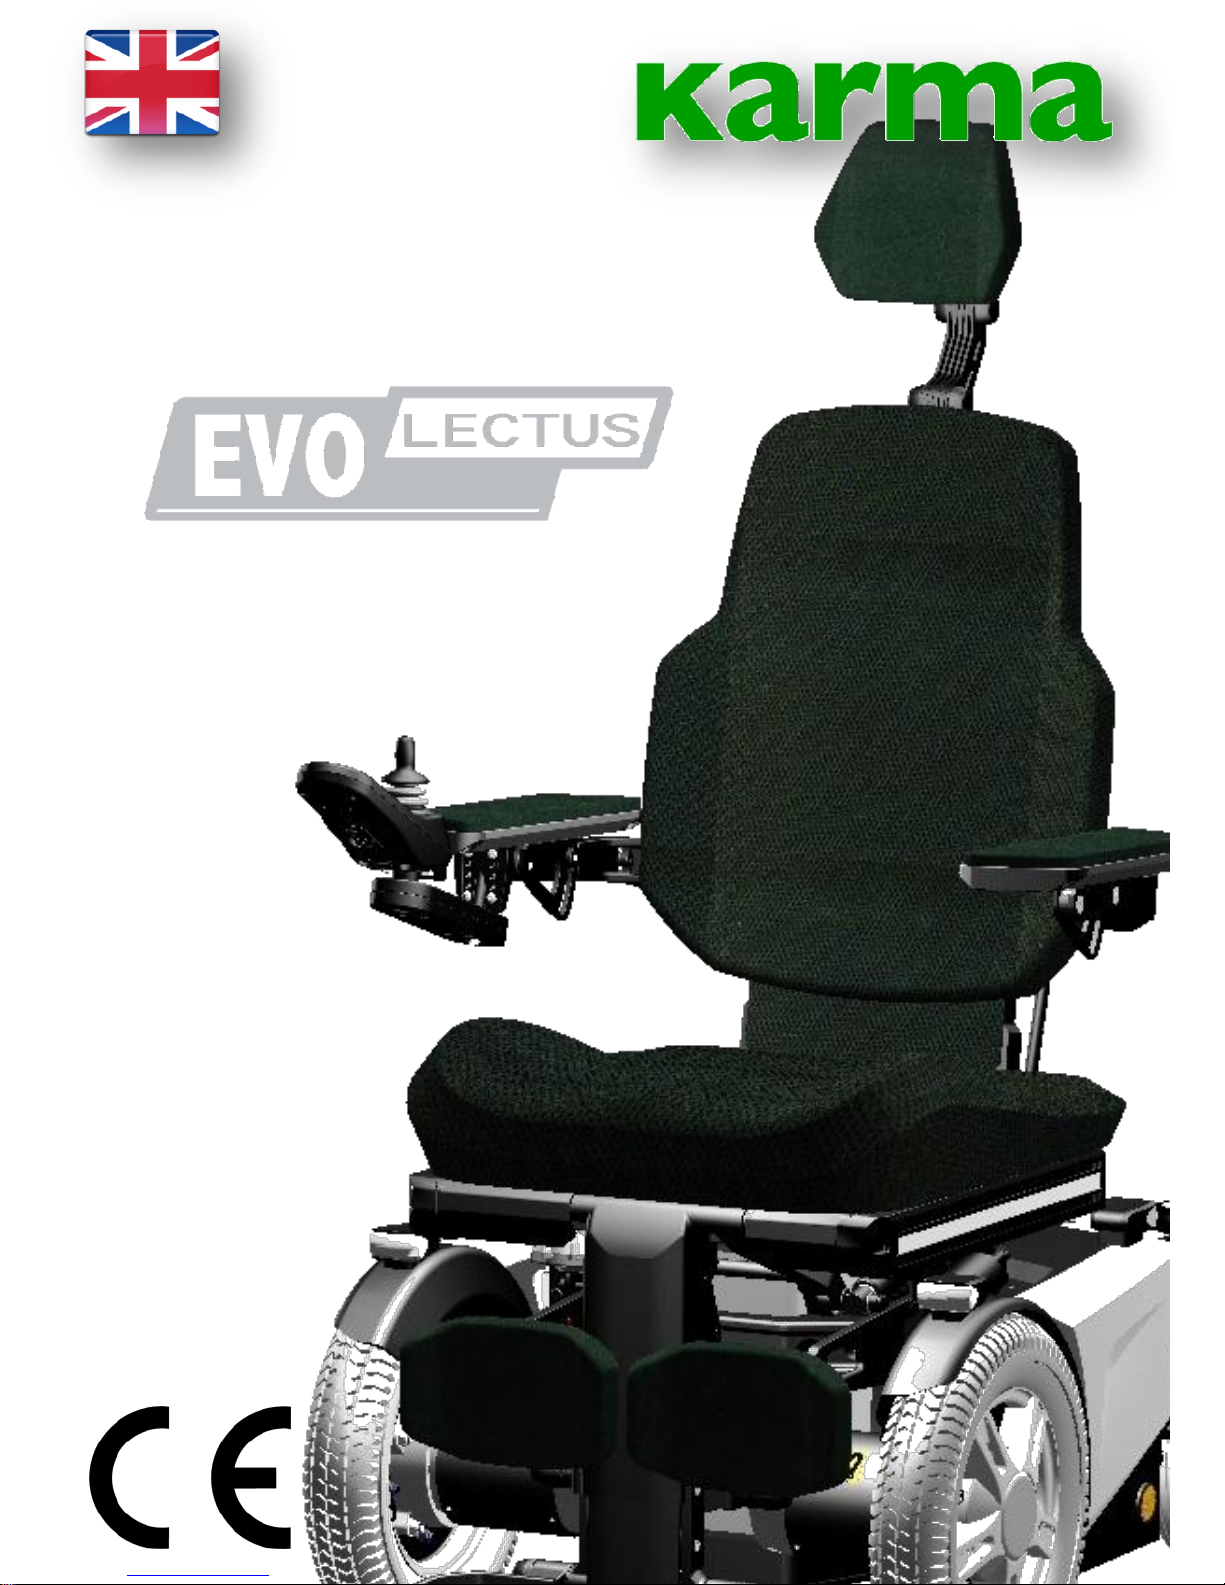
1
user manual
Page 2

2
release: 2015-08-22
Page 3

3
1. index
1. index _______________________________________________________ 3
2. how to contact Karma _________________________________________ 9
3. declaration of conformity ______________________________________ 10
4. introduction _________________________________________________ 11
chassis number _______________________________________________ 11
chassis serial plate _____________________________________________ 11
SN: stands for the chassis serial number. ________________________ 12
5. used symbols for warning, caution and note _______________________ 13
6. warranty ___________________________________________________ 14
7. intended use / intended user ___________________________________ 15
8. intended environment _________________________________________ 15
9. tyre pressure _______________________________________________ 15
10. the wheelchair _____________________________________________ 16
10.1. chassis _______________________________________________ 16
10.1.1 chassis suspension ___________________________________ 16
10.1.2 transport fixation loops ________________________________ 17
10.1.3 lights en reflectors ____________________________________ 17
10.1.4 battery compartments _________________________________ 18
10.1.5 main fuse ___________________________________________ 20
10.1.6 seat lift (optional) _____________________________________ 21
10.2 seat ___________________________________________________ 22
10.2.1 upholstered seat cushion ______________________________ 22
10.2.2 seat rail ____________________________________________ 22
10.2.3 seat tilt (optional) _____________________________________ 23
10.2.4 upholstered backrest __________________________________ 24
10.2.5 power recline backrest (optional) ________________________ 24
Page 4

4
10.2.6 upholstered armrest __________________________________ 25
10.2.7 legrest _____________________________________________ 25
10.2.8 powered legrest adjustment (optional) ____________________ 25
10.2.9 upholstered headrest (optional) _________________________ 26
10.2.10 upholstered calf support (optional) ______________________ 27
10.2.11 upholstered lateral support (optional) ____________________ 27
10.2.12 upholstered hip support (optional) ______________________ 28
10.2.13 positioning belt (optional) _____________________________ 28
10.3 the controls _____________________________________________ 29
10.3.1 side steering control __________________________________ 29
10.3.2 desktop control (optional) ______________________________ 29
11. the first set up ______________________________________________ 30
11.1 chassis suspension ______________________________________ 30
11.1.1 spring setting ________________________________________ 30
11.1.2 damper setting ______________________________________ 32
11.2 seat adjustments ________________________________________ 33
11.2.1 seat depth __________________________________________ 33
11.2.2 seat width __________________________________________ 36
11.2.3 armrest width ________________________________________ 37
11.2.4 armrest height _______________________________________ 40
11.2.5 armrest angle _______________________________________ 41
11.2.6 armrest depth _______________________________________ 42
11.2.7 armrest inside angle __________________________________ 43
11.2.8 legrest length ________________________________________ 44
11.2.9 legrest angle ________________________________________ 45
11.2.10 footplate angle ______________________________________ 46
11.2.11 calf support settings _________________________________ 47
11.2.12 headrest settings ____________________________________ 49
11.2.13 hip support settings __________________________________ 51
Page 5

5
11.2.13.2 setting the height position of the hip support _____________ 52
11.2.14 lateral support settings _______________________________ 54
11.3 positioning belts _________________________________________ 55
11.4 control settings __________________________________________ 56
11.4.1 height adjustment side control: _________________________ 56
11.4.2 depth adjustment side control ___________________________ 56
12 control panel _______________________________________________ 57
12.1 charging socket _________________________________________ 57
12.2 joystick ________________________________________________ 57
12.3 display ________________________________________________ 58
12.3.1 battery indicator (top bar) ______________________________ 58
12.3.2 focus light (top bar) ___________________________________ 58
12.3.3 profile name (main screen) _____________________________ 59
12.3.4 clock (main screen) ___________________________________ 59
12.3.5 speed display (main screen) ____________________________ 59
12.3.6 speed bar (main screen) _______________________________ 60
12.3.7 inhibit (main screen) __________________________________ 60
12.3.8 set functions (main screen) _____________________________ 60
12.3.9 additional options (main screen) _________________________ 61
12.3.10 message screen (main screen) _________________________ 61
12.3.11 current profile (base bar) ______________________________ 63
12.3.12 motor temperature (base bar) __________________________ 63
12.3.13 control system temperature (base bar) ___________________ 63
12.3.14 wheelchair lock _____________________________________ 63
12.4 buttons ________________________________________________ 65
12.4.1 on/off button ________________________________________ 65
12.4.2 horn button _________________________________________ 65
12.4.3 speed decrease button ________________________________ 65
12.4.4 speed increase button _________________________________ 65
Page 6

6
12.4.5 mode button ________________________________________ 66
12.4.6 profile button ________________________________________ 66
12.4.7 hazard Warning Button and LED ________________________ 66
12.4.8 lights Button and LED _________________________________ 66
12.4.9 left Indicator Button and LED ___________________________ 67
12.4.10 right Indicator Button and LED _________________________ 67
12.5 jack sockets ____________________________________________ 67
12.5.1 external profile switch jack _____________________________ 67
12.5.2 external on/off switch jack ______________________________ 67
12.6 R-net Connectors ________________________________________ 68
12.6 joystick________________________________________________ 69
13 electric system _____________________________________________ 70
13.1 batteries _______________________________________________ 70
13.2 fuses __________________________________________________ 71
14 using the wheelchair _________________________________________ 72
14.1 general warnings and advices ______________________________ 72
14.2 use in combination with other products _______________________ 73
14.3 hot and cold surfaces _____________________________________ 73
14.4 danger of pinching _______________________________________ 74
14.5 surroundings ___________________________________________ 75
14.6 precautions to prevent dangerous situations ___________________ 75
14.7 use on slopes: driving on downhill slopes _____________________ 76
14.8 use on slopes: driving on uphill slopes _______________________ 77
14.9 driving on sideways slopes ________________________________ 79
14.10 obstacle climbing _______________________________________ 80
14.11 use in presence of electromagnetic fields, e.g. from cell phones. __ 81
15 driving the wheelchair ________________________________________ 82
15.1 driving in general ________________________________________ 82
15.2 driving technique ________________________________________ 83
Page 7

7
15.3 stopping the wheelchair ___________________________________ 84
16 using the powered seat functions _______________________________ 84
17 using additional function of the wheelchair menu ___________________ 85
17 handling the mechanical brakes ________________________________ 86
17.1 release the mechanical brakes _____________________________ 86
18 charging the maintenance free batteries __________________________ 87
18.1 battery level ____________________________________________ 87
18.2 charging socket _________________________________________ 88
18.3 disposal of broken or worn out batteries ______________________ 90
19 transport of the wheelchair ____________________________________ 91
19.1 transportation guideline ___________________________________ 93
19.2 safety belt ______________________________________________ 94
19.3 transportation on an airplane _______________________________ 97
20 maintenance and repairs ______________________________________ 98
20.1 battery charging _________________________________________ 98
20.2 short term storage _______________________________________ 98
20.3 long term storage ________________________________________ 99
20.4 tools _________________________________________________ 100
20.5 wheels and tires ________________________________________ 101
20.5.1 puncture repair _____________________________________ 101
exploded view of front wheel __________________________________ 101
20.6 cleaning ______________________________________________ 102
20.6.1 upholstery, cloth / 3d mesh ____________________________ 102
20.6.2 metal surfaces ______________________________________ 102
20.6.3 plastic covers ______________________________________ 102
20.7 brake release, freewheel mode ____________________________ 103
20.8 battery replacement _____________________________________ 103
20.9 replacing the main fuse __________________________________ 105
21 Refurbishment and re-use of the product. _______________________ 106
Page 8

8
22 disposal of the product ______________________________________ 106
23 trouble shooting ____________________________________________ 107
23.1 diagnostics R-Net LCD ___________________________________ 108
24 technical specifications ______________________________________ 109
25 accessories _______________________________________________ 111
Page 9

9
2. how to contact Karma
head office Karma
Karma Medical
NO.2363, Sec. 2
University Road
Min-Hsiung Shiang
Chia-Yi 621
Taiwan
www.karma.com.tw
European office for sales and service:
Karma Europe BV
Euregiopark 12
6467 JE Kerkrade
Netherlands
phone: +31 (0)45 820 01 50
facsimile: +31 (0)45 820 01 59
mail: info@karma-europe.com
web: www.karma-europe.com
Produced and published by Karma Medical, Taiwan
Technical changes and print errors prohibited.
Page 10
10
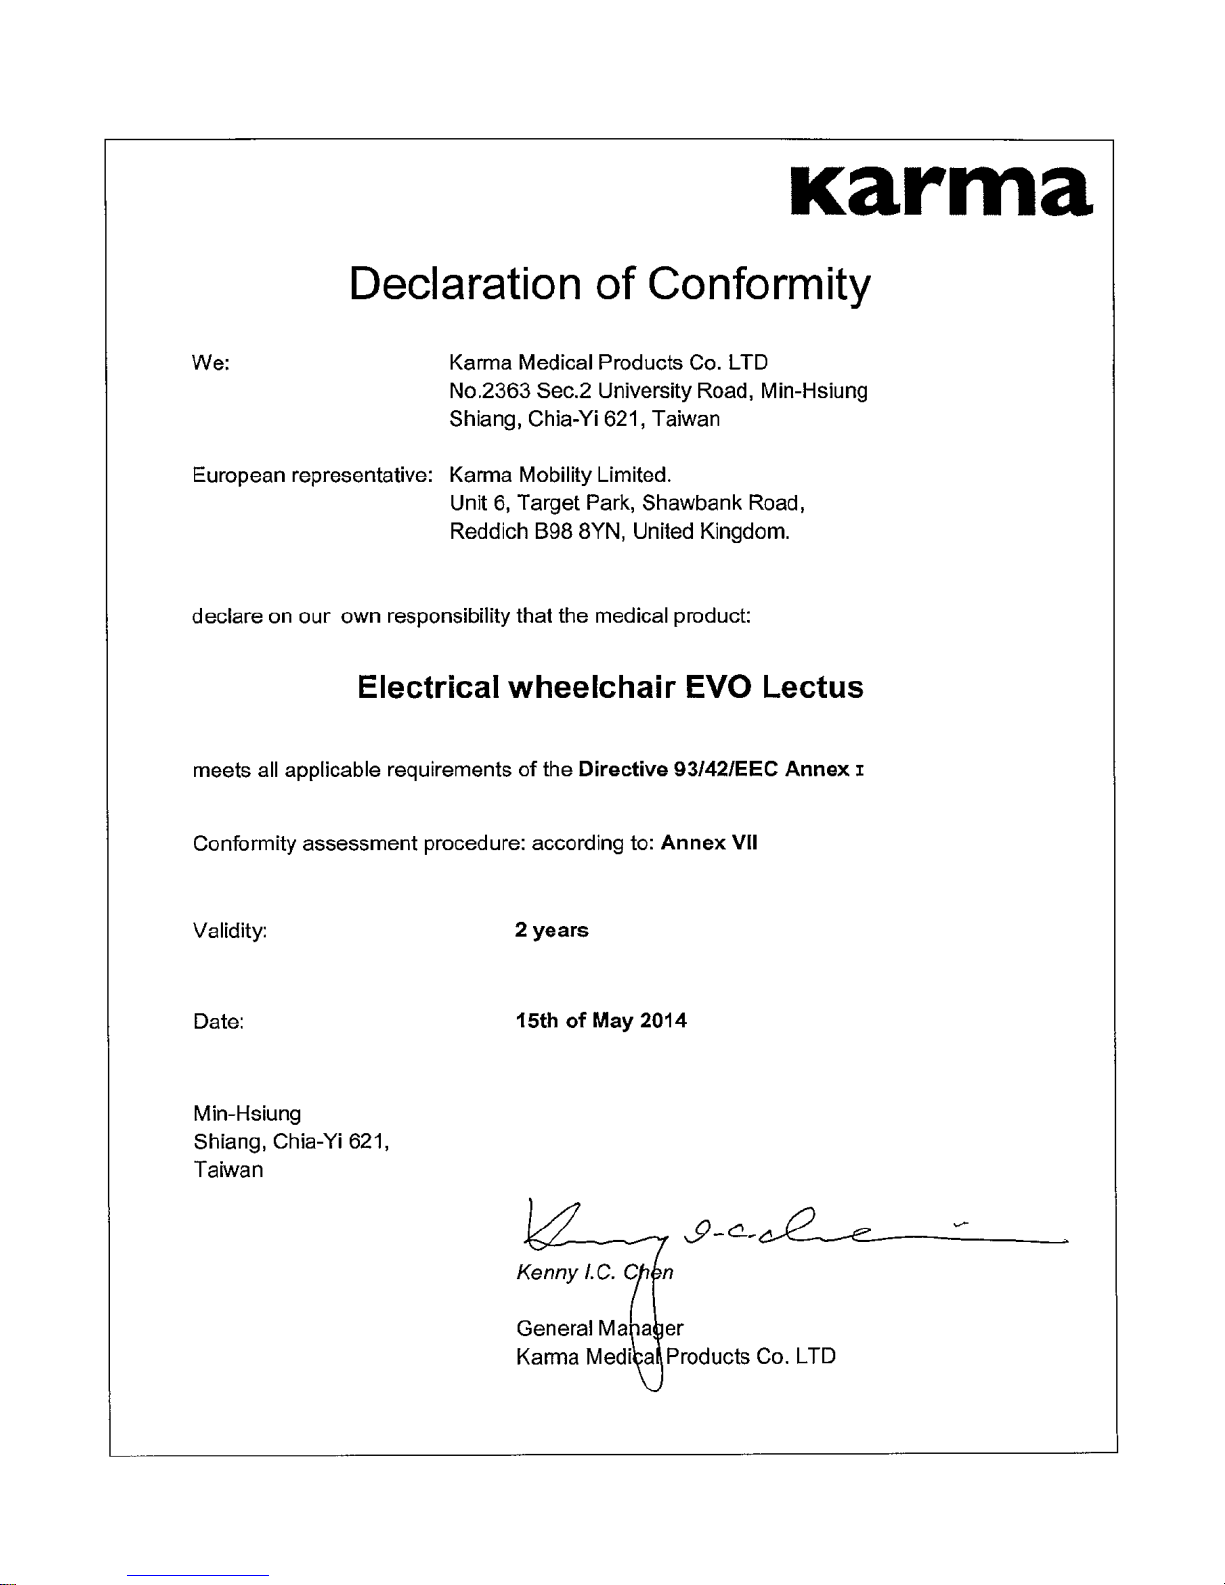
3. declaration of conformity
Page 11
11
4. introduction
Congratulation with you new Karma product! This product has been made with
great care and dedication. The Karma product will increase your freedom of
mobility and independence. Karma and it resellers all over the world are there
to support in any way. So if you have questions r suggestions about our
products, do not hesitate to get in contact with us at info@karma-europe.com.
Before you use the Karma product, we strongly recommend you to read this
manual carefully and always keep it with your product. This way you are
always able to find additional information when needed.
Karma runs the policy of continuously product improvement. Therefore
pictures of products or options as shown in this manual might be different from
what you see in this manual. Karma reserves the right to make changes to the
product without prior notice.
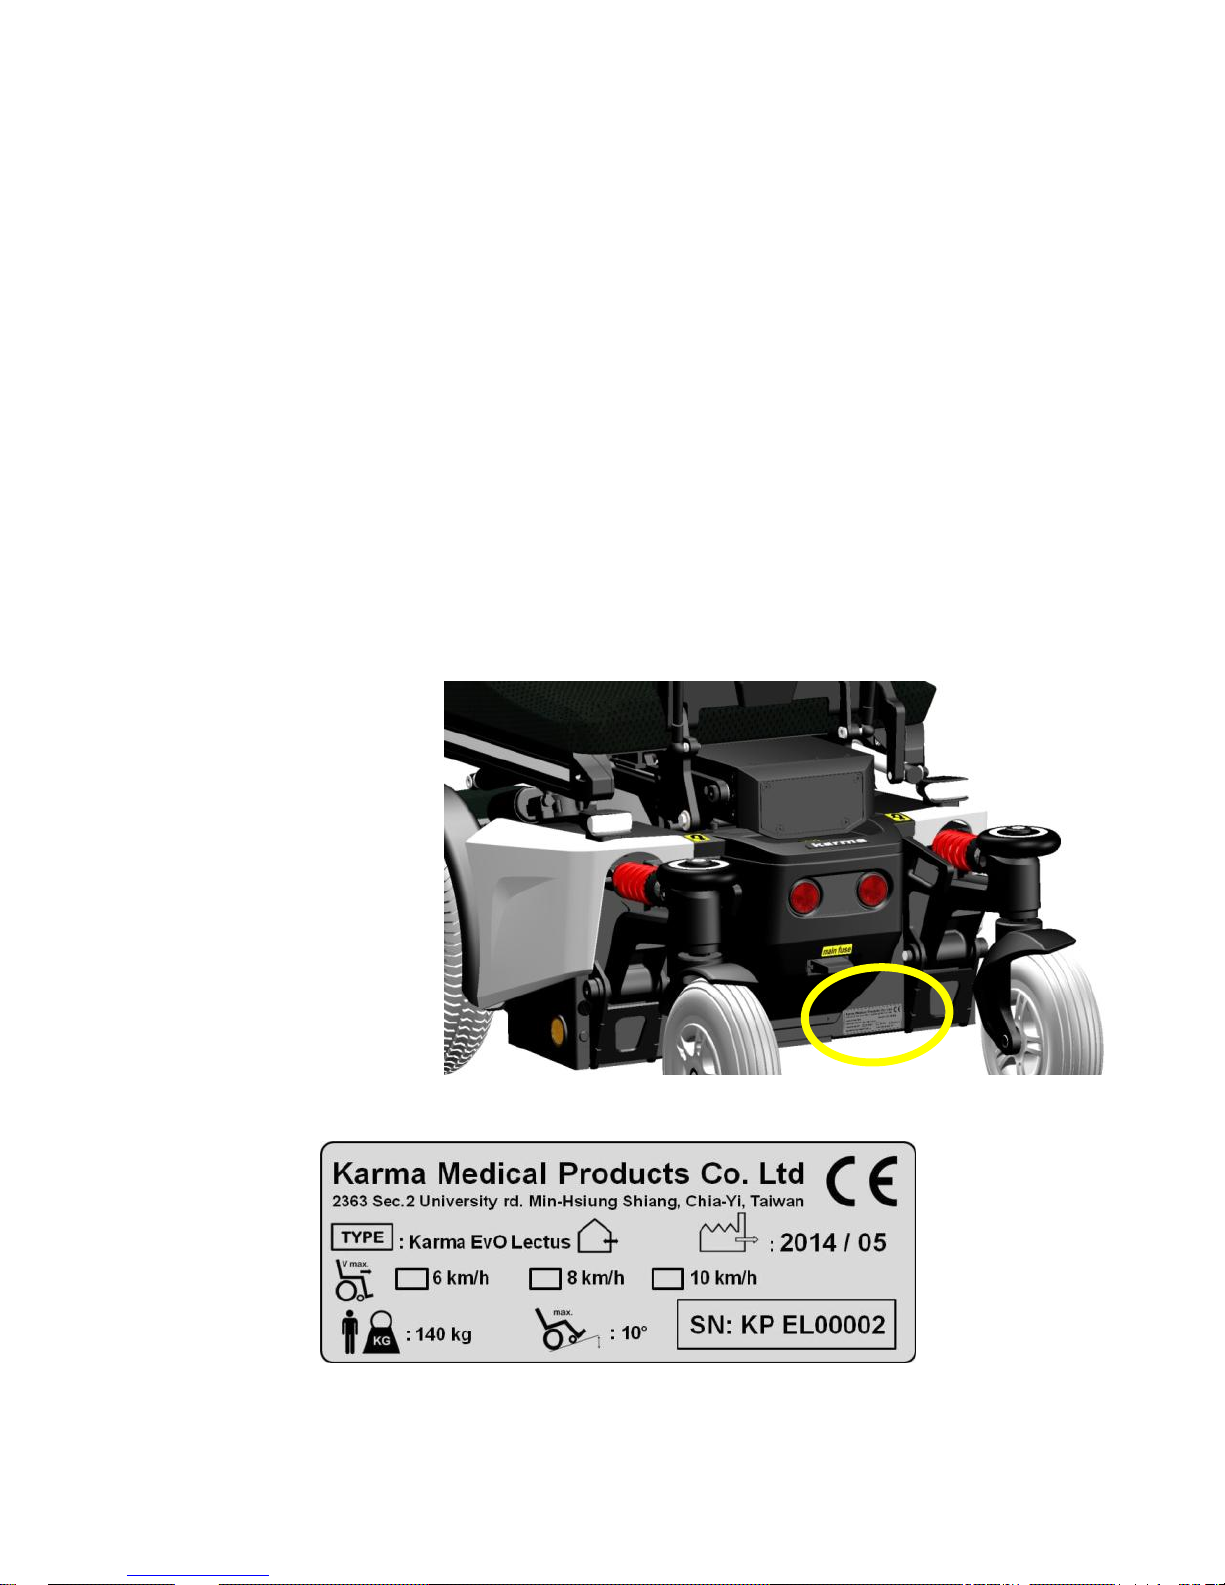
chassis number
The chassis number is
a very important
number. Your wheelchair will be stored in
our data system under
this main number. You
can find the number
on the rear end of the
chassis.
chassis serial plate
Page 12
12
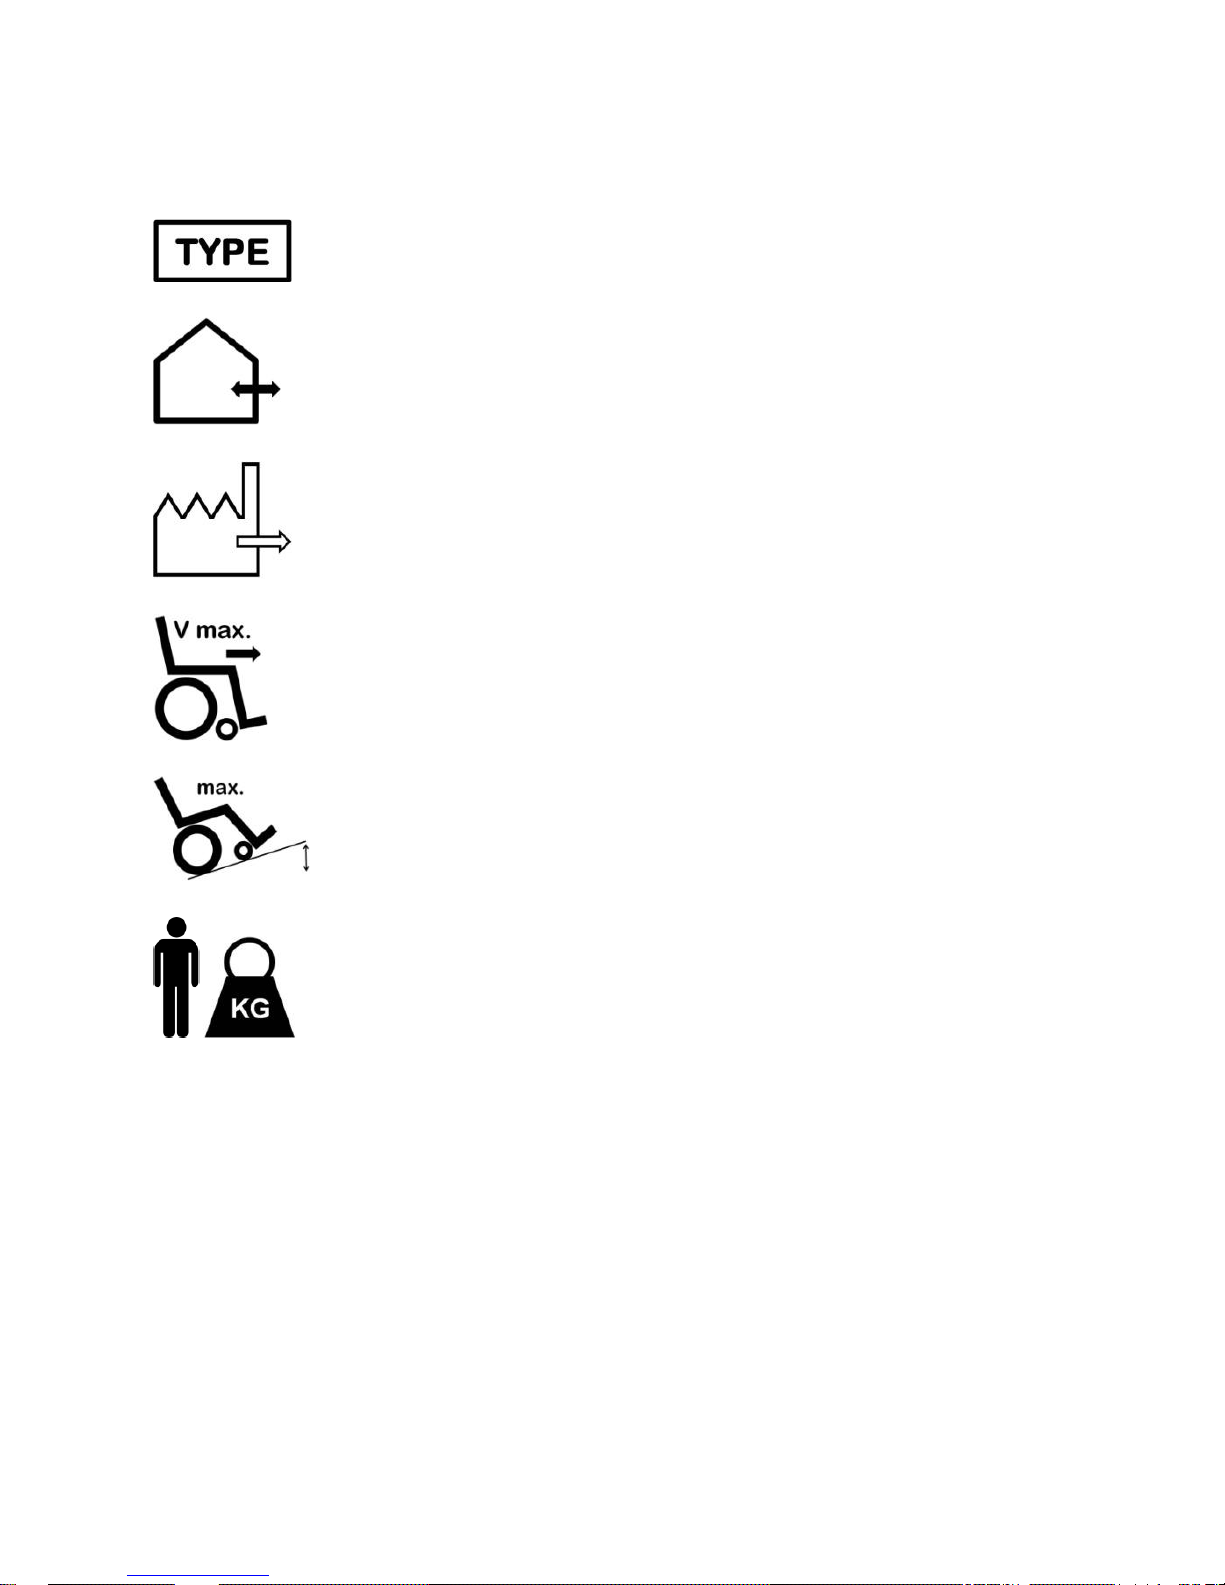
The used symbols on the chassis plate are explained below:
describes the model and type of the product.
stands for indoor- and outdoor use (Class B).
stands for the date of production.
this icon stands for the maximum driving speed.
this icons stands for the maximum slope to drive on.
this icon stands for the maximum user weight.
SN: stands for the chassis serial number.
Page 13
13
5. used symbols for warning, caution and note
General warnings are indicated by a symbol. There are three levels of
warnings:
1. warning
2. caution
3. note
If you see this sign please use extreme caution where this symbol
appears. Neglecting these warnings can lead to personal or material
damage.
If you see this symbol, use caution to prevent dangerous situations.
If you see this symbol we provide additional information which might be
good to know. Please take notice if this information.
● before using the wheelchair, you should read this manual to get familiar
with this product.
● Make sure the local reseller has set up the product in a proper way to
exactly fit your needs and requirements.
● always be accompanied by a attendant person when you drive the
wheelchair for the first time.
● the first drive should take place in an safe and wide area so you can
get acquainted to your wheelchair without any danger.
● Always start to drive the wheelchair in the lowest possible driving
speed first.
Page 14

14
6. warranty
Karma Medical supplies two years of warranty on this product. Your local
supplier will carry out this warranty. For batteries and battery charger you
receive one year warranty.
For a warranty claim you get in contact with our local authorized Karma
reseller or directly with Karma Europe BV. Make sure you also provide the
chassis serial number of your product.
The warranty does not apply to damage or faults of the product caused by
wrong or improper use, or neglected maintenance. The evaluation of it is the
privilege of Karma Medical or a representative to be appointed by Karma
Medical.
This guarantee does not apply to components susceptible to wear such as
tyres, seat covers, arm rests etc..
Karma Medical reserves the right to alter the specifications at any time. No
responsibility can be accepted for any changes in the specifications.
Change of specification can be caused by e.g. availability of parts, product
improvement based on market experience, changed legislations etc.
The use of non original parts on this product can lead to personal or
material damage. Karma Medical cannot be held responsible for these
results.
Repairs executed by unauthorized persons can lead to personal or
material damage. Karma Medical cannot be held responsible for these
results.
If you have any doubt about the service provided to your wheelchair,
please contact Karma Europe BV for information.
Page 15

15
7. intended use / intended user
The EvO powered wheelchair is meant to provide mobility to persons who are
not able to walk, stand or use a manual wheelchair, but who are very well able
to control and use the interface of a powered wheelchair. Apart from the
horizontal mobility, the EvO powered wheel provides the user with mobility in
vertical direction. This for example to reach light switches, a door bell and
doorknobs. The wheelchair is designed for a maximum user weight of 140 kg.
It is strongly suggested to have the use of the wheelchair evaluated by a
trained doctor, therapist or other qualified and trained staff.
This wheelchair is not suitable for persons who do not have the cognitive skills
to drive a powered wheelchair by themselves. Also it is not suitable for visually
impaired persons.
8. intended environment
The EvO powered wheelchair is not restricted to only inside or only outside
use. Because the large driving wheels are placed in front, the wheelchair is
extremely maneuverable and is able to cope with many terrain differences.
This, combined with the compact size of the EvO and the excellent speed
range and battery capacity, makes the wheelchair suitable for both indoor and
outdoor use. It is allowed to use the wheelchair in different weather conditions.
It can be used at temperatures of -25 degrees up to maximum 55 degrees
Celsius. It however must be noticed, that metal or plastic surfaces of the
wheelchair can become very hot when exposed to direct sun for longer time.
Because of the harmful combination of salt water and sand it is advised not to
use the wheelchair on beaches. We advise to clean the wheelchair after
having been in contact with sand and/or salt water as described in the
paragraph “cleaning”.
9. tyre pressure
The EvO uses air filled front tyres and solid or air filled tyres in the rear. The
choice of having solid or air filled rear tyres is made by the user during the
ordering of the wheelchair. In order to prevent tyre damage and to preserve
the performance of the wheelchair, the tyre pressure must be checked at least
on a monthly basis. The tyre pressure should be:
Large front air filled tyres : max. 300 Kpa / 43.5 PSI / 3 bar
Small rear air filled tyres : max. 200 Kpa / 29.0 PSI / 2 bar
The tire pressure is also show on the stickers in the rims of the chassis.
Page 16

16
10. the wheelchair
10.1. chassis
The chassis is the base of the wheelchair. It contains wheels, drive motors,
batteries, electronics and seat lift. The steel parts of the chassis are
electrolytic anodized and powder coated to ensure a long life without
corrosion.
Each of the front wheels is propelled by a powerful drive motor. These motors
also take care for the steering of the wheelchair. With this system it is possible
to turn on the spot. This makes the wheelchair optimal for indoor use.
10.1.1 chassis suspension
The chassis has independent suspension on each of the four wheels. The
stiffness can be adjusted to your personal requirements.
front suspension rear suspension
Page 17
17
10.1.2 transport fixation loops
fixation loops in the front fixation loops in the rear
The fixation loops are marked with this sign:
Further information about transportation of the wheelchair
you will find in chapter "transportation" .
10.1.3 lights en reflectors
The chassis has very strong and bright LED lights to make sure you can have
a safe drive in the dark. The orange reflectors on both sides and the red
reflectors on the rear also make you visible for other people as well. The lights
fulfill the European requirements. (E marked)
The additional LED indicators give our environment clear information in which
direction you want to go.
L
R R R
L L L
Page 18
18
10.1.4 battery compartments
The batteries are mounted as low as possible and as central as possible into
the chassis to provide an optimal centre point of gravity. This results in a
maximum stability of the wheelchair. The compartment can hold maintenance
free batteries up to 85Ah. For the specification of the batteries see the chapter
technical specifications.
The maintenance free batteries can be reached from the side. They can be
replaced whilst the user is still in the wheelchair.
the battery box
To reach the batteries, first remove the locking bolt [A]. Lift up the plastic cover
vertically [B], then pull it off the chassis in the horizontal direction. [C].
A
B
C
Page 19
19
After taking the cover off, the maintenance free
battery can be pulled out of the box.
Mind the cables!
At installing the maintenance free battery, one
should pay great attention to make sure the
cables are not jammed between the battery and
the battery box.
when pulling the battery out of the box do mind to not overstretch the
cables. This might lead to technical failure.
before removing the batteries, first remove the main fuse. This to reduce
the risk of short circuit or electrical shock. See the chapter of the main
fuse
before reconnecting the battery, read the wiring instructions on the inside
of the battery cover.
Page 20
20
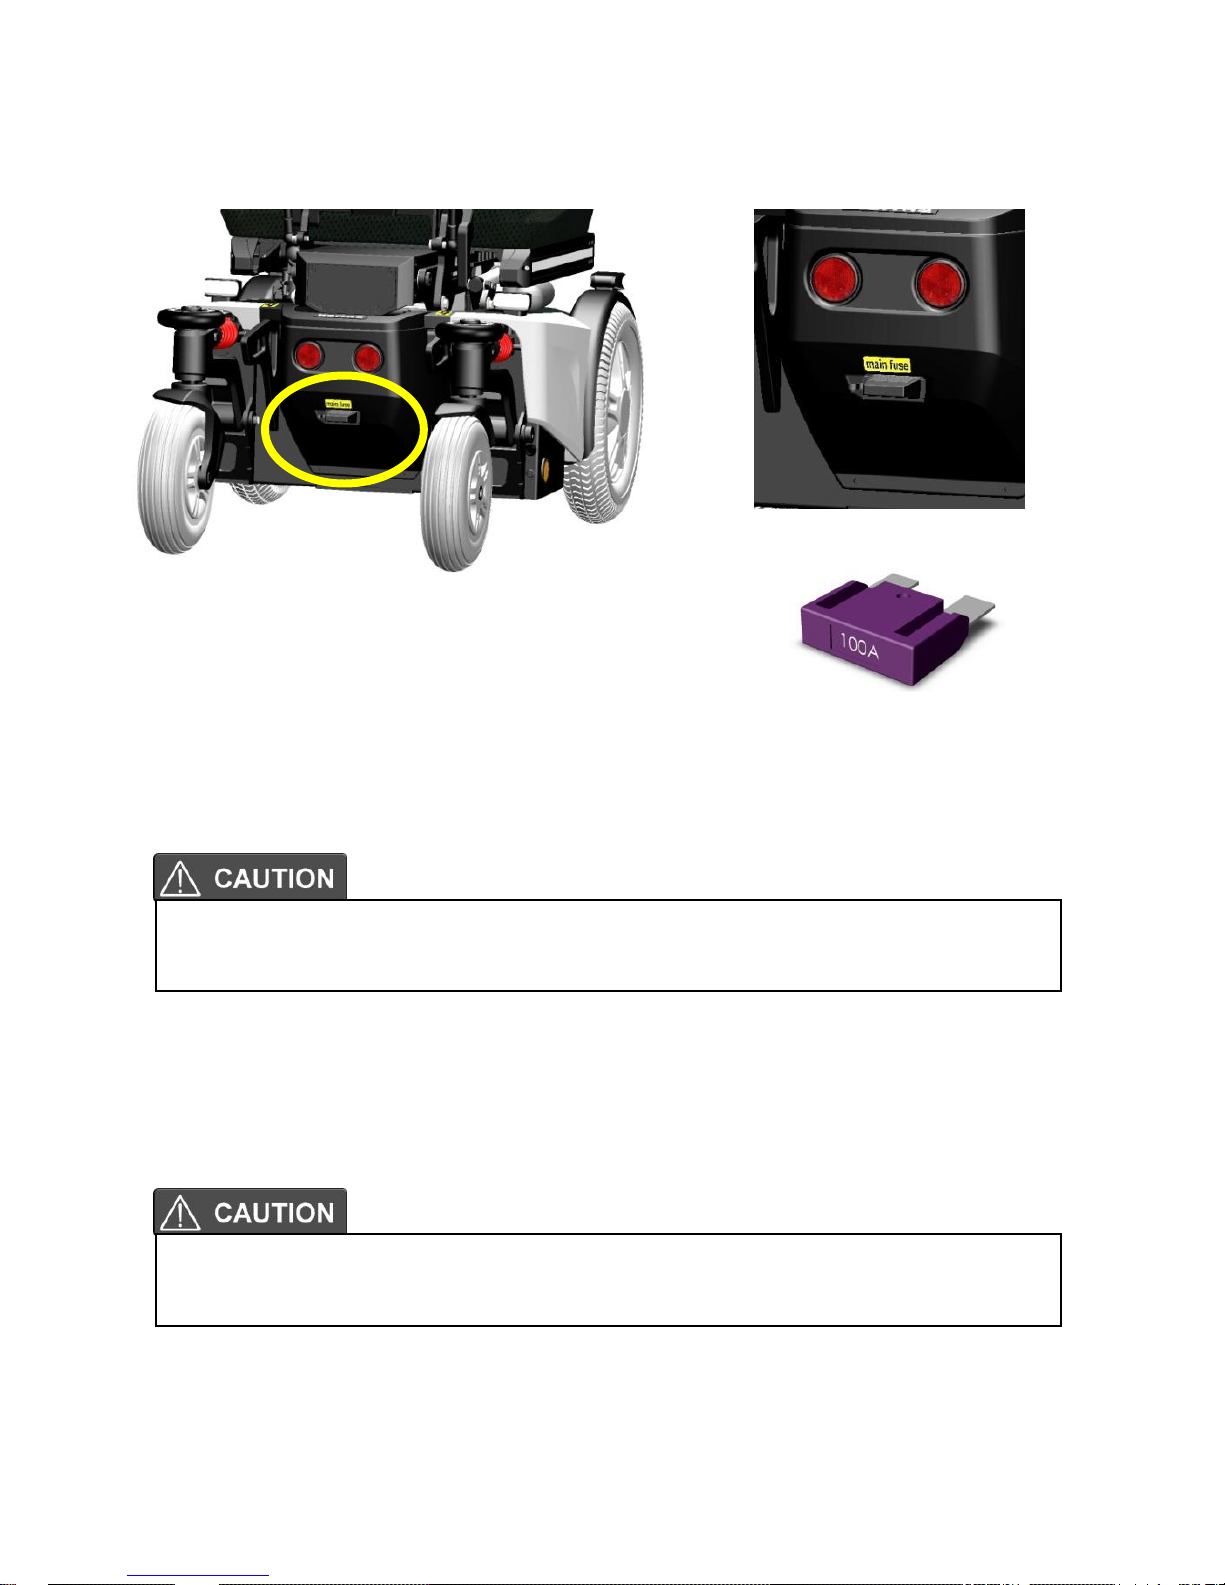
10.1.5 main fuse
The chassis contains a main fuse which is located at the rear of the chassis.
position main fuse
main fuse
The main fuse protects the whole electrical system of the wheelchair. This
fuse will only blow if there is a serious problem on the wheelchair.
The fuse also works as a main switch. By removing the main fuse the batteries
are disconnected. This is important when the wheelchair is transported in an
airplane. To remove the fuse, simply pull the plastic cover off and pull the fuse.
if the main fuse has blown, do not replace the fuse immediately. First
contact your local supplier to have the wheelchair checked .
Only use original main fuses as replacement. Using other fuses might
lead to material damage to the wheelchair.
Page 21
21
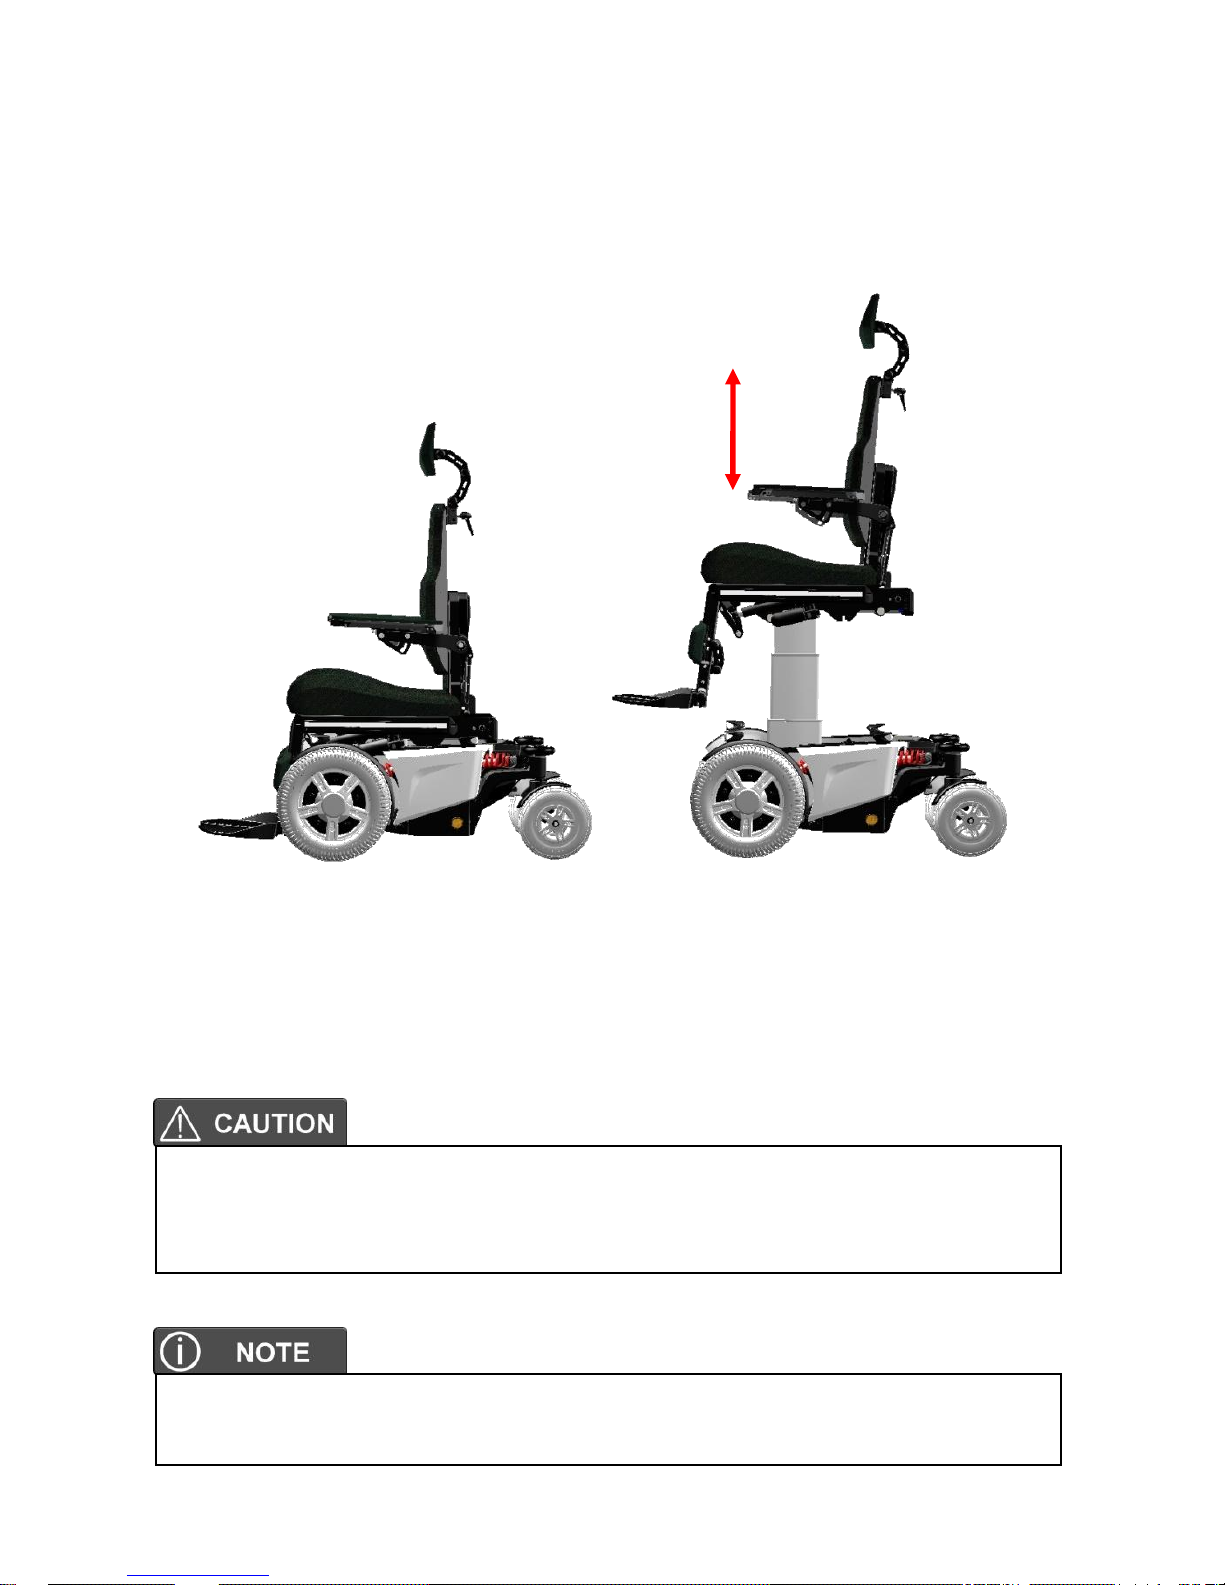
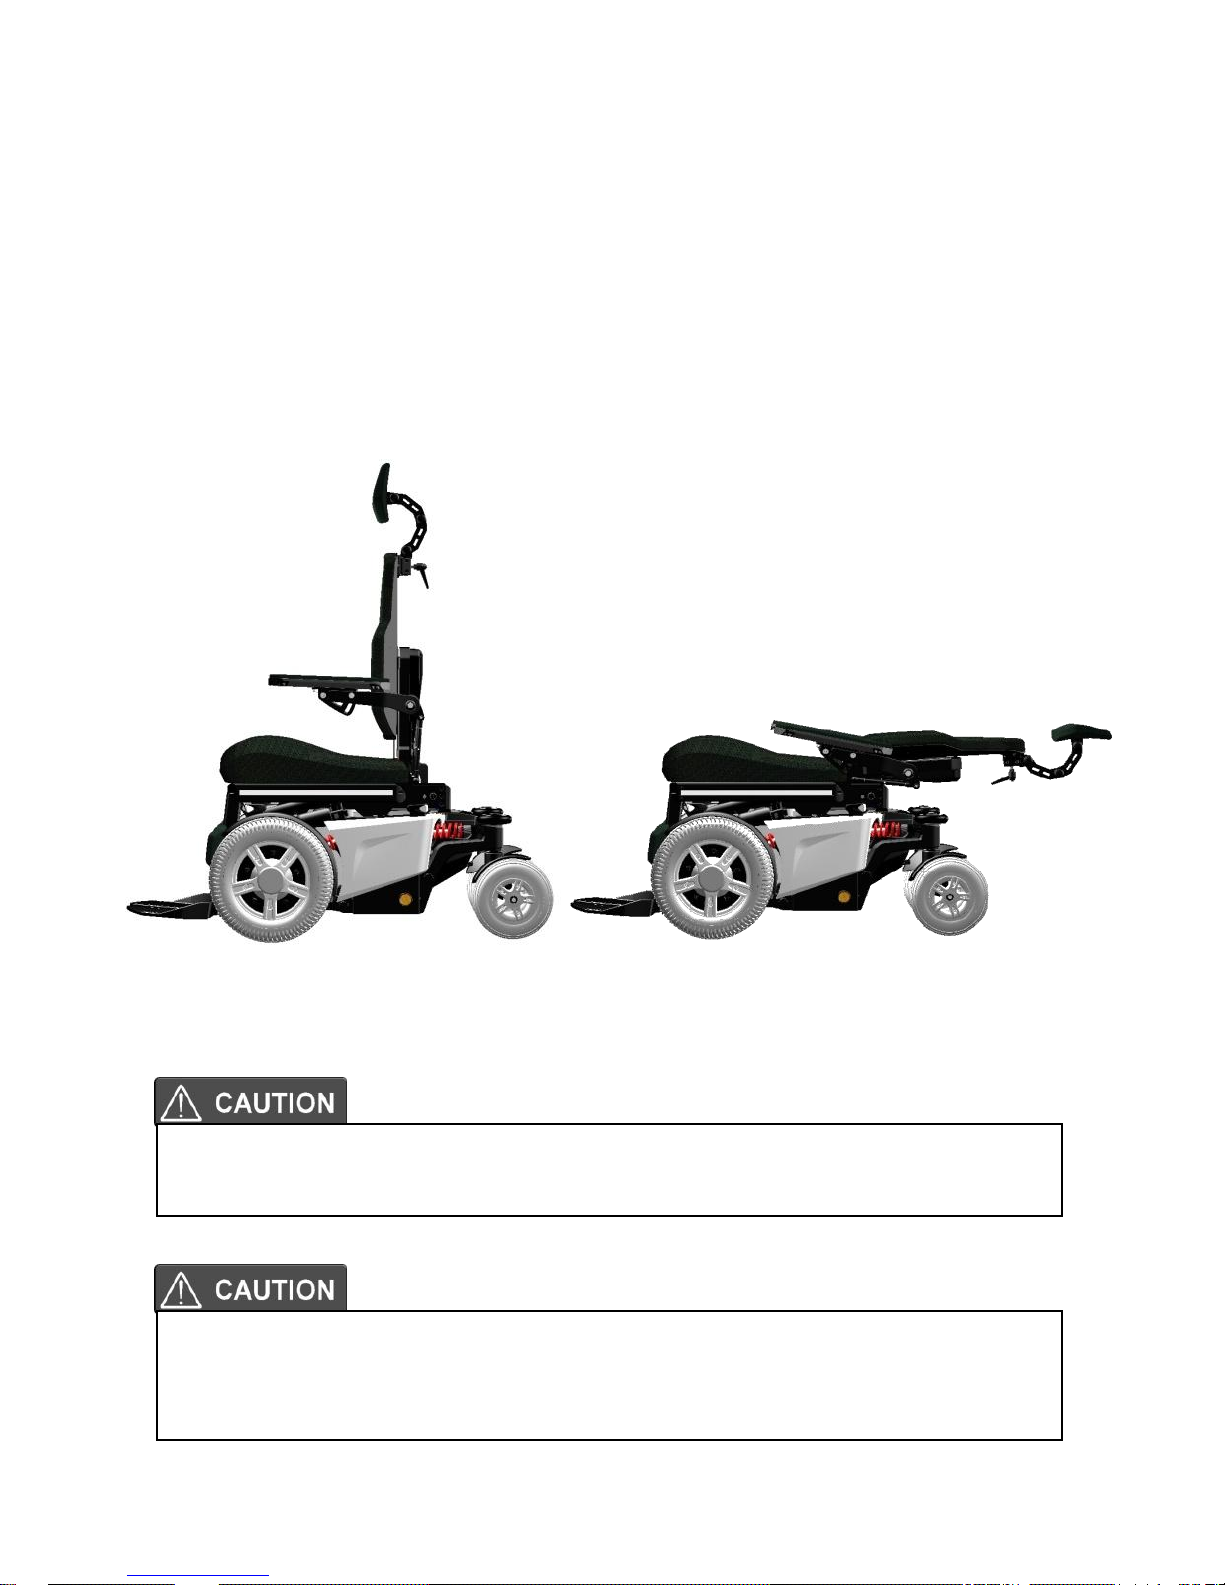
10.1.6 seat lift (optional)
The seat lift is centrally mounted into the chassis. With this lift the seat can be
raised step less up to 400mm. This enables the user to have more freedom of
movement, not only in horizontal area, but also in the vertical area. The seat
lift can be stopped at any height and will be automatically locked in position.
whilst lifting the seat, the driving speed will automatically reduced to gain
maximum stability at all times. At high seating position also the seat tilt will be
blocked to gain maximum stability. the seat height can be set to every height
position by the user. The maximum seat height is set to 950 mm (seat pan to
ground)
be careful driving in high seating position at slopes. We strongly suggest
to only use the seat lift on flat areas. Lifting high on a steep slope might
lead to instability and might cause personal or material damage.
The seat lift can also be very helpful for transferring or lifting the user in
or out of the wheelchair.
400mm
Page 22
22
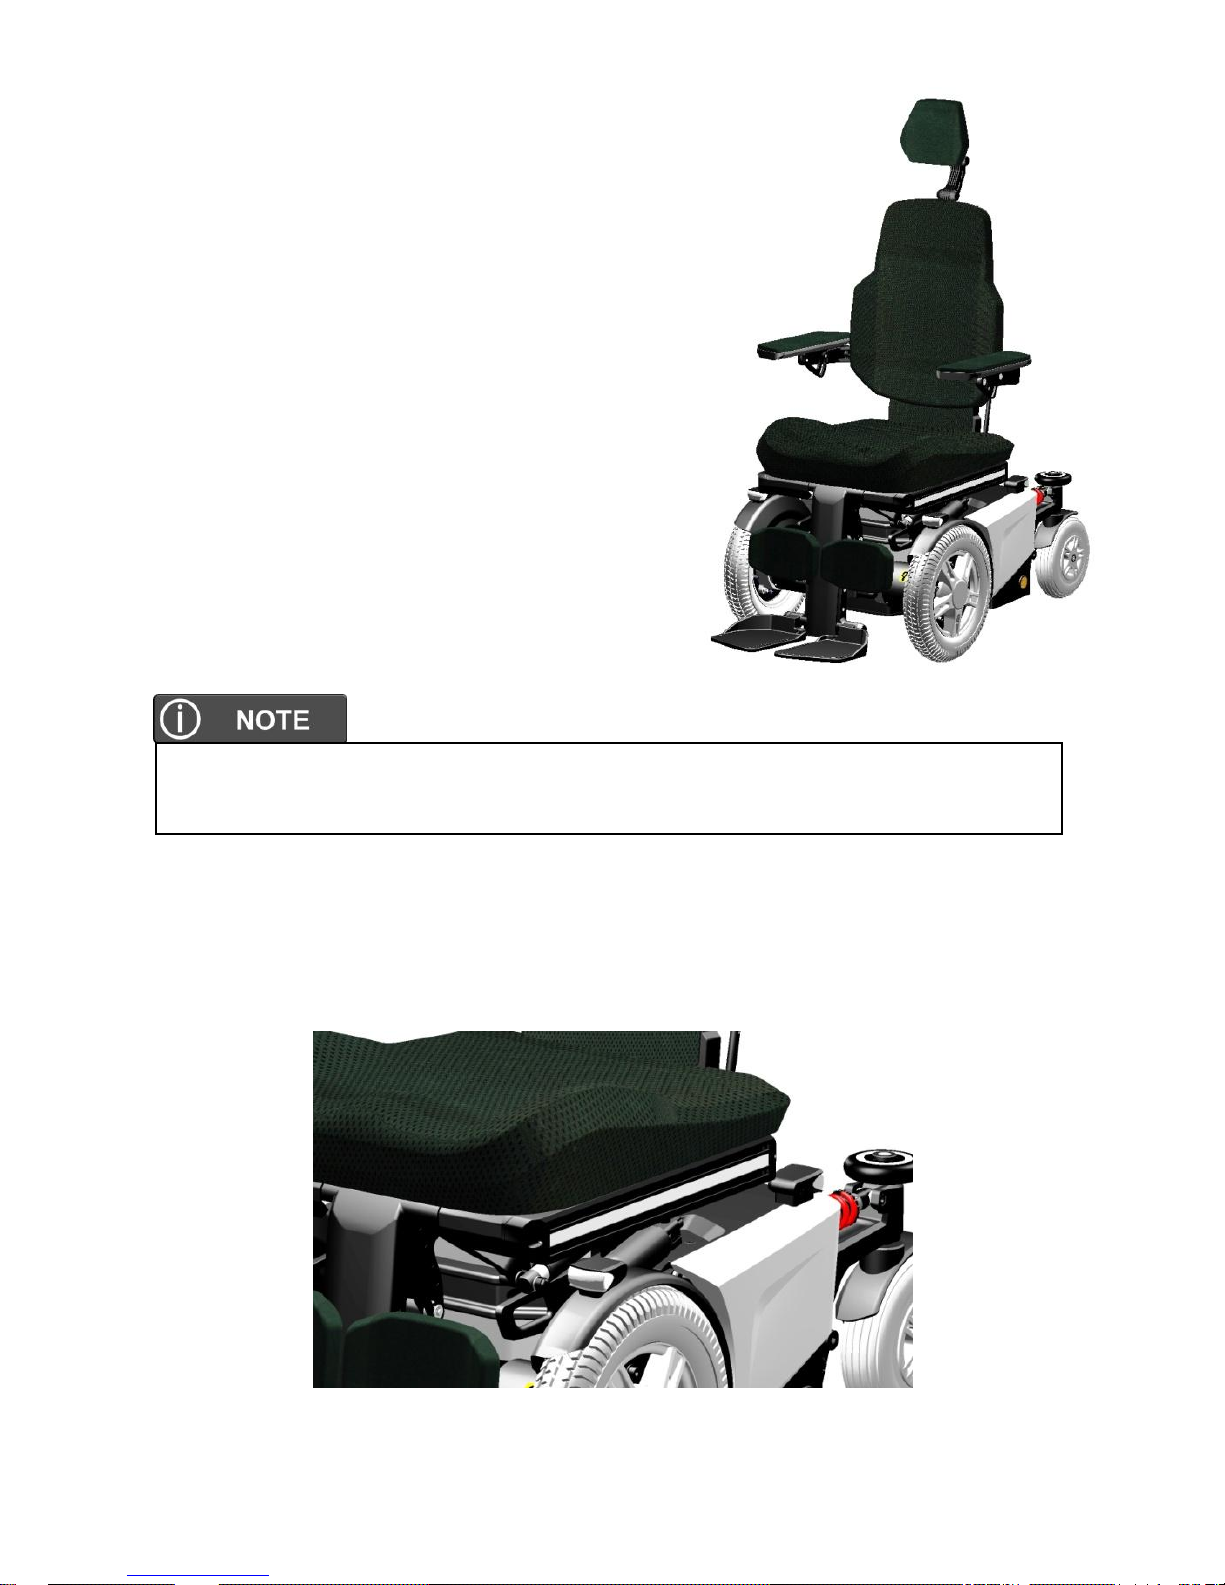
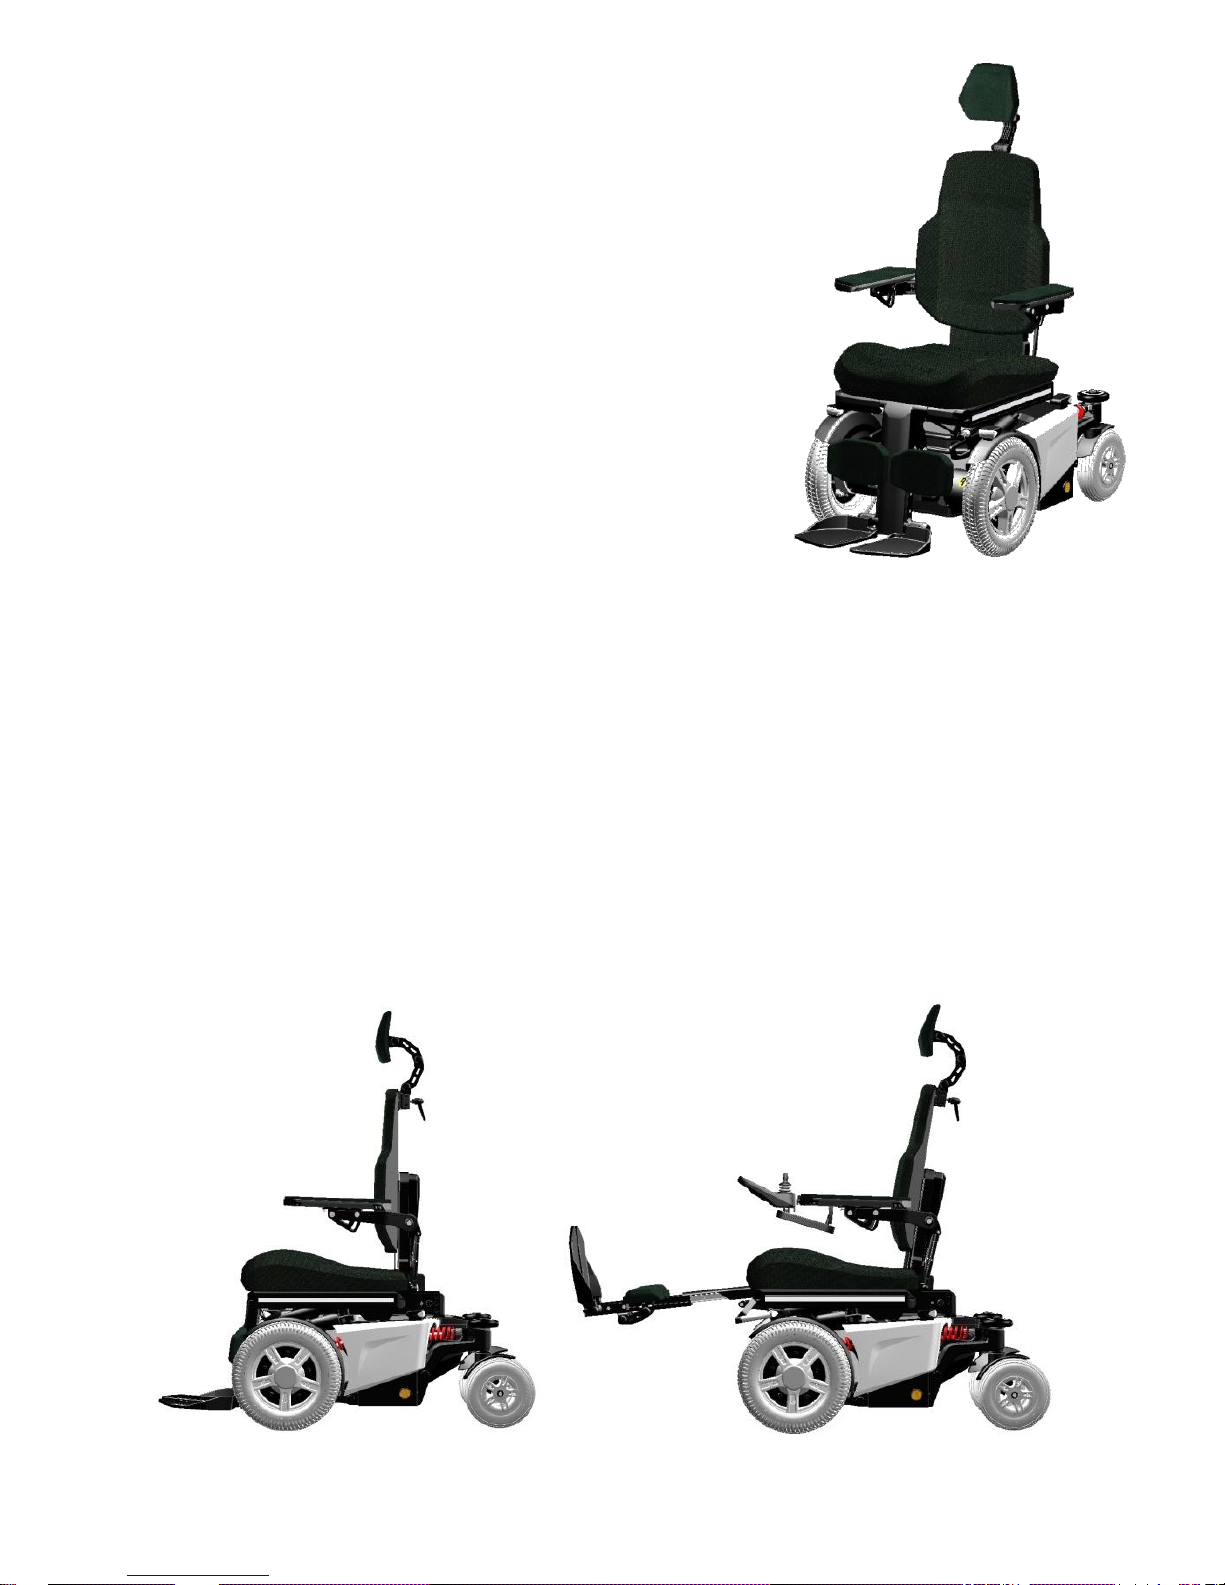
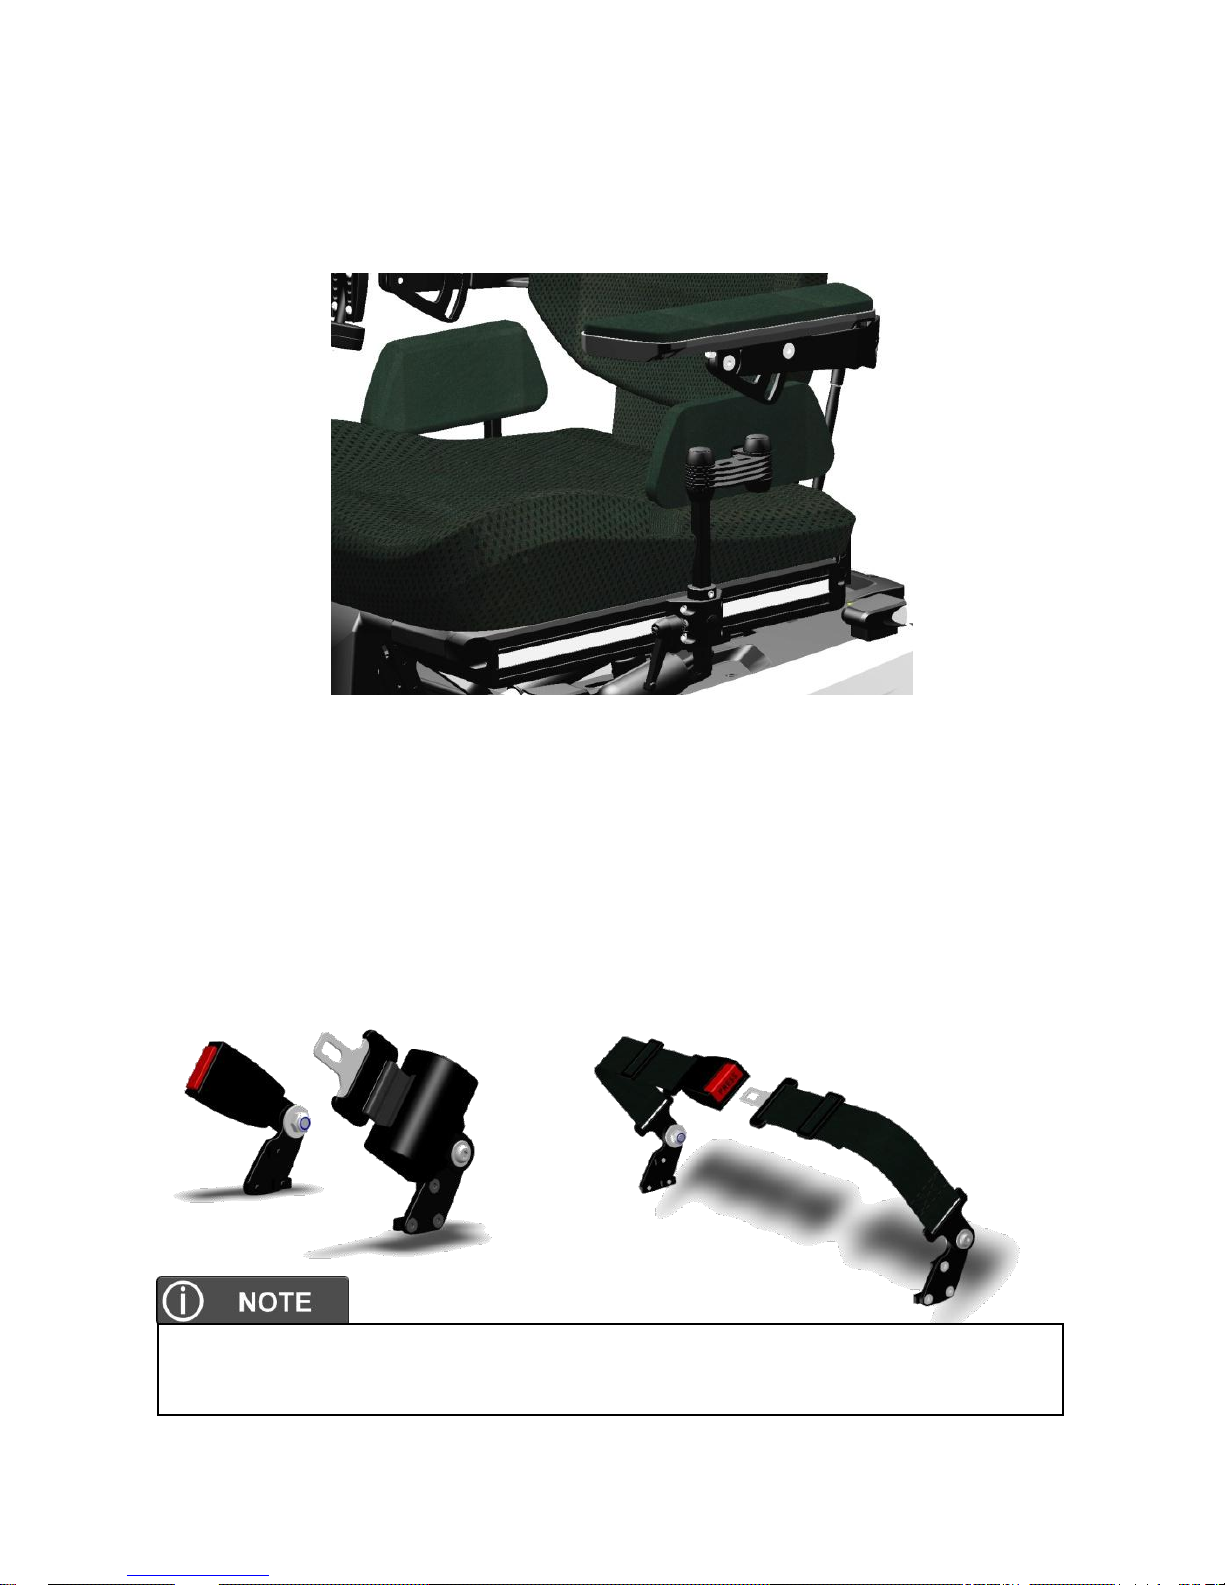
10.2 seat
The seating system is designed to optimize the
seating comfort to the user. It can be adjusted in seat
depth and seat width. A rail on each side provide
mounting point for accessories like hip supports
or safety belts. The seat pan is flat so other seating
cushion can be fitted on to the seat as well.
10.2.1 upholstered seat cushion
The upholstered seat cushion is available in
different sizes to provide optimal seating comfort
and support to the user. The cloth is available
as 3D mesh or breathing but waterproof cloth.
The seat cushion is well fixed with Velcro on to
the seat pan to prevent it from sliding.
10.2.2 seat rail
on each side of the seat frame there is a rail to mount different accessories to
the wheelchair. The middle area can be personalized with a color sticker.
seat rail
using other cushions with different thickness might influence the
biomechanical function of the legrest and or backrest.
Page 23
23
10.2.3 seat tilt (optional)
The seat tilt can be used to release pressure. The tilting angle is from 0 to 50°.
The tilt can also be used when driving down a slope for compensating the
negative seat angle. This provides a more stabile seat position and safe
driving.
If the tilt is activated over a certain angle, the driving speed will be reduced.
This to reduce the risk of danger whilst driving at high speed.
Always drive carefully on slopes. The angle of the slope has great
influence on the total stability of the wheelchair.
When tilting always check if there are no obstructions close to the
wheelchair. Especially in the front or rear of the wheelchair.
When tilting, the wheelchair will get longer. This has influence on the
driving characteristics of the wheelchair. Make sure there is enough
space to drive.
50°
Page 24
24
10.2.4 upholstered backrest
The upholstered backrest is available in different lengths and width sizes to
give the users maximum support and comfort. The cloth is available as 3D
mesh or breathing but waterproof cloth.
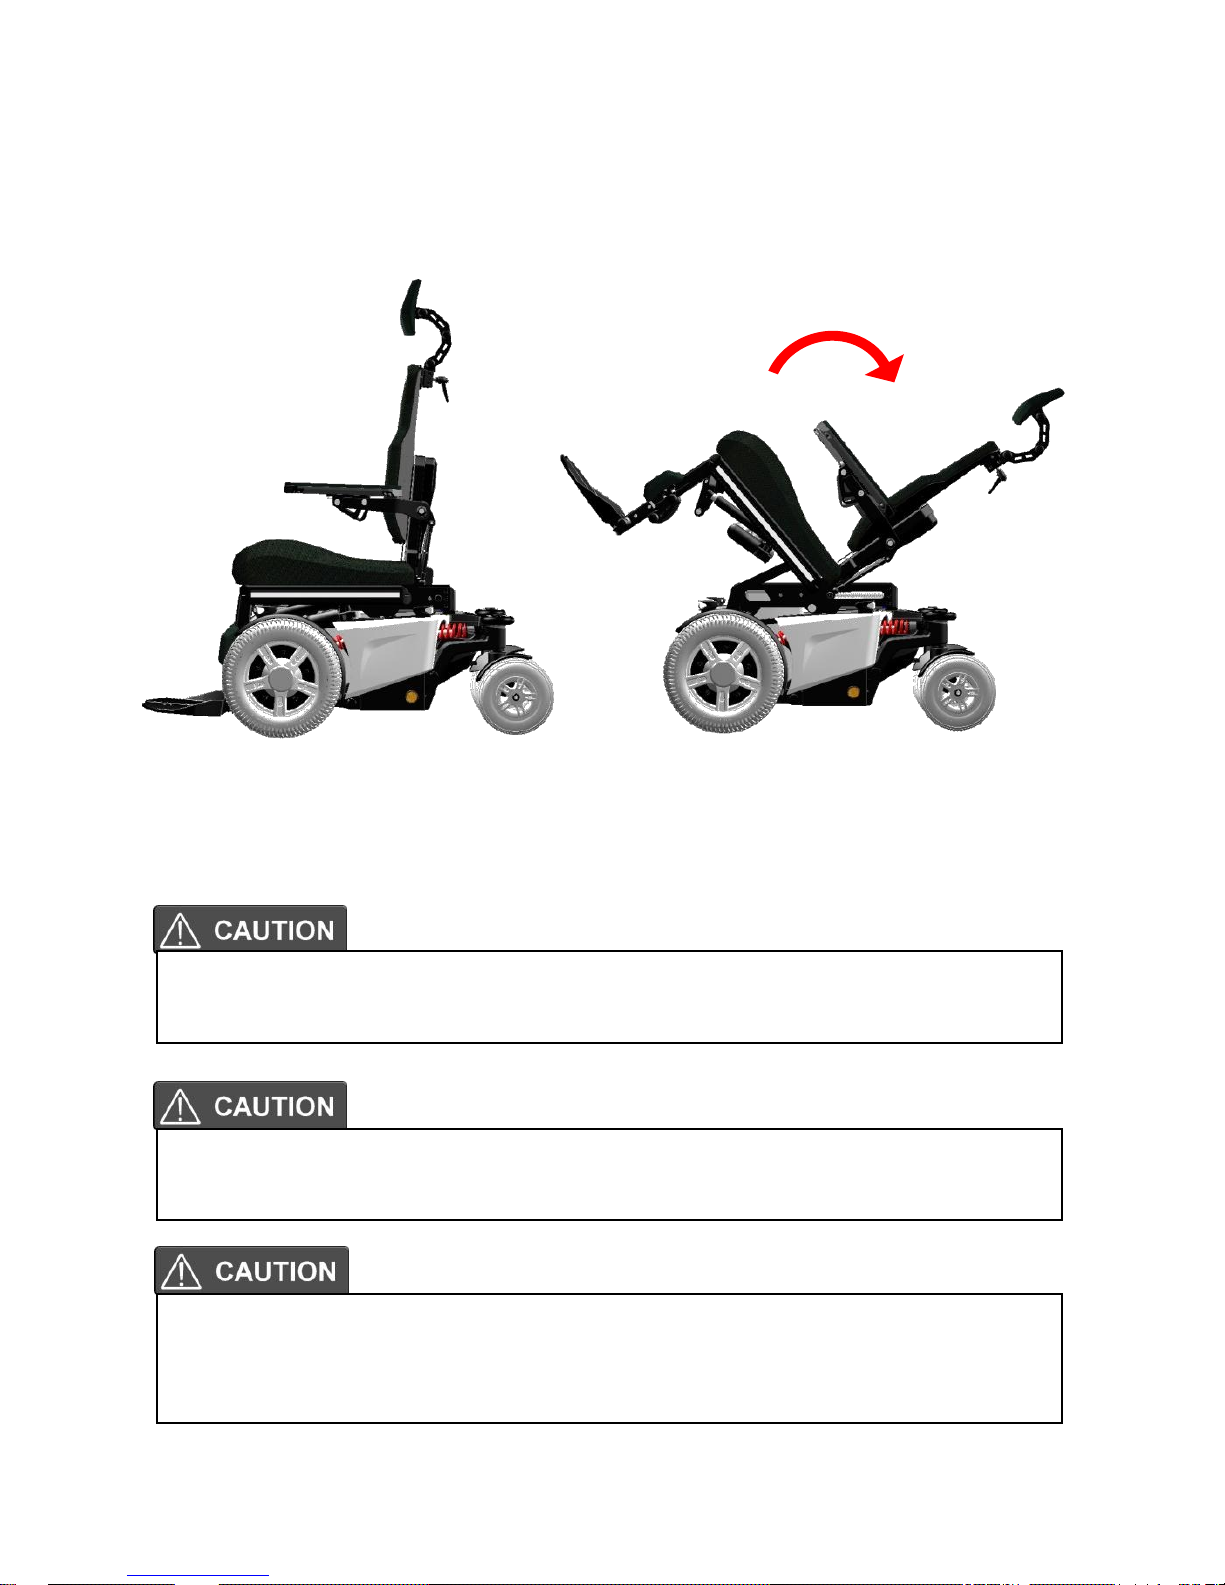
10.2.5 power recline backrest (optional)
The power recline backrest can be set from 85° to a flat horizontal position. It
gives the user the possibility to move into a laying position or a very active
sitting position.
At a reclined backrest position over 135° the driving speed will be
automatically reduced for safety reasons.
When reclining always check if there are no obstructions close to the
wheelchair. Especially in the rear of the wheelchair.
When reclining, the wheelchair will get longer. This has influence on the
driving characteristics of the wheelchair. Make sure there is enough
space to drive.
Page 25
25
10.2.6 upholstered armrest
The upholstered armrests of the seat provide good and
comfortable support of the arm which result in a stabile seating
position. The armrest has a soft upholstery on the top side. The
arm rests come in 320 mm or 400mm length.
A biomechanical mechanism makes sure the armrests
are always in a good position to supply optimal support.
The armrests are adjustable in height, depth, angle and
inside angle. For transferring in and out of the chair,
the armrests can be flipped up.
10.2.7 legrest
The legrest uses a central mounted tube on which the footplates are mounted.
The footplates come in two different sizes. The legrest can be adjusted in
length (left and right footplate independent) knee angle and footplate angle
(left and right independent). The footplates can be flipped up to decrease the
size of the wheelchair for transportation or storage. A build in rail can be used
to mount calf supports.
10.2.8 powered legrest adjustment (optional)
With a powered legrest the knee angle can be set from little less than 90° up
to a fully stretched leg angle. The biomechanical mechanism ensures the
lower leg length will always be the same.
Page 26
26
If the legrest is stretched over 45° the driving speed will automatically be
reduced for safety reasons.
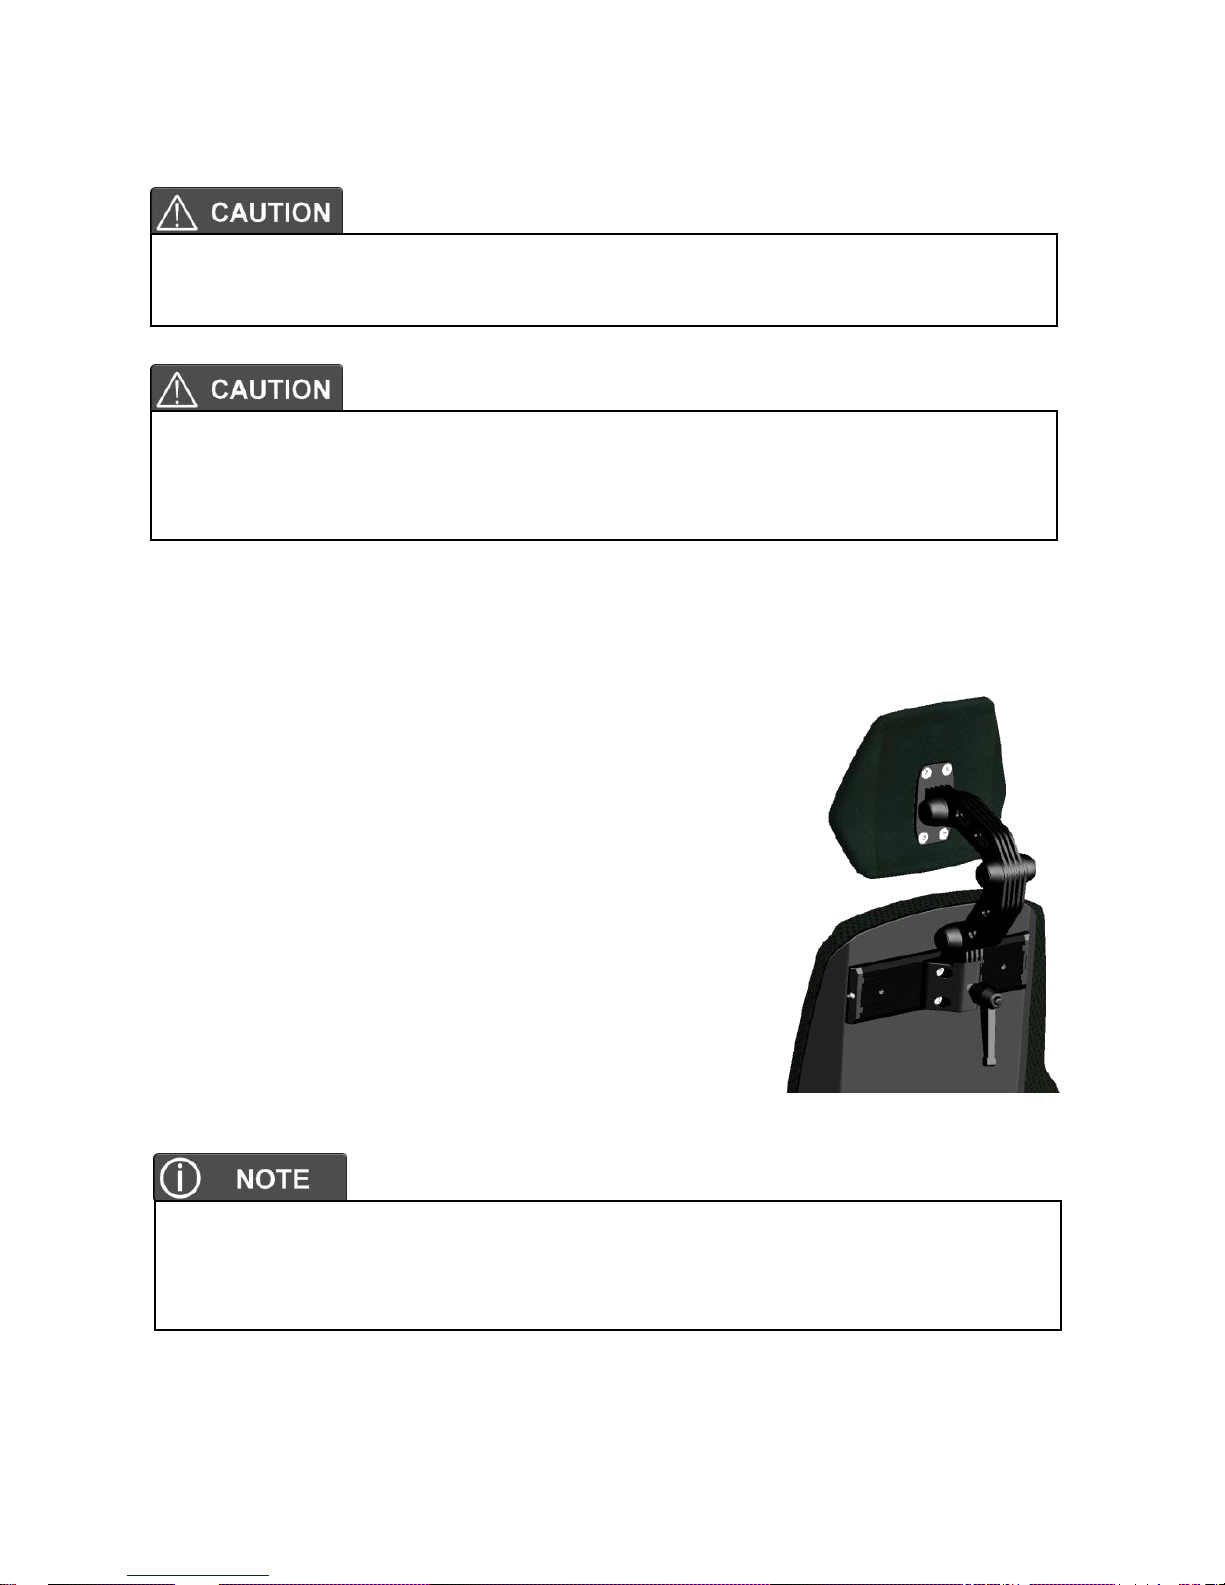
10.2.9 upholstered headrest (optional)
The upholstered headrest is adjustable in height, depth and
angle to the requirements of the user. It can be taken off
without losing its settings. As a additional option, a rail can
be mounted to move the headrest out of centre. Another
option is a rotation block to rotate the headrest to the
left or right.
When stretching the legrest always check if there are no obstructions
close to the wheelchair. Especially in the front of the wheelchair.
When stretching the legrest, the wheelchair will get longer. This has
influence on the driving characteristics of the wheelchair. Make sure
there is enough space to drive.
If the wheelchair user is transported in a taxi van we strongly advice to
use the headrest. This in order to provide you optimal stability whilst
driving in the taxi.
Page 27
27
10.2.10 upholstered calf support (optional)
The upholstered calf supports are adjustable in
height, depth, width and angle. They give
additional support when using a powered
legrest.
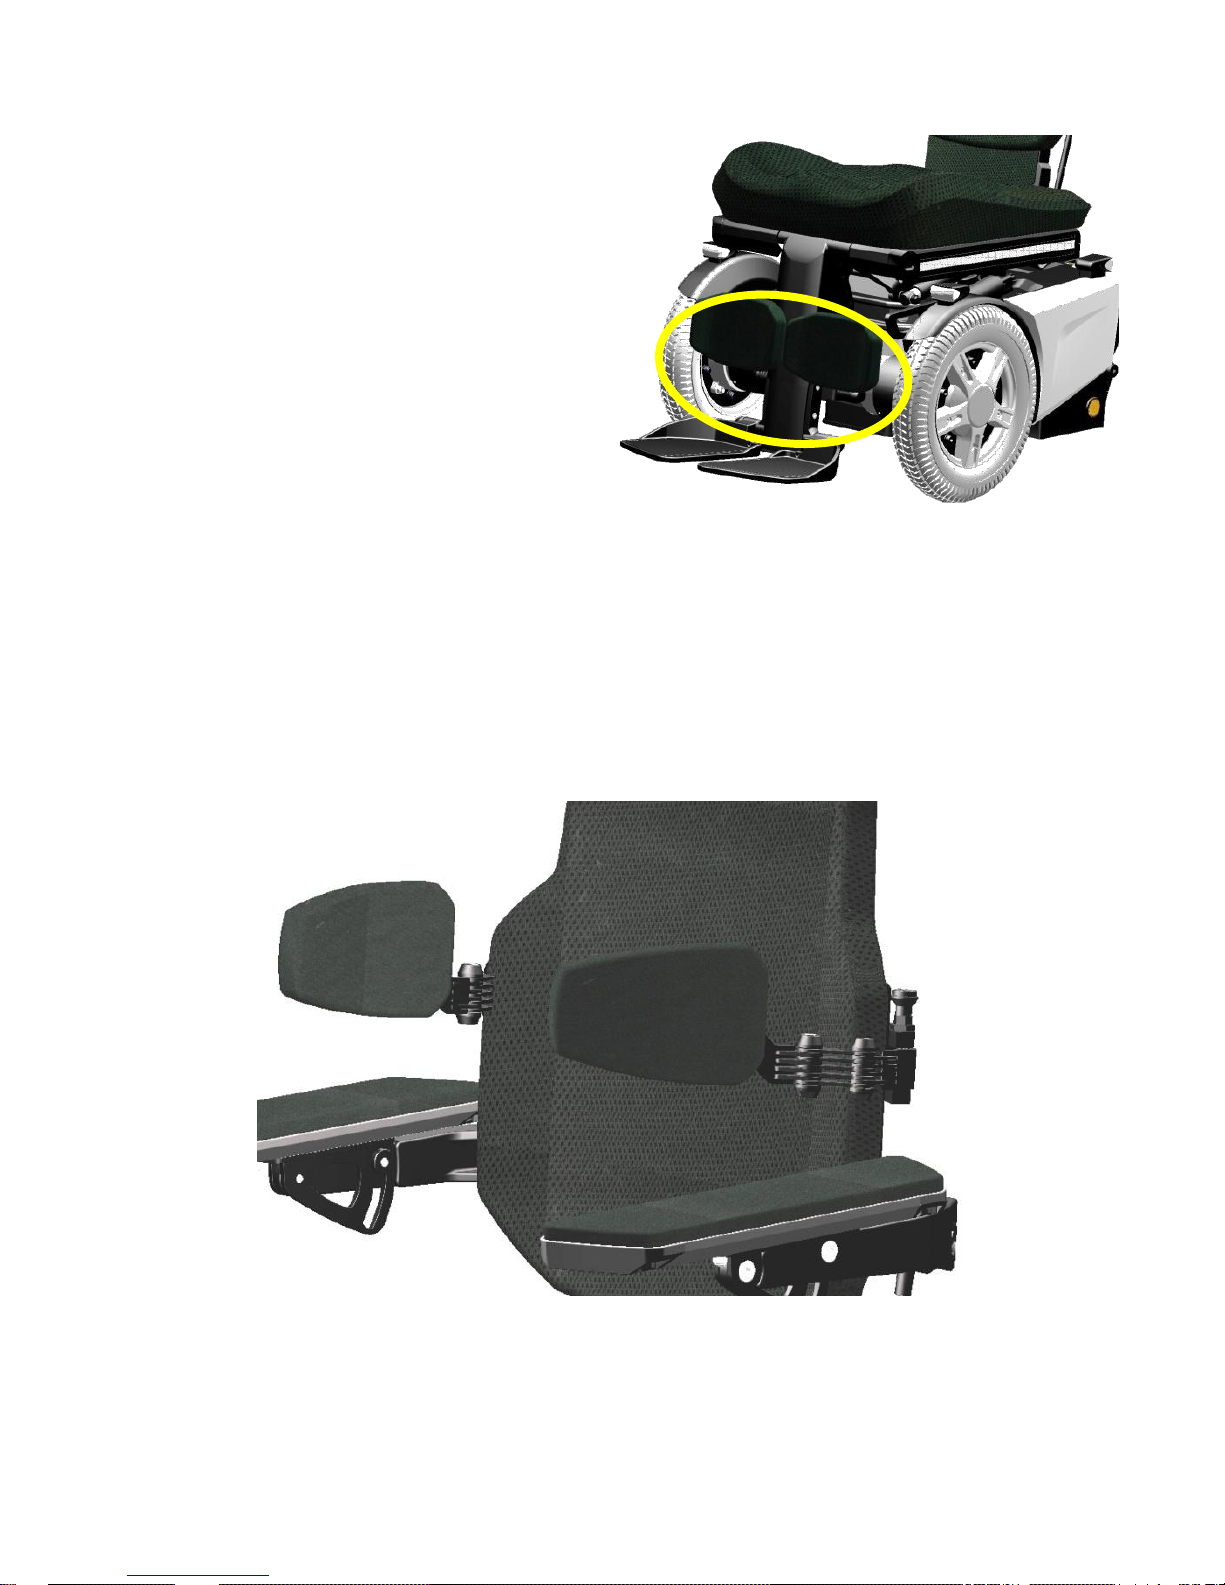
10.2.11 upholstered lateral support (optional)
The optional upholstered lateral support offer support on the upper body. The
supports are adjustable in height, width, depth and angle. The supports can
also be flipped sideways for transferring in or out of the wheelchair. During this
sideways flipping the adjustments stay intact. The soft rounded pads ensure
optimal support and great comfort.
upholstered lateral supports
Page 28
28
10.2.12 upholstered hip support (optional)
The upholstered hip supports offer side support to your hips or upper leg. The
support is adjustable in height, depth, width and angle. The soft pads offer
good and comfortable support.
upholstered hip supports
The hip supports can be taken away for transferring in or out of the
wheelchair, without losing the settings.
10.2.13 positioning belt (optional)
for positioning , several types of belts are available.
Positioning belts shall not be used as a car safety belt. If transported in a
car, the user needs to wear an additional car safety belt.
Page 29

29
10.3 the controls
10.3.1 side steering control
side steering control side steering, swing away
The EvO Lectus wheelchair has a side steering control unit, which is either
mounted on the left- or right armrest. The joystick module can be mounted on
a fixed bracket or on an (optional) swing away mechanism. This system
enable you to sit close to a table.
10.3.2 desktop control (optional)
desktop control, driving position desktop control, flipped up
The desktop control enables the user to have a table with a centre mounted
build-in joystick module. The table can be flipped up sideways for transferring
in and out of the wheelchair. The joystick module can be flipped up to use the
table as desktop. When flipped up, the driving mode of the wheelchair is
automatically blocked. This ensures a safe use of the wheelchair in any
position.
Page 30
30
11. the first set up
Before using, the wheelchair needs to be adjusted and set up for the user. In
this chapter we will explain all the setup which needs to be done before the
first drive.
11.1 chassis suspension
The suspension of a chassis has been designed to increase the comfort whilst
driving. Also climbing steps will be more easier having suspension on the
chassis. But suspension can also be a disadvantage. A suspension which is
set to soft has a negative influence on the control of the wheelchair. So it is
very important to have a good mix.
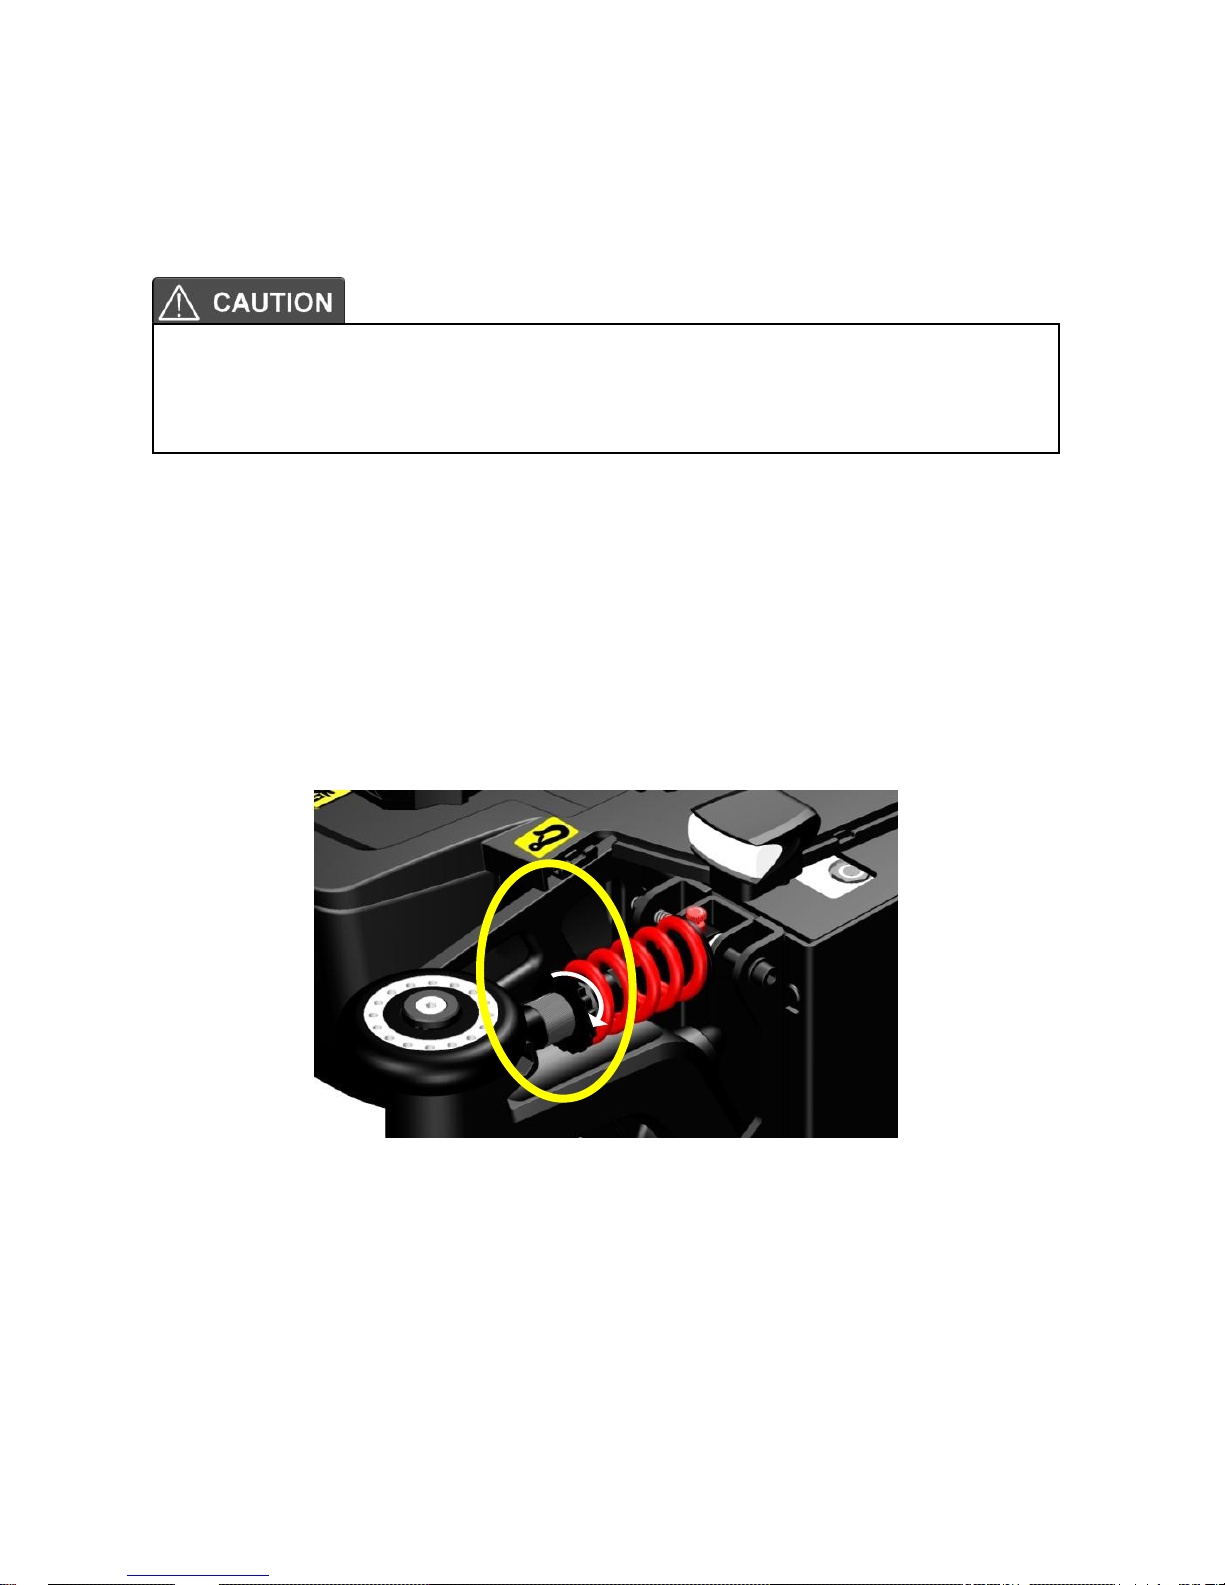
11.1.1 spring setting
The strength of the spring will be set by turning the ring shown above. By
turning it to the right (clockwise) the spring will have more tension and the
chassis becomes more stiff. This increases the mechanical traction en
improves control. The stiffness of the suspension depends on the user weight.
The settings needs to be done by setting and testing. We advise you to start
with a more stiff setting, since this results in the best control. If the suspension
is too hard, you can set it more soft by turning the ring more counter
clockwise. to make sure the balance of the left and right spring is the same,
we need to measure the setting.
before using the wheelchair it is vital to make the right set up for the user.
A non proper set up of the wheelchair might lead to uncontrolled driving
which can result in personal or material damage.
+
Page 31

31
the best way is to measure the distance between the ring and the end of the
tread in mm. Make sure that the spring settings in the front are identical. The
same for the two rear springs.
to soft settings of the spring will result in a very spongy behavior of the
chassis. The control of the wheelchair will be bad. Avoid soft settings.
if the springs are uneven set, it might lead to strange driving behavior of
the wheelchair. This might result in personal or material damage.
after setting the suspension, always drive first slowly and in an open
space to test the result of the setting.
Page 32

32
11.1.2 damper setting
The spring damper unit has a red adjustment wheel on the end of the damper.
This wheel adjusts the rebound speed of the spring.
turning the red knob clockwise will make the movement of the piston going
out again faster. This decreases the damping of the spring damper unit.
Turning the knob counter clock wise will increase the damping. The right
setting will be done by stetting and testing whilst driving. The average setting
is halfway. This is set by counting the clicks from the totally left position to the
totally right setting. These are 16 clicks. Now set the setting by 8 clicks form
the end position.
to soft settings of the damper will result in a very spongy behavior of the
chassis. The control of the wheelchair will be bad. Avoid soft settings.
if the dampers are uneven set, it might lead to strange driving behavior of
the wheelchair. This might result in personal or material damage.
after setting the suspension, always drive first slowly and in an open
space to test the result of the setting.
Page 33

33
11.2 seat adjustments
Before using the wheelchair, the seat must be set to the right size for the user.
Most of the time this will be done by your local supplier, together with your
therapist. A well adjusted seat will give you optimum support and comfort.
11.2.1 seat depth
To adjust the seat depth we have to do the following steps:
step 1: pull off the seat cushion.
step 2: loosen the top seat panel screws (A) using an 3mm Allan key.
step 3: take off the top seat panel.
step 4: loosen up the screws (B) of the side rails, using an Allan key size
4mm.
A
B
Page 34

34
step 5: loosen up the screws (C) of the legrest unit, using an 5mm Allan key.
step 6: move the legrest frame forward to increase the seat depth or
backwards to reduce the seat depth.
the seat depth is adjustable in steps of 25 mm, starting at a seat depth of
400mm.
step 7: tighten the screws of the legrest frame to fixate the seat depth.
the minimum seat depth of 400 mm must be set with extra attention. This
to avoid seat parts colliding with the seat lift.
the setting of the seat depth requires some expertise. Therefore we
strongly advise you to have it done by your local authorized Karma
dealer.
B
Page 35

35
step 8: mount the side rails into position and tighten the bolts.
step 9: place the top seat panel back into position and tighten the screws.
Now, the seat cushion can be put back in to place.
with every seat depth comes a different length of seat rail. Pre-order the
right length of rail first before changing the seat depth.
Page 36

36
11.2.2 seat width
to increase the seat width, additional extension rail can be mounted. Please
notice the following steps to increase the seat width:
step 1: take off the cushion
step 2: loosen the screws of the side rail (A) and remove them.
step 3: unpack the additional extension rail
A
Page 37

37
step 4: place the extension rail in to position and place the longer mounting
bolt which come with the extension rail.
step 5: tighten the bolts and place the wider seat cushion on the set pan.
11.2.3 armrest width
the distance between both armrest can be changed in steps of 50mm. To
change the distance you must do the following steps:
step 1: remove the rear cover of the backrest. to do this you must use a 3mm
Allan key to loosen the 6 small screws.
Page 38

38
step 2: loosen and remove the two bolts using an 5mm Allan key.
step 3: remove the spring lock pin from the ball joint.
step 4: detach the parallel bar from the armrest.
Page 39

39
step 5: pull out the armrest axle
step 6: take of the bearing ring (R)
step 7: add or remove the spacer of the axle and put the bearing back.
if the parallel bar is removed the armrest will fall down. So before
removing the parallel bar, make sure you hold the armrest with one hand
whilst removing the parallel bar with the other hand.
R
Page 40

40
step 8: put the axles back into the backrest frame and tighten the two central
bolts.
step 9: connect both parallel bars and secure them with the locking pin.
step 10: put the backrest cover back on the frame.
Now the armrests are set in to a different width position.
11.2.4 armrest height
The armrest height can be adjusted left and right independently. To set the
right armrest height, follow the next steps:
step 1: release the locking bolts (A) on each side of the armrest using an Allan
key size 5mm.
A
Page 41

41
step 2: set the armrest angle by using an 5mm Allan key. By rotating it
clockwise the armrest height will increase. Counterclockwise the armrest
height will be reduced.
step 3: once the right height is set, fixate this position by tightening the locking
bolts again.
11.2.5 armrest angle
to set the right armrest angle please take the following steps:
step 1: loosen the front armrest bolt (B) using a 5mm Allan key. don't take it
out, just loosening.
B
Page 42

42
step 2: loosen up the bolt (C) slightly until the armrest starts to move.
step 3: once the right armrest angle is set, first tighten the bolt (C) and then
the bolt (B).
11.2.6 armrest depth
The armrest can be step less adjusted in depth. To set the right armrest depth
follow the next steps:
step 1: loosen up the four bolts (D) using a 3mm Allan key.
if the second bolt is loosened the armrest will fall down. So loosening the
second bolt, make sure you hold the armrest with one hand whilst
loosening the bolt with the other hand.
C
D
Page 43

43
step 2: slide the armrest backward ort forwards into the required position.
step 3: tighten the four bolts. The armrest is set.
11.2.7 armrest inside angle
The armrest pad can be sideways adjusted over an angle of 15 degrees.
to set the armrest inside angle take the following steps:
step 1: loosen up nut (E) underneath the armrest pad using a 10mm wrench
head.
step 2: turn the armrest in the required aside angle.
step 3: tighten the nut again. now the angle is set.
always make sure the nut is correctly tightened. Especially on the
armrest where the joystick module is mounted. If the armrest is not fixed,
it might move whilst driving the wheelchair. This might lead to dangerous
situations.
Page 44

44
11.2.8 legrest length
the legrest length is step less adjustable. Both left and right length is
separately adjustable. To set the right length follow the next steps:
step 1: loosen up the bottom legrest (A) bolt first, using a 5mm Allan key.
step 2: slowly loosen up the top end bolt (B). Just enough to feel the footplate
is starting to move.
step 3: now slide the footplate into the required position.
step 4: if the right length is set, tighten bolts firmly.
by loosening the second bolt on the footplate, the footplate might
suddenly start to slide down. If the user has his or her foot on the
footplate, this sudden movement might cause an shock reaction.
It is best to hold the footplate with one hand and loosen the bolt with the
other hand.
make sure the legrest is in the right position. The surface pressure on the
upper leg part should be equally divided over the total length. A to short
or to long adjusted length might lead to pressure points on the upper legs
part.
Page 45

45
11.2.9 legrest angle
the legrest angle can be mechanically set following the next steps:
step 1: loosen up the bolt (F) on the telescopic tube of the legrest using a
5mm Allan key. Just open it far enough so you feel it is starting to move.
step 2: move the legrest into the required angle.
step 3: tighten the bolt so the setting is fixed.
The legrest angle can optionally be power adjusted. How to control the
powered legrest is explained in chapter 16.
by loosening the bolt of the telescopic tube, the legrest might suddenly
start to move down. If the user has his or her feet on the legrest, this
sudden movement might cause an shock reaction.
It is best to hold the legrest with one hand and loosen the bolt with the
other hand.
Page 46

46
11.2.10 footplate angle
The footplate angle can be adjusted for the left and right footplate separately.
The setting is step less. To adjust the angle follow the next steps:
step 1: insert the 4mm Allan key into the adjustment screw inside the
footplate.
step 2: turn the Allan clock wise to decrease the angle between footplate and
legrest. Turn the Allan key counter clock wise to increase the angle.
The adjustment screw is added with some lock tite to prevent it from
moving by itself. For that reason the turning might a little heavier than
expected.
Page 47

47
11.2.11 calf support settings
Optionally, calf supports can be mounted on the legrest.
The calf supports are fully step less adjustable.
11.2.11.1 adjusting the height of the calf support
step 1: loosen up the four bolts (G) using a 5mm Allan key, until the calf
support starts to slide in the rail.
step 2: slide the calf support into the required height position and fasten the
four bolts.
11.2.11.2 adjusting the width of the calf supports.
G
H
Page 48

48
step 1: loosen up the four bolts of the calf support pad, using a 5mm Allan
Key.
step 2: slide the pad into the right position on the rail.
step 3: tighten the four bolt. Repeat the same for the other calf support pad.
11.2.11.3 adjusting the depth and angle of the calf support pads.
step 1: remove the two covers on each side of the calf support.
step 2: loosen up the bolts of the friction setting, using a 6mm Allan key.
step 3: now push the calf support pad in the right depth and angle setting.
step 4: tighten the bolts again to fixate the position.
step 5: place the covers back onto the friction end caps.
Page 49

49
11.2.12 headrest settings
The optional head rest is fully step less adjustable to suit the user's needs. It
can be taken off without losing its setting.
detached from backrest high position low position
11.2.12.1 sideways adjustment headrest
the head rest has an optional rail for a sideways off centre adjustment. to set
this adjustment, take the following steps:
step 1: loosen the 4 bolts (L) using a 5mm Allan key.
step 2: move the headrest along the rail into the required position.
step 3: tighten the bolts again to fixate the position.
L
Page 50

50
11.2.12.2 headrest depth, height and angle adjustment.
the headrest has a friction system containing three rotation joints. By moving
each rotation joint you can set the height, depth and angle of the headrest all
at the same time. to set the headrest in its right position, follow the next steps:
step 1: take off the rubber covers (K) of the three joints
step 2: loosen up the bolts using a 6mm Allan key. Loosen then up until the
headrest can be moved.
step 3. push the headrest into the required position.
step 4: tighten the bolts firmly so the position is fixed.
step5: put the rubber covers back on the joints.
K
Page 51

51
11.2.13 hip support settings
the optional hip supports are fully step less adjustable in side position, height,
depth and angle. The can easily be take of the chair using a quick release
system, without its settings.
11.2.13.1 set the side position on the seat rail
to set the position on the seat rail, take the following steps:
step 1: loosen the four bolts (M) using a 5mm Allan Key.
step 2: move the hip support in to the required position.
step 3: tighten the four bolts, the setting is now fixed.
if you loosen up the bolts too much, the headrest will fall down. this might
cause a little shock reaction on the user in the wheelchair. It is better to
loosen the bolts bit by bit and every time try to move the headrest. the
friction will keep it stabile. make sure you hold the headrest with one hand
and loosen the bolt with the other hand.
M
Page 52

52
11.2.13.2 setting the height position of the hip support
to set the height of the hip support, take the following steps:
step 1: loosen the lever knob (N) and lift up the hip support into the right height
position.
step 2: loosen the bolt (O) of the fixation ring using a 4mm Allan key and
reposition this ring against the mounting block as a stopper.
step 3: tighten the nut of the fixation ring. Now the height is set and secured.
N
O
Page 53

53
step 4: remove the rubber covers (P) of the friction joints.
step 5: loosen the friction bolts (Q) so the padding can be moved.
step 6: tighten the frictions bolts. Now the position is fixed.
step 7: punt the covers back on to the friction joints.
P
if you loosen up the bolts too much, the hip support might start to suddenly
move. this might cause a little shock reaction on the user in the wheelchair.
It is better to loosen the bolts bit by bit and every time try to move the hip
support pad. the friction will keep it stabile. make sure you hold the hip
support with one hand and loosen the bolt with the other .hand.
Q
Page 54

54
11.2.14 lateral support settings
the optional lateral support can be adjusted step less in height, depth, width
and angle.
11.2.14.1 set the height of the lateral support.
step 1: loosen up the bolts (R) using a 5mm Allan key.
step 2: move the lateral support in to the required height.
step 3: tighten the bolts.
11.2.14.2 adjust the depth width and angle of the lateral support
R
S
Page 55

55
step 1: loosen the bolts (S) of the friction joints.
step 2: move the pad into the required angle, depth and width.
step 3: tighten the bolts to fixate the setting.
11.3 positioning belts
the optionally positioning belt can be adjusted in length and anchoring point.
To change the setting simply follow the next steps:
step 1: loosen the bolts (T) using a 4mm Allan key.
step2: move the bracket in the required position.
step3: fasten the bolts.
make sure the brackets are tighten properly to avoid sliding of the seat belt
along the seat rail. A sliding seat belt might result in poor seating position
of the user.
the positioning belt is not to be used as a safely belt. If the wheelchair is
transported in an occupied position, the user needs to wear a safety belt
which is mounted in the vehicle he or she is transported in.
T
Page 56

56
11.4 control settings
the side control joystick module is adjustable in depth, height and angle.
to set the depth take the following steps:
11.4.1 height adjustment side control:
To set the height adjustment of the side control follow the next steps:
step 1: loosen the bolts (V) using a 3mm Allan key.
step 2: move the bracket into the required height position.
step 3: fasten the bolts again.
11.4.2 depth adjustment side control
To set the depth adjustment of the side control follow the next steps:
step1: loosen the bolts (W) using a 3m Allan key.
step2: move the control in the required depth position.
step 3: tighten the bolts again.
V
W
Page 57

57
12 control panel
The wheelchair uses a color screen joystick
module. With this joystick module all functions
of the wheelchair can be controlled. This
joystick module can be mounted on the left or
right armrest or even as an integrated desktop
unit.
The joystick module contains a few major components which will be explained
separately.
12.1 charging socket
The charging socket is used to charge the batteries. Whilst charging the
batteries, the driving of the wheelchair is automatically blocked.
12.2 joystick
The primary function of the joystick is to control the speed and direction of the
wheelchair. The further you push the joystick from the center position the
faster the wheelchair will move. When you release the joystick the brakes are
automatically applied. If the wheelchair is fitted with powered seat functions,
the joystick can also be used to move and select the specific powered seat
function.
Several different shapes of joystick knobs are available to optimize the control
of the joystick.
Page 58

58
12.3 display
The color LCD screen is split into 3 areas of information. The Top Bar, the
Base Bar and the Main Screen Area.
12.3.1 battery indicator (top bar)
This displays the charge available in the battery and can be used to alert the
user to the status of the battery. if all LED's are on, the batteries are fully
charged. If the capacity is lowered one by one an LED will erase. The bar is
divided into three color zones: Green, orange and red. If only the LED are left
it means the batteries will be almost empty and need to be charged.
beside the color you also have different LED lighting modes:
LED's Steady: This indicates that all is well.
LED's Flashing Slowly: The control system is functioning correctly, but you
should charge the battery as soon as possible.
LED's Stepping Up : The wheelchair batteries are being charged. You will not
be able to drive the wheelchair until the charger is disconnected and you have
switched the control system off and on again.
12.3.2 focus light (top bar)
When the wheelchair system contains more than one method of direct control,
such as a secondary Joystick Module or a Dual Attendant Module, then the
Module that has control of the wheelchair will display the In Focus symbol.
Page 59

59
12.3.3 profile name (main screen)
The profile name shows in which drive
profile you are at the moment. The
name of the profile can be
programmed to your wishes by your
local supplier. The wheelchair can
have up to 8 different driving profiles.
Each profile is set to a certain
environment you want to drive in.
Standard the wheelchair comes with an
indoor- and outdoor profile.
12.3.4 clock (main screen)
The clock displays the current time in a
numeric format. The clock is user
adjustable. Adjustable options are:
• Visibility, whether the clock is
displayed on screen.
• The display format, 12 or 24 hour.
• The time, the user can adjust the
time.
12.3.5 speed display (main screen)
This gives a proportional display of the
wheelchairs speed. The Arc begins at
0% and has a programmable
maximum. The programmable
parameter is Max Displayed Speed.
The speeds can be set in mph or km/h.
The standard setting km/h.
Page 60

60
12.3.6 speed bar (main screen)
This speed bar displays the current
maximum speed setting. It contains 5
steps in speed. These steps can be
selected using the speed buttons,
explained in the chapter "Buttons"
12.3.7 inhibit (main screen)
If the speed of the wheelchair is being
limited; for example, by a raised seat,
then this orange symbol will be
displayed.
If the driving is stopped by an inhibit,
the bunny will flash in red.
12.3.8 set functions (main screen)
Displays the sections of the chair
currently selected for movement, the
name given to the selection and a
direction arrow showing what sort of
movement is available.
Besides the screen you use for driving or controlling the seat functions, there
are also other screens which show information. The most common screen
messages are explained in the next chapters
Page 61

61
12.3.9 additional options (main screen)
Additional screens can show the
additional options of the electronic
system. for example: Bluetooth,
environmental control, mouse function.
for more detailed information n about
these options, [pleas contact you local
supplier.
12.3.10 message screen (main screen)
The joystick module displays warning
icons and informational messages, in a
dedicated message window.
12.3.10.1 restart message
this icon is show when the system to be restarted. (most of
the time when a module has been exchanged or added.)
12.3.10.2 timer message
This symbol is displayed when the control system is changing
between different states. An example would be entering into
Programming Mode. The symbol is animated to show the sands
falling.
Page 62

62
12.3.10.3 sleep message
This symbol will be displayed for a short time before the R-net
enters into a sleep state.
12.3.10.4 joystick deflected message
this message is show if the wheelchair is started up and
the joystick is not in its zero position. If you let go of the
joystick, the system will start up normally and the
message disappears.
12.3.10.5 E-stop message
If the External Profile Switch is activated during
drive, or actuator operation, this symbol will be
displayed.
12.3.10.6 error codes
if something is wrong with the wheelchairs electronics, the wheelchair will stop
driving and an trip code (error code) will be displayed on the screen of the
Joystick module.
for more explanation about the trip code we refer to the chapter trouble
shooting.
Page 63

63
12.3.11 current profile (base bar)
The currently selected Profile is shown in numeric form.
12.3.12 motor temperature (base bar)
This symbol is displayed when the control system has intentionally
reduced the power to the motors, in order to protect them against
heat damage.
12.3.13 control system temperature (base bar)
This symbol is displayed when the control system has intentionally
reduced its own power, in order to protect itself against heat
damage.
12.3.14 wheelchair lock
The wheelchair has the option so secure against unintended use. Therefore
the joystick module can be locked. This way it is protected against unintended
use during storage or parking.
Lock options
The control system of the wheelchair can be locked in two ways: By using a
button sequence on the keypad, or with a physical key. This key can ordered
as an accessory.
Keypad locking
To lock the wheelchair by using the keypad lock:
- While the wheelchair is switched on, depress and hold the ON/OFF button.
- After 1 second the control system will beep.
- Now release the ON/OFF button.
- Deflect the joystick forwards until the control system beeps.
- Deflect the joystick in reverse until the control system beeps.
- Release the joystick, there will be a long beep.
- The wheelchair is now locked.
- The following screen will be displayed in the control box:
Page 64

64
wheelchair in locking mode
To unlock the wheelchair:
- If the control system has been switched off, press the ON/OFF button.
- Deflect the joystick forwards until the control system beeps.
- Deflect the joystick in reverse until the control system beeps.
- Release the joystick, there will be a long beep.
- The wheelchair is now unlocked.
Locking the wheelchair by using a physical key
locking key
To lock the wheelchair with the key lock:
- Insert and remove the supplied PGDT key into the charger socket.
- The wheelchair is now locked.
To unlock the wheelchair:
- Insert and remove the supplied PGDT key into the charger socket.
- The wheelchair is now unlocked.
Page 65

65
12.4 buttons
The joystick module has several button which will be explained below.
12.4.1 on/off button
The On/Off button applies power to the control system electronics, which in
turn supply power to the wheelchair’s motors. Do not use the On/Off button to
stop the wheelchair unless there is an emergency. (If you do, you may shorten
the life of the wheelchair drive components).
12.4.2 horn button
The horn will sound while this button is depressed.
12.4.3 speed decrease button
This button decreases the speed setting.
12.4.4 speed increase button
This button increases the speed setting. (it does not increase the maximum
speed!).
Always make sure the wheelchair is switched off before entering or leaving
the wheelchair. If the wheelchair is switched on during transferring, there is
a danger the joystick will be touched and the wheelchair will move.
Page 66

66
12.4.5 mode button
The Mode button allows the user to navigate through the available operating
modes for the control system. The available modes are dependent on
programming and the range of auxiliary output devices connected to the
control system.
12.4.6 profile button
The Profile button allows the user to navigate through the available Profiles for
the control system. The number of available Profiles is dependent on how the
control system is programmed.
Depending on the way the control system has been programmed a
momentary screen may be displayed when the button is pressed.
12.4.7 hazard Warning Button and LED
This button activates and de-activates the wheelchair’s hazard lights. Depress
the button to turn the hazards on and depress the button again to turn them
off.
When activated the hazard LED and the indicator LEDs will flash in sync with
the wheelchair’s indicators.
12.4.8 lights Button and LED
This button activates and de-activates the wheelchair’s lights. Depress the
button to turn the lights on and depress the button again to turn them off.
When activated the lights LED will illuminate.
Page 67

67
12.4.9 left Indicator Button and LED
This button activates and de-activates the wheelchair’s left indicator. Depress
the button to turn the indicator on and depress the button again to turn it off.
When activated the left indicator LED will flash in sync with the wheelchair’s
indicator(s).
12.4.10 right Indicator Button and LED
This button activates and de-activates the wheelchair’s right indicator.
Depress the button to turn the indicator on and depress the button again to
turn it off.
When activated the right indicator LED will flash in sync with the wheelchair’s
indicator(s).
12.5 jack sockets
12.5.1 external profile switch jack
This allows the user to select Profiles using an external device, such as a
buddy button. To change the Profile whilst driving simply press the button.
If the control system is set to latched drive or actuator control operation, then
the polarity of the jack input is reversed to effect a fail safe system; meaning
this input will provide an External Profile Switch function and an Emergency
Stop Switch function.
12.5.2 external on/off switch jack
This allows the user to turn the control system on and off using an external
device, such as a buddy button.
Page 68

68
\
12.6 R-net Connectors
To connect the Communication Cables:
• Holding the connector housing, firmly push the connector into its mate until
you can no longer see the yellow plastic.
The connectors are secured using a friction system.
To disconnect the Communication Cables:
• Holding the connector housing firmly, pull the connectors apart.
Do not hold or pull on the cable. Always grip the connector when connecting
and disconnecting.
When the control system is first switched on after a connection, or system
component change the Timer will be displayed whilst the system checks itself
and then the re-start icon will be displayed. Switch the control system off and
on again to operate.
The Joystick Module is supplied with rubber bungs that must be inserted
into the Jack Socket when no external device is connected.
If the communication is poor because of damaged cables, a trip code "bad
cable" might be show on the display. Should this message appear on the
display contact your local supplier to have the wheelchair checked.
Page 69

69
12.6 joystick
The joystick is primarily used to drive the wheelchair. just push the joystick into
the direction you want to drive and the wheelchair will start to move in that
direction.
The secondary purpose of the joystick is to navigate through men menu of the
wheelchair. By moving the joystick forward or backward you can scroll up or
down through the menu, by moving to the right you can enter a sub selection.
We strongly recommend to practice the function of the joystick before
starting to drive with the wheelchair.
Page 70

70
13 electric system
13.1 batteries
The wheelchair has two serial connected 12 volt maintenance free batteries
for the power supply. The capacity of the batteries can be 60, 72 or 85 Amps.
The batteries are fitted in the center of the chassis to arrange a low centre
point of gravity. Both batteries are easy accessible for maintenance or
replacement.
position and access of the maintenance free batteries
Be careful when using metal objects close to the batteries. A short circuit
might easily create strong sparks and can cause a fire. Should you need to
work on the batteries, use isolated tools and wear protective gear on
hands and eyes.
Batteries are chemical components and shall be treated as such. In case
of removal, one shall treat the batteries as chemical waist. The batteries
need to be disposed according to the local regulations for chemical waist.
Page 71

71
13.2 fuses
The wheelchair has one main fuses to protect the batteries again overload and
short circuit. This main fuse is placed between the rear wheels and easy
accessible. The electronics itself is completely protected again short circuit
and overload.
position of the main fuse
The main fuse is also used to disconnect the batteries from the electronics.
This is required when transporting the wheelchair on a plane.
additional fuses
Beside this main fuse there is a fuse on each battery close to one of the
connecting pole. They are integrated into the battery cable. This to protect
each battery separate for short circuit. these fuses are stronger than the main
fuse, so in case of a short circuit, the main fuse will blow first.
If the fuse in blown, please contact your local authorized supplier. He
should check the wheelchair first before replacing the main fuse. The fuse
only blows if a serious problem occurs.
Only use original spare part fuses of Karma. Using other fuses might
damage the electronic system or even cause fire.
Page 72

72
14 using the wheelchair
14.1 general warnings and advices
Please read this section of the manual very carefully as it contains issues
related to safety and possible hazards.
● When the user is driving the wheelchair for the first time, the supplier
has to make sure that the maximum driving speed and curving speed
are set in a slow mode. After learning to drive the wheelchair safely, the
set speeds can be increased.
● Special care should be taken in driving on unequal surfaces such as
slopes, unequal pavements and during descending from footpaths.
● It is not allowed to carry passengers other than the user on the
wheelchair.
● On slippery surfaces, like ice and snow, the driving speed must be
reduced accordingly.
● Do not drive through water puddles, you cannot see how deep they
are. This might lead to dangerous situations. water can damage the
wheelchair.
● Only charge the wheelchair in well ventilated areas.
● Note that no other persons or animals are in the direct contact zone of
the wheelchair when using it. This is for both driving and using the high
low. Because the wheelchair is a very powerful machine with a relative
high weight this might lead to severe injuries.
● When driving the wheelchair in the dark, be sure that you have the
lights switched on.
● Always drive slowly in the near surrounding of other people or
animals.
● Although the wheelchair is intensively tested, it cannot be excluded
completely that the wheelchair influences the performance of
electromagnetic fields (e.g. Alarm systems of shops, automatic doors
etc.).
● The driving characteristics of the wheelchair can be influenced by
strong electromagnetic fields (e.g. Those emitted by portable
telephones, electricity generators or high power sources. Try to avoid
the near presence of any radiation source such as radio's, cell phones
etc. If your wheelchair reacts to a source of radiation with unexpected
behavior, try to drive slowly to a safe place, turn off your wheelchair and
try to extinguish the radiation source.
Page 73

73
14.2 use in combination with other products
different- or customized seat:
14.3 hot and cold surfaces
● The combination of seat and user does not exceed the maximum
allowed weight on the wheelchair carrier and tilt mechanism (140 kgs).
● The seat is fixed properly to the seat post.
● The centre of gravity of the combination of user and seat is on the same
spot as when the standard seat would be used.
● The position of the tray table and/or the control unit is comfortable and
easy to use for the user.
● The used materials are in compliance with the accepted standards
mentioned in EN 12184 regarding flame resistance and bio-compatibility.
● The seat or any other mounted parts do not touch the wheelchair carrier
when using the high low function. Because the dimensions will vary from
the standard seat. This has to be checked by watching these parts when
activating the high low.
● The seat or any other mounted parts do not touch the wheelchair carrier
when using the tilt function. Because the dimensions will vary from the
standard seat. This has to be checked by watching these parts when tilting
the chair.
Some parts of the wheelchair can reach high temperatures when exposed
to direct sun. Please be careful with touching especially the plastic parts
under these circumstances in order to prevent skin burning.
The wheelchair can reach low temperatures when exposed to cold weather
(below zero degrees Celsius). Please take caution in touching especially
the metal parts with wet body parts under these circumstances as they
easily can freeze and get stuck to these surfaces.
Changes which are made by third parties are not covered by the warranty
and responsibility of Karma Medical.
Page 74

74
14.4 danger of pinching
User
Special care has been taken to make sure that the chance that the user
pinches him or herself while seated in the wheelchair is minimal. However
there are few situations that might lead to injury. Special caution has to be
taken under the following circumstances;
● When the tray table is closed, pinching of fingers or other body parts is
possible between the locking parts.
● When the revolving control unit is used in the tray table, pinching of fingers
or other body parts is possible when the control unit is being turned upside
down.
● When adjusting the seat while the user is sitting in the chair, please note
that no body parts are in the direct zone of the moving parts.
When moving the seat down, the tilt frame comes very close to the top
chassis cover. This creates a pinching danger, when at this time, hands
are on the top cover at the rear end of the chassis. For this reason a
warming decal is placed on the top cover on the rear of the chassis.
We advise you to always keep your hands or the hands from other persons
away from the rear end of the top chassis cover.
All areas where there might be a risk of pinching are indicated by these
warning decal:
Page 75

75
14.5 surroundings
Special care has been taken to make sure that the change that the
surroundings pinches him or herself is minimal. However there are few
situations that might lead to injury. Special caution has to be taken under the
following circumstances;
● When driving the wheelchair, make sure that no persons or animals are in
the near surrounding, because running over e.g. feet will lead to serious injury
as a result of the high weight of the electrical wheelchair.
● When using the seat lift and/or the electrical tilt adjustment, make sure that
no persons or animals are in the near surrounding, because it is possible to
get pinched by the moving mechanism, although the moving parts are
designed to be as safe as possible.
14.6 precautions to prevent dangerous situations
In order to prevent dangerous situations please take note of the following
precautions:
● Only charge the battery in well ventilated areas.
● Only drive at slow speed in the direct surrounding of other people or
animals.
● Always turn on the head and tail lights when using the chair under
circumstances with limited sight like darkness or fog.
● Please do not allow any persons to stand or sit on the wheelchair except for
the user.
● Make sure that the remaining battery power is sufficient for the distance that
is to be bridged.
● Do not replace a damaged fuse before it is known why the fuse is blown and
the cause is taken away.
● Have the wheelchair checked by your supplier after any collision or when
the wheelchair is otherwise (visual) damaged.
● Check the tire pressure and refill the tires if necessary every four weeks.
Check the tires at the same time for wear and damage. Replace if necessary.
Page 76

76
● Have the wheelchair checked on a yearly basis by your supplier.
● Do not change the programmed driving characteristics of your control unit,
as it is specific for the situation of the user. If any adjustment is required
because of a change of circumstances, please contact your supplier.
14.7 use on slopes: driving on downhill slopes
Driving on downhill slopes must always be done at a low speed and with great
care. Avoid sudden braking, abrupt avoidance maneuvers and never maintain
a speed higher than that at which you can maneuver the wheelchair in a safe
and secure manner. Always be aware of the fact that the control of the
wheelchair driving downhill is different than on level surfaces.
max. acceptable downhill slope
Always make sure that, when positioned on slopes, the brakes are
attached (no Freewheel).
If the wheelchair is in freewheel mode, there is a risk that the wheelchair
might start to move in an uncontrolled way. This might lead to personal or
material damage.
Page 77

77
14.8 use on slopes: driving on uphill slopes
Driving on uphill slopes must always be performed with great care and
attention. Avoid sudden avoidance maneuvers and never drive at a speed
higher than needed to maneuver the wheelchair in a safe and secure way.
Avoid holes and bumps as much as possible. Drive slowly and controlled.
When driving on downhill slopes with an uneven or slippery surface (for
example grass, gravel, sand, ice or snow) you should drive with extra care
and attention.
When driving on downhill you can use the tilt (if build in) to create a more
stabile seating position for yourself.
Never drive downhill on slopes bigger than 10°. This might result into
uncontrollable behavior of the wheelchair. This can lead to material or
personal damage. ( Dynamic stability according to ISO 7176-2= 6°.
The position of the seat in height and angle or the position of the backrest
has great influence on the stability of the wheelchair when driving on
slopes. Make sure the seat is in the optimal driving position to avoid tipping
over.
The position of the seat in height and angle or the position of the backrest
has great influence on the stability of the wheelchair if driving on slopes.
Make sure the seat is in the optimal driving position to avoid tipping over.
Page 78

78
max. acceptable uphill slope
When driving on uphill slopes with an uneven or slippery surface (for
example grass, gravel, sand, ice or snow) you should drive with extra care
and attention.
When driving on uphill you can use the tilt (if build in) to create a more
stabile seating position for yourself.
Never drive uphill on slopes bigger than 10°. This might result into
uncontrollable behavior of the wheelchair. This can lead to material or
personal damage. ( Dynamic stability according to ISO 7176-2= 6°.
The position of the seat in height and angle or the position of the backrest
has great influence on the stability of the wheelchair if driving on slopes.
Make sure the seat is in the optimal driving position to avoid tipping over.
Page 79

79
14.9 driving on sideways slopes
Driving on a sideways slope must always be performed with great care. Avoid
sudden avoidance maneuvers and never drive at a speed higher than needed
to maneuver the wheelchair in a safe and secure way. Avoid holes and bumps
as much as possible. Drive slowly and controlled.
driving on sideways slopes
When driving on sideways slopes with an uneven or slippery surface (for
example grass, gravel, sand, ice or snow) you should drive with extra care
and attention.
Never drive sideways slopes bigger than 10°. This might result into
uncontrollable behavior of the wheelchair. This can lead to material or
personal damage. ( Dynamic stability according to ISO 7176-2= 6°.
The position of the seat in height or the position of the backrest has great
influence on the stability of the wheelchair if driving on slopes. Make sure
the seat is in the optimal driving position to avoid tipping over.
Page 80

80
14.10 obstacle climbing
Do not drive the wheelchair
over obstacles of a height
bigger than 70mm. Driving over
tall edges increases the risk of
tipping over as well as the risk
of damage to the wheelchair.
Always be aware when
climbing obstacles of the
stability of your wheelchair.
Driving down of a higher surface
(like pavement), Always be
aware of the sudden forward
movement of your wheelchair
when driving down of it. If your
wheelchair has powered seat tilt,
you can use the seat tilt for more
stability whilst driving of the
pavement.
When driving over obstacles with uneven or slippery surface (for example grass,
gravel, sand, ice or snow) you should drive with extra care and attention.
Never drive on obstacles higher than 70mm. Always drive with maximum
attention and great care.
Page 81

81
14.11 use in presence of electromagnetic fields, e.g. from cell phones.
Use your cell phone only when the wheelchair is switched off. Although the
wheelchair is tested and approved for electromagnetic interference, there is a
very small change that strong electromagnetic fields from cell phones or some
other electrical products lead to unexpected and unpredictable electrical
reactions from the wheelchair.
Try to avoid the near presence of any radiation source such as radio's, cell
phones etc. If your wheelchair reacts to a source of radiation with unexpected
behavior, try to drive slowly to a safe place, turn off your wheelchair and try to
extinguish the radiation source.
When it is unavoidable to use the wheelchair under these circumstances, be
prepared for any unexpected and unpredictable electrical reactions from the
wheelchair.
If you enter an area where there might a risk of strong electromagnetic
interference, always reduce your driving speed and drive carefully.
Avoid area's where strong military transmitters are used. They might
interfere with your wheelchairs electronics.
Avoid area's close to high voltage power lines. They might interfere with
your wheelchairs electronics.
Avoid area's close to high frequency energy equipment, like high
frequency welding machines. They might interfere with your wheelchairs
electronics.
Page 82

82
15 driving the wheelchair
The wheelchair is designed for indoor and outdoor use. When driving indoors,
you must be careful when driving in, for example, narrow passageways, when
passing through doors and entryways as well as when using elevators, ramps,
etc. Also be aware of the risk of things getting caught in the machinery when
you use the electrical seat lift and seat tilt, in particular when the wheelchair
has been run in under a table, workbench or something like that.
Outdoors, you must remember to drive very slowly on steep downhill slopes
and to be very careful when driving on uneven surfaces, on uphill slopes, with
sideways slopes and when negotiating obstacles. Always maintain a safe
distance from the edge when driving close to drop-offs and pavements.
15.1 driving in general
Make sure that the control system is mounted right and that the joystick
position is correct. The hand or limb you use to operate the joystick should be
supported, for example by the wheelchair armrest. Do not use the joystick as
the sole support for your hand or limb, the wheelchair movements and bumps
could upset your control, which might result in uncontrolled driving.
1. Switch on the power by pressing the on/off button on the control panel.
2. Select the right profile (start with the indoor profile)
We recommend that you should make repeated test drives in areas in
which you know you feel secure so that you are quite familiar with how the
wheelchair and its accessories behave in different situations before you
begin using the wheelchair on normal roads and other public areas.
Always make sure the wheelchair is switched off before entering or leaving
the wheelchair. If the wheelchair is switched on during transferring, there is
a danger the joystick will be touched and the wheelchair will move.
Always make sure the wheelchair is switched off before entering or leaving
the wheelchair. If the wheelchair is switched on during transferring, there is
a danger the joystick will be touched and the wheelchair will move.
Page 83

83
3. Set an appropriate maximum speed by pressing the decrease or increase
button until the desired indicator lamp lights up for your type of driving. It is
preferable to begin with a low speed.
4. Carefully move the joystick forward to drive forward, and backward to drive
backward.
5. The speed of the wheelchair is adjusted continuously by the joystick being
moved different distances forward and backward respectively. The
wheelchair's electronics make creep driving possible over edges (max.
70mm.). You can drive up to the edge, and then carefully drive over it.
15.2 driving technique
The electronic control system of the wheelchair “reads” your joystick
movements and transforms these “commands” into movements of the
wheelchair. You will need very little concentration to control the wheelchair,
which is especially useful if you are inexperienced. One popular technique is
to simply point the joystick in the direction you want to go. The wheelchair will
move in the direction you push the joystick. Always think about driving as
flexibly and fluently as possible and avoid heavy braking and avoidance
maneuvers. The smoother you move the joystick, the smoother the wheelchair
will drive.
Do not perform the first test drive on your own. The test drive is of course
just a check of how you and the wheelchair function together, and you may
need some assistance.
Before driving, check that the wheel freewheel is set in the drive position.
Page 84

84
15.3 stopping the wheelchair
If you would like to stop simply move the joystick slowly towards the centre
and release the joystick. The wheelchair will come to a gentle stop. If you want
to stop more quickly, simply let go of the joystick. It will put itself back into
neutral position, which makes the wheelchair stop. Is there an emergency
situation and you need to make an emergency stop, pull the joystick
backwards. This will slow down and stop the wheelchair very fast.
16 using the powered seat functions
If your wheelchair has powered seat functions like seat lift, seat tilt , backrest
recline and/or powered legrest, you can control them by using the menu on
the joystick module.
To enter the seat function menu, push the button "Mode" on the joystick
module. You will leave the drive mode.
Be careful driving backwards. You cannot really oversee where you are
driving. It is better, when the space is available, to turn around and drive
forward. By driving backwards not seeing where you are heading you
might bump into something or someone. This can lead to personal or
material damage.
Be careful using the emergency brake. Especially when driving on slopes.
Extreme braking might create the risk of tipping over when you are on a
slope. Also be away that during braking you tend to lose balance yourself.
If not strapped into a seat belt you might run the risk of falling out of your
wheelchair whilst braking very hard.
Page 85

85
screen example of the seat function menu
By moving the joystick to the left or right you can switch between different
powered seat function. One the required seat function is shown on the display,
move the joystick forward or backward to activate the seat function in one
direction. As long as you deflect the joystick from centre the function will
move. release the joystick and the seat function movement will stop.
17 using additional function of the wheelchair menu
If your wheelchair has additional function build in like the blue tooth mouse
function, you are able to control this using the menu and joystick.
To enter the blue tooth mouse menu, push the button "Mode" on the joystick
module. You will leave the driving mode. The first screen you will see is the
powered seat function screen. If you push the "mode" button once more, you
will enter the blue tooth screen. Now the joystick becomes the mouse for using
the PC or laptop.
For further information about the additional options, we refer to your local
authorized supplier.
The acceleration and speed of each seat function can be programmed by
your local authorized supplier. Should you request a different setting,
please contact you r local authorized supplier.
Page 86

86
17 handling the mechanical brakes
The drive motors of the wheelchair have electro mechanical brakes. The brake
can be release to set the wheelchair into freewheel mode. In freewheel mode
the wheelchair can be pushed. this might be necessary to move the
wheelchair in certain cases.
17.1 release the mechanical brakes
To release the mechanical brakes, take the following step.
Look for the red lever on
each of the driving motor.
Around the lever is a
instruction sticker which
shows the direction to open
or lock the mechanical
brake. Move the lever into
the "open" position on each
motor. Now the wheelchair
is in freewheel mode and
can be pushed.
To lock the brakes, move
the lever in to the "lock"
position. on both motors.
If you want to put the wheelchair into freewheel mode, be sure to switch
the electronics first. Leaving the electronics switched on will result a large
resistance whilst pushing in freewheel mode.
If the parking brake is released (free-wheel mode), the wheelchair cannot
be driven by the electronics. Therefore the release of the brakes should
only be done in emergency cases and or for servicing. If the user is on
board, the parking brakes should always be attached.
Page 87

87
18 charging the maintenance free batteries
The amount of charge in your maintenance free batteries is depending on a
number of factors, including the way you use your wheelchair, the temperature
of the maintenance free batteries, their age and the type of maintenance free
batteries used. These factors will affect the distance you can travel in your
wheelchair. All wheelchair maintenance free batteries will gradually lose their
capacity when they get older. The most important factor that is reducing the
life span of your batteries is the amount of charge you take from the batteries
before you recharge them. The maintenance free battery life is also reduced
by the number of times you charge and discharge the batteries. Normally the
amount of cycles is between 300 and 700 times. To make your maintenance
free batteries last longer, do not allow them to become completely discharged.
Always recharge your maintenance free batteries promptly after they are
discharged. If your battery gauge reading seems to fall more quickly than
usual, your batteries may be worn out. If you wheelchair shows these
indications, please contact your local authorized supplier to have the
maintenance free batteries checked.
18.1 battery level
The power level of the batteries is displayed on the LCD screen of the joystick
module.
battery indicator
Always make sure that, when positioned on slopes, the brakes are
attached (no Freewheel). If the wheelchair is in freewheel mode, there is a
risk that the wheelchair might start to move in an uncontrolled way. This
might lead to personal or material damage.
Page 88

88
If the maintenance free batteries are fully charged, all ten LED's on the top bar
light up. The more energy is used the more LED extinguish, starting on the
right side.
If only the red LED are still on, it indicates that recharging of the maintenance
free batteries is required.
If only two red LED's are flashing, it indicates that the maintenance free
batteries are empty and should be charged immediately.
18.2 charging socket
The charger socket can be found on the front side of the joystick module. If the
wheelchair has an integrated desktop control, the charger socket will be on the
side of the joystick module.
If the battery indicator shows only two segments in flashing, you should
charge the batteries as soon as possible. This flashing is a warning signal.
You are still able to drive the wheelchair but only for a short distance. If the
batteries reach a level where they cannot supply enough energy to control
the wheelchair is a save way. The wheelchair will stop and give an error
warning saying “low battery voltage”
If the batteries should be drained completely, it is important that you
charge them up again as soon as possible since a complete loss of charge
reduces the lifespan of the batteries.
Information about the charger which is supplied with the wheelchair can be
found in the user manual of the charger itself. You can find the charger
user manual in the tool bag which comes with the wheelchair.
Some local dealers supply the wheelchair with their own brand of batteries
and battery charger. For information about these batteries and charger,
you should ask your local authorized supplier.
Page 89

89
charger socket position
Exendis Impulse charger
The wheelchair can be delivered with an Exendis charger. This charger has a
capacity to charge up to 11 ampere. This charger will fully charge the batteries
within 8 hours.
For more detailed information about the charger and its functions, we refer
to the manual which comes with the charger.
In some occasions putting in the charger socket yourself can be very
difficult. Sometimes you would like to have the charger socket on a specific
place on your wheelchair. For this reasons the Wheelchair has an
additional charger socket which can be place on the spot you can reach
yourself. For more information, please contact your local authorized
supplier.
Page 90

90
18.3 disposal of broken or worn out batteries
Batteries don’t last forever. Therefore batteries need to be changed after a
certain period. The safest way is to have this done by authorized personnel of
your local supplier. Batteries are chemical waist and need to be treated as
such, using protective clothing, gloves and glasses.
Be sure that the charger plug is pushed fully in position. You will not be
able to drive the wheelchair when the charger is connected. If the
wheelchair does drive with the charger plugged in, contact your local
authorized supplier.
In some occasions it might be the case that your local supplier will deliver
the wheelchair with a different brand charger. In that case your local
supplier will inform you about the functionality of that charger and will also
make sure the charger comes with a user manual.
Replacing damaged or old batteries needs to be done by authorized
personnel wearing protective clothing, gloves and safety glasses.
Old or damaged batteries are classified as chemical waist and need to be
disposed according to the local regulations for chemical waist. Please
contact your local supplier for further details.
Page 91

91
19 transport of the wheelchair
The wheelchair must only be transported in a vehicle that is approved or
adapted for such purposes. It is safest if the wheelchair is separated from the
drivers compartment. Transportation in a trailer is also an optional
recommendation. Should the wheelchair be transported in an MPV/estate car
or other vehicle, it is vital that the wheelchair is properly fixed and that the
fixing points of the car are well anchored. In all situations of transportation, the
wheelchair needs to be properly fixed using a 4-point heavy duty webbing
restraint to prevent the wheelchair from sliding or tilting while driving. Check
that the wheelchair is properly fastened and that the parking brakes are
engaged. The wheelchair can be locked into position by using fastening straps
through the brackets in the front and the back, each marked with an indication
sticker.
front transportation loops rear transportation loops
Secure the wheelchair according to the manufacturer of the vehicle restraint
systems instructions. Always make sure that the fastening points on the
transport vehicle are well anchored. Use of this is strongly advised since the
heavy wheelchair can cause serious problems in case of a car accident. The
wheelchair fulfils al requirements according to the ISO 7176-19:2001 standard
(“Wheeled mobility devices for use in motor vehicles).
The specifications of the wheelchair are in accordance with the
requirements specified in ISO 7176-19-2001
Page 92

92
Karma Medical Taiwan would always recommend transferring to a
car seat within a vehicle, however should this not be possible, the
following is the safest method:
a. The wheelchair must be positioned in a forward facing position.
b. An Unwin restraint system like model Gemini 3 or a different brand
with equivalent specification must be used.
c. As a car safety belt a Klippan Safety AB belt, model 907428 or a
different brand with equivalent specification must be used.
d. The restraint system must be fixed on the specific points of the
wheelchair, which show a label of a transportation hook.
e. A head restraint system must be fitted during transportation. This
device must be suitably positioned and able to stay on during
transportation.
f. The centre point of gravity of the wheelchair during transportation
should be as low as possible. A powered seat elevator must be in its
drive position, the backrest should be upright, the seat should be in a
horizontal position and the legrest should be positioned in
a normal seating position.
g. During transportation the wheelchair should be switched off to
prevent it from moving by accidental joystick use.
h. Make sure the tire pressure of each wheel of the wheelchair is in
the optimal condition. Too low tire pressure can result in a instable
behavior of the wheelchair during
transportation.
The position belt of a wheelchair is not meant to be used as a car safety
belt. It only prevents the user from sliding out of the seat while driving the
wheelchair. If a user is transported in his wheelchair, he or she should
wear an extra car safety belt, which is attached to the vehicle like all the
car safety belts.
When shipped by boat, please give special attention to prevent contact
with salt water or air. Salt water is extremely corrosive and might lead to
unwanted damage of the product.
Page 93

93
19.1 transportation guideline
The wheelchair has a 4-point heavy duty webbing
restraint. Using two brackets on the front end and two
brackets on each rear side of the chassis. The brackets
are indicated with a sticker.
The angle of the straps should be around 45° to the horizontal plane. This is in
order to have maximum effect in vertical and horizontal direction.
The straps have to be connected to the vehicle at suitable anchor points.
Make sure that the tire pressure is at the recommended level so the straps
can have maximum effect. Make sure the straps are tightened to maintain
optimal security.
Poor fixations of the wheelchair in a vehicle might cause damage to the
vehicle itself, the wheelchair or the passengers inside the vehicle while
driving. Not using a car safety belt while sitting in a wheelchair might lead
to serious injuries in case of an accident.
Page 94

94
19.2 safety belt
If the user is transported in his wheelchair, it is necessary to use a car safety
belt to secure the wheelchair user.
positioning of the car safety belts for wheelchair users.
The wheelchair has been crash tested using a ……. safety belt model …….
We advise you to use a similar system or a system that is equally specified. It
is very important to use the safety belt in the right angles according to the
wheelchair user. The angle for the pelvis part (2) of the safety belt must be in
angle of 30- 75 ° with the horizontal plane. (see picture below). Also the side
angle should stay between the vertical plane to maximum of 15° angle with the
vertical plane. (see picture below).
optimal angles for a safety belt used by the wheelchair user
Page 95

95
The shoulder part (1) of the safety belt should be positioned according to the
figure below.
shoulder safety belt positioning
Please obtain the following points for a optimal personal safety of the
wheelchair user:
- the pelvic belt should be worn low across the front of the pelvis, so
that the angle of the pelvic belt is within the preferred zone of 30° to
75° to the horizontal, as shown in figure above.
- a steeper (greater) angle within the preferred zone is desirable.
- belt restraints should not be held away from the body by wheelchair
components or parts, such as the wheelchair armrests or wheels,
along with an illustration similar to that of the figure shown above.
- upper torso belts should fit over the shoulder and across the chest,
as illustrated in figure of the shoulder safety belt positioning.
- belt restraints should be adjusted as tightly as possible, consistent
with user comfort.
- belt webbing should not be twisted when in use.
Page 96

96
picture of improper belt fit picture of proper belt fit
Please, make sure the following conditions are fulfilled to obtain a
safe transportation:
- Whenever possible the occupied wheelchair shall be located in a
forward-facing configuration and secured by the tie downs in
accordance with the WTORS ( wheelchair tie down and occupantrestraint system) manufacturer’s instructions.
- This wheelchair is suitable for use in vehicles and has met the
performance requirements for travelling forwards-facing in frontal
impact conditions. Its use in other configurations within a vehicle has
not been tested.
- The wheelchair has been dynamically tested in a forward-facing
orientation with the ATD (anthropomorphic test device) restrained by
both pelvic and upper torso belts.
- Both pelvic and upper torso belts should be used to reduce the
possibility of head and chest impacts with vehicle components.
- When possible, other auxiliary wheelchair equipment should be
either secured to the wheelchair or removed from the wheelchair and
secured in the vehicle during transit, so that it does not break free
and cause injury to vehicle occupants in the event of a collision.
- Positioning supports should not be relied on for occupant restraint
in a moving vehicle unless they are labeled as being in accordance
with the requirements specified in ISO 7176/19-2003.
- The wheelchair should be inspected by a manufacturer’s
representative before reuse following involvement in any type of
vehicle impact.
Page 97

97
19.3 transportation on an airplane
When transporting your wheelchair by air, you should primarily pay attention to
the following three things:
1. batteries
Gel batteries: In most cases, they do not need to be removed from the
wheelchair. The batteries only need to be disconnected from the wheelchair .
To do this simply unplug the main fuse in the rear of the chassis.
position of the main fuse the main fuse
Acid batteries: Most airlines require that batteries be removed from the
wheelchair and transported in special boxes that the airline may provide.
When transported by air, the wheelchair will be put with other goods in a
confined space. Therefore, it is important to take preventive action to minimize
transport damage to the wheelchair. Cover the control panel with soft, shockabsorbing material (foam plastic or similar) and fold it in towards the back
rest. Protect other protruding objects in a similar manner. Tape any loose
cables to the seat or covers.
2. the wheelchair’s dimensions and weight
How much the wheelchair weighs and how large it is are important, depending
on the type of airplane in which the wheelchair is to be transported. The
smaller the airplane is, the smaller the wheelchair may be/weigh and vice
versa. Always check with the airline what rules apply.
- Alterations or substitutions should not be made to the wheelchair
securement points or to structural and frame parts or components without
consulting the manufacturer.
- Only use "gelled electrolyte" batteries on powered wheelchairs when
used in a car.
Page 98

98
20 maintenance and repairs
The user and attendant have to take care of some maintenance, service and
occasionally fault finding activities. Other activities as described in this
paragraph should be carried out under supervision of your authorized dealer.
20.1 battery charging
This wheelchair is provided with two maintenance free batteries. During
normal use, the batteries must be charged every day. It is most convenient to
make it a daily practice to charge the wheelchair during the night.
After having taken care of these precautions, charge the batteries by plugging
in the charger in the rear of the control unit first. Plug in the charger in the
mains secondly. Read the manual of your charger carefully for any other
precautions and user prescriptions. When the wheelchair is not used over a
longer period, recharge the batteries every four weeks to keep the batteries in
good condition. If the batteries are not charged regularly, the remaining
capacity will quickly drop.
20.2 short term storage
For the charging process to produce a battery with good capacity, the
temperature in the storage room should not be lower than +5 degrees.
If it is stored at a temperature below +5 degrees, there is a higher risk that the
battery has not been fully charged when it comes to be used and also a higher
risk of corrosion.
● Only charge in a well ventilated room with no sources of open fire.
● Turn of the control unit before charging
● Make sure the charging cable is not causing crashes of people
● When the charger is disconnected from the wheelchair, also disconnect
the charger from the mains.
● Place the charger in a place where it can radiate its heat freely during
charging
Page 99

99
20.3 long term storage
The battery may be stored in an unheated room but it should be charged at
least once a month for maintenance purposes.
when the wheelchair is stored for a long term, we advise you to disconnect
the batteries from the wheelchair. This way the batteries will hold their
energy for a longer period.
When re-using the wheelchair, the batteries will be installed and fully
charged.
Ask you local authorized supplier to store and maintain the batteries if they
are not used for a long period. (more than two months)
• Please note that a battery discharges itself and that a discharged battery
can burst when it is cold. If the wheelchair is to be stored unused for an
extended period of time, the batteries must always be charged once a
month to avoid them being damaged.
• The wheelchair must not be stored in areas subject to condensation
(steam or moisture on surfaces), for example utility rooms or similar.
• The wheelchair may be stored in an unheated room. From the point of
view of corrosion, it is best for the room to be a few degrees warmer than
the surroundings as this keeps the room drier.
• If the wheelchair is fitted with acid batteries, the acid level should be
checked regularly. If the wheelchair is fitted with gel batteries, the liquid
level does not need to be checked.
• The life of the batteries depends entirely on regular charging.
Be careful when using metal objects close to the batteries. A short circuit
might easily create strong sparks and can cause a fire. Should you need to
work on the batteries, use isolated tools and wear protective gear on
hands and eyes.
Page 100

100
20.4 tools
The wheelchair comes with a tool kit to be able to adjust most settings.
the toolkit includes:
● a set of Allan keys
● a flat/Phillips screw driver
● a socket wrench 11 and 13 mm.
The main fuse must always be removed when batteries and are replaced.
Always switch off the power supply to the control panel before interrupting
the power with the main fuse.
Any unauthorized alterations to the wheelchair and its systems may lead to
an increased risk of accident.
All alterations to and interventions in the wheelchair’s vital systems must
be performed by an authorized service engineer. In case of doubt, always
contact an authorized service engineer.
Some repairs may require tools other than those supplied with the
wheelchair.
Damage caused by serf servicing or servicing by unauthorized personnel
cannot be claimed under warranty!
If you have any doubt in the capability of yourself or the service engineer,
please contact your local authorized supplier to help you.
 Loading...