

Karl Storz Thorax 1 2004 User manual

Anleitung Thorax 1/2004
Instructions Thorax 1/2004
Instrucción Tórax 1/2004


Anleitung Thorax 1/2004
Instructions Thorax 1/2004
Instrucción Tórax 1/2004
Anleitung
Instruccions
Instrucción

U 2
KARL STORZ arbeitet ständig an der
Weiterentwicklung aller Produkte. Bitte haben
Sie Verständnis dafür, dass deshalb Änderungen des Lieferumfangs, der Form, Ausstattung
und Technik möglich sind. Aus den Angaben,
Abbildungen und Beschreibungen dieser
Anleitung können daher keine Ansprüche hergeleitet werden.
Wichtiger Hinweis für die
Benutzer von KARL
STORZ Geräten und
Important information for
users of KARL STORZ
instruments
Indicaciones importantes
para usuarios de equipos e
instrumentos de KARL STORZ
Vielen Dank für Ihr Vertrauen in den Namen
KARL STORZ. Auch in diesen Produkten steckt
unsere ganze Erfahrung und Sorgfalt. Sie und
Ihr Haus haben sich damit für moderne und
hochwertige Instrumente der Firma
KARL STORZ entschieden.
Die vorliegende Anleitung dient der Information
für das mit der Aufbereitung von Instrumenten
für die Thoraxchirurgie beauftragte Personal.
Die von KARL STORZ hergestellten Instrumente
sind in der Regel empfindliche
Präzisionsinstrumente, die eine besondere
Sorgfalt bei der Aufbereitung verlangen. Um
Schäden bei der Aufbereitung zu vermeiden,
wird hier eine Hilfestellung zur Demontage,
Reinigung, Sterilisation und Montage des endoskopischen Instrumentariums von KARL
STORZ gegeben.
Thank you for your expression of confidence in
the KARL STORZ brand name. Like all of our
other products, these products are the result of
years of experience and great care in manufacture. You and your organization have decided
in favor of modern, high-quality items of equipment from KARL STORZ.
These instructions contain information for personnel authorized to prepare instruments for
thoracic surgery. The instruments and accessories manufactured by KARL STORZ are, as a
rule, sensitive precision instruments which
require particular care during preparation. To
prevent damage during preparation, support is
provided here for disassembly, cleaning, sterilization and assembly of the KARL STORZ endoscopic instruments.
Agradecemos la confianza que han depositado
en la marca KARL STORZ. Este producto, como
todos los demás, es el resultado de nuestra
amplia experiencia y esmero. Por ello, al decidirse
por KARL STORZ se han decidido, tanto Ud.
como su empresa, por instrumentos de precisión
modernos y de alta calidad.
La presente Instrucción tiene por objeto informar
al personal encargado de la preparación de
instrumentos para la cirugía de tórax. Los instrumentos fabricados por KARL STORZ son generalmente instrumentos de precisión delicados, que
requieren un esmero especial en su preparación.
Con el fin de evitar deterioros durante la preparación, esta Instrucción proporciona una ayuda para
el desmontaje, limpieza, esterilización y montaje
del instrumental endoscópico de KARL STORZ.
KARL STORZ is constantly working on the further development of all products. Please appreciate that changes to the scope of supply in
form, equipment and technology are possible
for this reason. Therefore, no claims may be
derived from the information, figures and descriptions in these instructions.
KARL STORZ trabaja continuamente en el desarrollo de todos sus productos. Por este motivo
rogamos comprendan que pueden producirse
modificaciones en el suministro, tanto en cuanto a
forma como a equipamiento y técnica. De las indicaciones, ilustraciones y descripciones en esta
Instrucción no emana por ello derecho alguno.
Version 1.1 – 11-2006

Wichtiger Hinweis für die Benutzer
von KARL STORZ Geräten und
Instrumenten................................U2
Über diese Anleitung .................. 4
Handhabung dieser Anleitung .................. 4
Symbole und Gefahrenhinweise ................ 5
Sicherheitshinweise .................................... 6
Generelle Hinweise zur Reinigung und
Sterilisation .................................................. 8
Oesophagoskopie –
Divertikuloskopie ........................ 9
Optisches Oesophagoskop für Erwachsene
und Kinder .................................................. 9
Optische Instrumente.................................. 12
Halbstarre und starre, nicht zerlegbare
Zangen ........................................................ 13
Zerlegbare Instrumente mit U-Feder-
Handgriff...................................................... 14
Flexible Zangen .......................................... 16
Instrumente mit Dreiringgriff........................ 18
Spreizdivertikuloskope ................................ 19
c Instrumente mit und ohne Anschluss
für unipolare Koagulation .......................... 20
Koagulations- und Dissektions-Elektroden 23
Allgemeine Hinweise .............................. 23
Kabelverbindungen ................................ 24
Demontage ............................................ 25
Adapter für Koagulations- und
Dissektionselektroden ............................ 26
Fiberglas-Lichtträger, Prismenscheinwerfer,
Lichtklammern ............................................ 26
Bronchoskopie – Tracheoskopie 27
Bronchoskope ............................................ 27
Zubehör für Bronchoskope ........................ 27
Stent-Applikator n. TONN............................ 27
Lenkbare Instrumentenführung und
Steuerungsinstrument n. MAASSEN .......... 27
Aspirator und Bronchusspüler .................... 28
Kopfstütze n. HASLINGER-LEMOINE ........ 29
Indicaciones importantes para usuarios de equipos e instrumentos de
KARL STORZ ....................................U2
Acerca de esta Instrucción .............. 4
Manejo de esta Instrucción .............................. 4
Símbolos e indicaciones de peligro .................. 5
Instrucciones de seguridad .............................. 6
Instrucciones generales para la limpieza y
esterilización ...................................................... 8
Esofagoscopio –
diverticuloscopio .............................. 9
Esofagoscopio óptico para adultos y para
pediatría ............................................................ 9
Instrumentos ópticos.......................................... 12
Pinzas rígidas y semirígidas, no
desmontables .................................................... 13
Instrumentos desmontables con mango
de resorte en U .................................................. 14
Pinzas flexibles .................................................. 16
Instrumentos con mango de tres anillas ............ 18
Diverticuloscopio expandible ............................ 19
Instrumentos c con y sin conexión
para coagulación monopolar ............................ 20
Electrodos para corte y coagulación ................ 23
Instrucciones generales ................................ 23
Conexiones de cables .................................. 24
Desmontaje.................................................... 25
Adaptador para electrodos para corte
y coagulación ................................................26
Portaluz de fibra óptica, proyector de
prismas, pinzas luminosas ................................ 26
Broncoscopio – traqueoscopio........27
Broncoscopios .................................................. 27
Accesorios para broncoscopios ........................ 27
Set de Applicadores de stent seg. TONN ........ 27
Guía orientable para instrumentos e instrumentos
de mando seg. MAASSEN ................................ 27
Aspirador e irrigador de bronquios.................... 28
Apoyacabezas seg. HASLINGER-LEMOINE .... 29
Anleitung
Thorax
Instructions
Thorax
Instrucción
Tórax
1
Important information for users of
KARL STORZ instruments..........U2
About these instructions ............ 4
Using these instructions ............................ 4
Symbols and hazard information ................ 5
Safety information........................................ 6
General instructions on cleaning
and sterilization .......................................... 8
Esophagoscopy –
diverticuloscopy .......................... 9
Optical esophagoscope for
adults and children .................................... 9
Optical instruments .................................... 12
Semirigid and rigid inseparable forceps .... 13
Take-apart instruments with
U-spring handle .......................................... 14
Flexible forceps .......................................... 16
Instruments with three-ring handle ............ 18
Distending diverticuloscopes...................... 19
c Instruments with and without
connector pin for unipolar coagulation ...... 20
Coagulation and dissecting electrodes ...... 23
General information ................................ 23
Cable connections.................................. 24
Disassembly .......................................... 25
Adapter for coagulation and
dissecting electrodes ............................ 26
Fiberoptic light carriers, prismatic light
deflectors, clip-on light deflectors .............. 26
Bronchoscopy –Tracheoscopy .. 27
Bronchoscopes .......................................... 27
Accessories for bronchoscopes ................ 27
TONN Stent Applicator................................ 27
MAASSEN steerable instrument guide
and control instrument ................................ 27
Aspirator and bronchial irrigator ................ 28
HASLINGER-LEMOINE head rest .............. 39

Inhalt
Contents
Contenido
Optische Instrumente
siehe Kapitel OesophagoskopieDivertikuloskopie
Halbstarre und starre Zangen
siehe Kapitel OesophagoskopieDivertikuloskopie
Koagulations- und Dissektionselektroden
siehe Kapitel Oesophagoskopie-
Divertikuloskopie ........................................
Stent-Zange n. FREITAG
siehe eigene Gebrauchsanweisung
Fiberglas-Lichtträger, Prismenscheinwerfer und
Lichtklammern
siehe Kapitel OesophagoskopieDivertikuloskopie
Autofluoreszenz ..........................32
Absaugventileinsatz ....................................32
Batterielichtquelle........................................33
Universal-Bronchoskop
siehe Kapitel Bronchoskopie – Tracheoskopie
Optische Zangen
siehe Kapitel Oesophagoskopie – Divertikulo skopie
Lenkbare Instrumentenführung
siehe Kapitel Bronchoskopie – Tracheoskopie
Fiberglas-Lichtträger
s
iehe Kapitel Oesophagoskopie – Divertikulo -
skopie
Mediastinoskopie –
Thorakoskopie ............................ 36
Mediastinoskop-Spatel................................ 36
Starre Zangen
siehe Kapitel OesophagoskopieDivertikuloskopie
Starre Trokare mit Silikonlippenventil 2,5 mm
bis 11 mm.................................................... 37
c Instrumente
siehe Kapitel Oesophagoskopie –Divertikulo skopie
Ergonomischer Multifunktionshandgriff n.
MATERN/WALLER ...................................... 38
Optical instruments
see Chapter
Esophagoscopy – Diverticulo -
scopy
Semirigid and rigid forceps
See section Esophagoscopy – Diverticuloscopy
Coagulation and dissecting electrodes
See section
Esophagoscopy and
diverticuloscopy ..........................................
FREITAG stent forceps
See corresponding instruction manual
Fiberoptc light carriers, prismatic deflectors
and clip-on deflectors
See section Esophagoscopy – Diverticuloscopy
Autofluorescence ...................... 32
Suction valve insert .................................... 32
Battery Light Source.................................... 33
Universal bronchoscope
See section Bronchoscopy – Tracheoscopy
Optical forceps
See section Esophagoscopy -– Diverticulo scopy
Steerable instrument guide
See section Bronchoscopy – Tracheoscopy
Fiber optic light carrier
See section Esophagoscopy – Diverticulo scopy
Mediastinoscopy –
Thoracoscopy ............................ 36
Mediastinoscope blade .............................. 36
Rigid forceps
See section Esophagoscopy – Diverticuloscopy
Rigid trocars with silicone lip valve,
2.5 mm and 11 mm .................................... 37
c instruments
See section Esophagoscopy-diverticuloscopy
MATERN/WALLER Ergonomic
Multifunction Handle .................................. 38
Surgical Sponge Holder.............................. 41
c Grasping Forceps, Scissors
and Biopsy Forceps, angulating ................ 44
Instrumentos ópticos
véase capítulo Esofagoscopio -– Diverticuloscopio
Pinzas rígidas y semirigidas
véase capítulo Esofagoscopio – Diverticuloscopio
Electrodos para corte y coagulación
véase capítulo Esofagoscopio – Diverticuloscopio
Pinzas Stent seg. FREITAG
véase Manual de instrucciones respectivo
Portaluz de fibra óptica, proyector de prismas,
pinzas luminosas
véase capítulo Esofagoscopio – Diverticuloscopio
Autofluorescencia ............................32
Suplemento para válvula de succión ................32
Fuente de luz a pila ..........................................33
Broncoscopio universal
véase capítulo Broncoscopio – Traqueoscopio
Pinzas ópticas
véase capítulo Esofagoscopio – Diverticuloscopio
Guía orientable para instrumentos
véase capítulo Broncoscopios – Traqueoscopio
Portaluz de fibra óptica
véase capítulo Esofagoscopio -–Diverticuloscopio
Mediastinoscopio – toracoscopio ..36
Espátula para medistinoscopio .......................... 36
Pinzas rígidas
véase capítulo Esofagoscopio -– Diverticuloscopio
Trocares rígidos con válvula con labio de
silicona 2,5 mm y 11 mm.................................... 37
Instrumentos c
véase capítulo Esofagoscopio – Diverticuloscopio
Mango ergonómico multifuncional seg.
MATERN/WALLER .............................................. 38
Portatorundas .................................................... 41
Pinzas de agarre, tijeras y punzones
angulables c .......................................... 44
Instrumentos RoBi
®
............................................ 46
Electrodos de disección .................................... 48
Retractor en abanico desmontable.................... 49
Pieza manual con válvula de vástago................ 50
Tubos para irrigación y succión con llave
de dos vías ........................................................ 51
2

3
Präparier-Tupferhalter.................................. 41
c Abwinkelbare Fasszange, Schere
und Biopsiezange ...................................... 44
RoBi
®
Instrumente ...................................... 46
Dissektions-Elektroden mit austauschbarer
Spitze .......................................................... 48
Zerlegbarer Fächer-Retraktor...................... 49
Handgriff mit Kolbenventil .......................... 50
Saug- und Spülrohre mit Zweiwegehahn.... 51
Nadelhalter.................................................. 51
Handgriff 30810 für Spülung, Absaugung
und Koagulation .......................................... 52
Handgriffe für Spülung und Absaugung
Modell 37112 T/37113 T ............................ 55
Saug- und Spülrohre aus Metall ................ 57
Nadelhalter und Nahtinstrument mit
Ringhandgriff .............................................. 57
Nadelhalter mit geradem und gebogenem
Handgriff...................................................... 58
Instrumente zur Videogestützten
Thoraxchirurgie–Lungenresektion 59
Instrumente zur Videogestützten Thoraxchirurgie–
Lungenresektion ................................................ 59
Koagulationselektroden
siehe Kapitel Oesophagoskopie –
Divertikuloskopie
Haltesysteme ..............................60
Gelenkstativ ................................................60
Instandhaltung ............................63
Betriebs-/Lagerbedingungen...................... 63
Entsorgung.................................................. 63
Richtlinienkonformität .................................. 63
Verantwortlichkeit ........................................ 63
Garantie ...................................................... 64
Wichtige Information .................................. 64
Instandsetzung............................................ 65
Reparatur-Austauschprogramm.................. 65
Anhang..........................................64
Reinigungs- und Desinfektionsmittel .......... 64
RoBi®Instruments........................................ 48
Dissecting electrodes with exchangeable
tips .............................................................. 48
Dismantling fan retractor ............................ 49
Handle with trumpet valve .......................... 50
Suction and irrigation tubes with
two-way stopcock ...................................... 51
Needle holder.............................................. 51
Handle 30810 for irrigation,
suction and coagulation.............................. 52
Handles for suction and irrigation
Models 37112 T/37113 T ............................ 55
Metal suction and irrigation tubes .............. 57
Needle holder and fascial closure
instrument with ring handle ........................ 57
Needle holder with straight and curved
handle, with and without ratchet ................ 58
Instruments for video-assisted
thoracic surgery – lung resection 59
Instruments for video-assisted
thoracic surgery – lung resection....................59
Coagulation electrodes
See section Esophagoscopy – Diverticuloscopy
Holding systems ..........................60
Articulated stand ........................................ 60
Maintenance ................................63
Operating/storage conditions .................... 63
Disposal ...................................................... 63
Directive compliance .................................. 63
Limitation of liability .................................... 63
Warranty ...................................................... 64
Important information .................................. 64
Servicing and repair.................................... 65
Repair and replacement program .............. 65
Appendix ......................................66
Cleaning Agents and Disinfectants ............66
Portaagujas ........................................................ 51
Manipulador 30810 para irrigación, succión
y coagulación .................................................... 52
Manipuladores para irrigación y succión
modelos 37112 T/37113 T.................................. 55
Tubos de metal para irrigación y succión .......... 57
Portaagujas e instrumento de sutura con
mango de anilla .................................................. 57
Portaagujos con mango recto y curvado, con
y sin bloqueo ...................................................... 58
Instrumentos para la resección
pulmonar en la cirugía de tórax
asistida por vídeo ..............................59
Instrumentos para la resección pulmonar en la
cirugía de tórax asistida por vídeo ....................59
Electrodos para coagulación
véase el capitulo Esofagoscopio – Diverticulo s copio
Sistemas de sujeción....................... 60
Soporte articulado .......................................... 60
Mantenimiento ..................................63
Condiciones de servicio/almacenamiento ........ 63
Gestión de desecho .......................................... 63
Conformidad con las directivas.......................... 63
Responsabilidades ............................................ 63
Garantía .............................................................. 64
Observaciones importantes .............................. 64
Reparaciones...................................................... 65
Programa de reparación e intercambio ............ 65
Anexo..................................................66
Productos de limpieza y desinfectión ................ 66
Inhalt
Contents
Contenido

4
Über diese Anleitung About this manual Acerca de esta Instrucción
Handhabung dieser Anleitung
Diese Anleitung ist keine Gebrauchsanweisung,
sondern gibt Hinweise zur Montage/Demontage,
Aufbereitung, Pflege und Sterilisation des
Instrumentariums für den Fachbereich Thorax.
Diese Anleitung setzt die Kenntnis der Anleitung
„Reinigung, Sterilisation und Pflege von
KARL STORZ Instrumenten“ voraus, in der die
verschiedenen Reinigungs- und Sterilisations verfahren detailliert beschrieben sind. Sollten Sie
über diese Anleitung noch nicht verfügen, so
können Sie diese kostenlos bei KARL STORZ
anfordern.
Der Abschnitt "Generelle Hinweise zur Reinigung
und Sterilisation" enthält grundlegende
Anweisungen, deren Kenntnis für die Korrekte
Reinigung, Desinfektion und Sterilisation unerläßlich ist.
Instrumente, bei denen das Reinigen, Zerlegen
und Zusammensetzen sowie die Reinigung,
Desinfektion und Sterilisation keine besonderen
Kenntnisse erfordert, sind in dieser Anleitung
nicht separat aufgeführt.
Besonders empfindliche Produktgruppen wie beispielsweise Optiken oder Fiberskope verfügen
über eigene Anleitungen. Für Geräte sind separate Gebrauchsanweisungen und Service Manuals
erhältlich. Andere, allgemeine Vorschriften
(Bestimmungsgemäße Verwendung, Qualifikation
des Anwenders, Sicherheitsmaßnahmen beim
Einsatz der Instrumente, usw.) sind zu beachten!
Using this manual
This manual does not contain instructions on how
to use the instruments, but instead provides general information regarding assembly/disassembly,
cleaning, care and sterilization of thorax instrument sets from KARL STORZ.
This manual presumes knowledge of the
‘Cleaning, sterilization and care of KARL STORZ
instruments’ manual, in which the various cleaning and sterilization methods are described in
detail. If you do not yet have this manual, it can
be requested without charge from KARL STORZ.
The section ‘General information on cleaning and
disinfection’ contains fundamental instructions,
knowledge of which is essential for correct cleaning, disinfection and sterilization.
Instruments whose cleaning, dismantling and
reassembly as well as disinfection and sterilization
do not require any special knowledge are not listed separately in these instructions.
Particularly sensitive product groups, such as telescopes or fiberscopes, have their own
manuals. Separate instruction manuals and service manuals are available for units. Other general
regulations (Normal use, User qualification, Safety
rules when using instruments, etc.) must be
heeded.
Manejo de esta Instrucción
Esta Instrucción no es un Manual de instrucciones,
sino un compendio de indicaciones generales para
la montaje/desmontaje, limpieza, esterilización y
conservación del instrumental para la especialidad
de Tórax.
Esta Instrucción presupone el conocimiento de
la Instrucción “Limpieza, esterilización y conservación de los instrumentos KARL STORZ”, en la cual
se describen detalladamente los diversos procedimientos de limpieza y esterilización. Si no dispone
Ud. todavía de esa Instrucción, puede solicitarla de
forma gratuita a KARL STORZ.
La sección “Instrucciones generales para limpieza y
esterilización” contiene indicaciones fundamentales,
cuyo conocimiento es indispensable para una limpieza, desinfección y esterilización correctas.
Aquellos instrumentos cuya limpieza, desinfección,
esterilización, desmontaje y montaje no requieren
conocimientos especiales, no se han detallado por
separado en esta Instrucción.
Los grupos de productos particularmente delicados,
tales como, p. ej., telescopios o fibroscopios, disponen de Instrucciones propias. Para los aparatos
existen Manuales de instrucciones y Manuales de
servicio por separado. Hay que observar, además,
otras directivas generales (uso previsto, cualificación
del usuario, medidas de seguridad al utilizar el instrumento, etc.).
5
Symbole und Gefahrenhinweise
Bitte lesen Sie diese Anleitung sorgfältig durch,
und beachten die Anweisungen genau. Die
Bezeichungen Warnung, Vorsicht und Hinweis
haben spezielle Bedeutungen. Wo immer sie in
der Anleitung verwendet werden, sollte der nachfolgende Text genau gelesen werden, um einen
sicheren und effizienten Gebrauch zu gewährleisten. Zur deutlichen Hervorhebung wird den
Bezeichnungen Warnung und Vorsicht ein
Piktogramm vorangestellt.
Warnung: Warnung macht auf eine
Gefährdung des Patienten oder des
Personals aufmerksam. Das
Nichtbeachten einer Warnung kann
Verletzungen des Patienten oder des
Personals zur Folge haben.
Vorsicht: Vorsicht macht darauf aufmerksam, dass bestimmte Maßnahmen
zu treffen sind, um eine Beschädigung
des Instrumentariums zu vermeiden.
Hinweis: Hinweise enthalten spezielle
Informationen zur Bedienung, oder sie erklären
wichtige Informationen.
Símbolos e indicaciones de peligro
Lea esta Instrucción y siga las indicaciones cuidado samente. Los términos Cuidado, Advertencia y Nota
tienen significados muy especiales. Cuando aparezcan en alguna parte de esta Instrucción, revise esa
sección cuidadosamente para asegurar la operación
inocua y eficaz de este producto. Para destacar más
claramente los términos Cuidado y Advertencia, los
mismos están precedidos por un pictograma adicional.
Cuidado: El término Cuidado llama la atención sobre una situación de peligro para el
paciente o para el personal. La inobservancia de este aviso podría conllevar lesiones
para el paciente o para el personal.
Advertencia: El término Advertencia llama
la atención sobre determinadas medidas de
mantenimiento o de seguridad que han de
llevarse a cabo a fin de evitar el deterioro del
instrumental.
Nota: Los párrafos denominados con el término
Nota contienen informaciones especiales para la
manipulación o aclaran informaciones importantes.
Über diese Anleitung About this manual Acerca de esta Instrucción
Symbols and hazard information
Please read this manual and follow its instructions carefully. The words Warning, Caution and
Note convey special meanings. Wherever they
are used in this manual, they should be carefully
reviewed to ensure the safe and effective operation of this product. To make the words Warning
and Caution stand out more clearly, they are
accompanied by a pictogram.
Warning: A Warning indicates that the
personal safety of the patient or physician may be involved. Disregarding a
Warning could result in injury to the
patient or physician.
Caution: A Caution indicates that particular procedures or precautions must be
followed to avoid possible damage to the
instrument.
Note: A Note indicates special information about
operating the instrument or clarifies important
information.

6
Sicherheitshinweise
Warnung: Die genannten Reinigungs-, Desin fekt ions- und Sterilisationsverfahren garantieren
alleine noch keine Desinfektion oder Sterilität.
Diese läßt sich nur erzielen, wenn vom Personal
nach anerkannten und validierten Aufbereitungs verfahr en vorgegangen wird.
Warnung: Neue Instrumente werden nicht steril
ausgeliefert und müssen somit vor der ersten An wendung sowie vor jeder weiteren Nutzung gründ lich gereinigt, desinfiziert und ggf. sterilisiert werden.
Warnung: Bei allen Reinigungsarbeiten an kontaminierten Endoskopen und Instrumenten sind
die UVV-Richtlinien (z. B. Tragen von Schutzhandschuhen und Schutzbrillen etc.) einzuhalten.
Warnung: Beachten Sie, dass eine Sterilisation
nur dann erfolgreich durchführbar ist, wenn
● die Instrumente von allen organischen
Materialien und Reinigungsrückständen befreit
sind. Eine Sterilisation erfolgt nur an sauberen
Oberflächen!
● nach anerkannten und validierten Verfahren
gearbeitet wird
● die empfohlenen Sterilisationsparameter ein-
gehalten werden. Diese sind nur bei vorgeschriebener Wartung und Kalibrierung des
Sterilisationsgerätes gültig.
Über diese Anleitung About this manual Acerca de esta Instrucción
Safety instructions
Warning: The listed cleaning, disinfection and
sterilization methods alone do not guarantee disinfection or sterility. This can only be achieved if
staff follows recognized and validated preparation
methods.
Warning: New instruments are delivered unsterilized and must therefore be thoroughly cleaned,
disinfected and, if necessary, sterilized prior to initial use and each subsequent reuse.
Warning: For all cleaning of contaminated endoscopes and instruments, the Accident Prevention
Regulations (UVV) must be observed (e.g. wearing of protective gloves and safety goggles).
Warning: Remember that sterilization is only then
successful if
● the instruments have been freed of all organic
materials and cleaning residues, as only clean
surfaces can be reached by the sterilization.
● work proceeds according to recognized and
validated methods.
● the recommended sterilization parameters are
maintained. These are only valid with sterilization equipment that is properly maintained and
calibrated.
Instrucciones de seguridad
Cuidado: Los procedimientos mencionados de limpieza, desinfección y esterilización no garantizan por
sí solos la desinfección o esterilización. Para conseguirlas, es preciso que el personal aplique los métodos de preparación reconocidos y validados.
Cuidado: Los instrumentos nuevos no se entregan
esterilizados y deben ser, por tanto, cuidadosamente limpiados, desinfectados y esterilizados antes de
la primera aplicación, así como antes de cada utilización subsiguiente.
Cuidado: Al efectuar todos los trabajos de limpieza
en endoscopios e instrumentos contaminados han
de observarse las normas para la prevención de
accidentes (p. ej., utilizar guantes y anteojos de protección).
Cuidado: Tenga en cuenta que la esterilización sólo
podrá llevarse a cabo con éxito si
● los instrumentos están libres de cualquier materia orgánica y residuos de productos de limpieza. Una esterilización es posible únicamente
sobre superficies limpias.
● se trabaja según procedimientos reconocidos y
validados.
● se respetan los parámetros de esterilización
recomendados. Los mismos sólo son válidos
con equipos de esterilización que se hayan mantenido y calibrado correctamente.

7
Die Richtlinien der Berufsgenossenschaft und
gleichrangiger Organisationen sind zu beachten
Über diese Anleitung About this manual Acerca de esta Instrucción
Observe the guidelines of the Employer’s Liability
Insurance Association and equivalent organizations.
Han de observarse las directivas de la mutual de
previsión contra accidentes y otras organizaciones
equivalentes.
Vorsicht: Die Verwendung anderer als der hier
aufgeführten Aufbereitungsverfahren kann sich
negativ auf Funktion und Lebensdauer auswirken.
Sämtliche daraus resultierenden Schäden sind
nicht durch die Garantie abgedeckt.
Vorsicht: Die folgenden Hinweise zu Reinigung
und Sterilisation gelten nur für das in dieser
Anleitung beschriebene thermostabile lnstrumentarium. Für Optiken und Fiberskope gelten besondere Richtlinien (siehe Anleitungen Optiken und
Fiberskope).
Vorsicht: Bei der Herstellung und Anwendung
der Lösungen sind die Angaben des
Chemikalien herstellers über Mischungsverhältnis
und Einlegedauer genauestens zu beachten. Eine
maximale Einlegedauer von 60 Minuten (auch in
Wasser) darf nicht überschritten werden. Zu langes Einlegen kann zu Beschädigungen führen.
Nach der Reinigung wird ein Spülen der
Instrumente mit VE-Wasser (vollentsalztes
Wasser) empfohlen.
Vorsicht: Der ständige Wechsel zwischen verschiedenen Aufbereitungsverfahren bedeutet eine
besondere Belastung der Materialien und ist
daher zu vermeiden. Eine einmalige
Verfahrensänderung, z. B. durch Neu anschaffung
von Geräten, ist jedoch möglich.
Caution: Use of preparation methods other than
those listed here may have a negative effect on
the function and service life. Any damage resulting from this is not covered by the guarantee.
Caution: The following information on cleaning
and sterilization only applies to the thermo stable
instrument set described in these instructions.
For telescopes and fiberscopes, special rules
apply (see instructions for telescopes and fiberscopes).
Caution: For the production and application of
solutions, precisely observe the information from
the manufacturer concerning dilution and immersion times. A maximum immersion time of 60
minutes (including in water) must not be exceeded. Prolonged immersion can lead to damage.
After cleaning it is recommended to rinse the
instruments with completely demineralized water.
Caution: Constant changing between various
preparation methods is especially hard on the
materials and must therefore be avoided. A oneoff change of method, due to procurement of
new cleaning and sterilization equipment for
example, is however possible.
Advertencia: La utilización de otros procedimientos
de preparación diferentes a los aquí expuestos
puede tener efectos negativos sobre el funcionamiento y la durabilidad de los instrumentos.
Cualquier deterioro resultante de los mismos no
está cubierto por la garantía.
Advertencia: Las instrucciones siguientes de limpieza y esterilización son válidas únicamente para el
instrumental termoestable descrito en esta
Instrucción. Para los telescopios y fibroscopios existen directivas especiales (véase la Instrucción para
telescopios y fibroscopios).
Advertencia: Durante la preparación y aplicación
de soluciones deben observarse con la mayor exactitud las indicaciones del fabricante en cuanto a relación de la mezcla y duración de la inmersión. No
debe superarse un tiempo máximo de inmersión de
60 minutos (también en agua). Una inmersión
demasiado prolongada puede conllevar deterioros.
Después de la limpieza se recomienda enjuagar los
instrumentos con agua completamente desalinizada.
Advertencia: La alternancia constante entre diferentes procedimientos de preparación conlleva una
solicitación intensa de los materiales y, por ello, se
debe evitar. No obstante, es posible una modificación excepcional de procedimiento en el caso, por
ejemplo, de haberse adquirido nuevos aparatos.

8
Über diese Anleitung About this manual Acerca de esta Instrucción
Generelle Hinweise zur Reinigung
und Sterilisation
Der nachfolgend dargestellte Medizinprodukte kreislauf veranschaulicht die Abfolge der verschiedenen Stationen einer sinnvollen
Instrumentenaufbereitung:
General instructions on cleaning
and sterilization
The medical device cycle shown below illustrates
the sequence of steps for advisable instrument
preparation:
Instrucciones generales para la
limpieza y esterilización
El circuito representado a continuación para
productos médicos ejemplifica la secuencia sucesiva
de las diferentes etapas de una preparación correcta de instrumentos:
Bereitstellung/Provision/Puesta a disposición
Nutzung/Use/Utilización
Entsorgung aus OP – Aufnahme in SterilisationsAbteilung/Removal from OR - receipt by sterilization
department/Retirada del quirófano – recepción en el
departamento de esterilización
Reinigung und Desinfektion/Cleaning and
disinfection/Limpieza y desinfección
Wartung & Pflege, Funktions- & Sicherheitprüfung/
Maintenance and care, functional and safety inspection/Mantenimiento y conservación, verificación de
funcionamiento y de seguridad
Verpackung/Packaging/Envasado
Sterilisation/Sterilization/
Esterilización
Lagerung/Storage/
Almacenamiento

9
Por lo general y conforme al ciclo de aplicación,
la preparación del instrumental aquí descrito
puede desglosarse en los siguientes cinco
pasos:
Advertencia
: Observe las indicaciones
para limpieza y esterilización en la
Instrucción “Limpieza, esterilización y
conservación de los instrumentos
KARL STORZ”. Allí se explican detalladamente los procedimientos para limpieza, desinfección y esterilización.
Nota
: En el capítulo “Limpieza, esterilización y
conservación” encontrará los accesorios de limpieza y contenedores de esterilización recomendados.
1. Limpieza previa manual
En determinados casos y debido a su diseño
constructivo (aberturas, lumen estrecho y largo,
etc.), así como dependiendo del tipo y grado de
suciedad, algunos instrumentos requieren una
limpieza previa manual.
Asimismo, una período prolongado de espera
antes de la preparación (= período de secado
de la contaminación) hacen necesaria una limpieza previa ya en el quirófano, en la cual se eliminan mecánicamente los residuos de tipo orgánico, así como, p. ej., de medicamentos (cepillado, enjuague con pistola de agua, etc.), enjuagando a continuación los instrumentos con agua
completamente desalinizada o destilada.
En principio, los instrumentos usados o contaminados deben prepararse lo más pronto posible.
Al hacerlo, los instrumentos desarmables deben
desmontarse siguiendo las indicaciones respectivas. Los instrumentos con articulación y las tijeras deben tratarse estando abiertos.
Elimine los residuos de tejido adheridos o requemados en las mordazas con un cepillo de limpieza, o lleve a cabo una limpieza previa con
solución H2O2 al 3 % lo más pronto posible
después de la aplicación. Al efectuar la limpieza, dedique particular esmero a las mordazas,
dado que se trata de piezas de precisión de
mecánica muy delicada.
According to the instrument cycle, preparation
of the instruments described here generally
comprises the following 6 steps:
Caution
: The instructions for cleaning
and sterilization in the manual
‘Cleaning, sterilization and care of
KARL STORZ instruments’ must be
observed. The methods for cleaning,
disinfection and sterilization are
explained there in detail.
Note:
Recommended cleaning accessories
and sterilization containers can be found in the
catalog chapter ‘Cleaning, sterilization and
care’.
1. Manual preliminary cleaning
The instruments may require manual preliminary cleaning on account of their design (e.g
slits and long, narrow lumens) and depending
on the type and degree of soiling.
In addition, a prolonged waiting time before
preparation (which allows the contamination to
dry on) may make preliminary cleaning necessary while still in the operating room. Organic
residues and pharmaceutical products, for
example, must be removed mechanically (by
brushing, rinsing through with a water gun,
etc.), and the instruments must subsequently
be rinsed off with completely demineralized or
distilled water.
Used and contaminated instruments should
always be prepared with the minimum possible
delay.
Separable instruments must be disassembled
following the instructions. Articulating instruments and scissors must be treated whilst
open.
Tissue remnants sticking or baked to the jaws
must be removed with a cleaning brush, and
the instrument must be precleaned with a 3%
H2O2 solution as soon as possible after use.
Special care must be taken when cleaning the
jaws, as they are precision-engineered parts.
Über diese Anleitung About this manual Acerca de esta Instrucción
Entsprechend dem Instrumentenkreislauf gliedert sich die Aufbereitung der hier beschriebenen Instrumente in der Regel in folgende 6
Schritte:
Vorsicht
: Die Hinweise zur Reinigung
und Sterilisation in der Anleitung
„Reinigung, Sterilisation und Pflege von
KARL STORZ Instrumenten“ müssen
beachtet werden. Dort sind die
Verfahren zur Reinigung, Desinfektion
und Sterilisation im Detail erklärt.
Hinweis
: Empfohlenes Reinigungszubehör und
Sterilisationscontainer sind im Katalogkapitel
„Reinigung, Sterilisation und Pflege“ zu finden
1. Manuelle Vorreinigung
Gegebenenfalls erfordern die Instrumente aufgrund ihrer konstruktiven Auslegung (Spalten,
lange enge Lumen etc.) sowie abhängig von
Art und Grad der Verschmutzung, einen manuellen Vorreinigungs schritt.
Weiterhin kann eine längere Wartezeit bis zur
Aufbereitung (= Antrocknungszeit der
Kontamination) eine erste Vorreinigung bereits
im OP erforderlich machen, wobei Rückstände
organischer Art sowie z.B. von Arzneimitteln
mechanisch (Bürsten, Durchspülen mit
Wasserpistole etc.) entfernt und die
Instrumente anschließend mit vollentsalztem
oder destilliertem Wasser abgespült werden.
Grundsätzlich sind gebrauchte bzw. kontaminierte Instrumente schnellstmöglich aufzubereiten.
Hierbei müssen zerlegbare Instrumente entsprechend den Angaben demontiert werden.
Gelenkinstrumente und Scheren müssen in
geöffnetem Zustand behandelt werden.
An den Maulteilen anklebende oder festgebackene Gewebereste mit einer Reinigungsbürste
entfernen bzw. schnellstmöglich nach der
Anwendung mit einer 3%igen H2O2-Lösung
vorreinigen. Den Maulteilen ist bei der
Reinigung besondere Sorgfalt zu widmen, da
es sich um feinmechanische Präzisionsteile
handelt.

10
2. Ultraschallbehandlung
Alle nicht zerlegbaren Scheren, Koagulations instrumente, sowie Mikroinstrumente sollten mit
Ultraschall vorgereinigt werden (3 – 5 Min.
Einwirkzeit).
Die Reinigungswirkung des Ultraschalls erreicht
auch schwer zugängliche Hohlräume. Deshalb
sind alle nicht zerlegbaren Scheren und Zangen
mit und ohne Spülkanal, Schienen schaft instrumente, Sauger, Zirkulärstanzen,
Koagulationsinstrumente sowie Mikro instrumente mit Ultraschall zu reinigen. An
Weichkunststoffteilen hat der Ultraschall keine
Reinigungswirkung, weil die Schwingungen
gedämpft werden.
Hohlkörperinstrumente (Sauger etc.) schräg ins
Ultraschallbad halten, damit sich die Hohl räume
füllen können. Großflächige Instrumente sind so
im Bad zu positionieren, dass sich keine Schall schatten bilden. Für das Ultraschallbad ungeeignet sind u.a. alle starren und flexiblen
Optiken, elektrische Geräte, Kabel, Prismen,
Gummiartikel, Magnet platten und Lichtleiter.
Nach der Reinigung gründlich mit VE-Wasser
spülen und anschließend umgehend trocknen.
Das Ablegen der Instrumente erfolgt in einem
geeigneten Instrumententräger (z.B. Siebkorb).
Hinweis
: Falls Schritte einer manuellen
Vorreinigung zwingend erforderlich sind, sind
diese beim jeweiligen Instrument in dieser
Anleitung erläutert
3. Manuelle/maschinelle Reinigung
und Desinfektion
Zur Aufbereitung müssen mehrteilige
Instrumente zerlegt, Dichtungen, Hahnreiber
und Schutzkappen entfernt werden.
Manuelle Reinigung/desinfizierende
Reinigung
Zur manuellen Reinigung bzw. desinfizierenden
Reinigung sind reinigungsaktive, nicht proteinfixierende Chemikalien, ggf. mit nachgewiesenem Wirkungsspektrum (Listung DGHM oder
vergleichbare) einzusetzen.
2. Ultrasound treatment
All non-separable scissors, coagulation instruments and microinstruments must be precleaned with ultrasound (3 - 5 minutes exposure
time).The cleaning effect of the ultrasound bath
reaches even inaccessible hollow spaces. For
this reason, all non-separable scissors and forceps, with or without irrigation channel, railsheath instruments, aspirators, circular punches, coagulation instruments and microinstruments must be preliminary cleaned with ultrasound. Ultrasound has no cleaning effect on
soft plastic parts because the oscillations are
attenuated.
Hollow instruments (aspirators etc.) should be
held at an angle in the ultrasound bath so that
the hollow spaces can fill. Position large instruments in the bath so that no acoustic shadows
are formed. The following items, amongst others, are not suitable for cleaning in an ultrasound bath: all rigid and flexible telescopes,
electrical devices, cables, prisms, rubber articles, magnetic discs and fiberoptic light cables.
After cleaning, rinse thoroughly with completely
demineralized water and then dry immediately.
Place the instruments in a suitable instrument
carrier (e.g. a tray holder).
Note: If manual preliminary cleaning is mandatory, the necessary steps are explained in this
manual for each instrument
3. Manual/machine cleaning
and disinfection
For preparation, multi-part instruments must be
dismantled, and seals, cock plugs and protective caps removed.
Manual cleaning/disinfecting cleaning
For manual cleaning or disinfecting cleaning,
use active-cleaning, non-protein-fixing chemicals, where necessary with a verified range of
action (DGHM (German Association of Hygiene
and Microbiology) listing or comparable).
2. Tratamiento con ultrasonidos
Todos los instrumentos no desmontables, tales
como tijeras, instrumentos de coagulación e instrumentos en miniatura, deben limpiarse previa mente
con ultrasonidos (3 a 5 min. de tiempo de incidencia). El efecto de limpieza de los ultrasonidos
alcanza también los espacios huecos de difícil
acceso. Por ello, todas las tijeras y pinzas con y
sin canal de irrigación, no desmontables, instrumentos con vaina guía , succionador, punzones circulares, instrumentos de coagulación, así como
instrumen tos en miniatura deben limpiarse con
ultrasonidos. En las piezas de material sintético
blando, los ultrasonidos no tienen ningún efecto
limpiador porque las vibraciones son absorbidas.
Sostenga en posición oblicua los instrumentos con
cuerpo hueco (succionador, etc.) en el baño de
ultrasonidos, a fin de que puedan llenarse las
cavidades . Los instrumentos de gran superficie
han de posicionarse de modo tal que no se formen sombras acústicas. Todos los telescopios rígidos y flexibles, aparatos eléctricos, cables, prismas, artículos de goma, placas magnéticas y portaluces, entre otros, no son apropiados para ser
sometidos a baño de ultrasonidos.
Después de la limpieza, enjuague los instrumentos
minuciosamente con agua completamente desalinizada y séquelos inmediatamente.
Los instrumentos deben depositarse en un recipiente apropiado (p. ej., cesta perforada).
Nota
: Si es absolutamente necesario llevar a cabo
una limpieza manual previa, los pasos operativos
al efecto se detallan en esta Instrucción para el
instrumento respectivo.
3. Limpieza y desinfección
manual/mecánica
Para la preparación deben desmontarse los instrumentos formados por varias piezas, y retirarse las
juntas, los machos de llave y las caperuzas de
protección.
Limpieza manual/limpieza desinfectante
Para la limpieza manual o la limpieza desinfectante deben utilizarse productos químicos con efecto
limpiador activo, sin fijación proteínica; en caso
necesario, con espectro comprobado de efectividad (listado DGHM o similar).
Über diese Anleitung About this manual Acerca de esta Instrucción

11
Vorsicht
: Bei der Herstellung und
Anwendung der Lösungen sind die
Angaben des Herstellers über
Mischungsverhältnis und Einlegedauer
genauestens zu beachten. Zu langes
Einlegen kann zu Beschädigungen
führen.
Hinweis
: Eine Liste der bezüglich Ihrer
Materialverträglichkeit getesteten und von
KARL STORZ freigegebenen Mittel zur manuellen Reinigung/Desinfektion finden Sie im
Anhang dieser Anleitung sowie auf der KARL
STORZ Homepage.
Beim Einlegen von Instrumenten in Reinigungsund Desinfektionslösungen darauf achten, dass
Luft aus den Hohlräumen entweichen kann, so
dass alle innenliegenden Flächen vollständig
benetzt werden. Dazu Instrumente am besten
schräg eintauchen, bis keine Luftblasen mehr
zu sehen sind. Grundsätzlich ist bei der
Reinigung darauf zu achten, dass sich der
Vorgang insbesondere auch auf alle Hohlräume
erstreckt (Schaftlumen, Hähne, Ventile etc.) und
dass diese durchgängig sind (Durchfluss kontrolle).
Oberflächen, Innenräume sowie Maulteile
gründlich mit einer geeigneten weichen Bürste,
Schwamm oder Reinigungspistole reinigen und
spülen. Kleinteile vorsichtig reinigen.
Mit der Reinigungspistole und Zubehör (Art. Nr.
27660) können Hohlräume besonders gut mit
Wasser durchspült und mit medizinisch reiner
Druckluft getrocknet werden.
Nach der Reinigung Instrumente ausgiebig mit
VE-Wasser spülen und mit medizinisch reiner
Druckluft trocknen.
Maschinelle thermische Reinigung und
Desinfektion
Soweit es möglich ist, sollte eine maschinelle
thermische Reinigungsdesinfektion, gefolgt von
einer Dampfsterilisation bei 134 °C stattfinden.
Der Vorteil der maschinellen Aufbereitung liegt
in der Reduzierung der Risiken für das Personal
und in der Standardisierung des
Reinigungsvorgangs (validierbare bzw. validierte Prozesse werden gefordert).
Durch die teilweise starke Bewegung des
Wassers ist es notwendig, dass alle Teile in
Caution:
When preparing and using
the solutions follow the manufacturer's
instructions paying close attention to
proper dilution and immersion times.
Note:
A list of products which have been tested and shown not to attack the surface and
approved by KARL STORZ for manual cleaning
and disinfection can be found in the appendix
of this manual and on the KARL STORZ home
page.
When immersing instruments in cleaning and
disinfectant solutions, ensure that air can
escape from hollow spaces so that all the internal surfaces are completely wetted. It is best to
immerse the instruments at an angle until no
more air bubbles can be seen. During cleaning, always ensure that all hollow spaces
(sheath lumens, stopcocks, valves etc.) are
also cleaned and that there are no obstructions
(flow test, for example with a syringe) .
Thoroughly clean surfaces, interiors and jaws
with a suitable soft brush, sponge or cleaning
gun, and rinse. Take care when cleaning small
parts.
The cleaning gun with accessories (Art. no.
27660) is ideal for rinsing out hollow spaces
with water and drying them with sterile compressed air.
After cleaning, rinse the instruments copiously
with completely demineralized water and dry
with sterile compressed air.
Thermal cleaning and disinfection in a
machine
As far as possible, thermal cleaning/disinfection should be carried out in a machine, followed by steam sterilization at 134°C. The
advantage of preparation by machine is that it
reduces the risks for personnel and standardizes the cleaning procedure (validatable or validated processes are demanded).
As there is sometimes strong movement of the
water, it is necessary to secure all parts in
holding devices to avoid damage. To ensure
that the instruments are adequately rinsed out,
it is essential to connect up the hollow spaces
appropriately to the washer/disinfector.
Advertencia
: Durante la preparación y
aplicación de soluciones deben observarse con la mayor exactitud las indicaciones del fabricante en cuanto a relación de la mezcla y duración de la inmersión. Una inmersión demasiado prolongada puede conllevar deterioros.
Nota: En el Anexo de esta Instrucción, así como
en la página web de KARL STORZ encontrará
usted una lista de los materiales verificados con
respecto a compatibilidad de materiales y autorizados por KARL STORZ para la limpieza/desinfección manual.
Al depositar los instrumentos en soluciones de
limpieza y desinfección, preste atención a que
pueda evacuarse el aire de los espacios huecos,
a fin de que las superficies interiores puedan
humedecerse completamente. Para ello, lo más
apropiado es introducir los instrumentos oblicuamente, hasta que ya no se vean burbujas de
aire. Por principio, durante la limpieza hay que
asegurarse de que con este procedimiento se
alcancen muy en particular todos los espacios
huecos (lumen de la vaina, llaves, válvulas, etc.)
y que éstos tengan capacidad de paso (control
de circulación).
Limpie y enjuague minuciosamente las superficies, los espacios interiores, así como las mordazas con un cepillo blando apropiado, una
esponja o una pistola de limpieza. Limpie las
piezas pequeñas con cuidado.
Con la pistola de limpieza y accesorios (art. nº
27660) pueden enjuagarse con agua los espacios huecos particularmente bien y secarse después con aire comprimido puro para uso médico.
Después de la limpieza enjuague abundamente
con agua completamente desalinizada y seque
con aire comprimido puro para uso médico.
Limpieza y desinfección térmico-mecánicas
En tanto sea posible, debe llevarse a cabo una
desinfección térmico-mecánica de limpieza,
seguida de una esterilización por vapor a 134°C.
La ventaja de la preparación mecánica radica en
la reducción del riesgo para el personal y la
estandarización del procedimiento de limpieza
(se exigen procesos validables o validados).
Debido al movimiento parcialmente intenso del
agua, es necesario que todas las piezas estén
fijadas en dispositivos de sujeción, que evitan un
Über diese Anleitung About this manual Acerca de esta Instrucción

12
Haltevor richtungen fixiert werden, die eine
Beschädigung verhindern. Für eine ausreichende Durchspülung der Instrumente ist es zwingend notwendig, dass Hohlräume entsprechend
an den Reinigungs- und
Desinfektionsautomaten angeschlossen werden.
Von der Verwendung von Pflegemitteln in der
Maschine ist abzuraten, weil sich Beläge auf
den Instrumenten bilden können, oder
Kunststoffe durch das Pflegemittel Schaden
erleiden. Eine gezielte, manuelle Pflege und
Schmierung von Gelenken etc. ist schonender.
Eine ausreichende Abschlussspülung mit VEWasser zur restlosen Entfernung von
Chemikalienrückständen ist erforderlich, da solche Rückstände zu chemischen
Kreuzreaktionen oder Belagbildungen bei der
anschließenden Sterilisation führen können.
Hinweis
: Eine Liste der getesteten und von
KARL STORZ freigegebenen Mittel zur maschinellen Reinigung/Desinfektion finden Sie im
Anhang dieser Anleitung und auf der KARL
STORZ Homepage.
4. Funktionsprüfung
Alle Instrumente sollen spätestens vor der
Sterilisation auf ihre Funktion hin überprüft werden. Diese Funktionskontrolle sollte v.a. nachfolgende Merkmale überprüfen:
• Erfolg der vorangegangenen Reinigung /
Restverschmutzung (in der Regel durch
optische Kontrolle der kritischen Bereiche)
• Gängigkeit der Gelenke
• Generelle Abnutzungserscheinungen
• Genaues Schließen der Pinzetten, Klemmen,
Stanzen etc.
• Sicheres Schließen von Ventilen und
Dichtungen
• Schärfe der schneidenden Instrumente
• Zustand der Optiken
• Zustand der Isolationsmäntel von Kabeln,
auch Kaltlichtkabeln
• Faserbrüche bei Kabeln
Beschädigtes Instrumentarium ist auszusortieren und einer fachgerechten und qualifizierten
Reparatur zuzuführen. Hierfür empfehlen wir
den KARL STORZ Reparatur-Service, der für
It is not advisable to use lubricants etc. in the
machine because they may cause deposits to
form on the instruments and may damage plastics. Selective manual care and lubrication of
joints etc. is safer and more effective.
It is necessary to perform a final thorough rinse
with completely demineralized water in order to
remove all chemical residue, as such residue
can lead to chemical cross reactions or the formation of deposits during final sterilization.
Note
: A list of products tested and approved by
KARL STORZ for machine cleaning/disinfection
can be found in the appendix of this manual
and on the KARL STORZ home page.
4. Functional testing
All instruments should be checked for correct
functioning before sterilization, at the latest.
This functional check should include the following aspects in particular:
• Success of previous cleaning / signs of resi-
dual dirt (as a rule via visual checks of the
critical areas)
• Smooth operation of the joints
• General signs of wear
• Exact closing of forceps, clamps and punch-
es etc.
• Secure closing of valves and seals
• Sharpness of cutting instruments
• Condition of telescopes
• Condition of the insulating sheaths of cables,
including cold light cables
• Broken fibres in cables
Damaged instruments must be separated out
and sent for expert, qualified repair. For this
purpose we recommend the KARL STORZ
Repair Service, which ensures consistent quality
and guaranteed safety of your instruments and
units.
Prior to sterilization, instruments with a closure
mechanism or joint must be treated with lubricants capable of withstanding steam sterilization (e.g. instrument oil Art. no. 27656 B).
Note:
Apply a thin coat of special grease to
sealing and running surfaces, such as stopcocks and plungers (Art. no. 27657). This thin
layer of grease not only serves to lubricate the
metal surfaces which are in contact with one
posible deterioro de las mismas. Para lograr un
enjuague suficiente de los instrumentos es absolutamente imprescindible que los espacios huecos
estén debidamente conectados a las máquinas
automáticas de limpieza/desinfección.
Se recomienda evitar el uso de detergentes en la
máquina, ya que podrían depositarse residuos en
los instrumentos, o el detergente podría deteriorar
los materiales sintéticos. Una conservación y lubricación manuales específicas de las articulaciones,
etc. es más cuidadosa.
Es necesario efectuar un abundante enjuague final
con agua completamente desalinizada con el fin
de eliminar por completo todos los residuos de
productos químicos, dado que dichos residuos
podrían provocar reacciones químicas cruzadas o
la formación de sedimentos durante la esterilización subsiguiente.
Nota
: En el Anexo de esta Instrucción y en la
página web de KARL STORZ encontrará una lista
de los productos verificados y autorizados por
KARL STORZ para la limpieza/desinfección mecánica.
4. Verificación de funcionamiento
Se debe verificar el funcionamiento de todos los
instrumentos, a más tardar, antes de la esterilización. Este control debe abarcar, sobre todo, la
verificación de las siguientes características:
• eficacia de la limpieza previa / presencia de
suciedad residual (por regla general, mediante
control visual de los sectores críticos)
• movimiento de las articulaciones
• signos generales de desgaste
• cierre exacto de las pinzas, dispositivos de
apriete, punzones, etc.
• cierre seguro de válvulas y juntas
• filo de los instrumentos cortantes
• estado de los telescopios
• estado del recubrimiento aislante de los cables,
incluyendo los cables de luz fría
• rotura de fibras en los cables
El instrumental deteriorado ha de segregarse y
someterse a una reparación especializada y
cualificada. Para ello recomendamos el servicio de
reparaciones de KARL STORZ, que responde de
la calidad constante y seguridad garantizada de
sus instrumentos y aparatos.
Über diese Anleitung About this manual Acerca de esta Instrucción

13
Über diese Anleitung About this manual Acerca de esta Instrucción
gleichbleibende Qualität und garantierte
Sicherheit Ihrer Instrumente und Geräte verbürgt.
Instrumente mit Schluss oder Gelenk sind vor
ihrer Sterilisation mit dampfsterilisierbaren
Pflegemitteln (z.B. Instrumentenöl Art-Nr. 27656
B) zu behandeln.
Hinweis
: Dichtungs- und Laufflächen, wie an
Hähnen oder Kolben, sind dünn mit Spezialfett
(Art.Nr. 27657) zu bestreichen. Diese dünne
Fettschicht dient nicht nur der Schmierung der
aufeinander laufenden Metall-MetallOberflächen, sondern auch der Dichtigkeit der
Hähne. Öl ist als Dichtmittel nicht geeignet.
Warnung
: Nur spezielle Schmiermittel
auf Weissölbasis verwenden, da die
Sterilisiermittel nicht jedes Öl durchdringen können, um die darunter liegenden
Oberflächen zu sterilisieren.
Hinweis
: Die Hähne sind zur Sterilisation
demontiert zu belassen und erst nach der
Sterilisation in das Gehäuse einzusetzen.
5. Sterilisation
Für fast alle Instrumente ist die Dampf sterilisation im fraktionierten Vakuumverfahren
bei 134 °C
(3,04 bar abs.), die Gassterilisation
(Formaldehyd, Ethylenoxid), die
Plasmasterilisation und die chemische
Sterilisation (STERIS) möglich. Die
Dampsterilisation mit 134 °C ist meistens das
schonendste und kostengünstigste Sterilisa tions verfahren. Dies gilt auch für starre Optiken,
weil sich bei einer Dampfsterilisation mit 121 °C
die längere Einwirkzeit negativ auswirken kann.
Eine Sterilisation ist grundsätzlich nur an gereinigten Oberflächen möglich.
Fast alle Instrumente können im zusammengebautem Zustand sterilisiert werden. Schrauben
und Verschlüsse nur leicht anziehen, damit sie
sich später wieder leicht lösen lassen.
Hinweis
: Sollte aufgrund konstruktiver
Gegebenheiten eine Sterilisation in demontiertem Zustand erforderlich sein, um die
Effektivität zu gewährleisten, wird beim jeweiligen Artikel in dieser Anleitung ausdrücklich
darauf hingewiesen
another, but also makes the stopcocks leakproof.
Oil is not suitable as a sealant.
Warning
: Only use special white oilbased lubricants as the sterilant is not
able to penetrate all types of oil in order
to sterilize the underlying surfaces.
Note
: Leave the stopcocks dismantled for sterilization and only insert them into the housing
once sterilization is complete.
5. Sterilization
For almost all instruments, steam sterilization by
the fractionated vacuum method at 134°C (3.04
bar.), gas sterilization (formaldehyde, ethylene
oxide), plasma sterilization and chemical sterilization (STERIS) are possible. Steam sterilization
at 134°C is usually the gentlest and most economical method of sterilization. This also applies
to rigid telescopes because the longer exposure
time for steam sterilization at 121°C can have a
negative effect.
Sterilization is only ever possible on surfaces
that have been cleaned.
Almost all instruments can be sterilized without
being dismantled. Only tighten screws and closures gently, so that they are easy to undo later.
Note:
If the design of the instrument necessitates sterilization in the dismantled state to
ensure effectivity, this is expressly stated for the
article in question in this manual.
For steam sterilization (with saturated steam at
134°C + 3°C), the process defined in EN 285 or
DIN 58946 Part 1, Number 3.25.2 should be
used. Use prevacuum methods for instruments
with a lumen. The steam must fulfill the requirements of EN 285, Appendix B, in order to avoid
discoloration and stains.
These procedures are also permissible for telescopes labeled ‘AUTOCLAVE’.
Caution
: When sterilizing telescopes,
please follow the instructions in the
Telescopes manual.
Los instrumentos con cierre o articulación deben
tratarse antes de su esterilización con un producto de conservación esterilizable por vapor
(p. ej., aceite para instrumentos art. nº 27656 B).
Nota
: Engrase ligeramente las juntas y las
superficies de deslizamiento, tales como llaves
o émbolos, con grasa especial (art. nº 27657).
Esta delgada capa de grasa sirve no solamente
para la lubricación de las superficies metálicas
que rozan entre sí, sino también para la hermeticidad de la llave. El aceite no es adecuado
como agente hermetizante.
Cuidado
: Utilice únicamente lubricantes
especiales a base de silicona o aceite
blanco, dado que los productos para
esterilización no pueden atravesar todos
los aceites a fin de esterilizar las superficies que se encuentran debajo.
Las llaves deben dejarse desmontadas para la
esterilización y montarse en la carcasa sólo después de efectuada la misma.
5. Esterilización
Para casi todos los instrumentos es posible
efectuar una esterilización por vapor por el procedimiento fraccionado al vacío a 134°C (3,04
bares absolutos), por gas (formaldehído, óxido
de etileno), por plasma y química (STERIS). La
esterilización por vapor a 134°C es, generalmente, el procedimiento de esterilización más cuidadoso y económico . Esto vale también para los
telescopios rígidos, porque en caso de una
esterilización por vapor a 121°C puede tener
efectos negativos debido al prolongado tiempo
de incidencia.
Básicamente, una esterilización es posible únicamente sobre superficies limpias.
Casi todos los instrumentos pueden esterilizarse
estando montados. Apriete los tornillos y cierres
sólo ligeramente, a fin de poder aflojarlos
después fácilmente de nuevo.
Nota
: Si debido a características constructivas
fuera necesario efectuar una esterilización en
instrumentos desmontados para garantizar la
efectividad, en esta instrucción se hace expresa
constancia de ello en el artículo respectivo.
Para la esterilización por vapor (con vapor saturado a 134°C +3°C) deben utilizarse los procedimientos según EN 285 ó DIN 58946 parte 1,
14
Für die Dampfsterilisation (mit Sattdampf bei
134°C + 3 °C) sollten die Verfahren nach EN
285 oder DIN 58946 Teil 1, Ziffer 3.25.2 verwendet werden. Bei Instrumenten mit Lumen sind
Vorvakuumverfahren zu verwenden. Der Dampf
muß die Anforderungen aus EN 285, Anhang B,
erfüllen, um Verfärbungen und Flecken zu
Vermeiden.
Diese Verfahren sind auch für die mit «AUTOKLAV» gekennzeichneten Optiken zugelassen.
Vorsicht
: Für die Sterilisation von
Optiken bitte die Anleitung Optiken
beachten.
Warnung
: Lange Lumen, Spalten und
Kanäle sowie zusammengesetzte
Instrumente sind nur mit dem fraktionierten Vorvakuumverfahren uneingeschränkt sterilisierbar.
Hinweis
: Ist eine Deaktivierung von Erregern
der Creutzfeldt-Jakob-Krankheit notwendig,
kann dasvon der WHO empfohlene
Dampfsterilisations verfahren verwendet werden
(18 min bei 134° C). eine Verlängerung der
Sterilisierzeit auf bis zu eine Stunde ist bei 134
°C in Sonderfällen möglich.
Da es zahlreiche Varianten der Reinigung,
Desinfektion und Sterilisation gibt, ist unbedingt
darauf zu achten, dass anerkannte und validierte (geprüfte) Aufbereitungsverfahren zur
Anwendung kommen.
Genauere Informationen darüber finden Sie in
der Anleitung „Reinigung, Sterilisation und
Pflege von KARL STORZ Instrumenten.“
6. Lagerung/Transport
Um Schäden bei Transport und Lagerung zu
vermeiden sind die Instrumente sorgfältig in
geeignete Haltevorrichtungen abzulegen.
Geeignetes Zubehör und Lagerungssysteme
sowie Sterilisationstrays für spezielle
Instrumententarien finden sie im entsprechenden Kapitel eines jeden KARL STORZ
Kataloges.
Warning
: Long lumens, slits and channels, and assembled instruments can
only be sterilized without restrictions with
the fractionated prevacuum method.
Note
: If it is necessary to deactivate the pathogens responsible for Creutzfeldt-Jakob disease,
the steam sterilization method recommended by
the WHO can be used (18 min at 134°C), the sterilization time may be extended to up to an hour
at 134°C in certain cases.
As there are various types of cleaning, disinfection and sterilization, it is essential to ensure that
recognized and validated (tested) preparation
methods are used.
Refer to the manual ‘Cleaning, sterilization and
care of KARL STORZ instruments’ for more
detailed information.
6. Storage/Transportation
To avoid damage during transportation and storage, place the instruments carefully in suitable
holding devices.
Suitable accessories, storage systems, and sterilization trays for special instrument sets can be
found in the relevant chapter of every
KARL STORZ catalog.
cifra 3.25.2. En caso de instrumentos con lumen
han de utilizarse procedimientos de prevacío. El
vapor debe cumplir los requerimientos según EN
285, Anexo B, a fin de evitar decoloraciones y
manchas.
Estos procedimientos también son admitidos
para telescopios identificados con “AUTO CLAVE”.
Advertencia
: Para la esterilización de
telescopios observe la Instrucción
Telescopios.
Cuidado
: Los orificios, aberturas y canales de mayor longitud, así como los
instrumentos totalmente montados sólo
son esterilizables sin restricciones por el
procedimiento fraccionado de prevacío.
Nota
: Si es necesario efectuar una desactivación
de agentes patógenos de la enfermedad de
Creutzfeldt-Jakob, ésta puede llevarse a cabo
por el procedimiento de esterilización por vapor
recomendado por la OMS (Organización Mundial
de la Salud) (18 minutos a 134°C).
En casos determinados es posible una prolongación del tiempo de esterilización de hasta una
hora a 134°C.
Dado que existen numerosas variantes de limpieza, desinfección y esterilización, ha de prestarse
necesariamente atención a que se empleen procedimientos de preparación reconocidos y validados (comprobados).
Información más detallada al respecto encontrará en la Instrucción “Limpieza, esterilización y
conservación de los instrumentos KARL STORZ”.
6. Almacenamiento/transporte
Con el fin de evitar deterioros durante el transporte y almacenamiento, los instrumentos deben
depositarse cuidadosamente en dispositivos de
sujeción apropiados.
En cada catálogo de KARL STORZ, en el capítulo correspondiente, encontrará detallado los
accesorios adecuados y sistemas de almacenamiento, así como los contenedores de esterilización para instrumentos especiales.
Über diese Anleitung About this manual Acerca de esta Instrucción
15
Oesophagoskopie
Divertikuloskopie
Esophagoscopy
Diverticuloscopy
Esofagoscopia
Diverticuloscopia
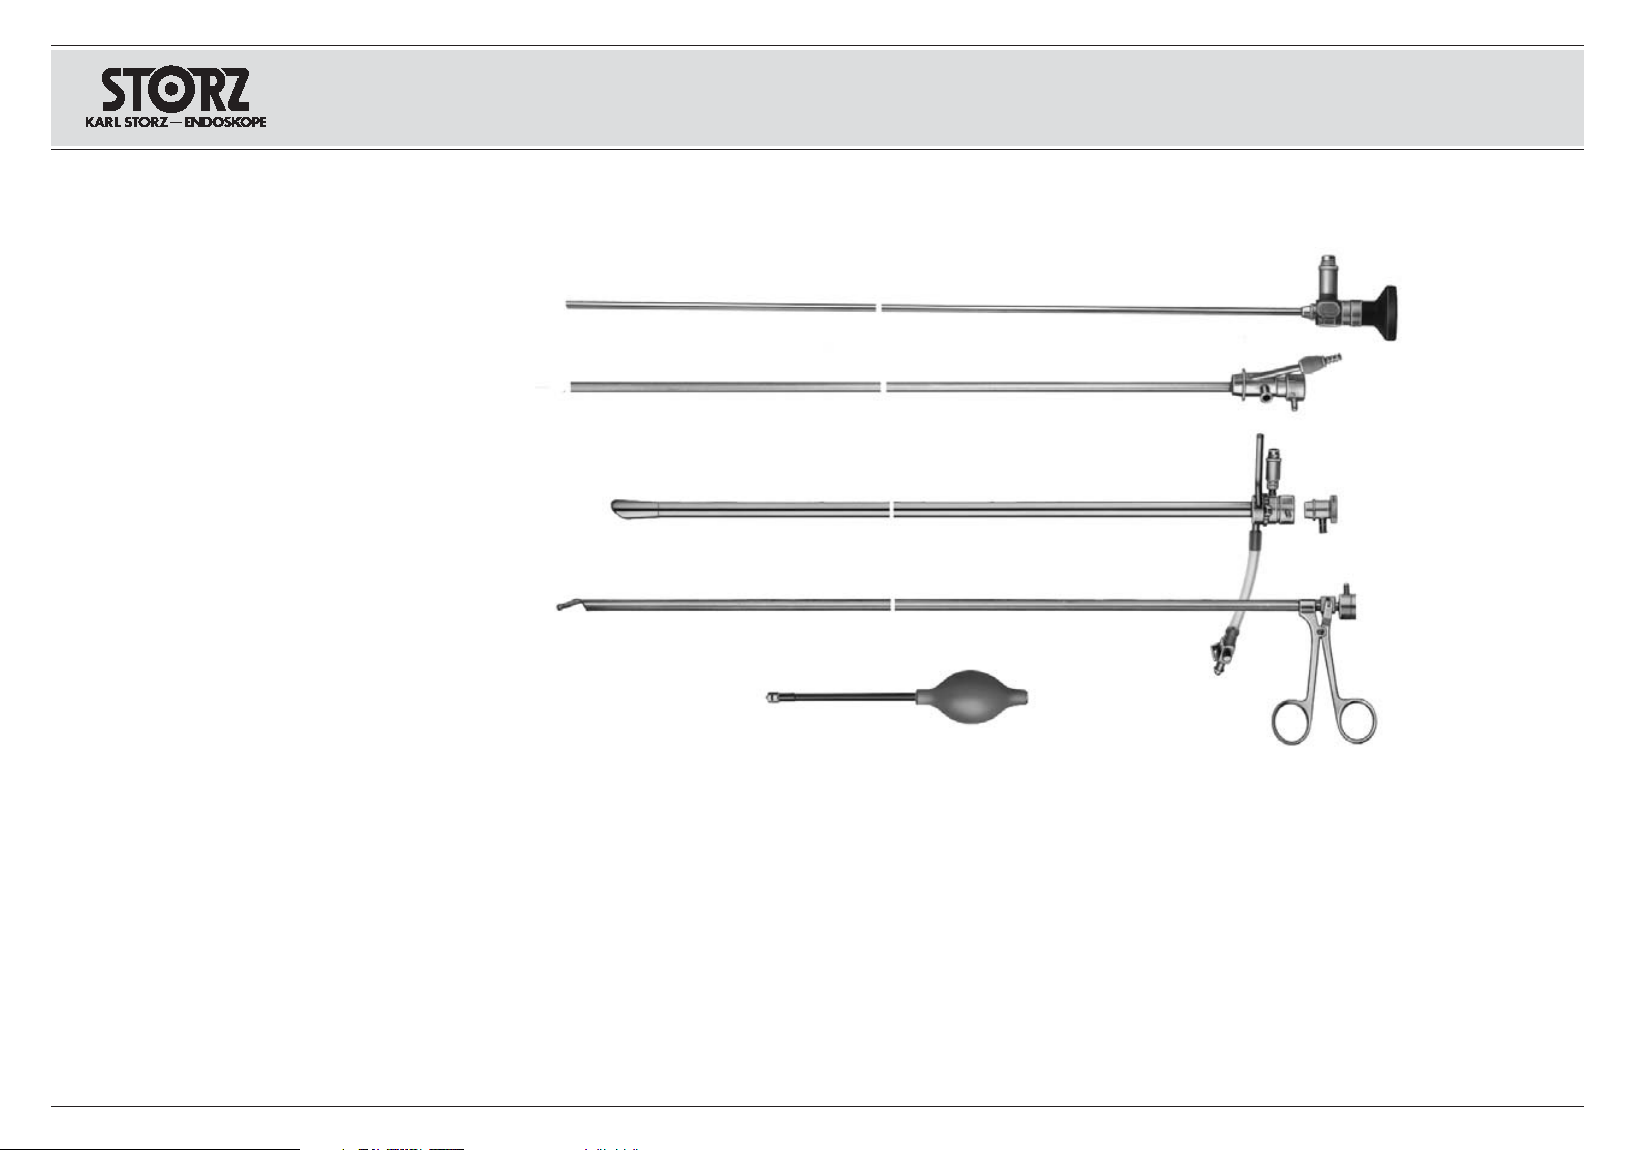
Optik
Tubus-Einsatz
Hebel zum Lösen der Verriegelung
Instrumentenkanal
Antibeschlag-Kanal
Oesophagoskop-Tubus
Verschlusskappe mit Beobachtungsfenster
Anschluss für Fiberglas-Lichtträger,
einschließlich 2 Adapter, abschraubbar
Optische Zange
Einrichtung zur Luftaufblähung
Gummigebläse zur Luftaufblähung
Optisches Oesophagoskop für
Erwachsene und Kinder
Optical esophagoscope for
adults and children
Telescope
Tube insert
Unlocking lever
Instrument channel
Anti-fog channel
Esophagoscope tube
Cap with observation window
Connection point for fiberoptic light carrier,
including 2 unscrewable adapters
Optical forceps
Air inflation facility
Rubber bulb for air inflation
Esofagoscopio óptico para adultos
y para pediatría
Telescopio
Suplemento de tubo
Palanca para soltar el enclavamiento
Canal para instrumentos
Canal antiempañante
Tubo-esofagoscopio
Caperuza de cierre con mirilla de
observación
Conexión para portaluz de fibra óptica,
inclusive 2 adaptadores desenroscables
Pinzas ópticas
Dispositivo para inflar aire
Pera de goma para inflar aire
12015 AA
12016 C
12016 E / F
12016 L / K / M / N
24924
16
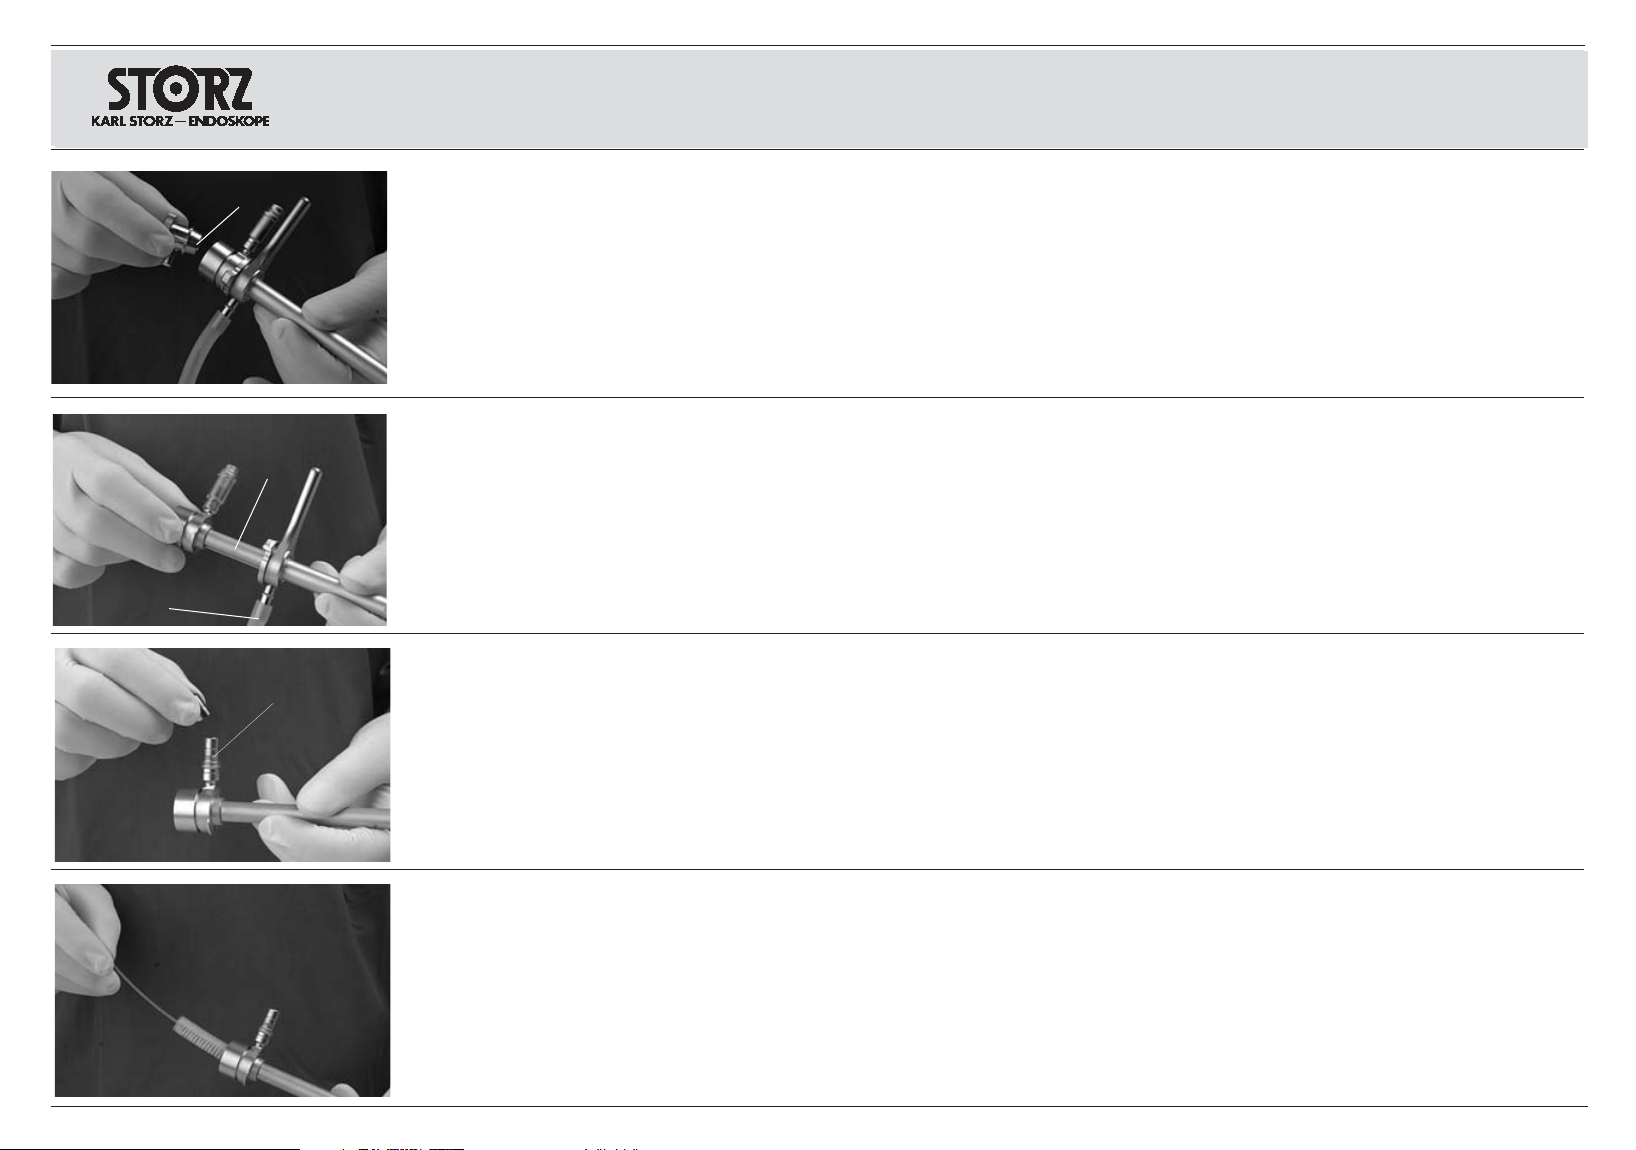
Demontage:
Optikarretierung durch ¼ Drehung entgegen
dem Uhrzeigersinnn öffnen. Optik bzw.
Verschlusskappe herausnehmen.
Ggf. Arretierung des Tubuseinsatzes
bzw. der optischen Zange durch ¼ Drehung
entgegen dem Uhrzeigersinn lösen.
Tubuseinsatz bzw. Instrument herausnehmen.
Silikonschlauch der Einrichtung zur Luftauf blähung vom Sauganschluß abziehen.
Die beiden Adapter vom Anschluss für
Fiberglas-Lichtleiter entfernen.
Kontaktfläche der Arretierungen mit
KARL STORZ Spezialfett fetten. Bewegliche
Teile mit KARL STORZ Instrumentenöl ölen.
Disassembly:
Open the telescope lock by giving it a ¼
turn counterclockwise. Remove telescope or
cap .
Oesophagoskopie –
Divertikuloskopie
Esophagoscopy –
diverticuloscopy
Esofagoscopia –
diverticuloscopia
Remove the two adapters from the fiberoptic
light cable connection point .
Lubricate the contact surface of the locks using
KARL STORZ special grease. Oil moving parts
with KARL STORZ instrument oil.
Retire ambos adaptadores de la conexión para el
portaluz de fibra óptica .
Engrase las superficies de contacto del enclavamiento con grasa especial de KARL STORZ.
Aceite las piezas móviles con aceite para instrumentos de KARL STORZ.
Desmontaje:
Suelte el enclavamiento del telescopio girando
¼ de vuelta en sentido contrario al de las agujas
del reloj. Extraiga el telescopio o la caperuza de
cierre .
If necessary, undo the lock of tube insert
or the optical forceps by giving it a ¼ turn
counterclockwise. Remove the tube
insert/instrument.
Remove silicone hose of the air inflation device
from the suction outlet.
Cleaning:
To clean the instrument, completely dismantle
the esophagoscope. Clean the outer surfaces
with a soft sponge. Clean out the lumen thoroughly with a brush. Rinse with water and dry
with sterile compressed air. Then clean the front
and rear surfaces of the prism with a soft cloth,
sponge, or cotton swab impregnated with 70%
alcohol.
Dado el caso, suelte el enclavamiento del
suplemento de tubo o de las pinzas ópticas
girando ¼ de vuelta en sentido contrario al de las
agujas del reloj. Extraiga el suplemento de tubo o
el instrumento.
Retire el tubo flexible de silicona del dispositivo
para inflar aire de la conexión para succión.
Limpieza:
Para la limpieza, el esofagoscopio debe desmontarse completamente. Limpie las superficies exteriores con una esponja. Cepille el lumen.
Enjuague con agua, seque con aire comprimido
puro para uso medicinal. Limpie posteriormente
las superficies anterior y posterior del prisma con
un paño suave, una esponja o un bastoncillo de
algodón embebido en alcohol al 70 %.
Reinigung:
Zur Reinigung ist das Oesophagoskop vollständig zu zerlegen. Außenflächen mit einem weichen Schwamm reinigen. Lumen durchbürsten.
Mit Wasser durchspülen, mit medizinisch reiner
Druckluft trocknen. Vordere und hintere Fläche
des Prismas mit einem weichen Tuch,
Schwamm oder Watte stäbchen, getränkt mit
70%igem Alkohol, nachreinigen.
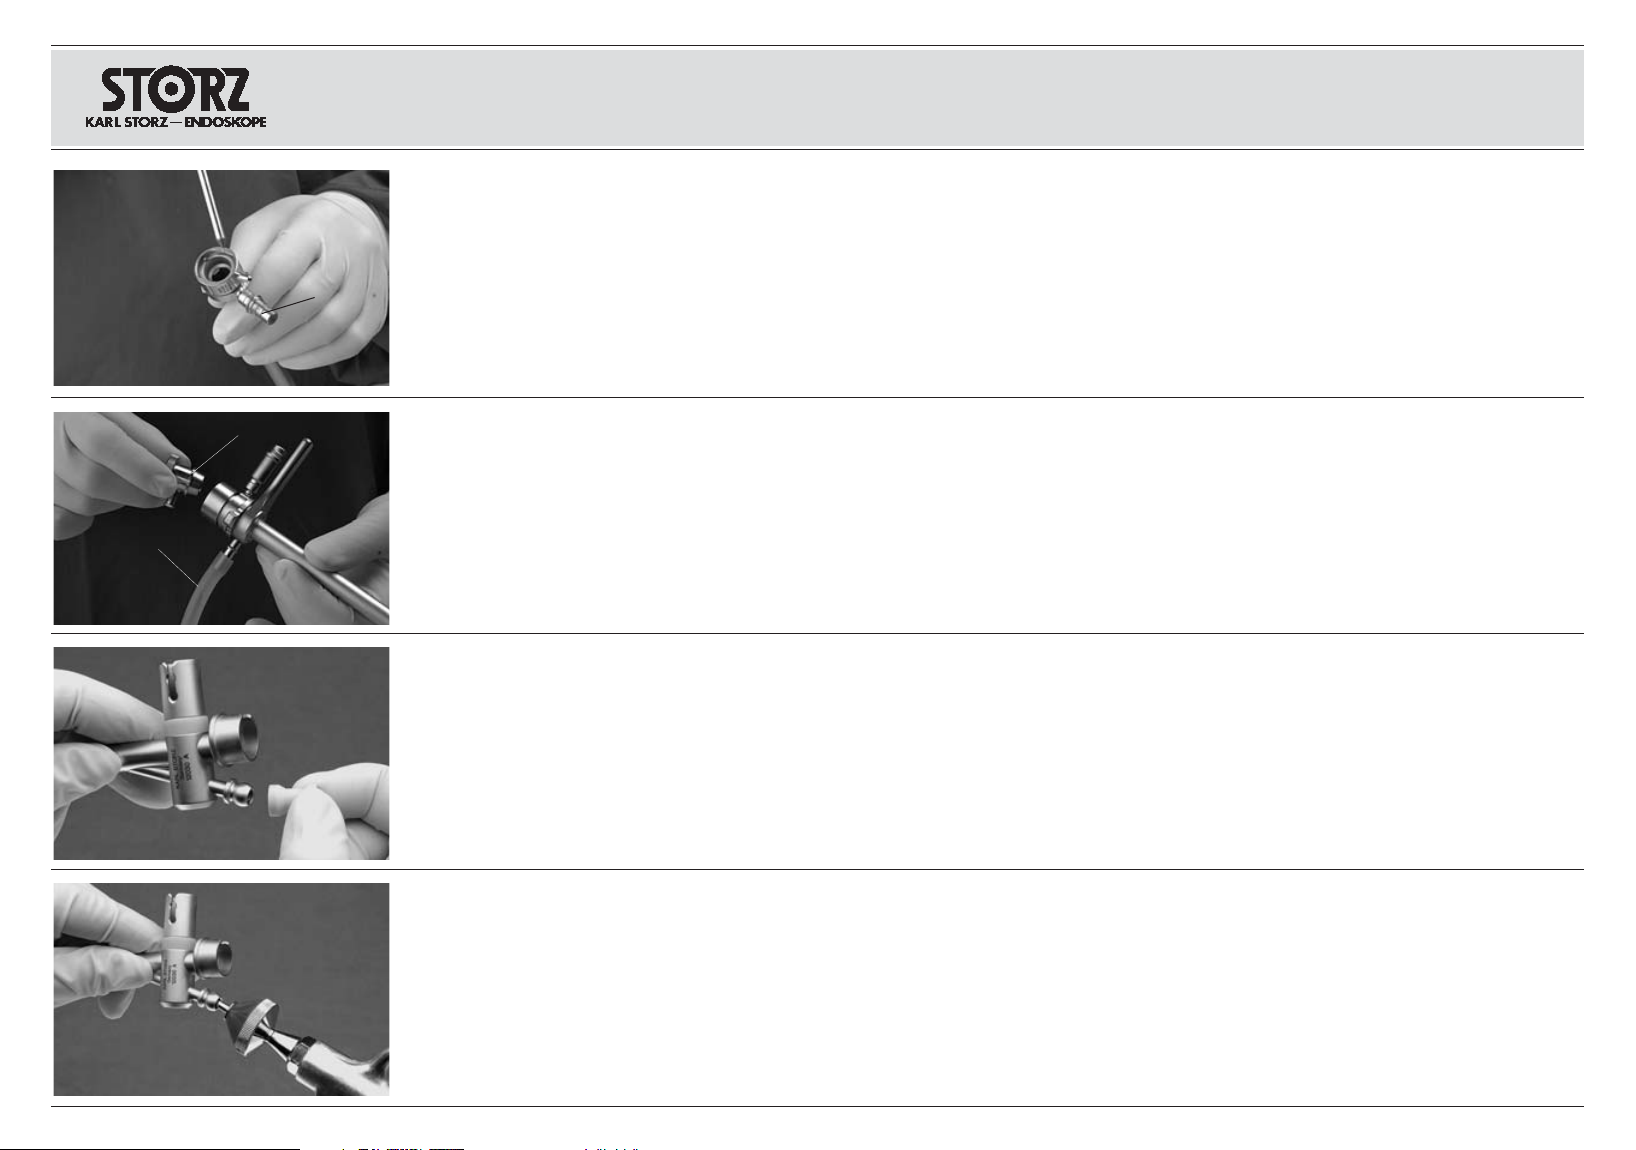
17
Oesophagoskopie
Divertikuloskopie
Esophagoscopy
Diverticuloscopy
Esofagoscopia
Diverticuloscopia
Optik in Tubus-Einsatz einschieben bzw.
Verschlusskappe aufsetzen und mittels
Arretierung verriegeln.
Silikonschlauch zur Luftaufblähung aufschieben. Ggf. Gebläseball an die Einrichtung zur
Luftaufblähung anschließen.
… mit Wasser durchspülen und mit medizinisch
reiner Druckluft trocknen.
Pediatric esophagoscope
Remove rubber cap, check for damage and if
necessary replace with a new one.
Clean the exterior with a soft sponge; thoroughly clean the lumen with a brush …
… rinse out with water and dry with sterile compressed air.
Esofagoscopio pediátrico
Retire la caperuza de goma, compruebe si presenta deterioros y, si es necesario, cámbiela.
Limpie la superficie exterior con una esponja
suave, cepille el lumen ...
... y, a continuación, enjuague con agua y seque
usando aire comprimido puro para uso médico.
Montage:
Lichtleitadapter auf den Lichtleiteranschluß
aufschrauben.
Tubus-Einsatz in 12 Uhr-Position in den
Oesophagoskop-Tubus einschieben.
Arretierung des Tubus-Einsatzes durch ¼
Umdrehung im Uhrzeigersinn schließen.
Assembly:
Screw the fiberoptic adapter onto fiberoptic
cable connection point .
Slide tube insert at the 12 o’clock position
into the esophagoscope tube . Close the lock
of the tube insert by giving it a ¼ turn clockwise.
Slide telescope into tube insert or fit cap
and engage the lock.
Slide on the air inflation silicone hose . If necessary, connect up inflation bulb to the air
inflation device .
Montaje:
Enrosque el adaptador para el portaluz en la
conexión del portaluz .
Introduzca el suplemento de tubo en el tubo
del esofagoscopio en la posición de 12 horas
. Cierre el enclavamiento del suplemento de
tubo girando ¼ de vuelta en el sentido de las
agujas del reloj.
Introduzca el telescopio en el suplemento
de tubo o coloque la caperuza de cierre ,
encastrando por medio del enclavamiento.
Monte el tubo flexible de silicona para inflar
aire . Dado el caso, conecte la pera de goma
al dispositivo para inflar aire .
Pädiatrisches Ösophagoskop
Gummikappe abziehen, auf Beschädigung prüfen und ggf. austauschen.
Außenfläche mit weichem Schwamm reinigen,
Lumen durchbürsten…

Oesophagoskopie
Divertikuloskopie
Esophagoscopy
Diverticuloscopy
Esofagoscopia
Diverticuloscopia
18
Optische Instrumente
Das Äußere der Zangen mit einem Schwamm,
die Maulteile mit einer Bürste säubern.
Optik-Kanal durchbürsten. Anschließend im
Ultraschallbad reinigen.
Mit Wasser durchspülen und mit medizinisch
reiner Druckluft trocken blasen.
Die Gelenkteile des Zangenmaulteils ölen.
Dabei das Instrument so halten, daß vom distalen Ende her Öl in das Gelenk einfließen kann,
damit auch der Zugdraht benetzt wird.
Die Gelenke am Griffteil müssen ebenfalls mit
Öl versorgt werden.
Oil the joint parts of the forceps jaws. Hold the
instrument so that oil can flow into the joint from
the distal end and the wire pull is also wetted.
The joints on the handle also have to be supplied with oil.
Optical instruments
Clean the exterior of the forceps with a sponge
and the jaws with a brush.
Brush out the telescope channel. Then clean in
an ultrasound bath.
Rinse out with water and blow dry with sterile
compressed air.
Instrumentos ópticos
Limpie la parte exterior de las pinzas con una
esponja y las mordazas con un cepillo.
Cepille el canal del telescopio. A continuación
limpie con ultrasonidos.
Enjuague con agua y seque con aire comprimido puro para uso medicinal.
Aceite las piezas articuladas de las mordazas
de las pinzas. Al hacerlo, sostenga el instrumento de tal forma que el aceite pueda afluir
desde el extremo distal hacia la articulación, a
fin de humedecer también el alambre de tracción.
También las articulaciones en el mango deben
ser aceitadas.

19
Esofagoscopia
Diverticuloscopia
Halbstarre und starre, nicht
zerlegbare Zangen
Schaft der halbstarren oder starren Instrumente
mit einem Schwamm reinigen.
Maulteile sorgfältig mit einer Bürste reinigen.
Anschließend im Ultraschallbad reinigen. Mit
Wasser abspülen und mit medizinisch reiner
Druckluft trocken blasen.
Abschließend Gelenk des Zangenmaulteiles
ölen. Dabei das Instrument so halten, daß das
Öl in den Mantel einfließen und so auch den
Zugdraht benetzen kann.
Bewegliche Teile des Handgriffs ebenfalls ölen.
Oesophagoskopie –
Divertikuloskopie
Esophagoscopy –
diverticuloscopy
Semirigid and rigid inseparable
forceps
Clean the sheath of the semirigid or rigid instruments with a sponge.
Clean the parts of the jaws carefully with a
brush. Then clean in an ultrasound bath. Rinse
with water and blow dry with sterile compressed air.
Finally oil the joint of the jaws of the instrument,
holding the instrument so that the oil can seep
into the jacket and thus also wet the wire pull.
Also oil moving parts of the handle.
Pinzas rígidas y semirrígidas, no
desmontables
Limpie la vaina de los instrumentos rígidos y
semirrígidos con una esponja.
Limpie las mordazas cuidadosamente con un
cepillo. A continuación limpie con baño de
ultrasonidos. Enjuague con agua y seque con
aire comprimido puro para uso medicinal.
Finalmente aceite la articulación de las mordazas. Al hacerlo, sostenga el instrumento de
modo tal que el aceite pueda fluir en la camisa
y humedecer el cable de tracción.
Aceite asimismo las piezas móviles del mango.

20
Oesophagoskopie
Divertikuloskopie
Esophagoscopy
Diverticuloscopy
Esofagoscopia
Diverticuloscopia
Zerlegbare Instrumente mit
U-Feder-Handgriff
Demontage
Führungsdraht nach unten drücken und aus
dem Griffstück ausrasten.
Einsatz nach vorne herausziehen.
Reinigung
Mit Schwamm oder Bürste reinigen.
LUER-Lock-Verschlußkappe abnehmen.
Dichtung entfernen, auf Beschädigung prüfen,
ggf. austauschen.
Take-apart instruments with
U-spring handle
Disassembly
Press the guide wire downward and then
detach from the grip.
Instrumentos desmontables con
mango de resorte en U
Desmontaje
Presione hacia abajo el alambre guía y desenclávelo de la pieza de empuñadura.
Pull out the insert toward the front.
Cleaning
Clean with a sponge or brush.
Remove the LUER-Lock cap.
Remove the seal, check for damage and
replace if necessary.
Extraiga el suplemento hacia adelante.
Limpieza
Limpie con una esponja o cepillo.
Retire la caperuza de cierre con cierre LUER.
Retire la junta, compruebe si presenta deterioros,
dado el caso reemplácela.
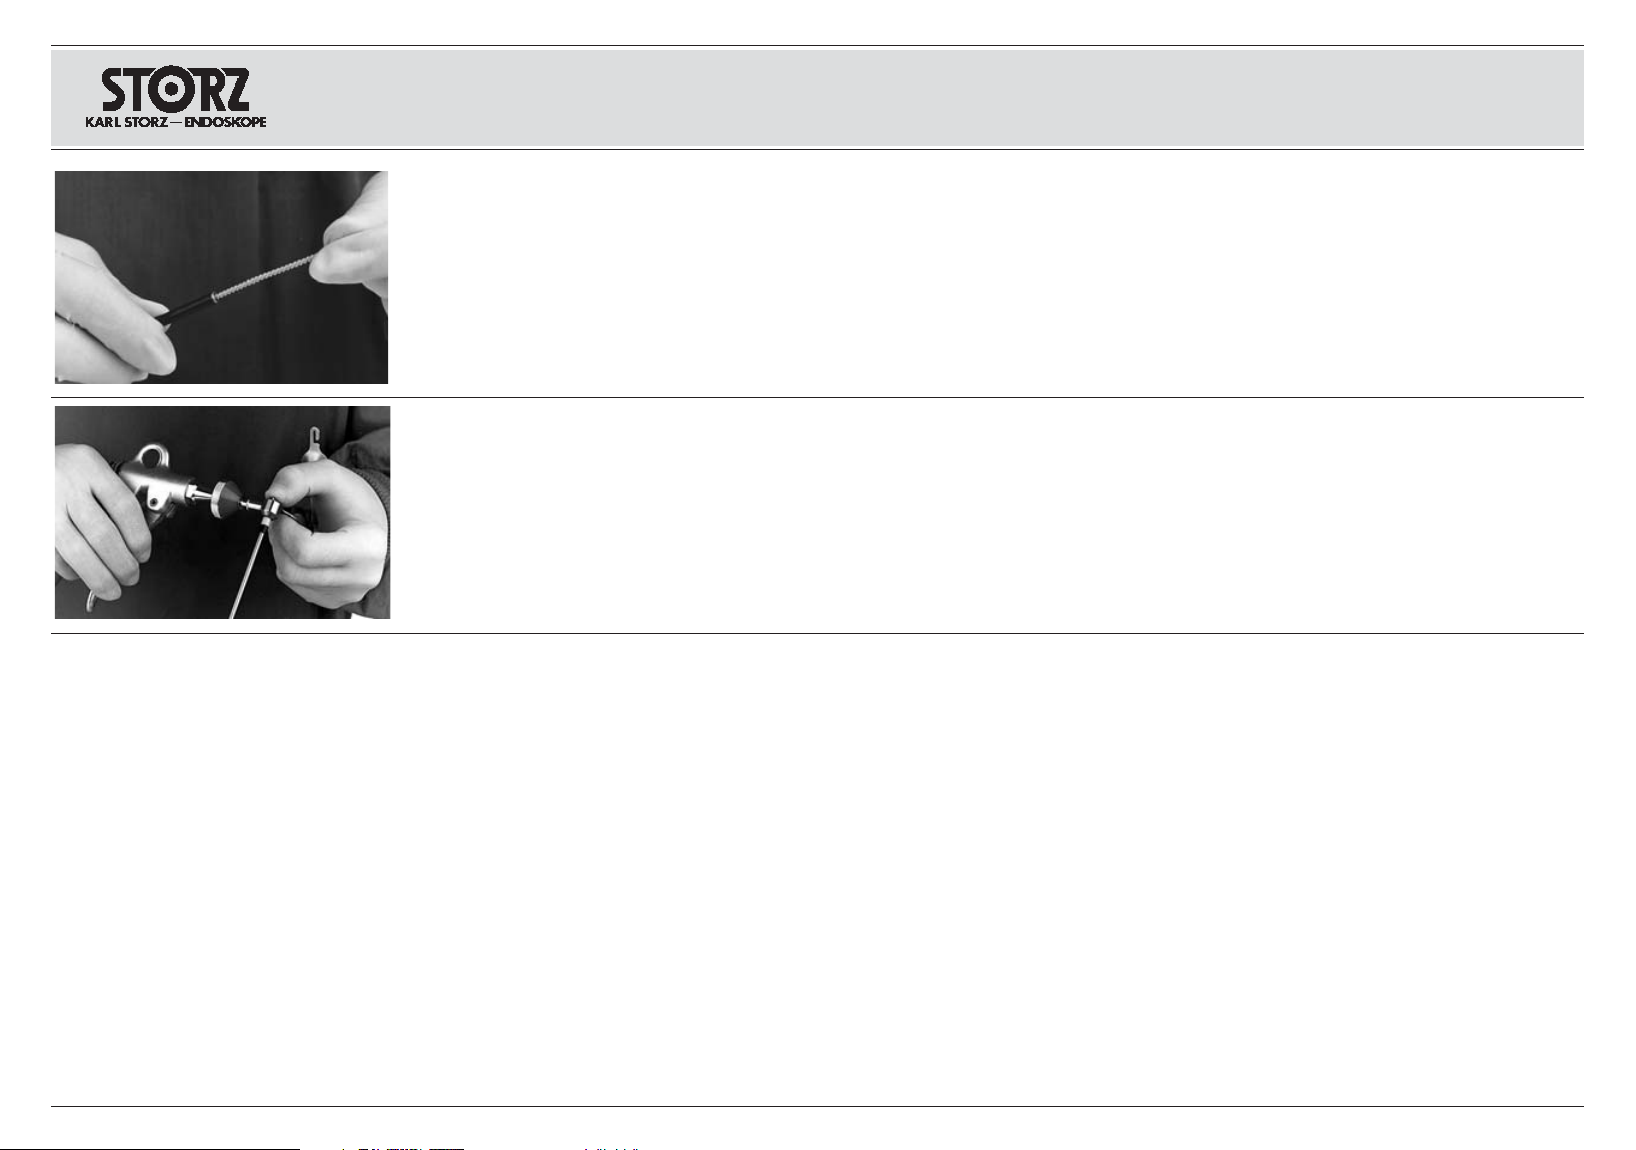
21
Oesophagoskopie
Divertikuloskopie
Esophagoscopy
Diverticuloscopy
Esofagoscopia
Diverticuloscopia
Kanal durchbürsten und durchspülen.
Spritze oder Reinigungsmaschine an den
LUER-Lock-Anschluß anschließen und mit
Wasser durchspülen. Mit medizinisch reiner
Druckluft trocknen.
Montage
Instrument in umgekehrter Reihenfolge wieder
zusammenbauen.
Brush out and rinse out the channel. Cepille y enjuague el canal.
Connect a syringe or cleaning machine to the
LUER-Lock fitting and rinse out with water. Dry
with sterile compressed air.
Assembly
Reassemble the instrument in reverse order.
Conecte la jeringa o la máquina de limpieza al
conector con cierre LUER y enjuague con agua.
Seque con aire comprimido puro para uso medicinal.
Montaje
Monte de nuevo el instrumento en orden inverso.
 Loading...