


20 2130 20 |
TELECAM® SL II |
20 2130 20 |
TELECAM® SL II |
20 2130 20 |
TELECAM® SL II |

Gebrauchsanweisung
Instruction Manual
Manual de instrucciones
20 2130 20 TELECAM® SL II
20 2130 20 TELECAM® SL II
20 2130 20 TELECAM® SL II

Version 1.3.8 – 05/2009
Wichtiger Hinweis für die |
Important information |
Indicaciones importantes |
Benutzer von KARL STORZ |
for users of KARL STORZ |
para los usuarios de |
Geräten |
devices |
aparatos de KARL STORZ |
Vielen Dank für Ihr Vertrauen in den Namen KARL STORZ. Wie alle unsere Produkte ist auch dieses Produkt das Ergebnis jahrelanger Erfahrung und großer Sorgfalt bei der Herstellung. Sie und Ihre Organisation haben sich für ein modernes, hochqualitatives Gerät von KARL STORZ entschieden.
Die vorliegende Gebrauchsanweisung soll helfen, die TELECAM® SL II Kamerakontrolleinheit richtig aufzustellen, anzuschließen und zu bedienen. Alle notwendigen Einzelheiten und Handgriffe werden anschaulich erklärt. Bitte lesen Sie deshalb diese Anleitung sorgfältig durch; bewahren Sie sie zum etwaigen Nachlesen in der mitgelieferten Schutzhülle an gut sichtbarer Stelle beim Gerät auf.
Thank you for your expression of confidence in the KARL STORZ brand name. Like all of our other products, this product is the result of years of experience and great care in manufacture. You and your organization have decided in favor of a modern high quality piece of equipment from KARL STORZ.
This instruction manual is intended to serve as an aid in the proper setup, installation, and operation of the TELECAM® SL II CCU.
All essential details of the equipment and all actions required on your part are clearly presented and explained. We thus ask that you read this manual carefully before proceeding to work with the equipment. Insert this manual in its protective wallet and keep it available for ready reference in a convenient and conspicuous location near the equipment.
Agradecemos la confianza que ha depositado en la marca KARL STORZ. Este producto, como el resto de los que fabricamos, es el resultado de nuestra amplia experiencia y capacidad técnicas. Con esta adquisición, tanto usted como su empresa se han decidido por un producto KARL STORZ de gran precisión, alta calidad y tecnología vanguardista.
Este Manual de instrucciones contiene todas las indicaciones necesarias para la instalación, puesta en funcionamiento y manipulación de la unidad de control de la cámara (CCU) TELECAM® SL II. Recomendamos su lectura detenida y colocación en un lugar visible cercano al aparato para facilitar la consulta. Procure mantener el Manual de instrucciones dentro de la funda de plástico que se adjunta para evitar su deterioro.
Caution: Federal (USA) law restricts this device to sale by or on the order of a physician.
Allgemeiner Warnhinweis
Benutzer von KARL STORZ-Geräten sollten sorgfältig in ihren Gebrauch und in die entsprechenden medizinischen Verfahren eingewiesen werden. Sie sollten die Geräte und Zubehörteile erst benutzen, nachdem sie vollständig mit der Gebrauchsanweisung, dem Zusammenbau und der Pflege vertraut sind. Die Gebrauchsanweisung sollte sorgfältig durchgelesen werden und dem Operationsteam während des Eingriffs zur Verfügung stehen. Die Gebrauchsanweisung und insbesondere die Vorsichtsund Warnhinweise sind unbedingt zu beachten.
General warning
Users of KARL STORZ devices should be thoroughly trained in their use and the applicable medical procedures. Use of these devices and accessories should not be undertaken until the user has fully familiarized himself/herself with the instructions for use, assembly and care. Instruction manuals should be carefully studied and be available to the surgical (endoscopic) team during the procedure; it is essential to follow the instructions contained in the instruction manual, paying particular attention to the Cautions and Warnings.
Advertencia general
Los usuarios deben estar plenamente capacitados en el uso de los aparatos KARL STORZ y en los procedimientos médicos correspondientes. El usuario debe utilizar estos aparatos y sus accesorios sólo después de haberse familiarizado completamente con el Manual de instrucciones, el montaje y la conservación del aparato. Se debe leer con atención el Manual de instrucciones y tenerlo a disposición del equipo quirúrgico durante la intervención. Es imprescindible observar las instrucciones contenidas en el Manual, particularmente las indicaciones de alarma y advertencia.
II

|
|
|
|
|
|
|
|
|
|
|
|
|
|
|
|
|
|
|
|
|
|
|
|
|
|
|
|
|
|
|
|
|
|
|
|
|
|
|
|
|
|
|
|
|
|
|
|
|
|
|
|
|
|
|
|
|
|
|
|
|
|
|
|
|
|
|
|
|
|
|
|
|
|
|
|
|
|
|
|
|
|
|
|
|
|
|
|
|
|
|
|
|
|
|
|
|
|
|
|
|
|
|
|
|
|
|
|
|
|
|
|
|
|
|
|
|
|
|
|
|
|
|
|
|
|
|
|
|
|
|
|
|
|
|
|
|
|
|
|
|
|
|
|
|
|
|
|
|
|
|
|
|
|
|
|
|
|
|
|
|
|
|
|
|
|
|
|
|
|
|
|
|
|
|
|
|
|
|
|
|
|
|
|
|
|
|
|
|
|
|
|
|
|
|
|
|
|
|
|
|
|
|
|
|
|
|
|
|
|
|
|
|
|
|
|
|
|
|
|
|
|
|
|
|
|
|
|
|
|
|
|
|
|
|
|
|
|
|
|
|
|
|
|
|
|
|
|
|
|
|
|
|
|
|
|
|
|
|
|
|
|
|
|
|
|
|
|
|
|
|
|
|
|
|
|
|
|
|
|
|
|
|
|
|
|
|
|
|
|
|
|
|
|
|
|
|
|
|
|
|
|
|
|
|
|
|
|
|
|
|
|
|
|
|
|
|
|
|
|
|
|
|
|
|
|
|
|
|
|
|
|
|
|
|
|
|
|
|
|
|
|
|
|
|
|
|
|
|
|
|
|
|
|
|
|
|
|
|
|
|
|
|
|
|
|
|
|
|
|
|
|
|
|
|
|
|
|
|
|
|
|
|
|
|
|
|
|
|
|
|
|
|
|
|
|
|
|
|
|
|
|
|
|
|
|
|
|
|
|
|
|
|
|
|
|
|
|
|
|
|
|
|
|
|
|
|
|
|
|
|
|
|
|
|
|
|
|
|
|
|
|
|
|
|
|
|
|
|
|
|
|
|
|
|
|
|
|
|
|
|
|
|
|
|
|
|
|
|
|
|
|
|
|
|
|
|
|
|
T YU I |
|
|
|
|
|
|
|
|
|
|
|
|
|
|
|
|
|
|||||||
|
Q |
|
|
|
|
|
|
|
W |
E |
|
|
|
|
|
|
|
|
|
R |
|
|
|
|
|
|
|
|
|
O |
|
|
P { } |
|||||||||||||||||||||||||||||
|
|
|
|
|
|
|
|
|
|
q |
|
|
|
|
|
|
|
|
|
|
|
q |
|
|
|
|
|
|
|
|
|
t |
|
|
|
|
|
|
|
|
|
|
q |
|
|
|
|
|
|
|
|
|
|
|
|
o |
||||||
|
|
|
|
|
|
|
|
|
|
|
|
|
|
|
|
|
|
|
|
|
|
|
|
|
|
|
|
|
|
|
|
|
|
|
|
|
|
|
|
|
|
|
|
|
|
|
|
|
||||||||||||||
|
|
|
|
|
|
|
|
|
|
|
|
|
|
|
|
|
|
|
|
|
|
|
|
|
|
|
|
|
|
|
|
|
|
|
|
|
|
|
|
|
|
|
|
|
|
|
|
|
|
|
|
|||||||||||
|
|
|
|
|
|
|
|
|
|
|
|
|
|
|
|
|
|
|
|
|
|
|
|
|
|
|
|
|
|
|
y |
|
|
|
|
|
|
|
|
|
|
|
|
|
|
|
|
|
|
|
|
|
|
|
||||||||
|
|
|
|
|
|
|
|
w |
|
|
|
|
|
|
|
|
w |
|
|
|
|
|
|
|
|
|
|
|
|
|
|
|
|
|
|
|
|
|
|
|
|
|
|
|
|
|
|
|
|
|
w |
|||||||||||
|
|
|
|
|
|
|
|
|
|
|
|
|
|
|
|
|
|
|
|
|
|
|
|
|
|
|
|
|
|
|
|
|
|
|
|
|
|
|
|
|
|
|
|
|
|
|
|
|
||||||||||||||
|
|
|
|
|
|
|
|
|
|
|
|
|
|
|
|
|
|
|
|
|
|
|
|
|
|
|
|
|
|
|
|
|
|
|
|
|
|
|
|
|
|
|
|
|
|
|
|
|
|
|
||||||||||||
|
|
|
|
|
|
|
|
|
|
|
|
|
|
|
|
|
|
|
|
|
|
|
|
|
|
|
|
|
|
|
|
|
|
|
|
|
|
|
|
|
|
|
||||||||||||||||||||
|
|
|
|
|
|
|
|
|
|
e |
|
|
|
|
|
|
|
|
|
e |
|
|
|
|
|
|
|
|
|
|
|
w |
|
|
|
|
|
|
|
|
|
|
w |
|
|
|
|
|
|
|
|
|
|
r |
||||||||
|
|
|
|
|
|
|
|
|
|
|
|
|
|
|
|
|
|
|
|
|
|
|
|
|
|
|
|
|
|
|
|
|
|
|
|
|
|
|
|
|
|
|
|
|
||||||||||||||||||
|
|
|
|
|
|
|
|
|
|
|
|
|
|
|
|
|
|
|
|
|
|
|
|
|
|
|
|
|
|
|
|
|
|
|
|
|
|
|
|
|
|
|
|
|
|
|
|
|
|
|
||||||||||||
|
|
|
|
|
|
|
|
|
|
|
|
|
|
|
|
|
|
|
|
|
|
|
|
|
|
|
|
|
|
|
|
|
|
|
|
|
|
|
|
|
|
|
|
|
|
|
|
|
|
|||||||||||||
|
|
|
|
|
|
|
|
|
r |
|
|
|
|
|
|
|
|
|
|
r |
|
|
|
|
|
|
|
|
|
|
|
|
|
|
|
|
|
|
|
|
|
u |
|
|
|
|
|
|
|
|
|
|
||||||||||
|
|
|
|
|
|
|
|
|
|
|
|
|
|
|
|
|
|
|
|
|
|
|
|
|
|
|
|
|
|
|
|
|
r |
|
|
|
|
|
|
|
|
|
|
|
|
|
|
|
|
|
|
|
|
|
|
|
||||||
|
|
|
|
|
|
|
|
|
|
|
|
|
|
|
|
|
|
|
|
|
|
|
|
|
|
q |
|
|
|
|
|
|
|
|
|
|
|
|
|
r |
i |
|||||||||||||||||||||
|
|
|
|
|
|
|
|
|
|
|
|
|
|
|
|
|
|
|
|
|
|
|
|
|
|
|
|
|
|
|
|
|
|
|
|
|
|
|
|
|
|
|
||||||||||||||||||||
|
|
|
|
|
|
|
|
|
|
|
|
|
|
|
|
|
|
|
|
|
|
|
|
|
|
|
|
|
|
|
|
|
|
|
|
|
|
|
|
|
|
|
||||||||||||||||||||
|
|
|
|
|
|
|
|
|
|
|
|
|
|
|
|
|
|
|
|
|
|
|
|
|
|
|
|
|
|
|
|
|
|
|
|
|
|
|
|
|
|
|
|
|
|
|
|
|
|
|
|
|
|
|
|
|
|
|
|
|
||
202120 30/202121 30 (PAL/NTSC) Parfocal-Zoom Kamerakopf Parfocal Zoom camera head Cabezal de la cámara Parfocal-Zoom
202120 40/202121 40 (PAL/NTSC) «AUTOCLAVE»
Parfocal-Zoom Kamerakopf (dampfsterilisierbar) Parfocal Zoom camera head (steam sterilizable)
Cabezal de la cámara Parfocal-Zoom (esterilizable con vapor)
20 |
2120 31/202121 31 (PAL/NTSC) |
202120 34/202121 34 (PAL/NTSC) |
202620 30/202621 30 |
20 |
212032/202121 32 (PAL/NTSC) |
Kamerakopf TELECAM®-C |
(PAL/NTSC) |
Kamerakopf TELECAM®-B |
Camera head TELECAM®-C |
Kamerakopf DCI® II |
|
Camera head TELECAM®-B |
Cabezal de la cámara TELECAM®-C |
Camera head DCI® II |
|
Cabezal de la cámara TELECAM®-B |
|
Cabezal de la cámara DCI® II |
|
III

|
|
Bedienungselemente, |
Controls, displays, |
Elementos de mando, |
|
|
Anzeigen, Anschlüsse |
connectors |
indicadores, conexiones y |
|
|
und ihre Funktion |
and their uses |
sus funciones |
|
|
|||
|
|
|
|
|
Q Netzschalter
W Taste für automatischen Weißabgleich
E Schublade für Kurzgebrauchsanweisung
R Kameraanschluss
T Videoausgangsbuchse BNC (Comp. Video)
Y Videoausgangsbuchsen S-Video (Y/C)
U Videoausgangsbuchse DV
IAnschlussbuchsen für die Fernbedienung von Zusatzgeräten (ACC 1/2)
O Anschlussbuchse für Tastatur
P Netzanschlussbuchse
{ Potentialausgleichsanschluss
} Sicherungshalter
q Fassmechanismus
w Fokusring
e Brennweiteneinstellung (Zoom)
r Funktionstasten
t Feststellhebel (TELECAM®-B Kamerakopf)
y Okular (TELECAM®-B Kamerakopf)
u C-Mount-Anschluss
i Antifog-Öffnung
o „Snap-in“ DCI® Kupplungsmechanismus
Q Power switch
W Automatic white balance button
E Slide for attaching abridged instructions
R Camera cable receptacle
T BNC video output connector (comp. video)
Y S-video video output connectors (Y/C)
U DV video output connector
IAccessory control outputs for remote control of peripheral units (ACC 1/2)
O Keyboard receptacle
P Power supply cord receptacle
{ Potential equalization connector
} Power fuse holder
q Grasping mechanism w Focusing ring
e Focal length adjuster (zoom) r User control buttons
t Fixation clamp (TELECAM®-B camera head)
y Eyepiece (TELECAM®-B camera head) u C-mount connection
i Antifog port
o “Snap-in” DCI® coupling mechanism
Q Interruptor de la red
W Tecla para el balance automático del blanco
ECajón para las instrucciones de uso resumidas
R Conector para cámara
TConector de salida de vídeo BNC (Comp. Video)
Y Conectores de salida de vídeo S (Y/C)
U Conector de salida de vídeo DV
IConectores para telemando de accesorios (ACC 1/2)
O Conector para teclado
P Enchufe para conexión a la red
{ Conexión equipotencial
} Soporte para fusibles
q Anillo de acoplamiento rápido w Anillo de enfoque
e Regulador de la distancia focal (Zoom) r Teclas funcionales
tPalanca de fijación (cabezal de la cámara TELECAM®-B)
y Ocular (cabezal de la cámara TELECAM®-B) u Conexión C-Mount
i Orificio antivaho
o Mecanismo DCI® de acoplamiento “Snap-in”
IV

|
|
Symbolerläuterungen |
Symbols employed |
Explicación de los símbolos |
|
|
|
|
|
|
|
|
|
|
|
|
|
|
|
|
|
|
|
|
|
|
|
Vor Inbetriebnahme des Gerätes Gebrauchsan- |
Read the instructions carefully before operating |
¡Antes de la puesta en marcha, lea el Manual de |
|
|
|
|
|
|
|
|
weisung beachten! |
the equipment! |
instrucciones! |
|
|
|
|
|
|
|
|
Ein |
Power on |
Conectado |
|
|
|
|
|
|
|
|
|||
|
|
|
|
|
|
|
|
Aus |
Power off |
Desconectado |
|
|
|
|
|
|
|
|
|||
|
|
|
|
|
|
|
|
Potentialausgleichsanschluss |
Potential equalization conductor |
Conexión equipotencial |
|
|
|
|
|
|
|
|
|||
|
|
|
|
|
|
|
|
|||
|
|
|
|
|
|
|
|
Anwendungsteil des Typs BF |
Type BF equipment |
Pieza de aplicación del tipo BF |
|
|
|
|
|
|
|
|
|||
|
|
|
|
|
|
|
|
|||
|
|
|
|
|
|
|
|
|||
|
|
|
|
|
|
|
|
Erdung |
Protective earth (ground) |
Puesta a tierra |
|
|
|
|
|
|
|
|
|||
|
|
|
|
|
|
|
|
|||
|
|
|
|
|
|
|
|
|
|
|
|
|
|
|
|
|
|
|
|||
~ |
Wechselstrom |
Alternating current |
Corriente alterna |
|||||||
|
|
|
|
|
|
|
|
|||
Defekte Sicherung mit einer T 1,6 A L 250V, |
Replace fuse with T 1.6 A L 250V, |
5 x 20 mm Sicherung, IEC 127 ersetzen |
5 x 20 mm fuse, IEC 127 |
Farbvideokamera |
Color video camera |
Videoeingang |
Video input |
Videoausgang |
Video output |
Weißabgleich |
White balance |
GEFAHR: Bei Verwendung zündfähiger Narkosegase in der unmittelbaren Umgebung des Gerätes besteht Explosionsgefahr.
VORSICHT: Gerät nicht öffnen. Gefahr eines elektrischen Schlags.
Lassen Sie Servicearbeiten nur von qualifiziertem Service-Personal durchführen.
Keine Flüssigkeiten auf oder über dem Gerät abstellen.
Gerät außerhalb der Reichweite von Patienten aufstellen.
DANGER: Risk of explosion if used in the presence of flammable anesthetics.
CAUTION: To reduce the risk of electrical shock, do not remove cover
Refer servicing to qualified service personnel.
Do not store liquids on or above the unit.
Keep out of reach of patients.
Reemplace el fusible defectuoso por un fusible T 1,6 A L 250V, 5 x 20 mm, CEI 127
Cámara de vídeo a color
Entrada de vídeo
Salida de vídeo
Balance de blancos
PELIGRO: Existe peligro de explosión si se emplean gases narcóticos inflamables en las inmediaciones del equipo.
PRECAUCIÓN: ¡No abrir! ¡Existe peligro de descarga eléctrica!
Los trabajos de mantenimiento debe usted encargarlos únicamente a personal autorizado del servicio técnico.
No deposite líquidos de ningún tipo sobre o por encima del equipo.
Mantenga el equipo fuera del alcance de los pacientes.
V

|
|
Symbolerläuterungen |
Symbols employed |
Explicación de los símbolos |
|
|
|
|
|
|
|
|
|
|
|
|
|
|
|
Fortsetzung Tabelle |
Continued table |
Continuación de la tabla |
Ausgang |
Output |
Salida |
Eingang |
Input |
Entrada |
Farbvideomonitor |
Color video monitor |
Monitor de vídeo a color |
Umweltschutz-Nutzungsdauer von 50 Jahren |
Environmental protection use period of 50 years |
Tiempo de vida útil inocua para el medio |
(China RoHS) |
(China RoHS) |
ambiente de 50 años (directiva RoHS china) |
Kursiv formatiert: Kameravoreinstellung |
Formatted in italics: Signifies camera default |
Formato en Cursiva: Preajuste de la cámara |
VI

|
|
Inhalt |
Contents |
Contenido del manual |
|
|
|
|
|
|
|
|
|
|
|
|
|
|
|
Allgemeiner Warnhinweis . . . . . . . . . . . . . . . . .II Geräteabbildungen . . . . . . . . . . . . . . . . . . . . . .III Bedienungselemente, Anzeigen,
Anschlüsse und ihre Funktion . . . . . . . . . . . . .IV Symbolerläuterungen . . . . . . . . . . . . . . . . . . . .V
Allgemeines . . . . . . . . . . . . . . . . . . . . . . .3
Gerätebeschreibung . . . . . . . . . . . . . . . . . . . . .3
Anwendungsgebiet . . . . . . . . . . . . . . . . . . . . . .3
Sicherheitshinweise . . . . . . . . . . . . . . . .4
Warnund Vorsichtshinweise . . . . . . . . . . . . . .4 Bestimmungsgemäße Verwendung . . . . . . . . . .8 Qualifikation des Anwenders . . . . . . . . . . . . . . .8 Sicherheitsmaßnahmen am Aufstellungsort . . .9 Sicherheitsmaßnahmen
beim Einsatz des Gerätes . . . . . . . . . . . . . . . . .9
General warning . . . . . . . . . . . . . . . . . . . . . . . .II Photographs of the equipment . . . . . . . . . . . . .III Controls, displays, connectors
and their uses . . . . . . . . . . . . . . . . . . . . . . . . . .IV Symbols employed . . . . . . . . . . . . . . . . . . . . . .V
General information . . . . . . . . . . . . . . . .3
Device description . . . . . . . . . . . . . . . . . . . . . . .3 Indication for use . . . . . . . . . . . . . . . . . . . . . . . .3
Safety instructions . . . . . . . . . . . . . . . . .4
Warnings and cautions . . . . . . . . . . . . . . . . . . .4 Intended use . . . . . . . . . . . . . . . . . . . . . . . . . . .8 User qualification . . . . . . . . . . . . . . . . . . . . . . . .8 Safety precautions at the site of installation . . .9 Safety precautions
when operating the unit. . . . . . . . . . . . . . . . . . .9
Aufstellen und Bedienungshinweise . .10
Auspacken . . . . . . . . . . . . . . . . . . . . . . . . . . .10 Grundausstattung . . . . . . . . . . . . . . . . . . . . . .10 Kompatible Kameraköpfe . . . . . . . . . . . . .10 Inbetriebnahme der TELECAM® SL II . . . . . . .11 Gerät aufstellen . . . . . . . . . . . . . . . . . . . . .11 Potentialausgleich anschließen . . . . . . . . .11 Gerät an das Stromnetz anschließen . . . .12 Monitor anschließen . . . . . . . . . . . . . . . . .12 Fußschalter anschließen . . . . . . . . . . . . . .12 Zusatzgerät/e anschließen . . . . . . . . . . . .13
Hinweise zum Anschluss von
Zusatzgeräten . . . . . . . . . . . . . . . . . . . . . .13 Tastatur anschließen . . . . . . . . . . . . . . . . .14 Kamerakopf anschließen . . . . . . . . . . . . . .14 CCU einschalten . . . . . . . . . . . . . . . . . . . .14 Endoskop und Lichtkabel anschließen . . . . . .15 TELECAM® SL II Kameraköpfe . . . . . . . . . . . .15 Endoskop anschließen . . . . . . . . . . . . . . .15 Lichtkabel anschließen . . . . . . . . . . . . . . .15 Bildschärfe einstellen . . . . . . . . . . . . . . . .16 TELECAM® Parfocal-Zoom Kamerakopf . . . . .16 Brennweite einstellen . . . . . . . . . . . . . . . .16 TELECAM®-B Kamerakopf . . . . . . . . . . . . . . . .17 TELECAM®-C Kamerakopf . . . . . . . . . . . . . . . .17 DCI® Kamerakopf . . . . . . . . . . . . . . . . . . . . . . .18 Endoskop anschließen . . . . . . . . . . . . . . .18 Lichtkabel anschließen . . . . . . . . . . . . . . .18 Bildschärfe einstellen . . . . . . . . . . . . . . . .18
Funktionstasten am Kamerakopf
verwenden . . . . . . . . . . . . . . . . . . . . . . . . .19 Videomonitor einstellen . . . . . . . . . . . . . . . . . .19
Installation and operating instructions 10
Unpacking the equipment . . . . . . . . . . . . . . . .10 Basic equipment . . . . . . . . . . . . . . . . . . . . . . .10 Compatible camera heads . . . . . . . . . . . .10 Installing the TELECAM® SL II . . . . . . . . . . . . .11 Installing the unit . . . . . . . . . . . . . . . . . . . .11 Connecting a ground line . . . . . . . . . . . . .11 Connecting power . . . . . . . . . . . . . . . . . . .12 Connecting the monitor . . . . . . . . . . . . . . .12 Connecting the footswitch . . . . . . . . . . . . .12 Connecting accessory device(s) . . . . . . .13
Instructions on connecting
accessory devices . . . . . . . . . . . . . . . . . .13 Connecting the keyboard . . . . . . . . . . . . .14 Connecting the camera head . . . . . . . . . .14 Powering up the CCU . . . . . . . . . . . . . . . .14 Connecting an endoscope and a light cable .15 TELECAM® SL II camera heads . . . . . . . . . . .15 Connecting an endoscope . . . . . . . . . . . .15 Connecting a light cable . . . . . . . . . . . . . .15 Adjusting image sharpness . . . . . . . . . . .16 TELECAM® Parfocal Zoom camera head . . . .16 Adjusting focal length . . . . . . . . . . . . . . . .16 TELECAM®-B camera head . . . . . . . . . . . . . . .17 TELECAM®-C camera head . . . . . . . . . . . . . . .17 DCI® camera head . . . . . . . . . . . . . . . . . . . . . .18 Connecting an endoscope . . . . . . . . . . . .18 Connecting a light cable . . . . . . . . . . . . . .18 Adjusting image sharpness . . . . . . . . . . .18
Using the camera head
control buttons . . . . . . . . . . . . . . . . . . . . . .19 Adjusting the video monitor . . . . . . . . . . . . . . .19
Advertencia general . . . . . . . . . . . . . . . . . . . . .II Imágenes del equipo . . . . . . . . . . . . . . . . . . . .III Elementos de mando, indicadores,
conexiones y sus funciones . . . . . . . . . . . . . . .IV Explicación de los símbolos . . . . . . . . . . . . . . .V
Generalidades . . . . . . . . . . . . . . . . . . . . .3
Descripción del equipo . . . . . . . . . . . . . . . . . . .3 Campo de aplicación . . . . . . . . . . . . . . . . . . . .3
Instrucciones de seguridad . . . . . . . . . .4
Indicaciones de alarma y advertencia . . . . . . .4 Empleo previsto . . . . . . . . . . . . . . . . . . . . . . . . .8 Capacitación del usuario . . . . . . . . . . . . . . . . . .8 Medidas de seguridad en el lugar
de emplazamiento . . . . . . . . . . . . . . . . . . . . . . .9 Medidas de seguridad
durante el empleo del equipo. . . . . . . . . . . . . .9
Montaje e instrucciones operativas . .10
Desembalaje . . . . . . . . . . . . . . . . . . . . . . . . . .10 Equipo básico . . . . . . . . . . . . . . . . . . . . . . . . .10 Cabezales compatibles de la cámara . . .10 Puesta en marcha de la TELECAM® SL II . . . .11 Montaje del aparato . . . . . . . . . . . . . . . . .11 Conexión equipotencial . . . . . . . . . . . . . .11 Conexión a la red de alimentación . . . . . .12 Conexión del monitor . . . . . . . . . . . . . . . .12 Conexión del interruptor de pedal . . . . . .12 Conexión accesorio/s p/control remoto . .13
Indicaciones para la conexión
de accesorios . . . . . . . . . . . . . . . . . . . . . .13 Conexión del teclado . . . . . . . . . . . . . . . .14 Conexión del cabezal de la cámara . . . . .14 Conexión de la CCU . . . . . . . . . . . . . . . . .14 Conexión del endoscopio y del cable de luz .15 Cabezales de la cámara TELECAM® SL II . . .15 Conexión de un endoscopio . . . . . . . . . . .15 Conexión de un cable de luz . . . . . . . . . .15 Ajuste de la nitidez de imagen . . . . . . . . .16 Cabezal cámara TELECAM® Parfocal-Zoom . .16 Ajuste de la distancia focal . . . . . . . . . . . .16 Cabezal de la cámara TELECAM®-B . . . . . . . .17 Cabezal de la cámara TELECAM®-C . . . . . . .17 Cabezal de la cámara DCI® . . . . . . . . . . . . . .18 Conexión de un endoscopio . . . . . . . . . . .18 Conexión de un cable de luz . . . . . . . . . .18 Ajuste de la nitidez de imagen . . . . . . . . .18
Uso de los botones de función en
el cabezal de la cámara . . . . . . . . . . . . . .19 Ajuste del monitor de vídeo . . . . . . . . . . . . . . .19
1

|
|
Inhalt |
Contents |
Contenido del manual |
|
|
|
|
|
|
|
|
|
|
|
|
|
|
|
Weißabgleich . . . . . . . . . . . . . . . . . . . . . . . . . .20 Bedienungshinweise für den Kamerakopf . . .21 Funktionen der Kamerakopftasten . . . . . .21 Bedienung der Kamerakopftasten . . . . . . . . .23 Programmierung der Kamerakopftasten . . . . .23 Menüfunktionen . . . . . . . . . . . . . . . . . . . . . . . .24 Menüzugriff mit der Tastatur . . . . . . . . . . .24 Patientendatenseiten . . . . . . . . . . . . . . . . .28 Einstellungen . . . . . . . . . . . . . . . . . . . . . . . . . .29
Instandhaltung . . . . . . . . . . . . . . . . . . . .30
Sicherungswechsel . . . . . . . . . . . . . . . . . . . . .30 Reinigung, Desinfektion und Sterilisation . . . .31 Allgemeine Pflegehinweise . . . . . . . . . . . . .31 Pflege und Handhabung . . . . . . . . . . . . . . .31 Überblick Aufbereitung . . . . . . . . . . . . . . . .33 (Vor-)Reinigung . . . . . . . . . . . . . . . . . . . . . .35 Manuelle Aufbereitung . . . . . . . . . . . . . . . .35
Maschinelle Aufbereitung
von autoklavierbaren Kameraköpfen . . . . . .38 Sterilisationsanleitung für nicht . . . . . . . . . . . .
autoklavierbare Kameraköpfe . . . . . . . . . . .40 Sterilisationsanleitung für . . . . . . . . . . . . . . . .
autoklavierbare Kameraköpfe . . . . . . . . . . .45 Verwendung von sterilen Überzügen . . . . .46 Literatur zum Thema Reinigung und . . . . . . .
Sterilisation . . . . . . . . . . . . . . . . . . . . . . . . .46 Wartung . . . . . . . . . . . . . . . . . . . . . . . . . . . . .47 Instandsetzung . . . . . . . . . . . . . . . . . . . . . . . .47 Reparaturprogramm . . . . . . . . . . . . . . . . . . . .48 Verantwortlichkeit . . . . . . . . . . . . . . . . . . . . . . .49 Garantie . . . . . . . . . . . . . . . . . . . . . . . . . . . . . .49
Technische Beschreibung . . . . . . . . . .50
Fehlersuchliste . . . . . . . . . . . . . . . . . . . . . . . . .50
Technische Daten . . . . . . . . . . . . . . . . . . . . . .53
Technische Unterlagen . . . . . . . . . . . . . . . . . .55
Anschlussübersicht . . . . . . . . . . . . . . . . . . . . .57
Blockschaltbild . . . . . . . . . . . . . . . . . . . . . . . .58
Ersatzteile, empfohlenes Zubehör . . .59
Ersatzteile/Zubehör . . . . . . . . . . . . . . . . . . . . .59 Empfohlenes Zubehör . . . . . . . . . . . . . . . . . .60
Anhang . . . . . . . . . . . . . . . . . . . . . . . . . .62
Reinigungsund Desinfektionsmittel . . . . . . . .62 Hinweise zur elektromagnetischen Verträglichkeit (EMV) . . . . . . . . . . . . . . . . . . . .64
White balance . . . . . . . . . . . . . . . . . . . . . . . . .20 Camera head operating instructions . . . . . . . .21 Camera head button functions . . . . . . . . .21 Operating camera head buttons . . . . . . . . . . .23 Programming the camera head buttons . . . . .23 Menu functions . . . . . . . . . . . . . . . . . . . . . . . .24 Menu access from keyboard . . . . . . . . . .24 Patient information pages . . . . . . . . . . . . .28 Setup . . . . . . . . . . . . . . . . . . . . . . . . . . . . .29
Maintenance . . . . . . . . . . . . . . . . . . . . .30
Fuse replacement . . . . . . . . . . . . . . . . . . . . . .30 Cleaning, disinfection and sterilization . . . . . .31 General care . . . . . . . . . . . . . . . . . . . . . . . .31 Care and handling . . . . . . . . . . . . . . . . . . . .31 Preparation Overview . . . . . . . . . . . . . . . . .33 (Preliminary) cleaning . . . . . . . . . . . . . . . . .35 Manual preparation . . . . . . . . . . . . . . . . . . .35
Machine preparation
of autoclavable camera heads . . . . . . . . . .38 Sterilization instructions –
non-autoclavable camera heads . . . . . . . . .40 Sterilization instructions –
autoclavable camera heads . . . . . . . . . . . .45 Use of sterile covers . . . . . . . . . . . . . . . . . .46 References for cleaning and sterilization . .46 Maintenance . . . . . . . . . . . . . . . . . . . . . . . . . .47 Servicing and repair . . . . . . . . . . . . . . . . . . . .47 Repair program . . . . . . . . . . . . . . . . . . . . . . . .48 Limitation of liability . . . . . . . . . . . . . . . . . . . . .49 Manufacturer’s warranty . . . . . . . . . . . . . . . . .49
Technical description . . . . . . . . . . . . . .50
Troubleshooting . . . . . . . . . . . . . . . . . . . . . . . .50 Technical data . . . . . . . . . . . . . . . . . . . . . . . . .53 Technical documentation . . . . . . . . . . . . . . . . .55 Wiring diagram . . . . . . . . . . . . . . . . . . . . . . . .57 Block diagram . . . . . . . . . . . . . . . . . . . . . . . . .58
Spare parts, recomm. accessories . . . .59
Spare parts/accessories . . . . . . . . . . . . . . . . .59 Recommended accessories . . . . . . . . . . . . . .60
Appendix . . . . . . . . . . . . . . . . . . . . . . . .62
Cleaning agents and disinfectants . . . . . . . . .62 Electromagnetic Compatibility (EMC) Information . . . . . . . . . . . . . . . . . . . . . . . . . . . .64
Balance de blancos . . . . . . . . . . . . . . . . . . . . .20 Instrucciones manejo del cabezal de cámara 21 Funciones de botones cabezal cámara . .21 Manejo de botones del cabezal de cámara . .23 Programación botones cabezal de cámara . .23 Funciones del menú . . . . . . . . . . . . . . . . . . . .24 Acceso al menú a través del teclado . . . .24 Páginas de información del paciente . . . .28 Instalación . . . . . . . . . . . . . . . . . . . . . . . . .29
Mantenimiento . . . . . . . . . . . . . . . . . . . .30
Cambio de fusibles . . . . . . . . . . . . . . . . . . . . .30 Limpieza, desinfección y esterilización . . . . . .31 Cuidado general . . . . . . . . . . . . . . . . . . . . .31 Conservación y manejo . . . . . . . . . . . . . . . .31 Vista general – Preparación . . . . . . . . . . . . .33 Limpieza (previa) . . . . . . . . . . . . . . . . . . . . .35 Preparación manual . . . . . . . . . . . . . . . . . . .35
Preparación mecánica de cabezales de
la cámara esterilizables en autoclave . . . . .38 Instrucciones de esterilización para cabezales de la cámara no esterilizables
en autoclave . . . . . . . . . . . . . . . . . . . . . . . .40 Instrucciones de esterilización para cabezales de la cámara esterilizables en autoclave . . . . . . . . . . . . . . . . . . . . . . . . . . .45 Utilización de cubiertas estériles . . . . . . . . .46 Bibliografía sobre el tema limpieza y . . . . . . .
esterilización . . . . . . . . . . . . . . . . . . . . . . . .46 Mantenimiento . . . . . . . . . . . . . . . . . . . . . . . .47 Reparaciones . . . . . . . . . . . . . . . . . . . . . . . . .47 Programa de reparación . . . . . . . . . . . . . . . . .48 Responsabilidades . . . . . . . . . . . . . . . . . . . . .49 Garantía . . . . . . . . . . . . . . . . . . . . . . . . . . . . .49
Descripción técnica . . . . . . . . . . . . . . .50
Localización de errores . . . . . . . . . . . . . . . . . .50 Datos técnicos . . . . . . . . . . . . . . . . . . . . . . . . .53 Documentación técnica . . . . . . . . . . . . . . . . . .55 Esquema de conexión . . . . . . . . . . . . . . . . . . .57 Diagrama funcional . . . . . . . . . . . . . . . . . . . .58
Piezas de repuesto, accesor. recom. . .59 |
|
Piezas de repuesto/accesorios . . . . . . . . . . |
.59 |
Accesorios recomendados . . . . . . . . . . . . . . |
60 |
Anexo . . . . . . . . . . . . . . . . . . . . . . . . . . .62
Productos de limpieza y desinfección . . . . . .62 Indicaciones sobre compatibilidad electromagnética . . . . . . . . . . . . . . . . . . . . . . .64
2
|
|
Allgemeines |
General information |
Generalidades |
|
|
|
|
|
|
|
|
|
|
|
|
|
|
|
Gerätebeschreibung
Die TELECAM® SL II Kamerakontrolleinheit (CCU) ist eine revolutionäre Endoskopie-Kamerakontroll- einheit für TELECAM® 1-Chip-Kameraköpfe und KARL STORZ Videoendoskope. Sie bietet zahlreiche Funktionen auf dem neuesten Stand der Technik. Hierzu zählen u.a.:
•Über Kamerakopftasten oder Tastatur zugängliche Kamerafunktionen für alle Fachgebiete
•Individuelle Anpassung der Kamera durch Programmierung der beiden Kamerakopftasten für vier Funktionen
•Bessere Bildqualität und weniger Bildrauschen durch volldigitale CCU-Elektronik
•Verbesserung von Kontrast und Bildschärfe durch digitale Bildoptimierung und faseroptische endoskopische Filtermöglichkeiten
•Mehrere Optionen zur Belichtungssteuerung mit patentiertem automatischem Belichtungssystem.
•Digitaler Videoausgang zum Anschluss von digitalen Aufzeichnungsgeräten
•Standbild-Funktion zum „Einfrieren“ des Videobildes auf dem Bildschirm
•Zweifache Bildvergrößerung durch elektronischen Zoom
Im Lieferumfang der TELECAM® SL II CCU ist eine Tastatur für den Zugriff auf Kamerafunktionen und die Einstellung von Bildschirmanzeigen wie Patientendaten und Setup enthalten.
Device description
The TELECAM® SL II camera control unit (CCU) is a revolutionary endoscopy camera control unit for use with single chip TELECAM® camera heads and KARL STORZ videoscopes. It provides many state-of-the-art features, including:
•Camera functions for use in all disciplines, accessible through camera head buttons or keyboard
•Customization of the camera by programming the two camera head buttons for four functions.
•All-digital CCU circuitry for increased image accuracy and less noise in the image
•Digital image enhancement and fiberoptic endoscope filtering capabilities to increase the level of contrast and image sharpness
•Multiple options for exposure control, including patented automatic exposure system.
•Digital video output for use with digital recording devices
•Freeze function for freezing image on screen
•Electronic zoom magnifies image to 2X
A keyboard is included with the TELECAM® SL II CCU to access camera functions and set displays such as patient information and setup.
Descripción del equipo
La unidad de control de la cámara (CCU) TELECAM® SL II es una revolucionaria unidad de control de la cámara endoscópica para cabezales de la cámara TELECAM® de 1 chip y videoendoscopios KARL STORZ. Esta CCU ofrece múltiples funciones con la técnica más moderna, tales como, p. ej.,:
•Funciones de la cámara para uso en todas las especialidades, accesibles mediante los botones del cabezal de la cámara o con el teclado
•Adaptación individual de la cámara mediante programación de los dos botones del cabezal de la cámara para cuatro funciones
•Mejor calidad de imagen y menor ruido de imagen mediante electrónica CCU completamente digitalizada
•Mejora del contraste y la nitidez de la imagen mediante optimización digital de la imagen y posibilidades endoscópicas de filtrado de la fibra óptica
•Más opciones de control de diafragma con el patentado sistema automático de diafragma.
•Salida de vídeo digital para uso con grabadoras digitales
•Función de imagen fija para congelar la imagen en la pantalla
•El zoom electrónico aumenta la imagen al doble de su tamaño
En el suministro de la CCU TELECAM® SL II se incluye un teclado para acceder a las funciones de la cámara y para el ajuste de las indicaciones en pantalla, tales como datos del paciente y Setup.
Anwendungsgebiet
Die TELECAM® SL II von KARL STORZ ist ein Farbvideokamerasystem, das als EndoskopieZubehör mit starren oder flexiblen Endoskopen eingesetzt werden kann. Der Kamerakopf wird an das Endoskop angeschlossen. Mit der TELECAM® SL II Kamerakontrolleinheit (CCU) von KARL STORZ können alle von KARL STORZ als kompatibel bezeichneten Kameraköpfe verwendet werden. Das Endoskopiebild lässt sich auf allen handelsüblichen OP-Videomonitoren anzeigen. Mit TELECAM® SL II Kameraköpfen können alle endoskopischen Standard-Lichtquellen eingesetzt werden.
Indication for use
The KARL STORZ TELECAM® SL II is a color video camera system which can be used as an endoscopic accessory with rigid or flexible endoscopes. The camera head is coupled to the endoscope. Any camera head which has been designated as compatible by KARL STORZ may be used with the KARL STORZ TELECAM® SL II camera control unit (CCU). The endoscopic image can be displayed on any standard operating room video monitor, and all standard endoscopic light sources may be used with TELECAM® SL II camera heads.
Campo de aplicación
La TELECAM® SL II de KARL STORZ es un sistema de cámara de vídeo a color que puede utilizarse con endoscopios rígidos o flexibles como accesorio endoscópico. El cabezal de la cámara se conecta al endoscopio. Con la unidad de control de la cámara (CCU) TELECAM® SL II de KARL STORZ pueden emplearse todos los cabezales de la cámara que KARL STORZ haya calificado de compatibles con dicho equipo. La imagen endoscópica puede mostrarse en todos los monitores de vídeo para quirófano usuales en el mercado. Con los cabezales de la cámara TELECAM® SL II se pueden usar todas las fuentes de luz endoscópicas estándar.
3
|
|
Sicherheitshinweise |
Safety instructions |
Instrucciones de seguridad |
|
|
Warnund Vorsichtshinweise |
Warnings and cautions |
Indicaciones de alarma y advertencia |
|
|
|
|
|
|
|
|
|
|
Warnund Vorsichtshinweise
Bitte lesen Sie diese Gebrauchsanweisung sorgfältig durch und beachten Sie die Anweisungen genau. Die Bezeichnungen Warnung, Vorsicht und Hinweis haben spezielle Bedeutungen. Wo immer sie in der Gebrauchsanweisung verwendet werden, lesen Sie den nachfolgenden Text genau, um einen sicheren und effizienten Betrieb des Gerätes zu gewährleisten.
Warnings and cautions
Please read this manual and follow the instructions carefully. The words Warning, Caution and Note convey special meanings. Wherever they are used in this manual, they should be carefully reviewed to ensure the safe and effective operation of the device.
Indicaciones de alarma y advertencia
Lea este Manual y siga las instrucciones cuidadosamente. Los términos Cuidado, Advertencia y Nota tienen significados muy especiales. Cuando aparezcan en alguna parte de este Manual, revise esa sección cuidadosamente para asegurar la operación inocua y eficaz de este aparato.
Definitionen |
Definitions |
Definiciones |
Warnung: Warnung macht auf eine Gefährdung des Patienten oder des Arztes aufmerksam. Die Nichtbeachtung einer Warnung kann Verletzungen des Patienten oder des Arztes zur Folge haben.
Vorsicht: Vorsicht macht darauf aufmerksam, dass bestimmte Wartungsoder Sicherheitsmaßnahmen zu treffen sind, um eine Beschädigung des Gerätes zu vermeiden.
Hinweis: Hinweise enthalten zusätzliche Informationen zur sicheren Bedienung des Gerätes.
Warning: A Warning indicates that the personal safety of the patient or physician may be involved. Disregarding a Warning could result in injury to the patient or physician.
Caution: A Caution indicates that particular service procedures or precautions must be followed to avoid possible damage to the unit.
Note: A Note indicates special information about operating the unit.
Cuidado: Este término llama la atención sobre una situación de peligro para el paciente o para el médico. No observar este aviso podría conllevar lesiones para el paciente o para el médico.
Advertencia: Este término llama la atención sobre determinadas medidas de mantenimiento o de seguridad que han de llevarse a cabo a fin de evitar el deterioro del aparato.
Nota: Las notas contienen informaciones adicionales para el manejo seguro del equipo.
Warnung: Lesen Sie diese Gebrauchsanweisung genau durch, bevor Sie das Gerät in Betrieb nehmen. Lesen Sie besonders das Kapitel Sicherheitshinweise aufmerksam durch, um Gefährdungen Ihrer Patienten, Ihres Personals sowie Ihrer eigenen Person zu vermeiden.
Machen Sie sich vor der ersten Anwendung des Gerätes am Patienten unbedingt mit der Funktionsweise und Bedienung des Gerätes vertraut.
Warning: Read this instruction manual thoroughly and be familiar with its contents prior to using this equipment. Read the section on safety instructions carefully to avoid putting your patients, personnel, or yourself at risk.
Before using the unit on the patient it is imperative that you be acquainted with how the unit operates and is controlled.
Cuidado: Lea detenidamente este Manual de instrucciones antes de usar el equipo. Lea con especial atención el capítulo referente a las instrucciones de seguridad, a fin de evitar poner en peligro a sus pacientes, a su personal y a Ud. mismo.
Familiarícese a fondo con los modos de funcionamiento y el manejo del equipo antes de emplearlo por primera vez con un paciente.
4

|
|
Sicherheitshinweise |
Safety instructions |
Instrucciones de seguridad |
|
|
Warnund Vorsichtshinweise |
Warnings and cautions |
Indicaciones de alarma y advertencia |
|
|
|
|
|
|
|
|
|
|
WARNUNGEN:
Warnung: Die Gebrauchsanweisungen und die Schnittstellenspezifikationen der in Kombination verwendeten Medizinprodukte sind genauestens zu beachten.
Warnung: Eine sicherheitstechnische Unbedenklichkeit bei Kombinationen von Medizinprodukten ist nur dann gegeben, wenn
•diese in den jeweiligen Gebrauchsanweisungen als solche ausgewiesen sind oder
•die Zweckbestimmung und die Schnittstellenspezifikation der in der Kombination verwendeten Produkte dies zulässt (vgl. IEC 60601-1-1).
Warnung: Prüfen Sie dieses Gerät vor jeder Anwendung auf seine Funktionsfähigkeit. Sollte das Bild während des Eingriffs ,unbrauchbar‘ werden, kann die Kamera vom Endoskop abgenommen und der Eingriff optisch fortgesetzt werden. Ist dies nicht möglich, so obliegt es der Entscheidung des Operateurs, wie am besten fortzufahren ist. Für diesen Fall empfehlen wir die Verfügbarkeit eines Ersatzsystems.
Warnung: Bei Verwendung zündfähiger Narkosegase in der unmittelbaren Umgebung des Gerätes besteht Explosionsgefahr.
Warnung: Gefahr eines elektrischen Schlages! Gerät nicht öffnen! Lassen Sie Service-Arbeiten nur durch autorisiertes Personal durchführen.
Jedes Öffnen des Gerätes durch unautorisierte Personen führt zum Erlöschen der Garantie. Einzige Ausnahme: die in dieser Gebrauchsanweisung beschriebenen Tätigkeiten.
Warnung: Das Gerät ist nur dann zuverlässig geerdet, wenn es an einer einwandfrei installierten Schutzkontakt-Steckdose angeschlossen ist. Stecker und Kabel routinemäßig prüfen und bei Beschädigung nicht verwenden.
Warnung: Die elektrischen Installationen des Operationssaals, in dem das Gerät angeschlossen und betrieben wird, müssen die Anforderungen der geltenden IEC-Normen erfüllen.
WARNINGS:
Warning: The instructions and interface specifications for medical devices used in combination must be observed precisely.
Warning: Combinations of medical devices are only assured to be safe if
•they are identified as such in the respective instruction manuals or
•the intended purpose and interface specifications of the devices used in combination permit this (cp. IEC 60601-1-1).
Warning: Test this equipment prior to each surgical use. In the event that the image becomes unusable during surgery, the camera may be disengaged from the endoscope and the procedure continued optically. If this is not possible, it is left to the discretion of the surgeon how best to proceed. Availability of a spare system is recommended.
Warning: Do not use in the presence of flammable anesthetics. There is a risk of explosion.
Warning: Danger of electric shock. Do not open the unit. Refer servicing only to qualified personnel. Any opening of the unit by unauthorized persons voids the guarantee. The only exception to this are activities described in this instruction manual.
Warning: Grounding reliability can only be achieved when the equipment is connected to a properly installed “Hospital Only” or “Hospital Grade” receptacle (i.e., approved for use in an operating room environment). Routinely inspect electrical plug and cord. Do not use if inspection reveals damage.
Warning: The electrical installations in the operating room in which the unit is connected and operated must comply with the applicable IEC standards.
AVISOS:
Cuidado: Deben observarse con la máxima exactitud los Manuales de instrucciones y las especificaciones de interface de los productos médicos y/o componentes de sistema utilizados en combinaciones entre sí.
Cuidado: Una aplicación técnica y de seguridad sin objeciones en el caso de combinaciones de productos médicos puede darse únicamente si
•los mismos están indicados expresamente como tales en los Manuales de instrucciones respectivos, o
•si la determinación de aplicación y la especificación de interface de los productos utilizados en combinación lo permiten (véase CEI 60601-1-1).
Cuidado: Verifique la capacidad de funcionamiento de este equipo antes de cada utilización. Si durante la intervención quirúrgica la imagen se volviera “inservible”, se puede retirar la cámara del endoscopio y proseguir la intervención bajo control visual. Si esto no fuera posible, el cirujano habrá de decidir la mejor forma de proseguir. Para estos casos recomendamos disponer de un sistema de recambio.
Cuidado: Existe peligro de explosión si se emplean gases narcóticos inflamables en las inmediaciones del equipo.
Cuidado: ¡No abrir! Peligro de descarga eléctrica. Los trabajos de servicio técnico deben ser realizados únicamente por personal autorizado por el fabricante. Si el equipo es abierto por personas no autorizadas, implica la extinción de los derechos de garantía. Unica excepción: las tareas descritas en este manual.
Cuidado: La conexión a tierra de este equipo es únicamente fiable si se encuentra conectado a un enchufe con puesta a tierra debidamente instalado. Controle el cable y el enchufe con regularidad y no los utilice si están deteriorados.
Cuidado: La instalación eléctrica del quirófano, donde el aparato está conectado y en servicio, debe cumplir los requisitos exigidos por las normas CEI vigentes.
5

|
|
Sicherheitshinweise |
Safety instructions |
Instrucciones de seguridad |
|
|
Warnund Vorsichtshinweise |
Warnings and cautions |
Indicaciones de alarma y advertencia |
|
|
|
|
|
|
|
|
|
|
Warnung: Vor sämtlichen Arbeiten am Gerät ist die Netzverbindung zu trennen.
Warnung: Gerät außerhalb der Reichweite von Patienten aufstellen.
Warnung: Aus Sicherheitsgründen dürfen bei einer Anwendung die Ausgangsbuchsen des Gerätes und der Patient nicht gleichzeitig berührt werden.
Warnung: Bei der Reinigung des Gerätes und bei der Aufbereitung/Sterilisation von Gerätezubehör („Kamerakopf-Einheit“) unbedingt die Gebrauchsanweisung beachten.
Warnung: Alle Abweichungen von den empfohlenen Verfahren für die Sterilisierung sind vom Benutzer zu validieren.
Warnung: Die an Analogund Digitalschnittstellen (Signaleinund ausgänge) anschließbaren Zusatzgeräte müssen gemäß der IEC 60601-1 für elektromedizinische Geräte und zusätzlich der IEC 60950 für Datenverarbeitungsgeräte aufgebaut und geprüft sein. Außerdem müssen alle Kombinationen der Systemnorm IEC 60601-1-1 entsprechen. Wer zusätzliche Geräte an die Signaleinoder ausgänge anschließt, konfiguriert ein medizinisches System und ist deshalb dafür verantwortlich, dass das System die Anforderungen gem. IEC 60601-1-1 erfüllt. Im Zweifelsfall sind Anfragen an die technische Abteilung oder den zuständigen Vertreter zu richten.
Warnung: Zur Vermeidung von Verbrennungen bei endoskopischen Eingriffen müssen Operateure dann besonders vorsichtig sein, wenn elektrische Operationsinstrumente verwendet werden, die nicht vom Typ BF/CF sind.
Warnung: Das durch das Endoskop ausgestrahlte Hochleistungslicht kann am Lichtausgang, an den Endflächen des Lichtkabels und an der Spitze des Endoskops zu hohen Temperaturen führen. Um das Risiko von Verbrennungen gering zu halten, die Lichtquelle immer mit der kleinstmöglichen Helligkeitseinstellung betreiben, die für optimalen Beleuchtung des endoskopischen Gebiets erforderlich ist, wenn diese mit der Videokamera gekoppelt ist.
Warning: Always unplug the unit before performing any maintenance including cleaning.
Warning: Keep out of reach of patients.
Warning: For reasons of safety, do not simultaneously touch the device output connectors and the patient.
Warning: It is essential to follow the instruction manual closely when cleaning the unit and preparing/sterilizing unit accessories (‘camera head assembly’).
Warning: Any deviations from the recommended parameters for sterilization should be validated by the user.
Warning: Accessory equipment connected to the analog and digital interfaces (signal inputs and outputs) must be set up and tested according to IEC 60601-1 for medical electrical equipment and additionally to IEC 60950 for data processing equipment. Furthermore, all configurations shall comply with the system standard
IEC 60601-1-1. Any person who connects additional equipment to the signal input part or signal output part configures a medical system, and is therefore responsible for ensuring that the system complies with the requirements of the system standard IEC 60601-1-1. If in doubt, consult the technical service department or your local representative.
Warning: To avoid burns during endoscopic procedures, operators must use caution when employing non-BF/CF type equipment while using electrosurgical devices.
Warning: High energy radiated light through endoscopes may give rise to high temperatures in front of the light outlet and to the tip of the endoscope. To minimize the risk of burns, always adjust the light source to the minimum illumination intensity necessary to achieve optimum illumination of the endoscopic scene when coupled to the video camera.
Cuidado: Antes de cualquier manipulación, desconecte el equipo de la red.
Cuidado: Mantenga la unidad lejos del alcance de los pacientes.
Cuidado: Por razones de seguridad no se debe entrar en contacto simultáneamente con los conectores de salida del aparato y con el paciente.
Cuidado: Al efectuar la limpieza del aparato y la preparación/esterilización de accesorios de aparatos (“unidad del cabezal de cámara”) observe imprescindiblemente las indicaciones contenidas en el Manual de instrucciones.
Cuidado: Cualquier desviación de los parámetros de esterilización recomendados deberá ser validada por el usuario.
Cuidado: Los equipos accesorios conectados a las interfaces analógica y digital (entradas y salidas de señales) deben haber sido construidos y verificados conforme a la norma CEI 60601-1 para aparatos eléctricos médicos y, asimismo, la norma CEI 60950 para equipo procesador de datos. Asimismo, todas las configuraciones deben cumplir con la norma CEI 60601-1-1 para sistemas. Cualquier persona que conecte un equipo adicional a las entradas o salidas de señales está configurando un sistema médico y es, por lo tanto, responsable de que el sistema cumpla con los requisitos de la norma CEI 60601-1-1. En caso de duda, consulte con el departamento de Servicio Técnico o con su representante local.
Cuidado: Con el fin de evitar quemaduras durante las intervenciones endoscópicas, los cirujanos deben tener extrema precaución al utilizar instrumentos quirúrgicos eléctricos que no sean del tipo BF/CF.
Cuidado: La luz de alta potencia que se emite a través del endoscopio puede producir temperaturas elevadas en la salida de luz, en las superficies de los extremos del cable de luz y en la punta del endoscopio. Para reducir el riesgo de quemaduras, utilice siempre la fuente de luz con el ajuste de brillo mínimo posible necesario para la iluminación óptima del área endoscópica, cuando la fuente esté acoplada a la cámara de vídeo.
6

|
|
Sicherheitshinweise |
Safety instructions |
Instrucciones de seguridad |
|
|
Warnund Vorsichtshinweise |
Warnings and cautions |
Indicaciones de alarma y advertencia |
|
|
|
|
|
|
|
|
|
|
Warnung: Patientenableitströme können sich addieren, wenn Endoskope mit energetisch betriebenem endoskopisch verwendbarem Zubehör verwendet werden. Das ist besonders wichtig, wenn ein Endoskop-Anwendungsteil des Typs CF eingesetzt wird. In diesem Fall sollte auch ein endoskopisch verwendbares Zubehör vom Typ CF verwendet werden, um den gesamten Patientenableitstrom zu minimieren.
Warnung: Vor jeder Verwendung sind die Außenflächen der Teile des Endoskops und des Endo- skop-Zubehörs, die in den Patienten eingeführt werden sollen, auf fehlerhafte rauhe Flächen, scharfen Kanten oder Vorsprünge zu überprüfen, um Sicherheitsrisiken auszuschalten.
Warnung: Bei nicht vorbereiteten Patienten können im Gastrointestinaltrakt manchmal zündfähige Gase vorhanden sein. Durch bestimmte Substanzen für die Vorbereitung des unteren Verdauungstraktes kann die Erzeugung von Methan gefördert werden. Dies gilt im besonderen Maße für die Koloskopie, ist aber auch vom oberen Gastrointestinaltrakt berichtet worden. Weiterhin ist bei der transurethralen Resektion der Prostata beobachtet worden, dass sich in der Blase oberhalb der Spülflüssigkeit Wasserstoff ansammeln kann. Entfernen Sie vor Verwendung von Hochfrequenz-Operations- instrumenten alle brennbaren Gase im Dickdarm, der Blase oder anderen Körperkavitäten.
Warnung: Wird das Kamerasystem bei einem chirurgischen Eingriff unter gleichzeitiger Verwendung eines Lasers benutzt, sind die Augen des Operateurs in besonderer Weise zu schützen. Er sollte immer dann einen Augenschutz tragen, wenn er das Operationsgebiet direkt durch das Endoskop betrachtet.
Vorsicht: Dieses Gerät darf während der Entladung eines Defibrillators nicht verwendet werden. Alle endoskopischen Geräte vom Patienten und aus dem Operationsbereich entfernen.
Vorsicht: Ein Eindringen von Flüssigkeit in das Gehäuse ist unbedingt zu vermeiden. Keine Flüssigkeit auf oder über dem Gerät lagern.
Vorsicht: Das Gerät nur mit der auf dem Typenschild angegebenen Spannung betreiben.
Vorsicht: Bei Sicherungswechsel nur Sicherungen mit den angegebenen Werten verwenden.
Warning: When endoscopes are used with energized endoscopically-used accessories, the patient leakage currents may be additive. This is particularly important if a Type CF endoscope is used, in which case a Type CF endoscopicallyused accessory should be used in order to minimize the total patient leakage current.
Warning: Before each use, the outer surface of the portions of the endoscope and any endo- scopically-used accessories which are intended to be inserted into the patient should be checked to ensure there are no unintended rough surfaces, sharp edges or protrusions which may cause a safety hazard.
Warning: Gas which may support combustion is sometimes present in the gastrointestinal tract of an unprepared patient and certain patient preparation substances used prior to GI endoscopy can enhance methane production. This is particularly relevant to colonoscopy, but has also been recorded in the upper GI tract and during transurethal resection of the prostate. It has been recorded that hydrogen can accumulate in the bladder above the irrigant solution. Dissipate any flammable gasses in the colon, bladder, or other body cavities prior to use of high frequency surgical equipment.
Warning: When using the camera system in a surgical discipline employing a laser, caution should be taken to prevent eye damage to the operator. The operator should wear protective glasses whenever viewing the surgical site directly through the endoscope.
Caution: This equipment may not be used during the discharge of a cardiac defibrillator. Remove all endoscopic equipment from patient contact and from the surgical site.
Caution: Do not store liquids on or above the device. Avoid allowing fluids to enter the unit.
Caution: Only operate the unit with the voltage stated on the unit’s identification plate.
Caution: When replacing fuses, use only fuses of the same rating.
Cuidado: Las corrientes de fuga del paciente pueden acumularse, si se utilizan endoscopios con accesorios para uso endoscópico activados por energía. Esto es particularmente importante si se utiliza una pieza de aplicación endoscópica del tipo CF. En este caso ha de emplearse también un accesorio para uso endoscópico del tipo CF, con el fin de minimizar la corriente total de fuga del paciente.
Cuidado: Antes de cada aplicación, compruebe si las superficies exteriores de las piezas del endoscopio y los accesorios endoscópicos que hayan de introducirse en un paciente presentan superficies ásperas defectuosas, bordes afilados o protuberancias que pudieran representar un riesgo para el paciente.
Cuidado: A veces se encuentra gas combustible en el tracto gastrointestinal de un paciente no preparado. La producción de gas metano puede aumentar con el uso de ciertas sustancias para la preparación del tracto gastrointestinal inferior. Esto es particularmente relevante en colonoscopia, pero también se ha reportado en el tracto gastrointestinal superior. Además, existen informes de que puede acumularse hidrógeno en la vejiga por encima de la solución de irrigación durante la resección transuretral de la próstata. Antes de utilizar instrumentos quirúrgicos de alta frecuencia elimine todos los gases inflamables del intestino grueso, de la vejiga o de otras cavidades corporales.
Cuidado: Si se utiliza el sistema de cámara en una intervención quirúrgica simultáneamente con un aparato de láser, hay que proteger debidamente los ojos del cirujano. El cirujano debe llevar siempre una protección ocular al observar la zona de operación directamente a través del endoscopio.
Advertencia: Este equipo no puede usarse durante la descarga de un desfibrilador. Mantenga todos los aparatos endoscópicos alejados del paciente y de la zona de operación.
Advertencia: Evite a toda costa que penetren líquidos en el interior del equipo. No deposite líquidos encima de o sobre la unidad.
Advertencia: Conecte a la red sólo con la tensión indicada en la placa de especificaciones.
Advertencia: Utilice sólo fusibles con las características indicadas.
7

|
|
Sicherheitshinweise |
Safety instructions |
Instrucciones de seguridad |
|
|
|
|
|
|
|
|
|
|
|
|
|
|
|
Machen Sie sich vor der ersten Anwendung des Gerätes am Patienten unbedingt mit der Funktionsweise und Bedienung des Gerätes vertraut.
Before using the unit on the patient it is imperative that you be acquainted with how the unit operates and is controlled.
Familiarícese a fondo con los modos de funcionamiento y el manejo del equipo antes de emplearlo por primera vez con un paciente.
Bestimmungsgemäße
Verwendung
Die TELECAM® SL II CCU ist eine Videokamera, die an ein starres oder flexibles Endoskop angeschlossen wird und für den Einsatz bei allgemeinen endoskopischen Eingriffen konzipiert ist. Die Verwendung der Kamera für andere Anwendungsgebiete ist aus Sicherheitsgründen nicht zulässig.
Diese CCU darf nur mit Zubehör, Verschleißund Einwegartikeln betrieben werden, die von
KARL STORZ für den Gebrauch mit der Kamera als geeignet bezeichnet werden oder deren sichere Verwendung nachgewiesen ist. Eigenmächtige Umbauten oder Veränderungen des Gerätes sind aus Sicherheitsgründen untersagt.
Intended use |
Empleo previsto |
The TELECAM® SL II CCU is a video camera which is attached to either a rigid or flexible endoscope and is intended and designed for use during general endoscopic procedures. Use of the camera in other applications is not allowed for safety reasons.
This CCU may only be used with accessories, wearing parts, and disposable items which are designated by KARL STORZ as suitable for the camera or the safe use of which is proven. For safety reasons, do not perform unauthorized conversions or modifications to the camera.
La CCU para TELECAM® SL II es una cámara de vídeo que se conecta a un endoscopio rígido o flexible y que ha sido diseñada para su aplicación en intervenciones quirúrgicas endoscópicas en general. Por razones de seguridad no está permitido utilizar la cámara en otros campos de aplicación.
Esta CCU debe utilizarse únicamente con accesorios, piezas de repuesto y artículos desechables que KARL STORZ haya identificado como adecuados para su uso con la cámara o cuya aplicación segura haya sido probada. Por razones de seguridad, está prohibido efectuar reformas o cambios arbitrarios en el aparato.
Qualifikation des Anwenders
Die TELECAM® SL II Kamerakontrolleinheit darf nur von Ärzten und medizinischem Assistenzpersonal angewendet werden, die über eine entsprechende fachliche Qualifikation verfügen und an den Geräten eingewiesen sind.
User qualification
The TELECAM® SL II CCU may only be used by physicians and medical assistants who have a corresponding specialized qualification and who have been instructed in use of the unit.
Capacitación del usuario
La unidad de control de la cámara TELECAM® SL II sólo puede ser empleada por médicos y personal de asistencia médica que dispongan de una cualificación profesional adecuada y que hayan recibido instrucciones sobre la utilización de los aparatos.
8

|
|
Sicherheitshinweise |
Safety instructions |
Instrucciones de seguridad |
|
|
|
|
|
|
|
|
|
|
|
|
|
|
|
60˚ |
Sicherheitsmaßnahmen am Aufstellort
Das Gerät darf nur in medizinisch genutzten Räumen benutzt werden, deren elektrische Anlagen nach den national gültigen Vorschriften installiert sind.
Das Gerät ist mit einer Steckvorrichtung für den Potentialausgleich ausgerüstet. Diese nach Maßgabe der national gültigen Vorschriften anschließen. Es ist nicht für den Betrieb in explosionsgefährdeten Bereichen bestimmt. Dies bedeutet u. a.: Bei Verwendung von leicht brennbaren und explosionsfähigen Inhalations-Anästhesiemitteln und deren Gemischen darf das Gerät nicht in der dargestellten Gefahrenzone betrieben werden. Dieses gilt auch für leicht brennbare und explosionsfähige Chemikalien, z. B. Hautdesinfektionsund Flächenschnelldesinfektionsmittel.
Safety precautions at the site of installation
The unit may only be used in medical rooms whose electrical systems have been installed in accordance with applicable national regulations. The unit is equipped with a connector for attaching a ground line. It should be connected before power is applied to the unit in compliance with current national regulations.
It is not intended for use in hazardous zones. This means, for example, that when using easily combustible and explosive inhalation anesthetics or mixtures thereof, the unit must not be operated inside the hazard zone shown in the diagram. This also applies for easily combustible and explosive chemicals, e.g. skin disinfectants and fast-acting surface disinfectants.
Medidas de seguridad en el lugar de emplazamiento
El equipo sólo podrá ser utilizado en espacios médicos cuya instalación eléctrica haya sido efectuada de acuerdo con las normas nacionales de seguridad vigentes.
El equipo está provisto de una conexión equipotencial. La conexión debe efectuarse de acuerdo con las normas nacionales de seguridad que estén vigentes.
El equipo no está previsto para ser utilizado en zonas expuestas a posibles explosiones. Esto significa, entre otras cosas:
Si se emplean productos anestésicos para inhalación fácilmente inflamables y explosivos o sus mezclas, no podrá utilizarse el equipo en las zonas calificadas como peligrosas por este motivo. Esto es válido también para productos químicos fácilmente inflamables y explosivos tales como, p. ej., productos para desinfección de la piel y desinfectantes rápidos para superficies.
Sicherheitsmaßnahmen beim Einsatz des Gerätes
Der Anwender hat sich vor der Anwendung des Gerätes von der Funktionssicherheit und dem ordnungsgemäßen Zustand des Gerätes zu überzeugen.
Während der Behandlung unter Verwendung der TELECAM® SL II muss der Patient mit der üblichen medizinischen Sorgfalt behandelt und beobachtet werden. Dazu gehört insbesondere die Sorge um sterile Applikationsbedingungen, sofern die Art des Eingriffs dies erfordert.
Dieses Gerät wurde geprüft und entspricht den EMV-Grenzwerten gemäß dem Medizinproduktegesetz 93/42/EWG (EN 55011 Class A und EN 60601-1-2 :2001).
Beachten Sie die Hinweise zur Elektromagnetischen Verträglichkeit im Anhang (S. 64-77).
Safety precautions when operating the unit
It is the user’s responsibility to make sure the equipment is safe and operates properly before use.
During treatment with the TELECAM® SL II the patient must be treated and kept under observation with the usual medical care. This includes keeping a check on the progress of treatment, as well as monitoring sterile application conditions where required by the type of intervention.
CE marked equipment has been tested and found to comply with the EMC limits for the Medical Device Directive 93/42/EEC (EN 55011 Class A and EN 60601-1-2 :2001).
Please read the Electromagnetic Compatibility Information in the appendix (p. 64-77).
Medidas de seguridad durante el empleo del equipo
El usuario debe comprobar la seguridad de funcionamiento y el buen estado del aparato antes de cada aplicación.
Durante el tratamiento empleando la TELECAM® SL II, el paciente debe ser tratado y observado con los cuidados médicos habituales. Esto incluye en particular el control de las condiciones estériles de aplicación, en tanto que el tipo de intervención así lo requiera.
Este equipo ha sido probado y cumple con los valores límites CEM según las especificaciones de la Directiva 93/42/CEE (EN 55011 Clase A y EN 60601-1-2 :2001) para Equipo Médico.
Observe las indicaciones sobre compatibilidad electromagnética en el Anexo (págs. 64-77).
9

|
|
Aufstellen und |
Installation and |
Montaje e |
|
|
Bedienungshinweise |
operating instructions |
instrucciones operativas |
|
|
|
|
|
|
|
|
|
|
|
|
|
|
|
Auspacken
Entnehmen Sie die TELECAM® SL II Kamerakontrolleinheit (CCU) und das Zubehör vorsichtig der Verpackung. Überprüfen Sie die Lieferung auf Vollständigkeit und auf eventuelle Beschädigungen.
Sollte die Lieferung Anlass zur Reklamation geben, so wenden Sie sich bitte umgehend an den Hersteller oder Lieferanten.
Wenn möglich, bewahren Sie die Originalverpackung auf, sie kann bei einem Transport des Gerätes nützlich sein.
Unpacking the equipment
Carefully unpack the TELECAM® SL II camera control unit (CCU) and remove the unit and its accessories from their packaging. Check for missing items and evidence of shipping damage. File any complaints with the manufacturer or supplier immediately.
If possible, retain the original packing materials for later use; these can come in handy if the unit has to be transported.
Desembalaje
Extraiga cuidadosamente la unidad de control de la cámara (CCU) TELECAM® SL II y sus accesorios de la caja. Revise si el envío está completo y compruebe posibles averías de transporte.
En caso de reclamaciones, diríjase inmediatamente al fabricante o al proveedor.
Si es posible, es recomendable guardar el embalaje original para volver a utilizarlo en un posible transporte posterior del equipo.
Grundausstattung |
|
|
Basic equipment |
|
Equipo básico |
|
|
|
||
TELECAM® SL II CCU |
|
|
|
TELECAM® SL II CCU |
|
|
CCU para TELECAM® SL II |
|
|
|
PAL/NTSC |
|
202130 20 |
PAL/NTSC |
202130 20 |
PAL/NTSC |
|
202130 20 |
|||
S-Video Verbindungskabel |
547 S |
S-Video connecting cable 547 S |
|
Cable de conexión S-Video |
547 S |
|||||
BNC-Verbindungskabel |
|
536 MK |
Composite Cable |
536 MK |
Cable de conexión BNC |
|
536 MK |
|||
Verbindungskabel zur Steue- |
|
|
|
|
|
Cable de conexión para |
|
|
|
|
rung von Zusatzgeräten (2x) |
202210 70 |
Accessory Cables (2x) |
202210 70 |
control de accesorios (2x) |
202210 70 |
|||||
DV-Verbindungskabel |
|
200400 82 |
DV Cable |
200400 82 |
Cable DV |
|
200400 82 |
|||
Netzkabel |
|
400 A (240V~) Intl. |
Power Cord |
400 A (240V~) Intl. |
Cable de red |
|
400 A (240V~) Intl. |
|||
|
|
400 B (110V~) U.S. |
|
400 B (110V~) U.S. |
|
|
400 B (110V~) U.S. |
|||
Tastatur |
|
202001 30 (Typ |
Keyboard |
202001 30U (type |
Teclado |
|
202001 30S (el tipo |
|||
|
|
abhängig vom Set) |
|
dependent upon set) |
|
|
depende del set) |
|||
Gebrauchsanweisung |
|
96206079 D |
Instruction Manual |
96206079 D |
Manual de instrucciones |
|
96206079 D |
|||
|
|
|
||||||||
Kompatible Kameraköpfe |
Compatible camera heads |
Cabezales compatibles de la cámara |
||||||||
TELECAM® Parfocal-- |
PAL |
|
202120 40 |
TELECAM® Parfocal |
PAL |
202120 40 |
TELECAM® Parfocal- |
PAL |
|
202120 40 |
Zoom «Autoclave» |
NTSC |
202121 40 |
Zoom «Autoclave» |
NTSC |
202121 40 |
Zoom «Autoclave» |
NTSC |
202121 40 |
||
TELECAM® |
PAL |
|
202120 30 |
TELECAM® |
PAL |
202120 30 |
TELECAM® |
PAL |
|
202120 30 |
Parfocal-Zoom |
NTSC |
202121 30 |
Parfocal Zoom |
NTSC |
202121 30 |
Parfocal-Zoom |
NTSC |
202121 30 |
||
TELECAM®-B |
PAL |
|
202120 31 |
TELECAM®-B |
PAL |
202120 31 |
TELECAM®-B |
PAL |
|
202120 31 |
|
NTSC |
202121 31 |
|
NTSC |
202121 31 |
|
NTSC |
202121 31 |
||
|
PAL |
|
202120 32 |
|
PAL |
202120 32 |
|
PAL |
|
202120 32 |
|
NTSC |
202121 32 |
|
NTSC |
202121 32 |
|
NTSC |
202121 32 |
||
TELECAM®-C |
PAL |
|
202120 34 |
TELECAM®-C |
PAL |
202120 34 |
TELECAM®-C |
PAL |
|
202120 34 |
|
NTSC |
202121 34 |
|
NTSC |
202121 34 |
|
NTSC |
202121 34 |
||
DCI® II |
PAL |
|
202620 30 |
DCI® II |
PAL |
202620 30 |
DCI® II |
PAL |
|
202620 30 |
|
NTSC |
202621 30 |
|
NTSC |
202621 30 |
|
NTSC |
202621 30 |
||
10
|
|
Aufstellen und |
Installation and |
Montaje e |
|
|
Bedienungshinweise |
operating instructions |
instrucciones operativas |
|
|
|
|
|
|
|
|
|
|
|
|
|
|
|
Inbetriebnahme der
TELECAM® SL II
Hinweis: Die TELECAM® SL II CCU darf in medizinisch genutzten Räumen nur benutzt werden, wenn deren elektrische Anlagen nach den national gültigen Vorschriften installiert sind.
Installing the TELECAM® SL II
Note: The TELECAM® SL II CCU may be used only in medical rooms with electrical installations conforming to the applicable national, state, and local electrical regulations.
Puesta en marcha de la TELECAM® SL II
Nota: La CCU TELECAM® SL II sólo podrá usarse en espacios médicos cuya instalación eléctrica haya sido efectuada de acuerdo con las normas nacionales de seguridad vigentes.
60˚ |
Warnung: Sie ist nicht für den Betrieb in explosionsgefährdeten Bereichen bestimmt. Bei Verwendung von explosiven Narkosegasen darf das Gerät nicht in der dargestellten Gefahrenzone betrieben werden.
Warning: This unit is not intended for use in hazardous zones. Do not operate the unit within the hazard zone shown in the diagram while explosive anesthetic gases are in use.
Cuidado: El equipo no está previsto para ser utilizado en áreas expuestas a posibles explosiones. Si se usan gases anestésicos explosivos, el equipo no deberá emplearse en las zonas señaladas como peligrosas.
Gerät aufstellen
Die Kamerakontrolleinheit (CCU) auf eine ebene Fläche stellen.
Auf ausreichenden Seitenabstand zu anderen Geräten (insbesondere Hochfrequenz-Chirurgie- geräten) und Gegenständen achten.
Gerät nur mit der auf dem Typenschild angegebenen Spannung betreiben.
Installing the unit
Place the CCU on a level surface.
Make sure there is sufficient distance on all sides to other instruments (especially radio frequency surgical equipment) and objects.
Before plugging in the unit, make sure that the voltage on the nameplate corresponds to the voltage of the local power line.
Montaje del aparato
Coloque la unidad de control de la cámara (CCU) sobre una superficie plana.
Mantenga una distancia de separación lateral suficiente respecto a otros equipos (particularmente aparatos quirúrgicos de AF) y objetos.
Conecte a la red sólo con la tensión indicada en la placa de especificaciones.
Potentialausgleich anschließen
Das Gerät ist mit einer Steckvorrichtung für den Potentialausgleich { ausgerüstet. Lassen Sie die Erdung ggf. durch sachkundiges Personal durchführen.
Connecting a ground line
The unit is equipped with a potential equalization connector for attaching a ground line {. The unit’s ground line should be installed by a qualified electrician.
Conexión equipotencial
EI equipo está provisto de una conexión equipotencial {. Encomiende la conexión a tierra a un técnico experto en la materia.
11
|
|
Aufstellen und |
Installation and |
Montaje e |
|
|
Bedienungshinweise |
operating instructions |
instrucciones operativas |
|
|
|
|
|
|
|
|
|
|
|
|
|
|
|
Gerät an das Stromnetz anschließen
Netzkabel anschließen, Netzstecker bis zum Anschlag in die Netzbuchse P einschieben.
Warnung: Netzstecker nur außerhalb explosionsgefährdeter Bereiche mit der Stromversorgung verbinden bzw. trennen.
Connecting power |
Conexión a la red de alimentación |
|||
Connect power cord. Insert power cord into |
Conecte el cable, introduzca el enchufe de la red |
|||
power cord receptacle P as far as it will go. |
hasta el tope en el conector de la red P. |
|||
|
|
Warning: Only insert the power plug into |
|
Cuidado: Conecte o desconecte el |
|
|
and remove it from electrical outlets |
|
enchufe de la red de la alimentación de |
|
|
|||
|
|
located outside areas subject to explo- |
|
corriente únicamente en sectores que no |
|
|
sion hazards. |
|
estén expuestos a peligro de explosión. |
Monitor anschließen |
Connecting the monitor |
Conexión del monitor |
|
Kamera-Kontrolleinheit mit Monitor verbinden. Je |
Connect the camera control unit to the video |
Conecte la unidad de control de la cámara con |
|
nach Anschlussmöglichkeit ihres Monitors kön- |
monitor to be used. Depending upon the types of |
el monitor. De acuerdo con las alternativas de |
|
nen Sie die Verbindung herstellen über |
video input connectors provided on the video |
conexión que ofrezca su monitor, la misma podrá |
|
|
|
monitor, this connection can be generated using |
efectuarse sobre: |
|
|
either the CCU’s |
|
– |
BNC-Anschluss T oder |
– BNC video output connector T or |
– conexión BNC T ó |
– S-Video (Y/C)-Anschluss Y oder |
– S-Video (Y/C) video output connector Y, or its |
– conexión S-Video (Y/C) Y ó |
|
– |
DV-Anschluss U. |
– DV video output connector U. |
– conexión DV U. |
Fußschalter anschließen
Mittels des optional erhältlichen Fußschalters
200101 30 mit Adapterkabel 202330 70 kann zwischen der Standbild-Funktion, d. h. „Einfrieren“ des Videobildes auf dem Bildschirm und der Livebild-Funktion umgeschaltet werden. Dazu den Stecker des Fußschalterkabels in die ACC1Buchse I einstecken. Zusätzlich ist im Benutzermenü (siehe Übersicht S. 25) „Zubehör 1“ auf „Fusspedal“ zu programmieren.
Connecting the footswitch
The optional footswitch 200101 30 and adaptor cable 202330 70 may be used to toggle between the Freeze function, i.e. the ‘frozen’ video image on screen, and the live image function. To do this, plug the footswitch cable into the ACC 1 socket I and configure Accessory 1 to footswitch in the User Menu (see overview on page 26).
Funktion auslösen
Durch Drücken des Fußschalters wird das Videobild “Eingefroren”. “Für Livebild Kopftasten/ Fußschalter drücken” erscheint auf dem Monitor.
Durch nochmaliges Drücken des Fußschalters wird das Livebild wieder angezeigt.
Activating the function
Freeze the video image by pressing down the footswitch. ‘Press head button/footswitch to unfreeze’ will appear on the monitor.
Return to the live image by pressing down the footswitch again.
Hinweis: Die Umschaltung zwischen Standbild |
Note: You can also toggle between the still |
und Livebild kann auch durch die Kamerakopf- |
image and live image using the camera head |
tasten erfolgen, falls einer der Kamerakopftasten |
buttons, if one of the buttons has been config- |
darauf programmiert wurde. |
ured for this purpose. |
Conexión del interruptor de pedal
El uso del interruptor de pedal 200101 30 con cable adaptador 202330 70, suministrables opcionalmente, permite conmutar entre la función de imagen fija, es decir, “congelamiento” de la imagen de vídeo en la pantalla, y la función de imagen en vivo. Para ello, introduzca el enchufe del cable del interruptor de pedal en el conector ACC 1 I. Además, en el Menú de usuario (véase sinopsis en la pág. 27) debe programarse “Interruptor de pedal” en “Accesorios 1”.
Activar la función
Al presionar el interruptor de pedal, la imagen de vídeo se “congela”. En el monitor aparece: “Para imagen en vivo presione los botones del cabezal/el interruptor de pedal”.
Presionando nuevamente el interruptor de pedal vuelve a aparecer la imagen en vivo.
Nota: La conmutación entre imagen fija e imagen en vivo puede realizarse también utilizando los botones del cabezal de la cámara, siempre que uno de ellos se haya programado al efecto.
12
|
|
Aufstellen und |
Installation and |
Montaje e |
|
|
Bedienungshinweise |
operating instructions |
instrucciones operativas |
|
|
|
|
|
|
|
|
|
|
|
|
|
|
|
Zusatzgerät/e (zur Fernbedienung) anschließen
Wenn Zusatzgeräte wie z. B. ein Video-Printer oder KARL STORZ AIDA® vom Kamerakopf oder der Tastatur aus gesteuert werden sollen, so ist der Anschluss für die Fernbedienung am Zusatzgerät (Remote) mit den Buchsen I ACC1 und/oder ACC2 an der Kamerakontrolleinheit zu verbinden (verwendbare Modelle auf Anfrage).
Connecting accessory device(s) for remote control
If peripheral units such as a video printer or KARL STORZ AIDA® are to be remotely controlled via the camera head or keyboard, the terminal for peripheral equipment remote control (Remote) must be connected up to sockets I ACC1 and/or ACC2 on the camera control unit (suitable versions available upon request).
Conexión de accesorio/s para control remoto
Si los accesorios, tales como la impresora de vídeo o KARL STORZ AIDA®, han de manejarse desde el cabezal de la cámara o desde el teclado, entonces habrá que conectar el control remoto en el accesorio (Remote) con los conectores I ACC1 y/o ACC2 en la unidad de control de la cámara (modelos utilizables según demanda).
Hinweise zum Anschluss von Zusatzgeräten
Die beste Bildqualität wird erzielt, wenn das Kamerasignal ohne Umweg direkt an den Monitor weitergeleitet wird.
Dokumentationsgeräte wie Video-Printer lassen sich andererseits am besten überwachen, wenn sie zwischen Kamerakontrolleinheit und Monitor geschaltet werden. Zwischengeschaltete Geräte verringern allerdings die Stärke des ursprünglichen Signals, so dass die Bildqualität auf dem Monitor mit jedem zwischengeschalteten Gerät abnimmt.
Die beste Lösung ist in einem solchen Fall die Verwendung von 2 Monitoren. Während das Signal auf dem Hauptmonitor direkt von der CCU abgegriffen wird, wird ein zweiter Anschluss von der CCU zu den Zusatzgeräten und von dort zum zweiten Monitor geleitet, mit dem die Funktion der Zusatzgeräte überwacht wird.
Steht nur ein Monitor zur Verfügung, so empfiehlt es sich, den Monitor einmal direkt anzusteuern (z. B. mit dem Composite-Anschluss), um ein optimales Live-Bild zu erhalten, und eine zweite Kabelverbindung (z. B. S-Video) zu den Zusatzgeräten und von dort zum entsprechenden Anschluss des Monitors aufzubauen. Mit dem auf der Frontseite des Monitors befindlichen SignalEingangswahlschalter kann nun zwischen LiveBild (Direktverbindung) und Kontrolle der Zusatzgeräte hinund hergeschaltet werden.
Instructions on connecting accessory devices
Optimal image quality is achieved when the camera signal is transmitted to the monitor directly without any detour.
Documentation equipment such as printers or video recorders, on the other hand, can best be monitored when they are connected between the CCU and the monitor. However, intermediate equipment reduces the intensity of the original signal so image quality on the monitor is reduced by each piece of intermediate equipment.
The best solution in such a case is to use two monitors. Once the signal on the main monitor is taken from the CCU direct, a second connection is made from the CCU to the peripheral units and from there to the second monitor with which operation of the peripheral units is monitored.
If there is only one monitor available, it is recommended that the monitor be controlled directly (e.g. with the composite connection) in order to achieve an optimal live image, and that a second cable connection (e.g. S-video) be set up with the peripheral units and from there to the corresponding socket of the monitor. With the signal input selector at the front of the monitor it is now possible to switch to and fro between live image (direct link) and monitoring of the peripheral unit.
Indicaciones para la conexión de accesorios
La mejor calidad de imagen se obtiene cuando la señal de la cámara llega directamente al monitor.
Por otra parte, los equipos de documentación, tales como la impresora o la grabadora de vídeo, se pueden supervisar mejor si se encuentran conectados entre la unidad de control de la cámara y el monitor. Sin embargo, los aparatos conectados intermedios reducen la potencia de la señal original, de modo que la calidad de la imagen en el monitor disminuye con cada aparato que se haya interpuesto.
La mejor solución en tal caso es el empleo de 2 monitores. Mientras la señal en el monitor principal se toma directamente de la CCU, se realiza una segunda conexión desde la CCU a los accesorios y de allí a un segundo monitor con el que se supervisa el funcionamiento de estos aparatos.
Si sólo se dispone de un monitor, entonces se recomienda conectar el monitor una vez directamente (p. ej., con el conector Composite) para obtener una imagen “en vivo” óptima y efectuar una segunda conexión por cable (p. ej., vídeo S) a los accesorios y de allí al conector correspondiente del monitor. Con el selector de entrada de señal que se encuentra en la parte delantera del monitor puede conmutarse entre la imagen “en vivo” (conexión directa) y el control de los accesorios.
13
|
|
Aufstellen und |
Installation and |
Montaje e |
|
|
Bedienungshinweise |
operating instructions |
instrucciones operativas |
|
|
|
|
|
|
|
|
|
|
|
|
|
|
|
Tastatur anschließen
Zur Eingabe der Patientendaten und zur Einrichtung des Kamerakopfes ist eine Tastatur erforderlich. Zum Anschluss der Tastatur das Tastaturkabel in die Tastaturanschlussbuchse O auf der Rückseite der CCU stecken.
Weitere Hinweise zu den Funktionen und Vorgehensweisen mit der Tastatur finden Sie im Kapitel „Menüfunktionen“ auf Seite 24.
Connecting the keyboard
A keyboard is required to enter patient data and program the camera head. To connect the keyboard, plug the keyboard connecting cable into the keyboard receptacle O on the CCU's back panel.
For further details on keyboard functions and operations please see ‘Menu functions’ on page 24.
Conexión del teclado
Para ingresar los datos de los pacientes y ajustar el cabezal de la cámara es preciso disponer de un teclado. Para conectar el teclado se introduce el cable del mismo en el conector de teclado O en el lado posterior de la CCU.
Ulteriores informaciones sobre las funciones y forma de proceder con el teclado las encontrará usted en el capítulo “Funciones del menú” en la página 24.
Kamerakopf anschließen
Hinweis: Stellen Sie sicher, dass der Kamerakopfstecker vor Verbindung mit der CCU trocken und sauber ist.
Den Kamerakopfstecker in die Steckbuchse R für das Kamerakopfkabel an der Frontplatte der CCU stecken.
Connecting the camera head
Note: Always ensure the camera head connector is completely clean and dry prior to insertion into the CCU.
Plug the camera head connector into the camera head cable receptacle R on the CCU's front panel.
Conexión del cabezal de la cámara
Nota: Asegúrese de que el enchufe de la cámara está seco y limpio antes de conectarlo a la CCU.
El enchufe del cabezal de la cámara se introduce en el conector R para el cable del cabezal de la cámara en la placa frontal de la CCU.
CCU einschalten
Kamerakontrolleinheit (CCU) und Videomonitor einschalten Q.
Nach jedem Einschalten erscheint auf dem Monitor für ca. 2 Sekunden ein Farbtestmuster. Wenn der Kamerakopf nicht korrekt und vollständig in die CCU eingesteckt ist, erscheint weiterhin das Testbild auf dem Monitor.
Das Testbild ist so lange zu sehen, bis der Kamerakopfstecker richtig in die CCU eingesteckt ist.
Warnung: Die Videokamera vor jedem Eingriff testen. Vergewissern Sie sich vor Beginn des Eingriffs, dass auf allen Videomonitoren das richtige Videobild erscheint.
Powering up the CCU
Switch on the camera control unit Q and the video monitor.
Each time the CCU is switched on, color bars will appear on the video test screen for about 2 seconds. If the camera head is not plugged into the CCU correctly and completely, the color bars will remain on the monitor.
The color bars will remain visible until the camera head connector is properly and completely inserted into the CCU.
Warning: Test the video camera before each procedure. Ensure that the proper video image appears on all video monitors before beginning each procedure.
Conexión de la CCU
Conecte la unidad de control de la cámara (CCU) Q y el monitor de vídeo.
Cada vez que se conecte aparecerá durante aprox. 2 segundos una imagen de test de color en el monitor. Si el cabezal de la cámara no está introducido correctamente y por completo en la CCU, el patrón de prueba permanece en la pantalla.
El patrón de prueba permanece en pantalla hasta que el enchufe del cabezal de cámara se haya introducido correctamente en la CCU.
Cuidado: Compruebe la cámara de vídeo antes de cada intervención quirúrgica. Antes de comenzar dicha intervención, asegúrese de que en todos los monitores aparece la imagen de vídeo correcta.
14
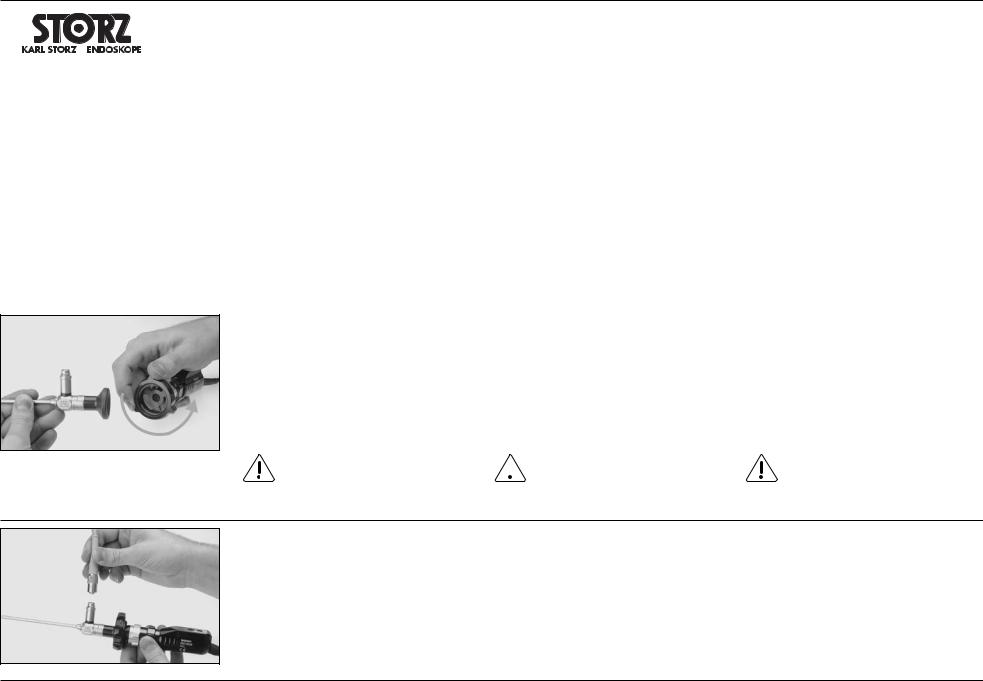
|
|
Aufstellen und |
Installation and |
Montaje e |
|
|
Bedienungshinweise |
operating instructions |
instrucciones operativas |
|
|
|
|
|
|
|
|
|
|
|
|
|
|
|
TELECAM® SL II
Kameraköpfe
Ihre TELECAM® SL II CCU kann mit einem der folgenden Kameraköpfe ausgerüstet werden:
•TELECAM® Parfocal-Zoom Kamerakopf
•TELECAM® Parfocal-Zoom Kamerakopf «AUTOCLAVE»
•TELECAM®-B Kamerakopf (siehe S. 17)
•TELECAM®-C Kamerakopf (siehe S. 17)
•DCI® Kamerakopf (siehe S. 18)
Der Anschluss von Endoskopen und Lichtkabeln sowie das Einstellen der Bildschärfe wird beispielhaft am Kamerakopf TELECAM® ParfocalZoom erklärt.
TELECAM® SL II camera heads
Your TELECAM® SL II CCU can be equipped with any of the following camera heads:
•TELECAM® Parfocal Zoom camera head
•TELECAM® Parfocal Zoom camera head «AUTOCLAVE»
•TELECAM®-B camera head (see p. 17)
•TELECAM®-C camera head (see p. 17)
•DCI® camera head (see p. 18)
The connecting of endoscopes and light cables, as well as the adjusting of the image sharpness, is explained using the example of the TELECAM® Parfocal Zoom camera head.
Cabezales de la cámara TELECAM® SL II
Su CCU TELECAM® SL II puede ser equipada con uno de los siguientes cabezales de cámara:
•cabezal de cámara TELECAM® Parfocal-Zoom
•cabezal de cámara TELECAM® Parfocal-Zoom «AUTOCLAVE»
•cabezal de la cámara TELECAM®-B (véase pág. 17)
•cabezal de la cámara TELECAM®-C (véase pág.17)
•cabezal de la cámara DCI® (véase pág.18)
La conexión de endoscopios y cables de luz, así como el ajuste de la nitidez de la imagen se explican, a título de ejemplo, con el cabezal de la cámara TELECAM® Parfocal Zoom.
Endoskop anschließen
TELECAM® SL II Kameraköpfe verfügen über eine integrierte Instrumentenkupplung für den Anschluss von Standard-Endoskopen (Ausnahme DCI®; siehe S. 18). Dazu den äußeren Ring der Kupplung gegen die Federkraft (in Pfeilrichtung) drehen, das DIN-Okular des Endoskops einsetzen und den äußeren Ring loslassen. Die Instrumentenkupplung schließt mittels der Federkraft selbsttätig.
Connecting an endoscope
The TELECAM® SL II camera heads have an integrated instrument coupler (exception: DCI®, see page 18). To attach a standard endoscope to the instrument coupler, rotate the outer ring of the coupler clockwise towards the tension spring
(in the direction of the arrow), insert the DIN endoscope eyepiece and release the outer ring. The tension spring enables the instrument coupler to automatically click into place.
Vorsicht: Ein zusätzliches Festdrehen |
|
Caution: No further tightening of the |
des äußeren Rings zur weiteren Fixierung |
|
outer ring to position the eyepiece is |
|
||
des Okulars ist nicht erforderlich. Dies |
|
required. This may, among other things, |
kann u. U. zu einer Beschädigung der |
|
cause damage to the instrument coupler! |
Instrumentenkupplung führen! |
|
|
Conexión de un endoscopio
Los cabezales de la cámara TELECAM® SL II disponen de un acoplamiento integrado para instrumentos para la conexión de endoscopios estándar (excepción: DCI®, véase pág. 18). Para ello gire el anillo exterior del acoplamiento en sentido contrario a la fuerza del muelle (en dirección de la flecha), monte el ocular DIN del endoscopio y suelte el anillo exterior. El acoplamiento para instrumentos se cierra automáticamente a causa de la fuerza del muelle.
Advertencia: No es necesario seguir apretando el anillo exterior para una mejor fijación del ocular. Bajo determinadas circunstancias, esto podría deteriorar el acoplamiento para instrumentos.
Lichtkabel anschließen
Lichtkabel mit dem Endoskop verbinden (Vierteldrehung der Rändelschraube auf den Schraubsockel).
Hinweis: Um eine optimale Lichtausbeute zu erzielen, sind die Lichteinund -austrittsflächen an Lichtkabel und Endoskop sauber zu halten. Diese Flächen mit einem in Reinigungslösung getränkten Wattetupfer säubern und anschließend mit einem in 70%igem Isopropylalkohol getränkten Wattetupfer abwischen.
Connecting a light cable
Connect the light cable to the endoscope eyepiece by twisting the thumbscrew on the screw base through one-quarter turn.
Note: The entrance and exit faces of the light cable and endoscope must be kept clean if optimal light transmission is to be maintained. Clean both faces with a cotton swab soaked in cleaning solution and then wipe with a cotton swab soaked in 70% isopropyl alcohol.
Conexión del cable de luz
Conecte el cable de luz con el endoscopio (cuarto de vuelta del tornillo moleteado sobre el zócalo roscado).
Nota: Para obtener un rendimiento máximo de la luz, mantenga limpias las superficies de entrada y salida de luz del cable de luz y del endoscopio. Limpie estas superficies con una torunda de algodón embebida en solución de limpieza y repase a continuación con una torunda de algodón embebida en alcohol isopropílico al 70 %.
15

|
|
Aufstellen und |
Installation and |
Montaje e |
|
|
Bedienungshinweise |
operating instructions |
instrucciones operativas |
|
|
|
|
|
|
|
|
|
|
|
|
|
|
|
|
|
Bildschärfe einstellen |
Adjusting image sharpness |
Ajuste de la nitidez de la imagen |
Die Bildschärfe kann durch Drehen des silbernen Fokusrings w eingestellt werden.
Image sharpness can be adjusted by rotating the silver camera lens focusing ring w.
La nitidez de la imagen puede ajustarse girando el anillo de enfoque w.
TELECAM® Parfocal-Zoom Kamerakopf
Brennweite einstellen
Die Brennweite kann am blauen Zoomring e eingestellt werden.
Hinweis: Um eine optimale Lichtausbeute zu erzielen, sind die Lichteinund -austrittsflächen an Lichtkabel und Endoskop sauber zu halten. Diese Flächen mit einem in Reinigungslösung getränkten Wattetupfer säubern und anschließend mit einem in 70%igem Isopropylalkohol getränkten Wattetupfer abwischen.
Vorsicht: Rückstände von Chemikalien am Lichtkabel und am Lichteinlass des Endoskops können durch die Hitzeentwicklung der Lichtquelle einbrennen, damit die Lichtfasern beschädigen und die Lichtleistung sowie die Bildqualität beeinträchtigen.
TELECAM® Parfocal Zoom |
Cabezal de cámara TELECAM® |
camera head |
Parfocal-Zoom |
Adjusting focal length |
Ajuste de la distancia focal |
The focal length or image size can be adjusted |
La distancia focal puede ajustarse mediante el |
by rotating the blue focal length adjustment |
anillo azul de zoom e. |
(zoom) ring e. |
|
Note: The entrance and exit faces of the light cable and endoscope must be kept clean if optimal light transmission is to be maintained. Clean both faces with a cotton swab soaked in cleaning solution and then wipe with a cotton swab soaked in 70% isopropyl alcohol.
Caution: Heat from the light source can cause chemical residue on the light cable and on the light entrance of the endoscope to burn. This can damage the light fibers and have a detrimental effect on the lighting power and the picture quality.
Nota: Para obtener un rendimiento máximo de la luz, mantenga limpias las superficies de entrada y salida de luz del cable de luz y del endoscopio. Limpie estas superficies con una torunda de algodón embebida en solución de limpieza y repase a continuación con una torunda de algodón embebida en alcohol isopropílico al 70 %.
Advertencia: El calor generado por la fuente de luz puede quemar los residuos de productos químicos en el cable de luz y en la entrada de luz del endoscopio, deteriorando las fibras ópticas y menoscabando la potencia lumínica y la calidad de la imagen.
16
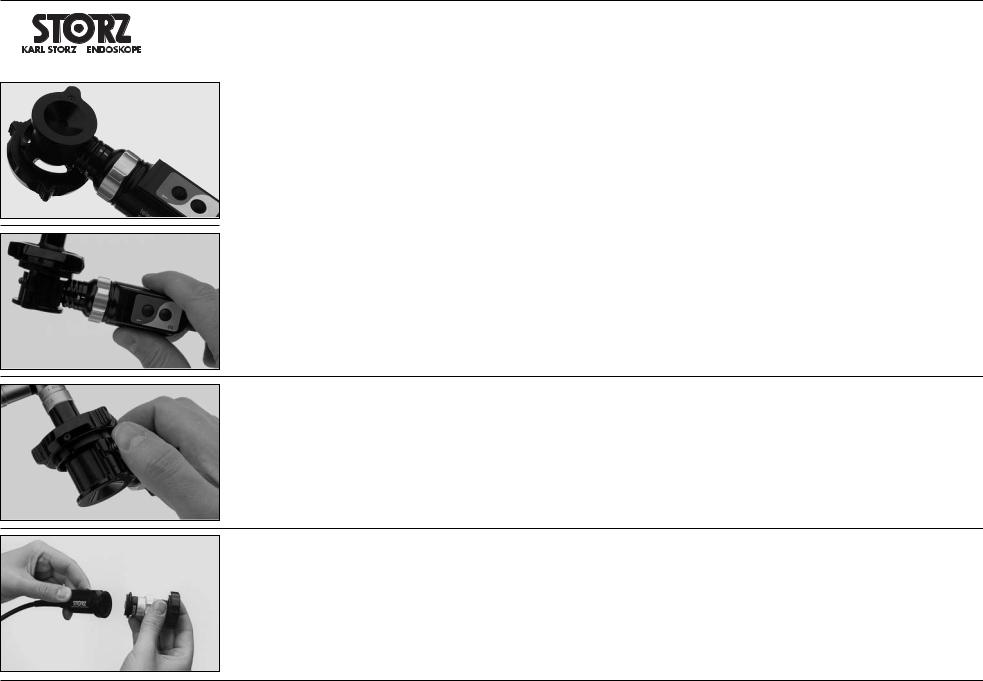
|
|
Aufstellen und |
Installation and |
Montaje e |
|
|
Bedienungshinweise |
operating instructions |
instrucciones operativas |
|
|
|
|
|
|
|
|
|
|
|
|
|
|
|
TELECAM®-B Kamerakopf
Hinweis: Der TELECAM®-B Kamerakopf ist mit einem integrierten Bildteiler ausgerüstet, der auch bei Anschluss der Kamera den Direkteinblick durch das Endoskop ermöglicht.
Der Bildteiler wurde so konstruiert, dass er sich
– unabhängig von der Bewegung des Endoskopes – immer in 6-Uhr-Position befindet.
Dies ist insbesondere bei Verfahren, die mit häufigem Drehen des Endoskopes verbunden sind, von Nutzen. Es ist aber auch möglich, den Bildteiler in jede andere Position zu bringen und durch Drehen des CCD-Sensors stets das korrekt ausgerichtete Bild auf dem Monitor zu sehen.
TELECAM®-B camera head
Note: The TELECAM®-B camera head is equipped with an integrated beamsplitter which also permits direct vision through the endoscope even when the camera is connected up.
The beamsplitter is designed so that, irrespective of endoscope movement, it is always located in the 6 o’clock position.
This is particularly useful for procedures which involve frequent rotation of the endoscope. It is, however, also possible to position the beamsplitter in any other direction (angle), and by turning the CCD sensor to always see the correctly aligned image on the monitor.
Cabezal de la cámara
TELECAM®-B
Nota: El cabezal de la cámara TELECAM®-B está equipado con un divisor integral de imagen, que estando conectada la cámara permite la vista directa a través del endoscopio.
El divisor de imagen está construido de modo tal que, independientemente de los movimientos del endoscopio, se encuentre siempre en la posición de 6 horas.
Esto es particularmente útil en intervenciones que impliquen el giro frecuente del endoscopio. También es posible, sin embargo, colocar el divisor de imagen en cualquier otra posición y, girando el sensor CCD, orientar nuevamente la imagen correctamente sobre el monitor.
Falls gewünscht, kann die Kamera durch Fixierung des Feststellhebels t auch fest an das Okular gekoppelt werden.
If required, the camera can also be firmly attached to the eyepiece by activating the fixation clamp t.
Si se desea, la cámara puede también fijarse al ocular, para lo cual no hay más que bloquear la palanca de fijación t.
TELECAM®-C (C-Mount) Kamerakopf
Adapter (Objektiv) anbringen
Der TELECAM®-C Kamerakopf benötigt ein Objektiv. Das Objektiv im Uhrzeigersinn auf den Kamerakopf schrauben.
TELECAM®-C (C-mount) camera head
Connecting an adaptor (lens)
The TELECAM®-C camera head requires a lens. Screw the lens onto the camera head in a clockwise direction.
Cabezal de la cámara TELECAM®-C (C-Mount)
Conexión de un adaptador (objetivo)
El cabezal de la cámara TELECAM®-C requiere el uso de un objetivo. Enrosque el objetivo al cabezal de la cámara en el sentido de las agujas del reloj.
17

|
|
Aufstellen und |
Installation and |
Montaje e |
|
|
Bedienungshinweise |
operating instructions |
instrucciones operativas |
|
|
|
|
|
|
|
|
|
|
|
|
|
|
|
DCI® Kamerakopf
Endoskop anschließen
Die DCI® H® Endoskop-Optik in den ,Snap-in‘ DCI® Kopplungsmechanismus schieben. Die Kupplung rastet automatisch ein, wenn die Optik eingeschoben wird.
DCI® camera Head
Connecting an endoscope
Insert the DCI® H® endoscopic telescope into the “snap-in” DCI® coupling mechanism. The endoscope will automatically lock in when the telescope is inserted.
Cabezal de la cámara DCI®
Conexión del endoscopio
Deslice el endoscopio DCI® H® en el mecanismo de acoplamiento DCI® “de captura” (Snap-in). El acoplamiento se encastra automáticamente cuando se introduce el telescopio.
Zum Lösen der Optik Verschlussmechanismus o herunterdrücken und Optik aus dem Kamerakopf herausziehen.
To release the telescope, press down the release mechanism o, and pull the telescope out of the camera head.
Para soltar el telescopio, presione hacia abajo el mecanismo de cierre o y extraiga el telescopio del cabezal de la cámara.
Lichtkabel anschließen
Spezial-Lichtkabel 495 DC oder 495 DV an DCI® Kamerakopf anschließen. Dazu Lichtkabelstecker (längeres Ende) bis zum Einrasten in in den DCI®-Kamerakopf einschieben.
Lichtkabel nur am Griffstück anfassen. Niemals am Kabel ziehen.
Lichtkabel entfernen: Lichtkabel aus dem DCI® Kamerakopf herausziehen.
Hinweis: Um eine optimale Lichtausbeute zu erzielen, sind die Lichteinund -austrittsflächen an Lichtkabel und Endoskop sauber zu halten. Diese Flächen mit einem in Reinigungslösung getränkten Wattetupfer säubern und anschließend mit einem in 70%igem Isopropylalkohol getränkten Wattetupfer abwischen.
Connecting a light cable
Connect special light cable 495 DC or 495 DV to the DCI® camera head. To do this, push the longer end of the light cable connector into the DCI® camera head until it locks into place.
Only grip the light cable by the handle piece. Never pull on the cable.
To disconnect the light cable, pull the cable out from the DCI® camera head.
Note: The entrance and exit faces of the light cable and endoscope must be kept clean if optimal light transmission is to be maintained. Clean both faces with a cotton swab soaked in cleaning solution and then wipe with a cotton swab soaked in 70% isopropyl alcohol.
Conexión del cable de luz
Conecte el cable de luz especial 495 DC ó 495 DV al cabezal de la cámara DCI®. Para ello, introduzca el enchufe del cable de luz (extremo largo) en el cabezal de la cámara DCI® hasta que encastre.
Sujete el cable de luz únicamente en la pieza de agarre. Nunca tire del cable.
Para retirar el cable de luz: extraiga el cable de luz del cabezal de la cámara DCI®.
Nota: Para obtener un rendimiento máximo de la luz, mantenga limpias las superficies de entrada y salida de luz del cable de luz y del endoscopio. Limpie estas superficies con una torunda de algodón embebida en solución de limpieza y repase a continuación con una torunda de algodón embebida en alcohol isopropílico al 70 %.
Bildschärfe einstellen |
Adjusting image sharpness |
Ajuste de la nitidez de imagen |
Die Bildschärfe kann durch Drehen des Fokusrings w eingestellt werden.
Image sharpness can be adjusted by rotating the camera lens focusing ring w.
La nitidez de imagen puede ajustarse girando el anillo de enfoque w.
18

|
|
Aufstellen und |
Installation and |
Montaje e |
|
|
Bedienungshinweise |
operating instructions |
instrucciones operativas |
|
|
|
|
|
|
|
|
|
|
|
|
|
|
|
Funktionstasten am Kamerakopf verwenden
Am DCI® Kamerakopf befinden sich 2 Funktionstasten, die für die Steuerung verschiedener Funktionen programmiert werden können.
Die vollständige Beschreibung der Benutzung der Funktionstasten finden Sie auf Seite 21.
Using the camera head control buttons
On the DCI® camera head, there are two user control buttons which can be programmed for controlling various camera functions.
You will find more information in the section ‘Camera head operating instructions’ on page 21.
Uso de los botones de función en el cabezal de la cámara
En el cabezal de la cámara DCI® se encuentran 2 botones de función que pueden programarse para el mando de diversas funciones.
La descripción completa de la forma de utilización de estos botones de función se encuentra en la pág. 21.
Videomonitor einstellen
(mittels des internen Farbtestbildgenerators)
(Diese Einstellungen können nur durchgeführt werden, wenn der Monitor mit dem S-Video oder BNC-Ausgang der CCU verbunden ist).
1.Beim Einschalten der CCU ohne angeschlossenen Kamerakopf werden Farbbalken angezeigt. Die Farbbalken können bei entsprechender Programmierung dieser Funktion auch mit den Kamerakopftasten oder mit der Tastatur aktiviert werden. Weitere Informationen erhalten Sie im Abschnitt „Bedienungshinweise für den Kamerakopf“ auf Seite 21.
2.Helligkeitsund Kontrastregler so justieren, dass im oberen Bereich des Testbildes sieben vertikale Balken zu sehen sind, deren Helligkeit von links nach rechts abnimmt.
3.Farbregler des Monitors jetzt so weit aufdrehen, dass die Balken farbig erscheinen, ohne dass jedoch Bildrauschen zu sehen ist.
Adjusting the video monitor
(using the integral color test pattern generator)
(These adjustments can be performed only if the monitor is connected to the CCU’s S-video or BNC output).
1.Color bars appear when the CCU is turned on without a camera head connected. (Color bars can also be activated with camera head buttons if programmed to this function, or with the keyboard. For further information, see ‘Camera head operating instructions’ on page 21).
2.Adjust the video monitor’s brightness and contrast controls until seven vertical bars declining in brightness from left to right become visible across the upper portion of the test pattern.
3.Adjust the video monitor’s chrominance control until the bars appear in color, with no interference effects visible along their edges.
Ajuste del monitor de vídeo
(utilizando el generador interno de patrones de prueba en color)
(Estos ajustes sólo pueden llevarse a cabo si el monitor está conectado con la salida de vídeo S o BNC de la CCU).
1.Al conectar la CCU sin conectar el cabezal de la cámara se muestran bandas de color. Las bandas de color pueden también activarse utilizando los botones del cabezal o el teclado, si se ha programado esta función correspondientemente. Encontrará más información en el capítulo “Instrucciones de manejo del cabezal de la cámara”, en la pág. 21.
2.Ajuste los reguladores de brillo y contraste de tal forma que en la parte superior de la imagen de prueba se vean siete bandas verticales, cuyo brillo disminuye de izquierda a derecha.
3.Gire el regulador de color del monitor hasta que las bandas aparezcan en color, sin que al hacerlo se produzcan ruidos de imagen.
Hinweis: Einige Monitore bieten Setup-Optionen zur optimalen Einstellung des Videobildes. Dies umfasst automatische Abgleichung von Helligkeit, Kontrast, Farbstärke und Farbtoneigenschaften. Wenn Ihr Monitor derartige automatische Einstellfunktionen aufweist, verfahren Sie entsprechend der jeweiligen Gebrauchsanweisung.
Note: Some monitors have menus which offer setup options to optimize the video image. If selected, these set-up options automatically adjust the monitor’s brightness, contrast, chrominance, and hue features. If your monitor is configured with these automatic set-up options, adjust the settings according to the instructions provided in the monitor’s operating manual.
Nota: Algunos monitores ofrecen opciones de Setup para la optimización del ajuste de la imagen de vídeo. Dichas opciones abarcan la compensación automática del brillo, del contraste, de la intensidad del color y de las características de los matices. Si su monitor posee este tipo de funciones automáticas de ajuste, proceda de acuerdo con las indicaciones del Manual de instrucciones respectivo.
19

|
|
Aufstellen und |
Installation and |
Montaje e |
|
|
Bedienungshinweise |
operating instructions |
instrucciones operativas |
|
|
|
|
|
|
|
|
|
|
|
|
|
|
|
Weißabgleich
Der Weißabgleich passt die Farbsteuerung des Kamerasystems der verwendeten Lichtquelle an. Ausführung des Abgleichs:
1.Lichtquelle einschalten und mit dem Kamerakopf (mit montiertem Endoskop) auf eine weiße Oberfläche zeigen, so dass keine farbigen Gegenstände im Sichtfeld der Kamera zu sehen sind. Diese Ansicht muss mindestens 70% des Bildschirmbereichs einnehmen.
2.Die Weißabgleichs-Taste W an der Vorderseite der CCU drücken. Nach Aktivierung erscheint die Meldung „Weißabgleich“ auf dem Monitor.
3.Der Weißabgleich wurde erfolgreich ausgeführt, wenn die Meldung „Weißabgleich OK“ auf dem Monitor angezeigt wird. Wurde der Weißabgleich nicht korrekt ausgeführt, wird eine der folgenden Meldungen angezeigt:
„Weißabgleich Fehlgeschlagen – zu Dunkel“:
Weist darauf hin, dass das Sichtfeld zu dunkel ist. In diesem Fall den Abstand zwischen Endoskop und der weißen Oberfläche verringern und Weißabgleich erneut durchführen.
„Weißabgleich Fehlgeschlagen – zu Hell“:
Weist darauf hin, dass das Sichtfeld zu hell ist. In diesem Fall den Abstand zwischen Endoskop und der weißen Oberfläche vergrößern und den Weißabgleich erneut durchführen.
„Weißabgleich Fehlgeschlagen – Farbe“: Weist darauf hin, dass die Farbtemperatur außerhalb des Regelbereichs des Weißabgleichs liegt.
Hinweis: Die letzte Einstellung des Weißabgleichs bleibt gespeichert, auch wenn die Kamera ausgeschaltet wird.
Beim nächsten Gebrauch der Kamera sollte ein neuer Weißabgleich durchgeführt werden, um immer eine optimale Farbwiedergabe zu gewährleisten.
White Balance
The white balance determines the camera system's color controls based on the light source in use.
To perform this adjustment:
1.Turn on the light source and point the camera head (with attached endoscope) at a white surface, with no colored objects visible within the camera's field of view. The view should fill at least 70% of the area of the screen.
2.Press the white balance button W on the CCU front panel. Once activated, “White balancing” appears on the monitor.
3.The white balance has been successfully performed when “White balance O.K.” appears on the monitor. If white balancing has not been performed correctly, one of the following messages will appear:
“White balance fail – dark” Indicates that the field of view is too dark. Shorten the distance between the endoscope and the white surface. Activate white balance again.
“White balance fail – bright” Indicates that the field of view is too bright. Lengthen the distance between the endoscope and the white surface.
Activate white balance again.
“White balance fail – color” Indicates that the color temperature exceeds the white balance control range.
Note: The last white balance setting remains stored even after the camera has been switched off.
When the camera is next used, a new white balance should be performed in order to ensure optimal chrominance at all times.
Balance de blancos
El balance de blancos adapta el control de color del sistema de la cámara basándose en la fuente de luz utilizada.
Realización del balance de blancos:
1.Conecte la fuente de luz y dirija el cabezal de la cámara (con el endoscopio montado) sobre una superficie blanca, de modo que en el campo visual no se encuentre ningún objeto de color. Esta vista debe cubrir por lo menos el 70 % de la superficie de la pantalla.
2.Pulse la tecla para balance de blancos W en el lado anterior de la CCU. Tras la activación aparece el mensaje “Balance de blancos” en el monitor.
3.El balance de blancos se ha realizado correctamente cuando aparece el mensaje “Balance de blancos correcto” en el monitor. Si el balance de blancos no ha tenido éxito aparece uno de los mensajes siguientes:
“Fallo balance de blancos – oscuro”: Indica que el campo visual está demasiado oscuro. En este caso, la distancia entre el endoscopio y la superficie blanca ha de disminuirse y efectuar de nuevo el balance de blancos.
“Fallo balance de blancos – brillo”: Indica que el campo luminoso tiene demasiada luz. En este caso, aumentar la distancia entre el endoscopio y la superficie blanca y volver a efectuar el balance de blancos.
“Fallo balance de blancos – color”: Indica que la temperatura de color está fuera del margen regulable para el balance de blancos.
Nota: El último ajuste de balance de blancos permanece almacenado también al desconectar la cámara.
Al volver a utilizar la cámara deberá realizarse un nuevo balance de blancos a fin de garantizar siempre una óptima reproducción de color.
20
 Loading...