

Karl Storz VITOM TH 200, IMAGE1 PILOT TC 014 Instruction Manual

GEBRAUCHSANWEISUNG
TH 200 – VITOM® 3D-Exoskop
TC 014 – IMAGE1 PILOT
INSTRUCTION MANUAL
TH 200 – VITOM® 3D Exoscope
TC 014 – IMAGE1 PILOT
MANUAL DE INSTRUCCIONES
TH 200 – Exoscopio VITOM
®
3D
TC 014 – IMAGE1 PILOT


Wichtiger Hinweis für
die Benutzer von
KARL|STORZ Geräten
Important information
for users of
KARL|STORZ devices
Indicaciones importantes
para los usuarios de
equipos de KARL|STORZ
1 Wichtiger Hinweis für
die Benutzer von
KARL|STORZ Geräten
Es wird empfohlen, vor der Verwendung die
Eignung der Produkte für den geplanten
Eingriff zu überprüfen.
Vielen Dank für Ihr Vertrauen in den Namen
KARL|STORZ. Auch in diesem Produkt steckt
unsere ganze Erfahrung und Sorgfalt. Sie und
Ihr Haus haben sich damit für ein modernes und
hochwertiges Gerät der Firma KARL|STORZ
entschieden.
Die vorliegende Gebrauchsanweisung soll in
Verbindung mit der Gebrauchsanleitung der
IMAGE1|S helfen, das VITOM
anzuschließen und zu bedienen. Alle notwendigen
Einzelheiten und Handgriffe werden anschaulich
erklärt. Bitte lesen Sie deshalb diese Anleitungen
sorgfältig durch; bewahren Sie sie zum etwaigen
Nachlesen in der mitgelieferten Schutzhülle an gut
sichtbarer Stelle beim Gerät auf.
Individuelle Funktionen der mit dem VITOM
3D-Exoskop verwendbaren CCU sind der
Gebrauchsanweisung für die IMAGE1|S zu
entnehmen.
®
3D richtig
®
1 Important information
for users of
KARL|STORZ devices
It is recommended to check the suitability of
the products for the intended procedure prior
to use.
Thank you for your expression of confidence in
the KARL|STORZ brand name. Like all of our
other products, this product is the result of years
of experience and great care in manufacture. You
and your organization have decided in favor of
a modern, high-quality item of equipment from
KARL|STORZ.
This instruction manual is intended to aid you with
proper connection and operation of the VITOM
3D in conjunction with the instruction manual
for the IMAGE1|S. All the necessary details and
actions are clearly explained. We thus ask that you
read these manuals carefully before proceeding to
work with the equipment. Insert in the protective
wallet and keep available for ready reference in
a convenient and conspicuous location near the
equipment.
Please refer to the IMAGE1|S instruction manual
for the individual functions of the CCU that can be
used with the VITOM
®
3D exoscope.
®
1 Indicaciones importantes
para los usuarios de
equipos de KARL|STORZ
Antes de su utilización, se recomienda
comprobar la idoneidad de los productos en
cuanto a la intervención planeada.
Agradecemos la confianza que ha depositado
en la marca KARL|STORZ. Este producto,
como todos los demás, es el resultado de
nuestra amplia experiencia y esmero. Con esta
adquisición, tanto usted como su institución se
han decidido por un producto KARL|STORZ de
alta calidad y tecnología vanguardista.
Este Manual de instrucciones, junto con el Manual
de instrucciones del IMAGE1|S, contiene todas
las indicaciones necesarias para la instalación
y manipulación del VITOM
contiene todas las explicaciones necesarias sobre
las particularidades y los detalles de su manejo.
Recomendamos la lectura detenida de este
Manual y su colocación cerca del aparato, en un
lugar visible, debidamente protegido en la funda
de plástico que se adjunta.
Las funciones individuales de la unidad de control
de la cámara (CCU) utilizable con el exoscopio
®
VITOM
3D las encontrará en el Manual de
instrucciones de la IMAGE1|S.
®
3D. Con este fin,
Version 1.0 – 09/2016 96206591D
III
Geräteabbildungen
Images of the device
Imágenes del equipo
1
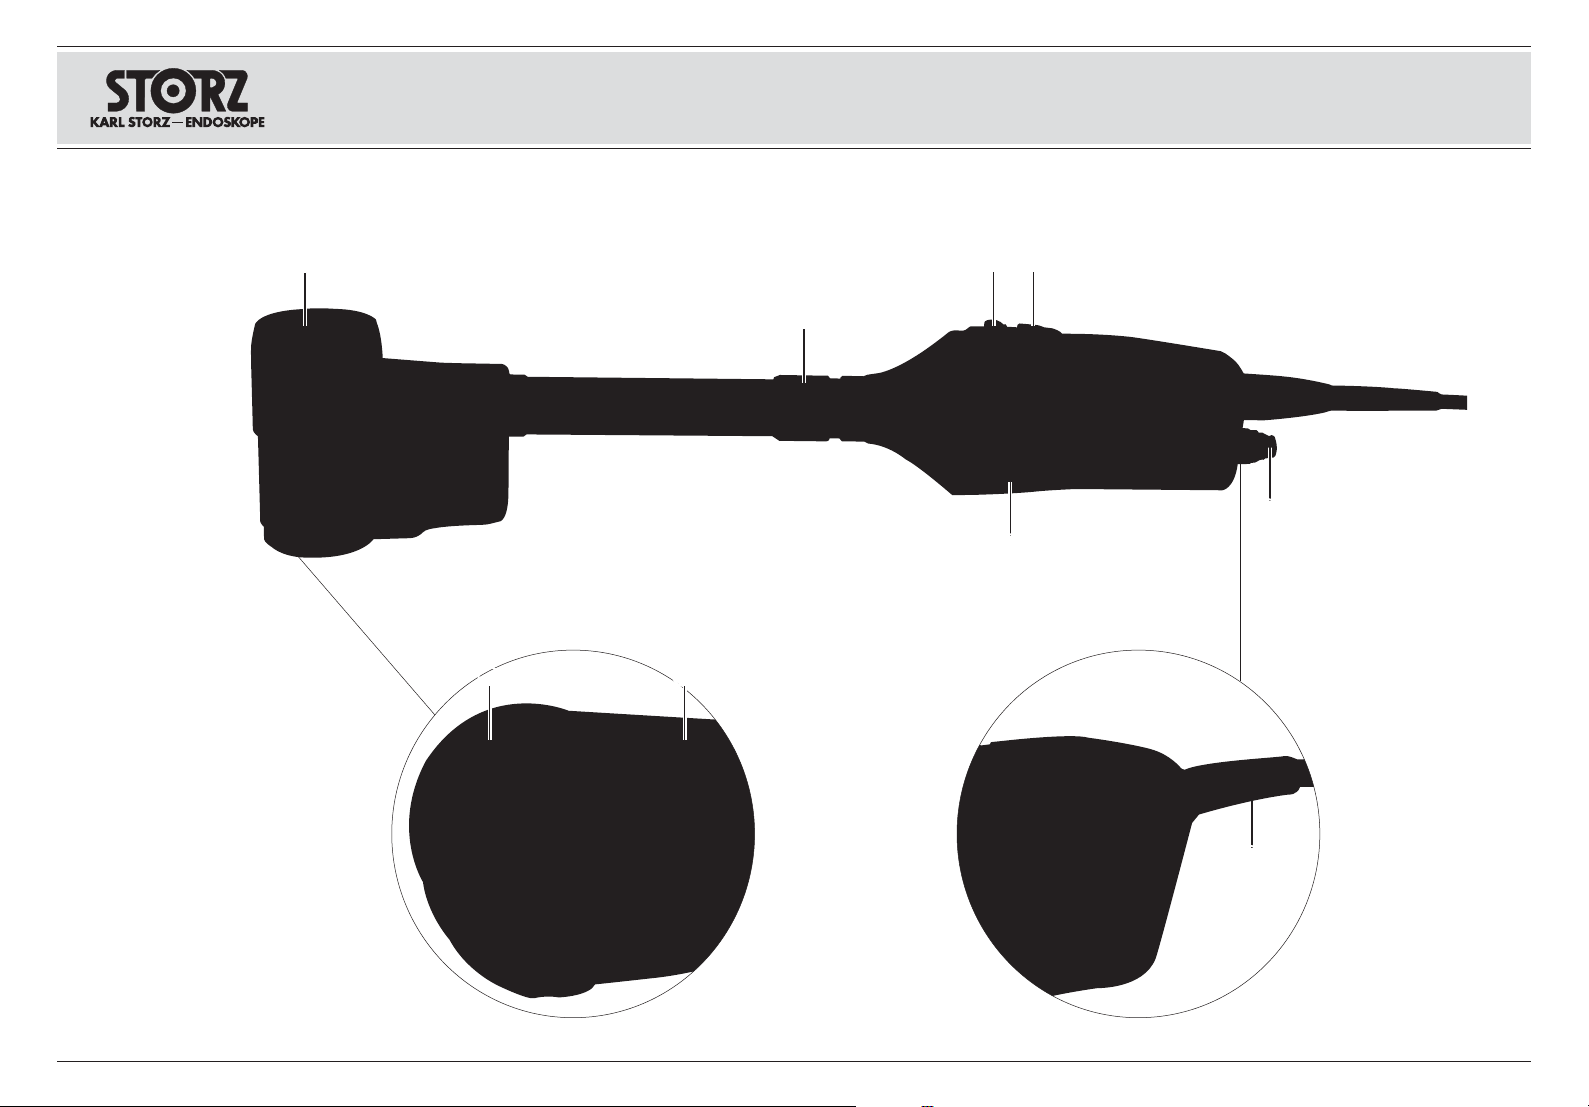
2 Geräteabbildungen
2. 1 VITOM® 3D-Exoskop
7 8
2 Images of the device
2. 1 VITOM® 3D exoscope
4
3
2
5
2 Imágenes del equipo
2. 1 Exoscopio VITOM® 3D
6
9
IV

Geräteabbildungen Images of the device
Imágenes del equipo
2. 1. 1 Bedienelemente, Anzeigen,
Anschlüsse und ihre Funktion
1 Drehknopf zur Einstellung der horizontalen
Bildausrichtung
2 Schaftverstärkung für Anschluss an
Haltesystem
3 Schaltwippe – im Menü nach oben/unten
blättern bzw. programmierte Funktionen
4 Benutzertaste: Menüaufruf, Auswahl bzw.
programmierte Funktionen
5 Handgriff
6 Anschluss für Lichtleitkabel
7 Stereo-Objektiv
8 Lichtaustritt – integrierte Beleuchtungseinheit
9 Video-Verbindungskabel
2. 1. 1 Controls, displays,
connectors and their uses
1 Rotary knob for horizontal image adjustment
2 Sheath support for connection to holding
system
3 Rocker switch – Scroll up/down in menu/
programmed functions
4 Control button: Open menu, selection/
programmed functions
5 Handle
6 Connection for fiberoptic light cable
7 Stereo lens
8 Light outlet – integrated illumination unit
9 Video connection cable
2. 1. 1 Elementos de control, indicadores,
conexiones y sus funciones
1 Botón giratorio para ajustar la orientación de la
imagen en el plano horizontal
2 Refuerzo de la vaina para conexión al sistema
de sujeción
3 Tecla basculante de conmutación – Hojear
hacia arriba / hacia abajo en el menú o
funciones programadas
4 Botón de usuario: acceso al menú, selección o
funciones programadas
5 Mango
6 Conexión para el cable de luz
7 Objetivo estereoscópico
8 Salida de luz – Unidad de iluminación integrada
9 Cable de conexión de vídeo
V
Geräteabbildungen
Images of the device
Imágenes del equipo
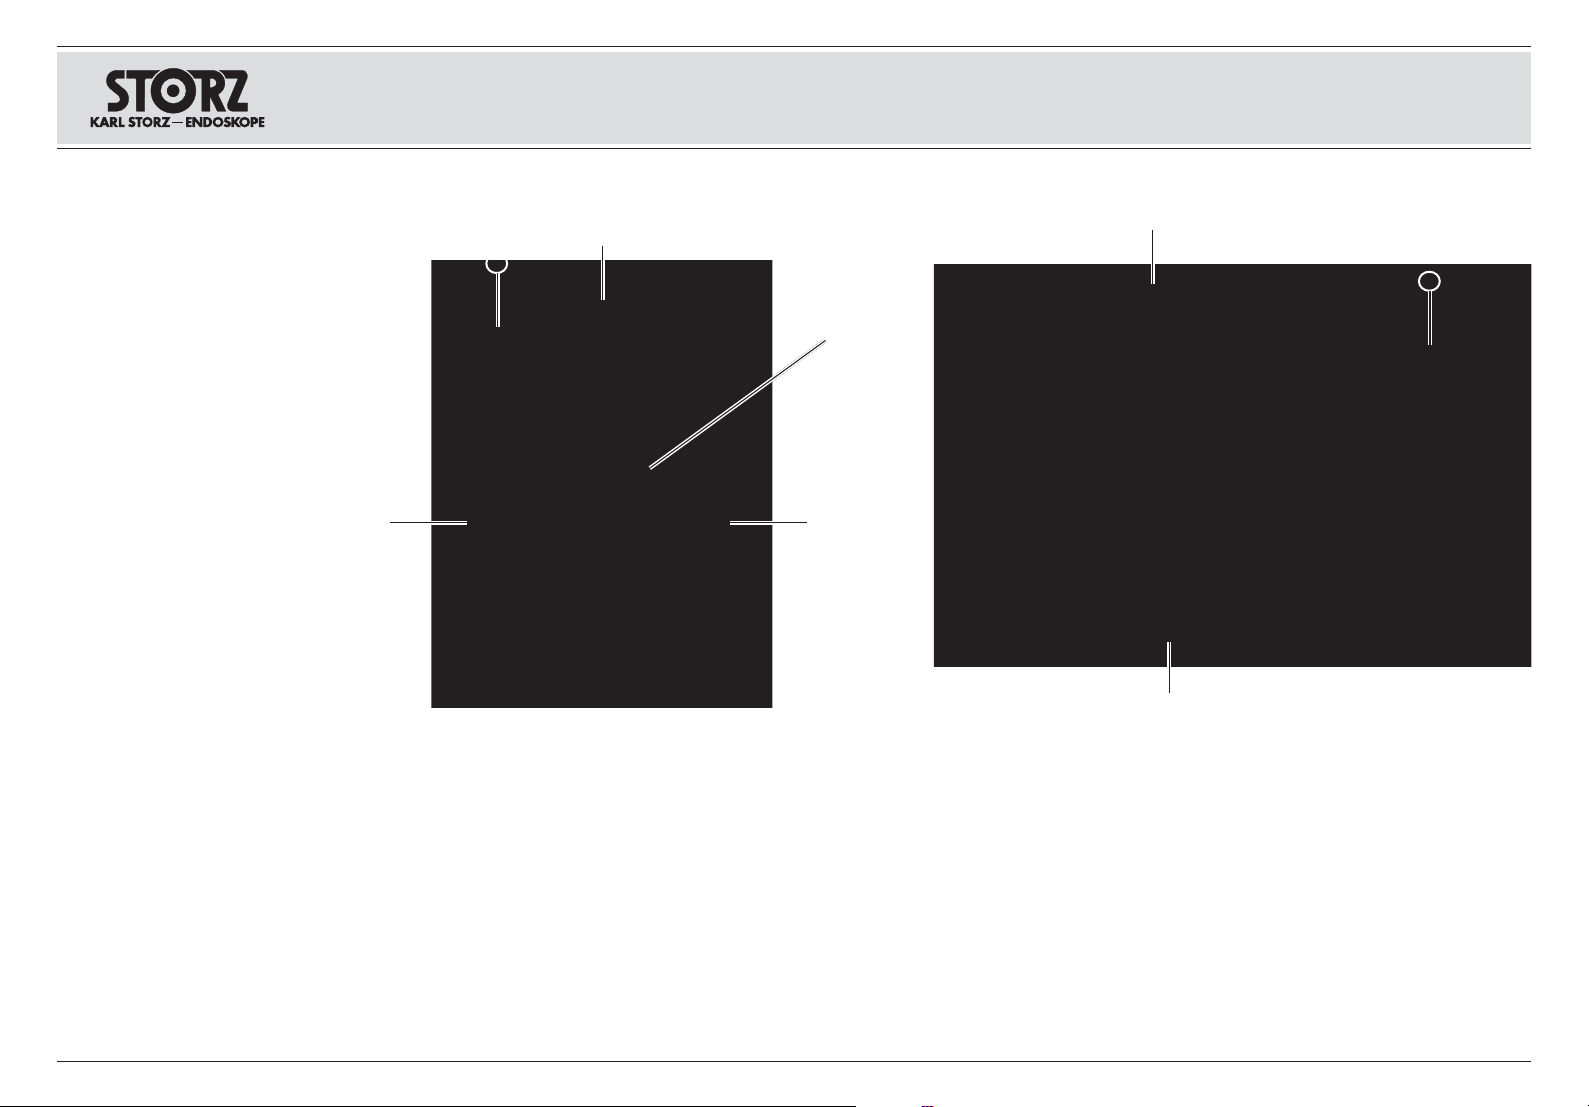
2. 2 IMAGE1 PILOT
2
1
2. 2. 1 Bedienelemente, Anzeigen,
Anschlüsse und ihre Funktion
1 Benutzertasten 1 – 4 für programmierte
Funktionen
2 LED zur Anzeige des Betriebsstatus
3 3D Wheel für Steuerung von Zoom, Fokus und
ROI sowie Navigation durch das Menü
4 Benutzertaste rechts: Abbruch, Rücksprung
aus einem Menü und Esc
5 Benutzertaste links: Aufruf des Kameramenüs,
Setup-Menüs und Auswahl
6 KSLOCK-Schnellkupplung (männlich) für
Anschluss an ein KARL|STORZ Haltesystem
2. 2 IMAGE1 PILOT
3
3
45
2. 2. 1 Controls, displays,
connectors and their uses
1 Control buttons 1 – 4 for programmed
functions
2 LED for operating status display
3 3D wheel for control of zoom, focus and ROI
as well as navigation through the menu
4 Right control button: Cancel, jump back from a
menu and Esc
5 Left control button: Open the camera menu,
Setup menu and selection
6 KSLOCK quick-release coupling (male) for
connection to a KARL|STORZ holding system
2. 2 IMAGE1 PILOT
1
6
2. 2. 1 Elementos de control, indicadores,
conexiones y sus funciones
1 Botones de usuario 1-4 para funciones
programadas
2 LED indicador del estado de servicio
3 Rueda 3D para el control del zoom, del
enfoque y del campo de interés, así como para
navegación por el menú
4 Botón derecho de usuario: cancelar, salir de un
menú y Esc
5 Botón izquierdo de usuario: acceso al menú de
la cámara, menú de configuración y selección
6 Acoplamiento rápido KSLOCK (macho)
para conexión a un sistema de sujeción
KARL|STORZ
VI
Symbolerläuterungen
Symbols employed
Explicación de los símbolos
3 Symbolerläuterungen
3. 1 Symbole auf dem Produkt
Gebrauchsanweisung
befolgen
Gerät Typ CF/
Defib. resistent
CE-Kennzeichnung
3. 2 Symbole auf dem Label und
der Verpackung
Gebrauchsanweisung
beachten
Artikelnummer
SN
Seriennummer
Anzahl der Produkte in der
Produktverpackung
Zerbrechlich, mit Sorgfalt
handhaben
3 Symbols employed
3. 1 Symbols on the product
Follow instructions for use
Type CF device/
Defib. resistant
CE mark
3. 2 Symbols on label and
packaging
Consult instructions for use
Catalogue number
SN
Serial number
Number of products in the
product packaging
Fragile, handle with care
3 Explicación de los símbolos
3. 1 Símbolos utilizados en el producto
Siga el manual de
instrucciones
Aparato tipo CF/
resistente a la desfibrilación
Símbolo|CE
3. 2 Símbolos utilizados en el
etiquetado y el embalaje
Consúltense las
instrucciones de uso
Número de catálogo
SN
Número de serie
Cantidad de productos en
el embalaje
Frágil; manipúlese con
cuidado
VII
10
14
Rx ONLY
60°C
(140°F)
Trocken aufbewahren
Temperaturbegrenzung
Nach US-amerikanischem
Bundes recht (21 CFR
801.109) darf dieses Produkt
nur an oder auf Verschreibung
durch einen Arzt („licensed
physician“) verkauft werden.
10
14
Rx ONLY
60°C
(140°F)
Keep dry
Temperature limit
Federal (USA) law restricts
this device to sale by or on
the order of a physician.
10
14
Rx ONLY
60°C
(140°F)
Manténgase seco
Límite de temperatura
De acuerdo a la ley federal
norteamericana (21|CFR
801.109) este producto solo
puede venderse a facultativos o ser recetado por ellos
(“médico con licencia”).

Inhalt
Contents Contenido del manual
1 Wichtiger Hinweis für
die Benutzer von
KARL STORZ Geräten .......................... III
2 Geräteabbildungen ................................ IV
2. 1 VITOM
®
3D-Exoskop .................................IV
2. 1. 1 Bedienelemente, Anzeigen,
Anschlüsse und ihre Funktion ................. V
2. 2 IMAGE1 PILOT ..........................................VI
2. 2. 1 Bedienelemente, Anzeigen,
Anschlüsse und ihre Funktion .................VI
3 Symbolerläuterungen ...........................VII
3. 1 Symbole auf dem Produkt ........................VII
3. 2 Symbole auf dem Label und der
Verpackung ..............................................VII
4 Allgemeines .............................................4
4. 1 Gerätebeschreibung ...................................4
5 Sicherheitshinweise ................................5
5. 1 Warn- und Vorsichtshinweise .....................5
5. 2 Anwendungsbereiche .................................9
5. 2. 1 Zweckbestimmung ..................................9
5. 2. 2 Indikation .................................................9
5. 2. 3 Kontraindikationen ...................................9
5. 3 Patientenprofil ...........................................9
5. 4 Benutzerprofil ............................................9
5. 5 Vorgesehene Einsatzbedingungen ............10
5. 5. 1 Gebrauch ..............................................10
5. 5. 2 Weitere vorgesehene Bedingungen ........10
5. 6 Sicherheitsmaßnahmen beim
Einsatz des Instrumentes .........................11
6 Aufstellen und
Bedienungshinweise .............................12
6. 1 Auspacken ...............................................12
6. 2 Komponenten des VITOM
®
3D-Systems .............................................12
6. 2. 1 Notwendige Grundausstattung ..............12
6. 2. 2 Optionales Zubehör ..............................12
6. 3 Kompatible Kamera-
Kontrolleinheiten (CCU) ............................13
6. 4 Vor jedem Gebrauch ................................13
1 Important information
for users of
KARL STORZ devices ........................... III
2 Images of the device ............................IV
2. 1 VITOM
®
3D exoscope ...............................IV
2. 1. 1 Controls, displays,
connectors and their uses ...................... V
2. 2 IMAGE1 PILOT ..........................................VI
2. 2. 1 Controls, displays,
connectors and their uses ......................VI
3 Symbols employed ............................... VII
3. 1 Symbols on the product ...........................VII
3. 2 Symbols on label and
packaging ................................................VII
4 General information ................................4
4. 1 Description of the device ............................4
5 Safety instructions ..................................5
5. 1 Warnings and cautions ...............................5
5. 2 Applications ...............................................9
5. 2. 1 Intended use ............................................9
5. 2. 2 Indication .................................................9
5. 2. 3 Contraindications .....................................9
5. 3 Patient profile .............................................9
5. 4 User profile .................................................9
5. 5 Intended conditions of use .......................10
5. 5. 1 Use ........................................................10
5. 5. 2 Other intended conditions ......................10
5. 6 Safety precautions when
operating the instrument ..........................11
6 Installation and
operating instructions ..........................12
6. 1 Unpacking the equipment ........................12
6. 2 Components of the VITOM
®
3D
system .....................................................12
6. 2. 1 Necessary basic equipment ...................12
6. 2. 2 Optional accessories .............................12
6. 3 Compatible camera control
units (CCU) ...............................................13
6. 4 Before each use .......................................13
1 Indicaciones importantes
para los usuarios de
equipos de KARL STORZ ..................... III
2 Imágenes del equipo ............................ IV
2. 1 Exoscopio VITOM
®
3D ..............................IV
2. 1. 1 Elementos de control, indicadores,
conexiones y sus funciones .................... V
2. 2 IMAGE1 PILOT ..........................................VI
2. 2. 1 Elementos de control, indicadores,
conexiones y sus funciones ....................VI
3 Explicación de los símbolos ...............VII
3. 1 Símbolos utilizados en el producto ...........VII
3. 2 Símbolos utilizados en el
etiquetado y el embalaje...........................VII
4 Generalidades ..........................................4
4. 1 Descripción del aparato .............................4
5 Instrucciones de seguridad ...................5
5. 1 Indicaciones de alarma y advertencia .........5
5. 2 Campos de aplicación ................................9
5. 2. 1 Uso previsto ............................................9
5. 2. 2 Indicaciones.............................................9
5. 2. 3 Contraindicaciones ..................................9
5. 3 Perfil del paciente .......................................9
5. 4 Perfil del usuario .........................................9
5. 5 Condiciones previstas de aplicación .........10
5. 5. 1 Empleo ..................................................10
5. 5. 2 Otras condiciones previstas ...................10
5. 6 Medidas de seguridad al
emplear el instrumento .............................11
6 Montaje e
instrucciones operativas ......................12
6. 1 Desembalaje ............................................12
6. 2 Componentes del sistema
®
VITOM
3D...............................................12
6. 2. 1 Equipamiento básico requerido .............12
6. 2. 2 Accesorios opcionales ...........................12
6. 3 Unidades de control de la
cámara compatibles (CCU) ......................13
6. 4 Antes de cada uso ...................................13
1

Inhalt
Contents Contenido del manual
6. 5 Allgemeine Hinweise zur Inbetriebnahme
des VITOM® 3D-Exoskops ......................14
6. 6 VITOM
®
3D-Exoskop an Haltearm
befestigen ................................................14
6. 7 Lichtkabel an VITOM
®
3D-Exoskop
anschließen ..............................................15
6. 8 VITOM
®
3D und Haltearm mit
Sterilüberzug überziehen .........................16
6. 9 IMAGE1 PILOT befestigen ........................17
6. 10 IMAGE1 PILOT mit
Sterilüberzug versehen ............................18
6. 11 VITOM
®
3D an Lichtquelle
anschließen ..............................................19
6. 12 VITOM
®
3D an D3-LINK™
anschließen ..............................................19
6. 13 CCU, Lichtquelle und
Monitor einschalten ..................................19
6. 14 Optimale Lichteffizienz ..............................19
6. 15 Demontage des VITOM
®
3D-Systems nach Gebrauch ...................20
7 Bedienung des VITOM
®
3D-Exoskop-Systems ...........................21
7. 1 Einstellen des Horizonts ..........................21
7. 2 Steuerung der optischen Funktionen des
®
VITOM
3D mit dem IMAGE1 PILOT ........21
7. 2. 1 Einstellen der Vergrößerung ...................22
7. 2. 2 Einstellen des Fokus .............................22
7. 2. 3 Wählbarer Bildausschnitt während
Vergrößerung (ROI) ...............................23
7. 3 Steuerung der IMAGE1 S mit
Hilfe des IMAGE1 PILOT .........................25
7. 4 Programmierbare Funktions tasten
am IMAGE1 PILOT ...................................27
7. 5 Funktion Advanced Exposure Levelling
(AEL) .......................................................27
7. 6 Erweiterte PIP-Swap-Funktion .................29
7. 7 Bedienung des VITOM
®
3D-Exoskops
ohne IMAGE1 PILOT ...............................30
8 Aufbereitung
nicht validiert für
US-amerikanische Kunden ..................32
8. 1 Allgemeine Pflegehinweise........................32
6. 5 General information on commissioning
of the VITOM
6. 6 Attaching the VITOM
®
3D exoscope ....................14
®
3D
exoscope to the holding arm ....................14
6. 7 Connecting the light cable to
the VITOM
6. 8 Fitting the VITOM
®
3D exoscope ........................15
®
3D and
holding arm with a sterile cover ................. 16
6. 9 Attaching the IMAGE1 PILOT ...................17
6. 10 Fitting the IMAGE1 PILOT
with a sterile cover ...................................18
6. 11 Connecting the VITOM
®
3D
to a light source .......................................19
6. 12 Connecting the VITOM
®
3D
to the D3-LINK™ .....................................19
6. 13 Switching on the CCU, light
source and monitor ..................................19
6. 14 Optimal light efficiency ..............................19
6. 15 Disassembly of the VITOM
®
3D
system after use .......................................20
7 Operation of the VITOM
®
3D
exoscope system ..................................21
7. 1 Setting the horizon ...................................21
7. 2 Controlling the optical functions of the
®
VITOM
3D via the IMAGE1 PILOT...........21
7. 2. 1 Adjusting the magnification ....................22
7. 2. 2 Adjusting the focus ................................22
7. 2. 3 Selectable region of interest during
magnification (ROI) .................................23
7. 3 Control of the IMAGE1 S using
the IMAGE1 PILOT ...................................25
7. 4 Programmable function buttons on
the IMAGE1 PILOT ...................................27
7. 5 Advanced Exposure Levelling
(AEL) function ...........................................27
7. 6 Extended PIP-Swap function ....................29
7. 7 Operation of the VITOM
®
3D exoscope
without IMAGE1 PILOT ............................30
8 Reprocessing
not validated for
US customers ........................................32
8. 1 General care instructions ..........................32
6. 5 Indicaciones generales sobre la puesta
en servicio del exoscopio VITOM® 3D ......14
6. 6 Fijación del exoscopio VITOM
®
3D al brazo de sujeción ............................14
6. 7 Conexión del cable de luz al
exoscopio VITOM
6. 8 Recubrimiento del VITOM
®
3D .............................15
®
3D y del
brazo de sujeción con la funda estéril ......16
6. 9 Fijación de la IMAGE1 PILOT ...................17
6. 10 Recubrimiento de la IMAGE1
PILOT con la funda estéril ........................18
6. 11 Conexión del VITOM
®
3D
a una fuente de luz ...................................19
6. 12 Conexión del VITOM
®
3D al
D3-LINK™ ...............................................19
6. 13 Conexión de la CCU, la fuente
de luz y el monitor ....................................19
6. 14 Optima eficiencia lumínica ........................19
6. 15 Desmontaje del sistema
7 Manejo del sistema de
®
VITOM
3D después del uso ...................20
exoscopio VITOM
®
3D...........................21
7. 1 Ajuste del plano horizontal .......................21
7. 2 Mando de las funciones ópticas
del VITOM
®
3D con la IMAGE1 PILOT ......21
7. 2. 1 Ajuste del zoom .....................................22
7. 2. 2 Ajuste del enfoque .................................22
7. 2. 3 Encuadre de imagen seleccionado
durante el zoom (campo de interés) .......23
7. 3 Control del IMAGE1 S con la
IMAGE1 PILOT .........................................25
7. 4 Teclas de función programables en la
IMAGE1 PILOT .........................................27
7. 5 Función Advanced Exposure
Levelling (AEL) ..........................................27
7. 6 Función “PIP-Swap” ampliada ..................29
7. 7 Manejo del exoscopio VITOM
®
3D sin la
IMAGE1 PILOT .........................................30
8 Preparación no
validada para clientes
de los EE.UU. .........................................32
8. 1 Indicaciones generales de conservación ..32
2

Inhalt
Contents Contenido del manual
8. 1. 1 Pflege und Handhabung ........................33
8. 2 Allgemeine Warnhinweise .........................35
8. 3 Manuelle Wischdesinfektion .....................36
8. 4 Montage, Prüfung und Pflege ...................37
8. 5 Begrenzung der Wiederaufbereitung ........37
9 Aufbereitung nur für
US-amerikanische Kunden ..................38
9. 1 Allgemeine Pflegehinweise........................38
9. 1. 1 Pflege und Handhabung ........................38
9. 2 Allgemeine Warnhinweise .........................41
9. 3 Manuelle Wischdesinfektion .....................42
9. 4 Prüfung nach der Reinigung .....................42
9. 5 Begrenzung der Wiederaufbereitung ........42
10 Instandhaltung .......................................43
10. 1 Wartung und
Sicherheitsüberprüfung ............................43
10. 1. 1 Wartung .................................................43
10. 1. 2 Sicherheitsüberprüfung ..........................43
10. 2 Instandsetzung .........................................44
10. 3 Entsorgung ..............................................44
10. 4 Reparaturprogramm .................................45
10. 5 Verantwortlichkeit .....................................46
10. 6 Garantie ................................................... 46
11 Technische Beschreibung ....................47
11. 1 Technische Daten VITOM
®
3D ..................47
11. 2 Technische Daten IMAGE1 PILOT ............48
11. 2. 1 Normenkonformität ................................49
11. 2. 2 Richtlinienkonformität
(für VITOM
®
3D) .....................................49
12 Hinweise zur elektromagnetischen
Verträglichkeit (EMV) ............................50
13 Niederlassungen....................................63
8. 1. 1 Care and handling .................................33
8. 2 General warnings .....................................35
8. 3 Manual wipe-down disinfection ................36
8. 4 Assembly, inspection and care .................37
8. 5 Reprocessing limits ..................................37
9 Reprocessing
for US customers only ..........................38
9. 1 General care instructions ..........................38
9. 1. 1 Care and handling .................................38
9. 2 General warnings .....................................41
9. 3 Manual wipe-down disinfection ................42
9. 4 Inspection after cleaning ...........................42
9. 5 Reprocessing limits ..................................42
10 Servicing ................................................43
10. 1 Maintenance and
safety check .............................................43
10. 1. 1 Maintenance ..........................................43
10. 1. 2 Safety check ..........................................43
10. 2 Servicing and repair ..................................44
10. 3 Disposal ...................................................44
10. 4 Repair program ........................................45
10. 5 Limitation of liability ..................................46
10. 6 Warranty ...................................................46
11 Technical description ............................47
11. 1 Technical data VITOM
®
3D .......................47
11. 2 IMAGE1 PILOT technical data ..................48
11. 2. 1 Standard compliance .............................49
11. 2. 2 Directive compliance
(for VITOM
®
3D) .....................................49
12 Information on electromagnetic
compatibility (EMC) ...............................50
13 Subsidiaries ...........................................63
8. 1. 1 Conservación y manipulación ................33
8. 2 Advertencias generales ............................35
8. 3 Desinfección manual por frotado ..............36
8. 4 Montaje, verificación y conservación ........37
8. 5 Limitación de la repreparación ..................37
9 Preparación solo
para clientes de los EE.UU. ..................38
9. 1 Indicaciones generales de conservación ..38
9. 1. 1 Conservación y manipulación ................38
9. 2 Advertencias generales ............................41
9. 3 Desinfección manual por frotado ..............42
9. 4 Comprobación después de la limpieza .....42
9. 5 Limitación de la repreparación ..................42
10 Mantenimiento .......................................43
10. 1 Mantenimiento y
verificación de seguridad ..........................43
10. 1. 1 Mantenimiento .......................................43
10. 1. 2 Verificación de seguridad .......................43
10. 2 Reparaciones ...........................................44
10. 3 Gestión de residuos .................................44
10. 4 Programa de reparaciones .......................45
10. 5 Responsabilidad .......................................46
10. 6 Garantía ................................................... 46
11 Descripciones técnicas ........................47
11. 1 Datos técnicos VITOM
®
3D ......................47
11. 2 Datos técnicos de la IMAGE1 PILOT ........48
11. 2. 1 Conformidad con las normas .................49
11. 2. 2 Conformidad con las directivas
(para VITOM
®
3D) ..................................49
12 Indicaciones sobre compatibilidad
electromagnética (CEM) .......................50
13 Sociedades distribuidoras....................63
3

Allgemeines
General information
Generalidades
4 Allgemeines
4. 1 Gerätebeschreibung
Das VITOM® 3D-Exoskop ist ein hochauflösendes
stereoskopisches Visualisierungssystem
mit integriertem Zoom, Fokussierung
und Bildaufrichtungsmechanik für die
Visualisierung mikrochirurgischer Eingriffe. Die
Anwendungsgebiete sind vergleichbar mit denen
eines Operationsmikroskops. Mit dem VITOM
3D-Exoskop wird der Situs vergrößert auf einem
3D-Bildschirm dargestellt.
Das VITOM
mit der IMAGE1|S kompatibel.
Für den Einsatz wird das VITOM
®
3D-Exoskop ist über den D3-LINK™
®
3D-Exoskop mit
Hilfe eines Haltearmes so positioniert, dass der
Anwender den Situs einsehen kann.
Die Bedienung des VITOM
®
3D-Exoskops erfolgt
über die mitgelieferte Bedieneinheit (IMAGE1
PILOT). Die Bedieneinheit wird mit einem zweiten
Haltearm so am Operationstisch befestigt, dass
der Anwender diese bequem erreichen und
bedienen kann.
®
4 General information
4. 1 Description of the device
The VITOM® 3D exoscope is a high-resolution
stereoscopic visualization system with integrated
zoom, focusing and image alignment mechanism
for visualization of microsurgical interventions. The
applications are comparable to those of a surgical
microscope. With the VITOM
displayed site is enlarged on a 3D screen.
The VITOM
IMAGE1|S via the D3-LINK™.
The VITOM
®
3D exoscope is compatible with the
®
3D exoscope is positioned for use
with the aid of a holding arm in such a way that
the user can visualize the site.
The VITOM
®
3D exoscope is controlled using the
control unit supplied (IMAGE1 PILOT). The control
unit is secured to the operating table using a
second holding arm in such a way that the user
can reach and operate it with ease.
®
3D exoscope, the
4 Generalidades
4. 1 Descripción del aparato
El exoscopio VITOM® 3D es un sistema de
visualización estereoscópico de alta resolución
con zoom, enfoque y giro mecánico de la imagen
integrados, el cual se utiliza para la visualización
de intervenciones microquirúrgicas. Los campos
de aplicación son los de un microscopio
quirúrgico. El exoscopio VITOM
acercar la representación del campo operatorio en
una pantalla 3D.
El exoscopio VITOM
IMAGE1|S a través del D3-LINK™.
El exoscopio VITOM
®
3D es compatible con el
®
3D se utiliza posicionado
con un brazo de sujeción, de modo que el usuario
pueda visualizar el campo operatorio.
El exoscopio VITOM
®
3D se maneja mediante
la unidad de mando incluida en el suministro
(IMAGE1 PILOT). La unidad de mando se
fija a la mesa del quirófano con un segundo
brazo de sujeción de modo tal, que el usuario
pueda acceder a dicha unidad y manejarla
cómodamente.
®
3D permite
4

Sicherheitshinweise
Safety instructions
Instrucciones de seguridad
5 Sicherheitshinweise
5. 1 Warn- und Vorsichtshinweise
Bitte lesen Sie diese Gebrauchsanweisung
sorgfältig durch und beachten Sie die
Anweisungen genau. Die Bezeichnungen
Warnung, Vorsicht und Hinweis haben
spezielle Bedeutungen. Wo immer sie in der
Gebrauchsanweisung verwendet werden, lesen
Sie den nachfolgenden Text genau, um einen
sicheren und effizienten Betrieb des Gerätes zu
gewährleisten.
WARNUNG: Warnung macht auf eine
Gefährdung des Patienten oder des Arztes
3
aufmerksam. Die Nichtbeachtung einer
Warnung kann Verletzungen des Patienten
oder des Arztes zur Folge haben.
VORSICHT: Vorsicht macht darauf
aufmerksam, dass bestimmte Wartungs-
2
oder Sicherheitsmaßnahmen zu treffen
sind, um eine Beschädigung des Gerätes
zu vermeiden.
HINWEIS: Hinweise enthalten zusätzliche
1
Informationen zur sicheren Bedienung des
Gerätes.
5 Safety instructions
5. 1 Warnings and cautions
Please read this manual carefully and follow
its instructions precisely. The words Warning,
Caution and Note convey special meanings.
Wherever they are used in the instruction manual,
please read the text that follows carefully, in
order to ensure safe and efficient operation of the
device.
WARNING: A Warning indicates that the
personal safety of the patient or physician
3
may be involved. Disregarding a Warning
could result in injury to the patient or
physician.
CAUTION: A Caution indicates that
particular service procedures or
2
precautions must be followed to avoid
possible damage to the device.
NOTE: Notes contain additional information
1
on the safe operation of the device.
5 Instrucciones de seguridad
5. 1 Indicaciones de alarma y
advertencia
Le rogamos leer este Manual de instrucciones
con la mayor atención y observar estrictamente
sus instrucciones. Los términos Cuidado,
Advertencia y Nota tienen significados
especiales. Cuando aparezcan en alguna parte de
este Manual de instrucciones, lea detenidamente
el texto subsiguiente para asegurar un servicio
seguro y eficiente del aparato.
CUIDADO: El término Cuidado llama la
atención sobre una situación de peligro
3
para el paciente o para el médico. La
inobservancia de este aviso podría
conllevar lesiones para el paciente o para
el médico.
ADVERTENCIA: El término Advertencia
llama la atención sobre determinadas
2
medidas de mantenimiento o de seguridad
que han de llevarse a cabo a ǫ n de evitar
el deterioro del aparato.
NOTA: Las notas contienen informaciones
1
adicionales para el manejo seguro del
aparato.
5

Sicherheitshinweise
Safety instructions
Instrucciones de seguridad
WARNUNG: Verletzungsgefahr
und Gefahr der Beschädigung von
3
Produkten: Das Nichtbeachten
dieser Gebrauchsanweisung und
aller Gebrauchsanweisungen der in
Kombination eingesetzten Produkte kann
zu Verletzungen von Patienten, Anwendern
und Dritten sowie zu Beschädigung am
Produkt führen. Lesen Sie alle relevanten
Gebrauchsanweisungen sorgfältig
durch und beachten Sie immer die
beschriebenen Anweisungen. Prüfen
Sie die Funktion der in Kombination
eingesetzten Produkte.
WARNUNG: Verletzungsgefahr:
Nicht korrekt zusammengebaute und
3
beschädigte Instrumente können zu
Verletzungen des Patienten führen.
Instrumente und damit in Verbindung
verwendetes Zubehör müssen unmittelbar
vor und nach jeder Anwendung auf
einwandfreien Zustand, Funktionsfähigkeit,
unbeabsichtigte raue Oberflächen, scharfe
Ecken, gratige Kanten, vorspringende
Teile und Vollständigkeit überprüft werden.
Fehlende oder abgebrochene Bauteile
dürfen nicht im Patienten zurückgelassen
werden.
WARNUNG: Verletzungsgefahr: Durch
falsche Anwendung medizinischer
3
Instrumente besteht Verletzungsgefahr für
Patienten. Die Anwender medizinischer
Instrumente müssen über eine
entsprechende medizinische Qualifikation
verfügen und mit der Anwendung vertraut
sein.
WARNUNG: Verletzungsgefahr
und Gefahr von Schäden an den
3
Produkten: Durch die Verwendung
von Anwendungsteilen außerhalb des
Sichtbereichs besteht die Gefahr der
unabsichtlichen Verletzung von Gewebe
und Beschädigung von Zubehör. Halten
Sie die Anwendungsteile der aktiven
Elektrode sowie Laser und andere Energie
übertragende Instrumente während
der Anwendung immer zielgerichtet im
Sichtbereich.
WARNING: Risk of injury and damage
to the products: Failure to observe and
3
follow this instruction manual and the
instruction manuals of products used in
combination can result in injury to patients,
users and third parties as well as damage
to the product. Please read all relevant
instruction manuals carefully and always
follow the instructions given precisely.
Check the functioning of the products
used in combination.
WARNING: Risk of injury: Incorrectly
assembled and damaged instruments can
3
lead to injuries to the patient. Instruments
and all of the accessories used in
combination with them must be checked
immediately before and after every use to
ensure that they are complete, free from
damage, and in full working order and
have no unintentional rough surfaces,
sharp corners, burred edges or projecting
parts. Care must be taken not to leave
missing or broken-off components inside
the patient.
WARNING: Risk of injury: Incorrect
application of medical instruments poses a
3
risk of injury for patients. Users of medical
instruments must have an appropriate
medical qualification and be acquainted
with the application.
WARNING: Risk of injury and risk of
damaging the products: If applied parts
3
are used outside of the field of vision there
is a risk that tissue and accessories could
be damaged unintentionally. Always hold
the applied parts of the active electrode,
laser and other instruments which transmit
energy pointed at the target in the field of
vision during use.
CUIDADO: Riesgo de lesiones y
riesgo de deterioro de los productos.
3
La inobservancia de este Manual de
instrucciones y de los Manuales de
instrucciones de los productos utilizados
en combinación puede provocar lesiones
en pacientes, usuarios y terceros, así
como deterioros en el producto. Lea
con atención todos los Manuales de
instrucciones relevantes y observe en
todo momento las instrucciones descritas.
Compruebe el buen funcionamiento de los
productos utilizados en combinación.
CUIDADO: Riesgo de lesiones. Los
instrumentos incorrectamente montados o
3
deteriorados pueden provocar lesiones al
paciente. Inmediatamente antes y después
de cada aplicación, compruebe el perfecto
estado, la capacidad de funcionamiento
y la integridad de los instrumentos y de
los accesorios utilizados en combinación
con estos, y asegúrese de que no
presenten superǫ cies rugosas, aristas
aǫ ladas, cantos con rebabas o piezas
sobresalientes. Ninguna pieza constructiva
puede quedar dentro del paciente.
CUIDADO: Riesgo de lesiones. Una
aplicación incorrecta de los instrumentos
3
médicos puede representar un riesgo de
lesiones para los pacientes. Los usuarios
de instrumentos médicos deben disponer
de la correspondiente cualiǫ cación médica
y estar familiarizados con su aplicación.
CUIDADO: Riesgo de lesiones y riesgo
de deterioros en los productos. La
3
utilización de piezas de aplicación fuera
del campo visual puede conllevar lesiones
involuntarias en tejidos y el deterioro de
los accesorios. Durante su utilización,
mantenga siempre correctamente
orientadas y dentro del campo visual las
piezas de aplicación del electrodo activo,
así como el láser y otros instrumentos
conductores de energía.
6

Sicherheitshinweise
Safety instructions
Instrucciones de seguridad
WARNUNG: Verletzungsgefahr und
Gefahr von Schäden an den Produkten:
3
Durch die hohe Lichtenergie können sich
das distale Ende, der Lichtanschluss,
angrenzende Bauteile und Gewebe vor
dem Lichtaustrittsfenster erhitzen. Dadurch
kann es zu Verbrennungen am Patienten,
am Anwender und am OP-Zubehör
kommen.
• Vermeiden Sie direkten Gewebekontakt
mit dem distalen Ende sowie dem
Lichtanschluss der Optik und des
Lichtkabels.
• Legen Sie das Exoskop und den Lichtleiter nicht auf dem Patienten oder mit
direktem Kontakt zu OP-Zubehör ab.
• Wählen Sie die Lichtleistung der
Kaltlichtquelle stets so gering wie
möglich, um gerade noch eine optimale
Ausleuchtung des OP-Feldes zu
erreichen.
WARNUNG: Verletzungsgefahr:
Durch optische Strahlung besteht
3
Verletzungsgefahr für die Augen.
Schauen Sie nie in das freie Ende
eines angeschlossenen Lichtleiters
oder Exoskops. Tragen Sie bei
Laseranwendungen immer normgerechte
Schutzausrüstung.
WARNUNG: Verletzungsgefahr:
Eine Überlastung durch zu starke
3
Krafteinwirkung kann zu Brüchen,
Verbiegen und Funktionsstörungen des
Medizinproduktes und zu Verletzungen
des Patienten oder Anwenders führen.
Instrumente nicht überlasten. Verbogene
Instrumente nicht in die Ausgangsposition
zurückbiegen.
WARNING: Risk of injury and risk of
damaging the products: The highly
3
concentrated light energy can cause
the distal end, the light port, adjacent
components and tissue in front of the
light emission window to heat up. This
can cause burns to the patient, user and
operating accessories.
• Avoid direct tissue contact with the
distal end, as well as with the light port
of the telescope and the light cable.
• Never allow the exoscope and the
fiberoptic light cable to rest on the
patient or come in direct contact with
surgical accessories.
• Always select the lowest possible light
output of the cold light source which
still allows optimal illumination of the
operating field.
WARNING: Risk of injury: Optical radiation
poses a risk of injury to eyes. Never look
3
into the free end of either a connected
fiberoptic light cable or an exoscope.
Always wear standardized protective
equipment when using lasers.
WARNING: Risk of injury: Overloading the
instrument by exerting too much force may
3
cause the medical device to break, bend,
and malfunction, and consequently injure
the patient or user. Do not overload the
instruments. Do not bend bent instruments
back to their original position.
CUIDADO: Riesgo de lesiones y riesgo de
deterioros en los productos. Debido a la
3
elevada energía lumínica, el extremo distal,
la conexión de luz, las piezas constructivas
limítrofes o los tejidos situados delante
de la mirilla de salida de luz pueden
calentarse. Esto puede provocar
quemaduras en el paciente, el usuario y
los accesorios quirúrgicos.
• Evite el contacto directo del tejido
con el extremo distal, así como con
la conexión de luz del telescopio y del
cable de luz.
• No coloque el exoscopio o el cable
de luz sobre el paciente o en contacto
directo con los accesorios quirúrgicos.
• Seleccione siempre en la fuente de
luz fría la mínima potencia lumínica
de aplicación posible para alcanzar
una óptima iluminación del campo
operatorio.
CUIDADO: Riesgo de lesiones. Existe
riesgo de lesiones oculares debido a
3
radiación óptica. No mire nunca hacia el
extremo libre de un cable de luz o de un
exoscopio mientras están conectados.
Durante una aplicación de láser utilice
siempre un equipamiento protector
conforme a las normas.
CUIDADO: Riesgo de lesiones. Una
sobrecarga debida a una aplicación con
3
excesiva fuerza puede conllevar roturas,
deformaciones y fallos de funcionamiento
del producto médico y provocar, con ello,
lesiones en el paciente o el usuario. No
sobrecargue los instrumentos. No intente
forzar los instrumentos deformados a su
posición inicial.
7

Sicherheitshinweise
Safety instructions
Instrucciones de seguridad
WARNUNG: Verletzungsgefahr:
Patientenableitströme können sich
3
addieren, wenn mit Energie versorgte
Endotherapiegeräte gleichzeitig benutzt
werden. Dies ist dann besonders
wichtig, wenn ein Endoskop mit
einem Anwendungsteil des Typs
CF benutzt wird. In diesem Fall
muss auch ein Endotherapiegerät
mit einem Anwendungsteil des
Typs CF benutzt werden, um den
Gesamtpatientenableitstrom zu
minimieren.
WARNUNG: Das Video-System kann
während des Einsatzes funktionsuntüchtig
3
werden. Ein adäquates Ersatzsystem ist
bereitzustellen.
WARNUNG: Gefahr eines Stromschlages:
Gerät nicht öffnen! Lassen Sie
3
Servicearbeiten nur durch autorisiertes
Personal durchführen. Das Entfernen von
Abdeckungen durch nicht autorisiertes
Personal führt zum Erlöschen der Garantie.
WARNUNG: Lebensgefahr: Bei
Patienten mit Herzschrittmachern ist
3
darauf zu achten, dass das proximale
(= patientenferne) Ende der Optik nicht
näher als 2 cm an dem Herzschrittmacher
positioniert wird. Das Gerät erzeugt am
Einstellring ein magnetisches Feld, welches
zu Störungen bei Herzschrittmachern oder
anderen elektrischen Geräten führen kann.
WARNUNG: Überprüfen Sie vor der
Verwendung das Verfallsdatum sowie
3
die Verpackung auf Beschädigungen.
Produkte mit abgelaufenem Verfallsdatum
bzw. beschädigte Verpackungen dürfen
nicht verwendet werden.
VORSICHT: Schützen Sie das Gerät vor
Spritzwasser und anderen Flüssigkeiten.
2
VORSICHT: Keine Flüssigkeit auf oder
über dem Gerät abstellen.
2
WARNING: Risk of injury: Patient leakage
currents may add if powered endotherapy
3
devices are used simultaneously. This is
particularly important if an endoscope with
a Type CF applied part is used. In that
case, an endotherapy device with a Type
CF applied part must be used to minimize
the total patient leakage current.
WARNING: The video system may
stop working during use. An adequate
3
replacement system must be kept
available.
WARNING: Risk of electric shock: Do not
open the device! Have servicing carried
3
out by authorized personnel only. The
removal of covers by unauthorized staff
voids the warranty.
WARNING: Risk of fatal injury: In the
case of patients with cardiac pacemakers
3
it must be ensured that the proximal
end (=|furthest from the patient) of the
telescope is not positioned less than 2 cm
from the pacemaker. The device generates
a magnetic field at the setting ring which
can cause cardiac pacemakers or other
electrical devices to malfunction.
WARNING: Before use, check the
expiration date and ensure that the
3
packaging is undamaged. If the expiration
date has passed or the packaging is
damaged, the product must not be used.
CAUTION: Protect the device from water
splashes and other liquids.
2
CAUTION: Do not store liquids on or
above the device.
2
CUIDADO: Riesgo de lesiones. Las
corrientes de fuga del paciente pueden
3
acumularse si se utilizan simultáneamente
aparatos de endoterapia activados por
energía. Esto es especialmente importante
cuando se utiliza un endoscopio con
una pieza de aplicación del tipo|CF. En
este caso, ha de emplearse también un
aparato de endoterapia con una pieza
de aplicación del tipo CF, con el ǫ n de
minimizar la corriente total de fuga del
paciente.
CUIDADO: El sistema de vídeo puede
quedar inoperativo durante la aplicación.
3
Hay que tener disponible un sistema de
repuesto adecuado.
CUIDADO: Riesgo de descarga eléctrica.
No abra el aparato. Los trabajos de
3
mantenimiento y reparación deben
encargarse únicamente al personal
autorizado. Si una persona no autorizada
retira cubiertas, esto comporta la extinción
de los derechos de garantía.
CUIDADO: Peligro de muerte. En el
caso de pacientes con marcapasos debe
3
prestarse atención a que el extremo
proximal (= alejado del paciente) del
telescopio no quede posicionado a
menos de 2|cm del marcapasos. El
aparato genera en el anillo de ajuste un
campo magnético que puede provocar
interferencias en marcapasos u otros
aparatos eléctricos.
CUIDADO: Antes de su utilización,
compruebe la fecha de caducidad y
3
veriǫ que que el envase no presente
deterioros. No se deben utilizar productos
con fecha de caducidad vencida o
embalajes deteriorados.
ADVERTENCIA: Proteja el aparato contra
salpicaduras de agua u otros líquidos.
2
ADVERTENCIA: No deposite líquidos
sobre el aparato o por encima del mismo.
2
8
Sicherheitshinweise
Safety instructions
Instrucciones de seguridad
5. 2 Anwendungsbereiche
5. 2. 1 Zweckbestimmung
Das VITOM® 3D dient zur kurzzeitigen, nichtinvasiven Darstellung des Operationsfeldes
während mikrochirurgischer, offener und
endoskopischer Eingriffe.
5. 2. 2 Indikation
Extrakorporale Darstellung des Operationsfeldes
während mikrochirurgischer, offener und
endoskopischer Eingriffe.
5. 2. 3 Kontraindikationen
Die Verwendung des VITOM® 3D-Exoskops ist
kontraindiziert, wenn nach Einschätzung des
behandelnden Arztes, das VITOM® 3D-System
nicht für die Darstellung des Operationsfeldes
geeignet ist oder der Allgemeinzustand des
Patienten die Verwendung des VITOM
3D-Systems nicht zulässt.
Da KARL|STORZ Lichtquellen nicht für die
Anwendung in der Ophthalmologie geeignet sind,
ist auch die Verwendung des VITOM
in diesem Fachgebiet kontraindiziert.
®
®
3D-Systems
5. 3 Patientenprofil
Die Anwendung des VITOM® 3D ist nicht auf
ein gewisses Patientenprofil (Geschlecht, Alter,
Gewicht etc.) beschränkt. Der Gesundheitszustand
für die jeweilige Anwendung ist vom behandelnden
Arzt zu beurteilen und für geeignet zu erklären.
5. 4 Benutzerprofil
• Ausreichende und anerkannte Kenntnisse in der
jeweiligen Anwendung
• Ausreichende Auffassungsgabe zur rationalen
Beurteilung der aktuellen Operationssituation
• Ausreichende Sprachkenntnisse in mindestens
einer vom Gerät und der Gebrauchsanweisung
verwendeten Sprache
• Absolvierung einer umfassenden Einweisung in
die Bedienung und Anwendung des Geräts
• Kenntnis über den Inhalt der
Gebrauchsanweisung
• Mindestens eine umfassende Einweisung in die
Bedienung des Gerätes
5. 2 Applications
5. 2. 1 Intended use
The VITOM® 3D is used for the short-term, noninvasive visualization of the operating field during
microsurgical, open and endoscopic interventions.
5. 2. 2 Indication
Extracorporeal visualization of the operating
field during microsurgical, open and endoscopic
interventions.
5. 2. 3 Contraindications
Use of the VITOM® 3D exoscope is
contraindicated, if, in the opinion of the attending
physician, the VITOM® 3D system is not suitable
for visualization of the operating field, or the
general condition of the patient does not permit
the use of the VITOM
As KARL|STORZ light sources are not intended for
use in ophthalmology, the use of the VITOM
system is also contraindicated in this field.
®
3D system.
®
3D
5. 3 Patient profile
The use of the VITOM® 3D is not limited to a
certain patient profile (sex, age, weight etc.). The
attending physician must assess a patient’s health
for the relevant application and declare it suitable.
5. 4 User profile
• Adequate and recognized skills in the relevant
application
• Adequate powers of comprehension to
rationally assess the surgical situation in hand
• Adequate language skills in at least one of
the languages used on the device and in the
instruction manual
• Be thoroughly trained in the operation and use
of the device
• Knowledge of the contents of the instruction
manual
• Have been trained thoroughly at least once in
the use of the device
5. 2 Campos de aplicación
5. 2. 1 Uso previsto
El VITOM® 3D sirve para proporcionar
una visualización breve, no invasiva, del
campo quirúrgico durante intervenciones
microquirúrgicas, abiertas y endoscópicas.
5. 2. 2 Indicaciones
Visualización extracorporal del campo quirúrgico
durante intervenciones microquirúrgicas, abiertas y
endoscópicas.
5. 2. 3 Contraindicaciones
La utilización del exoscopio VITOM® 3D está
contraindicada cuando, según la evaluación
del médico tratante, el sistema VITOM® 3D no
sea adecuado para la visualización del campo
operatorio o el estado general del paciente no
permita la utilización del sistema VITOM
Debido a que las fuentes de luz de KARL|STORZ
no son adecuadas para su utilización en
oftalmología, también la utilización del sistema
®
VITOM
3D está contraindicada en esta
especialidad.
®
3D.
5. 3 Perfil del paciente
La aplicación del VITOM® 3D no está limitada a
pacientes que presenten un perfil determinado
(sexo, edad, peso, etc.). Es responsabilidad
del médico encargado del tratamiento evaluar
el estado de salud y la adecuación de cada
aplicación.
5. 4 Perfil del usuario
• Suficientes conocimientos convalidados de la
aplicación correspondiente
• Facultad de comprensión suficiente para una
evaluación racional de la situación quirúrgica
actual
• Conocimiento suficiente de al menos uno de los
idiomas utilizados en el aparato y en el Manual
de instrucciones
• Conclusión de una exhaustiva instrucción en el
manejo y la aplicación del aparato
• Conocimiento del contenido del Manual de
instrucciones
• Como mínimo, una instrucción exhaustiva en el
manejo del aparato
9

Sicherheitshinweise
Safety instructions
Instrucciones de seguridad
• Keine körperlichen Behinderungen, die
die Wahrnehmung von Aktivierungs- und
Alarmsignalen (optisch und akustisch)
beeinträchtigen und nicht durch Hilfsmittel
ausgeglichen werden können.
5. 5 Vorgesehene
Einsatzbedingungen
5. 5. 1 Gebrauch
Das Gerät ist für den Einsatz in Krankenhäusern
und Arztpraxen vorgesehen. Die technischen
Daten und Umgebungsbedingungen sind in der
Gebrauchsanweisung beschrieben.
Der Anwender hat sich vor der Anwendung
des Gerätes von der Funktionssicherheit und
dem ordnungsgemäßen Zustand des Gerätes
zu überzeugen. Während der Behandlung mit
dem VITOM
der üblichen medizinischen Sorgfalt behandelt
und beobachtet werden. Dies schließt die
Verlaufskontrolle des Behandlungsvorgangs, die
Überwachung der Vitalwerte und der Narkose mit
ein.
5. 5. 2 Weitere vorgesehene
Verwendungshäufigkeit:
Gebrauchsdauer:
Aufstellungsort: Positionierung an einem
Beweglichkeit: kann in Kombination mit
Kombination: kann mit anderen für die
Steuerung: kann über den IMAGE1 PILOT
®
3D-Exoskop muss der Patient mit
HINWEIS: Jeder Behandlungsvorgang
1
darf nur durchgeführt werden, wenn die
visuelle Beobachtung der Gerätewirkung
sichergestellt ist.
Bedingungen
Ein- bis mehrmals täglich
von mehreren Minuten bis zu
mehreren Stunden täglich
geeigneten Haltesystem
einem Haltearm positioniert
und bewegt werden
Operation notwendigen
Geräten gleichzeitig am
Patienten eingesetzt werden
gesteuert werden
• No physical impairments that could diminish
perception of activation and alarm signals (visual
and acoustic) and that cannot be compensated
using auxiliary means.
5. 5 Intended conditions of use
5. 5. 1 Use
The device is intended for use in hospitals and
doctors' offices. The technical data and ambient
conditions are described in the instruction manual.
It is the user’s responsibility to make sure the
device is safe and operating properly before using
the device. During treatment with the VITOM
exoscope the patient must be treated and kept
under observation with the usual medical care.
This includes keeping a check on the progress of
treatment, as well as monitoring the vital signs and
the anesthetic.
NOTE: Any treatment may only be
1
performed if visual observation of the action
of the device is ensured.
5. 5. 2 Other intended conditions
Frequency of
use:
Length of use: from a few minutes to several
Place of
installation:
Mobility: can be positioned and moved
Combination: can be used on the patient
Control: can be controlled via the
one or more times a day
hours a day
Positioning on a suitable
holding system
in combination with a holding
arm
at the same time as other
equipment required for the
operation
IMAGE1 PILOT
®
3D
• Carencia de impedimentos corporales que
puedan menoscabar la percepción de las
señales de activación y alarma (visuales y
acústicas), y que no puedan ser compensadas
por medios auxiliares.
5. 5 Condiciones previstas de
aplicación
5. 5. 1 Empleo
El aparato está previsto para su aplicación en
hospitales y consultorios médicos. Los datos
técnicos y las condiciones ambientales están
descritos en el Manual de instrucciones.
El usuario ha de cerciorarse de la seguridad
de funcionamiento y el buen estado del equipo
antes de cada aplicación del aparato. Durante
el tratamiento con el exoscopio VITOM
paciente debe ser tratado y observado con los
cuidados médicos habituales. Esto incluye los
controles de desarrollo del tratamiento, así como
la vigilancia de los valores vitales y anestésicos.
NOTA: Cada procedimiento de tratamiento
1
solo podrá ser llevado a cabo si está
asegurado el control visual de los efectos del
aparato.
5. 5. 2 Otras condiciones previstas
Frecuencia de
uso:
Duración de la
aplicación:
Lugar de
emplazamiento:
Movilidad: Puede posicionarse y
Combinación: Puede utilizarse en el paciente
Control: Puede controlarse mediante la
De una a varias veces al día
Desde varios minutos hasta
varias horas al día
Posicionamiento en un
sistema de sujeción adecuado
desplazarse en combinación
con un brazo de sujeción
simultáneamente con otros
aparatos necesarios para la
intervención quirúrgica
IMAGE1 PILOT
®
3D, el
10

Sicherheitshinweise Safety instructions
Instrucciones de seguridad
5. 6 Sicherheitsmaßnahmen beim
Einsatz des Instrumentes
Vor der Anwendung des Instrumentes hat sich der
Anwender von der Funktionssicherheit und dem
ordnungsgemäßen Zustand des Instrumentes zu
überzeugen.
Während einer Behandlung in Verbindung mit dem
®
VITOM
3D-Exoskop muss der Patient mit der
üblichen medizinischen Sorgfalt behandelt und
beobachtet werden. Dazu gehört insbesondere die
Sorge um sterile Applikationsbedingungen, sofern
die Art des Eingriffs dies erfordert.
5. 6 Safety precautions when
operating the instrument
It is the user’s responsibility to make sure the
instrument is safe and operates properly before
using it.
During treatment in conjunction with the VITOM
3D exoscope, the patient must be treated and
kept under observation using the usual medical
care. This includes monitoring sterile application
conditions where required by the type of
intervention.
5. 6 Medidas de seguridad al
emplear el instrumento
El usuario ha de cerciorarse de la seguridad de
funcionamiento y del buen estado del instrumento
antes de cada aplicación.
®
Durante un tratamiento con el exoscopio VITOM
3D, el paciente debe ser tratado y observado con
los cuidados médicos habituales. Esto incluye, en
particular, el control de las condiciones estériles
de aplicación, en tanto el tipo de intervención así
lo requiera.
®
11

Aufstellen und
Bedienungshinweise
Installation and
operating instructions
Montaje e
instrucciones operativas
6 Aufstellen und
Bedienungshinweise
6. 1 Auspacken
Entnehmen Sie das VITOM® 3D-Exoskop
vorsichtig aus der Verpackung. Überprüfen Sie die
Lieferung auf Vollständigkeit und auf eventuelle
Beschädigungen.
Sollte die Lieferung Anlass zur Reklamation geben,
so wenden Sie sich bitte umgehend an den
Hersteller oder Lieferanten.
Wenn möglich, bewahren Sie die Original verpackung auf, sie kann bei einem Transport des
Gerätes nützlich sein.
6. 2 Komponenten des VITOM®
3D-Systems
6. 2. 1 Notwendige Grundausstattung
Kamerasystem und Monitor:
1 IMAGE1|S CONNECT Modul (TC 200 DE)
1 IMAGE1|S D3-LINK™ Modul (TC 302)
1 32" 3D-Monitor (TM 323)
1 3D-Polarisationsbrille (9800 GF)
®
VITOM
3D-Exoskop:
1 VITOM
1 IMAGE1 PILOT (TC 014)
1 Steriler Überzug für VITOM
1 Steriler Überzug für IMAGE1 PILOT
Empfohlene Lichtquelle:
1 Power LED 300 (TL 300)
1 Lichtkabel mit 4,8|mm Durchmesser
Haltearme:
1 geeignetes KARL|STORZ Haltesystem für
1 VITOM
1 geeignetes KARL|STORZ Haltesystem für den
6. 2. 2 Optionales Zubehör
1 VITOM® 3D-Illuminator (TH 002)
®
3D-Exoskop (TH 200)
®
(TH 001)
(041150-20)
(z. B. 495 TIP oder 495 VIT)
®
VITOM
3D-Exoskop (z. B. 28272 HS mit
28272 HP)
®
3D-Klemmbacke mit Kugelgelenk für
KARL|STORZ Haltesysteme (28272 VTK)
IMAGE1 PILOT (z. B. 28272 HA mit 28172 HR)
3D-Exoskop
6 Installation and
operating instructions
6. 1 Unpacking the equipment
Carefully remove the VITOM® 3D exoscope from
its packaging. Check for missing items and
evidence of damage during shipment.
Please file any complaints with the manufacturer
or supplier immediately.
If possible, retain the original packing materials for
later use; these can come in handy if the device
has to be transported.
6. 2 Components of the VITOM® 3D
system
6. 2. 1 Necessary basic equipment
Camera system and monitor:
1 IMAGE1|S CONNECT module (TC 200 EN)
1 IMAGE1|S D3-LINK™ module (TC 302)
1 32" 3D monitor (TM 323)
1 3D polarization glasses (9800 GF)
®
VITOM
3D exoscope:
1 VITOM
1 IMAGE1 PILOT (TC 014)
1 Sterile cover for VITOM
1 Sterile cover for IMAGE1 PILOT
Recommended light source:
1 Power LED 300 (TL 300)
1 Light cable with a diameter of 4.8|mm
Holding arms:
1 Suitable KARL|STORZ holding system for
1 VITOM
1 Suitable KARL|STORZ holding system for the
6. 2. 2 Optional accessories
1 VITOM® 3D iIlluminator (TH 002)
®
3D exoscope (TH 200)
®
3D exoscope (TH 001)
(041150-20)
(e.g., 495 TIP or 495 VIT)
®
VITOM
3D exoscope (e.g., 28272 HS with
28272 HP)
®
3D clamping jaw with ball joint for
KARL|STORZ holding systems (28272 VTK)
IMAGE1 PILOT (e.g., 28272 HA with 28172 HR)
6 Montaje e
instrucciones operativas
6. 1 Desembalaje
Extraiga el exoscopio VITOM® 3D con cuidado
fuera del embalaje. Revise si el envío está
completo y compruebe posibles deterioros de
transporte.
En caso de reclamaciones, diríjase
inmediatamente al fabricante o al proveedor.
Es recomendable guardar el embalaje original
para volver a utilizarlo en un posible transporte
posterior del aparato.
6. 2 Componentes del sistema
VITOM® 3D
6. 2. 1 Equipamiento básico requerido
Sistema de cámara y monitor:
1 Módulo IMAGE1|S CONNECT (TC 200 ES)
1 Módulo IMAGE1|S D3-LINK™ (TC302)
1 Monitor 3D de 32" (TM 323)
1 Gafas 3D de polarización (9800 GF)
Exoscopio VITOM
1 Exoscopio VITOM
1 IMAGE1 PILOT (TC014)
1
Funda estéril para el exoscopio VITOM® 3D (TH 001)
1
Funda estéril para la IMAGE1 PILOT (041150-20)
Fuente de luz recomendada:
1 Power LED 300 (TL 300)
1 Cable de luz con 4,8|mm de diámetro
(p.|ej., 495|TIP o 495|VIT)
Brazos de sujeción:
1 Sistema de sujeción KARL|STORZ adecuado
para el exoscopio VITOM
(p.|ej., 28272|HS con 28272|HP)
1 Mordaza de retención VITOM
articulación esférica, para sistemas de sujeción
KARL|STORZ (28272|VTK)
1 Sistema de sujeción KARL|STORZ adecuado
para la IMAGE1 PILOT (p.|ej., 28272|HA con
28172|HR)
6. 2. 2 Accesorios opcionales
1 Iluminador VITOM® 3D (TH 002)
®
3D:
®
3D (TH 200)
®
3D
®
3D, con
12

Aufstellen und
Bedienungshinweise
Installation and
operating instructions
Montaje e
instrucciones operativas
1 AIDA™ Dokumentationssystem
(WD 200 oder WD 250)
Bei Verwendung des POINT SETTER Haltesystems:
1 VITOM
®
3D-Klemmbacke für POINT SETTER
Haltesystem (28272 VTP)
6. 3 Kompatible Kamera-
Kontrolleinheiten (CCU)
CCU
IMAGE1|S CONNECT (TC 200)
ab SW-Version 2.6 in Kombination mit
IMAGE1|S D3-LINK™ (TC 302)
ab SW-Version 2.6
Bitte überprüfen Sie die Software-Version wie folgt:
1. Setup-Menü öffnen (Setup-Taste auf dem Dashboard
oder Shift-Enter-Taste auf der Tastatur).
2. „Module Information“ auswählen.
3. Software-Version überprüfen.
Sollte die oben genannte bzw. eine höhere
Software-Version (TC 200 – 2.6, TC 302 – 2.6)
nicht auf Ihrer Kamerakontrolleinheit IMAGE1|S
installiert sein, können Sie die Software-Version
mithilfe des optional beiliegenden USB-Sticks
installieren oder kontaktieren Sie bitte Ihren
KARL|STORZ Service Partner.
Falls ein Hardwareupgrade des kompatiblen Link
Moduls (TC 302) erforderlich sein sollte, wird Ihnen
dies durch das System angezeigt. Für weitere
Fragen kontak tieren Sie bitte Ihren KARL|STORZ
Service Partner.
6. 4 Vor jedem Gebrauch
Vor jedem Gebrauch muss das Instrument auf
Beschädigungen untersucht werden, insbesondere
im Bereich des distalen Endes (Deckglas,
Lichtaustritt, ...). Vor jedem Gebrauch müssen das
Video-Verbindungskabel und das Lichtkabel auf
Beschädigungen, insbesondere Bruchstellen und
Risse, untersucht werden.
Instrumente mit beschädigten Kabeln dürfen
nicht weiter verwendet werden. Die Kabel
sind auszutauschen (das Lichtkabel durch
den Anwender oder durch den Service, das
Video-Verbindungskabel durch den Service).
1 AIDA™ documentation system
(WD 200 or WD 250)
When using the POINT SETTER holding system:
1 VITOM
®
3D clamping jaw for POINT SETTER
holding system (28272 VTP)
6. 3 Compatible camera control
units (CCU)
CCU
IMAGE1|S CONNECT (TC 200)
from SW version 2.6 in combination
with IMAGE1|S D3-LINK™ (TC 302)
from SW version 2.6
Please check the software version as follows:
1. Open the Setup menu (Setup key on the dashboard or
Shift+Enter key on the keyboard).
2. Select “Module Information”.
3. Check the software version.
If the above-mentioned or a higher software
version (TC 200 – 2.6, TC 302 – 2.6) is not
installed on your IMAGE1|S camera control unit,
you can install the software version using the
USB stick optionally provided or contact your
KARL|STORZ service partner.
If it is necessary to upgrade the hardware of the
compatible Link module (TC 302), the system
will show you this. For more information on this,
please contact your KARL|STORZ service partner.
6. 4 Before each use
Before each use, the instrument must be
inspected for damage, especially around the distal
end (cover glass, light outlet, ...).
Before each use, the video connecting cable
and light cable must be inspected for damage,
especially breaks and cuts.
The use of instruments with damaged cable
must be discontinued. Cables must be replaced
(light cable to be replaced by the user or the
Service|Dept., and the video connection cable by
the Service Dept.).
1 Sistema de documentación AIDA™
(WD|200 o WD|250)
En caso de utilizarse el sistema de sujeción
POINT|SETTER:
1 Mordaza de retención VITOM
tema de sujeción POINT SETTER (28272|VTP)
®
3D para el sis-
6. 3 Unidades de control de la
cámara compatibles (CCU)
CCU
IMAGE1 S CONNECT (TC200)
a partir de la versión de software 2.6 en
combinación con el IMAGE1|S D3-LINK™
(TC|302) a partir de la versión de software 2.6
Por favor, compruebe la versión de software como
se indica a continuación:
1. Abra el menú de configuración (tecla Setup en el panel
de control o la combinación de teclas Mayús+Intro en
el teclado).
2. Seleccione “Module Information” (Información del
módulo).
3. Compruebe la versión de software.
Si la versión de software arriba indicada u otra
superior (TC 200 – 2.6, TC 302 – 2.6) no estuviera instalada en su unidad de control de cámara
IMAGE|1, puede instalar la versión de software
utilizando la memoria|USB que se incluye opcionalmente en el suministro, o bien póngase en contacto con el Servicio|Técnico de KARL|STORZ.
Si es necesario realizar una ampliación del
hardware del módulo|Link compatible (TC|302),
esto le será indicado por el sistema. Si tiene
alguna pregunta, póngase en contacto con el
Servicio|Técnico de KARL|STORZ.
6. 4 Antes de cada uso
Antes de cada utilización debe comprobarse si el
instrumento presenta deterioros, particularmente en
el sector del extremo distal (cristal protector, salida de
luz, ...). Antes de cada utilización debe comprobarse
si el cable de conexión de vídeo y el cable de luz presentan deterioros, particularmente roturas o grietas.
No se permite el uso de instrumentos cuyos
cables estén deteriorados. Deben cambiarse los
cables (el cable de luz por parte del usuario o el
Servicio Técnico, el cable de conexión de vídeo
por parte del Servicio Técnico).
13

Aufstellen und
Bedienungshinweise
Installation and
operating instructions
Montaje e
instrucciones operativas
9
6. 5 Allgemeine Hinweise zur
Inbetriebnahme des VITOM
®
3D-Exoskops
Das VITOM® 3D-Exoskop wird während
des praktischen Einsatzes stets von einem
Haltesystem über dem Situs gehalten. Der
Haltearm sollte so positioniert werden, dass der
OP-Ablauf nicht gestört wird und der Anwender
eine optimale und ergonomisch günstige Sicht
auf den 3D-Monitor hat. Der Monitor sollte daher
möglichst direkt gegenüber und auf Augenhöhe
des Anwenders positioniert werden.
HINWEIS: Das VITOM® 3D-Exoskop
1
sowie angeschlossene Geräte dürfen in
medizinisch genutzten Räumen nur benutzt
werden, wenn deren elektrische Anlagen
nach den national gültigen Vorschriften und
Normen installiert sind.
HINWEIS: Beachten Sie stets die Anleitung
1
des verwendeten Haltesystems und dessen
Eignung für die Verwendung mit dem
VITOM® 3D-Exoskop.
6. 6 VITOM® 3D-Exoskop an
Haltearm befestigen
Für den Betrieb des VITOM® 3D-Exoskops
wird ein Haltearm von KARL|STORZ
8
A
(z. B. endoskopisches Haltesystem) benötigt, der
mindestens 2|kg Traglast zulässt.
Das VITOM
Klemmbacke (28272 VTK oder 28272 VTP) je
nach Haltesystem am KARL|STORZ Haltesystem
befestigt.
Befestigen Sie die Klemmbacke korrekt am
Haltesystem und stellen Sie sicher, dass die
Klemmbacke mit dem Haltesystem fest verbunden
B
ist (siehe Abb. A: Korrekt befestigte Klemmbacke
am Haltesystem und Abb. B: Falsch befestigte
Klemmbacke am Haltesystem).
®
3D-Exoskop wird mit einer
HINWEIS: Für die Benutzung der
1
Klemmbacke 28272 VTK bzw. 28272 VTP
am Haltesystem die entsprechenden
Gebrauchsanweisungen (Art.-Nr.: 97000154
bzw. 97000155) beachten.
6. 5 General information on
commissioning of|the
VITOM
The VITOM® 3D exoscope is always held over
the site by a holding system during a practical
application. The holding arm should be positioned
in such a way that the operating theater
procedures are not interrupted and the user has
an optimal and ergonomic view of the 3D monitor.
If possible, the monitor should therefore be
positioned directly opposite the user at eye level.
NOTE: The VITOM® 3D exoscope including
1
the equipment connected may only be used
in medical rooms in which the electrical
equipment has been installed in accordance
with applicable national regulations and
standards.
NOTE: Always observe the instructions for
1
the holding system used and its suitability for
use with the VITOM® 3D exoscope.
®
|3D exoscope
6. 6 Attaching the VITOM® 3D
exoscope to the holding arm
For operation of the VITOM® 3D exoscope, a
KARL|STORZ holding arm (e.g., endoscopic
holding system) which can carry a load of at least
2|kg is required.
Depending on the holding system, the VITOM
3D exoscope is attached to the KARL|STORZ
holding system using a clamping jaw (28272 VTK
or 28272 VTP).
Attach the clamping jaw to the holding system
correctly and ensure that the clamping jaw is
firmly connected to the holding system (see Fig.|A:
Clamping jaw correctly attached to the holding
system and Fig.|B: Clamping jaw incorrectly
attached to the holding system).
NOTE: Observe the relevant instruction
1
manuals for use of the clamping jaw
28272 VTK or 28272 VTP on the holding
system (Art. no.: 97000154 or 97000155).
6. 5 Indicaciones generales sobre
la puesta en|servicio del
exoscopio VITOM
Durante la aplicación práctica, el exoscopio
VITOM® 3D permanece siempre fijado encima
del campo operatorio mediante un sistema de
sujeción. El brazo de sujeción debe colocarse en
una posición que no entorpezca el desarrollo de la
operación y que facilite al usuario una óptima visión
ergonómica sobre el monitor 3D. Por esta razón, el
monitor debe posicionarse en lo posible inmediatamente frente al usuario, a la altura de los ojos.
NOTA: El exoscopio VITOM® 3D, así
1
como los aparatos conectados, solo
podrán usarse en ambientes médicos cuya
instalación eléctrica haya sido efectuada
de acuerdo con las normas nacionales de
seguridad vigentes.
NOTA: Tenga siempre en cuenta la
1
Instrucción del sistema de sujeción utilizado
y su idoneidad para ser utilizado con el
exoscopio VITOM® 3D.
6. 6 Fijación del exoscopio VITOM®
3D al brazo de sujeción
Para utilizar el exoscopio VITOM® 3D, se requiere
un brazo de sujeción de KARL|STORZ (p.|ej.,
sistema endoscópico de sujeción) que admita una
capacidad de carga de 2|kg como mínimo.
®
El exoscopio VITOM
sujeción KARL|STORZ con una mordaza de
retención (28272|VTK o 28272|VTP), dependiendo
del sistema de sujeción utilizado.
Fije correctamente la mordaza de retención al
sistema de sujeción y asegúrese de que dicha
mordaza quede fijamente unida al sistema
de sujeción (véanse la fig. A: mordaza de
retención fijada correctamente al sistema de
sujeción y la fig.|B: mordaza de retención fijada
incorrectamente al sistema de sujeción).
NOTA: Con respecto a la utilización de
1
las mordazas de retención 28272|VTK o
28272|VTP en el sistema de sujeción, tenga
en cuenta los Manuales de intrucciones
correspondientes (n.º de art.: 97000154 o
97000155).
®
3D se fija al sistema de
®
3D
14
Aufstellen und
Bedienungshinweise
Installation and
operating instructions
Montaje e
instrucciones operativas
Anschließend öffnen Sie die Klemmbacke
28272 VTK oder 28272 VTP durch gleichzeitiges
Drücken der Entriegelungsknöpfe. Legen Sie das
®
VITOM
in die Klemmbacke und achten Sie hierbei
auf die richtige Orientierung (siehe Abb. C).
HINWEIS: Durch die umlaufende Nut, kann
1
das VITOM® 3D nur in einer Richtung in die
Klemmbacke gelegt werden.
Halten Sie das VITOM
schließen Sie die Klemmbacke mit der anderen
C
Hand bis sie hörbar einrastet (siehe Abb. D).
Prüfen Sie, ob das VITOM
Klemmbacke gehalten wird, bevor Sie es
loslassen. Die Klemmbacke ermöglicht eine
Drehung des VITOM® 3D entlang der Achse. Dies
erlaubt eine komfortable Positionierung während
des Eingriffs (siehe Abb. E).
Je nach Haltesystem und Klemmbacke kann das
®
VITOM
3D entweder über das Kugelgelenk an
der Klemmbacke (Art.-Nr.: 28272 VTK) oder über
das im POINT SETTER integrierte Kugelgelenk in
alle Raumrichtungen geschwenkt werden.
D
HINWEIS: Vor jedem Eingriff ist zu prüfen,
1
ob mit dem gewählten Haltesystem das
VITOM® 3D-Exoskop so positioniert werden
kann, dass der Situs optimal eingesehen
werden kann.
®
3D in Position und
®
3D sicher in der
6. 7 Lichtkabel an VITOM®
3D-Exoskop anschließen
Das Lichtkabel wird durch Aufstecken auf
den vorgesehenen Lichtanschlussstutzen und
Rechtsdrehung angebracht. Auf festen Sitz des
E
Anschlusses achten (siehe Abb. F). Für VITOM®
3D werden Lichtkabel mit Faserdurchmesser
4,8|–|5,0|mm empfohlen.
VORSICHT: Beachten Sie unbedingt,
dass das Kreissymbol auf dem VITOM®
2
3D und das Kreissymbol auf dem
Lichtkabel übereinstimmen müssen
(siehe|nachfolgende Tabelle).
Then open the clamping jaw 28272 VTK or
28272 VTP by simultaneously pressing the unlock
buttons. Place the VITOM
and pay particular attention to correct orientation
(see Fig.|C).
NOTE: Due to the circumferential groove,
1
the VITOM® 3D can only be placed in the
clamping jaw in one direction.
Hold the VITOM
clamping jaw with your other hand until it clicks
into place audibly (see Fig.|D). Check whether
the VITOM
before you let it go. The clamping jaw ensures
that the VITOM® 3D can rotate along its axis.
This permits a comfortable position during the
intervention (see Fig.|E).
Depending on the holding system and clamping
jaw, the VITOM
directions either via the ball joint on the clamping
jaw (Art. no.: 28272 VTK) or via the integrated ball
joint in the POINT SETTER.
NOTE: Before every intervention, check
1
whether the VITOM® 3D exoscope can be
positioned using the holding system selected
in such a way that optimal visualization of the
site is ensured.
®
®
3D is safely held in the clamping jaw
®
3D can be swiveled in all
®
in the clamping jaw
3D in position and close the
6. 7 Connecting the light cable to
the VITOM® 3D exoscope
The light cable is mounted by fitting to the light
port provided and turning clockwise. Check that it
is firmly connected (see Fig.|F). Light cables with a
fiber diameter of 4.8|–|5.0|mm are recommended
for the VITOM® 3D.
CAUTION: Please note that the circular
symbol on the VITOM® 3D and the circular
2
symbol on the light cable must correspond
(see following table).
A continuación, abra la mordaza de retención
28272|VTK o 28272|VTP presionando
simultáneamente los botones de desbloqueo.
Sujete el VITOM
comprobando que la orientación sea la correcta
(véase la fig. C).
NOTA: Debido a la ranura continua, el
1
VITOM® 3D únicamente puede montarse en
una dirección en la mordaza de retención.
Mantenga el VITOM
cierre la mordaza de retención con la otra mano
hasta que encastre con un clic audible (véase la
fig. D). Compruebe si el VITOM
bien sujeto a la mordaza de retención antes de
soltarlo. La mordaza de retención permite girar
el VITOM® 3D alrededor del eje. Ello permite
posicionar el exoscopio cómodamente en el curso
de la intervención (véase la fig. E).
Dependiendo del sistema de sujeción y la
mordaza de retención que se utilicen, el VITOM
3D puede bascularse en todas las direcciones
por medio de la articulación esférica de la
mordaza de retención (n.º de art.: 28272|VTK)
o de la articulación esférica integrada en el
POINT|SETTER.
NOTA: Antes de cada intervención hay
1
que comprobar si con el sistema de ǫ jación
escogido es posible posicionar el exoscopio
VITOM® 3D de modo que pueda visualizarse
perfectamente el campo operatorio.
®
en la mordaza de retención,
®
3D en la misma posición y
®
3D ha quedado
®
6. 7 Conexión del cable de luz al
exoscopio VITOM® 3D
El cable de luz se monta insertándolo en el pitón
de conexión de luz previsto al efecto y girando
hacia la derecha. Preste atención a que la
conexión quede bien firme (véase la fig. F). Para
el VITOM® 3D se recomienda utilizar cables de luz
con un diámetro de fibra de 4,8|–|5,0|mm.
ADVERTENCIA: Es imprescindible
comprobar que el símbolo circular que
2
aparece en el VITOM® 3D coincida con el
símbolo circular del cable de luz (véase la
siguiente tabla).
15
F
 Loading...