

Page 1
NT 65/2 Eco
English 5
Français 10
Español 16
Register and win!
www.kaercher.com
59649270 01/13
Page 2
ON
OFF
ON
OFF
23
1
1
22
21
12
18
13
20
19
24
23
14
15
23
17
16
4
5
6
11
234
10
789
Page 3
Page 4
Page 5
Please read and comply with
these original instructions prior
to the initial operation of your appliance and
store them for later use or subsequent owners.
– Before first start-up it is definitely nec-
essary to read the safety indications Nr.
5.956-249!
– The non-compliance of the operating
and safety instructions may lead to
damages of the appliance and to dangers for the operator and other persons.
– In case of transport damage inform ven-
dor immediately
Contents
Environmental protection . . EN . . .1
Symbols in the operating in-
structions . . . . . . . . . . . . . . EN . . .1
Proper use . . . . . . . . . . . . . EN . . .1
Device elements. . . . . . . . . EN . . .2
Start up. . . . . . . . . . . . . . . . EN . . .2
Operation . . . . . . . . . . . . . . EN . . .3
Transport . . . . . . . . . . . . . . EN . . .3
Storage. . . . . . . . . . . . . . . . EN . . .3
Maintenance and care . . . . EN . . .3
Troubleshooting . . . . . . . . . EN . . .3
Warranty. . . . . . . . . . . . . . . EN . . .4
Accessories and Spare Parts EN . . .4
Technical specifications . . . EN . . .5
Environmental protection
The packaging material can be
recycled. Please do not throw
the packaging material into
household waste; please send
it for recycling.
Old appliances contain valuable materials that can be recycled; these should be sent for
recycling. Batteries, oil, and
similar substances must not
enter the environment. Please
dispose of your old appliances
using appropriate collection
systems.
Notes about the ingredients (REACH)
You will find current information about the
ingredients at:
www.kaercher.com/REACH
Symbols in the operating in-
structions
Danger
Immediate danger that can cause severe
injury or even death.
몇 Warning
Possible hazardous situation that could
lead to severe injury or even death.
Caution
Possible hazardous situation that could
lead to mild injury to persons or damage to
property.
Proper use
몇 Warning
The appliance is not suitable for vacuuming
dust which endangers health.
– The machine is meant for dry and wet
cleaning of floors and walls.
– This appliance is suited for the commer-
cial use, e.g. in hotels, schools, hospitals, factories, shops, offices, and rental
companies.
– The ambient temperature must not ex-
ceed 40 °C during operation.
– 1
5EN
Page 6

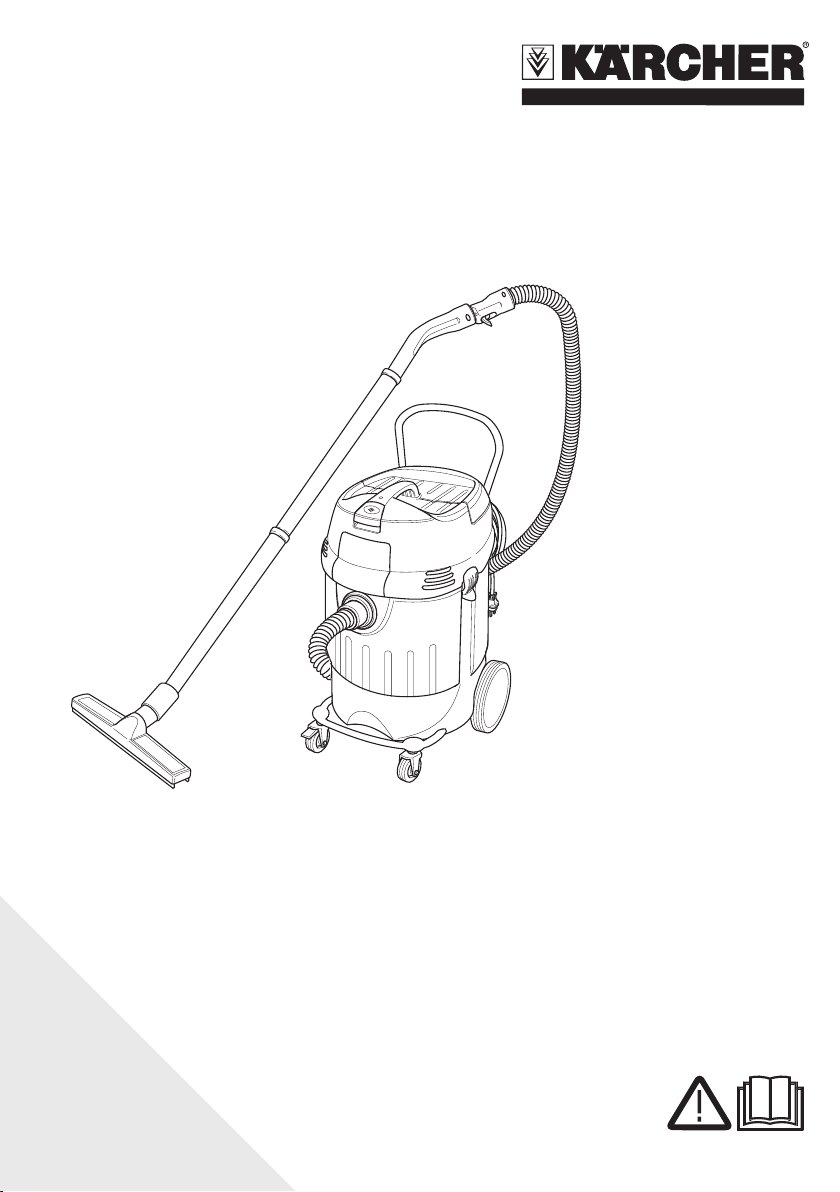
Device elements
1 Electrodes
2 Handle
3 Suction hose
4 Power cord
5 Suction head lock
6 Wheel
7 Dirt receptacle
8 Suction head
9 Steering roller bow
10 Steering roller
11 Floor nozzle
12 Suction tube
13 Suction support
14 Main switch
15 Carrying handle
16 Filter cover
17 Push handle
18 Nameplate
19 Bender
20 Slide for filter cleaning
21 Floor nozzle holder
22 Drain hose
23 Exhaust filter
24 Flat fold filter
Start up
Caution
The flat pleated filter must always be in
place while vacuuming.
Dry vacuum cleaning
– When vacuuming fine dust, you may
also use an additional paper filter bag or
a membrane filter (special accessory).
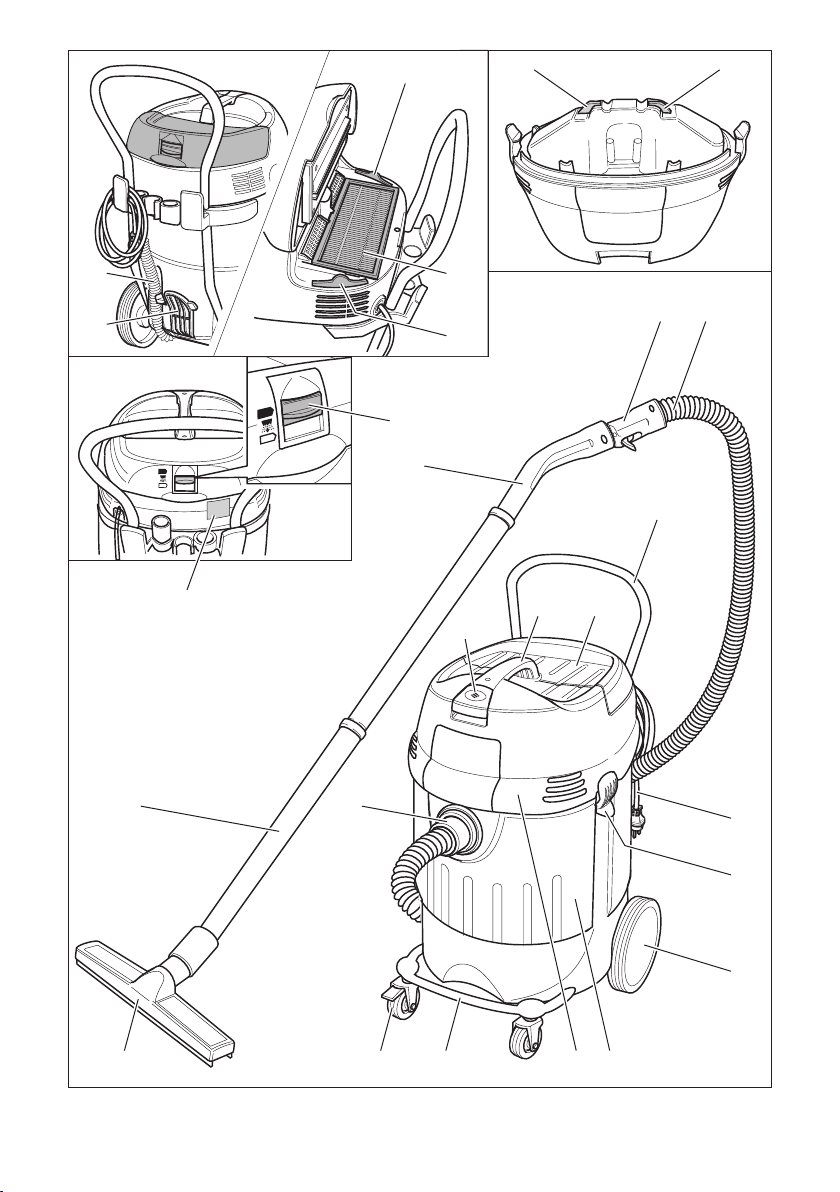
Inserting the paper filter bag
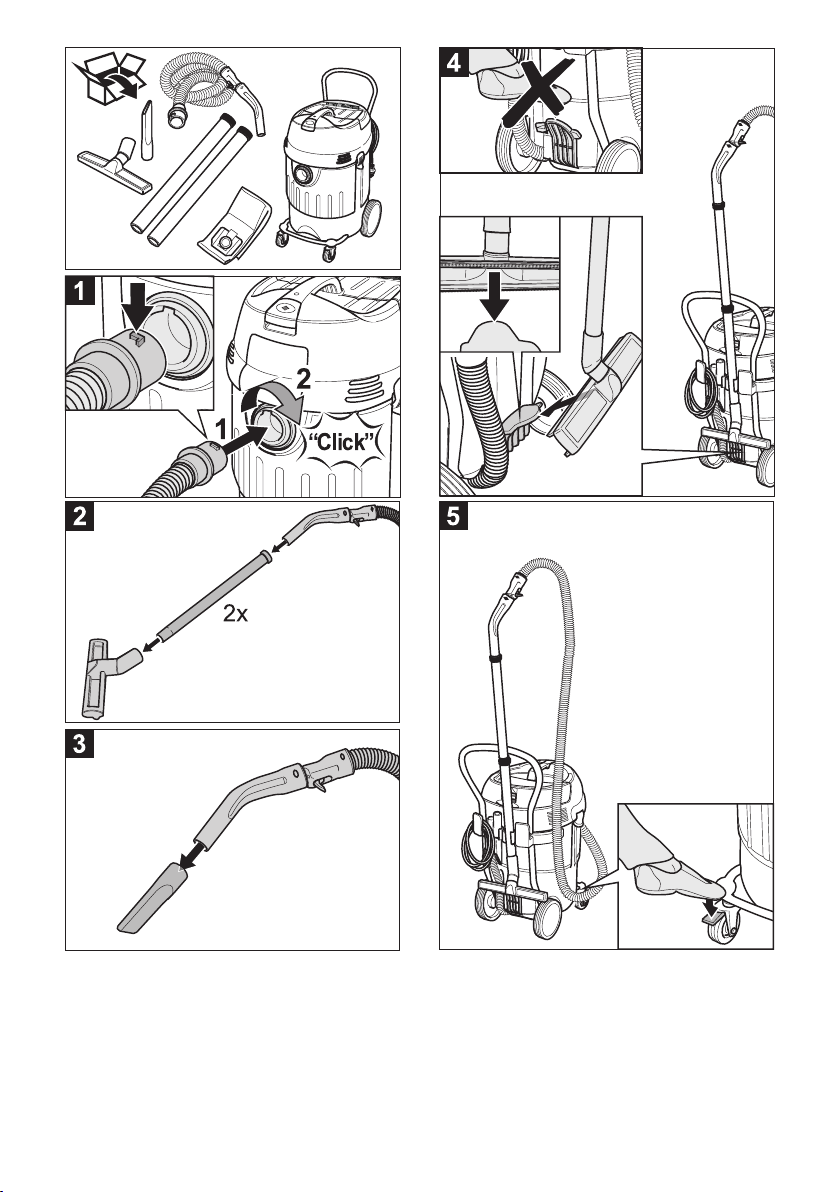
Illustration
Release and remove the suction head.
Insert the paper filter bag or the mem-
brane filter (special attachment).
Insert and lock the suction head.
Wet vacuum cleaning
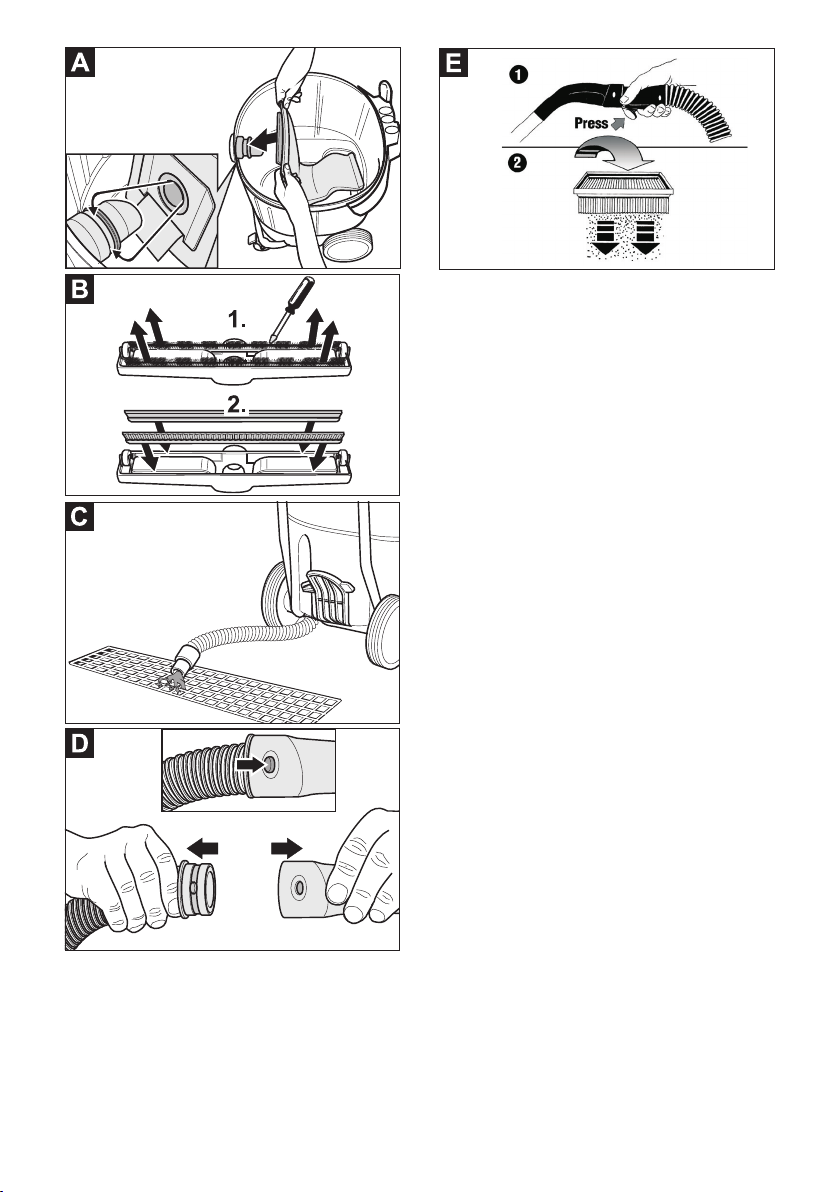
Inserting the rubber lips
Illustration
Remove the brush strips.
Install the rubber lips.
Note: The structured side of the rubber lips
must point outwards.
Remove the paper filter bag
– If the appliance is used to vacuum wet
dirt the paper filter bag or the membrane filter (special accessory) must always be removed.
– It is recommended to use a special filter
bag (wet) (see Filter systems).
Drain off dirt water
Illustration
Drain off dirty water through the drain-
age hose.
General
– If wet dirt is vacuumed with the uphol-
stery or crevice nozzle or if water is
sucked up from a container it is recommended to deactivate the "Filter Dedusting" function.
– If the maximum liquid level is reached
the appliance will turn off automatically.
– In case of non-conductive liquids
(such as emulsion drilling fluids,
oils, and greases) the appliance is
not turned off when the container is
full. The filling level must be continuously monitored and the container
must be emptied in time.
– After the wet vacuuming: Clean the flat
folded filter with the filter cleaning.
Clean the electrodes with a brush.
Clean the container with a damp rag
and dry it.
Clip connection
Illustration
The suction hose is equipped with a clip
system. All C-40/C-DN-40 accessories can
be connected.
6 EN
– 2
Page 7

Operation
Storage
Turning on the Appliance
Plug in the main plug.
Switch on the appliance at the main
switch.
Filter dedusting
Note: A filter dedusting every 5 to 10 min-
utes will increase the life of the flat folded
filter.
– Switch off filter dedusting:
Push the slide upward.
– Switch on filter dedusting:
Push the slide downward.
Illustration
Press and hold the switch on the handle
for several seconds while the filter
cleaning is turned on. The flat folded filter is automatically cleaned through an
air jet (pulsating sound).
Turn off the appliance
Switch off the appliance at the main
switch.
Pull out the mains plug.
After each operation
Empty the container.
Vacuum and wipe the appliance inside
and outside with a damp cloth.
Transport
Caution
Risk of injury and damage! Observe the
weight of the appliance when you transport
it.
Remove the suction pipe with the floor
nozzle from the holder. Hold the appliance at the handle and at the suction
pipe to transport it.
When transporting in vehicles, secure
the appliance according to the guidelines from slipping and tipping over.
Caution
Risk of injury and damage! Note the weight
of the appliance in case of storage.
This appliance must only be stored in interior rooms.
Maintenance and care
Danger
First pull out the plug from the mains before
carrying out any tasks on the machine.
Exchanging the flat pleated filter
Open filter door.
Replace the flat pleated filter.
Close the filter door, it must lock into
place.
Replace exhaust filter
Open filter door.
Replace exhaust filter.
Close the filter door, it must lock into
place.
Cleaning the electrodes
Release and remove the suction head.
Clean the electrodes with a brush.
Insert and lock the suction head.
Troubleshooting
Danger
First pull out the plug from the mains before
carrying out any tasks on the machine.
Suction turbine does not run
Check the receptacle and the fuse of
the power supply.
Check the power cable, the power plug
and electrodes of the device.
Turn on the appliance.
Suction turbine turns off
Empty the container.
– 3
7EN
Page 8

Suction turbine does not start again
after the container has been emp-
tied
Turn off the appliance and wait for 5
seconds, turn it on again after 5 seconds.
Clean the electrodes as well as the
space between the electrodes with a
brush.
Suction capacity decreases
Remove choking of suction nozzle, suc-
tion tube, elbow, handle, suction hose,
or flat folded filter.
Exchange the paper filter bag.
Filter dedusting: Repeatedly press the
button on the handle while the filter
cleaning is turned on.
Ensure the filter cover properly locks
into place.
Clean or replace the membrane filter
(special accessory) under running water.
Replace the flat pleated filter.
Check drain pipe for leaks.
Dust comes out while vacuuming
Check for proper installation of the flat
pleated filter.
Replace the flat pleated filter.
Automatic shut-off (wet vacuum
cleaning) does not react
Clean the electrodes as well as the
space between the electrodes with a
brush.
Continuously check the filling level in
case of non-conductive liquid.
Filter dedusting switches perma-
nently
Release the blocked suction nozzle or
end of the hose.
Stop the continuous vacuuming from
the liquid container or switch the filter
cleaning off.
Remove choking of suction nozzle, suc-
tion tube, elbow, handle, suction hose,
or flat folded filter.
Replace the flat pleated filter.
Filter cleaning is not working
Suction hose is not connected.
Automatic filter cleaning cannot be
switched off
Inform Customer Service
Automatic filter cleaning cannot be
switched on
Inform Customer Service
Warranty
The warranty terms published by the relevant sales company are applicable in each
country. We will repair potential failures of
your appliance within the warranty period
free of charge, provided that such failure is
caused by faulty material or defects in manufacturing. In the event of a warranty claim
please contact your dealer or the nearest
authorized Customer Service centre.
Please submit the proof of purchase.
Accessories and Spare Parts
– Only use accessories and spare parts
which have been approved by the manufacturer. The exclusive use of original
accessories and original spare parts
ensures that the appliance can be operated safely and trouble free.
– At the end of the operating instructions
you will find a selected list of spare parts
that are often required.
– For additional information about spare
parts, please go to the Service section
at www.kaercher.com.
8 EN
– 4
Page 9
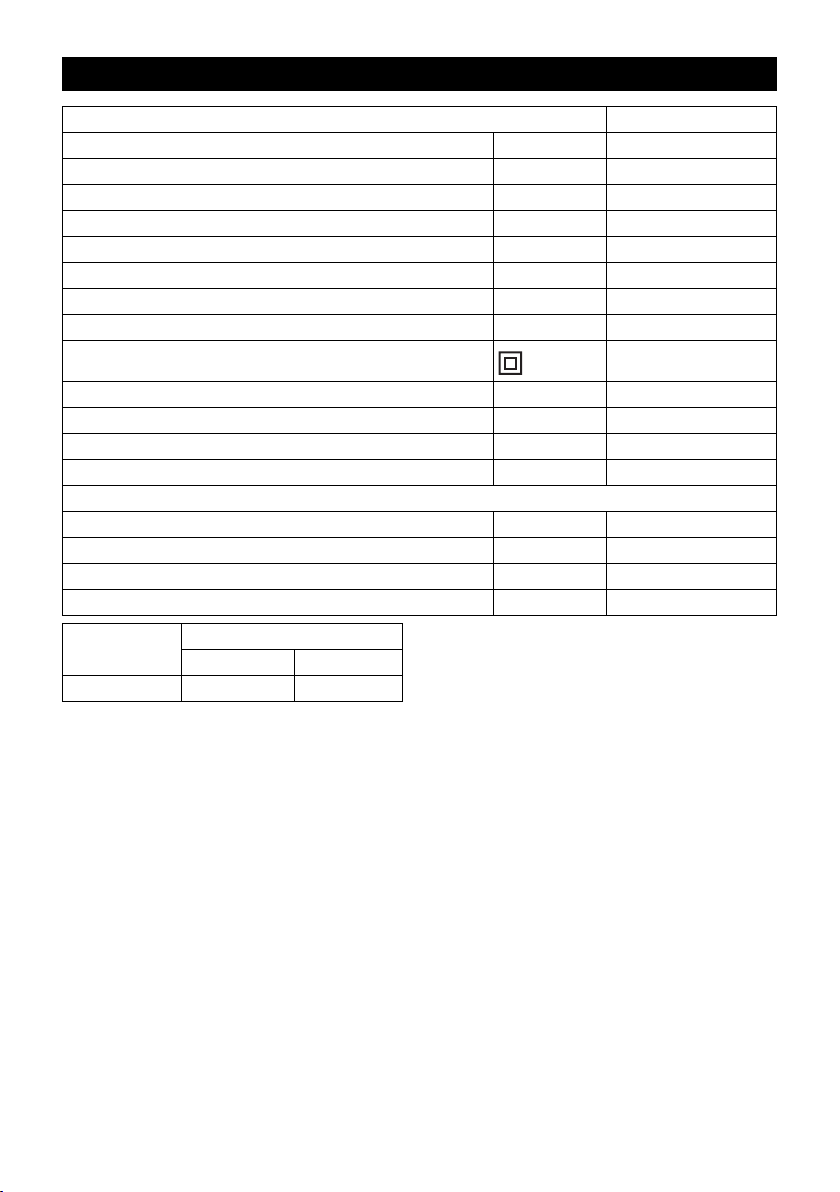
Technical specifications
NT 65/2 Eco
Mains voltage V 120
Frequency Hz 1~ 60
Rated current A 18
Container capacity l 65
Filling quantity (liquid) l 50
Air volume (max.) l/s 2x 54
Negative pressure (max.) kPa (mbar) 23,5 (235)
Type of protection -- IPX4
Protective class II
Suction hose connection (C-DN/C-ID) mm 40
Length x width x height mm 600 x 480 x 920
Typical operating weight kg 19,0
Max. ambient temperature °C +40
Values determined to EN 60335-2-69
Sound pressure level L
Uncertainty K
pA
pA
Hand-arm vibration value m/s
Uncertainty K m/s
Power cord SJTW-A 3x14 AWG
Part no.: Cable length
VEX 6.648-919.0 10 m
dB(A) 74
dB(A) 1
2
2
<2,5
0,2
– 5
9EN
Page 10

Lire ces notice originale avant la
première utilisation de votre appareil, se comporter selon ce qu'elles requièrent et les conserver pour une
utilisation ultérieure ou pour le propriétaire
futur.
– Avant la première mise en service, vous
devez impérativement avoir lu les
consignes de sécurité N° 5.956-249 !
– En cas de non-respect des instructions
de service et des consignes de sécurité, l'appareil risque de subir des dommages matériel et l'utilisateur ainsi que
toute tierce personne sont exposés à
des dangers potentiels.
– Contactez immédiatement le revendeur
en cas d'avarie de transport.
Table des matières
Protection de l’environnement FR . . .1
Symboles utilisés dans le mode
d'emploi . . . . . . . . . . . . . . . FR . . .1
Utilisation conforme . . . . . . FR . . .1
Éléments de l'appareil . . . . FR . . .2
Mise en service . . . . . . . . . FR . . .2
Utilisation . . . . . . . . . . . . . . FR . . .3
Transport . . . . . . . . . . . . . . FR . . .3
Entreposage. . . . . . . . . . . . FR . . . 3
Entretien et maintenance . . FR . . .3
Assistance en cas de panne FR . . .4
Garantie . . . . . . . . . . . . . . . FR . . .5
Accessoires et pièces de re-
change . . . . . . . . . . . . . . . . FR . . .5
Caractéristiques techniques FR . . .6
Protection de l’environne-
ment
Les matériaux constitutifs de
l’emballage sont recyclables.
Ne pas jeter les emballages
dans les ordures ménagères,
mais les remettre à un système
de recyclage.
Les appareils usés contiennent
des matériaux précieux recyclables lesquels doivent être
apportés à un système de recyclage. Il est interdit de jeter
les batteries, l'huile et les substances similaires dans l'environnement. Pour cette raison,
utiliser des systèmes de collecte adéquats afin d'éliminer
les appareils hors d'usage.
Instructions relatives aux ingrédients
(REACH)
Les informations actuelles relatives aux ingrédients se trouvent sous :
www.kaercher.com/REACH
Symboles utilisés dans le
mode d'emploi
Danger
Pour un danger immédiat qui peut avoir
pour conséquence la mort ou des blessures corporelles graves.
몇 Avertissement
Pour une situation potentiellement dangereuse qui peut avoir pour conséquence des
blessures corporelles graves ou la mort.
Attention
Pour une situation potentiellement dangereuse qui peut avoir pour conséquence des
blessures légères ou des dommages matériels.
Utilisation conforme
몇 Avertissement
Cet appareil n'est pas conçu pour aspirer
des poussières nocives.
– Cet aspirateur est destiné au nettoyage
à sec et au nettoyage par voie humide
des sol et murs.
– Cet appareil convient à un usage indus-
triel, par exemple dans le cadre d'hôtels, d'écoles, d'hôpitaux, d'usines, de
magasins, de bureaux et d'agences de
location.
10 FR
– 1
Page 11

– La température ambiante ne doit pas
dépasser 40° C au cours de l'utilisation
de l'appareil.
Éléments de l'appareil
1 Electrodes
2 Poignée
3 Flexible d’aspiration
4 Câble d’alimentation
5 Verrouillage de la tête d'aspiration
6 Roue
7 Récipient collecteur
8 Tête d'aspiration
9 Étrier à roulettes
10 Galet de direction
11 Buse pour sol
12 Tuyau d'aspiration
13 Consoles d'aspiration
14 Interrupteur principal
15 Poignée de transport
16 Recouvrement du filtre
17 Guidon de poussée
18 Plaque signalétique
19 Coude
20 Poussoir pour le nettoyage du filtre
21 Support pour buse de sol
22 Flexible d'écoulement
23 Filtre d'air évacué
24 Filtre plat de plis
Mise en service
Attention
Le filtre à plis plats ne doit jamais être retiré
durant l'aspiration.
Aspiration de poussières
– Pour l'aspiration de poussières fines, il
est possible d'utiliser de surcroît un sac
de filtrage en papier ou un filtre à membranes (accessoire spécial).
Montage du sachet filtre en papier
Illustration
Déverrouiller et retirer la tête d'aspiration.
Mettre en place le sac de filtrage en pa-
pier ou le filtre à membranes (accessoire spécial).
Positionner la tête d'aspiration et la ver-
rouiller.
Aspiration humide
Montage des lèvres en caoutchouc
Illustration
Démonter les bandes de brosse
Monter les lèvres en caoutchouc.
Remarque : la face structurée des lèvres en
caoutchouc doit être dirigée vers l'extérieur.
Retirer le sachet filtre en papier.
– Pour aspirer des saletés humides, il
faut toujours retirer le sachet filtre en
papier ou bien le filtre à membrane (accessoires spéciaux).
– Il est recommandé d'utiliser un filtre pa-
pier spécial (humide) (voir systèmes de
filtration).
Vider l'eau sale
Illustration
Laisser l'eau sale s'écouler par le
flexible de vidange.
Généralités
– Pour l'aspiration de saletés humides
avec le suceur plat ou le petit suceur, ou
bien si l'aspiration consiste surtout à aspirer de l'eau d'un réservoir, il est recommandé de désactiver la fonction
"Nettoyage du filtre".
– L'appareil se met automatiquement
hors marche lorsque le niveau de liquide maxi est atteint.
– En cas de liquides non conducteurs
(par exemple émulsion de perçage,
huiles et graisses), l'appareil n'est
pas mis hors marche lorsque le réservoir est plein. Le niveau de remplissage doit être contrôlé en
permanence et le réservoir doit être
vidé à temps.
– 2
11FR
Page 12

– À la fin de l'aspiration humide : nettoyer
le filtre à plis plats en même temps que
le filtre. Nettoyer les électrodes avec
une brosse. Nettoyer le réservoir avec
un chiffon humide et le sécher.
Clip de fixation
Illustration
Le flexible d'aspiration est doté d'un système à clip. Il est possible de raccorder
tous les accessoires C-40/C-DN-40.
Utilisation
Mettre l'appareil en marche
Brancher la fiche secteur.
Mettre l'appareil en service au niveau
de l'interrupteur principal.
Nettoyage du filtre
Remarque : un actionnement du net-
toyage du filtre toutes les 5 à 10 minutes
augmente la durée de vie du filtre à plis
plats.
– Mettre le nettoyage du filtre hors ser-
vice :
Pousser le poussoir.
– Mettre le nettoyage du filtre en service :
Pousser le poussoir vers le bas.
Illustration
Maintenir la touche appuyée pendant
plusieurs secondes sur la poignée, le
nettoyage de filtre étant enclenché. Le
filtre à plis plats est automatiquement
nettoyé par un courant d'air (bruit de
pulsation).
Mise hors service de l'appareil
Mettre l'appareil hors service au niveau
de l'interrupteur principal.
Retirer le connecteur de la prise.
Après chaque mise en service
Vider le réservoir.
Nettoyer la partie intérieure et exté-
rieure de l'appareil en l'aspirant et en
l'essuyant avec un chiffon humide.
Transport
Attention
Risque de blessure et d'endommagement !
Respecter le poids de l'appareil lors du
transport.
Retirer le tube d'aspiration avec la buse
de sol du support. Pour transporter l'appareil, le saisir au niveau de la poitnée
et du tube d'aspiration.
Sécuriser l'appareil contre les glisse-
ments ou les basculements selon les directives en vigueur lors du transport
dans des véhicules.
Entreposage
Attention
Risque de blessure et d'endommagement !
Prendre en compte le poids de l'appareil à
l'entreposage.
Cet appareil doit uniquement être entreposé en intérieur.
Entretien et maintenance
Danger
Avant d'effectuer tout type de travaux sur
l'appareil, le mettre hors service et débrancher la fiche électrique.
Remplacement du filtre à plis plats
Ouvrir le recouvrement du filtre.
Remplacer le filtre à plis plats.
Fermer le recouvrement du filtre, il faut
l'entendre s'enclencher.
Remplacer le filtre d'air évacué
Ouvrir le recouvrement du filtre.
Remplacer le filtre d'air évacué.
Fermer le recouvrement du filtre, il faut
l'entendre s'enclencher.
12 FR
– 3
Page 13

Nettoyage des électrodes
Déverrouiller et retirer la tête d'aspira-
tion.
Nettoyer les électrodes avec une
brosse.
Positionner la tête d'aspiration et la ver-
rouiller.
Assistance en cas de panne
Danger
Avant d'effectuer tout type de travaux sur
l'appareil, le mettre hors service et débrancher la fiche électrique.
La turbine d'aspiration ne fonc-
tionne pas
Vérifier la prise et le fusible de l'alimen-
tation électrique.
Vérifier le câble d'alimentation, la fiche
secteur et les électrodes de l'appareil.
Allumer l’appareil.
Turbine d'aspiration se met hors
marche
Vider le réservoir.
Turbine d'aspiration ne se remet
pas en marche après avoir vidé la
cuve
Mettre l'appareil hors marche et at-
tendre 5 secondes avant de le remettre
en marche.
Nettoyer les électrodes ainsi que l'es-
pace libre entre les électrodes à l'aide
d'une brosse.
La force d'aspiration diminue
Retirer tout colmatage de la buse d'as-
piration, du tuyau d'aspiration, du
coude, de la poignée, du flexible d'aspiration ou du filtre à plis plats.
Remplacer le sachet filtre en papier.
Nettoyage de filtre : actionner plusieurs
fois le bouton sur la poignée, pendant
que le nettoyage du filtre est activé.
Enclencher correctement le recouvre-
ment de filtre.
Nettoyer le filtre à membrane (acces-
soire spécial) à l'eau courante ou le
remplacer.
Remplacer le filtre à plis plats.
Contrôler l'étanchéité du flexible de vi-
dange.
De la poussière s'échappe lors de
l'aspiration
Vérifier la position de montage du filtre
à plis plats.
Remplacer le filtre à plis plats.
Dispositif automatique de coupure
(aspiration humide) ne se dé-
clenche pas
Nettoyer les électrodes ainsi que l'es-
pace libre entre les électrodes à l'aide
d'une brosse.
Contrôler en permanence le niveau de
remplissage en cas de liquides non
conducteurs.
Le nettoyage du filtre commute en
permanence
Desserrer la buse d'aspiration coincée
ou l'extrémité du flexible.
Achever l'aspiration continue depuis le
réservoir de liquide ou couper le système de nettoyage de filtre.
Retirer tout colmatage de la buse d'as-
piration, du tuyau d'aspiration, du
coude, de la poignée, du flexible d'aspiration ou du filtre à plis plats.
Remplacer le filtre à plis plats.
Le nettoyage de filtre ne fonctionne
pas
Le flexible d'aspiration n'est pas raccor-
dé.
Le nettoyage du filtre ne se laisse
pas mettre hors service.
Informer le service après-vente.
– 4
13FR
Page 14

Le nettoyage du filtre ne se laisse
pas mettre en service
Informer le service après-vente.
Garantie
Dans chaque pays, les conditions de garantie en vigueur sont celles publiées par
notre société de distribution responsable.
Les éventuelles pannes sur l’appareil sont
réparées gratuitement dans le délai de validité de la garantie, dans la mesure où
celles-ci relèvent d'un défaut matériel ou
d'un vice de fabrication. En cas de recours
en garantie, adressez-vous à votre revendeur ou au service après-vente agréé le
plus proche munis de votre preuve d'achat.
Accessoires et pièces de re-
change
– Utiliser uniquement des accessoires et
des pièces de rechange autorisés par le
fabricant. Des accessoires et des
pièces de rechange d’origine garantissent un fonctionnement sûr et parfait
de l’appareil.
– Une sélection des pièces de rechange
utilisées le plus se trouve à la fin du
mode d'emploi.
– Plus information sur les pièces de re-
change vous les trouverez sous
www.kaercher.com sous le menu Service.
14 FR
– 5
Page 15

Caractéristiques techniques
NT 65/2 Eco
Tension du secteur V 120
Fréquence Hz 1~ 60
Courant nominal A 18
Capacité de la cuve l 65
Plein de liquide l 50
Débit d'air (maxi) l/s 2x 54
Dépression (maxi) kPa (mbar) 23,5 (235)
Type de protection -- IPX4
Classe de protection II
Raccord du flexible d'aspiration (C-DN/C-ID) mm 40
Longueur x largeur x hauteur mm 600 x 480 x 920
Poids de fonctionnement typique kg 19,0
Température ambiante (maxi) °C +40
Valeurs définies selon EN 60335-2-69
Niveau de pression sonore L
Incertitude K
pA
pA
Valeur de vibrations bras-main m/s
Incertitude K m/s
Câble d’alimentation
SJTW-A 3x14 AWG
Référence Longueur de
câble
VEX 6.648-919.0 10 m
dB(A) 74
dB(A) 1
2
2
<2,5
0,2
– 6
15FR
Page 16

Antes del primer uso de su apa-
rato, lea este manual original,
actúe de acuerdo a sus indicaciones y
guárdelo para un uso posterior o para otro
propietario posterior.
– ¡Antes de la primera puesta en marcha
lea sin falta las instrucciones de uso y
las instrucciones de seguridad n.°
5.956-249!
– El incumplimiento de las instrucciones
de uso y de las indicaciones de seguridad puede provocar daños en el aparato y poner en peligro al usuario y a otras
personas.
– En caso de daños de transporte infor-
me inmediatamente al fabricante.
Índice de contenidos
Protección del medio ambiente ES . . .1
Símbolos del manual de ins-
trucciones. . . . . . . . . . . . . . ES . . . 1
Uso previsto . . . . . . . . . . . . ES . . .1
Elementos del aparato . . . . ES . . .2
Puesta en marcha . . . . . . . ES . . .2
Manejo . . . . . . . . . . . . . . . . ES . . .3
Transporte . . . . . . . . . . . . . ES . . . 3
Almacenamiento . . . . . . . . ES . . .3
Cuidados y mantenimiento. ES . . .3
Ayuda en caso de avería . . ES . . .3
Garantía . . . . . . . . . . . . . . . ES . . .5
Accesorios y piezas de repues-
to . . . . . . . . . . . . . . . . . . . . ES . . .5
Datos técnicos . . . . . . . . . . ES . . .6
Protección del medio ambien-
te
Los materiales empleados
para el embalaje son reciclables y recuperables. No tire el
embalaje a la basura doméstica y entréguelo en los puntos
oficiales de recogida para su
reciclaje o recuperación.
Los aparatos viejos contienen
materiales valiosos reciclables
que deberían ser entregados
para su aprovechamiento posterior. Evite el contacto de baterías, aceites y materias
semejantes con el medio ambiente. Por este motivo, entregue los aparatos usados en los
puntos de recogida previstos
para su reciclaje.
Indicaciones sobre ingredientes
(REACH)
Encontrará información actual sobre los ingredientes en:
www.kaercher.com/REACH
Símbolos del manual de ins-
trucciones
Peligro
Para un peligro inminente que acarrea lesiones de gravedad o la muerte.
몇 Advertencia
Para una situación que puede ser peligrosa, que puede acarrear lesiones de gravedad o la muerte.
Precaución
Para una situación que puede ser peligrosa, que puede acarrear lesiones leves o
daños materiales.
Uso previsto
몇 Advertencia
El aparato no es apto para aspirar polvos
nocivos para la salud.
– Este aspirador está diseñado para la
limpieza de pisos y superficies murales.
– Este aparato es apto para el uso en
aplicaciones industriales, como en hoteles, escuelas, hospitales, fábricas,
tiendas, oficinas y negocios de alquiler.
– La temperatura del entorno no debe su-
perar los 40 ºC durante el uso del aparato.
16 ES
– 1
Page 17

Elementos del aparato
1 Electrodos
2 Mango
3 Manguera de aspiración
4 Cable de conexión a la red
5 Bloqueo del cabezal de absorción
6 Rueda
7 Recipiente acumulador de suciedad
8 Cabezal de aspiración
9 Estribo de ruedas giratorias
10 Rodillo de dirección
11 Boquilla barredora de suelos
12 Tubo de aspiración
13 Tubuladura de aspiración
14 Interruptor principal
15 Asa de transporte
16 Cubierta del filtro
17 Estribo de empuje
18 Placa de características
19 Codo
20 Pasador para la limpieza de filtros
21 Soporte para boquilla para suelos
22 Manguera de salida
23 Filtro de escape de aire
24 filtro plano de papel plegado
Puesta en marcha
Precaución
Al aspirar no retirar nunca el filtro plano de
papel plegado.
Aspiración en seco
– Para la aspiración de polvo fino tam-
bién se puede utilizar una bolsa filtrante
de papel o un filtro de membrana (accesorios especiales).
Montaje de la bolsa filtrante de papel
Figura
Desbloquear y extraer el cabezal de as-
piración.
Insertar la bolsa filtrante de papel o el
filtro de membrana (accesorios especiales).
Colocar y bloquear el cabezal de aspi-
ración.
Aspiración de líquidos
Montaje del borde de goma
Figura
Desmontar la tira de cerdas.
Montar los labios de goma.
Nota: El lateral estructurado del borde de
goma tiene que estar para afuera.
Retirar la bolsa filtrante de papel
– Para aspirar suciedad líquida se debe
retirar la bolsa filtrante de papel o el filtro de membrana (accesorios especiales).
– Se recomienda utilizar una bolsa filtran-
te especial (húmeda) (véase sistemas
filtrantes).
Purgue el agua sucia
Figura
Suelte el agua residual a través de la
manguera de salida.
General
– Al aspirar suciedad húmeda con la bo-
quilla para tapicerías o juntas, o cuando
se aspira principalmente agua de un recipiente, se recomienda desactivar la
función „Limpieza del filtro“.
– Al alcanzar el máx. nivel de líquido se
apaga automáticamente el aparato.
– En el caso de líquidos no conducto-
res (como emulsión de taladro, aceites y grasas), no se apaga el aparato
cuando el recipiente esté lleno. Se
debe comprobar el nivel continuamente y vaciar a tiempo el recipiente.
– Tras finalizar la aspiración de líquidos:
limpiar el filtro plano de papel plegado
con la limpieza de filtros. Limpiar los
electrodos con un cepillo. Limpiar y secar el recipiente con un paño húmedo.
Enganche de clip
Figura
La manguera de aspiración está equipada
con un sistema de clip. Se pueden conectar
todos los accesorios C-40/C-DN-40.
– 2
17ES
Page 18

Manejo
Almacenamiento
Conexión del aparato
Enchufe la clavija de red.
Conectar el aparato con el interruptor
principal.
Limpieza de filtro
Nota: Si se activa la limpieza de filtro cada
5-10 minutos, se aumenta la duración del
filtro plano de papel plegado.
– Desconectar la limpieza del filtro:
Desplazar el pasador hacia arriba.
– Conectar la limpieza del filtro:
Desplazar el pasador hacia abajo.
Figura
Pulsar el botón del asa durante varios
segundos con la limpieza de filtros conectada. El filtro plano de papel plegado se limpia automáticamente con un
soplo de aire (ruido vibrante).
Desconexión del aparato
Desconectar el aparato con el interrup-
tor principal.
Extraer el enchufe de la red.
Después de cada puesta en marcha
Vacíe el recipiente.
Limpie el aparato por dentro y por fuera
aspirándolo y frotar con un paño húmedo.
Transporte
Precaución
¡Peligro de lesiones y daños! Respetar el
peso del aparato en el almacenamiento.
Este aparato sólo se puede almacenar en
interiores.
Cuidados y mantenimiento
Peligro
Antes de efectuar cualquier trabajo en el
aparato, hay que desconectar de la red
eléctrica.
Cambiar el filtro plano de papel ple-
gado
Abrir la cubierta del filtro.
Cambiar el filtro plano de papel plega-
do.
Cerrar la cubierta del filtro, se debe oír
cómo encaja.
Recambiar el filtro de escape de aire
Abrir la cubierta del filtro.
Sustituir el filtro de escape de aire
Cerrar la cubierta del filtro, se debe oír
cómo encaja.
Limpiar los electrodos
Desbloquear y extraer el cabezal de as-
piración.
Limpiar los electrodos con un cepillo.
Colocar y bloquear el cabezal de aspi-
ración.
Precaución
¡Peligro de lesiones y daños! Respetar el
peso del aparato para el transporte.
Sacar el tubo de aspiración con la bo-
quilla para suelos del soporte. Coger el
aparato por el asa y la tubería de aspiración para el transporte.
Al transportar en vehículos, asegurar el
aparato para evitar que resbale y vuelque conforme a las directrices vigentes.
18 ES
Ayuda en caso de avería
Peligro
Antes de efectuar cualquier trabajo en el
aparato, hay que desconectar de la red
eléctrica.
– 3
Page 19

La turbina de aspiración no funcio-
na
Comprobar la clavija y el seguro del su-
ministro de corriente.
Comprobar el cable, enchufe y electro-
dos del aparato.
Conexión del aparato
La turbina de aspiración se desco-
necta
Vacíe el recipiente.
La turbina de aspiración no funcio-
na tras vaciar el recipiente
Apagar el aparato, esperar 5 segundos
y volver a encender tras 5 segundos.
Limpiar los electrodos y el espacio en-
tre los electrodos con un cepillo.
La capacidad de aspiración dismi-
nuye
Eliminar las obstrucciones de la boqui-
lla, tubo de aspiración, codo, empuñadura, manguera de aspiración o el filtro
plano de papel plegado.
Cambiar la bolsa filtrante de papel.
Limpieza de filtro: Pulsar varias veces
el botón del asa con la limpieza de filtros conectada.
Encajar correctamente la cubierta del
filtro.
Limpiar o cambiar el filtro de la mem-
brana (accesorios especiales) con
agua corriente.
Cambiar el filtro plano de papel plega-
do.
Comprobar si la tubería de salida es es-
tanca.
Pérdida de polvo durante la aspira-
ción
Comprobar si el filtro plano de papel
plegado está montado correctamente.
Cambiar el filtro plano de papel plega-
do.
El sistema automático de desco-
nexión (aspiración en húmedo) no
arranca
Limpiar los electrodos y el espacio en-
tre los electrodos con un cepillo.
Controlar el nivel del líquido no conduc-
tor de electricidad permanentemente.
La limpieza de filtro se conecta con-
tinuamente
Aflojar la boquilla de aspiración ajusta-
da o el extremo de la manguera.
Finalizar la aspiración continuada del
recipiente de líquidos o desconectar la
limpieza de filtros.
Eliminar las obstrucciones de la boqui-
lla, tubo de aspiración, codo, empuñadura, manguera de aspiración o el filtro
plano de papel plegado.
Cambiar el filtro plano de papel plega-
do.
La limpieza de filtros no funciona
La manguera de aspiración no está no
conectada
La limpieza de filtro no se puede
apagar
Avisar al servicio técnico.
La limpieza de filtro no se puede co-
nectar
Avisar al servicio técnico.
– 4
19ES
Page 20

Garantía
En todos los países rigen las condiciones
de garantía establecidas por nuestra empresa distribuidora. Las averías del aparato
serán subsanadas gratuitamente dentro
del periodo de garantía, siempre que se deban a defectos de material o de fabricación.
En un caso de garantía, le rogamos que se
dirija con el comprobante de compra al distribuidor donde adquirió el aparato o al servicio al cliente autorizado más próximo a su
domicilio.
Accesorios y piezas de re-
puesto
– Sólo deben emplearse accesorios y
piezas de repuesto originales o autorizados por el fabricante. Los accesorios
y piezas de repuesto originales garantizan el funcionamiento seguro y sin averías del aparato.
– Podrá encontrar una selección de las
piezas de repuesto usadas con más
frecuencia al final de las instrucciones
de uso.
– En el área de servicios de www.kaer-
cher.com encontrará más información
sobre piezas de repuesto.
20 ES
– 5
Page 21

Datos técnicos
NT 65/2 Eco
Tensión de red V 120
Frecuencia Hz 1~ 60
Corriente nominal A 18
Capacidad del depósito l 65
Cantidad de líquido l 50
Cantidad de aire (máx.) l/s 2x 54
Depresión (máx.) kPa (mbar) 23,5 (235)
Categoria de protección -- IPX4
Clase de protección II
Toma de tubo flexible de aspiración (C-DN/C-ID) mm 40
Longitud x anchura x altura mm 600 x 480 x 920
Peso de funcionamiento típico kg 19,0
Temperatura ambiente (máx.) °C +40
Valores calculados conforme a la norma EN 60335-2-69
Nivel de presión acústica L
Inseguridad K
pA
pA
Valor de vibración mano-brazo m/s
Inseguridad K m/s
Cable de conexión a la
red
SJTW-A 3x14 AWG
No. de pieza Longitud del
cable
VEX 6.648-919.0 10 m
dB(A) 74
dB(A) 1
2
2
<2,5
0,2
– 6
21ES
Page 22

Filtersysteme / Filter Systems / Système de filtres
Flachfaltenfilter *
Flat pleated
filter *
Filtre plat à
plis *
Bestell-Nr.
Order No.
Numéro de
référence
Menge
Quantity
Quantité
Normalstäube
Normal dust
Poussières
normales
Feinstäube
Fine dust
Poussières fines
Abrasive Stäube
Abrasive dust
Poussières
abrasives
Flüssigkeiten,
nasser Schmutz
Liquids, wet dirt
Liquides, saletès
humides
* BIA C geprüft, Rückhaltevermögen > 99,9 %
* BIA C approved, Retention > 99,9 %
* Contrôle BIA C, Conservation > 99,9 %
6.904-283 6.904-285 6.904-282 6.904-252 6.904-284
15151
XXX
XXX
XXXX
Papierfiltertüte
3-lagig
(reißfest) *
Paper filter bag
triple layered
(tenacious) *
Sachet filtre à 3
épaisseurs
(résistant à la
rupture) *
Membranfilter
Diaphragm
filter
Filtre à
membrane
Spezialfiltertüte, nass
Special filter
bag, wet
Sachet filtre
spécial,
mouillé
XX
Flachfaltenfilter (PES) *
Flat pleated
filter (PES) *
Filtre plat à plis
(PES) *
22
Page 23

Zubehör / Accessories / Accessoires
4.440-679 K
4.440-728 K/EL
4.060-474 K
4.060-533 K/EL
6.906-321 K
6.906-279 K
6.906-344 K C 40
5.407-109 K/EL
5.407-111 K/EL
5.407-113 K/EL C 40 --> C 35
5.031-904 K
5.032-427 K/EL
CDN 40
CDN 40
C 40
C 40
C 40
C 40
Verlängerung,
extension,
rallonge
C 40 --> DN 35
C 40 --> DN 40
DN 40
DN 40
4,0
4,0
4,0
10,0
2,5
6.902-081 M
6.906-531 M
6.906-554 K
6.903-018 M
6.903-051 M
DN 40
DN 40
DN 40
DN 40
DN 40
0,5
1,0
360
370
450
23
Page 24

Zubehör / Accessories / Accessoires
6.903-033 K
6.905-817 M
6.902-105 G/Oil DN 40 0,20
2.637-217 K DN 40
DN 40
DN 40
0,30
0,40
[mm]
Umbausatz für
nichtleitende
Medien,
Upgrade kit for nonconducting media,
Kit de modification
pour les fluides non
conducteurs
EL = elektrisch leitend, electrical conductive, conducteur électrique
K = Kunststoff, Plastic, Plastique
C = Clip-Verbindung, Clip connection, Connexion de clip
DN = Konus-Verbindung, Cone connection, Connexion de cône
M = Metall, metal, métal
G = Gummi, Rubber, Caoutchouc
Oil = ölbeständig, oil resistant, résistant à l’huile
2.640-426
6.905-877 G
6.903-062 G
6.903-081 Oil
6.903-063 G
6.906-146 Oil
6.905-878 K
6.904-064 K
6.904-065 K
360
370
370
450
450
360
370
450
24
Page 25

NT 65/2 Eco
25
Page 26

Page 27

Page 28

http://www.kaercher.com/dealersearch
 Loading...