

Page 1
Register and win!
www.kaercher.com
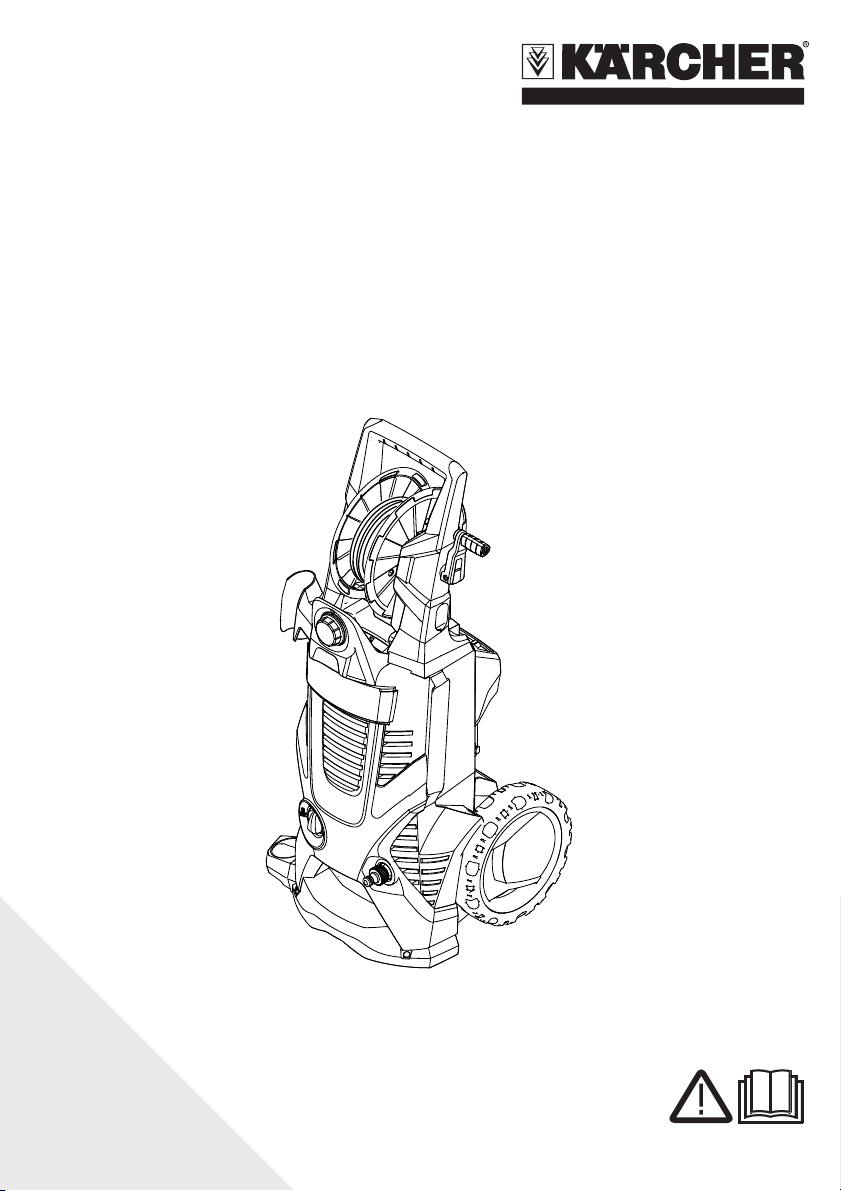
K 6.450
Operating Instructions
Before first use of the unit
read these operating instructions
and act in accordance with them.
59639200 10/10
Page 2
Contents
General information 2
Description of the Appliance 3
Safety instructions 4
Operation 6
Transport 9
Storage 9
Maintenance and care 10
Troubleshooting 10
Customer Service 11
Technical specifications 11
Assembly 12
Spare Parts 15
General information
Dear Customer,
Please read and comply with these
original instructions prior to the initial operation of your appliance and store
them for later use or subsequent owners.
Proper Use
This high-pressure cleaner is designed for
domestic use only:
– to clean machines, vehicles, buildings,
tools, facades, terraces, garden equipment etc. using a high-pressure water
jet (and detergents if required).
– with accessories, replacement parts
and detergents approved by KÄRCHER. Observe the instructions provided
with these detergents.
Symbols in the operating
instructions
Danger
Immediate danger that can cause severe
injury or even death.
몇 Warning
Possible hazardous situation that could
lead to severe injury or even death.
Caution
Possible hazardous situation that could
lead to mild injury to persons or damage to
property.
Symbols on the machine
The high pressure jet may not
be directed at persons, animals, live electrical equipment
or at the appliance itself. Pro-
tect the appliance against frost.
Environmental protection
The packaging material can be recy-
cled. Please do not place the packaging into the ordinary refuse for disposal, but
arrange for the proper recycling.
Old appliances contain valuable ma-
terials that can be recycled. Please
arrange for the proper recycling of old
appliances. Please dispose your old appliances using appropriate collection systems.
Notes about the ingredients (REACH)
You will find current information about the
ingredients at:
http://www.karcher.de/de/unternehmen/
umweltschutz/REACH.htm
Scope of delivery
The scope of delivery of your appliance is illustrated on the packaging. Check the contents of the appliance for completeness
when unpacking.
In the event of missing accessories or any
transport damage, please contact your
dealer.
Warranty
The warranty terms published by the relevant sales company are applicable in each
country. We will repair potential failures of
your appliance within the warranty period
free of charge, provided that such failure is
caused by faulty material or defects in manufacturing. In the event of a warranty claim
please contact your dealer or the nearest
authorized Customer Service centre.
Please submit the proof of purchase.
2 English
Page 3
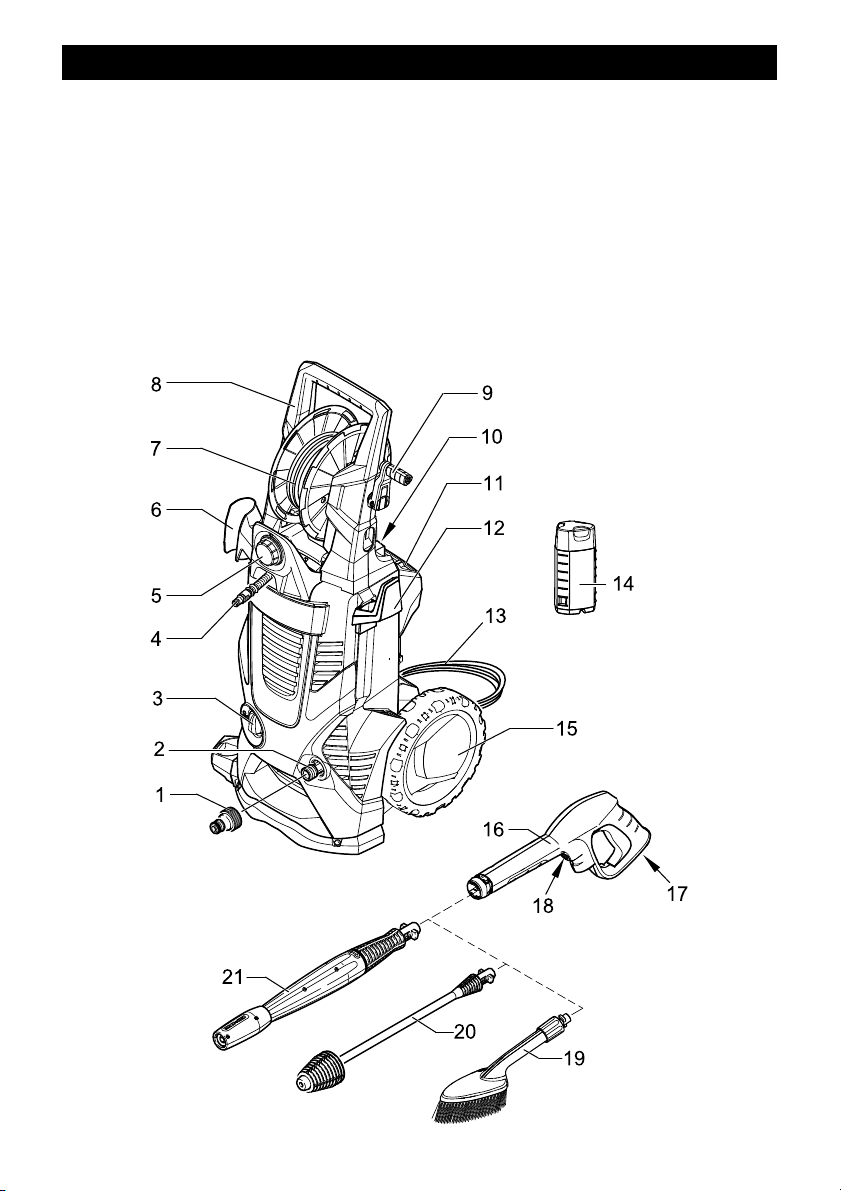
Description of the Appliance
1 Coupling element for water connection
2 Water connection with integrated sieve
3 Appliance switch "0/OFF“/ „I/ON“
4 High pressure hose
5 Dosage regulator for detergent
6 Storage for trigger gun
7 High-pressure hose drum
8 Transport handle
9 Hand crank for hose drum
10 Storage of detergent reservoir with de-
tergent connection
11 Storage for accessories
12 Storage hook for mains connection cable
13 Mains cable with mains plug
14 Detergent reservoir with locking lid
15 Wheels
16 Trigger gun
17 Lock trigger gun
18 Key to detach the high-pressure hose
from the trigger gun
19 Washing brush
20 Spray lance with Dirtblaster
21 Spray lance with pressure regulation
(Vario Power)
English 3
Page 4

Safety instructions
Danger
Never touch the mains plug and the
socket with wet hands.
The appliance must not be used if the
power cord or important parts of the appliance, e.g. high-pressure hoses, trigger gun or safety devices are damaged.
Check the power cord and mains plug
for damage before every use. If the
power cord is damaged, please arrange
for it to be replaced immediately by an
authorised repair agent or a skilled
electrician
Check the high-pressure hose for dam-
age before every use. Please arrange
for the immediate replacement of a
damaged high-pressure hose.
The appliance may not be used in areas
where a risk of explosion is present.
If the appliance is used in hazardous ar-
eas (e.g. filling stations) the corresponding safety provisions must be
observed.
High-pressure jets can be dangerous if
improperly used. The jet must not be directed at persons, animals, live electrical equipment or at the appliance itself.
The high-pressure jet must not be di-
rected at other persons or directed by
the user at him/herself to clean clothing
or footwear.
Never use the appliance to clean ob-
jects containing hazardous substances
(e.g. asbestos).
Vehicle tyres or tyre valves are suscep-
tible to damage from the high-pressure
jet and may burst. The first indication of
this is a discolouration of the tyre. Damaged vehicle tyres/tyre valves are highly dangerous. Ensure that a distance of
at least 30 cm is observed when cleaning with the jet!
Risk of explosion!
Do not spray flammable liquids.
Never draw in fluids containing solvents
or undiluted acids and solvents! This includes petrol, paint thinner and heating
oil. The spray mist thus generated is
highly inflammable, explosive and poi-
sonous. Do not use acetone, undiluted
acids and solvents as they are damag-
ing to the materials from which the ap-
pliance is made.
몇 Warning
The mains plug and the coupling of an
extension cable must be watertight and
must never lay in the water.
Unsuitable extension cables can be
hazardous. Only use extension cables
outdoors which have been approved for
this purpose and labelled with a suffi-
cient cable cross-section:
1 - 10 m: 1.5 mm
Always fully unroll electrical cables from
the cable drum.
High-pressure hoses, fixtures and cou-
plings are important for the safety of the
appliance. Only use high-pressure hos-
es, fixtures and couplings recommend-
ed by the manufacturer.
This appliance is not intended for use
by persons with reduced physical, sen-
sory or mental capabilities.
The appliance must not be operated by
children or persons who have not been
instructed accordingly.
Children should be supervised to pre-
vent them from playing with the appli-
ance.
The operator must use the appliance
correctly. When working with the appli-
ance, he must consider the local condi-
tions and pay due care and attention to
other persons, in particular children,
who are nearby.
Do not use the appliance when there
are other persons around unless they
are also wearing safety equipment.
Wear protective clothing and safety
goggles to protect against splash back
containing water or dirt.
2
; 10 - 30 m: 2.5 mm
2
4 English
Page 5

Caution
In case of extended downtimes, switch
the appliance off at the main switch / appliance switch or remove the mains
plug.
Do not operate the appliance at temper-
atures below 0 °C.
Observe a distance of at least 30 cm
when using the jet to clean painted surfaces to avoid damaging paintwork.
Never leave the appliance unattended
when it is in operation.
Make sure that the power cable or ex-
tension cables are not damaged by running over, pinching, dragging or similar.
Protect the power cable from heat, oil,
and sharp edges.
All current-conducting parts in the work-
ing area must be protected against jet
water.
The appliance may only be connected
to an electrical supply which has been
installed in accordance with IEC 60364.
The appliance may only be connected
to alternating current. The voltage must
correspond with the type plate on the
appliance.
For safety reasons, we recommend that
you operate the appliance only via a
earth-leakage circuit breaker (max.
30 mA).
Cleaning operations which produce oily
waste water, e.g. engine washes, underbody washes, may only be carried
out using washing stations equipped
with an oil separator.
This appliance was designed to be
used with detergents which are supplied or recommended by the manufacturer. The use of other detergents or
chemicals may compromise the safety
of the appliance.
Safety Devices
Caution
Safety devices protect the user and must
not be modified or bypassed.
Power switch
The appliance switch prevents unintentional operation of the appliance.
Lock trigger gun
This lock locks the lever of the trigger gun
and prevents the inadvertent start of the appliance.
Overflow valve with pressure switch
The overflow valve prevents the permissible working pressure from being exceeded.
If the lever on the trigger gun is released
the pressure switch turns off the pump, the
high-pressure jet is stopped. If the lever is
pulled the pump is turned on again.
Prerequisites for the appliance's
stability
Caution
Create stability for the appliance prior to all
work on or with the appliance to prevent accidents or damage.
– The stability of the appliance is warrant-
ed when it is placed onto an even sur-
face.
English 5
Page 6
Operation
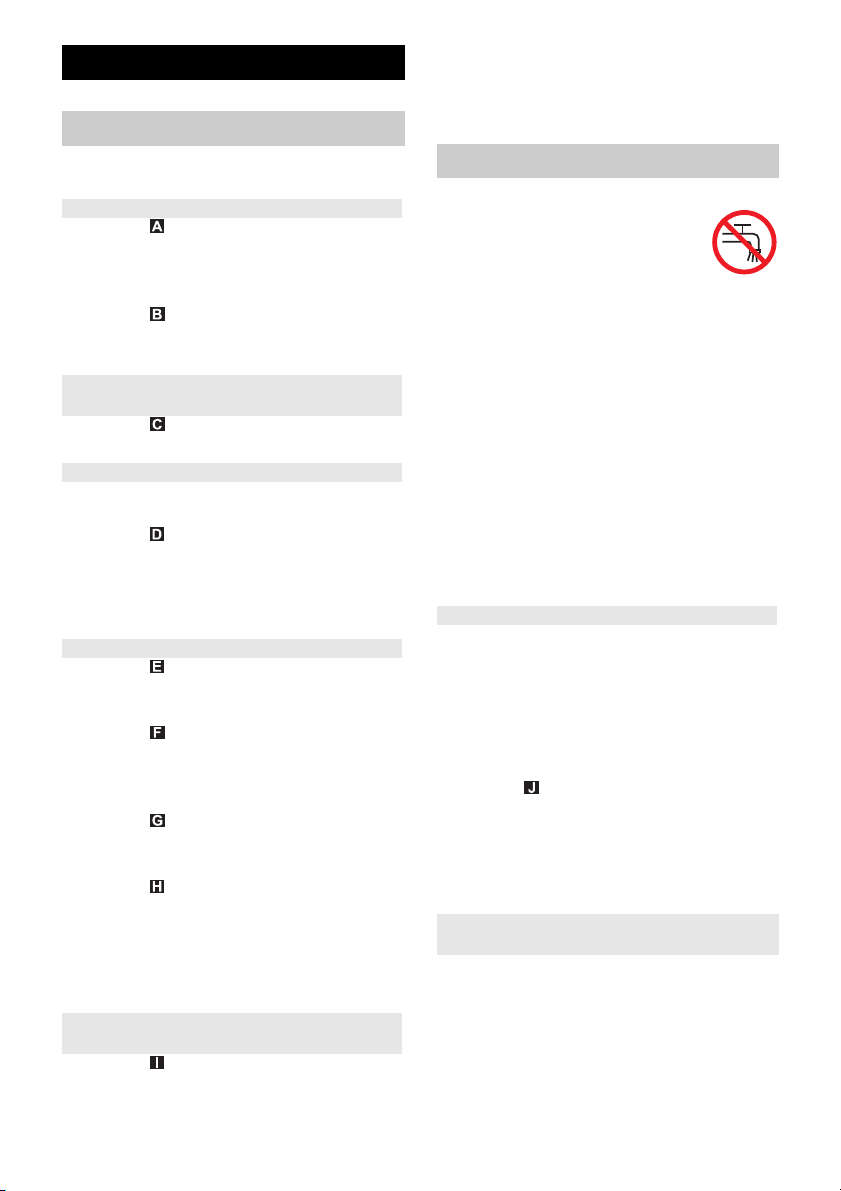
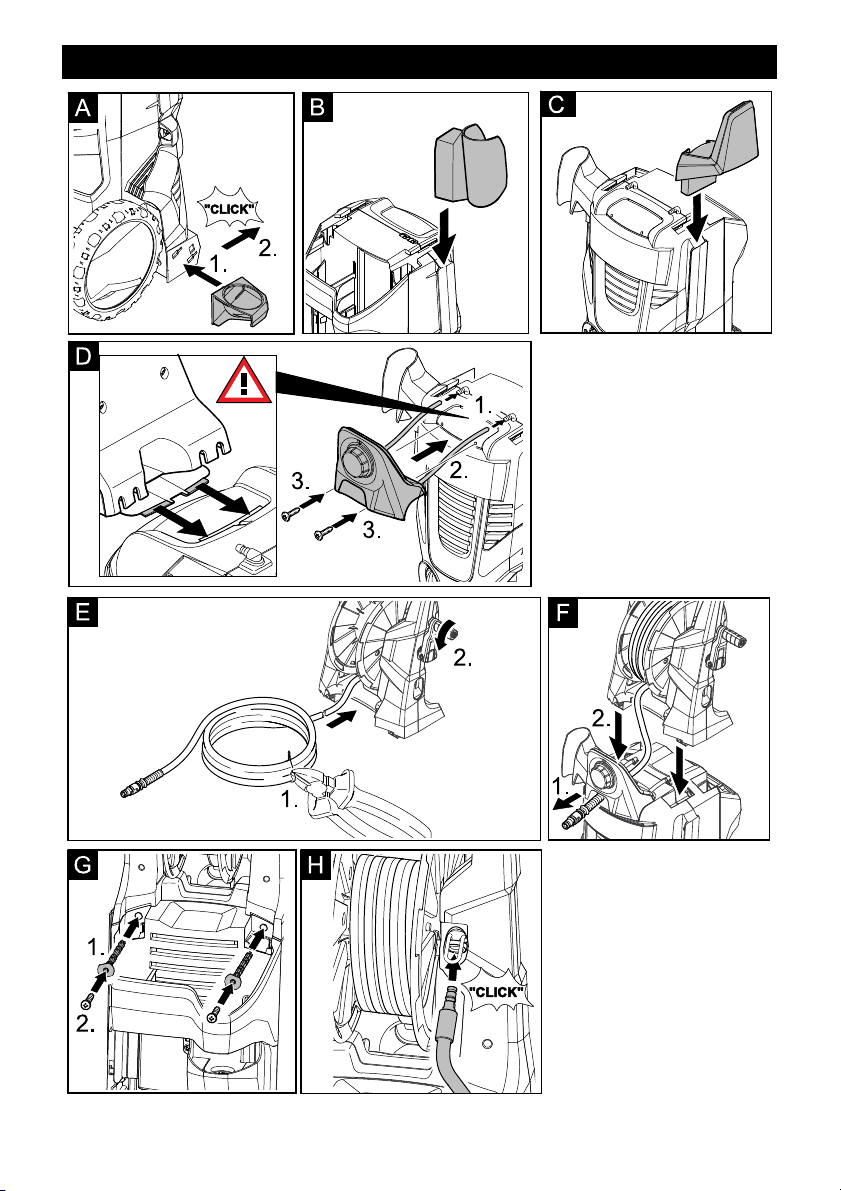
Î Illustrations on Page 12
Before Startup
Mount loose parts delivered with appliance
prior to start-up.
Install the storage for hand-spray gun
Illustration
Î Place the bottom holder into the recess-
es and push forward until it audibly
locks in.
Illustration
Î Insert the top holder and push down all
the way.
Install the storage hook for the mains
connection cable
Illustration
Î Install the top storage hook.
Install the dosage regulator for detergent
You will need the 2 included screws as well
as a Philips screwdriver PH 2.
Illustration
Î Insert both detergent hoses onto the
hose fittings.
Î Install the dosage regulator and con-
nect using 2 screws.
Install the transport handle
Illustration
Î Wind up the high-pressure hose on the
hose drum.
Illustration
Î Slide the free end of the coiled high
pressure hose through the recesses on
the dosage regulator.
Illustration
Î Attach the transport handle, insert the
bolts into the bores and screw them in.
Illustration
Î Press the connecting fitting from the
short high pressure hose into the brass
intake until it locks into place audibly.
Check the secure connection by pulling
on the high pressure hose.
Connect the high pressure hose to the
hand spray gun
Illustration
Î Push the high pressure hose into the
trigger gun until it locks audibly.
Note: Make sure the connection nipple
is aligned correctly.
Check the secure connection by pulling
on the high pressure hose.
Water supply
몇 Warning
According to the applicable regulations, the appliance must never be
used on the drinking water supply
without a system separator. Use a
suitable system separator manufactured by
KÄRCHER; or, as an alternative, a system
separator as per EN 12729 Type BA. Water
flowing through a system separator is considered non-drinkable.
Caution
Always connect the system separator to
the water supply, never directly to the appliance!
Note: Impurities in the water can damage
the high-pressure pump and accessories.
For protection, the use of the KÄRCHER
water filter (optional accessory, order no.
4.730-059) is recommended.
Water supply from mains
Observe regulations of water supplier.
For connection values, see type plate/technical data.
Î Use a fibre-reinforced water hose (not
included) with a standard coupling.
(Minimum diameter 1/2 inch (13 mm),
minimum length 7.5 m).
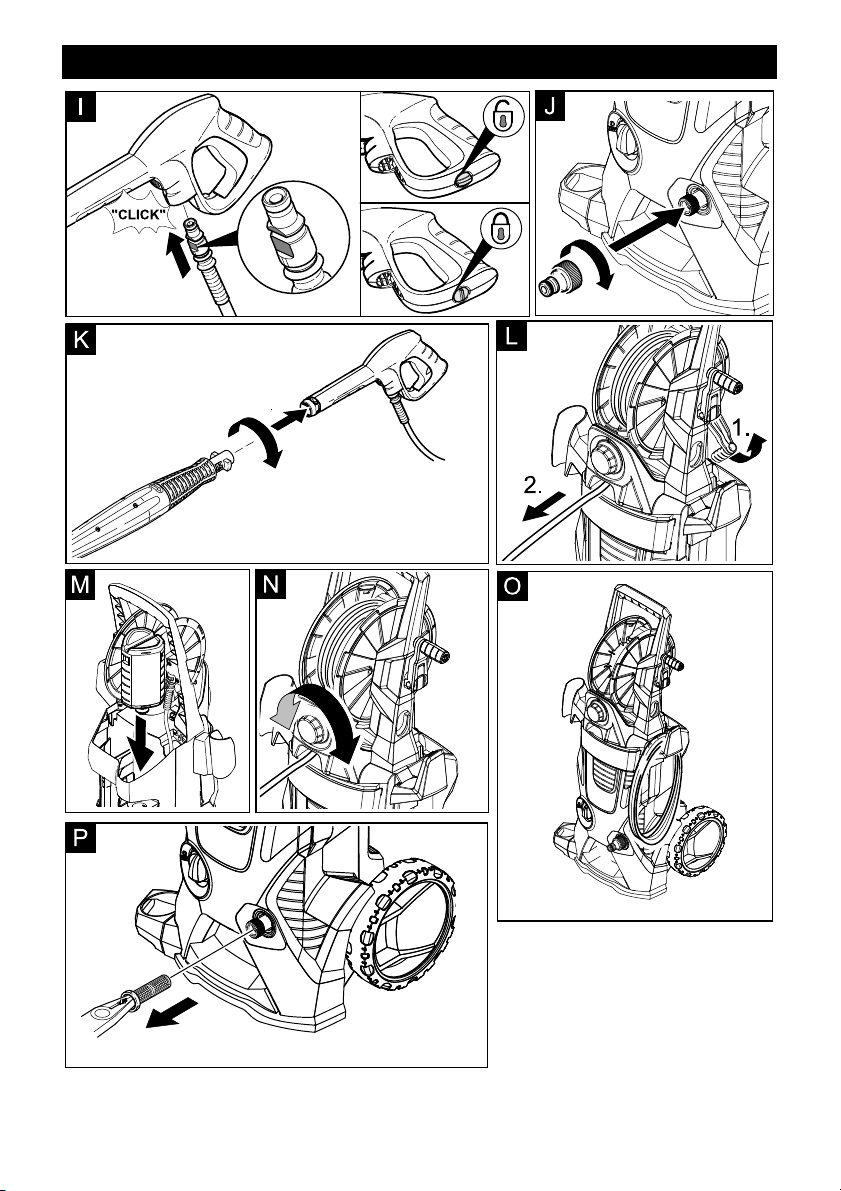
Illustration
Î Screw the supplied coupling element to
the water connection on the appliance.
Push the water supply hose onto the
coupling unit, then connect it to the wa-
ter supply.
How to draw water from a bucket when
using a KÄRCHER Pressure Cleaner
KÄRCHER recommends using the suction
hose accessory (sold separately) Order no.
9.505-779.0.
STEP 1:
Î Connect the suction hose to the water
inlet on the pressure cleaner and drop
the other end into a bucket.
6 English
Page 7
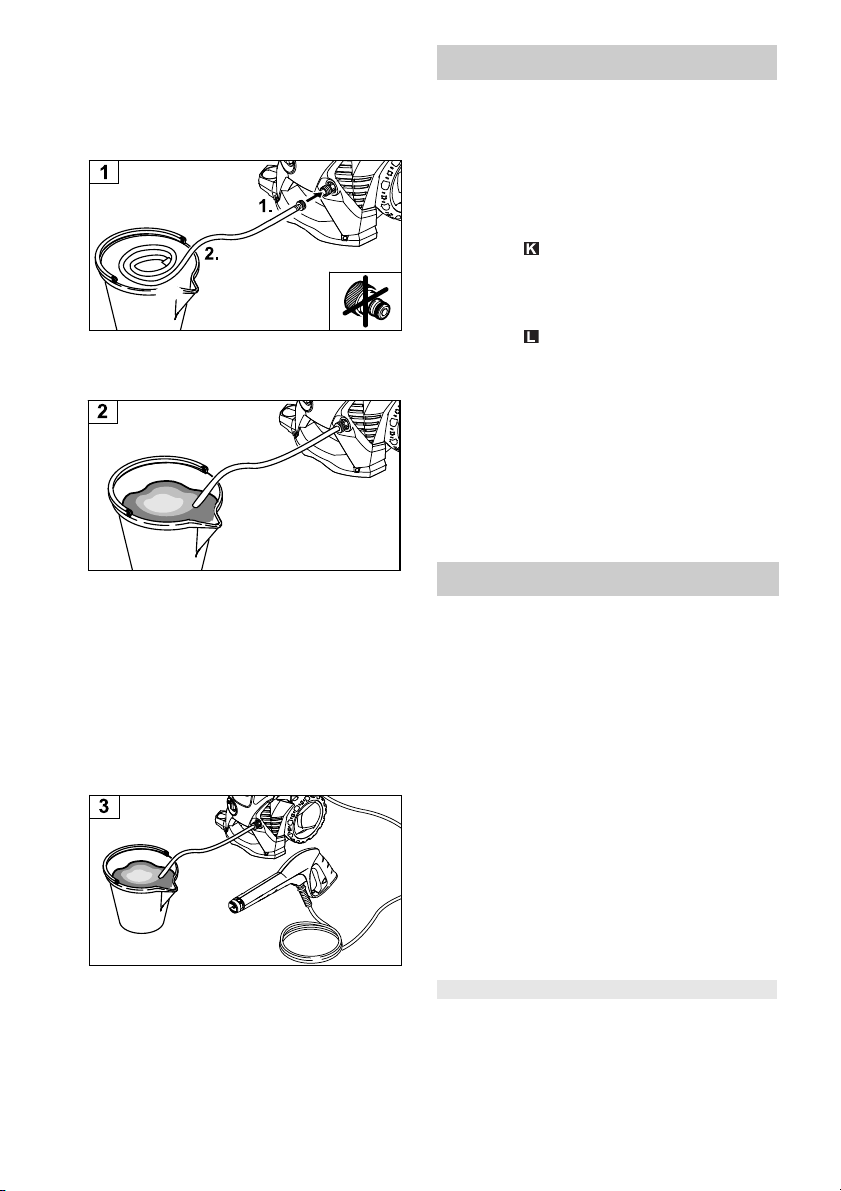
Tip: If you are not using this accessory, coil
a hose into the bucket and ensure that you
only use a standard hose clamp to connect
to the pressure washer.
CLICK FITTINGS MUST NOT BE USED!
STEP 2:
Î Fill up your bucket with water.
STEP 3:
Î Connect the KÄRCHER power cord to
an electricity source and turn on at powerpoint. Make sure the high pressure
nozzle is not connected and turn the
unit on at the ON/OFF switch. Press the
trigger on the gun - the unit is ready for
use once there is a constant water system.
STEP 4:
Î Connect the high pressure nozzle and
press the hand trigger to begin cleaning.
Start up
Caution
Dry runs lasting longer than two minutes
lead to damages to the high pressure
pump. If the appliance does not build up
pressure within two minutes, switch it off
and proceed as instructed in the Chapter
"Troubleshooting".
Illustration
Î Push the spray lance into the trigger
gun and fasten it by turning it through
90°.
Illustration
Î Unwind the high pressure hose from the
hose drum. Hold on to the transport
handle during this procedure.
Note: If the hand crank is in its secured
position, fold it up first.
Î Completely open the water tap.
Î Completely uncoil the mains cable.
Î Insert the mains plug into the socket.
Î Turn on the appliance “I/ON”.
Operation
몇 Danger
The trigger gun is subjected to a recoil force
when the water jet is discharged. Make
sure that you have a firm footing and are
also holding the trigger gun and spray lance
firmly.
Caution
Prior to cleaning, make sure that the high
pressure is placed safely on level ground.
Wear protective goggles and protective
clothing during the cleaning process.
Î Unlock the lever on the trigger gun.
Î Pull on the lever of the trigger gun; the
device will switch on.
Note: Release the lever of the trigger gun;
the device will switch off again. High pressure remains in the system.
Spray lance with pressure regulation
Carrying out the most common cleaning
tasks. The work pressure can be stagelessly regulated between "Min" and "Max".
Î Release the lever on the trigger gun.
Î Turn the spray lance to the desired po-
sition.
English 7
Page 8
Note: Suitable for working with detergent;
for this, turn the spray lance to the "Mix" position.
Set the dosage regulator to the desired
suction volume for detergent.
Spray lance with Dirtblaster
For particularly dirty items or areas.
Caution
Car tyres, paint or sensitive surfaces such
as wood should not be cleaned with the dirt
blaster, as there is a risk of damage.
– Not suitable for use with detergents.
Washing brush
– Note: Suitable for use with detergents.
Set the dosage regulator to the desired
suction volume for detergent.
Working with detergent
Please use exclusively KÄRCHER detergents and care products to carry out the respective cleaning task, as these were
specifically developed for your appliance.
The use of other detergents and care products may lead to premature wear and can
invalidate your warranty claims. Please obtain information at your local dealer or request information directly from KÄRCHER.
Notes regarding the detergent: The most
commonly use detergents can be purchased ready to use in their detergent reservoirs with locking lids. This will make the
pesky refilling and filling processes redundant.
Illustration
Î Remove the lid from the detergent res-
ervoir and press the detergent reservoir
into the detergent connection with the
opening facing down.
Illustration
Î Adjust the suction volume of the deter-
gent solution by means of the dosage
regulator for detergents.
Î Use spray lance with pressure regula-
tion (Vario Power).
Î Turn the spray lance to "Mix" position.
Note: This will mix the detergent with
the water stream.
Note: If required, the washing brushes can
be used to work with detergent.
Recommended cleaning method
Î Spray the detergent sparingly on the
dry surface and allow it to react, but not
to dry.
Î Spray off loosened dirt with the high-
pressure jet.
Interrupting operation
Î Release the lever on the trigger gun.
Î Lock the lever on the trigger gun.
Î During longer breaks (more than 5 min-
utes), also turn the appliance off using
the "0/OFF" switch.
Finish operation
Caution
Only separate the high-pressure hose from
the trigger gun or the appliance while there
is no pressure in the system.
Î Remove the detergent reservoir from
the intake and close it with the lid. To
store, place into the intake rotated by
180°.
Î Release the lever on the trigger gun.
Î Turn off the appliance "0/OFF".
Î Turn off tap.
Î Detach the appliance from the water
supply.
Caution: When disconnecting the supply or high pressure hose, warm water
may leak from the connections after operation.
Î Press the lever on the trigger gun to re-
lease any remaining pressure in the
system.
Î Lock the lever on the trigger gun.
Î Pull out the mains plug.
8 English
Page 9

Transport
Caution
In order to prevent accidents or injuries,
keep in mind the weight of the appliance
during transport (see Specifications).
When transporting by hand
Î Pull the appliance by its transport han-
dle.
When transporting in vehicles
Î Prior to horizontal transport: Remove
the detergent reservoir from the intake
and close it with the lid.
Î Secure the appliance against shifting
and tipping over.
Storage
Caution
In order to prevent accidents or injuries,
keep in mind the weight of the appliance
when selecting a storage location for it (see
Specifications).
Storing the Appliance
Î Park the machine on an even surface.
Î Wind the entire high pressure hose onto
the hose drum by rotating the hand
crank counter-clockwise.
Î Insert the hand spray gun with the spray
lance into the holder for the hand spray
gun.
Illustration
Î Stow away the mains cable, the high-
pressure hose and accessory at the ap-
pliance.
Prior to extended storage periods, as during the winter, also observe the instructions
in the Care section.
Frost protection
Caution
Protect the appliance and its accessories
against frost.
The appliance and its accessories can get
destroyed through frost if there are any water residues in them. To avoid damage to
them:
Î Completely drain all water from the ap-
pliance:
Detach spray lance from the trigger
gun.
Switch the appliance on ("I/ON“), press
the trigger gun lever until no further wa-
ter is discharged (approx. 1 min).
Turn off the appliance.
Î Store the appliance and the entire ac-
cessories in a frost-safe room.
English 9
Page 10
Maintenance and care
Danger
Turn off the appliance and remove the
mains plug prior to any care and maintenance work.
Care
Prior to longer periods of storage, e.g. in
the winter:
Illustration
Î Pull out the sieve in the water connec-
tion using flat-nose pliers and clean under running water.
Maintenance
The appliance is maintenance-free.
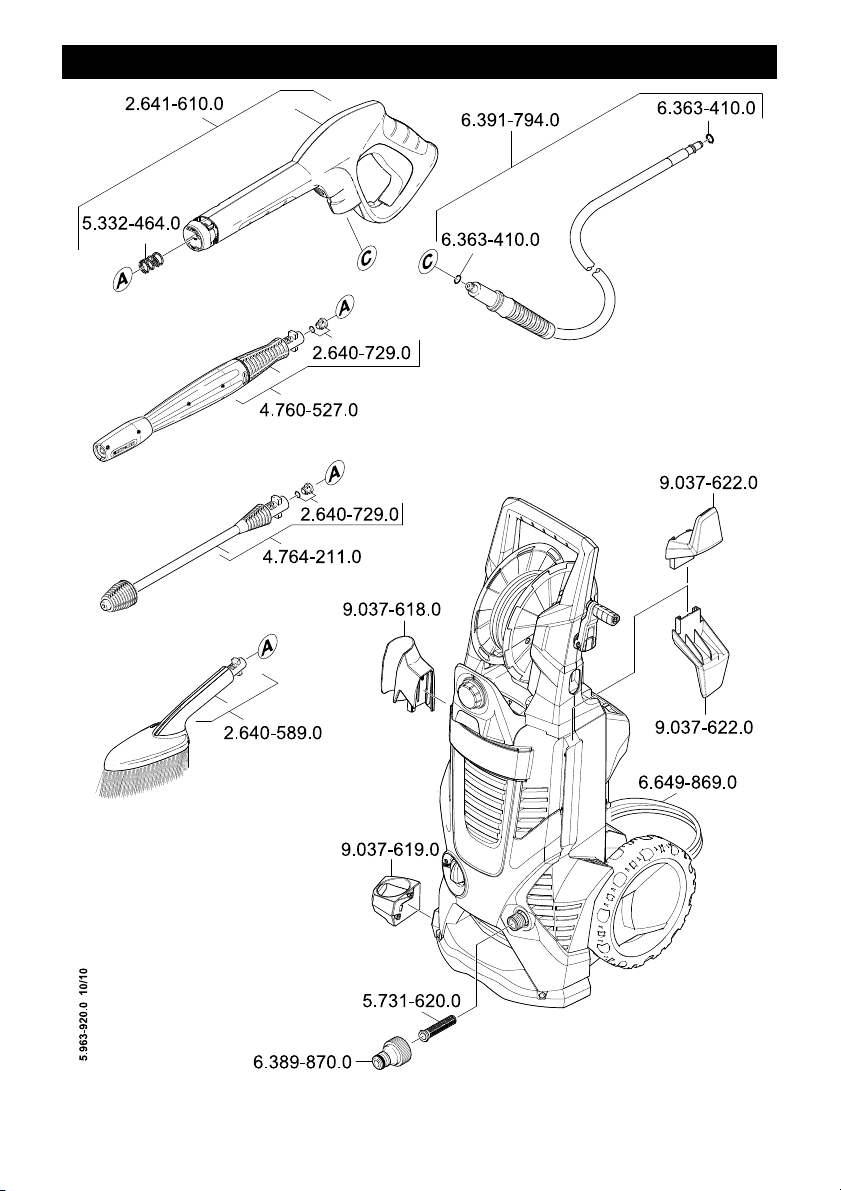
Spare parts
Use only original KÄRCHER spare parts.
You will find a list of spare parts at the end
of these operating instructions.
Special accessories
Special accessories expand the possibilities of using your appliance. Please contact
your KÄRCHER dealer for further information.
Troubleshooting
You can rectify minor faults yourself with
the help of the following overview.
If in doubt, please consult the authorized
customer service.
Danger
Turn off the appliance and remove the
mains plug prior to any care and maintenance work.
Repair works may only be performed by the
authorized customer service.
Appliance is not running
Î Pull on the lever of the trigger gun; the
device will switch on.
Î Check whether the voltage indicated on
the type plate corresponds to the volt-
age of the mains supply.
Î Check the mains connection cable for
damages.
Pressure does not build up in the
appliance
Î Check setting at the spray lance.
Î Appliance ventilation.
Switch on the appliance without con-
nection the high-pressure hose (max. 2
minutes) and run it until the water dis-
charging from the high-pressure outlet
is free of bubbles. Switch off appliance
and reconnect high-pressure hose.
Î Check the water supply.
Î Pull out the sieve in the water connec-
tion using flat-nose pliers and clean un-
der running water.
Strong pressure fluctuations
Î Clean high-pressure nozzle: Remove
dirt and debris from the nozzle bore, us-
ing a needle and rinse through with wa-
ter from the front.
Î Check water flow quantity.
Appliance is leaking
Î Slight leakage from the appliance pump
is normal. If the leakage increases con-
tact the authorized customer service.
10 English
Page 11
No detergent infeed
Î Use spray lance with pressure regula-
tion (Vario Power).
Turn the spray lance to "Mix" position.
Î Check the settings at the dosage regu-
lator for detergent.
Î Check the detergent suction hose for
kinks.
Customer Service
Australia
KÄRCHER Pty. Ltd.
40 Koornang Road
Scoresby, Victoria 3179
1800 675 714 (Free Call)
www.karcher.com.au
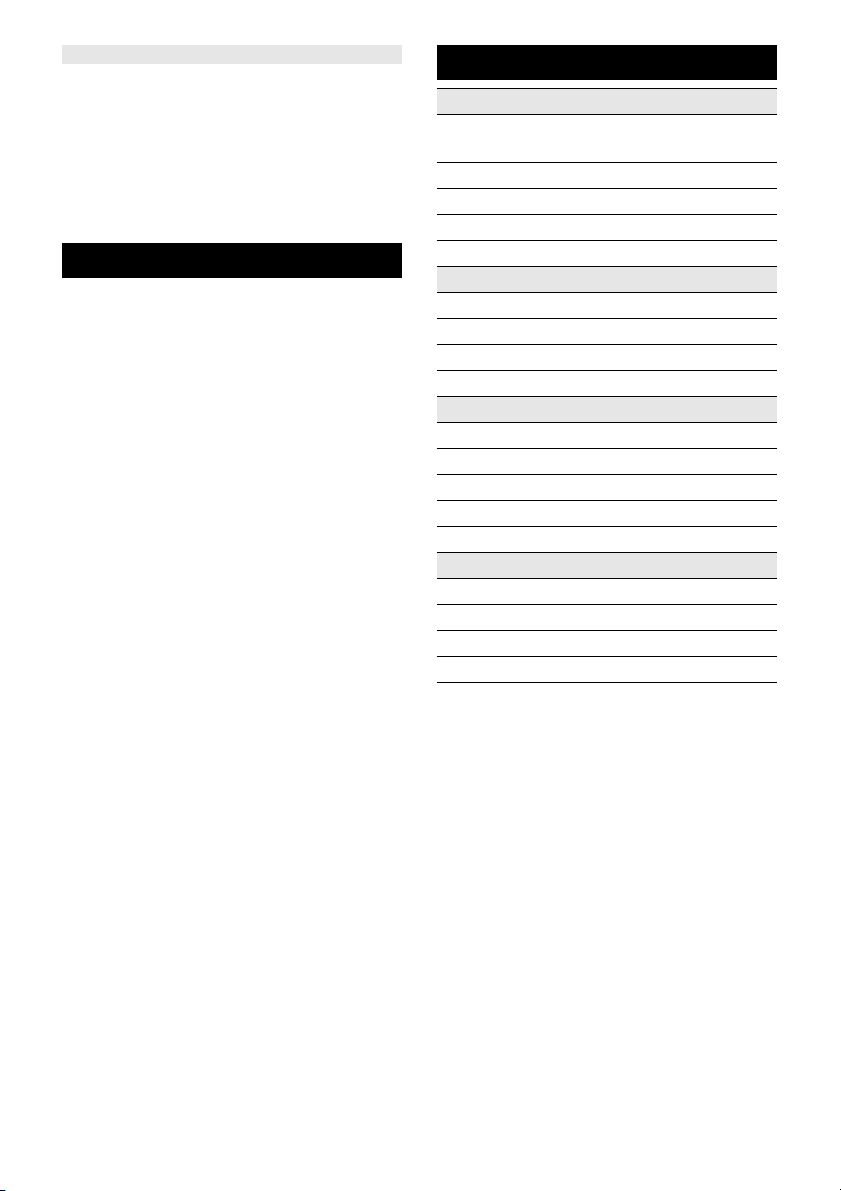
Technical specifications
Electrical connection
Voltage 230-240
1~50VHz
Connected load 2,2 kW
Protection class IP X5
Protective class I
Mains fuse (slow-blow) 16 A
Water connection
Max. feed pressure 0,6 MPa
Max. feed temperature 60 °C
Min. feed volume 11 I/min
Max. Suction height 1,0 m
Performance data
Working pressure 13 MPa
Max. permissible pressure 15 MPa
Water flow rate 8,2 I/min
Detergent flow rate 0,3 I/min
Recoil force of trigger gun 20 N
Dimensions and weights
Length 407 mm
Width 447 mm
Height 972 mm
Weight 19,8 kg
Subject to technical modifications!
English 11
Page 12
Assembly
12 English
Page 13
Assembly
English 13
Page 14
Notes
14 English
Page 15
Spare Parts
English 15
Page 16

 Loading...