

Page 1

5.956–394 F 19695 10/95
Page 2

English 2000 GM
2
Page 3

2000 GM English
English
Please read these operating instructions before starting and strictly
observe the "Safety Instructions for High Pressure Cleaners"
(5.951-949).
Français
Veuillez lire attentivement la présente notice d´instructions avant la
mise en service et respecter en particulier les "Consignes de
sécurité pour nettoyeurs haute pression" (5.951-949).
Español
Page 4
Page 10
Página 16
Antes de poner en marcha el aparato deberá estudiar atentamente
las "Advertencias y observaciones relativas a la seguridad
para limpiadoras de alta presión" (5.951-949).
3
Page 4
English 2000 GM
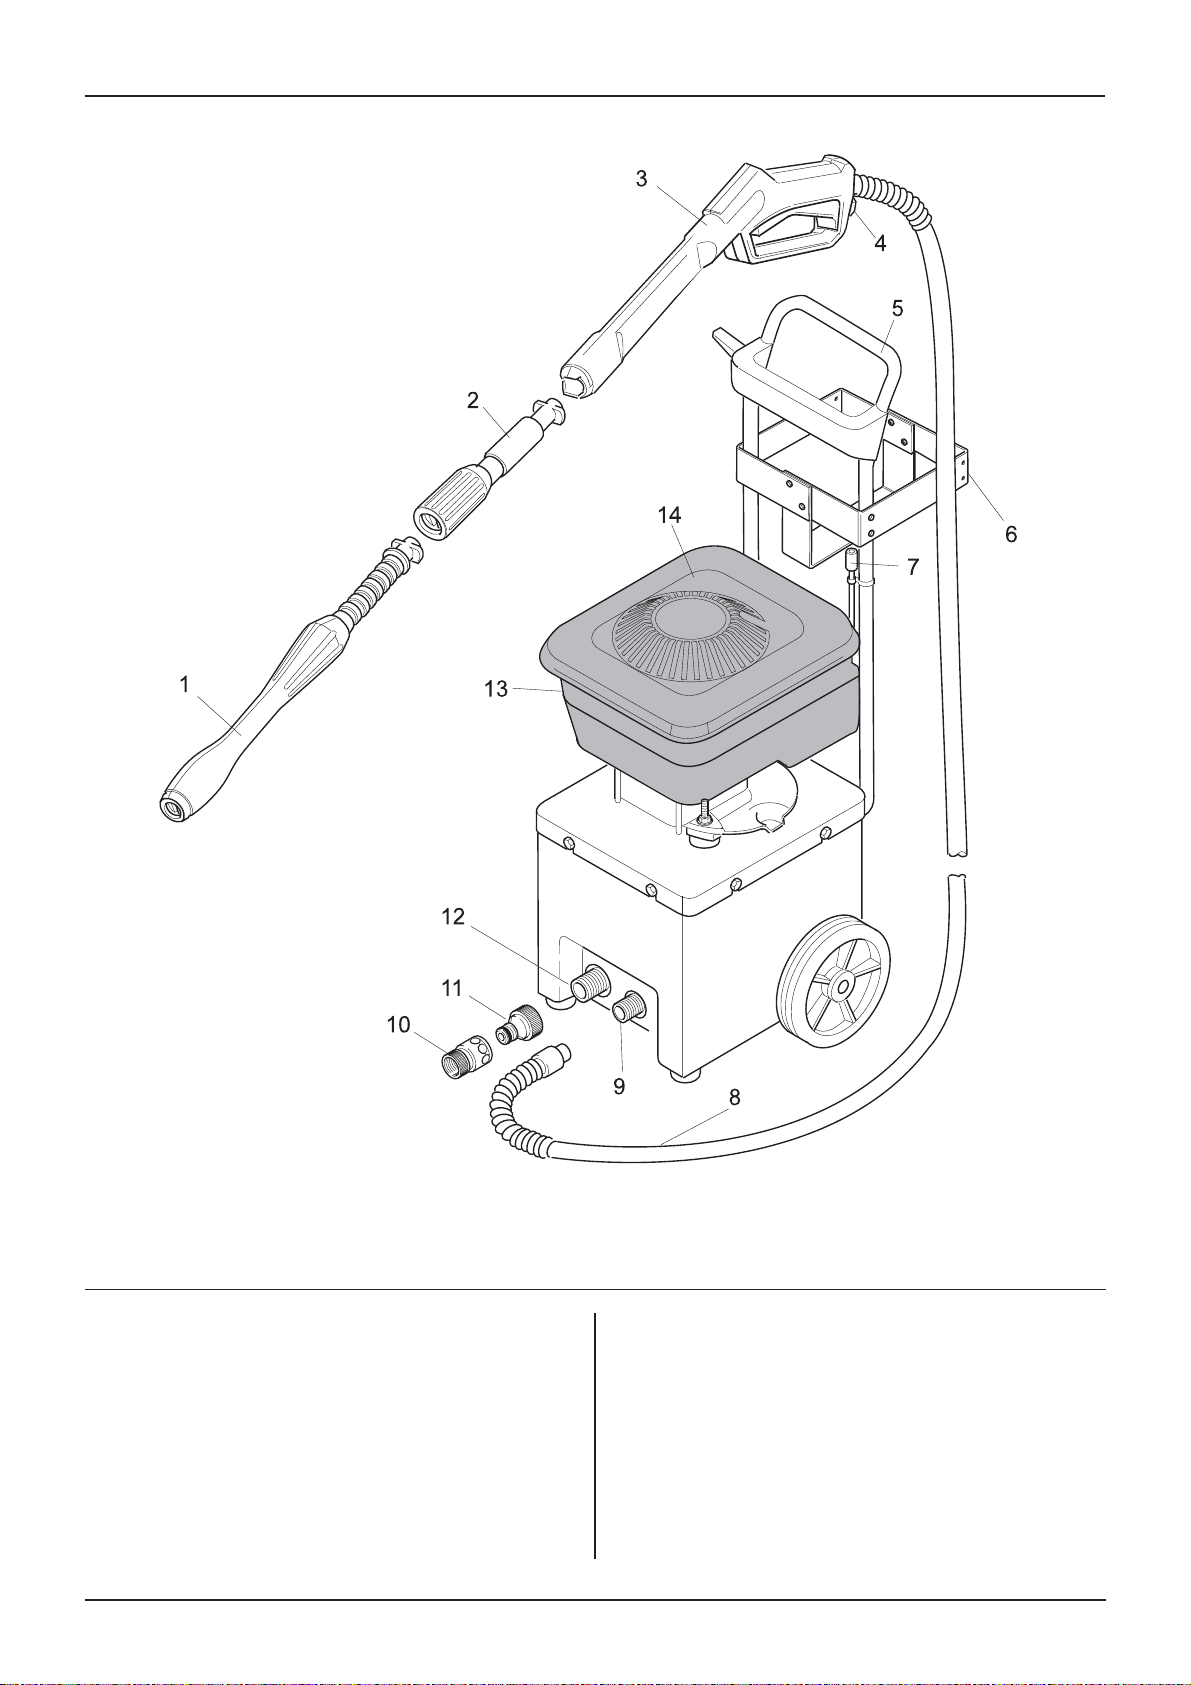
1 Spray lance with pressure regulator
2 Spray lance extension
3 Hand gun
4 Safety catch
5 Push handle
6 Basket for detergent reservoir
7 Detergent suction hose with filter
and metering ring
4
8 High-pressure hose
9 High-pressure outlet
10 Female coupling
11 Male coupling
12 Water inlet with strainer
13 Bracket
14 Engine
Page 5

2000 GM English
1. Unit Start-Up
CAUTION:
- FIRE HAZARD! Do not operate the high-pressure cleaner if fuel has been spilled. Instead,
move the machine to a different location and
avoid creating sparks of any kind.
- Do not store, spill or use engine fuels near
open flame or in the vicinity of devices featuring an open pilot flame, such as boilers, water
heaters, etc., or device that may create sparks
of any kind.
- Keep flammable items and materials away
from the engine silencer (minimum distance: 2
meters).
- Do not operate the motor without the silencer,
and check and clean the latter on a regular
basis. Replace if necessary.
- Do not use the motor in woods, scrubs and
grasslands without having a spark catcher attached to the silencer.
- Except during engine tuning, do not operate
the engine with the air cleaner removed, or
without a suitable cover over the air intake.
- Do not make adjustments to governor springs,
governor linkages or other parts that may result in a higher engine RPM.
- BURN HAZARD! Do not touch hot silencers,
cylinders or cooling fins.
- ASPHYXIATION HAZARD! Exhaust fumes
are poisonous. Never operate the unit in enclosed rooms.
1.1 Unpacking the unit
l Should you notice any transport damage during
unpacking, notify your dealer immediately.
l Because you care about the environment, please
do not dispose of packaging components in regular domestic waste. Instead, take the items to a
collection point for recycling.
1.2 Attaching the accessories
l Mount the holding basket for the detergent (3 me-
tal hoops) to the push handle.
l Attach the push handle to the unit.
1.3 Engine
l Prior to using the unit, read the operating instruc-
tions supplied by the engine manufacturer, and
pay particular attention to the safety instructions.
l Fill the fuel tank with unleaded petrol. Do not use
a petrol/oil mixture for two-stroke engines.
l The engine is supplied without engine oil. A cer-
tain amount of engine oil is packaged with the
unit. Pour this engine oil into the oil filler hole on
the engine.
l Check the engine oil level. Do not start the engine
if the oil level has dropped below the „MIN“ level.
Top up oil if necessary.
1.4 Pump
l The pump is filled with oil. An oil change is not
required.
1.5 Water inlet
l See „Specifications“ for connection data.
1.Screw male coupling (11) onto the machine.
Do not overtighten.
2.Screw female coupling (10) onto male end of garden hose. Be sure the hose end is in good condition so a leak does not occur. Do not overtighten.
3. To connect, push female coupling onto male
coupling all the way until it clicks
twice to assure
full flow of water to the pump.
Caution: Failure to push female coupling on all the
way can damage the pump if allowed to run dry.
4.Turn on water supply: If leak occurs, retrace steps
1 to 3, making sure connections are tight and that
couplings are not reversed.
Caution: The male and female connection are
not the same thread size. Reversing the connections will damage the coupling and cause a water
leak preventing the pump from priming properly.
1.6 Suction feed operation
To draw water from an open reservoir, proceed as
follows:
l Remove the threaded coupling from the unit’s
water inlet, and directly connect a suction feed
hose with filter (order no. 4.440-238) to the water
inlet.
l Set the metering ring on the detergent suction
hose to zero.
l Without the high-pressure hose being attached,
operate the pump until a solid stream of water
exits at the high-pressure outlet.
l At this point, connect the high-pressure hose
again.
Note: Dirt in the feed water could lead to the appliance being damaged. To avoid this risk, we
recommend fitting a filter. A suitable filter with
3/4" connection (order no. 4.730-059).
1.7 Spray lance
l To attach the spray lance to the hand gun, insert
the spray lance into the bayonet coupling of the
hand gun. Overcoming the spring pressure, firmly
press the lance into the coupling and twist it a
quarter-turn until it locks into place.
If required, you can use the additional spray lance
extension.
5
Page 6

English 2000 GM
2. Operation
2.1 Operating with high pressure
l Start the engine while observing the engine
manufacturer’s operating instructions.
l Using the safety catch, unlock the handgun trig-
ger and pull the trigger.
l The working pressure can be variably adjusted by
turning the spray lance on the outside (+/-).
2.2 Operating with detergent
l Set the lowest working pressure with the spray -
lance. No detergent can be drawn in with a high
working pressure.
l Hang the detergent suction hose into the deter-
gent reservoir (not supplied with the unit).
l To protect the environment, we recommend to
use detergents sparingly. Observe the metering
and/or mixing instructions provided on the pakkaging labels of the detergent supply containers.
l By offering you an individualised range of cle-
aning and preserving agents, Kärcher guarantees
trouble-free operation of the unit. Request more
information or ask for our catalogue and/or individual information brochures on specific detergents.
2.3 Work interruptions
l To prevent damage caused by overheating wa-
ter, switch OFF the pump during work breaks that
are longer than 10 minutes.
2.4 Switching OFF the unit
l After operating the unit with water having a high
saline content (i.e., sea water), the unit should be
flushed for 2 – 3 minutes with tap water while the
handgun is open.
l Set the throttle to the STOP position.
l Close the water supply valve and unscrew the
water supply line from the water inlet of the unit.
l Actuate the handgun trigger until the unit is no
longer pressurised.
l Prevent inadvertent opening of the handgun trig-
ger by locking it with the safety catch.
Universal cleaner Profi RM 555 ASF
This cleaning agent may be used undiluted.
Universal cleaner Profi RM 555 ULTRA
Automotive cleaner Profi RM 555 ULTRA
House and garden cleaner Profi RM 565 ULTRA
Boat cleaner Profi RM 575 ULTRA
Before using, these cleaning agents must be diluted
with 9 parts of water (1:9).
Note:
Only cleaning agents approved by the equipment
manufacturer may be used. Unsuitable detergents
may damage the unit and the object being cleaned.
We recommend the following cleaning method:
Step 1: Pre-soaking the area to be cleaned.
Spay the detergent sparingly onto the area to be
cleaned and allow to soak for 1 – 4 minutes.
Step 2: Cleaning step
Using the high-pressure jet, flush the area clean.
l After using a detergent, the unit should be flushed
with clean water. To do this, hang the detergent
suction hose into a container filled with clean
water, and operate the pump for approximately
1 minute.
6
Page 7

2000 GM English
3. Care and Maintenance
3.1 Monthly or as required
l Clean the filter on the detergent suction hose.
l Clean the high-pressure nozzle.
Using a needle, remove possible blockages from
the nozzle orifice. Afterwards, flush with water
from the front.
l Clean the strainer in the water inlet. It can easily
be pulled out with a pair of pliers.
3.2 Precautions in freezing
temperatures
l A unit that has not been completely drained may
be damaged by water freezing inside the components. During the winter season, it is recommended to store the unit in a heated area. If this
is not feasible, the unit should be completely drained and flushed with antifreeze.
l Draining the unit
– Remove the water feed hose and high-pressu-
re hose from the unit.
– Allow the unit to operate for a maximum 1 mi-
nute until the pump and the lines have been
purged.
l Antifreeze
In the event that the unit is taken out of operation
for extended periods, flushing the unit with an
antifreeze is recommended. This practice also
achieves a certain degree of corrosion protection.
4. Troubleshooting
This chapter contains a few helpful hints which may
help you remedy small defects without requiring
further assistance. In all other cases please contact
the authorised customer service.
4.1 Unit does not run
l Perform the maintenance procedures on the en-
gine as outlined in the operating instructions issued by the engine manufacturer.
4.2 Unit does not reach operating
pressure
l Set the spray lance to the maximum working
pressure.
l Clean the water inlet strainer.
l Check the water supply volume.
4.3 Strong pressure fluctuations
l Clean the high-pressure nozzle. Remove dirt from
the nozzle hole with a needle and then rinse out
with water from the front.
4.4 Pump is leaking
l Three drops per minute are normal. In the event
that the exiting water volume is larger, contact the
authorised customer service.
4.5 No detergent is being drawn in
l Set the spray lance to the minimum working
pressure.
l Clean both the detergent suction hose and the
filter, and check the hose for leaks.
l Check all supply lines feeding the pump for pos-
sible leaks or blockage.
7
Page 8

English 2000 GM
5. General Information
5.1 Possible applications
– Use the unit for cleaning machines, vehicles,
buildings, tools, etc.
– For example, clean facades, terraces, and gar-
den implements, etc. with the high-pressure jet
only.
– For reasons of environmental protection, engines
may only be cleaned in locations equipped with
suitable oil separators.
– In the event that the unit is used at petrol stations
and in other hazardous areas, the appropriate
safety regulations must be observed.
– For the removal of stubborn dirt, we recommend
the use of the dirt blaster which is available as an
optional accessory.
6. Specifications
5.2 Safety devices
Safety Valve/Overflow valve
The safety valve also serves as the overflow valve.
When the hand gun is closed, the valve opens and
water is returned to the suction side of the pump.
5.3 Warranty
The applicable warranty conditions in different countries are issued by the respective national distributor
of products. During the warranty period, any malfunctions of the unit caused by a material or manufacturing defect will be repaired free of charge.
In the event of a warranty claim, please take the unit,
with proof of purchase, to your original dealer, or to
the nearest authorised customer service centre.
Engine Data (Honda GXV 140)
1 Cylinder, four-stroke
Nominal output at 3600 RPM................................................. 3.7 kW (5.0 HP)
Operating RPM ................................................................... 3150 r.p.m. (3150 U/min.)
Fuel tank capacity.................................................................. 0.4 gal (1,1 l)
Fuel type ............................................................................ petrol unleaded
Sound pressure level (45635)................................................. 87 dB (A)
Sound power level ................................................................ 100 dB (A)
Water connection
Supply temperature (max.) ................................................... 140 °F (60 °C)
Supply rate (min.) .................................................................. 2.6 g.p.m. (600 l/h)
Supply hose (Order no. 4.440-207)
- length (min.) ...................................................................... 25 ft (7,5 m)
- diameter (min.)................................................................. 3/4 "
Suction height from open tank
at a water temperature of 20 °C/68 °F.................................... 39 in (1 m)
Performance data
Operating pressure ............................................................. 2000 psi (138 bar)
Flow rate ................................................................................ 2.2 g.p.m. (500 l/h)
Detergent intake.................................................................... 0- 8 g.p.h. (0- 30 l/h)
Recoil force of handgun
at operating pressure (max.) .................................................. 22 N
Dimensions
Length ..................................................................................... 23 in (575 mm)
Width....................................................................................... 14 in (360 mm)
Height...................................................................................... 36 in (915 mm)
Weight without accessories .................................................... 59 lbs (27 kg)
8
Page 9

Page 10

Français 2000 GM
10
1 Lance à régulation de pression
2 Rallonge de lance
3 Poignée-pistolet
4 Cran de sécurité
5 Etrier
6 Support du réservoir de détergent
7 Flexible à détergent,
avec filtre et dosage
8 Flexible haute pression
9 Prise haute pression
10 Accouplement féminin
11 Accouplement mâle
12 Prise d’eau avec crible
13 Support de poignée-pistolet
14 Moteur
Page 11

2000 GM Français
1. Mise en service
ATTENTION:
– Ne pas faire fonctionner le nettoyeur haute pres-
sion si du carburant a été répandu. Transférer
l’appareil a un autre endroit et éviter toute formation d’étincelle.
– Ne pas ranger, renverser ou utiliser de carburant
à proximité de flammes nues et d’appareils tels
que fours, chaudières, chauffe-eau, comportant
une veilleuse ou générateurs d’étincelles.
– Eloigner du silencieux tous objets et matériaux
facilement inflammables (distance minimum: 2
mètres).
– Ne pas faire marcher le moteur sans son pot
d’échappement et contrôler et nettoyer ce dernier
régulièrement ou le changer si nécessaire.
– Ne pas faire marcher le moteur sur terrain boisé,
buissonneux ou à hautes herbes, sauf si le pot
d’échappement est équipé d’un dispositif pareétincelles.
– Sauf pour les opérations de réglage, ne pas faire
marcher le moteur sans son filtre à air ou sans
capot au-dessus du manchon d’aspiration.
– Ne pas modifier les réglages des ressorts régula-
teurs, des tringleries régulatrices ou d’autres
pièces car ceci risquerait de hausser la vitesse du
moteur.
– Ne pas toucher les pots d’échappement, cylindres
ou ailettes de refroidissement lorsqu’ils sont
chauds. Risque de brûlure.
– Il est interdit de faire marcher l’appareil dans des
locaux fermés. RISQUE D’INTOXICATION.
1.1 Déballer l’appareil
• Si lors du déballage vous constatez des dégâts
dûs au transport, veuillez en informer votre transporteur par lettre recommandée avec accusé de
réception dans les 3 jours.
• Remplissez le réservoir de carburant avec de
l’essence sans plomb. N’utilisez en aucun cas de
l’essence deux-temps.
• Le moteur est livré sans son plein d’huile. Pour
cette raison, versez dans le carter moteur, par
l’orifice de remplissage, le contenu du bidon
d’huile compris dans les fournitures.
• Contrôlez le niveau d’huile du moteur. Ne mettez
pas l’appareil en service si le niveau d’huile est
descendu en-dessous du repère „MIN“. Rajoutez
de l’huile si nécessaire.
1.4 Pompe
• La pompe est livrée avec un plein d’huile. Un
changement d’huile n’est pas nécessaire.
1.5 Prise d’eau
• Valeurs de branchement: voir les données tech-
niques.
• Vissez le raccord de flexible sur la prise d’eau de
l’appareil.
• Reliez un flexible d’alimentation en eau (non
compris dans les fournitures) à l’appareil et à la
conduite d’eau domestique.
1.6 Mode Aspiration
Si vous aspirez de l’eau depuis un réservoir découvert, respectez les consignes suivantes:
– Dévissez la pièce-raccord de la prise d’eau de
l’appareil puis branchez directement un flexible
d’aspiration avec filtre (n° de réf. 4.440-238) directement contre l’appareil.
– Sur le flexible d’aspiration de détergent, réglez la
bague de dosage sur zéro.
– Laissez la pompe marcher sans flexible haute
pression jusqu’à ce que l’eau sorte sans bulles
par la sortie haute pression.
– Ensuite, rebranchez le flexible haute pression.
• Après le déballage, ne jetez pas l’emballage tout
simplement à la poubelle. Rapportez les éléments
constitutifs de l’emballage à un point de collecte
approprié en vue de leur recyclage.
1.2 Monter les accessoires
• Montez le support du réservoir de détergent
(3 étriers en tôle) contre le guidon.
• Montez le guidon contre l’appareil.
1.3 Moteur
• Avant de mettre l’appareil en service, veuillez lire
la notice d’instructions publiée par le fabricant du
moteur et respectez tout particulièrement les consignes de sécurité.
Remarque: Les impuretés éventuellement présentes dans l’eau d’alimentation peuvent endommager l’appareil. Pour empêcher cela, nous recommandons l’emploi d’un filtre à eau à raccord
3/4".
1.7 Lance
• Enfoncez la lance dans la fermeture à bayonnette
du pistolet (il faut ce faisant vaincre la résistance
du ressort). Tournez ensuite la lance de 90° pour
qu’elle encoche.
Si nécessaire, vous pouvez utiliser la rallonge de
lance.
11
Page 12

Français 2000 GM
2. Commande
2.1 Service haute pression
• Faites démarrer le moteur en respectant la notice
d’instructions publiée par le fabricant du moteur.
• Déverrouillez le cran d’arrêt de la gâchette du
pistolet puis enfoncez la gâchette.
• La pression de travail est réglable en continu: il
suffit de tourner l’extérieur de la lance (+/-).
2.2 Service avec des détergents
• Régler la lance sur la pression de service
minimum. Le détergent ne peut pas être aspiré à
haute pression.
• Accrochez le flexible de détergent dans le réservoir de détergent (non compris dans les fournitures).
• Pour ménager l’environnement, nous recommandons d’utiliser le détergent parcimonieusement.
Respectez les recommandations de dosage portées sur les étiquettes des bidons de détergent.
• Nous vous proposons une gamme personnalisée
de détergents et de produits d’entretien et vous
garantissons des travaux sans incident. Demandez conseil ou réclamez notre catalogue ou les
fiches d’information sur les détergents.
Nous vous recommandons la méthode de nettoyage suivante:
1ère étape: décoller les souillures
Pulvériser le détergent parcimonieusemnt puis le
laisser agir pendant 1 à 4 minutes.
2ème étape: enlever les souillures
Avec le jet haute pression, chasser les souillures
décollées.
• Bien rincer les circuits de l’appareil après un travail ayant fait appel à un détergent. Pour ce faire,
accrocher le flexible d’aspiration de détergent
dans un réservoir d’eau claire puis laisser marcher la pompe pendant environ 1 minute.
2.3 Interruption du service
• Lors de pause prolongées (plus de 10 minutes),
arrêter la pompe afin qu’elle ne soit pas endommagée par une surchauffe de l’eau.
2.4 Eteindre l’appareil
• Après un travail à l’aide d’eau salée (eau de mer),
rincer l’appareil pendant au moins 2-3 minutes à
l’eau douce, gâchette de la poignée-pistolet
enfoncée.
Détergent universel Profi RM 555 ASF
Ce détergent est utilisable sans avoir à le diluer.
Détergent universel Profi RM 555 ULTRA
Détergent pour voitures Profi RM 565 ULTRA
Détergent pour la maison
et le jardin Profi RM 570 ULTRA
Détergent pour bateaux Profi RM 575 ULTRA
Ces détergents devront être dilués avant utilisation
(1 part de détergent, 9 parts d’eau).
Remarque:
N’utiliser que des détergents reconnus aptes par le
fabricant de l’appareil. Des détergents inappropriés
peuvent endommager l’appareil ou l’objet à nettoyer.
• Réglez la manette des gaz sur „STOP“.
• Fermez l’arrivée d’eau puis dévissez le flexible
d’arrivée d’eau de l’appareil.
• Appuyez sur la gâchette jusqu’à ce que l’appareil
soit hors pression.
• Pour empêcher toute pulvérisation involontaire,
bloquez la gâchette du pistolet à l’aide du cran
d’arrêt.
12
Page 13

2000 GM Français
3. Entretien et nettoyage
3.1 Chaque mois ou suivant besoins
• Nettoyez le filtre du flexible à détergent.
• Nettoyer la buse haute pression.
A l’aide d’une aiguille, retirez les souillures obstruant l’alésage de la buse. Rincez ensuite à l’eau
en faisant rentrer celle-ci par l’avant de la buse.
• Nettoyez le crible situé dans la prise d’eau.
Le crible s’enlève facilement à l’aide d’une pince
plate.
3.2 Protection antigel
• Le gel peut détruire l’appareil s’il contient encore
de l’eau. Pendant l’hivernage, le mieux est encore de ranger l’appareil dans un local chauffé. Nous
recommandons sinon de vidanger l’appareil ou
de le rincer avec de l’antigel.
• Vidange de l’appareil
– De l’appareil, dévissez le flexible d’arrivée
d’eau et le flexible haute pression.
– Laissez marcher l’appareil pendant 1 minute
maximum, temps nécessaire à la pompe et aux
conduites pour se vider.
• Antigel
Avant des pauses de service prolongées, nous
recommandons de pomper de l’antigel dans
l’appareil. Ceci le protège relativement bien de la
corrosion.
4. Dérangements et remèdes
Dans ce chapitre nous vous conseillons comment
remédier vous-même aux petits dérangements.
Dans tous les autres cas, veuillez vous adresser au
service après-vente (SAV) agréé.
4.1 L’appareil ne marche pas
• Effectuez les travaux d’entretien du moteur con-
formément aux indications figurant dans la notice
d’instructions publiée par le fabricant du moteur.
4.2 L’appareil ne monte pas en pression
• Régler la lance sur la pression de travail
maximale.
• Nettoyez le crible situé dans la prise d’eau.
• Vérifiez le débit de l’eau d’alimentation.
• Vérifiez si toutes les conduites d’alimentation ar-
rivant à la pompe sont étanches ou obstruées.
4.3 Fortes variations de pression
• Nettoyer la buse haute pression. A l’aide d’une
aiguille, retirer les impuretés obstruant le trou de
la buse. La rincer ensuite par devant.
4.4 Pompe non étanche
• Une fuite de 3 gouttes par minute est admissible.
Si le gouttage augmente, confiez la réparation au
SAV agréé.
4.5 Pas d’aspiration de détergent
• Régler la lance sur la pression de travail minimum.
• Nettoyez le flexible d’aspiration de détergent avec
filtre et vérifiez son étanchéité.
13
Page 14

Français 2000 GM
5. Consignes générales
5.1 Destination
– Utilisez l’appareil pour nettoyer les machines,
véhicules, bâtiments, outils, etc.
– Nettoyez par ex. les façades, terrasses, appareils
de jardin uniquement au jet haute pression et sans
détergent.
– Les nettoyages de moteurs ne pourront être ef-
fectués qu’aux endroits équipés d’un séparateur
d’huile correspondant (protection de l’environnement).
– Si l’appareil est mis en oeuvre dans des stations-
service ou dans d’autres zones dangereuses, il
faut respecter la réglementation de sécurité correspondante.
– En présence de souillures rebelles, nous recom-
mandons d’utiliser la fraise à souillures (accessoire spécial).
5.2 Dispositifs de sécurité
Vanne de sécurité/Vanne de surpression
La vanne de sécurité sert en même temps de vanne
de surpression.
Lorsque vous relâchez la gâchette de la poignéepistolet, cette vanne s’ouvre et l’eau retourne du
côté aspiration de la pompe.
5.3 Garantie
Dans chaque pays, les conditions de garantie en
vigueur sont celles publiées par notre société de
distribution autorisée. Si pendant la durée de la
garantie votre machine présente des vices de matière ou de fabrication, la réparation est gratuite.
En cas de garantie, veuillez vous adresser à votre
revendeur ou à votre bureau du service après-vente
le plus proche de chez vous. Prière de toujours retourner l’appareil avec les accessoires, la carte de
garantie et la preuve d’achat.
6. Données techniques
Performances du moteur (Honda GXV 140)
1 cylindre, 4 temps
Puissance nominale à 3600 t/min.......................................... 3,7 kW (5,0 HP)
Vitesse de service............................................................... 3150 U/min (3150 r.p.m.)
Contenance du réservoir ....................................................... 1,1 l (0,4 gal)
Carburant .......................................................................Essence sans plomb
Niveau de pression acoustique (DIN 45 635)......................... 87 dB (A)
Niveau de puissance sonore ................................................ 100 dB (A)
Branchement de l’eau
Température d’arrivée (maxi.) ................................................ 60 °C (140 °F)
Débit d’arrivée (maxi.)........................................................... 600 l/h (2.6 g.p.m.)
Flexible d’arrivée (n° de réf. 4.440-207)
- Longueur (minµi.)............................................................. 7,5 m (25 ft)
- Diamètre (mini.) ............................................................... 3/4 "
Hauteur d’aspiration depuis un
réservoir ouvert, eau à 20°C/68°F ............................................ 1 m (39 in)
Performances
Pression de travail ................................................................ 138 bars (2000 psi)
Débit de refoulement ............................................................ 500 l/h (2,2 g.p.m.)
Aspiration de détergent..................................................... 0 – 30 l/h (0–8 g.p.h.)
Force de recul à la poignée pistolet,
développée par la pression de travail..................................... 22 N
Dimensions
Longueur............................................................................... 575 mm (23 in)
Largeur.................................................................................. 360 mm (14 in)
Hauteur ................................................................................. 915 mm (36 in)
Poids sans les accessoires..................................................... 27 kg (59 lbs)
14
Page 15

Page 16

Español 2000 GM
16
1 Lanza con regulación de la presión
2 Prolongación de lanza
3 Pistola
4 Seguro contra accionamiento
involuntario de la pistola
5 Asa
6 Soporte para el depósito del detergente
7 Manguera del detergente con filtro y
dosificación
8 Manguera de alta presión
9 Conexión (salida) de alta presión
10 Acoplamiento
11 Acoplamiento
12 Toma de agua con filtro
13 Soporte de alojamiento de la pistola
14 Motor
Page 17

2000 GM Español
1. Puesta en marcha
ATTENTIÓN:
-No trabajar con la limpiadora de alta presión en
caso de haberse derramado combustible
(gasolina). Retirar la máquina del lugar. ¡Evitar
cualquier formación de chispas hasta que no se
haya evaporado el combustible!
-No guardar, derramar ni manipular el combustible
cerca de fuentes de fuego abierto o de aparatos
tales como estufas, calderas, calentadores de
agua, etc. que posean llama de encendido o
puedan originar chispas.
-Mantener alejados (distancia mínima 2 m) los
objetos o materiales fácilmente inflamables del
colector de escape.
- No operar el motor sin silenciador. Revisar
regularmente el estado del silenciador. Verificarlo,
limpiarlo o sustituirlo por uno nuevo en caso
necesario.
- No trabajar con el aparato en áreas o zonas
recubiertas de bosque, matorrales o hierba si no
se ha equipado el tubo de escape del aparato con
un parachispas.
-No hacer funcionar el motor sin el filtro de aire o sin
la tapa sobre la boca de aspiración, con excepción
de los trabajos de ajuste.
-No efectuar reajustes ni modificaciones en los
muelles de ajuste, varillajes del regulador u otras
piezas o elmentos susceptibles de elevar el número
de revoluciones del motor. En caso de unos
regímenes de revoluciones excesivamente
elevados, el motor puede sufrir graves desperfectos.
1.1 Desembalar el aparato
• Si al desembalar el aparato comprobara Vd. al-
gún daño o desperfecto en el mismo atribuible al
transporte, rogamos se dirija inmediatamente al
Distribuidor en donde adquirió su aparato.
• No tire el embalaje del aparato y sus elementos al
cubo de basura. Entréguelo en los Puntos o Centros Oficiales de recogida para su reciclaje o recuperación
1.2 Montar los accesorios
• Montar el soporte para el depósito del detergente
(3 estribos de chapa) sobre el asa del aparato.
• Montar el asa en el aparato.
1.3 Motor
• Antes de poner en marcha el aparato deberán
leerse las instrucciones de servicio del fabricante
de los motores y observarse asimismo los consejos y advertencias de seguridad.
• Llenar el depósito del combustible con gasolina
sin plomo. No utilizar en ningún caso mezcla para
motores de dos tiempos.
• El motor se suministra con el depósito de aceite
vacío. Rellenar el aceite que se suministra con el
aparato en la boca de llenado del motor.
• Verificar el nivel del aceite del motor. No poner el
aparato en marcha en caso que el nivel del aceite se
encontrara por debajo de la marca de mínimo nivel
de llenado.
1.4 Bomba
• La bomba está llena de aceite. No es necesario
cambiar el aceite.
-No tocar los silenciadores, cilindros o aletas de
refrigeración que estuvieran calientes. ¡Peligro de
quemaduras!
- El aparato no deberá funcionar en espacios o recintos
cerrados. ¡PELIGRO DE INTOXICACION!
1.5 Circuito de alimentación de agua
• Observar los valores de conexión que se descri-
ben en las características técnicas del aparato.
• Montar el acoplamiento para la manguera en la
toma (entrada) del aparato.
• Empalmar una manguera para la alimentación de
agua (no está incluida en el equipo de serie) al aparato y a la conexión (grifo) de agua de la red.
1.6 Servicio de aspiración
En caso de aspirar agua desde recipientes abiertos,
deberán observarse estrictamente las instrucciones
y normas de la empresa abastecedora de agua de
la zona.
- Retirar el racor de acoplamiento de la toma de
agua del aparato y acoplar directamente al aparato una manguera de aspiración con filtro (Nº de
pedido 4.440-238).
- Ajustar el anillo de dosificación en la manguera
de aspiración del detergente a la posición «0».
- Hacer funcionar la bomba, sin acoplar la manguera de alta presión, hasta que el agua salga sin
burbujas de aire en la salida de alta presión del
aparato.
- Empalmar la manguera de alta presión al aparato.
Advertencia: La suciedad disuelta en el agua de
alimentación puede dañar el aparato. Con objeto de
evitar esta situación, aconsejamos emplear un filtro
para el agua, acoplamiento 3/4".
1.7 Lanza con regulación de la presión
• Encajar la lanza, haciendo presión contra la fuer-
za del muelle, en el acoplamiento de bayoneta de
la pistola y girarla en un ángulo de 90°, hasta que
enclave.
17
Page 18

Español 2000 GM
2. Manejo del aparato
2.1 Servicio de alta presión
• Poner en marcha el motor según las instruccio-
nes de servicio facilitadas por el fabricante del
motor.
• Desbloquear la pistola a través del seguro contra
accionamiento involuntario y oprimir la palanca
de accionamiento de la pistola.
• La presión de trabajo se puede ajustar de modo
continuo, girando la lanza hacia el exterior (+/-).
2.2 Pulverización del detergente
• Ajustar la lanza a baja presión de trabajo. Con alta
presión no se puede aspirar detergente.
• Introducir la manguera de aspiración del detergente en el depósito del detergente (no incluido
en el equipo de serie de la limpiadora).
• En interés de la protección del medio ambiente,
recomendamos hacer un uso muy moderado de
los detergentes.
• Disponemos de una amplia gama individual de
detergentes y agentes conservantes, por lo que
podemos garantizar el funcionamiento seguro y
correcto de su aparato. No dude en consultarnos
o solicite nuestro catálogo general o las hojas
informativas específicas sobre detergentes.
Detergente universal Profi RM 555 ULTRA
Detergente específico
para turismos Profi RM 565 ULTRA
Detergente específico
para el hogar y jardín Profi RM 570 ULTRA
Detergente específico
para embarcaciones Profi RM 575 ULTRA
Estos detergentes tienen que ser diluidos en agua
en la proporción de 1:9
(1 parte de detergente, 9 partes de agua).
Advertencia:
Sólo deberán utilizarse aquellos detergentes
recomendados u homologados por el Fabricante.
Unos detergentes inapropiados pueden causar
daños en el aparato y en el objeto a limpiar.
Método de limpieza aconsejado:
Primer paso: Separar la suciedad
Pulverizar el detergente en cantidad mdoerada
sobre la superficie u objeto a limpiar y dejar que
actúe durante 1 a 4 minutos.
Segundo paso: Eliminar la suciedad
Eliminar la suciedad separada con el chorro de
agua de alta presión.
• Una vez finalizados los trabajos con un detergente deberá enjuagarse el aparato con agua limpia.
Para ello se introduce la manguera de aspiración
del detergente en un recipiente con agua limpia,
haciendo funcionar la bomba durante 1 minuto
aproximadamente.
2.3 Interrupción del funcionamiento
del aparato
• En caso de estar el aparato inactivo durante unos
períodos de prolongados (más de 10 minutos),
deberá desconectarse la bomba a fin de evitar
daños por el sobrecalentamiento del agua.
2.4 Desconexión del aparato
• Tras haber trabajado con agua salada (del mar),
enjuagar la limpiadora con agua de red (limpia),
con la palanca de accionamiento de la pistola
oprimida, durante un período mínimo de 2-3 minutos.
• Colocar la palanca del acelerador en la posición
de parada «STOP».
• Cerrar la alimentación de agua (grifo) y desempalmar la manguera de alimentación de agua del
aparato.
• Oprimir la palanca de accionamiento de la pistola
hasta que el aparato quede totalmente sin presión.
• Conectar el seguro contra accionamiento involuntario de la pistola.
18
Page 19

2000 GM Español
3. Trabajos de cuidado y mantenimiento
3.1 Mensualmente o según necesidad
• Limpiar el filtro en la manguera de aspiración del
detergente.
• Limpiar la boquilla de alta presión.
Eliminar las obstrucciones en la boquilla con ayuda de una aguja. Enjuagarla con agua limpia de
dentro hacia afuera.
• Limpiar el filtro en la toma de agua del aparato. El
filtro se extrae con ayuda de unos alicates de boca
plana.
3.2 Protección contra heladas
• Los aparatos que no hayan sido vaciados com-
pletamente de agua o por cuyo interior no se haya
hecho circular una solución de agente anticongelante, pueden sufrir daños a consecuencia de las
bajas temperaturas. Por eso aconsejamos guardar el aparato durante la estación invernal en una
nave o espacio protegido contra las bajas temperaturas (provisto de calefacción).
• Vaciado del aparato
– Desempalmar las mangueras de alimentación
de agua y de alta presión del aparato.
– Hacer funcionar el aparato durante 1 minuto como
máximo, hasta haber evacuado completamente
el agua de la bomba y las tuberías.
• Adición de anticongelante
Para largos períodos de inactividad del aparato,
aconsejamos la aplicación de agente anticongelante, dado que de este modo también se logra
una cierta protección contra la corrosión.
4. Localización de averías
En el prsente capítulo queremos facilitarle una serie
de consejos que le permitirán subsanar por sí mismo
perturbaciones y averías de menor importancia. En
caso de averías de mayor envergadura deberá
avisarse al Servicio Postventa Oficial.
4.1 El aparato no se pone en marcha
• Revisarlo y efectuar los trabajos de mantenimien-
to tal y como se explica en las instrucciones de
servicio del fabricante del motor.
4.2 El aparato no coge presión
• Ajustar la máxima presión de trabajo en la lanza.
• Limpiar el filtro en la toma de agua del aparato.
• Verificar el caudal de alimentación de agua.
• Verificar la estanqueidad de las tuberías de ali-
mentación hacia la bomba. Verificar asimismo si
presentan obstrucciones.
4.3 En el aparato se producen fuertes
oscilaciones en la presión
• Limpiar la boquilla de alta presión. Eliminar con
ayuda de una aguja las obstrucciones que pudieran existir en la boquilla y enjuagarla con agua (de
dentro hacia afuera).
4.4 Inestanqueidades en la bomba
• Unas fugas del orden de 3 gotas por minuto son
admisibles. En caso de registrarse unas fugas
mayores, avisar al Servicio Postventa Oficial.
4.5 No se produce aspiración
de detergente
• Ajustar la lanza a la mínima presión de trabajo.
• Limpiar la manguera de aspiración del detergente
con filtro. Verificar su estanqueidad.
19
Page 20

Español 2000 GM
5. Advertencias y consejos de carácter general
5.1 Aplicación del aparato
– El aparato ha sido diseñado para la limpieza de
máquinas, vehículos, edificios, herramientas, etc.
– Limpiar fachadas y exteriores de edificios, terra-
zas, aparatos de jardinería, etc. sin detergentes,
sólo con el chorro de alta presión.
– Por razones de protección medioambiental, la lim-
pieza de motores sólo puede efectuarse en aquellos puntos y zonas que estén dotadas del correspondiente separador de aceite.
– En caso de emplear el aparato en gasolineras y
estaciones de servicio, o en zonas de peligro,
habrá que observar las correspondientes normas
de seguridad.
– Para la eliminación de suciedad particularmente
resistente y fuertemente adherida, aconsejamos
utilizar nuestra boquilla rotativa con ‘efecto fresadora’.
5.2 Dispositivos de seguridad
Válvula de seguridad/Válvula de derivación
La válvula de seguridad es al mismo tiempo una
válvula de derivación. Al dejar de oprimir la palanca
de accionamiento de la pistola, la válvula abre y el
agua vuelve a las válvulas de aspiración de la
bomba.
5.3 Garantía
En cada país rigen las condiciones de garantía
establecidas por las correspondientes Sociedades
Distribuidoras. Las perturbaciones y averías de su
aparato serán subsanadas de modo gratuito en la
medida en que las causas de las mismas sean
debidas a defectos de material o de fabricación.
En un caso de garantía rogamos se dirija, con el
aparato y los accesorios, así como el comprobante
de compra del mismo, al Distribuidor en donde
adquirió el aparato o a la Delegación Oficial del
Servicio Postventa más próxima.
6. Características Técnicas
Potencia y rendimientos del motor (Honda GXV 140)
monocilíndrico, de gasolina, cuatro tiempos
Potencia nominal a 3.600 r.p.m. ................................................... 3,7 kW
Número de revoluciones de servicio del motor.......................... 3150 r.p.m.
Capacidad del depósito de combustible .......................................0,4 gal
Combustible ......................................................................... gasolina sin plomo
Nivel sonoro según norma DIN 45635........................................... 87 dB (A)
Nivel de potencia acústica ........................................................... 100 dB (A)
Conexión a la red de agua
Máx. temperatura del agua de alimentación................................140 °F
Caudal de alimentación ................................................................ 2,6 g.p.m.
Manguera de alimentación (Nº de pedido 4.440-207)
- Longitud (mín.)............................................................................ 25 ft
- Diámetro (mín.)..........................................................................3/4 "
Altura de aspiración del agua desde un recipiente
abierto a una temperatura de 20°C ............................................... 39 in
Potencia y rendimientos
Presión de trabajo......................................................................2000 psi
Caudal...........................................................................................2,2 g.p.m.
Aspiración de detergente ........................................................... 0 – 8 g.p.h.
Fuerza de retroceso a
máxima presión de trabajo............................................................. 22 N
Medidas del aparato
Longitud ......................................................................................... 23 in
Altura.............................................................................................. 14 in
Altura.............................................................................................. 36 in
Peso sin accesorios ....................................................................... 59 lbs
20
Page 21

 Loading...