

Page 1
사내모든대외비문서의외부반출을금지합니다.
AR2040
Quick Installation Guide
1. AR2040 overview
➊
➋
➊ LED (Power, Signal)
➋ WPS Button
➌ Ethernet Ports
➍ Factory Reset Button (press 5~6 seconds)
➎ Power On/Off Button
6
Power Connector
➌
➍
➎
6
LED Scenario
The light on the front side of your AR2040 gives you
information about the AR2040’s operation.
LED Color Blink On Off
Reboot
Restore
Connect to Internet Disconnect
Complete Grouping
(slave)
Complete Join
Complete Grouping
(master)
Power
Signal
Red
Yellow
Blue
Red
Yellow
Blue
Booting Complete Booting
Grouping (Slave)
Join
Grouping
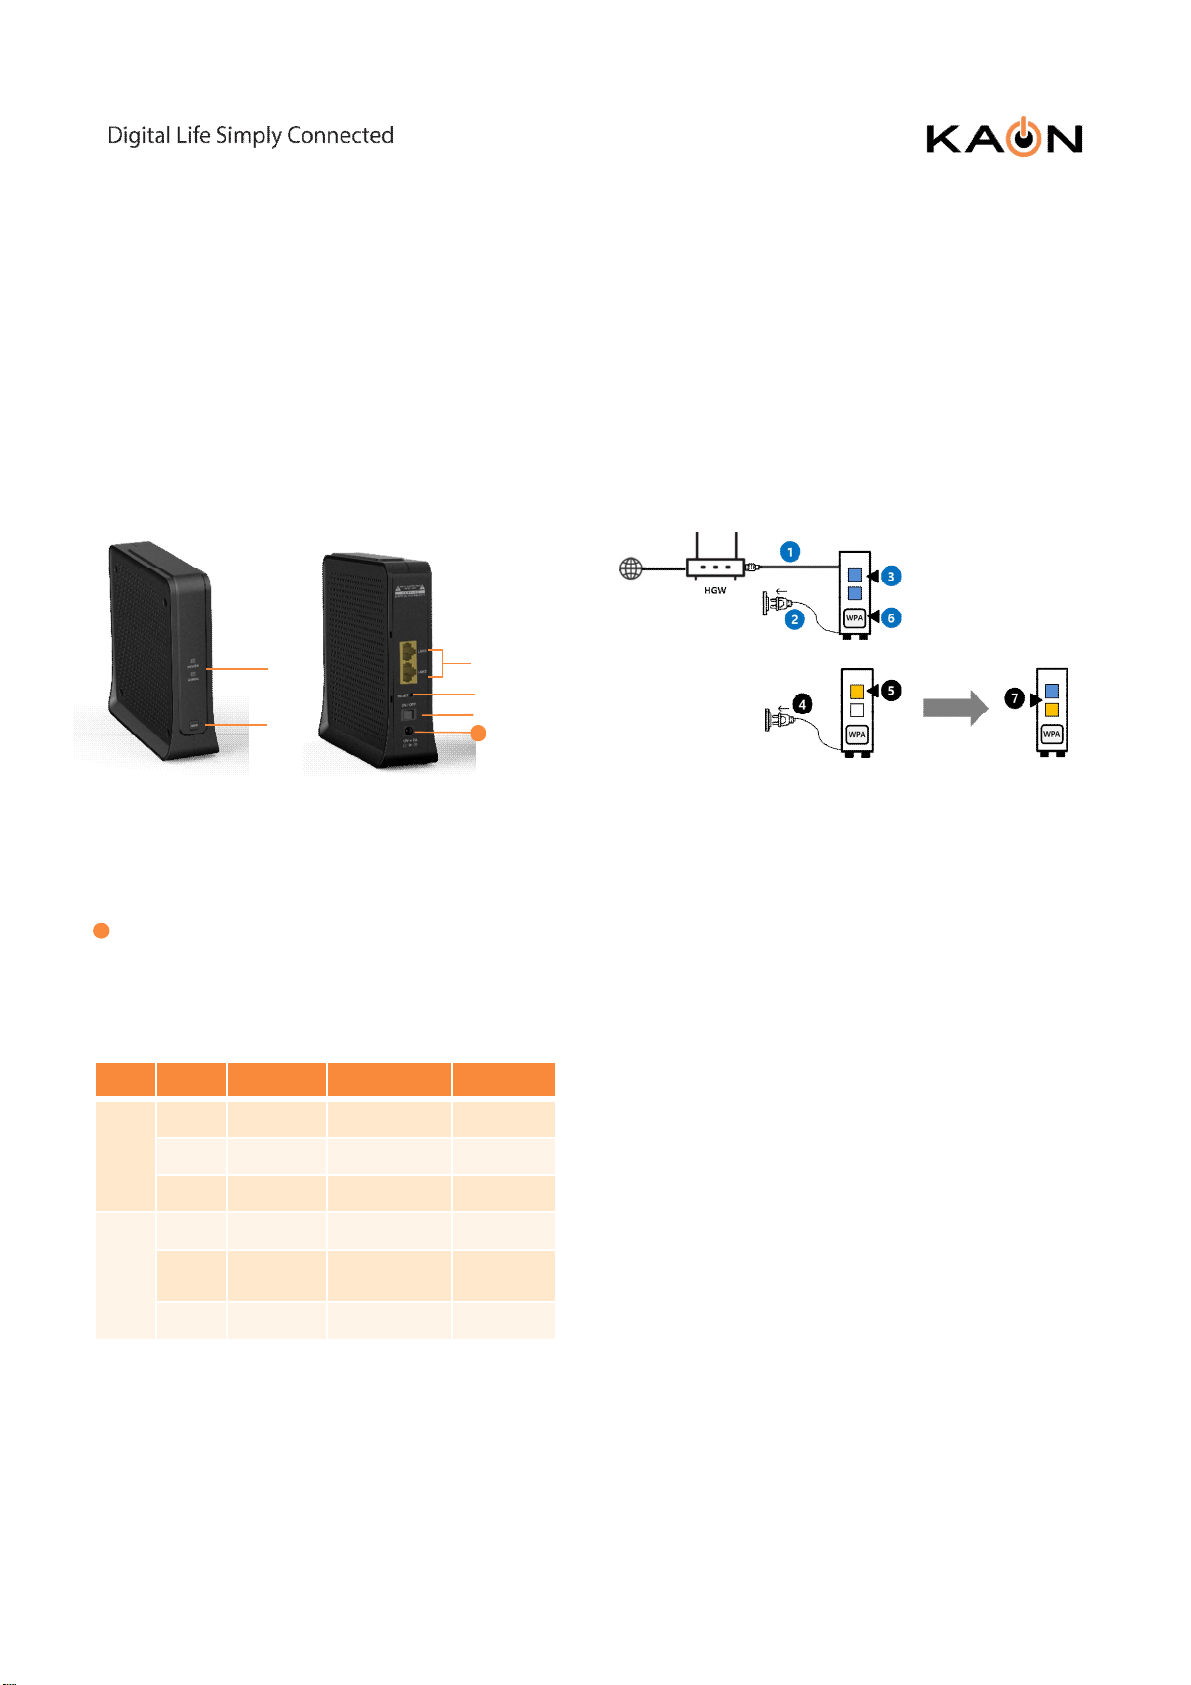
2. Quick Mesh Setup with WPS
Step 1. Connect one of the AR2040(Master) to your
gateway with the Ethernet cable.
Step 2. Plug your AR2040(Master) to a power socket
Step 3. Check that the Power LED changes to Blue,
Check that the Signal LED changes to Blue.
Step 4. Place additional AR2040(Slave) at a distance
of around three meters from the working AR2040
connected to your home gateway and plug the
AR2040 into a power socket
Step 5. Check that the Power LED solid to Yellow.
Step 6. Press the WPS button on AR2040(Master)
for 2-3 seconds ( In AR2040 where Signal LED is
BLUE)
Step 7. Check that the Power LED on the satellite
AR2040 changes to Blue. Check that the Signal LED
on the satellite AR2040 turns yellow.
Step 8. Place the AR2040 where you need but it
should be position which Signal LED shows solid
yellow.
Note : The Signal LED of the AR2040 indicates solid
yellow when it is connected as the slave device,
whereas the Signal LED of the AR2040 indicates
solid blue when it is connected as the master device.
이름:이봉철/부서:네트워크시스템팀/출력시간:2020-01-1709:05
Note: You’ll get the best signal when it is in an
open space like on a shelf or a table.
Page 2

사내모든대외비문서의외부반출을금지합니다.
AR2040 Wi-Fi Extender
3. Mesh Setup with Mobile App
Step 1. Download the Kaon WiFi App
Scan the unique QR code below, or go to Google
Play or the Apple App Store to download the Kaon
WiFi app. Install the app on a compatible iPhone or
Android smartphone.
Kaon WiFi
Follow the step-by-step instructions on the App to
connect your home gateway to the AR2040 unit.
Step 2. Launch the WiFi app. Select Set up
manually
Step 3. Go to Wi-Fi settings to connect to your
network (AR2146 Wi-Fi network name)
Step 4. Tap Find my device, enter your login
information printed on a label on the bottom of the
AR2040 and tap Login. You can see the dash board
of the app after you successfully set up your Wi-Fi
network.
4. Accessing your AR2040 from WebUI
Step 1. Access the web-based setup page
a. Connect your PC to the working AR2040 (master
mode)’s wireless network (SSID).
b. WebUI address, ID and the password are located
at the label at the bottom of your device.
c. Launch a web browser (Internet Explorer or
Chrome).
d. Enter http://kaonmesh[][][][] or http://192.168.50.1
([][][][] is the last 4 digits of the working AR2040’s
serial number) in the address bar, then press.
e. Enter the default user name, admin and
password, password in the fields.
Note : You can view and change your Wi-Fi
name (SSID) and password, and see all your
AR2040 configured as a mesh network (master
and slave mode) in your Wi-Fi.
Note : You can view and change your Wi-Fi name
(SSID) and password, and see all your AR2040s
configured as a mesh network in your Wi-Fi.
Step 5. Add AR2040 to an existing Wi-Fi network,
tap icon on the top right hand corner of the
dashboard. Tap “+” to add new AR2040 and scan
QR code printed on a label on the bottom of the
AR2040, then tap Create Mesh.
Step 6. Customize the network name and password
Tap icon on the top right hand corner of the
dashboard, and select the Wi-Fi settings to create
your own network name (SSID) and password.
Note: If your device disconnects from the Wi-Fi
network, view the available Wi-Fi network and then
choose the new network name (SSID) and enter the
new password.
KAONMEDIA Co., Ltd.
KAONMEDIA Building, 884-3,
Seongnam-daero, Bundang-gu,
Seongnam-si, Gyeonggi-do,
463-839, South Korea
© 2019 KAONMEDIA Co., Ltd. KAONMEDIA and the KAONMEDIA Logo are trademarks of KAONMEDIA Co., Ltd. Other
brands are trademarks or registered trademarks of their respective holders.
This document is for informational purposes only. Information and views expressed in this document may change without
notice. For technical support and other information, please contact your sales representative or contact us by email.
www.kaonmedia.com I sales_support@kaonmedia.com
이름:이봉철/부서:네트워크시스템팀/출력시간:2020-01-1709:05
Page 3

사내모든대외비문서의외부반출을금지합니다.
AR2040 Wi-Fi Extender
Technical Specifications
• Wireless Characteristics
– 4x4 5GHz 802.11ac
– 2x2 2.4GHz 802.11n
– 4 Spatial Streams
– Wave 2 (MU-MIMO)
– Beamforming
– High-power transmit for maximum
coverage
• 5GHz Wireless Operating Channels
– 5 GHz UNI bands (5.15-5.25 GHz, 5.725
GHz-5.850 GHz bands)
– 20, 40 and 80 MHz bandwidths
supported
• Wireless Security
– WPA2 / WPA / AES / WEP-128 / WEP-
64
– Push-button Wireless setup (WPS) and
reset support
• Processor
• LEDs
– Two (2) LEDs : power / signal status
• Management
– TR-069 management client
– Local web access
– Mobile application support (optional)
• Operating Environment
– Operating temperature 0º to + 40ºC
– Relative humidity 8% to 95%; Non-
condensing
• Regulatory Certification
– Wi-Fi Alliance®
– Wi-Fi CERTIFIED EasyMesh™
– CE
– RoHS
– WEEE
– FCC
– UL
– 900 MHz processor
Physical Specifications
• Memory
– 128MB Flash and 256MB RAM
- Dimensions : 160 x 160 x 50 mm
(6.2 x 6.2 x 1.9 in)
• Antenna
– Four (4) high performance internal
antennas
• Ports
– Two (2) RJ45 Gigabit Ethernet
(10/100/1000Mbps) LAN ports
KAONMEDIA Co., Ltd.
KAONMEDIA Building, 884-3,
Seongnam-daero, Bundang-gu,
Seongnam-si, Gyeonggi-do,
463-839, South Korea
© 2019 KAONMEDIA Co., Ltd. KAONMEDIA and the KAONMEDIA Logo are trademarks of KAONMEDIA Co., Ltd. Other
brands are trademarks or registered trademarks of their respective holders.
This document is for informational purposes only. Information and views expressed in this document may change without
notice. For technical support and other information, please contact your sales representative or contact us by email.
Accessories
- One (1) 12V/1.5A power adapter
- One (1) Ethernet cable
- Quick start guide
www.kaonmedia.com I sales_support@kaonmedia.com
이름:이봉철/부서:네트워크시스템팀/출력시간:2020-01-1709:05
Page 4

사내모든대외비문서의외부반출을금지합니다.
AR2040 Wi-Fi Extender
FCC Part 15.105 statement
This equipment has been tested and found to comply with the limits for a Class B digital device, pursuant to part 15 of the FCC
Rules.
These limits are designed to provide reasonable protection against harmful interference in a residential installation. This equipment
generates, uses and can radiate radio frequency energy and, if not installed and used in accordance with the instructions, may
cause harmful interference to radio communications. However, there is no guarantee that interference will not occur in a particular
installation. If this equipment does cause harmful interference to radio or television reception, which can be determined by turning
the equipment off and on, the user is encouraged to try to correct the interference by one or more of the following measures:
- Reorient or relocate the receiving antenna.
- Increase the separation between the equipment and receiver.
- Connect the equipment into an outlet on a circuit different from that to which the receiver is connected.
- Consult the dealer or an experienced radio/TV technician for help.
FCC Part 15.21 statement
Any changes or modifications not expressly approved by the party responsible for compliance could void the user's authority to
operate this equipment.
RF Exposure Statement (MPE)
The antenna(s) must be installed such that a minimum separation distance of at least 20 cm is maintained between the radiator
(antenna) and all persons at all times. This device must not be co-located or operating in conjunction with any other antenna or
transmitter
KAONMEDIA Co., Ltd.
KAONMEDIA Building, 884-3,
Seongnam-daero, Bundang-gu,
Seongnam-si, Gyeonggi-do,
463-839, South Korea
© 2019 KAONMEDIA Co., Ltd. KAONMEDIA and the KAONMEDIA Logo are trademarks of KAONMEDIA Co., Ltd. Other
brands are trademarks or registered trademarks of their respective holders.
This document is for informational purposes only. Information and views expressed in this document may change without
notice. For technical support and other information, please contact your sales representative or contact us by email.
www.kaonmedia.com I sales_support@kaonmedia.com
이름:이봉철/부서:네트워크시스템팀/출력시간:2020-01-1719:14
 Loading...