


KAMERA WERK DRESDEN GmbH
¾¾¾¾¾¾¾¾¾¾¾¾¾¾¾¾¾¾¾¾¾¾¾¾¾¾¾¾¾¾¾¾¾¾¾¾¾¾¾¾¾¾¾¾¾¾¾¾¾¾¾¾¾¾¾¾
User Manual
NOBLEX PRO 150/175
¾¾¾¾¾¾¾¾¾¾¾¾¾¾¾¾¾¾¾¾¾¾¾¾¾¾¾¾¾¾¾¾¾¾¾¾¾¾¾¾¾¾¾¾¾¾¾¾¾¾¾¾¾¾¾¾
Page 1 of 15
KAMERA WERK DRESDEN GmbH
¾¾¾¾¾¾¾¾¾¾¾¾¾¾¾¾¾¾¾¾¾¾¾¾¾¾¾¾¾¾¾¾¾¾¾¾¾¾¾¾¾¾¾¾¾¾¾¾¾¾¾¾¾¾¾¾
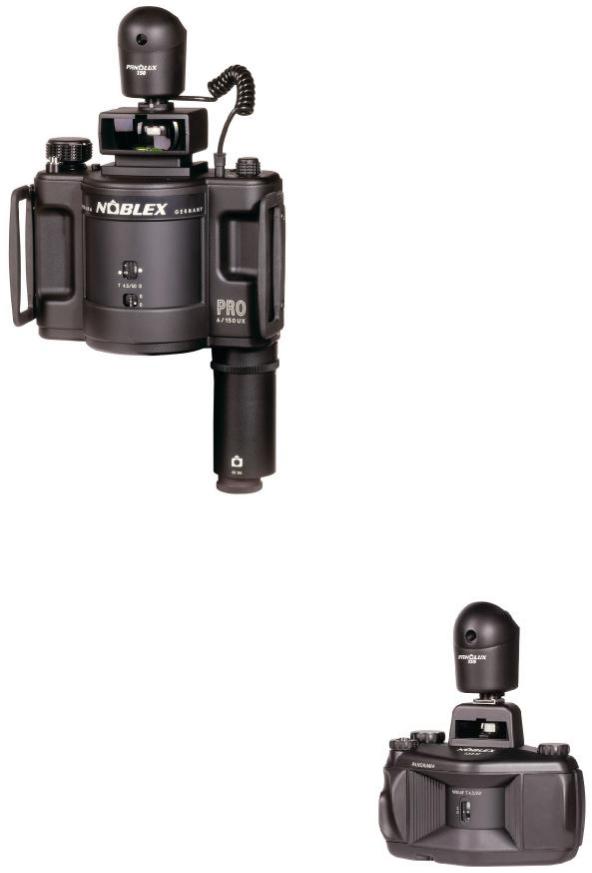
NOBLEX PRO 6/150 UX with onplugged PANOLUX 135 and slow exposure module
NOBLEX 135 U with on-plugged
PANOLUX 135
¾¾¾¾¾¾¾¾¾¾¾¾¾¾¾¾¾¾¾¾¾¾¾¾¾¾¾¾¾¾¾¾¾¾¾¾¾¾¾¾¾¾¾¾¾¾¾¾¾¾¾¾¾¾¾¾
Page 2 of 15
KAMERA WERK DRESDEN GmbH
¾¾¾¾¾¾¾¾¾¾¾¾¾¾¾¾¾¾¾¾¾¾¾¾¾¾¾¾¾¾¾¾¾¾¾¾¾¾¾¾¾¾¾¾¾¾¾¾¾¾¾¾¾¾¾¾
Introduction
Congratulations on your purchase of a new NOBLEX camera. With the patented and unique operation principle of NOBLEX cameras you enter in a new world of dramatic and expanded photographic applications. As NOBLEX cameras vastly differ tram traditional camera systems, we recommend reading the operating instructions carefully before using the camera the first time.
Please note:
These operating instructions are general instructions for all NOBLEX cameras for roll film. Should you own a model not having all features, you can omit certain chapters.
Please refer to the table on page 13 for information on technical features of your camera.
Special Features of NOBLEX
1.NOBLEX cameras use the principle of the lens rotating 360° for each exposure.
2.The film, resting on a curved film plane, is exposed through the constantly moving shutter slit.
3.During the first half of the rotation the lens drum is accelerated to a constant speed insuring absolutely even exposure of the film during the second half of the rotation.
4.This results in distortion free photographs with an angle of view of 146° when using a NOBLEX PRO 6/150 and 138° when taking pictures with a NOBLEX PRO 175. What makes these pictures stand out are their remarkably even edge to edge illumination and unsurpassed sharpness.
5.The photographs correspond to the natural space perception of the human eye.
Important Notes
1.The camera is not waterproof and therefore not suited for use in wet environments, when raining or in snow. A camera dropped into the water by accident, should immediately send to the NOBLEX Service Centre. Protect your camera tram seawater haze and tram high humidity. To properly clean your camera, use a dry cloth or a soft brush after taking pictures.
2.In the event service is required, never try to repair your camera your-self, contact the closest NOBLEX Service Station.
3.Remove the batteries if you will not use the camera for more than two weeks.
4.When not using the camera store it in the case and keep the camera in a cool, dry and dust-free location. Do not expose the camera to direct sunlight if it is not necessary and avoid strong heat influence (e.g. in trunk or glove compartments of cars).
5.Check all camera functions carefully after long storage.
6.Batteries can leak or explode and have the potential to cause personal harm. Do not open battery, expose to fire or high temperature, recharge, put in backwards, or mix with any other battery type. Dispose of them properly and always avoid misuse.
7.As with any electronic item, pay attention to condensation when moving tram a cold area to a warmer, as high humidity and dampness may occur.
8.If colour film remains too long in the camera, you may experience a colour shift. Always use fresh film.
9.Avoid taking photographs in the direction of a strong light source, e.g. the sun.
¾¾¾¾¾¾¾¾¾¾¾¾¾¾¾¾¾¾¾¾¾¾¾¾¾¾¾¾¾¾¾¾¾¾¾¾¾¾¾¾¾¾¾¾¾¾¾¾¾¾¾¾¾¾¾¾
Page 3 of 15
KAMERA WERK DRESDEN GmbH
¾¾¾¾¾¾¾¾¾¾¾¾¾¾¾¾¾¾¾¾¾¾¾¾¾¾¾¾¾¾¾¾¾¾¾¾¾¾¾¾¾¾¾¾¾¾¾¾¾¾¾¾¾¾¾¾
Table of Contents
Introduction _____________________________________________________________________ 3 Special Features of NOBLEX _______________________________________________________ 3 Important Notes __________________________________________________________________ 3 Table of Contents_________________________________________________________________ 4 Designation of Parts and Operating Elements _________________________________________ 5 Attaching the Camera Strap ________________________________________________________ 6 Inserting the Batteries _____________________________________________________________ 6 Inserting and removing the film _____________________________________________________ 6
Inserting the film (NOBLEX PRO 150) ______________________________________________ 6 Removing the film (NOBLEX PRO 150) _____________________________________________ 7 Inserting the film (NOBLEX PRO 175) ______________________________________________ 7 Removing the film (NOBLEX PRO 175) _____________________________________________ 7 Short Time Exposures_____________________________________________________________ 8 Long Time Exposures _____________________________________________________________ 8 Use of ‘Lens Shift’ function ________________________________________________________ 8 Multiple Exposures _______________________________________________________________ 8 Filters and Close-up Lenses ________________________________________________________ 9 The Slow Exposure Module ________________________________________________________ 9 Attaching to NOBLEX PRO _______________________________________________________ 9 Operating and Exposing in the Slow Speed Range __________________________________ 10 The PANOLUX 150 _______________________________________________________________ 11 Care of Camera__________________________________________________________________ 11 What to do then your camera requires service? ______________________________________ 11 Accessories for the NOBLEX PRO 150/175 __________________________________________ 12 Technical data and tables _________________________________________________________ 12 Drum running times of the NOBLEX PRO 150/175 ___________________________________ 12 Technical data of the NOBLEX PRO 150/175 models_________________________________ 13
¾¾¾¾¾¾¾¾¾¾¾¾¾¾¾¾¾¾¾¾¾¾¾¾¾¾¾¾¾¾¾¾¾¾¾¾¾¾¾¾¾¾¾¾¾¾¾¾¾¾¾¾¾¾¾¾
Page 4 of 15

KAMERA WERK DRESDEN GmbH
¾¾¾¾¾¾¾¾¾¾¾¾¾¾¾¾¾¾¾¾¾¾¾¾¾¾¾¾¾¾¾¾¾¾¾¾¾¾¾¾¾¾¾¾¾¾¾¾¾¾¾¾¾¾¾¾
Designation of Parts and Operating Elements
Shutter speed setting knob (2) |
Double exposue button (6) |
|
shutter release |
Connection for PANOLUX 150 (12) |
button (4) |
Lug for camera |
LED indicator(6) |
start button (5b) |
lug for camera |
||
stap (8) |
|
|
|
|
strap (8) |
ON/OFF switch (10) |
accessory shoe for PANOLUX 150 (13) |
film advance knob (5) |
|||
|
|
|
|
|
|
Above: |
View of above |
|
Tripod bushing |
Connetion for slow |
|
Below on left: |
View of behind |
|
|||
|
|
|
exposure modul (5a) |
||
Below on right: |
View of below |
|
|
|
|
|
|
|
|
||
|
|
|
|
|
|
Counter (5a)
MODEL 150
Battery |
deep of field |
start |
MODEL 175 |
compartment |
scale (25a) |
button (5b) |
|
cover (24) |
|
|
|
¾¾¾¾¾¾¾¾¾¾¾¾¾¾¾¾¾¾¾¾¾¾¾¾¾¾¾¾¾¾¾¾¾¾¾¾¾¾¾¾¾¾¾¾¾¾¾¾¾¾¾¾¾¾¾¾
Page 5 of 15
 Loading...