

Kambrook KSB400, X Blade Pro Instruction Booklet

Due to continual improvement in design or otherwise, the product you
purchase may differ slightly from the illustration in this book. Issue B13
Kambrook - New Zealand
Private Bag 94411
Botany, Manukau
Auckland 2163
New Zealand
Customer Service Line/
Spare Parts 0800 273 845
Customer Service Fax 0800 288 513
www.kambrook.co.nz
Kambrook - Australia
Building 2, Port Air Industrial Estate
1A Hale Street
Botany NSW 2019
Australia
Customer Service Line 1300 139 798
Customer Service Fax 1800 621 337
www.kambrook.com.au

X Blade Pro
Food Prep
System
KSB400
Instruction Booklet

Important
Please retain your instruction
book for future use.
In the event that you need some assistance with your
Kambrook appliance, please contact our Customer Service
Department on 1300 139 798 (Australia) or 0800 273 845
(New Zealand). Alternatively, visit us on our website at
www.kambrook.com.au or www.kambrook.co.nz

Contents
Kambrook Recommends
Safety First
p4
Your Kambrook X Blade Pro
Food Prep System
p7
Operating Your Kambrook
Stick Mixer
p9
Food Preparation Guide p24
Care, Cleaning and Storage p28
Recipes p33

4
Kambrook Recommends Safety First
IMPORTANT: Please retain your
instruction book for future use.
At Kambrook, we believe that safe performance is the first priority in any
consumer product, so that you, our valued customer can confidently
use and trust our products. We ask that any electrical appliance that
you use be operated in a sensible fashion with due care and attention
placed on the following important operating instructions.
Important Safeguards For Your Kambrook
X Blade Pro Food Prep System
• Carefully read all instructions before
operating the Kambrook X Blade Pro Food
Prep System for the first time and save for
future reference.
• Remove and safely discard any packaging
material and promotional labels before
using the Stick Mixer for the first time.
• To eliminate a choking hazard for young
children, remove and safely discard the
protective cover fitted to the power plug of
this Stick Mixer.
• Do not place the Stick Mixer near the edge
of a bench or table during operation. Ensure
the surface is level, clean and free of water,
flour, etc.
• Do not place the Stick Mixer on or near a
hot gas or electric burner, or where it could
touch a heated oven.
• If using the Stick Mixer as a hand blender to
blend hot food in a saucepan, firstly remove
the saucepan from the heat source and
ensure the power cord and body of Stick
Mixer are also kept away from any heat
source.
• Take care when handling the Stick Mixer,
attachments and sharp cutting blades,
when emptying the bowl and during
cleaning. Remember the blade and
attachments are very sharp and should be
kept out of reach of children.
• Always make sure the Stick Mixer is
completely and properly assembled
before operating.
• Ensure the Stick Mixer is turned OFF by
releasing the ‘ON’ or ‘TURBO’ button on the
Stick Mixer motor. Turn the power off at the
power outlet and remove the power plug
from the power outlet before attempting
to attach or disassemble any of the
accessories.
• Always ensure the Stick Mixer motor is
securely fitted onto the food processing bowl
lid, blending shaft or masher attachment
before operating.
• Always ensure the food processing bowl lid
is securely locked in place before operating
the food processing bowl.
• Do not use attachments other than those
provided with the Stick Mixer.
• Do not attempt to operate the Stick Mixer by
any method other than those described in
this booklet.
• Do not process hot or boiling liquids in the
processing bowl – allow liquids to cool before
placing into the processing bowl.
• Do not operate the Stick Mixer continuously
for more than 1 minute. Allow the motor to
rest for 1 minute between each use.
• Never mix dry, thick or heavy mixtures for
more than 20 seconds. Stop the operation
and stir the ingredients before continuing.
Allow the motor to rest for 1 minute between
each use.

5
• Ensure the Stick Mixer is turned OFF by
releasing the ‘ON’ or ‘TURBO’ button on
the motor head. Turn the power off at the
power outlet and remove the power plug
from the power outlet before attempting
to move the Stick Mixer, when not in use, if
left unattended and before disassembling,
cleaning or storing.
• When blending or mashing, if food becomes
lodged around the processing blade or in
the blade guard, release the ‘ON’ or ‘TURBO’
speed button, switch the power off at the
power outlet and remove the power plug
from the outlet. Use a spatula to dislodge
the food. Do not use fingers as the blades
are sharp.
• Ensure the Stick Mixer is switched off and
unplugged at the power outlet before
changing accessories or approaching parts
that move when they are in use.
• Do not use the Stick Mixer with wet hands.
• Do not push the food into the feed chute
with your fingers or other utensils. Always use
the food pusher provided.
• Keep fingers, hands, knives and other utensils
away from moving blades and discs.
• Do not place hands or fingers in the
food processing bowl unless the motor,
processing blade or disc has come to a
complete stop. Ensure the Stick Mixer is
switched off and unplugged at the power
outlet before removing the lid from the food
processing bowl.
• Use the blade protector when storing the
processing blade.
• Do not process thin fluids such as water, milk,
stock, juice etc in the food processing bowl
as this could result in overflow. To reduce the
risk of overflow, always add drier or thicker
ingredients to the food processing bowl prior
to adding fluids.
• Do not place anything on top of the
appliance when the lid is on, when in use
and when stored.
• To protect against electric shock, do not
immerse the Stick Mixer motor, cord or power
plug in water or any other liquid.
• Do not remove the Stick Mixer from
ingredients during operation. Ensure the
Stick Mixer is switched OFF and has stopped
turning before removing, to avoid contact
with moving blade.
• Do not leave the Stick Mixer unattended
when in use.
• Do not allow children to use the Stick Mixer
without supervision.
• Do not place any parts of the Stick Mixer in a
microwave oven.
• Do not wash the mashing attachment
connector, processing bowl lid or the motor
of the Stick Mixer in the dishwasher. The
detachable blending shaft, processing bowl,
cube cutter blade, cube cutter disc, cube
cutter blade holder, cube cutter cleaning
accessory, processing blade, shredding/
slicing disc, chipping disc and masher
attachment are dishwasher safe.
• Keep the Stick Mixer clean. Follow the Care,
Cleaning and Storage instructions provided
in this book.

6
Important Safeguards For All Electrical
Appliances
• Fully unwind the power cord before use.
• Connect only to 230V or 240V power outlet.
• Do not let the power cord hang over the
edge of a bench or table, touch hot surfaces
or become knotted.
• To protect against electric shock, do not
immerse the power cord, power plug or
appliance in water or any other liquid,
unless it is recommended in the cleaning
instructions.
• The appliance is not intended for use by
persons (including children) with reduced
physical, sensory or mental capabilities,
or lack of experience and knowledge,
unless they have been given supervision or
instruction concerning use of the appliance,
by a person responsible for their safety.
• Children should be supervised to ensure that
they do not play with the appliance.
• It is recommended to inspect the appliance
regularly. Do not use the appliance if the
power supply cord, plug, connector or
appliance becomes damaged in any way.
Return the entire appliance to the nearest
authorised Kambrook Service Centre for
examination and/or repair.
• Any maintenance other than cleaning
should be performed at an authorised
Kambrook Service Centre.
• This appliance is for household use only.
Do not use this appliance for other than its
intended use. Do not use in moving vehicles
or boats. Do not use outdoors. Misuse may
cause injury.
• The installation of a residual current device
(safety switch) is recommended to provide
additional safety protection when using
electrical appliances. It is advisable
that a safety switch with a rated residual
operating current not exceeding 30mA be
installed in the electrical circuit supplying
the appliance. See your electrician for
professional advice.
• Always turn the appliance to the OFF
position, switch off at the power outlet
and unplug at the power outlet when the
appliance is not in use.
• Before cleaning, always turn the appliance
to the OFF position, switch off at the power
outlet, unplug at the power outlet and
remove the power cord, if detachable, from
the appliance and allow all parts to cool.
• Do not place this appliance on or near
a heat source, such as hot plate, oven or
heaters.
• Position the appliance at a minimum
distance of 20cm away from walls, curtains
and other heat or steam sensitive materials
and provide adequate space above and on
all sides for air circulation.
7
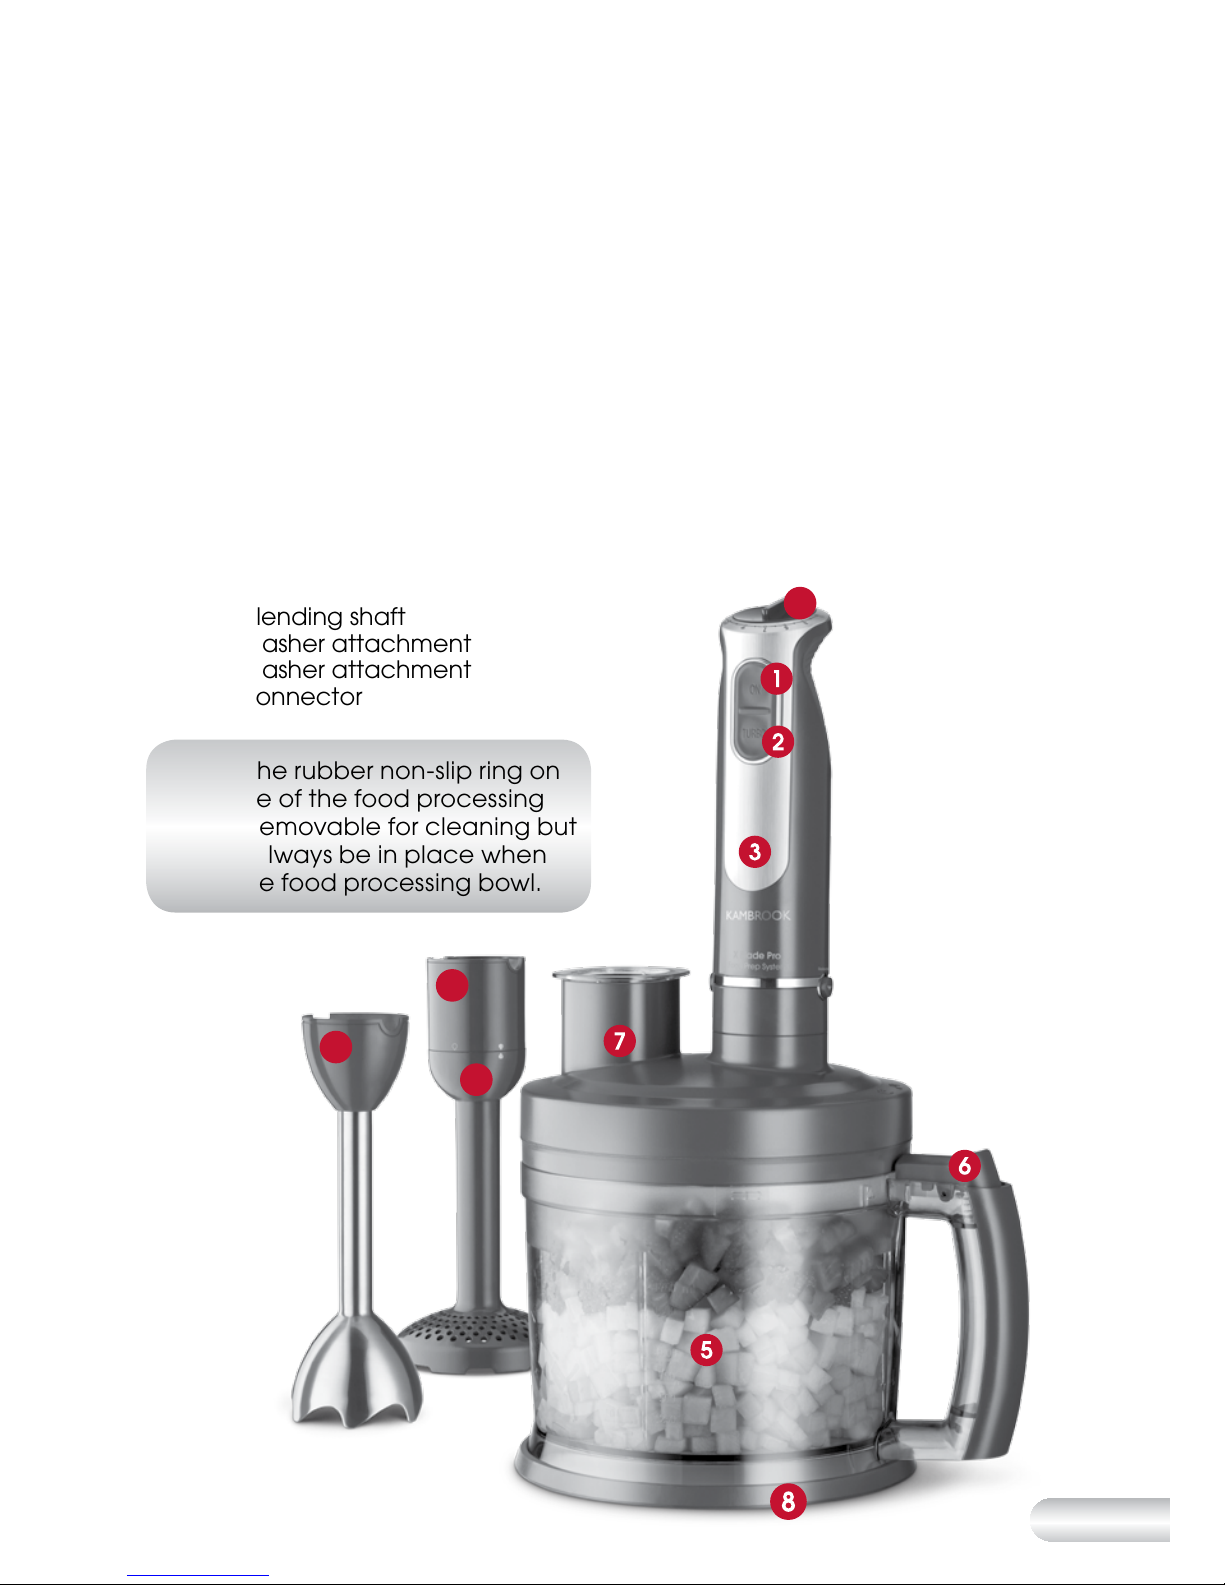
Your Kambrook X Blade Pro Food Prep System
1. 'ON' speed button
2. 'TURBO' speed button
3. 600 watt powerful Stick Mixer
motor controls stick mixer and
attaches to food processing
bowl for operating cubic and
food processing attachments
a) Variable speed control dial to
adjust motor speed from low to
high as required depending on
the processing task
4. Stick Mixer attachments for
blending or mashing
a) Stainless steel four tip
blending shaft
b) Masher attachment
c) Masher attachment
connector
NOTE: The rubber non-slip ring on
the base of the food processing
bowl is removable for cleaning but
should always be in place when
using the food processing bowl.
5. 2 litre processing bowl used
with cubic and food processing
attachments
6. Lid release button on processing
bowl handle. Press down on
button to release the locking
mechanism on the lid.
7. Processing bowl lid with feed
chute and food pusher used
with cubic and food processing
attachments
8. Non-slip rubber ring (removable)
4a
4b
4c
3a
8
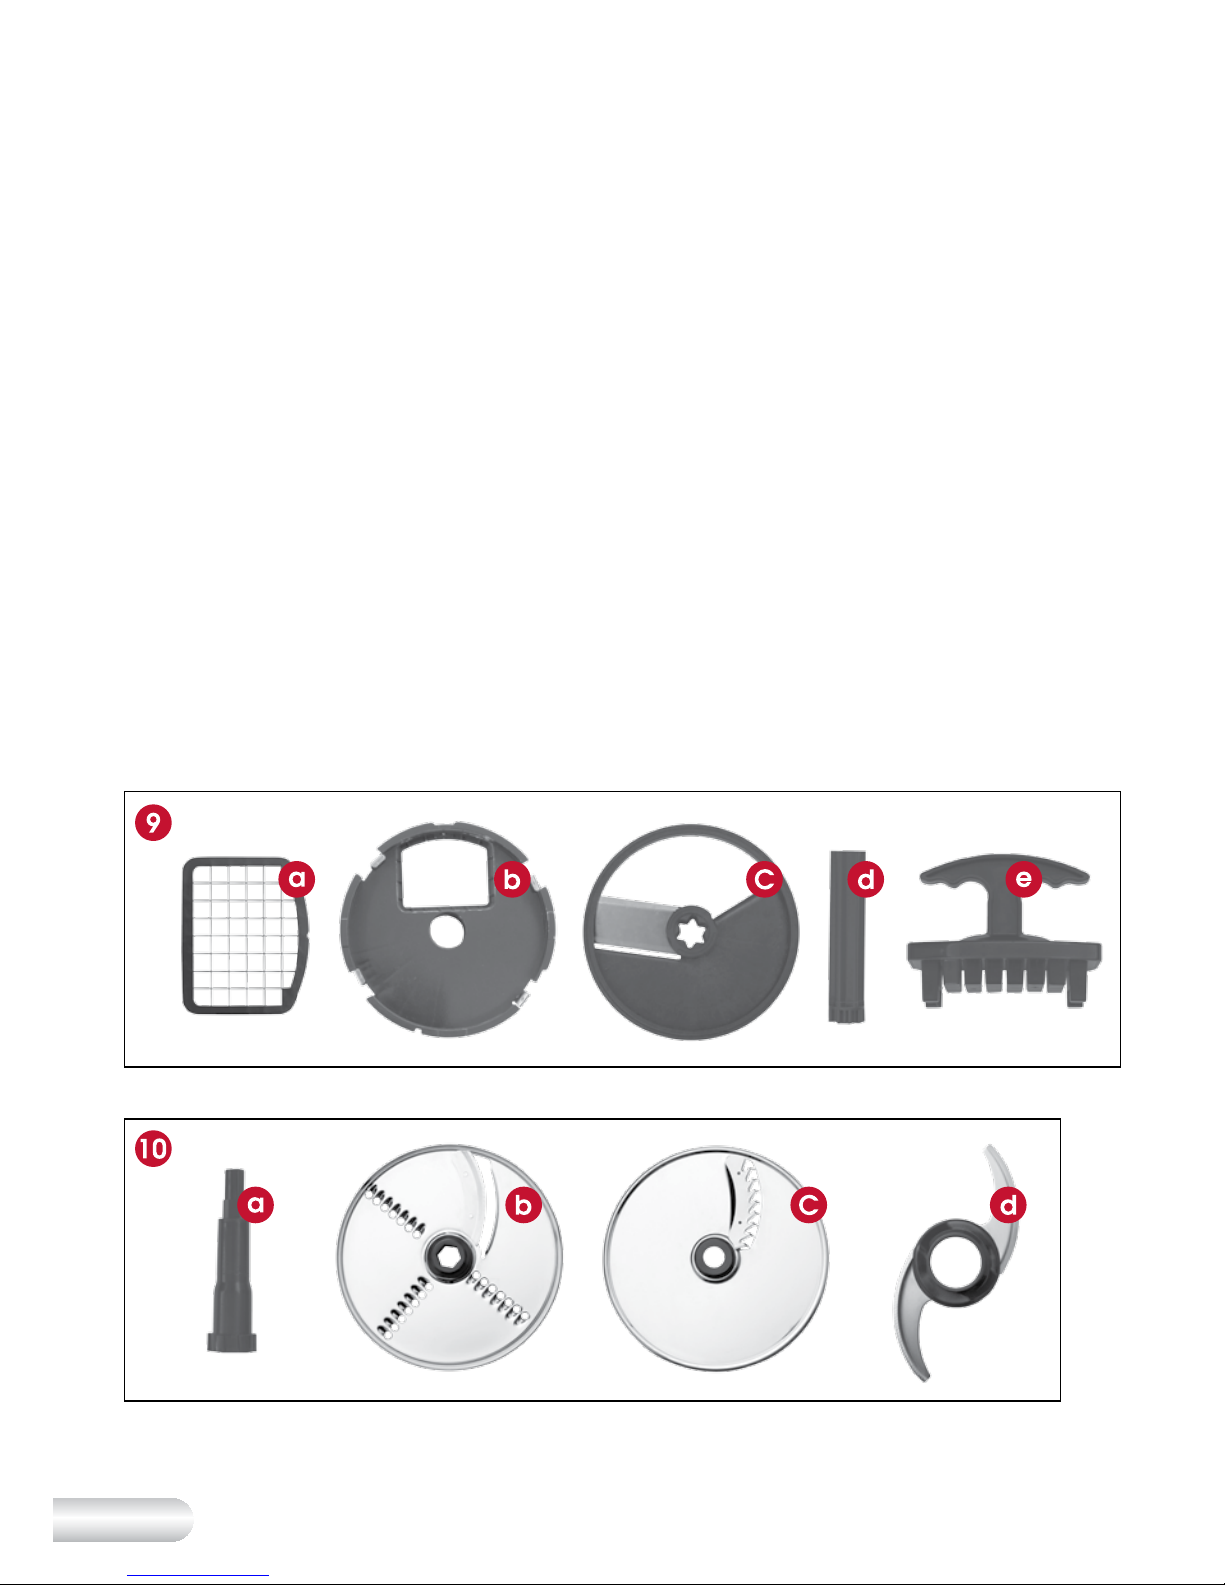
Your Kambrook X Blade Pro
Food Prep System Continued...
9. Cubic attachment for dicing
a) Cube cutter blade
b) Blade holder with locking clips
c) Disc with stainless steel blade
d) Cube cutter shaft- inserted
into the assembled cubic
attachment and placed
inside the processing bowl
e) Cube cutter cleaning
accessory to help remove
foodstuffs that may get
caught in cube cutter blade
after dicing
10. Food Processing attachment
for processing, slicing, shredding
or chipping
a) Spindle - sits inside the
processing bowl to be used
with processing blade,
slicing/shredding disc and
chipping disc
b) Reversible stainless steel
slicing/ shredding disc
c) Stainless steel chipping disc
d) Stainless steel processing
blade

9
Operating Your Kambrook Stick Mixer
Before First Use
Remove any packaging material
and promotional labels.
When unpacking the Stick Mixer,
check to see you have received all
the required parts and accessories
as outlined in the parts list before
discarding the packaging.
Disassemble and wash blending shaft,
cube cutter blade, cube cutter disc,
processing blade, processing bowl,
slicing/shredding disc, chipping disc
and mashing attachment with warm
soapy water, rinse and dry thoroughly.
Ensure no water remains inside the
blending shaft to avoid water running
into the Stick Mixer motor when
re-attached.
NOTE: Carefully remove the
protective safety storage cover
from the processing blade. The
processing blade is extremely
sharp, it should only ever be held
by its central plastic.
WARNING: All blades are
extremely sharp. Handle
with care.
NOTE: DO NOT place the masher
connector, processing bowl lid
and Stick Mixer motor into a
dishwasher or submerge in water
for cleaning. Wipe the masher
connector, processing bowl lid
and Stick Mixer motor with a
damp cloth. The detachable
blending shaft, processing bowl,
blade holder, cube cutter blade,
cube cutter disc, cube cutter
shaft, cube cutter cleaning
tool, processing blade, slicing/
shredding disc, chipping disc
and masher attachment are
dishwasher safe.
NOTE: Before placing the
blending shaft back onto the
Stick Mixer motor after washing,
make sure that the blending shaft
has been dried thoroughly.
Stick Mixer Motor
The Stick Mixer motor with button
controls is versatile and can
be attached to:
•The stainless steel four blade
blending shaft for use as a hand
blender
•The masher attachment to
conveniently make lump-free mash
•The processing bowl lid for use
with the cubic attachment to dice
vegetables and fruit in a short
amount of time
•The processing bowl lid using the
slicing/shredding disc, chipping
disc or processing blade for use as
a food processor

10
WARNING: Do not
immerse the Stick Mixer
motor, power cord, or
plug in water or any other
liquid.
Stick Mixer Attachments
WARNING: All processing
blades are extremely
sharp. Handle with care
and only lift from the
shaft.
To Attach the Stainless Steel
Blending Shaft to the Stick
Mixer Motor
Align the lock buttons on the drive
end of the Stick Mixer motor with
the grooves found at the top of the
four blade blending shaft. Push down
to lock into place until an audible
“click” sound is heard to indicate
that it is secure.
Using the Hand Blender
Ensure the blender is correctly and
securely assembled as detailed prior.
1. Place food to be processed into
a sufficiently large mixing bowl or
saucepan (not provided).
2. Insert the power plug into a 230V
or 240V power outlet and turn
the power on.
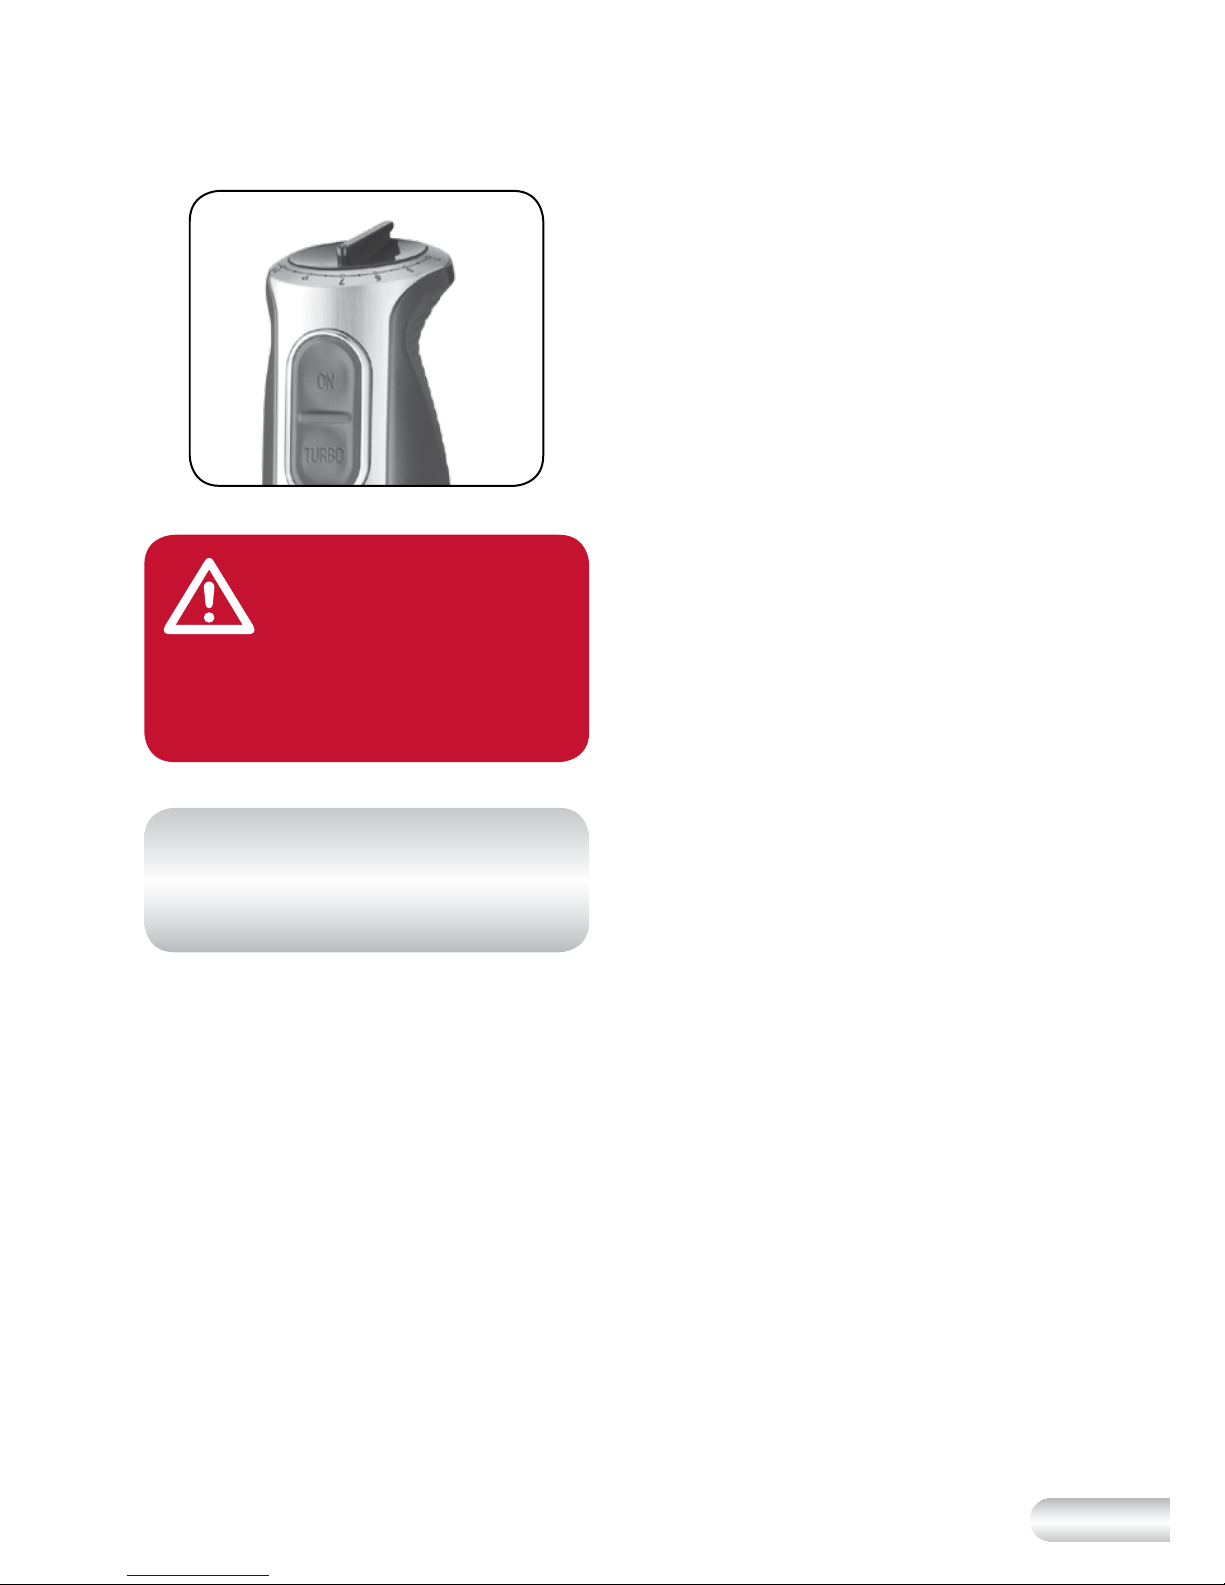
3. Using the Variable Speed
Control Dial located on top of the
Stick Mixer motor (See Fig. 1), turn
the dial to a low speed setting
and then, if required, adjust to a
higher speed setting depending
on what the recipe specifies.
4. Place the blending shaft as
deeply as possible into the
saucepan and press and hold
the ‘ON’ button. The button must
be kept pressed for the duration
of operation. If an extra burst of
power is required when blending,
press the ‘TURBO’ speed button
instead of the 'ON' button.
5. With one hand work through the
ingredients in the saucepan with
a gentle raising and lowering
motion of the Stick Mixer, whilst
with the other hand hold onto
the saucepan handle for
increased control.
6. Once processing is complete,
switch OFF the motor by releasing
the ‘ON’ or ‘TURBO’ speed
button, switch off at the power
outlet and remove the power
plug from the outlet.
7. To avoid splashing when lifting the
Stick Mixer out of the saucepan,
ensure the motor has completely
stopped and the blades have
stopped rotating.
NOTE: The Stick Mixer has a
Variable Speed Control Dial that
adjusts speed from low to high
depending on the processing
task. Turn dial from a low speed of
1 up to a higher speed if required
(See Fig. 1). Pressing the ‘TURBO’
button however will override the
Variable Speed and operate at
maximum speed.
Operating Your Kambrook Stick Mixer Continued...
11
Fig. 1
WARNING: DO NOT
process hard foodstuffs
such as ice, coffee
beans, cereals or
chocolate in lumps
as these may result in
damage to the blades.
NOTE: The Stick Mixer motor will
only operate while the ‘ON’ or
‘TURBO’ speed button remains
pressed - this is a safety feature.
To Detach the Stainless Steel
Blending Shaft
1. Once blending is complete,
switch OFF the motor by releasing
the ‘ON’ or ‘TURBO’ speed
button, switch off at the power
outlet and remove the power
plug from the outlet.
2. Holding the Stick Mixer motor with
one hand and the upper plastic
part of the blending shaft with
the other hand, press the two
‘Release’ buttons found at the
drive end of the Stick Mixer motor
and pull the blending shaft away
from the motor.
Recommendations when Using
the Stick Mixer as a Hand Blender
•The Stick Mixer blends foods
and liquids rapidly, therefore it is
easy to over-process. Remember
when using the blending shaft,
to stop the Stick Mixer and
check foodstuffs throughout the
operation.
•The stainless steel blending shaft
on the Stick Mixer allows for hot
food to be processed directly in
the saucepan. This makes blending
soups and sauces very easy. For
safety reasons, move the saucepan
away from the heat before
processing.
•Ensure the body of the Stick Mixer
and power cord are kept away
from any heat source.
•When pureeing and blending,
cut food into uniform sizes. This
will ensure smooth and consistent
results.
•Warm all liquids to be added to
soups and purees, this will ensure
even blending.
•DO NOT process hard foodstuffs
such as ice, coffee beans, cereals
or chocolate in lumps as these may
result in damage to the blades.
Dislodge Food from the Blending
Blade
If foodstuffs become lodged around
the four tip blade or in the blade
guard surrounding the blade, follow
the safety instructions outlined below:
1. Release the ‘ON’ or ‘TURBO’
speed button, switch the power
off at the power outlet and
unplug the power plug from
the outlet.
12
2. Use a spatula to carefully dislodge
the food. DO NOT use fingers as
the blades are sharp.
3. After the food has been removed
and blades are clear, plug the
Stick Mixer back into the power
supply, switch the power on and
continue blending.
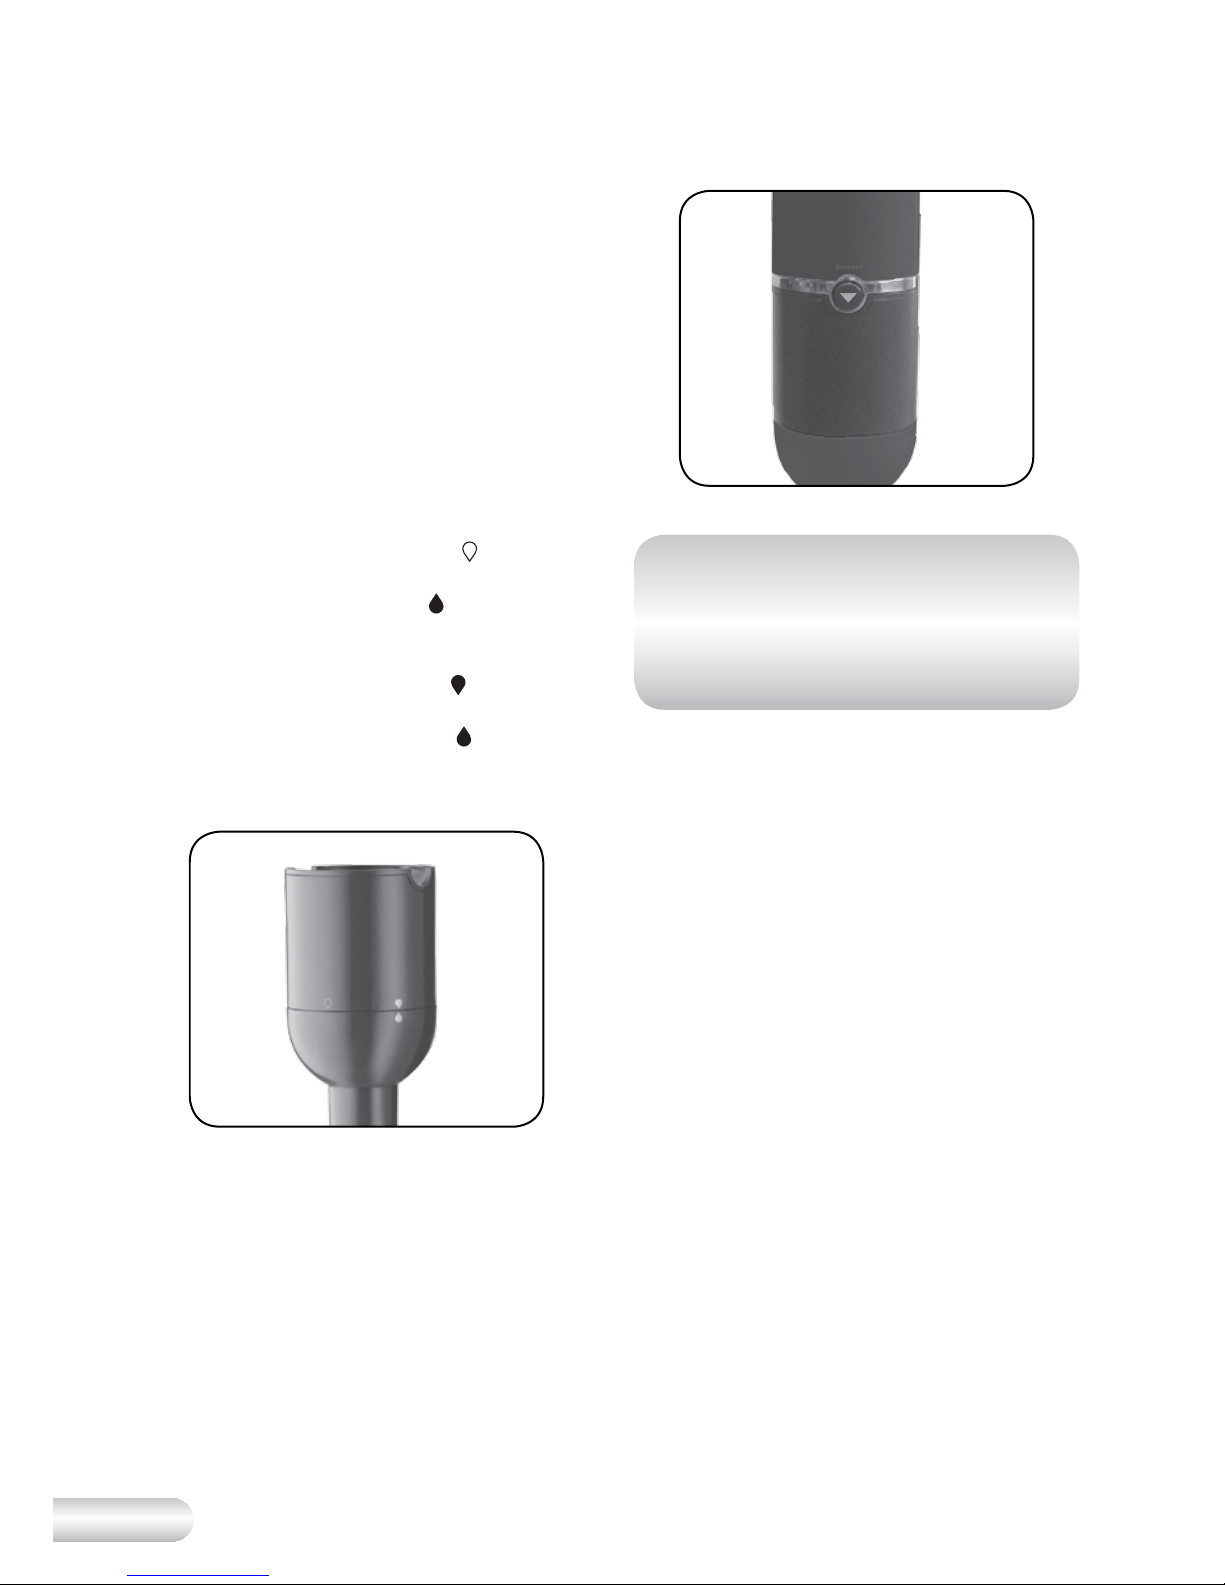
To Attach the Masher Attachment
to the Stick Mixer Motor
1. To assemble the masher
attachment, align the (
) symbol
on the masher attachment
connector with the (
) symbol
found on the masher attachment.
Turn the masher attachment anticlockwise so that the (
) symbol
on the masher attachment
connector aligns with (
) symbol
on the masher attachment
(See Fig. 2).
Fig. 2
2. Align the lock buttons on the drive
end of the Stick Mixer motor with
the grooves at the top of the
masher attachment connector
after the connector has been
connected to the masher
attachment. Push down to lock
into place until an audible “click”
sound is heard to indicate that it is
secure (See Fig. 3).
Fig. 3
NOTE: Ensure the masher
attachment is dry and that
there is no water inside before
attaching to avoid any water
getting in the Stick Mixer motor.
Using the Stick Mixer as
a Masher
1. Place cooked foodstuffs to be
mashed into a saucepan.
2. Insert the plug into a 230V or 240V
power outlet and then turn the
power on at the power outlet.
3. Insert the mashing attachment
deeply into a saucepan and
press and hold the ‘ON’ or
'TURBO' button to turn the masher
on. Choose a Variable Speed
as per the recipe guideline or
alternatively, press and hold the
'TURBO' speed button to select
the maximum speed.
4. To efficiently mash the foodstuffs,
use a gentle raising and
lowering motion.
5. Switch OFF the motor by releasing
the ‘ON’ button and then lift
the Stick Mixer out of the
saucepan. To avoid splattering,
allow the blades to stop rotating
before lifting the masher out of
the saucepan.
Operating Your Kambrook Stick Mixer Continued...

13
6. The Stick Mixer will only
operate while either the ‘ON’ or
‘TURBO’ speed control button
is continuously pressed - this is a
safety feature.
To Remove the Masher
Attachment
1. Once mashing is complete,
release the ‘ON’ or ‘TURBO’
speed button, switch the power
off at the power outlet and
unplug the power plug from
the outlet.
2. To remove the masher from the
Stick Mixer motor, press the two
‘Release’ buttons found at the
drive end of the Stick Mixer motor
and pull the masher away from
the motor.
3. To separate the masher
attachment connector from
the masher attachment, turn
the masher attachment in a
clockwise direction and
pull apart.
Recommendations when using
the Stick Mixer with the Masher
Attachment
•The Stick Mixer is powerful
and processes quickly. It is
recommended that in order to
avoid ‘over mashing’ potatoes,
stop the Stick Mixer and
check the consistency of the
foodstuffs regularly.
•The masher attachment allows for
foodstuffs to be mashed directly in
the saucepan. For safety reasons,
always remove the saucepan from
the heat and allow to cool to room
temperature before mashing.
•When mashing, ensure the
potatoes are cut into uniform
sizes and fully cooked to ensure
even and consistent results.
•Ensure the body of the Stick Mixer
and power cord are kept away
from any heat source.
NOTE: The masher attachment
should only be used for mashing
tasks; do not use it to blend.
Cubic Attachment
To assemble the Cubic Attachment
into the Food Processor Bowl
WARNING: The cube
cutter blade and disc
are extremely sharp and
should only be handled
by the plastic parts.
The cubic attachment is used to dice
fruits and raw or cooked vegetables,
such as carrots, pumpkin and onions.
1. To use the cubic attachment, the
cube cutter blade and blade
disc must first be assembled into
the blade holder. To do this, sit
the blade holder on a bench so
that the protruding cylinder is
facing downwards and pull the
four locking clips away from the
edges of the blade holder. Next,
holding the cube cutter blade by
the outside plastic edges, align
the tab on the cube cutter blade
with the matching groove on the
blade holder and drop into the
blade holder cavity (See Fig. 4).
Make sure the cube cutter blade
sits securely and flush inside the
cavity of the blade holder.
 Loading...