

Page 1

Due to continual improvement in design or otherwise, the product you
purchase may differ slightly from the illustration in this book. Issue A13
Kambrook - New Zealand
Private Bag 94411
Botany, Manukau
Auckland 2163
New Zealand
Customer Service Line/
Spare Parts 0800 273 845
Customer Service Fax 0800 288 513
www.kambrook.co.nz
Kambrook - Australia
Building 2, Port Air Industrial Estate
1A Hale Street
Botany NSW 2019
Australia
Customer Service Line 1300 139 798
Customer Service Fax 1800 621 337
www.kambrook.com.au
Page 2

Instruction Booklet
Café Duo
Espresso
Machine
KES150
Page 3

Important
Please retain your instruction
book for future use.
In the event that you need some assistance with your
Kambrook appliance, please contact our Customer Service
Department on 1300 139 798 (Australia) or 0800 273 845
(New Zealand). Alternatively, visit us on our website at
www.kambrook.com.au or www.kambrook.co.nz
Page 4

Contents
Kambrook Recommends Safety
First
p4
Your Kambrook Café Duo
Espresso Machine
p7
Using your Kambrook
Espresso Machine
p8
Care, Cleaning and Storage p18
Troubleshooting Guide p21
Coffees to try p22
Page 5

4
Kambrook Recommends Safety First
IMPORTANT: Please retain your
instruction book for future use.
At Kambrook, we believe that safe performance is the first priority in any
consumer product, so that you, our valued customer can confidently
use and trust our products. We ask that any electrical appliance that
you use be operated in a sensible fashion with due care and attention
placed on the following important operating instructions.
Important Safeguards For Your Kambrook Café
Duo Espresso Machine
• Carefully read all instructions before
operating the espresso machine for the first
time and save for future reference.
• Remove and safely discard any packaging
material and promotional labels before using
the espresso machine for the first time.
• To eliminate a choking hazard for young
children, remove and safely discard the
protective cover fitted to the power plug of
this espresso machine.
• When unpacking the espresso machine,
check to see you have received all the items
listed in the parts list, before discarding the
packaging.
• Do not place the espresso machine near the
edge of a bench or table during operation.
Ensure that the surface is level, stable, clean
and free of water and other substances.
• Do not operate the espresso machine on a
sink drain board.
• Always ensure the espresso machine is
properly assembled before use. Follow the
instructions provided in this book.
• The espresso machine must not be supplied
through an external switching device, such
as a timer, or connected to circuit that is
regularly switched on and off by the utility.
• Do not use attachments other than those
provided with the espresso machine.
• Do not attempt to operate the espresso
machine by any other method other than
described in this book.
• Do not leave the espresso machine
unattended whilst in operation or connected
at the power outlet.
• Do not move while the espresso machine is
switched on and/or in operation.
• Do not allow the cord to touch hot surfaces.
• The cup-warming tray will always be heating
when the espresso machine is switched on
at the power outlet. Please switch off and
unplug when not in use.
• Do not place anything other than coffee
cups for warming on top of the espresso
machine.
• Only use cold water in the water tank. Do
not use de-mineralised water, mineral water,
distilled water or any other liquid. Check
water level before use and replace water
daily. Never use the espresso machine
without water in the water tank.
• Do not overfill coffee filter basket. Ensure the
correct dose of coffee is used.
• Ensure the portafilter is firmly inserted and
secured into the group head before starting
the espresso machine brewing process.
• Do not leave the espresso machine
unattended while shots of coffee are being
extracted. You need to manually switch the
selector control to 'STANDBY' mode to stop
theespresso machine once sufficient coffee
has flowed into the cups.
Page 6

5
• Do not leave the espresso machine
unattended while frothing milk. You need
to manually switch the selector control to
'STANDBY' mode to stop frothing milk.
• The metal parts of the portafilter may still be
very hot after use. Cool down these parts by
running under cold water.
• Never remove the portafilter from the group
head during the brewing operation as the
espresso machine is under pressure.
• Ensure to use the filter retainer clip when
discarding the coffee grounds.
• Do not touch hot surfaces. High
temperatures are generated during use,
which could cause burns. Always use the
handle and warn others (especially children)
of the possible dangers of burns from steam,
hot water or warming tray, especially when
brewing coffee and frothing milk.
• Allow the espresso machine to cool down
before moving or cleaning any parts.
• Liquid should not be allowed to run over
the top of the froth enhancer, otherwise the
froth enhancer will not function. To avoid
splattering of hot milk, do not lift the steam
tip above the surface of the milk while
frothing.
• Never let coffee or water level in a cup reach
the spouts of the portafilter.
• Ensure the selector control is in the 'STANDBY'
mode before removing the steam wand from
the frothing jug.
• If the espresso machine is not used for an
extended period, disconnect the espresso
machine from the power outlet.
• Always switch off at the power outlet, and
then unplug the espresso machine from the
outlet:
- Before filling with water or emptying it
- Before leaving it unattended
- Before attempting to move the
espresso machine
- Before cleaning and maintenance unless
otherwise specified in this booklet
- Immediately after use
• Before starting the decalcifying process (or
de-scale feature), ensure drip tray is empty
and inserted correctly in position.
• The water tank should never be removed
or completely emptied during decalcifying
process (or de-scale feature).
• To prevent damage to the espresso machine
do not use alkaline cleaning agents
when cleaning, uses a soft cloth and mild
detergent.
• Store the espresso machine out of reach of
children.
• Do not store the espresso machine with
water in the water tank. Always empty the
tank after use.
• Always store the espresso machine in the
upright position.
• Keep the espresso machine clean. Follow the
cleaning instructions provided in this book.
Page 7

6
Important safeguards for all electrical
appliances
• Fully unwind the power cord before use.
• Connect only to a 230V or 240V power outlet.
• Do not let the power cord hang over the
edge of a bench or table, touch hot surfaces
or become knotted.
• To protect against electric shock, do not
immerse the power cord, power plug or
appliance in water or any other liquid or
allow moisture to come in contact with
the part, unless it is recommended in the
cleaning instructions.
• The appliance is not intended for use by
persons (including children) with reduced
physical, sensory or mental capabilities,
or lack of experience and knowledge,
unless they have been given supervision or
instruction concerning use of the appliance
by a person responsible for their safety.
• Children should be supervised to ensure that
they do not play with the appliance.
• It is recommended to regularly inspect the
appliance. To avoid a hazard, do not use
the appliance if power cord, power plug or
appliance becomes damaged in any way.
Return the entire appliance to the nearest
authorized Kambrook service centre for
examination and / or repair.
• Any maintenance other than cleaning
should be performed at an authorised
Kambrook Service Centre.
• This appliance is for household use only. Do
not use this appliance for anything other
than its intended use. Do not use in moving
vehicles or boats. Do not use outdoors.
Misuse may cause injury.
• The installation of a residual current device
(safety switch) is recommended to provide
additional safety protection when using
electrical appliances. It is advisable
that a safety switch with a rated residual
operating current not exceeding 30mA be
installed in the electrical circuit supplying
the appliance. See your electrician for
professional advice.
• Always turn the appliance to the OFF
position, switch off at the power outlet
and unplug at the power outlet when the
appliance is not in use.
• Before cleaning, always turn the appliance
to the OFF position, switch off at the power
outlet, unplug at the power outlet and
remove the power cord, if detachable, from
the appliance and allow all parts to cool.
• Do not place this appliance on or near
a heat source, such as hot plate, oven or
heaters.
• Position the appliance at a minimum
distance of 20cm away from walls, curtains
and other heat or steam sensitive materials
and provide adequate space above and on
all sides for air circulation.
Page 8
7
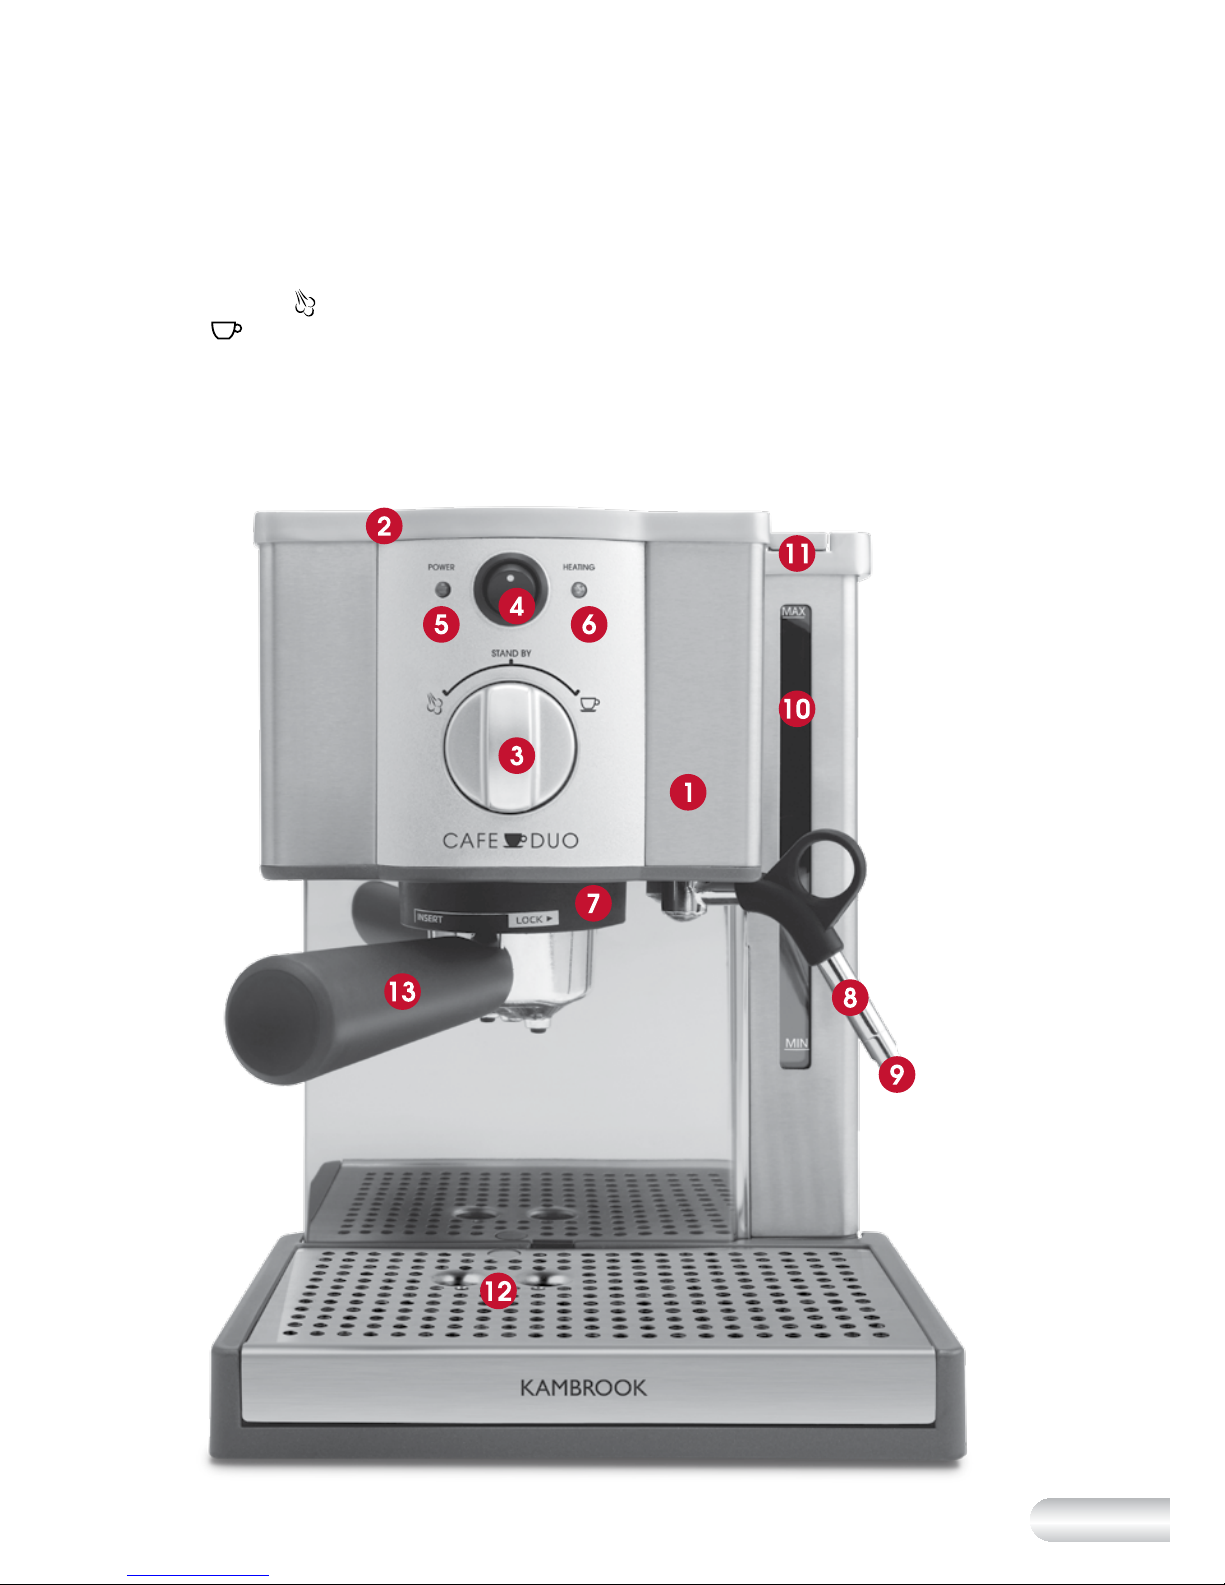
Your Kambrook Café Duo Espresso Machine
1. Durable stainless steel design
2. Cup warming tray
3. Selector control featuring;
'STEAM'
and 'ESPRESSO'
mode
4. Power On/Off button
5. Power indicator light
6. Heating indicator light
7. Group head
8. Steam wand
9. Steam wand tip
10. Water reservoir
11. 1.2 litre removable water tank
12. Drip tray with water level
indicator
13. Portafilter
Page 9

8
14. 1 and 2 cup stainless steel dual
wall filter baskets (1 and 2 cup
shot extraction)
15. Combined measuring spoon and
coffee tamper
16. Stainless steel milk jug
Your Kambrook Café Duo Espresso Machine
Continued...
17. Froth enhancer
18. Steam wand cleaning tool
Not Shown
• 15 bar Italian pump
• Thermoblock heating system
Page 10

9
Using Your Kambrook Espresso Machine
Before First Use
Remove any packaging material and
promotional labels before using your
espresso machine for the first time.
Ensure you have removed all parts
and accessories before discarding the
packaging.
It is recommended before first use to
clean all the parts and accessories of
the espresso machine including the
water tank, portafilter, filter baskets,
combined measuring spoon and
coffee tamper, froth enhancer, and
milk frothing jug using warm water
and dishwashing liquid. Rinse well and
dry thoroughly.
Filling the water tank
1. Ensure the espresso machine
selector control is switched to
the ‘STANDBY’ mode and is
switched off at the power outlet
and unplugged prior to filling the
water tank.
2. Open the water reservoir lid
and holding onto the water
tank handle, remove the water
tank from the water reservoir
(see Fig.1).
Fig. 1
3. Fill the water tank with cold water
to the ‘MAX’ level indicator line
marked on the water tank and
insert the tank back into the water
reservoir and push down until it sits
flush and firmly into place. Close
the water reservoir lid.
NOTE: The water tank level should
be checked regularly with use.
Cold fresh water must be used to
fill the tank.
NOTE: Do not use de-mineralised
or distilled water in this machine.
This will adversely affect the
machine’s operation and will
potentially impair the flavour of
your coffee.
WARNING: Do not store
the espresso machine with
water in the water tank.
Always empty the tank
after use.
Pre-heating the machine
Prior to making your first coffee to
ensure the machine is pre-heated, for
optimum crema, it is recommended
to carry out a complete brewing
operation of your espresso machine;
using water only, without any ground
coffee in the portafilter.
1. Ensure the selector control is in the
‘STANDBY’ mode, plug the power
cord into a 230V or 240V power
point and switch ‘ON’ at the
power point.
Page 11

10
2. Turn the espresso machine on
by pressing the power On/Off
button to the ‘ON’ position;
the 'POWER' light will illuminate
red and the ‘HEATING’ light will
illuminate orange indicating that
the machine has commenced
heating.
3. Once the machine has reached
optimum temperature, the
'HEATING' light will automatically
switch off.
4. Once the 'HEATING' light has
turned off, set the selector control
to the ‘ESPRESSO’
mode and
allow a small amount of water
to pour through the group head
for a few seconds without the
portafilter in place.
5. Pre-heat the portafilter with filter
basket assembled by holding it
under the group head. Set the
selector control to the ‘ESPRESSO’
mode and rinse the portafilter
by running the water over the
portafilter. Dry the rinsed portafilter
thoroughly before use.
6. After pre-heating the machine
and rinsing the portafilter, ensure
the selector control is back in the
‘STANDBY’ mode.
To Pre-warm cups
Your machine is fitted with a cup
warming tray. It is recommended
to warm your serving cup to help
maintain the coffee’s optimum
temperature.
1. To pre-warm the cup, rinse the
cup in hot water, dry thoroughly
and place the cup upside down
onto the cup warming tray. Leave
cup on the tray until ready to
brew (see Fig.2).
Fig. 2
Alternatively the cup can be
pre-warmed by running hot
water over the cup from the
group head. Set the selector
control to the ‘ESPRESSO’
mode and allow a small amount
of water to pour through the
group head for a few seconds
without the portafilter in
place. Once the cup is rinsed,
turn selector control back to
‘STANDBY’ mode. This should
be done right before the brew
process.
2. Dry cup thoroughly before use.
WARNING: If pre-warming
the cup or portafilter using
hot water from the group
head, care should be
taken as hot water running
through the group head
may burn.
WARNING: The cupwarming tray will always
be heating when the
appliance is switched on
at the power outlet. Switch
espresso machine off and
unplug when not in use.
Using Your Kambrook Espresso Machine Continued...
Page 12

11
Purging the group head
Before using the espresso machine at
any time, it is recommended to purge
the group head (run a short flow of
water through the group head). This
will purge any ground coffee residue
and stabilise the water temperature
prior to extraction
1. To purge the group head, place
a container or empty cup under
the group head, run a short flow
of water through the group head
by switching the selector control
to ‘ESPRESSO’
mode. Let the
water run for approximately 5
seconds or until cup is full.
2. Switch the selector control to
‘STANDBY’ mode and empty
water from cup.
NOTE: When purging the group
head, ensure there is no ground
coffee in the filter baskets.
NOTE: When purging the group
head, a pumping noise will be
heard during operation. This is
normal as the machine is building
up pressure pushing the water
through the thermoblock heating
system.
Preparing the coffee
Your espresso machine comes with
a combined measuring spoon
and coffee tamper. The measuring
spoon can be used to measure the
ground coffee being placed into the
portafilter and the coffee tamper is to
tamp the ground coffee after it has
been placed into the portafilter.
1. Place the 1 or 2 cup filter basket
into the portafilter; 1 cup filter
basket is for 1 shot extraction,
2 cup is for 2 shot extractions
(see Fig.3).
Fig. 3
NOTE: Use only the stainless steel
filter baskets supplied with the
espresso machine. Using different
filter baskets may affect the
performance of the espresso
machine.
NOTE: Ensure the correct amount
of coffee for each filter is used as
this will affect the performance
of the machine during extraction
process. The correct coffee
amount used will help optimise
correct flavour and crema.
2. Using the measuring spoon
provided fill the portafilter with
ground coffee. For 1 cup filter
basket use 1 level measure and
for 2 cup filter basket use 2 level
measures (see Fig.4).
Page 13

12
Fig. 4
3. Ensure the ground coffee is
distributed evenly in the filter
basket, by tapping the portafilter
several times.
NOTE: The grind size should be
fine but not too fine. The grind size
will affect the rate at which the
water flows through the ground
coffee in the filter basket and
the taste of the espresso. If the
grind is too fine (looks like powder
and feels like flour when rubbed
between fingers), the water
will not flow through the coffee
even when under pressure. The
resulting espresso will be OVER
EXTRACTED, dark in colour and
bitter in flavour. If the grind is
too coarse the water will flow
through the ground coffee in
the filter basket too quickly. The
resulting espresso will be UNDER
EXTRACTED, lacking in colour and
flavour.
Tamping the ground coffee
1. Once ground coffee is distributed
evenly in the filter basket, using
the coffee tamper provided,
holding the portafilter by the
handle in one hand, press down
firmly with the tamping end of
the measuring spoon and ensure
coffee is level . The filter basket
should be filled leaving 0.05mm
from the rim of the basket when
tamped (see Fig.5).
Fig. 5
WARNING: Do not overfill
the filter basket with coffee.
The filter basked should be
filled leaving 0.05mm from
rim of filter basket when
tamped.
NOTE: When brewing for a mug of
coffee, always use the 2 cup filter.
If you require a larger coffee, add
the hot water first and then brew
the coffee.
2. Any excess ground coffee that
is on the rim of the filter basket
should be cleaned off to ensure
the portafilter sits flush under the
group head.
Using Your Kambrook Espresso Machine Continued...
Page 14

13
Brewing the coffee
1. Ensure the selector control is in the
‘STANDBY’ mode, plug the power
cord into a 230V or 240V power
point and switch ‘ON’ at the
power point.
2. Turn the espresso machine on
by pressing the power On/Off
button to the ‘ON’ position;
the 'POWER' light will illuminate
red and the ‘HEATING’ light will
illuminate orange indicating that
the machine has commenced
heating.
3. Once the machine has reached
optimum temperature, the
'HEATING' light will automatically
switch off.
NOTE: If the 'HEATING' light has
not switched ON, this is because
the machine has already
reached optimum temperature
during the machines pre-heating
and purging process. The
'HEATING' light will cycle On/Off
during operation.
4. Ensure the drip tray is fitted
into place.
5. Set the selector control to
the ‘ESPRESSO’
mode and
allow a small amount of water
to pour through the group head
for a few seconds without the
portafilter in place.
6. Place the assembled portafilter
with ground coffee underneath
the group head so that the
handle is aligned with the ‘INSERT’
graphic (see Fig.6).
Fig. 6
7. Insert the portafilter up into the
group head and rotate the
handle to the right until resistance
is felt or until it can no longer be
rotated. The portafilter should now
be sitting in line with the ‘LOCK’
graphic (see Fig.7).
WARNING: The espresso
machine may be warm to
touch during operation.
Care should be taken
during use.
Fig. 7
8. Place one or two pre-heated
cups under the group head
depending on extraction
preference (1 cup or 2 cup)
(see Fig.8).
Page 15

14
Fig. 8
9. Set the selector control to the
‘ESPRESSO’
mode. The coffee
extraction process will begin. The
shot extraction will need to be
manually stopped when sufficient
coffee shot has been extracted.
TIP: We recommend:
30ml espresso - 1 shot extraction
60ml espresso - 2 shot extraction
10. When sufficient coffee has
extracted into the cup/s, set
the selector control to the
‘STANDBY’ mode, this will stop
the extraction process.
WARNING: When using
fresh coffee grind or preground coffee, water may
build up on top of puck
after shot is extracted.
This is normal as pressure
builds up during
extraction, this will not
affect the performance of
the machine.
11. To remove the portafilter from the
group head, turn the portafilter to
the left until it releases (see Fig.9).
Fig. 9
12. To empty the used coffee grind,
turn the portafilter upside down in
a bin and gently tap out the puck
(used coffee grind should be
thrown away with domestic waste
and not down the sink as this may
block drains).
13. To clean the portafilter and filter
baskets see page 19.
WARNING: The metal
parts of the portafilter
may still be very hot after
use. Cool down these
parts by running under
cold water.
WARNING: Do not
touch hot surfaces.
High temperatures are
generated during use,
which could cause
burns. Always use the
handle and warn others
(especially children) of
the possible dangers of
burns from steam, hot
water or warming tray,
especially when brewing
coffee and frothing milk.
Using Your Kambrook Espresso Machine Continued...
Page 16

15
WARNING: Do not leave
the espresso machine
unattended while shots
of coffee are being
extracted. You need
to manually switch
the selector control to
'STANDBY' mode to stop
the coffee extraction
once sufficient coffee has
flowed into the cups.
NOTE: Ensure the filter basket is
not thrown away when removing
the puck.
How to froth milk
Your espresso machine comes with
a stainless steel milk frothing jug. The
milk frothing jug is perfect for creating
textured milk for cappuccinos and
lattés.
1. If machine has not been preheated before frothing the milk,
follow ‘Pre-heating the machine’
on page 9.
2. Pour the desired amount of cold
milk into the stainless steel milk
frothing jug (approx. 1/3 full).
WARNING: When filling
the milk jug, ensure the
milk is sitting below the
V of the milk jug spout
to ensure hot milk does
not overflow when milk is
being frothed.
TIP: For best results, ensure the milk
has been stored in the refrigerator
and is taken out just before use.
3. Place the stainless milk frothing
jug underneath the steam wand
and hold the milk frothing jug on
an angle so that the steam wand
tip and/or the froth enhancer is
sitting just below the surface of
the milk (see Fig.10).
Fig. 10
4. Set the selector control to the
‘STEAM’
mode, the ‘HEATING’
light will illuminate orange.
5. When the desired volume of
froth has been achieved,
immerse the steam wand and
/or froth enhancer deeper into
the milk frothing jug to further
heat the milk.
6. Use your free hand to hold
the base of the milk frothing
jug. When the milk frothing jug
becomes too hot to touch,
set the selector control to the
‘STANDBY’ mode to stop the
steam function.
Page 17

16
TIP: A thermometer may be
used to determine milks optimum
temperature. The optimum milk
temperature is between 60-65
degrees Celsius. If milk is heated
any further, the milk will begin to
boil at 72 degrees Celsius and the
natural sweetness and texture of
the milk will be affected.
TIP: When using the froth
enhancer during milk frothing
process, this allows enough milk
for approximately 2 standard
cups (approximately 150-180ml).
TIP: For best crema results, when
frothing milk, ensure the steam
wand is sitting just on top of
the milk surface during frothing
process. If the steam wand is
submerged in milk this will only
heat the milk a smooth crema
consistency will not be achieved.
7. Slowly release the milk frothing jug
away from the steam wand.
8. Wipe the steam wand with a
damp cloth and purge directly
after texturing the milk to remove
any milk that is left over in the
steam wand tip.
9. To clean the steam wand and
milk frothing jug, follow the
‘Care, Cleaning and Storage’
Instructions on page 18.
WARNING: Milk should
not be allowed to run
over the top of the froth
enhancer, otherwise it will
not function properly.
WARNING: To avoid
splattering of hot milk, do
not lift the steam nozzle
above the surface of
the milk while frothing
and ensure the selector
control is set to the
‘STANDBY’ mode before
removing the milk frothing
jug from under the steam
wand.
WARNING: Ensure the
selector control is in the
'STANDBY' mode before
removing the steam wand
from the frothing jug.
Using the froth enhancer
Your espresso machine comes with a
froth enhancer which helps to further
aerate the milk. This can be used as
an extension to the the steam wand
to create further textured milk for
cappuccinos or lattés.
1. To assemble the froth enhancer,
using either end of the froth
enhancer, slide upwards over the
steam wand until tightly fitted
against the rubberised steam
wand handle (see Fig.11).
Fig. 11
Using Your Kambrook Espresso Machine Continued...
Page 18

17
2. To use the froth enhancer for
frothing milk, follow the same
instructions above in the ‘How to
froth milk’ section.
3. To remove the froth enhancer,
wait until the steam wand
has cooled down completely
and slide the froth enhancer
downwards away from the steam
wand (see Fig.12).
Fig. 12
4. To clean the froth enhancer,
follow the ‘Care, Cleaning and
Storage’ instructions on page 18.
Page 19

18
Care, Cleaning and Storage
WARNING: Do not touch
hot surfaces. Allow the
espresso machine to cool
down before moving or
cleaning any parts.
Cleaning the steam wand
and froth enhancer
Your espresso machine comes with a
steam wand cleaning tool. The steam
wand cleaning tool is designed to
clear the opening of the steam wand
tip, to remove the steam wand tip for
further cleaning and to clean the filter
holders if blocked.
1. The steam wand and froth
enhancer should always be
cleaned after frothing milk.
2. If the froth enhancer has been
used, wait until the steam wand
or froth enhancer has cooled
down completely and slide the
froth enhancer downwards away
from the steam wand (see Fig.13).
Fig. 13
3. Wipe the steam wand with a
damp cloth and purge the steam
wand directly after texturing the
milk to remove any milk that is left
over in the steam wand tip.
4. The froth enhancer can be
washed using warm soapy water.
Dry thoroughly before next use.
5. If the steam wand becomes
blocked wait for the machine to
cool down. Using the cleaning
tool provided, clear the opening
by inserting the pin into the steam
wand tip. This will unblock the
opening (see Fig.14).
Fig. 14
6. To further clean the steam tip; if
the steam wand remains blocked
the tip of the steam wand can be
removed by using the spanner in
the middle of the cleaning tool
(see Fig.15).
Fig. 15
7. Rotate the spanner clockwise
until the steam wand tip becomes
loose. Soak the tip in hot water
until tip is unblocked. Replace
the tip back onto the steam
wand rotating the spanner anticlockwise to tighten.
Page 20

19
Fig. 16
5. The group head should be wiped
over with a soft damp cloth to
remove any espresso grounds.
Cleaning the drip tray
1. The drip tray should be removed,
emptied and cleaned after
each use or when the drip tray
water level indicator is exposed,
indicating the drip tray is full.
2. Remove the grid, steam baffle
and water level indicator from
the drip tray, wash all parts with
warm soapy water, rinse and dry
thoroughly before use.
Cleaning the outer housing
and cup warming tray
1. The outer housing and cup
warming tray can be cleaned
with a soft, damp cloth. Polish
with a soft, dry cloth. Do not use
abrasive cleansers, pads or cloths
which can scratch the surface.
WARNING: Do not
clean any of the parts
or accessories in the
dishwasher.
Cleaning the stainless milk
frothing jug
1. The stainless milk frothing jug
should be rinsed after every use.
2. Pour any remaining milk out and
rinse the stainless milk frothing jug
with warm soapy water, rinse and
dry thoroughly before use.
Cleaning the filter baskets
and portafilter
The filter baskets and portafilter should
be rinsed under hot water directly
after use.
1. Once the puck has been
removed from the filter basket,
the portafilter should be rinsed
after every use.
2. The portafilter can be rinsed by
holding it under the group head.
Ensure the selector control is set
to the ‘ESPRESSO’
mode and
rinse the portafilter by running
the water over the portafilter. Dry
the rinsed portafilter thoroughly
before use.
3. Wait until the portafilter and filter
basket has cooled down; remove
the filter basket by tipping the
portafilter upside down and
tapping the portafilter gently until
filter basket is removed.
4. The stainless steel filter baskets
should be rinsed under water
directly after each use to remove
all coffee particles. If the fine
holes in the 1 cup or 2 cup filter
basket become blocked, the fine
pin on the cleaning tool can be
used to clear the hole, remove
the cap from the cleaning tool
and replace once unblocked. Dry
the rinsed filter baskets thoroughly
before use (see Fig.16).
Page 21

20
Decalcifying the machine
After regular use, hard water can
cause mineral build up in and
on many of the inner functioning
components, reducing the brewing
flow, power of the machine, and
affecting the quality of coffee.
We advise decalcifying the machine
on a regular basis (every 2-3 months)
using a mixture of white vinegar
and water.
Diluted solution
(for softer water)
•1 part white vinegar
•2 parts cold tap water
Concentrated solution
(for harder water)
•1 part white vinegar
•1 part cold tap water
WARNING: Before starting
the decalcifying process
(or de-scale feature),
ensure drip tray is empty
and inserted correctly in
position.
WARNING: The water tank
should never be removed
or completely emptied
during decalcifying
process (or de-scale
feature).
1. Ensure the selector control is in the
‘STANDBY’ mode, the ‘POWER’
button is in the ‘Off’ position and
the machine is switched off at the
power outlet and unplugged.
2. Remove the portafilter and pour
the mixture of white vinegar and
water into the water tank.
3. Plug the machine into the power
outlet and switch ‘ON’.
4. Press the ‘POWER’ button to
the ‘ON ’position and turn
the selector control to the
‘STANDBY’ mode.
5. Place a large container under the
grouphead, and steam wand.
When the brewing temperature
has been reached the orange
‘HEATING’ light will switch off.
Turn the selector control to
the ‘ESPRESSO’
mode to
commence pour.
6. Once half the mixture of
white vinegar and water has
run through the group head
turn the selector control to the
‘STANDBY’ mode.
7. Set the selector control to the
‘STEAM’
mode and allow
the remaining solution to run
through the steam wand. When
the solution has run through,
set the selector control back to
‘STANDBY’ mode.
8. After decalcifying, remove the
water tank and rinse thoroughly
then refill with fresh cold water.
Care, Cleaning and Storage Continued...
Page 22

21
Troubleshooting Guide
Problem Possible Cause or Solution
Coffee not extracting • Machine is not turned on or plugged in
• Water tank is empty
• Selector control not in 'ESPRESSO'
mode
• Coffee grind is too fine
• Too much coffee in the filter
• The filter is blocked
• Excessive tamping
Coffee runs out too quickly • Coffee grind is too coarse
• Incorrect quantity of coffee in the filter basket
• Not firmly tamped
Coffee runs too slowly • The water tank is empty or low
• Coffee grind is too fine
• Machine is blocked by scale build up
(see 'Decalcifying the machine' on page 20)
• Too much coffee in the filter basket
• Excessive tamping
Coffee runs out around the
edge of the filter holder
• Filter holder is not inserted in the brew head properly
• There are coffee grounds affecting the sealing around the
filter rim
Coffee is too weak or watery • Coffee grind is not fine enough
(use coffee ground for espresso machines)
• Not enough coffee in the filter
• Incorrect quantity of coffee in the filter basket
• Not firmly tamped
Coffee is too cold • Machine not preheated.
• Cups not preheated
• Milk not heated enough (if making a cappuccino or latté)
refer to Milk guide
No crema • Coffee grind is too coarse.
• Not enough coffee in the filter.
• Incorrect quantity of coffee.
• Not firmly tamped.
• Coffee is not fresh.
No steam is generated • Machine is not turned on.
• Water tank is empty.
• Selector control not in ‘Steam’ position.
• Steam wand is blocked (see 'Cleaning the steam wand and
froth enhancer' on page 18)
Page 23

22
CAPPUCCINO
A single shot of espresso topped with textured milk
and garnished with drinking chocolate.
Coffees to try
ESPRESSO
Intense and aromatic, an espresso or short black as
it’s also known. It is served in a small cup or glass to a
level of approximately 30mL.
CAFÉ LATTÉ
Served in a glass, a café latté consists of one-third
espresso, topped with steamed milk and about
10mm of foam.
MACCHIATO
Traditionally served short, the macchiato is also
poured as a long black with a dash of milk or a
dollop of foam.
LONG BLACK
Add hot water first, then a shot of espresso
(single or double) is added so that crema is
maintained.
RISTRETTO
Meaning restricted, a ristretto is an extremely short
espresso of approximately 15mL, distinguished by its
intense flavour and aftertaste.
Page 24

23
Notes
 Loading...