KaMA-Ispeak DDX-3000 Owners manual

© COPYRIGHT LAMBA plc 2003. E&O E.
KAM DDX3000
PRO DIRECT DRIVE TURNTABLE
OVERVIEW
The KAM DDX3000 turntable is designed to give the DANCE DJ, MOBILE DJ & CLUB INSTALLATION maximum flexibility and features for minimum cost. This deck should combine all the features you may have wished for with a top build quality and specification.
PRECAUTION
Read the manual carefully before operation. Do not remove cover or back to prevent electrical shock. NO USER REPLACEABLE PARTS INSIDE. The apparatus should not be exposed to dripping or splashing and no objects filled with liquids, such as drinks glasses, should be placed on the apparatus. Use the unit on a flat surface. Be sure not to connect the power or cables before moving the unit. Do not use chemical solvents on the unit.
Checklist of Parts:
1 x Turntable unit
1 x Turntable platter
1 x Slip mat
1 x 45 RPM adapter
1 x Counter weight
1 x Headshell
1 x RCA cable
1 x Target light
1 x AC power cord
1 x Cartridge
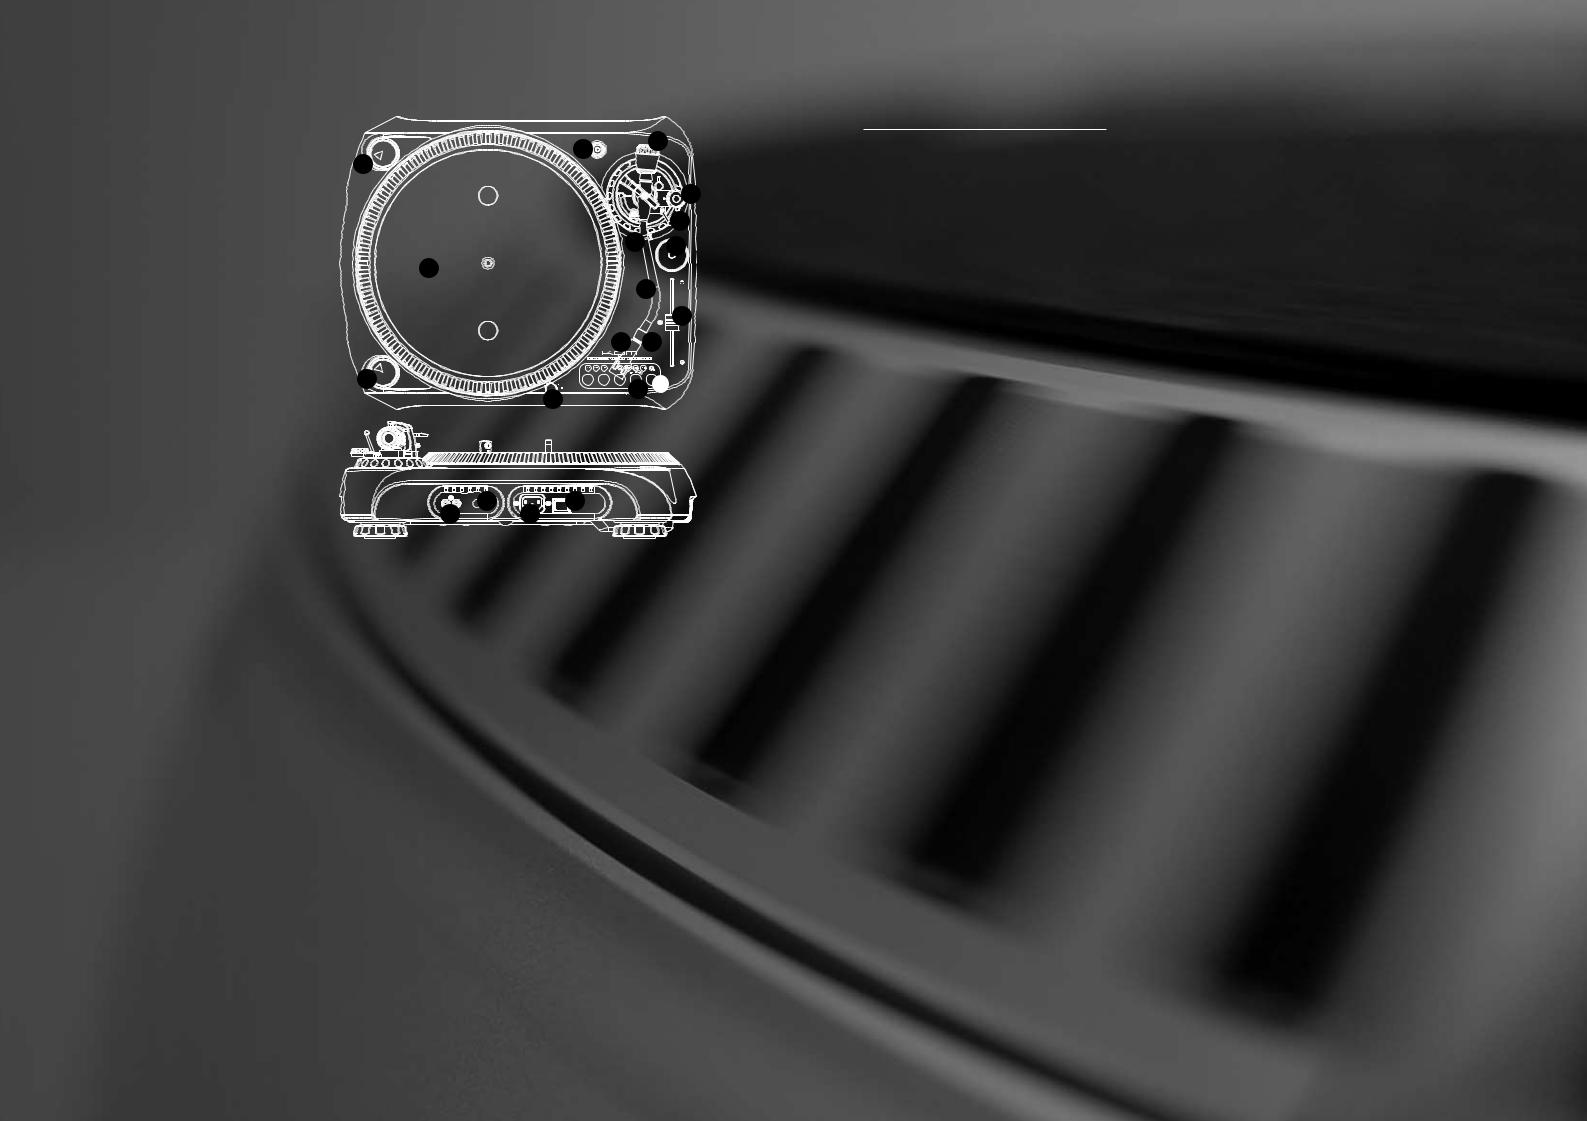
q START/STOP BUTTON Press this button to start or stop the platter.
w PLATTER
e MOTOR OFF Press the button to disengage the motor, and the LED will flash. Press the button again to re-engage the motor.
r TARGET LIGHT Insert target light to the deck and it will light up.
t PLATTER REVOLUTION SPEED BUTTONS For 33 rpm - press 33. For 45 rpm - press 45. For 78 rpm - press 33 & 45 simultaneously. y REVERSE This button is used to reverse the direction of the platter rotation.
u PITCH SELECT Sets the adjustment range of the pitch slider. Press the button to switch to ±10% pitch, press again to switch to ±20% pitch and again for ±50%.
i QUARTZ LOCK This disengages the pitch slider and sets the platter to 0% pitch adjust. o HEADSHELL LOCKING NUT
Visit www.kam.co.uk/tuition for full tone arm assembly instructions.
1) PITCH SLIDER Use this to change the speed of the platter when the PITCH indicator is lit. 1! S SHAPED TONE ARM To start playback, gently place the stylus on the record using the headshell finger support. Do not drop the stylus onto the record as it may cause damage to the diamond tip and to the record.
1@ 45 RPM ADAPTOR Place on center spindle for playing 7" records with large center holes. 1# ANTI SKATE KNOB When a record is playing, a force is generated drawing the stylus towards the center of the record. This control compensates for that force and needs to be set to the same value as the counter weight pressure ring.


 1$ q
1$ q 
 1#
1#
2)
 2!
2!
w
1!
 1( o
1( o q
q 
 r
r


 u
u

1* 1& 1%
1$ COUNTERWEIGHT Use this to balance the tone arm and to adjust the stylus pressure. Visit www.kam.co.uk/tuition for full tone arm assembly instructions.
1% POWER SWITCH This switch turns the power on or off.
1^ POWER CORD CONNECTOR Used to connect the included power cord.
1& GND Ground wire connection post.
1* PHONO OUTPUT This is a standard ‘phono level’ output (using RCA jacks) which can be connected to the ‘phono’ input on any DJ mixer. 1( HEADSHELL Install cartridge here. When installing a cartridge, refer to the installation instructions supplied by the manufacturer of that cartridge. Visit www.kam.co.uk/tuition for full tone arm assembly instructions.
2) TONE ARM LIFT This elevates the tone arm above the record surface.
2! TONE ARM CLAMP AND REST Use this rest for the tone arm and clamp it in position during transportation.
OPERATING
1.Turn the power dial to turn on and the speed indicator and the strobe-illuminator will light up.
2.Insert target light for illumination the stylus.
3.Place a record on the turntable mat. When playing a 45rpm record with a large center hole; place the 45rpm adapter on the center spindle.
4.Set the rotation speed to match the record.
5.Release the arm clamp.
6.Set the cueing lever to the up position.
7.Press the Start/Stop button and the turntable platter will start to rotate.
8.Move the tone arm over the desired groove.
9.Set the cueing lever to the down position, the tone arm will descend slowly onto the record and play begins.
10.Set the desired pitch adjusts range by depressing the buttons until the desired pitch is reached.
Options are ±10% or ±20 or ±50%.
11.Adjust the pitch to a desirable speed. During play, observe the strobe dots. If the strobe dots appear to the right, the pitch is slower than the rated speed. If they flow to the left, the rated speed. If the strobe dots appear stationary, which means the platter is in normal turntable speed, move the pitch control slider up or down to adjust the speed.
12.To suspend play, lift arm with cueing lever.
13.When play is finished, raise the cueing lever, move the tone arm to the armrest and secure the tone arm with the arm clamp.
14.Press the Start/Stop button to stop the platter rotating.
15.Turn the power dial to turn off the power.
FURTHER INFORMATION
You will find two free downloadable PDF files at www.kam.co.uk/tuition. One covers everything you need to know about correct connection and installation of you new Kam turntables and all other related equipment. The other provides a step by step guide to mixing for beginners.
SPECIFICATION
MOTOR |
3.5kg Direct drive |
|
|
POWER SUPPLY |
AC240V ~ 50Hz |
|
|
POWER CONSUMPTION |
11.5 Watts |
|
|
DIMENSIONS |
450 x 86 x 370mm |
|
|
WEIGHT |
9.8Kgs |
|
|
Due to continuous product development, specifications are subject to change.
INSTRUCTION MANUAL
KAM DDX3000
PRO DIRECT DRIVE TURNTABLE
 Loading...