

KAM KSM Vegas LED Instruction Manual
KSM Vegas LED
High power smoke machine with multicolour LED FX
Due to continuous product development, please ensure that you have downloaded
the latest instruction manual for this product from the Kam website at www.kam.co.uk
MANUAL VERSION 1.0
18- 10- 13
For the latest updates and information on the entire Kam range visit:
www.kam.co.uk
Kam products are manufactured by: Lamba plc, Unit 1, Southfields Road, Dunstable, Bedfordshire, United Kingdom LU6 3EJ
Telephone: (+44) (0)1582 690600 • Fax: (+44) (0)1582 690400 • Email: mail@lambaplc.com • Web: www.lambaplc.com
Made in China. Due to continuous product development, specifications and appearance are subject to change. © Copyright Lamba plc 2013. E&OE.
Thank you for purchasing this Kam product, we are sure that it will serve you for many years to come.
To optimise the performance of this product, please read these operating instructions carefully to familiarise yourself with the basic
operations of this unit. Please retain them for future reference. This unit has been tested at the factory before being shipped to you.
To prevent or reduce the risk of electrical shock or fire, do not expose the unit to rain or moisture. To prevent a fire hazard, do not
expose the unit to any naked flame sources. Unplug this apparatus during lightning storms or if it is unlikely to be used for long
periods of time.
When installing the unit, please ensure you leave enough space around the unit for ventilation. Slots and openings in the unit are
provided for ventilation to ensure reliable operation of the product and to protect it from overheating. To prevent fire hazard, the
openings should never be blocked or covered.
The unit is powered by mains electricity, always handle the power cable by the plug. Never pull out the plug by pulling on the cable.
Never touch the power cable when your hands are wet as this could cause an electric shock. Do not tie a knot in the cable. The
power cable should be placed such that it is not likely to be stepped on. A damaged power cable can cause a fire or give you an
electrical shock. Check the power cord periodicaly, if you ever find that it is damaged, replace it before using the unit again. Contact
your retailer for a replacement.
The voltage of the available power supply differs according to country or region. Be sure that the power supply voltage of the area
where this unit is to be used meets the required written on the unit.
The lightning flash symbol inside a triangle is to alert the user to the presence high voltage within the unit’s enclosure that
may be of sufficient power to constitute a risk of electrical shock to persons.
Caution: to prevent the risk of electric shock, do not attempt to open the unit. No user-serviceable parts inside. Refer all
servicing to qualified service personnel.
The exclamation mark inside a triangle is intended to alert the user to the presence of important operating and
maintenance instructions in the literature accompanying the appliance.
Select the installation location of your unit carefully. Avoid placing it in direct sunlight or locations subject to vibration and excessive
dust. Do not use the unit where there are extremes in temperature (below 41ºF / 5ºC or exceeding 95ºF / 35ºC).
Unpacking and safety Please unpack your new product carefully. Your new product should reach you in perfect condition. Please
check that no damage has occurred during transit. If any damage is found, do not operate your unit. Please contact the retailer you
purchased it from immediately. If there is any damage to the mains cable do not use the device. Always disconnect the unit from the
mains supply when carrying out any cleaning of the unit.
Power supply
Use the plug to connect to the main power supply with the following connections:
Wire Connection
Brown Live
Blue Neutral
Yellow/Cyan Earth
Manufacturer declarations
In compliance with the following requirements: RoHS Directive (2002/95/EU) and WEEE Directive (2002/96/EU).
If this product is ever no longer functional please take it to a recycling plant for environmentally friendly disposal.
CE declaration of conformity
R&TTE Directive (1999/5/EU), EMC Directive (2004/108/EU), Low Voltage Directive (2006/95/EU).
The declarations are available on application from certification@lambaplc.com
Before putting the devices into operation, please observe the respective country-specific regulations.
Package contents
1 x smoke machine / 1 x wireless remote control / 1 x instruction manual (this document) / 1 x mains cable
Safety instructions
Please read the following notes carefully because they include important safety information regarding this product.
1. Always plug in the power plug last and disconnect from the mains when the device is not in use or before cleaning.
2. Do not install and operate the device in rain or extreme heat, moisture or dusty environments.
3. This device is for indoor use only and in a dry environment.
4. If the device has been exposed to drastic temperature fluctuations, do not switch the unit on immediately but wait until it reaches
room temperature.
5. Do not shake the device and avoid brute force when installing or operating.
6. Do not use the device during thunderstorms. Disconnect the unit from the mains.
7. Do not use solvents or aggressive detergent to clean the device. Use a soft, clean cloth.
8. Do not modify the device or the connected power cord.
9. In the event of a serious operating problem, stop using the unit immediately. Never try to repair the unit by yourself. Repairs
carried out by unskilled people can lead to damage or malfunction. Please contact your Authorised Kam Retailer. Always use the
same type of spare parts.
10. Never connect the device to a dimmer pack.
11. Make sure the power cord is never crimped or damaged.
12. Never disconnect the power cord by pulling or tugging on the cord.
13. Avoid direct eye exposure to the LED light source while it is on.
14. Never drink the smoke fluid.
15. IMPORTANT – the smoke aperture on the unit can get VERY HOT. Never touch this area whilst the unit is in operation
and always leave the unit to cool down before touching the area.
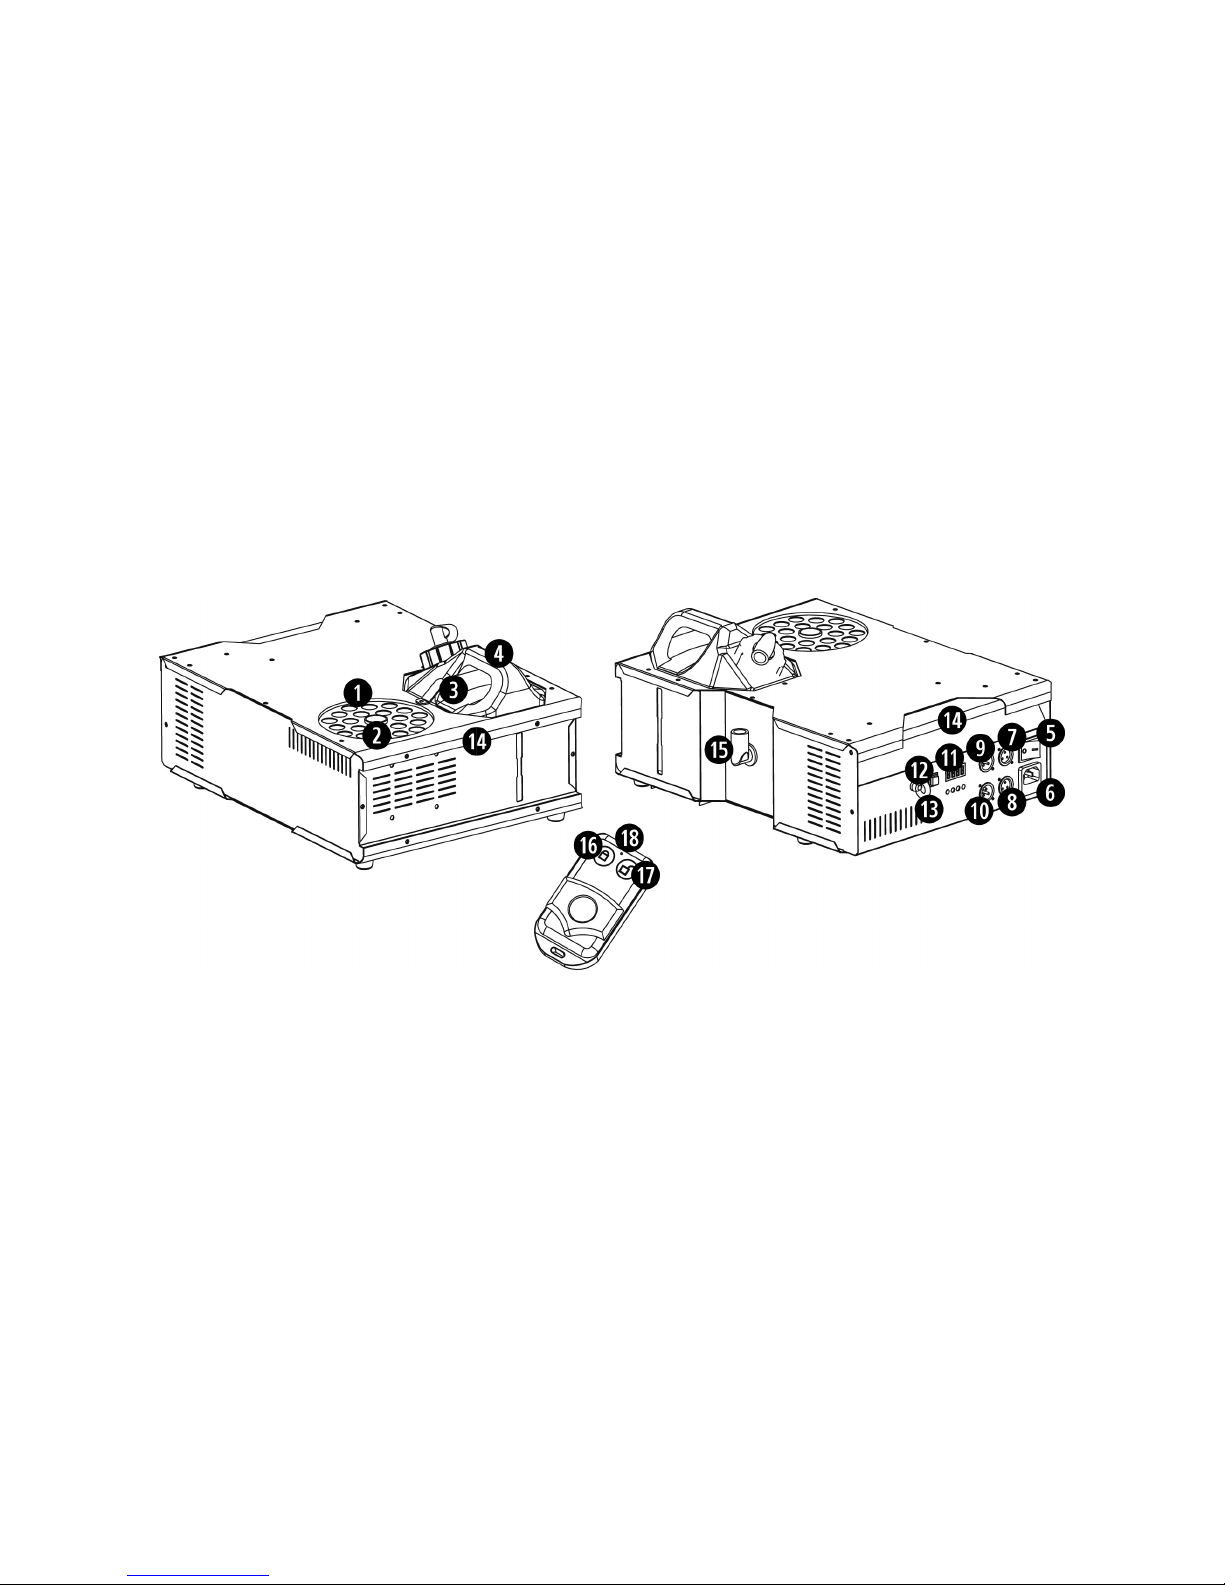
1. LED back lights 7. DMX512 input (3 pin) 13. Safety eyelet
2. Smoke aperture 8. DMX512 input (5 pin) 14. Handles
3. Fluid tank security bracket 9. DMX512 output (3 pin) 15. 360° rotatable oil pipe
4. Fluid tank 10. DMX512 ouput (5 pin) 16. Remote On button
5. Power on switch 11. Control LED display 17. Remote Off button
6. Mains power input 12. Manual Fog button 18. Remote function LED
Setup and operation
1. Unpack your unit then remove the tank.
2. Unscrew the top cap of the tank.
3. Fill the tank with smoke fluid (do not over fill the tank).
4. Screw on the cap securely. Replace the tank in the unit ensuring that the fluid tank security bracket is holding the tank in place.
5. Check that the pipe is fed down towards the bottom of the bottle so that a consistent flow of fluid is supplied to the machine.
6. Connect the IEC mains cable to the rear of the unit and then to the mains power. Turn the unit on using the Power on button.
7. Warm-up time is usually between 3-4 minutes. During warm-up the LED display on the rear of the unit flashes the word ‘HEAT’.
8. When the machine is ready, the Control LED display will stop flashing.
9. Press the Manual Fog button on the rear of the unit for 5 seconds so that the fluid has a chance to flow through the heater. The
unit is now ready to use.
10. It is recommended that the unit produces smoke with small pauses in between so that the temperature is maintained and the
thermostat doesn’t switch off.
11. Wireless remote operation - press the left button and the unit will output smoke until you press the right hand stop button.
 Loading...