

KAM KKA500 Instruction Manual

Project5 20/10/05 12:43 Page 1
REAR PANEL CONNECTIONS
[32] Video Inputs - use these to connect the Video output
from your VOD or VCD system, or your DVD player. Video
input source selection is automated in such a way that
KOD will always have priority over VOD video input …
and the audio Input selection will follow this protocol
automatically whenever both an audio and video input is
connected.
[33] Video Output - use this to connect the KKA500 to your
video projector, TV, monitor etc.
[34] Score Output - High and Low grade Score output
connectors.
[35] Audio Line Inputs (VOD, VCD, DVD) - unbalanced,
line level inputs using RCA Phono connectors. These can
accept a signal from any line level audio device.
[36] VOD Input Volume control - used to set the incoming
volume of music from the VOD Input.
[37] Mic Inputs 4 & 5 - use these two 'combi' sockets to
connect microphones to Mic channels 4 & 5. They will
accept either 1/4” Jack or XLR type connectors and work
with any mic level signal.
[38] Audio Record Out - connect this unbalanced line
level output to the input of a Recording device (MD etc)
to record the combined microphone and music audio.
[39] Sub Woofer Out - use this unbalanced line level RCA
Phono type connection to send audio to an active Sub
Woofer.
[40] Centre Output - use this unbalanced line level RCA
Phono type connector to send the sound from your
microphones only to a Centre Speaker System.
[41] Speaker Outputs - use set A and set B of these
Speakon type speaker outputs to connect the KKA500 to
your speakers.
[42] Mains Power - use the IEC type mains inlet to supply
mains power to the unit.
SPECIFICATIONS
Power 2 x 200W RMS @ 8 Ohms
DSP Echo 24BIT processing
Key Control 24BIT processing
Freq' Response 20Hz - 20kHz (+/-3dB)
Mic input Impedance 5mv-100mv/600 Ohm
Line Input Impedance 250mv-47 kOhm
S/N Ratio 85dB
Tone Controls
Music 2 way +/-8dB
Mic 3 way +/-5dB
Output Impedance 4 to 16 Ohm
Dimensions 428 x 380 x 148mm
Weight 12kg
2 x 350W RMS @ 4 Ohms
KKA500
instruction manual
37
32
36
35
33
38
34
39
41
40
www.kam.co.uk
42
KKA500
www.kam.co.uk
KKA500
Project5 20/10/05 12:43 Page 2
KKA500
manual
OVERVIEW
The KKA500 is a sophisticated and powerful microphone
mixer, voice processor, effects processor and amplifier in
a single integrated unit. It is a superb solution for either
the home Karaoke enthusiast or the professional
Karaoke performer.
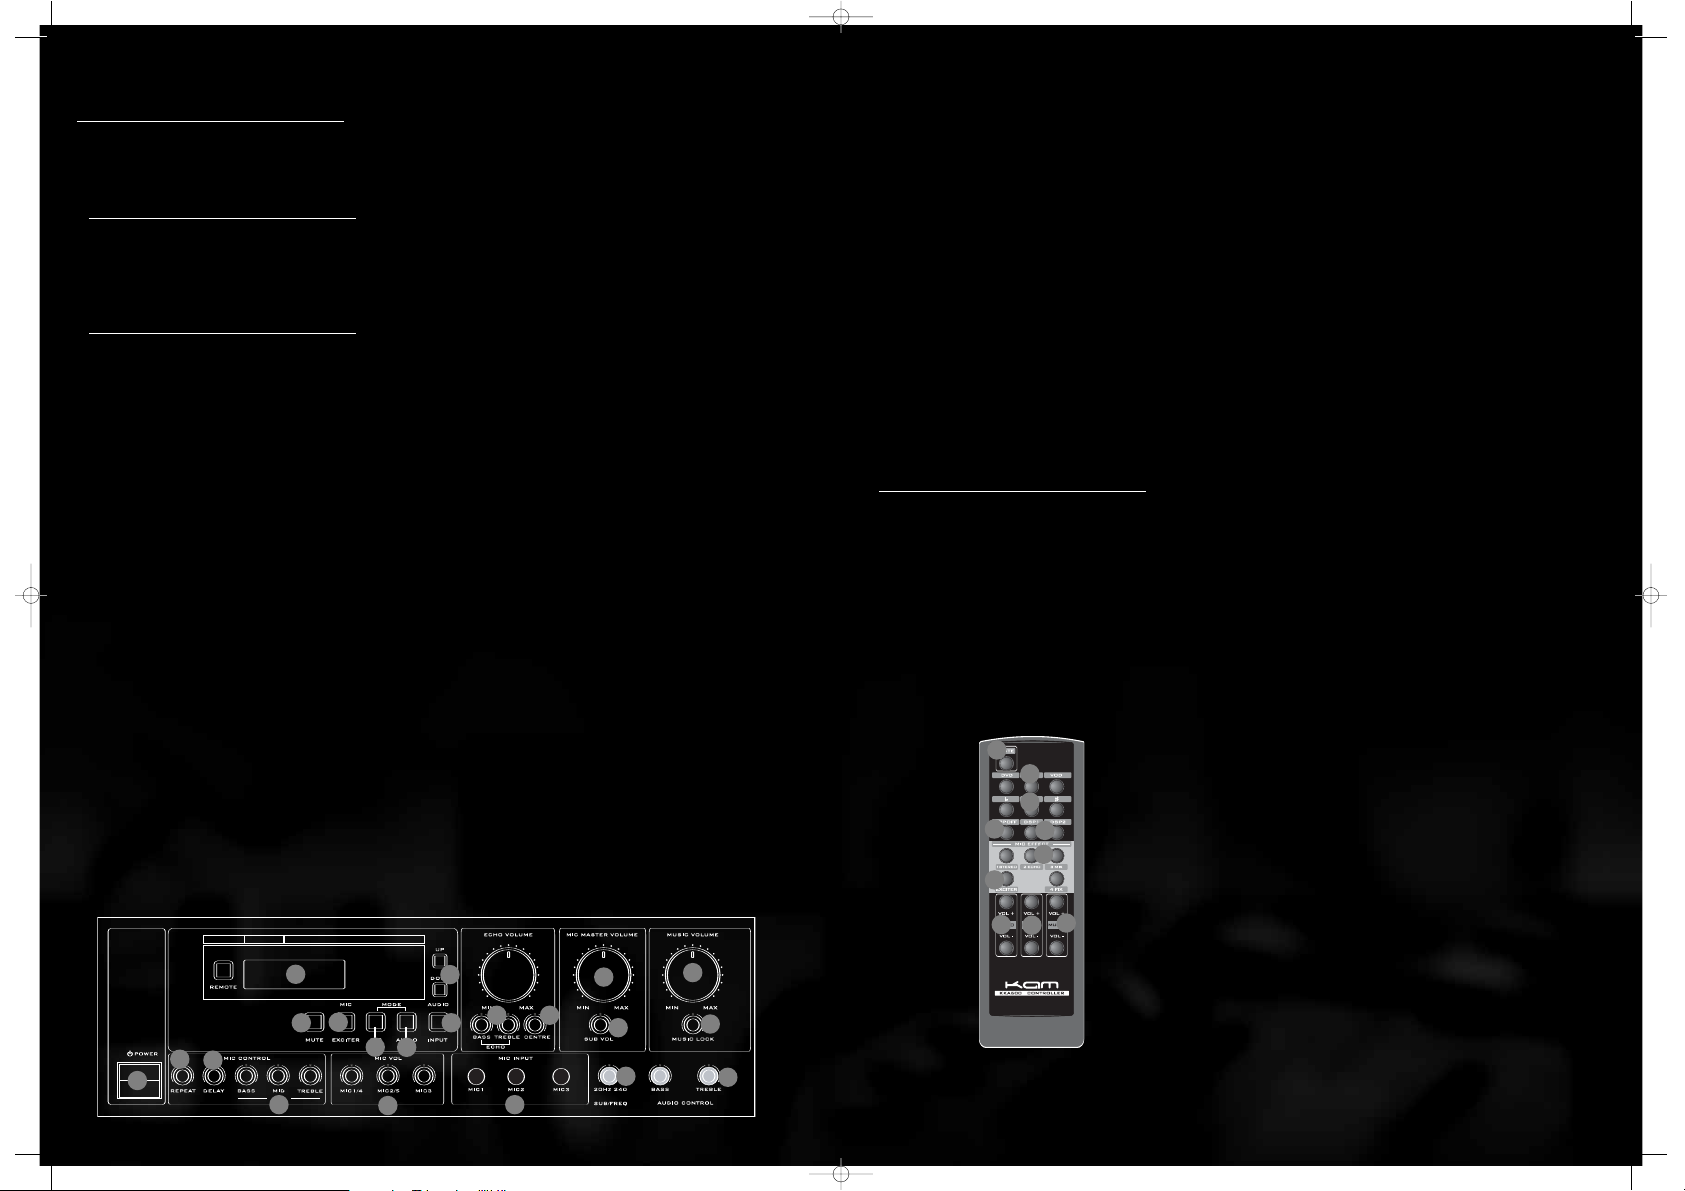
FRONT PANEL CONTROLS
[1] Power switch - use this to turn the mains power on/off.
NOTE Always turn off the mains power and set all volume
controls to zero before making and audio connections.
[2] LCD Display - this backlight LCD screen shows various
types of information as you change settings on the
KKA500.
[3] Up/Down buttons - use these to to alter settings. Their
function is dependant upon which parameter you have
selected for editing using the other controls.
[4] Input Selection button - press this button then use the
up/down buttons [3] to choose the music source you wish
to sing along to. There are three separate line level audio
inputs on the KKA500 (see Rear Panel Connections for
details) available. They are labeled; VOD, VCD & DVD
but you can connect any line level audio equipment.
When using the video inputs, the source selection is
automated in such a way that VOD will always have
priority over VCD video input and the audio Input
selection will follow this protocol automatically
whenever both an audio and video input is connected.
[5] Music Volume control - use this control to adjust the
playback volume of the currently selected music source.
NOTE this control does not adjust the volume of the
microphones or effects.
[6] Music Lock control - turn this fully clockwise to 'lock'
the Overall Music Volume at its current setting.
This can be used to prevent accidental adjustment of the
music volume setting during performance.
[7] Music Tone controls - use these bass and treble
controls to adjust the tone of your music.
[8a] Music Mode button (once) - press this button once
then use the up/down buttons [3] to determine whether
the music will have either of the two DSP Music Effects
applied to it.
[8b] Music Mode button (twice) - press this button twice
then use the up/down buttons [3] to adjust the Music Key
Control feature. Key Control is used to transpose the tone
of the source music without altering it's tempo. Press the
down button to lower the music tone, or the up button to
raise the music by a 'semi-tone'. Press repeatedly to raise
or lower by up to four semi tones.
[9] Sub Woofer volume control - use this to adjust the
volume of an active Sub Bass woofer.
[10] Sub Woofer Frequency control - use this to adjust the
Crossover frequency. The idea is that all frequencies
BELOW the Crossover Frequency will be sent to the Sub
and everything above will be sent to the main outputs.
[11] Centre Speaker Volume control - used to adjust the
volume of the Centre output. The Centre Output carries
only the sound from the Microphones.
[12] Mute button - use this to temporarily stop all sound
being sent to the outputs.
[13] Front Panel Microphone Inputs - use these 1/4”
Jack type microphone input connectors to connect
microphones to Mic channels 1 to 3. Mic inputs 4 & 5
are found on the rear panel.
[14] Master Microphone Volume control - use this to set
the level of ALL 5 microphones in relation to your source
music.
[15] Individual Microphone Volume controls - use these to
set the volume of each microphone in relation to the
other microphones. The first control adjusts the volume of
Mics 1 & 4, the next control sets the volume of Mics 2 & 5
and the third control adjusts the volume of Mic 3.
[16] Microphone Tone controls - use these bass, mid and
treble tone controls to adjust the tone of all 5 microphone
channels at once.
[17] Microphone Exciter button - press this button then use
the up/down buttons [3] to switch the Microphone Exciter
function on/off. The Mic Exciter compresses the sound of
all microphones to make them sound stronger and more
vibrant.
[18a] Microphone Mode button (once) - press this button
once then use the up/down buttons [3] to select which
Microphone Effect you wish to use. There are four effects
to choose from; Stereo Enhance, Echo, Reverb and a
Stereo/Echo/Reverb combination.
[18b] Microphone Mode button (twice) - press this button
twice then use the up/down buttons [3] to switch the
Microphone control Lock feature on/off. This can be used
to prevent accidental adjustment of the various
microphone settings during performance.
[19] Mic Effect Tone controls - use these bass and treble
controls to adjust the tone of the DSP Effects.
[20] Echo Repeat control - use this to adjust how long the
echoes of the Echo Effect continue for. Different settings
are useful for different types of music. Turning clockwise
increases how long the echoes continue for.
[21] Echo Delay control - use this to adjust the interval
between each echo of the Echo Effect. This can be used
to adjust the echo effect in such a way that the timing of
the echoes match the Beats Per Minute of the source
music and blend seamlessly with the music. Turning
clockwise increases the interval between
each echo.
THE REMOTE CONTROL
The KKA500 is supplied with an IR Remote control unit that
provides easy access to the functions most commonly
used during a Karaoke performance.
[22] Music Source Selection buttons - use these three
buttons to choose between the VOD, VCD & DVD music
inputs. When using the video inputs, the source selection
is automated in such a way that VOD will always have
priority over VCD video input … and the audio Input
selection will follow this protocol automatically whenever
both an audio and video input is connected.
25
22
31
26
27
28
29
[23] Music Volume buttons - use these to increase
or decrease the source music volume.
[24] Microphone Volume buttons
or decrease the volume of all microphones.
[25] Mute button - use this to temporarily stop all sound
being sent to the outputs.
[26] Music DSP Off button - use this to switch the Music
DSP effects off.
[27] Music DSP1 & DSP2 Effects select buttons - use these
to select either of the Music DSP Effects.
[28] Microphone Effects Select buttons - use these to
select which Microphone DSP Effect to use.
[29] Microphone Exciter On/Off button - use this to turn the
Microphone Exciter on or off.
[30] Microphone effect Depth button - press up or down to
increase or decrease the Microphone Effect depth.
[31] Music Key Control buttons - use these buttons to
transpose the tone of the source music without altering its
ess the plus button to increase by one semi-tone
tempo. Pr
or use the minus button to decrease by one semi-tone.
Press repeatedly to increase or decrease by up to four
semi tones.
- use these to increase
24
23
30
2
17
12
20
21
8
1
16
15
18
3
19
4
11
14
9
10
13
5
6
7
 Loading...