


Blender
Blender
Batidora de Vaso
USK BL 1
120V~60Hz 500W
Assembly page 1/16

IMPORTANT SAFEGUARDS
When using your appliance, basic safety precautions should always
be followed, including the following:
1. READ ALL INSTRUCTIONS
2. Check that your mains voltage corresponds to that stated on the
rating plate of the appliance before using the appliance.
3. To protect against electrical shock do not immerse cord, plug, or
the motor unit in water or other liquid.
4. Close supervision is necessary when the appliance is used by or
near children.
5. Unplug from outlet when not in use and before putting on or
taking off parts or before cleaning.
6. Do not operate any appliance with a damaged cord or plug or
after the appliance malfunctions or has been damaged in any
manner. Return appliance to the nearest authorized service
facility for examination, repair, or adjustment.
7. The use of accessory attachments, including the pouring jar, not
recommended by the appliance manufacturer may cause
injuries.
8. Do not use outdoors.
9. Do not let cord hang over edge of table or counter or touch hot
surfaces.
10. Do not place on or near a hot gas or electric burner, or in a
heated oven.
11. Always attach plug to appliance first, then plug cord into the wall
outlet. To disconnect remove the plug from the wall outlet.
12. Do not use appliance for other than intended use.
13. This kind of appliance cannot function continuously, it is not a
professional type of appliance. It is necessary to make temporary
stops. Check the section "Important information" in the
instruction manual.
14. It is absolutely necessary to keep this appliance clean at all times
as it comes into direct contact with food.
2
USK BL 1 - 051107

15. The pouring jar should be assembled correctly on the motor base
before you plug it into the mains. The appliance is equipped with
a safety, which prevents the pouring jar from working if it is not
assembled correctly. Furthermore the pouring jar should be
locked so that the appliance can work.
16. The appliance is designed for the preparation of small quantities
of food, which have to be consumed rather quickly. It is not
designed for the preparation of large quantities at once.
17. Keep hands and utensils out of container while blending to
reduce the risk of severe personal injury and/or damage to
blender. A rubber spatula may be used but must be used only
when blender is not running.
18. Do not use a broken, chipped or cracked blender jar.
19. To reduce the risk of injury, never place the cutting unit blades on
base without jar properly attached. Blades are sharp, handle with
care.
20. Always operate the blender with cover in place.
21. Always close the jar with the lid before starting mixing. When
mixing hot liquid, do not fill more than 2/3 of the jar and be very
careful in order to avoid splashing of hot liquid, otherwise you can
get burned. Do not forget to close the feeding hole of the
pouring jar with the cap.
22. Screw on blade assembly firmly. Injury can result if moving blades
accidentally become exposed.
23. Do not leave blender unattended while it is operating.
24. To disconnect, press the ON/OFF key, then remove the plug from
wall outlet.
SAVE THESE INSTRUCTIONS
POLARIZED PLUG INSTRUCTIONS
This appliance has a polarized plug (one blade is wider than the
other). To reduce the risk of electric shock, this plug will fit into the
polarized outlet only one way. If the plug does not properly fit into
the outlet at first, reverse it. If it still does not fit, contact a competent
qualified electrician. Do not attempt to modify the plug in any way.
3
USK BL 1 - 051107

SHORT CORD INSTRUCTIONS
A short power supply cord is provided to reduce the hazards resulting
from becoming entangled in, or tripping over a longer cord.
Extension cords may be used if care is exercised in their use.
• The electrical rating of the extension cord should be at least
that of the appliance. If the electrical rating of the extension
cord is too low, it could overheat and burn.
• The resulting extended cord should be arranged so that it will
not drape over the counter top or tabletop where it can be
pulled on by children or tripped over.
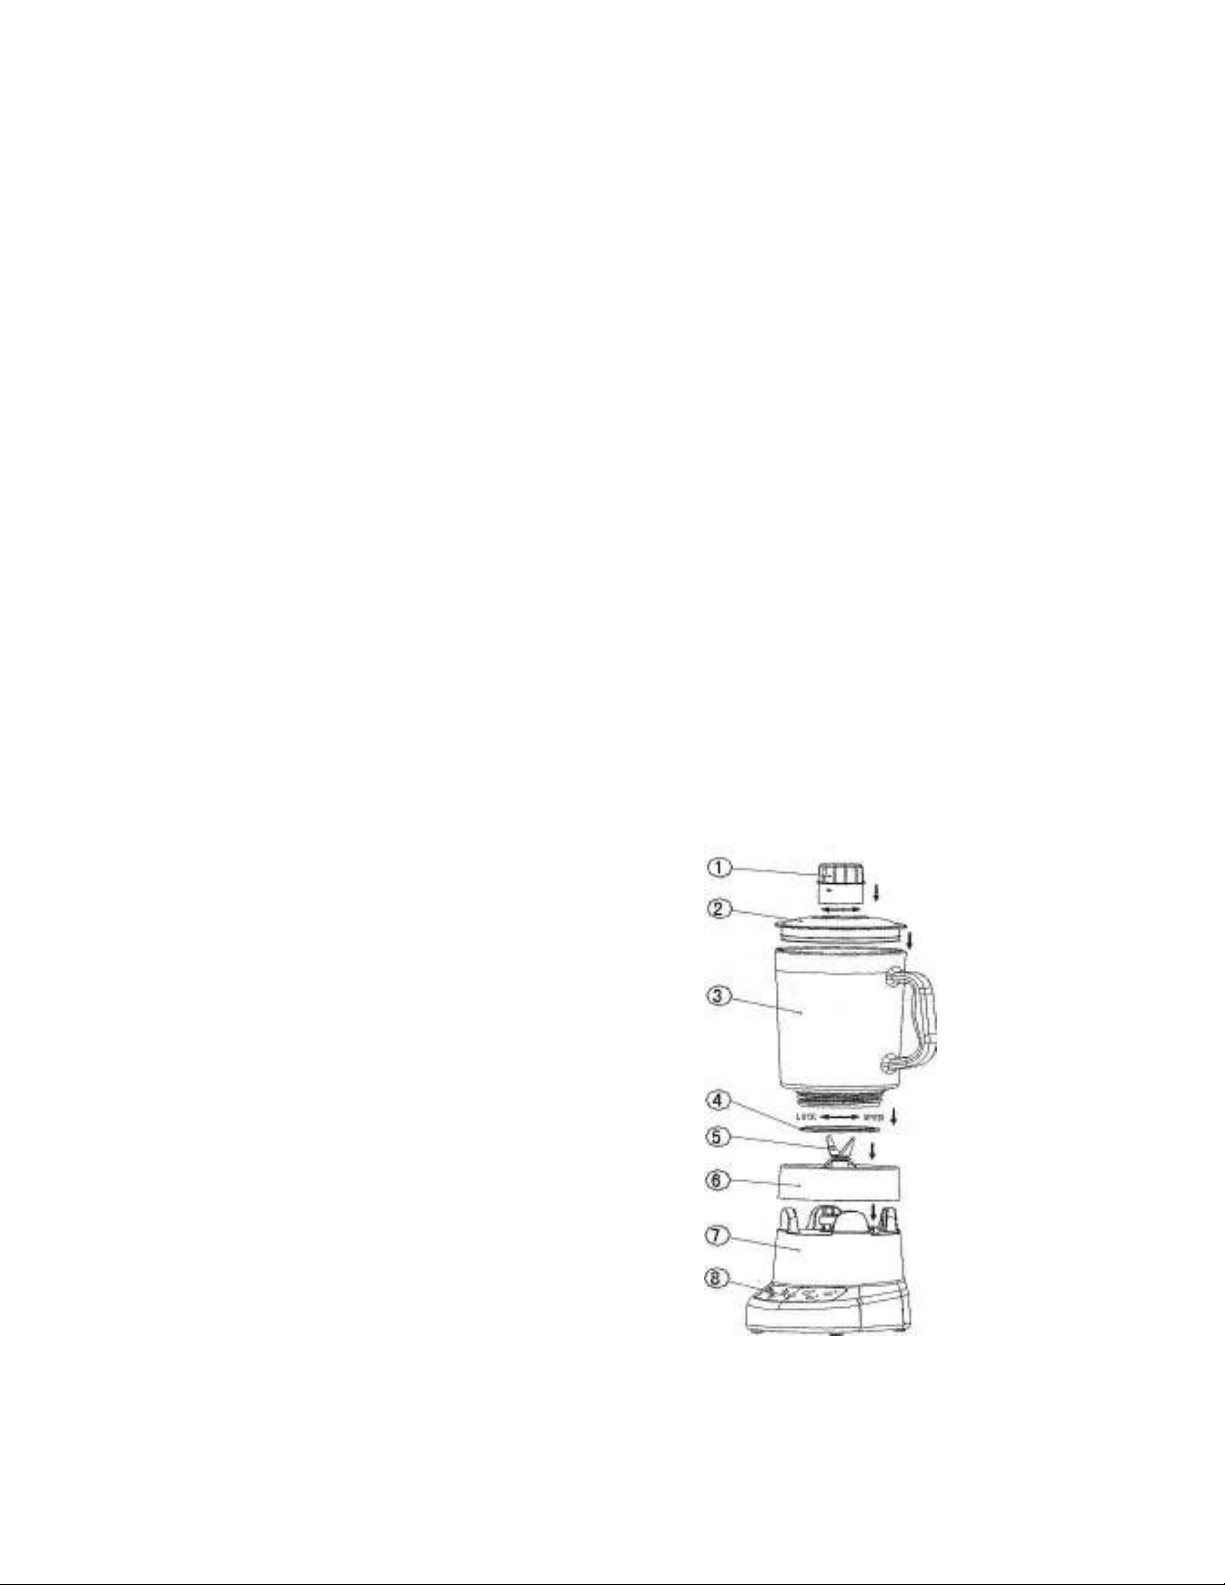
PART DESCRIPTION
1. Cap
2. Lid
3. Pouring jar
4. Sealing ring
5. Blade assembly
6. Base of the blade assembly
7. Motor block
8. Control panel
4
USK BL 1 - 051107

IMPORTANT INFORMATION
This appliance is not for professional use. You should follow the
requested breaks. Failure to follow this instruction carefully may result
in damage to the motor. The maximum continuous usage time is 3
minutes. After 3 minutes of continuous use, you should insert a break
of at least 10 minutes.
ASSEMBLY OF THE BLENDER AND USE
CAUTION!
Your appliance is fitted with a security device on the motor block
allowing the functioning of the appliance only when the jar is
correctly placed on the motor block. If this condition is met and the
appliance does not start, call your after-sales service.
• Assemble the pouring jar on the motor block and make sure it is
correctly positioned, otherwise the appliance will not work.
• Fill the pouring jar with the chosen ingredients.
• Close the lid and make sure the cap is closed as well. To lock the
cap, turn it after having inserted it in the lid.
• Plug in the appliance and press the ON/OFF key. The red pilot
light comes on.
• Select the speed setting that is most suitable for the ingredients
you want to process. The corresponding pilot light will illuminate,
indicating that the setting is active. Note: some speed settings
operate in sequences with small intervals. This is normal and does
not indicate a failure.
• The button "P" (Pulse) allows a manual operation because you
have to keep pushing it when functioning.
• Press "Mix" to mix solid ingredients.
• Press "Chop" to chop solid ingredients.
• Press "Stir" to stir liquids.
• Press "Ice crush" to crush ice.
• Press "Puree" to mash soft ingredients.
• It is also possible to add liquids or other ingredients anytime
without stopping the appliance. You only have to remove the
cap, which closes the lid opening by turning and lifting it straight
up.
5
USK BL 1 - 051107

• Once you have finished the preparation, press button the On/Off
key to stop the appliance and unplug the appliance.
• Remove the jar from the base by lifting it up. Then remove the lid
and pour the liquid in the desired receptacle.
HOW TO CLEAN
• Always unplug from outlet before cleaning.
• For a quick rinsing of the pouring jar (for example between two
preparations), you can use clear water and switch on your
appliance for a few seconds. In this case, do not use any
detergent.
• For a full cleaning of the pouring jar, remove it from the motor
block and unscrew the base of the blade assembly by turning it
anti-clockwise to disassemble it (this will make the cleaning
easier). Then you can clean the blades and the jar with soapy
water and rinse thoroughly with clear water. Dry before
assembling. Therefore you only have to screw the blades support
by turning it clockwise in the bottom of the pouring jar (tighten
vigorously in order to avoid leaks). Attention, do not lose the
sealing ring during this operation.
• You can wipe the motor block with a soft damp cloth.
6
USK BL 1 - 051107

CONSEJOS DE SEGURIDAD
Cuando use algún aparato eléctrico siempre deben seguirse
precauciones básicas de seguridad incluyendo las siguientes:
1. LEA TODAS LAS INSTRUCCIONES.
2. Antes de utilizar el aparato, compruebe que el voltaje de la red
eléctrica coincide con el indicado en la placa de datos técnicos
del aparato.
3. Para protegerse contra una descarga eléctrica, no sumerja el
aparato o el enchufe en agua o en otros líquidos.
4. Es siempre necesaria la supervisión cercana cuando este
aparato sea utilizado cerca de niños. Este aparato no debe ser
usado por niños.
5. Desconecte el aparato de la toma de corriente cuando la
unidad no se encuentre en uso, para montar o desmontar
accesorios o antes de limpiarla.
6. No opere este y ningún aparato si el cable o el enchufe están
quemados o dañados, o después de que el aparato ha
funcionado inadecuadamente, se ha caído o ha sido dañado
en cualquier manera. El aparato debe ser reemplazado por el
fabricante o por un centro de servicio autorizado o por una
persona similar calificada.
7. El uso de accesorios, incluso los del vaso, que no sean los
recomendados por el fabricante pueden causar incendios,
descargas eléctricas o lesiones.
8. No use en exteriores
9. No permita que el cable cuelgue de la orilla de la mesa o del
mostrador o toque las partes calientes.
10. No coloque este aparato cerca de quemadores de estufas de
gas o eléctricas, o dentro de un horno caliente.
11. Enchufe siempre primero el cable al aparato y después en el
enchufe de la red eléctrica. Para desconectar el aparato,
desenchúfelo.
12. No use este aparato mas que para lo que ha sido diseñado.
13. Este aparato no puede funcionar de manera ininterrumpida, no
es un aparato profesional. Es necesario efectuar pausas a
7
USK BL 1 - 051107

intervalos regulares. Consulta el punto "Tiempo de utilización" en
el manual de instrucciones.
14. Es indispensable guardar el aparato limpio, ya que está en
contacto directo con el alimento.
15. Compruebe que el acoplamiento del vaso y el bloque motor se
ha realizado adecuadamente antes de ponerlo en marcha. Si
este acoplamiento no se ha realizado adecuadamente un
dispositivo de seguridad impedirá que su aparato se ponga en
marcha. Es decir el piñón del vaso y la muesca del bloque motor
deben estar bien acoplados para que el aparato se ponga en
marcha.
16. El aparato esta previsto para pequeñas cantidades de comida
donde el consumo no debe ser demasiado tardío. No está
concebido para la preparación de grandes cantidades a la vez.
17. Mantenga las manos y los utensilios fuera del vaso mientras el
aparato esté en funcionamiento, para reducir el riesgo de
lesiones personales severas y/o daños a el aparato. Se puede
usar una espátula de goma, pero únicamente cuando el
aparato no esté funcionando.
18. No use el vaso si éste está roto, astillado o cuarteado.
19. Para reducir el riesgo de lesiones, nunca ponga las cuchillas de
la unidad de corte sin que el vaso esté correctamente instalado
en la base. Las cuchillas son filudas, manipúlelas con cuidado.
20. Siempre haga funcionar el aparato con la tapa puesta.
21. Cierre siempre el vaso antes de comenzar a batir. Cuando bata
líquidos calientes no llene más de dos tercios del vaso y sea
prudente para evitar las proyecciones, pues estas pueden
provocar quemaduras. No se olvide de cerrar el tapón del vaso
antes de poner el aparato en marcha.
22. Atornille firmemente el conjunto de cuchillas. Pueden producirse
lesiones si las cuchillas en movimiento quedan accidentalmente
expuestas.
23. No deje el aparato sin vigilancia mientras ésta esté funcionando.
24. Para desconectar el aparato, pulse el botón "0" y desenchufe el
aparato.
GUARDE ESTAS INSTRUCCIONES
8
USK BL 1 - 051107
INFORMACIÓN SOBRE EL ENCHUFE POLARIZADO
Para reducir el riesgo de choque eléctrico, este aparato tiene un
enchufe polarizado (una pata es más ancha que la otra).
Como medida de seguridad, este enchufe calza en el
tomacorriente polarizado de una sola manera. Si el enchufe no
cabe totalmente en el tomacorriente, gire el enchufe. Si aún así no
calza, consulte a un servicio técnico cualificado. No intente anular
esta característica de seguridad.
INSTRUCCIONES DEL CABLE
El cable de alimentación del aparato es un cable corto a fin de
disminuir el riesgo de accidentes (caídas al tropezar con él, etc.)
Puede utilizar un alargador si es necesario.
• Asegúrese de que el nivel eléctrico del cable es igual o
mayor que el indicado. Una extensión con un bajo nivel
eléctrico correría el riesgo de sobrecalentarse y de
estropearse.
• Para evitar riesgos colocar de forma tal que los niños no
puedan jalarlo o tropezar con él.. Que no arrastre nunca por
el suelo.
PARTES
1. Tapón
2. Tapa
3. Jarra
4. Junta hermética
5. Cuchilla
6. Soporta de las cuchillas
7. Bloque del motor
8. Panel de control
9
USK BL 1 - 051107

TIEMPO DE UTILIZACIÓN
Este aparato no está concebido para un uso profesional. Para una
utilización óptima de su aparato y evitar el deterioro de su motor, el
tiempo de utilización continuada máxima es 3 minutos. Después de
3 minutos de uso continuo, es necesario hacer una pausa de
utilización de al menos 10 minutos.
MONTAJE DEL VASO Y USO
¡CUIDADO!
Su aparato está equipado de un dispositivo de seguridad a nivel del
bloque del motor, en el que se pone el vaso; este sistema permite el
funcionamiento del aparato solamente cuando esté correctamente
junto sobre el bloque motor. Si esta condición está satisfecha y que
su aparato no arranca, diríjase al servicio postventa más cercano.
• Junte el vaso graduado sobre el bloque motor, e compruebe
que esté instalado correctamente.
• Rellene el vaso graduado con los ingredientes deseados.
• Cierra la tapadera y el tapón de la tapadera. Para fijar el tapón,
gíralo.
• Enchufe el aparato y pulse el botón On/Off. El testigo luminoso
rojo se encenderá.
• Elija el modo de funcionamiento mejor adaptado para los
ingredientes usados. El testigo luminoso del modo elegido se
encenderá. Nota: en algunos modos las cuchillas funcionan en
secuencias con intervalos cortos. Es normal y no indica una
deficiencia.
• La tecla “Pulse” permite un uso manual.
• Seleccione la tecla “Mix” para batir los alimentos sólidos.
• Seleccione “Chop” para picar los ingredientes sólidos.
• Seleccione la tecla “Stir” para mezcla los ingredientes líquidos.
• Seleccione “Ice crushing” para machacar el hielo.
• Seleccione “Puree” para pisar el puré.
• Es posible añadir en cada momento líquidos u otros ingredientes
sin parar el aparato. Basta simplemente con sacar el tapón que
cierra la abertura de aprovisionamiento de la tapadera
levantándolo verticalmente.
10
USK BL 1 - 051107

• Cuando esté terminada la preparación, pare el aparato (tecla
On/OFF) y desenchúfelo.
• Quite el vaso de la base levantándolo. Quite la tapa del vaso y
vierte el líquido en el contenedor deseado.
LIMPIEZA
• Desenchufe siempre el aparato antes de limpiarlo.
• Para un enjuagado rápido del vaso ( entre dos preparaciones
por ejemplo), ponga agua caliente en el aparato y póngalo en
marcha durante unos instantes, pero sin utilizar detergente.
• Para una limpieza completa del vaso graduado, sáquelo del
bloque motor y gire el soporte de las cuchillas en el sentido
inverso de las agujas del reloj por debajo del vaso para
desmontarlo (esto le facilitará la limpieza). Puede lavar el
conjunto con agua jabonosa, y enjuagar en abundancia con
agua clara. Haga secar antes de juntar de nuevo el conjunto.
Para eso, tiene que atornillar el soporte de hojas girándolo en el
sentido de las agujas del reloj en el fondo del vaso graduado
(apriete enérgicamente para evitar goteras). Procure no
extraviar la junta de estanqueidad durante esta operación.
• El bloque motor no tiene que ser limpiado más que con una
bayeta húmeda.
11
USK BL 1 - 051107

CONSIGNES DE SECURITE
Lors de l’utilisation de l'appareil, veiller à toujours respecter des
mesures de précaution élémentaires, notamment:
1. LISEZ L’ENSEMBLE DES INSTRUCTIONS.
2. Avant d'utiliser l'appareil, vérifiez que la tension du réseau
correspond bien à celle notée sur la plaque signalétique de votre
appareil.
3. Pour écarter les risques d’électrocution, n'immergez pas le
cordon, la fiche ou le bloc moteur dans l'eau ou dans tout autre
liquide.
4. Faites particulièrement attention lorsque I’appareil est utilisé par
ou en présence d’enfants.
5. Débranchez l'appareil de la prise murale lorsqu’il n’est pas utilisé
ou avant de le nettoyer.
6. Ne faites pas fonctionner l'appareil si son cordon ou sa fiche est
endommagé ou si l'appareil a présenté un dysfonctionnement
ou est endommagé. Retournez l’appareil au centre de service
autorisé pour le faire vérifier ou réparer.
7. L'utilisation d’accessoires, y compris de la verseuse, non
recommandés par le fabricant présente des risques d’incendie,
d’électrocution ou de blessure.
8. N'utilisez pas l'appareil à l'extérieur.
9. Ne laissez pas le cordon pendre de la table ou d'un comptoir et
évitez qu’il touche une surface chaude.
10. Ne placez pas l'appareil sur ou près d'un brûleur à gaz ou
électrique ou dans un four chaud.
11. Insérez toujours le cordon d'abord dans l'appareil et ensuite dans
la prise murale. Pour déconnecter l'appareil, débranchez-le.
12. N'utilisez pas cet appareil à des fins autres que celles pour
lesquelles il est conçu.
13. Ce genre d’appareil ne peut fonctionner de façon continue, il ne
s’agit pas d’un appareil de type professionnel. Il est nécessaire
d’effectuer des pauses à intervalles réguliers. Consultez la
rubrique « Intervalles d’utilisation » du mode d’emploi.
12
USK BL 1 - 051107

14. Il est indispensable de garder cet appareil propre étant donné
qu’il est en contact direct avec la nourriture.
15. The pouring jar should be assembled correctly on the motor base
before you plug it into the mains. Cet appareil est muni d’un
dispositif de sécurité empêchant le démarrage du moteur tant
que le bol verseur n’est pas correctement placé. De plus, le bol
doit être verrouillé pour que l'appareil se mette en marche.
16. L’appareil est conçu pour la préparation de petites quantités de
nourriture dont la consommation ne doit pas être trop tardive.
L’appareil n’est pas conçu pour la préparation de grandes
quantités à la fois.
17. Gardez vos mains hors du bol verseur lorsque votre appareil est
sous tension ou en fonctionnement, ceci afin d’éviter de graves
blessures et ou d'éviter d'endommager l'appareil. Vous pouvez
utiliser une spatule en caoutchouc uniquement lorsque l'appareil
est hors tension.
18. N'utilisez pas la verseuse si elle est abîmée, cassée ou fêlée.
19. Afin d'éviter tout risque de blessure, ne placez jamais l'ensemble
de lames sur la base sans l'avoir attaché fermement à la verseuse
au préalable. Les lames sont coupantes, manipulez-les avec
prudence.
20. Placez toujours le couvercle correctement avant d'utiliser
l'appareil.
21. Fermez bien le couvercle avant de mixer. Lorsque vous mixez des
liquides chauds, ne remplissez jamais plus de 2/3 du bol et soyez
prudents afin d'éviter les éclaboussures car celles-ci pourraient
vous brûler. N'oubliez pas de mettre le capuchon afin de couvrir
l'orifice de remplissage du couvercle.
22. Serrez fermement l'ensemble des lames. Si les lames ne sont pas
fixées correctement, cela peut entraîner de graves blessures.
23. Ne laissez pas le blender sans surveillance lorsqu'il est en
fonctionnement.
24. Pour déconnecter l'appareil, appuyez sur le bouton "0" et
débranchez l'appareil.
CONSERVEZ CES INSTRUCTIONS
13
USK BL 1 - 051107

CONSIGNES CONCERNANT LA FICHE POLARISEE
Ce produit est muni d'une fiche polarisée (une lame plus large que
l'autre). Ce genre de fiche n'entre que d'une façon dans une prise
polarisée, afin de minimiser les risques de chocs électriques. Si vous
n'arrivez pas à enfoncer la fiche à fond dans la prise, retournez la
fiche et réessayez. Si cela ne fonctionne toujours pas, faites appel à
un service qualifié compétent. N'essayez jamais de modifier la fiche!
CONSIGNES CONCERNANT LE CORDON
Le cordon d’alimentation de l’appareil est un cordon de type court,
et ce afin de diminuer les risques d’accidents (chute si vous marchez
sur le cordon...). Vous pouvez toutefois utiliser une rallonge si
nécessaire mais:
• Assurez-vous que l'ampérage de la rallonge soit égal ou
supérieur à celui de l'appareil. Une rallonge avec un
ampérage inférieur à celui de l'appareil risquerait de
surchauffer et de brûler.
• La rallonge ne doit pas pendre du plan de travail ou de la
table afin d'éviter que les enfants ne le tirent ou trébuchent.
DESCRIPTION
1. Capuchon
2. Couvercle
3. Bol verseur
4. Joint d’étanchéité
5. Lames
6. support des lames
7. Bloc moteur
8. Panneau de commande
14
USK BL 1 - 051107

INTERVALLES D’UTILISATION
Cet appareil ne peut être utilisé de façon professionnelle. Vous
devez respecter les pauses de fonctionnement. Dans le cas
contraire vous risqueriez d’endommager le moteur. La durée
maximale d’utilisation continue est de 3 minutes. Après une utilisation
continue de 3 minutes, il est nécessaire d'effectuer une pause de
fonctionnement d'au moins 10 minutes.
MONTAGE DU BLENDER ET UTILISATION
ATTENTION !
Votre appareil est équipé d’un dispositif de sécurité au niveau du
bloc moteur, sur lequel doit être posé le bol. Ce dispositif autorise la
mise en fonctionnement de l’appareil seulement lorsque celui-ci est
correctement assemblé sur le bloc moteur. Si cette condition est
remplie et que votre appareil ne démarre pas, consultez notre
service après-vente.
• Assemblez le bol verseur sur le bloc moteur et assurez-vous que le
bol est bien positionné, si non, l'appareil ne se mettra pas en
fonctionnement.
• Remplissez le bol verseur avec les ingrédients désirés.
• Fermez le couvercle et assurez-vous que le capuchon est
également en place. Pour bloquer le capuchon, tournez-le
légèrement.
• Branchez l’appareil et appuyez sur le bouton On/Off. Le témoin
lumineux rouge s’allume.
• Choisissez le mode de fonctionnement le mieux adapté aux
ingrédients utilisés. Le témoin lumineux correspondant à la
fonction choisie s'allume. Remarque: pour certains modes de
fonctionnement, les lames fonctionnent par séquences avec de
courts intervalles. Cela est normal et n'indique pas un
dysfonctionnement de l'appareil.
• La touche "Pulse" permet une utilisation manuelle.
• Sélectionnez la touche "Mix" pour mixer les aliments solides.
• Sélectionnez la touche "Chop" pour hacher les ingrédients solides.
• Sélectionnez la touche "Stir" pour les mélanger des ingrédients
solides et liquides.
15
USK BL 1 - 051107

• Sélectionnez "Ice crush" pour piler de la glace.
• Sélectionnez "Puree" pour écraser des ingrédients mous.
• Il est possible de rajouter à tout moment des liquides ou autres
ingrédients sans arrêter l’appareil. Il suffit simplement de retirer le
capuchon fermant l’ouverture d’approvisionnement du
couvercle en le soulevant verticalement.
• Une fois la préparation terminée, arrêtez l’appareil (bouton
On/Off) et débranchez la fiche de la prise de courant.
• Retirez le bol verseur du bloc moteur en le soulevant. Retirez
ensuite le couvercle et versez le liquide dans le récipient désiré.
NETTOYAGE
• Toujours débrancher votre appareil avant de le nettoyer.
• Pour un rinçage rapide du bol verseur (entre deux préparations
par exemple), vous pouvez utiliser de l’eau claire et faire
fonctionner l’appareil quelques instants. Dans ce cas, n’utilisez
pas de détergent.
• Pour un nettoyage complet du bol verseur, retirez-le du bloc
moteur et tournez le support de lame dans le sens inverse des
aiguilles d’une montre par le dessous du bol pour le démonter
(ceci vous facilitera le nettoyage). Vous pouvez alors laver
l’ensemble avec de l’eau additionnée de détergent et rincer
abondamment à l’eau claire. Faites sécher avant de remonter
l’ensemble. Pour cela, il vous suffit de visser le support de lames
en le tournant dans le sens horaire au fond du bol verseur (serrez
énergiquement pour éviter les fuites). Attention de ne pas égarer
le joint d’étanchéité lors de cette opération.
• Vous pouvez nettoyer le bloc moteur à l’aide un chiffon doux
légèrement humide.
K051107
Back cover page (last page)
Assembly page 16/16
 Loading...