

Kaiser HGG 60501, HGG 61531, HGE 60301, HGG 60511, HGE 60309 User Manual
...
USER MANUAL
GEBRAUCHSANWEISUNG
ИНСТРУКЦИЯ ПО ОБСЛУЖИВАНИЮ И ЭКСПЛУАТАЦИИ
EN
DE
RU
HGG 5..
HGE 5..
GAS AND GAS-ELECTRIC COOKERS
GAS- UND GAS-ELEKTROHERDE
ГАЗОВЫЕ И ГАЗО-ЭЛЕКТРИЧЕСКИЕ ПЛИТЫ

2
EN
DEAR CUSTOMER,
thank you for purchasing this Kaiser product.
We are convinced that you have made the right choice.
The appliance satisfies the high quality demands and
corresponds to comprehensive international standards.
Having been designed by the best European designers,
the modern appearance of the cooker is sure to be a
splendid interior decoration of your kitchen.
The cooker is intended to realize even your most
complicated cookery projects.
Please read these instructions carefully before starting
operation to be sure to obtain optimum performance.
The following recommendations are aimed to protect
you from possible inconveniences which can occur as a
result of the wrong operation and, at the same time,
reduce the consumption of electric energy. Proper
operation and maintenance provide a longer service life
of the unit and make cooking a pleasure.
The Kaiser cookers fulfill the main norms of safety,
hygiene and environment protection in correspondence
with the EU directives and are certified according to EU
norms and standards (DIN ISO 9001, ISO 1400),
standards of Russia (Gosstandart) and the CIS.
The company’s policy is aimed at constant improvement
of product quality. Modifications made to the design and
equipment result in exclusively positive changes in
operating qualities of the appliances. The right for
changes in the products is reserved by the manufacturer.
We wish you an effective use of the Kaiser product.
Yours faithfully,
OLAN-Haushaltsgeräte
Berlin Germany
The appliances under present operating instructions are designed for
domestic and not industrial use.

3
DE RU
LIEBE KUNDIN, LIEBER KUNDE,
wir danken Ihnen für den Erwerb unserer Technik.
Wir sind überzeugt, dass Sie eine richtige Wahl
getroffen haben. Dieses Produkt entspricht den hohen
Forderungen zur Qualität und den modernsten
internationalen Standards. Das Gerät wird Ihnen Ihre
Kochprojekte ermöglichen, während sein modernes
Aussehen, das von den besten europäischen Designern
entwickelt worden ist, zum Prachtstück Ihrer Küche
wird.
Wir bitten Sie die Bedienungsanleitung vor der Nutzung
aufmerksam zu lesen. Die Beachtung von Empfehlungen
schützt Sie von eventuellen Unannehmlichkeiten, die als
Folge der falschen Nutzung des Herds auftreten
können, und ermöglicht Ihnen den Verbrauch von
Elektroenergie zu reduzieren. Der Herd bringt Ihnen
viel Vergnügen auf lange Zeit, wenn der Gebrauch der
vorliegenden Bedienungsanleitung entsprechen wird.
Unsere Herde entsprechen den Hauptforderungen der
Sicherheit, der Hygiene und des Umweltschutzes, laut
den Direktiven der EU, was mit Zertifikaten DIN ISO
9001, ISO 1400, entsprechend den im Rahmen der EU
geltenden Normen, bestätigt ist, und genauso auch den
Anforderungen von Gosstandart in Russland und
Standards anderer GUS Länder, was durch die
Identifikationszertifikate bestätigt ist.
Mit den Gedanken der ständigen Verbesserung der
Qualität unserer Herde sind Änderungen bei Design
und Einrichtung, die nur zu positiven Veränderungen
der technischen Eigenschaften führen, vom Hersteller
vorbehalten.
Wir wünschen Ihnen die effektive Nutzung unseres
Produkts.
Hochachtungsvoll
OLAN-Haushaltsgeräte
Berlin Germany
Wir Informieren Sie, dass unsere Geräte, die der Gegenstand der
vorliegenden Bedienungsanleitung sind, sind ausschließlich für den
häuslichen Gebrauch vorbestimmt.
ɍȼȺɀȺȿɆɕɃ ɉɈɄɍɉȺɌȿɅɖ,
ɛɥɚɝɨɞɚɪɢɦ ȼɚɫ ɡɚ ɩɪɢɨɛɪɟɬɟɧɢɟ ɧɚɲɟɣ ɬɟɯɧɢɤɢ.
Ɇɵ ɭɜɟɪɟɧɵ, ɱɬɨ ȼɵ ɫɞɟɥɚɥɢ ɩɪɚɜɢɥɶɧɵɣ ɜɵɛɨɪ.
Ⱦɚɧɧɵɣ ɩɪɨɞɭɤɬ, ɭɞɨɜɥɟɬɜɨɪɹɸɳɢɣ ɫɚɦɵɦ ɜɵɫɨɤɢɦ
ɬɪɟɛɨɜɚɧɢɹɦ ɢ ɨɬɜɟɱɚɸɳɢɣ ɦɢɪɨɜɵɦ ɫɬɚɧɞɚɪɬɚɦ,
ɩɨɡɜɨɥɢɬ ȼɚɦ ɥɟɝɤɨ ɜɨɩɥɨɬɢɬɶ ɜɫɟ ȼɚɲɢ
ɤɭɥɢɧɚɪɧɵɟ ɫɩɨɫɨɛɧɨɫɬɢ, ɚ ɟɝɨ ɫɨɜɪɟɦɟɧɧɵɣ ɜɢɞ,
ɪɚɡɪɚɛɨɬɚɧɧɵɣ ɥɭɱɲɢɦɢ ɟɜɪɨɩɟɣɫɤɢɦɢ ɞɢɡɚɧɟɪɚɦɢ,
ɜɟɥɢɤɨɥɟɩɧɨ ɭɤɪɚɫɢɬ ȼɚɲɭ ɤɭɯɧɸ.
ɉɪɨɫɢɦ ȼɚɫ ɜɧɢɦɚɬɟɥɶɧɨ ɩɪɨɱɢɬɚɬɶ ɢɧɫɬɪɭɤɰɢɸ
ɩɨ ɨɛɫɥɭɠɢɜɚɧɢɸ ɢ ɷɤɫɩɥɭɚɬɚɰɢɢ ɞɨ ɩɭɫɤɚ
ɭɫɬɪɨɣɫɬɜ
ɚ. ɋɨɛɥɸɞɟɧɢɟ ɫɨɞɟɪɠɚɳɢɯɫɹ ɜ ɧɟɣ
ɪɟɤɨɦɟɧɞɚɰɢɣ ɡɚɳɢɬɢɬ ȼɚɫ ɨɬ ɜɨɡɦɨɠɧɵɯ
ɧɟɩɪɢɹɬɧɨɫɬɟɣ ɩɪɢ ɧ
ɟɩɪɚɜɢɥɶɧɨɣ ɷɤɫɩɥɭɚɬɚɰɢɢ
ɩɥɢɬɵ, ɚ ɬɚɤɠɟ ɩɨɡɜɨɥɢɬ ȼɚɦ ɭɦɟɧɶɲɢɬɶ ɪɚɫɯɨɞ
ɷɥɟɤɬɪɨɷɧɟɪɝɢɢ. ȿɫɥɢ ɷɤɫɩɥɭɚɬɚɰɢɹ ɩɥɢɬɵ ɛɭɞɟɬ
ɫɨɨɬɜɟɬɫɬɜɨɜɚɬɶ ɧɚɫɬɨɹɳɟɣ ɢɧɫɬɪɭɤɰɢɢ, ɧɚɲɚ
ɩɥɢɬɚ ɛɭɞɟɬ ɪɚɞɨɜɚɬɶ ȼɚɫ ɞɨɥɝɨɟ ɜɪɟɦɹ.
ɇɚɲɢ ɩɥɢɬɵ ɩɨɥɧɨɫɬɶɸ ɫɨɨɬɜɟɬɫɬɜɭɟɬ ɨɫɧɨɜɧɵɦ
ɬɪɟɛɨɜɚɧɢɹɦ ɛɟɡɨɩɚɫɧɨɫɬɢ, ɝɢɝɢɟɧɵ ɢ ɡɚɳɢɬɵ
ɨɤɪɭɠɚɸɳɟɣ ɫɪɟɞɵ, ɫɨɝɥɚɫɧɨ ɞɢɪɟɤɬɢ
ɜɚɦ
ȿɜɪɨɩɟɣɫɤɨɝɨ ɋɨɸɡɚ, ɱɬɨ ɩɨɞɬɜɟɪɠɞɟɧɨ
ɫɟɪɬɢɮɢɤɚɬɚɦɢ DIN ISO 9001, ISO 1400, ɜ
ɫɨɨɬɜɟɬɫɬɜɢɢ ɫ ɧɚɫɬɨɹɳɢɦɢ ɧɨɪɦɚɦɢ,
ɞɟɣɫɬɜɭɸɳɢ
ɦɢ ɧɚ ɬɟɪɪɢɬɨɪɢɢ ȿɜɪɨɩɟɣɫɤɨɝɨ
ɫɨɨɛɳɟɫɬɜɚ, a ɬɚɤɠɟ ɩɨɥɧɨɫɬɶɸ ɨɬɜɟɱɚɸɬ ɜɫɟɦ
ɬɪɟɛɨɜɚɧɢɹɦ Ƚɨɫɫɬɚɧɞɚɪɬɚ Ɋɨɫɫɢɢ ɢ ɫɬɚɧɞɚɪɬɨɜ
ɞɪɭɝɢɯ ɫɬɪɚɧ ɋɇȽ, ɱɬɨ ɩɨɞɬɜɟɪɠɞɚɟɬɫɹ
ɫɟɪɬɢɮɢɤɚɬɚɦɢ ɫɨɨɬɜɟɬɫɬɜɢɹ.
ɋ ɦɵɫɥɶɸ ɨ ɞɚɥɶɧɟɣɲɟɦ ɩɨɜɵɲɟɧɢɢ ɬɟɯɧɢɱɟɫɤɢɯ ɢ
ɷɤɫɩɥɭɚɬɚɰɢɨɧɧɵɯ ɯɚɪɚɤɬɟɪɢɫɬɢɤ ɧɚɲɢɯ ɩɥɢɬ ɦɵ
ɨɫɬɚɜɥɹɟɦ ɡɚ ɫɨɛɨɣ ɩɪɚɜɨ ɧɚ ɜɧɟɫɟɧɢɟ ɢɡɦɟɧɟɧɢɣ ɜ
ɞɢɡɚɣɧ ɢ ɭɫɬɪɨɣɫɬɜ
ɨ, ɜɥɢɹɸɳɢɯ ɬɨɥɶɤɨ
ɩɨɥɨɠɢɬɟɥɶɧɨ ɧɚ ɩɨɬɪɟɛɢɬɟɥɶɫɤɢ
ɟ ɤɚɱɟɫɬɜɚ ɢ
ɫɜɨɣɫɬɜɚ ɩɪɨɞɭɤɬɚ.
ɀɟɥɚɟɦ ȼɚɦ ɷɮɮɟɤɬɢɜɧɨɝɨ ɩɨɥɶɡɨɜɚɧɢɹ ɩɪɨɞɭɤɬɨɦ
ɧɚɲɟɣ ɮɢɪɦɵ.
ɍɜɚɠɚɸɳɢɣ ȼɚɫ
OLAN-Haushaltsgeräte
Berlin Germany
ɂɧɮɨɪɦɢɪɭɟɦ, ɱɬɨ ɧɚɲɢ ɩɪɢɛɨɪɵ, ɹɜɥɹɸɳɢɟɫɹ ɩɪɟɞɦɟɬɨɦ
ɧɚɫɬɨɹɳɟɣ ɂɧɫɬɪɭɤɰɢɢ, ɩɪɟɞɧɚɡɧɚɱɟɧɵ ɢɫɤɥɸɱɢɬɟɥɶɧɨ ɞɥɹ
ɞɨɦɚɲɧɟɝɨ ɩɨɥɶɡɨɜɚɧɢɹ.

4
EN
CONTENTS
INSTALLATION INSTRUCTIONS 6
Installation 6
Connection 8
Adjustment to different gas types 12
Safety conditions 14
BRIEF DESCRIPTION 18
Location drawing 18
Control panel 20
EQUIPMENT 22
Gas cooking zones control 24
Gas oven control 28
Multifunction electrical oven control 30
Operation functions of the oven 32
Oven 36
Electronic sensor timer Touch control 38
PRACTICAL ADVICE 52
CLEANING AND SERVICING 60
ENVIROMENTAL COMPATIBILITY 70

5
DE RU
INHALTSVERZEICHNIS
FÜR DEN INSTALLATEUR 7
Aufstellen des Herdes 7
Gasherd anschließen 9
Anpassung an eine andere Gasart 13
Sicherheitsbedingungen 15
KURZBESCHREIBUNG 19
Gesamtansicht 19
Bedienblende 21
AUSSTATUNG 23
Gebrauch vom Gaskochfeld 25
Steuerung von Gasbackofen 29
Steuerung von Multifunktionselektrobackofen 31
Betriebsfunktion des Backofens 33
Gebrauch vom Backofen 37
Elektronische Zeitschaltuhr Touch control
mit Sensorbedienung 39
PRAKTISCHE EMPFEHLUNGEN 53
PFLEGE UND WARTUNG 61
UMWELTVERTRÄGLICHKEIT 71
ɈȽɅȺȼɅȿɇɂȿ
ɂɇɋɌɊɍɄɐɂə ɉɈ ɆɈɇɌȺɀɍ 7
ɍɫɬɚɧɨɜɤɚ ɩɥɢɬɵ 7
ɉɨɞɤɥɸɱɟɧɢɟ ɩɥɢɬɵ 9
ɉɪɢɫɩɨɫɨɛɥɟɧɢɟ ɤ ɞɪɭɝɨɦɭ ɬɢɩɭ ɝɚɡɚ 13
ɍɫɥɨɜɢɹ ɛɟɡɨɩɚɫɧɨɫɬɢ 15
ɄɊȺɌɄɈȿ ɈɉɂɋȺɇɂȿ 19
ȼɧɟɲɧɢɣ ɜɢɞ 19
ɉɚɧɟɥɶ ɭɩɪɚɜɥɟɧɢɹ 21
ɈȻɈɊɍȾɈȼȺɇɂȿ 23
ɉɨɥɶɡɨɜɚɧɢɟ ɝɚɡɨɜɨɣ
ɩɨɜɟɪɯɧɨɫɬɶɸ 25
ɍɩɪɚɜɥɟɧɢɟ ɪɚɛɨɬɨɣ ɝɚɡɨɜɨɝɨ
ɞɭɯɨɜɨɝɨ ɲɤɚɮɚ 29
ɍɩɪɚɜɥɟɧɢɟ ɪɚɛɨɬɨɣ ɦɧɨɝɨɮɭɧɤɰɢɨɧɚɥɶɧɨɝɨ
ɷɥɟɤɬɪɢɱɟɫɤɨɝɨ ɞɭɯɨɜɨɝɨ ɲɤɚɮɚ 31
Ɋɚɛɨɱɢɟ ɮɭɧɤɰɢɢ ɞɭɯɨɜɨɝɨ ɲɤɚɮɚ 33
ɉɨɥɶɡɨɜɚɧɢɟ ɞɭɯɨɜɵɦ ɲɤɚɮɨɦ 37
ɋɟɧɫɨɪɧɨɟ ɷɥɟɤɬɪɨɧɧɨɟ ɩɪɨɝɪɚɦɦɢɪɭɸɳɟɟ
ɭɫɬɪɨɣ
ɫɬɜ
ɨ Touch control 39
ɉɊȺɄɌɂɑȿɋɄɂȿ ɋɈȼȿɌɕ 53
ɈȻɋɅɍɀɂȼȺɇɂȿ ɂ ɍɏɈȾ 61
ɈɏɊȺɇȺ ɈɄɊɍɀȺɘɓȿɃ ɋɊȿȾɕ 71
6
EN
INSTALLATION INSTRUCTIONS
INSTALLATION
Unhampered access to all control units as well as
duly ventilation of the kitchen are primary
installation requirements.
Before using your new appliance, make sure to fit
it properly. By fixing the adjustable feet in a proper
position, you can keep the upper surface strictly
horizontally and, thus, avoid backlash. For this
purpose, take out the drawer at the bottom.
The cooker is intended to be build up into kitchen
furniture, however, only up to the height of the
working plate, i.e. fixing up higher than 850 mm
from the floor level is unreasonable.
All materials used for furniture panels should be
heat resistant at the temperature 100°C minimum.
Breach of this regulation can result in distortion or
ungluing of panel coverings. To avoid heat
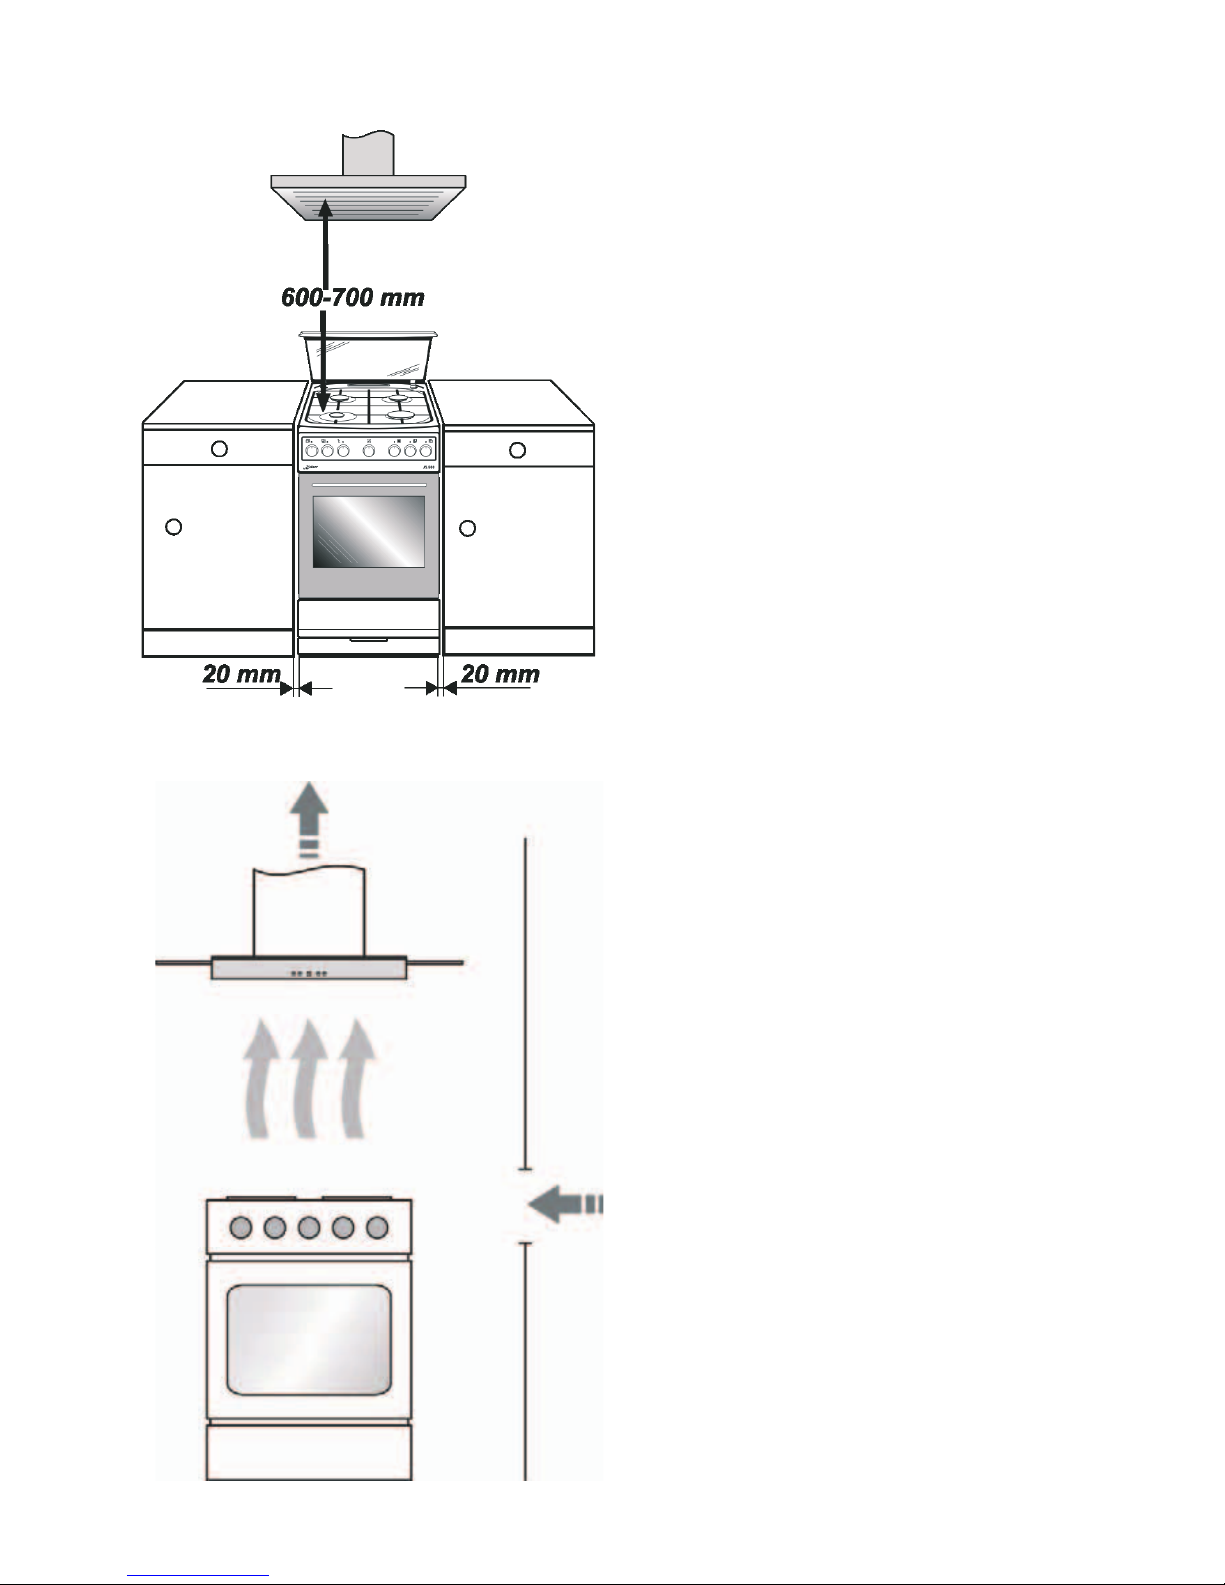
distortion of the furniture panels, ensure that the
space between the contact surfaces is not less
than 2 cm.
Please mount the fume extractor hood at about
600-700 mm above the cooking surface (see
installation instructions for your fume extractor
hood).
3,5 kWt gas cookers are provided with a
connecting cable (cross-section – 3 x 1,5 mm
2
,
length – approx. 1,5 m) and a plug equipped with a
safety stud.
Make sure that the AC outlet is isolated and not
placed above the cooker.
After the cooker has been installed, check up if the
electrical outlet is easy to access.

7
DE RU
FÜR DEN INSTALLATEUR
AUFSTELLEN DES HERDES
Der Küchenraum muss eine funktionstüchtige
Ventilation haben und der Herd ist so aufzustellen,
dass der Benutzer einen freien Zutritt zu allen
Bedienelementen hat.
Vor dem Benutzen stellen Sie den Herd richtig auf,
durch Drehen von Stützfüßen erreichen Sie die
horizontale Lage der Oberfläche des Herdes. Dafür
nehmen Sie den unteren Kasten heraus.
Der Herd darf in die Reihe von Möbel nur bis zu
der Höhe der Arbeitsoberfläche der Möbel, d.h.
850 mm vom Fußboden eingebaut werden. Einbau
über diese Höhe ist unzweckmäßig. Die
Küchenmöbel soll Verkleidung haben, die für die
Temperatur 100°ɋ geeignet ist. Die
Nichtübereinstimmung mit dieser Bedingung kann
zur Deformation der Oberfläche oder Lösung der
Verkleidung der Möbel bringen. Wenn Sie davon
nicht überzeugt sind, über welche thermische
Standhaftigkeit die Möbel verfügt, ist es notwendig,
den Herd in die Möbel so einzubauen, dass der
Abstand von 2 cm zwischen dem Herd und Möbel
erhalten bleibt.
Der Höhenabstand zwischen den
Kochstellenbrennern und der Abzugshaube soll ca.
600-700 mm betragen (siehe die
Bedienungsanleitung für Ihre Abzugshaube).
Die Herdmodelle mit einer Leistung bis zu 3,5 kW
sind mit einem Anschlusskabel versehen, das
einen Querschnitt von 3 x 1,5 mm2 und eine Länge
von ca. 1,5 m, sowie einen Schutzkontaktstecker
hat.
Die Netzsteckdose muss mit einem
Schutzkontaktdecke versehen und darf nicht über
dem Herd angeordnet sein.
Es ist erforderlich, dass die Netzsteckdose für den
Benutzer nach dem Aufstellen vom Herd
zugänglich ist.
ɂɇɋɌɊɍɄɐɂə ɉɈ ɆɈɇɌȺɀɍ
ɍɋɌȺɇɈȼɄȺ ɉɅɂɌɕ
Ʉɭɯɨɧɧɨɟ ɩɨɦɟɳɟɧɢɟ ɞɨɥɠɧɨ ɨɛɥɚɞɚɬɶ
ɢɫɩɪɚɜɧɨɣ ɜɟɧɬɢɥɹɰɢɟɣ, ɚ ɩɥɢɬɚ ɞɨɥɠɧɚ ɛɵɬɶ
ɭɫɬɚɧɨɜɥɟɧɚ ɬɚɤ, ɱɬɨɛɵ ɨɛɟɫɩɟɱɢɬɶ ɫɜɨɛɨɞɧɵɣ
ɞɨɫɬɭɩ ɩɨɬɪɟɛɢɬɟɥɹ ɤɨ ɜɫɟɦ ɷɥɟɦɟɧɬɚɦ
ɭɩɪɚɜɥɟɧɢɹ.
Ⱦɨ ɧaɱaɥɚ ɩɨɥɶɡoɜɚɧɢɹ ɩɪɚɜɢɥɶɧɨ ɭɫɬɚɧɨɜɢɬɟ
ɩɥɢɬɭ, ɜpaɳeɧɢeɦ oɩɨpɧɵɯ ɧoɠeɤ ɞɨɛɟɣɬɟɫɶ
ɝɨɪɢɡɨɧɬɚɥɶɧɨɝɨ ɩɨɥɨɠɟɧɢɹ ɩɨɜɟɪɯɧɨɫɬɢ ɩɥɢɬɵ.
Ⱦɥɹ ɷɬɨɝɨ ɜɵɧɶɬɟ ɧɢɠɧɢɣ ɹɳɢɤ.
ɉɥɢɬɚ ɦɨɠɟɬ ɛɵɬɶ ɜɫɬɪɨɟɧɚ ɜ ɪɹɞ ɦɟɛ
ɟɥɢ
ɬɨɥɶɤɨ ɞɨ ɜɵɫɨɬɵ ɪɚɛɨɱɟɣ ɩɨ
ɜɟɪɯɧɨɫɬɢ ɦɟɛɟɥɢ,
ɬ.ɟ. 850 ɦɦ ɨɬ ɩɨɥɚ. Ɂɚɫɬɪɨɣɤɚ ɜɵɲɟ ɷɬɨɝɨ
ɭɪɨɜɧɹ ɧɟɰɟɥɟɫɨɨɛɪɚɡɧɚ.
Ɇɟɛɟɥɶ ɞɥɹ ɡɚɫɬɪɨɣɤɢ ɞɨɥɠɧɚ ɢɦɟɬɶ ɨɛɥɢɰɨɜɤɭ
ɜɵɞɟɪɠɢɜɚɸɳɭɸ ɬɟɦɩɟɪɚɬɭɪɭ 100°ɋ.
ɇɟɫɨɨɬɜɟɬɫɬɜɢɟ ɷɬɨɦɭ ɭɫɥɨɜɢɸ ɦɨɠɟɬ ɩɪɢɜɟɫɬɢ
ɤ ɞɟɮɨɪɦɚɰɢɢ ɩɨɜɟɪɯɧɨɫɬɢ ɢɥɢ ɨɬɤɥɟɢɜɚɧɢɸ
ɨɛɥɢɰɨɜɤɢ ɦɟɛɟɥɢ. ȿɫɥɢ ȼɵ ɧɟ ɭɜɟɪɟɧɵ , ɤɚɤɨɣ
ɬɟɩɥɨɜɨɣ ɫɬɨɣɤɨɫɬɶɸ ɨɛɥɚɞɚɟɬ ɦɟɛɟɥɶ, ɩɥ
ɢɬɭ
ɫɥɟɞɭɟɬ ɜɫɬɪɚɢɜɚɬɶ ɜ ɦɟɛɟɥɶ ɫɨɯɪɚɧɹɹ ɩɪɢ
ɷɬɨɦ ɪɚɫɫɬɨɹɧɢɟ ɨɤɨɥ
ɨ 2 ɫɦ.
Ɋɚɫɫɬɨɹɧɢɟ ɦɟɠɞɭ ɪɟɲɟɬɤɚɦɢ ɝɨɪɟɥɨɤ ɩɥɢɬɵ ɢ
ɜɵɬɹɠɧɵɦ ɭɫɬɪɨɣɫɬɜɨɦ ɞɨɥɠɧɨ ɛɵɬɶ
ɨɪɢɟɧɬɢɪɨɜɨɱɧɨ 600-700 ɦɦ (ɫɦɨɬɪɢɬɟ
ɢɧɫɬɪɭɤɰɢɸ ɤ ȼɚɲɟɦɭ ɜɵɬɹɠɧɨɦɭ ɭɫɬɪɨɣɫɬɜɭ).
Ɇɨɞɟɥɢ ɩɥɢɬ ɦɨɳɧɨɫɬɶɸ ɜ 3,5 ɤȼɬ ɫɧɚɛɠɟɧɵ
ɩɨɞɫɨɟɞɢɧɢɬɟɥɶɧɵɦ ɩɪɨɜɨɞɨɦ ɫ ɫɟɱɟɧɢɟɦ 3 ɯ
1,5 ɤɜ.ɦɦ, ɞɥɢɧɨɣ ɩɪɛɥ. 1,5 ɦ ɢ ɜɢɥɤɨɣ ɫ
ɡɚɳɢɬɧɵɦ ɤɨɧɬɚɤɬɨɦ.
ɒɬɟɩɫɟɥɶɧɨɟ ɝɧɟɡɞɨ ɷɥɟɤɬɪɨɩɪɨ
ɜɨɞɤɢ ɞɨɥɠɧɨ
ɛɵɬɶ ɡɚɤɪɵɬɵɦ ɢ ɧɟ ɞɨɥɠɧɨ ɧɚɯɨɞɢɬɶɫɹ ɧɚɞ
ɩɥɢɬɨɣ.
ɉɨɫɥɟ ɭɫɬɚɧɨɜɤɢ ɩɥ
ɢɬɵ ɫɥɟɞɭɟɬ ɨɛɟɫɩɟɱɢɬɶ
ɩɨɬɪɟɛɢɬɟɥɸ ɞɨɫɬɭɩ ɤ ɲɬɟɩɫɟɥɶɧɨɦɭ ɝɧɟɡɞɭ
ɷɥɟɤɬɪɨɩɪɨɜɨɞɤɢ.
8
EN
CONNECTION
The serviceman should:
1. Possess an appropriate certificate.
2. Take into consideration the information re. the
type of gas suitable for this cooker (registed at
the switchboard panel and the data plate). This
information should be compared with the gas
supply requirements at the gas supply pipe.
3. Check up:
x efficiency of ventilation (i.e. air interchange
in the kitchen)
x leak-proof pipe junction
x operation efficiency of all control units of
the cooker
x adjustability of the power line to the
protective (zero) conductor.
x
4. Provide the User with the installation certificate
as well as give instructions concerning
operation of the coocker.
Attention! Connection to the gas cylinder
or gas pipe is allowed to be carried out only
by an authorized serviceman who should
observe all safety regulations.

9
DE RU
GASHERD ANSCHLIESSEN
Der Installateur muss:
1. Gasberechtigung besitzen.
2. Die am Typenschild und am Etikett angeführten
Informationen bezüglich Gasart zur Kenntnis
nehmen, für welche der Herd ausgelegt ist. Die
Informationen mit Gaslieferungsbedingungen
am Installierungsort vergleichen.
3. Folgendes überprüfen:
x Wirksamkeit der Lüftung, d.h. Luftwechsel
im Aufstellungsraum,
x Dichtheit der Gasarmaturverbindungen,
x Funktionsfähigkeit aller Funktionselemente
des Herdes,
x Ausrüstung der elektrischen Installation mit
der Schutzleitung (Nullleitung).
x
4. Dem BENUTZER das Zeugnis des
Herdanschlusses an die Gasinstallation
ÜBERGEBEN und in die Bedienung dessen
einweisen.
ɉɈȾɄɅɘɑȿɇɂȿ ɉɅɂɌɕ
Ɇɨɧɬɟɪ ɞɨɥɠɟɧ:
1. Ɉɛɥɚɞɚɬɶ ɫɨɨɬɜɟɬɫɬɜɭɸɳɢɦ ɫɟɪɬɢɮɢɤɚɬɨɦ.
2. Ɉɡɧɚɤɨɦɢɬɫɹ ɫ ɢɧɮɨɪɦɚɰɢɟɣ, ɧɚɯɨɞɹɳɟɣɫɹ
ɧɚ ɡɚɜɨɞɫɤɨɣ ɬɚɛɥɢɱɤɟ ɩɥɢɬɵ ɨ ɬɢɩɟ ɝɚɡɚ, ɧɚ
ɤɨɬɨɪɵɣ ɨɧɚ ɧɚɫɬɪɨɟɧɚ. ɂɧɮɨɪɦɚɰɢɸ ɫɪɚɜɧɢɬɟ
ɫ ɭɫɥɨɜɢɹɦɢ ɩɨɞɚɱɢ ɝɚɡɚ ɜ ɦɟɫɬɟ ɭɫɬɚɧɨɜɤɢ.
3. ɉɪɨɜɟɪɢɬɶ:
x ɷɮɮɟɤɬɢɜɧɨɫɬɶ ɜɟɧɬɢɥɹɰɢɢ, ɬ.ɟ.
ɜɨɡɞɭɯɨɨɛɦɟɧɚ ɜ ɩɨɦɟɳɟɧɢɢ,
x ɩɥɨɬɧɨɫɬɶ ɫɨɟɞɢɧɟɧɢɣ ɝɚɡɨɜɨɣ
ɚɪɦɚɬɭɪɵ,
x ɷɮɮɟɤɬɢɜɧɨɫɬɶ ɞɟɣɫɬɜɢɹ ɜɫɟɯ
ɮɭɧɤɰɢɨɧɚɥɶɧɵɯ ɷɥɟɦ
ɟɧɬɨɜ ɩɥɢɬɵ,
x ɩɪɢɫɩɨɫɨɛɥɟɧɢɟ ɷɥɟɤɬɪɨɩɪɨɜɨɞɤɢ ɤ
ɫɨɜɦɟɫɬɧɨɣ ɪɚɛɨɬɟ ɫ ɡɚɳɢɬɧɵɦ
(ɧɭɥɟɜɵɦ) ɩɪɨɜɨɞɨɦ.
4. ȼɵɞɚɬɶ ɉɈɌɊȿȻɂɌȿɅɘ ɫɜɢɞɟɬɟɥɶɫɬɜɨ
ɩɨɞɫɨɟɞɢɧɟɧɢɹ ɝɚɡɨɜɨɣ ɩɥɢɬɵ ɢ ɨɡɧɚɤɨɦɢɬɶ ɟɝɨ
ɫ ɨɛɫɥɭɠɢɜɚɧɢɟɦ.
ȼɧɢɦɚɧɢɟ! ɉɨɞɤɥɸɱɟɧɢɟ ɩɥɢɬɵ ɤ
ɝɚɡɨɛɚɥɥɨɧɭ ɫ ɩɪɨɩɚɧ-ɛɭɬɚɧɨɦ ɢɥɢ ɤ
ɫɭɳɟɫɬɜɭɸɳɟɦɭ ɝɚɡɨɩɪɨɜɨɞɭ ɦɨɠɟɬ
ɛɵɬɶ ɫɨɜɟɪɲɟɧɨ ɬɨɥɶɤɨ
ɫɟɪɬɢɮɢɰɢɪɨɜɚɧɧɵɦ ɫɩɟɰɢɚɥɢɫɬɨɦ,
ɫɨɛɥɸɞɚɸɳɢɦ ɜɫɟ ɩɪɚɜɢɥɚ
ɛɟɫɨɩɚɫɧɨɫɬɢ.
Achtung! Der Herd darf an eine
PROPAN-BUTAN-Flasche oder an die
existierende Gasinstallation nur von
einem befugten Installateur
angeschlossen werden, der alle
Sicherheitsvorschriften einhält.
10
EN
To connect the cooker to a gas cylinder, screw on a
min. 0,5 m long metal junction pipe provided with an
end junction hose (8 x 1 mm) onto the lead-in pipe.
The gas-supply pipe must not get in contact with
the protective metal elements on the cooker’s rear
wall. Check up if the junctions are leak-proof.
It is advisable to tighten the junctions by insulating
teflon tape.
Overtightening (max. tightening torque – 20 Nm) or
using glue can result in junction damage and lead
to gas leak.
In plant, the gas cooker has been pre-adjusted for
operating on AC power and single-phase current
(230 volt ~ 50 hz). First check up if the AC outlet
complies with the cooker’s electric capacity, and
then plug in.
The power outlet should have a zero phase.
Cautions: CHECK UP LEAKPROOFNESS
of the connection to the gas supply pipe or
gas cylinder using soap suds only. Don’t
use open flame – danger to life!
11
DE RU
Bei dem Anschließen des Herdes an eine
Gasflasche, schrauben Sie auf die Einführung 1/2”
den min. 0,5ɦ langen metallischen
Anschlussstutzen mit einem SchlauchAnschlussstutzen (8 x 1mm) an. Das
Gasleitungsrohr darf mit metallischen
Schutzelementen der Rückwand des Herdes nicht
in Berührung kommen. Beachten Sie, dass der
Anschluss dicht ist.
Es wird empfohlen, die Verbindungen mit
Teflonband abzudichten.
Überspannen (max. Drehmoment – 20 Nm) bzw.
Anleimen kann zu Schaden der Verbindungsstelle
führen bzw. das Gasleck verursachen.
Der Herd ist werksseitig für die Versorgung mit
Einphasenwechselstrom (230V ~50Hz) ausgelegt
und mit der Anschlussleitung ausgestattet. Vor
dem
Anschließen des Herdes an die Steckdose
überprüfen Sie, ob sie der elektrischen Leistung
des Herdes entspricht.
Die Netzsteckdose, an die der Herd anzuschließen
ist, muss unbedingt mit der Nullphase versehen
sein werden.
ɉɪɢ ɩɨɞɤɥɸɱɟɧɢɢ ɩɥɢɬɵ ɤ ɝɚɡɨɛɚɥɨɧɭ, ɧɚ ɜɜɨɞ
1/2” ɧɚɜɢɧɬɢɬɟ ɦɟɬɚɥɥɢɱɟɫɤɢɣ ɤɨɧɰɟɜɨɣ
ɩɚɬɪɭɛɨɤ ɞɥɢɧɨɣ ɦɢɧ. 0,5ɦ ɫɨ ɲɥɚɧɝɨɜɵɦ
ɤɨɧɰɟɜɵɦ ɩɚɬɪɭɛɤɨɦ 8 x 1ɦɦ. ɉɨɞɚɸɳɚɹ ɝɚɡ
ɬɪɭɛɚ ɧɟ ɞɨɥɠɧɚ ɤɚɫɚɬɶɫɹ ɦɟɬɚɥɥɢɱɟɫɤɢɯ
ɷɥɟɦɟɧɬɨɜ ɡɚɳɢɬɵ ɡɚɞɧɟɣ ɫɬɟɧɵ ɩɥɢɬɵ.
Ɉɛɪɚɬɢɬɟ ɜɧɢɦɚɧɢɟ ɧɚ ɫɨɯɪɚɧɟɧɢɟ ɩɥɨɬɧɨɫɬɢ
ɫɨɟɞɢɧɟɧɢɣ.
Ɋɟɤɨɦɟɧɞɭɟɬɫɹ ɭɩɥɨɬɧɢɬɶ ɫɨɟɞɢɧɟɧɢɹ ɩɪɢ
ɩɨɦɨɳɢ ɭɩɥɨɬɧɹɸɳɟɣ ɥɟɧɬɵ ɢɡ ɬɟɮɥɨɧɚ.
ɉɟɪɟɬɹɠɤɚ ɛɨɥɶɲɢɦ ɦɨɦɟɧɬɨɦ (ɦɚɤɫ. 20ɧɦ) ɢɥɢ
ɢɫɩɨɥɶɡɨɜɚ
ɧɢɟ ɤɥɟ
ɹ ɦɨɠɟɬ ɜɵɡɜɚɬɶ
ɩɨɜɪɟɠɞɟɧɢɟ ɫɨɟɞɢɧɟɧɢɹ ɢ ɟɝɨ ɧɟɩɥɨɬɧɨɫɬɶ.
ɉɥɢɬɚ ɧɚɫɬɪɨɟɧɚ ɡɚɜɨɞɨɦ ɧɚ ɩɢɬɚɧɢɟ
ɩɟɪɟɦɟɧɧɵɦ, ɨɞɧɨɮɚɡɧɵɦ ɬɨɤɨɦ (230ȼ ~ 50Ƚɰ)
ɢ ɨɛɨɪɭɞɨɜɚɧɚ ɩɪɢɫɨɟɞɢɧɢɬɟɥɶɧɵɦ ɩɪɨɜɨɞɨɦ.
Ⱦɨ ɩɨɞɫɨɟɞɢɧɟɧɢɹ ɩɥɢɬɵ ɤ ɪɨɡɟɬɤɟ ɩɪɨɜɟɪɶɬɟ,
ɫɨɨɬɜɟɬɫɬɜɭɟɬ ɥɢ ɨɧɚ ɷɥɟɤɬɪɢɱɟɫɤɨɣ ɦɨɳɧɨɫɬɢ
ɩɥɢɬɵ.
ɗɥɟɤɬɪɢɱɟɫɤɚɹ ɪɨɡɟɬɤɚ, ɤ ɤɨɬɨɪɨɣ ɛɭɞɟɬ
ɩɨɞɫɨɟɞɢɧɟɧɚ ɩɥɢɬɚ, ɞɨɥɠɧɚ ɛɵɬɶ ɨɛɨɪɭɞɨɜɚɧɚ
ɧɭɥɟɜɨɣ ɮɚɡɨɣ.
Achtung! Nach dem Anschließen des
Gerätes an das Gasnetz (bzw. die
Gasflasche) mit Seifenwasser
KONTROLLIEREN, ob der Anschluss
DICHT ist bzw. Gas austritt. Auf keinen
Fall einen Feuerzeug, einen Zündholz
oder offene Flamme anderer Art
ȼɧɢɦɚɧɢɟ! ɉɨɫɥɟ ɩɨɞɤɥɸɱɟɧɢɹ ɩɪɢɛɨɪɚ
ɤ ɝɚɡɨɩɪɨɜɨɞɭ ɢɥɢ ɝɚɡɨɜɨɦɭ ɛɚɥɨɧɭ
ɉɊɈɄɈɇɌɊɈɅɂɊɈȼȺɌɖ
ȽȿɊɆȿɌɂɑɇɈɋɌɖ ɫɨɟɞɢɧɟɧɢɣ ɫ
ɩɨɦɨɳɶɸ ɦɵɥɶɧɨɣ ɩɟɧɵ. ɇɢ ɜ ɤɨɟɦ
ɫɥɭɱɚɟ ɧɟ ɩɪɢɦɟɧɹɬɶ ɨɬɤɪɵɬɨɟ ɩɥɚɦɹ ɜ
ɥɸɛɨɦ ɜɢɞɟ.

12
EN
1
2
3
ADJUSTMENT TO DIFFERENT GAS TYPES
The cookers are supplied with gas burners which the
manufacturer has adjusted to natural gas used in
your country.
The type of gas is specified on the data
plate as well as in the warranty of quality. The data
plate is to find on the base or on the back of the
ɫooker.
To adjust gas burners, remove knobs of the gas
burners.
To adjust the gas burners of the oven, withdraw the
bottom of the oven cavity.
To adjust the cooker to another type of gas:
x replace a nozzle (see table 1),
x adjust the lowerer pressure of the valves
x adjust air supply to the gas burners of the oven.
1 – To replace the nozzle: screw out the nozzle (use
screw tip N° 7) and replace it with another one in
compliance with the available type of gas (see the
table 1).
2 – To adjust the burners: Switch on gas and select
“Sparing flame”. For adjustment, use a 2,5 mm-screw
tip.
3 – To replace the nozzle in the oven: See table 1 “a”
to adjust air supply correctly.
Table 1
Type of
gas
Burner: type / diameter
«ɚ»
Small Normal Big Oven
Natural gas
0,75 1,09 1,24 1,3 3
Liquid gas
0,52 0,67 0,84 0,84 10
Gas
supply
Adjusting from liquid
gas to natural gas
Adjusting from natural
gas to liquid gas
Full
flame
Nozzle burner 1
Replace in compliance
with Table 1
Nozzle burners 1
Replace in compliance
with Table 1
Saving
flame
Regulating needle 2
Screw out slightly and
adjust the flame size
Adjusting needle 2
Screw in against the
stop and check up gas
supply
Attention! (A hint for the serviceman) The
adjustment of the cooker to another gas type
should be registered at the connection
place.
Issue and attach a label with the gas type
which the cooker has been adjusted to.
13
DE RU
ANPASSUNG AN ANDERE GASARTEN
Diese Herde sind mit Gasbrennern ausgestattet, die
von der Herstellerfabrik zum Verbrennen des in
Ihrem Land benutzten Erdgases angepasst sind. Der
Gastyp ist in dem Typenschild, das an der Rückwand
des Herdes angebracht ist, angegeben.
Um die Gasbrenner einzustellen, sind Drehregler der
Gashähne abzunehmen.
Die Einstellelemente des Backofenbrenners sind
nach dem Herausschieben des
Backofenraumbodens zugänglich.
Um den Herd an eine andere Gasart anzupassen;
sind folgende Tätigkeiten auszuführen:
x Düsen auswechseln (siehe Tabelle 1 ),
x ҏreduzierten Ventildurchfluss nachstellen,
x ҏLuftzufuhr zum Backofenbrenner nachstellen.
1 - Austausch der Brennerdüse – Düse mit dem
Sondersteckschlüssel SW7 herausdrehen und gegen
eine neue Düse austauschen, welche der Gasart
entspricht (siehe Tabelle 1).
2 - Regulierung der Brenner erfolgt mittels eines 2,5
mm Regelschraubendrehers beim angezündeten
Brenner, der auf „Sparflamme“ eingestellt ist.
3 - Austausch der Brennerdüse vom Backofen.
Regulierung von Luftzufuhr (siehe Tabelle 1 «a»).
Tabelle 1
Gasart
Düse Typ / Durchmesser
«ɚ»
Spar Normal Stark Backofenbrenner
Erdgas
0,75 1,09 1,24 1,3 3
Flüssiggas
0,52 0,67 0,84 0,84 10
Brenner
Umstellung vom
Flüssiggas
auf Erdgas
Umstellung vom
Erdgas auf
Flüssiggas
Volle
Flamme
Brenndüse
1 gegen
eine entsprechende
gemäß der Tab.1
auswechseln
Brennerdüse
1 gegen
eine entsprechende
gemäß derTab.1
auswechseln
Spar
flamme
Einstellnadel 2 ein
wenig heraus-
schrauben und die
Flammengröße
nachstellen
Einstellnadel 2 leicht
bis zum Anschlag ein-
schrauben und die
Flammengröße
überprüfen
ɉɊɂɋɉɈɋɈȻɅȿɇɂȿ Ʉ ȾɊɍȽɈɆɍ Ɍɂɉɍ
ȽȺɁȺ
ɉɥɢɬɵ ɫɧɚɛɠɟɧɵ ɝɨɪɟɥɤɚɦɢ, ɧɚɫɬɪɨɟɧɧɵɦɢ
ɡɚɜɨɞɨɦ-ɩɪɨɢɡɜɨɞɢɬɟɥɟɦ ɧɚ ɩɪɢɪɨɞɧɵɣ ɝɚɡ,
ɢɫɩɨɥɶɡɭɟɦɵɣ ɜ ȼɚɲɟɣ ɫɬɪɚɧɟ. Ɍɢɩ ɝɚɡɚ ɭɤɚɡɚɧ ɧɚ
ɡɚɜɨɞɫɤɨɣ ɬɚɛɥɢɱɤɟ. Ɂɚɜɨɞɫɤɚɹ ɬɚɛɥɢɱɤɚ
ɧɚɯɨɞɢɬɫɹ ɧɚ ɡɚɞɧɟɣ ɫɬɟɧɤɟ ɩɥɢɬɵ.
ɑɬɨɛɵ ɨɬɪɟɝɭɥɢɪɨɜɚɬɶ ɝɚɡɨɜɵɟ ɝɨɪɟɥɤɢ ɩɥɢɬɵ
ɫɧɢɦɢɬɟ ɪɭɱɤɢ ɤɪɚɧɨɜ.
ɑɬɨɛɵ ɨɬɪɟɝɭɥɢɪɨɜɚɬɶ ɝɚɡɨɜɵɟ ɝɨɪɟɥɤɢ ɞɭɯɨɜɤɢ
ɧɚɞɨ ɜɵɞɜɢɧɭɬɶ ɞɧɨ ɤɚɦɟɪɵ ɞɭɯɨɜɤɢ
ɑɬɨɛɵ ɧɚɫɬɪɨɢɬɶ ɩɥɢɬɭ ɧɚ ɝɨɪɟɧɢɟ ɞɪɭɝɨɝɨ ɬɢɩɚ
ɝɚɡɚ, ɫɥɟɞɭɟɬ:
x ɡɚɦɟɧɢɬɶ ɫɨ
ɩɥɚ (ɫɦ. ɬɚɛɥɢɰɭ 1),
x ɨɬɪɟɝɭɥɢɪɨ
ɜɚɬɶ ɩɨɧɢɠɟɧɧɨɟ ɞɚɜɥɟɧɢɟ ɤɥɚɩɚɧɨɜ,
x ɨɬɪɟɝɭɥɢɪɨɜɚɬɶ ɩɨɞɚɱɭ ɜɨɡɞɭɯɚ ɝɨɪɟɥɤɢ ɞɭɯɨɜɤɢ.
1 - Ɂɚɦɟɧɚ ɢɧɠɟɤɬɨɪɚ – ɢɧɠɟɤɬɨɪ ɜɵɜɢɧɬɢɬɶ ɩɪɢ
ɩɨɦɨɳɢ ɬɨɪɰɟɜɨɝɨ ɤɥɸɱɚ ɫ ɧɚɫɚɞɤɨɣ 7 ɢ ɡɚɦɟɧɢɬɶ
ɧɚ ɧɨɜɵɣ, ɫɨɨɬɜɟɬɫɬɜɭɸɳɢɣ ɬɢɩɭ ɝɚɡɚ (ɫɦ.
ɬɚɛɥɢɰɭ 1).
2 - Ɋɟɝɭɥɢɪɨɜɤɭ ɤɪɚɧɨɜ ɧɭɠɧɨ ɩɪɨɢɡɜɨɞɢɬɶ ɩɪɢ
ɡɚɠɠɟɧɧɨɣ ɤɨɧɮɨɪɤɟ ɜ ɩɨɥɨɠɟɧɢɢ «ɷɤɨɧɨ
ɦɧɨɟ
ɩɥɚɦɹ», ɫ ɢɫɩɨɥɶɡɨɜɚɧɢɟɦ ɪɟɝɭɥɢɪɨɜɨɱɧɨɝɨ ɜɢɧɬɚ
ɜɟɥɢɱɢɧɨɣ 2,5 ɦɦ.
3 - Ɂɚɦɟɧɚ ɢɧɠɟɤɬɨ
ɪɚ ɞɭɯɨɜɤɢ – ɪɟɝɭɥɢɪɨɜɤɚ
ɩɨɞɚɱɢ ɜɨɡɞɭɯɚ (ɫɦ. ɬɚɛɥɢɰɭ 1 – «ɚ»).
Ɍɚɛɥɢɰɚ 1
Ɍɢɩ ɝɚɡɚ
Ƚɨɪɟɥɤɚ ɬɢɩ / ɞɢɚɦɟɬɪ
«ɚ»
ɦɚɥɚɹ ɇɨɪɦɚɥ. ɍɫɢɥɟɧ. ɞɭɯɨɜɤɢ
ɉɪɢɪɨɞɧɵɣ
0,75 1,09 1,24 1,3 3
ɉɪɨɩɚɧ-ɛɭɬɚɧ
0,52 0,67 0,84 0,84 10
ɉɨɞɚɱɚ
ɝɚɡɚ
ɇɚɫɬɪɨɣɤɚ ɫ
ɩɪɨɩɚɧ-ɛɭɬɚɧɚ ɧɚ
ɩɪɢɪɨɞɧɵɣ ɝɚɡ
ɇɚɫɬɪɨɣɤɚ ɫ ɩɪɢ-
ɪɨɞɧɨɝɨ ɝɚɡɚ ɧɚ
ɩɪɨɩɚɧ-ɛɭɬɚɧ
Ȼɨɥɶɲɚɹ
ɩɨɞɚɱɚ
ɝɚɡɚ
ɋɨɩɥɨ ɝɨɪɟɥɤɢ
1
ɡɚɦɟɧɢɬɟ
ɫɨɨɬɜɟɬɫɬɜɭɸɳɢɦ
Ɍɚɛɥɢɰɚ 1
ɋɨɩɥɨ ɝɨɪɟɥɤɢ
1
ɡɚɦɟɧɢɬɟ
ɫɨɨɬɜɟɬɫɬɜɭɸɳɢɦ
ɫɨɝɥɚɫɧɨ ɬɚɛɥ. 1
ɗɤɨɧɨɦɧɚɹ
ɩɨɞɚɱɚ
ɝɚɡɚ
Ɋɟɝɭɥɢɪɭɸɳɭɸ
ɢɝɥɭ 2 ɥɟɝɤɨ
ɜɵɜɢɧɬɢɬɟ ɢ
ɨɬɪɟɝɭɥɢɪɭɣɬɟ
ɩɨɞɚɱɭ ɝɚɡɚ
Ɋɟɝɭɥɢɪɭɸɳɭɸ
ɢɝɥɭ 2 ɥɟɝɤɨ ɜɜɢɧɬɢɬɟ ɞɨ ɫɨɩɪɨɬɢɜ-
ɥɟɧɢɹ ɢ
ɩɪɨɜɟɪɶɬɟ ɩɨɞɚɱɭ
ɝɚɡɚ
ȼɧɢɦɚɧɢɟ! (ɤ ɦɨɧɬɟɪɭ) ɉɟɪɟɧɚɫɬɪɨɣɤɭ
ɩɥɢɬɵ ɧɚ ɞɪɭɝɨɣ ɬɢɩ ɝɚɡɚ ɨɛɨɡɧɚɱɶɬɟ ɜ
ɫɜɢɞɟɬɟɥɶɫɬɜɟ ɩɨɞɫɨɟɞɢɧɟɧɢɹ ɩɥɢɬɵ.
ɉɨɫɥɟ ɪɟɝɭɥɢɪɨɜɤɢ ɧɭɠɧɨ ɪɚɡɦɟɫɬɢɬɶ
ɷɬɢɤɟɬɤɭ ɫ ɭɤɚɡɚɧɢɟɦ ɬɢɩɚ ɝɚɡɚ, ɧɚ ɤɨɬɨɪɵɣ
ɧɚɫɬɪɨɟɧɚ ɩɥɢɬɚ.
Achtung! (Hinweis für den Installateur) Die
Umstellung des Herdes auf eine andere
Gasart ist im Herdanschlusszeugnis zu
vermerken.
Nach der Regulierung ist das Etikett mit
dem Hinweis auf die Gasart, auf die der
Herd an
gep
asst wurde, aufzukleben.

14
EN
SAFETY CONDITIONS
x Please, keep watch over children as long as the
gas cooker is in operation. Children are
unaware of operating rules. Hot gas burners,
hot oven cavity, oven door pane, pans and pots
with hot liquid on the grid above the burners can
cause a skin-burn.
x Connection cords of electric appliances, e.g. a
mixer, should not get in contact with hot parts of
the cooker.
x Don’t put inflammable materials into the bottom
drawer of the cooker, since they can get
inflamed while the cooker is in operation.
x Keep watching the cooker while frying: oils and
fats can get inflamed due to overheating.
x If faults occur, further operation is not allowed
until the appliance has been repaired by an
authorized serviceman.
x Don’t turn on the valve of the gas inlet or gas
cylinder before you make sure that the gas
burners are switched off.
x Keep the burners clean. The overflown food or
residues must be immediately removed after the
burners get cold.
x Don’t put pans directly onto the burners.
x The weight of a pan put on the grid above a
burner should not exceed 10 kg; the total weight
of the pans over the four burners should be
max. 40 kg.
x Don’t strike the handles and the burners.
x Don’t put more than 15 kg on the open oven
door.
x Unauthorized persons are not allowed to carry
on amedments or repair the cooker.
x It is not allowed to turn on the knobs of the
burners if the electric ignition is out.
x Don’t blow out the flame of the burner!
x Users are not allowed to adjust the cookers to
different gas type on their own, move the cooker
to another place or make changes in the gas
supply system. These operations can be carried
on only by an authorized serviceman.

15
DE RU
SICHERHEITSBEDINGUNGEN
x Während des Gasherdbetriebs auf Kinder
aufpassen, weil sie über keine Kenntnisse
hinsichtlich die Herdbedienung verfügen.
Insbesondere heiße Kochstellenbrenner,
Backofenraum, Rost, Türscheibe, Kochgeschirr
mit heißer Flüssigkeit können bei Kindern
Verbrennungen verursachen.
x Es ist zu beachten, dass kein Anschlusskabel
anderer Elektrogeräte (wie z.B. eines Mixers)
mit heißen Herdteilen in Kontakt kommt.
x Leichtentflammbare Materialien dürfen nicht in
der Schublade aufbewahrt werden; während
des Backofenbetriebes könnten sie
aufflammen.
x Das Kochfeld während des Bratens nicht ohne
Aufsicht lassen. Überhitzte Öle und Fette sind
leichtentzündlich!
x Falls der Herd beschädigt wird, darf er erst
wieder benutzt werden, nachdem die
Beschädigung von einem qualifizierten
Fachmann beseitigt ist.
x Den Gasabsperhahn an der
Gasanschlussstelle bzw. an der Gasflasche
niemals öffnen ohne sicherzustellen, dass alle
Gassperventile zugedreht sind.
x Gasbrenner nicht überfluten bzw.
verunreinigen lassen. Beschmutzte
Gasbrenner sofort nach dem Abkühlen reinigen
und abtrocknen.
x Kein Geschirr direkt auf die Gasbrenner
aufstellen.
x Auf dem Rost über einem Gasbrenner kein
Geschirr aufstellen, dessen Gewicht 10 kg
überschreitet; das Gesamtgewicht vom
Geschirr, das auf dem ganzen Rost aufgestellt
ist, darf nicht mehr als 40 kg sein.
x Drehregler und Gasbrenner nicht aufschlagen.
x Keine Gegenstände auf die aufgeklappte
Backofentür stellen, die schwerer als 15 kg
sind.
x Es ist streng verboten, den Gasherd von nicht
speziell ausgebildeten Personen zu
modifizieren bzw. reparieren lassen.
x Es ist verboten, die Gasabsperhähne der
Kochstellen und des Backofens zu öffnen,
ohne ein angezündetes Streichholz oder
Gaszünder in der Hand zu haben.
x Gasbrennerflamme nie durch Blasen löschen.
x Eigenwillige Anpassung vom Gasherd an einen
anderen Gastyp, Verstellung des Herdes sowie
Einführung von Änderungen in die
Gasversorgungsleitung sind verboten. Diese
Tätigkeiten dürfen ausschließlich von einem
autorisierten Installateur durchgeführt werden.
ɍɋɅɈȼɂə ȻȿɁɈɉȺɋɇɈɋɌɂ
x ɉɨɠɚɥɭɣɫɬɚ, ɜɨ ɜɪɟɦɹ ɩɨɥɶɡɨɜɚɧɢɹ ɩɥɢɬɨɣ
ɫɥɟɞɢɬɟ ɡɚ ɞɟɬɶɦɢ, ɬɚɤ ɤɚɤ ɞɟɬɢ ɧɟ ɡɧɚɸɬ
ɩɪɢɧɰɢɩɨɜ ɨɛɫɥɭɠɢɜɚɧɢɹ ɩɥɢɬɵ. Ƚɨɪɹɱɢɟ
ɝɨɪɟɥɤɢ ɩɥɢɬɵ, ɤɚɦɟɪɚ ɞɭɯɨɜɤɢ, ɝɪɢɥɶ,
ɫɬɟɤɥɨ ɞɜɟɪɰɵ, ɫɬɨɹɳɚɹ ɩɨɫɭɞɚ ɫ ɝɨɪɹɱɟɣ
ɠɢɞɤɨɫɬɶɸ ɦɨɝɭɬ ɛɵɬɶ ɩɪɢɱɢɧɨɣ ɨɠɨɝɚ ɭ
ɪɟɛɟɧɤɚ.
x ɉɨɞɫɨɟɞɢɧɢɬɟɥɶɧɵɣ ɷɥɟɤɬɪɨɩɪɨɜɨɞ
ɦɟɯɚɧɢɱɟɫɤɨɝɨ ɨɛɨɪɭɞɨɜɚɧɢɹ ɧɚɩɪ. ɦɢɤɫɟɪɚ
ɧɟ ɞɨɥɠɟɧ ɤɚɫɚɬɶɫɹ ɝɨɪɹɱɢɯ ɱɚɫɬɟɣ ɩɥɢɬɵ.
x ɇɟ ɤɥɚɞɢɬ
ɟ ɜ ɜɵɞɜɢɠɧɨ
ɣ ɹɳɢɤ ɝɨɪɸɱɢɟ
ɦɚɬɟɪɢɚɥɵ, ɬɚɤ ɤɚɤ ɜɨ ɜɪɟɦɹ ɩɨɥɶɡɨɜɚɧɢɹ
ɩɥɢɬɨɣ ɨɧɢ ɦɨɝɭɬ ɜɨɫɩɥɚɦɟɧɢɬɶɫɹ.
x ɇɟ ɨɫɬɚɜɥɹɣɬɟ ɩɥɢɬɭ ɛɟɡ ɩɪɢɫɦɨɬɪɚ ɜɨ
ɜɪɟɦɹ ɠɚɪɟɧɶɹ. Ɇɚɫɥɚ ɢ ɠɢɪɵ ɦɨɝɭɬ
ɜɨɫɩɥɚɦɟɧɢɬɶɫɹ ɢɡ-ɡɚ ɩɟɪɟɝɪɟɜɚ!
x ȼ ɫɥɭɱɚɟ ɩɨɜɪɟɠɞɟɧɢɹ ɩɥɢɬɵ, ɞɚɥɶɧɟɣɲɚɹ
ɷɤɫɩɥɭɚɬɚɰɢɹ ɪɚɡɪɟɲɟɧɚ ɬɨɥɶɤɨ ɩɨɫɥɟ
ɩɨɥɧɨɝɨ ɭɫɬɪɚɧɟɧɢɹ ɩɨɜɪɟɠɞɟɧɢɣ
ɤɜɚɥɢɮɢɰɢɪɨɜɚɧɧɵɦ ɫɩɟɰɢɚɥɢɫɬɨɦ.
x ɇɟ ɨɬɤɪɵɜɚɣɬɟ ɤɪɚɧ ɧɚ ɜɜɨɞɟ ɝɚɡɚ ɢɥɢ
ɤɥɚɩɚɧ ɧɚ ɝɚɡɨɛɚɥɥɨɧɟ ɧɟ ɭɛɟɞɢɜɲɢɫɶ
ɩɪɟɞɜɚɪɢɬɟ
ɥɶɧɨ ɜ ɬɨɦ, ɱɬɨ ɜɫɟ ɤɪ
ɚɧɵ ɩɥɢɬɵ
ɡɚɤɪɵɬɵ.
x ɂɡɛɟɝɚɣɬɟ ɡɚɥɢɜɚɬɶ ɢ ɡɚɝɪɹɡɧɹɬɶ ɝɨɪɟɥɤɢ.
Ɂɚɝɪɹɡɧɟɧɧɵɟ ɝɨɪɟɥɤɢ ɫɥɟɞɭɟɬ ɨɱɢɫɬɢɬɶ ɢ
ɜɵɫɭɲɢɬɶ ɧɟɦɟɞɥɟɧɧɨ ɩɨɫɥɟ ɨɯɥɚɠɞɟɧɢɹ
ɩɥɢɬɵ.
x ɇɟ ɫɥɟɞɭɟɬ ɫɬɚɜɢɬɶ ɩɨɫɭɞɭ ɧɟɩɨɫɪɟɞɫɬɜɟɧɧɨ
ɧɚ ɝɨɪɟɥɤɢ.
x ɉɨɫɭɞɚ, ɫɬɨɹɳɚɹ ɧɚ ɪɟɲɺɬɤɟ ɧɚɞ ɨɞɧɨɣ ɢɡ
ɝɨɪɟɥɨɤ ɧɟ ɞɨɥɠɧɚ ɩɪɟɜɵɲɚɬɶ ɦɚɫɫɭ 10 ɤɝ, ɚ
ɨɛɳɢɣ ɜɟɫ ɩɨɫɭɞɵ ɧɚ ɜɫɟɯ ɪɟɲɺɬɤɚɯ ɦɚɫɫɭ
ɫɜɵɲɟ 40 ɤɝ .
x ɇɟ ɫɥɟɞɭɟɬ ɫɬɭɱɚɬɶ ɩɨ ɪɭɱɤɚɦ ɢ ɝɨɪɟɥɤɚɦ.
x ɇɟ ɫɥɟɞɭɟɬ ɫɬɚɜɢɬɶ ɩɪɟɞɦɟ
ɬɵ ɦɚɫɫɨɣ
ɛɨɥɶɲɟ 15 ɤɝ ɧɚ ɨɬɤɪɵɬɭɸ ɞɜɟɪɰɭ ɞɭɯɨɜɤɢ.
x Ɂɚɩɪɟɳɚɟɬɫɹ ɫɨɜɟɪɲɚɬɶ ɦɨɞɢɮɢɤɚɰɢɸ ɢ
ɪɟɦɨɧɬ ɩɥɢɬɵ ɥɢɰɚɦɢ, ɛɟɡ
ɩɪɨɮɟɫɫɢɨɧɚɥɶɧɨɣ ɩɨɞɝɨɬɨɜɤɢ.
x Ɂɚɩɪɟɳɚɟɬɫɹ ɨɬɤɪɵɜɚ
ɬɶ ɤɪɚɧɵ ɩɥɢɬɵ ɛɟɡ
ɜɤɥɸɱɟɧɧɨɝ
ɨ ɷɥɟɤɬɪɨɩɨɞɠɢɝɚ ɢɥɢ ɡɚɠɠɟɧɨɣ
ɫɩɢɱɤɢ.
x Ɂɚɩɪɟɳɚɟɬɫɹ ɡɚɞɭɜɚɬɶ ɩɥɚɦɹ ɝɨɪɟɥɤɢ.
x Ɂɚɩɪɟɳɚɟɬɫɹ ɫɚɦɨɫɬɨɹɬɟɥɶɧɨ ɫɨɜɟɪɲɚɬɶ
ɧɚɫɬɪɨɣɤɭ ɩɥɢɬɵ ɧɚ ɞɪɭɝɨɣ ɬɢɩ ɝɚɡɚ,
ɩɟɪɟɧɨɫɢɬɶ ɩɥɢɬɭ ɧɚ ɞɪɭɝɨɟ ɦɟɫɬɨ, ɚ ɬɚɤɠɟ
ɫɨɜɟɪɲɚɬɶ ɢɡɦɟɧɟɧɢɹ ɜ ɫɢɫɬɟɦɟ ɩɢɬɚɧɢɹ.
ɗɬɢ ɨɩɟɪɚɰɢɢ ɦɨɝɭɬ ɛɵɬɶ ɫɨɜɟɪɲɟɧɵ ɬɨɥɶɤɨ
ɤɜɚɥɢɮɢɰɢɪɨɜɚɧɧɵɦ ɫɩɟɰɢɚɥɢɫɬɨɦ.

16
EN
x Don’t let children and persons who are not
informed about the operation instructions to
operate the cooker.
x Watch the pans while boiling in order not to
extinguish the burners.
In case of gas leak, it is not allowed:
to strike a match, smoke, switch on and off an
electric receiver (a door bell, a light switch) as well
as use other electrical or mechanical appliances
which can cause electric or chugging spark. In this
case, immediately shut off gas supply (turn off the
valve of the gas cylinder or the switch which cuts off
the connection to the gas supply), air the room and
contact an authorized person.
x Don’t attach any cables to the gas appliance.
x If the gas leaking out of a nontight junction gets
inflamed, immediately cut off the gas supply by
turning off the valve of the gas cylinder or the
switch which disconnects gas supply).
x In case of damage: air the room, disconnect the
appliance from the power supply and repair the
fault.
x If the gas leaking out of the nontight junction of
the gas cylinder gets inflamed, wrap the cylinder
with a wet blanket to extinguish the flame and
turn off the valve (stopcock) of the gas cylinder.
Further use of the damaged gas cylinder is not
allowed.
x If you don’t use the gas cooker for a few days,
disconnect it from the gas supply by turning off
the stop valve. In case of a gas cylinder, turn off
the stopcock every time after the use.
The gas supply should provide the cooker with
the type of gas it has been adjusted to in plant.
Information about the gas type which the
cooker has been adjusted to is registered on the
data plate on the cookers back.

17
DE RU
x Kleinen Kindern und Personen, welche mit der
Gebrauchsanweisung des Gasherdes nicht
vertraut sind, den Gasherd nicht bedienen
lassen.
x Während des Kochens beachten Sie, dass
Übergelaufenes die Gasbrenner nicht ablöscht.
Im Falle eines Gasleckverdachtes ist folgendes
untersagt:
Streichhölzer anzünden, Zigaretten rauchen,
Elektrogeräte ein- und ausschalten (Klingel- und
Lichtschalter) sowie sonstige elektrische und
mechanische Geräte benutzen, die Elektro- und
Schlagfunkentstehung verursachen können. In so
einem Fall muss der Gasabsperrhahn der
Gasanschlussleitung bzw. der Gasflasche sofort
zugedreht und der Raum gelüftet werden; danach
muss die Schadensursache von einem
autorisierten Fachmann beseitigt werden.
x Keine Erdungsleitungen dürfen an die
Gasanschlussleitung angeschlossen werden.
x Falls sich das aus einer undichten
Gasinstallation entweichende Gas entzündet,
ist der Gaszulauf mittels des
Gasabsperrhahnes sofort abzusperren.
x In jeder Situation, wo eine technische Störung
auftritt, ist der Herd von der Stromversorgung
unbedingt zu trennen (wobei das
obenangeführte Prinzip zu beachten ist) und
die Störung bei einer autorisierten
Reparaturstelle anzumelden.
x Falls sich das aus einem undichten
Gasflaschenventil entweichende Gas
entzündet, ist die Gasflasche mit einer feuchten
Decke zu bedecken, um die Flamme zu
löschen und die Gasflasche abzukühlen.
Wiedergebrauch einer beschädigten
Gasflasche ist streng verboten.
x Falls der Gasherd einige Tage nicht genutzt
werden soll, ist der Hauptabsperrhahn der
Gasanschlußleitung zuzumachen. Wenn der
Gasherd von einer Gasflasche versorgt wird,
muss das Gasflaschenventil nach jedem
Gebrauch zugedreht werden.
Ihr Gasherd soll an die Gasanschlußleitung
angeschlossen werden, welche mit der Gasart
versorgt ist, für die Ihr Gasherd werksseitig
ausgelegt ist. Die Information über die Gasart,
an die Ihr Gasherd werksseitig angepasst
worden ist, ist dem Typenschild zu entnehmen.
Das Typenschild befindet sich auf der
Rückwand des Gerätes.
x ɇɟ ɞɨɩɭɫɤɚɣɬɟ ɤ ɩɥɢɬɟ ɦɚɥɵɯ ɞɟɬɟɣ, ɚ ɬɚɤɠɟ
ɥɢɰ, ɧɟ ɨɡɧɚɤɨɦɥɟɧɧɵɯ ɫ ɪɭɤɨɜɨɞɫɬɜɨɦ ɩɨ
ɷɤɫɩɥɭɚɬɚɰɢɢ ɩɥɢɬɵ.
x Ɉɛɪɚɬɢɬɟ ɜɧɢɦɚɧɢɟ ɧɚ ɦɨɦɟɧɬ ɤɢɩɹɱɟɧɢɹ,
ɱɬɨɛɵ ɧɟ ɡɚɥɢɬɶ ɝɨɪɟɥɤɢ.
ȼ ɫɥɭɱɚɟ ɩɨɞɨɡɪɟɧɢɹ ɭɬɟɱɤɢ ɝɚɡɚ ɧɟɥɶɡɹ:
ɡɚɠɢɝɚɬɶ ɫɩɢɱɤɢ, ɤɭɪɢɬɶ, ɜɤɥɸɱɚɬɶ ɢ ɜɵɤɥɸɱɚɬɶ
ɷɥɟɤɬɪɨɩɪɢɟɦɧɢɤɢ (ɡɜɨɧɨɤ ɢɥɢ ɜɤɥɸɱɚɬɟɥɶ
ɨɫɜɟɳɟɧɢɹ), ɚ ɬɚɤɠɟ ɩɨɥɶɡɨɜɚɬɶɫɹ ɞɪɭɝɢɦɢ
ɷɥɟɤɬɪɢɱɟɫɤɢɦɢ ɢ ɦɟɯɚɧɢɱɟɫɤɢɦɢ ɭɫ
ɬɪ
ɨɣɫɬɜɚɦɢ, ɜɵɡɵɜɚɸɳɢɦɢ ɨɛɪɚɡɨɜɚɧɢɟ ɷɥɟɤɬɪɢɱɟɫɤɨɣ ɢɥɢ ɬɨɥɱɤɨɨɛɪɚɡɧɨɣ ɢɫɤɪɵ. ȼ ɬɚɤɨɦ
ɫɥɭɱɚɟ ɫɥɟɞɭɟɬ ɧɟɦɟɞɥɟɧɧɨ ɩɟɪɟɤɪɵɬɶ ɩɨɞɚɱɭ
ɝɚɡɚ (ɩɟɪɟɤɪɵɬɶ ɤɥɚɩɚɧ ɧɚ ɝɚɡɨɛɚɥɥɨɧɟ ɢɥɢ
ɤɪɚɧ, ɨɬɫɟɤɚɸɳɢɣ ɩɨɞɚɱɭ ɝɚɡɚ) ɢ ɩɪɨɜɟɬɪɢɬɶ
ɩɨɦɟɳɟɧɢɟ, ɚ ɡɚɬɟɦ ɜɵɡɜɚɬɶ ɥɢɰɨ, ɢɦɟɸɳɟɟ
ɩɪɚɜɨ ɧɚ ɭɫɬɪɚɧɟɧɢɟ ɬɚɤɨɝɨ ɪɨɞɚ ɩɪɢɱɢɧ.
x ɇɟ ɫɥɟɞɭɟɬ ɩɨɞɫɨɟɞɢɧɹɬɶ ɤ ɝɚɡɨɜɨɣ
ɭɫɬɚɧɨɜɤɟ ɧɢɤɚɤɢɯ ɩɪɨɜɨɞɨɜ.
x ȼ ɫɥɭɱɚɟ ɜɨɫɩɥɚɦɟɧɟɧɢɹ ɝɚɡɚ, ɜɵɬɟɤɚɸɳɟɝɨ
ɢɡ ɧɟɩɥɨɬɧɨɣ ɭɫɬɚɧɨɜɤɢ, ɫɥɟɞɭɟɬ
ɧɟɦɟɞɥɟɧɧɨ ɩɟɪɟɤɪɵɬɶ ɩɨɞɚɱɭ ɝɚɡɚ ɩɪɢ
ɩɨɦɨɳɢ ɡɚ
ɩɨɪɧɨɝɨ ɤɥɚɩɚɧɚ ɧɚ ɝɚɡɨɛɚɥɥɨɧɟ
ɢɥɢ ɤɪɚɧɚ, ɨɬɫɟɤɚɸɳɟɝɨ ɩɨɞɚɱɭ ɝɚɡɚ
x ȼ ɤɚɠɞɨɦ ɫɥɭɱɚɟ, ɜɵɡɜɚɧɧɨɦ ɬɟɯɧɢɱɟɫɤɢɦɢ
ɧɟɢɫɩɪɚɜɧɨɫɬɹɦɢ, ɫɥɟɞɭɟɬ ɨɛɹɡɚɬɟɥɶɧɨ
ɨɬɤɥɸɱɢɬɶ ɷɥɟɤɬɪɨɩɢɬɚɧɢɟ ɩɥɢɬɵ,
ɩɪɟɞɜɚɪɢɬɟɥɶɧɨ ɩɪɨɜɟɬɪɢɜ ɩɨɦɟɳɟɧɢɟ ɢ
ɭɫɬɪɚɧɢɬɶ ɧɟɞɨɫɬɚɬɨɤ.
x ȼ ɫɥɭɱɚɟ ɜɨɫɩɥɚɦɟɧɟɧɢɹ ɝɚɡɚ, ɜɵɬɟɤɚɸɳɟɝɨ
ɢɡ ɧɟɩɥɨɬɧɨɝɨ ɤɥɚɩɚɧɚ ɧɚ ɝɚɡɨɛɚ
ɥɥɨɧɟ, ɫɥɟ-
ɞɭɟɬ: ɧɚ ɛɚɥɥɨɧ ɧɚɤ
ɢɧɭɬɶ ɦɨɤɪɨɟ ɨɞɟɹɥɨ
ɞɥɹ ɨɯɥɚɠɞɟɧɢɹ ɛɚɥɥɨɧɚ, ɡɚɜɟɪɧɭɬɶ ɤɥɚɩɚɧ
ɧɚ ɝɚɡɨɛɚɥɥɨɧɟ. Ɂɚɩɪɟɳɚɟɬɫɹ ɜɬɨɪɢɱɧɨ
ɷɤɫɩɥɭɚɬɢɪɨɜɚɬɶ ɩɨɜɪɟɠɞɟɧɧɵɣ ɛɚɥɥɨɧ.
x ȼ ɫɥɭɱɚɟ ɩɟɪɟɪɵɜɚ ɜ ɩɨɥɶɡɨɜɚɧɢɢ ɩɥɢɬɨɣ,
ɩɪɨɞɨɥɠɚɸɳɟɝɨɫɹ ɧɟɫɤɨɥɶɤɨ ɞɧɟɣ, ɫɥɟɞɭɟɬ
ɩɟɪɟɤɪɵɬɶ ɫɬɨɩɨɪɧɵɣ ɤɪɚɧ ɩɨɞɚɱɢ ɝɚɡɚ, ɚ
ɩɪɢ ɩɨɥɶɡɨɜɚɧɢɢ ɝɚɡɨɛɚɥɥɨɧɨɦ – ɤɚɠɞɵɣ
ɪɚɡ ɩɨɫɥɟ ɢɫɩɨɥɶɡɨɜɚɧɢɹ.
ɉɥɢ
ɬɚ ɞɨɥɠɧɚ ɛɵɬ
ɶ ɩɨɞɫɨɟɞɢɧɟɧɚ ɤ ɬɚɤɨɦɭ
ɠɟ ɬɢɩɭ ɝɚɡɚ, ɧɚ ɤɨɬɨɪɵɣ ɨɧɚ ɧɚɫɬɪɨɟɧɚ
ɡɚɜɨɞɨɦ. ɂɧɮɨɪɦɚɰɢɹ ɨ ɬɢɩɟ ɝɚɡɚ, ɧɚ
ɤɨɬɨɪɵɣ ɩɥɢɬɚ ɧɚɫɬɪɨɟɧɚ ɡɚɜɨɞɨɦ,
ɧɚɯɨɞɢɬɫɹ ɧɚ ɡɚɜɨɞɫɤɨɣ ɬɚɛɥɢɱɤɟ ɧɚ ɡɚɞɧɟɣ
ɫɬɟɧɤɟ ɩɥɢɬɵ.
18
EN
BRIEF DESCRIPTION
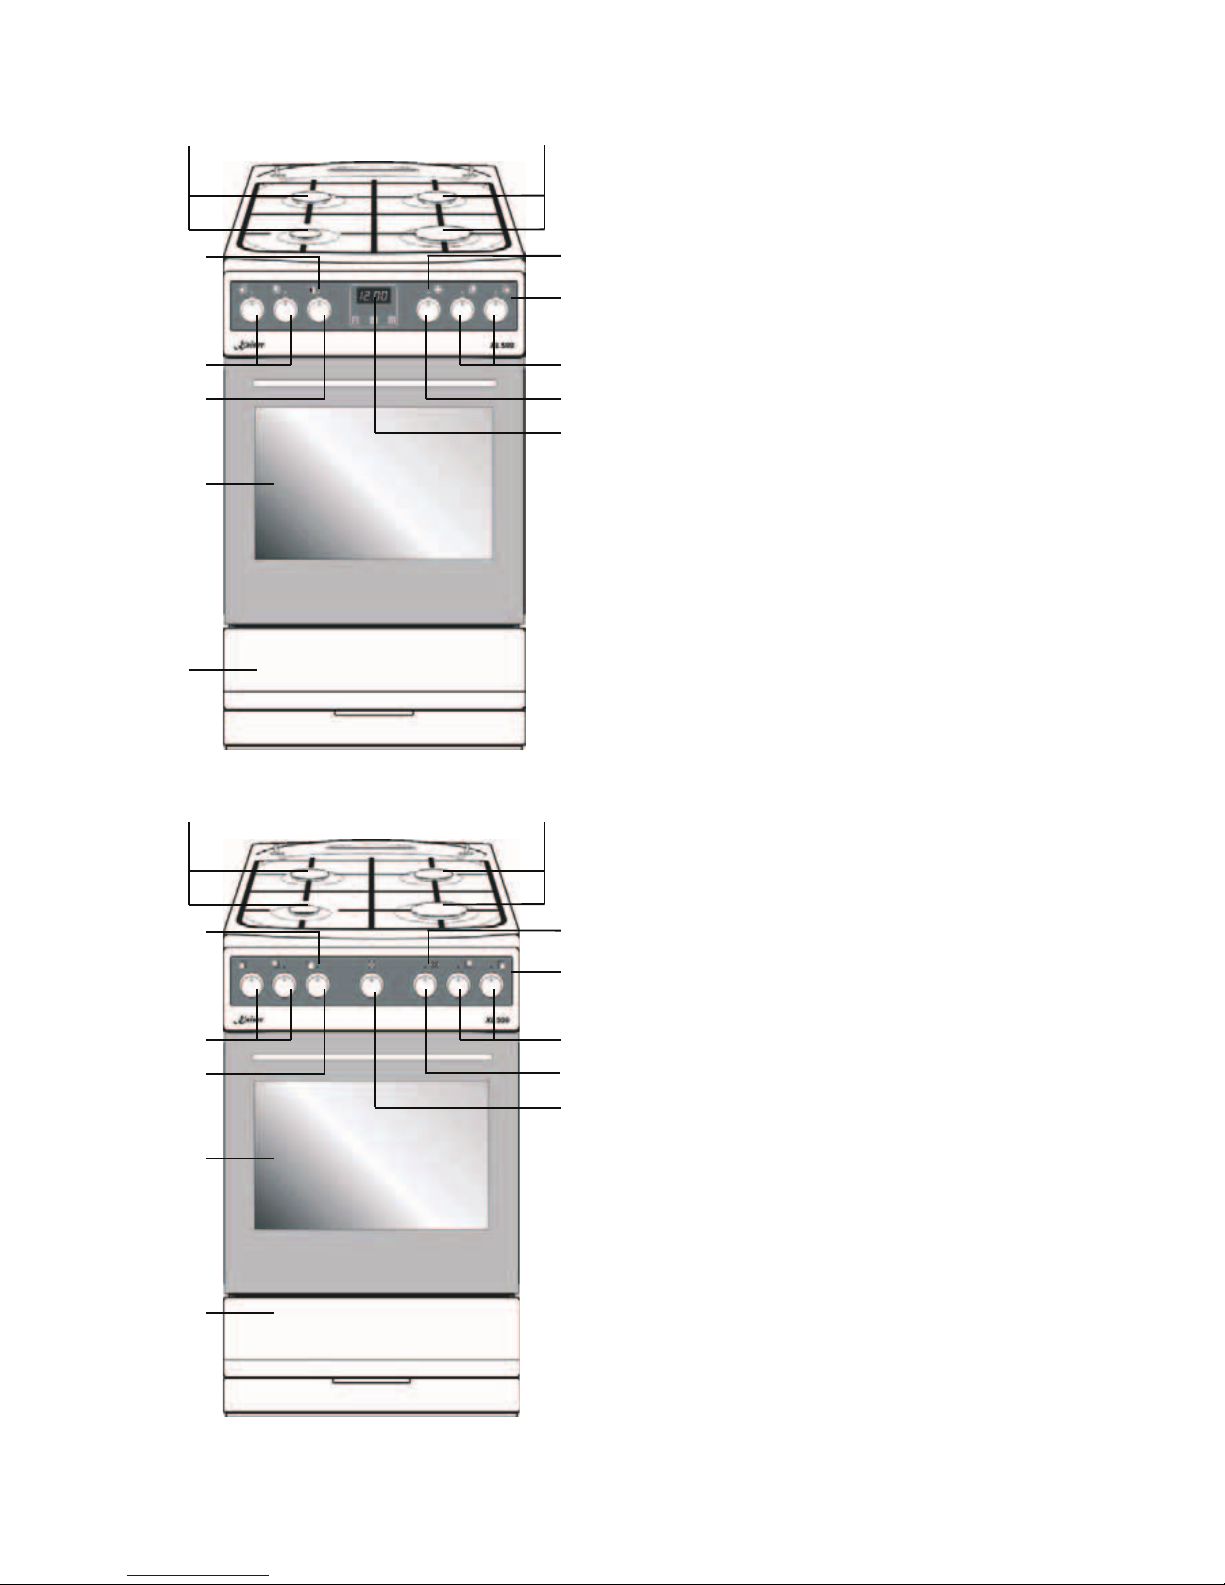
LOCATION DRAWING
Arrangement of functional assemblies
1 Gas burners
2 Knobs of the gas burners control
3 Knobs of the oven temperature control
4 Knobs of the oven operating functions
5 Pilot light ON / OUT (yellow)
6 Oven door
7 Drawer
8 Oven temperature - pilot light (red)
9 Control panel
10 Electronic timer
11 Timer
Depending on the technical equipment, different models are provided
with different control panels
and relevantly arranged operating
elements.
1
1
2
3
6
7
8 5
2
9
4
10
2
3
6
8 5
2
9
4
11
1 1
7

19
DE RU
KURZBESCHREIBUNG
GESAMTANSICHT
Anordnung von Funktionsbaugruppen
1 Gasbrenner
2 Drehregler für Kochstellbrennern
3 Backofen- Temperaturwähler
4 Drehregler des Backofenbetriebsfunktionen
5 Betrieb - Kontrollleuchte ON/OFF (gelb)
6 Backofen
7 Schublade
8 Backofentemperatur - Kontrolleuchte (rot)
9 Bedienblende
10 Digitale Zeitschaltuhr
11 Taimer
Verschiedene Modelle, je nach ihrer technischen Ausrüstung, sind mit
verschiedenen Bedienblenden versehen, an denen die
Bedienelemente sinnvoll angeordnet sind.
ɄɊȺɌɄɈȿ ɈɉɂɋȺɇɂȿ
ȼɇȿɒɇɂɃ ȼɂȾ
ɉɪɢɦɟɪɧɨɟ ɪɚɡɦɟɳɟɧɢɟ ɮɭɧɤɰɢɨɧɚɥɶɧɵɯ
ɭɡɥɨɜ
1 Ƚɨɪɟɥɤɢ ɩɥɢɬɵ
2 Ɋɭɱɤɢ ɧɚɝɪɟɜɚɬɟɥɶɧɵɯ ɩɨɥɟɣ
3 Ɋɭɱɤɚ ɬɟɪɦɨɪɟɝɭɥɹɬɨɪɚ ɞɭɯɨɜɤɢ
4 Ɋɭɱɤɚ ɪɟɠɢɦɚ ɪɚɛɨɬɵ ɞɭɯɨɜɤɢ (ɪɚɛɨɱɢɯ
ɮɭɧɤɰɢɣ)
5 Ʉɨɧɬɪɨɥɶɧɚɹ ɥɚɦɩɨɱɤɚ ɪɚɛɨɬɵ ɩɥɢɬɵ
(ɠɟɥɬɚɹ)
6 Ⱦɭɯɨɜɨɣ ɲɤɚɮ
7 ȼɵɞɜɢɠɧɨɣ ɹɳɢɤ
8 Ʉɨɧɬɪɨɥɶɧɚɹ ɥɚɦɩɨɱɤɚ ɬɟɦɩɟɪɚɬɭɪɵ
ɞɭɯɨɜɤɢ (ɤɪɚɫɧɚɹ)
9 ɉaɧeɥɶ ɭɩɪɚɜɥɟɧɢɹ
10 ɉɪɨɝɪɚɦɦɢɪɭɸɳɟɟ ɭɫɬɪɨɣɫɬɜɨ
11 Ɇɢɧɭɬɧɢɤ
Ɉɬɞɟɥɶɧɵɟ ɦɨɞɟɥɢ, ɜ ɡɚɜɢɫɢɦɨɫɬɢ ɨɬ ɢɯ ɬɟɯɧɢɱɟɫɤɨɝɨ
ɨɛɨɪɭɞɨɜɚɧɢɹ, ɢɦɟɸɬ ɪɚɡɥɢɱɧɵɟ ɩɚɧɟɥɢ ɭɩɪɚɜɥɟɧɢɹ ɫ
ɫɨɨɬɜɟɬɫɬɜɟɧɧɨ ɪɚɡɦɟɳɟɧɧɵɦɢ ɧɚ ɧɢɯ ɷɥɟɦɟɧɬɚɦɢ ɭɩɪɚɜɥɟɧɢɹ.

20
EN
CONTROL PANEL
Models XL 500: Control Panel
with mechanical Timer
Models XL 500: Control Panel
with electronic sensor timer
1. Knobs of gas burners
2. Knob of the oven temperature control
3. Knob of the oven operating functions
4. Control light ON/OFF (yellow)
5. Oven operation - Control light (red)
6. Timer (if available)
7. Digital programming device
8. Button « - »
9. Button “Function selection”
10. Button « + »
1
4
2
6 3
1
5
1
2
1
4 5 7
3
8 9
10

21
DE RU
BEDIENBLENDE
Bedienblende von Modellen XL 500
mit Kurzzeitwecker
Bedienblende von Modellen XL 500
mit elektronischer Zeitschaltuhr mit
Sensorbedienung
1.
Drehregler
für Gasbrenner
2. Drehregler “Backofentemperatur”
3. Drehregler “Backofenbetriebsfunktionen”
oder „Backofenlicht“
4. Kontrollleuchte ON/OFF (gelb)
5. Backofenbetrieb Kontrollleuchte (rot)
6. Kurzzeitwecker (falls vorhanden)
7. Digitale Zeitschaltuhr
8. Drucktaste « - »
9. Betriebdrucktaste
10. Drucktaste « + »
ɉȺɇȿɅɂ ɍɉɊȺȼɅȿɇɂə
ɉɚɧɟɥɢ ɭɩɪɚɜɥɟɧɢɹ ɦɨɞɟɥɟɣ XL 500 ɫ
ɦɢɧɭɬɧɢɤɨɦ
ɉɚɧɟɥɢ ɭɩɪɚɜɥɟɧɢɹ ɦɨɞɟɥɟɣ XL 500
ɫ ɫɟɧɫɨɪɧɵɦ ɷɥɟɤɬɪɨɧɧɵɦ
ɩɪɨɝɪɚɦɦɢɪɭɸɳɢɦ ɭɫɬɪɨɣɫɬɜɨɦ
1 Ɋɭɱɤɢ ɭɩɪɚɜɥɟɧɢɹ ɝɚɡɨɜɵɦɢ
ɝɨɪɟɥɤɚɦɢ
2 Ɋɭɱɤɚ “Ɍɟɪɦɨɪɟɝɭɥɹɬɨɪɚ ɞɭɯɨɜɤɢ”
3 Ɋɭɱɤɚ “Ɋɟɠɢɦ ɪɚɛɨɬɵ ɞɭɯɨɜɤɢ” ɢɥɢ
„Ɉɫɜɟɳɟɧɢɟ ɞɭɯɨɜɤɢ“
4 Ʉɨɧɬɪɨɥɶɧɚɹ ɥɚɦɩɨɱɤɚ ȼɤɥ/ȼɵɤɥ ( ɠɟɥɬ.)
5 Ʉɨɧɬɪɨɥɶɧɚɹ ɥɚɦɩɨɱɤɚ ɪɚɛɨɬɵ ɞɭɯɨɜɤɢ
(ɤɪɚɫɧ.)
6 Ɇɢɧɭɬɧɢɤ (ɩɪɢ ɧɚɥɢɱɢɢ)
7 Ⱦɢɝɢɬɚɥɶɧɨɟ ɩɪɨɝɪɚɦɦɢɪɭɸɳɟɟ
ɭɫɬɪɨɣɫɬɜɨ
8 Ʉɧɨɩɤɚ « - »
9 Ʉɧɨɩɤɚ ɜɵɛɨɪɚ ɮɭɧɤɰɢɣ
10 Ʉɧɨɩɤɚ « + »

22
EN
EQUIPMENT
GAS BURNERS AND RELEVANT
OPERATING ELEMENTS
HGG 50501*, HGG 50511*, HGG 50521*,
HGG 50531*
1
-
Knob of the gas burner
in front (left) 1,0
kW
2
-
Knob of the gas burner
behind (left)
1,8 kW
3
-
Knob of the gas burner
behind (right)
1,8 kW
4
-
Knob of gas burner
in front (right ) 2,8 kW
HGE 50301*, HGE 50302*
1
-
Knob of the gas burner
in front (left) 1,0
kW
2 -
Knob of the electrical cooking zone
behind (left)
Ø180 mm 1,2 kW
3
-
Knob of the gas burner
behind (right)
1,8 kW
4
-
Knob of the gas burner
in front (right) 2,8 kW
HGE 50508...
1
–
Knob of the gas burner
in front (left)
1,0
kW
2
-
Knob of the gas burners
behind (left)
1,8 kW
3
-
Knob of the gas burner
behind (right)
1,8 kW
4
-
Knob of the gas burner
in front (right) 2,8 kW
HGE 50306...
1
-
Knob of the gas burner
in front (left) 1,0
kW
2 -
Knob of the electrical cooking zone
behind (left)
Ø180 mm 1,2 kW
3
-
Knob of the gas burner
behind (right)
1,8 kW
4
-
Knob of the gas burner
in front (right) 2,8 kW
* - Modifikation
3
3
4
3
4
4
3
4
43
3
4

23
DE RU
AUSSTATUNG
KOCHFELD MIT GASBRENNERN
HGG 50501*, HGG 50511*, HGG 50521*,
HGG 50531*
1
- Drehregler für
Gasbrenner
vorne links
1,0
kW
2
- Drehregler für
Gasbrenner
hinten links
1,8 kW
3
- Drehregler für
Gasbrenner
hinten rechts
1,8 kW
4
- Drehregler für
Gasbrenner
vorne rechts
2,8
kW
HGE 50301*, HGE 50302*
1 -
Drehregler
für
Gasbrenner
vorne links
1,0
kW
2 -
Drehregler
für Elektrokochfeld hinten links
Ø180 mm 1,2 kW
3
- Drehregler für
Gasbrenner
hinten rechts
1,8 kW
4
- Drehregler für
Gasbrenner
vorne rechts
2,8
kW
HGE 50508...
1
- Drehregler für
Gasbrenner
vorne links
1,0
kW
2
- Drehregler für
Gasbrenner
hinten links
1,8 kW
3
- Drehregler für
Gasbrenner
hinten rechts
1,8 kW
4
- Drehregler für
Gasbrenner
vorne rechts
2,8
kW
HGE 50306...
1 -
Drehregler
für
Gasbrenner
vorne links
1,0
kW
2 -
Drehregler
für Elektrokochfeld hinten links
Ø180 mm 1,2 kW
3
- Drehregler für
Gasbrenner
hinten rechts
1,8 kW
4
- Drehregler für
Gasbrenner
vorne rechts
2,8
kW
* - Die Modifikationen
ɈȻɈɊɍȾɈȼȺɇɂȿ
ȼȺɊɈɑɇȺə ɉɈȼȿɊɏɇɈɋɌɖ ɋ
ȽȺɁɈȼɕɆɂ ȽɈɊȿɅɄȺɆɂ
HGG 50501*, HGG 50511*, HGG 50521*,
HGG 50531*
1 - Ɋɭɱɤɚ ɭɩɪɚɜɥɟɧɢɹ ɝɚɡɨɜɨɣ ɝɨɪɟɥɤɨɣ
- ɩepeɞɧɹɹ ɥɟɜɚɹ
1,0
ɤȼɬ
2 - Ɋɭɱɤɚ ɭɩɪɚɜɥɟɧɢɹ ɝɚɡɨɜɨɣ ɝɨɪɟɥɤɨɣ
- ɡɚɞɧɹɹ ɥɟɜɚɹ 1,8 ɤȼɬ
3 - Ɋɭɱɤɚ ɭɩɪɚɜɥɟɧɢɹ ɝɚɡɨɜɨɣ ɝɨɪɟɥɤɨɣ
- ɡɚɞɧɹɹ ɩɪɚɜɚɹ 1,8 ɤȼɬ
4 - Ɋɭɱɤɚ ɭɩɪɚɜɥɟɧɢɹ ɝɚɡɨɜɨɣ ɝɨɪɟɥɤɨɣ
- ɩɟɪɟɞɧɹɹ ɩɪɚɜɚɹ
2,8
ɤȼɬ
HGE 50301*, HGE 50302*
1 - Ɋɭɱɤɚ ɭɩɪɚɜɥɟɧɢɹ ɝɚɡɨɜɨɣ ɝɨɪɟɥɤɨɣ
- ɩepeɞɧɹɹ ɥɟɜɚɹ
1,0
ɤȼɬ
2 - Ɋɭɱɤɚ ɭɩɪɚɜɥɟɧɢɹ ɷɥ. ɧɚɝɪɟɜɚɬɟɥɶɧɵɦ
ɩɨɥeɦ - ɡɚɞɧɟɟ ɥɟɜɨɟ
Ø180 mm 1,2 ɤȼɬ
3 - Ɋɭɱɤɚ ɭɩɪɚɜɥɟɧɢɹ ɝɚɡɨɜɨɣ ɝɨɪɟɥɤɨɣ
- ɡɚɞɧɹɹ ɩɪɚɜɚɹ 1,8 ɤȼɬ
4 - Ɋɭɱɤɚ ɭɩɪɚɜɥɟɧɢɹ ɝɚɡɨɜɨɣ ɝɨɪɟɥɤɨɣ
- ɩɟɪɟɞɧɹɹ ɩɪɚɜɚɹ
2,8
ɤȼɬ
HGE 50508...
1 - Ɋɭɱɤɚ ɭɩɪɚɜɥɟɧɢɹ ɝɚɡɨɜɨɣ ɝɨɪɟɥɤɨɣ
- ɩepeɞɧɹɹ ɥɟɜɚɹ
1,0
ɤȼɬ
2 - Ɋɭɱɤɚ ɭɩɪɚɜɥɟɧɢɹ ɝɚɡɨɜɨɣ ɝɨɪɟɥɤɨɣ
- ɡɚɞɧɹɹ ɥɟɜɚɹ 1,8 ɤȼɬ
3 - Ɋɭɱɤɚ ɭɩɪɚɜɥɟɧɢɹ ɝɚɡɨɜɨɣ ɝɨɪɟɥɤɨɣ
- ɡɚɞɧɹɹ ɩɪɚɜɚɹ 1,8 ɤȼɬ
4 - Ɋɭɱɤɚ ɭɩɪɚɜɥɟɧɢɹ ɝɚɡɨɜɨɣ ɝɨɪɟɥɤɨɣ
- ɩɟɪɟɞɧɹɹ ɩɪɚɜɚɹ
2,8
ɤȼɬ
HGE 50306...
1 - Ɋɭɱɤɚ ɭɩɪɚɜɥɟɧɢɹ ɝɚɡɨɜɨɣ ɝɨɪɟɥɤɨɣ
- ɩepeɞɧɹɹ ɥɟɜɚɹ
1,0
ɤȼɬ
2 - Ɋɭɱɤɚ ɭɩɪɚɜɥɟɧɢɹ ɷɥ. ɧɚɝɪɟɜɚɬɟɥɶɧɵɦ
ɩɨɥeɦ - ɡɚɞɧɟɟ ɥɟɜɨɟ
Ø180 mm 1,2 ɤȼɬ
3 - Ɋɭɱɤɚ ɭɩɪɚɜɥɟɧɢɹ ɝɚɡɨɜɨɣ ɝɨɪɟɥɤɨɣ
- ɡɚɞɧɹɹ ɩɪɚɜɚɹ 1,8 ɤȼɬ
4 - Ɋɭɱɤɚ ɭɩɪɚɜɥɟɧɢɹ ɝɚɡɨɜɨɣ ɝɨɪɟɥɤɨɣ
- ɩɟɪɟɞɧɹɹ ɩɪɚɜɚɹ
2,8
ɤȼɬ
* - Ɇɨɞɢɮɢɤɚɰɢɢ

24
EN
GAS COOKING ZONES CONTROL
Before using your new appliance, we ask you to do
the following:
x Read carefully the operating instructions and
safity conditions.
x Remove the packaging, empty the drawer,
clean the oven cavity in order to eliminate
preservative agents.
x Check up functional efficiency of the stop
valves (installation junction and that of the
cooker) as well as the other control units.
x Heat up the oven (at 250° C for 30 min.)
x Service the cooker only in case of duly
ventilation.
The cooking zones control is achieved by means
of knobs 1, 2, 3 and 4 set up on the control panel
of the cooker.
All gas cookers XL 500 are provided with the
system of electrical ignition operated by means of
knobs.
To switch on a gas burner:
x Press the corresponding knob of the selected
burner against the stop and turn it to the left up
to the position strong gas supply.
x Keep the switch pressed till the burner ignites.
x After the burner has ignited, let the knob go
and select the required flame volume (e.g.
sparing flame).
x To switch off the burner after the food is ready
turn on the knob to the right (position “off”).
If your appliance is provided with gas control
system for the burners and the oven, to ignite a
burner press the knob against the stop and
keep it in the position “strong gas supply” to
activate the control system.
Attention! It is not allowed to adjust gas
supply between the position burner off
and the position strong gas supply
 Loading...