

Page 1
VW 70 Plus
Operating Instructions
Before first use of the unit
read these operating instructions
and act in accordance with them.
59652360 (12/13)
Page 2
2
Page 3
Contents
Proper use . . . . . . . . . . . . . . . . . . . .3
Safety instructions . . . . . . . . . . . . . .3
Start up. . . . . . . . . . . . . . . . . . . . . . .5
Finish up your work / clean appliance . . .7
Troubleshooting . . . . . . . . . . . . . . . .7
Special accessories . . . . . . . . . . . . .8
Technical specifications . . . . . . . . . .8
Disposing of old device and battery
pack . . . . . . . . . . . . . . . . . . . . . . . . .8
Customer Service. . . . . . . . . . . . . . .9
Dear Customer,
Please read and comply with
these original instructions
prior to the initial operation of your appliance and store them for later use or
subsequent owners.
Proper use
– Use this battery operated ap-
pliance only for personal use,
for cleaning moist, smooth
surfaces such as windows,
mirrors or tiles. Not meant for
the vacuum of dust.
– The appliance is not intended
to vacuum up larger amounts
of fluids from horizontal surfaces, such as from a tipped
drinking glass (max. 25 ml).
– Only use this appliance with
conventional window cleaners (no spirit, no foam cleaners).
– We recommend: Window
cleaner concentrate made by
KÄRCHER (see chapter "Ac-
cessories").
Any use extending beyond this
is not considered as proper use.
The manufacturer is not liable
for any losses resulting from
this; the user alone bears the
risk for this.
Safety instructions
This appliance is not intended
for use by persons with limited physical, sensory or mental capacities or lacking experience and/or skills, unless
such persons are accompanied and supervised by a person in charge of their safety
or they have received precise
instructions on the use of this
appliance and have understood the resulting risks.
Children may only use this
appliance if they are over the
age of 8 and supervised by a
person in charge of their safety, or if they have received instructions on the use of this
appliance and have understood the resulting risks.
Children must not play with
this appliance.
Supervise children to prevent
them from playing with the
appliance.
Cleaning and user mainte-
nance must not be performed
by children without supervision.
Do not insert objects into the
air louvers.
Do not spray jet into eyes.
Do not direct the spray jet di-
rectly on equipment containing electrical components,
such as the interior of ovens.
English 3
Page 4

Prior to using this appliance
on sensitive (high shine) sur-
faces, test the microfibre wip-
ing pad at an inconspicuous
location.
Information regarding the battery
Short circuit hazard! Do not
insert conductive objects
(such as screwdrivers or sim-
ilar) into the charger plug.
You may recharge the battery
using only the original charg-
er provided with the appli-
ance or a charger approved
by KÄRCHER.
Tips for using the battery
charger
In case of visual damage, re-
place the charger with charg-
er cable immediately by origi-
nal parts.
Only use and store the charg-
er in dry rooms, ambient tem-
perature 5 - 40° C.
Never touch the mains plug
with wet hands.
몇 Information regarding the
transport
The battery has been tested
as per the relevant directives
for international transport and
can be transported/shipped.
Environmental protection
The packaging material can be
recycled. Please do not place the
packaging into the ordinary refuse for disposal, but arrange for
the proper recycling.
Old appliance contain valuable
recyclable materials and substances that must not be released
into the environment. Thus, the
appliance and the accumulator
contained must not be disposed
of via the domestic waste. The
disposal can take place via locally
available return and collection
systems free of charge.
Notes about the ingredients
(REACH)
You will find current information about
the ingredients at:
www.kaercher.com/REACH
Symbols in the operating instructions
Danger
Immediate danger that can
cause severe injury or even
death.
몇 Warning
Possible hazardous situation
that could lead to severe injury
or even death.
Caution
Possible hazardous situation
that could lead to mild injury to
persons or damage to property.
4 English
Page 5

Start up
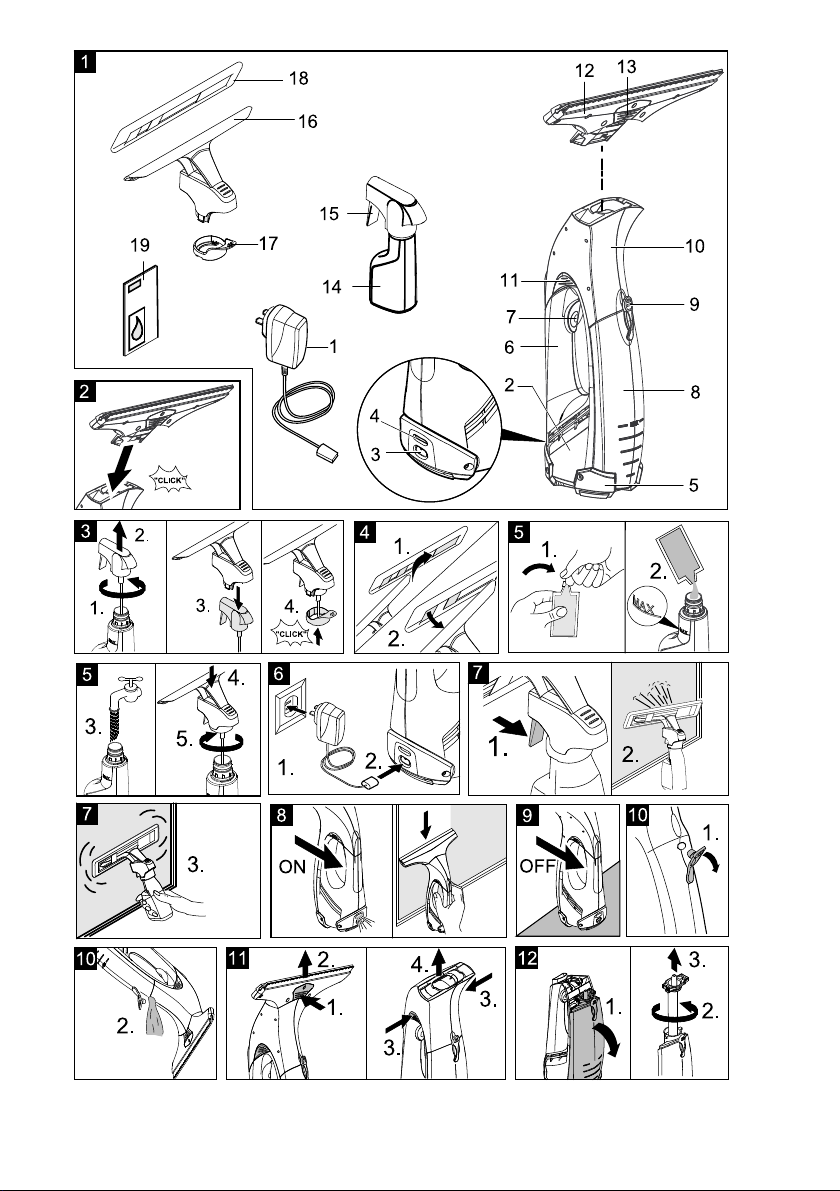
Description of the Appliance
When unpacking the product, make
sure that no accessories are missing
and that none of the package contents
have been damaged. If you detect any
transport damages please contact your
dealer.
Illustrations on Page 2
Illustration
1 Charger with charging cable
2 Basic appliance
3 Charging box
4 Charge/operations display
5 Support leg
6 Handle
7 ON/OFF switch for appliance
8 Dirt water reservoir, removable
9 Lock, dirt water reservoir
10 Separator
11 Unlocking device, separator
12 Attachment with removable lips
13 Unlocking device, suction nozzle
14 Spray bottle
15 Spray lever
16 Wiping attachment
17 Fastening ring for the wiper attach-
ment
18 Micro-fibre wiping pad (2 piece)
19 Window cleaner concentrate
Assemble the appliance
Illustration
Attach the suction nozzle to the
separator until it snaps in place au-
dibly
Attach the spray bottle and
wiper attachment and fill it
with detergent
Note: Please note that after the first
use of the spray head the plastic seal
will be broken.
Attach the wiping attachment
Illustration
Remove the spray head from the
spray bottle.
Attach the wiper attachment to the
spray head.
Secure the wiper attachment and
the spray head with the fixating ring.
Illustration
Attach the wiper pad to the wiper at-
tachment and secure with Velcro.
Fill the spray bottle
Illustration
Fill the included concentrate (1 x 20
ml) into the spray bottle and fill the
bottle slowly with clear water
(makes 250 ml of detergent solution).
Close the bottle.
Charge the battery
Illustration
Insert the charger delivered with the
appliance into a proper socket.
Insert the charging cable plug to the
back of the appliance.
Note: During the charging process,
the charge/operating display blinks.
Once the battery is fully charged, it
will be permanently illuminated.
English 5
Page 6

Start working
Interrupting the work
Cleaning with spray bottle and wiper attachment
Illustration
Press the spray lever on the bottle
to apply the detergent and spray the
surface evenly; after that, loosen
the dirt using the wiping pad.
Note: Rinse pad under running wa-
ter if needed!
Illustration
Switch the appliance on, the
charge/operations display will illu-
minate.
Important: Prior to use, ensure that
the squeegees are free of soiling.
Pull the appliance from the top to
the bottom to vacuum up the deter-
gent.
Note: Hard to reach areas can be
vacuumed vertically or horizontally
(limited areas).
Notes:
If the battery is low, the charging / power indicator starts flashing slowly and
the appliance switches off after a certain time. If this is the case, charge the
battery.
The appliance can be switched off
while the spray bottle is in use. This
significantly increases the operating
time per battery charge.
Cleaning without the spray bottle
Apply the detergent as usual ac-
cording to manufacturer's instruc-
tions and loosen the dirt.
Further procedure same as the
"Cleaning with spray bottle and wip-
er attachment", see illustration .
Illustration
Switch off the appliance and set it
down on the pedestal (parking position).
Emptying the reservoir during
operation
Once the max. fill level (mark) of the
dirt water reservoir is reached, please
empty the tank.
Illustration
Turn off the appliance.
Illustration
Pull off the lock of the dirt water res-
ervoir and empty the tank.
Close the closure of the wastewater
tank.
6 English
Page 7

Finish up your work / clean
appliance
Illustration
Turn off the appliance.
Illustration
Unlock the suction nozzle first and
remove it from the separator, then
unlock the separator and remove it,
too.
Clean the separator and the suction
nozzle under running water (not
dishwasher safe).
Illustration
Caution: The basic appliance
contains electrical components.
Do not clean this under running
water!
Remove the dirt water reservoir, ro-
tate the lock and pull out.
Empty the reservoir and rinse with
clear water. Close the reservoir
again.
Remove the wiping cover from the
spray bottle and rinse it under run-
ning water. The wiping cover can
also be washed in the washing ma-
chine at a temperature of up to
60°C (without the use of fabric sof-
teners).
Let the cleaned appliance dry prior
to assembly.
Charge the battery.
Storing the Appliance
Troubleshooting
Spray bottle does not spray
Refill detergent.
Pump mechanism in spray botte
defective, contact dealer.
Machine does not start
Check the charge/operations display:
No signal or slowly blinking signal:
Charge the battery.
With a rapidly blinking signal: In-
form your dealer.
Streaks while cleaning
Clean the pull-off lip.
Reverse the used pull-off lip:
Pull the silicone squeegee to the
side. Wet the squeegee in the area
of the curve with water or detergent.
Slide the silicone squeegee back in
the holder in reverse order.
Replace the pull-off lip if neces-
sary:
If both edges are worn after turning
the silicone squeegee around, a
new silicone squeegee is required.
Replace silicone squeegee as described above.
Adjust the dosing of cleaning solution.
Water is leaking from the air
louvers
Empty the dirt water reservoir (max.
100 ml content).
Store the appliance upright in a dry
room.
English 7
Page 8

Special accessories
Window cleaner concentrate
(4 x 20 ml)
Order No. 6.295-302.0
Micro-fibre wiping pad (2 piece)
Order No. 2.633-100.0
Removable lips, wide (2 ea.)
Order No.: 2.633-005.0
Technical specifications
Type of protection IP X4
Volume of dirt water
reservoir
Operating time with full
charge
Nominal battery voltage 3,6 V
Rated power of appli-
ance
Charging current for
empty battery
Output voltage, charger 5,5 V
Output current, charger 600 mA
Sound pressure level
(EN 60704-2-1)
Weight 0,7 kg
Battery type Li-Ion
Subject to technical modifications!
100 ml
20 min
12 W
2h
54 dB(A)
Disposing of old device and
battery pack
This appliance includes a built-in battery pack; please remove this battery
pack before disposing of the old appliance.
Remove battery pack and
dispose of
Risk of a short circuit
Do not touch contacts or
wires.
Risk of explosion
Do not expose the accumula-
tor to direct sunlight, heat or
fire.
Risk of injury due to short
circuit, chemical burn or
escaping irritant vapours
Do not open the accumulator.
The appliance may only be
opened in order to dispose of
the battery pack.
Remove the battery pack and
dispose of properly (at a collection site or the dealer).
8 English
Page 9

Customer Service
Australia
KÄRCHER Pty. Ltd.
40 Koornang Road
Scoresby, Victoria 3179
1800 675 714 (Free Call)
www.karcher.com.au
New Zealand
Karcher Ltd.
East Tamaki, Aukland
12 Ron Driver Place
(09) 274-4603
www.karcher.co.nz
English 9
Page 10

Page 11

Page 12

www.karcher.com.au
www.karcher.co.nz
 Loading...