


Digital Photo Frame Keychain with
1.5” LCD and Built-in Memory
General Setup
• Press and hold the MENU button to turn on the frame.
• To turn off the frame, shortly press the MENU button to
display the settings, select "OFF" and then press the MENU
button to power off. (No OFF function in USB power supply
mode)
Note: Before using the JP-151, download image files into the
device with the USB and make sure the battery charge is enough.
If the battery is low, charge the battery first (see "Connecting to a
Computer/ Transferring Files" section).
Digital Photo Frame Keychain V10M10_IM_EN_08272008
GETTING STARTED
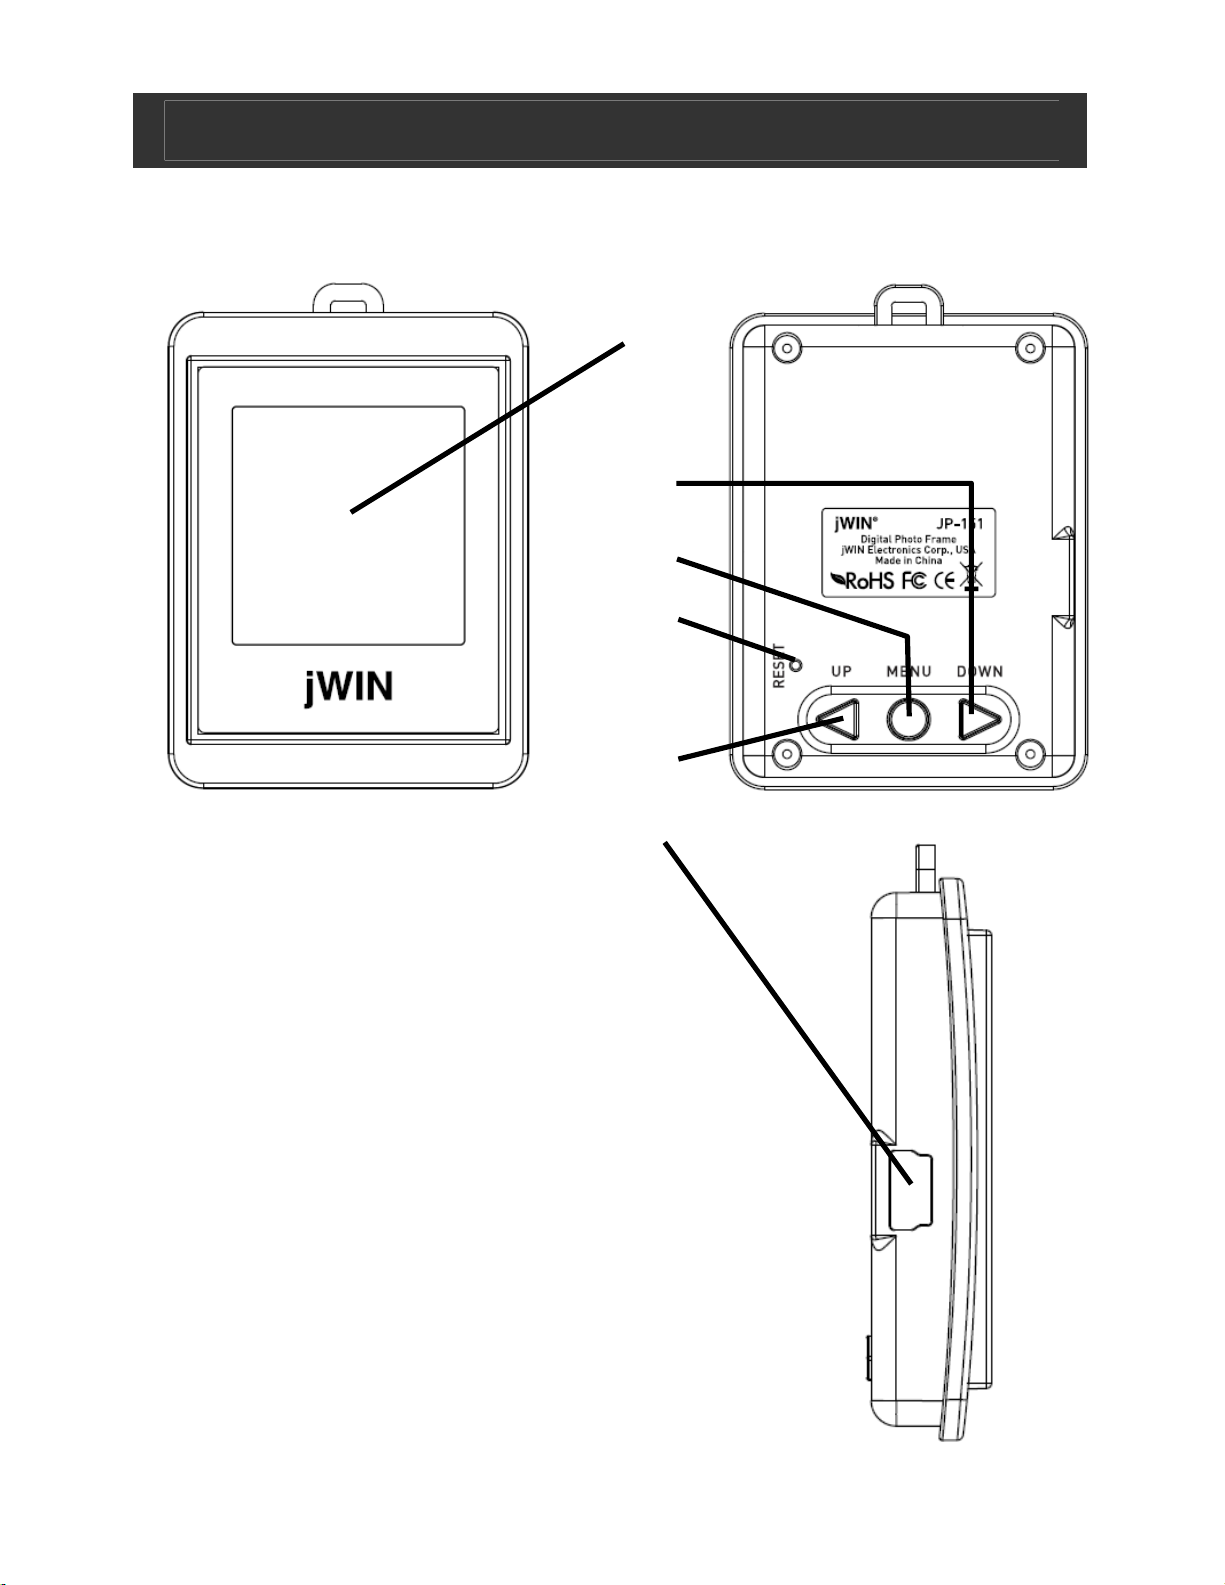
Location of Controls
1
2
3
4
1. LCD display
2. PREV button
3. MENU button
4. RESET hole
5. NEXT button
6. USB port
5
6
- 1 -
www.jWIN.com

Digital Photo Frame Keychain V10M10_IM_EN_08272008
GETTING STARTED
Menu Guide Chart
MENU FUNCTION
OFF Power off the device.
Delete Delete the picture
Display
Mode
Clock Set Set the date and time.
Auto
ON/OFF
Display photos in auto slide show or manually.
Steps:
(1) Press the “
number of year.
(2) Press the MENU button to confirm the
year. Repeat the operation to set the rest
items.
Set the time at which the device power on or off
automatically.
Steps:
(1) Select "ON" to enable the function.
ٛ
W” or “X” button to set the
(2) Press the “
auto-power-on and auto-power-off time.
(3) Press the MENU button to confirm.
(4) To disable the function, select "OFF" and
press the MENU button to confirm.
Clock
Display
Brightness Adjust the brightness of the screen.
Exit Exit from the menu
Display the date and time in full screen or as the
water mark on the picture.
W” or “X” button to set the
- 2 -
www.jWIN.com

Digital Photo Frame Keychain V10M10_IM_EN_08272008
GETTING STARTED
Menu Navigation
Press the MENU button to enter Menu mode. The menu
provides settings to set the display mode, clock, auto on/off etc.
Press the
MENU button to confirm your selection.
W or X button to select a menu item. Press the
Connecting to a Computer/Transferring Files
You can charge the battery and download files by connecting
to a computer. Follow these steps:
1. Connect the USB cable to the USB interface of PC.
2. Connect the smaller end of the USB cable to the USB
interface of this unit. When connected to the computer, the
LCD screen provides two options - "USB Charge" or "USB
Update".
3. To download files from the computer, press “
select "USB Update" and press the MENU button to confirm.
An image transfer tool will run automatically. It may take a
W” or “X” to
while..
• To use the tool, click “run the program” or “open folder
to view files” then click DPF exe. on the pop up window.
If the tool does not run automatically, click “local disk” in
“My Computer” then click DPF exe.
• Then transfer desired files between the device and
computer.
4. Click "Select files" to select image files from your computer.
The selected files are listed in the file list.
Note: Upload time may lengthen depending on the size of the
image.
- 3 -
www.jWIN.com

Digital Photo Frame Keychain V10M10_IM_EN_08272008
OPERATIONAL INSTRUCTIONS
Connecting to a Computer/Transferring
Files-continued
5. Select image files from the file list by clicking the mouse, and
press the "Batch" button to send the selected files to the
device. Before sending, you can edit the selected picture in
the Image Editor box:
• Click the "Selection" button to select an area from the
picture. You can use the mouse to drag a selection area
or move the selection area.
• Click the “Clear” button to cancel area selection.
• Click the “Rotate Right or Left” to rotate the picture right or
left.
• Click " → " to send the edited picture to the device.
6. Click "Sync" to finish downloading and save the update.
Clock of the device is also synchronized with the computer by
this step.
7. To charge the battery, select "USB Charge" and press the
MENU button to confirm. It takes about 3 hours to fully
charge the device.
- 4 -
www.jWIN.com

Digital Photo Frame Keychain V10M10_IM_EN_08272008
OPERATIONAL INSTRUCTIONS
Editing Pictures
Also you can edit the pictures stored in the device, uploading
them to the computer, deleting or rotating them:
1. Select the picture that you want to edit from the right pane of
the screen.
2. Click the SAVE button to save the picture into the computer.
3. Click the DELETE button to delete the picture.
Notes:
• An image transfer tool will run automatically, and you see two
new-added disk drives in "My Computer". One is for running
the image transfer tool manually. Please note that the other is
dummy. No need to open it.
Troubleshooting
What kind of photos does this unit support?
• JPEG/BMP/GIF (static image) format.
The unit does not respond
• Press the RESET button.
How many pictures can I store in the unit?
• Up to 61 pictures depending on the memory size.
Image file transfer tool does not run automatically
• Reconnect the unit to the computer and try again.
- 5 -
www.jWIN.com

Digital Photo Frame Keychain V10M10_IM_EN_08272008
USER SAFETY GUIDE
Important Safety Instructions
YOU CAN HELP TO PROTECT THE
ENVIRONMENT!
Please remember to respect the local
regulations: Hand in the non-working electrical
equipment to an appropriate waste disposal
center.
FOR USED BATTERIES
Disposed of the used batteries properly. Please follow the local
regulations for the battery disposal.
FCC RULES
This device complies with Part 15 of the FCC Rules. Operation is
subject to the condition that this device does not cause harmful
interference.
Note: Do not make changes or modify the device in any way.
Changes or modifications not expressly approved by the
party responsible for compliance could void the user’s
authority to operate the equipment.
Additional Important Instructions
• No naked flame sources such as lighted candles should
be placed on the apparatus.
• Use this apparatus in the moderate climates. It is
recommended not to use this apparatus such in a lighting
storm.
- 6 -
www.jWIN.com

TEL: 516-626-7188
FAX: 516-626-7105
website: www.jWIN.com
© 2008 jWIN Electronics Corp. All rights reserved. No
portion of this printed material or product enclosed
herewith including design, shape and graphics, may be
reproduced or transmitted in any form without the
expressed written consent of jWIN Electronics Corp. by
any means, electronic or mechanical, including
photocopying, recording or use of an information
storage and retrieval system. Any unauthorized
distribution or reproduction of this printed material or
product, or any portion thereof, will be prosecuted to
the fullest possible extent of the law.
 Loading...