

Page 1
PORTABLE DVD PLAYER
• Before attempting to connect, operate or adjust this product, please save and read the Quick Guide completely.
• The style of the product shown in the Quick Guide may be different from the actual unit due to various models.
Quick Guide
Playable Format:
DVD/DVD R/DVD RW/Audio CD/Kodak Picture CD/JPEG Picture CD/MPEG 4/DviX
JD-TV108
JDTV108QGV10M10EN04072005
Page 2
2
PORTABLE DVD PLAYER USER GUIDE
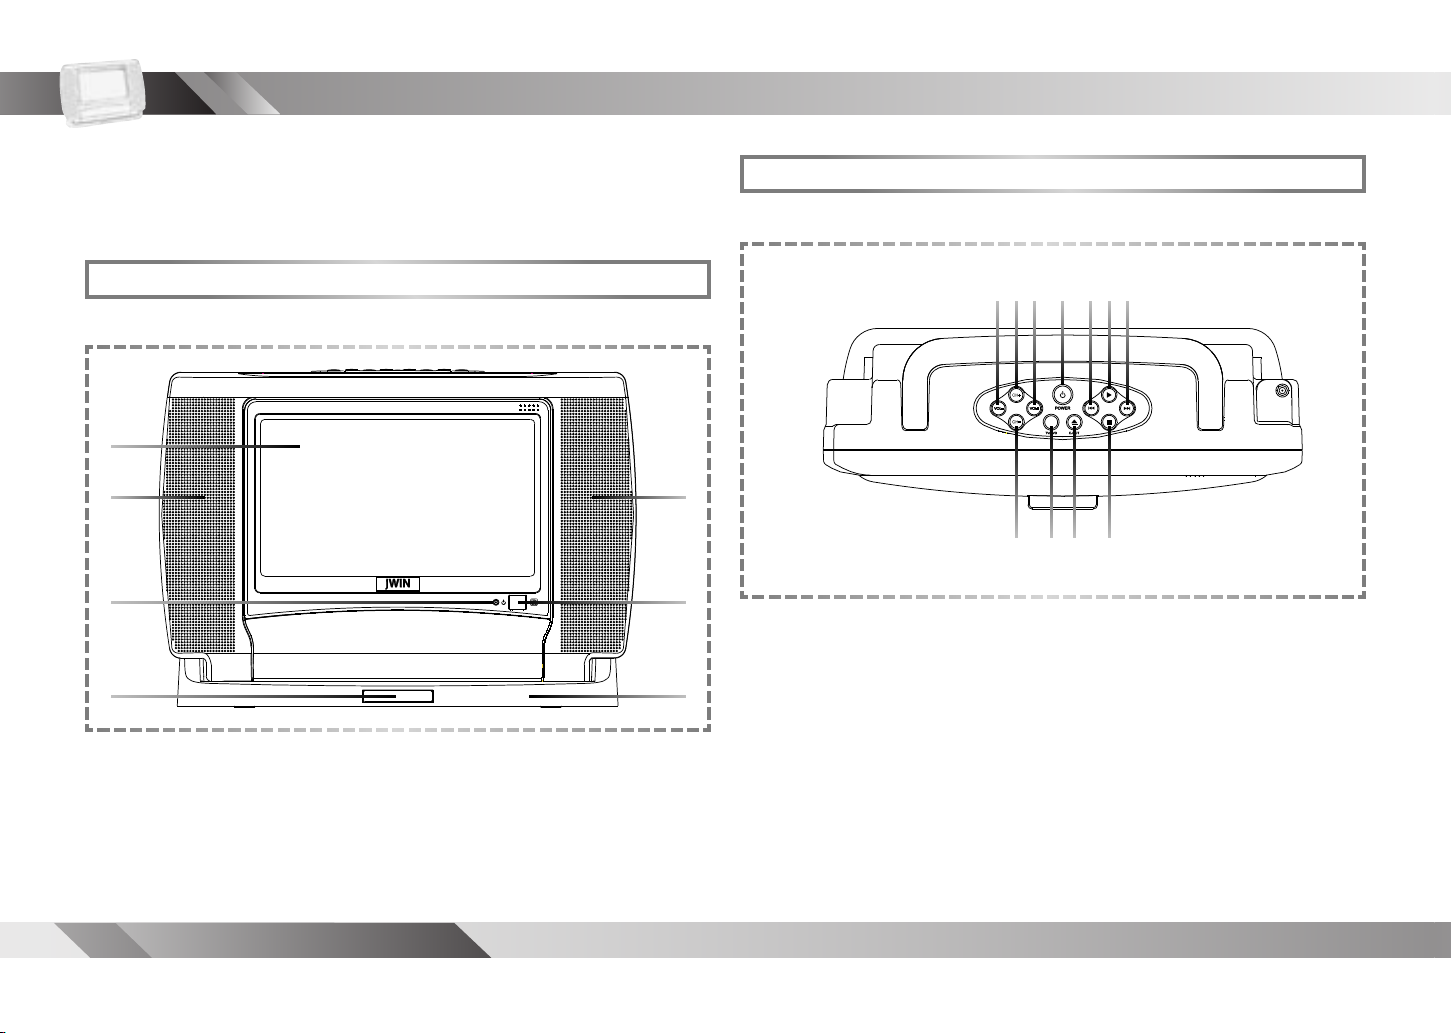
Top View
Getting to Know Your Portable DVD Player
Welcome to the Portable DVD Player Quick Guide. This Guide
will instruct you to identify and set up your Portable DVD Player in
a quick and easy way. Please carefully follow the instructions.
Front View
1.
2. 2.
6.
4.3.
5.
1. LCD Screen
2. Speakers
3. Power Indicator
4. Remote Sensor
1. 2. 3. 4. 5.6. 7.
8. 9.10. 11.
2. CHANNEL(+) Button
4. POWER Button
5. PREVIOUS Button
6. PLAY Button
7. NEXT Button
8. CHANNEL(-) Button
9. TV/DVD Button
10. EJECT Button
11. STOP Button
1. VOLUME(-) Button
3. VOLUME(+) Button
5. Remote Control Carrier
6. Base
Page 3
3
PORTABLE DVD PLAYER USER GUIDE
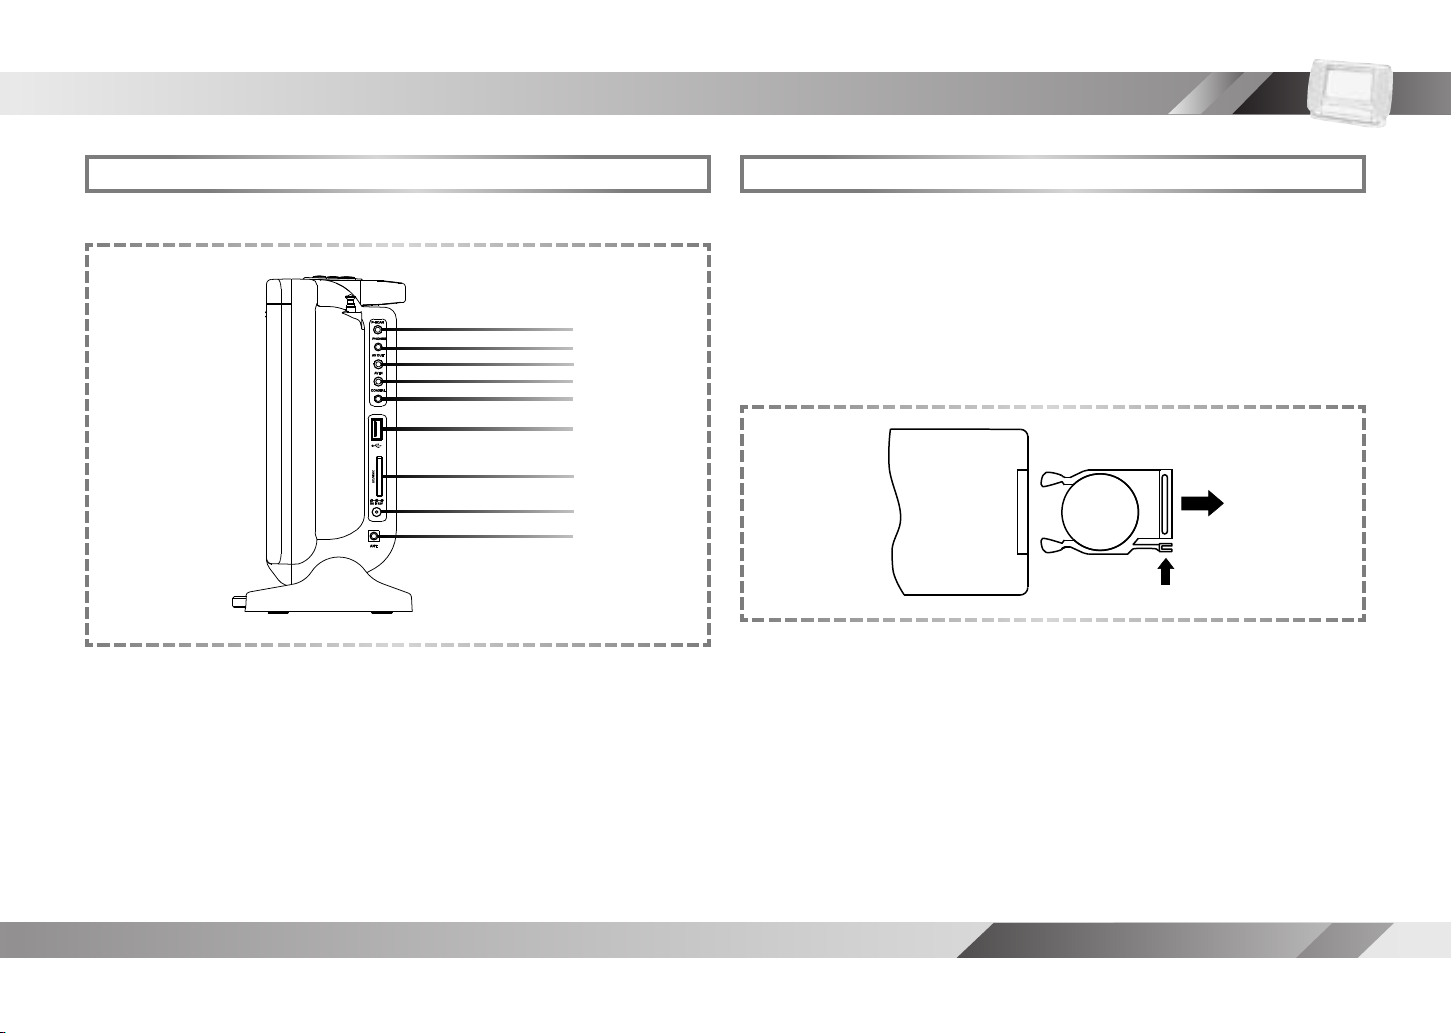
Right Side View
Getting to Know Your Portable DVD Player
1.
2.
3.
4.
5.
6.
7.
8.
9.
1. P-SCAN Output Jack
2. PHONES Jack
3. AV OUT Jack
4. AV IN Jack
5. COAXIAL Output Jack
Battery Installation for the Remote Control
Insert the battery and match the (+) and (-) on battery to the marks
inside the battery compartment.
First-time use:
+
CR2025
OPEN
PUSH
REAR OF
REMOTE
CONTROL
6. USB Port
7. SD/MMC Card Slot
8. DC IN Jack
9. CABLE IN (Ant.) Jack
Remember to remove the insulating mylar strip from the battery.
Service life of battery:
1. The battery in the Remote Control normally lasts for about
one year, although this depends on how often and for what
operations the Remote Control is used.
2. If the remote control unit fails to work even when it is operated
near the player, replace the battery.
3. Use a 3V lithium battery (No. CR2025 or equivalent).
Page 4
4
PORTABLE DVD PLAYER USER GUIDE
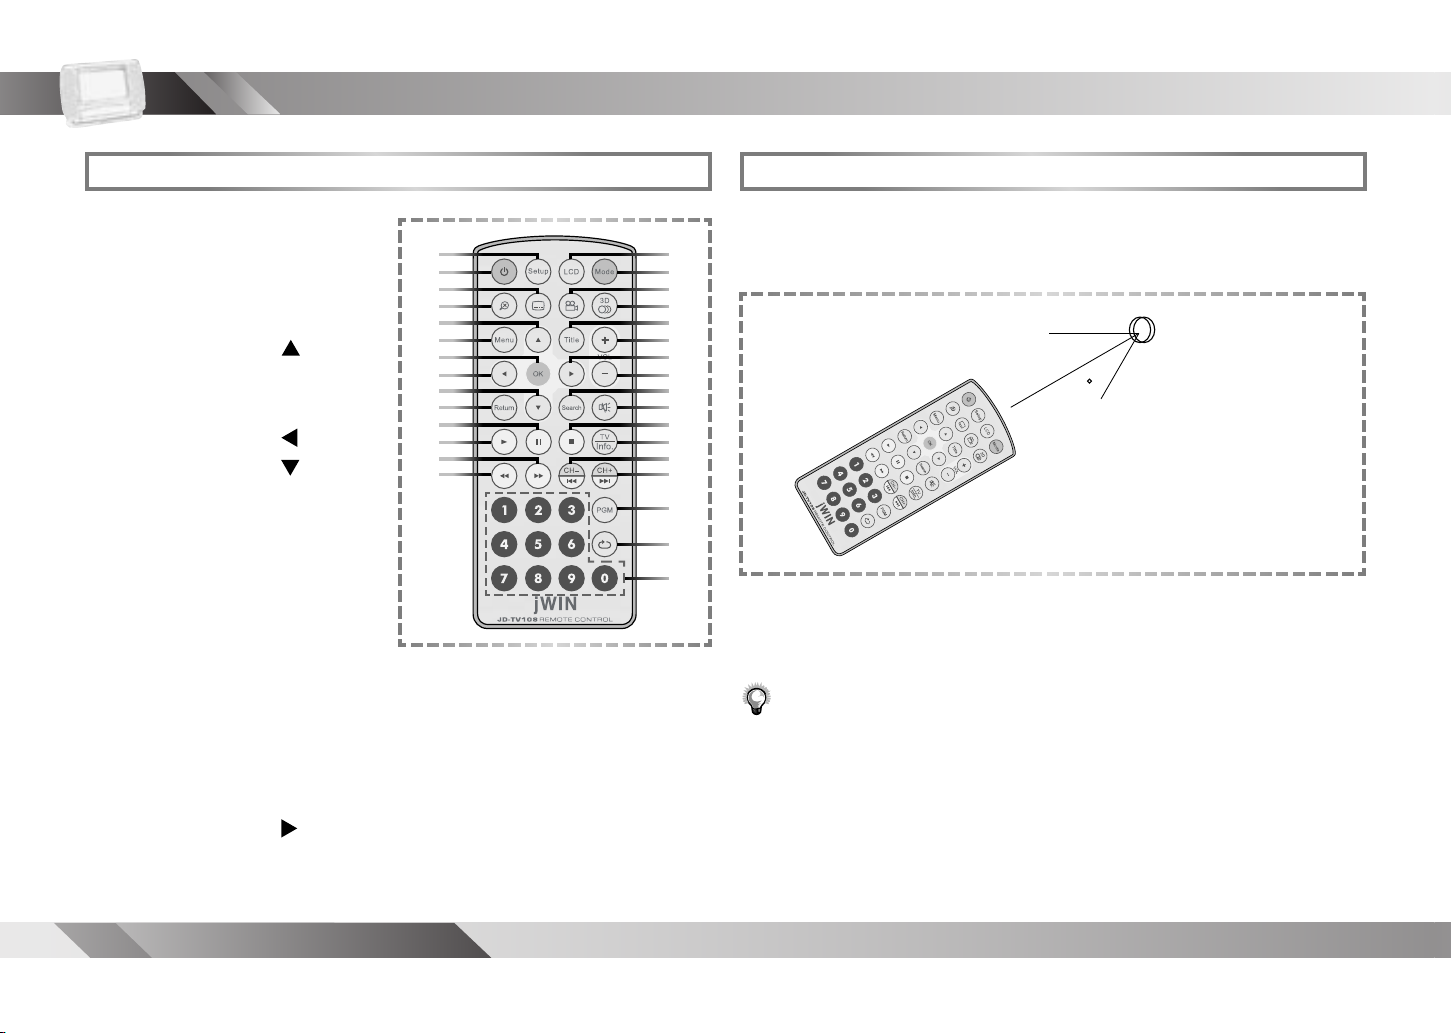
Remote Control Operation Range
The operating distance may vary according to the brightness of
the room.
Note:
•
• Do not place objects between the remote control unit and the remote control
signal sensor.
• Do not use this remote control unit while operating the remote control or
the other equipment.
Remote Control
Getting to Know Your Portable DVD Player
24. Mute Button
25. Stop Button
26. TV Source/Info. Button
27. Channel(-)/Previous Button
28. Channel(+)/Next Button
29. Program Button
30. Repeat Button
31. Number Buttons
2.
4.
6.
8.
10.
12.
14.
29.
30.
31.
3.
1.
5.
7.
9.
11.
13.
1. Setup Button
2. Power Button
3. Subtitle Button
4. Zoom Button
5. Cursor Button (
)
6. Menu Button
7. OK Button
8. Cursor Button (
)
9. Cursor Button (
)
10. Return Button
11. Pause Button
12. Play Button
13. Fast Forward Button
14. Fast Backward Button
15. LCD Button
16. Mode Button
17. Angle Button
18. Audio Button
19. Title Button
20. Volume(+) Button
21. Cursor Button (
)
22. Volume(-) Button
23. Search Button
30º
15.
16.
17.
18.
19.
20.
21.
22.
23.
24.
25.
26.
27.
28.
Point the remote control unit no more than 6 meters (20 ft.) from the
remote control sensor and within about 60° of the front of the unit.
Remote Senser
Do not point bright lights at the remote control signal sensor (on the unit).
30
Page 5

5
PORTABLE DVD PLAYER USER GUIDE
Quick Operation Guide
Connect to External Equipment
1. Connect the Portable DVD Player to Power.
Please connect the supplied AC adapter to the DC IN jack on the
right side of the unit.
2. Conne c t it with earphones or connect it TO external
equipment.
If you want to enjoy a better listening and viewing quality, you can
connect the Portable DVD Player to external equipment, such as
a TV or an audio ampli er with speakers.
Note:
• Before connecting, make sure to turn off the power on the Portable DVD
Player and any external equipment.
Note:
Yellow White Red
Video
Audio Input
Input
(White) (Red)
(Yellow)
OR OR
Yellow White Red
Audio Input
(White) (Red)
Orange
Green Blue Red
Y Pb Pr Input
(Green) (Blue) (Red)
• Make sure the external equipment supports the audio/video inputs
supplied by the JD-TV108.
Page 6

6
PORTABLE DVD PLAYER USER GUIDE
Quick Operation Guide
POWER
EJECT
3. Press Power button on the top panel of the unit to turn
on the DVD Player.
4. Press Eject button on the top panel of the unit to open the
disc cover. To widen the cover gap, pull the cover forward.
5. Gently hold the edge of the disc, then put it in the disc frame
with the printed side down.
Note:
• This player doesn’t support the playback of 8cm (3.15") discs.
6. Close the disc cover.
7. Press Play button on the top panel of the unit or Play
on the remote control to play the disc.
Input from External Equipment
You could input images and sounds FROM external equipment by
connecting the portable DVD player to external equipment with
audio or video cables.
Yellow White Red
Video
Audio Output
Output
(Yellow)
Note:
• Make sure the external equipment provides audio/video output
jacks for connection, via cable, to the appropriate input
connector on the JD-TV108.
(White) (Red)
AV IN
White Red
Audio Output
OR
(White) (Red)
Page 7

7
PORTABLE DVD PLAYER USER GUIDE
Viewing Angle and Handle Adjustment
15
Caution:
•
The viewing angle of this DVD Player can be adjusted by tilting
the unit’s body up to 15° back on its base. Thus, the adjustable
viewing angle is between 0° and approximately 15°.
The handle can be raised for convenient carrying of the DVD
player.
To avoid possible injuries and damage to the device, do not place your
hands between the unit’s body and its base, or press on the LCD screen
while adjusting the angle.
Page 8

8
PORTABLE DVD PLAYER USER GUIDE
USB Flash Drive and SD/MMC Card Operation
Note:
•
JPEG and MP3.
•
Insert a USB Flash Drive
Insert a SD/MMC Card
1. You can insert a USB Flash Drive in the USB port or an
SD/MMC card in the slot on the unit's right panel to
experience its contents, which is typically photos or music.
2. Press
Mode button on the remote control to select USB
Mode or SD/MMC Card Mode.
Note:
• Press
include “DVD Mode”, “USB”, “CARD”, “AV IN” and “TV TUNER”.
3. A le list appears on the screen, press
Mode a number of times to toggle through different modes, which
Up /
the remote control to select a preferred JPEG or MP3 le.
4. Press
OK or
Play to view the selected le.
For Picture File Playback Only
• Press
• Press
Playable formats for the USB Flash Drive and SD/MMC cards include
If the JPEG le size is over 1.0MB, it may take longer to read.
Right to rotate the picture clockwise by 90°.
Left to rotate the picture counter-clockwise by 90°.
Down on
Page 9

9
PORTABLE DVD PLAYER USER GUIDE
TV Tuner Operation
Outdoor Antenna
Telescoping
Antenna
NTSC (National Television System Committee) and PAL
(Phase Alternating Line) are two published standards
that determine how video signals are transmitted, received,
and processed in different parts of the world. The
United States, Canada, and many countries in
North and South America utilize NTSC. PAL is
the video standard commonly found in
Europe, Asia, and Australia (see
next page).
Your JD-TV108 is not capable of receiving PAL broadcasts or PAL
cable transmissions, but it can play most PAL DVDs, were you ever
to encounter them through foreign travel or exchange. Viewing a
DVD recorded in the PAL format is subsequently discussed in this
Quick Guide and in the User Manual. Your JD-TV108 is capable of
playing all NTSC DVDs.
To receive TV signals, you can use the built-in telescoping
antenna, an (external) outdoor antenna, cable feed, or satellite.
Telescoping Antenna TV Signal
1. Raise the Telescoping Antenna and place the unit in the
best position to receive the strongest TV signal.
Receiving TV Signal from Cable
1. Connect the RF cable from the outdoor antenna or cable
TV provider, to the ANT. jack on the right side of the player.
Antenna
PAL
NTSC
Cable TV
Note:
• Before connecting the RF coaxial cable to the Antenna/Cable TV signal
input (ANT.) jack of the DVD player, you will need an NTSC adapter
(shown above).
Page 10

10
PORTABLE DVD PLAYER USER GUIDE
TV Tuner Operation
•
Make sure that the DVD Player is correctly connected.
•
TV reception quality maybe different due to various areas.
1.
Press
Power button on the top panel of the unit to turn
on the DVD Player.
2.
Press
Mode to select TV Tuner Mode.
Note:
•
Press
Mode a number of times. You can toggle through different modes,
3.
Press
TV to select CABLE or ANTENNA as the TV source.
4.
Press
Search, a TV tuner window appears on the screen.
5.
Press
Up
/
Down
to highlight a preferred option.
Channel
56
Freq
415.3MHz
Favorite
Yes
Auto search
Canada, Japan, Korea, Panama, Taiwan, United States, Peru,
Chile, Mexico, etc.
PAL-B/G
Australia, Denmark, Finland, Germany, Holland, Italy,
Malaysia, New Zealand, Portugal, Spain, Singapore, Sweden,
Switzerland, Thailand, etc.
PAL-I/I
Hong Kong, South Africa, Ireland, United Kingdom, etc.
PAL-D/K
Czech, China, Hungary, Poland, etc.
Note: The -B/G, -I/I, and the -D/K designations are small variations within the
PAL standard that apply to different countries. For all intents and
purposes, these suffixes can be ignored.
Countries that use the NTSC Video Standard
Countries that use the PAL Video Standard
How to Use theTV Tuner
including “DVD Mode”, “USB”, “CARD”, “AV IN” and “TV TUNER”.
Page 11

11
PORTABLE DVD PLAYER USER GUIDE
Note:
TV Tuner Operation
Right
6. Press
Left
/
to select a setting for the highlighted
option.
Channel
Right
• Press
to select the next channel or press
select the previous channel.
Freq:
Right
• Press
to increase the frequency or press
decrease the frequency for the best tuning.
To Select Preferred Available Channels
1. Press
(i.e. favorite) channel for viewing.
Left
to
Note:
• This function only works with available channels.
• If a channel is set “No” in the Favorite setting, the channel will be skipped when
Left
to
pressing
Channel-
Channel- /
/
Channel+
to choose a preferred
Channel+ to toggle through channels.
Favorite:
• Press
Left
/
Right
to select “Yes” or “No”. "Yes" allows
the channel to be included when the CH-/CH+ button is used.
Auto search:
• Press
Right
and tuner search starts automatically and
allows the channel to be conrmed.
• After completing Auto Search, the DVD player will store all available TV
channels. However, if more channels become available in your area, Auto
Search may need to be conducted again to update the available channels.
• Each time Auto Search is run, all the previously stored channels will be
erased and replaced.
7.
To leave the TV tuner window, press
Search again.
To Select a Specic Channel
1. Press Number Button(s) to specify the channel.
Note:
• This function can be applied to all the channels, including those that are
set to “No” in the Favorite setting.
To Recall Between the Current Channel and the
Previous Channel
1. Press
will be recalled.
Repeat, and the previously selected channel can
Page 12

 Loading...