

Page 1

MD-CD COMBINATION DECK
PLATINE COMBINÉE MD-CD
XU-301BK
CD
CD
CD
STANDBY
POWER
XU-301 MD-CD COMBINATION DECK
3
2
1
CD PITCH CONTROL
TIMER
/CLOCK
NORMAL SPEED
DIGITAL INPUT
48kHz
32kHz 44.1kHz
DIGITAL CD
REC SOURCE SELECTOR
MIXING
LINE MIC
1st TRACK
-
3
CD
PLAY & EXCHANGE
LISTENING
EDIT
REC
CD REC
SKIP
SAMPLING RATE CONVERTER
REC
REC
REC
STOP
PAUSE
START
INSTRUCTIONS
MANUEL D’INSTRUCTIONS
CANCEL
CD
MD
DISPLAY
TITLEEDIT
MIX BALANCE REC LEVEL
CD
LINE
LINE
MIC
MIC
PLAY MODE/CHARA
SET
MAXMIN
PHONES
For Customer Use:
Enter below the Model No. and Serial
No. which are located either on the rear,
bottom or side of the cabinet. Retain this
information for future reference.
Model No.
Serial No.
LVT0009-001B
[J]
Page 2

Warnings, Cautions and Others/Mises en garde, précautions et indications diverses
CAUTION
RISK OF ELECTRIC SHOCK
DO NOT OPEN
CAUTION “TO REDUCE THE RISK OF ELECTRIC
SHOCK DO NOT REMOVE COVER (OR BACK)
NO USER SERVICEABLE PARTS INSIDE
REFER SERVICING TO QUALIFIED SERVICE PERSONNEL”
The lightning flash with arrowhead symbol, within
an equilateral triangle, is intended to alert the user
to the presence of uninsulated “dangerous voltage”
within the product’s enclosure that may be of
sufficient magnitude to constitute a risk of electric
shock to persons.
The exclamation point within an equilateral triangle
is intended to alert the user to the presence of
important operating and maintenance (servicing)
instructions in the literature accompanying the
appliance.
WARNING:
TO REDUCE THE RISK OF FIRE OR ELECTRIC
SHOCK, DO NOT EXPOSE THIS APPLIANCE TO RAIN OR MOISTURE.
To reduce the risk of electrical shocks, fire, etc.:
1. Do not remove screws, covers or cabinet.
2. Do not expose this appliance to rain or moisture.
AC power cord
The AC power cord of this unit has certain one-way direction
connections to prevent electric shock. Refer to the illustration for correct connection.
(For CANADA)
CAUTION
TO PREVENT ELECTRIC SHOCK, MATCH
WIDE BLADE OF PLUG TO WIDE SLOT, FULLY
INSERT.
(Pour le CANADA)
ATTENTION
POUR EVITER LES CHOCS ELECTRIQUES,
INTRODUIRE LA LAME LA PLUS LARGE DE LA
FICHE DANS LA BORNE CORRESPONDANTE
DE LA PRISE ET POUSSER JUSQU’AU FOND.
G-1
Page 3

Thank you for purchasing this JVC product. Please read these instructions through carefully before starting operation to ensure that you will
derive the optimum performance and a long service life from your unit.
Table of Contents
BEFORE OPERATION
Precautions .................................................................................................................................................................................... 2
Features.......................................................................................................................................................................................... 3
Connections ................................................................................................................................................................................... 4
Names of the Parts......................................................................................................................................................................... 6
Using the Remote Control ............................................................................................................................................................. 8
Power ON/OFF Operations ......................................................................................................................................................... 11
PLAY OPERATIONS
Listening to CDs.......................................................................................................................................................................... 12
• Giving a Title to a CD ......................................................................................................................................................... 17
Listening to MDs ......................................................................................................................................................................... 20
MIX PROGRAM Play ................................................................................................................................................................ 24
RECORDING/EDITING OPERATIONS
Recording onto MDs ................................................................................................................................................................... 26
• Manual Recording ............................................................................................................................................................... 28
• CD Recording (single-action recording) ............................................................................................................................. 29
• CD Recorfing (1st TRACK recording) ............................................................................................................................... 30
• CD Recorfing (LISTENING EDIT recording)................................................................................................................... 31
• Mixing Recording................................................................................................................................................................ 32
MD Editing Functions ................................................................................................................................................................. 34
• Dividing tracks (DIVIDE function) .................................................................................................................................... 35
• Joining tracks (JOIN function) ............................................................................................................................................ 36
• Moving tracks (MOVE function) ........................................................................................................................................ 37
• Erasing a track (ERASE function) ...................................................................................................................................... 39
• Erasing all the tracks (ALL ERASE function) .................................................................................................................... 40
• Giving titles to discs and tracks (TITLE function).............................................................................................................. 41
Character Layout Table ............................................................................................................................................................... 44
English
CLOCK/TIMER FACILITIES
Setting the Clock ......................................................................................................................................................................... 45
Timer Operations......................................................................................................................................................................... 46
• Timer Play (Wake-up play) ................................................................................................................................................. 46
• Timer Recording.................................................................................................................................................................. 49
IMPORTANT INFORMATION
COMPU LINK Function ............................................................................................................................................................. 50
TEXT COMPU LINK Control System ....................................................................................................................................... 51
Information on the MDs (Minidiscs)........................................................................................................................................... 52
MD (Minidisc) Error Messages................................................................................................................................................... 53
Restrictions Imposed by MDs (Minidiscs).................................................................................................................................. 54
Restriction on Copying Digital Material ..................................................................................................................................... 54
Troubleshooting........................................................................................................................................................................... 55
Main Specifications ..................................................................................................................................................................... 56
1
Page 4

Precautions
English
1. Safeguarding against electric shocks, fire hazards and damage
1) A very low current will still flow even when the POWER button is set at STANDBY. To save power
and ensure safety when the unit is not going to be used for an extended period of time, disconnect the
power cords from the household AC outlet.
2) Do not handle the power cord with wet hands.
3) To unplug the power cord from the wall outlet, always take hold of the molded plug part and pull the
plug free rather than pulling the cord.
4) If the power cord is damaged or found to have a disconnected wire or a contact failure, consult your
dealer.
5) Do not bend the cord at a sharp angle, and do not pull or twist it.
6) Do not modify the power cord in any way.
7) Do not remove the screws in order to disassemble the unit, and do not touch any of the parts inside
the unit.
8) Do not insert metallic objects into the unit.
9) Unplug the power cord if there is a chance that lightning may strike.
10) If water should find its way inside the unit, unplug the power cord from the outlet, and consult your
dealer.
11) Do not install the unit in a poorly ventilated location.
2. Installation
1) Avoid placing the unit on or adjacent to an amplifier: this is to prevent the humming caused by the
unit’s proximity to some types of amplifiers. Move the unit where it will not be affected by the
amplifier.
2) Avoid installing the unit where the ambient temperature will exceed 35 °C (95 °F) (namely, in direct
sunlight, near a heating appliance, etc.) or drop below 5 °C (41 °F), where it it is very humid or
dusty, or where the unit will be subject to vibration.
3) The unit may not function properly if it is moved suddenly from a cold place (0 °C (32 °F)) to a
warm place since condensation may form inside the unit. In such a case, leave the unit standing for
about 30 minutes, after which time it should function properly.
3. Cleaning the cabinet
Never use benzine or paint thinners to clean the cabinet as they may mar the unit’s surface finish.
2
Page 5

Features
• 3CD + MD combination deck
• CD-TEXT facility supported
• Simultaneous copying of CD-TEXT characters (track titles, etc.) onto MDs
• Input of CD disc titles and names of artists enabled
• Full complement of input/output facilities including optical digital,
LINE and MIC
• Sampling rate converter which supports 3 digital sources incorpo-
rated
• 32 kHz, 44.1 kHz and 48 kHz
• Mixing and recording of CD+LINE, CD+MIC or LINE+MIC recording
signals possible
• Choice of 3 analog recording signal sources (CD, LINE and MIC)
• 3CD + MD mixing programs
• CD synchro recording in 3 modes: single action, 1st track and
listening edit
• CD pitch control
• This enables the CD play speed to be adjusted up to 12% faster or slower than the normal play
speed.
English
• Timer functions
• Timer play and timer recording (DAILY or ONCE)
• Remote control whose buttons can be used to input titles provided
with unit
• Direct input of letters of alphabet possible
3
Page 6

Connections
Do not turn on the power until all the
connections have been completed.
English
Analog Connections
Use the accessory pin cords to connect the unit’s LINE connectors with the MD connectors on the receiver, etc.
TAPE
/MD
OUT
(REC)
(PLAY)
TEXT
COMPU LINK
( )
1 MASTER UNIT
( )
2 SLAVE UNIT
TEXT COMPU LINK
( )
1 MASTER UNIT
( )
2 SLAVE UNIT
IN
COMPU LINK
SYNCHRO
MODE
MD TD
Amplifier, receiver etc.
Accessory connecting cord
(with black plugs)
-
3
Power cord
XU-301BK MD-CD combination deck
DIGITAL IN
OPTICAL
DIGITAL OUT
OPTICAL
( )
IN REC
( )
L
( )
R
Recording signals
(line input)
Accessory pin cord
LINE
( )
OUT PLAY
LEFT
RIGHT
Playback signals
Accessory connecting cord
(with green plugs)
-
3
COMPU LINK
SYNCHRO
MODE switch
• Setting of 1 (MASTER UNIT) and 2 (SLAVE UNIT) selector
When connection is made
to a CD player only
Support for JVC’s
TEXT COMPU LINK
When connection is made
to a receiver only
When connection is made
to a receiver and CD player
• For further details on the TEXT COMPU LINK function, see page 51.
1 (MASTER UNIT)
2 (SLAVE UNIT)
2 (SLAVE UNIT)
NOTE
Before selecting the COMPU LINK-3 mode (MD or TD) or TEXT
COMPU LINK (master or slave) function, disconnect the power
cord from the power outlet to turn off the power. The function will
be not be set if it is selected while the power is on.
Alternatively, when the COMPU LINK-3 mode (MD or TD) or
TEXT COMPU LINK (master or slave) function is selected while
the power is on, disconnect the power cord and then re-connect it.
VICTOR COMPANY OF JAPAN , LIMITED
• Selecting the MODE switch position
• When connected with MD
input/output terminals of the
amplifier or receiver
MODE
MD
TD
• For further details on the COMPU LINK function, see page 50.
Optional connecting cord
This is connected for synchro recording.
CD player, cassette deck or
other component made by JVC
MADE IN JAPAN
• When connected with TAPE
input/output terminals of the
amplifier or receiver
-
3
COMPU LINK
SYNCHRO
MODE
MD
TD
Misconnections can be avoided by using the white plugs on the
accessory pin cords for the LEFT channel and the red plugs for the
RIGHT channel.
Insert the plugs all the way in. Incomplete connections cause noise.
4
Page 7

Digital Connections
Before proceeding, check whether the optical digital cable can be
connected.
Connect the stereo amplifier and source component to the DIGITAL
(OPTICAL) connectors on the unit using the optical digital cable.
One connecting cable is used to transmit the stereo signals (L/R)
as the digital signals.
CD player, etc.
Note
• When the synchro record-
To OPTICAL connector (OUT)
ing function is to be used,
connect the CD player etc.
and unit’s ground side
using the pin cord.
Optional optical digital cable
TEXT COMPU LINK
( )
1 MASTER UNIT
( )
2 SLAVE UNIT
MODE
MD TD
DIGITAL IN
OPTICAL
DIGITAL OUT
OPTICAL
( )
IN REC
( )
L
( )
R
LINE
OUT PLAY
Input signal
( )
LEFT
RIGHT
-
3
COMPU LINK
SYNCHRO
• How to use the OPTICAL connectors for
the connections
1 Remove the protective cap.
• When the connector is not going to be used, fit this
protective cap back in position.
2 Check that the end of the optical
digital cable is not dirty, and insert
it securely.
XU-301BK MD-CD combination deck
English
To OPTICAL OUT
connector
Stereo amplifier with OPTICAL
connector
Output signal
Optional optical
digital cable
To OPTICAL INPUT connector
VICTOR COMPANY OF JAPAN , LIMITED
MADE IN JAPAN
Before purchasing an optical digital cable (optional), make sure that the cable in question can be
connected to the amplifier, etc.
Do not bend the optical digital cable.
Red light emitted from the OPTICAL OUT connector
When the power is turned on, the inside of the connector lights up red. This light is for sending the
digital signals. Although this light will not harm your eyes, keep the protective cap in place if the
connector is not going to be used.
5
Page 8

Names of the Parts
English
CD Parts/Common Parts
POWER button and STANDBY lamp (See page 11)
This sets the power to ON from the OFF (standby mode), or vice
versa.
TIMER/CLOCK button (See pages 45, 46)
This is used for setting the clock and programming the timer.
CD trays (trays 1, 2 and 3 from the bottom)
These are opened and CDs placed on them.
Remote control sensor
This receives the signals emitted by
the remote control.
CD PITCH CONTOROL buttons
and indicators (See page
1st TRACK REC button
and lamp (See page
CD REC button and lamp (See page
LISTENING EDIT and SKIP buttons
(See page 31)
STANDBY
POWER
30
CD
CD
CD
14
)
XU-301 MD-CD COMBINATION DECK
3
2
1
CD PITCH CONTROL
TIMER
/CLOCK
NORMAL SPEED
)
1st TRACK
CD REC
REC
29
CD1, CD2, CD3 buttons, lamps and 0 buttons
(See pages
These are used to listen to CDs. When the 0 button is pressed,
the corresponding tray is opened or closed.
11, 12, 13
)
DISPLAY/CHARA button
EDIT button
(See page 18)
(See page
This button changes the contents of
the display window and the
character input mode.
LISTENING
CANCEL button
(See page
-
3
CD
PLAY & EXCHANGE
EDIT
SKIP
SAMPLING RATE CONVERTER
18
32kHz
REC
REC
REC
STOP
PAUSE
START
)
DIGITAL INPUT
44.1kHz
DIGITAL CD
48kHz
REC SOURCE SELECTOR
TITLE button
(See page
LINE MIC
CANCEL
CD
MD
MIXING
18
TITLEEDIT
MIX BALANCE REC LEVEL
LINE
MIC
Control buttons
Set the function to “CD” when using CDs or to
“MD” when using an MD, and then use the
control buttons.
• 1, ¡:
For forward search, reverse search (See
pages
15, 22
• 7 (stop) :
)
For stopping play (See pages
• 6 :
For starting/pausing play (See pages
)
12, 20
)
12, 20
)
17
)
PLAY MODE button
)
(See pages
DISPLAY
PLAY MODE/CHARA
SET
16, 23
Jog dial
(See pages
17, 45, 46
CD
MAXMIN
LINE
PHONES
MIC
SET button
(See pages
17, 45, 46
PHONES jack
Headphones which have been
purchased separately are
connected here.
)
)
)
CD button and lamp (See page 15)
Display window
“Paused” indicator
“Playing” indicator
(See page
CD numbers and play status
displays
While a CD is playing, the display
lights in sequence to indicate that the
disc is rotating. (See page 12)
“TEXT” appears when CD text is
input.
(See page 12)
12
)
6
CD number displays
(See page
CD
DISC
PERFORMER GENRE
L
40 30 151020
R
Level meter
Title mode display
(See page
17
12
TITLE
3 0
6
)
Track number displays
)
(See page
MD
DAILY
ONCE
Timer mode display
(See page
46
Repeat play mode
display (See page
)
12
)
MIX PROGRAM
1
RANDOM
REPEAT
ALL1 CD
16
)
23
Play time displays
(See page
12
)
MIX program
mode display
(See page 24)
Music calendar
This indicates the numbers of the
tracks. After a track is played, its
number is no longer indicated
Random play mode
display (See page 16)
CD play mode display
• This display is cleared when no CD has been detected on the tray and “NO DISC” is displayed.
This flashes if the CD pause
mode is established.
If this lights, it means that the CD
on this tray can be played.
Page 9

MD Parts
MD recording control buttons and lamp (See page 28)
• REC PAUSE:This is used to pause recording.
• REC START: This is used to start recording.
• REC STOP: This is used to stop recording.
0 (eject) button (See page 21)
DIGITAL INPUT lamps (See page
These light according to the sampling frequency
of the digital input signal.
MD opening
XU-301 MD-CD COMBINATION DECK
3
CD
2
CD
CD
1
STANDBY
CD PITCH CONTROL
TIMER
/CLOCK
POWER
NORMAL SPEED
1st TRACK
CD REC
REC
LISTENING
-
3
CD
PLAY & EXCHANGE
EDIT
SKIP
TITLE button (See page
41
EDIT button (See page 35)
28
)
DIGITAL INPUT
48kHz
32kHz 44.1kHz
DIGITAL CD
MIXING
REC SOURCE SELECTOR
SAMPLING RATE CONVERTER
REC
REC
REC
PAUSE
START
STOP
DISPLAY/CHARA button
(See pages
This button changes the contents of the display
window and the character input mode.
17, 21, 29, 42
)
Jog dial
(See pages
DISPLAY
PLAY MODE/CHARA
TITLEEDIT
MIX BALANCE REC LEVEL
CD
LINE
LINE
MIC
PHONES
MIC
SET
MAXMIN
LINE MIC
CANCEL
CD
MD
)
23, 35
English
)
REC SOURCE SELECTORS and lamps
(See pages
• DIGITAL: Selects the device that is connected to the
•CD: Selects CD1 through CD3 as the recording
• LINE: Selects the device that is connected to the
• MIC: Selects the microphone input as the recording
(CD, LINE, and MIC input can be mixed.)
28, 33
)
OPTICAL IN jack as the recording source.
source.
LINE IN jack as the recording source.
source.
Display window
“Playing” indicator (See page
Title mode display
(See page
DIGITAL input
indicator
(See page
28
Level meter
OVER indicator (See page 28)
This lights when the recording input signal
is too high.
Function
41
)
CD
)
display
DISC TRACK
DIGITAL
L
40 30 151020
R
20
TITLE
6
TOC indicator
CANCEL button (See pages
MD button and lamp (See page
MIX BALANCE knob and lamp
(See page
33
)
MIC jack
A microphone which has been purchased
separately can be connected here.
REC LEVEL knob and lamp (See page 28)
Track number displays (See page
)
3 0
OVER
MD
TOC REC
MD EDIT
DIVIDE
JOIN
MOVE
ALL ERASE
MIX PROGRAM
1
Editing mode display (See page
REC indicator (See page
33, 38
20
)
)
SET button (See page
20
)
“Paused” indicator (See page 20)
Play time displays (See page
Music calendar
23
RANDOM
REPEAT
ALL1 CD
(See page
This indicates the numbers of
the tracks. After a track is
played, its number is no
longer indicated.
Random play mode display (See page 23)
Repeat play mode display (See page
35
28
)
35
)
)
20
)
20
)
23
)
* TOC: Table of Contents
This corresponds to the table of contents of a book, etc.
The TOC contains the data on the positions where the tracks are recorded, the breaks between
the tracks, the track order (track numbers), etc.
7
Page 10

Using the Remote Control
R
English
Installing the dry batteries ———————————————————————————
1 Slide open the cover.
2 Install the dry batteries
(Size “AAA”, R03 or UM4 x 2).
3 Slide the cover back
into position.
• Align the polarities with the
markings inside the battery
compartment of the remote
control, and install.
Remote control operations ———————————————————————————
The remote control has two sets of control panels: the regular control panel on the unit’s exterior, and the editing control panel which is
revealed when the exterior panel is opened out. The regular controls are used mainly for playing CDs and MDs and for recording MDs, and
the editing controls are used mainly when editing and inputting titles.
Regular control
panel
CD
CD
CD
STANDBY
POWER
XU-301 MD-CD COMBINATION DECK
3
2
1
CD PITCH CONTROL
TIMER
/CLOCK
NORMAL SPEED
Editing control panel
When the editing controls are usedWhen the regular controls are used
CANCEL
CD
MD
DISPLAY
TITLEEDIT
MIX BALANCE REC LEVEL
CD
LINE
LINE
MIC
MIC
PLAY MODE/CHARA
SET
MAXMIN
PHONES
STANDBY
POWER
CD
3
2
CD
CD
1
XU-301 MD-CD COMBINATION DECK
CD PITCH CONTROL
TIMER
/CLOCK
NORMAL SPEED
-
3
CD
PLAY & EXCHANGE
LISTENING
1st TRACK
EDIT
BEC
CD REC
SKIP
SAMPLING RATE CONVERTE
• To input titles, the remote control
can be operated sideways. Refer
to page 10 for the names of the
buttons.
DIGITAL INPUT
48kHz
32kHz 44.1kHz
-
3
CD
PLAY & EXCHANGE
LISTENING
1st TRACK
EDIT
BEC
CD REC
SKIP
SAMPLING RATE CONVERTER
REC
REC
PAUSE
START
MIXING
REC
DIGITAL CD
LINE MIC
STOP
REC SOURCE SELECTOR
How to use the remote control correctly —————————
• Point the remote control correctly at the remote control sensor on the main unit, and press the buttons.
• The remote control can be operated at a distance of up to 7 meters or so from the remote control
sensor. This distance will be less if the remote control is operated from a position which is not
directly in front or on the same level as the main unit.
8
When the distance over which the remote control can be operated starts to drop, it means that the
batteries are nearing the end of their service life.
Replace both batteries (size “AAA”, R03 or UM4 alkaline batteries) with fresh units.
The dry batteries provided with the unit are for operational check purposes. Replace them with fresh
units at the earliest opportunity.
Page 11

When installing the dry batteries, ensure that the and polarities are aligned correctly with the
markings.
Do not drop the remote control or subject it to strong impact.
I In order to ensure that the remote control does not fail to operate, avoid operation under the following
conditions:
• When the remote control sensor is exposed to direct sunlight or other intense sources of light
• When objects in front of the remote control sensor block the transmission of signals from the
remote control
Names of the buttons (regular control panel) —————————————————
English
, ) (See pages
Number buttons (
These are used for CD or MD direct play operation.
They are also used for MD editing operations.
~
MIX PROGRAM , and
buttons (See page 25)
These are used to establish the MIX program
play mode.
NORMAL button
(See pages
This releases the MIX program
play mode or random mode.
16, 23, 25
)
CD PITCH CONTROL buttons
14
(See page
)
1st TRACK REC button
LISTENING EDIT and SKIP buttons
REC SOURCE selector buttons
REC PAUSE button
15, 20
)
POWER button
CD1, CD2 and CD3 buttons
REPEAT button (See pages
This is used to listen to a CD or MD repeatedly.
RANDOM button (See pages
This is used to play CD or MD tracks at random.
16, 23
16, 23
)
)
DISPLAY MODE button
21
(See page
This changes what it is to be shown in the
display window.
)
CD REC button
TRACK MARKING mode selector
button (AUTO/MANUAL)
(See page
32
)
REC START button
4 , ¢ buttons
(See pages
These are used to locate tracks on a CD or MD.
15, 22
)
REC STOP button
MD button
3 (play) button
This is used to start CD or MD play.
1 , ¡ buttons (See pages
15, 22
)
7 (stop) button
CD button
Buttons which are not described here function in the exactly same way as their counterparts on the main unit.
9
Page 12

Names of the buttons (editing control panel) —————————————————
43
Character input buttons (See page
English
These enables characters to be input directly when
titles are to be given to a CD or MD.
)
TITLE button
EDIT button
SET button
ENTER button
(See page 43)
This is used to enter the
editing modes.
Not used
Upper/lower-case letter selector button (See page 43)
• Upper-case letters are input when this button’s lamp is off.
• Lower-case letters are input when this button’s lamp is lighted.
< / 4| , ¢ / > buttons (See pages
• In the MIX program play mode: These buttons are used to select theprogram source and tracks.
• When titles are given: These buttons select the title input mode and track numbers, and
they also move the cursor while the characters are input.
CANCEL button
3 (Play) button (page 26)
Buttons which are not described here function in the exactly same way as their counterparts on the main unit.
25, 43
)
10
Page 13

Power ON/OFF Operations
MD
XU-301 MD-CD COMBINATION DECK
CD
3
2
CD
CD
1
STANDBY
CD PITCH CONTROL
TIMER
/CLOCK
POWER
NORMAL SPEED
1st TRACK
CD REC
REC
POWER button
• To turn on the power
Main unit
Remote control
Lamp goes out.
STANDBY
STANDBY
POWER
POWER
Power ON/OFF operations
CD1, CD2, CD3 buttons
LISTENING
CD1, CD2, CD3 buttons
DIGITAL INPUT
32kHz 44.1kHz
-
3
CD
PLAY & EXCHANGE
EDIT
SKIP
SAMPLING RATE CONVERTER
REC
REC
REC
PAUSE
DIGITAL CD
START
STOP
REC SOURCE SELECTOR
6 button
• To turn on the power by pressing a function
When the power is off, it can be turned on and a function can be
selected simply by pressing one of the buttons shown in the figure
• The currently
selected function
(“CD” at the time of
purchase) appears in
the display window.
below.
Main unit
Remote control
CD button
48kHz
LINE MIC
CANCEL
CD
MD
MIXING
MD button
button once
DISPLAY
TITLEEDIT
MIX BALANCE REC LEVEL
CD
LINE
LINE
MIC
MIC
Function
“CD”
PLAY MODE/CHARA
SET
MAXMIN
PHONES
CD button
POWER button
3 button
Operation
If one of these buttons is pressed
when a CD is on the corresponding CD tray, continuous
play starts from the CD tray
which corresponds to the button
which was pressed.
MD button
English
• To turn off the power
Main unit
Remote control
Lamp lights.
STANDBY
STANDBY
POWER
POWER
Main unit
CDCD
“CD”
The function is set to “CD.”
Remote control
• The clock display
appears in the
display window. It
Main unit
flashes if the clock
has not been set.
“MD”
The function is set to “MD.”
Remote control
(The power can be
turned OFF only by
the POWER button.)
• When the 6 button (or the 3 button on the remote control) is
pressed, the power is turned on, and the selected function is established. Play will start when the CD has been placed on the tray or
the MD has been inserted in its slot.
When an MD is installed or one of the CD trays is opened, the power will be turned on but the
function is not selected. If the 0 (MD eject) button is pressed when an MD has been inserted in its
slot, the power is switched off after the MD has been ejected.
11
Page 14

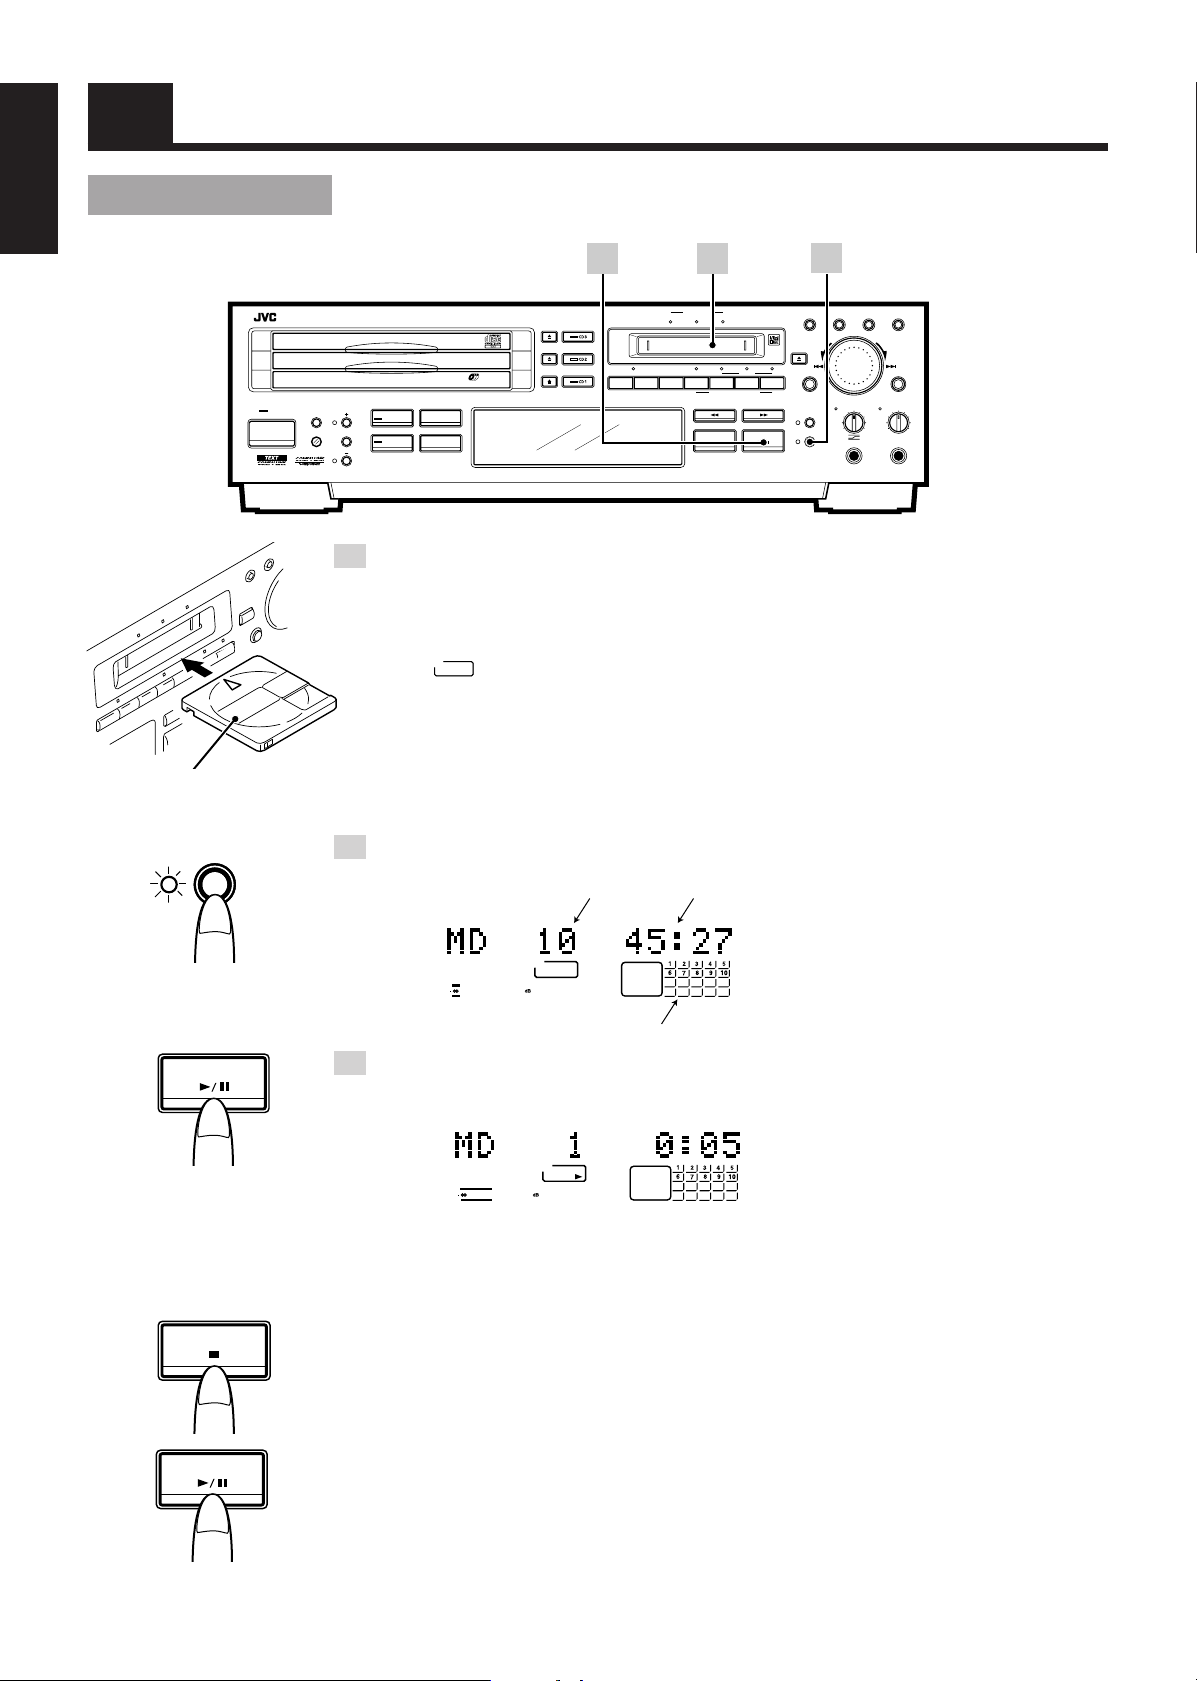
Listening to CDs
Operate by following the steps
below in numerical order.
English
Continuous Play (playing CD1, CD2
and CD3 through once each)
·
1
2
XU-301 MD-CD COMBINATION DECK
3
CD
2
CD
1
CD
STANDBY
CD PITCH CONTROL
TIMER
/CLOCK
POWER
NORMAL SPEED
1st TRACK
CD REC
REC
LISTENING
-
3
CD
PLAY & EXCHANGE
EDIT
SKIP
Example: When playing starting with CD1
1 Open the CD tray (by pressing the CD1 0 button).
• The power comes on, and the CD1 tray opens.
2 Place the CD in position and close the tray.
Place the CD with its
label side facing up.
SAMPLING RATE CONVERTER
3
CANCEL
CD
MD
DISPLAY
TITLEEDIT
MIX BALANCE REC LEVEL
CD
LINE
LINE
MIC
MIC
DIGITAL INPUT
48kHz
32kHz 44.1kHz
REC
REC
REC
PAUSE
START
STOP
DIGITAL CD
REC SOURCE SELECTOR
MIXING
LINE MIC
PLAY MODE/CHARA
SET
MAXMIN
PHONES
• Place an 8-cm CD in
the center cutout.
• While referring to steps 1 and 2, press the CD2 0 button and CD3 0 button, and place CDs in
position on the CD2 and CD3 trays.
• While the tray concerned is being opened or closed or while the CD selection is being changed
internally, no operation will result even if the 0 button is pressed.
3 Press the CD1 button. \ Play now starts.
• The function is set to “CD,” and CD1 play starts from track No.1.
CD
MD
L
40 30 15102063 0
R
• The numbers of the tracks which have been played are cleared from the music calendar.
- When CD3 has been played through, operation stops automatically.
• When one or more CDs are already on the trays.
Press the CD1, CD2 or CD3 button corresponding to the CD concerned directly. Continuous play
starts with the CD corresponding to the number of the button pressed. If the button is pressed when
the power is turned off, continuous play starts when the power is next turned on.
• When play starts from CD2
The CDs are played in the sequence of CD2 = CD3 = CD1, after which play is automatically
stopped.
• When play starts from CD3
The CDs are played in the sequence of CD3 = CD1 = CD2, after which play is automatically
stopped.
If one of the trays does not contain a CD, play skips to the CD in the next tray in the sequence.
12
Page 15

• Playing CDs using the 6 button
CDCD
English
• First set the
function to “CD.”
When the above button is then pressed,
play starts from the CD on the tray for
which “ ” is displayed.
Stopping CD play —————————————————————
• Stopping play at any time
• When the button on the left is pressed after the function has been set to “CD,” the track number
and play time appear on the display.
When all the tracks on a CD have been played through, play will stop automatically.
• Stopping play temporarily
• If the button on the left is pressed when the function has been set to the “CD” mode, the play
status display and 8 indicator flash. When it is pressed again, play is resumed from the place
where it was stopped.
• Concerning the CD numbers and play status display
The display shows for each CD tray whether or not a CD has been inserted as well as the play status
of the CD.
This is displayed when
CD text has been entered.
While a CD is playing, this lights in sequence,
and it flashes in the pause mode. It goes off when
“NO DISC” is displayed to indicate that a disc has
not been inserted.
The CD on the CD tray for which
this has lighted is playing.
Precaution concerning volume setting
Unlike analog records, CDs have very low levels of noise. If you set the volume on the basis of the
level of the noise heard during the intro as you might with an analog record, an unexpectedly loud
sound may be delivered as a result. Before turning off the power, turn down the volume to prevent
this from happening.
If, in step 2, the CD1 button is pressed first while the CD tray is open, the CD tray will close, and play
will start from the first track on that CD.
Storing CDs
• Always ensure that each CD is stored in its own case.
• Do not place CDs in direct sunlight, near a heating appliance or any other location which is
susceptible to high temperatures.
If cellophane tape, an adhesive sticker or some other form of glue is present on the label side, clean it
off before use.
- Do not stick adhesive labels or write anything on a CD.
- Do not bend CDs.
- Do NOT insert shaped CDs, such as CDs in a heart, flower or other shape, because their shape does
not match the shape of the CD tray, and using them will give rise to malfunctioning.
13
Page 16

CD PITCH CONTROL ————————————————————
English
The CD PITCH CONTROL buttons
The CD play signals are output to any other device from DIGITAL OUT OPTICAL only when the play
speed is set to NORMAL.
Normally, NORMAL SPEED should be set.
and can be used to vary the CD playback speed by up to ±12%.
CD Text———————————————————————————
“CD Text” is a new function featured by music CDs which CDs available to date did not have: it displays
the album title, names of the tracks and artists, and other information.
This unit displays the CD Text data using alphanumerics. When material is digitally recorded onto an
MD, the CD Text data is recorded together.
• To view the CD text information
Press the DISPLAY/CHARA button (or the DISPLAY MODE button on the remote control) in the
stop or play mode.
Main unit
DISPLAY
/CHARA
Remote control
Track number
and play time
DISC TITLE (or TRACK TITLE)
\
«
PERFORMER
«
GENRE
»
«
SONGWRITER
«
COMPOSER
«
ARRANGER
«
MESSAGE
• What is displayed changes each
time this button is pressed. Text
containing more than 13 characters
will be scrolled.
NOTICE
“ ” may be displayed as shown if the CD is dusty or scratched or if it has been placed
upside down on the tray. In a case like this, check whether the CD is upside down, and turn it over if
it is. If it is not, check whether the CD is dusty or scratched and clean or replace it if it is.
If there are no CDs inside the unit and the 6 button or CD1, CD2 or CD3 button is pressed, the
“NO DISC” message will appear after the corresponding number of the CD.
“NO DATA” is displayed for any item in the CD text for which no data has been recorded.
When the REPEAT button of the remote control is pressed during continuous play, the continuous
play mode is released and the repeat play mode is established instead.
14
Page 17

Direct Play (starting play from a specific track)
CD play can be started from a specific track by pressing the corresponding number button(s) on the
remote control.
1
2
2
1
1 Press the CD button.
• Press the button corresponding to the CD whose track is
to be heard.
English
2 Press the number button(s).
• To play a track from No.1 to No.10
Press the number button (
~
) corresponding to the track.
• To play track No.11 or above
First press the button, and then press one of the number buttons (
Example: Track No.15
Press
Example: Track No.20
Press
Example: Track No.25
Press
The track number corresponding to the buttons pressed appears in the display window, and direct play
now starts.
followed by .
followed by .
twice followed by .
•
•
•
~
).
• Another track can be selected even during play.
Press the number button(s) corresponding to the track which is to be heard. The display now changes
to indicate the corresponding track No., and play starts from the beginning of the track concerned.
• To select a track of a CD on another tray, select the CD tray and then perform the same operation.
Reverse Search and Forward Search
After pressing the CD button.
• Reverse search or forward search is possible by holding down the corresponding button during play.
A garbled sound will be heard during reverse search or forward search. Release your finger when the
part to be heard is reached.
Main unit Remote control
Reverse search
Forward search
Reverse search
Forward search
15
Page 18

English
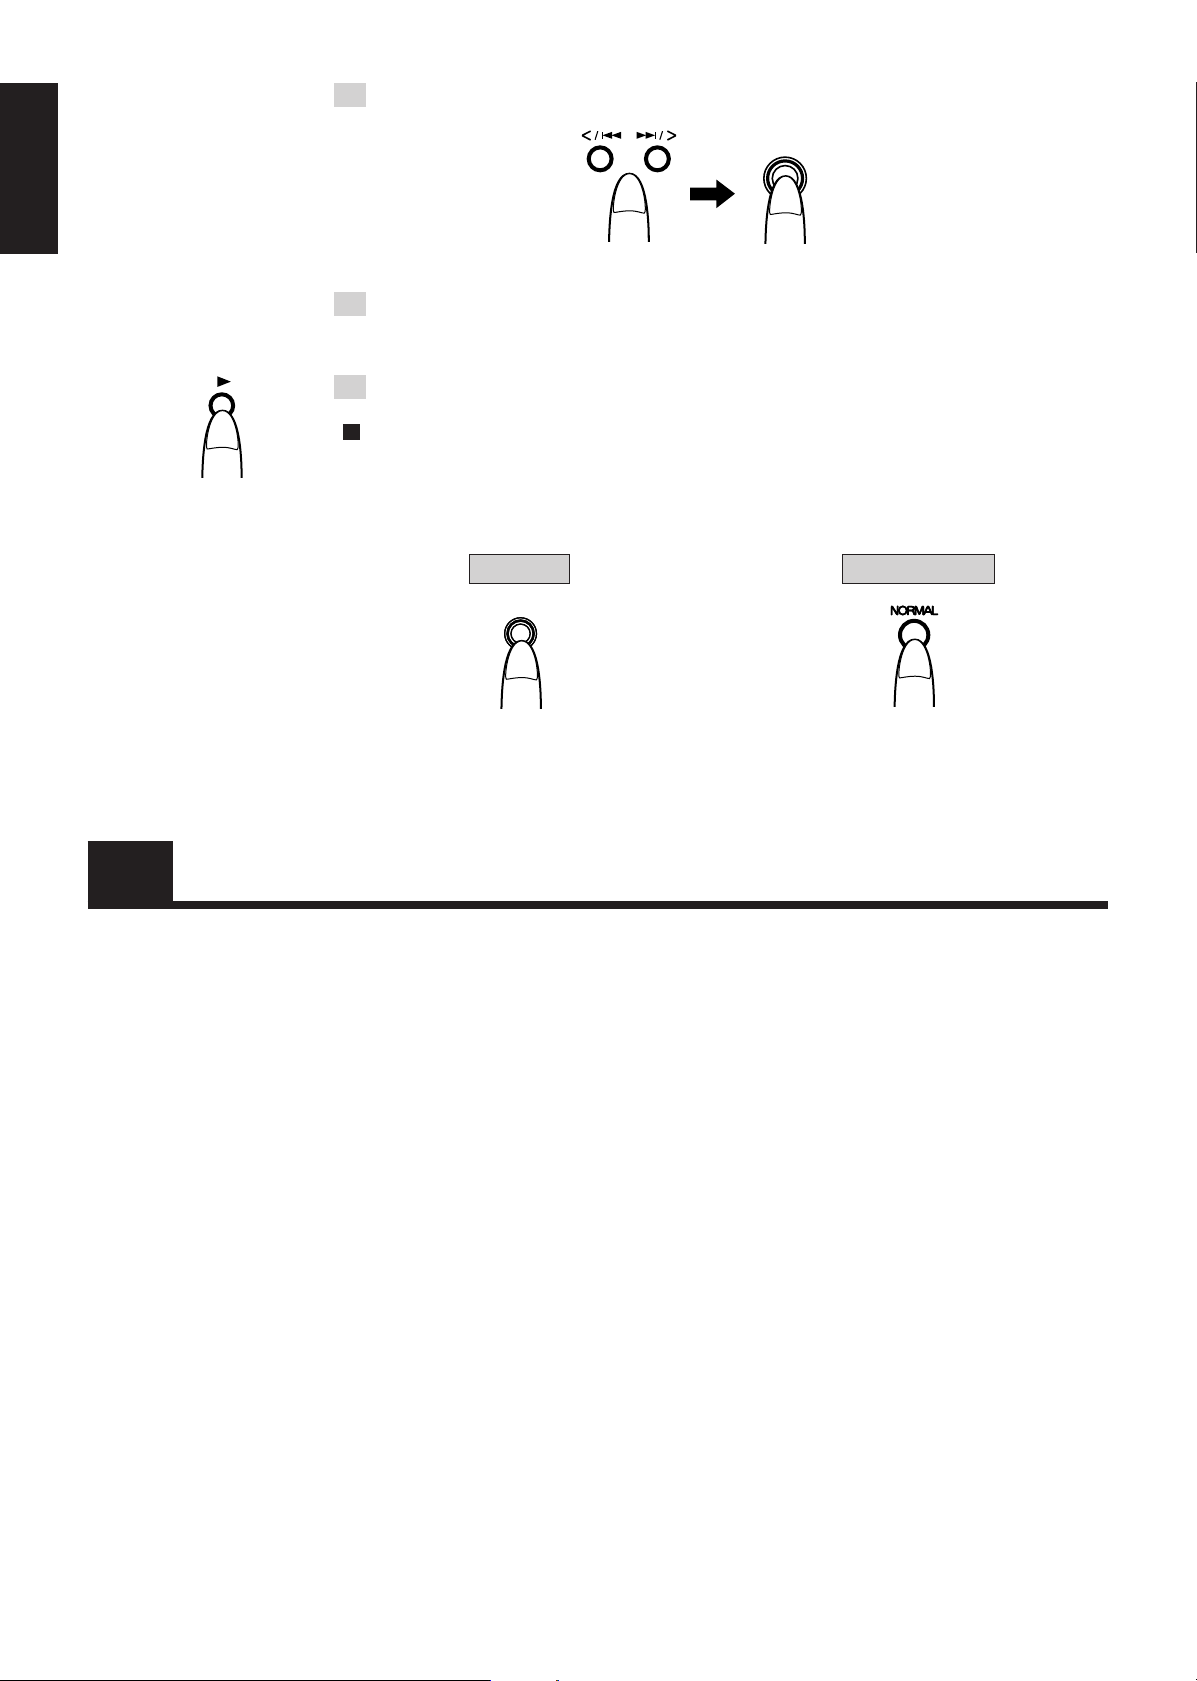
Skipping Tracks
• To skip to the previous or next track with this unit, turn the jog dial. With the remote control, tap the
¢ or 4 button once. When the operation is performed while the last track on the CD is playing,
play moves on to the next CD.
Main unit Remote control
REPEAT button
To skip to the start
of the current or
previous track
Direct play cannot be initiated by pressing the button alone: this button must be used with one of
the number buttons (
“RANDOM” appears on the display. In this case, clear the display first.
~
To skip to the start
of the next track
). Neither can direct play be initiated when “MIX PROGRAM1–3” or
To skip to the start
of the current or
previous track
To skip to the start of
the next track
Repeat Play (using the remote control)
• The repeat play mode can be selected by pressing the REPEAT button on the remote control when the
function is set to “CD.” Each time, the button is pressed, a different display appears in the display
window as shown below.
Displayed.
REPEA T ALL : Repeat play of all the
\
Repeat play mode
is released.
Play is repeated in the selected mode when the CD1, CD2 or CD3 button or 3 button (or the 6 button
on the main unit) is pressed.
»
«
REPEAT 1 : Repeat play of 1 track
tracks on all the CDs.
Random Play
16
RANDOM button
• The random play mode can be selected by pressing the RANDOM button on the remote control or the
PLAY MODE button on the main unit when the function is in the CD stop mode.
Main unit
PLAY MODEPLAY MODE
Normal display
(play mode is
released)
• Press this button in
the stop mode.
Remote control
Normal display
(random mode is released)
• Press this button in
the stop mode.
Random play is started by pressing the 6 button (or the 3 button on the remote control).
P1 NO PROGRAM
\
«
P2 NO PROGRAM
«
P3 NO PROGRAM
»
«
CD RANDOM
: MIX program play mode
: Random play mode
CD RANDOM
(Press the NORMAL button to
return to the normal mode.)
• To release the random play mode
Press the PLAY MODE button in the stop mode.
“RANDOM” is cleared from the display window, and the random play mode is released.
The NORMAL button on the remote control can also be used to release this mode.
Page 19

Giving a title to a CD
The CD can be given a title as well as the name of the artist and
genre of music using up to 32 characters.
3
CD
2
CD
CD
1
STANDBY
POWER
1
DIGITAL INPUT
48kHz
XU-301 MD-CD COMBINATION DECK
CD PITCH CONTROL
TIMER
/CLOCK
NORMAL SPEED
1st TRACK
CD REC
-
3
CD
PLAY & EXCHANGE
LISTENING
EDIT
REC
SKIP
SAMPLING RATE CONVERTER
32kHz 44.1kHz
REC
REC
REC
PAUSE
DIGITAL CD
START
STOP
REC SOURCE SELECTOR
1 Select the CD which is to be given a title.
Example: CD1
• The title can be given while the CD is playing or when it has stopped.
2 Press the TITLE button.
TITLE
• The disc title input mode is now established.
-1
·
3
-2
3
MIXING
LINE MIC
2
CANCEL
·
CD
MD
6
DISPLAY
TITLEEDIT
MIX BALANCE REC LEVEL
CD
LINE
LINE
MIC
MIC
4
PLAY MODE/CHARA
SET
MAXMIN
PHONES
Flashing
This appears when no title has been given.
-1
English
5
-2
·
5
3 Use the jog dial to select the items and press the SET button.
SET
• Turn the dial counterclockwise
to go in the reverse direction
• If nothing has been entered when PERFORMER or GENRE has been selected, “NO DATA” is
displayed.
• When genre has been selected, operation advances to step 5 on page
DISC TITLE : Disc name
«
PERFORMER : Name of artist
«
GENRE : Genre of music
18
.
• To enter the title or name of the artist
4 Select the type of characters to be used for the title.
DISPLAY
/CHARA
Each time this is pressed,
the character type changes.
\
Upper-case letters/symbols
«
Lower-case letters/symbols
«
Numbers
For details, refer to the character layout table on page 44.
17
Page 20

5 Input the title (using up to 32 characters).
SET
English
To return to a
previous character
1 Select the characters.
To advance to a
later character
2 Enter the selection.
Example : Disc title
CD
DISC
TITLE
MD
L
40 30 15102063 0
R
• If the wrong character has been input, clear it using the CANCEL button.
• The title of your choosing is input by repeating steps 4 and 5.
• To clear a particular character which has been input, use the 1 button to align the cursor with
the character, and press the CANCEL button. Then, select the correct character and press the SET
button. In this way, any of the characters can be corrected.
• To input a space, press the ¡ button during the input procedure. A space can be input either by
pressing the SPACE button on the remote control or by entering the space
(positioned between
Z and !) among the letters and symbols.
Titles for up to 200 CDs can be stored in the unit’s memory. When one of these CDs is inserted, its
title will be displayed. Track titles and other CD text information is copied together during digital
recording.
To stop operation at any time
In the play mode, press the 7 (stop) button. In the stop mode, press the 6 button.
TITLE
TITLE
• When the title or name of the artist has been entered
6 Press the TITLE button.
• “EDITING” appears, and the data is stored in the memory IC.
• To enter the name of the artist, repeat the procedure starting from step 1.
• Selecting and entering a genre (genres for up to 200 CDs can be
stored)
Continued from step 1 on page
17
5 Use the jog dial to select and enter the genre.
SET
NO DATA
(this appears before
the genre is entered
1 Select the genre.
2 Enter the selection.
or canceled)
• Each time the jog dial is turned, one of the 27 genres can be selected. Genres contained 14 or
more letters are scrolled on the display. ( \ See list of genres on the next page)
ADUL T CONTEMPORARY
\
«
ALTERNATIVE ROCK
»
jj
»
«
SPOKEN WORD
WORLD MUSIC
\
6 Press the TITLE button.
• “EDITING” appears, and the genre is stored in the memory IC.
18
To cancel a genre which has been stored in the memory IC
Use the jog dial to select “NO DATA,” press the SET button and then press the TITLE button.
The genre is now canceled. A different genre can now be selected and stored.
Page 21

List of Music Genres ————————————————————
Genre
ADUL T CONTEMPORAR Y
ALTERNATIVE ROCK
CHILDRENS MUSIC
CLASSICAL
CONTEMPORARY CHRISTIAN
COUNTRY
DANCE
EASY LISTENING
EROTIC
FOLK
GOSPEL
HIP HOP
JAZZ
LA TIN
MUSICAL
NEW AGE
OPERA
OPERETT A
POP MUSIC
RAP
REGGAE
ROCK MUSIC
RHYTHM EFFECTS
SOUND EFFECTS
SOUND TRACK
SPOKEN WORD
WORLD MUSIC
English
Disc Lock Function
To prevent children from taking out or inserting CDs
A Disc Lock function can be engaged to make it impossible for children to take CDs out or insert others.
In the power standby mode, press CD1 0 button while holding down 7 button.
“LOCKED” appears for 3 seconds, and it is no longer possible to take out or insert CDs.
• To release the Disc Lock function.
Repeat the same step.
“UNLOCKED” appears for 3 seconds, and the Disc Lock function is released.
19
Page 22
Listening to MDs
Operate by following the steps
below in numerical order.
English
Place the MD with its label side facing
up, and insert it in the direction of the
‹or ] mark.
Lamp lights.
MD
CD
CD
CD
STANDBY
POWER
Playing all tracks
XU-301 MD-CD COMBINATION DECK
3
2
1
CD PITCH CONTROL
TIMER
/CLOCK
NORMAL SPEED
1st TRACK
CD REC
REC
1 Place the MD in position.
• Place the MD with its label side facing up. When it is inserted in the direction shown by the
arrow, the power turns on and the MD is automatically drawn inside.
• When “MD” is already set as the function, the track numbers and play time are displayed after the
“TOC READING” display.
• The
2 Set the function to “MD.”
-
3
CD
PLAY & EXCHANGE
LISTENING
EDIT
SKIP
MD
display appears to indicate that an MD has been inserted.
SAMPLING RATE CONVERTER
3 1
DIGITAL INPUT
32kHz 44.1kHz
REC
REC
REC
PAUSE
DIGITAL CD
START
STOP
48kHz
MIXING
REC SOURCE SELECTOR
LINE MIC
CANCEL
CD
MD
2
TITLEEDIT
MIX BALANCE REC LEVEL
LINE
MIC
MIC
DISPLAY
CD
LINE
PLAY MODE/CHARA
SET
PHONES
The display changes to track No.1 after 3 seconds.
MAXMIN
MD
L
40 30 15102063 0
R
Music calendar
3 Press the 6 button. \ Play now starts.
• MD play starts from track No.1.
MD
L
40 30 15102063 0
R
• The numbers of the tracks which have been played are cleared from the music calendar.
Stopping MD play —————————————————————
• Stopping play at any time
• When the button on the left is pressed, the track number and play time appear on the display.
When all the tracks on an MD have been played through, play will stop automatically.
• Stopping play temporarily
• When the button on the left is pressed, 8 is displayed. When it is pressed again, play is resumed
from the place where it was stopped.
20
Page 23

When the MD has been placed inside ———————————
MD
• When the button on the left is pressed,
Lamp
lights.
the power turns on, and play starts.
• To eject the MD
Press the MD 0 button. “MD EJECT” appears in the display window, and the MD is ejected.
MD
The
The MD can be ejected even when the power is off. In this case, as soon as the MD is ejected, the
power is automatically turned off.
Precaution concerning volume setting
Unlike analog records, MDs have very low levels of noise. If you set the volume on the basis of the
level of noise heard during the intro as you might with an analog record, an unexpectedly loud sound
may be delivered as a result. Before turning off the power, turn down the volume to prevent this from
happening.
If there is no MD inside the unit, “MD NO DISC” is displayed when the function is set to “MD” or
the 6 button is pressed.
display is cleared.
Changing the display in the display window ———————
• Use the DISPLAY/CHARA button (or the DISPLAY MODE button on the remote control). Each
time it is pressed, the display changes as shown below.
English
Main unit
DISPLAY
DISPLAY
/CHARA
/CHARA
Remote control
• When it is pressed in the stop mode
\
Play time of track No.1
«
Play time of all the tracks
«
Remaining time (REMAIN) : “0:00” appears for a play-only MD.
«
Disc name : “NO TITLE” appears when the disc name of the MD has not
been recorded.
• When it is pressed during play
Elapsed time of track being played
\
«
Track name : “NO TITLE” appears when the track name has not been
recorded.
<Tips and Precautions>
• To ensure that the MD sound remains perfect
Each MD disc is housed inside a cartridge which protects it from dust and dirt and which ensures easy
handling. However, bear in mind the following precautions to ensure that its sound remains perfect.
Do not open the shutter!
The shutter is locked to prevent it from opening. Forcing it open will break the disc.
21
Page 24

English
Keep MDs away from the following locations!
Do not place or keep MDs in any of the following locations.
• Any location exposed to direct sunlight, inside a car or wherever the temperature may increase to
a very high level
Such locations will warp the discs and render them unusable.
• A bathroom or other extremely humid location
The disc may rust.
• A beach, sandbox or other sandy location
Fine particles will enter through the gaps in the cartridge, dirtying or scratching the disc surface.
Clean at regular intervals!
If the cartridge becomes dusty or dirty, wipe away the dust or dirt using a soft, dry cloth.
Direct Play (starting play from a specific track)
MD play can be started from a specific track by pressing the corresponding number button(s) on the
remote control.
2
1
1 Set the function to “MD.”
MD
Lamp lights.
2 Press the number button(s).
• To play a track from No.1 to No.10
Press the number button (
~
) corresponding to the track.
• To play track No.11 or above
First press the button, and then press one of the number buttons (
Example: Track No.15
Press
Example: Track No.20
Press
Example: Track No.25
Press
The track number corresponding to the buttons pressed appears in the display window, and direct play
now starts.
followed by
followed by
twice followed by
.
.
•
•
•
.
~
).
• Another track can be selected even during play.
Press the number button(s) corresponding to the track which is to be heard. The display now changes
to indicate the corresponding track No., and play starts from the beginning of the track concerned.
22
Reverse Search and Forward Search
After pressing the MD button.
• Reverse search or forward search is possible by holding down the corresponding button during play.
A garbled sound will be heard during reverse search or forward search. Release your finger when the
part to be heard is reached.
Main unit
Reverse search
Forward search
Remote control
Reverse search
Forward search
Page 25

Skipping Tracks
• To skip to the previous or next track with this unit, turn the jog dial. With the remote control, tap the
¢ or 4 button once.
Main unit
Remote control
English
REPEAT button
To skip to the start
of the current or
previous track
Direct play cannot be initiated by pressing the ( ) button alone: this button must be used with one
of the number buttons (
“RANDOM” appears on the display. In this case, clear the display first.
To skip to the start of
the next track.
). Neither can direct play be initiated when “MIX PROGRAM1–3” or
~
To skip to the start
of the current or
previous track
To skip to the start of
the next track
Repeat Play (using the remote control)
• The repeat play mode can be selected by pressing the REPEAT button on the remote control when the
function is set to “MD.” Each time, the button is pressed, a different display appears in the display
window as shown below.
REPEAT ALL : Repeat play of all the
\
tracks on the MD.
Repeat play mode
is released.
Play is repeated in the selected mode when the 3 button (or the 6 button on the main unit) is pressed.
»
REPEAT 1 : Repeat play of 1 track
Displayed
«
Random Play
RANDOM button
• The random play mode can be selected by pressing the RANDOM button on the remote control or the
PLAY MODE button on the main unit when the function is set to “MD.”
Main unit
PLAY MODEPLAY MODE
Normal display
(play mode is
released)
• Press this button
in the stop mode.
Remote control
Normal display
(random mode is released)
• Press this button
in the stop mode.
Random play is started by pressing the 6 button (or the 3 button on the remote control).
P1 NO PROGRAM
\
»
«
P2 NO PROGRAM
«
P3 NO PROGRAM
«
MD RANDOM
: MIX program play mode
: Random play mode
MD RANDOM
(Press the NORMAL button to
return to the normal mode.)
• To release the random play mode
Press the PLAY MODE button in the stop mode.
“RANDOM” is cleared from the display window, and the random play mode is released.
The NORMAL button on the remote control can also be used to release this mode.
23
Page 26

English
Operate by following the steps
MIX PROGRAM Play
Up to 16 tracks can be programmed in programs 1, 2 and 3. Any tracks on the MD, CD1, CD2 and CD3 can be selected.
1
below in numerical order.
-1
·
7 2 5
4
-1
XU-301 MD-CD COMBINATION DECK
CD
3
2
CD
CD
1
STANDBY
CD PITCH CONTROL
TIMER
/CLOCK
POWER
PLAY MODE
NORMAL SPEED
• Press this if the stop mode
has been established.
CANCEL
CD
MD
DISPLAY
TITLEEDIT
MIX BALANCE REC LEVEL
CD
LINE
LINE
MIC
MIC
PLAY MODE/CHARA
SET
MAXMIN
PHONES
-2
··
4
1st TRACK
CD REC
DIGITAL INPUT
32kHz 44.1kHz
48kHz
-
3
CD
PLAY & EXCHANGE
LISTENING
EDIT
REC
SKIP
SAMPLING RATE CONVERTER
REC
REC
REC
PAUSE
START
STOP
DIGITAL CD
MIXING
REC SOURCE SELECTOR
LINE MIC
1 Insert the MD and CDs whose tracks are to be programmed.
• Tracks on an MD or CD which has not been inserted cannot be played even when they have been
programmed. Operation will simply move on to the next program.
2 Select the program mode. (1 – 3)
\
MIX PROGRAM 1: Program 1
«
Normal display
(program mode
released)
MIX PROGRAM 2: Program 2
«
MIX PROGRAM 3: Program 3
»
«
RANDOM
• “NO PROGRAM” appears when no programming has been performed.
3 Press the SET button.
SET
Program number
Program mode
Programmed
sequence
Program source
Track number
-2
53
24
Example: Program 1
L
40 30 15102063 0
R
MD
MIX PROGRAM
1
4 Select and enter the program source.
SET
Ô MD Ô CD1 Ô CD2 Ô CD3 Ô (back to the beginning)
• The source can be selected in the reverse direction by turning the jog dial counterclockwise.
• When the SET button is pressed, the programming sequence and track number flash.
5 Select and enter one of the tracks.
1 Select the track.
• When track 2 on the MD is selected for program 1: • When the selection is entered:
MD
L
40 30 15102063 0
R
2 Enter the selection.
Flashing
SET
L
R
Program 2 flashes.
MD
40 30 15102063 0
Page 27

6 Repeat steps 4 and 5 (this procedure can be repeated for up to 16
tracks).
• The tracks on the MD alone or only the tracks on the CDs can be programmed also.
7 Press the 6 button to start MIX PROGRAM play.
• The numbers of the tracks which have been played are cleared from the music calendar, and they
are displayed when play is completed.
- Operation stops automatically when all the programmed tracks have been played.
The same operating procedure is followed for programs 2 and 3.
To cancel the programming
Press the CANCEL button. The last program setting is canceled. Press the CANCEL button repeatedly to cancel all the program settings.
To check the programming
To check what has been programmed while the tracks are being programmed, press the 7 (stop)
button, and use the jog dial to check.
Playing MIX PROGRAMs using the remote control ————
English
2
Open the remote control’s cover.
-2
4
-2
··
53
7
1 Insert the MD and CDs whose tracks are to be programmed into
the main unit.
2 Select the program mode.
Example: Program 1
• “P1 NO PROGRAM” is displayed.
3 Press the SET button.
• “P1 S01 MD 1” is displayed.
SET
4 Select and enter the program source.
• Select one of the sources.
= MD = CD1 = CD2 = CD3 = (back to the beginning)
SET
1 This can select the source
in the reverse direction.
• When the SET button is pressed, the programming sequence and track number flash.
-1
4
-1
·
5
2 Then press this button.
25
Page 28
English
5 Select and enter the track.
SET
1 Select the track. 2 Enter the selection.
6 Repeat steps 4 and 5 (this procedure can be repeated for up to
16 tracks).
• The tracks on the MD alone or only the tracks on the CDs can be programmed also.
7 Press the £ button to start MIX PROGRAM play.
Operation stops automatically when all the programmed tracks have been played. The same operating
procedure is followed for programs 2 and 3.
• To return the program mode to the normal status in the stop mode
Main unit
PLAY MODE
• Repeatedly press this until the play time
appears in the display window.
Recording onto MDs
Types of recording —————————————————————
The following 5 types of recording are possible with this unit.
• Manual recording (page 28)
One of the recording sources is selected, and its material is recorded.
• DIGITAL
• CD (CD1–CD3)
• LINE
• MIC
Remote control
• The play time display appears when
this button is pressed.
Read through this section
before recording.
26
• CD recording (single-action recording) (page 29)
CD recording is initiated by a single action: just press the CD REC button.
• CD recording (1st TRACK recording) (page 30)
When the 1st TRACK REC button is pressed, only the first tracks on CD1, CD2 and CD3 are
recorded. You can compile your own album of original hit numbers.
• CD recording (LISTENING EDIT recording) (page 31)
When the LISTENING EDIT button is pressed, only the tracks you want to hear can be programmed
and recorded.
• Mixing recording (page 32)
This enables mixing recording for CD + LINE, CD + MIC or LINE + MIC.
Page 29

Adding track numbers ———————————————————
• Recording the numbers automatically
With CD digital recordings, the numbers are added automatically following the numbers in the
recording source.
• Adding your own numbers (at any time except during synchro REC)
When MANUAL is set using the TRACK MARKING button and the SET button on the main unit or
remote control is pressed during recording, a number can be added exactly where desired.
Sampling rate converter ——————————————————
The unit incorporates a sampling rate converter to ensure that the original digital signals will be recorded
regardless of the sampling frequency (32 kHz, 44.1 kHz or 48 kHz) of the recording source.
Microphone connections —————————————————
Use a microphone equipped with a standard plug.
Microphone
MIC
6.3 mm diameter
standard plug
NOTICE
• To prevent the erasure of important recordings
Each recording MD comes with an accidental erasure prevention knob to ensure that important
recordings will be not erased by mistake. After recording or editing material, slide the knob on the
cartridge side to the open position. This prevents recording over or editing of the existing material.
To proceed with recording over or editing, return the knob to the closed position.
purchased separately
OFF
ON
• If the microphone has an
ON/OFF switch, set it to ON.
English
Accidental erasure prevention knob
Set the knob to the open
position to prevent existing
Set the knob to the closed
position to record or edit.
material from being erased
accidentally.
• When sticking adhesive labels onto MD cartridges for use
Adhere the label securely all the way to the edge of the cartridge so that it will not peel off. If the
label protrudes from its adhesion area or is not adhered properly, it may not be possible to eject the
MD or some other trouble may result.
Analog signals are recorded when the line input and mic input signals are mixed and recorded.
The recording input level must be adjusted.
The “DISC PROTECTED” display appears 3 times and then is released when recording operations
are performed for a MD whose accidental erasure prevention knob has been set to the open position.
27
Page 30

Manual Recording
English
DIGITAL CD
3
CD
2
CD
CD
1
STANDBY
POWER
Flashing
REC
PAUSE
REC
START
Flashing
MIXING
LINE MIC
REC SOURCE SELECTOR
• Press the same button again
to clear the selection.
2
DIGITAL INPUT
XU-301 MD-CD COMBINATION DECK
CD PITCH CONTROL
TIMER
/CLOCK
NORMAL SPEED
1st TRACK
-
3
CD
PLAY & EXCHANGE
LISTENING
EDIT
REC
SKIP
CD REC
SAMPLING RATE CONVERTER
32kHz 44.1kHz
REC
REC
REC
PAUSE
DIGITAL CD
START
STOP
1 Insert the recording MD.
• Insert the MD with its label side facing up.
2 Establish the rec pause mode.
• The remaining recording time on the MD and
The record mode indicator lamp flashes.
• All the REC SOURCE SELECTOR lamps flash when none of the REC SOURCE SELECTOR
buttons have been selected.
3 Select (one of) the recording sources.
• DIGITAL : For recording the sound of a unit which has been connected to the OPTICAL IN
connector (digital input)
• CD : For recording the CDs inserted into CD1, CD2 and/or CD3 (when the CD pitch
control is set to OFF for the digital input)
Note: Analog recording is performed for CD+LINE or CD+MIC mixing even
when the CD pitch control has been set to OFF.
• LINE : For recording the sound of a unit which has been connected to the LINE IN
connector (analog input)
• MIC : For recording the sound from a microphone which has been connected to the MIC
jack (analog input)
48kHz
MIXING
REC SOURCE SELECTOR
MD
31 46
DISPLAY
PLAY MODE/CHARA
TITLEEDIT
MIX BALANCE REC LEVEL
CD
LINE
LINE
MIC
PHONES
MIC
SET
MAXMIN
CANCEL
LINE MIC
CD
MD
appear in the display window.
REC
(When analog signals
are supplied)
REC
PAUSE
REC
START
• If a source has already been selected, its corresponding lamp will light. The lamp of the selected
source stops flashing and lights. The other lamps go off.
4 When analog signals are supplied, adjust the recording level.
Lamp lights.
REC LEVEL
L
R
MAXMIN
(The sound will be recorded with some distortion if the
• Adjust the volume in such a way that the 0 dB display
is not exceeded when the loudest sound is supplied.
40 30 15
10206
3 0
OVER
display (red) lights continuously.)
5 Play the sound of the source to be recorded.
• If the CD1 button is pressed when CDs serve as the source, the tracks are recorded in the follow-
ing sequence: CD1 = CD2 = CD3.
6 Press the REC START button to start the recording.
• Press the TRACK MARKING button on the remote control to allocate track numbers during
recording.
• When MD recording is completed
After “UTOC WRITING” is displayed, operation stops automatically.
Press the REC STOP button to stop the recording at any time.
• DIGITAL INPUT lamps
These lamps light as follows in the rec pause or recording mode.
• DIGITAL : 32 kHz–48 kHz lights depending on the sampling frequency of the recording
source.
• CD : 44.1 kHz lights
28
Page 31

When DIGITAL IN UNLOCK is scrolled and displayed, the OPTICAL IN connector is not connected
to the source unit.
In the case of an MD with some remaining space, the end of the last track recorded is automatically
searched, and recording is commenced immediately.
To record over all the existing tracks, erase all the tracks using the ALL ERASE function (see page
40
), and then proceed with the new recordings.
Upon completion of the MD recording, “UTOC WRITING” is displayed. Operating any button while
this message is displayed may render the MD unusable.
Always wait for “UTOC WRITING” to be cleared before proceeding with the next operation.
When digital input signals are supplied, they will be recorded in their original digital form. There is
no need to adjust their recording level.
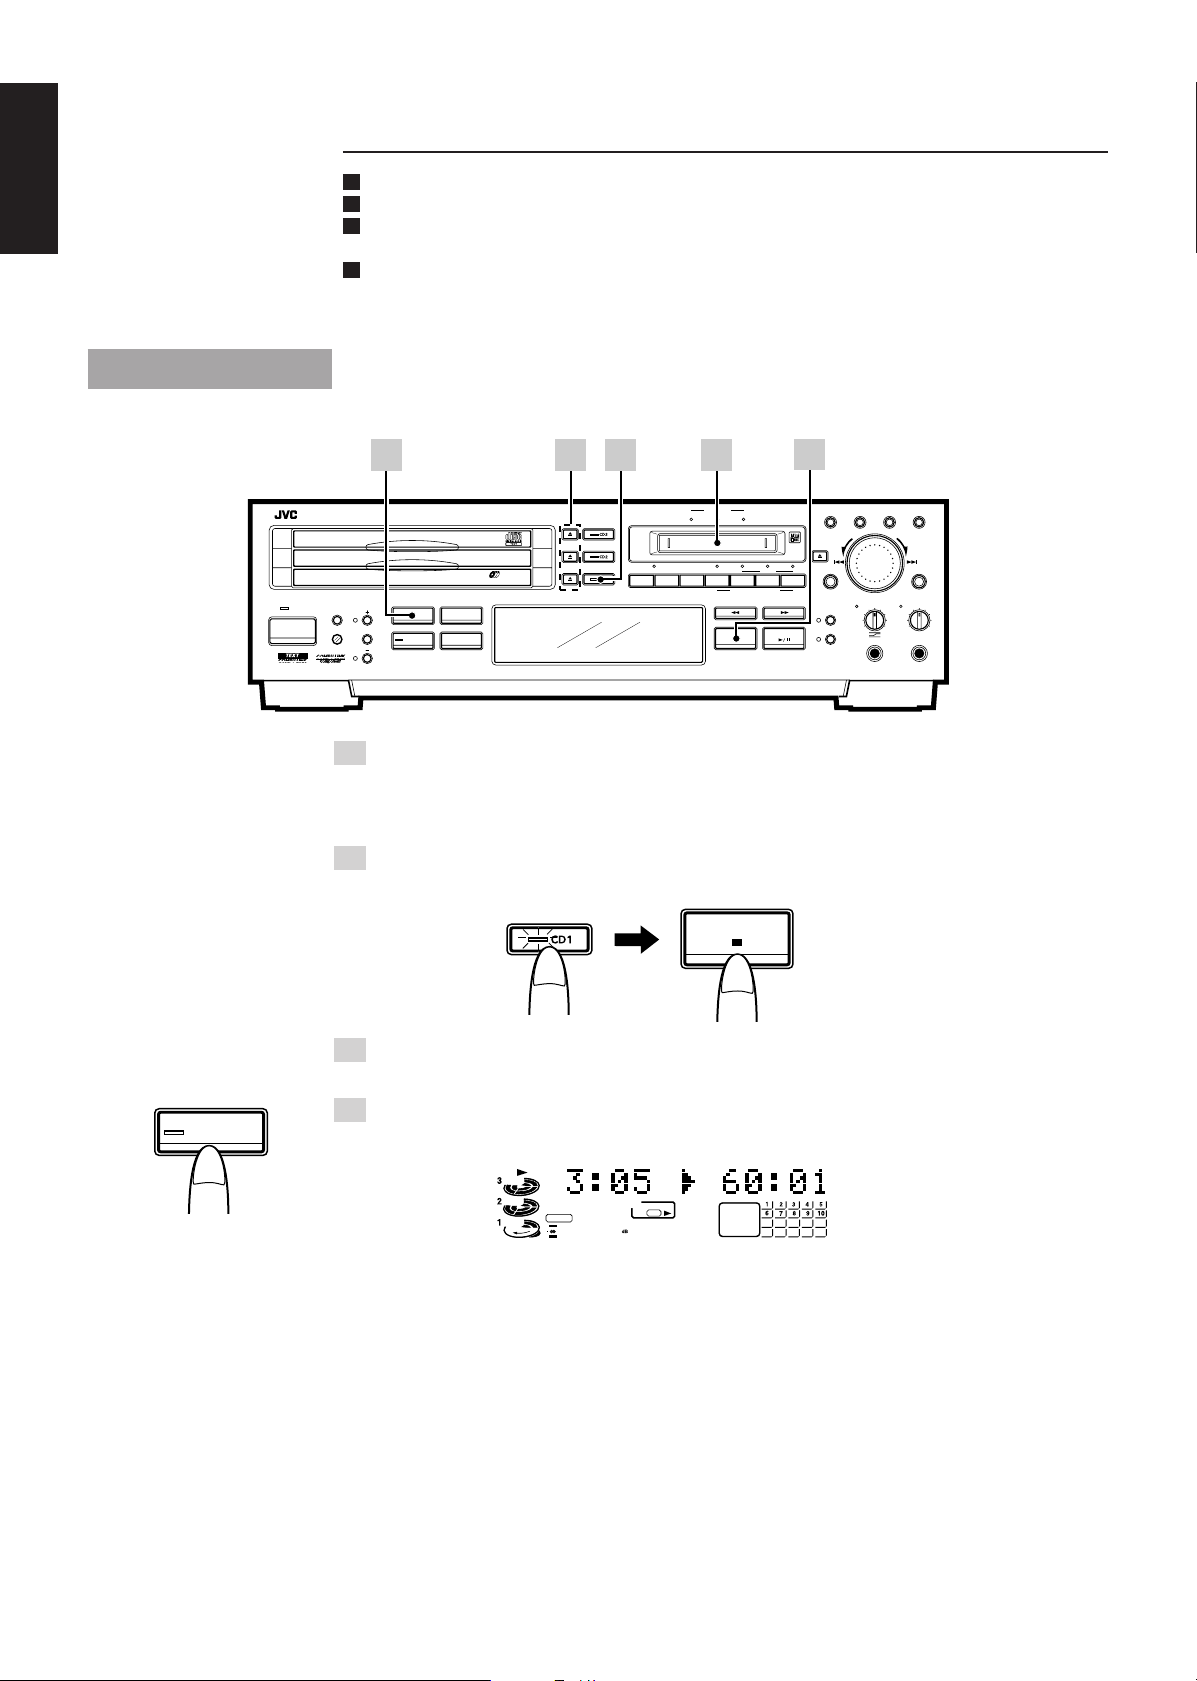
CD Recording (single-action recording)
CD play and MD recording are started simultaneously.
English
CD REC
-1
CD
CD
CD
STANDBY
POWER
XU-301 MD-CD COMBINATION DECK
3
2
1
CD PITCH CONTROL
TIMER
/CLOCK
NORMAL SPEED
3
-
3
CD
PLAY & EXCHANGE
LISTENING
1st TRACK
EDIT
REC
CD REC
SKIP
1
SAMPLING RATE CONVERTER
REC
PAUSE
2
DIGITAL INPUT
48kHz
32kHz 44.1kHz
REC
REC
DIGITAL CD
START
STOP
REC SOURCE SELECTOR
1 Select and stop the CD to be recorded.
Example: When recording CD1
• Only the selected CD is recorded.
2 Insert the recording MD.
• Insert the MD with its label side facing up.
3 Press the CD REC button to start the recording.
• CD play and MD recording start simultaneously. This is called synchro recording. Recording
starts from track 1.
Remaining play time of
track being recorded
MIXING
LINE MIC
-2
1
TITLEEDIT
CANCEL
MIX BALANCE REC LEVEL
CD
MD
LINE
MIC
Remaining recording
time on MD
DISPLAY
PLAY MODE/CHARA
SET
CD
MAXMIN
LINE
PHONES
MIC
Main unit
DISPLAY
/CHARA
The mode changes each
time this is pressed.
Remote control
CD
MD
DIGITAL
L
40 30 15102063 0
R
TOC REC
“DIGITAL” is displayed.
• When a CD is recorded, its digital signals are recorded in their original form. A track mark is
automatically placed where one track changes to the next, and the track number also changes.
• When MD recording is completed
After “UTOC WRITING” is displayed, operation stops automatically. It also stops automatically
when CD play finishes. CD play is transferred to the next tray.
• To check a track number during recording
Press DISPLAY/CHARA button (or DISPLAY MODE on the remote control).
Remaining time of
\ Remaining recording time on MD
track being recorded
CD number and track number ‰ MD track number
‰
«
29
Page 32
English
• To stop the recording at any time
Press the 7 (stop) button. The recording mode is released after “UTOC WRITING” is displayed.
There is no need to adjust the recording level (for a digital recording).
Recording is not possible while a CD or MD is playing.
When the CD REC button is pressed, the function is automatically switched to “CD.” This means
that when the CD to be recorded has been selected, recording can proceed straightaway.
Upon completion of the MD recording, “UTOC WRITING” is displayed. Operating any button while
this message is displayed may render the MD unusable.
Always wait for “UTOC WRITING” to be cleared before proceeding with the next operation.
CD Recording (1st TRACK recording)
Only the first tracks on the CDs can be recorded on the MD.
-2
2
DISPLAY
PLAY MODE/CHARA
TITLEEDIT
MIX BALANCE REC LEVEL
CD
LINE
LINE
MIC
MIC
PHONES
SET
MAXMIN
CANCEL
CD
MD
CD
CD
CD
STANDBY
POWER
XU-301 MD-CD COMBINATION DECK
3
2
1
CD PITCH CONTROL
TIMER
/CLOCK
NORMAL SPEED
-1
4
-
3
CD
PLAY & EXCHANGE
LISTENING
1st TRACK
EDIT
REC
SKIP
CD REC
21 3
SAMPLING RATE CONVERTER
DIGITAL INPUT
48kHz
32kHz 44.1kHz
REC
REC
REC
PAUSE
START
STOP
DIGITAL CD
REC SOURCE SELECTOR
MIXING
LINE MIC
1 Insert CDs into CD1, CD2 and CD3 in the order in which their first
tracks are to be recorded.
• Once the first track of a CD has been recorded, another track on that CD can be substituted during
recording. The substituted CD track is recorded after the last CD.
2 Select CD1 and establish the stop mode.
Example: When recording from CD1 (CD whose first track is to be recorded first)
30
1st TRACK
REC
3 Insert the recording MD.
• Insert the MD with its label side facing up.
4 Press the 1st TRACK REC button to start recording.
• CD play and MD recording start simultaneously. Only the first track on the CD is recorded.
CD
MD
DIGITAL
L
40 30 15102063 0
R
TOC REC
• When a CD is recorded, its digital signals are recorded in their original form. A track mark is
automatically placed where one track changes to the next, and the track number also changes.
• When MD recording is completed
After “UTOC WRITING” is displayed, operation stops automatically. It also stops automatically
when play of the last CD finishes.
• To stop the recording at any time
Press the 7 (stop) button.
The recording mode is released after “UTOC WRITING” is displayed.
Page 33
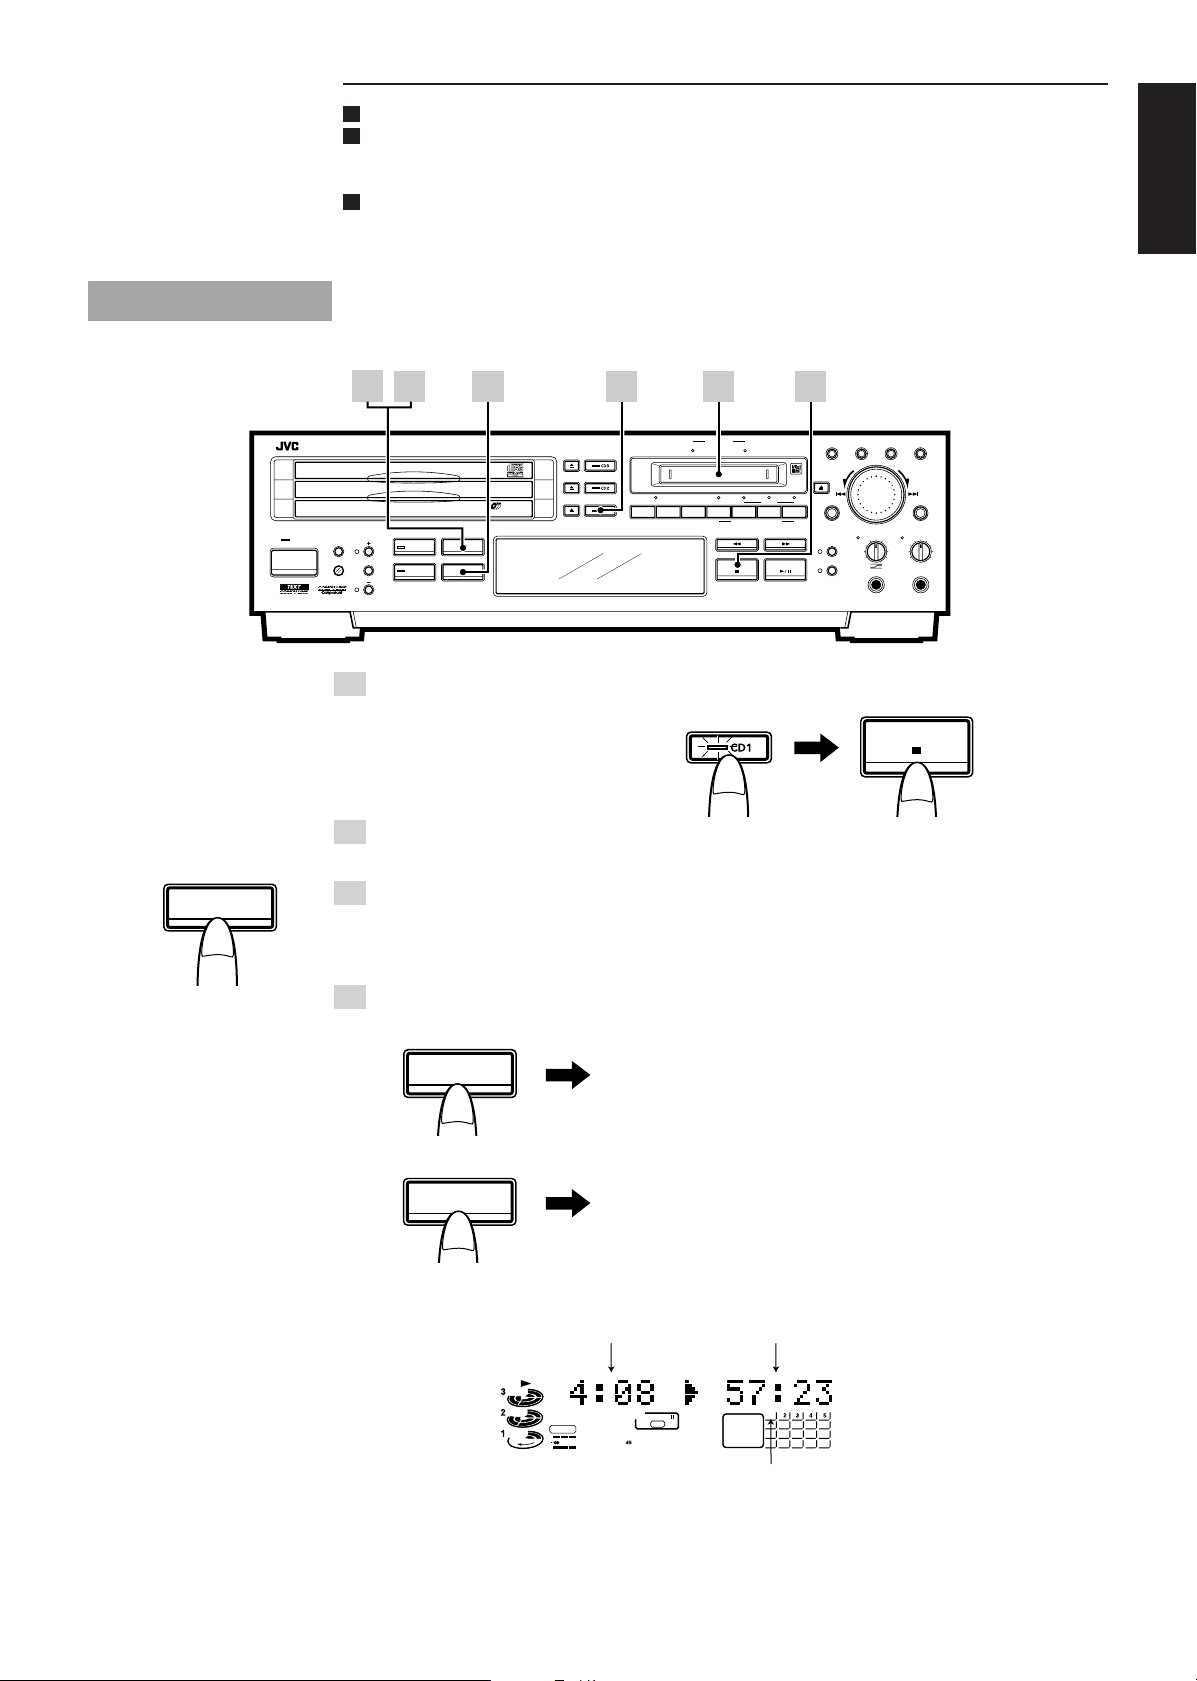
There is no need to adjust the recording level (for a digital recording).
Upon completion of the MD recording, “UTOC WRITING” is displayed. Operating any button while
this message is displayed may render the MD unusable.
Always wait for “UTOC WRITING” to be cleared before proceeding with the next operation.
This unit uses a microcomputer to perform a large number of operations. If the unit fails to operate
no matter which button is pressed, disconnect the power cord, and then wait a few moments before reconnecting it.
CD Recording (LISTENING EDIT recording)
Selected tracks can be programmed and recorded.
English
LISTENING
EDIT
CD
CD
CD
STANDBY
POWER
3
XU-301 MD-CD COMBINATION DECK
3
2
1
CD PITCH CONTROL
TIMER
/CLOCK
NORMAL SPEED
a
·
4
1st TRACK
REC
CD REC
LISTENING
b
4
-
3
CD
PLAY & EXCHANGE
EDIT
SKIP
SAMPLING RATE CONVERTER
-1
1 2
DIGITAL INPUT
32kHz 44.1kHz
REC
REC
REC
PAUSE
START
STOP
DIGITAL CD
1 First, select and stop the CD to be recorded.
Example: When recording CD1
• Only the selected CD is recorded.
2 Insert the recording MD.
• Insert the MD with its label side facing up.
3 Press the LISTENING EDIT button.
• Start play from the first track, “LISTENING EDIT” is scrolled and displayed, and the play time of
the first track and remaining recording time on the MD are displayed. MD is set to the rec pause
mode.
48kHz
MIXING
REC SOURCE SELECTOR
LINE MIC
-2
1
DISPLAY
PLAY MODE/CHARA
TITLEEDIT
MIX BALANCE REC LEVEL
CD
LINE
LINE
MIC
MIC
PHONES
SET
MAXMIN
CANCEL
CD
MD
4 Program the tracks (while the CD is playing).
a. When the track now playing is to be recorded
LISTENING
EDIT
• The track is stored in the memory, and operation moves on to
the next track.
b. When the track is not to be recorded
SKIP
• The track is not stored in the memory, and operation moves on
to the next track.
• When the first track has been stored in the memory
Play time of second track
CD
DIGITAL
L
40 30 15102063 0
R
MD
REC
Remaining recording time on MD
“1” is cleared from the music calendar.
31
Page 34

When there is not much recording time left on the MD, the tracks which can be recorded are automatically searched (on all the CDs).
English
• If a track which can be
recorded is found, its
play time is displayed.
Press the LISTENING
• If no track which can
be recorded is found,
recording will start
from program 1.
EDIT button to
program the track.
When up to 32 tracks are programmed, recording starts from program 1.
The same applies when the programming for all the CDs is completed.
• When MD recording is completed
After “UTOC WRITING” is displayed, operation stops automatically. It also stops automatically
when play of the last CD finishes.
• To stop the recording at any time
Press the 7 (stop) button.
The recording mode is released after “UTOC WRITING” is displayed.
Track marking ———————————————————————
The mode can be switched from AUTO to MANUAL or vice versa by pressing the TRACK MARKING
button on the remote control.
• When AUTO has been set:
• Whenever playback advances from one track to another during digital recording, the track number
at the MD side is automatically incremented by 1.
• Whenever no sound at the playback side continues for 3 or more seconds during analog recording,
the track number at the MD side is automatically incremented by 1.
• When MANUAL has been set:
• The track number at the MD side remains unchanged whether digital recording or analog
recording is performed.
• The track number at the MD side is automatically incremented by 1 by pressing the SET button
on the remote control or unit at the desirable location.
There is no need to adjust the recording level (for a digital recording).
Up to 32 tracks can be included in the programming. The same track cannot be programmed twice.
If a CD has no tracks which are to be recorded, remove it from the CD tray.
Upon completion of the MD recording, “UTOC WRITING” is displayed. Operating any button while
this message is displayed may render the MD unusable.
Always wait for “UTOC WRITING” to be cleared before proceeding with the next operation.
Mixing Recording
XU-301 MD-CD COMBINATION DECK
CD
3
2
CD
CD
1
STANDBY
CD PITCH CONTROL
TIMER
/CLOCK
POWER
NORMAL SPEED
1st TRACK
REC
CD REC
LISTENING
-
3
CD
PLAY & EXCHANGE
EDIT
SKIP
SAMPLING RATE CONVERTER
2 416
REC
PAUSE
3
CANCEL
CD
MD
DISPLAY
TITLEEDIT
MIX BALANCE REC LEVEL
CD
LINE
LINE
MIC
MIC
PLAY MODE/CHARA
SET
MAXMIN
PHONES
DIGITAL INPUT
48kHz
32kHz 44.1kHz
DIGITAL CD
MIXING
REC SOURCE SELECTOR
LINE MIC
REC
REC
START
STOP
32
REC
PAUSE
REC
START
Lamp lights.
1 Insert the recording MD.
• Insert the MD with its label side facing up.
2 Establish the rec pause mode.
• The remaining recording time on the MD and
All the REC SOURCE SELECTOR lamps flash.
MD
REC
appear in the display window.
Page 35

Flashing
MIXING
CD
REC SOURCE SELECTOR
LINE MIC
Example:
CD + LINE
• Press the same button again
to clear the selection.
3 Select two recording sources.
• CD + LINE : To mix and record CD and line input signals
• CD + MIC : To mix and record CD and mic input signals
• LINE + MIC : To mix and record line input and mic input signals
• The lamps of the selected sources stop flashing and light. The other lamp goes off.
• Since analog signals are recorded, the REC LEVEL and MIX BALANCE lamps light.
Lamp lights.
MIX BALANCE
LINE
MIC
CD
LINE
REC LEVEL
MAXMIN
4 Adjust the recording level and mixing balance.
English
REC
PAUSE
REC
START
MIX BALANCE
CD
LINE
LINE
MIC
REC LEVEL
MIX BALANCE
CD
LINE
LINE
MIC
MAXMIN
CD + LINE CD volume is reduced. Line input volume is reduced.
CD + MIC CD volume is reduced. Mic input volume is reduced.
LINE + MIC Line input volume is reduced. Mic input volume is reduced.
• Adjust the volume in such a way that the 0 dB display of the level meter is not exceeded when the
loudest sound is supplied.
5 Play the sound of the source to be recorded.
• If the CD1 button is pressed when mixing with a CD and recording the result, the tracks are
recorded in the following sequence: CD1 = CD2 = CD3.
6 Press the REC START button to start the recording.
• When MD recording is completed
After “UTOC WRITING” is displayed, operation stops automatically. Press the REC STOP button to
stop the recording at any time.
Upon completion of the MD recording, “UTOC WRITING” is displayed. Operating any button while
this message is displayed may render the MD unusable.
Always wait for “UTOC WRITING” to be cleared before proceeding with the next operation.
33
Page 36

Operate by following the steps
MD Editing Functions
English
In addition to its recording and play functions, the MD part of this combination unit comes with editing functions. Recorded tracks can be
joined, divided or erased exactly where required.
below in numeical order.
Dividing tracks (DIVIDE function)
This involves adding a track mark (see Note) at some point during
the track which is to be made into the start of an additional track
so that the original track is divided into two tracks.
Track No.
DIVIDE
1
Track A Track B Track C Track D
1
Track A Track B Track C Track D
2
2
3
3
4
Joining tracks (JOIN function)
This involves erasing a track mark and turning two adjoining
tracks into one track.
Track No.
JOIN
1
Track A Track B Track C Track D
2
3
4
Erasing tracks (ERASE function)
This enables unnecessary tracks, narration, etc. to be erased
speedily. The erased parts do not remain as silences but are closed
up by the subsequent tracks.
Track No.
4
New tracks can
be recorded.
Erasing
Track B
1
Track A Track B Track C Track D
1
Track A Track C Track D
2
2
3
3
Erasing all the tracks (ALL ERASE
function)
All the tracks can be erased at once without recording fresh
material over them.
Track No.
4
ALL
ERASE
1
Track A Track B Track C Track D
2
3
1
Track A + Track B Track C Track D
2
3
Moving tracks (MOVE function)
Tracks can be moved around so that they are in the desired
sequence.
Track No.
4
4
MOVE
1
Track A Track B Track C Track D
1
Track A Track C Track D Track B
2
2
3
3
Note: Track marks
These marks are provided to locate the start of each track. Whatever lies between one track mark and
the next is considered to a track, and the numbers of the tracks (called “track numbers”) are displayed
in the sequence in which they are to be played.
New tracks can be recorded.
Giving titles to discs and tracks
(TITLE function)
A title consisting of up to 32 characters can be given to a disc and
a track. The title given appears in the display window.
34
Page 37

Dividing tracks (DIVIDE function)
XU-301 MD-CD COMBINATION DECK
CD
3
2
CD
CD
1
STANDBY
CD PITCH CONTROL
TIMER
/CLOCK
POWER
NORMAL SPEED
MD
EDIT
• The function changes each
time this button is pressed.
-1
1st TRACK
CD REC
1
-
3
CD
PLAY & EXCHANGE
LISTENING
EDIT
REC
SKIP
SAMPLING RATE CONVERTER
REC
REC
PAUSE
START
DIGITAL INPUT
32kHz 44.1kHz
REC
STOP
DIGITAL CD
7
48kHz
MIXING
REC SOURCE SELECTOR
LINE MIC
2
·
CANCEL
CD
MD
-2 -2
4
6
1
4
DISPLAY
TITLEEDIT
MIX BALANCE REC LEVEL
CD
LINE
LINE
MIC
MIC
-1
5
·
PLAY MODE/CHARA
SET
MAXMIN
PHONES
-2
3
1 Insert the MD to be edited, and set the function to “MD.”
• The number of tracks and play time are displayed.
2 Select “DIVIDE.”
MD EDIT
DIVIDE
Flashing
= DIVIDE = JOIN = MOVE = ERASE = ALL ERASE =
(back to the beginning)
3 Press the SET button.
-1
5
·
English
Now waiting for input
SET
identifying track to be divided
MD
MD EDIT
L
40 30 15102063 0
R
DIVIDE
Flashing
4 Select the track to be divided and play it.
To return to a
previous track
• When the track to be divided is selected using the number button on the remote control corresponding to the track number, the track is played directly.
To advance to a
later track
5 Press the SET button at the point where the track is to be divided.
Example: When dividing the second track
SET
L
40 30 15102063 0
R
MD
MD EDIT
DIVIDE
Flashing
To return to a
previous track
To advance to a
later track
• The numbers of the divided track and subsequent track flash on the music calendar, and the
recording lasting for 4 seconds starting where the track was divided is repeatedly played.
• The jog dial can be used to finely adjust the position where the track is to be divided.
Movement is possible within the POSITION –128 to 128 range (about 8 seconds before or after
the position). The recording lasting for 4 seconds starting from the position to which the dividing
point has been moved is repeatedly played.
35
Page 38

EDIT
6 Press the EDIT button.
• “EDITING” appears, and the track number is incremented by 1. The change is stored in the
memory IC.
• Play stops automatically.
English
CD
CD
CD
STANDBY
POWER
XU-301 MD-CD COMBINATION DECK
3
2
1
CD PITCH CONTROL
TIMER
/CLOCK
NORMAL SPEED
7 Eject the MD. \ The editing mode is now exited.
• After “UTOC WRITING” is displayed, the MD is ejected.
• The data in the memory IC has been recorded on the MD.
The editing mode can also be exited by pressing the POWER button in step 7 to turn off the power.
When the wrong track is selected in step 4
Before pressing the SET button, turn the jog dial or use the number buttons on the remote control to
select the track again.
To stop DIVIDE at any time
Press the EDIT button. If the SET button has already been pressed as in step 5, first press the
CANCEL button, and then press the EDIT button.
Do not disconnect the power cord or subject the unit to the vibration while “UTOC WRITING”
appears. Doing so may make it impossible to play the MD.
Joining tracks (JOIN function)
1st TRACK
CD REC
-1
1
32kHz 44.1kHz
-
3
CD
PLAY & EXCHANGE
LISTENING
EDIT
REC
SKIP
SAMPLING RATE CONVERTER
REC
REC
PAUSE
START
STOP
7
DIGITAL INPUT
48kHz
DIGITAL CD
REC SOURCE SELECTOR
MIXING
LINE MIC
REC
6
2
·
CANCEL
CD
MD
DISPLAY
TITLEEDIT
MIX BALANCE REC LEVEL
CD
LINE
LINE
MIC
MIC
4
PLAY MODE/CHARA
PHONES
3
-1
SET
MAXMIN
5
·
MD
EDIT
• The function changes each
time this button is pressed.
-2 -2
4
1
1 Insert the MD to be edited, and set the function to “MD.”
• The number of tracks and play time are displayed.
2 Select “JOIN.”
MD EDIT
JOIN
Flashing
= DIVIDE = JOIN = MOVE = ERASE = ALL ERASE =
(back to the beginning)
3 Press the SET button.
SET
L
R
40 30 15102063 0
Flashing
MD
MD EDIT
JOIN
4 Select the track to be joined and play it.
36
To return to a
previous track
To advance to a
later track
• When the track to be joined is selected using the number button on the remote control corresponding to the track number, the track is played directly.
Page 39

EDIT
5 Press the SET button.
Example: When joining the second track
SET
L
40 30 15102063 0
R
MD
MD EDIT
JOIN
Flashing
6 Press the EDIT button.
• “EDITING” appears, and the track number is decremented by 1. The change is stored in the
memory IC.
• Play stops automatically.
7 Eject the MD. \ The editing mode is now exited.
• After “UTOC WRITING” is displayed, the MD is ejected.
• The data in the memory IC has been recorded on the MD.
The editing mode can also be exited by pressing the POWER button in step 7 to turn off the power.
When the wrong track is selected in step 4
Before pressing the SET button, turn the jog dial or use the number buttons on the remote control to
select the track again.
To stop JOIN at any time
Press the EDIT button. If the SET button has already been pressed as in step 5, first press the
CANCEL button, and then press the EDIT button.
Do not disconnect the power cord or subject the unit to the vibration while “UTOC WRITING”
appears. Doing so may make it impossible to play the MD.
English
XU-301 MD-CD COMBINATION DECK
CD
3
2
CD
CD
1
STANDBY
TIMER
/CLOCK
POWER
MD
EDIT
• The function changes each
time this button is pressed.
Moving tracks (MOVE function)
-1
CD PITCH CONTROL
NORMAL SPEED
1st TRACK
CD REC
1
DIGITAL INPUT
48kHz
32kHz 44.1kHz
-
3
CD
PLAY & EXCHANGE
LISTENING
REC
EDIT
SKIP
SAMPLING RATE CONVERTER
REC
REC
REC
DIGITAL CD
STOP
PAUSE
START
REC SOURCE SELECTOR
2
7
MIXING
LINE MIC
·
CANCEL
CD
MD
1
1 Insert the MD to be edited, and set the function to “MD.”
• The number of tracks and play time are displayed.
2 Select “MOVE.”
MD EDIT
MOVE
Flashing
= DIVIDE = JOIN = MOVE = ERASE = ALL ERASE =
(back to the beginning)
6
DISPLAY
TITLEEDIT
MIX BALANCE REC LEVEL
CD
LINE
LINE
MIC
MIC
-2
4
-1
·
PLAY MODE/CHARA
SET
MAXMIN
PHONES
-1
5
··
43
-2
-2
5
3 Press the SET button.
SET
L
40 30 15102063 0
R
MD
MD EDIT
MOVE
37
Page 40

4 Select the track to be moved.
English
EDIT
SET
Example: When the second track has been selected
Flashing
MD
MD EDIT
1 Select the track. 2 Enter the track selection.
L
40 30 15102063 0
R
MOVE
• When the track to be moved is selected using the number button on the remote control corresponding to the track number, the track is played directly.
5 Select the destination to which the track is to be moved.
SET
1 Select the track. 2 Enter the track selection.
• When the movement destination is selected using the number button on the remote control
corresponding to the track number at the destination, the track is played directly.
Example: When moving the track to the fourth track
Track No.4 flashes.
MD
L
40 30 15102063 0
R
MD EDIT
MOVE
6 Press the EDIT button.
• “EDITING” appears, and the sequence of tracks is changed. The change is stored in the memory
IC.
7 Eject the MD. \ The editing mode is now exited.
• After “UTOC WRITING” is displayed, the MD is ejected.
• The data in the memory IC has been recorded on the MD.
The editing mode can also be exited by pressing the POWER button in step 7 to turn off the power.
When the wrong track is selected in step 4 and/or step 5.
Before pressing the SET button, turn the jog dial or use the number buttons on the remote control to
select the track again.
To stop MOVE at any time
Press the EDIT button. If the movement destination has already been selected as in step 5, first press
the CANCEL button, and then press the EDIT button.
Do not disconnect the power cord or subject the unit to the vibration while “UTOC WRITING”
appears. Doing so may make it impossible to play the MD.
38
Page 41

Erasing a track (ERASE function)
CD
CD
CD
STANDBY
POWER
MD
EDIT
• The function changes each
time this button is pressed.
-1
XU-301 MD-CD COMBINATION DECK
3
2
1
CD PITCH CONTROL
TIMER
/CLOCK
NORMAL SPEED
1st TRACK
CD REC
1
32kHz 44.1kHz
-
3
CD
PLAY & EXCHANGE
LISTENING
EDIT
REC
SKIP
SAMPLING RATE CONVERTER
REC
REC
PAUSE
START
7
DIGITAL INPUT
48kHz
DIGITAL CD
REC SOURCE SELECTOR
MIXING
LINE MIC
REC
STOP
··
6
2
DISPLAY
TITLEEDIT
CANCEL
MIX BALANCE REC LEVEL
CD
MD
CD
LINE
LINE
MIC
MIC
-2 -2
4
1
1 Insert the MD to be edited, and set the function to “MD.”
• The number of tracks and play time are displayed.
2 Select “ERASE.”
MD EDIT
Flashing
ERASE
= DIVIDE = JOIN = MOVE = ERASE = ALL ERASE =
(back to the beginning)
4
5
3
-1
English
PLAY MODE/CHARA
SET
MAXMIN
PHONES
EDIT
3 Press the SET button.
SET
L
40 30 15102063 0
R
Flashing
MD
MD EDIT
ERASE
4 Select the track to be erased and play it.
To return to a
previous track
• When the number button on the remote control corresponding to the track number is pressed, the
track to be erased is played directly.
To advance to a
later track
5 Press the SET button.
Example: When erasing the second track
SET
L
40 30 15102063 0
R
MD
MD EDIT
ERASE
Flashing
6 Press the EDIT button.
• “EDITING” appears, and the second track is erased. The change is stored in the memory IC.
• Play stops automatically.
39
Page 42
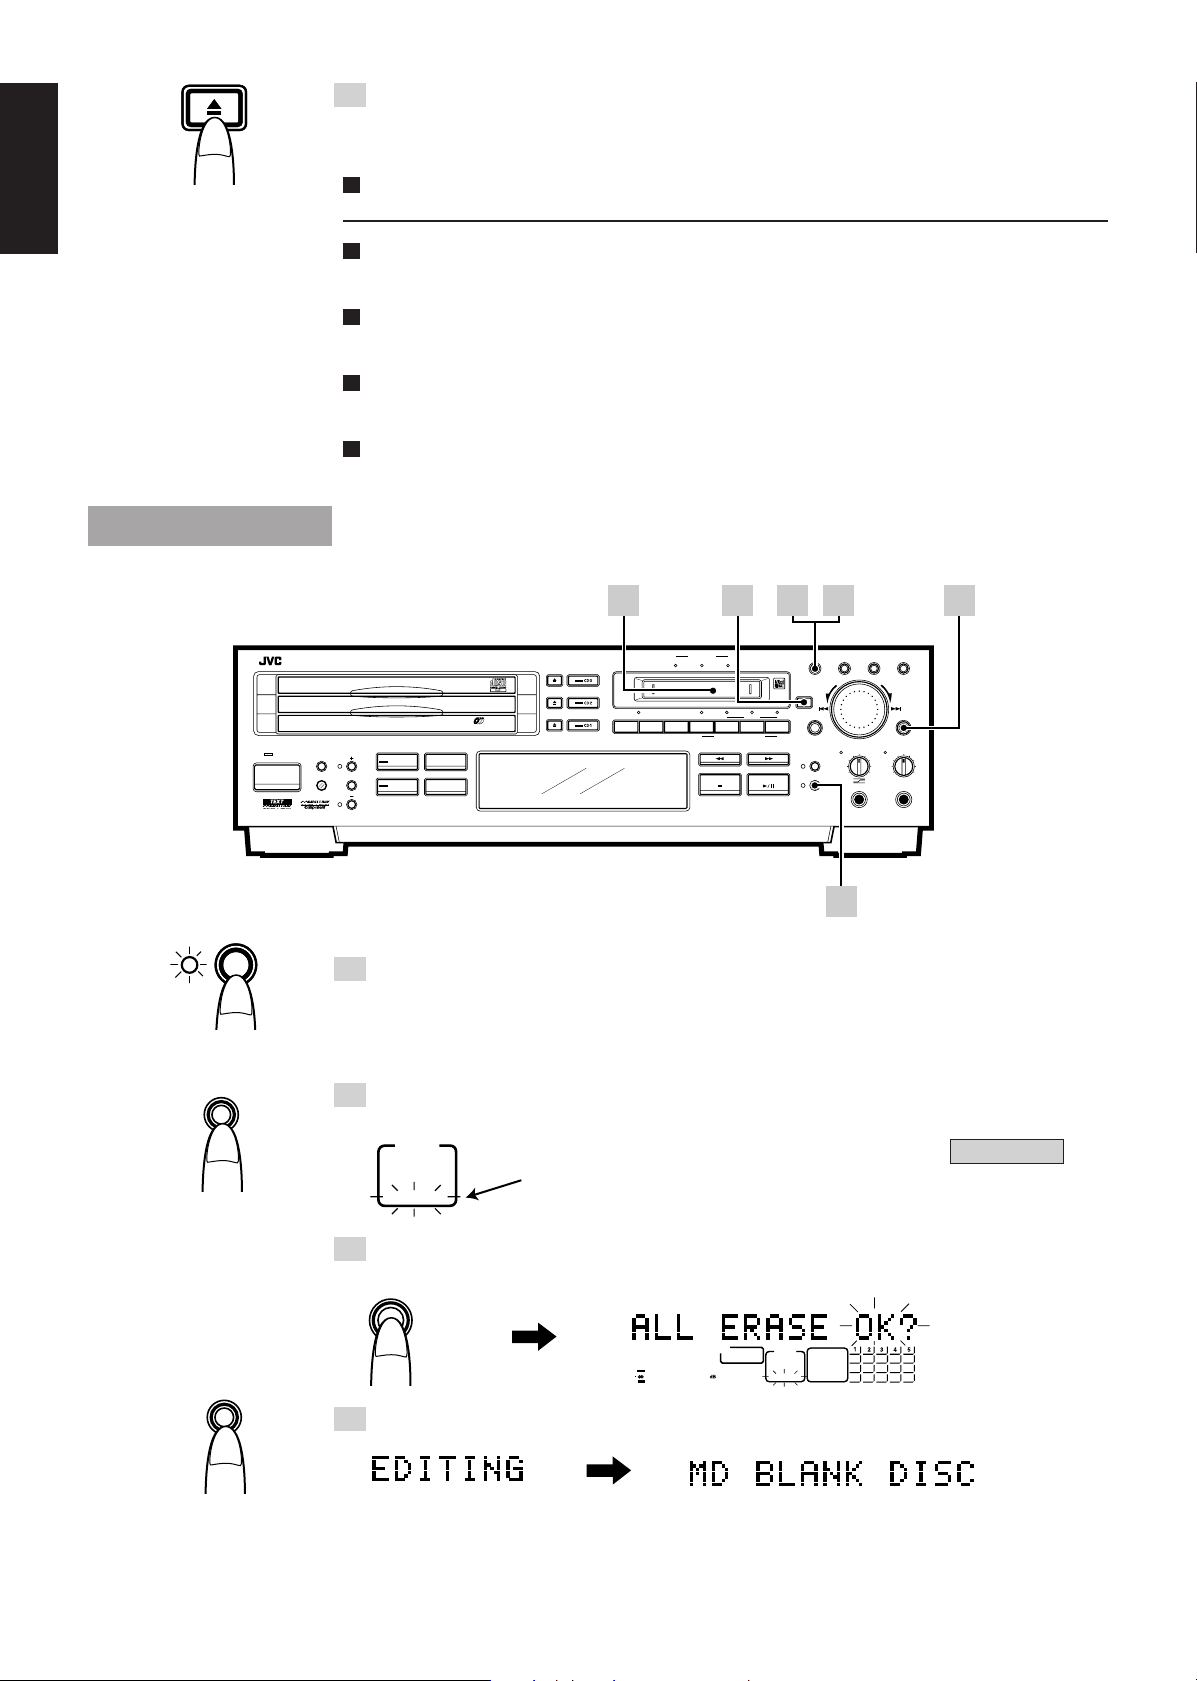
English
7 Eject the MD. \ The editing mode is now exited.
• After “UTOC WRITING” is displayed, the MD is ejected.
• The data in the memory IC has been recorded on the MD.
The editing mode can also be exited by pressing the POWER button in step 7 to turn off the power.
Once a track is erased, the recording cannot be restored.
Keep the accidental erasure prevention knob on an MD containing important recordings to the open
27
position. \ See page
.
When the wrong track is selected in step 4
Before pressing the SET button, turn the jog dial or use the number buttons on the remote control to
select the track again.
To stop ERASE at any time
Press the EDIT button. If the track has already been selected as in step 5, first press the CANCEL
button twice, and then press the EDIT button.
Do not disconnect the power cord or subject the unit to the vibration while “UTOC WRITING”
appears. Doing so may make it impossible to play the MD.
Erasing all the tracks (ALL ERASE
function)
-1
1
5
·
4
2
3
CD
CD
CD
STANDBY
POWER
MD
EDIT
• The function changes each
time this button is pressed.
CANCEL
CD
MD
DISPLAY
TITLEEDIT
MIX BALANCE REC LEVEL
CD
LINE
LINE
MIC
MIC
-2
1
XU-301 MD-CD COMBINATION DECK
3
2
1
CD PITCH CONTROL
TIMER
/CLOCK
NORMAL SPEED
1st TRACK
CD REC
DIGITAL INPUT
48kHz
32kHz 44.1kHz
-
3
CD
PLAY & EXCHANGE
LISTENING
REC
EDIT
SKIP
SAMPLING RATE CONVERTER
REC
REC
REC
PAUSE
START
STOP
DIGITAL CD
REC SOURCE SELECTOR
MIXING
LINE MIC
1 Insert the MD to be edited, and set the function to “MD.”
• The number of tracks and play time are displayed.
2 Select “ALL ERASE.”
MD EDIT
Flashing
ALL ERASE
= DIVIDE = JOIN = MOVE = ERASE = ALL ERASE =
(back to the beginning)
3 Press the SET button.
PLAY MODE/CHARA
SET
MAXMIN
PHONES
40
EDIT
SET
MD
L
40 30 15102063 0
R
MD EDIT
ALL ERASE
4 Press the EDIT button.
• “MD BLANK DISC” appears, and all the tracks are erased. The change is stored in the memory
IC.
Page 43

CD
3
2
CD
CD
1
STANDBY
POWER
5 Eject the MD. \ The editing mode is now exited.
Giving titles to discs and tracks
(TITLE function)
XU-301 MD-CD COMBINATION DECK
CD PITCH CONTROL
TIMER
/CLOCK
NORMAL SPEED
• After “UTOC WRITING” is displayed, the MD is ejected.
• The data in the memory IC has been recorded on the MD.
The editing mode can also be exited by pressing the POWER button in step 5 to turn off the power.
To stop the ALL ERASE operation at any time
Press the EDIT button.
Do not disconnect the power cord or subject the unit to the vibration while “UTOC WRITING”
appears. Doing so may make it impossible to play the MD.
-1 -1-1
1st TRACK
CD REC
1
-
3
CD
PLAY & EXCHANGE
LISTENING
EDIT
REC
SKIP
SAMPLING RATE CONVERTER
REC
REC
PAUSE
START
DIGITAL INPUT
32kHz 44.1kHz
REC
STOP
DIGITAL CD
7
48kHz
REC SOURCE SELECTOR
MIXING
LINE MIC
2
CANCEL
CD
MD
6
DISPLAY
TITLEEDIT
MIX BALANCE REC LEVEL
CD
LINE
LINE
MIC
MIC
4
PLAY MODE/CHARA
SET
PHONES
MAXMIN
3
··
(When giving
a track title)
5
English
MD
1
3
-2
3
(When giving
a track title)
1 Insert the MD to be edited, and set the function to “MD.”
• The number of tracks and play time are displayed.
2 Press the “TITLE” button.
TITLE
• Press this when the unit is
in the stop mode.
DISC
L
40 30 15102063 0
R
TITLE
Flashing
MD
3
• To give a title to a disc (DISC TITLE).
Press the SET button.
SET
Cursor (flashing)
Character to be input (flashing)
• To give a title to a track (TRACK TITLE)
Select the track which is to be given a title, and press the SET
button.
SET
5
··
-2-2
Example: Giving a title to track No.1
• The cursor flashes.
The track number flashes.
41
Page 44

English
4 Select the type of characters to be used for the title.
DISPLAY
/CHARA
Upper-case letters/symbols
\
≠
Lower-case letters/symbols
≠
Each time this is pressed, the character
type changes. (The input characters
appear in the display window.)
For details, refer to the character layout table on page 44.
5 Input the title (using up to 32 characters).
Numbers
SET
TITLE
To return to a
previous
character
1 Select the characters. 2 Enter the selection.
DISC
L
R
TITLE
40 30 15102063 0
To advance to a
later character
MD
• If the wrong character has been input, clear it using the CANCEL button.
• The preferred title is input by repeating steps 4 and 5.
• To clear a particular character which has been input, use the 1 button to align the cursor with
the character, and press the CANCEL button. Then, select the correct character and press the SET
button. In this way, the character can be corrected.
• If the ¡ button is pressed when the cursor is positioned as shown in the figure above, a space
will be input.
6 Press the TITLE button.
• The title now appears after “EDITING.” It is stored in the memory IC.
• To give other tracks titles, repeat the procedure starting with step 2.
7 Eject the MD. \ The editing mode is now exited.
• After “UTOC WRITING” is displayed, the MD is ejected.
• The data in the memory IC has been recorded on the MD.
42
The editing mode can also be exited by pressing the POWER button in step 7 to turn off the power.
In step 3, only those numbers of the tracks which are recorded on the MD can be selected by the jog
dial as track numbers.
To stop operation at any time
Press the TITLE button in step 2, 3, 4 or 5.
Up to 5 characters which are being input can be displayed. When the sixth character is input, the
characters are scrolled forward so that the first character is cleared from the display.
Do not disconnect the power cord or subject the unit to the vibration while “UTOC WRITING”
appears. Doing so may make it impossible to play the MD.
Page 45
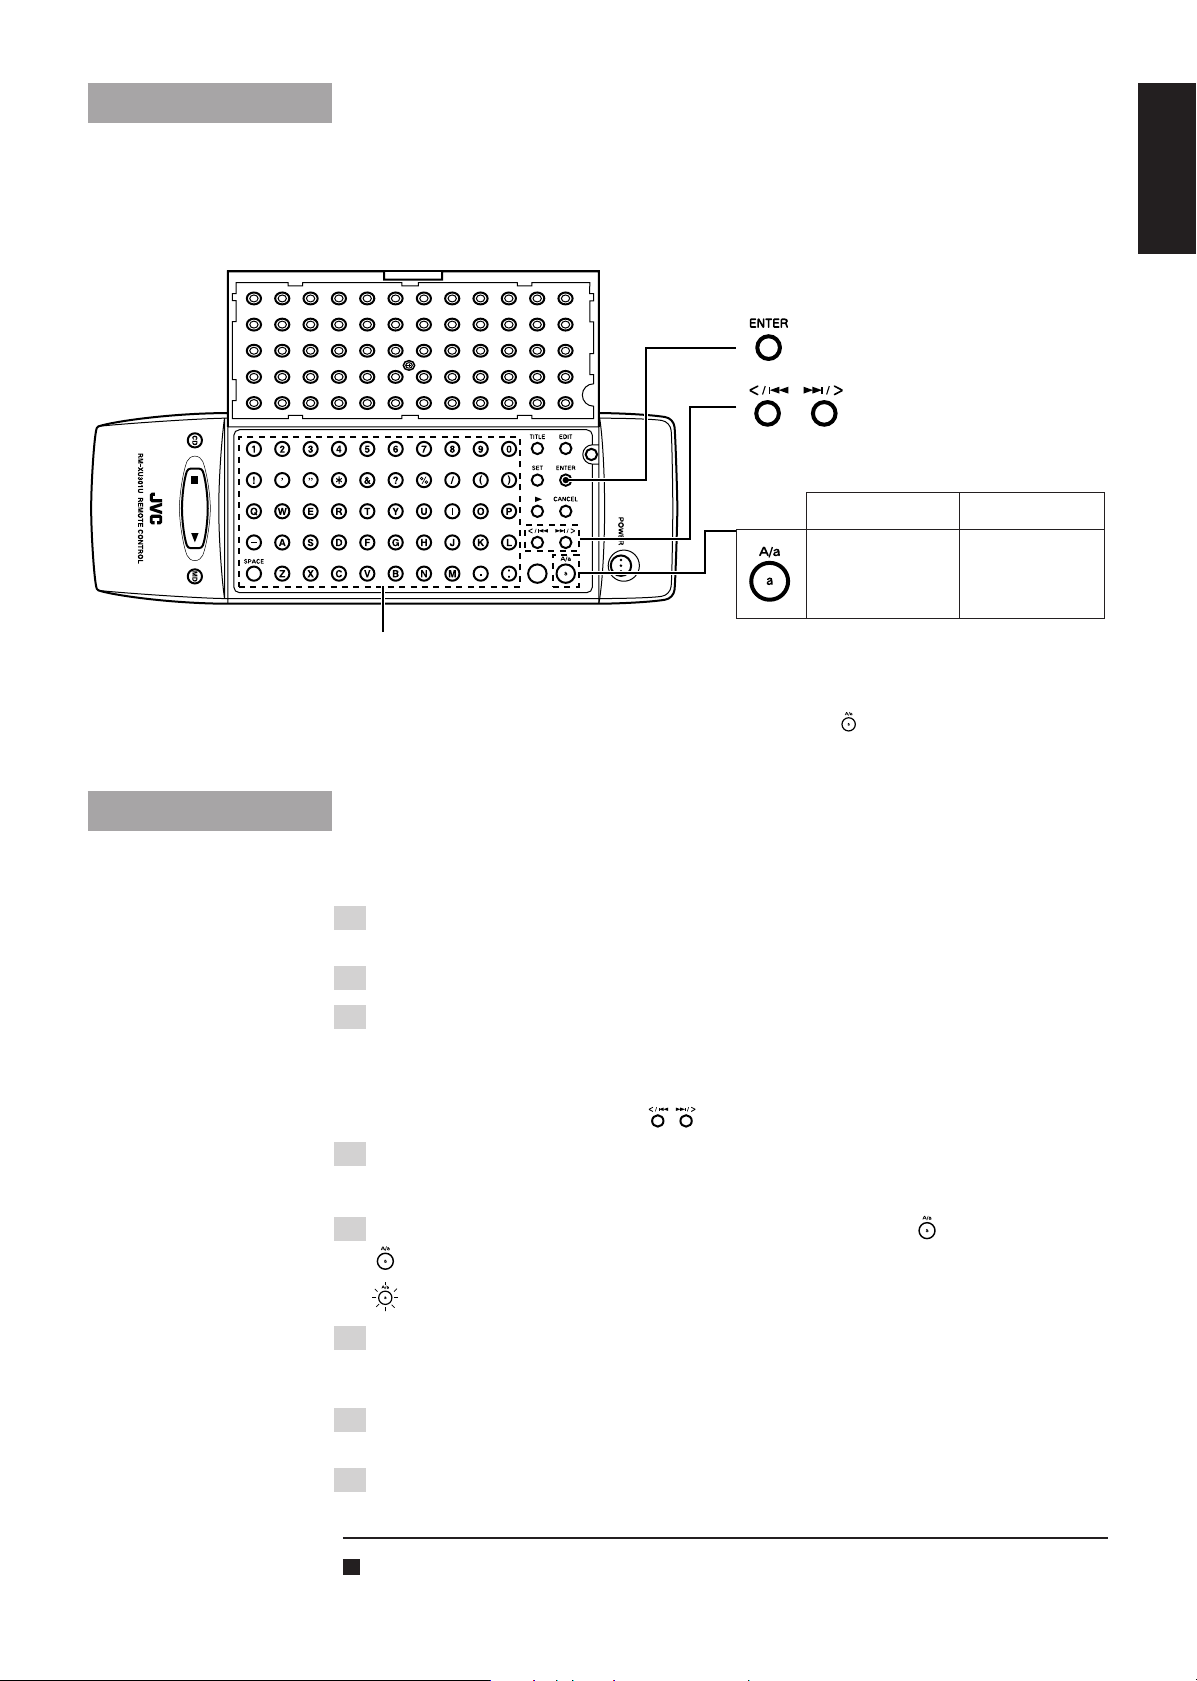
Editing operations using the remote
control
Buttons bearing the same markings as those on the main unit function in exactly the same way as their
main unit counterparts. This section describes how to use the buttons on the remote control which are not
provided on the main unit.
: This is used to enter the editing modes.
: These are used to select a track
number or move the cursor while
characters are being input
Lamp off Lamp on*
Characters can be
input as lower-case
letters.
Character input buttons:
These are used to input alphanumerics directly as
per the character input mode.
Spaces and “–” can be input regardless of the
input mode which has been selected.
Characters can be
input as uppercase letters.
* The lamp automatically goes off if none of
the button is pressed for two or more
minutes.
The lamp can be turned on or off by pressing
the
button.
English
Giving titles to discs and tracks using
the remote control
1 Insert the MD to be edited, and press the MD button.
Open the remote control’s cover.
2 Press the TITLE button.
3 -1 (MD stop mode)
• To give a title to a disc:
Press the SET button.
• To give a title to a track:
Select the track using , and press the SET button.
3 -2 (During MD play)
Proceed to skipping step 4.
4 Select upper-case or lower-case letters using the button.
(Lamp off) : Upper-case letters can be input.
(Lamp on) : Lower-case letters can be input.
5 Input the title (containing up to 32 characters) using the character
input buttons.
• The characters can be input directly.
6 Press the ENTER button.
• The procedure can also be completed by pressing the TITLE button again.
7 Eject the MD. \ This completes the editing.
• UTOC WRITING flashes, and the MD is ejected.
When selecting a track using the number buttons on the remote control, keep the remote control’s
cover closed while using the buttons.
43
Page 46
Character Layout Table
English
This unit enables the titles of the album and tracks to be written for the disc and tracks which have been recorded.
The characters which can be used for this purpose are shown below.
Upper-case letters Lower-case letters Numbers
ABCDE
FGH I J
KLMNO
PQRST
UVWXY
Z
(space)
!”#$
%& ’ ( )
*+,–.
/:;<=
abcde
fghi j
klmno
pqrst
uvwxy
z
(space)
!”#$
%& ’ ( )
*+,–.
/:;<=
01234
56789
>?@
>?@
44
Page 47
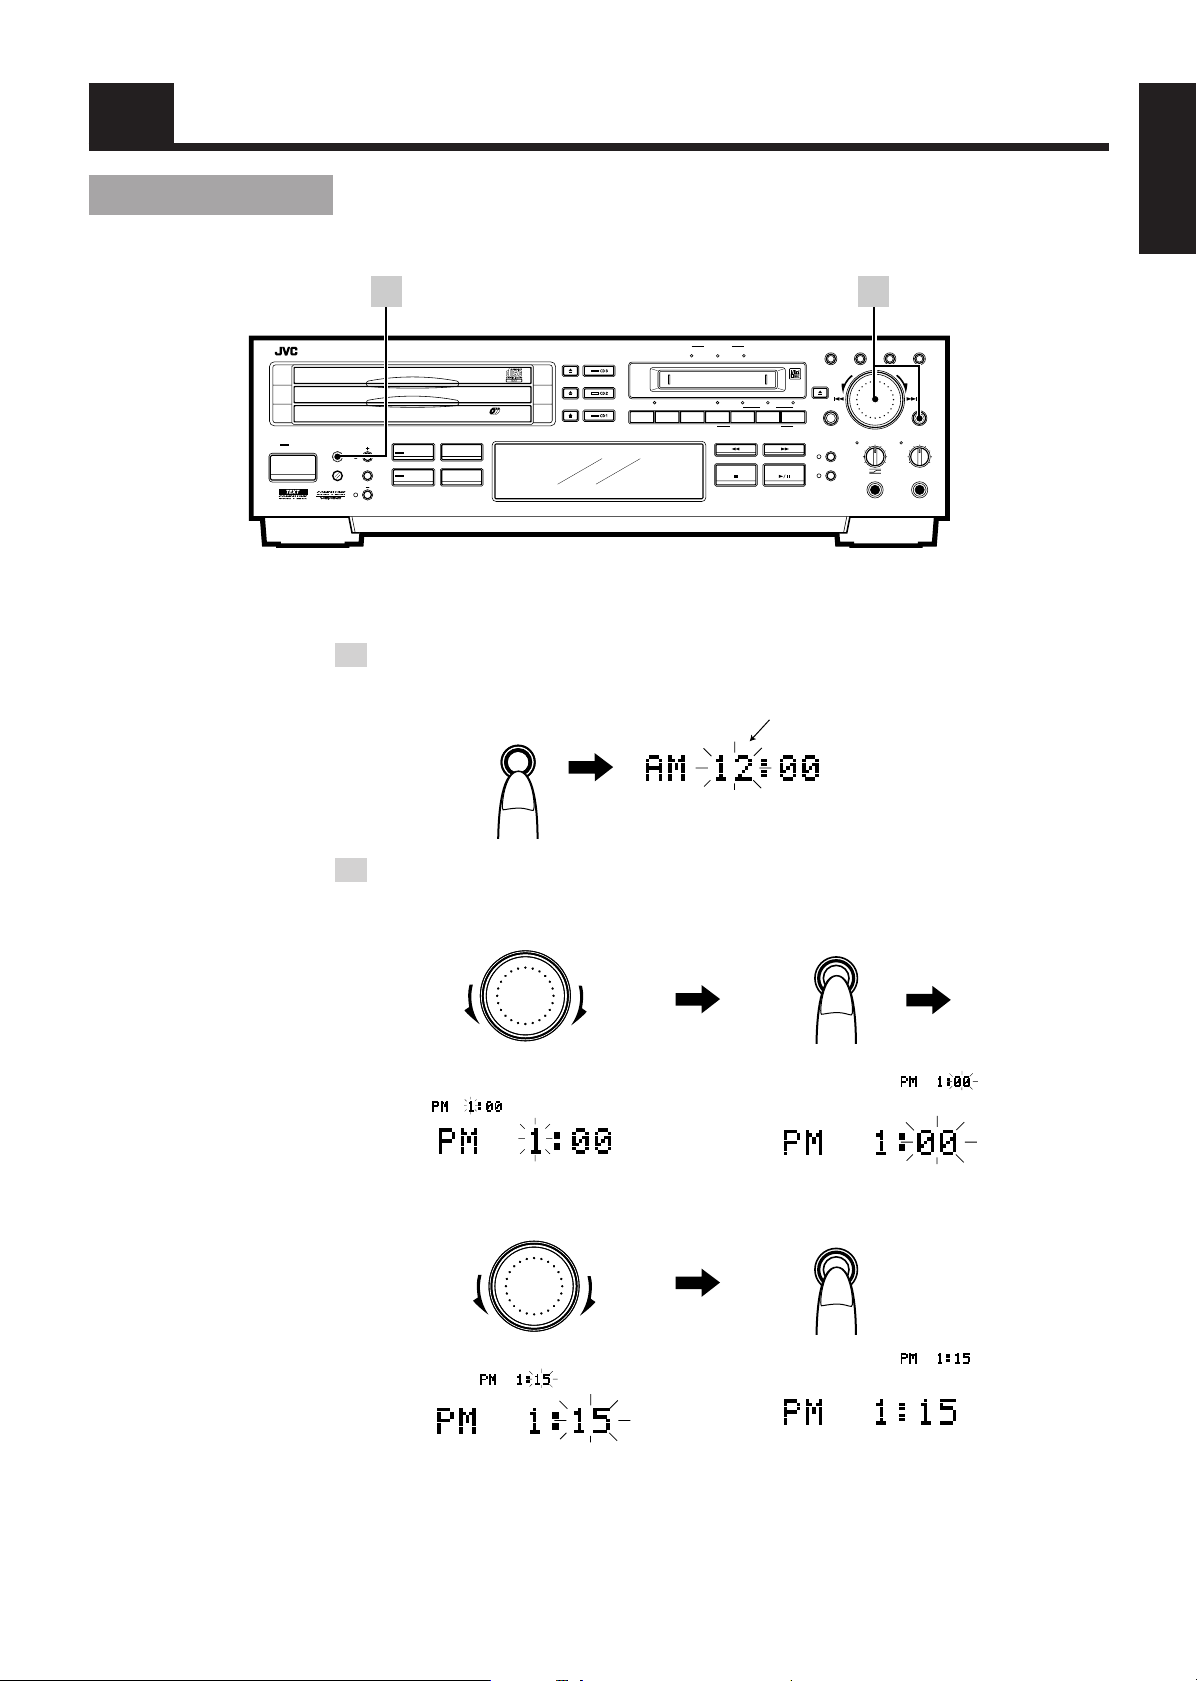
Setting the Clock
Setting the Present Time
(to be performed when the unit is to be used for the first time)
1
DIGITAL INPUT
48kHz
32kHz 44.1kHz
REC
REC
REC
PAUSE
START
STOP
DIGITAL CD
REC SOURCE SELECTOR
MIXING
LINE MIC
CD
3
2
CD
CD
1
STANDBY
POWER
XU-301 MD-CD COMBINATION DECK
CD PITCH CONTROL
TIMER
/CLOCK
NORMAL SPEED
1st TRACK
CD REC
-
3
CD
PLAY & EXCHANGE
LISTENING
EDIT
REC
SKIP
SAMPLING RATE CONVERTER
• Example: Setting the time to 1:15 PM (while the power is OFF)
This unit uses a 12-hour clock to indicate the time.
1 Press the TIMER/CLOCK button.
• The time display is illuminated, and the “hour” display starts flashing.
TIMER
TIMER
/CLOCK
/CLOCK
Flashes
CANCEL
CD
MD
2
DISPLAY
TITLEEDIT
MIX BALANCE REC LEVEL
CD
LINE
LINE
MIC
MIC
PLAY MODE/CHARA
SET
PHONES
English
MAXMIN
(When the time is to be re-set, the present time
will flash.)
2 Set the clock. (The time changes continuously when the jog dial is
turned.)
SET
To put back the time
1 Use the dial to align the “hour” display
with “ ”.
3 Use the dial to align the “minute”
display with “
To advance the time
”.
2 Press the SET button. “ ” is
displayed.
SET
4 Press the SET button. “
” is displayed.
Two seconds later, the display darkens.
45
Page 48
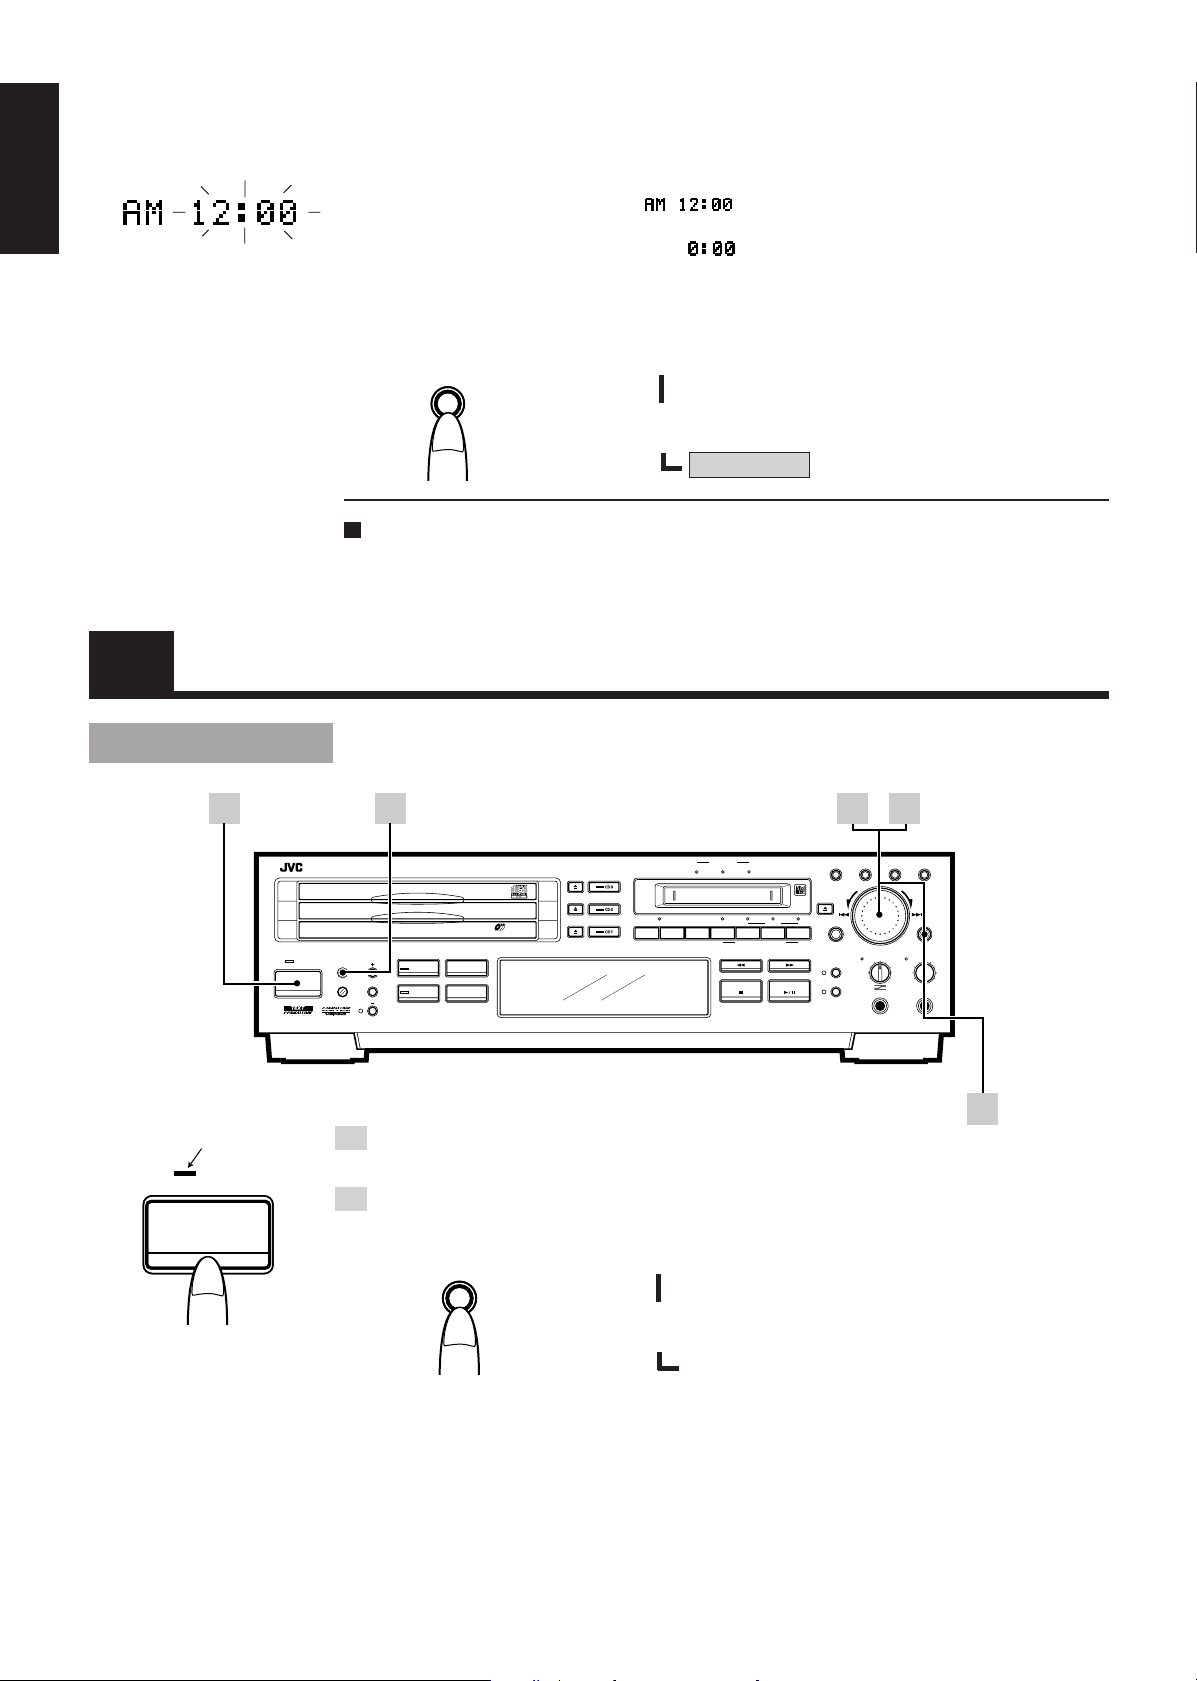
English
• To ascertain the correct time
Use the time display on your TV screen or call the speaking clock.
• When a power failure has occurred or the power cord has been
disconnected
The time display is cleared, and the “
re-set the time by previous steps 1 and 2. When the power cord is left disconnected for an extended
period of time, the time display returns to “ .”
” flashing display is returned. In a case like this,
• Setting the time while the power is ON
After the power has been turned on, press the TIMER/CLOCK button, select the present time display,
and set the time.
TIMER
TIMER
/CLOCK
/CLOCK
Function
display
If the CANCEL button is pressed while setting the “minute” display, the flashing “hour” display is
restored. This function comes in handy for correcting the “hour” display.
DAILY TIMER
\
«
ONCE TIMER
»
«
Present Time : Select this display and set the time.
Timer Operations
Timer Play (wake-up play)
1
Lamp goes out.
STANDBY
STANDBY
POWER
POWER
CD
3
2
CD
CD
1
STANDBY
POWER
2
XU-301 MD-CD COMBINATION DECK
-
3
CD
PLAY & EXCHANGE
CD PITCH CONTROL
TIMER
/CLOCK
NORMAL SPEED
1st TRACK
CD REC
LISTENING
EDIT
REC
SKIP
SAMPLING RATE CONVERTER
1 Turn on the power.
• The selected function (“CD” at the time of purchase) is displayed.
2 Select the timer mode (DAILY TIMER or ONCE TIMER).
TIMER
TIMER
/CLOCK
/CLOCK
Function
display
• The mode changes each time
this button is pressed.
Operate by following the steps
below in numerical order.
·
4
5
CANCEL
CD
MD
DISPLAY
TITLEEDIT
MIX BALANCE REC LEVEL
CD
LINE
LINE
MIC
MIC
PLAY MODE/CHARA
SET
MAXMIN
PHONES
DIGITAL INPUT
48kHz
32kHz 44.1kHz
REC
REC
REC
PAUSE
START
STOP
DAILY TIMER : The timer is activated every day.
\
DIGITAL CD
REC SOURCE SELECTOR
MIXING
LINE MIC
«
ONCE TIMER : The timer is activated only once.
»
«
Present Time (“hour” display flashes.)
3
46
Operating examples
• Set DAILY TIMER for timer playback.
• Set ONCE TIMER for timer recording.
Page 49
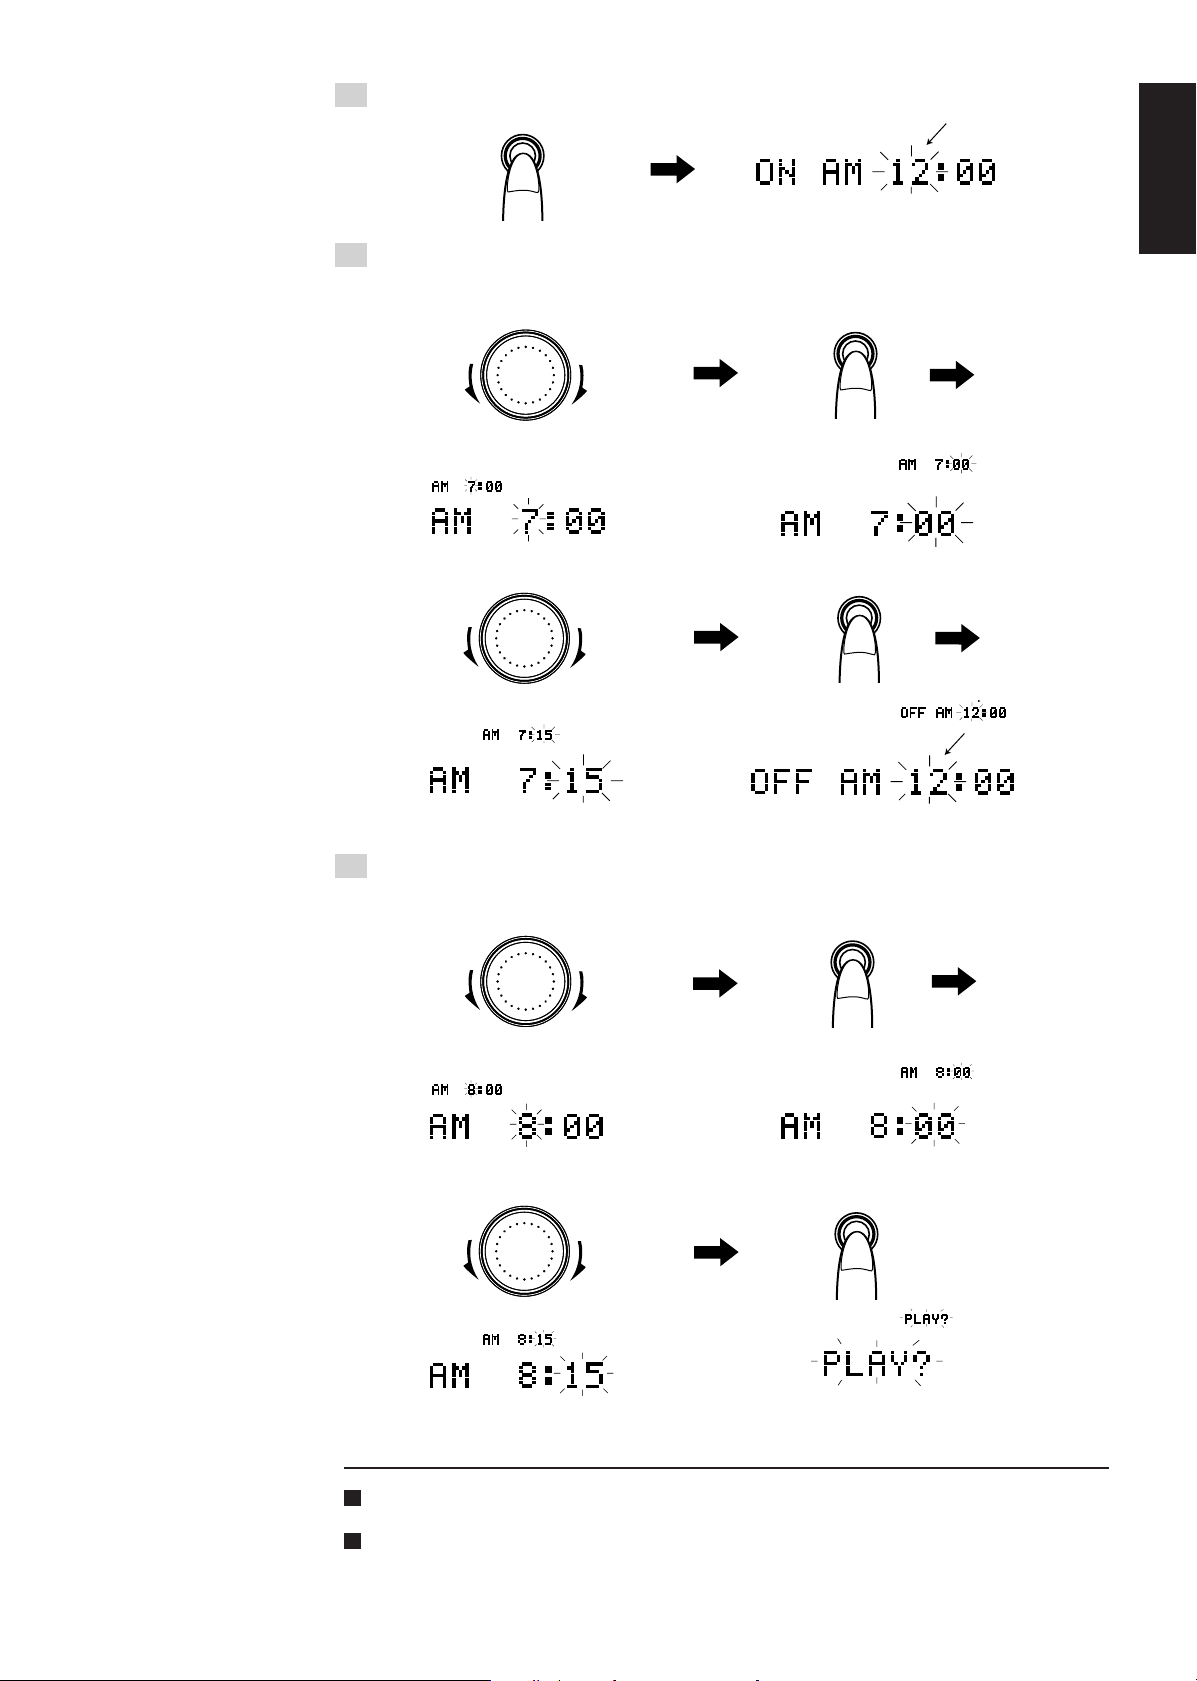
3 Press the SET button.
SET
The start time flashes.
4 Set the timer start time (this unit uses a 12-hour clock).
English
Example: When timer play is to start at 7:15AM
To put back the time
1 Use the dial to align the “hour” display
with “
3 Use the dial to align the “minute”
display with “ ”.
To advance the time
”.
5 Set the timer end time.
SET
2 Press the SET button. “ ” is displayed.
SET
4 Press the SET button. “ ” is displayed.
The end time flashes.
Example: When timer play is to end at 8:15AM
To put back the time
1 Use the dial to align the “hour” display
with “
3 Use the dial to align the “minute”
display with “ ”.
To advance the time
”.
«
Continues to page
SET
2 Press the SET button. “ ” is
displayed.
SET
4 Press the SET button. “
48
or 49.
” is displayed.
Before proceeding with timer programming, make sure that the present time has been set correctly.
\ See page 45.
If the CANCEL button is pressed while setting the “minute” display, the flashing “hour” display is
restored. This function comes in handy for correcting the “hour” display.
47
Page 50

Timer Play (wake-up play) (continued)
English
8
DIGITAL INPUT
48kHz
32kHz 44.1kHz
REC
REC
REC
PAUSE
DIGITAL CD
START
STOP
REC SOURCE SELECTOR
CD
CD
CD
STANDBY
POWER
XU-301 MD-CD COMBINATION DECK
3
2
1
CD PITCH CONTROL
TIMER
/CLOCK
NORMAL SPEED
1st TRACK
CD REC
-
3
CD
PLAY & EXCHANGE
LISTENING
EDIT
REC
SKIP
SAMPLING RATE CONVERTER
MIXING
LINE MIC
7
CANCEL
CD
MD
DISPLAY
TITLEEDIT
MIX BALANCE REC LEVEL
CD
LINE
LINE
MIC
MIC
PLAY MODE/CHARA
PHONES
6
SET
MAXMIN
Continued from page 47 (while “PLAY?” is flashing)
6 Press the SET button.
SET
DAILY
• When “REC?” flashes, turn the jog dial to select “PLAY?” flashing.
• The timer programming is displayed once, and then the function display is restored.
This display appears when the
DAILY TIMER play mode is set.
The timer programming is displayed once,
and then the function display is restored.
Lamp lights.
STANDBY
STANDBY
POWER
POWER
CANCEL
7 Set the function to “CD” or “MD”—whichever disc is to be heard—
and place the MD or CD in position.
• When MD play is set.
MD
Place the MD to be
heard in position.
• When CD play is set.
CDCD
Place the CD or CDs to be
heard in position on the CD1,
CD2 and/or CD3 tray.
8 Turn off the power.
The present time now appears in the display window.
Match the connected receiver or other source with the unit’s setting, and adjust the volume to the
appropriate level. Match the timer with the unit’s timer setting.
•
•
•
Timer play now starts at the programmed start time, and the power is turned off at the programmed
end time.
• Clearing a timer operation
Turn on the power, press the TIMER/CLOCK button, select the timer mode, and press the CANCEL
button.
The DAILY 3 (or ONCE 3) display is cleared, and the timer operation is also cleared.
48
Page 51

Timer Recording (unattended recording of the sound from a broadcast receiver or other component)
English
CANCEL
CD
MD
·
6
DISPLAY
TITLEEDIT
MIX BALANCE REC LEVEL
CD
LINE
LINE
MIC
MIC
7
PLAY MODE/CHARA
SET
MAXMIN
PHONES
DIGITAL INPUT
32kHz 44.1kHz
REC
STOP
8
DIGITAL CD
48kHz
REC SOURCE SELECTOR
MIXING
LINE MIC
9
XU-301 MD-CD COMBINATION DECK
CD
3
2
CD
CD
1
STANDBY
CD PITCH CONTROL
TIMER
/CLOCK
POWER
NORMAL SPEED
1st TRACK
CD REC
REC
LISTENING
-
3
CD
PLAY & EXCHANGE
EDIT
SKIP
SAMPLING RATE CONVERTER
REC
REC
PAUSE
START
Continued from page 47 (while “PLAY?” is flashing)
6 Select “REC?” and press the SET button.
SET
1 Select “ .”
2 Press the SET button. \
7 Select the sound source to be recorded, and press the SET button.
Lamp lights.
STANDBY
STANDBY
POWER
POWER
SOURCE OPT?: Optical digital input
\
«
SOURCE LINE?: Line input (analog)
When the jog dial is
turned clockwise
SET
SOURCE MIC?: Mic input (analog)
ONCE
The timer programming is displayed once,
and then the function display is restored.
«
This display appears when the ONCE TIMER
play mode is set.
8 Place the recording MD in position.
• Place the MD with its label side facing up, and insert it in the direction of the # or ] mark.
9 Turn off the power.
The present time now appears in the display window.
Match the timer of the connected source with the unit’s setting. (In the case of the mic input, ensure
that the microphone has been connected to the unit.)
Recording will now start at the programmed start time, and the power will be turned off at the
programmed end time.
When operation is completed once in the ONCE TIMER mode, the timer programming is cleared.
•
•
•
If digital signals are not supplied when timer recording has been started with digital input signals,
DIGITAL IN UNLOCK
“
” is scrolled on the display, and no signals will be recorded.
When using the timer to record a BS program, for instance, check that the broadcast station with the
desired program can be tuned in correctly before programming the timer start and end times.
The timer programming is cleared when the power has failed or the power cord has been disconnected. In a case like this, reset the clock and repeat the timer programming.
49
Page 52

COMPU LINK Function
English
• What is COMPU LINK?
The COMPU LINK remote control system (or, simply, “COMPU LINK”) serves to enable the kind of simple operations provided by an
integrated component to be conducted even though this unit is a discrete component.
These simple operations can be performed by connecting the COMPU LINK-3 SYNCHRO or COMPU LINK-1 SYNCHRO connector on
each of the components involved.
Connections
Accessory connecting cords
XU-301BK MD-
Amplifier CD player
The COMPU LINK functions provided with JVC’s products
come in the form of COMPU LINK-3 or COMPU LINK-1.
They are compatible, and the difference between them is that
COMPU LINK-3 has the functions of COMPU LINK-1 and
some additional functions as well.
CD combination
deck
• Synchro recording
With this function, recording starts automatically in synchronization with the start of the source playback.
How to identify the type of
COMPU LINK function provided
COMPU LINK-3
SYNCHRO
The type of function is marked above the
connector on the rear panel of the product.
For instance, a product with the COMPU
LINK-3 SYNCHRO marking supports the
COMPU LINK-3 function.
Operation To perform
• Synchro recording
Source component Recording component
• CD player
Example: CD player \ MD-CD combination deck
Synchro recording
XU-301BK MD-CD
combination deck
1 Place the CD inside the CD player.
• Program the tracks if they are to be recorded in a programmed sequence.
2 Place the recording MD in the MD-CD
combination deck.
3 Press the DIGITAL button (with digital
connections).
• Press the LINE button when analog connections have been
performed.
4 Press the REC PAUSE button.
• Always proceed to operate from the stop mode.
5 Press the PLAY button on the CD player.
• The CD play and MD-CD combination deck recording now
start automatically.
50
Page 53

TEXT COMPU LINK Control System
This system transfers text information back and forth between the individual components of an audio system, and it enables CD text and MD
text information to be displayed on the receiver (or amplifier) or on the TV screen, in which case it uses the on-screen display function of the
receiver (or amplifier). The following operations can be performed by connecting the unit using the TEXT COMPU LINK function.
• Tracks can be selected by checking their disc and track titles displayed on the TV screen.
• Disc or track titles can be input for recording MDs using the TV screen.
• When recording material from a CD which supports the CD TEXT function to an MD, the CD TEXT track title information is recorded in
its original form onto the MD.
Connections with amplifier or receiver (refer to page 4)
To use this control system, the XU-301BK must be connected with the stereo receiver or stereo amplifier following the steps below.
1. If the stereo receiver or amplifier and this unit have already been plugged into the AC outlets, disconnect their AC power cords.
2. Connect the receiver and unit as described below using the COMPU LINK-3 (SYNCHRO) and TEXT COMPU LINK connectors.
1) COMPU LINK-3 (SYNCHRO) connectors: Use the cable with the monaural mini-plugs (black).
COMPU LINK-3
SYNCHRO
MODE
MD TD
2) TEXT COMPU LINK connectors: Use the cable with the stereo mini-plugs (green).
Stereo receiver or amplifier
Stereo receiver or amplifier
TEXT COMPU LINK
( )
1 MASTER UNIT
( )
2 SLAVE UNIT
English
IMPORTANT:
Set the Master/Slave Selector on the rear panel to “2 (SLAVE UNIT).”
3. Connect the stereo receiver and unit using the cables with RCA pin plugs (see page 4) (and a digital cable if desired: see page 5).
4. Connect the AC power cords of these components to the AC outlets.
Notes:
In order to use the TEXT COMPU LINK function, you must use a JVC receiver (or amplifier) which supports this function and you must
connect it correctly using the designated cord.
For further details on how to use the TEXT COMPU LINK function, refer to the Instruction Manual accompanying the receiver (or
amplifier) which supports this function.
Connection to CD player or CD changer (refer to page 4 and 5)
This unit can record CD TEXT information onto an MD when it is directly connected to a CD changer made by JVC which supports the
TEXT COMPU LINK function. The optical digital cables are used for this connection.
XU-301 Deck CD changer
DIGITAL IN
OPTICAL
Digital cord
NOTES:
Connect the COMPU LINK-3 (SYNCHRO) connector on the unit to the COMPU LINK-3 (SYNCHRO) connector on the CD changer.
Connect the TEXT COMPU LINK connector on the unit to the TEXT COMPU LINK connector on the CD changer.
Set the master/slave selector on the unit to “1 (MASTER UNIT).”
DIGITAL
(OPTICAL)
51
Page 54

Information on MDs (Minidiscs)
This is a new digital audio disc format: it has a diameter of 64 mm and enables up to 74 minutes of playback and recording.
English
Function of the cartridge
The diameter of the actual disc is 64 mm, making it slightly smaller
than CD singles. Each disc is housed in a cartridge. The pocketsize cartridge measures 68 x 72 mm and is 5 mm thick. It is easy to
carry about and store. Since the disc is protected by the cartridge, it
is kept free from dust and dirt, and there is no danger of the disc
being scratched or exposed to fingerprints due to the shutter which
is closed at all times except while the disc is being used. All in all,
these features make the minidisc extremely easy to use.
Cartridge
Disc
Shutter
Two types of discs available
MDs come in two types: the recording MD which can be used for
recording, and the play-only MD which can be used for playback
only. Both types use the same system for playback: a laser beam is
directed onto the disc and the signals are read out by its reflection.
However, the system for recording is different.
Play-only MDs
This type of MD is used for pre-recorded MDs available on the
market. It cannot be used for recording. As with CDs, data is
recorded by the presence or absence of small indentations called
pits. A disc with this kind of recording system is called an “optical
disc.”
SOUND
ATRAC (Adaptive Transform Acoustic
Coding)
Sound contains some elements which are not actually very audible.
For instance, when the sound is soft, it is hard to hear the bass and
treble. Also, during or immediately after a passage of loud sound,
soft sounds cannot be heard even though they may be there. A
technique called ATRAC (Adaptive Transform Acoustic Coding) is
used with MDs to select or dispense with sounds on the basis of our
acoustic characteristics so that the data is compressed into a small
quantity. It compresses the data to be recorded into about one-fifth
of the original data so that it can be stored even on a small-size MD.
(dB)
Sharp
\
Sensitivity of
our ears
\
Dull
+20
0
-20
-40
-60
20 50 100 500 1k
Low | Sound range \ High
5k 15k10k
(Hz)
Sound range and sensitivity of our ears
Sound jump guard memory
When an MD is played, a function (sound jump guard memory)
operates to store the data of the track being played instantly in a
memory to prevent jumps in the sound due to vibration. When the
disc signals cannot be read by the optical laser because of vibration,
the function uses the data in the “sound jump guard memory” to
ensure that there are no breaks in the sound actually heard.
Optical pickup
STOP
Play-only MD
Recording MDs
This is the “blank” type of MD which can be used for recording. Its
data is recorded using magnetism which is easily processed so that
recordings can be made again and again. By using a laser beam to
heat spots on its surface to cancel out the magnetism, the data is
recorded using a magnetic head. A disc with this kind of recording
system is called a “magneto-optical disc.”
52
Recording MD
Sound jump
guard memory
During normal play When vibration has occurred
UTOC (User Table of Contents)
In addition to the data of its tracks, a recording MD comes with the
UTOC contents facility. This records the position of each track, the
breaks between the tracks, the track sequence, etc., and tracks can be
searched quickly by viewing these contents. During editing, all that
changes is the UTOC contents: the tracks themselves need not be rerecorded.
UTOC
Track details
Contents
1. Track A: Page 9
2. Track B: Page 6
3. Track C: Page 10
•
•
•
Page 55

MD (Minidisc) Error Messages
Error message
MD BLANK DISC
CANNOT JOIN
DISC ERROR
DISC FULL
DISC PROTECTED
EMERGENCY STOP
MD NO DISC
NON AUDIO CANNOT COPY
PLAYBACK DISC
TRACK PROTECTED
SCMS CANNOT COPY
Significance
An MD with nothing recorded on it has
been inserted.
An attempt has been made to join tracks
which cannot be joined.
Trouble with MD (damage).
The MD does not have enough available
time. The track number has exceeded 254.
The MD has been set to the accidental
erasure prevention mode.
An error occurred during recording.
An MD has not been inserted.
An attempt was made to digitally copy a
CD-ROM (or video CD, etc.).
An attempt was made to record or edit a
play-only MD.
The track is protected.
An attempt was made to digitally record a
digitally recorded source.
Remedy
Replace with a pre-recorded MD unless
something is to be recorded onto the blank
MD.
This is due to limitations on the MD system.
(See page 54.)
Replace the MD.
Replace with another recording MD.
Slide the MD’s accidental erasure prevention knob so that the hole is blocked.
Stop operation by pressing the 7 (stop)
button, and perform the operation again.
Insert an MD.
Stop the recording.
Replace with a recording MD.
This cannot be released by this unit.
Release it at the unit which originally
protected the track.
Set to analog recording.
English
53
Page 56
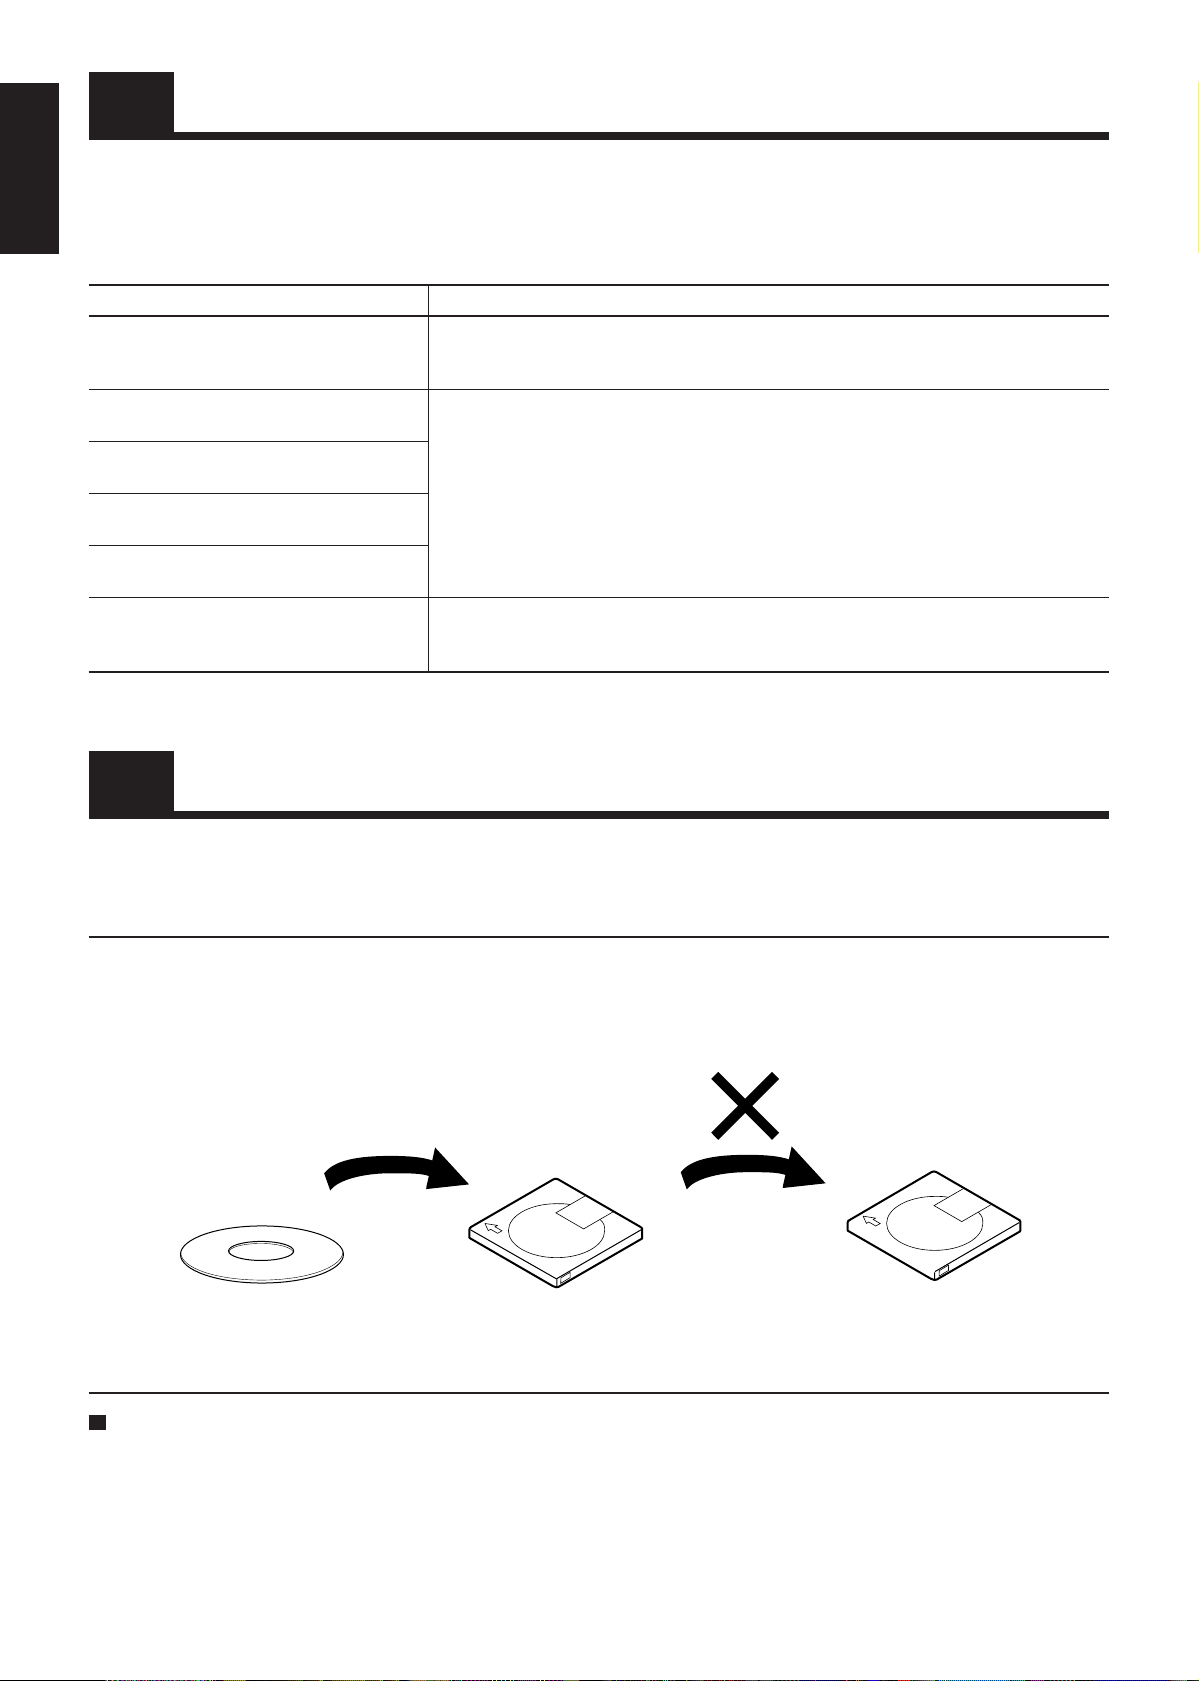
Restrictions Imposed by MDs (Minidiscs)
MDs use their own system to record information which is different from conventional cassette tapes and DAT tapes. This system has a
English
number of restrictions which sometimes give rise to the following symptoms. These symptoms do not, however, indicate that something is
wrong with the product.
Symptom Cause
“DISC FULL” is displayed even though the
recording time displayed for the MD has not
been used up.
“DISC FULL” is displayed despite sufficient
leeway in track numbers and recording time.
It is sometimes not possible to use the JOIN
function.
The remaining time is not increased even
though tracks are deleted.
The sound is sometimes skipped during rapid
advance or rapid reverse operations.
The recorded time and the remaining time
together do not equal the recording time
displayed for the MD.
The number of tracks which can be recorded on an MD is limited, and this has nothing to
do with the recording time. Track numbers 255 and above cannot be recorded.
When some of the MD recordings are erased and replaced with new recording repeatedly,
empty areas are formed on parts of the disc. When a recording is made on this kind of disc,
the data of a track is divided in bits and pieces among and recorded on these empty areas.
When the number of these divided areas increases, “DISC FULL” may be displayed during
recording. If the data is divided so that some parts are less than 8 seconds in length, it may
not be possible to use the JOIN function to join the track concerned. In addition, the
remaining time will not increase even if these parts are erased. The sound of tracks which
have been divided up in bits and pieces and recorded may break up during rapid advance or
rapid reverse operations.
Recording on an MD is not possible unless there are successive spaces at least 2 seconds in
length. For this reason, a shorter recording time will be displayed for an MD with a large
number of short empty areas.
Restriction on Copying Digital Material
Due to copyright and other considerations, the following restriction is now in place for MDs onto which the digital signals of CDs have been
copied.
SCMS (Serial Copy Management System)
MDs can digitally record the clear sound of CDs. However, it is now not possible to copy the digital signals of an MD recorded in this way
onto another MD using another unit. In other words, copies of copies cannot be made. This restriction is known as SCMS (Serial Copy
Management System).
This unit is designed to comply with this restriction.
OK
DIGITAL
The copyright laws allow recordings to be made for the personal enjoyment of the individual user but they do not allow such recordings to be
used for other any purposes without permission from the holder of the copyrights.
DIGITAL
NO
MDs on which CD sound has been recorded using this unit cannot be digitally copied by other units.
54
Page 57

Check out the points below before
Troubleshooting
requesting repairs or servicing.
Symptom Cause Remedial action/check Ref.
English
No sound.
The time display flashes in the
COMMON
display window.
Play fails to start
Specific parts are not played
CD PLAYERMD RECORDER
properly.
The inserted MD is ejected.
MD cannot be inserted.
No recording.
Timer fails to start.
TIMER
No remote control operations.
REMOTE
CONTROL
•An MD with nothing recorded on it has been
inserted. (“BLANK DISC” is displayed.)
•A power failure has occurred or the power
cord has been disconnected.
•The CD has been inserted upside down.
•Condensation has formed on the lens.
•The CD is scratched.
•The MD was not inserted properly.
•An MD has already been inserted.
•The MD is set to the accidental erasure
prevention mode (“DISC PROTECTED” is
displayed).
•Present time is not correct.
•The timer display ( ) fails to appear.
•The dry batteries in the remote control have
discharged.
•The remote control sensor is exposed to
direct sunlight or some other intense source
of light.
•Replace the MD on which tracks have been
recorded.
•Set the clock and re-program the timer.
•Insert it properly with the label side facing
up.
•Turn on the power and wait for a couple of
hours.
•Replace the CD.
•Re-insert the MD by pushing it gently until
it clicks into position.
•Press the 0 button, eject the MD, and insert
another MD.
•Slide the accidental erasure prevention knob
so that the hole is blocked.
•Set the time properly.
•Press the TIMER button so that the timer
display ( ) appears.
•Replace them with two fresh batteries (R03
or size “AAA”or UM4).
•Operate the remote control where it will not
be exposed to direct sunlight, a lighting
fixture or some other intense source of light.
20
45-47
12
20
21
27
45
8
9
• If the unit fails to operate properly even when the remedial action suggested above has
been taken:
This unit uses a microcomputer to perform a large number of operations. If it fails to operate no matter which button is pressed, disconnect
the power cord, and then wait a few moments before re-connecting it. Then set the time and re-program the timer.
If something important is going to be recorded, always test-record first to check that the recording turns out properly before proceeding
with the actual recording.
The manufacturer assumes no liability whatsoever for any damages resulting from missed opportunities while conducting recording,
playback or CD play operations due to malfunctioning of or trouble in the unit, or for any incidental damage.
55
Page 58

English
Main Specifications
CD Player Section
System Compact disc digital audio system
Readout system Non-contact optical readout (using semiconductor laser)
Error correction system CIRC
Number of channels 2
Pitch control ±12%
Total harmonic distortion (1 kHz) 0.009%
Dynamic range (1 kHz) 90 dB
Signal-to-noise ratio 94 dB
Frequency response 8Hz ~ 20 kHz
Wow and flutter Less than measurable limit
MD Recorder Section
System Mini-disc digital audio system
Recording system Magnetic field modulation overwrite system
Signal readout system Non-contact optical system using semiconductor laser (λ = 780nm)
Sound compression system ATRAC system
Number of channels 2
Wow and flutter Less than measurable limit
Sampling frequency 44.1 kHz
Frequency response 8 Hz ~ 20 kHz
Inputs: Analog (LINE IN) Minimum input level: 300 mV (Full scale –12 dB)/50 kΩ
Digital (optical) Input level: –23 dBm – –15 dBm
Microphone Minimum input level: 3 mV (Full scale –12 dB)/600-10 kΩ matching
impedance
Dynamic range (1 kHz) 88 dB (during play)
Signal-to-noise ratio 88 dB (during play)
The unit’s specifications and exterior are subject to change without
notice due to improvements.
Timer Section
Timer system Once-a-day operation (ON/OFF timer)
Clock display 12-hour display
Common Specifications
Output connectors: Analog LINE x 1 set, 2 V/5 kΩ (Full scale)
Headphones x 1, 4 mW/32 Ω, 8 Ω – 1 kΩ matching impedance
Digital OPTICAL x 1, –21 dBm ~ –15 dBm
Other connectors COMPU LINK-3/SYNCHRO x 2
TEXT COMPU LINK x 2
Power requirements AC 120 V (60 Hz)
Power consumption 15 W in power ON mode; 6 W in STANDBY mode
Dimensions 17-3/16" x 5 x 12-1/2" inches (W x H x D)
(435 x 127 x 316 mm)
Mass Approx. 13.3 lbs (6.0 kg)
Accessories
Remote control (RM-XU301U) (1)
R03, size “AAA” or UM4 dry batteries (to check operation of remote control
Pin cords (2)
COMPU LINK-3 cable (1)
TEXT COMPU LINK cable (1)
• This unit is licensed under the U.S. and foreign patents of Dolby Laboratories Licensing Corpora-
tion.
) (
2)
56
Page 59

VICTOR COMPANY OF JAPAN, LIMITED
EN,FR
JVC
0298IMMIDESAN
 Loading...