

Page 1
PORTABLE MINIDISC RECORDER
GRABADOR PORTÁTIL DE MINIDISC
XM-R700SL
INSTRUCTIONS
MANUAL DE INSTRUCCIONES
For Customer Use:
Enter below the Model No. is located on
the bottom of the cabinet and Serial No.
is located inside of the cabinet. Retain
this information for future reference.
Model No.
Serial No.
LVT0621-004A
[US]
Page 2
Gracias por adquirir este producto JVC. Lea atentamente las instrucciones antes de ponerlo en marcha para sacarle el
máximo partido y asegurarse de que hace de él un uso apropiado de manera que garantice su buena conservación.
Índice
Accessorios incluídos ................................................... 1
Situación de los mandos ............................................... 1
Preparativos relacionados con la alimentación
eléctrica .................................................................... 2
Bloque contra accionamiento accidental
(Función de bloqueo) ............................................... 3
Reproducción normal ................................................... 3
Canbio del sonido (A.C.BASS) .................................... 5
Cómo ver en pantalla la información del disco ............ 7
Español
Reproducción repetida y aleatoria
(Utilización del mando a distancia) ......................... 7
Selección de las opciones operativas del control remoto .......
Preparativos para la grabación...................................... 8
Compruebe los puntos siguientes antes de grabar ........ 9
Grabación normal ......................................................... 9
Grabación sincronizada (SYNCHRO) ....................... 10
Edición del MD (con la unidad) ................................. 11
División de pistas (Función DIVIDE) ........................ 12
Unión de pistas (Función JOIN)................................. 12
Desplazar pistas (Función MOVE)............................. 13
Borrado de pistas (Función ERASE).......................... 13
Para borrar todas las pistas (Función ALL ERASE) .. 13
Cómo darle un título a un MD (Función TITLE)....... 14
Utilización de la unidad con el accesorios opcional... 15
Precaución .................................................................. 15
Información sobre los Minidiscs (MD) ...................... 16
Mensajes del Minidiscs (MD) .................................... 17
8
Limitaciones del Minidisc .......................................... 18
Normas sobre las grabaciones digitales...................... 18
Mantenimiento............................................................ 18
Guía para la solución de problemas ........................... 19
Características técnicas............................................... 20
Accessorios incluídos
Adaptador de corriente (AA-R555)............................. 1
Auriculares .................................................................. 1
Mando a distancia........................................................ 1
Cable óptico digital ..................................................... 1
Pila de iones de litio (recargable) (BN-R3610) ........... 1
Compartimento de batería externa .............................. 1
Bolsa ............................................................................ 1
Adaptador de corriente ................................................ 1
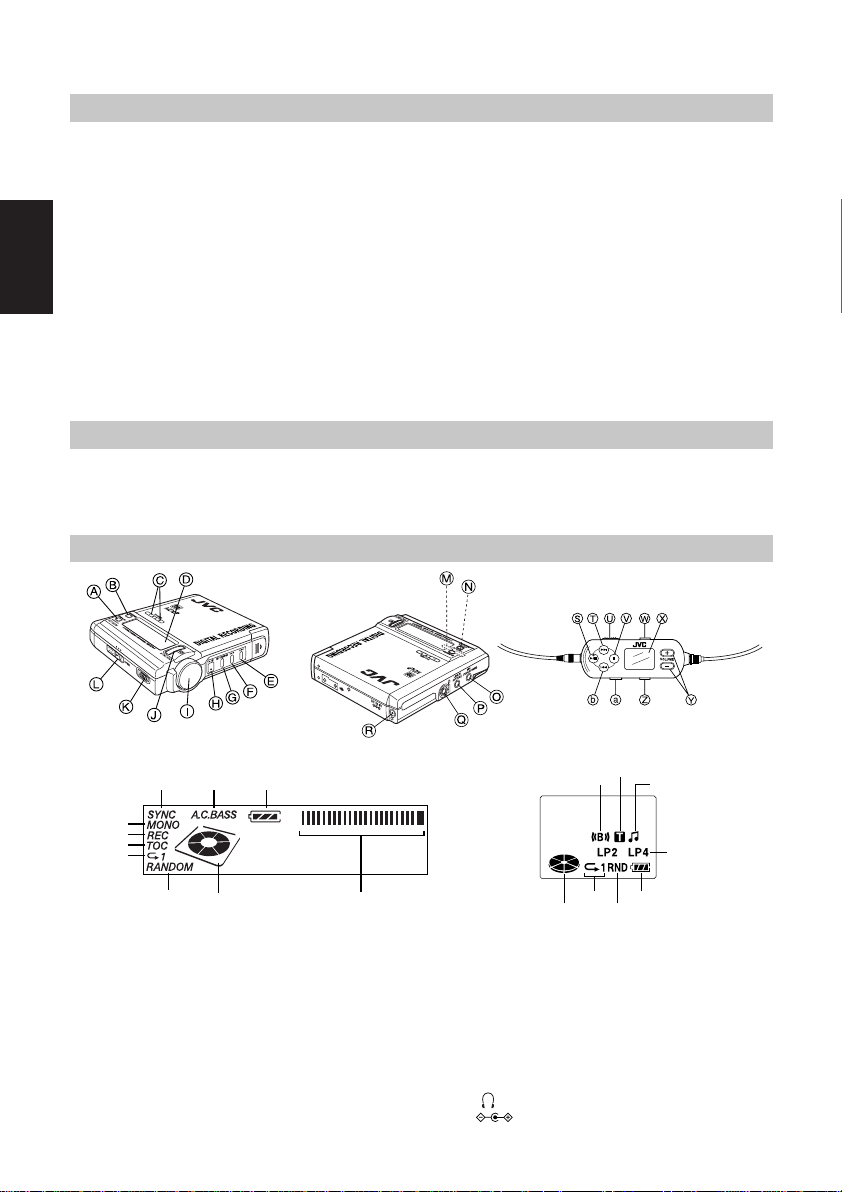
Situación de los mandos
[Indicación en la unidad]
A.C.
BASS
de disco
MONO
REC
TOC
Repetida
Sincronizado
RANDOM Indicador
[En la unidad]
A Botón DISPLAY/CHARA./
REC MODE
B Botón EDIT/ENTER
C Botón VOLUME +, –
D Pantalla
E Botón de salto/búsqueda (¢)
F Botón de salto/búsqueda (4)
G Botón de paro (7)/CHARGE
H
Botón de reproducción/pausa
I Mando giratorio
1
Pila
-dB 1240 OVER
Medidor de niveles máximos
J Botón SET/SYNCHRO
K Interruptor REC
L Interruptor OPEN
M Interruptor HOLD
N Interruptor MIC IN MARK
MODE
O
Connector
P Connector
Q Entrada de auriculares ( )
(6)
R Connector DC IN 6V ( )
[Indicación en el mando a distancia]
Indicador de disco
MIC (PLUG IN POWER)
LINE IN (OPTICAL)
A.C. BASS
TRAIN
Repetida
Pila
Reproducción aleatoria
Modo MANUAL
Modo de reproducción larga
[En el mando a distancia]
S
Botón de reproducción/pausa (6)
T Botón de salto/búsqueda (¢)
U Interruptor HOLD
V Botón de parada (7)
W Botón de potenciación de gra-
ves A.C.BASS
X Pantalla
Y Botón VOLUME +/–
Z Botón DISPLAY
a Botón P.MODE
b Botón de salto/búsqueda (4)
Page 3
Preparativos relacionados con la alimentación eléctrica
Como fuente de alimentación puede utilizar la batería recargable y/o las baterías secas, o un adaptador de corriente.
Para obtener información relativa a la duración de las baterías, consulte las especificaciones (página 20).
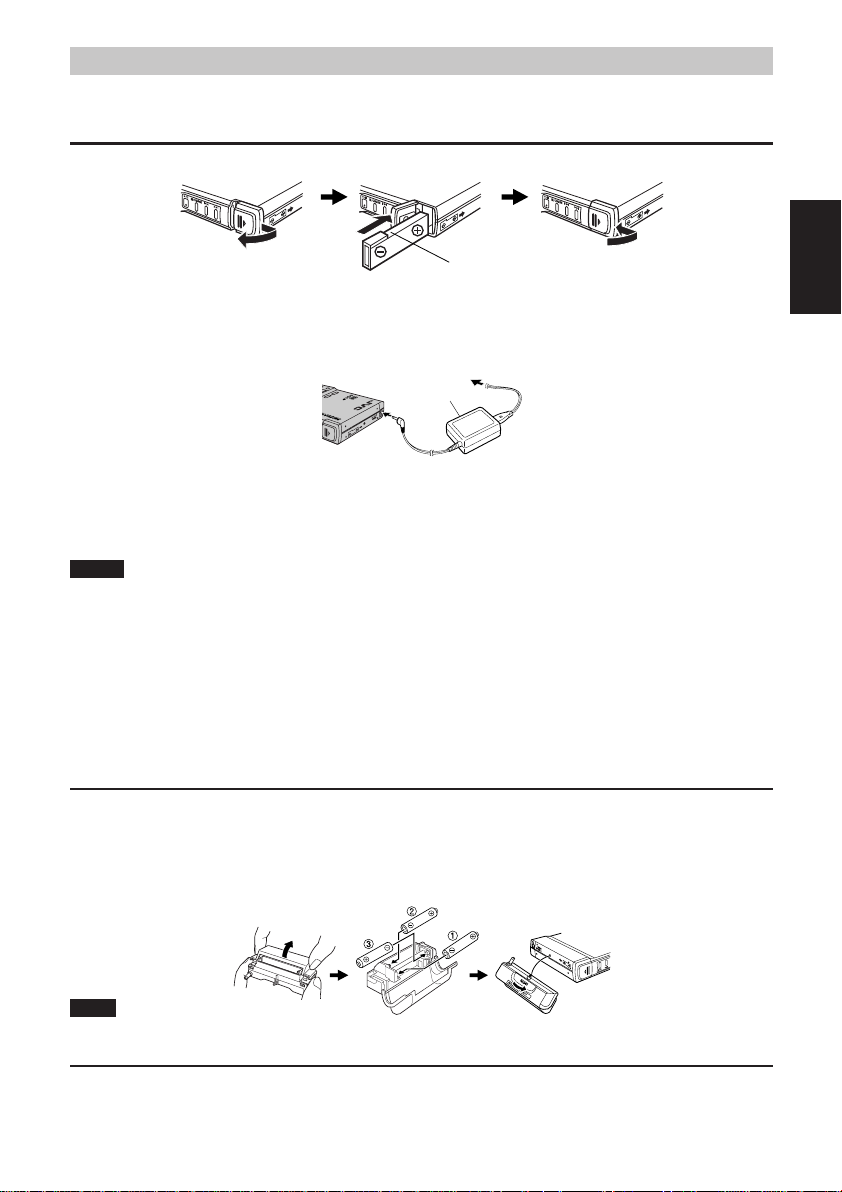
Utilización de la pila de iones de litio (batería recargable) (BN-R3610)
1 Introduzca la batería recargable en la unidad.
Parte recortada
Deslice la tapa y abrala.
nal “–” de la misma hacia usted y
la parte recortada hacia arriba.
2 Para recargar la batería recargable, conecte el adaptador de corriente que se suministra.
Adaptador
de corriente
A la toma de corriente alterna
3 Presione dos veces el botón 7/CHARGE de la unidad.
El visor indica “CHARGE” y se inicia la carga. Cuando la carga ha finalizado, desaparece la indicación “CHARGE”.
•
La indicación “CHARGE” se visualizará durante 5 segundos incluso cuando no se introduzca la batería de iones de litio.
4 Desconecte el adaptador de corriente.
Notas
• La batería no se recarga si se está utilizando la unidad.
• Las pilas tardan aproximadamente 2 horas en recargarse.
• Las pilas recargables tienen una vida de 500 ciclos de carga-descarga aproximadamente. Sabrá que se han gastado
las pilas y que debe cambiarlas en el momento en que, recién recargadas, empiecen a durar mucho menos de lo
que duraban que al principio.
• El adaptador de CA podrá calentarse mucho durante la carga. Esto no es un defecto de funcionamiento.
• Antes de iniciar una grabación, cargue completamente la batería recargable. De lo contrario, la unidad puede apa-
garse durante la grabación.
• La carga con esta unidad deberá realizarse a una temperatura de entre +5°C a +35°C. De lo contrario aparecerá la
indicación “HIGH TEMP” o “LOW TEMP” en el visor.
Funcionamiento con pilas seca (no incluida)
1 Tal como se ha explicado anteriormente, abra la tapa del compartimento de las baterías
e introduzca en el mismo tres pilas alcalinas LR6 (UM-3).
2 Gire el cierre del compartimento de las baterías en la dirección indicada por la flecha
hasta que se detenga. (Para soltar el compartimento de las baterías, gire el cierre en
sentido contrario hasta que el compartimento se suelte.)
Cierre bien la tapa.Introduzca la batería con el termi-
Español
Nota
Para alargar la vida de las pilas, puede utilizar a la vez una pila recargable y las pilas seca.
(Vista inferior)
Funcionamiento con adaptador de corriente
Conecte a la unidad el adaptador de corriente que se suministra.
Consulte el diagrama de conexiones en “Utilización de la batería de iones de litio (batería recargable)”.
Cuando se apaga la unidad con una batería de iones de litio en su interior, aparece la indicación “CHARGE” y se
inicia automáticamente la recarga.
2
Page 4
Nota
Cuando el adaptador de corriente está conectado, la unidad se encuentra en espera. El circuito principal está “activo”
siempre que el adaptador de corriente esté conectado a una toma eléctrica.
Indicador de la batería
El indicador de batería se visualiza en el visor de la unidad y en el del mando a distancia. Cuando el indicador experimenta los cambios siguientes significa que la energía se agotará enseguida.
Si utiliza una batería recargable, recárguela.
Si utiliza una pila seca, cámbiela por una nueva.
Nota
El indicador de batería se visualiza también cuando está conectado el adaptador de corriente, aunque sin ningún significado.
Español
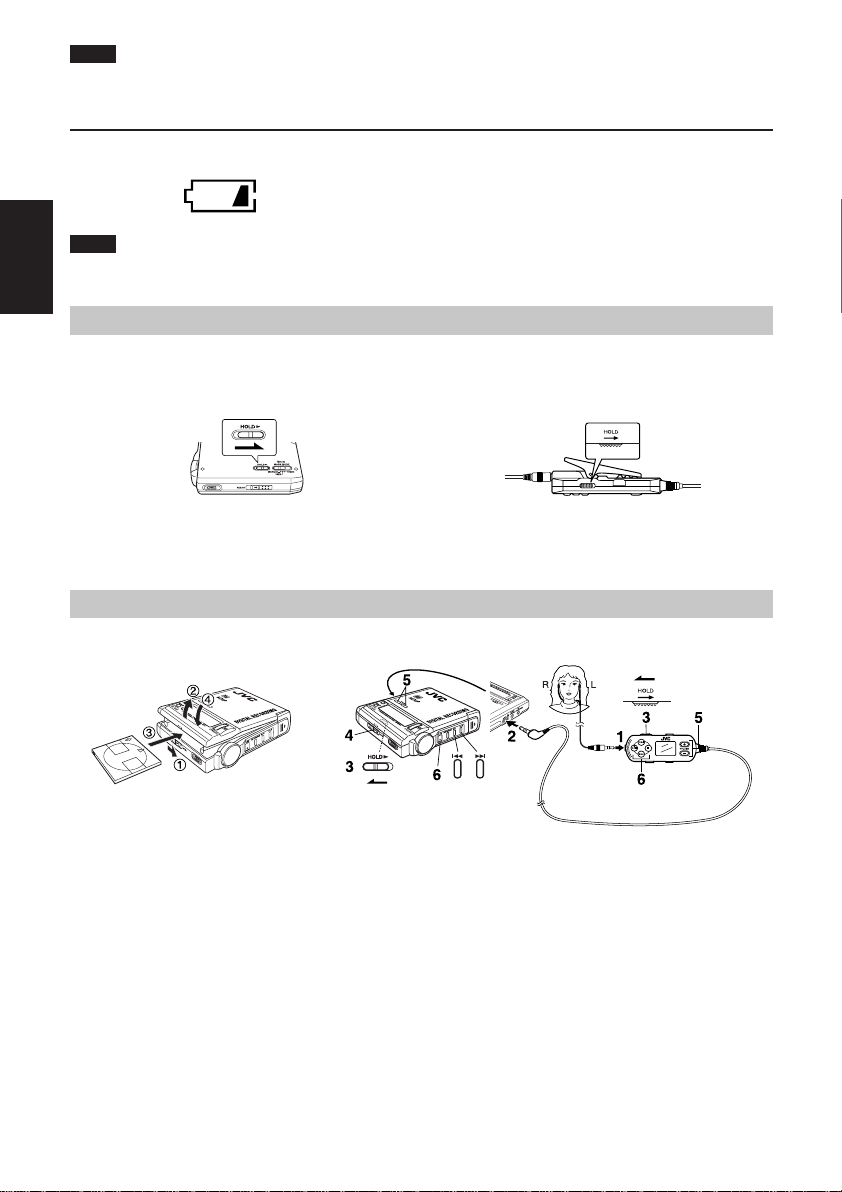
Bloqueo contra accionamiento accidental (Función de bloqueo)
Esta función permite bloquear los mandos de la unidad para evitar que se activen accidentalmente funciones no deseadas.
La unidad y el control remoto poseen cada uno un interruptor de bloqueo HOLD independiente.
Parte inferior de la unidad
Para activar la función de bloqueo, deslice el interruptor de bloqueo HOLD en el sentido de la flecha.
En el modo de bloqueo, la operación de los botones será imposible.
•
Una vez activado el interruptor HOLD de la unidad, aparecerá “HOLD” cada vez que se presione un botón en la unidad.
Devuelva el interruptor a su posición inicial para poder usar los mandos normalmente.
Parte superior del mando a distancia
Reproducción normal
Siga los pasos del 1 al 6 para la reproducción normal.
1 Conecte firmemente los auriculares.
2 Conecte firmemente el control remoto.
3 Desbloquee el interruptor de bloqueo HOLD.
4 Introduzca un minidisc.
1 Deslice el botón de apertura OPEN para liberar la tapa.
2 Abra la tapa manualmente.
3 Introduzca el minidisc en la ranura debajo de la tapa hasta que quede bien encajado, con la etiqueta mirando
hacia arriba. Asegúrese de que la flecha % o ], marcada en el minidisc, apunte hacia donde se indica en la
ilustración.
4 Cierre la tapa.
En la pantalla aparece el mensaje “TOC Reading”, que indica que la unidad está leyendo el disco. Acto
seguido, aparecen el número de pistas y el tiempo de reproducción.
Cuando ajuste un modo de sonido, el nombre del modo (por ejemplo, “A.C.BASS”) aparecerá primero.
5 Ajuste el volumen entre 0 y 25.
Pulse el botón VOLUME +, – de la unidad o del mando a distancia. Para cambiar el volumen de forma continua, pulse el botón de VOLUME.
3
Page 5
6 Pulse el botón 6 de la unidad o del mando a distancia.
Se inicia la reproducción desde la primera pista y finaliza una vez se han reproducido todas las pistas del MD.
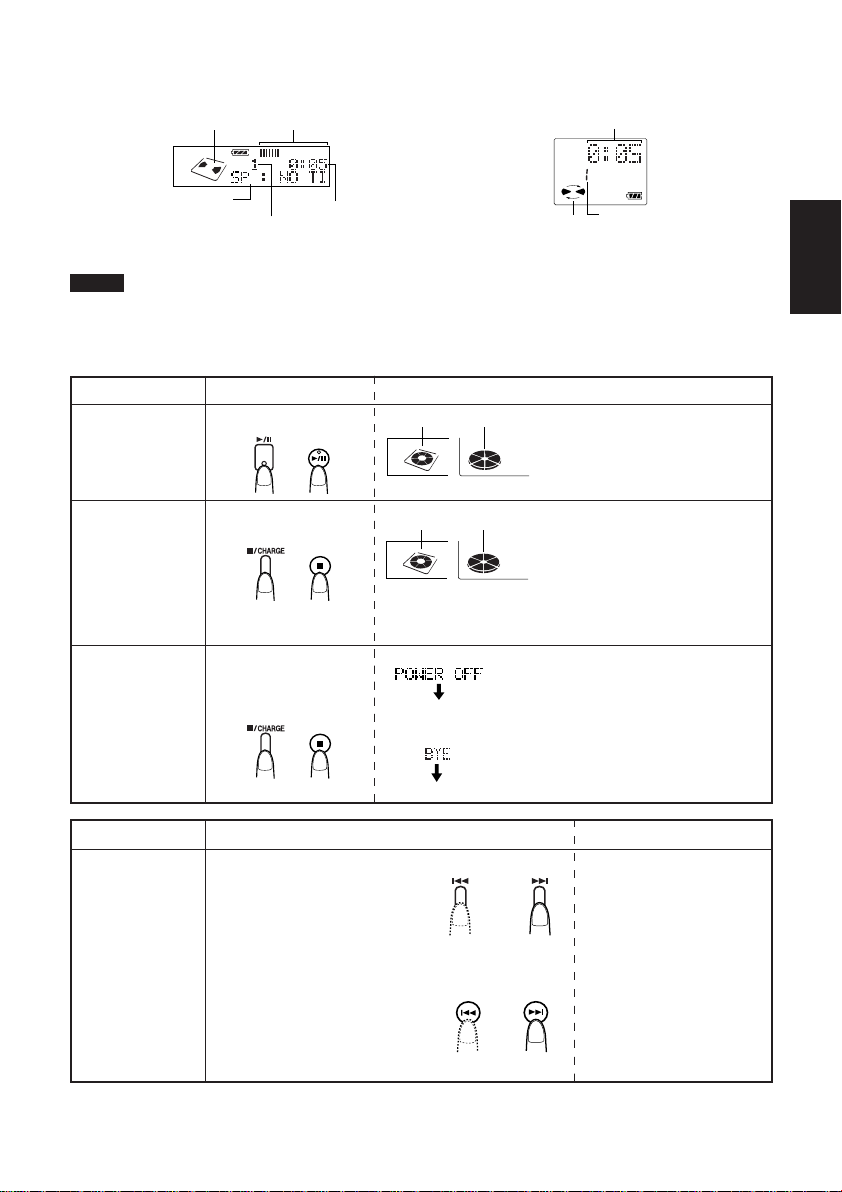
[Indicación en la unidad] [Indicación en el mando a distancia]
El indicador del
disco gira
Medidor de niveles máximos
Tiempo de reproducción
Modo de reproducción y título
de pista
Número de la pista reproducida
Tiempo de reproducción
El indicador del disco gira
Número de la pista reproducida
Para expulsar el minidisc, deslice el botón de OPEN hasta la posición de apertura y abra la tapa con la mano. El
minidisc saldrá automáticamente.
Notas
•
Si no introduce un minidisc, en la pantalla aparece el mensaje “NO DISC” y la unidad se apaga transcurridos unos 10 segundos.
• Al pulsar el botón 6 por primera vez, en la pantalla de la unidad y el mando a distancia aparecerá “TOC
Reading” y “T.READ” durante varios segundos, para leer la información del MD. Espere hasta que el mensaje
desaparezca excepto cuando detenga la unidad pulsando el botón 7.
Funcionamiento
Para hacer una
pausa durante la
reproducción
Para detener la
reproducción
(modo detenido)
Para apagar la
unidad
(modo apagado)
Botón
Pulse durante la reproducción.
o
Pulse durante la reproducción.
o
Empuje en modo Stop, o
pulse durante más de 1 segundo en cualquier otro
modo.
o
Parpadea.
Se detiene.
• Unidad
(En Blanco)
• Mando a distancia
(En Blanco)
Pantalla/instrucciones
Parpadea.
Se detiene.
Pulse la tecla de nuevo para reanudar la
reproducción. La unidad se apagará automáticamente si no recibe ninguna instrucción transcurridos 2 minutos.
Pulse el botón 6 para reiniciar la reproducción. La pista actual se reproduce desde el
principio (reanudación de la reproducción).
La unidad se apagará automáticamente si no
recibe ninguna instrucción transcurridos 45
segundos.
En este caso, para restablecer la reproducción, pulse el botón 6 durante más de un
segundo.
En este caso, para restablecer la reproduc-
La alimentación se desconectará después
ción, pulse el botón 6 durante más de un
que aparezca “POWER OFF” y “BYE”
segundo.
en la pantalla.
Para encender la unidad, pulse el botón
6. Seguidamente se reproducirá desde
el principio la última pista que se estaba
reproduciendo antes de apagar la unidad
(reanudación de la reproducción).
Español
Funcionamiento
Avance /
retroceso rápido
Botón
Función SKIP (unidad)
Pulse estas teclas durante la reproducción o en modo detenido para saltar de
una pista a otra.
Función SEARCH (unidad)
Mantenga pulsada una de estas teclas
durante la reproducción para avanzar o retroceder por el disco.
Función SKIP (mando a distancia)
Pulse estas teclas durante la reproducción o en modo detenido para saltar de
una pista a otra.
Función SEARCH (mando a distancia)
Mantenga pulsada una de estas teclas
durante la reproducción para avanzar o retroceder por el disco.
Retroceso
Retroceso Avance
Avance
Pantalla/instrucciones
• Cuando se activa la reproducción aleatoria, el botón SKIP no
puede utilizarse para retroceder
a alguna de las pista reproducidas aleatoria mente.
4
Page 6
Modo de reproducción y visualización de título de la pista
Cuando se reproduzca un MD, el modo de reproducción y el título grabado en la pista que se está reproduciendo
aparecerán en la parte inferior de la pantalla de la unidad. También, en la pantalla del mando a distancia, aparecerá
una vez el título de la pista si está grabado. Además, en la pantalla del mando a distancia aparecerán los
indicadores “LP2” y “LP4”.
Modo de reproducción:
Hay cuatro modos de reproducción que se muestran en la pantalla de la unidad: SP (STEREO), LP2, LP4 y
MN(MONO). Tenga en cuenta que los MDs se reproducirán con la misma duración que el momento de grabarse.
SP: Indica que las pistas están grabadas en el modo de grabación estéreo normal en esta unidad o aquellas graba-
das en una grabadora de MD incompatible con MDLP*.
LP2: Indica que las pistas están grabadas a dos veces la duración en el modo de grabación estéreo. El indicador
“LP2” de la pantalla del mando a distancia también se encenderá.
LP4: Indica que las pistas están grabadas a 4 veces la duración en el modo de grabación estéreo. El indicador
Español
“LP4” de la pantalla del mando a distancia también se encenderá.
MN: Indica que las pistas están grabadas en el modo de grabación monoaural en esta unidad o aquellas grabadas en
una grabadora de MD incompatible con MDLP*. El indicador “MONO” se encenderá en la pantalla de la
unidad.
* MDLP caracteriza un nuevo método de compresión de sonido (ATRAC3) y la función de grabación y
reproducción a dos veces (o 4 veces) la duración normal.
El logotipo MDLP está marcado en grabadoras de MD y reproductores compatibles con MDLP. También
está marcado en MDs ya grabados en ATRAC3 (excluyendo los MDs que pueden grabarse).
Título de pista:
El título de la pista aparecerá en las pantallas de la unidad y el mando a distancia. Si el título es largo y no puede
visualizarse de una vez, éste se desplazará. Si no tiene título, “NO TITLE” se desplazará en la pantalla de la unidad
pero nada aparecerá en la del mando a distancia.
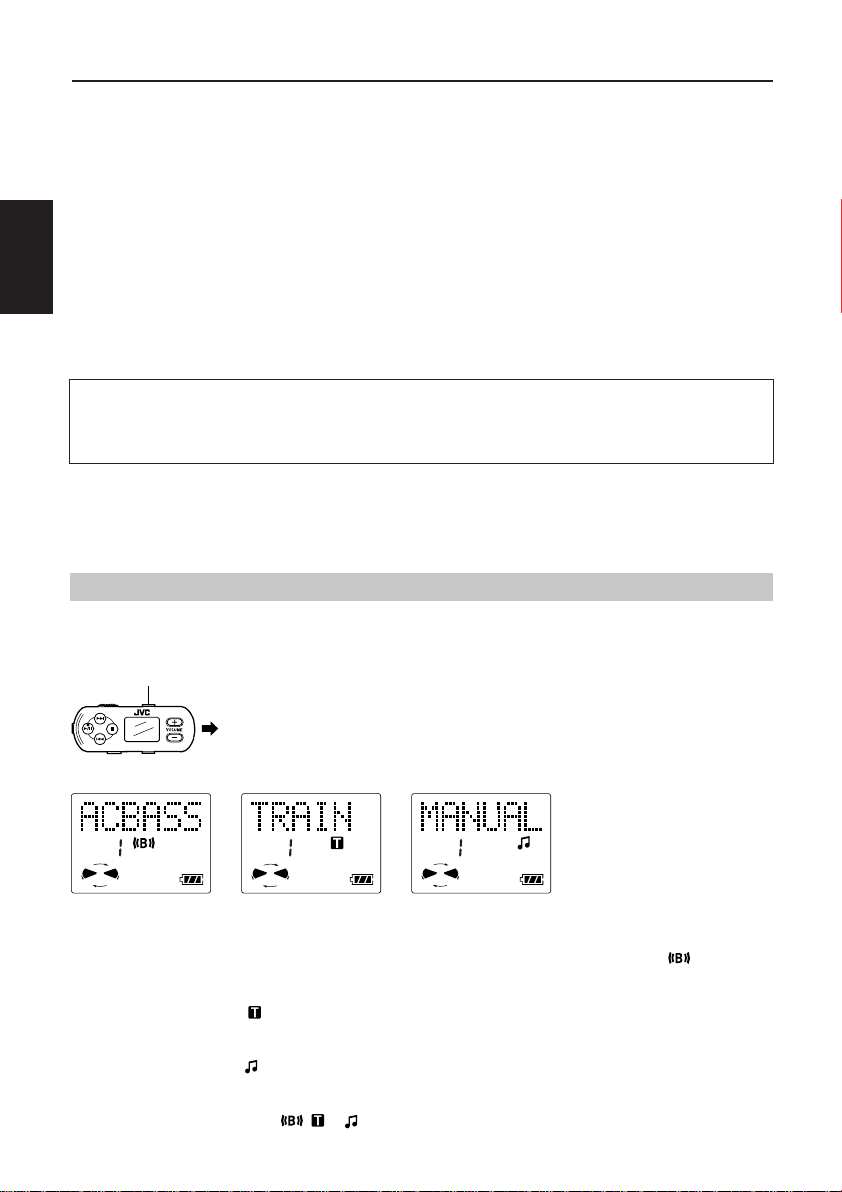
Cambio del sonido (A.C.BASS)
Usted podrá elegir de entre los siguientes modos de sonido. Cada vez que pulse el botón A.C.BASS del mando a
distancia, el nombre del modo de sonido cambiará como sigue tanto en las pantallas de la unidad como del mando a
distancia:
A.C.BASS
A.C.BASS = TRAIN = MANUAL* = (Pantalla original)
*: En la pantalla de la unidad, aparecerá “MANUAL EQ”.
[En el caso de la pantalla del mando a distancia]
A.C.BASS : La función de potenciación de graves (A.C.BASS) está activada y el nivel de graves se controla
TRAIN : La cantidad de pérdida de sonido a través de los auriculares se reducirá.
MANUAL : En este modo, usted podrá ajustar el tono. Consulte “Ajuste del tono en el modo de sonido MA-
(MANUAL EQ)
Para cancelar una función anterior, pulse el botón A.C.BASS del mando a distancia para salir del modo anterior,
es decir, para cambiar al indicador , , o en la pantalla del mando a distancia.
automáticamente en conjunción con el volumen del sonido.
El indicador “A.C.BASS” se encenderá en la pantalla de la unidad y el indicador se encenderá
en la pantalla del mando a distancia.
El indicador se encenderá en la pantalla del mando a distancia.
NUAL” en la página 6.
El indicador se encenderá en la pantalla del mando a distancia.
5
Page 7

Ajuste del tono en el modo de sonido MANUAL
Usted podrá ajustar el tono cambiando los graves y agudos.
1 Pulse el botón A.C.BASS del mando a distancia hasta que en la pantalla aparezca “MA-
NUAL”.
El indicador se encenderá en la pantalla del mando a distancia. (Si el indicador ya está encendido, podrá
saltar este paso.)
2 Pulse el botón A.C.BASS durante 2 segundos o más.
El siguiente medidor de nivel de tono aparecerá en la pantalla del mando a distancia.
(Durante 2 segundos)
Botón A.C.BASS
Barra de nivel de graves
Barras fijas (nivel plano)
Barra de nivel de agudos
Español
¢: Pulse para seleccionar los agudos.
4: Pulse para seleccionar los graves.
VOLUME +/– : Pulse para ajustar el nivel.
3 Para cambiar el nivel de graves, pulse el botón 4. La barra de nivel de graves parpa-
deará. Después, pulse el botón VOLUME + o – para mover la barra de nivel de graves
hacia arriba o abajo (en pasos de 3).
4 Para cambiar el nivel de agudos, repita el paso 3 anterior excepto la pulsación del botón ¢.
Para salir del modo de sonido MANUAL:
• Espere hasta que la pantalla vuelva automáticamente a la original.
• Cuando ninguna barra de nivel esté parpadeando, pulse un botón que no sean los botones 4 y ¢ del mando a
distancia.
• Cuando la barra de nivel esté parpadeando, pulse el botón A.C.BASS o el botón 7 del mando a distancia.
Notas
• Si deja la unidad durante 8 segundos en el paso 2, la visualización volverá a la original. En tal caso, repita desde
el paso 2.
• Si deja la unidad durante 16 segundos en el paso 3 o 4, la visualización volverá a la original. En tal caso, repita
desde el paso 2.
• Los niveles de tono ajustados aquí se almacenarán en la memoria.
6
Page 8
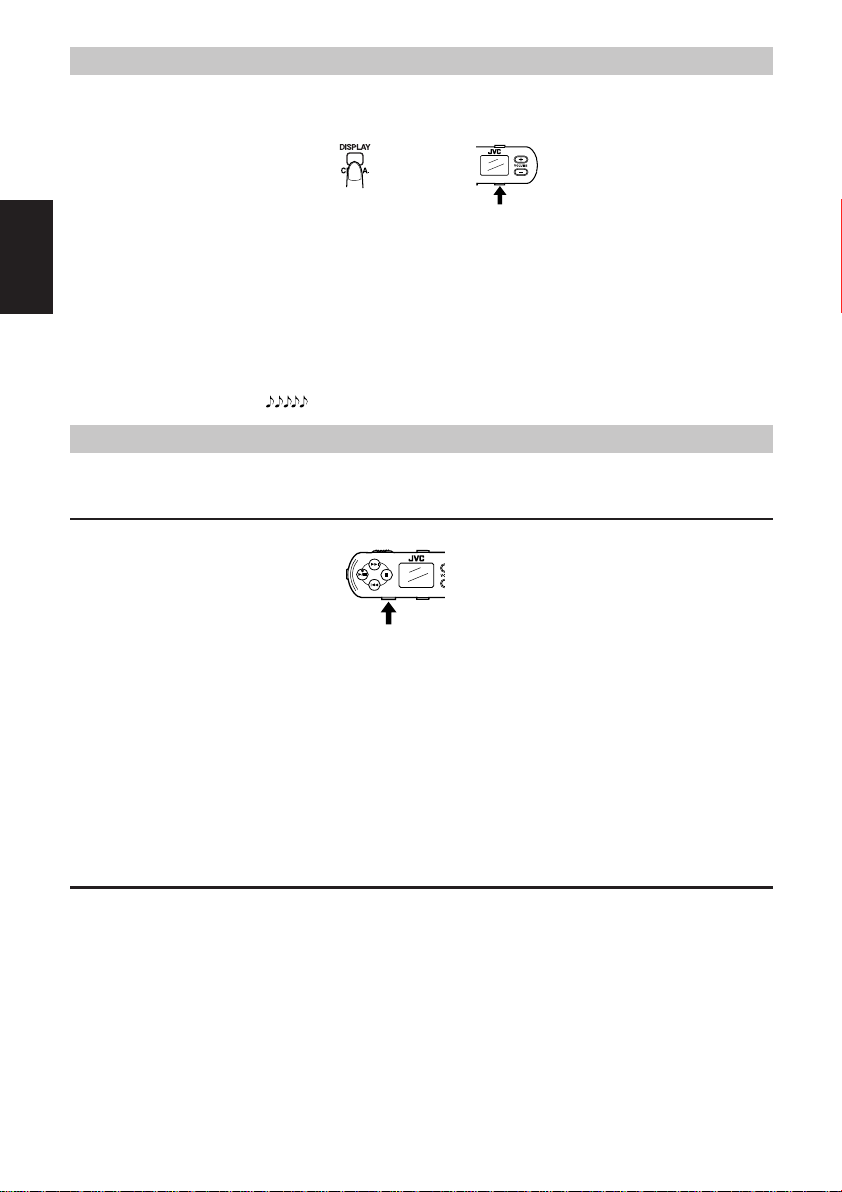
Cómo ver en pantalla la información del disco
Cada vez que pulse el botón DISPLAY/CHARA. (o DISPLAY) en el modo detenido o durante la reproducción, se
visualiza la información del disco del modo siguiente.
El botón DISPLAY/CHARA. en la unidad y el botón DISPLAY del mando a distancia funcionan de forma independiente.
o
Cambio de indicación en la unidad:
En modo detenido:
Título del disco*, número total de pistas y tiempo total
de reproducción del MD = Capacidad de grabación
(tiempo restante) del MD (p. ej., REMAIN -69:20) =
Español
Indicación normal = (vuelta al principio)
Durante la reproducción:
Tiempo restante de reproducción de la pista = Indicación normal = (vuelta al principio)
*: El título del disco o el de la pista se desplazará si es demasiado largo. Si no tienen título, “NO TITLE” aparecerá
en la pantalla de la unidad y “ ~”en la del mando a distancia.
Cambio de indicación en el mando a distancia:
En modo detenido:
Título del disco* = Número total de pistas y tiempo total de reproducción del MD = Título de la pista* =
Indicación normal = (vuelta al principio)
Durante la reproducción:
Título de la pista* = Indicación normal = (vuelta al
principio)
Reproducción repetida y aleatoria (Utilización del mando a distancia)
Puede seleccionar el modo de reproducción repetida, el cual le permite repetir todas las pistas o una pista en particular cuantas veces desee. La reproducción aleatoria le permite escuchar todas las pistas en orden aleatorio.
Cómo seleccionar la reproducción repetida y la reproducción aleatoria en modo detenido
En modo detenido, pulse el botón P.MODE del mando a distancia. Cada vez que pulse el botón, el modo de reproducción cambia del modo siguiente.
Botón P.MODE
P1 = P = RND = P1 RND = PRND = Pantalla original = (Vuelta al principio)
P1: Repite una pista.
P: Repite todas las pistas.
RND: Reproduce las pistas en orden aleatorio.
P1 RND: Repite una pista escogida al azar.
PRND: Repite todas las pistas en orden aleatorio.
(En el visor de la unidad se ilumina el indicador “RANDOM” en lugar de “RND”.)
Una vez seleccionado uno de estos modos de reproducción, pulse el botón 3/8.
Por ejemplo, para iniciar la reproducción aleatoria, pulse el botón P.MODE hasta que aparezca el indicador “RND”
y luego pulse el botón 3/8.
Si desea desactivar las funciones de reproducción repetida o reproducción aleatoria, detenga el minidisc y pulse el botón P. MODE hasta que vuelva a aparecer la pantalla original.
Cómo activar la reproducción repetida durante la reproducción
Durante la reproducción normal:
Cada vez que pulse el botón P. MODE seleccionará en el siguiente orden un modo de reproducción:
P1 = P = pantalla original = (vuelta al principio)
Seleccione “P1” para que suene repetidamente la pista reproducida en ese momento y “P” para que se repita todo
el disco.
Durante la reproducción aleatoria:
Cada vez que pulse el botón P. MODE seleccionará en el siguiente orden un modo de reproducción:
P1 RND = P RND = pantalla original = (vuelta al principio)
Seleccione “P1 RND” tpara que suene repetidamente una pista seleccionada al azar y “P RND” para que se repita
todo el disco en orden aleatorio.
(En el visor de la unidad se ilumina el indicador “RANDOM” en lugar de “RND”.)
Cuando detenga una vez la reproducción aleatoria y la vuelva a iniciar, se reproducirá la pista que se estaba reproduciendo la última vez. Después, se llevará a cabo la reproducción aleatoria.
Para desactivar la función de reproducción repetida, detenga el minidisc y pulse el botón P. MODE hasta que
vuelva a aparecer la pantalla original.
7
Page 9
Selección de las opciones operativas del control remoto
Cómo anular un pitido
Cada vez que pulse los botones del control remoto se oirá un ligero pitido, excepto cuando pulse el botón A. C.
BASS o cuando ajuste el botón VOLUME +, –.
Para anular el pitido, en el modo de parada o durante la reproducción, mantenga pulsado el botón A.C.BASS, y dentro de un segundo,
pulse el botón P.MODE. “BEEP OFF” se desplazará en la pantalla
del mando a distancia.
Para restablecer el pitido, vuelva a efectuar la misma operación. “BEEP ON” se desplazará en la pantalla.
Nota
Si no pulsa el botón P.MODE antes de un segundo, el modo de sonido cambiará.
A.C.BASS
(Mantenga pulsado)
(Antes de 1 segundo)
Cambio del contraste de la visualización de caracteres
El contraste de la visualización de caracteres puede ajustarse cuando los caracteres se vuelvan menos claros debido a
la temperatura del ambiente o durante el desplazamiento. En el modo de parada o durante la reproducción, mantenga
pulsado el botón A.C.BASS y, antes de un segundo, pulse el botón 4 o ¢.
El ajuste podrá realizarse entre LCD00 y LCD15. Mientras el botón
4
o ¢ esté pulsado, el contraste cambiará continuamente. El ajus-
te inicial es “LCD10”.
Nota
Si no pulsa el botón 4 o ¢ antes de un segundo, el modo de sonido cambiará.
A.C.BASS
(Mantenga pulsado)
(Antes de 1 segundo)
o
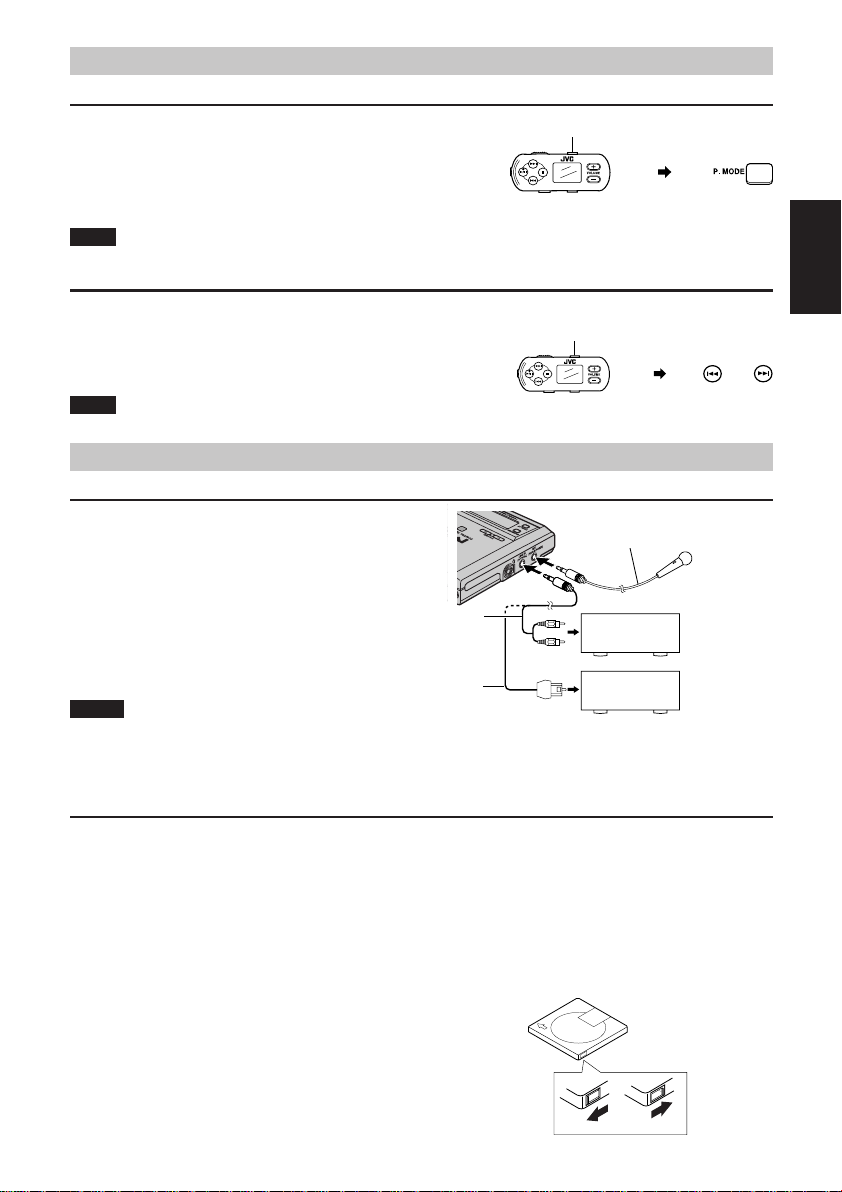
Preparativos para la grabación
Conexión para grabar
Conecte una de las siguientes fuentes de música a la unidad.
• Entrada analógica al conector LINE IN (OPTICAL)
• Entrada digital al conector LINE IN (OPTICAL)
• Entrada de micrófono al conector MIC (PLUG IN POWER)
Micrófono (no incluido)
Español
Notas
Cable de conexión estereofónico
(no incluido)
Cable óptico digital (incluido)
Reproductor
de MD, casete,
etc.
Reproductor
de CD, etc.
• No se puede mezclar el sonido del micrófono con la fuente en LINE IN.
• Puesto que la prioridad de cada entrada es la siguiente, asegúrese de desconectar la otra fuente de música antes de
proceder a la grabación. Por ejemplo, desconecte el micrófono antes de grabar una entrada analógica.
Entrada digital (LINE IN) > entrada MIC > entrada analógica (LINE IN)
Cosas que debe saber antes de empezar a grabar
• La grabación o reproducción de material sujeto a derechos de propiedad intelectual puede ser
ilegal sin la autorización previa del propietario de dichos derechos.
• Lea atentamente las “Normas sobre las grabaciones digitales” de la página 18.
•
La grabadora de MD graba las siguientes frecuencias de muestereo para fuentes de audio digitales, LINE IN (OPTICAL).
32 kHz, 44,1 kHz y 48 kHz
• Cuando grabe de una entrada digital o la entrada de micrófono, el nivel de grabación se ajustará automáticamente
en forma correcta. Cuando grabe de una entrada analógica, será necesario ajustar adecuadamente el nivel de grabación. La grabación no se verá afectada por el ajuste de A.C.BASS o el nivel de tono.
• Para evitar que borre o grabe en los Minidiscs por error, los discos llevan una pestaña de protección de borrados
accidentales en la parte posterior. Deberá ser puesto en la posición cerrada antes grabar o editar.
• La operación del mando a distancia será deshabilitada durante la grabación y la edición.
• Durante la grabación deberá evitar desconectar o conectar
el cable de conexión o el micrófono.
• Durante la grabación deberá evitar extraer la pila
recargable. De lo contrario, no podrá abrir la tapa a menos
que vuelva a insertar la pila recargable o conecte el cargador de CA a la unidad.
Cerrar
Permite grabar
y editar
Pestaña de protección de
borrados accidentales
Cerrar
Evita que se
borre el contenido
8
Page 10
Compruebe los puntos siguientes antes de grabar
• El MD no es del tipo sólo reproducción.
• La pestaña contra el borrado accidental del cartucho del MD se encuentra en posición cerrada.
• El MD tiene espacio suficiente para grabar. Si no, ejecute la función ALL ERASE o ERASE, mencionada más
adelante, para borrar todas las pistas o las pistas que desee del MD. Puede verificar el tiempo de grabación que
queda en el MD pulsando repetidamente el botón DISPLAY/CHARA. en la unidad en modo detenido. (Ver
“Cómo ver en pantalla la información del disco” en la página 7.)
Grabación normal
PRECAUCIONES:
• Asegúrese de que la batería esté completamente cargada. De lo contrario, es posible que la unidad se desactive,
dejando la grabación incompleta.
• Mientras en la pantalla aparezca “UTOC Writing”, para evitar la grabación inadecuada, no dé golpes a la unidad y
Español
no desconecte ningún cable de la unidad, incluyendo el cable del adaptador de corriente.
Notas
• La operación de grabación solamente es posible con los botones de la unidad.
• Cuando se grabe una señal estéreo en el modo MONO, el sonido estéreo se oirá a pesar de que la señal se haya
grabado correctamente en el modo MONO.
1 Compruebe las cosas antes de grabar.
Consulte “Compruebe los puntos siguientes antes de grabar” más arriba.
2 Inserte un MD con la cara de la etiqueta hacia arriba.
Continúe con el paso siguiente después que “TOC Reading” desaparezca de la pantalla.
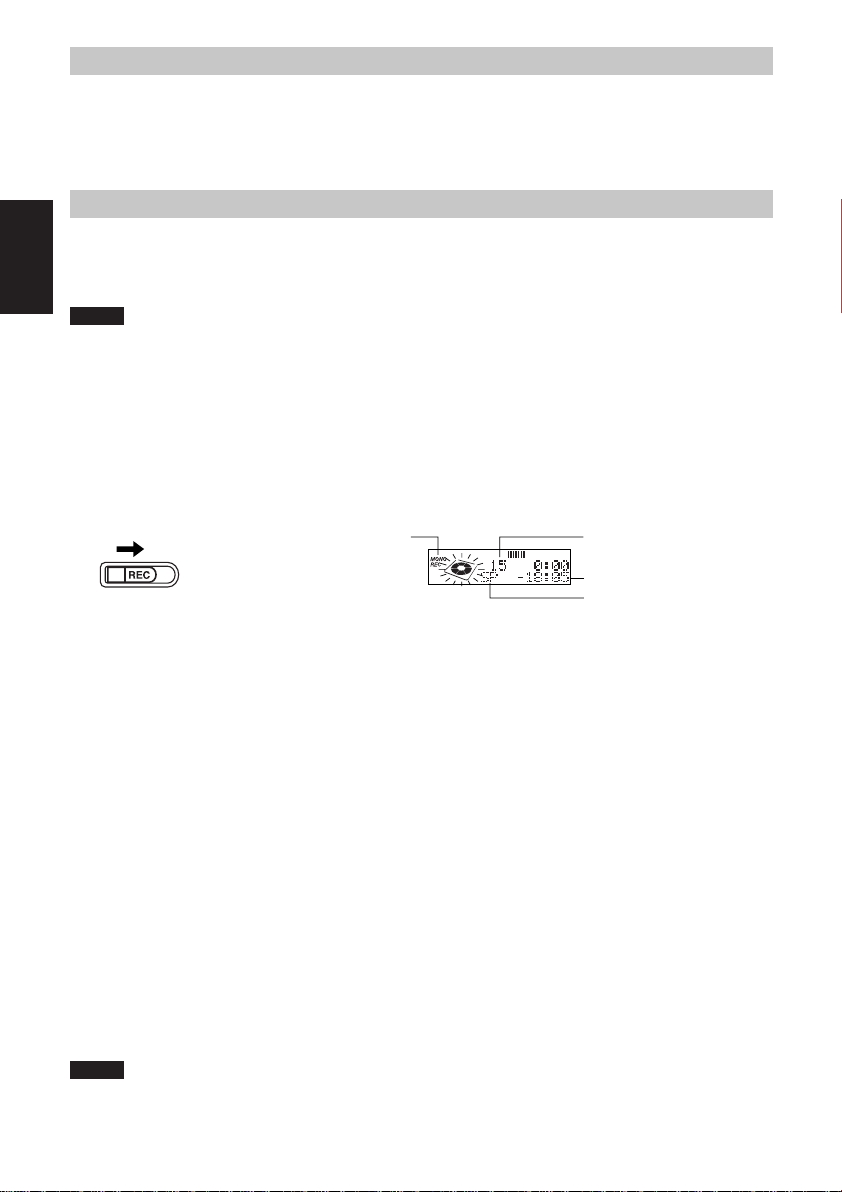
3 Deslice el interruptor REC.
La unidad entrará en el modo de grabación/espera, el indicador REC se encenderá, y el indicador de disco parpadeará. El número de pista aumentará en uno.
(aparece solamente si se
selecciona MONO.)
• Para cancelar el modo de grabación/espera, pulse el botón 7/CHARGE.
4 Antes de dos minutos, pulse el botón REC MODE para seleccionar el modo de graba-
ción.
Cada vez que pulse el botón, la visualización cambiará como sigue:
SP = LP2 = LP4 = MONO
SP: Significa grabación estéreo de duración normal. El número de horas utilizables para la grabación es
igual que lo indicado en el paquete del MD.
LP2: Significa grabación estéreo de duración 2 veces la normal. El número de horas utilizables para la gra-
bación es el doble que lo indicado en el paquete del MD.
LP4: Significa grabación estéreo de duración 4 veces la normal. El número de horas utilizables para la gra-
bación es de 4 veces lo indicado en el paquete del MD.
MONO: Significa grabación monoaural de duración normal. El número de horas utilizables para la grabación
es el doble de lo indicado en el paquete del MD.
5 Reproduzca la fuente de grabación.
6 Ajuste el nivel de grabación para la entrada analógica solamente.
Consulte “Ajuste el nivel de grabación” de la página 10.
7 Pulse el botón 6 para iniciar la grabación.
Cuando el MD esté lleno, en la pantalla aparecerá “UTOC Writing”, indicando que la grabación se ha completado exitosamente. El indicador “TOC” permanecerá encendido durante este período. Después, el MD se parará.
(El indicador “TOC” se apagará.)
Para realizar una pausa, pulse el botón 6. (El número de pista aumentará en uno.)
Para cancelar la pausa, pulse otra vez el botón 6.
Para cesar la grabación, pulse el botón 7/CHARGE. “UTOC Writing” aparecerá en la pantalla y después el MD se
detendrá. (El indicador “TOC” se apagará.)
Notas
• Durante la grabación, el modo de grabación no cambiará incluso aunque pulse el botón REC MODE. Para cambiarlo, tendrá que detener la unidad.
• Una vez que haya ajustado el modo de grabación, éste se mantendrá hasta que la unidad se desconecte. Cuando
conecte la unidad, siempre se seleccionará el modo de grabación SP (estéreo).
9
Número total de pista
Tiempo restante
Modo de grabación
Page 11

Título “LP:” ON/OFF
Para aumentar el espacio utilizable para un título, podrá borrar el nombre del modo de grabación “LP:” que se suma
inmediatamente antes del título.
En el modo de parada, pulse el botón SET durante dos segundos o más.
Cada vez que pulse el botón, la pantalla cambiará como sigue:
TITLE LP: OFF Ô TITLE LP: ON
Para borrar de un título, seleccione “TITLE LP:OFF”. De lo contrario, seleccione “ON”.
Nota
El “LP:” grabado no podrá borrarse (editarse) con la función TITLE mencionada en la página 14.
Ajuste el nivel de grabación (para la entrada analógica solamente)
El nivel de grabación deberá ajustarse de forma que el medidor de nivel de pico no alcance la marca OVER para
evitar la distorsión de la señal de grabación.
Pulse los botones 4 o ¢ de la unidad para reducir o aumentar el nivel de grabación.
Usted podrá cambiar el nivel de grabación entre “REC LEVEL 00” (no se grabará nada) a “REC LEVEL 25”.
Marcación de pista (Cuando grabe de la entrada LINE IN solamente)
• Cada vez que la reproducción del lado de la fuente avance de una pista a otra durante la grabación digital, el número de pista del MD aumentará automáticamente en 1.
• Cada vez que en el lado de la reproducción no haya sonido durante 3 o más segundos durante la grabación
analógica/digital, el número de pista del MD aumentará automáticamente en 1.
• Durante la grabación analógica/digital, usted podrá aumentar el número de pista en 1 deslizando el interruptor
REC. (Añadiendo el número de pista de esta manera, podrá editar más tarde los contenidos de la grabación utilizando las funciones de edición, tales como borrado, movimiento, y unión. Además, podrá localizar rápidamente
la pista deseada con el botón de avance rápido o retroceso.)
Marcación de pista (Cuando grabe señales de entra MIC)
Usted podrá elegir la forma de hacer una pista de una entrada MIC, con el botón MIC IN MARK MODE en la base
de la unidad.
• Si necesita cambiar el ajuste, deberá ajustar este botón antes de comenzar la grabación.
Español
MANUAL: El número de pista podrá aumentarse en 1 deslizando el interruptor REC.
3 MIN: El número de pista aumenta automáticamente en 1 aproximadamente cada tres minutos. También
podrá aumentarse deslizando el interruptor REC.
10 MIN: El número de pista aumenta automáticamente en 1 aproximadamente cada 10 minutos. También
podrá aumentarse deslizando el interruptor REC.
Grabación sincronizada (SYNCHRO)
La grabación sincronizada se inicia automáticamente cuando la unidad detecta una señal de entrada y finaliza si la
unidad no detecta ninguna señal durante 30 segundos.
• Utilice los botones de la unidad.
1 Inserte un MD con la cara de la etiqueta hacia arriba.
Continúe con el paso siguiente después que “TOC Reading” desaparezca de la pantalla.
2 Deslice el interruptor REC.
3 Pulse el botón SYNCHRO.
Se encenderá el indicador “SYNC”, y el modo de grabación actual y “SYNCHRO” aparecerán en la pantalla.
Después, el indicador de disco parpadeará.
Para cancelar la grabación sincronizada, pulse otra vez el botón SYNCHRO para apagar el indicador “SYNC”.
4 Pulse el botón 6.
El indicador “SYNC” parpadeará, indicando que la unidad está en el modo de grabación/espera.
5 Reproduzca la fuente de grabación.
Cuando la unidad detecte una señal de entrada, la grabación comenzará automáticamente. La grabación finalizará automáticamente si la unidad no detecta ninguna señal durante 30 segundos.
Nota
Una vez que pulse el botón 6 durante la grabación sincronizada, la unidad pasará al modo de grabación/pausa y la
grabación sincronizada se desactivará. Para iniciar la grabación SYNCHRO, repita los pasos anteriores.
10
Page 12
Edición del MD (con la unidad)
Además de las funciones de grabación y reproducción, la unidad incorpora funciones de edición. Se pueden dividir,
unir, desplazar o borrar pistas grabadas en el MD según se precise. Asimismo, se puede poner un título al disco y a
las pistas que contiene.
No se puede editar el MD en modo de reproducción aleatoria.
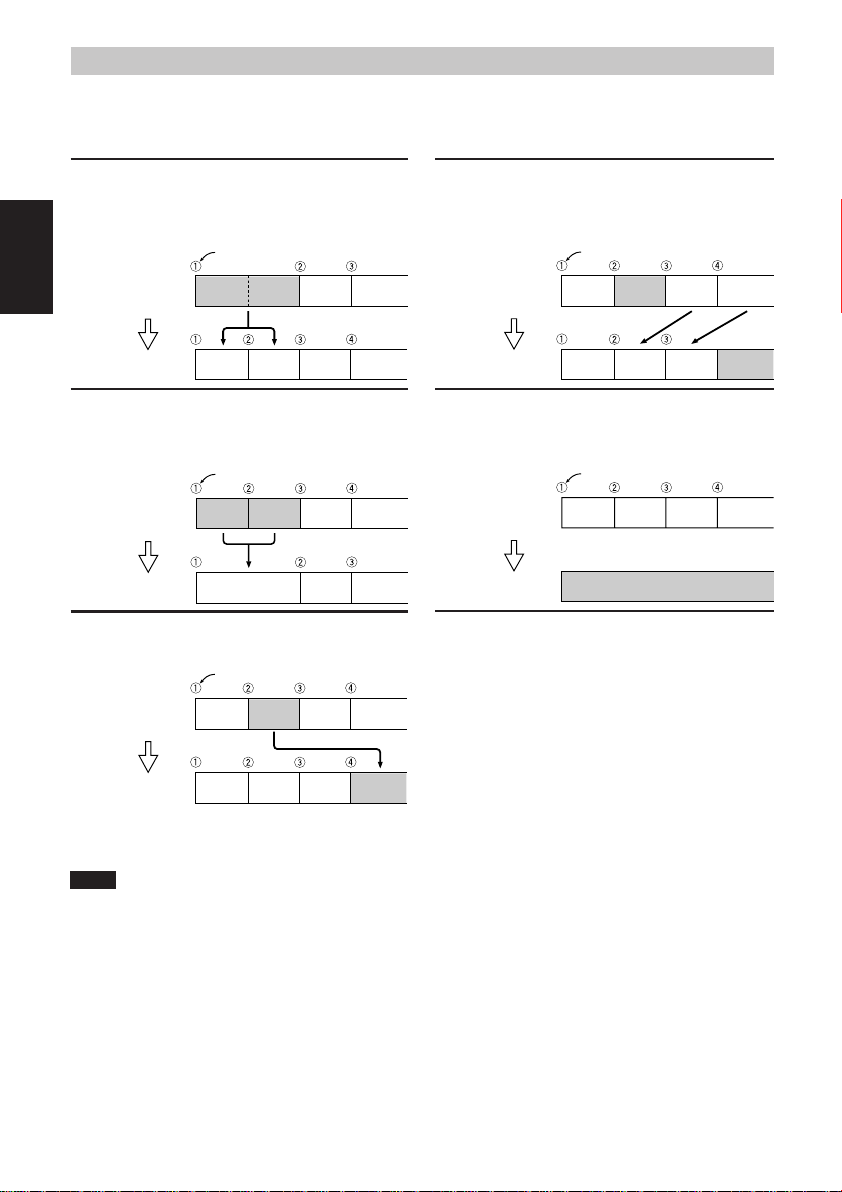
División de pistas (Función DIVIDE)
Consiste en insertar una marca en algún punto de la
pista (véase Nota) para que cree una pista adicional, de
manera que la pista original queda dividida en dos.
N° de Pista
Español
DIVIDE
Pista A Pista B Pista C Pista D
Pista A Pista B Pista C Pista D
Unión de pistas (Función JOIN)
Consiste en borrar la marca de separación existente entre dos pistas correlativas para convertirlas en una sola.
N° de Pista
JOIN
Pista A Pista B Pista C Pista D
Pista A + Pista B Pista C Pista D
Desplazar pistas (Función MOVE)
Puede mover las pistas en cualquier dirección para que
queden en el orden deseado.
MOVE
N° de Pista
Pista A Pista B Pista C Pista D
Borrado de pistas (Función ERASE)
Elimina las pistas innecesarias. Las partes habladas, por
ejemplo, pueden borrarse muy rápidamente. La parte
borrada no queda como un espacio en blanco, ya que la
pista siguiente avanza hasta ocupar su lugar.
Borrado
de pista B
N° de Pista
Pista B Pista C Pista D
Pista A
Pista C Pista D
Pista A
Se pueden
grabar nuevas
pistas.
Borrado de todas las pistas (Función
ALL ERASE)
Se pueden borrar todas las pistas de una sola vez sin
tener que grabarlas encima.
ALL
ERASE
N° de Pista
Pista A Pista B Pista C Pista D
Se pueden grabar nuevas pistas.
Cómo darle un título a los discos y a
las pistas (Función TITLE)
Si lo desea, le puede dar un título de hasta 61 caracteres
a un disco o pista. El titulo dado aparecerá en la
pantalla del equipo.
Pista A Pista C Pista D Pista B
Nota
Nota
Poner marcas en las pistas: Las marcas sirven para encontrar el inicio de cada pista. Todo lo que quede entre marca y
marca se considera una pista. Los números de las pistas se muestran en la secuencia en que se van a reproducir.
11
Page 13
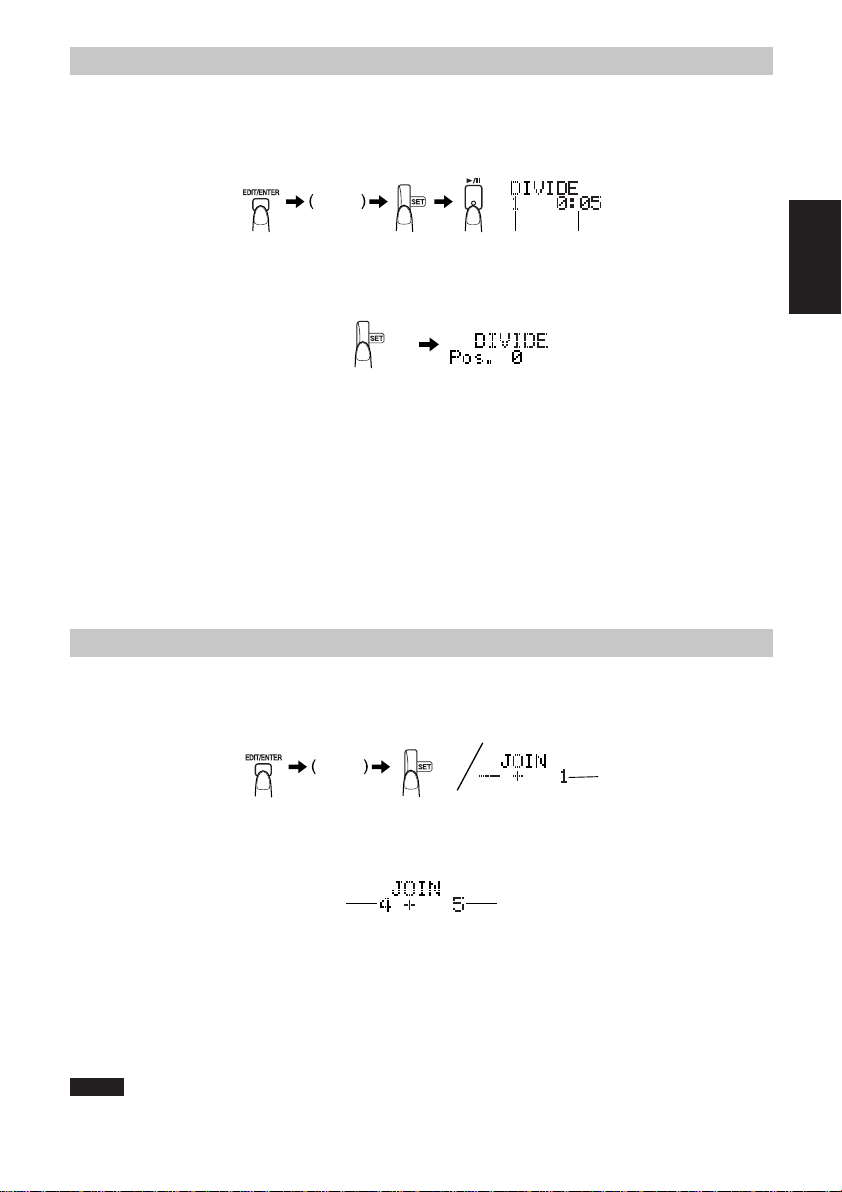
División de pistas (Función DIVIDE)
Utilice la unidad para ejecutar esta función.
1 En modo detenido, pulse el botón EDIT/ENTER y gire el mando giratorio JOG hasta que
aparezca “DIVIDE?”.
2 Pulse el botón SET y seguidamente el botón 6.
Mando
giratorio
JOG
Pista que se va a dividir
3 Gire el mando giratorio JOG (o pulse el botón 4 o ¢) para seleccionar el número de
la pista que desea dividir.
4 Presione el botón SET en el punto en el que quiere que se divida la pista.
• El equipo reproduce de forma automática los cuatro primeros segundos de cada división de pistas.
• El movimiento será posible dentro de un marge de POSITION –128 a +128 (el siguiente período de tiempo
antes y después de la posición).
Modo de grabación SP: Unos 8 segundos
Modo de grabación MONO o LP2: Unos 16 segundos
Modo de grabación LP4: Unos 32 segundos
Para desplazar el punto, gire el mando giratorio JOG mientras escucha la música.
5 Pulse el botón EDIT/ENTER.
Aparece “COMPLETE” y “TOC” para indicar que la grabación se ha realizado con éxito.
• La pista seleccionada se divide en dos pistas y el número de pista se incrementa en 1.
• Cuando apaga la unidad pulsando el botón 7/CHARGE, aparece la indicación “UTOC Writing” y se escribe el
contenido editado. (El indicador “TOC” desaparece.)
Para cancelar la operación, pulse el botón 7/CHARGE en el paso 1 a 4.
Tiempo de reproducción
Español
Unión de pistas (Función JOIN)
Utilice la unidad para ejecutar esta función.
1 En modo detenido, pulse el botón EDIT/ENTER y gire el mando giratorio JOG hasta que
aparezca “JOIN?”.
2 Presione el botón SET.
• Puede escuchar la pista pulsando el botón 6. La pista seleccionada se reproduce repetidamente.
3 Gire el mando giratorio JOG (o pulse el botón 4 o ¢) para seleccionar el número de
la pista que desea unir.
Pista que se va a unir
4 Presione el botón SET.
Aparece “PUSH ENTER”.
5 Presione el botón EDIT/ENTER.
Aparece “COMPLETE” y “TOC” para indicar que la grabación se ha realizado con éxito.
La pista seleccionada y la pista anterior se unen y el número de pista se incrementa en 1.
• Cuando apaga la unidad pulsando el botón 7/CHARGE, aparece la indicación “UTOC Writing” y se escribe el
contenido editado. (El indicador “TOC” desaparece.)
Para cancelar la operación, pulse el botón 7/CHARGE en el paso 1 a 4.
Notas
• Las pistas grabadas en diferentes modos de grabación no pueden unirse. (Por ejemplo, SP y LP2)
• La pista grabada con la entrada analógica y la grabada con la entrada digital con pueden unirse.
Mando
giratorio
JOG
Pista seleccionada
Pista seleccionada
12
Page 14
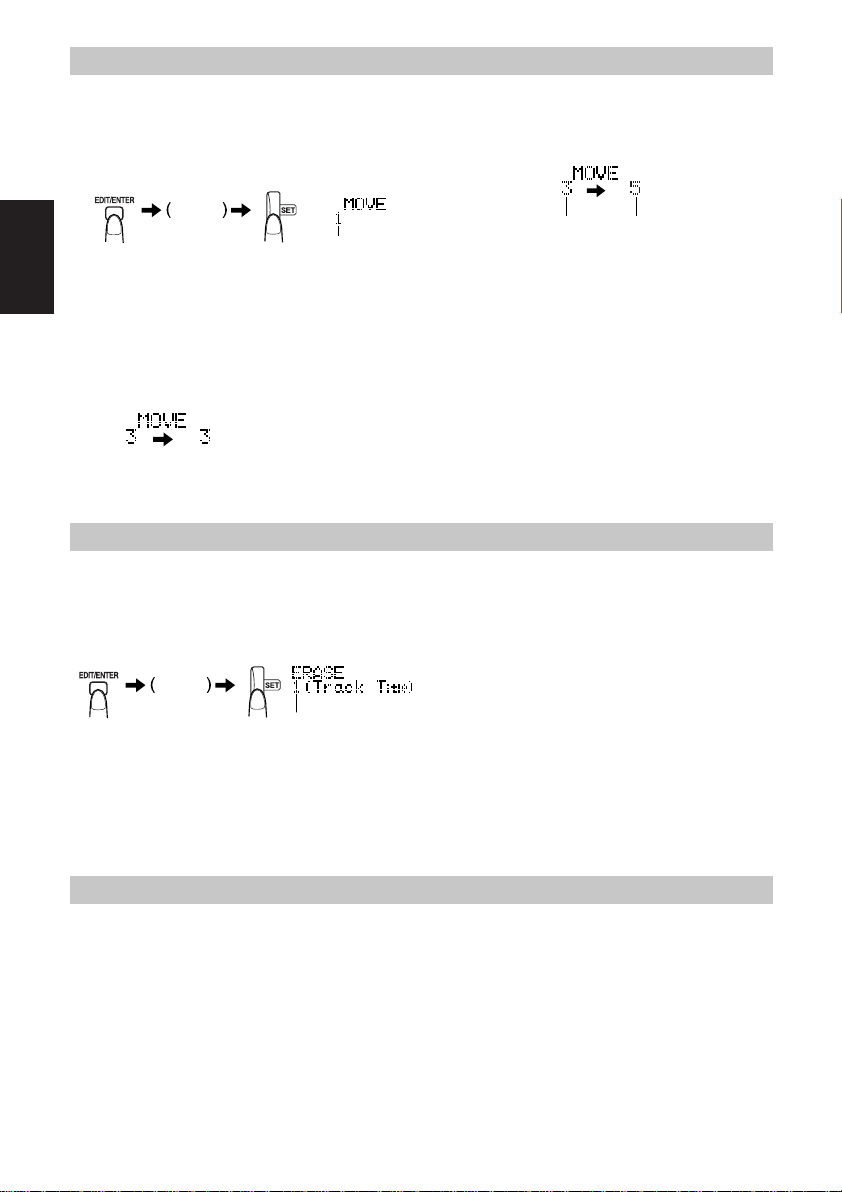
Desplazar pistas (Función MOVE)
Utilice la unidad para ejecutar esta función.
1 En modo detenido, pulse el botón EDIT/
ENTER y gire el mando giratorio JOG
hasta que aparezca “MOVE?”.
2 Presione el botón SET.
Mando
giratorio
JOG
• Puede escuchar la pista pulsando el botón 6.
Español
La pista que se va a desplazar se reproduce repetidamente.
Pista que se va a
desplazar
3 Gire el mando giratorio JOG (o pulse el
botón 4 o ¢) para seleccionar el número de la pista que desea desplazar.
4 Presione el botón SET.
Borrado de pistas (Función ERASE)
Utilice la unidad para ejecutar esta función.
1 En modo detenido, pulse el botón EDIT/
ENTER y gire el mando giratorio JOG
hasta que aparezca “ERASE?”.
2 Presione el botón SET.
3 Gire el mando giratorio JOG (o pulse el
Mando
giratorio
JOG
Pista que se va a borrar
• Puede escuchar la pista pulsando el botón 6.
La pista que se va a borrar se reproduce repetidamente.
botón 4 o ¢) para seleccionar el número de la pista que desea borrar.
5 Gire el mando giratorio JOG (o pulse el
botón 4 o ¢) para seleccionar el lugar de destino al que se debe desplazar
la pista.
Pista que se va a desplazar
• Si reproduce el MD, la pista de destino se reproduce repetidamente.
Pista de destino
6 Presione el botón SET.
Aparece “PUSH ENTER”.
7 Presione el botón EIDT/ENTER.
Aparece “COMPLETE” y “TOC” para indicar que
la grabación se ha realizado con éxito.
• Cuando apaga la unidad pulsando el botón 7/
CHARGE, aparece la indicación “UTOC Writing” y
se escribe el contenido editado. (El indicador “TOC”
desaparece.)
Para cancelar la operación, pulse el botón 7/
CHARGE en el paso 1 a 6.
4 Presione el botón SET.
Aparece “ERASE OK? PUSH ENTER”.
5 Presione el botón EDIT/ENTER.
Aparece “COMPLETE” para indicar que la pista
se ha borrado.
La pista seleccionada se borra y el número de pista
se reduce en 1.
• Cuando apaga la unidad pulsando el botón 7/
CHARGE, aparece la indicación “UTOC Writing” y
se escribe el contenido editado.
Para cancelar la operación, pulse el botón 7/
CHARGE en el paso 1 a 4.
Para borrar todas las pistas (Función ALL ERASE)
Utilice la unidad para ejecutar esta función.
1 En modo detenido, pulse el botón EDIT/ENTER y gire el mando giratorio JOG hasta que
aparezca “ALL ERASE?”.
2 Presione el botón SET.
Aparece “ERASE OK? PUSH ENTER”.
3 Presione el botón EDIT/ENTER.
Aparece “COMPLETE” para indicar que la pista se ha borrado.
Todas las pistas del MD se borran y aparece la indicación “BLANK DISC”.
• Cuando apaga la unidad pulsando el botón 7/CHARGE, aparece la indicación “UTOC Writing” y se escribe el
contenido editado.
Para cancelar la operación, pulse el botón 7/CHARGE en el paso 1 o 2.
13
Page 15

Cómo darle un título a un MD (Función TITLE)
Utilice la unidad para ejecutar esta función.
• Puede poner un título al MD y a las pistas del MD. Los títulos admiten hasta 61 caracteres del juego de caracteres
incluido.
Acerca del número de caracteres ingresados para un MD
El número total de caracteres que se puede ingresar para un MD es 1792, y el número máximo que se puede ingresar
para cada pista es 61. (No obstante, el número efectivo que se puede ingresar puede ser ligeramente inferior a este
número máximo debido a las limitaciones del MD – consulte la página 18.
• Un espacio puede ser contado como un carácter.
• Cuando se utiliza el método de grabación estereofónica de larga duración (LP2 o LP4: consulte la página 9), el
número máximo que se puede ingresar para el título de una pista se reducirá automáticamente debido a que agregan automáticamente “LP:” y cuatro espacios al comienzo del título de pista. Por consiguiente, esto hará que se
reduzca el número total de caracteres que se pueden ingresar para un MD.
Ejemplo: Se podrán ingresar hasta 10 caracteres para cada pista si el MD está compuesto de 120 pistas grabadas
utilizando el método de grabación estereofónica de larga duración.
Nota
• Cuando “LP:” se grabe a la cabeza del título, no podrá borrarlo (editar). Antes de la grabación podrá seleccionar
entre colocarlo o no. Con respecto a los detalles, consulte “Título “LP:” ON/OFF” en la página 10.
Español
1 En modo detenido, pulse el botón EDIT/
ENTER.
Aparece la indicación “TITLE?”.
2 Presione el botón SET.
Pista a la que se va
a poner un título.
• Puede escuchar la pista pulsando el botón 6. La
pista a la que se va a poner un título se reproduce repetidamente.
3 Gire el mando giratorio JOG (o pulse el
botón 4 o ¢) para seleccionar el
número de la pista que se va a poner
un título.
Para seleccionar el título del disco, gire el mando giratorio JOG atrás (o pulse el botón 4) hasta que
aparezca en el visor la siguiente marca del disco.
Indicador
de disco
[Botones de edición de títulos en la unidad]
Botón Función
Cambia el tipo de caracteres de escritura del modo siguiente.
Letras mayúsculas (ABC) = Letras minúsculas (abc) = Símbolos (espacio, !”) = Números (012) =
(Vuelta al principio)
Se añaden los caracteres seleccionados al campo del título.
JOG
(Adelante)
JOG
(Atrás)
¢
4
Mueve el cursor hacia la derecha. Cuando continúe girando, los caracteres se desplazarán hacia la izquierda.
Mueve el cursor hacia la izquierda. Cuando continúe girando, los caracteres se desplazarán hacia la derecha.
Mueve el cursor del título hacia la derecha.
Mueve el cursor del título hacia la izquierda.
4 Presione el botón SET.
Cursor
Campo del título
Caracteres que se van a
introducir
5 Introduzca el título que le quiera dar
(hasta 61 caracteres)
Utilice los botones de edición de título siguientes
para introducir un título.
14
Page 16

Por ejemplo: si el título es “M1”
5 6 7 8 9
0
1 2 3 4
1) Seleccione “M” Coloque el cursor en la letra M con el mando giratorio JOG.
2) Presione el botón SET. La letra M aparecerá en la zona de títulos.
3) Presione el botón DISPLAY/CHARA. hasta que la pantalla muestre los números.
4) Seleccione “1” y presione el botón SET. El título “M1” aparecerá en pantalla.
• Si ha introducido un carácter erróneo, bórrelo pulsando el botón 7/CHARGE.
• Para borrar uno de los caracteres introducidos utilice el botón ¢ o 4 para alinear el cursor con el
caracter y presione después 7/CHARGE. A continuación, seleccione el caracter correcto y presione el botón SET.
[Tabla del juego de caracteres]
Letras mayúsculas Letras minúsculas Símbolos Números
(espacio)
! ” # $
% &
+
/
: ; < =
>
? @ _
’ ( )
, – .
`
Español
B C D
A
F
G
K L
Q
P
V W X Y
U
Z
H
M N
R S T
E
I
J
O
a
f
k
p
u
z
b
g
l
q
v
c d
h i
m
r
w x y
s
n o
e
j
t
6. Presione el botón EDIT/ENTER.
Aparece “COMPLETE” y “TOC” para indicar que la grabación se ha realizado con éxito.
• Cuando apaga la unidad pulsando el botón 7/CHARGE, aparece la indicación “UTOC Writing” y se escribe el
contenido editado (El indicador “TOC” desaparece.)
Para cancelar la operación, presione el botón 7/CHARGE en el paso 1 al paso 3 o bájelo 4 o 5, hasta que el
visualizador retorne a la visualización normal.
Utilización de la unidad con el accesorio opcional
Escuchar MD con un equipo de sonido
Puede escuchar los minidiscs a través de un equipo de
sonido.
• Conecte un cable de conexión estéreo (no incluida)
como se muestra a la derecha después de desactivar
el amplificador.
• Ajuste el volumen en la unidad.
• Ajuste el volumen en el amplificador.
• Utilice los mandos de la unidad. (Los mandos del
control remoto emitirán un pitido.)
Cable de conexión
estéreo (no incluida)
Amplificador
o
Precaución
Pilas
• Apague siempre la unidad antes de cambiar la pila.
Pila recargable de iones de litio (BN-R3610):
• Utilice sólo la pila recargable (BN-R3610) suministrada con la unidad.
• Cambie la pila cuando se haya gastado. Sabrá que está gastada cuando, recién cargada, tarde poco tiempo en descargarse.
• La vida de la pila se acorta si la recarga cuando todavía está cargada.
•
Cuando cargue una pila por primera vez o cuando cargue una que lleva mucho tiempo sin ser usada, es posible que
se descargue antes de lo habitual. Cárguela y descárguela unas cuantas veces para que funcione con normalidad.
• No acerque objetos metálicos a los polos de las pilas recargables; podría provocar un cortocircuito y hacerse daño.
• Las pilas deben recargarse a una temperatura de entre 0°C y 40°C.
Pila seca y pila recargable:
Siga los pasos siguientes para no estropear las pilas y evitar que pierdan electrólito.
• Concatene correctamente los polos positivos ª y negativos · al introducir las pilas.
• Saque las pilas si no va a utilizar la unidad durante un tiempo prolongado.
• No arroje las pilas al fuego; no las cortocircuite, desmonte o someta a temperaturas elevadas.
• No intente recargar las pilas secas.
15
Page 17

Transporte de pilas:
Si se guarda una pila seca o una pila recargable en el bolsillo o la mete en una bolsa, asegúrese de que dentro no
haya ningún objeto metálico (un collar, por ejemplo), ya que podría producirse un cortocircuito y, en consecuencia,
un incendio.
Es muy importante que lleve siempre la pila en su funda.
Nota sobre la batería recargable.
Esta batería es reciclable.
Cumpla la normativa de reciclaje de su localidad.
Adaptador de corriente
• Manipule con cuidado el adaptador de corriente. Una manipulación incorrecta resulta peligrosa.
• No lo toque con las manos mojadas.
• No ponga objetos pesados encima del mismo.
• No lo doble forzosamente
• Asegúrese de que conecta únicamente el adaptador de corriente que se suministra con la unidad.
•
Desenchufe el adaptador de corriente de la toma cuando no vaya a utilizar la unidad durante un tiempo prolongado.
Unidad
No modifique ni repare la unidad
Podría averiarla.
No deje caer la unidad y evite darle golpes fuertes
Podría estropearla.
No coloque la unidad en lugares inapropiados
No la coloque en ninguno de los lugares siguientes, ya que podría averiarse:
1. Cuarto de baño u otros lugares húmedos.
2. Almacenes u otros lugares donde se acumule el polvo.
3. Lugares de temperatura elevada (cerca de un calefactor, etc.).
No deje durante mucho tiempo la unidad en lugares expuestos directamente la luz del sol
Podría deformarse la caja, perder brillo o incluso averiarse.
Precauciones para la utilización de los auriculares
• No use los auriculares con el volumen muy alto; los médicos lo desaconsejan.
• Si le parece oír pitidos, baje el volumen; si es preciso, deje incluso de utilizar los auriculares.
•
No se ponga auriculares mientras conduce, ya que podría provocar situaciones de peligro. En muchos países está prohibido.
• Si lleva puestos los auriculares en situaciones de posible peligro, extreme las precauciones y, si es preciso, desconecte temporalmente los auriculares.
• Si lleva auriculares especiales de los que dejan oír sonidos externos, no suba demasiado el volumen hasta el punto
de no oír lo que ocurre a su alrededor.
Durante la conducción
Se recomienda no encender la unidad durante la conducción por motivos de seguridad.
Español
Información sobre los Minidiscs (MD)
Se trata de un nuevo formato de audio digital en forma de minidisco con un diámetro de 64 mm y que permite grabar
o reproducir un tiempo máximo de 80 minutos (mode SP).
La carcasa
El diámetro del disco, propiamente dicho, es de 64 mm, inferior a los CD tamaño single (3''). El disco está protegido
por una carcasa de 68 × 72 mm que, gracias a su reducido
tamaño, es fácil de transportar y cabe en cualquier sitio.
Gracias a la protección de la carcasa, es muy difícil que el
disco se llene de polvo o se ensucie. Además, la carcasa
cuenta con un cierre de seguridad que siempre está activado
excepto durante la utilización del disco, así no hay peligro
de que el disco se raye o se llene de huellas dactilares, lo
que facilita su manejo.
Hay dos tipos de Minidiscs
Existen dos tipos de Minidiscs, los “grabables” y los que “sólo
se pueden escuchar”. En cuanto a la reproducción, el funcionamiento de los dos tipos de discos es idéntico: el láser envía
un rayo que rebota en el disco y trae consigo la señal. La gra-
bación, no obstante, es lo que diferencia a los dos discos.
Discos que sólo se pueden escuchar
Es el sistema utilizado en los Minidiscs ya grabados, los
disponibles en el mercado. No se puede grabar encima. AL
igual que sucede con los CD, los datos se graban en base a
la existencia o ausencia de unas pequeñas indentaciones llamadas “pits”. A los discos grabados con este formato se les
llama “discos ópticos.”
Minidiscs grabables
Son los discos “vírgenes” que puede adquirir para hacer sus
propias grabaciones. En este caso, los datos se graban por
magnetismo, lo que permite procesarlos más fácilmente y
grabar una y otra vez en el mismo disco. El láser, por su
parte, calienta el disco y borra todo el magnetismo, lo que
posibilita que el cabezal magnético pueda volver a grabar
nuevos datos. Los discos que utilizan este método de grabación se llaman magnetoópticos (MO).
16
Page 18

ATRAC (Adaptive TRansform Acoustic
Coding)/ATRAC3
El MD proporciona 80 minutos de grabación y reproducción, mucho más que un CD de audio, pero tiene tan sólo
un diámetro de 64mm. Esta gran capacidad de almacenamiento de datos se debe al sistema ATRAC, una técnica de
comprensión de audio desarrollada para el MD. Esta tecnología suprime los sonidos débiles que serían inaudibles por
el oído humano. Esta tecnología, basada en la sensibilidad
del oído humano a los sonidos, permite comprimir los datos
grabados a aproximadamente una quinta parte del volumen
de datos originales.
Asimismo, esta unidad incorpora las ventajas de las técnicas ATRAC3 más recientes, que pueden reducir la cantidad
Español
de datos a grabar a una décima o una vigésima parte del volumen de datos originales. Esto permite que esta unidad
pueda brindar una grabación estéreo de doble o cuádruple
duración.
Mensajes del Minidiscs (MD)
Mensaje
BLANK DISC
CANNOT JOIN
DISC ERROR
DISC FULL
DISC
PROTECTED
EMERGENCY STOP
NO DISC
NON AUDIO
CANNOT COPY
PLAYBACK DISC
TRACK
PROTECTED
SCMS
CANNOT COPY
DIGITAL IN
UNLOCK
BATT ERROR
HIGH TEMP
LOW TEMP
Se ha introducido un disco que no tiene nada grabado.
Ha intentado unir unas pistas que no se pueden unir.
El disco tiene un problema (está dañado).
(Cambie el disco.)
No queda suficiente espacio libre en el disco.
Contiene más de 254 pistas.
El disco está en modo de protección de borrados accidentales.
(Desplace la pestaña de protección de borrados accidentales, el orificio debe
quedar tapado)
Se ha producido una anomalía durante la grabación.
(Detenga el disco presionando el botón 7 y repita el proceso.)
No hay ningún disco en el equipo.
Ha intentado copiar digitalmente un CD-ROM.
(Detenga la grabación.)
Ha intentado grabar o editar un disco que sólo es de lectura.
La pista está protegida.
(El equipo no le puede quitar la protección a la pista. Tendrá que hacerlo
desde el aparato utilizado para protegerla.)
Ha intentado hacer una copia de una copia mediante grabación digital.
(Realice la grabación a través de la entrada digital (LINE IN).)
El cable digital está desconectado.
La vida útil de la batería se ha agotado.
La temperatura de la batería recargable se sale de los límites admisibles.
Memoria anti saltos en el sonido
Si lo desea, puede hacer que el reproductor de Minidiscs
grabe en memoria los datos de la pista que esté reproduciendo mediante una función llamada “memoria anti saltos
en el sonido”. Así, aunque el equipo no pueda leer los datos
correctamente a causa de las sacudidas o vibraciones, la información se almacena en esta zona de memoria para que el
sonido no tenga interrupciones.
UTOC (tabla de contenidos del usuario)
A parte del espacio de grabación, los Minidiscs disponen de
una tabla de contenidos del usuario o “UTOC”. En esta
zona del disco se puede grabar información sobre la posición de las pistas grabadas, las divisiones entre pistas y el
orden de las pistas. El equipo consulta la UTOC cuando
busca la música, lo que le permite encontrarla y empezar a
reproducirla con rapidez. Cuando se editan los Minidiscs
sólo se toca la zona “UTOC” del disco, por lo que no hace
falta volver a grabar las pistas.
Significado/Acción
17
Page 19

Limitaciones del Minidisc
Los Minidiscs graban la información en un formato propio, diferente al utilizado por los casetes convencionales o cintas
DAT. El formato de grabación utilizado supone ciertas limitaciones (no se trata de anomalías).
Aparece el mensaje “DISC FULL” (disco lleno)
a pesar de no haber agotado todo el tiempo disponible.
Aparece el mensaje “DISC FULL” (disco lleno)
a pesar de no haber agotado el número máximo
de pistas ni el tiempo máximo de grabación.
La función JOIN (unir) a veces no funciona.
El tiempo disponible de grabación no aumenta
aunque se borren pistas.
La música salta cuando se avanza o retrocede
rápidamente.
El tiempo que dura la parte grabada del disco
más el tiempo disponible es inferior a la duración total del disco.
Problema Causa
Los Minidiscs sólo pueden grabar un número de pistas limitado (aunque ocupen poco tiempo). No se pueden grabar en un
mismo disco más de 254.
Cuando se borra y se vuelve a grabar en un disco se crean espacios en blanco. Cuando se graba en un disco con espacios
en blanco, las pistas se dividen y aprovechan las zonas vacías.
Si hay muchas zonas en blanco, aparece el mensaje “DISC
FULL” (disco lleno) durante la grabación. Cuando se cree una
parte de 8 segundos o menos (modo SP) entre división, esa
pista no podrá unirse con la función JOIN, e incluso si se borra, el tiempo utilizable restante del disco no aumentará. Las
pistas divididas en pequeños fragmentos pueden saltar al
avanzar o retroceder rápidamente.
El minidisc deberá tener por lo menos 2 segundos (modo SP)
de un espacio continuo para grabar. Por este motivo, el tiempo de grabación indicado en el disco puede disminuir si contiene muchos espacios en blanco.
Normas sobre las grabaciones digitales
Existe una normativa sobre derechos de autor que limita la realización de copias de CD y cintas DAT en Minidiscs a través
de los terminales digitales.
SCMS (sistema de control de copias en serie)
Los Minidiscs pueden grabar a través de los terminales de entrada/salida de los dos equipos un sonido muy nítido que apenas
representa una pérdida de calidad respecto a los originales (CD o DAT). Sin embargo, los Minidiscs incorporan una limitación que no les permite grabar a otro Minidisc los datos (grabados a su vez de un CD o cinta DAT) a través de los terminales
de entrada/salida. Dicho de otro modo, no se puede hacer una copia de una copia. A esta norma se le llama SCMS (Serial
Copy Management System; es decir “sistema de control de copias en serie”).
Todas las grabadoras de Minidiscs cumplen con esta normativa. Si intenta hacer una copia de una copia, el equipo mostrará
el mensaje “SCMS CANNOT COPY” (SCMS, no se puede copia) y le impedirá seguir.
Español
OK
DIGITAL
La grabación o reproducción de material sujeto a derechos de propiedad intelectual puede ser ilegal sin la autorización previa
del propietario de dichos derechos.
DIGITAL
NO
Mantenimiento
UNIDAD:
Limpie la unidad y el control remoto con un paño suave. Para la suciedad más difícil emplee un paño mojado en
agua o en agua con jabón, bien escurrido, y luego séquelo todo.
• Si prefiere utilizar un paño impregnado con limpiador, léase antes las instrucciones de uso del paño.
• No utilice alcohol ni disolventes.
MINIDISCS:
Si se ensucia el cartucho del minidisc, límpielo con un paño húmedo y luego séquelo.
No guarde los minidiscs en los siguientes lugares:
• Lugares expuestos a la luz directa del sol.
• Lugares donde se acumula el polvo o la humedad.
• Cerca de algún radiador o calefactor.
• Sobre el salpicadero del coche o cerca de las ventanas de atrás.
Cómo manipular los minidiscs:
• No abra el obturador. Éste se cierra para evitar que se abra el minidisc; si lo fuerza para abrirlo, puede estropear el
disco.
18
Page 20

Guía para la solución de problemas
Antes de llevar a reparar la unidad, compruebe que no aparezca la causa de su problema en la siguiente tabla. Tal
vez consiga solucionar el problema haciendo tan sólo algunas pequeñas comprobaciones o ajustes.
Si tiene alguna duda sobre las explicaciones de la tabla o no consigue solucionar el problema siguiendo los consejos
indicados en la tabla, busque un servicio técnico en el directorio de servicios técnicos autorizados (que se adjunta
con la unidad) o póngase en contacto con su distribuidor.
No funciona.
Problema
No consigue reproducir el minidisc.
Español
Las pistas del MD no se reproducen
por orden.
No se puede grabar en el MD.
No se oye la música; hace demasiados ruidos.
Las imágenes de la televisión se
distorsionan.
¿Ha introducido el minidisc? Si no lo ha introducido, en la pantalla aparecerá el
mensaje “NO DISC”.
• ¿Está desactivado el interruptor de bloqueo HOLD?
• ¿Está gastada la pila o batería?
• ¿Está averiado el MD? (Reproduzca otro MD.)
• ¿Se ha formado vaho en el lector?
(Espere una hora e inténtelo de nuevo.)
¿Está activada la función de reproducción repetida o reproducción aleatoria?
¿Está en posición abierta la pestaña contra el borrado accidental del MD? (Colóquela en posición cerrada.)
• ¿Ha conectado los auriculares hasta el fondo?
• ¿Está sucia la clavija? (Limpie la clavija si está sucia.)
• ¿Está grabado el minidisc? Si está vacío, en la pantalla aparecerá el mensaje
“BLANK DISC”.
¿Está la unidad demasiado cerca de la televisión o de la radio? (Si tiene la televisión
o la radio conectada sólo a una antena interior, conéctela a una antena exterior.)
Haga las siguientes comprobaciones
La unidad no se enciende.
Los discos grabados en el modo de
grabación estéreo de larga duración
(LP2 o LP4) con esta unidad no podrán reproducirse con otras grabadoras o reproductores de MD.
19
¿Ha desconectado de la unidad la fuente de alimentación con los interruptores
HOLD activados?
Si la grabadora o el reproductor de MD no tiene el logotipo MDLP, no podrá reproducirse la pista grabada utilizando el modo LP. No se emitirá ningún sonido de
esta pista, pero esto no es un mal funcionamiento.
Page 21

Características técnicas
Reproductor de Minidisc Portátil
Tipo : Sistema de sonido digital para minidiscs
Frecuencia de muestreo : 44,1 kHz
Sistema de compresión de sonido : ATRAC (Adaptive Transform Acoustic Coding) /ATRAC3
Número de canales : 2 canals (estéreo)/1 canal (mono-aural)
Respuesta de frecuencia : De 20 Hz a 20 000 Hz
Fluctuación y trémolo : Imperceptible
Entrada : LINE IN: 100 mV / 47 kOhm
Salida : Auriculares (3,5 mm dia. estéreo × 1)
Duración de pila o batería :
Pila rechargeable
(BN-R3610)
Pilas alcalines
(
LR6 DURACELL ULTRA
Pila rechargeable
+
Pilas alcalines
* La duración varía según las condiciones y la temperatura ambientales.
* Una batería recargable (BN-R3610) se recarga en 2 horas.
Alimentación : 3,6 V de c. c. (batería recar-gable),
Dimensiones (An × Al × Pr) : 81,7 × 19,5 × 88,9 mm
Peso : 155 g aprox. (sin batería)
OPTICAL: –23 a –14 dBm
(* Se utiliza el mismo conector para LINE IN y para OPTICAL)
MIC: 1,3 mV / 200 Ohm a 2 kOhm
3mW por canal a 10% THD/16 ohms a 47 kohms
Cuando se reproduzca
SP
13 horas
37 horas
)
55 horas
4,5 V de c. c. (pila de tamaño R6 × 3),
6V de c.c.
(Sin botones ni mandos.)
LP2
16 horas
46 horas
67 horas
LP4
18 horas
51 horas
75 horas
Cuando se grabe
SP
6 horas
14 horas
22 horas
8,5 horas
19 horas
31 horas
LP2
11 horas
25 horas
41 horas
LP4
Español
Adaptador de corriente (AA-R555)
Alimentación de entrada : 110 V - 240 V de c.a., 50 Hz / 60 Hz
Tensión de salida : 6 V de c. c., 0,6 A
El diseño y las características de este producto pueden sufrir modificaciones sin previo aviso.
Las patentes EE.UU.y extranjeras han sido otorgadas por Dolby Laboratories Lincensing Corporation.
20
Page 22

VICTOR COMP ANY OF JAPAN, LIMITED
EN, SP, CH
1100MNMCREJES
Page 23

CAUTION! THIS PRODUCT UTILIZES A LASER.
USE OF CONTROLS OR ADJUSTMENTS OR PERFORMANCE OF PROCEDURES OTHER THAN THOSE SPECIFIED HEREIN MAY RESULT IN HAZARDOUS RADIATION EXPOSURE.
DO NOT OPEN COVERS AND DO NOT REPAIR YOURSELF. REFER SERVICING TO QUALIFIED PERSONNEL.
WARNING : TO REDUCE THE RISK OF FIRE OR ELECTRIC SHOCK, DO NO T EXPOSE THIS APPLIANCE TO
RAIN OR MOISTURE.
¡ADVERTENCIA! ESTA AP ARATO UTILIZA UN LÁSER.
EL USAR LOS CONTROLES, HACER LOS REGLAJES O LOS PASOS REQUERIDOS EN FORMA DIVERSA DE
LA AQUÍ EXPUESTA PUEDE REDUNDAR EN EXPOSICIÓN PELIGROSA A LA RADIACIÓN.
NO ABRA LAS TAPES NI HAGA REPARACIONES USTED MISMO. EN CASO DE PRODUCIRSE ANOMALÍAS
SOLICITE AYUDA DE PERSONAL CUALIFICADO.
AVISO : PARA REDUCIR EL RIESGO DE INCENDIOS O SACUDIDAS ELÉCTRICAS, NO LO EXPONGA A LA
LLUVIA O HUMEDAD.
CAUTION!
1.Do not block the ventilation openings or holes.
(If the ventilation openings or holes are blocked by a newspaper or cloth, etc., the heat may not be able to get out.)
2.Do not place any naked flame sources, such as lighted candles, on the apparatus.
3.When discarding batteries, environmental problems must be considered and local rules or laws gov erning the disposal of these batteries
must be followed strictly.
4.Do not use this apparatus in a bathroom or places with water.
Also do not place any containers filled with water or liquids (such as cosmetics or medicines, flower v ases, potted plants, cups, etc.) on top
of this apparatus.
CAUTION(Lithium-ion battery)
1.Danger of explosion if battery is incorrectly replaced.
2.Replace only with the same or equivalent type.
PRECAUCION!
1.No obstruya las rendijas o los orificios de ventilación.
2.No ponga sobre el aparato ninguna llama al descubierto, como velas encendidas.
3.Cuando tenga que descartar las pilas, tenga en cuenta los problemas ambientales y observe estrictamente los reglamentos o las leyes
4.No utilice este aparato en el cuarto de baño o en lugares donde hay agua. Tampoco coloque ningún recipiente que contenga agua u otros
PRECAUCION (Pila de iones de litio)
1.Peligro de explosión si se reemplaza la pila de manera incorrecta.
2.Cámbielas únicamente por otras del mismo tipo o equivalentes.
• • • • • • • • • • • • • • • • • • • • • • • • • • • • • •
(Si las rendijas o los orificios de ventilación quedan tapados con un periódico, un trozo de tela, etc., no se podrá disipar el calor).
locales sobre disposición de las pilas.
líquidos (frascos de cosméticos o medicinas, floreros, macetas, vasos, etc.) encima de este aparato.
• • • • • • • • • • • • • • • • • • • • • • • • • • • • • •
G-1
Page 24

CLASS 1
LASER PRODUCT
1. CLASS 1 LASER PRODUCT
2. CAUTION: Invisib le laser radiation when open and interlock
failed or defeated. Avoid direct exposure to beam.
3. CAUTION: Do not open the top cover. There are no user
serviceable parts inside the Unit; leave all servicing to qualified service personnel.
1. PRODUCTO LASER CLASE 1
2. PELIGRO: En el interior hay radiación láser invisible. Evite
el contacto directo con el haz.
3. PRECAUCIÓN: No abra la tapa superior. En el interior de la
unidad no existen piezas reparables por el usuario; deje todo
servicio técnico en manos de personal calificado.
• This unit has been manufactured with great precision. Applying a strong shock to the unit or dropping it may cause a failure: For
example, if you sit down with the unit into a back pock et of your trousers, it may e xert the pressure upon the unit and may cause a failure.
• Esta unidad ha sido fabricada con gran precisión. La aplicación de un golpe fuerte a la unidad o su caída podría causar
fallas: Por ejemplo, si se sentara con la unidad en el bolsillo trasero de su pantalón, podría ejercer presión sobre la unidad y
causar una falla.
● WARNING LABEL, PLACED INSIDE THE
UNIT
● ETIQUETA DE ADVERTENCIA, PEGADA
EN EL INTERIOR DE LA UNIDAD
NEVER TOUCH THE LENS.
NO TOCAR NUNCA LA LENTE.
AC adaptor
• Handle the AC adaptor carefully. Improper handling is dangerous.
• Do not touch it with wet hands.
• Do not place heavy objects on top of it.
• Do not forcibly bend it.
• Be sure to connect only the AC adaptor provided with the unit.
• Disconnect the AC adaptor from the power outlet if the unit is not going to be used for a long time.
Adaptador de corriente
• Manipule con cuidado el adaptador de corriente. Una manipulación incorrecta resulta peligrosa.
• No lo toque con las manos mojadas.
• No ponga objetos pesados encima del mismo.
• No lo doble forzosamente
• Asegúrese de que conecta únicamente el adaptador de corriente que se suministra con la unidad.
• Desenchufe el adaptador de corriente de la toma cuando no vaya a utilizar la unidad durante un tiempo prolongado.
G-2
Page 25

Thank you for purchasing this JVC product. Please read these instructions carefully before starting operation to be
sure to obtain optimum performance and a longer service life from the unit.
Table of Contents
Supplied Accessories .................................................... 1
English
Location of Controls..................................................... 1
Power Supply Preparations........................................... 2
Accidental Operation Prevention Function
(Hold Mode) ............................................................ 3
Normal Play.................................................................. 3
Changing the Sound (A.C.BASS) ................................ 5
Showing the Disc Information ..................................... 7
Repeat Play and Random Play
(Using the Remote Control)..................................... 7
Selecting the Operational Options of Remote Control ....... 8
Preparation Before Recording ...................................... 8
Check Items Before Starting Recording....................... 9
Standard Recording ...................................................... 9
SYNCHRO Recording (SYNCHRO) ........................ 10
Editing the MD (Using the unit)................................. 11
Dividing Tracks (DIVIDE Function).......................... 12
Joining Tracks (JOIN Function) ................................. 12
Moving Tracks (MOVE Function) ............................. 13
Erasing Tracks (ERASE Function)............................. 13
Erasing All the Tracks (ALL ERASE Function) ........ 13
Giving Titles to MD (TITLE Function) ..................... 14
Using the Unit with Optional Accessory.................... 15
Cautions ...................................................................... 15
Information on MDs (Minidiscs) ............................... 16
MD (Minidisc) Messages ........................................... 17
Minidisc Limitations .................................................. 18
Rules of Digital Dubbing ........................................... 18
Maintenance ............................................................... 18
Troubleshooting Guide ............................................... 19
Specifications ............................................................. 20
Supplied Accessories
AC adaptor (AA-R555) ......................................... 1 pc.
Headphones ........................................................... 1 pc.
Remote controller .................................................. 1 pc.
Optical digital cable............................................... 1 pc.
Lithium–ion battery (rechargeable) (BN-R3610).. 1 pc.
External Battery case ............................................. 1 pc.
Carrying pouch ...................................................... 1 pc.
AC Plug Adaptor ................................................... 1 pc.
Location of Controls
[Display on the unit]
Synchro
BASS
MONO
REC
TOC
Repeat
RANDOM
[On the unit]
A DISPLAY / CHARA. / REC
MODE button
B EDIT/ENTER button
C VOLUME +, – button
D Display
E Skip / search button (¢)
F Skip / search button (4)
G Stop (7)/CHARGE button
H Play / pause button (6)
I JOG dial
1
A.C.
Disc Mark
Battery
-dB 1240 OVER
Peak Level Meter
J SET / SYNCHRO button
K REC switch
L OPEN switch
M HOLD switch
N MIC IN MARK MODE switch
O MIC (PLUG IN POWER) jack
P LINE IN (OPTICAL) jack
Q Headphones jack ( )
R DC IN 6V jack ( )
[Display on the remote control]
Repeat
Random
TRAIN
Battery
Manual Mode
Long playback
Modes
A.C. BASS
Disc Mark
[On the remote control]
S Play / pause button (6)
T Skip / search button (¢)
U HOLD switch
V Stop button (7)
W
A.C.BASS (Active Clear Bass) button
X Display
Y VOLUME +/– button
Z DISPLAY button
a P.MODE button
b Skip / search button (4)
Page 26

Power Supply Preparations
As a power supply source, you can use the rechargeable battery and/or dry-cell batteries, or AC adaptor.
For information on operating times of batteries, refer to the specifications (page 20).
Using lithium–ion battery (rechargeable battery) (BN-R3610)
1 Insert the rechargeable battery into the unit.
Cut part
Slide the cover and open it.
minal facing you and its cut part
facing up.
2 To charge the rechargeable battery, connect the supplied AC adaptor.
To AC power outlet
AC adaptor
3 Press the 7/CHARGE button twice on the unit.
“CHARGE” appears on the display and charging starts. When charging is completed, “CHARGE” will disappear.
• “CHARGE” will appear for 5 seconds even when no lithium-ion battery is inserted.
4 Disconnect the AC adaptor.
Notes
• Recharging is not made if the unit is being used.
• It takes approximately 2 hours to recharge the rechargeable battery.
• Rechargeable battery has a service life of approximately 500 charge-discharge cycles. If the operating time on one
full charge becomes noticeably shorter than it used to be, the battery has reached the end of its service life and
should be replaced.
• The AC adaptor may become warm while recharging is in progress. This is not a malfunction.
• Before starting recording, fully charge the rechargeable battery. Otherwise, the unit may shut off during recording.
• Recharging with this unit shall be made at the temperature from +5°C to +35°C. Otherwise, “HIGH TEMP” or
“LOW TEMP” will appear on the display.
Using dry-cell batteries (not included)
1 As explained below, open the battery cover of the battery case and insert three LR6 (UM-
3) alkaline batteries into the battery compartment.
2
Turn the knob of the battery case in the direction as shown by the arrow until it stops. (To
detach the battery case, turn the knob toward in reverse until the battery case is removed.)
Firmly close the cover.Insert the battery with its “–” ter-
English
Note
To lengthen the battery life, you can use both rechargeable battery and the dry-cell batteries.
(Bottom View)
Using the AC adaptor
Connect the supplied AC adaptor to the unit.
Refer to the connecting diagram in “Using lithium-ion battery (rechargeable battery)”.
When the unit is turned off with a lithium-ion battery inserted, “CHARGE” is displayed and recharging automatically starts.
2
Page 27

Note
The unit is in the standby condition when the AC adaptor is connected. The primary circuit is always “live” as long
as the AC adaptor is connected to an electrical outlet.
Battery indicator
The battery indicator appears on the display of the unit and remote control. When the indication changes as follows,
English
power will be shut off a short while after.
Rechargeable battery: Recharge it.
Dry-cell batteries: Replace them with new ones.
Note
The battery indicator also appears when the AC adaptor is connected, though it has no meaning.
Accidental Operation Prevention Function (Hold Mode)
This function prevents accidental operation of buttons on the unit.
The unit and remote control have the HOLD switches, each of which works independently.
Bottom of the unit
Slide the HOLD switch in the direction shown by the arrow to activate it.
In HOLD mode, no button operation is possible.
• Once the HOLD switch of the unit has been activated, “HOLD” will appear each time a button on the unit is
pressed.
To operate the unit or remote control normally, release the HOLD switch.
Top of the remote control
Normal Play
Follow the numbers in the figure to perform normal-play.
1 Connect the headphones plug firmly.
2 Connect the remote control plug firmly.
3 Release the HOLD switches.
4 Load an MD.
1 Slide the OPEN switch to open the lid.
2 Open the lid by hand.
3 Insert the MD into the MD slot beneath the lid, with its label side facing up. Insert the MD until it stops. Be
sure % or ] mark on the MD are oriented as shown in the figure.
4 Close the lid.
“TOC Reading” appears on the display. Then the track number and playback time appear.
When a sound mode is set, the mode name (for example, “A.C.BASS”) will firstly appear.
5 Adjust the volume level between 0 and 25.
Press the VOLUME+, – button on the unit or remote control. To continuously change the volume level, depress
the VOLUME button.
3
Page 28

6 Press the 6 button on the unit or remote control.
Playback will start from the first track and ends after playing all the tracks of the MD.
[Unit’s display] [Remote control’s display]
Disc mark turns. Peak Level Meter
Playing time
English
Playback mode and track title
Number of tracks being played
Playing time
Disc mark turns.
Number of tracks being played
To eject the MD, slide the OPEN switch to open the lid and open it by hand. Then, the MD comes out.
Notes
• If no MD is loaded, “NO DISC” appears on the display and the power will be automatically shut off after approx.
10 seconds.
• When the 6 button is pressed for the first time, “TOC Reading” and “T.READ” appear on the unit’s display and
remote control’s display for several seconds, to read the information on the MD. Wait until this message disappears except when stopping the unit by pressing the 7 button.
Operation
Button
Press during play.
Blinks.
Display/reference
Blinks.
Press again to restart play.
If nothing is done for 2 minutes, the
To pause play
To stop play
(Stop mode)
To turn off the unit
(Off mode)
or
Press during play.
or
Push in Stop mode, or
press for more than 1 second in any other mode.
or
Stops.
Stops.
• Unit
(Blank display)
• Remote Control
power will be automatically shut off.
Press the 6 button to restart play.
The current track will be played from
the beginning (Resume Play).
If nothing is done for 45 seconds, the
power will be automatically shut off.
In this case, to restart play, press the
6 button for more than one second.
The power is shut off after “POWER
OFF” and “BYE” appear on the display.
To turn on the unit, press the 6 button. Then, the last track before turning
off the power will be played from the
beginning (Resume Play).
Operation
Fast forward/
reverse
(Blank display)
Button
Skip function (unit)
Press during play or in Stop mode.
Search function (unit)
Keep depressed during play.
Skip function (remote control)
Press during play or in Stop mode.
Search function (remote control)
Keep depressed during play.
Reverse
Forward
Reverse Forward
Display/reference
• During Random Play, the
skip buttons cannot be used
to skip back to tracks that
were played previously in the
random sequence.
4
Page 29

Playback mode and track title display
When an MD is played back, the playback mode and the title recorded on the track being played back appear at the
lower part of the unit’s display. Also, on the remote control’s display, the track title appears once if it is recorded.
Also, “LP2” and “LP4” indicators are on the remote control’s display.
Playback mode:
English
There are four playback modes shown on the unit’s display; SP (STEREO), LP2, LP4, and MN (MONO). Note that
MDs are played back in the same recording length as they were recorded.
SP: Indicates the tracks recorded in standard stereo recording mode on this unit or those recorded on an MD re-
corder incompatible with MDLP*.
LP2: Indicates the tracks recorded in 2 times long-hour stereo recording mode. The “LP2” indicator on the remote
control’s display also lights up.
LP4: Indicates the tracks recorded in 4 times long-hour stereo recording mode. The “LP4” indicator on the remote
control’s display also lights up.
MN: Indicates the tracks recorded in standard monaural recording mode on this unit or those recorded on an MD
recorder incompatible with MDLP*. The “MONO” indicator on the unit’s display also lights up.
* MDLP features a new sound compression method (ATRAC3) and a 2 times (or 4 times) long-hour stereo
recording and playing function.
The MDLP logo is marked on the MD recorders and players compatible with MDLP. It is also marked on
MDs prerecorded in ATRAC3 (excluding recordable MDs).
Track title:
The track title will appear on the unit’s and remote control’s displays. If the title is long and cannot be displayed at a
time, it will be scrolled. If no title is given, “NO TITLE” will scroll on the unit’s display but nothing will appear on
the remote control’s display.
Changing the Sound (A.C.BASS)
You can choose one of the following sound modes. Each time you press the A.C.BASS button on the remote control,
the sound mode name changes as follows on both unit’s and remote control’s displays:
A.C.BASS
A.C.BASS = TRAIN = MANUAL* = (Original display)
*: On the Unit’s display, “MANUAL EQ” appears.
[In the case of remote control’s display]
A.C.BASS : The A.C.BASS (Active Clear Bass) function is enabled and the bass level is automatically controlled
TRAIN : The amount of sound leaking from the headphones will be reduced.
MANUAL : In this mode, you can adjust the tone. See “Adjusting Tone in MANUAL Sound Mode” on page 6.
(MANUAL EQ)
To cancel above function, press the A.C.BASS button on the remote control to exit above mode, i.e., to go out ,
, or indicator on the remote control’s display.
in conjunction with the sound volume.
The “A.C.BASS” indicator lights up on the unit’s display and the indicator lights up on the remote control’s display.
The indicator lights up on the remote control’s display.
The indicator lights up on the remote control’s display.
5
Page 30

Adjusting Tone in MANUAL Sound Mode
You can adjust the tone by changing the bass and treble.
1 Press the A.C.BASS button on the remote control until “MANUAL” appears on the dis-
play.
The indicator lights up on the remote control’s display. (If the indicator is already lit, you can skip this
step.)
2 Press the A.C.BASS button for 2 seconds or more.
The following tone level meter appears on the remote control’s display.
(For 2 seconds)
A.C.BASS button
Bass level bar
Fixed bars (flat level)
Treble level bar
English
¢: Press to select Treble.
4: Press to select Bass.
VOLUME +/– : Press to adjust the level.
3 To change the bass level, press the 4 button. The bass level bar blinks. Then, press
the VOLUME + or – button to move the bass level bar up or down ( in 3 steps each).
4 To change the treble level, repeat above step 3 except for pressing the ¢ button.
To exit MANUAL sound mode:
• Wait until the display automatically returns to the original one.
• When no level bar is blinking, press a button other than the 4 and ¢ buttons on the remote control.
• When the level bar is blinking, press the A.C.BASS or 7 button on the remote control.
Notes
• If you leave the unit for 8 seconds in step 2, the display returns to the original one. In this case, repeat from the
step 2.
• If you leave the unit for 16 seconds in step 3 or 4, the display returns to the original one. In this case, repeat from
the step 2.
• The tone levels set here is stored in memory.
6
Page 31

Showing the Disc Information
Each time you press the DISPLAY / CHARA. (or DISPLAY) button in Stop mode or during playback, the disc information is displayed as follows.
The DISPLAY / CHARA. button on the unit and the DISPLAY button on the remote control work independently.
English
or
Display change on the unit:
In Stop mode:
Disc title*, total track number, and total playback time
of the MD = Recordable capacity (remaining time) of
the MD (e.g. REMAIN -69:20) = Normal display =
(back to the beginning)
During Playback:
Playback remaining time of the track = Normal display = (back to the beginning)
*: The disc title or track title will scroll if it is long. If no title is given, “NO TITLE” appears on the unit’s display
and “ ~” appears on the remote control’s display.
Display change on the remote control:
In Stop mode:
Disc title* = Total track number and total playback
time of the MD = Track title* = Normal display =
(back to the beginning)
During Playback:
Track title* = Normal display = (back to the beginning)
Repeat Play and Random Play (Using the Remote Control)
You can select Repeat Play or Random Play. In Repeat Play, you can repeat all the tracks or individual track as
many times as you like. In Random Play, you can play all the tracks in random order.
Selecting Repeat Play and Random Play in Stop mode
In Stop mode, press the P.MODE button on the remote control. Each time you press the button, the play mode
changes as follows:
P.MODE button
P1 = P = RND = P1 RND = PRND = Original display = (back to the beginning)
P1: Repeats 1 track.
P: Repeats all the tracks.
RND: Random play
P1 RND: Repeats one track randomly selected.
PRND: Repeats all the tracks in random order.
(On the unit’s display, “RANDOM” indicator lights up instead of “RND”.)
After selecting one of the above modes, press the 6 button.
For example, to start Random Play, press the P.MODE button until “RND” indicator appears and then press the 6 button.
To exit Repeat Play or Random Play, stop the MD and then press the P.MODE button until the display returns to
the original one.
Repeat Play during Playback
During Normal Play:
Each time you press the P.MODE button, the play mode changes as follows:
P1 = P = Original display = (back to the beginning)
Select “P1” to repeatedly play the current track. Select “P” to repeat all the tracks.
During Random Play:
Each time you press the P.MODE button, the play mode changes as follows:
P1 RND = PRND = Original display = (back to the beginning)
Select “P1 RND” to repeatedly play a randomly selected track. Select “PRND” to repeat all the tracks in random
order. (On the unit’s display, “RANDOM” indicator lights up instead of “RND”.)
When you stop Random Play once and then restarts it, the track lastly played is played back. After that, Random
Play is carried out.
To exit Repeat Play, stop the MD and then press the P.MODE button until the display returns to the original one.
7
Page 32

Selecting the Operational Options of Remote Control
Muting a pip tone
When you press the buttons on the remote control, a pip tone is issued except for the A.C.BASS and VOLUME +, – buttons.
To mute the pip tone, in Stop mode or during playback, press and
hold the A.C.BASS button, and within one second, press the P.MODE
A.C.BASS
button. “BEEP OFF” scrolls on the remote control’s display.
To resume a pip tone, do the same operation again. “BEEP ON”
will scroll on the display.
Note
(Press and hold)
(Within 1 second)
If the P.MODE button is not pressed within one second, Sound mode will changed.
Changing the Display Character Contrast
The character display contrast can be adjusted when the characters become less clear due to ambient temperature or
during scrolling. In Stop mode or during playback, press and hold the A.C.BASS button and, within one second,
press the
4 or ¢
Adjustment can be made between LCD00 and LCD15. While the
4 or ¢ button is pressed, the contrast will be changed continu-
ously. The initial setting is “LCD10”.
Note
If the 4 or ¢ button is not pressed within one second, Sound mode will be changed.
button.
A.C.BASS
(Press and hold)
(Within 1 second)
or
Preparation Before Recording
Connection for recording
Connect one of the following music sources to the unit.
• Analog input to the LINE IN (OPTICAL) jack
• Digital input to the LINE IN (OPTICAL) jack
• Microphone input to the MIC (PLUG IN POWER) jack
Microphone (not supplied)
English
Notes
Stereo connection cable (not supplied)
Optical digital cable (supplied)
MD player,
tape deck, etc.
CD player, etc.
• You cannot mix the microphone sound with the LINE IN source.
• Since the priority for each input is as follows, be sure to disconnect the other music source before recording. For
example, disconnect the microphone before recording an analog input.
Digital input (LINE IN) > MIC input > Analog input (LINE IN)
Things to know before you start recording
•
It may be unlawful to record or play back copyrighted material without the consent of the copyright owner.
• Carefully read the “Rules of Digital Dubbing” on page 18.
• The MD recorder supports the following sampling frequencies for digital source, LINE IN (OPTICAL).
32 kHz, 44.1 kHz and 48 kHz
• When recording a digital input or microphone input, the recording level is automatically set correctly. When re-
cording an analog input, it is necessary to adjust the recording level properly. Recording is not affected by the
A.C.BASS or tone level setting.
• The accidental erasure prevention knob is provided on the back of an MD cartridge to prevent accidental erasure
or recording. It must be set to the close position before recording or editing.
• Remote control operation will be disabled during record-
Accidental erasure prevention knob
ing or editing.
• Unplugging or plugging of the connection cord or micro-
phone should be avoided during recording.
• Removal of the rechargeable battery should be avoided
during recording. Otherwise, you cannot open the lid unless the rechargeable battery is reinserted or AC adaptor is
For recording
or editing
Close
Open
For protecting
erasure
connected to the unit.
8
Page 33

Check Items Before Starting Recording
• The MD is not the Play-only type one.
• The accidental erasure prevention knob of the MD cartridge is set to the close position.
• The MD has enough space for recording. If not, carry out ALL ERASE or ERASE function mentioned later to
erase all the tracks or desired tracks in the MD. You can check the recordable remaining time of the MD by re-
English
peatedly pressing the DISPLAY/CHARA. button on the unit in Standby mode. (See “Showing the Disc Information” on page 7.)
Standard Recording
CAUTIONS:
•
Be sure that the rechargeable battery is fully charged. Otherwise, the unit may shut off, leaving recording unfinished.
• While “UTOC Writing” appears on the display, to avoid improper recording, do not give a shock to the Unit and
do not disconnect any cable from the Unit, including the AC adaptor’s cable.
Notes
• The recording operation is possible only with the buttons on the unit.
• When a stereo signal is recorded in MONO mode, stereo sound will be heard though the signal is correctly recorded in
MONO mode.
1 Check the things before recording.
See “Check Items Before Starting Recording” above.
2 Insert an MD with its label side facing up.
Proceed to the next step after “TOC Reading” goes out on the display.
3 Slide the REC switch.
The unit enters Rec/Standby mode, the REC indicator lights up, and the disc mark blinks. The track number is
increased by one.
• To cancel Rec/Standby mode, press the 7/CHARGE button.
(Appears only if MONO is selected.)
4 Within two minutes, press the REC MODE button to select the recording mode.
Each time you press the button, the display changes as follows:
SP = LP2 = LP4 = MONO
SP: Signifies standard-hour stereo recording. The number of hours usable for recording is the same as
shown on the package of the MD.
LP2: Signifies 2 times long-hour stereo recording. The number of hours usable for recording is twice as
long as shown on the package of the MD.
LP4: Signifies 4 times long-hour stereo recording. The number of hours usable for recording is 4 times as
long as shown on the package of the MD.
MONO: Signifies standard-hour monaural recording. The number of hours usable for recording is twice as
long as shown on the package of the MD.
5 Play the recording source.
6 Adjust the recording level for analog input only.
See “Adjusting the recording level” on page 10.
7 Press the 6 button to start recording.
When the MD becomes full, “UTOC Writing” appears on the display, indicating that the recording is successfully completed. The “TOC” indicator will light up during this period. Then, the MD stops. (The “TOC” indicator goes out.)
To pause, press the 6 button. (The track number is increased by one.)
To cancel pause, press the 6 button again.
To stop recording, press the 7/CHARGE button. “UTOC Writing” appears on the display and then the MD stops.
(The “TOC” indicator goes out.)
Notes
• During recording, recording mode does not change even if the REC MODE button is pressed. To change it, you
need to stop the Unit.
• Once you have set the recording mode, it remains until the Unit is turned off. When the Unit is turned on, SP
(Stereo) recording mode is always selected.
Total track number
Remaining time
Recording mode
9
Page 34

Title “LP:” ON/OFF
To increase the space usable for a title, you can delete the recording mode name “LP:” that will be added immediately before the title.
In stop mode, press the SET button for two seconds or more. Each time you press the button, the display alternates
as follows:
TITLE LP: OFF Ô TITLE LP: ON
To delete from the title, select “TITLE LP: OFF”. Otherwise, select “ON”.
Note
The recorded “LP:” cannot be deleted (edited) with the TITLE function mentioned on page 14.
Adjusting the recording level (for analog input only)
The recording level should be adjusted so that the peak level meter does not reach the OVER mark to avoid distorting the recording signal.
Press the 4 or ¢ buttons on the unit to decrease or increase the recording level.
You can change the recording level between “REC LEVEL 00” (nothing will be recorded) to “REC LEVEL 25”.
Track marking (When recording LINE IN input signals)
• Whenever playback at the source side advances from one track to another during digital recording, the track
number of the MD is automatically incremented by 1.
• Whenever no sound at the playback side continues for 3 or more seconds during analog/digital recording, the track
number of the MD is automatically incremented by 1.
•
During analog/digital recording, you can increment the track number by 1 by sliding the REC switch. (By adding the
track number in this way, you can edit the recording contents later using the edit functions, such as erase, move, and
join. Also, you can quickly locate the desired track using the fast forward or reverse button.)
Track marking (When recording MIC input signals)
You can choose the way to make a track for the MIC input, with the MIC IN MARK MODE switch on the bottom of
the unit.
• If you need to change the setting, you must set this switch before starting recording.
English
MANUAL: You can increase the track number by 1 by sliding the REC switch.
3 MIN: The track number is automatically increased by 1 approx. every three minutes. You can also in-
crease it by sliding the REC switch.
10 MIN: The track number is automatically increased by 1 approx. every 10 minutes. You can also increase
it by sliding the REC switch.
SYNCHRO Recording (SYNCHRO)
The synchro recording automatically starts when an input signal is given and ends if no signal condition continues
for 30 seconds.
• Use the buttons on the unit.
1 Insert an MD with its label side facing up.
Proceed to the next step after “TOC Reading” goes out on the display.
2 Slide the REC switch.
3 Press the SYNCHRO button.
The “SYNC” indicator lights up, and the current recording mode and “SYNCHRO” appear on the display.
Then, the disc mark blinks.
To cancel the synchro recording, press the SYNCHRO button again to go out the “SYNC” indicator.
4 Press the 6 button.
The “SYNC” indicator blinks, indicating that the unit enters Rec/Standby mode.
5 Play the recording source.
When an input signal is detected by the unit, recording automatically starts.
The recording will automatically end if no signal condition continues for 30 seconds.
Note
Once the 6 button is pressed during the SYNCHRO recording, the unit enters Rec/Pause mode and the SYNCHRO
recording is disabled. To restart the SYNCHRO recording, repeat the above steps.
10
Page 35

Editing the MD (Using the unit)
In addition to its recording and play functions, the unit comes with editing functions. You can divide, join, move, or
erase the recorded tracks in the MD as required. Also, you can give a disc title to the MD and track titles to the
tracks in the MD.
Note that you cannot edit the MD in Random Play mode.
English
Dividing tracks (DIVIDE function)
This involves adding a track mark (see Note) at some
point during the track which is to be made into the start
of an additional track so that the original track is divided into two tracks.
DIVIDE
Track No.
Track A Track B Track C Track D
Track A Track B Track C Track D
Joining tracks (JOIN function)
This involves erasing a track mark and turning two adjoining tracks into one track.
Track No.
Track A Track B Track C Track D
JOIN
Track A + Track B Track C Track D
Moving tracks (MOVE function)
Tracks can be moved around so that they are in the desired sequence.
MOVE
Track No.
Track A Track B Track C Track D
Erasing tracks (ERASE function)
This enables unnecessary tracks. Narration, etc. to be
erased speedily. The erased parts do not remain as silences but are closed up by the subsequent tracks.
Erasing
Track No.
Track A
Track B
Track C Track D
Track B
Track A
Track C Track D
New tracks can
be recorded.
Erasing all the tracks (ALL ERASE
function)
All the tracks can be erased at once without recording
fresh material over them.
ALL
Track No.
Track B Track C Track D
Track A
ERASE
New tracks can be recorded.
Giving titles to discs and tracks
(TITLE function)
A title consisting of up to 61 characters can be given to
a disc and a track. The title given appears in the display
window.
Track A Track C Track D Track B
Note
Note
Track marks: These marks are provided to locate the start of each track. Whatever lies between one track mark and
the next is considered to a track and the numbers of the tracks (called “track numbers”) are displayed in the sequence
in which they are to be played.
11
Page 36

Dividing Tracks (DIVIDE Function)
Use the unit to carry out this function.
1
In Stop mode, press the EDIT/ENTER button and turn the JOG dial until “DIVIDE?” is displayed.
2 Press the SET button and then press the 6 button.
JOG dial
English
Track to be divided
3
Turn the JOG dial (or press the 4 or ¢ button) to select the track number to be divided.
Playing time
4 Press the SET button at the point where the track is to be divided.
• The recording lasting for 4 seconds starting where the track was divided is repeatedly played for your reference.
• Movement is possible within the POSITION-128 to +128 range (the following period of time before and after
the position).
Recording mode SP: About 8 seconds
Recording mode MONO or LP2: About 16 seconds
Recording mode LP4: About 32 seconds
To move the point, turn the JOG dial while listening the music.
5 Press the EDIT/ENTER button.
“COMPLETE” and “TOC” appear, indicating successful recording.
• The selected track is divided into two tracks and the track number will increase by 1.
• When you turn off the power by pressing the 7/CHARGE button, “UTOC Writing” will be displayed and the
edited contents are written. (The “TOC” indicator goes out.)
To cancel the operation, press the 7/CHARGE button in step 1 through 4.
Joining Tracks (JOIN Function)
Use the unit to carry out this function.
1 In Stop mode, press the EDIT/ENTER button and turn the JOG dial until “JOIN?” is dis-
played.
2 Press the SET button.
JOG dial
• You can listen to the track by pressing the 6 button. The selected track is repeatedly played.
3 Turn the JOG dial (or press the 4 or ¢ button) to select the track number to be joined.
Selected track
Track to be joined
Selected track
4 Press the SET button.
“PUSH ENTER” appears.
5 Press the EDIT/ENTER button.
“COMPLETE” and “TOC” appear, indicating successful recording.
The selected track and the previous track are joined and the track number is decreased by 1.
• When you turn off the power by pressing the 7/CHARGE button, “UTOC Writing” will be displayed and the
edited contents are written. (The “TOC” indicator goes out.)
To cancel the operation, press the 7/CHARGE button in step 1 through 4.
Notes
• The tracks recorded in different recording modes cannot be joined. (For example, SP and LP2.)
• The track recorded with the analog input and that recorded with the digital input cannot be joined.
12
Page 37

Moving Tracks (MOVE Function)
Use the unit to carry out this function.
1 In Stop mode, press the EDIT/ENTER
button and turn the JOG dial until
English
“MOVE?” is displayed.
2 Press the SET button.
5 Turn the JOG dial (or press the 4 or
¢ button) to select the destination to
which the track is to be moved.
JOG dial
Track to moved
• You can listen to the track by pressing the 6
button. The track to be moved is repeatedly
played.
3 Turn the JOG dial (or press the 4 or
¢ button) to select the track number
to be moved.
4 Press the SET button.
Erasing Tracks (ERASE Function)
Use the unit to carry out this function.
1 In Stop mode, press the EDIT/ENTER
button and turn the JOG dial until
“ERASE?” is displayed.
2 Press the SET button.
JOG dial
Track to be erased
• You can listen to the track by pressing the 6
button. The track to be erased is repeatedly
played.
3 Turn the JOG dial (or press the 4 or
¢ button) to select the track number to
be erased.
Track to be moved
• If you are playing back the MD, the destination
track is repeatedly played.
Destination track
6 Press the SET button.
“PUSH ENTER” appears.
7 Press the EDIT/ENTER button.
“COMPLETE” and “TOC” appear, indicating successful recording.
• When you turn off the power by pressing the 7/
CHARGE button, “UTOC Writing” will be displayed
and the edited contents are written. (The “TOC” indicator goes out.)
To cancel the operation, press the 7/CHARGE button
in step 1 through 6.
4 Press the SET button.
“ERASE OK? PUSH ENTER” appears.
5 Press the EDIT/ENTER button.
“COMPLETE” appears, indicating successful erasing.
The selected track is erased and the track number
is decreased by 1.
• When you turn off the power by pressing the 7/
CHARGE button, “UTOC Writing” will be displayed
and the edited contents are written.
To cancel the operation, press the 7/CHARGE button
in step 1 through 4.
Erasing All the Tracks (ALL ERASE Function)
Use the unit to carry out this function.
1 In Stop mode, press the EDIT/ENTER button and turn the JOG dial until “ALL ERASE?”
is displayed.
2 Press the SET button.
“ERASE OK? PUSH ENTER” appears.
3 Press the EDIT/ENTER button.
“COMPLETE” appears, indicating successful erasing.
All the tracks in the MD are erased and “BLANK DISC” is displayed.
• When you turn off the power by pressing the 7/CHARGE button, “UTOC Writing” will be displayed and the
edited contents are written.
To cancel the operation, press the 7/CHARGE button in step 1 or 2.
13
Page 38

Giving Titles to MD (TITLE Function)
Use the unit to carry out this function.
• You can give a disc title to the MD and a track title to the tracks in the MD. Any title name can be given up to 61
characters using the provided character sets.
About the number of characters inputted for an MD
The total number of characters that can be input for an MD is 1792, and the maximum number that can be input for
each track is 61. (However, the actual number you can input may be slightly less than this maximum numbers due to
the MD limitations — see page 18.)
• A space can be counted as one character.
• When the stereo long-hour recording (LP2 or LP4: see page 9) method is used for recording, the maximum
number you can input for a track title automatically reduced since “LP:” and four spaces are automatically added
to the beginning of the track title. Consequently this reduces the total number of characters you can input for an
MD.
Example: You can input up to 10 characters for each track if an MD is composed of 120 tracks recorded using the
stereo long-hour recording method.
Note
• When “LP:” is recorded to head of the title, you cannot delete (edit) it. Attaching it or not is selectable before
recording. For details, see “Title “LP:” ON/OFF” on page 10.
English
1 In Stop mode, press the EDIT/ENTER
button.
“TITLE?” is displayed.
2 Press the SET button.
Track to be entitled
• You can listen to the track by pressing the 6 button. The track to be entitled is repeatedly played.
3 Turn the JOG dial (or press the 4 or
¢ button) to select the track number
to be entitled.
To select the disc title, turn the JOG dial reverse
(or press the 4 button) until the following disc
mark is shown on the display.
Disc mark
[Title editing buttons on the unit]
Button Function
Changes the type of characters to be input as follows.
Upper-case letters (ABC) = Lower-case letters (abc) = Symbols (space, !”) = Numbers (012) =
(back to the beginning)
Adds the character being selected to the title name area.
JOG
(forward)
JOG
(reverse)
¢
4
Moves the cursor for the character to be input to the right.
the left.
Moves the cursor for the character to be input to the left.
the right.
Moves the cursor for the title name to the right.
Moves the cursor for the title name to the left.
4 Press the SET button.
Cursor
Title name area
Characters to be input
5 Input a preferred title (up to 61 charac-
ters).
Use the following title editing buttons to input a title.
When continue turning, the characters scroll to
When continue turning, the characters scroll to
14
Page 39

Example: When input the title “M1”
5 6 7 8 9
0
1 2 3 4
Numbers
1) Select “M” (put the cursor to the letter M using the JOG dial).
2) Press the SET button. The letter M is now displayed in the title name area.
3) Press the DISPLAY / CHARA. button until the numbers are displayed.
4) Select “1” and press the SET button. The title name “M1” will be displayed.
English
• If the wrong character has been input, clear it by pressing the 7/CHARGE button.
• To clear a particular character which has been input, use the ¢ or 4 button to align the cursor with the
character, and press the 7 /CHARGE button. Then, select the correct character and press the SET button.
[Character sets table]
Upper-case letters
A
B C D E
F
G H I J
K
L M N O
P
Q R S T
V W X Y
U
Z
Lower-case letters
b c d e
a
f
g h i j
k l m n o
p
q r s t
v w x y
u
z
Symbols
(space)
! ” # $
% &
’ ( )
+
, – .
/ : ; < =
>
? @ _ `
6 Press the EDIT/ENTER button.
“COMPLETE” and “TOC” appear, indicating successful recording.
• When you turn off the power by pressing the 7/CHARGE button, “UTOC Writing” will be displayed and the edited contents are written. (The “TOC” indicator goes out.)
To cancel the operation, press the 7/CHARGE button in step 1 through 3 or depress it in step 4 or 5, until the
display returns to the original display.
Using the Unit with Optional Accessory
Listening to MDs with an audio system
You can listen to MDs through your audio system.
• Connect a stereo connection cable (not supplied) as
shown on the right after turning off the amplifier.
• Adjust the volume level of the unit to an appropriate
level.
• Adjust the volume level on the amplifier.
• Use the unit’s buttons for operation. (The remote
control will issue a pip tone.)
Stereo connection cable
(not supplied)
Amplifier
or
Cautions
Batteries
• Before replacing batteries, always turn off the unit.
Rechargeable lithium–ion battery (BN-R3610):
• Use only the rechargeable battery (BN-R3610) supplied with the unit.
• If the power delivered by the battery lasts for a very short time after recharging, it means that the battery’s service
life is over. Do not use it any more.
• Recharging already charged battery will shorten its service life.
• When recharging battery for the first time or when it has not been used for a long period of time, the play time
may be shorter than usual. In a case like this, repeatedly recharge and discharge the battery. This will restore it to
its regular state.
• Do not allow any metal objects to touch the terminals of rechargeable battery since this may cause short-circuiting
which is dangerous.
• Recharging shall be made at the temperature from 0°C to 40°C.
Dry cell battery and rechargeable battery:
To prevent damage to the batteries and electrolyte leakage, heed the following points.
• Align the ª and · polarities properly when inserting the batteries.
• Remove the batteries if you do not plan to use the unit for a long period of time.
• Do not throw batteries into a fire, and do not short-circuit, disassemble or subject them to excessive heat.
• Do not attempt to recharge dry cell batteries.
15
Page 40

Carrying batteries:
When putting dry cell or rechargeable battery in a pocket or bag, ensure that no other metal objects such as a necklace are placed together with them. Contact with metal may cause short-circuiting which, in turn, may cause a fire.
Notice about the rechargeable battery.
The battery is designated recyclable.
Please follow your local recycling regulations.
AC adaptor
• Handle the AC adaptor carefully. Improper handling is dangerous.
• Do not touch it with wet hands.
• Do not place heavy objects on top of it.
• Do not forcibly bend it.
• Be sure to connect only the AC adaptor provided with the unit.
• Disconnect the AC adaptor from the power outlet if the unit is not going to be used for a long time.
Unit
No altering or remodelling
This can cause malfunctioning.
No dropping or strong impacts
This may damage the unit.
Locations to be avoided
Avoid using the unit in the following locations since they can cause malfunctioning.
1. Bathrooms and other moisture-prone places.
2. Warehouses and other dusty places
3. Very hot places near heating appliances, etc.
Do not leave the unit exposed to direct sunlight for long periods of time
This may deform or discolor the cabinet and may also cause malfunctioning.
Precautions for Listening with the headphones
• Do not play your headset at a high volume. Hearing experts advise against continuous extended play.
• If you experience a ringing in your ears, reduce volume or discontinue use.
• Do not use while operating a motorized vehicle. It may create traffic hazard and is illegal in many areas.
• You should use extreme caution or temporarily discontinue use in potentially hazardous situations.
• Even if your headphones is an open-air type designed to let you hear outside sounds, don’t turn up the volume so
high that you cannot hear what’s around you.
When driving a car
In the interest of traffic safety, do not operate the unit while driving.
English
Information on MDs (Minidiscs)
This is a new digital audio disc format: it has a diameter of 64 mm and enables up to 80 minutes (SP mode) of playback and
recording.
The cartridge
The diameter of the disc itself is 64 mm, smaller than a CD
single. The disc sits inside a 68 × 72 mm cartridge, which
also being pocket size, makes minidiscs extremely handy
for carrying and storage. Since the disc is protected by the
cartridge, dust and dirt cannot easily get into it. And thanks
to a shutter which is closed at all times except during use,
there is no need to worry about scratches or finger marks,
making the handling of minidiscs very simple.
Two types of minidisc
There are two types of minidisc, “recordable MDs” and
“playback-only MDs.” The playback method for each is the
same: a laser irradiates the disc and the signal is read from
the beam which comes back. However, the recording
method for each type is different.
Playback-only MD
This is the type used for commercially-available pre-recorded MDs, on which recording cannot be done. Like a
CD, data is recorded based on the presence or absence of
small indentations called pits. A disc recorded with this format is called an “optical disc.”
Recordable MDs
These are the so-called “blank” MDs you can use to make
your own recordings. Data is recorded by magnetism,
which is easily processed, so that recording can be done
again and again. By using a laser to heat the disc, the magnetism is erased and the magnetic head records the new
data. Discs with this type of recording method are called
magneto-optical (MO) discs.
16
Page 41

ATRAC (Adaptive TRansform Acoustic
Coding)/ ATRAC3
The MD provides 80 minute recording and playback time,
much more than an audio CD, but in a diameter of only
64mm. This ability to store such a large amount of data is
English
the result of ATRAC, an audio compression technique developed for MD. This technology cuts out faint sounds that
would not be heard by the human beings. This technology,
based on human sensitivity to sounds, reduces recorded
data volume up to about one-fifth of the original data volume.
Furthermore, this unit takes advantage of the latest ATRAC 3
techniques, which can reduce the amount of data to record
to one-10th or one-20th of the original data volume. This
allows for 2 times or 4 times long-hour stereo recording on
this unit.
MD (Minidisc) Messages
Sound skip guard memory
With the minidisc, the data of the track being played can be
temporarily stored up using a function called “sound skip
guard memory”. Even when data cannot be collected properly from the disc due to shaking or vibrations, information
is stored in the “sound skip guard memory”, so that there is
no break in the sound which is actually delivered.
UTOC (User Table Of Contents)
In a minidisc, apart from the recorded tracks, there is the
“UTOC”. In this area, information such as the position
where each track is recorded, the track divisions, and track
order are listed. When music search is done, the UTOC is
consulted, and the tracks are quickly found and played
back. When editing is done, only the UTOC is changed, so
there is no need to re-record the tracks.
Message
BLANK DISC
CANNOT JOIN
DISC ERROR
DISC FULL
DISC
PROTECTED
EMERGENCY STOP
NO DISC
NON AUDIO
CANNOT COPY
PLAYBACK DISC
TRACK
PROTECTED
SCMS
CANNOT COPY
DIGITAL IN
UNLOCK
BATT ERROR
HIGH TEMP
LOW TEMP
Meaning/Action
A disc has been inserted with nothing recorded on it.
You have tried to join tracks which cannot be joined.
There is a problem (damage) with the disc.
(Replace the disc.)
There is not enough space left on the disc.
There are over 254 tracks.
The disc is in accidental erasure protection mode.
(Slide the accidental erasure protection tab so that the hole is covered.)
A malfunction occurred during recording.
(Stop the disc by pressing the 7 button and redo the operation.)
There is no disc in the unit.
You have tried to digitally dub a CD-ROM.
(Stop recording.)
You have tried to record or edit on a playback-only disc.
The track is protected. (This unit cannot undo track protection. Undo the pro-
tection using the appliance that created it.)
You have tried to make a copy of a copy by digital dubbing.
(Dub using analog input (LINE IN).)
The digital cable is disconnected.
The life of battery has ended.
The temperature of rechargeable battery is out of acceptable range.
17
Page 42

Minidisc Limitations
The minidisc records information in an original format that differs from that of conventional cassette tapes or DATs.
Since there are some limitations with this recording format, the following types of conditions may arise. These conditions are not malfunctions.
“DISC FULL” is displayed, even though the possible recording time is not used up.
“DISC FULL” is displayed, even though the number of tracks and recording time are not at the limit.
The JOIN function sometimes does not work.
The remaining usable time on the disc does not increase even when tracks are erased.
The sound skip during fast forward or fast rewind.
The amount of recorded time on the disc added to
the amount of remaining time falls shout of the
disc’s total possible recording time.
Condition Cause
With the minidisc, there is a maximum number of tracks which
can be recorded, regardless of time. More than 254 tracks cannot
be recorded on a disc.
When parts of the disc are erased and re-recorded, blank spots are
created on the disc. When recording to such a disc, one track of
data is divided and recorded in the blank areas. During recording,
when these divided parts become numerous, the “DISC FULL”
message may be displayed. When a part of 8 seconds or less (SP
mode) is created by division, that track cannot be joined by the
JOIN function, and even if it is erased, the remaining usable time
on the disc does not increase. Tracks divided into small pieces
may skip when fast forward or fast rewind is done.
Minidiscs must have at least 2 seconds (SP mode) of continuous
space in order to record. For this reason, the actual recording time
of discs with a lot of short blank areas becomes shorter.
Rules of Digital Dubbing
The following rules regarding copyright exist for dubbing to MDs from CDs or DATs through digital terminals.
SCMS (Serial Copy Management System)
Minidiscs can record clear sound with low loss of quality from CDs or DATs through each component’s digital input/output
terminal. However, minidiscs are set up so that a disc recorded in this way cannot be recorded onto another minidisc through
digital input/output terminals. In other words, you can not make a copy of a copy. This rule is called SCMS (Serial Copy
Management System).
The recorder is designed in compliance with this rule. If you try to make a copy of a copy the error message “SCMS
CANNOT COPY” is displayed, and dubbing can not be done.
DIGITAL
OK
DIGITAL
NO
English
It may be unlawful to record or play back copyrighted material without the consent of the copyright owner.
Maintenance
Unit:
Wipe the unit and remote control with a soft cloth. Remove stubborn dirt using a cloth which has been dipped in
water or soapy water and wrung out, and then wipe dry.
• If you intend to use a chemically treated cleaning cloth, read its directions first.
• Do not use alcohol or paint thinners.
MDs:
If the MD cartridge is dirty, wipe it with a damp cloth and then wipe dry.
When storing MDs, avoid locations which are
• Exposed to direct sunlight.
• Susceptible to high levels of humidity or dust.
• Directly exposed to heat from a heating appliance.
• On top of a car dashboard or near the rear window.
Handling the MDs
• Do not open the shutter. The shutter is usually locked to prevent opening. Do not force to open it or the disc may
be destroyed.
18
Page 43

Troubleshooting Guide
Before requesting service for this unit, check the chart below for a possible cause of the problem you are experiencing.
Some simple checks or a minor adjustment on your part may eliminate the problem and restore proper operation.
If you are in doubt about some of the check points, or if the remedies indicated in the chart do not solve the problem,
refer to the directory of Authorized Service Centers (enclosed with this unit) to locate a convenient service center, or
English
consult your dealer for instructions.
Cannot operate.
Problem
Cannot play the MD.
Tracks on MD do not play in order.
Recording cannot be made on MD.
Cannot hear music—too noisy.
TV picture is distorted.
Power is not turned on.
Discs recorded in long-hour stereo
recording mode (LP2 or LP4) with
this unit cannot be played back
with the other MD recorders and
MD players.
Is the MD loaded? If not loaded, “NO DISC” will appear.
• Is the HOLD switch released?
• Is the battery low?
• Is the MD faulty? (Play other MD.)
• Is there moisture condensation on the lens?
(Wait for about an hour and then try again.)
Is the Repeat Play or Random Play selected?
Is the accidental erasure prevention knob of the MD set to the open position?
(Set it to the close position.)
• Is the headphones plug inserted all the way?
• Is the plug dirty? (Wipe away dirt on the plug.)
• Is music recorded on the MD? If not, “BLANK DISC” will appear.
Is the unit too near a TV or tuner? (If the TV or tuner is connected to a simple
indoor antenna, connect it to an outdoor antenna.)
Was the power source removed from the unit with the HOLD switches activated?
(Release both HOLD switches and try to operate again.)
If the MD recorder or MD player has not MDLP logo on it, you cannot reproduce
the track recorded using the LP mode. No sound comes out for that track, but this
is not a malfunction.
Check this
19
Page 44

Specifications
Portable minidisc recorder
Type : Minidisc digital audio system
Sampling frequency : 44.1 kHz
Audio compression system : ATRAC (Adaptive TRansform Acoustic Coding)/ATRAC3
Number of channels: : 2 channels (stereo) / 1 channel (mono)
Frequency response : 20 Hz to 20 000 Hz
Wow & flutter : Unmeasurable
Input : LINE IN: 100 mV / 47 kohms,
Output : Headphones (3.5 mm dia. stereo × 1)
Duration of battery :
Rechargeable battery
(BN-R3610)
Alkaline batteries
(LR6 DURACELL ULTRA)
Rechargeable battery
* Above duration may differ depending on the ambient temperature and conditions.
* A rechargeable battery (BN-R3610) is charged for 2 hours.
Power requirements : DC 3.6 V (rechargeable battery),
Dimensions (W×H×D) : 81.7 × 19.5 × 88.9 mm (excluding buttons and controls)
Mass : Approx. 155 g (without battery)
+
Alkaline batteries
OPTICAL: –23 to –14 dBm,
(*Same jack is used for LINE IN and OPTICAL)
MIC: 1.3 mV / 200 ohms to 2 kohms
3 mW / ch at 10% THD / 16 ohms to 47 kohms
When Playing back
SP
13 hours
37 hours
55 hours
DC 4.5 V (R6 size battery × 3),
DC IN 6 V
LP2
16 hours
46 hours
67 hours
LP4
18 hours
51 hours
75 hours
When recording
SP
6 hours
14 hours
22 hours
LP2
8.5 hours
19 hours
31 hours
English
LP4
11 hours
25 hours
41 hours
AC adaptor (AA-R555)
Input power source : AC 110 - 240 V, 50 / 60 Hz
Output voltage : DC 6 V, 0.6 A
Design and specifications are subject to change without notice.
US and foreign patents licensed from Dolby Laboratories Licensing Corporation.
20
 Loading...