

Page 1
For Customer Use:
Enter below the Model No. and Serial
No. which are located either on the rear,
bottom or side of the cabinet. Retain this
information for future reference.
Model No.
Serial No.
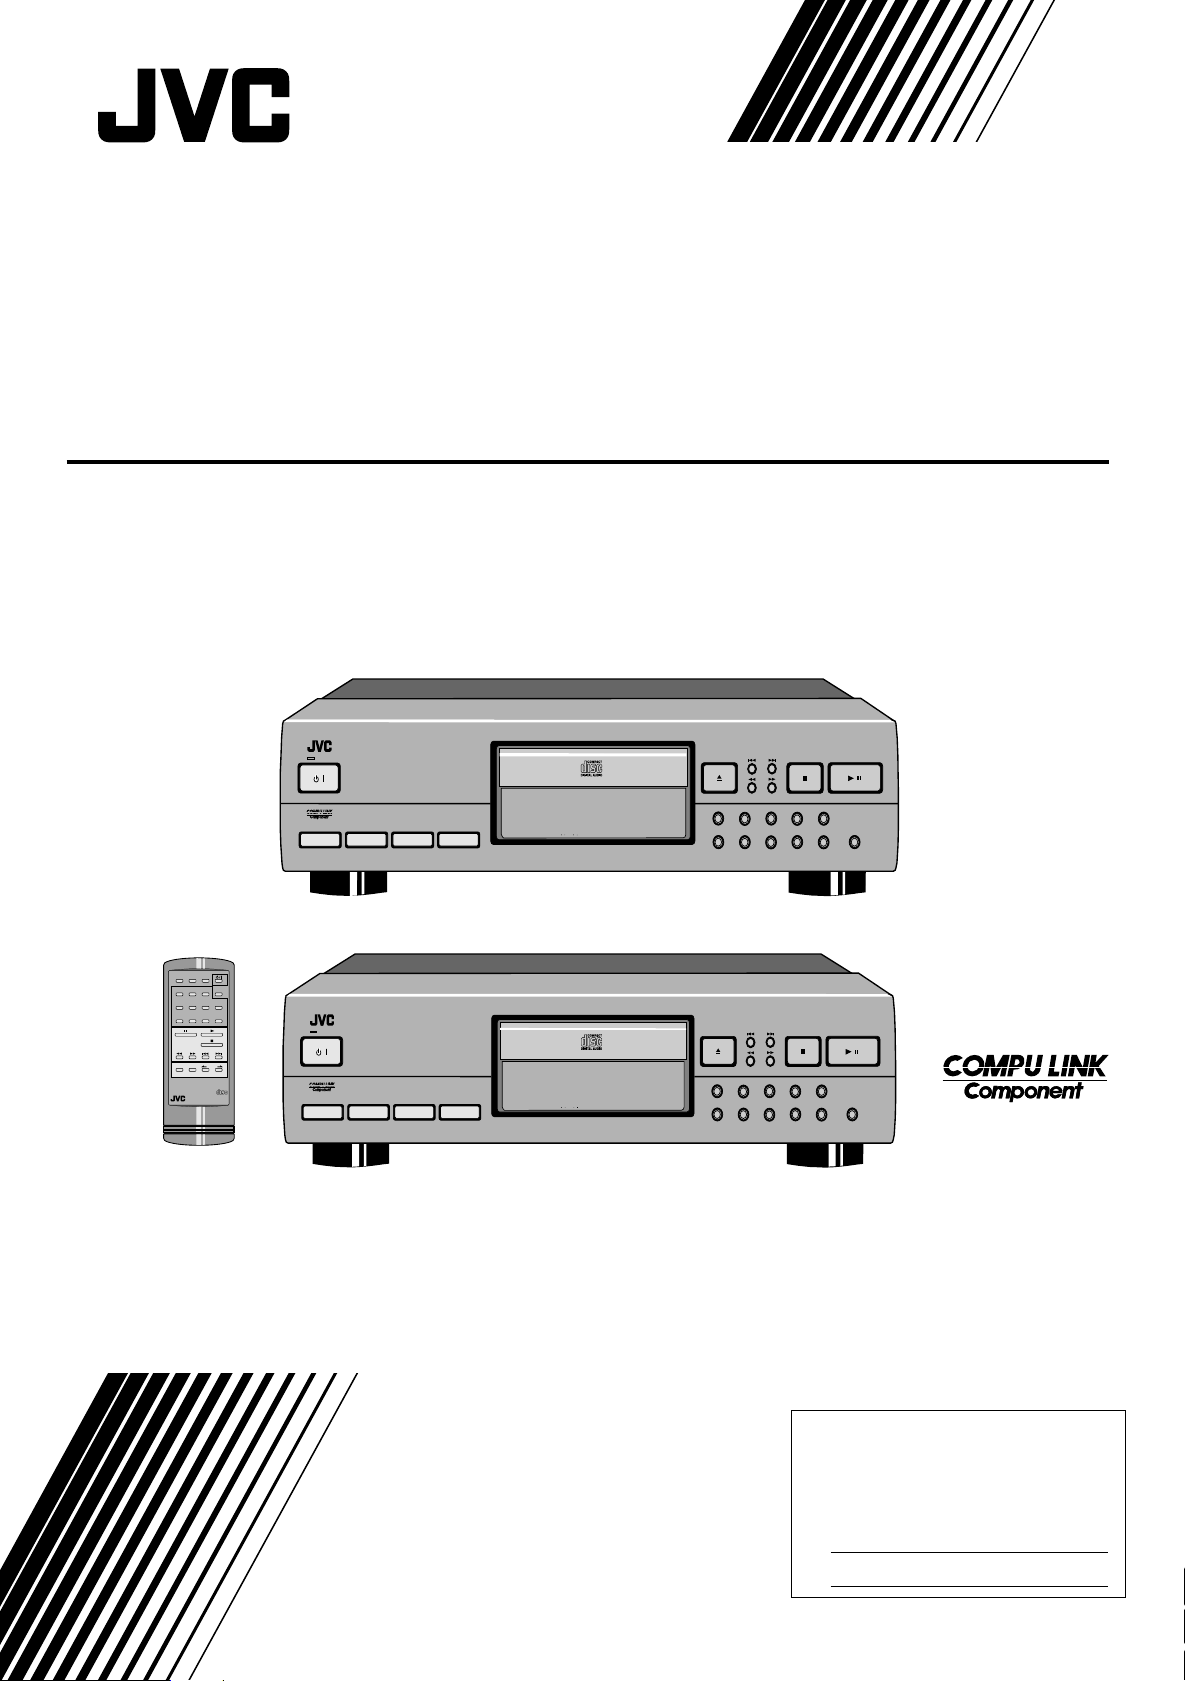
COMPACT COMPONENT SYSTEM
COMPACT DISC PLAYER
XL-V130BK/XL-V230BK
XL-V130BK
XL-V130 COMPACT DISC PLAYER
STANDBY/ON
PROGRAM
STANDBY
/
RANDOM REPEAT CANCEL
P E M D D CONVERTER CONVERTER
Pulse Edge Modulation Differential Linearity Errorless D/A Converter
OPEN / CLOSE
PLAY / PAUSE
STOP/CLEAR
1 2 3 4 5
6 7 8 9 10 +10
/
CANCEL RANDOM
PROGRAM
OPEN /
CLOSE
123
4567
8 9 10 +10
SEARCH
AUTO SEARCH / CHECK
REPEAT DISPLAY INDEX
ALL / 1
MODE
COMPACT
DIGITAL AUDIO
RM-SX230EU REMOTE CONTROL
XL-V230 COMPACT DISC PLAYER
STANDBY
/
STANDBY/ON
RANDOM REPEAT CANCEL
PROGRAM
INSTRUCTIONS
XL-V230BK
P E M D D CONVERTER CONVERTER
Pulse Edge Modulation Differential Linearity Errorless D/A Converter
OPEN / CLOSE
1 2 3 4 5
6 7 8 9 10 +10
STOP/CLEAR
PLAY / PAUSE
'
/
LET0029-001A
[BS]
Page 2
Warnings, Cautions and Others
IMPORTANT for the U.K.
DO NOT cut off the mains plug from this equipment. If the plug
fitted is not suitable for the power points in your home or the cable
is too short to reach a power point, then obtain an appropriate
safety approved extension lead or consult your dealer.
BE SURE to replace the fuse only with an identical approved type,
as originally fitted.
If nontheless the mains plug is cut off ensure to remove the fuse
and dispose of the plug immediately, to avoid a possible shock
hazard by inadvertent connection to the mains supply.
If this product is not supplied fitted with a mains plug then follow
the instructions given below:
IMPORTANT.
DO NOT make any connection to the terminal which is marked with
the letter E or by the safety earth symbol or coloured green or
green-and-yellow.
The wires in the mains lead on this product are coloured in
accordance with the following code:
Blue : Neutral
Brown : Live
As these colours may not correspond with the coloured markings
identifying the terminals in your plug proceed as follows:
The wire which is coloured blue must be connected to the terminal
which is marked with the letter N or coloured black.
The wire which is coloured brown must be connected to the
terminal which is marked with the letter L or coloured red.
IF IN DOUBT - CONSULT A COMPETENT ELECTRICIAN.
Caution –– POWER switch!
Disconnect the mains plug to shut the power off completely. The
POWER switch in any position does not disconnect the mains line.
The power can be remote controlled for XL-V230BK.
CAUTION
To reduce the risk of electrical shocks, fire, etc.:
1. Do not remove screws, covers or cabinet.
2. Do not expose this appliance to rain or moisture.
IMPORTANT FOR LASER PRODUCTS
REPRODUCTION OF LABELS
1 CLASSIFICATION LABEL, PLACED ON REAR ENCLOSURE
CLASS 1
LASER PRODUCT
2 WARNING LABEL, PLACED INSIDE THE UNIT
G-1
DANGER: Invisible laser
radiation when open and
interlock failed or defeated.
AVOID DIRECT EXPOSURE
TO BEAM. (e)
1. CLASS 1 LASER PRODUCT
2. DANGER: Invisible laser radiation when open and interlock failed or
defeated. Avoid direct exposure to beam.
3. CAUTION: Do not open the top cover. There are no user service-
able parts inside the Unit; leave all servicing to qualified service
personnel.
VARNING: Osynlig laserstrålning när denna del är
öppnad och spärren är
urkopplad. Betrakta ej
strålen. (s)
ADVARSEL: Usynlig laserstråling ved åbning, når
sikkerhedsafbrydere er ude
af funktion. Undgå udsættelse for stråling (d)
VARO: Avattaessa ja suojalukitus ohitettaessa olet
alttiina näkymättömälle
lasersäteilylle. Älä katso
säteeseen. (f)
Page 3

We would like to thank you for purchasing one of our JVC
products.
Before connecting this unit to the wall outlet, please read
the instructions carefully to ensure that you obtain the
best possible performance.
If you have any questions, please consult your JVC
dealer.
Table of contents
INTRODUCTION................................................ 1
Precautions .................................................................1
About this manual .......................................................1
Names of buttons ........................................................2
BEFORE USING FOR THE FIRST TIME .......... 4
Installing the unit .........................................................4
Connecting to other equipments ................................ 4
Supplying the power .................................................. 5
To connect the AC power cord of the main unit ............ 5
Installing the batteries .................................................6
To install the batteries in the remote control unit ........... 6
COMPU LINK connection ...................................................... 6
BASIC OPERATIONS ....................................... 7
Basic functions for disc playback ............................... 7
Turning on the power of this unit .................................... 7
Loading a disc in the disc tray ....................................... 7
Remote control operation ............................................... 7
Playing a disc ................................................................. 8
Stopping playback ......................................................... 8
Locating a point to start playback .............................. 8
Skipping to a desired track ............................................ 8
Skipping to a desired index ........................................... 8
Searching for a desired section ..................................... 9
Specifying a desired track ............................................. 9
Displaying the time ..................................................... 9
Switching the time display on XL-V230BK ..................... 9
Displaying the time on XL-V130BK ................................ 9
VARIOUS PLAYBACK PATTERNS ............... 10
Playing tracks in a desired order ..............................10
Playing tracks in a random order .............................. 10
Playing repeatedly .................................................... 11
Repeating whole disc ................................................... 11
Repeating one track ..................................................... 11
GENERAL INFORMATIONS........................... 12
COMPU LINK remote control system ....................... 12
Care and handling .................................................... 13
Troubleshooting ........................................................ 14
Specifications............................................................ 15
Page 16
Page 4

INTRODUCTION
Precautions
Load compact disc only
Never insert anything other than a compact disc into any part of the
player.
If a problem persists
If something goes wrong, turn off the power immediately. If the same
problem reoccurs when the power is turned on once more, turn off the
power again and consult your JVC dealer.
Handling the power cord
When unplugging from the wall socket, always pull the plug body,
never the power cable.
Volume settings
A CD player has almost zero background noise. Because of this, the
technique of listening to the background level and then setting the
volume before the music starts, as used with analog turntables or tape
decks, cannot be used. If you raise the volume level too high, speaker
damage may result.
Condensation
The CD player uses optical components. If it is moved from a cold
location to a warm one, or is used in a room subject to excessive
humidity or where a fire has just been lit, condensation could form on
the optical components.
This may prevent the laser beam from being properly transmitted and
thus causes noise or even a malfunction.
If condensation has formed and the CD player does not function
correctly, we recommend that you leave it turned on for an hour or two.
If at the end of this time the CD player still does not function properly,
please consult your JVC dealer.
About this manual
This manual covers the operating instructions for the compact disc
player XL-V130BK and XL-V230BK.
There are several functions which require separate instructions for
each model. Please check the model number stated on the carton box,
and follow the descriptions applicable to your unit.
This manual is organized as follows:
The first part, “INTRODUCTION”, gives you the precautions when
using this unit, and shows you the names of buttons on the main unit
and the remote control unit.
The second part, “BEFORE USING FOR THE FIRST TIME”, tells you
what kind of operations you should do before playing a disc. This part
describes where to place the unit for best results, how to install
batteries in the remote control unit and how to connect this unit to the
amplifier/receiver and other components.
The third part, “BASIC OPERATIONS”, describes how to load a disc,
and convenient basic functions for playing disc.
The fourth part, “VARIOUS PLAYBACK PATTERNS”, describes various functions for playing disc, and convenient functions for recording.
The fifth part, “GENERAL INFORMATIONS”, describes the COMPU
LINK remote control system which facilitates various operations between JVC components, and explains how to take care of discs.
This part also includes “Troubleshooting” which tells you how to check
the unit when a malfunction occurs, and the technical informations
regarding this unit.
Transporting the unit
When carrying this unit, it is best to avoid either tilting it or turning it
upside-down. Where you cannot avoid doing so, please remove the
disc first.
Using compact discs
Compact discs are made of plastic and can be easily damaged. If the
disc is dirty, scratched, warped or otherwise damaged, the digital
information may not be picked up correctly.
Applicable discs
This unit can only be used with compact discs bearing the mark below.
Never use discs of other types.
'
Page 1
Page 5
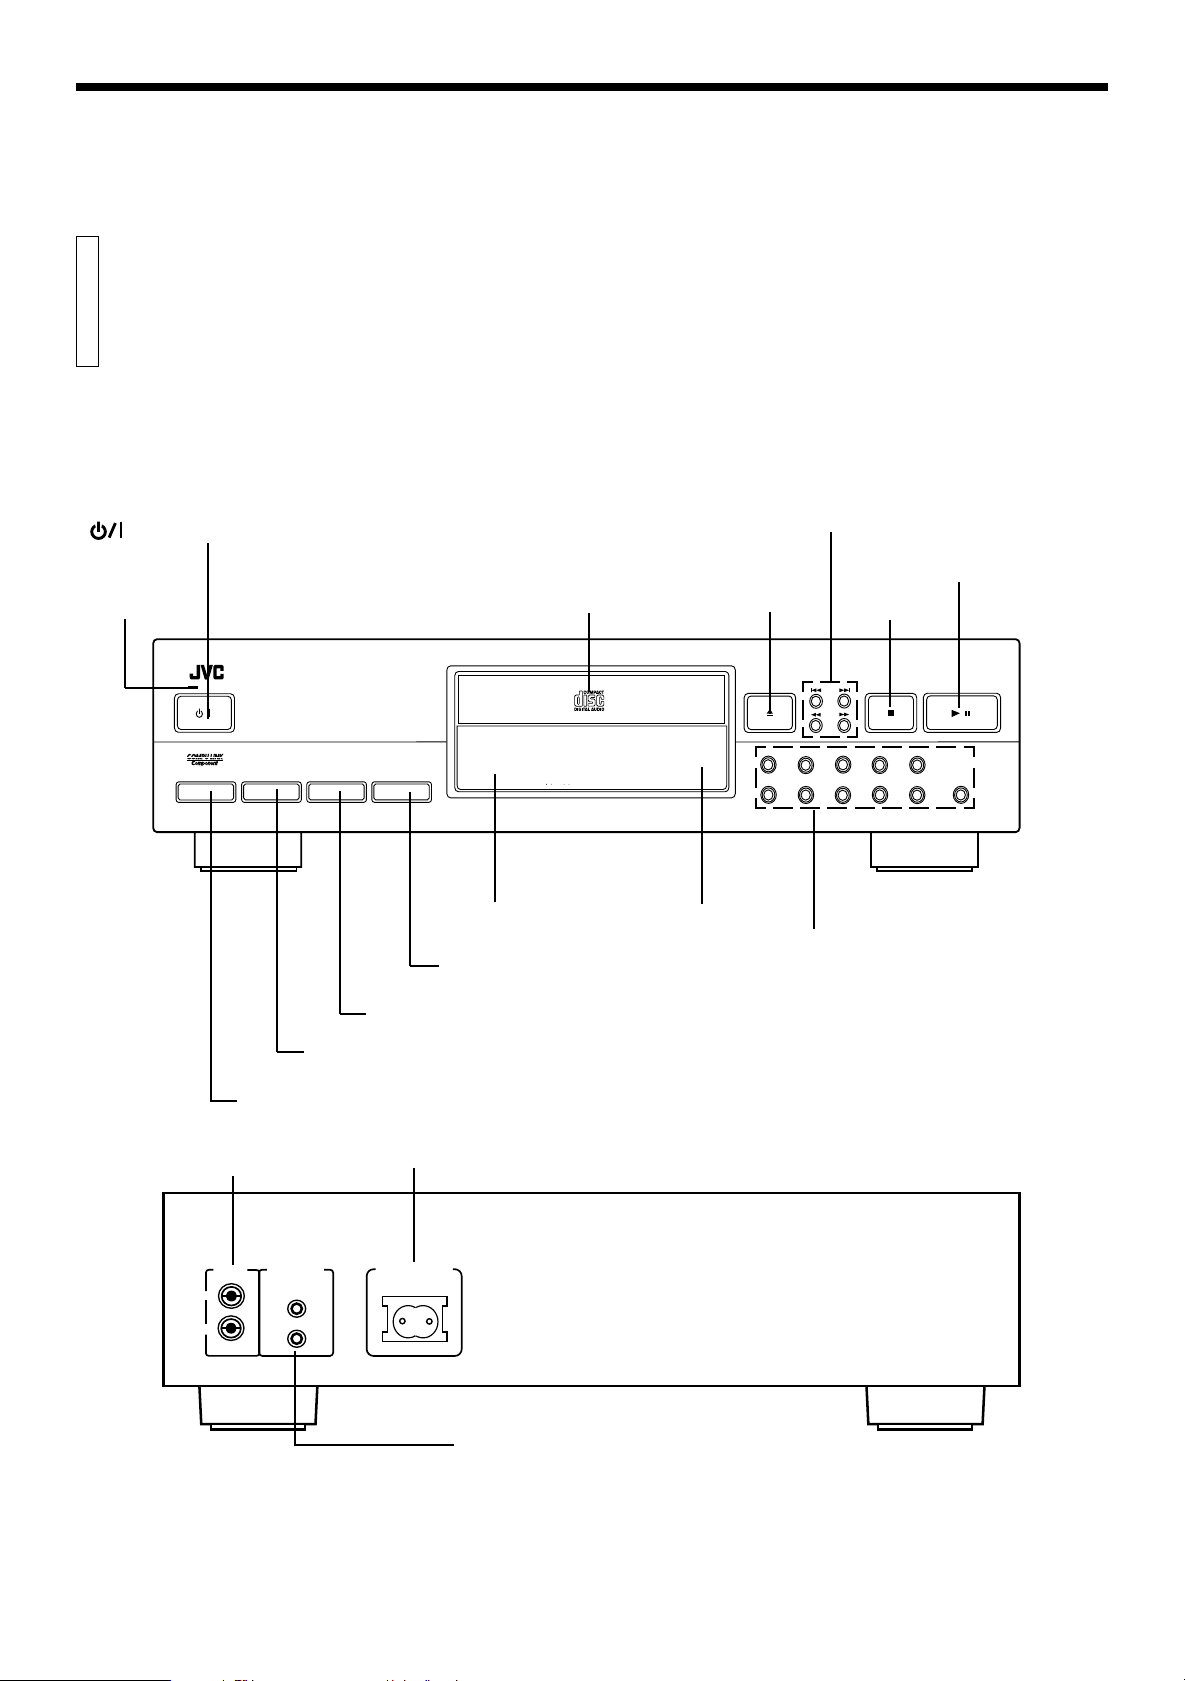
Names of buttons
Main unit
: (STANDBY ON) button
STANDBY
indicator
XL-V230 COMPACT DISC PLAYER
STANDBY
/
STANDBY/ON
PROGRAM
RANDOM REPEAT CANCEL
Disc tray
P E M D D CONVERTER CONVERTER
Pulse Edge Modulation Differential Linearity Errorless D/A Converter
0 OPEN/CLOSE button
INTRODUCTION
4¢ AUTO SEARCH/CHECK buttons
22 33 SEARCH buttons
3/8 PLAY/PAUSE
button
7 STOP/CLEAR
button
OPEN / CLOSE
1 2 3 4 5
6 7 8 9 10 +10
STOP/CLEAR
PLAY / PAUSE
/
PROGRAM button
OUTPUT jacks
COMPULINK-3
OUTPUT
LEFT
RIGHT
(SYNCHRO)
Display window
CANCEL button
REPEAT button
RANDOM button
random play back button
AC power cord inlet
AC POWER CORD
COMPU LINK-3 (SYNCHRO) jacks
remote sensor
(XL-V230BK Only)
Numeric keypad
Page 2
Page 6
INTRODUCTION
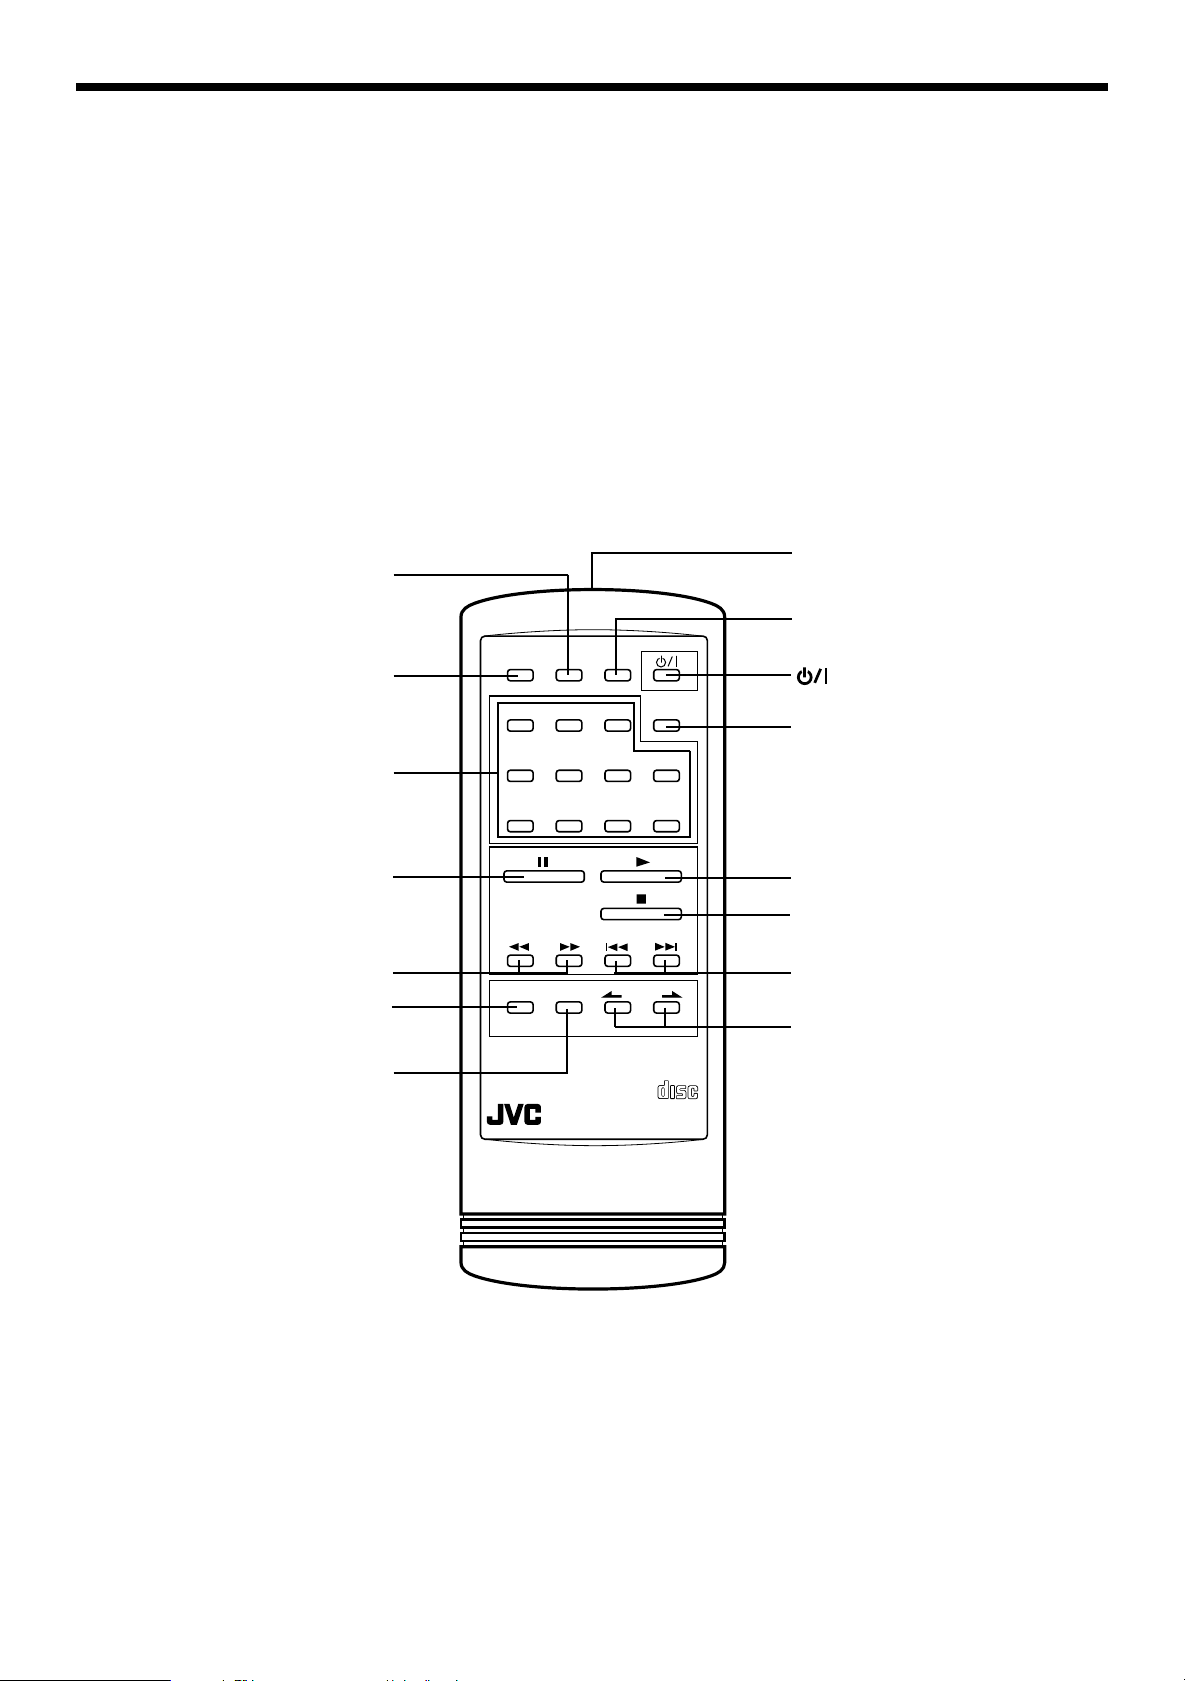
Remote control unit (XL-V230BK only)
CANCEL button
PROGRAM button
Numeric keypad
CANCEL RANDOM
PROGRAM
OPEN /
123
4567
CLOSE
Remote control signal
transmitter
RANDOM: random
playback button
: STANDBY/ON button
OPEN/CLOSE button
8: Pause button
1/¡ SEARCH buttons
REPEAT ALL/1 button
DISPLAY MODE:
switching time display button
8 9 10 +10
SEARCH
REPEAT DISPLAY INDEX
ALL / 1
AUTO SEARCH / CHECK
MODE
RM-SX230EU REMOTE CONTROL
3: Play button
7: Stop button
4/¢ AUTO SEARCH/CHECK buttons
ø/Ø INDEX buttons
COMPACT
DIGITAL AUDIO
Page 3
Page 7

BEFORE USING FOR THE FIRST TIME
Connecting to other
Installing the unit
equipments
Best location
Select a location which is level, dry and neither too cold nor too hot
(temperature range 5°C (41°F) to 35°C (95°F)). Also, avoid dusty
locations or any location subject to vibration.
If interference occurs
If this equipment is placed near a tuner or a radio receiver tuned to AM
frequencies, interference may occur. If this happens, we recommend
either that you move this unit as far away as possible from the tuner or
receiver or briefly turn off the power to this unit.
Connecting to an amplifier or receiver allows you to listen to the sound
from the speakers.
Connect the OUTPUT jacks of this unit to the line input jacks of an
amplifier or receiver with the supplied audio cord.
Notes
÷
Never connect the OUTPUT jacks to the PHONO jacks of the
amplifier or receiver. This may cause damage to the components.
÷
Make sure that the same channels are connected between this unit
and the amplifier or receiver: LEFT to LEFT and RIGHT to RIGHT.
÷
Do not connect the power plug until all connections are complete.
÷
Connect the plugs firmly. Loose connections may cause noise or
malfunction.
Rear panel of this unit
COMPULINK-3
OUTPUT
AC POWER CORD
SYNCHRO
LEFT
RIGHT
Audio cord
OUTPUT
LEFT
RIGHT
Amplifier or receiver
Speaker unit
Page 4
Page 8

BEFORE USING FOR THE FIRST TIME
Supplying the power
To connect the AC power cord of the
main unit
The AC power cord is supplied separately and must be connected to
the unit.
Plug the AC power cord into the AC POWER CORD inlet of this unit and
connect to the wall outlet after all connections are complete.
Note
When using the COMPU LINK Remote Control System, do not connect
the power cord to the SWITCHED AC OUTLET of an amplifier or
receiver.
AC power cord inlet
COMPULINK-3
OUTPUT
LEFT
RIGHT
Supplied AC power
cord
(SYNCHRO)
AC POWER CORD
Rear panel of this unit
To the wall outlet
Page 5
Page 9

BEFORE USING FOR THE FIRST TIME
Installing the batteries
(XL-V230BK Only)
To install the batteries in the remote
control unit
Before operating the remote control unit, install two batteries.
1. Remove the rear cover of the remote control unit by pressing
down and simultaneously pulling it backwards.
2. Install batteries. Be sure that the batteries are installed with
correct polarity, (+) and (–).
COMPU LINK connection
JVC’s COMPU LINK Remote Control System provides unified control
over system components connected with COMPU LINK. Connecting
JVC audio components with the COMPU LINK jacks automatically
controls relative operations between components and facilitates various operations. With the COMPU LINK connection to an amplifier or
receiver, you can operate XL-V130BK/XL-V230BK with the amplifier or
receiver’s remote control unit. Synchronized recording is also available with this feature.
Connecting the COMPU LINK cord
The COMPU LINK-3 SYNCHRO jacks are used to output and input the
control signal for the COMPU LINK remote control system.
COMPU LINK-compatible products are provided with the jacks marked
COMPU LINK-1, COMPU LINK-2 or COMPU LINK-3, referring to the
COMPU LINK version. XL-V130BK/XL-V230BK is equipped with
COMPU LINK-3. You can connect XL-V130BK/XL-V230BK also to a
component with a lower COMPU LINK versions. But, in that case, only
the lower versions’ features will be available.
Plug the supplied COMPU LINK cord into the COMPU LINK-3 SYNCHRO
jack on the rear panel of XL-V130BK/XL-V230BK. Plug the other end
into the COMPU LINK jack of the other component. If there are two
COMPU LINK jacks, plug it into either of them.
Connecting the COMPU LINK system components with the COMPU
LINK cords
3. Attach the rear cover by sliding it back into position.
Notes
Incorrect use of batteries can cause corrosion or damage. Note the
following points to lengthen battery life.
÷
Install batteries observing the correct polarity, (+) and (–).
÷
Do not use new and old batteries simultaneously.
÷
Batteries with similar shapes may have different voltage ratings. Be
sure to use the correct batteries.
÷
Remove batteries from the remote control unit if it will not be used
for a long period of time.
÷
Do not expose batteries to heat or flame.
Battery replacement
Service life of batteries depends on the condition of use; standard life
is about one year. When the batteries become weak, the operating
distance of the remote control unit becomes short . If this happens,
replace the batteries R03(UM-4)/AAA(24F) with new ones.
Note
÷
The lower the temperature, the shorter the battery life.
Amplifier or receiver
Supplied COMPU LINK cord
CD player
Cassette deck Turntable
Page 6
Page 10

BASIC OPERATIONS
Basic functions for disc
playback
Turning on the power of this unit
Press the (STANDBY/ON) button to turn on this unit. The
STANDBY indicator is turned off and the display is turned on.
Remote control unit
(XL-V230BK ONLY)
Press again to turn the power off and activate the standby mode. The
STANDBY indicator is lit.
The power is automatically turned on also by;
÷ Pressing the 0 OPEN/CLOSE button.
÷ Pressing the 3 button on the remote control unit or the 3/8 PLAY/
PAUSE button on the main unit.
Notes
÷
A small amount of power (4 watts) is consumed even in the standby
mode.
÷
To turn the power off completely, disconnect the power cord from the
wall outlet.
Main unit
STANDBY
STANDBY/ON
Loading a disc in the disc tray
Use the 0 OPEN/CLOSE button to open and close the disc tray.
Remote control unit
(XL-V230BK ONLY)
OPEN/
CLOSE
Main unit
OPEN/CLOSE
0
1. Open the disc tray by pressing the 0 OPEN/CLOSE button.
2. Place a disc on the disc tray according to the groove with its
label side up.
3. Close the disc tray by pressing the 0 OPEN/CLOSE button.
Note
÷
When loading a disc in the disc tray, be sure to put the disc according
to the groove. Otherwise, the disc will be damaged when the disc
tray is closed, and the disc cannot be removed from the unit.
Good
Compact disc
No Good
Page 7
Main unit
Disc tray
Remote control operation (XL-V230BK Only)
Point the remote control unit towards the remote sensor and operate it
steadily and carefully. The remote control unit can be used within a
range of about 7 meters (23 feet) from the remote sensor, and at angles
of up to about 30 degrees.
Page 11

BASIC OPERATIONS
Locating a point to start
playback
Playing a disc
Press the 3 button on the remote control unit or the 3/8 PLAY/
PAUSE button on the main unit.
Remote control unit
(XL-V230BK ONLY)
The 3 indicator lights on the display and playback starts.
When no disc is loaded in the unit, the disc tray opens.
To stop playback temporarily, press the 8 button on the remote control
unit or the 3/8 PLAY/PAUSE button on the main unit.
The 8 indicator lights on the display and playback stops temporarily.
To resume playback, press the 3 button on the remote control unit or
the 3/8 PLAY/PAUSE button on the main unit.
Main unit
PLAY/PAUSE
6
Stopping playback
Press the 7 button.
Remote control unit
(XL-V230BK ONLY)
Main unit
STOP/CLEAR
Skipping to a desired track
Use the 4/¢ buttons.
Remote control unit
(XL-V230BK ONLY)
AUTO SEARCH/CHECK
4
To skip back to the beginning of the track being played, tap the 4
button. When the beginning of the track is reached, tapping this button
again skips to the previous track.
To skip to the next track, tap the ¢ button.
When using the 4¢ buttons on the main unit, tap them until the
desired track appears.
¢
Main unit
Skipping to a desired index (XL-V230BK Only)
(for a disc with INDEX)
Use the ø/Ø INDEX buttons.
Remote control unit
ø
INDEX
Ø
To skip back to the beginning of the index being played, tap the ø
INDEX button. When the beginning of the index is reached, tapping
this button again skips to the previous index.
To skip to the next index, tap the Ø INDEX button.
Page 8
Page 12

BASIC OPERATIONS
Displaying the time
Searching for a desired section
Keep the 1/¡ SEARCH buttons on the remote control unit or
the 22 /33 SEARCH buttons on the main unit pressed during
playback.
Remote control unit
(XL-V230BK ONLY)
SEARCH
1
¡
Main unit
Playback advances or reverses rapidly.
While the 1 button is kept pressed, playback rapidly reverses
toward the beginning of the track. While the ¡ button is kept
pressed, playback rapidly advances toward the end of the track.
When the desired section is reached, release the button. The player
resumes normal playback from that point.
Note
Two speeds are available for fast forward and fast backward.
Pressing and holding the button provides the faster speed.
Specifying a desired track
Swithching the time display on XL-V230BK
Each time the DISPLAY MODE button is pressed, the time display
changes as the following.
Remote control unit
DISPLAY
MODE
EACH = EACH REMAIN = TOTAL
=
TOTAL REMAIN
=
The corresponding indicator lights in each time mode.
EACH: Shows the elapsed time of the track being played.
EACH REMAIN: Shows the remaining playback time of the track being
played.
TOTAL: Shows the total playing time of the disc being played.
TOTAL REMAIN: Shows the remaining playback time of the disc being
played.
Displaying the time on XL-V130BK
The XL-V130BK has the following time displays.
To specify the desired track number, use the numeric keypad (110, +10).
Remote control unit
(XL-V230BK ONLY)
23
1
56
4
910
8
7
+10
Main unit
1
6
23
78
45
9 10 +10
The unit searches for the selected track and playback starts automatically.
When selecting track number 10 or less, press the corresponding
numeric button. When selecting track number 11 or above, use the
[+10] button.
Example: To select track number 12, press [+10] and then [2].
To select track number 25, press [+10] twice and then [5].
To select track number 30, press [+10] twice and then [10].
Note
The track number which does not exist on the selected disc, cannot be
selected.
EACH: Shows the elapsed time of the track being played.
EACH REMAIN: Shows the remaining playback time of the track being
played.
TOTAL: Shows the total playing time of the disc being played.
Page 9
Page 13

VARIOUS PLAYBACK PATTERNS
Playing tracks in a
desired order
You can play only the favorite tracks in any desired order.
CANCEL
PROGRAM
Numeric keypad
3
PLAY
PLAY
STOP/CLEAR
3
PLAY / PAUSE
/
PROGRAM
STANDBY
/
STANDBY/ON
PROGRAM
XL-V230 COMPACT DISC PLAYER
RANDOM REPEAT CANCEL
CANCEL
main unit
P E M D D CONVERTER CONVERTER
Pulse Edge Modulation Differential Linearity Errorless D/A Converter
Numeric keypad
OPEN / CLOSE
1 2 3 4 5
6 7 8 9 10 +10
1. In stop mode, press the PRAGRAM button so that "PRGM"
lights on the display.
Playing tracks in a
random order
You can select and play tracks in a random order.
Selections are made so that each track in the disc is played only
once.
RANDOM
main unit
RANDAM
1. Press the RANDOM button so that the "RANDOM" indicator
lights on the display.
÷ To skip to the track to be played next, press the ¢ button.
To exit random playback
Press the stop button,and the random mode is cancelled.
2. Select the track number with the numeric keypad.
Refer to “Specifying a desired track” on page 9 for entering the
track number.
The selected track number is programmed and the following
display appears.
Display shows the track
number selected for step 1.
PRGM
STEP
TOTAL
9
÷ If you want to cancel the displayed program step, press the
CANCEL button and then enter the new track number.
3. Repeat step 2 for other tracks to be programmed.
You can program up to 32 tracks.
4. Start playback by pressing the 3 button.
The programmed tracks are played in the programmed order.
÷ You can skip to a desired program step with the 4 or ¢ button.
÷ You can add tracks in the program during the playback.
To check the program contents
Press the 4 or ¢ button during stop mode. Each time the 4 or
¢ button is pressed, the program contents are displayed in the
programmed order or the reverse order.
To clear the entire program
In stop mode, press the 7 STOP/CLEAR button on the main unit. The
program contents will be cleared, however, the program mode is not
canceled.
To exit program mode
Press the PROGRAM button again, and the program mode is cancelled.
Page 10
Page 14

VARIOUS PLAYBACK PATTERNS
Playing repeatedly
You can repeatedly play the whole disc or one track.
It is also possible to utilize this function in combination with
random/program playback function.
main unit
REPEAT
REPEAT ALL/1
Repeating whole disc
Press the REPEAT (ALL/1) button so that the REPEAT indicator
lights on the display.
All tracks are played repeatedly.
Repeating one track
Press the REPEAT (ALL/1) button so that the REPEAT 1 indicator
lights on the display.
The displayed track is played repeatedly.
To cancel repeat mode
Press the REPEAT (ALL/1) button so that the REPEAT and REPEAT 1
indicators go out.
Page 11
Page 15

GENERAL INFORMATIONS
COMPU LINK remote
control system
The COMPU LINK Remote Control System controls relative
operations between components automatically and facilitates
various operations.
This is a system originated and developed by JVC for facilitating
various system operations.
The following is a brief explanation of this system:
Automatic source selection
When the supplied COMPU LINK cord is utilized to connect this unit to
others equipped with COMPU LINK jacks, switching-in of each system
component can be performed with a single touch on the source
selector button located on a JVC amplifier or receiver.
When selection is carried out in this manner, the corresponding unit will
automatically start operation.
Upon pressing of the play button, the source selector of the amplifier
or receiver changes automatically. When a new unit is switched in, the
previously selected component stops operation within five seconds.
Synchronized recording
Synchronized recording refers to the process in which a JVC cassette
deck starts recording, synchronized with this unit. Synchronized
recording is carried out as follows:
1. Set the cassette deck to the recording pause mode in accordance
with its instructions.
2. To record only certain tracks, program the tracks in any order, as
desired.
3. Press the 3/8 PLAY/ PAUSE button on the front panel of this unit.
The cassette deck automatically starts recording, synchronized
with this unit.
Notes
÷
Synchronized recording stops automatically when this unit stops
playback.
÷
To cancel synchronized recording, press the 7STOP button of this
unit or the cassette deck.
÷
To properly operate the synchronized recording, the buttons/controls other than POWER, 7 STOP and OPEN do not function.
÷
If the recording pause mode is set on the cassette deck by pressing
8
PAUSE button after pressing the ¶ REC and 3 PLAY buttons
the
simultaneously, synchronized recording is not possible. For details,
refer to the instructions for the cassette deck.
Automatic power on/off function
This function is to control the power on/off of the receiver/amplifier or
this unit respectively as the following.
÷ When this unit enters playback mode, the power of the receiver or
amplifier is turned on.
÷ When the source selector of the receiver/amplifier is set to CD
function mode, the power of this unit is turned on.
Notes
÷
Abnormal operation may result if the power supply of the component(s)
is interrupted. If this happens, you must start over again.
÷
Ensure that the COMPU LINK jacks of the each component are
connected with the supplied COMPU LINK cord. Also, be sure to
fully read the instructions for each component.
÷
When the power of the amplifier or receiver is switched off, this unit
is also turned off automatically.
Page 12
Page 16

GENERAL INFORMATIONS
Care and handling
How to handle CDs
When handling compact discs, do not touch the surface of the disc (reflective silver side - the side without the label).
Since compact discs are made of plastic, they are easily damaged. If
the disc gets dirty, dusty, scratched or warped, the sound will not be
picked up correctly and, in addition, such discs may cause the CD
player to malfunction.
Even on label side
Do not damage the label side, stick paper to or use any adhesive on
this surface.
Maintenance of discs
When there are fingerprints or other dirt adhering to a disc, wipe the
disc with a soft, dry cloth with a movement going from the inside
outwards.
If difficult to clean, wipe the disc with a cloth moistened with water.
Never use record cleaners, petrol, alcohol or any anti-static agents.
Storage
Make sure that discs are kept in their cases. If discs are piled one on
top of another without their protective cases, they can be damaged.
Do not put discs in any location where they can be exposed to direct
sunlight - or in any place where humidity or temperature is high. Avoid
leaving discs in your car!
Page 13
Page 17

GENERAL INFORMATIONS
Troubleshooting
What appears to be a malfunction may not always be serious. Please go through the following list before requesting service.
Symptom Possible cause Remedy
The unit is not operative.
The remote control unit does not function.
(XL-V230BK only)
Playback is not possible.
The reproduced sound includes noise.
Power plug is disconnected from the AC
outlet.
The AC power cord plug is disconnected
from the AC power cord inlet of this unit.
Disc is not loaded.
Batteries are exhausted.
There is an obstacle between remote control
unit and the remote sensor of the main unit.
Direct sunlight shines on the remote sensor
of the main unit.
Disc is inserted upside down.
Disc is not loaded in the correct position.
Moisture is condensed inside the unit.
Disc is dirty.
Disc is warped.
Connect the plug to an AC outlet.
Connect the plug to an AC power
cord inlet.
Load a disc in the disc tray.
Replace both batteries.
Remove the obstacle.
Shade the unit from the direct sunlight.
Load a disc with its label-side up in the
disc tray.
Load the disc according to the groove of
the disc tray.
Leave the unit turned on until the moisture evaporates.
Wipe off the disc surface with a soft
cloth.
Replace the disc with a new one.
The sound is intermittent.
Disc is scratched.
Replace the disc with a new one.
Page 14
Page 18

GENERAL INFORMATIONS
Specifications
General
System: Compact disc player
Signal detection system: Non-contact optical system
Sampling frequency: 44.1 kHz
Power requirements AC 230 V
Power consumption: 10watts (POWER ON)
4 watts (STANDBY)
Dimensions (W x H x D): 435 x 101 x 281 mm
Mass: 3.3 kg
Audio performance
Frequency response: 2 Hz to 20,000 Hz (±1 dB)
Dynamic range: More than 98 dB (at 1 kHz)
Signal to noise ratio: More than 106 dB
Total harmonic distortion: Less than 0.0025% (at 1 kHz)
Channel separation: More than 94 dB (at 1 kHz)
Wow and flutter: Less than measurable limit
Output level 2.0Vrms (at 10 kohms)
, 50Hz
Accessories
Remote control unit (RM-SX230EU)(XL-V230BK only) .............. 1
Battery R03(UM-4)/AAA(24F) (XL-V230BK only) ....................... 2
Audio cord ................................................................................. 1
COMPU LINK cord .................................................................... 1
AC POWER cord ....................................................................... 1
Design and specifications subject to change without notice.
Page 15
Page 19

VICTOR COMPANY OF JAPAN, LIMITED
EN
0397YMYMACJSC
JVC
 Loading...