

Page 1
XL-R5000BK
SERVICE MANUAL
CD/CDR MULTIPLE COMPACT DISC RECORDER
XL-R5000BK
Supplement
With sincere apology for that the following items have been
left off the previously issued Service Manual (No. 20824) for
the XL-R5000BK, we issue this supplement to add those
items to the Service Manual.
1. CD-R unit's tray and belt replacement procedure
2. XL-R5000BK check-up procedure
3. Power supply section block diagram
Area Suffix
J
C
B
E
Continental Europe
EN
Northern Europe
U.S.A.
Canada
U.K.
This service manual is made from 100% recycled paper.
COPYRIGHT 2000 VICTOR COMPANY OF JAPAN, LTD.
No.20824B
Aug. 2000
Page 2
XL-R5000BK
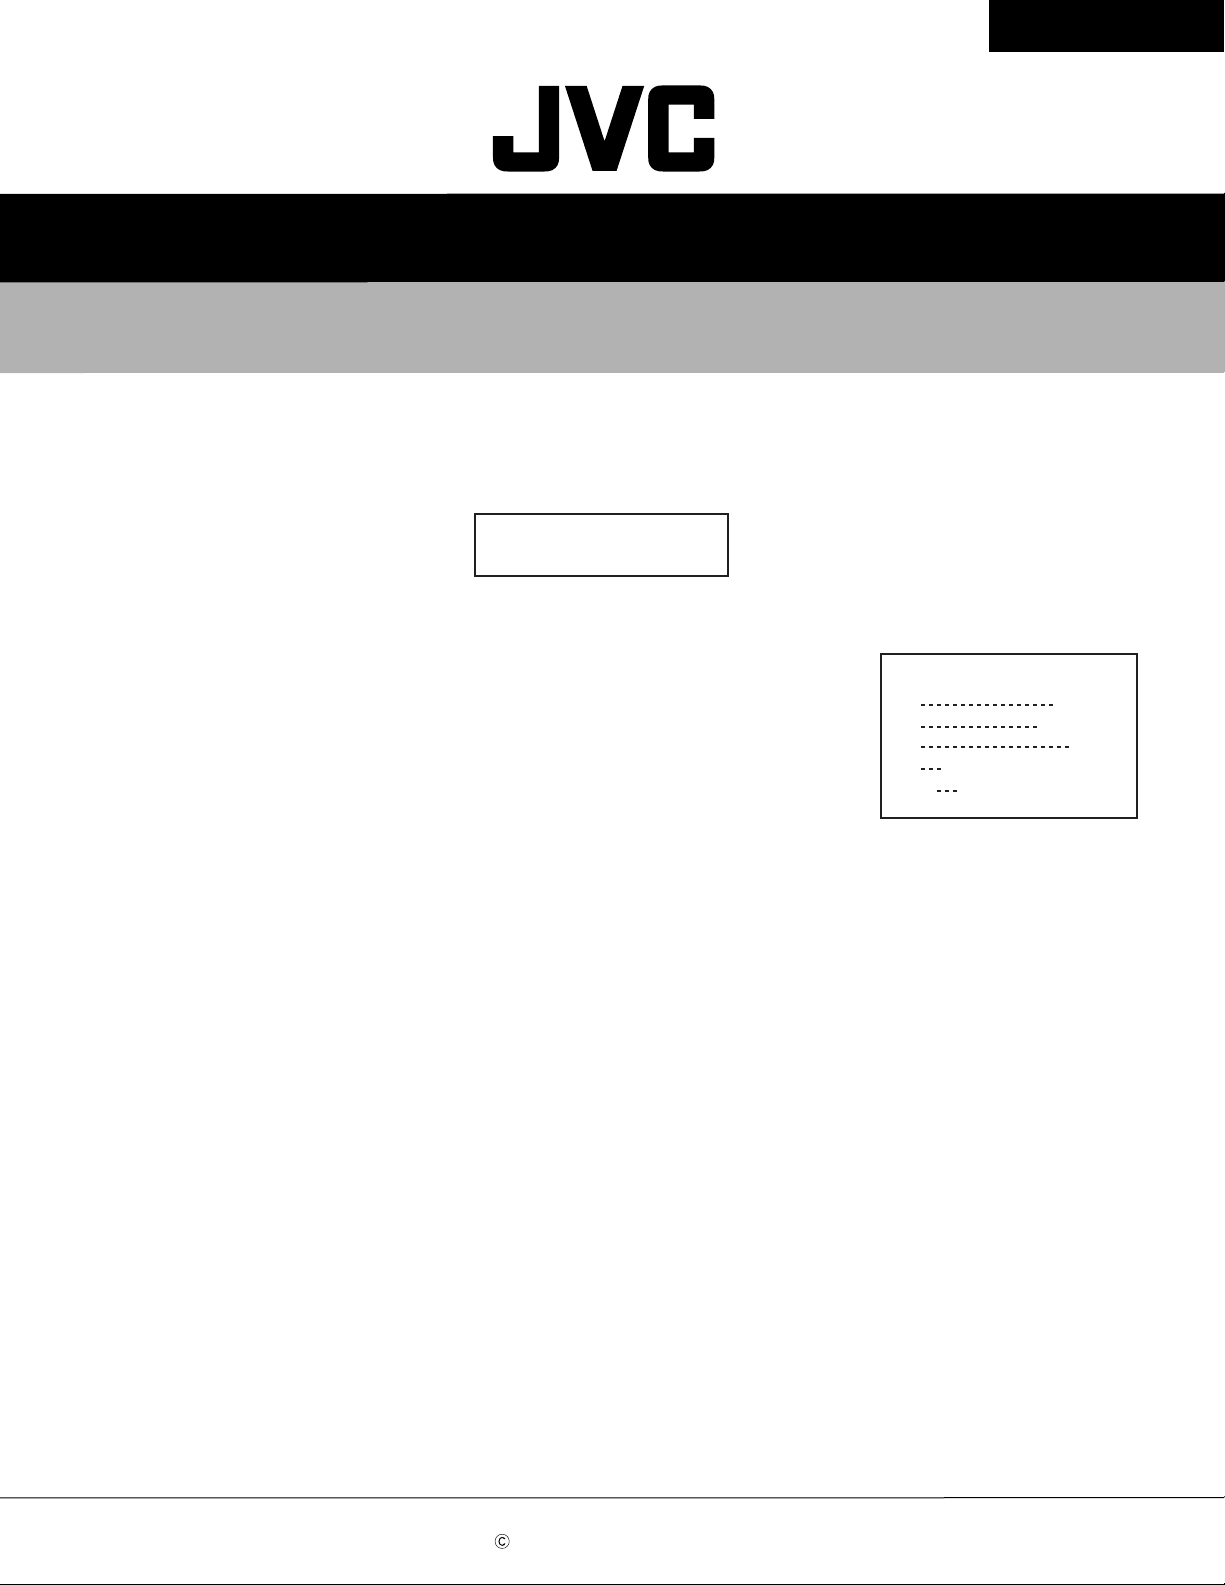
CDR Unit Tray Replacement Procedure
Refer to the separate figure.
When removing the tray:
1. Make sure that the pickup is located in the innermost position (usual position).
If the pickup is out of the innermost position, locate it in the innermost position with care not to touch the lens.
2. While turning the gear drive (3 in the figure) clockwise to lower the mechanism, draw the tray towards the front side.
Pull out the tray to the full extent (as shown in the figure).
3. Press the lever (1 in the figure) in the direction of the arrow (leftward).
4. Holding the lever (1) in the status of the above step 3, raise the lever (2 in the figure) in the direction of the arrow
(upward).
5. Pull the tray out of the CDR unit with the levers held in the above-mentioned status.
When setting a new tray:
1
Slide the slide gear (4 in the figure) rightwards to lower the mechanism before inserting a new tray.
2
Insert a new tray into the CDR unit front the front side.
3
Going through the procedure for removing the tray in the reverse order, turn the gear drive counterclockwise to raise
the mechanism upwards and check to see if it is in the topmost position.
That is all for the tray replacement procedure.
1
2
3
4
1-2
Page 3
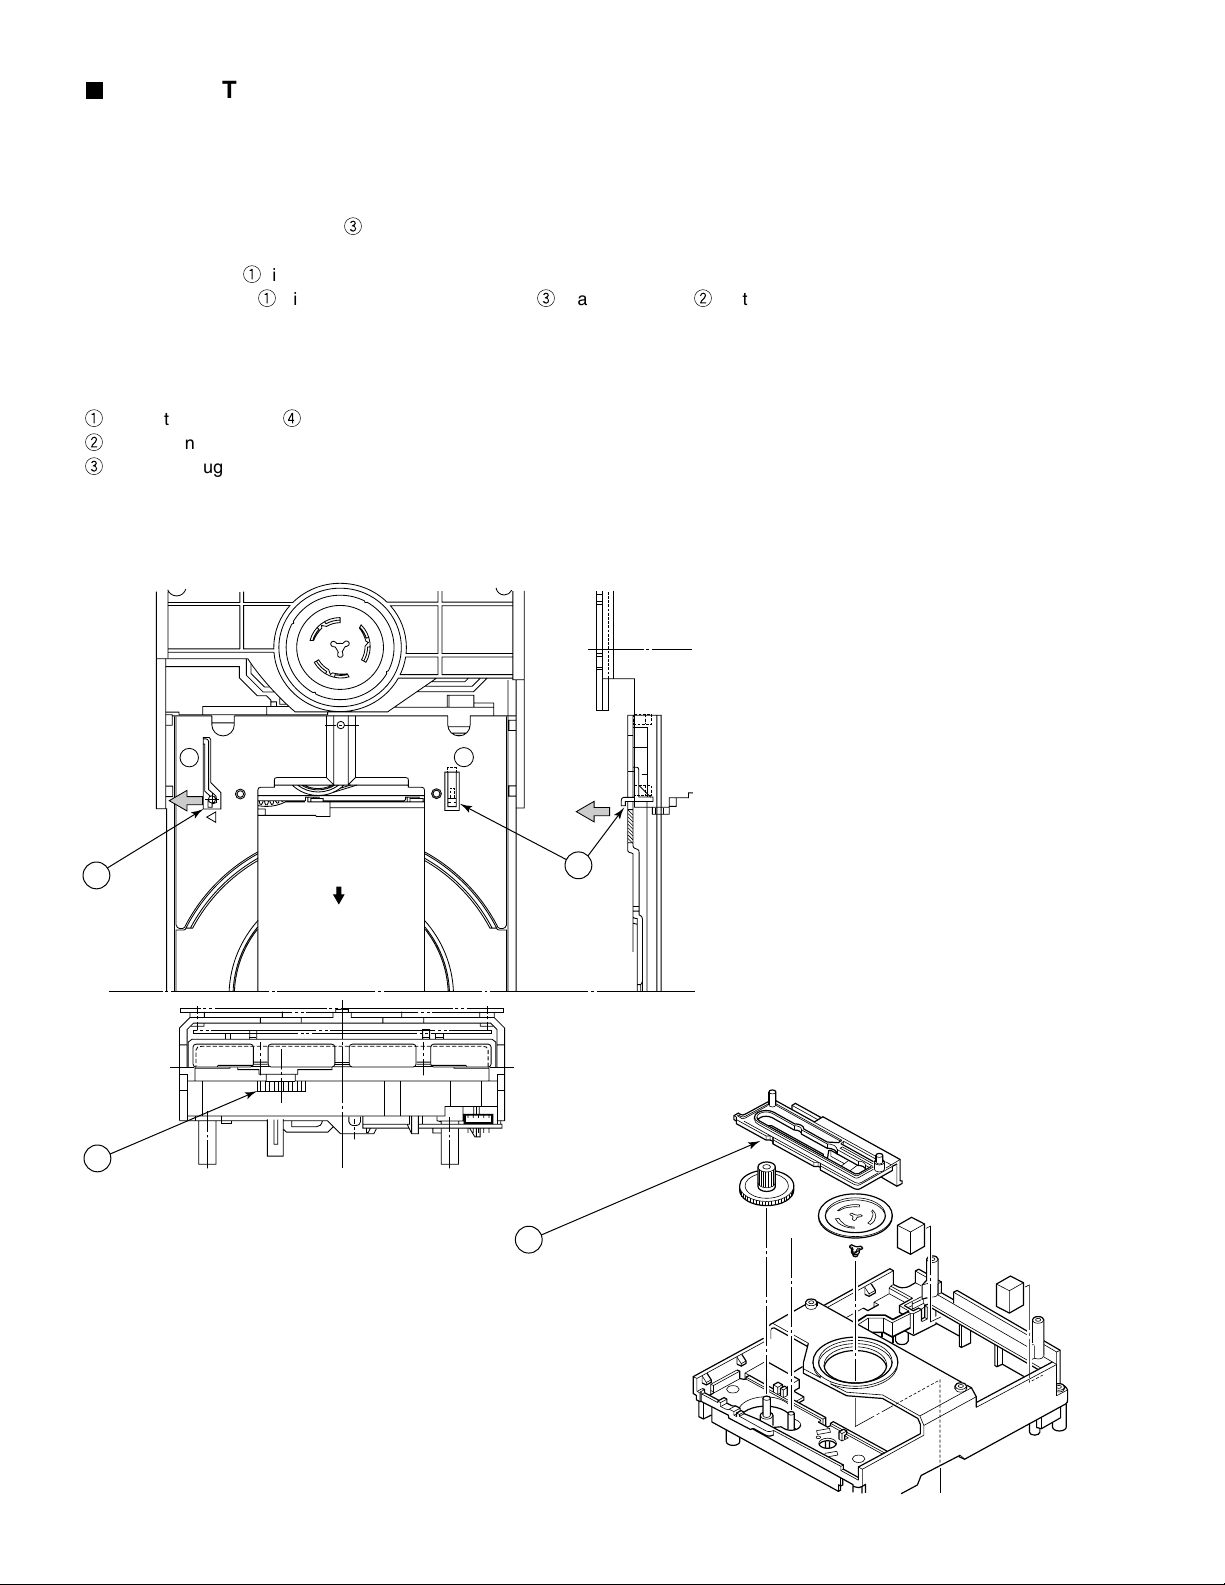
CRD-Unit Belt Replacement Procedure
Refer to the figure below.
1. Remove the tray following to the tray removal procedure.
2. Remove the belt with the tweezers or the like.
3. Wipe over the belt creep (A in the figure) of the pulley gear (1 in the figure) and pulley motor (2 in the figure)
with alcohol.
4. Engage a new belt with 1 first and 2 next by use of tweezers or the like.
5. Make sure that the belt is neither twisted nor soiled with grease, etc.
6. Restore the tray to the original position.
A
XL-R5000BK
BELT, SQUARE
1
Don't soil with grease, etc.
2
1-3
Page 4

XL-R5000BK
How to check for 3CD and CD-R
1. Special tools and CDR & CDRW Disc.
CD TEST DISC:CTS-1000
CD-R for Audio
CD-RW for Audio
Note: 1. Be sure to use general audio CD-R and CD-RW disks available on the market for this set.
2. This set is incapable of playing any CD-R or CD-RW disk for the personal computer.
3. The CD-RW disk can be played only by the player compatible with the CD-RW disk.
4. The CD-R disk that has not been finalized after writing can be played by the CD-R unit only.
How to check up the CD-R unit whether it is normal (OK) or defective (NG ).
* For checking up the CD-R unit for normal or abnormal status, open the Service Menu.
1. How to open the Service Menu.
1) Press both the DIGITAL key and POWER key simultaneously.
2) Press the MENU key.
The following menu items appear one after another on the FL Display.
1 "READ_RID_CODE"
JVCCA01089231
2 "ENG_SETUP____"
3 "3CD_FC_ADJ___"
********
4 "3CD_TRK_ADJ__"
///
5 "READ_CDR_C1__"
6 "CDR_SELFDIAG."
DIAG OK or NG
7 "SYSTEM_AGING_"
COPY PLAY ERAS
///
/
below 200Hz
****
The menu items from 1to 8can be repeatedly shown on the
display by the JOG dial or the FWD/BWD key on the remote
controller.
0
/
If the SET key is pressed while a menu item is shown on the
display, the setting value of the item appears on the display.
The menu item
unit. After the self-diagnosing result appears on the display, quit
the Service Menu by turning off the set, otherwise you cannot
access the further menu items.
For details of each menu item, refer to the next page.
If "DIAG NG" message appears, replace the CD-R unit with new one.
6shows the self-diagnosing result of the CD-R
1-4
8 "READ_VERSION_"
**** ****
*
Page 5

XL-R5000BK
Explanation of Service menu
1. READ RID CODE
When this menu item is executed, the RID code is read out and it is shown by the FL tube for 5 seconds. This selection is
automatically cleared after the 5-second display.
Example of display: JVCCA01089231
Manufacturer code: JVC
Type code: CA01
Unique No.: 089231
2. ENG SETUP
Explanation of this item is omitted because of the confidential function.
3. 3CD FC ADJ (3CD focus automatic adjustment value readout) (000000F7)
When this menu item is executed, the 3CD unit focus automatic adjustment value (hexadecimal number in six figures) is
displayed by the FL tube for 3 seconds. This selection is automatically cleared after the 3-second display. When the set fails in
reading out the 3CD unit focus automatic adjustment value, a message "NG" is shown for the value to be read.
4. 3CD TRK ADJ (3CD tracking automatic adjustment value readout) (00000FA)
When this menu item is executed, the 3CD unit tracking automatic adjustment value (hexadecimal number in six figures) is
displayed by the FL tube for 3 seconds. This selection is automatically cleared after the 3-second display. When the set fails in
reading out the 3CD unit tracking automatic adjustment value, a message "NG" is shown for the value to be read.
5. READ CDR C1 (CDR C1 error rate readout)
When this menu item is executed, the CDR is set to the play mode with display of the C1 error rate. To escape from this menu
item, switch off the set.
6. CDR SELFDIAG (CDR self-diagnosing)
When this menu item is executed, the set carries out self-diagnosing of the CDR. When nothing wrong is detected by the self-
diagnosis, a message "DIAG OK" appears on the display. To quit this self-diagnosing mode, switch off the set.
7. SYSTEM AGING (Running operation)
When this menu item is executed, the set automatically starts the following running operation. For executing this item, it is
required to set a blank CD-RW disk in the CDR beforehand. The time required for a running operation or number of times of pick
movement can be controlled by changing the data written on the disc set on the current tray of the 3CD.
(When the running operation starts without disk, "000CD 1ACOPY" is shown on the display.)
One time disk dubbing (COPY)
Play of CDR until readout is complete (PLAY)
Erasure of CDR from disk (ERAS)
If the set receives an effective input from the key, remote controller or DCS, it immediately stops the running operation. If the
running operation is suspended by the STOP key or because of an error, the following message is continuously displayed until the
set is switched off.
Classification of the unit in which
an error breaks out
CDorCDR
Error code (hexadecimal number in
two figures)
000CD
Operation executed last
COPYorPLAYorERAS
Number of execution times (4-digits
decimal number)
1ACOPY
8. READ VERSION (Version number readout)
When this menu item is executed, version numbers of the syscon, CDR farm and 3CD farm are shown by the FL tube for 5
seconds. This selection is automatically cleared after the 5-second display.
Syscon version No. (in 3 digits) CDR farm version No. (in 3 digits) 3CD farm version No. (in 3 digits)
Each version No. is set apart from the other(s) by a space.
A 3-digit number is shown as *.**. The last two digits are shown in the decimal places.
When the set fails in reading out a version number, "000" (three zeros) is shown for the version number to be read.
1-5
Page 6

XL-R5000BK
Check mode Method
1. Check Mode
The Check Mode is prepared for checking timer operation and display with the FL tube.
2. Check mode setup method
Setup: In the status that the set is turned off, press the POWER key together with the DISPLAY key to turn on the set.
Cancel: Shift the mode to the backup mode, or press the POWER key together with the DISPLAY key to turn on the set again for
resetting.
3. Operation
The set is switched on and all segments of the FL tube go on. Adjust the clock so that its indication gains one minute per one
real second.
If the set is operated anyhow other than for check mode canceling, the FL indication reverts to the normal status. After that, the
set continues normal operation except the speeded up clock operation.
Clearing all settings
This operation clears all of settings and restore them to the default values, for example, settings of the menu items are restored
to the respective default values or registered programs are cleared by this operation. In short, this operation restores every
setting to the initial status on shipment.
In the status that the set is switched off, press the POWER key together with the LINE key to turn on the set.
Items subject to this clearing/resetting operation
Clearance of clock setting AM12:00
Clearance of timer setting OFF
Clearance of program for playing back programs OFF
Clearance of registered listening edit and program edit programs OFF
Switching off repeat setting OFF
Clearance of child lock Free
Setting the current unit for 3 CD's and DNO (DISK NO) for the tray 1
Resetting the 3CD play mode to the normal mode
Switching off pitch control setting OFF
Setting the recording source selection to 3CD digital recording
Setting the dubbing speed double
Switching on the AUTO TRK setting OFF
Switching on the TRK space OFF
Switching on the FS CON setting OFF
Switching on the DIG (Digtal) IN SYNC setting OFF
1-6
Page 7

Block diagram
XL-R5000BK
1-7
Page 8

XL-R5000BK
VICTOR COMPANY OF JAPAN, LIMITED
AUDIO & COMMUNICATION BUSINESS DIVISION
PERSONAL & MOBILE NETWORK B.U 10-1,1Chome,Ohwatari-machi,Maebashi-city,371-8543,Japan
No.20824B
Printed in Japan
200008(O)
 Loading...