

Page 1
Specifications
SD audio player
Type : SD audio player
Sampling rate : 32 kHz/44.1kHz/48kHz
Audio format : AAC format/MP3 format
Number of channels : 2 channels (stereo)
Frequency response : 20 Hz to 20,000 Hz (+0dB, –6dB)
Maximum recording time (with a 64 MB SD memory card)
High-quality rec. : Approx. 64 minutes (128 kbps)
Standard rec. : Approx. 86 minutes (96 kbps)
Long-hour rec. : Approx. 129 minutes (64 kbps)
Output : Headphones (3.5 mm dia. stereo × 1)
2.5 mW/ch (32 ohms)
Duration of battery : Approx. 11 hours when using two fully
Power requirements : DC 1.2 V (rechargeable battery)
Dimensions (W × H × D) : 2
Mass : Approx. 0.172 lbs (78 g)
Battery charger
Input power source : AC 120 V, 60 Hz
Output voltage : DC 1.7 V, 950 mA
* Design and specifications are subject to change without notice.
This main unit is resistant to spray.
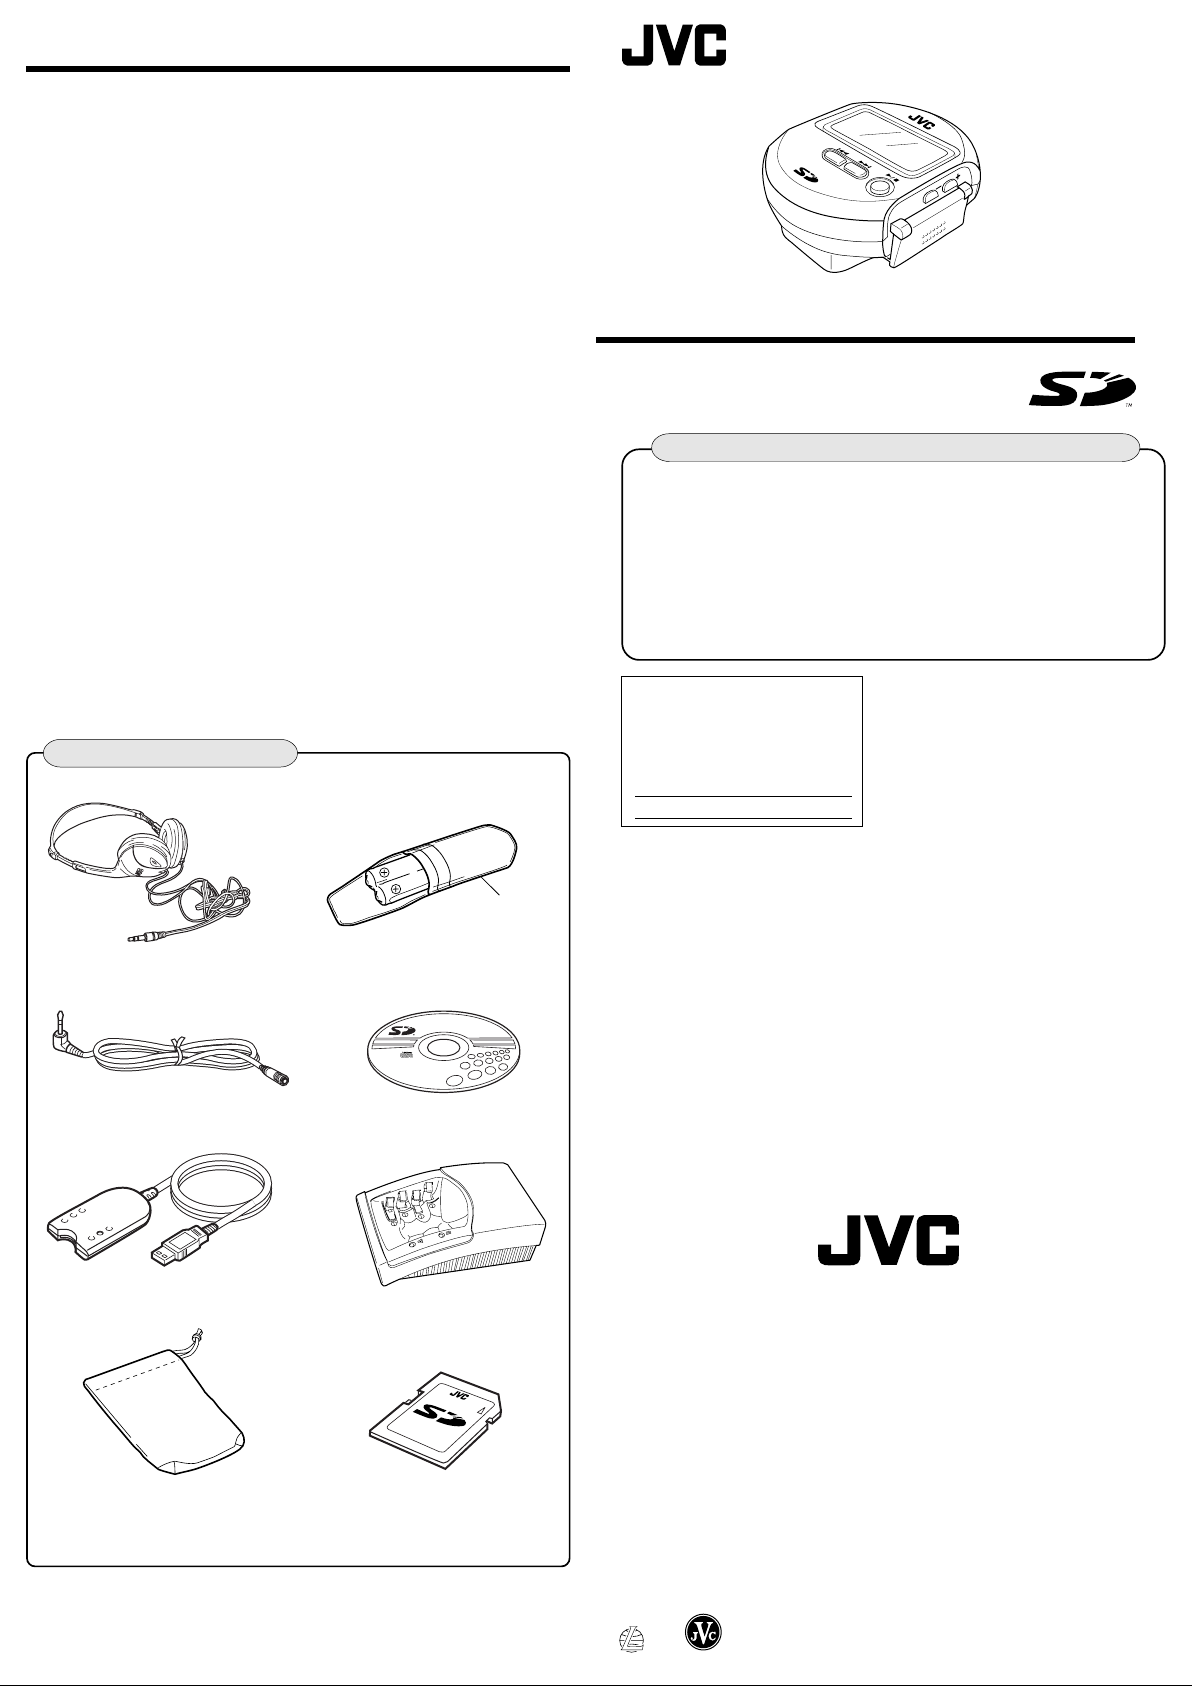
Supplied Accessories
Check the packing carton for these accessories.
matching impedance (16 ohms to 47 kohm)
charged rechargeable batteries
Approx. 17 hours when using two alkaline
batteries (L30 (24A), AAA size)
DC 1.5 V (AAA size battery)
Two batteries are used in parallel.
1
/8”× 13/16” × 29/16” (53.5 × 30.5 × 65 mm)
(Excluding buttons and controls)
(without batteries)
INSTRUCTIONS
SD AUDIO PLAYER XA-SD1
E
M
LU
O
V
SD Audio Player
XA-SD1
Be sure to read this before any other information
After checking the accessories, perform check-out (recording) on
the SD memory card using the following procedure.
For more details, read the operating instructions of Media Manager
and the Online Help of RealJukebox®.
1 Install the USB reader/writer driver and installation
software (RealJukebox®) in the CD-ROM in your PC.
2 Connect the USB reader/writer to the PC.
3 Open RealJukebox® and perform check-out of the SD
memory card.
For Customer Use:
Enter below the Model No. and Serial
No. which are located either on the rear
of the cabinet or inside of the battery
compartment. Retain this information
for future reference.
Model No.
Serial No.
Thank you for purchasing this JVC
product. Please read these instructions
carefully before starting operation to be
sure to obtain optimum performance and
a longer service life from the unit.
LVT0718-002A [J]
Headphones 1 pc.
Extension cord 1 pc.
USB reader/writer unit 1 pc.
Battery case
Rechargeable battery (BN-R1213)
1 pack (2 pcs.)
CD-ROM (Media Manager) 1 pc.
VICTOR COMPANY OF JAPAN, LIMITED
Battery charger (AC-R129) 1 pc.
Carrying pouch 1 pc.
SD memory card (64 MB) 1 pc.
Remove the rechargeable batteries from their case before use.
Use numbers indicated in parentheses when asking for replacement parts.
• SD logo is a trademark.
• Portions of this product are protected under copyright law and are
provided under license by ARIS/SOLANA/4C.
• RealJukebox® is a registered trademark of RealNetwork, Inc.
EN
Printed in Japan
0601HMMWSTOZK
Page 2
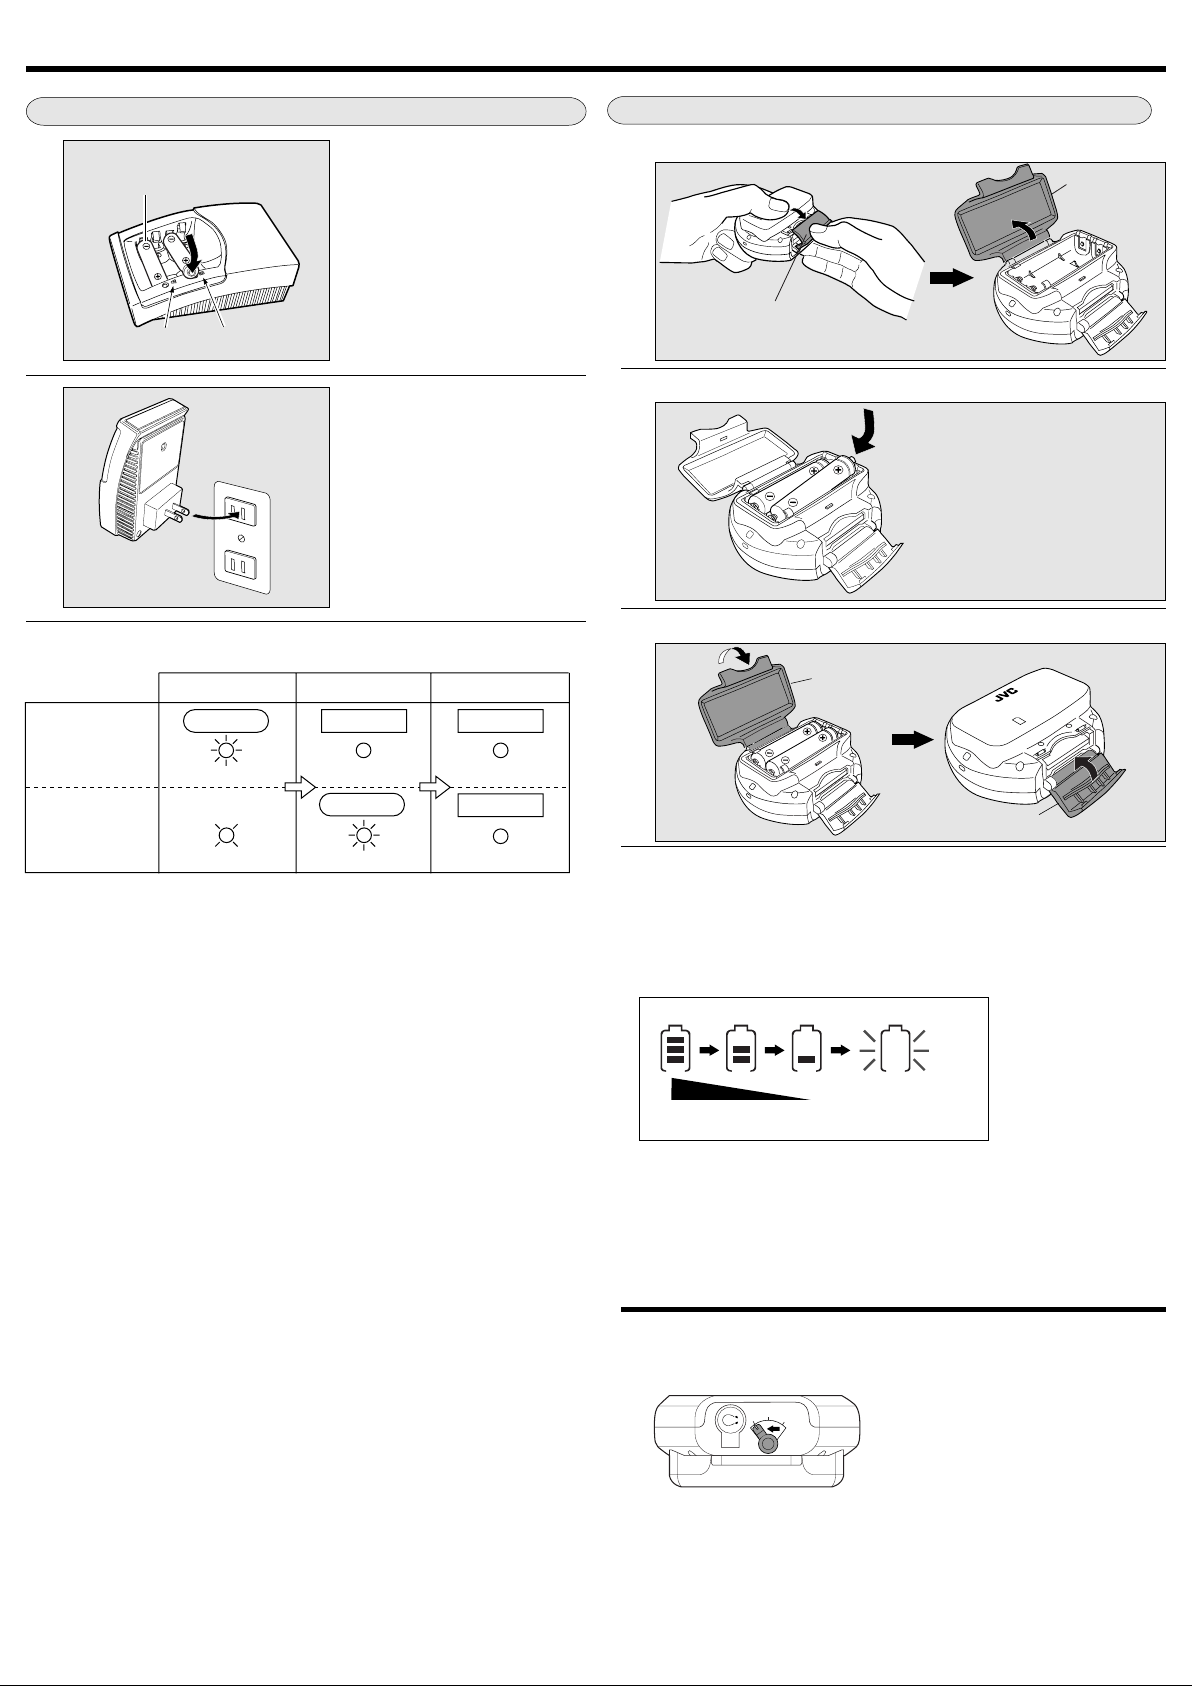
Preparing the power supply
1
2
Insert rechargeable nickel metal hydride batteries (BN-R1213, hereinafter referred to as rechargeable batteries) or L30 (24A) alkaline dry cell batteries.
Recharging the Rechargeable Batteries
Rechargeable battery: (BN-R1213)
1
(supplied)
1
Compartment A
2
2
Compartment B
To a household
power outlet
Insert two rechargeable
batteries in the battery
charger.
• Insert them in the correct ª
and · polarity as indicated
inside the battery charger.
• The two batteries will be
recharged separately one after
another.
Insert the power plug blades
into a household power outlet.
•
Recharging begins with the
battery inserted in position A. The
recharging of two batteries will
complete in about 4-1/2 hours.
• It is possible to recharge about
300 times.
• After recharging completes,
remove the power plug blades
from the power outlet.
Charge indicator lamps
A charging state B charging state Completed
Charging Finished Finished
Compartment A
(Fast on-and-off) (Continuous on) (Continuous on)
Insert batteries in the Main unit.
Open the battery compartment cover.
1
: PUSH RELEASE
CARD
Card cover
(Open it while pushing the
battery compartment cover.)
Insert batteries.
2
• Insert them in the correct ª
and · polarity as indicated
inside the battery compartment.
(You can use L30 (24A)
alkaline batteries or rechargeable batteries only.)
Close the battery compartment cover.
3
Battery compartment
cover
CARD : PUSH RELEASE
Battery
compartment
cover
Charging Finished
Compartment B
(Slow on-and-off)
(Continuous on)(Fast on-and-off)
• If two batteries are inserted in the battery charger that has already been
plugged into the power outlet, the first-inserted battery will be recharged first.
• Fast blinking refers to one blink per about 1 second, and slow blinking
refers to one blink per about 3 seconds.
Card cover
■ Caution for use of dry cell batteries:
Be sure to use L30 (24A) alkaline batteries. Manganese batteries cannot be
used to power the unit.
■ Remaining battery power display:
Use the remaining battery power indicator in the display panel as the
reference for identifying the available power.
Blinking
Recharge
High
Low
(or replace).
Notes on battery replacement
During recharging of the batteries, use two L30 (24A) alkaline batteries,
which is available in electric appliance stores. The built-in clock display
can be retained by changing the batteries within 30 seconds.
Hold mode
The hold mode protects the unit against accidental press of control buttons.
It prevents the following acci-
MODE
NORM
HOLD
dents:
• Battery exhaustion by turning the
unit on without noticing it.
• Interruption of playback due to
accidental press of a button.
Page 3
S
D
A
U
D
IO
P
L
A
Y
E
R
X
A
-S
D
1
MODE
HOLD
NOMR
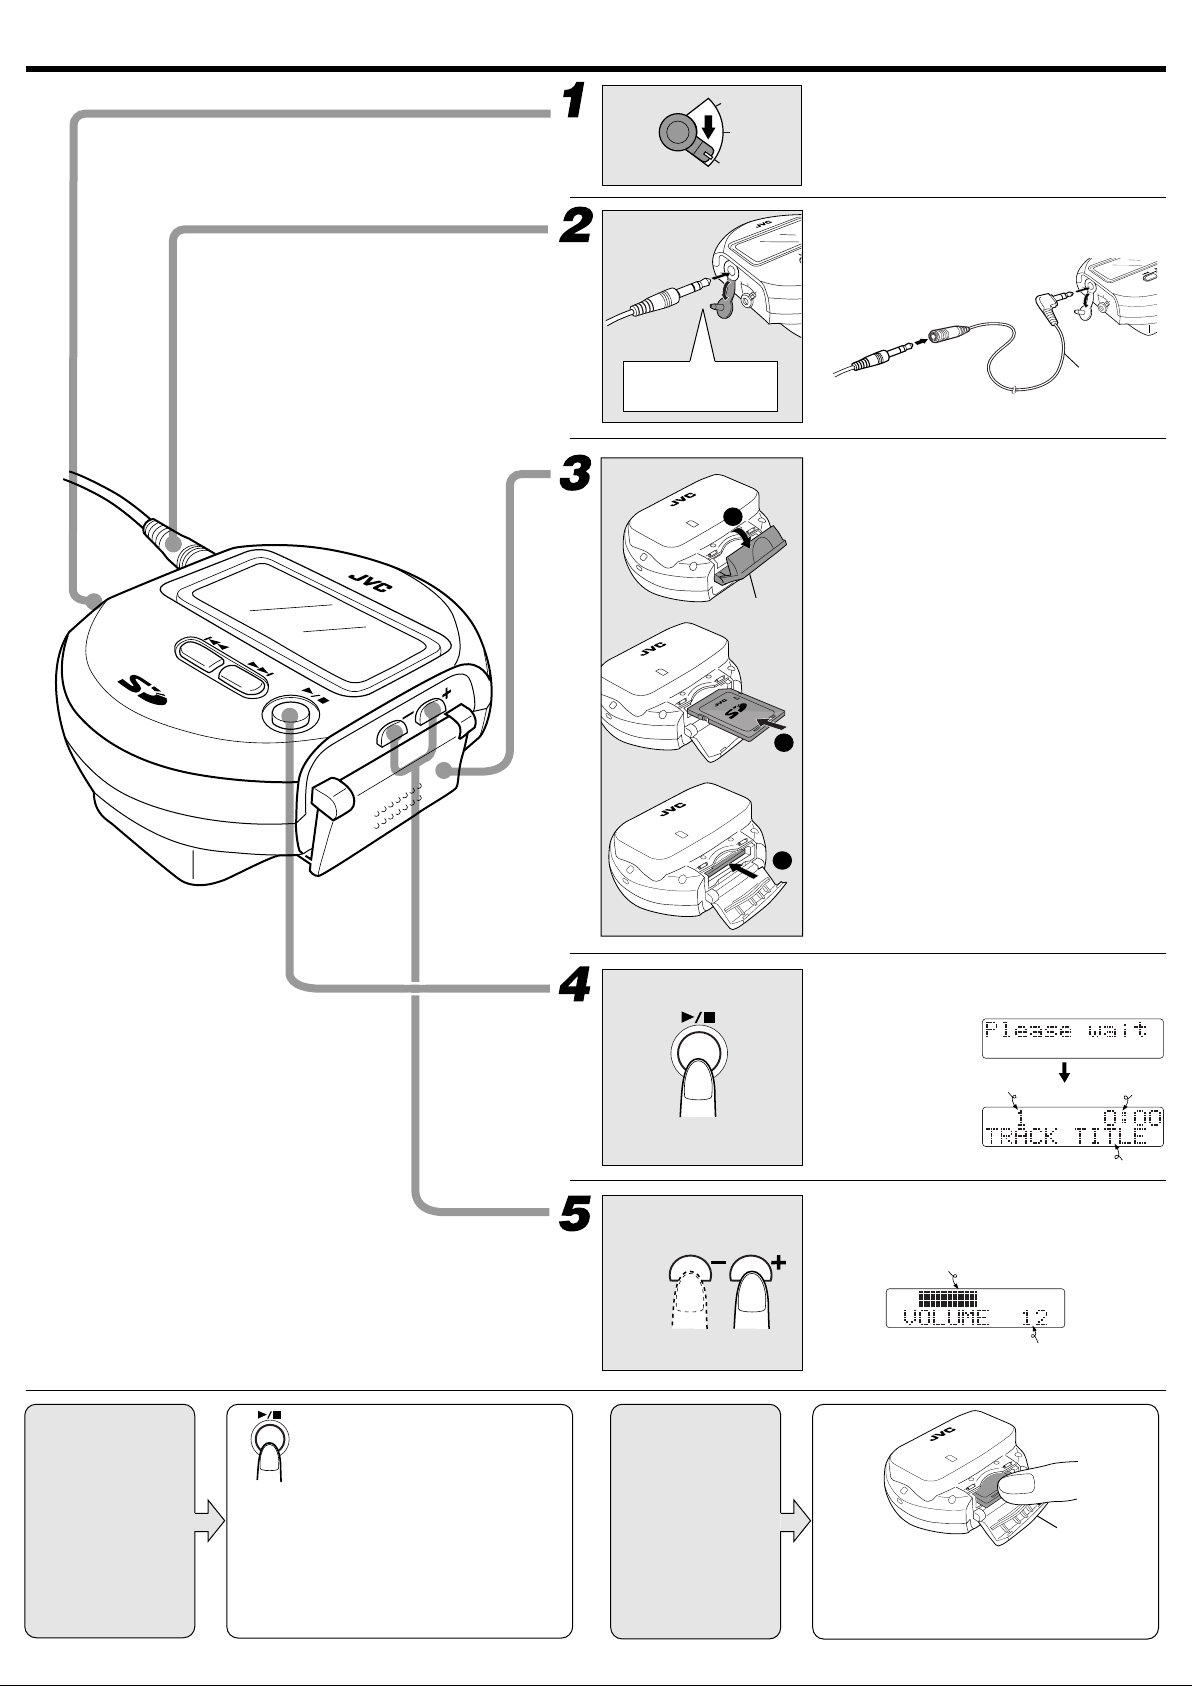
Playback
SD AUDIO PLAYER XA-SD1
HOLD
MODE
NORM
HOLD
Insert the plug
firmly.
CARD : PUSH RELEASE
1
Card cover
CARD : PUSH RELEASE
SD AUDIO PLAYER XA-SD1
MODE
NOMR
Set to NORM.
Connect headphones.
To use an extension cord, see below.
Extension cord
(supplied)
Insert an SD memory card containing data check-out (recording).
~ Slide the card cover on the side of
the unit in the direction of the arrow
and open the card cover.
Open it while pushing the battery compartment cover.
Ÿ Hold the SD memory card with the
label side up, then insert the card
from the side having cut corners.
VOLUME
To
decrease
VOLUME
2
! Insert the SD memory card by
pushing the center of its edge until
SH RELEASE
D : PU
CAR
3
it locks, then close the card cover.
Note
Never insert the SD memory card upside
down. Otherwise, it will not be able to be
removed.
Press 3/7.
The unit is turned on and playback starts.
Immediately
To
increase
after press
Approx. 2 sec.
later
Adjusting the volume
Press and hold to vary continuously.
Volume level meter
Track No.
Elapsed play time
Track title
Stop playback
and turn the
unit off.
Press 3/7.
The unit is turned off automatically in about 10 seconds.
■ Resume
3/7
When
been turned off, playback resumes from the
position at which the unit was turned off.
However, playback starts from the first track if
is pressed again after the unit has
the SD memory card is changed or batteries are
removed and inserted again while the unit is off.
To remove
the SD
memory card
Volume level (Adjustment range 0 to 25)
E
S
A
LE
E
R
H
S
U
: P
D
R
A
C
Card cover
While playback is stopped, open the card
cover (operations ~ in step 3 above) and
1
unlock and remove the SD memory card by
pushing its center area.
Page 4

Using the convenient features
Preparation
HOLD
NORM
MODE
Set the MODE switch knob to "NORM".
Skipping tracks
Forward search/
Reverse search
Selecting track
Preparation
Press 4/¢ during playback.
• When the all-track repeat mode (see below) is set, it is also possible to
• In the random play mode (see below), it is not permitted to skip to a
To skip backward
To skip forward
Press and hold 4/¢ during playback.
• When the all-track repeat mode (see below) is set, it is also possible to
• In the random play mode (see below), it is not permitted to search disc
Forward searchReverse search
1
Press 3/7 during
playback.
Playback is stopped.
HOLD
NORM
2
Press 4/¢ to
select a track.
To skip
backward
MODE
Set the MODE switch knob to "MODE".
To skip
forward
skip from the final track to the first track.
track which has already been played.
search the memory from the final track to the first track.
into a track which has already been played.
•
3
Press 3/7 to play
the selected track.
If you hold the key depressed in step 2, the
track numbers can be varied in sequence.
•
When the unit is left untouched for more
than about 10 seconds after playback is
stopped or a track is selected, the unit
will be turned off automatically.
Repeat playback
Random playback
Selecting the
sound
Playlist playback
RealJukebox® does
not support the
playlist playback.
Press VOLUME – during playback.
Each press alternates:
No display
(To repeat a single track) (To repeat all tracks) (To play all tracks in a
(Cancel)
random order for once)
(VOLUME button)
In the playlist play mode (see
below), repeat or random playback
plays only the tracks in the selected
playlist.
Press VOLUME + during playback.
Each press alternates:
No display
(Extra bass)
(Easy for the ears, preventing
(Cancel)
outside sound leak)
(VOLUME button)
1
Press ¢ during playback.
Blink
2
Press ¢.
3
Press VOLUME +/– to
select a playlist number.
Press ¢.
\
Number of playlists
Playlist No.
The clock/playlist
setting mode starts.
Total number
of tracks
• If you selected a playlist in stop mode, press 3/7 to start playback.
• To return to all-track play mode, select "
" (default Playlist) in step 3.
Total play time
Tracks in the
selected playlist
will be played
automatically.
Playlist
title
• To cancel the above procedure in the middle, set the MODE switch knob to "NORM" any time you want.
After setting
HOLD
NORM
MODE
Set the MODE switch knob to "NORM".
Page 5
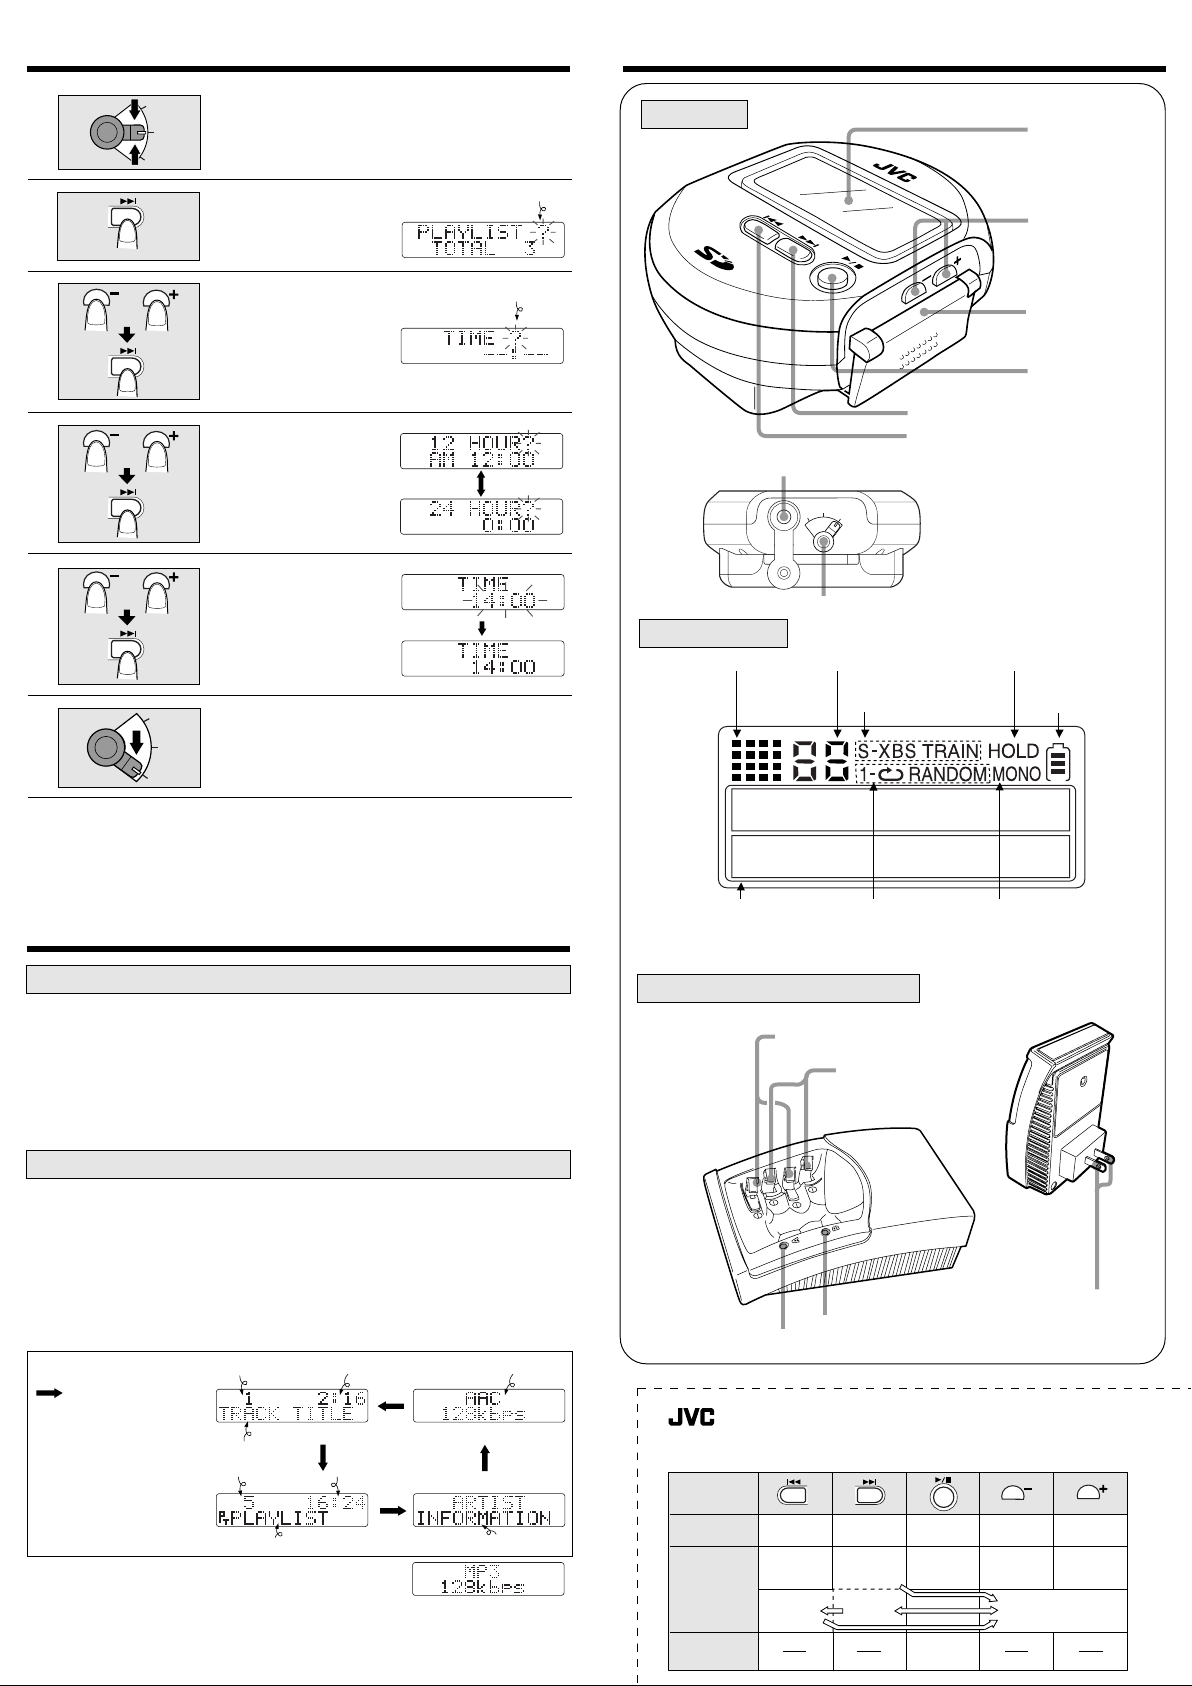
Adjusting the clock Controls
S
D
A
U
D
IO
P
L
A
YE
R
X
A
-S
D
1
VOLUME
MODE
NORM
HOLD
HOLD
1
2
Set to "MODE" during playback.
To cancel the following procedure in the middle,
MODE
set the switch knob to "NORM" any time you
NORM
want.
Press ¢.
The unit enters the clock/
playlist setting mode.
blink
Main unit
Display panel
+/– VOLUME
buttons*
3
Select "TIME?".
«
blink
Press ¢.
The unit enters the clock
setting mode.
Select either
4
display mode.
12-hour or 24-hour?
«
Press ¢.
Adjust the time.
«
5
Press ¢.
Count of time starts.
HOLD
6
Set to "NORM".
MODE
NORM
The clock is displayed for about 2 seconds when either operation below is performed.
• When the MODE switch knob is set to "HOLD" during playback.
• When 3/7 is pressed while the unit is in the hold mode.
To maintain the accuracy of clock, it is recommended to adjust the time of
the day periodically.
Adjustment and Switching of Display Panel
Adjusting the contrast
Set the MODE switch knob to "HOLD" during playback.
1
While holding 3/7 depressed, adjust contrast by
2
pressing VOLUME + (to brighten) or – (to darken).
(Side)
(Headphones) jack
MODE switch knob
Display panel
Operation indicators
Character information/
play time display
Playlist No. display
Sound indicators
Play mode
indicators
Battery charger (AC-R129)
LR6 battery seats
LR03 battery
seats
SD memory card
insertion slot
3/7 (play/stop)
button*
¢ (Forward skip/search) button*
4 (Reverse skip/search) button*
* The functions of the buttons
marked * vary depending on
the setting of the MODE
switch knob. For details, see
the quick operation reference
chart.
HOLD mode indicator
Remaining battery
power indicator
MONO indicator
(Indicates that the current
tracks has been recorded
in the monaural mode.)
Set the MODE switch knob to "NORM".
3
Switching the displayed information
Set the MODE switch knob to "MODE" during playback.
1
Press 4 to switch information.
2
• When a track title, playlist title or artist information is too long to be
displayed once, it is displayed by scrolling (moved toward the left).
• This unit may not be capable of displaying certain letters such as
Chinese characters.
Bit rate display*Elapsed play timeTrack No.
: Each press switches the
displayed information.
The displayed information returns
to the track title display after it
has been displayed for a few
seconds.
To keep information displayed,
continue holding the key.
* The above bit rate display is an example with a track
recorded in the AAC format. With the track recorded in the
MP3 format, the display becomes as shown on the right.
Set the MODE switch knob to "NORM".
3
Track title
Total number of tracks
Playlist title
Total play time
Artist information
Charge indicators A
* If you cut out this sheet for use, it is
recommended to retain it between plastic
sheet holder and etc. to conserve the paper.
MODE Control
Position
NORM
Cut here
MODE
HOLD
Skip/Fast
Reverse
Display
change
Cancel
selection
Charge indicators B
Cut here
Skip/Fast
Forward
Clock/playlist
setting mode
selection
Play/Stop
Play/Stop
Enter
Clock
Power plug
SD Audio Player XA-SD1
Quick Operation Reference
for Each Mode
Volume Down
Play mode
change
Volume Up
Sound
change
Selection in clock/
playlist setting mode
Page 6
Cautions
Before using this unit, be sure to read the applicable items of the operating
instructions and these safety-suggestions carefully.
Afterwards keep them handy for future reference. Take special care to
follow the warnings indicated on the unit itself as well as in the operating
instructions.
Safety
1. Care of battery charger - Never take hold of the battery charger if
your hand is wet, and always grasp the plug body when connecting or
disconnecting it.
2. Nonuse Periods - When not in use, be sure to disconnect the battery
charger from the AC power outlet.
3. Batteries - If the set is not used for a long period of time, remove all
the batteries to prevent potential damage due to possible battery
leakage. Do not mix batteries (old and new ) or different types of
batteries.
Installation
Placement
1. Foreign Material - Care should be taken so that objects do not fall
into and liquids are not spilled into the unit. Do not subject this unit to
excessive smoke, dust, mechanical vibration, or shock.
2. Magnetism - The unit should be situated away from equipment or
devices that generate strong magnetic fields.
THE FOLLOWING PHRASES ARE APPLIED ONLY FOR U.S.A.:
This device complies with Part 15 of the FCC Rules.
Operation is subject to the following two conditions : (1) This device
may not cause harmful interference, and (2) this device must accept any
interference received, including interference that may cause undesired
operation.
CAUTION!
This equipment has been tested and found to comply with the limits for
a Class B digital device, pursuant to Part 15 of the FCC Rules.
These limits are designed to provide reasonable protection against
harmful interference in a residential installation. This equipment
generates, uses and can radiate radio frequency energy and, if not
installed and used in accordance with the instructions, may cause
harmful interference to radio communications. However, there is no
guarantee that interference will not occur in a particular installation. If
this equipment does cause harmful interference to radio or television
reception, which can be determined by turning the equipment off and
on, the user is encouraged to try to correct the interference by one of
the following measures:
• Reorient or relocate the receiving antenna.
• Increase the separation between the equipment and receiver.
• Connect the equipment into an outlet on a circuit different from that
to which the receiver is connected.
• Consult the dealer or an experienced radio/TV technician for help.
Any unauthorized changes or modifications to this equipment would
void the user’s authority to operate this device.
3. Stacking - Do not place any objects, on top of the unit.
WARNING:
TO REDUCE THE RISK OF FIRE OR ELECTRIC SHOCK, DO
NOT EXPOSE THIS APPLIANCE TO RAIN OR MOISTURE.
CAUTION
This main unit is resistant to spray.
However, this function is inactive in any of the following condition.
• When the cap on the headphones is removed.
• When the card cover or the battery compartment cover is open.
In case the unit is moistened, wipe it with a soft, dry cloth
before reusing it. Also take care of the following points.
• Do not leave the unit under high humidity, for example
in a bathroom.
• Keep the unit away from direct moistening by tap water etc.
• Do not change the SD memory card or batteries with wet hands.
(Otherwise, the water drop may fall from your hand and penetrate
inside the unit.)
Precautions on the unit and SD memory card
To prevent malfunction, do not leave the unit and/or SD memory card in
the following locations.
• In a closed automobile (particularly in the summer).
• In a place with high humidity, for example in a bathroom
• In a place with excessive dust.
• In a place subject to direct sunlight or near heating equipment.
• In a place exposed to corrosive gas, etc.
Also avoid the following:
• Disassembly or modification.
• Strong impact, dropping or moistening with rainwater.
Inserting an object other than an SD memory card into the card insertion slot.
•
• Using a cracked or deformed SD memory card.
• Applying excessive force when opening the battery compartment cover
or card cover.
• Removing the label on SD memory card or attaching another label or
sticker on the existing label.
• When the unit is moistened by water, water drops may penetrate the SD
memory card insertion slot or behind the card cover. When the unit is
moistened, hold it so that the card insertion slot faces downward, open
the card cover and wipe off water drops well before inserting or
removing the SD memory card. Also be sure to wipe water drops
around and inside the headphones jack.
To protect recorded data
• Set the write protect switch on the SD
memory card to "LOCK". Do not unlock
this switch until the next time you check
out (record) or edit the data in the card.
• Do not touch the metallic terminals of the
SD memory card with a bare hand or
metallic object.
Write
protect
switch
LOCK
64
MB
CU-SD064U
Page 7

Cautions
Listening caution
I
N
C
D
I
U
N
S
O
T
R
R
T
I
C
E
E
S
L
E
•
•
EST. 1924
A
N
S
S
O
I
O
T
C
A
I
Do not play your headphones or earphones at a high volume. Hearing
experts advise against continuous extended play.
If you experience a ringing in your ears, reduce volume or discontinue use.
Do not use while operating a motorized vehicle. It may create a traffic
hazard and is illegal in many areas.
You should use extreme caution or temporarily discontinue use in potentially hazardous situations.
Even if your headphones or earphones is an open-air type designed to let
you hear outside sounds, don’t turn up the volume so high that you can’t
hear what’s around you.
Sound can be deceiving. Over time your hearing “comfort level” adapts to
higher volumes of sound. So what sounds “normal” can actually be loud
and harmful to your hearing.
Guard against this by setting your equipment at a safe level BEFORE your
hearing adapts.
To establish a safe level:
• Start your volume control at a low setting.
• Slowly increase the sound until you can hear it comfortably and clearly,
and without distortion.
Once you have established a comfortable sound level:
• Set the dial and leave it there.
Carrying dry cell batteries / rechargeable batteries
around
When putting dry cell or rechargeable batteries in a pocket or bag, ensure
that no other metal objects such as a necklace are placed together with
them. Contact with metal may cause short-circuiting which, in turn, may
cause a fire.
Be absolutely sure to carry the rechargeable batteries in the provided
battery carrying case.
When purchasing rechargeable batteries
As a safety precaution, the SD audio players made by JVC have a construction designed to make it impossible to recharge ordinary batteries.
To use rechargeable batteries, be absolutely sure to purchase the rechargeable Ni-MH batteries designed especially for this unit.
Special rechargeable Ni-MH batteries:
BN-R1213 (set of 2)
For details, check with your dealer.
Notice about the rechargeable battery
The battery is designed recycable.
Please follow your local recycling regulations.
When driving a car
In the interest of traffic safety, do not operate the unit while driving.
Rechargeable batteries
• Only the BN-R1213 or HHR-4UP/HHR-4AH (Panasonic) battery can
be recharged.
• Recharging already charged batteries will shorten their service life.
• When recharging batteries for the first time or when they have not been
used for a long period of time, the play time may be shorter than usual.
In a case like this, repeatedly recharge and discharge the batteries. This
will restore them to their regular state.
• Do not allow any metal objects to touch the terminals of rechargeable
batteries since this may cause short-circuiting which is dangerous.
• The rechargeable batteries and charger equipment may generate heat
during recharging. This is not a malfunction.
• If the rechargeable batteries are recharged near a radio receiver, noise
may interfere with AM reception.
• The rechargeable batteries should be recharged under an ambient
temperature between 10 and 35˚C.
When the rechargeable batteries are not to be used for a long period, recharge
•
them at least every 3 months to prevent degradation of performance.
• When the battery operation time from the fully charged condition drops
below half the usual, it is a sign that the service life of the rechargeable
batteries has expired. In this case, replace the rechargeable batteries.
WARNING
• Use only JVC chargers designed for BN-R1213.
• Do not disassemble, dispose of in fire, or short circuit.
• Do not remove the covering.
Dry cell batteries / rechargeable batteries
To prevent damage to the batteries and electrolyte leakage, heed the
following points.
• Align the ª and · polarities properly when inserting the batteries.
• Do not mix different types or makers of batteries or old and new
batteries.
• Remove the batteries if you do not plan to use the unit for a long period
of time.
• Do not throw batteries into a fire, and do not short-circuit, disassemble
or subject them to excessive heat.
• Do not attempt to recharge dry cell batteries.
Page 8
Messages
Troubleshooting Guide
NO CARD
NOT SD CARD
NOT SD AUDIO
NO PLAYLIST
NO TITLE
NO INFO
NO TRACK
UNFORMAT
ILLEGAL FORM
LOCKED
NOT PLAY
NOT DISPLAY
NOT SUPPORT
U01
ERROR
No SD memory card is inserted.
The SD card is not inserted firmly.
A card other than SD memory card is
inserted.
The SD memory card does not contain
recording of SD audio data.
No play list has been created.
The track and play list are not titled.
The artist information is not recorded.
The play list contains no recording (checkout) at all.
The SD memory card is not formatted.
The data format is other than specified.
The inserted SD memory card is unusable.
The data is not in the AAC or MP3 data.
(Displayed in playback)
The character data are not displayable.
The data is other than AAC or MP3 data.
(Displayed in the bit rate screen)
The battery power is too low to turn the
unit on.
There is an error. If it cannot be recovered by
removing then inserting the card or by turning the unit
off then to on again, remove and insert the batteries.
Before requesting service for this unit, check the chart below for a possible
cause of the problem you are experiencing. Some simple checks or a minor
adjustment on your part may eliminate the problem and restore proper
operation.
If you are in doubt about some of the check points, or if the remedies
indicated in the chart do not solve the problem, refer to the directory of
Authorized Service Centers (enclosed with this unit) to locate a convenient
service center, or consult your dealer for instructions.
Problem
Cannot play
Cannot hear
music
Tracks on SD card
do not play in order
Too noisy.
Note
This unit provides versatile operations under the microcomputer control. If
the unit cannot be operated properly by pressing any button, remove the
batteries and insert them again.
Check this
• Is the unit set to the hold mode?
• Is the SD memory card inserted?
• Are batteries exhausted? (If they are not,
remove and insert them again.)
• Is the volume too low?
• Does the selected play list contain no
check-out (recording) at all?
• Is the headphone plug inserted completely
into the jack? (Unplug then plug in again.)
• Is the headphone plug dirty?
• Is random playback activated?
• Is a playlist selected?
• Is the unit placed near a TV or cellular
phone?
Maintenance
Maintenance of the unit
When the unit gets dirty, wipe with a soft, dry cloth. If it is contaminated
seriously, clean with a cloth slightly moistened with light neutral detergent
solution then wipe dry with a soft, dry cloth.
• Do not use any type of abrasive pad, scouring powder or solvent such as
alcohol or benzine.
• When you want to use a chemical cloth for cleaning, be sure to read
carefully and observe its cautions and notes.
Note
This unit is a precision instrument. Do not subject it to a
strong impact by hitting or dropping it. Otherwise, the SD
memory card may be unlocked or the unit may fail.
Page 9
Media Manager V2
Basic Operating Instructions
· These instructions describe basic
Before enjoying music with
your SD Audio Player
Follow the instructions in this
manual and online help to record
music onto your SD memory card.
Before connecting, operating or adjusting this product, please read these instructions completely.
Please keep this manual for future reference.
operations such as installation and
checking out tracks. For more
detailed instructions, refer to the
online help included on the CD-ROM.
· For details on using Windows, the
computer, and peripheral equipment, refer
to the appropriate operating instructions.
LVT0719-002A
Page 10

Media Manager:
Before use
Is a software package that includes RealJukebox for JVC, an AAC plug-in, an
SD Interface plug-in, driver software for the USB Reader/Writer, and the setup
programs for all these components.
· JVC in no way provides a guarantee for the RealJukebox Player Application or
associated plug-in module. JVC accepts no liability for any problems that may arise
either during the installation or through use of the RealJukebox Player Application
and/or associated plug-in module. JVC does not provide a guarantee that content
managed by the RealJukebox Player Application and/or associated plug-in module
can be transferred to an SD Card.
· Electronic Music Distribution services are provided by a third party and not by JVC.
Therefore JVC has no responsibility and accepts no liability for any problems that
may arise with an Electronic Music Distribution service.
· You may be unable to record or use music data under some computer
environments. This company accepts no responsibility for any loss of data or
damages incurred by loss of data.
· Modifications to the product and these operating instructions may be made without
prior notice.
· Illustrations and screen examples in these operating instructions may differ from
the actual product.
Registration
Please register your copy of RealJukebox for JVC. Registration allows you to
take advantage of product support and to receive information about the latest
version of the software and other products.
Visit the registration site on the Internet and fill out the online form.
Registering on the Internet
1. After starting RealJukebox for JVC, click on the [to JVC] button in the main
window.
2. Follow the instructions found on the homepage.
2
Page 11

Contents
Before use
System requirements........................................................................... 4
What you can do with RealJukebox for JVC........................................ 5
Installation............................................................................................ 6
Using the online help ......................................................................... 11
Connecting an SD memory Card....................................................... 13
· The USB Reader/Writer ...................................................................... 14
· Protecting the data on your SD memory card ..................................... 14
Getting started
Startup ............................................................................................... 15
· Startup................................................................................................. 15
· Exiting ................................................................................................. 17
Main features of the display............................................................... 18
Checking out tracks to an SD memory card ...................................... 24
Reference
Troubleshooting................................................................................. 25
Formatting SD memory cards............................................................ 26
Copyright protection limitations.......................................................... 27
Limitations in Windows Explorer........................................................ 27
Product information............................................................................ 27
Before use
3
Page 12

System requirements
Operating System: Microsoft®Windows 98 or Windows Me
Before use
RealJukebox for JVC cannot be used on Microsoft Windows 3.1, Microsoft
Windows NT, Microsoft Windows 2000 or Macintosh operating systems.
Correct operation cannot be guaranteed when used on Microsoft Windows 95
or Microsoft Windows 98 that has been upgraded from Windows 95/3.1.
Minimum System:
Intel Pentium®233MHz MMX, or
equivalent CPU
64MB RAM
Hard drive space:
CD-ROM drive
16 bit Sound card and speakers
16-bit color video card
Internet connection and web browser
(Microsoft
later)
®
30MB for Software
200MB for Music
Internet Explorer®5.01 or
Recommended System:
Intel Pentium®ΙΙ 333MHz MMX, or
equivalent CPU
64MB RAM
Hard drive space:
CD-ROM drive that supports digital
audio extraction
Full Duplex Sound card and speakers
16-bit color video card
Internet connection and web browser
(Microsoft
later)
®
30MB for Software
1GB for Music
Internet Explorer®5.01 or
4
Page 13

What you can do with RealJukebox for JVC
RealJukebox for JVC includes the following new features:
· New Skins - radically new ways to enjoy your RealJukebox for JVC
· Navigation Bar - access to key sections with the touch of a button
· Broken Links Management - remove all missing files from RealJukebox for
JVC
· Watch Music Folders - allows you to quickly import tracks that you have
downloaded
· AutoPlaylists - create track mixes automatically
· Improved Interface - Navigation Bar, Command Bar, optional tree view,
and more
· Keyword Search - find the songs you like in seconds
· Recently Played Tracks displays the last 20 tracks you played
· Radio tuner - access thousands of radio stations via the RealPlayer
· Online Track/Artist info - live information via the web
· Track Info - add album art, lyrics, and more to your tracks and albums
· Print Jewel Cases - Print CD covers/inserts with graphics and track lists
· Visualizations - animate to the rhythm of your music
· Record from Mic/Line In - transfer your vinyl or cassette collection to your PC
or simply record from your microphone
· SD Audio Player and SD memory card support
· Edit Track Properties
· Drag-and-drop track editing
The copyright protection technology used by RealJukebox for JVC follows the
guidelines set by the Secure Digital Music Initiative (SDMI).
Before use
Note
You will need an Internet connection and an Internet service provider in order to use
music data services.
5
Page 14

Installation
The driver for the USB Reader/Writer and RealJukebox for JVC are included
Before use
on the supplied CD-ROM. Follow these steps to install them.
Checking drive ID
You may have to specify the drive ID during installation. Turn on the computer
and start Windows. Refer to the following to check the ID of the drive.
Double click on
the "My Computer"
icon at the top left
of the screen.
If you have more than one CD-ROM
drive, select the one into which you
have inserted the CD-ROM.
Installation
Do not connect the USB Reader/Writer until installation is complete.
Turn on the computer and start Windows.
Insert the included CD-ROM into
the CD-ROM drive.
· The installer program starts automatically .
· If you haven't installed Internet Explorer 5.01
or later, a message will appear recommending
that you install Internet Explorer 5.5, which is
included on the CD-ROM.
· If Internet Explorer 5.01 or later is already
installed, proceed from step .
· If the installer program doesn't start, run the program by specifying the
file name ( page 10).
6
CD-ROM drive ID
(E in this case)
Page 15

Follow the onscreen instructions to install Internet
Explorer.
Take the CD-ROM out of the drive and then reinsert it.
· The installer program starts automatically .
· If the installer program doesn't start, run the program by specifying the
file name ( page 10).
Click on [Next].
Select all two applications under
normal circumstances.
Make changes if your computeroperating environment requires then
click on [Next].
Read the license agreement, check "Accept" and click
on [Next].
The USB Reader/Writer driver is
installed.
Before use
Continued on next page
7
Page 16

Installation
Before use
If the computer has RealPlayer or RealJukebox.
If the computer has RealPlayer or
RealJukebox, the information appares.
Click “Yes” to start installation.
Note
If the computer doesn’t have RealPlayer and RealJukebox, the RealJukebox for JVC
installer starts automatically.
Read the licence agreement and click on [Accept].
Click on [Next].
Make changes to the destination if
necessary before clicking on [Next].
8
Page 17

Select whether to create icons on the desktop and toolbar,
and click on [Finish].
Recommendation: create both icons.
The setup program starts.
Check "Yes" and click on [Finish].
The computer restarts and
installation is complete.
Before use
Note
If you decided not to install the USB Reader/Writer driver in step , the computer will
not restart automatically.
9
Page 18

Installation
If the installation program doesn't start automatically
Before use
Click on [Start] and, click
on "Run...".
Type in "#:\setup.exe" and click on [OK].
· #: Enter the CD-ROM ID here.
( page 6, Checking drive ID)
· Letters you enter here can be
either upper or lower case.
· The installation program starts.
Go to step on page 7 and
continue.
10
Page 19

Using the online help
Online help for RealJukebox
These instructions describe basic operations such as installation and checking
out tracks. For more detailed instructions, refer to the online help included on
the CD-ROM.
To show the online help
Do one of the following.
· Click on [Start] and select
"Programs"
"RealJukebox" →
"RealJukebox Help".
· After starting RealJukebox
Help, select [Contents] from the
"Help" menu.
To search using the table of contents
· Double click on to display its contents.
· Double click on to see an explanation.
→ "Real" →
(Example)
Before use
Searching by keyword
The table of contents is replaced by a list of keywords when you click on the
"Index" tab.
You can find a keyword by either entering it or scrolling through the list.
Double click on the keyword to see an explanation.
11
Page 20

Using the online help
SD Audio HELP
Before use
The SD Audio Help includes explanations about the sections of RealJukebox
for JVC specific to JVC that have not been explained in these operating
instructions or in the Online Help for RealJukebox.
· AAC settings and explanations
· Data conversion
· Checking out and checking in with SD memory cards
And more
To show the online help for SD Audio
After starting RealJukebox for JVC.( page 15 )
Connect the USB Reader/Writer ( page 13).
Insert an SD memory card into the USB Reader/Writer.
Click on [Devices].
Double click on "JVC Device" and then double click on "SD
Card".
Click on the [SD Audio Help] button.
To show the organizer, click on [View] and select “Organizer”.
12
Page 21

Connecting an SD memory Card
Connect the included USB Reader/Writer to checkout (record) tracks to your
SD memory card.
Note
· Connect to an AC power supply when using a portable computer. Data can be lost or
errors can occur if the computer turns off during operation.
· Operation cannot be guaranteed under the following circumstances:
*When you have connected two or more USB Reader/Writer to your computer or are
using another USB device.
*When you have connected another SD memory card adapter.
*When you are using a USB hub or extension cord.
Turn on the computer and start Windows.
Connect the USB Reader/Writer
to the computer's USB port.
The "New Hardware Found" screen appears.
The driver for the USB Reader/Writer is enabled
automatically.
Check that it appears in Windows Explorer as a removable drive.
Taking care that the card is
To the
computer's
USB port
ACCESS lamp
facing the right way, insert the
SD memory card into the USB
Reader/Writer.
Insert label-up
with the cut-off
corner facing in
Note
You can damage the card and USB Reader/Writer's slot if you insert the card
incorrectly.
Ensure the USB Reader/Writer's ACCESS lamp is off before inserting or ejecting
SD memory card.
Before use
Do not remove the SD memory card while checking out even if the
ACCESS lamp is off.
13
Page 22

Connecting an SD memory Card
The USB Reader/Writer
Before use
· Do not wet, drop, or expose the USB Reader/Writer to impacts.
· Do not use or store in locations directly exposed to sunlight, a heat vent,
or a heating appliance.
· Do not disassemble or modify.
· Do not insert foreign objects into the slot.
CAUTION:
This equipment has been tested and found to comply with the limits for a Class B
digital device, pursuant to Part 15 of the FCC Rules.
These limits are designed to provide reasonable protection against harmful
interference in a residential installation. This equipment generates, uses and can
radiate radio frequency energy and, if not installed and used in accordance with the
instructions, may cause harmful interference to radio communications. However,
there is no guarantee that interference will not occur in a particular installation. If this
equipment does cause harmful interference to radio or television reception, which
can be determined by turning the equipment off and on, the user is encouraged to try
to correct the interference by one or more of the following measures:
· Reorient or relocate the receiving antenna.
· Increase the separation between the equipment and receiver.
· Connect the equipment into an outlet on a circuit different from that to which the
receiver is connected.
· Consult the dealer or an experienced radio/TV technician for help.
Any unauthorized changes or modifications to this equipment would void the user’s
authority to operate this device.
This device complies with Part 15 of the FCC Rules. Operation is subject to the
following two conditions: (1) This device may not cause harmful interference, and (2)
this device must accept any interference received, including interference that may
cause undesired operation.
Responsible Party: JVC AMERICAS CORP.
1700 VALLEY ROAD WAYNE, N.J. 07470, USA
Protecting the data on your SD memory card
Performing the following actions before RealJukebox for JVC has started
completely, while the USB Reader/Writer's ACCESS lamp is on, and while checking
out tracks can damage your SD memory card and corrupt the data it contains.
· Inserting or ejecting the SD memory card
· Connecting or disconnecting the USB Reader/Writer
· Shutting down RealJukebox for JVC or Windows forcefully
· Turning the computer off forcefully (for example, unplugging the AC
power supply cord)
14
Page 23

Startup
Startup
Double-click on the desktop icon.
RealJukebox for JVC starts and the registration wizard
begins.
Note
If the icon is not on the desktop, from the [Start] menu, select
"Programs" → "Real" → "RealJukebox" → "RealJukebox".
Fill out the form and Click
on [Next].
Click on [Next].
Getting started
Click on [Next].
Select "Express Setup
(Recommended)" under normal
circumstances. Select "Custom
Setup" if necessary before clicking
on [Next].
Continued on next page
15
Page 24

Startup
Getting started
Click on [Finish].
You are connected to
http://www.Real.com/central/ and
your registration information is
sent. A screen appears asking if
you want to use RealJukebox as
the default player.
Click on [Yes].
Setup of RealJukebox for
JVC finishes and the
operation window appears.
After doing this once, the RealJukebox for JVC operation window will be
displayed by simply clicking on the desktop icon.
Note
Turn off the power-saving functions on your computer while using RealJukebox for JVC.
16
Page 25

Exiting
Click on the xbox at the top
of the main window.
Getting started
17
Page 26

Main features of the display
Use the Navigation Bar to display track lists and other RealJukebox for JVC
feature areas, and the Control Panel to play and record tracks. The Command
Getting started
Bar contains commands you can use on tracks or track lists, Playlists,
devices, and more. RealJukebox for JVC menus contain many additional
options, including Preferences, Navigation options, and Help.
Navigation Bar
( page 20)
Location
Bar
Organizer Link buttons
( page 23)
Editing Tools
Control Panel
( page 22)
Menu Bar
( page 23)
Display Area JVC homepage linkCommand Bar
( page 21)
These buttons are displayed after
(
the SD memory card is detected.
Organizer buttonStatus Bars
Header Bar
( page 23)
(
Track Info
If play starts automatically when you insert a CD into the CD-ROM drive, you
will need to shutdown any CD playing applications before you can use
RealJukebox for JVC.
18
Page 27

Quick Start
This section will help you get started using some of RealJukebox for JVC's
basic features. As you become more experienced using RealJukebox for JVC,
be sure to explore both the program and this Help system to learn about the
many additional tools and options available to you.
Note
The following instructions assume that all default automatic playback options are on.
Feature
Record/Play CDs
Play Tracks
Create Playlists
Download Music
To Record and Play a CD, insert it into your CD-ROM
drive. To toggle recording on/off, click the Record
button on the Control Panel. To toggle playback
on/off, click the Play button.
To view and play your recorded music, click a Group
button (Genre, Artist, Album), then double-click items
in the display window to open or play them, or select a
track and click the Play button in the control panel.
To create a custom Playlist, click New Playlist in the
Command Bar and follow the on-screen instructions.
To download music from the Internet, click the Music
Guide button in the Navigation Bar and follow the
links.
Description
RealJukebox Homepage
Getting started
RealJukebox Homepage gives you an easy way to get started using
RealJukebox. Each item in the window provides a brief description of a
RealJukebox feature, and you can click a link to display track lists, create
Playlists, download music, and more.
Note
To see an overview of all options, click the organizer button to see RealJukebox for JVC
in organizer view. To go back to the previous location, use the Back or Forward buttons
on the Location Bar.
19
Page 28

Main features of the display
RealJukebox for JVC Controls and Navigation
Getting started
The Navigation Bar
The Navigation Bar gives you instant access to every RealJukebox for JVC
feature area. Just click a button to display the track list or feature you want to
use, then use the Control Panel and Command Bar to play tracks, create
Playlists, and more.
Shows
hidden
buttons.
Note
Feature
Home
CD
Music Guide
All Tracks
Genre
Artist/Album
Search
Playlists
AutoPlaylists
Radio
Devices
You can customize the Navigation Bar: right-click the Navigation Bar and
choose the buttons you wish to display by checking/unchecking the boxes.
Description
Go to the RealJukebox homepage.
Record or play a CD.
Go to Music Guide and download music from the
Internet.
View all tracks in your music library.
Click a Group button to go to the desired Track Group.
View the Artist and Album Track Groups.
Search your music library using keywords. If you don't
>>
>>
on
on the
see this button in the Navigation Bar, click the
the right end.
View your Playlists. If you don't see this button in the
>>
Navigation Bar, click the
View your AutoPlaylists. If you don't see this button in
the Navigation Bar, click the
Go to Real.com and play live streamed radio
broadcasts using the RealPlayer.
View your installed portable devices. If you don't see
this button in the Navigation Bar, click the
right end.
on the right end.
>>
on the right end.
20
Page 29

The Command Bar
The Command Bar displays context-sensitive options based on the current
track list or feature area . Many of these options are only available under the
certain circumstances, such as when an appropriate item is selected.
Getting started
Feature
New Playlist
New AutoPlaylist
Edit AutoPlaylist
Copy to Playlist
Copy to Device
Add Tracks
Check All
Check None
Remix Now
Update Now
Begin Transfer
Configure
View Track Info
Edit View Track
Info
Clear History
New Stations
New Music Guide
Description
Launch a new window to help you create a new Playlist.
Launch a new window to help you create and design
a new AutoPlaylist.
Lets you change the criteria for the selected AutoPlaylist.
Send selected tracks to an existing Playlist.
Send selected tracks to a portable device queue.
Add selected tracks to a Playlist, AutoPlaylist, or
portable device.
Select all tracks for recording from CD or transfer to a
portable device.
Skip all tracks when recording from CD or transferring
to a portable device.
Remix a selected AutoPlaylist: Automatically generates
a new compilation of tracks using the same criteria.
Updates the Music Guide display.
Transfer queued tracks to a portable device. (Changes
to "Cancel Transfer" when tracks are being transferred)
Configure a portable device in preparation for transferring
tracks. (Available only when a portable device is selected)
View Track Info associated with the selected track.
Change artist name, album title, and genre for
multiple tracks. Add lyrics, album art, and more.
Erase the list of recently played tracks.
Available only in the Recent window.
Appears only when new radio stations are available. Click
the New Stations button to display the Radio window.
Appears only when Music Guide has been updated.
Click New Music Guide to display the latest version of
the Music Guide.
21
Page 30

Main features of the display
The Control Panel
The Control Panel provides recording and playback control as well as skip,
Getting started
seek (search), shuffle (random), continuous play (repeat) options.
The Control Panel also offers Visualization settings, quick access to your
RealPlayer, and Skin mode.
22
Feature
Record
Play
Pause
Stop
Previous
Next
Continuous
Shuffle
Return
Volume
Control
Progress Bar
Launch RealPlayer
Click to begin recording the CD in your CD drive. Click
again to stop recording.
Click to play the selected track. Click again to stop playing.
Click to pause playback. Click again to resume playback.
Click to stop both playback and recording.
Click to jump to previous track on the current CD or track list.
Click to jump to next track on the current CD or track list.
Play current CD or track list repeatedly.
Play current CD or track list randomly.
Click the return button to return to the currently
playing track list. For example, if you're playing a track
from a Playlist, and you're browsing your Groups
(Genre, Artist, Album), clicking the return button takes
you back to the Playlist your track is playing from.
Click and drag the slider to pump up the volume
(right) or tone it down (left). Use the arrow keys to
“fine tune” your settings.
The Progress Bar displays the current track's
playback progress. You can skip forward and
backward in the currently playing track by dragging
the slider left (back) or right (forward).
Launches the RealPlayer.
Description
Page 31

The Status Bars
· Play Status Bar
This bar provides up-to-date information on the currently playing track,
including the name of the track and artist and the time elapsed/length of the
track. Other information includes icons that tell you whether the track is
playing from a CD (CD) or a recorded music file (an icon will tell you the
format), and whether the track is playing in stereo (((( · ))))
· Record Status Bar
This bar provides up-to-date information on the currently recording track,
including the name of the track and artist, the track number, and the
recording progress. The Record Status bar only appears while a track is
recording.
The Menu Bar
The menu bar offers dozens of options including navigation, preferences,
playlists, plus online sites and Help. Click to open a menu, then click again to
select an option.
The Header Bar
The Header Bar is the bar just above any track list. With a Group, Playlist, or All
Tracks open, it contains the headers Track Name, Album, Artist, etc. You can
specify which headers and columns appear in
Tools>Preferences>Display.
Getting started
· To sort tracks by header criteria, click a header. For instance, to
sort by name, click the "Name" header ( Track Name, Playlist
Name, Grouping Name).
Note
Tracks on CD cannot be sorted, and Playlist tracks cannot be sorted using the Header
Bar.
23
Page 32

Checking out tracks to an SD memory card
Select tracks you have recorded on your computer and check them out to an
SD memory card. The tracks are converted as they are checked out, so
Getting started
ensure you have made the correct conversion settings.
Note
Before using new SD memory card, perform the formatting ( page 26).
Connect the SD memory card.
Select tracks.
Click on “Copy to”→
“Device”.
Click on “OK”.
Click on “Begin Transfer”.
“On Device” is shown when
checking out is finished.
Note
Do not insert or remove SD memory cards while a progress bar in the
Transfer Status area is being displayed.
24
Page 33

Troubleshooting
Before requesting service, make the below checks and refer to the online Help.
If you are in doubt about some of the check points, or if the remedies indicated
in the chart do not solve the problem,
Installation and startup
Reference
Problems
Cannot install
Cannot start.
I want to install
just the USB
Reader/Writer
driver.
Check points or causes
Insert the CD-ROM.
·
· Ensure you have specified the correct CD-ROM drive.
· Ensure the program is installed on the hard disc. The
program cannot be run from the CD-ROM.
· Ensure the computer has at least 64 MB of RAM.
Install the driver from the included CD-ROM. In step
of the installation procedure on page 7, remove the
checks from RealJukebox [with JVC plug-in].
25
Page 34

Formatting SD memory cards
Format your SD memory card to use SD Audio data. Some or all of the data
on the card will be lost when you format it. Select "Format only for SD Audio
(Erase all Audio data)" under normal circumstances. Select "Format entire
card (Erase all data)" only when necessary.
Reference
Note
Tracks you have checked out using software other than RealJukebox for JVC are also deleted
when you format the card. Check the data on the card before commencing formatting.
Use only the method described below to format your card. Using other methods can
render the card unable to checkout or play.
Click on "Devices".
Double-click on
"JVC Device".
Right Click on "SD Card".
26
Click on "Configure".
Click on "Initialize (Format)".
Recomended: "Format only for SD Audio
(Erases all Audio data)"
Click on [Start].
The SD memory card is formatted.
Page 35

Copyright protection limitations
· This software includes copyright limitations decided upon by the Secure
Digital Music Initiative (SDMI).
You may be unable to use music data with this software if the data is
*
copyright-protected or if you have recorded from a DVD-Audio player.
Where the owner of the copyright or music data providers have set
*
conditions with regard to the use of the data, you are obliged to abide by
those conditions.
· Your attention is drawn to the fact that recording pre-recorded SD memory
card may infringe copyright laws.
· Upgrading RealJukebox for JVC
RealJukebox for JVC follows the guidelines set by the SDMI. Future changes
to these guidelines may render some functions of RealJukebox for JVC
inoperable. Upgraded versions of RealJukebox for JVC will be offered in
such circumstances. A charge may be applied to these upgrades.
Limitations in Windows Explorer
· SD memory cards are shown as external drives (for example, "D") in
Windows Explorer when they are connected to the computer.
Do not use Explorer to move SD memory card music data or folders, change
their names, or delete them. This can render the music data unplayable. Use
only RealJukebox for JVC for editing.
· Similarly, do not use Explorer to move, change the names of, or delete music
data and folders you have saved to your computer.
Reference
27
Page 36

VICTOR COMPANY OF JAPAN, LIMITED
© 2001 VICTOR COMPANY OF JAPAN, LIMITED
Printed in Japan
0601HMMSANSAN
· SD logo is a trademark.
· Portions of this product are protected under copyright law and are provided
under license by ARIS / SOLANA /4C.
· Microsoft and its logo as well as Windows and Windows NT are registered
trademarks of Microsoft Corporation of the U.S. in both the United States and
other countries.
· Pentium and MMX are registered trademarks of Intel Corporation of the U.S.
· Sound Blaster 16 is a trademark of Creative Technology, Ltd. of the U.S.
· IBM and PC/AT are registered trademarks of International Business Machines
Corporation of the U.S.
· Macintosh is a registered trademark of Apple Computer, Inc. of the U.S. in
both the United States and other countries.
· The Real logo, RealAudio, RealNetworks and RealPlayer are registered
trademarks of RealNetworks Inc.
RealJukebox, RealDownload, Real.com and Take 5 are trademarks of
RealNetworks, Inc.
· Other names of systems and products mentioned in these instructions are
usually the registered trademarks or trademarks of the manufacturers who
developed the system or product concerned.
The ™ and ® marks are not used to identify registered trademarks and
trademarks in these instructions.
· Licensed AAC Patents(U.S. patent numbers);
Pat.
5,848,391
5,291,557
5,451,954
5,400,433
5,222,189
5,357,594
5,752,225
5,394,473
5,583,962
5,274,740
5,633,981
5,297,236
4,914,701
5,235,671
07/640,550
5,579,430
08/678,666
98/03037
97/02875
97/02874
98/03036
5,227,788
5,285,498
5,481,614
5,592,584
5,781,888
08/039,478
08/211,547
5,703,999
08/557,046
08/894,844
 Loading...