

Page 1

MICRO COMPONENT SYSTEM
UX-E8DAB
—Consists of CA-UXE8DAB and SP-UXE8DAB
INSTRUCTIONS
GVT0224-001B
[B]
Page 2

Warnings, Cautions and Others
CAUTION — button!
Disconnect the mains plug to shut the power off completely (the STANDBY lamp goes off ). When installing the
apparatus, ensure that the plug is easily accessible. The button in any position does not disconnect the mains line.
• When the System is on standby, the STANDBY lamp lights red.
• When the System is turned on, the STANDBY lamp goes off .
The power can be remote controlled.
CAUTION
To reduce the risk of electrical shocks, fi re, etc.:
1. Do not remove screws, covers or cabinet.
2. Do not expose this appliance to rain or moisture.
CAUTION:
• Do not block the ventilation openings or holes. (If the ventilation openings or holes are blocked by a newspaper or
cloth, etc., the heat may not be able to get out.)
• Do not place any naked fl ame sources, such as lighted candles, on the apparatus.
• When discarding batteries, environmental problems must be considered and local rules or laws governing the
disposal of these batteries must be followed strictly.
• Do not expose this apparatus to rain, moisture, dripping or splashing and that no objects fi lled with liquids, such as
vases, shall be placed on the apparatus.
IMPORTANT FOR LASER PRODUCTS
1. CLASS 1 LASER PRODUCT
2. CAUTION: Do not open the top cover or cabinet. There are no user serviceable parts inside the unit; leave all
servicing to qualifi ed service personnel.
3. CAUTION: Visible and/or invisible class 1M laser radiation when open. Do not view directly with optical instruments.
4. REPRODUCTION OF LABEL: CAUTION LABEL, PLACED INSIDE THE UNIT.
CAUTION:
Excessive sound pressure from earphones or headphones can cause hearing loss.
G-1
Page 3
IMPORTANT for the U.K.
DO NOT cut off the mains plug from this equipment. If the plug fi tted is not suitable for the power points in your
home or the cable is too short to reach a power point, then obtain an appropriate safety approved extension lead or
consult your dealer.
BE SURE to replace the fuse only with an identical approved type, as originally fi tted.
If nonetheless the mains plug is cut off ensure to remove the fuse and dispose of the plug immediately, to avoid a
possible shock hazard by inadvertent connection to the mains supply.
If this product is not supplied fi tted with a mains plug then follow the instructions given below:
IMPORTANT:
DO NOT make any connection to the terminal which is marked with the letter E or by the safety earth symbol or
coloured green or green-and-yellow.
The wires in the mains lead on this product are coloured in accordance with the following code:
Blue: Neutral
Brown: Live
As these colours may not correspond with the coloured markings identifying the terminals in your plug proceed as
follows:
The wire which is coloured blue must be connected to the terminal which is marked with the letter N or coloured
black.
The wire which is coloured brown must be connected to the terminal which is marked with the letter L or coloured
red.
IF IN DOUBT - CONSULT A COMPETENT ELECTRICIAN.
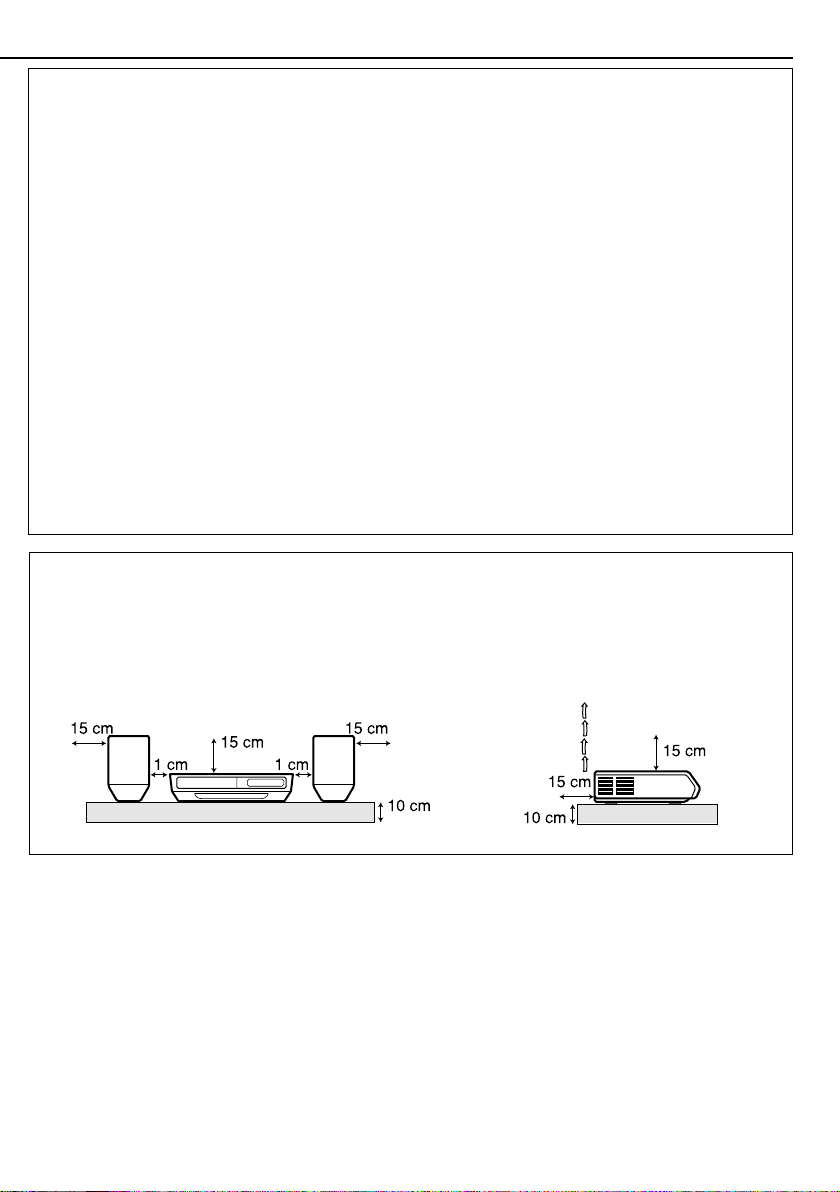
CAUTION: Proper Ventilation
To avoid risk of electric shock and fi re, and to prevent damage, locate the apparatus as follows:
1. Front: No obstructions and open spacing.
2. Sides/ Top/ Back: No obstructions should be placed in the areas shown by the dimensions below.
3. Bottom: Place on the level surface. Maintain an adequate air path for ventilation by placing on a stand with a
height of 10 cm or more.
Front view Side view
SP-UXE8DAB CA-UXE8DAB SP-UXE8DAB
CA-UXE8DAB
G-2
Page 4

Information for Users on Disposal of Old Equipment
[European Union]
This symbol indicates that the electrical and electronic equipment should not be disposed as
general household waste at its end-of-life. Instead, the product should be handed over to the
applicable collection point for the recycling of electrical and electronic equipment for proper
treatment, recovery and recycling in accordance with your national legislation.
By disposing of this product correctly, you will help to conserve natural resources and will
Attention:
This symbol is only
valid in the European
Union.
help prevent potential negative eff ects on the environment and human health which could
otherwise be caused by inappropriate waste handling of this product. For more information
about collection point and recycling of this product, please contact your local municipal offi ce,
your household waste disposal service or the shop where you purchased the product.
Penalties may be applicable for incorrect disposal of this waste, in accordance with national
legislation.
(Business users)
If you wish to dispose of this product, please visit our web page www.jvc-europe.com to
obtain information about the take-back of the product.
[Other Countries outside the European Union]
If you wish to dispose of this product, please do so in accordance with applicable national
legislation or other rules in your country for the treatment of old electrical and electronic
equipment.
Dear Customer,
This apparatus is in conformance with the valid European directives and
standards regarding electromagnetic compatibility and electrical safety.
European representative of Victor Company of Japan, Limited is:
JVC Technology Centre Europe GmbH
Postfach 10 05 52
61145 Friedberg
Germany
G-3
Page 5

SAFETY INSTRUCTIONS
“SOME DOS AND DON’TS ON THE SAFE USE OF EQUIPMENT”
This equipment has been designed and manufactured to meet international safety standards but, like
any electrical equipment, care must be taken if you are to obtain the best results and safety is to be
assured.
Do read the operating instructions before you attempt to use the equipment.
Do ensure that all electrical connections (including the mains plug, extension leads and
interconnections between pieces of equipment) are properly made and in accordance with the
manufacturer’s instructions. Switch off and withdraw the mains plug when making or changing
connections.
Do consult your dealer if you are ever in doubt about the installation, operation or safety of your
equipment.
Do be careful with glass panels or doors on equipment.
DON’T continue to operate the equipment if you are in any doubt about it working normally, or if it is
damaged in any way—switch off , withdraw the mains plug and consult your dealer.
DON’T remove any fi xed cover as this may expose dangerous voltages.
DON’T leave equipment switched on when it is unattended unless it is specifi cally stated that it is
designed for unattended operation or has a standby mode.
Switch off using the switch on the equipment and make sure that your family know how to do this.
Special arrangements may need to be made for infi rm or handicapped people.
DON’T use equipment such as personal stereos or radios so that you are distracted from the
requirements of traffi c safety. It is illegal to watch television whilst driving.
DON’T listen to headphones at high volume as such use can permanently damage your hearing.
DON’T obstruct the ventilation of the equipment, for example with curtains or soft furnishings.
Overheating will cause damage and shorten the life of the equipment.
DON’T use makeshift stands and NEVER fi x legs with wood screws—to ensure complete safety always
fi t the manufacturer’s approved stand or legs with the fi xings provided according to the instructions.
DON’T allow electrical equipment to be exposed to rain or moisture.
ABOVE ALL
– NEVER let anyone, especially children, push anything into holes, slots or any other opening in the
case—this could result in a fatal electrical shock.;
– NEVER guess or take chances with electrical equipment of any kind—it is better to be safe than
sorry!
G-4
Page 6

Please read all instructions carefully before operation, to ensure your complete understanding and to
Thank you for purchasing a JVC product.
obtain the best possible performance from the unit.
Contents
Precautions . . . . . . . . . . . . . . . . . . . . . . . . . . 2
Getting Started . . . . . . . . . . . . . . . . . . . . . . . 2
Supplied Accessories . . . . . . . . . . . . . . . . . . . . . . . 2
Prepare the Remote Control . . . . . . . . . . . . . . . . 2
Connections . . . . . . . . . . . . . . . . . . . . . . . . . . . . . . . 3
Basic and Common Operations . . . . . . . . 5
Operating on the System . . . . . . . . . . . . . . . . . . . 5
Operating on the Remote Control . . . . . . . . . . 6
Display Information . . . . . . . . . . . . . . . . . . . . . . . . 6
Playing Back a Disc
/USB Mass Storage Class Device . . . . . 7
Loading a Disc . . . . . . . . . . . . . . . . . . . . . . . . . . . . . 7
Connecting a USB Mass Storage
Class Device . . . . . . . . . . . . . . . . . . . . . . . . . . . . . 7
Basic Disc/USB Mass Storage Class Device
Operations . . . . . . . . . . . . . . . . . . . . . . . . . . . . . . 8
Turning Off the System Automatically
—Auto Standby . . . . . . . . . . . . . . . . . . . . . . . . . . . . 8
Prohibiting Disc Ejection . . . . . . . . . . . . . . . . . . . 8
Playing at Random—Random Play . . . . . . . . . 9
Playing Repeatedly—Repeat Play
Programming the Playing Order
—Program Play . . . . . . . . . . . . . . . . . . . . . . . . . . . . 9
. . . . . . . . . . . . 9
Listening to the Radio . . . . . . . . . . . . . . . 10
Basic Tuner Operations . . . . . . . . . . . . . . . . . . . . 10
Presetting Stations and Services . . . . . . . . . . .11
Receiving FM Stations
with Radio Data System . . . . . . . . . . . . . . . . . 11
Changing the Radio Data System
Information . . . . . . . . . . . . . . . . . . . . . . . . . . . .11
Switching Temporarily to a Program
of Your Choice Automatically . . . . . . . . . . . . 12
Searching for Programs Using PTY Codes
(PTY Search) . . . . . . . . . . . . . . . . . . . . . . . . . . . .12
What is the DAB System? . . . . . . . . . . . . . . . . . .13
Changing the DAB Information . . . . . . . . . . . . 13
Scanning for Ensembles . . . . . . . . . . . . . . . . . . . 13
Tuning in to All the Ensembles . . . . . . . . . . . .13
Improving the DAB Reception . . . . . . . . . . . . .13
Listening to an iPod . . . . . . . . . . . . . . . . . 14
Listening to an iPod . . . . . . . . . . . . . . . . . . . . . . . 14
Basic iPod Operations . . . . . . . . . . . . . . . . . . . . .15
Listening to a Digital Audio Player . . . . 16
Listening to a Digital Audio Player . . . . . . . . .16
Recording on a Digital Audio Player . . . . . . .16
Setting the Clock and
the Daily Timer . . . . . . . . . . . . . . . . . . . . 17
Setting the Clock . . . . . . . . . . . . . . . . . . . . . . . . . . 17
Setting the Daily Timer . . . . . . . . . . . . . . . . . . . . 17
Learning More about This System . . . . . 18
Troubleshooting . . . . . . . . . . . . . . . . . . . . 21
Maintenance . . . . . . . . . . . . . . . . . . . . . . . . 22
Specifications . . . . . . . . . . . . . . . . . . . . . . . 22
1
Page 7

Precautions
Notes on the power cord
• When you are away on travel or otherwise for an
extended period of time, remove the plug from the
wall outlet. A small amount of power (2.3 W) is always
consumed while the power cord is connected to the
wall outlet.
• When unplugging the System from the wall outlet,
always pull the plug, not the power cord.
• Do not handle the power cord with wet hands.
• Disconnect the power cord before cleaning the System
or moving the System.
• Do not alter, twist or pull the power cord, or put
anything heavy on it, which may cause fire, electric
shock, or other accidents.
• If the cord is damaged, consult a dealer and have the
power cord replaced with a new one.
Getting Started
Supplied Accessories
After unpacking, check to be sure that you have all the
following items. The number in parentheses indicates the
quantity of each piece supplied.
• Remote control (x 1)
• Lithium coin battery CR2025 (x 1) (The battery has
been installed when shipped from the factory.)
• AM loop antenna (x 1)
• FM antenna (x 1)
• DAB antenna (x 1 )
•
Connection cable for iPod (x 1)
• Stand for iPod (x 1)
• Core filter (x 1)
If anything is missing, consult your dealer immediately.
Prepare the Remote Control
When you use the remote
control for the first time, pull
out the insulation sheet.
Replacing the Battery in the Remote Control
Insert the battery into
the remote control by
matching the polarity
(+ and –) correctly.
Insulation sheet
Lithium coin battery
(product number: CR2025)
Avoid moisture, water, dust, and high temperatures
• Do not place the System in moist or dusty places.
• If water gets inside the System, turn off the power and
remove the plug from the wall outlet, then consult your
dealer. Using the System in this state may cause a fire or
electrical shock.
• Do not expose the System to direct sunlight or place it
near a heating device.
Notes on installation
• Select a place which is level, dry and neither too hot nor
too cold between 5˚C and 35˚C.
• Do not install the System in a place subject to vibrations.
• Do not put heavy objects on the System.
To prevent malfunction or damage of the System
• Do not insert any metallic objects, such as wires,
hairpins, coins, etc. into the System.
• Do not block the vents.
There are no user-serviceable parts inside. If
anything goes wrong, unplug the power cord
and consult your dealer.
NOTES
• Store the battery in a place where children cannot
reach. If a child accidentally swallows the battery,
consult a doctor immediately.
• Do not recharge, short, disassemble or heat the battery
or dispose of it in a fire. Doing any of these things may
cause the battery to give off heat, crack, or start a fire.
• Do not leave the battery with other metallic materials.
Doing this may cause the battery to give off heat, crack,
or start a fire.
• When throwing away or saving the battery, wrap it in
tape and insulate; otherwise, the battery may start to
give off heat, crack, or start a fire.
• Do not poke the battery with tweezers or similar tools.
Doing this may cause the battery to give off heat, crack,
or start a fire.
• Dispose of battery in the proper manner, according to
federal, state, and local regulations.
• The batteries (battery pack or batteries installed )
shall not be exposed to excessive heat source such as
sunshine, fire or the like.
CAUTION:
Danger of explosion if battery is incorrectly replaced.
Replace only with the same or equivalent type.
2
Page 8
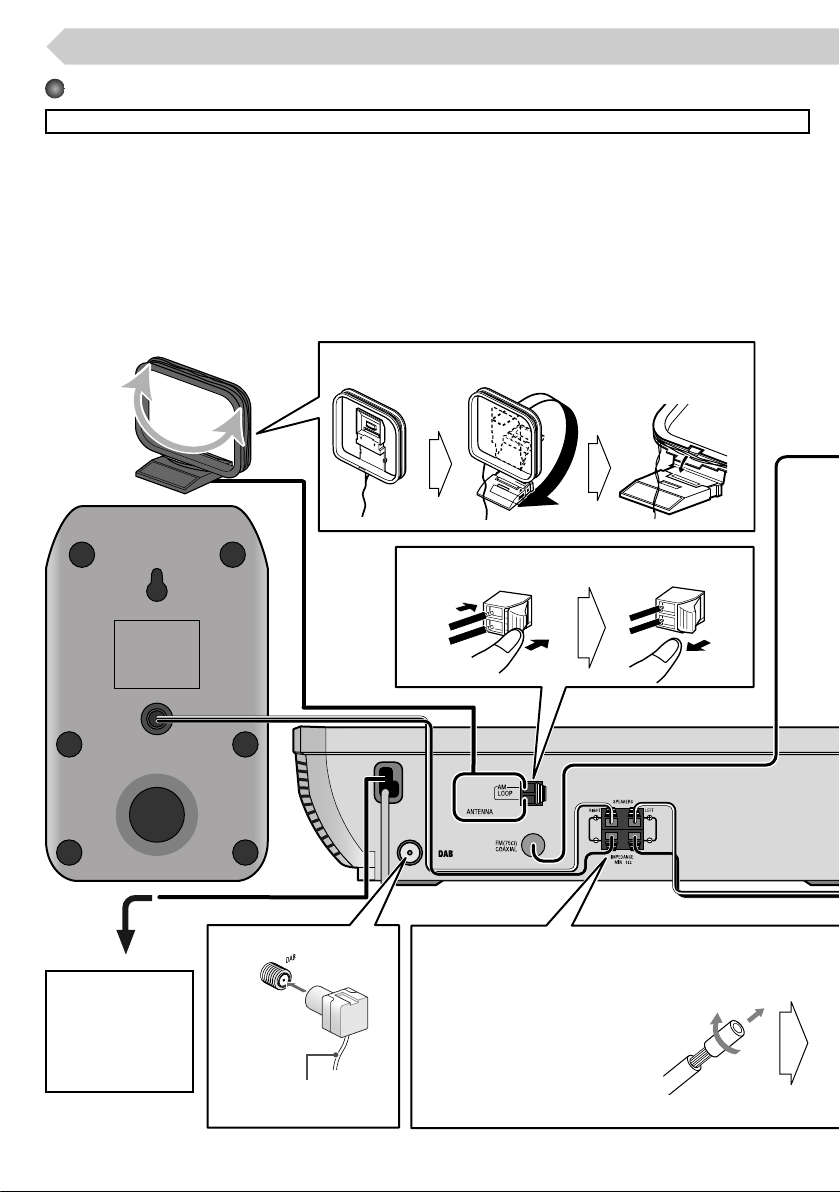
Connections
Do not connect the power cord until all other connections have been made.
NOTES
• Make sure the antenna conductors do not touch any other terminals, connecting cords or the power cord. Also, keep
the antennas away from metallic parts of the System, connecting cords, and the power cord. This could cause poor
reception.
• If the cords are covered with vinyl, remove the vinyl to expose the tip of the cord by twisting it.
• DO NOT connect more than one speaker to each terminal.
• DO NOT allow the conductor of the speaker cords to be in contact with any metallic parts of the System.
AM loop antenna (supplied)
Turn it until the best reception is
obtained.
To assemble the AM loop antenna
To connect the AM loop antenna
To a wall outlet
Plug in the power
cord only after all
connections are
complete.
3
DAB antenna (supplied)
Extend the wire so that you can
receive your desired ensembles.
To connect the speaker cords
Make sure both speakers are connected correctly and firmly.
• Before connecting the speaker cords, twist and pull the
insulation coat off.
When connecting the speaker cords,
match the polarity of the speaker
terminals: black cord with white
stripe to (+) and black cord to (–).
Page 9
For better FM reception
Disconnect the supplied FM antenna, and connect to an outdoor FM antenna
using a 75 Ω wire with a coaxial type connector (IEC or DIN45325).
For better DAB reception
FM antenna (supplied)
Extend it to obtain the best
reception.
Disconnect the supplied DAB antenna, and connect an active
antenna.
(See “Improving the DAB Reception” on page 13.)
Attaching the Core Filter
Attach the provided core filter to the USB cable (not supplied) to
reduce interference.
Outdoor FM antenna
(not supplied)
Active antenna
(not supplied)
1
Stopper
USB cable
2
To the System
2 cm
3
NOTES
• Do not damage the USB cable by applying excessive force when
winding.
• Use a USB 2.0 cable of less than 1 m in length.
Release the stopper of
the core filter.
Run the USB cable
through the core filter,
leaving approx. 2 cm
between the unit-side
end of the USB cable
and the core filter.
Firmly wind the cable
twice inside the
cutout of the core
filter.
Close the core filter
until you hear a
clicking sound.
4
Page 10

Basic and Common Operations
Operating on the System
To Pr ess
Turn on or off (standby)
the power
The STANDBY lamp on the System turns off/on.
See “Playing Back a Disc/USB Mass Storage Class Device” on page 7.
Select a source*
Adjust the volume
1
You can operate the source buttons on the System by simply touching them, because these buttons are “touch
*
sensor panel.”
2
*
The corresponding source indicator lights on the display (not applicable for LINE).
Using Headphones
Be sure to turn down the volume before
connecting or putting on the headphones.
• Connecting the headphones will deactivate
the speakers.
1, 2
PHONES jack
See “Listening to an iPod” on page 14.
Press repeatedly to select DAB, FM, AM or LINE.
• For DAB, FM and AM, see “Listening to the Radio” on page 10.
• For LINE, see “Listening to a Digital Audio Player” on page 16.
You can adjust the volume level from level 0 (VOL MIN) to level 31 (VOL
MAX).
Stereo mini plug cord
STANDBY lamp
Point at the remote sensor on the front
panel. (The operating range is approx. 7 m.)
NOTES
• DO NOT turn off (standby) the System with the volume set to an extremely
high level; otherwise, the sudden blast of sound can damage your hearing,
the speakers and/or the headphones when you turn on the System or start
playback.
• Do not put objects such as the headphone cord on “touch sensor panel.”
• Do not put a fluorescent light near the System; otherwise, “touch sensor
panel” may not work correctly.
5
Page 11

Operating on the Remote Control
To Pr ess
Turn on or off (standby) the
power
The STANDBY lamp on the System turns off/on.
See “Listening to an iPod” on page 14.
See “Playing Back a Disc/USB Mass Storage Class Device” on
Select a source*
2
page 7.
Press repeatedly to select FM, AM, LINE or DAB.
• For FM, AM and DAB, see “Listening to the Radio” on page
10.
• For LINE, see “Listening to a Digital Audio Player” on page 16.
Adjust the volume
Drop the volume in a
moment
Reinforce the bass sound
You can adjust the volume from level 0 (“VOL MIN”) to level
31 (“VOL MAX”).
To restore the volume, press again, or adjust the volume level.
Press and hold until the AHB indicator lights up on the display.
To cancel, press and hold again.
• Once: for the bass level
• Twice: for the treble level
Adjust the tone (Bass/Treble)
Then, press VOLUME + to increase the level or press
VOLUME – to decrease it.
• You can adjust the bass and/or treble level from –3 to +3.
Changing the display
brightness
Press when the System is turned on.
To cancel this function, press again.
Press and hold for more than 2 seconds when the System is
on standby.
Set the Save Mode
• Setting the Save Mode allows you to reduce power
consumption by turning the display off while on standby.
To cancel this function, press and hold for more than 2
seconds again.
Change the display
information
You can switch between the clock and the various source
information display.
• For setting the clock, see page 17.
Press briefly and repeatedly to specify the time (in minutes) as
Turn off the System by using
follows (The SLEEP indicator lights up on the display.):
the Sleep Timer
• To check the remaining time after setting the Sleep Timer, press once.
2
*
The corresponding source indicator lights on the display (not applicable for LINE).
Display Information
Play mode indicators
(See page 9.)
Source indicators
File type indicators (See page 7.)
RESUME indicator
(See page 7.)
Canceled
AHB indicator (See above.)
Band indicators
FM/DAB reception indicators (See page 10.)
QPL indicator (See page 16.)
Main display
Timer mode indicators (See page 17.)
SLEEP indicator (See above.)
A.STBY (Auto Standby) indicator (See page 8.)
Radio Data System indicators (See page 12.)
6
Page 12

Playing Back a Disc/USB Mass Storage Class Device
This System can play back following discs and files:
– CD.
– CD-R/CD-RW recorded in audio CD format (CD-DA).
– MP3/WMA files on CD-R/CD-RW recorded in ISO 9660 format.
– MP3/WMA files on a USB mass storage class device.
• When playing back an MP3 or WMA track, MP3 or WMA indicator lights on the display.
Loading a Disc
1
2
Press to open the disc
tray.
• When using an 8 cm
disc, place it on the
inner circle of the disc
tray.
Connecting a USB Mass Storage
Class Device
You can connect a USB mass storage class device such
as a USB flash memory device, MP3 player, or multimedia
card reader, etc. to the System.
USB memory
(not supplied)
3
RESUME Play
When you stop the playback by one of the following
operations, this System stores the beginning of the track
stopped at on the disc or stores the position stopped at
of the file on the USB mass storage class device.
– Pressing 7 once (The RESUME indicator lights up on
the display.)
– Changing the source
– Turning off the System
When you start playback again, playback starts from the
stored position.
To clear the stored position, press 7 while playback is
stopped.
Press to close the disc
tray.
Front view
USB cable
(not supplied)
NOTES
• Always set the volume to the minimum level when
connecting or disconnecting a USB mass storage class
device.
• Do not disconnect the USB mass storage class device
when the System is turned on. It may cause malfunction
of both this System and the device.
• The USB mass storage class device is charged through
the USB MEMORY terminal when the System is turned
on and the source is USB.
• Use a USB 2.0 cable of less than 1 m in length.
• You cannot connect a computer to the USB MEMORY
terminal of the System.
• Noise and static electricity may stop the sound of the
USB mass storage class device. In this case, disconnect
and then connect the USB mass storage class device
again after turning off the System.
• Opening the disc tray or disconnecting the USB mass
storage class device also clears the stored position.
• When you clear the stored position and start playback,
playback starts...
– For disc: From the beginning of the first track
– For USB mass storage class device: From the
beginning of the current file
If you disconnect the USB mass storage class device,
connect it again, and start playback, playback starts
from the beginning of the first file.
NOTE
This function does not work in Program Play and
Random Play (see page 9).
or
7
Page 13
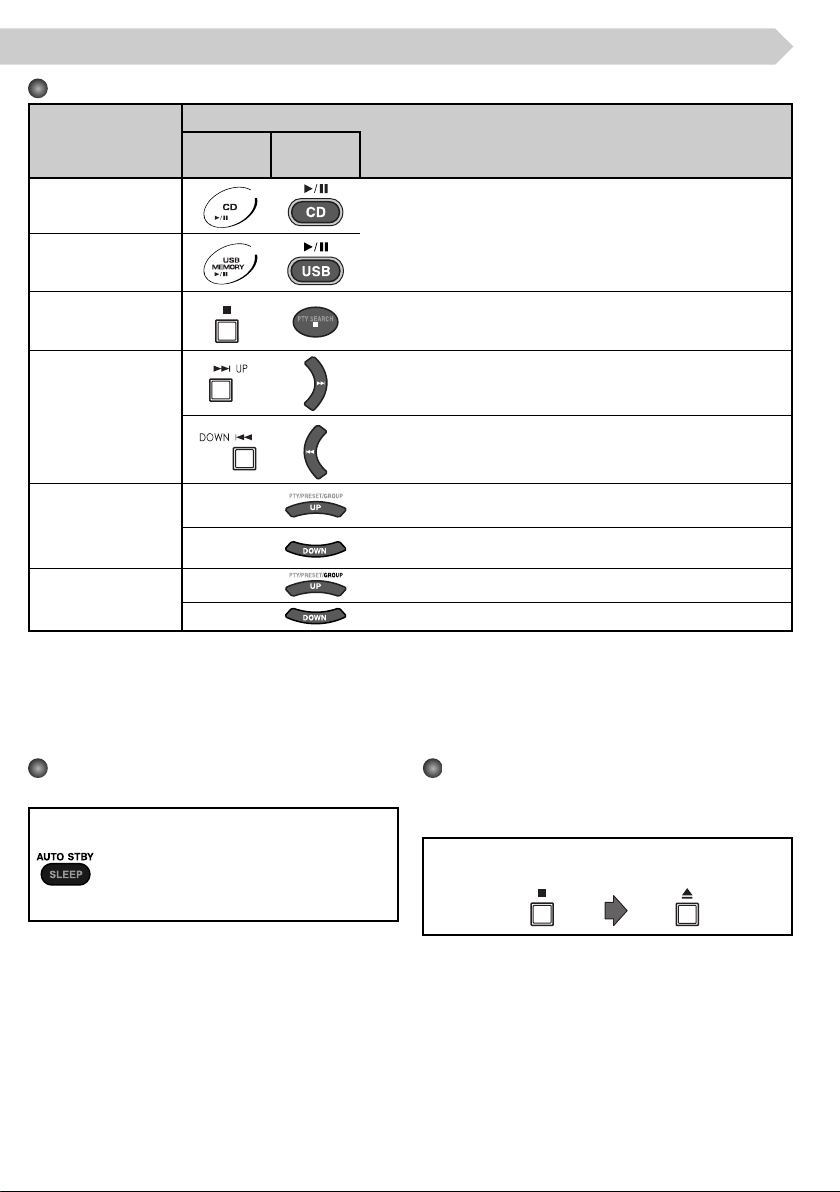
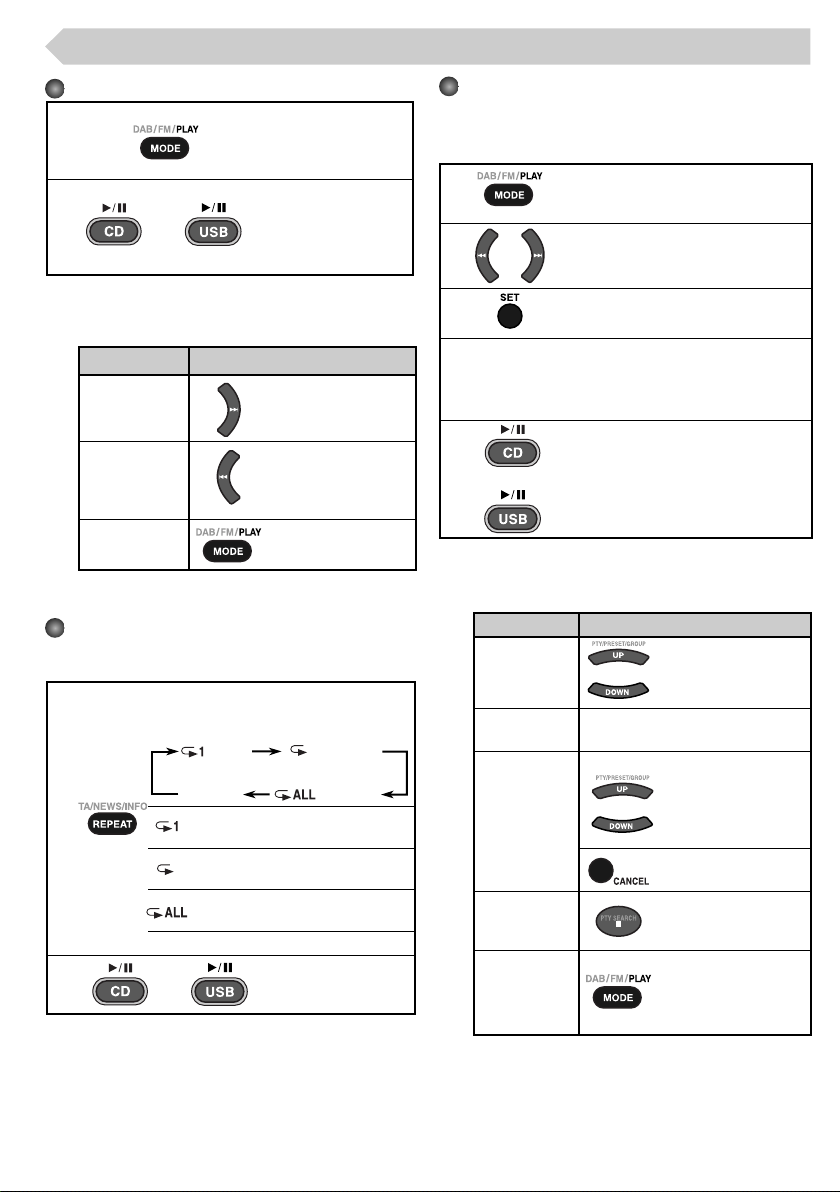
Basic Disc/USB Mass Storage Class Device Operations
Press
To
Play back the disc
Play back a USB mass
storage class device
Stop playback
Select a track
On the
System
On the
remote
• The current track number and elapsed playing time appear on
the main display.
For MP3/WMA files: Before the current track number and
elapsed playing time appear, the tag information is scrolled if it
is recorded.
• During playback, press again to pause.
• While playback is stopped, the total track number and total
playing time (for MP3/WMA files, group number and track
number) appear on the main display.
Press to select the next track.
Press to go back to the beginning of the current or previous track.
Forward search/
Reverse search
Select a group
(MP3/WMA only)
NOTES
• If no disc is inserted, “NO DISC” appears on the main display.
• If no USB mass storage class device is connected, “NO USB” appears on the main display.
• If MP3/WMA files are not recorded on the disc or the USB mass storage class device, “NO FILE” appears on the main
display.
—
—
—Press to select the next group while playback is stopped.
—Press to select the previous group while playback is stopped.
Turning Off the System
Automatically—Auto Standby
Press and hold until the A.STBY indicator
lights up on the display.
• The A.STBY indicator starts flashing after
playback stops.
If no operation is done for about 3 minutes,
the System turns off.
To cancel, press and hold again.
Press once or twice to fast-forward the track during playback.
To stop searching, press 6.
Press once or twice to fast-reverse the track during playback.
To stop searching, press 6.
Prohibiting Disc Ejection
You can lock the disc tray so that no one can eject the
loaded disc.
• This is possible while the System is on standby.
On the System only
[Press and hold]
To cancel the prohibition, repeat the same procedure.
8
Page 14
Playing at Random—Random Play
Press until the RND
1
2
or
(random) indicator
lights up on the display
before playback.
Playback starts in a
random order.
Random Play ends
when all tracks have
been played back.
Programming the Playing Order—
Program Play
• This function is not available for MP3/WMA discs.
• You can program up to 32 tracks.
Press repeatedly until the PRGM
1
2
(program) indicator lights up on the
display before playback.
or
Select a track number to program.
Operations during Random Play
To Pr ess
Skip a track
Go back to the
beginning of
the current
track
Exit from
Random Play
Press to skip the
current track.
Press to go back to
the beginning of the
current track.
Press once while
playback is stopped.
Playing Repeatedly—Repeat Play
• This function is not available when Random Play is
activated.
Press repeatedly before you start
playback to specify the repeat mode as
follows:
1
2
REP 1 REP GRP
REP OFF
REP 1
REP GRP
REP ALL Repeats all tracks.
REP OFF Normal playback.
or
(MP3/WMA only)
REP ALL
Repeats the current (or
specified) track.
Repeats all tracks in the
current group.
3
Repeat steps 2 and 3 to program other tracks you
want.
4
• If you try to program a 33rd track, “FULL” will
appear on the display.
5
Press to program the selected track.
The tracks are played in the order you
or
have programmed.
Operations during Program Play
To Pr ess
Check the
programmed
contents
Add tracks
Repeat steps
playback is stopped.
Press while playback
or
is stopped.
2 and 3 above while
1 Press to select
the track you
want to erase
while playback is
stopped.
Erase tracks
or
2 Press to erase the
track.
Erase the
entire
program
Exit from
Program Play
Press while playback
is stopped.
Press twice while
playback is stopped.
• The stored program
is erased.
9
Page 15

Listening to the Radio
Basic Tuner Operations
To
Select a band
Change the FM reception
mode (When a stereo
broadcast is hard to receive
or noisy)
For FM/AM
Select a frequency
Tune in to a preset station —
On the System On the remote
When you change the source to DAB for the first time after plugging in the power
cord, the System automatically scans the DAB bands for available ensembles. (See
page 13.)
• For general information about DAB, see “What is the DAB system?” on page 13.
Press
The selected band and frequency appear
on the main display.
• When an FM stereo broadcast or a DAB
service with sufficient signal strength is
tuned in, the ST (stereo) indicator lights
up on the display.
Press to improve reception.
—
or
or
or
The MONO indicator lights up on the
display. Reception will improve though
the stereo effect is lost.
To restore the stereo effect, press again.
Press and hold for more than 2 seconds.
The System starts searching for stations
and stops when a station of sufficient
signal strength is tuned in.
• Press during search to stop.
• Press repeatedly to change the
frequency step by step.
Press to select the preset number of the
preset station.
• For presetting stations, see page 11.
For DAB
Select an ensemble —
Select a service (either
primary or secondary)
Tune in to a preset service —
or
or
or
Press briefly while “ENSEMBLE” is displayed.
• You can select from the ensembles
found in the ensemble scanning.
Press briefly to change services.
• When you reach the last/first service of
an ensemble and press ¢/4, you
skip to the next/previous ensemble
respectively. It may take some time to
change ensembles.
Press briefly to select the preset number of
or
the preset service.
• For presetting services, see page 11.
10
Page 16

Presetting Stations and Services
You can preset 30 FM stations, 15 AM stations and 30 DAB
services manually.
Tune in to the station/service you want to preset.
• You can also store the monaural reception mode
1
for FM stations.
Press to activate the preset number
entry mode.
2
3
4
• Finish the following process while
the indication on the display is
flashing.
Press to select a preset number for
or
the station/service you are storing.
Press to store the station/service.
Receiving FM Stations with Radio
Data System
Radio Data System allows FM stations to send an
additional signal along with their regular program signals.
With the System, you can receive the following types of
Radio Data System signals.
PS (Program
Service):
PTY (Program
Type):
RT (Radio Text): Shows text messages the station
Enhanced Other
Networks:
Shows commonly known
station names.
Shows the type of the programs
being broadcast.
sends.
Provides information about the
types of programs broadcast by
the Radio Data System stations
on different networks.
NOTES
• If you store a new station/service onto an occupied
preset number, the previously stored one on that
number will be erased.
• When you preset DAB services, you can only preset
primary services. If you select a secondary service to
store, its primary service is stored instead.
Changing the Radio Data System
Information
Each time you press the button, the main
display changes as follows:
Frequency
(Non-Radio Data System signal)
NOTES
• “PS,” “PTY,” or “RT” is displayed while the System is
searching for the corresponding Radio Data System
information.
• If no Radio Data System signals are sent by a station,
“NO PS,” “NO PTY,” or “NO RT” appears on the main display.
11
Page 17

Switching Temporarily to
a Program of Your Choice
Automatically
The Enhanced Other Networks function allows the System
to switch temporarily to a station/service broadcasting a
program of your choice (TA, NEWS, or INFO).
• While you are listening to an FM station, the System can
switch to one of the preset FM stations.
• While you are listening to a DAB service, the System can
switch to another DAB service.
• This function works only while listening to a station/
service which provides the required signals.
Press repeatedly to select the program type:
(Canceled)
TA Traffic announcement in your area
NEWS News
INFO Information
How the Enhanced Other Networks function works:
Case 1
If no station/service is broadcasting the program of
your choice
The System continues tuning in to the current station/
service.
\
When a station/service starts broadcasting the
program of your choice, the System automatically
switches to that station/service.
The PTY code indicator starts flashing.
\
When the program is over, the System goes back
to the previously tuned station/service, but the
function still remains active (the indicator stops
flashing and remains lit).
Case 2
If a station/service is broadcasting the program of
your choice
The System automatically switches to the station/
service. The PTY code indicator starts flashing.
\
When the program is over, the System goes back
to the previously tuned station/service, but the
function still remains active (the indicator stops
flashing and remains lit).
Case 3
If the station/service currently tuned in is
broadcasting the program of your choice
The PTY code indicator starts flashing.
\
When the program is over, the indicator stops
flashing (the function still remains active).
Searching for Programs Using PTY
Codes (PTY Search)
While listening to an FM station:
You can locate a particular kind of program from the 30
preset stations (see page 11) by specifying a PTY code.
While listening to a DAB service:
You can locate a particular kind of program from among
all the services you can receive by specifying a PTY code.
• For details about PTY codes, see page 20.
Press to enter the PTY code setting
1
2
3
NOTES
• To stop at any time during the search, press PTY
SEARCH.
• To continue searching after it has stopped on an
unwanted program, press PTY SEARCH again while the
PTY code is flashing on the display.
• If no program is found, “NOTFOUND” appears on the
display.
mode.
“PTY” and “SELECT” appear
alternately on the main display.
Select a PTY code.
or
The System starts searching for a
program of the selected type. One is
tuned in when found.
12
Page 18

What is the DAB System?
DAB (Digital Audio Broadcasting) is one of the digital radio
broadcasting systems available today. It can deliver digital
quality sound without any annoying interference or signal
distortion. Furthermore, it can carry text, pictures and
data. In contrast to FM broadcast, where each program is
transmitted on its own frequency, DAB combines several
programs (called “services”) to form one “ensemble.”
“Primary services” (main radio stations) are sometimes
accompanied by “secondary services” to broadcast
additional programs.
CAUTION:
Electrostatic discharge from your body may cause noise
from the speakers and you cannot hear the broadcast.
If this happens, turn off the System (on standby), then turn
it on again.
Changing the DAB Information
Each time you press the button, the main
display changes as follows:
Service label
PTY
Scanning for Ensembles
The System scans the DAB bands to pick out available
ensembles.
• When you change the source to DAB for the first
time after plugging in the power cord, the System
automatically performs the scanning.
To start the scanning
Press and hold for more than 2 seconds while
DAB is selected as the source.
• When you move your System or adjust the
antenna position, perform the scanning.
When the scanning is complete, the System starts playing
the first service of the ensemble found first .
Tuning in to All the Ensembles
1
2
“ENSEMBLE” appears on the main
display.
Press and hold for more than 2
seconds.
The frequency changes every
second through all of the ensembles
or
regardless of their signal status.
• Release the button when the
desired ensemble is reached.
Clock
(Non-DAB signal)
Frequency
PTY: Program Type (See page 11.)
DLS: Dynamic Label Segment (text
messages the station sends)
* The preset number is displayed only when
the service has been selected using the
PRESET UP/DOWN keys.
NOTE
• If no signals are sent, “NOSIGNAL” (instead of a service
label), “NO PTY” (instead of PTY), or “NO TEXT” (instead of
DLS) appears on the display.
DLS
Preset channel
number*
Ensemble ID
13
Improving the DAB Reception
With the supplied DAB antenna, you may not be able to
receive L-Band ensembles. You can improve the reception
of both L-Band and Band III ensembles by using an active
antenna (see page 4).
To supply the power to the active antenna
After connecting an active antenna, press
and hold for more than 2 seconds while the
System is on standby. Power is supplied to
the active antenna and “ANT.P ON” appears
on the display.
To cut the power supply, press and hold
again. “ANT.P OFF” appears on the display.
• You cannot change this setting when the
Save Mode is activated (see page 6).
Page 19

Listening to an iPod
Listening to an iPod
Compatible iPod types:
iPod nano 1GB/2GB/4GB
iPod nano (2nd Generation) 2GB/4GB/8GB
iPod mini 4GB/6GB
iPod (4th Generation) 20GB/40GB
iPod photo (4th Generation) 20GB/30GB/40GB/60GB
iPod video (5th Generation) 30GB/60GB/80GB
• iPod is a trademark of Apple Inc., registered in the U.S.
and other countries.
• If the iPod does not play correctly, update your iPod
Software to the latest version. For details about updating
your iPod, check on the Apple web site
<http://www.apple.com>.
To connect an iPod
Do not connect or disconnect the iPod when the system
is turned on.
• When connecting the plug, make sure that the side with
the arrow mark is facing down.
1
2
Adjust the volume to the level you want to listen
3
to.
NOTES
• When iPod is selected as the source...
– “CONNECT” appears on the main display with the
iPod connected.
– “NO CONNE” appears on the main display without the
iPod connected.
• The iPod battery is charged through the iPod terminal in
the following cases:
– When the System is turned on and the source is iPod.
– When the System is turned off.
Turn the volume down to the
minimum level.
The iPod is turned on and the last
track you have selected is played
back.
• If the track is not played back
automatically, press again.
5 mark
Front view
Connection cable for iPod
(supplied)
arrow mark
Stand for iPod
(supplied)
14
Page 20

Basic iPod Operations
To
On the
System
On the
remote
Press
Play back
Select a
track/Forward
search/Reverse
search
To Turn off the iPod
Press and hold for more than 2 seconds.
• Turning off the System* or changing
from iPod to another source also turns
off the iPod.
* Turning off the System may not turn
off the iPod depending on the current
source.
Disconnecting the iPod
• When disconnecting the iPod, make
sure this System is turned off.
• To disconnect the cable from the
iPod, press the buttons on the sides
while pulling it out.
• During playback, press again to pause.
• Press to select the next track.
• Press and hold to fast-forward the track during playback.
• Press to go back to the beginning of the current or previous track.
• Press and hold to fast-reverse the track during playback.
NOTE
If any iPod other than those listed on “Compatible
iPod types” (on page 14) is connected, the iPod may
not be operated from the System. In this case, you can
deactivate the iPod battery charge function so that the
iPod may be operated, but the iPod cannot be charged
through the System.
To deactivate the battery charge
function
Change the source to “iPod” and press
and hold while no iPod is connected.
• “P.OFF” appears on the main display.
To use the battery charge function, change the source
to iPod and press and hold SET until “P.ON” appears on
the main display.
15
Page 21

Listening to a Digital Audio Player
IMPORTANT:
It should be noted that it may be unlawful to
re-record pre-recorded tapes, records, or discs
without the consent of the owner of copyright in
the sound or video recording, broadcast or cable
program and in any literary, dramatic, musical, or
artistic embodied therein.
Listening to a Digital Audio Player
Digital Audio Player
Front view
Stereo mini plug cord (not
supplied)
1
2
Start playing the connected Digital Audio Player.
3
Adjust the volume to the level you want to listen
4
to.
Turn the volume down to the
minimum level.
Press repeatedly to select LINE.
To audio output
(or headphone out, etc.)
To Adjust the Audio Input Level
If the sound from the Digital Audio Player connected
to the LINE IN jack is too loud or too quiet, you can
change the audio input level through the LINE IN jack
without changing the volume level.
Press and hold for more than 2 seconds
while LINE is selected as a source.
You can select one of three levels :
To Play Back a Digital Audio Player
Easily
Quick Portable Link (QP Link) automatically switches
the source to LINE as the Digital Audio Player
connected to the LINE IN jack starts playback.
Press and hold for more than 2 seconds
to activate QP Link.
The QPL indicator lights up on the
display.
To cancel this function, press and hold
for more than 2 seconds again.
When QP Link is activated, connecting a Digital
Audio Player to the LINE IN jack and starting playback
performs the following:
– While listening to another source...
Changes the source to LINE.
– While the System is on standby...
Turns on the System and changes the source to LINE
(not applicable when the Save Mode is activated).
Recording on a Digital Audio Player
Digital Audio Player equipped with
Front view
Stereo mini plug cord
(not supplied)
Start recording on the Digital Audio Player or set it
1
ready for recording.
2
To audio input
Tune in to the station you
want to recording, or start
playing the iPod, disc, or
USB mass storage class
device.
audio input
To Select the Audio Output Level
If the recorded sound on the Digital Audio Player
connected to the LINE OUT jack is too loud or too
quiet, you can change the audio output level through
the LINE OUT jack without changing the volume level.
Press to change the audio output
level when the System is turned on.
or
You can select one of two levels :
16
Page 22

Setting the Clock and the Daily Timer
Setting the Clock
Without setting the built-in clock, you cannot use the Daily Timer or the Sleep Timer.
Press to activate the clock setting mode.
1
• If you have already adjusted the clock before, press repeatedly until the clock setting mode is
selected.
2
• To exit from the clock settings, press CLOCK/TIMER as required.
• To go back to the previous step, press CANCEL.
or
Adjust the hour, then the minute.
Setting the Daily Timer
Using the Daily Timer, you can wake up with your favourite music.
• You can store three Daily Timer settings, but you can activate only one of them at a time.
Press repeatedly to select one of the timer settings—DAILY 1 ON time, DAILY 2 ON time,
or DAILY 3 ON time.
Daily 1 Timer Daily 2 Timer
1
Canceled Clock setting mode ON (Time)
1 Adjust the hour then the minute for the on-time.
2 Adjust the hour then the minute for the off-time.
3 Select the playback source—TUNER-FM, TUNER-AM, DAB, DISC, LINE, USB or iPOD.*
2
or
3
* When iPOD is selected as the playback source, charge the iPod battery through the iPod terminal (see page 14);
otherwise, Daily Timer may not work.
• To exit from the timer settings, press CLOCK/TIMER as required.
• To correct a misentry during the process, press CANCEL. You can return to the previous step.
4 For DAB/FM/AM: Select a preset service/station.
For LINE: Make the connected device ready for playback.
5 Select the volume level.
• You can choose from “VOLUME 0” to “VOLUME 31” and “VOLUME – –.” If you select
“VOLUME – –,” the volume is set to the same level as when the System was last
turned off.
Turn off the System (on standby).
• When a Daily Timer is set, the timer indicator ( ) lights up on the display.
• When the on-time of the Daily Timer comes, the System increases the volume level
gradually to the preset level over about 10 seconds.
ON (Time) ON (Time)
(See above.) Daily 3 Timer
To turn off the Daily Timer
1
Press repeatedly to select “DAILY 1,” “DAILY 2,” or “DAILY 3.”
2
To turn on the Daily Timer again, select one of the timer settings by pressing CLOCK/TIMER, then press SET.
17
Page 23

Learning More about This System
Basic and Common Operations (see pages 5 to 6)
• Pressing one of the source buttons also turns on the
System and starts playing back.
Playing Back a Disc/USB Mass Storage Class Device
(see pages 7 to 9)
• This System cannot play “packet write” discs.
• For MP3/WMA playback...
– In this manual, “file” and “track” are interchangeably
used for MP3/WMA operations.
– This System can play back MP3/WMA files with the
extension code <.mp3> or <.wma> (regardless of the
letter case—upper/lower).
– It is recommended that you make each MP3/WMA
file at a sampling rate of 44.1 kHz and at bit rate of
128 kbps. This System cannot play back files made at
bit rate of less than 64 kbps.
– When making MP3/WMA discs, use ISO 9660 Level 1
or Level 2 for the disc format.
– This System can show Tag data ( Version 1).
– MP3/WMA discs require a longer readout time than
regular CDs. (It depends on the complexity of the
group/file configuration.)
– Some MP3/WMA files cannot be played back and will
be skipped. This results from their recording process
and conditions.
– The playback order of MP3/WMA tracks may be
different from what you had intended while recording.
If a folder does not include MP3/WMA tracks, they are
ignored.
• For USB mass storage class device playback...
– When connecting a USB mass storage class device,
refer also to its manual.
– You can play back MP3/WMA files on a USB mass
storage class device (maximum data transfer rate:
2 Mbps).
– Connect one USB mass storage class device to the
System at a time. Do not use a USB hub.
– This System is compatible with USB 2.0 Full Speed.
– You cannot play back a file larger than 2 Gigabytes.
– This System cannot recognize a USB mass storage
class device whose rating is other than 5 V and does
not exceed 500 mA.
– This System may not play back some USB mass
storage class devices and does not support DRM
(Digital Rights Management).
– You cannot send any data to your USB mass storage
class device from this System.
– Noise and static electricity may stop the USB mass
storage class device’s sound. In this case, disconnect
and connect the USB mass storage class device again
after turning off the System.
• An iPod does not play on the USB MEMORY terminal.
• This System can recognize up to 511 tracks on a
disc/USB mass storage class device. Also, the System
can recognize up to 150 tracks per group and up to
99 groups on a disc/USB mass storage class device (for
MP3/WMA).
– Playable files which do not belong to any groups are
treated as being part of Group 1.
JVC bears no responsibility for any loss of data in USB
mass storage class device while using this System.
18
Page 24

Listening to the Radio (see pages 10 to 13)
• The time shown on the display is based on the builtin clock of the System, not on the information sent
through DAB or Radio Data System.
• If you want to know more about Radio Data System, visit
<http://www.rds.org.uk>.
Listening to an iPod (see page 14 to 15)
• The iPod battery cannot be charged while the System is
in Save Mode.
• When the battery charge function (see page 15) is
turned off, the iPod may not be turned on from the
System.
• You cannot send any data to your iPod from the System.
• Sound distortion may occur when playing back audio
sources with high recording levels. When distortion
occurs, it is recommended to turn off the equalizer of
the iPod. For information on operating the iPod, see the
iPod instruction manual.
• Do not hit or touch the iPod terminal pins or connector
pins directly. This could damage the connector part.
• Do not carry the System with iPod connected. You
might drop it or it might cause damages to the
connector part.
Listening to a Digital Audio Player (see page 16)
• When the sound signal from the Digital Audio Player
is too weak, QP Link may not function correctly. In this
case, turn up the volume of the Digital Audio Player so
that the System can detect the sound signal properly.
• Changing from LINE to another source while QP Link is
working will deactivate QP Link temporarily. In this case,
the following will reactivate QP Link:
– Pressing and holding QP LINK on the remote control.
– When no sound signal comes from the LINE IN jack for
about 30 seconds after the System has been turned
off.
• If you press the
the preset Timer turns the System off while QP Link is
working, the System deactivates QP Link temporarily. In
such cases, the following will reactivate QP Link:
– When no sound signal comes from the LINE IN jack for
about 30 seconds after the System has been turned
off.
– When you turn on the power again.
• Before recording on a Digital Audio Player, deactivate QP
Link or disconnect the Digital Audio Player from the LINE
IN jack; otherwise, LINE will be selected as the source
and the recording will stop.
• Sound adjustments (see page 6) do not affect the sound
recorded on the Digital Audio Player.
Setting the Clock and the Daily Timer (see page 17)
• “0:00” flashes on the main display until you have set the
clock.
• The clock may gain or lose 1 to 2 minutes per month. If
this happens, readjust the clock.
• When you unplug the power cord or if a power failure
occurs, the clock and the timer will be canceled. You
need to set the clock first, then the timer again.
• If you set the Sleep Timer after the Daily Timer has
started playing the selected source, the Daily Timer is
canceled.
button to turn the System off or if
19
Page 25

Description of the PTY codes for Radio Data System and DAB
NEWS: News.
AFFAIRS: Topical program expanding or enlarging
INFO: Programs the purpose of which is to
SPORT: Programs concerned with any aspect of
EDUCATE: Educational programs.
DRAMA: All radio plays and serials.
CULTURE: Programs concerning any aspect of
SCIENCE: Programs about natural sciences and
VARIED: Used for mainly speech-based programs
POP M: Commercial music of current popular
ROCK M: Rock music.
EASY M: Current contemporary music considered to
LIGHT M: Instrumental music, and vocal or choral
CLASSICS: Performances of major orchestral works,
OTHER M: Music not fitting into any of the other
*
Only Radio Data System has this PTY code.
NOTE
Classification of the PTY codes for some FM stations may be different from the above list.
upon the news—debate, or analysis.
impart advice in the widest sense.
sports.
national or regional culture, including
language, theater, etc.
technology.
such as quizzes, panel games and
personality interviews.
appeal.
be “easy-listening”.
works.
symphonies, chamber music, etc.
categories.
WEATHER: Weather reports and forecasts.
FINANCE: Stock Market reports, commerce, trading
etc.
CHILDREN: Programs targeted at a young audience.
SOCIAL: Programs about sociology, history,
geography, psychology and society.
RELIGION: Religious programs.
PHONE IN: Involving members of the public
expressing their views either by phone or
at a public forum.
TRAVEL: Travel information.
LEISURE: Programs about recreational activities.
JAZZ: Jazz music.
COUNTRY: Songs which originate from, or continue
the musical tradition of the American
Southern States.
NATION M: Current popular music of the nation or
region in that country’s language.
OLDIES: Music from the so-called “golden age” of
popular music.
FOLK M: Music which has its roots in the musical
culture of a particular nation.
DOCUMENT: Programs concerning factual matters,
presented in an investigative style.
TEST*: Broadcasts for testing emergency
broadcast equipment or unit.
ALARM*: Emergency announcement.
NONE*: No program type, undefined program, or
difficult to categorize into particular types.
20
Page 26

Troubleshooting
If you are having a problem with your System, check this list for a possible solution before calling for service.
General
The power does not come on.
\ The power plug is not inserted securely. Plug it in
securely.
Adjustments or settings are suddenly canceled
before you finish.
\ There is a time limit. Repeat the procedure again.
Operations are disabled.
\ The built-in microprocessor may malfunction due to
external electrical interference. Unplug the power
cord and plug it back in.
Unable to operate the System from the remote
control.
\ The path between the remote control and the
remote sensor on the System is blocked.
\ The batteries of the remote control are exhausted.
No sound can be heard.
\ The speaker connections are incorrect or loose.
\ Headphones are connected.
The System does not work properly.
\ Many functions of this System are performed by
microcomputers. If pressing a button does not result
in the normal action, disconnect the power cord from
the wall outlet, wait for a while, and connect the cord
again.
Disc/USB Mass Storage Class Device
Operations
The disc does not play.
\ The disc is placed upside down. Place the disc with
the label side facing up.
\ The disc is recorded with “packet writing (UDF file
system).” It cannot be played. Check the files you want
to play back.
The USB mass storage class device does not play.
\ The USB mass storage class device is not connected
properly.
MP3/WMA groups and tracks are not played back as
you expect.
\ The playing order was determined when the groups
and tracks were recorded. It depends on the writing
application.
The sound is discontinuous.
\ The disc is scratched or dirty.
\ MP3/WMA files have not been properly copied onto
the USB mass storage class device.
The USB mass storage class device’s sound stops.
\ Noise and static electricity may stop the sound. In this
case, disconnect then connect the USB mass storage
class device again after turning off the System.
The disc tray does not open or close.
\ The power cord is not plugged in.
\ Disc ejection is prohibited (see page 8).
Radio Operations
Hard to listen to broadcasts because of noise.
\ Antenna connections are incorrect or loose.
\ The AM loop antenna is too close to the System.
\ The FM antenna is not properly extended or
positioned.
Cannot receive an ensemble.
\ Your area is not covered by the ensemble.
\ The DAB antenna is not properly extended or
positioned. Adjust the antenna and try the ensemble
scanning again.
\ Connect an active antenna (see page 4).
iPod Operations
iPod is not turned on.
\ The iPod is not connected properly.
iPod does not play though “CONNECT” appears on
the main display.
\ The battery of the iPod is empty. Leave the iPod
connected for more than 10 minutes.
iPod is not played back from the System.
\ The iPod battery charge function is activated.
\ The iPod is not compatible with the System. Check
the compatibility on the list on page 14.
iPod is not charged.
\ The source is not iPOD.
\ The System is in Save Mode.
\ The iPod battery charge function is deactivated.
Timer Operations
The Daily Timer does not work.
\ The System was already turned on when the on-time
came. The Timer starts working only when the System
is turned off.
\ The iPod battery is not charged through the iPod
terminal when iPOD is selected as the playback
source.
21
Page 27

Maintenance Specifications
To get the best performance out of the System, keep your
discs and the mechanism clean.
Handling discs
• Remove the disc from its case by holding it at the edge
while pressing the center hole lightly.
• Do not touch the shiny surface of the disc, or bend the
disc.
• Put the disc back in its case after use.
• Be careful not to scratch the surface of the disc when
placing it back in its case.
• Avoid exposure to direct sunlight, extreme temperature,
and moisture.
To clean the disc:
Wipe the disc with a soft cloth in a straight line from
center to edge.
Cleaning the System
• Stains should be wiped off with a soft cloth. If the
System is heavily stained, wipe it with a cloth which has
been soaked in water-diluted neutral detergent and
wrung well, then wipe clean with a dry cloth.
• Since the System may deteriorate in quality, become
damaged or get its paint peeled off, be careful about
the following:
– DO NOT wipe it with a hard cloth.
– DO NOT wipe it forcefully.
– DO NOT wipe it with thinner or benzine.
– DO NOT apply any volatile substances such as
insecticides to it.
– DO NOT allow any rubber or plastic to remain in
contact for a long period of time.
Amplifier section
OUTPUT POWER:
20 W (10 W + 10 W) at 6 Ω (10% THD)
Speakers/Impedance: 6 Ω – 16 Ω
Audio input LINE IN:
500 mV/47 kΩ (at “IN_LVL1”)
250 mV/47 kΩ (at “IN_LVL2”)
125 mV/47 kΩ (at “IN_LVL3”)
Audio output LINE OUT:
1.0 Vrms (47 kΩ) (at “OUT_LVL1”)
2.0 Vrms (47 kΩ) (at “OUT_LVL2”)
Digital input: USB MEMORY
Tuner section
FM Tuning range: 87.50 MHz – 108.00 MHz
AM (MW) Tuning range:
522 kHz – 1 629 kHz
DAB tuning range:
BAND III : 174.928 MHz – 239.200 MHz
L-B AND: 1 452.960 MHz – 1 490.624 MHz
CD player section
Dynamic range: 88 dB
Signal-to-noise ratio: 85 dB
Wow and flutter: Immeasurable
USB storage
USB specification: Compatible with USB 2.0 Full Speed
Compatible device: Mass storage class
Compatible file system: FAT16, FAT32
Bus power supply: Max. 500 mA
Speakers
Speaker units: 8 cm cone x 1
Impedance: 6 Ω
Dimensions (approx.): 101 mm x 185 mm x 166 mm
(W x H x D)
Mass (approx.): 0.7 kg each
Microsoft and Windows Media are either registered
trademarks or trademarks of Microsoft Corporation in
the United States and/or other countries.
Supplied Accessories
See page 2.
General
Power requirements: AC 230 V , 50 Hz
Power supply to iPod, USB mass storage class device:
5 V/500 mA
Power consumption: 20 W (Power on)
2.3 W (On standby, without
charging iPod)
1.0 W or less (Save Mode)
Dimensions (approx.): 287 mm x 70 mm x 220 mm
(W x H x D)
Mass: 1.7 kg
Specifications and appearance are subject to change
without prior notice.
22
Page 28

MICRO COMPONENT SYSTEMUX-E8DAB
EN
© 2007 Victor Company of Japan, Limited
0607JSKMDCJMM
 Loading...