

Page 1

COMBINATION CAMERA
TK-C675B
RELEASE
LOCK
INSTRUCTIONS
This instruction book is made from 100% recycled paper.
For Customer Use :
Enter below the Serial No. which
is located on the body.
Retain this information for future
reference.
Model No. TK-C675B
Serial No.
Page 2

For USA and CANADA
CAUTION
RISK OF ELECTRIC SHOCK
DO NOT OPEN
CAUTION : TO REDUCE THE RISK OF ELECTRIC SHOCK,
REFER SERVICING TO QUALIFIED SERVICE PERSONNEL.
DO NOT REMOVE COVER (OR BACK).
NO USER SERVICEABLE PARTS INSIDE.
Due to design modifications, data given in this instruction
book are subject to possible change without prior notice.
WARNING:
TO REDUCE THE RISK OF FIRE OR
ELECTRIC SHOCK, DO NOT EXPOSE THIS
APPLIANCE TO RAIN OR MOISTURE.
The lightning flash with arrowhead symbol, within an
equilateral triangle is intended to alert the user to the
presence of uninsulated “dangerous voltage” within the
product's enclosure that may be of sufficient magnitude to constitute a risk of electric shock to persons.
The exclamation point within an equilateral triangle
is intended to alert the user to the presence of important operating and maintenance (servicing) instructions in the literature accompanying the appliance.
Information for USA
This device complies with Part 15 of the FCC Rules.
Changes or modifications not approved by JVC could v oid
the user's authority to operate the equipment.
Thank you for purchasing this product.
CONTENTS
FEATURES ......................................................................... 2
OPERATING PRECAUTIONS............................................. 3
SAFETY PRECAUTIONS ................................................... 3
CONTROLS, CONNECTORS AND INDICATORS.............. 4
INSTALLATION ................................................................... 5
CONNECTIONS.................................................................. 8
HOW TO USE THE FERRITE CORE.................................. 9
MENU SETTINGS............................................................. 10
Menu operations ............................................................... 10
Menu screen flow .............................................................. 11
CAMERA MODE SELECT screen .................................... 12
CAMERA VIDEO ADJUST screen.................................... 13
VIDEO ADJUST FOR POSITION screen ......................... 14
POSITION TEXT screen ................................................... 15
CAMERA TEXT screen ..................................................... 16
AREA TEXT screen .......................................................... 17
ALARM TEXT screen ........................................................ 18
AUTO PAN SET screen..................................................... 19
AUTO PATROL SETUP screen ......................................... 20
FACTORY SETTINGS screen ........................................... 21
TROUBLESHOOTING ...................................................... 22
SPECIFICATIONS............................................................. 23
m Before starting an important recording, be sure to per-
form a test recording in order to confirm that a normal
recording is possible.
m We do not accept liability for the loss of a recording in
the case of it becoming impossible to record due to a
problem in the video camera, VCR or video tape.
m We do not accept liability for any damage to the cam-
era in cases when it is dropped because of incomplete
installation due to not observing the installation instructions correctly. Please be careful when installing the
camera.
AVERTISSEMENT:
POUR EVITER LES RISQUES D'INCENDIE OU
D'ELECTROCUTION, NE PAS EXPOSER
L'APPAREIL A L'HUMIDITE OU A LA PLUIE.
INFORMATION (FOR CANADA)
RENSEIGNEMENT (POUR CANADA)
This Class [B] digital apparatus meets all requirements of
the canadian Interference-Causing Equipment Regulations.
Cet appareil numénque de la classe [B] respecte toutes les
exigences du Réglement sur le matériel brouilleur du Canada.
FEATURES
m Features large aper ture lens with 16x zoom ratio (f=4.5 to
72mm, F1.2, at wide angle).
m Wide coverage angle (Horizontal 3.8° to 56°, Vertical 2.9° to
44°).
m 64 preset positions .
m 360 deg ree endless panning.
m Maxim um 240 deg ree/sec. panning speed.
m Maxim um 2-second z oom speed.
m One-push auto focus capability.
m RS-485 (Maximum Number of Connections: 32) or RS-422A
control signal.
m High-quality pictures by adopting dome cover with optical
distortion compensation and CCD with 380,000 (U: type)
or 440,000 (E: type) effective pixels.
m Adopts large aperture lens, highly sensitiv e CCD.
(Minimum illumination : 2.8 lx, at wide angle)
m Auto panning function.
m Variable panning speed.
The panning speed is varied automatically according to
the zoom ratio of the lens. (The panning speed decreases
when the zoom lens is set near TELE and increases when
it is set near WIDE.)
m Auto flip
When the camera reaches its tilting limit, it automatically
flips itself over by 180 degrees by panning around.
(This makes it possible for the camera to continue tilting
even after it has been tilted straight downward.)
mAuto patrol
Preset positions are activated in sequence.
m Menu screen display
A built-in character generator provides an on-screen menu
display for easy selection and setting of various functions.
m 5-language on-screen display
Names or designations for camera, preset, area and alarm
can be displayed in English, German, F rench, Italian and
Spanish. (E type only)
m Area title indication
The 360˚ panning angle (horizontal rotation) is divided into
16 sectors, allowing you to chec k the title in each area.
When the camera is manually panned, the preset area
designation is shown on the screen.
2
Page 3

Operating precautions
● To save energy, when it is not being used turn the system's
power off.
● This camera has been designed for indoor use. It cannot be
used outdoors.
● This camera has been designed exclusiv ely to be hung from
the ceiling.It may malfunction if it is placed on a surface or if
it is tilted.
● Do not install or use the camera in the following places.
• In a place exposed to rain or moisture.
• In a place with vapor or oil soot, for example in a kitchen.
• In a temperature outside the operating temperature range
(–10°C to 50°C).
• Near a source of radiation, X-rays, strong radio waves or
magnetism.
• In a place subject to vibration.
• In a place with excessive dirt.
● Insufficient head ventilation of the camera ma y cause a malfunction.
Be careful not to block the ventilation to the camera.
● If this camera and the cables connected to this camera are
used where there are strong electromagnetic waves or where
there is magnetism present, for example near a r adio or TV
transmitter, po w er tr ansformer or an electric motor, the picture may produce noise and the colors may be affected.
● This camera incorporates an AGC circuit. As a result, when
it is used under low light conditions, the camera sensitivity
is automatically boosted and the picture may look uneven.
This is not a malfunction however.
● When the AGC is ON in the auto iris mode, varying the iris
with the IRIS control button may not change the picture
brightness due to the gain boost function. In this case, s witch
the AGC OFF or set the iris mode to manual.
● In auto iris mode, the IRIS control buttons may not function
under certain brightness conditions (i.e. when a sufficient
amount of light cannot be obtained). In this case , set the iris
mode to manual.
● The white balance setting when used under a fluorescent
lamp should be A TW (A uto White). If it is set to MANU (Manual), the white balance may not be adjustable.
● When presetting this unit’ s position, turn it on and wait until
it has warmed up sufficiently inside (about 30 minutes). This
is to avoid a change in the lens focus due to a rise in temperature after installation.
● When this camera is used in the AUT O white balance mode,
the recorded colors may be slightly different from the actual
colors due to the operational principles of the auto-tracking
white balance circuit. This is however not a malfunction.
● If a high-intensity object (such as a lamp) is shot, the image
on the screen may hav e vertical lines (smear) or blur (blooming) at its periphery. This is a characteristic of the CCD, and
is not a defect.
● The electronic shutter of this camera has been set to 1/60(1/
50) sec. at the factory. When the camera is used under a
fluorescent lamp or in an area with a local power frequency
of 50/60 Hz, change the shutter speed to 1/100(1/60) on the
remote control unit. (The sensitivity deteriorates slightly with
a shutter speed of less than 1/100(1/60) sec.)
Utype (Etype)
● When the camera is used to monitor the same position continuously for 24 hours or more, the contact resistance of the
horizontal rotary parts may increase after long hours of use,
and the picture may be affected b y noise interference or the
remote control operation may become unstable.
To prevent this, turn the system power off and on at least
once a week (to initialize) and also clean the contacts.
● Do not touch the dome cover of the lens directly with your
hand, contamination of this cover will lead to a deterioration
of the picture quality.
● Observe the following when carrying out camera maintenance.
• Turn the power OFF bef ore proceeding to carry out main-
tenance.
• Clean the dome cover lens using a lens wiper cloth (or a
tissue).
If it is contaminated seriously , clean the contaminated part
with a cloth (or a tissue) which has been soaked in a solution of water and a neutral detergent.
● In order to reduce the generation of unnecessary signals,
be sure to install the provided ferrite cores when connecting the cables. (See “How to use the f errite core” on page 9)
● Some subjects may not be brought into f ocus with the autofocus facility of this unit. Focusing will be made easier by
locating a subject with highly contrasted vertical stripes near
the center of the image.
● Optional controller is required to use the TK-C675B camera. Please contact your local dealer or installer for more
information about this controller.
Caution during continuous use
Continuous use of the preset sequence or auto panning operation may make the service life much shorter than expected.
The guaranteed operation count for the zoom lens of this
camera is around 400,000 times.
(Example)
24 hours of operation per day with single zoom
operation per minute:
400,000 (times)/60 (minutes)/24 (hours) = 278 (da ys)
Safety precautions
• As this unit contains parts which rotate at high speeds, it
should be installed in a place suitable to withstand the possible vibrations and to support the unit weight of 2 kg. If the
ceiling is made of dressed-face plywood, plaster board or
another material which is not strong enough to support the
unit, reinforce the installed surface by using a reinforcing
material (including plywood). If the reinforcement is insufficient, the monitor picture may be blurred due to vibrations
or in the worst case the unit may fall.
• Installation of this unit requires expertise. Please contact
your dealer for details.
• The ceiling to mount the TK-C675B has to be strong enough
to support ten times the weight of this product.
If the ceiling is not strong enough, make sure to apply reinforcement to the ceiling before installation.
• Be sure to tighten the screws and nuts securely, Insufficient
tightening may cause the unit to fall from its mount.
• The unit is to be powered by an AC24V.
Isolated power supply only. (E type)
Class 2 only (U type)
3
Page 4

Controls, connectors and indicators
View when the camera body
cover is removed
11
15
14
16
15
13
12
Camera position
alignment mark
Dome cover lens
Dome cover
17
Ventilation
18
■ Ceiling mount ■ Camera body
10
23 1
9
(Front)
4
5
6
7
8
5
(Back: Camera side)
1
VIDEO OUTPUT terminal
Outputs composite video signals and is to be connected
to a monitor, etc. (Output impedance 75ohm)
2
Control signal terminals
The camera can be controlled by RS-422A or RS-485 signals.
3
AC 24V input terminals
Input the 24 V AC power.
Isolated power only (E type)
Class 2 only (U type)
Drop prevention wire
4
Engage this wire in the drop prevention wire hook
the camera.
Mounting holes (× 4)
5
Use these holes to attach the ceiling mount to the ceiling.
6
Camera connector (male)
Connects with the camera connector 13 on the camera.
7
Lock screw
Use this screw to fasten the camera clamp 14 to fix the
camera.
8
Camera position alignment mark
Align with the mark 17 when mounting the camera onto
the ceiling mount.
9
Safety wire hole
To prevent the camera from dropping accidentally, pass a
12
on
safety wire from the ceiling through these holes.
10
Terminal board cover
Protects the cable connection terminals against dirt, etc.
11
Control signal termination switch (TERM)
This is a termination ON/OFF switch for the input signals
2
to the control signal terminal
. When it is set to ON, the
“RX+” to “RX–” route is terminated via 110Ω resistor.
12
Hook for attaching the drop prevention wire
4
Attach the drop prevention wire
13
Camera connector (female)
Connects with the camera connector
to this hook.
6
on the ceiling
mount.
14
Camera clamp
Fix the camera body to the ceiling mount by fastening the
7
lock screw
15
Camera body cover
to this clamp.
Remove this cover when using the setting switches 16.
16
Setting switches
Set the PROTOCOL, etc.
Ref. “Switch settings” on page 6.
17
Camera positioning alignment mark
When mounting the camera onto the ceiling mount ,align it
with the mark
18
Ventilation
.
8
This is the ventilator for the internal cooling fan.
CAUTION
Make sure that nothing interferes with the v entilator when
installing the camera.
4
Page 5

Installation
1.
2.
ø90mm
Remove the terminal board
cover by flipping it up while
pushing its top to the left.
TX+
TX–
VIDEO OUT
RX+
RX–
1.
Make a hole (90 mm dia.) in the ceiling for passing through the
connection cables.
2.
Connect the cables to the terminal board.
Tur n the power of all the connected equipment to OFF before
connecting the cables.
Remove the terminal board cover and connect the video signal
cable (coaxial cable),the control signal cables (× 4) and the AC
24 V power cables (× 2).
●AC 24 V power cables
Connect the AC 24 V power supply to the AC 24V terminals on
the terminal board. To prevent connection errors or a cable disconnection, we recommend the use of lug plates for the connections.
The following table shows the connection distances and connection cables provided that 2-conductor VVF cab les (vinyl-insulated
vinyl sheath cables) are used.
Drop prevention wire rail
To controller
Lug plates
To AC24V
To monitor, etc.
RX+ RX–
(TX–)(TX+)
(RX–)
(RX+)
TX+
TX–
To controller
Meshed wire
Polyethylene
Core
conductor
12mm
6mm
Fold the meshed wire back.
CAUTION
In order to reduce the generation of unnecessary signals, be sure to install the provided ferrite cores when
connecting the cables.
3.
Ceiling mount
Maximum extension
(reference)
Conductor diameter
100 m 260 m 410 m 500 m
1.0ømm
and more than
1.6ømm
and more than
2.0ømm
and more than
2.6ømm
and more than
CAUTION
• If thin cables are used(i.e. with a high resistance), a significant
voltage drop will occur when the unit is at its maximum power
consumption (pan, tilt, zoom operated simultaneously). Either use
a thick cable to restrict the voltage drop at the camera side to
below 10%, or place the AC 24V pow er supply near to the camera.
If voltage drop occurs during operation, the performance will be
unstable.
• Attach the cable conductors so that they do not come into contact with the drop prevention wire.
• Be sure to connect the AC 24 V cables correctly. Otherwise the
camera will be damaged.
●Control signal cables
These cables should be connected only when it is required to
control the camera using the RS-422A or RS-485 signals. The
use of 0.65 4-conductor twisted pair cables is recommended. With
these cables, the maximum extension distance is 1,200 m.
●Video signal cables
Connect the coaxial cables to the video signal output terminals.
Treat the tips of the coaxial cables as shown on the left before
connection.
After having connected all of the required cables, again attach the
terminal board cover.
3.
Attach the ceiling mount to the ceiling.
Attach the ceiling mount to the ceiling using 4 screws, while pa ying attention not to foul the connection cables.
Use M4 or No. 8-32 UNC screws and bolts f or attaching the mount.
If using wood screws, use those with a diameter of 4.1 mm.
The screw head height should be no more
than 4 mm.
max.
4 mm
Screws
CAUTION
The ceiling to mount the TK-C675B has to be strong enough to
support ten times the weight of this product.
If the ceiling is not strong enough, make sure to apply reinforcement to the ceiling before installation.
To prevent accidental dropping of the camera, connect the ceiling
plate or channel with the ceiling mount using a safety wire. Thread
the safety wire through the safety wire hole on the ceiling mount.
5
Page 6
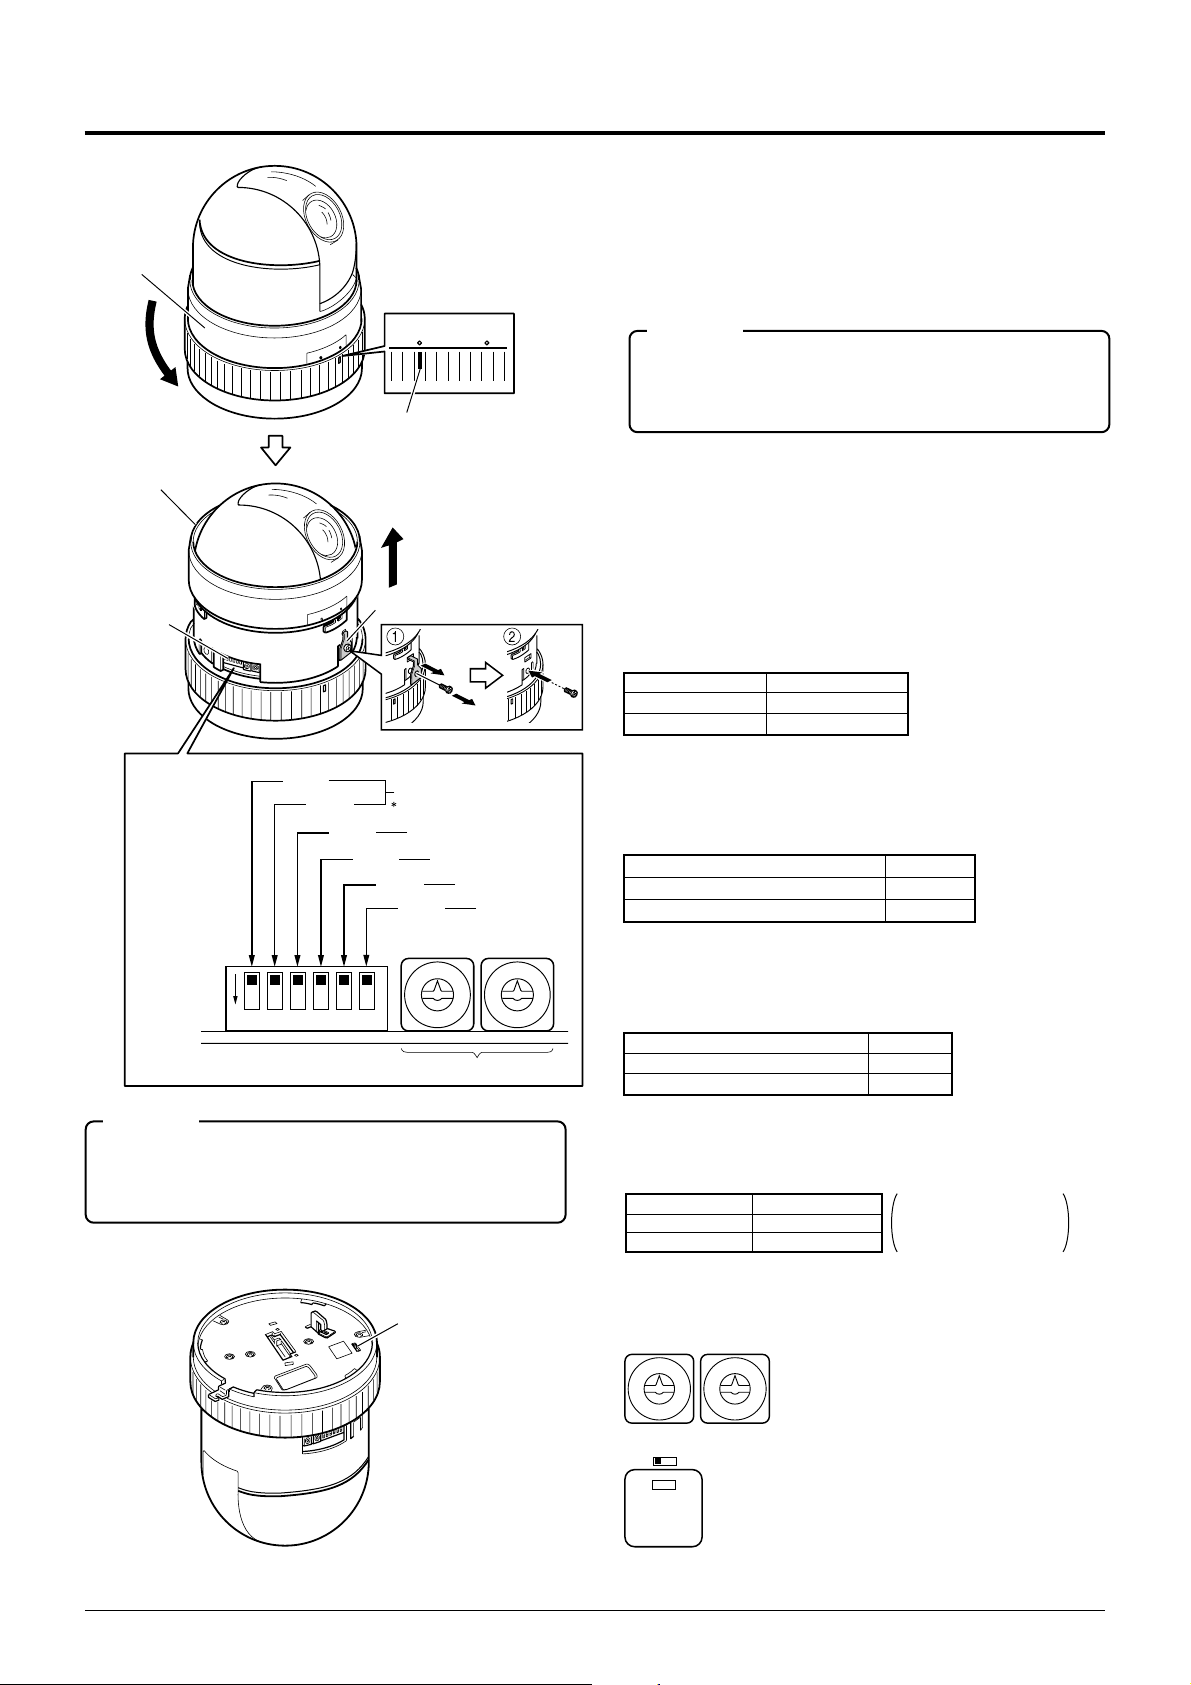
Installation (continued)
4.
Camera body
cover
RELEASE
LOCK
RELEASE
LOCK
Mark
Camera body
cover
LOCK
RELEASE
Transportation bracket
Setting
switches
5.
SW1
SW2
SW3
123456
ON
Reserved
This switch must be set OFF.
DISP
SW5
PROTOCOL (1)
PROTOCOL (2)
SW4
SW6
DOUBLE
FIGURES
0
1
9
2
8
3
7
4
6
5
SYNC
SINGLE
FIGURES
0
9
8
7
6
Board
Machine ID
CAUTION
The setting of these switches will be read only once at the
time when the power is turned on. Even if the setting is
changed in a state where the power is on, such a change
will not be reflected.
5.
TERM switch
4.
Tur n the camera body cover to anti clockwise to set the word
“RELEASE” on the camera body cov er ov er the mark, then pull
the camera body cover upward.
Transportation bracket is mounted when it is shipped from the
factory. Make sure to remove it bef ore installation.
<How to remove the transportation bracket>
Remove the screw to remo ve the transportation bracket.
1
Then fasten the dome cov er with the screw which was removed.
2
CAUTION
If the power is supplied without removing the transportation
bracket, initialization won’t be carried out properly , so that the
camera cannot be controlled with a remote control unit.
Make sure that it is removed.
5.
Check the switch settings and the communication protocol.
Read the controller specifications carefully before proceeding
to the switch settings.
■ Switch settings
DISP, PROT OCOL (1), (2), SYNC, Machine ID . Set these switches as required.
●DISP (SW3)
Selects whether “MANUAL” is displayed or not when the camera's preset position is changed by the manual operation of the
remote control unit.
MANUAL SW3
Displayed OFF
Not displayed ON
●PROTOCOL (1) (SW4)
Selects whether a single or multiple cameras are controlled in
the system.
Set PROT OCOL(1) to Multi drop when connecting multiple cameras in series.
Point to point OFF
Multi drop (when using the RM-P2580)
When set to Multi drop, be sure to set the Machine ID of each camera.
1
2
3
4
5
●PROTOCOL (2) (SW5)
Set according to the communication protocol used for controlling the cameras.
PROTOCOL (2)
Duplex (when using the RM-P2580)
Simplex ON
Ref. “Control signal connection” is on page 9.
●SYNC (SW6)
When this switch is set to ON, the vertical sync of the camera is
locked to the AC power line frequency.
SYNC SW6
INT OFF
LL ON
(Initial set: OFF)
• SW1 and SW2 are not in use for the present. Make sure that
they are set to OFF.
●Machine ID
0
1
9
8
7
6
9
2
8
3
7
4
5
6
The machine ID should be set when us-
0
1
2
ing the camera in Multi drop.
3
4
Choose an ID in the 1 to 32 range.
5
(Initial set: 00)
●TERM switch
• When SW4 is set to ON in order to connect more
ON OFF
RX TERM
(110 Ω)
SC46125-002
(Initial set: ON)
than one camera in series, set the TERM switch of
only the terminal camera to ON. The TERM switches of the other cameras should be set to OFF.
See “Connections” on page 8.
• When SW4 is set to OFF, this switch should be set to
ON.
(Initial set: OFF)
SW4PROTOCOL (1)
ON
SW5
OFF
LL mode
U type: 60 Hz area only
E type: 50 Hz area only
(Initial set: OFF)
(Initial set: OFF)
6
Page 7

Camera body cover
6.
Claw
Setting
switches
Cover
7.
Claw
LOCK
RELEASE
RELEASE
Indication
mark
LOCK
RELEASE
Ceiling mount on the ceiling
RELEASE
LOCK
LOCK
Installation (continued)
6.
Attach the camera body cover.
Align "RELEASE on the camera body cover with the indication mark on the camera body , fit the cover onto the camera body, then rotate the cover clockwise until “LOCK” is
indicated.
• Check that the three claws on the cover are locked onto
the camera body and that there is no clearance between
the cover and the camera body.
7.
Attaching the drop prevention wire.
As shown in the illustration, pull out the drop prevention
wire from the ceiling mount and engage it with the drop
prevention wire hook on the back of the camera.
CAUTION
Be sure to connect the drop prevention wire . Otherwise the
camera body may drop from the ceiling.
8.
Mount the camera body.
1) Ensure that the lock screw on the ceiling mount is loose.
2) Align the camera position alignment mark (^) on the ceil-
5
ing mount with the camera position alignment mark (
the camera body and fit the camera body into the mount.
3) Rotate the camera body clockwise until it is checked.
Then, check that the camera body clamp is located on the
lock screw on the ceiling mount.
4) Tighten the lock screw.
) on
Pull
out.
Drop prevention
wire
8.
Lock screw
Ceiling mount
on the ceiling
Hook for attaching
the Drop prevention
wire
Camera position
alignment mark
Camera position
alignment mark
CAUTION
Be sure to tighten the lock screw fully. Otherwise the camera body may vibrate or drop from the ceiling.
For dismounting the camera from the ceiling, perf orm steps
1.
to 8. in the reverse order.
Camera clamp
Lock screw
Camera body Rotate the camera
body clockwise.
Tighten the lock screw.
7
Page 8

Connections
CAUTION
If this camera and the cables connected to this camera is used where there are strong electromagnetic waves or where there
is magnetism present, for example near a radio or TV transmitter, power transformer or an electric motor, the picture may
produce noise and the colors may be affected.
Optional controller is required to use the TK-C675B camera. Please contact your local dealer or installer for more information
about this controller.
■ When the system is composed of a single camera
24V AC
■ When the system is composed of more than one camera
CAUTION
Be sure to terminate the control signal cable at both ends. The cables (length of stub) connecting to non-terminated equipment
(camera or controller) must be as short as possible. If the length of stub is long, control may not be made correctly.
CONTROL
VIDEO OUT
PROTOCOL(1) SW4 :OFF
TERM : ON
Controller*
Monitor
● When the controller is not located at the end.
CAM1 CAM2 CAM31 CAM32
PROTOCOL(1) : ON
MACHINE ID : 01
TERM : ON
PROTOCOL(1) : ON
MACHINE ID : 02
TERM : OFF
• Set the TERM switches of the cameras at both ends
(CAM1 and CAM32) to ON, and TERM switches of the
other cameras to OFF.
• Do not terminate at the controller.
length of stub
● When the controller is located at the end.
CAM1 CAM2 CAM32
length of stub
CONTROL Cable
length of stub
CONTROLLER*
VIDEO
SWITCHER, etc.
CONTROL Cable
length of stub
PROTOCOL(1) : ON
MACHINE ID : 31
TERM : OFF
length of stub
PROTOCOL(1) : ON
MACHINE ID : 32
TERM : ON
Terminate it
with 110ohm.
CONTROLLER*
PROTOCOL(1) : ON
MACHINE ID : 01
TERM : ON
PROTOCOL(1) : ON
MACHINE ID : 02
TERM : OFF
PROTOCOL(1) : ON
MACHINE ID : 32
TERM : OFF
• Set the TERM switch of CAM1 to ON, and also, terminate at the controller with 110 ohm.
Set the TERM switches of the other cameras to OFF.
8
VIDEO
SWITCHER, etc.
Page 9

■ control signal connection
Wire clamp
Use a twisted-pair cable for the connection.
Connections (continued)
●Duplex
When the camera is controlled with the full duplex protocol, set SW5 to OFF.
Camera Controller
RX+
RX–
TX+
TX–
Four wires must be connected.
●For example (connection with the RM-P2580)
Camera RM-P2580
RX+ C
RX– D
TX+ A
TX– B
TX+
TX–
RX+
RX–
C TX+
D TX–
A RX+
B RX–
●Simplex
When the camera is controlled with the simplex transmission protocol, set SW5 to ON.
Camera Controller
RX+
RX–
Two wires must be connected.
TX+
TX–
How to use the ferrite core
In order to reduce the generation of unnecessary signals, be sure to install the provided ferrite cores when connecting
the cables.
TERMINAL BOARD
AC 24V INPUT
terminals
Large ferrite core
Control signal
terminals
Small ferrite core
VIDEO OUTPUT
terminals
Large ferrite core
Notes
Install the ferrite cores within 100 mm of the camera-side connectors.
(Fasten the ferrite core with the provided wire clamp as the drawing
on the right.)
• For AC 24V INPUT terminals
Pass the AC 24V cable through the ferrite core twice and cconnect it to the camera.
• For Control signal terminals
Pass the Control signal cable through the ferrite core three times and cconnect it to the camera.
• For VIDEO OUTPUT terminals
Pass the VIDEO SIGNAL cable through the ferrite core and cconnect it to the camera.
AC 24V
Controller
Monitor, etc.
9
Page 10

Menu settings
This chapter shows an example of connection to the JVC’s remote control unit RM-P2580. Read it and refer also to the instruction
manual of the RM-P2580.
Menu operations
It is possible to set the menu screen of the remote control unit (RM-P2580).
Item
Cursor
SETUP
MENUMENU SET
CLOSECLOSE
FOCUS
NEAR
WIDEWIDE
SETMENU
buttonbutton
SPEED
IRIS
AF
ZOOM
OPENOPEN
FAR
TELE CLEAR
CAMERACAMERA POSITIONPOSITION
POWERPOWER
ALARM
KEY LOCKKEY LOCK
CAMERA/POSITION
1
2
4
5
7
8
0
/HOME/HOME
SETUP
CAME AR..
CONT ORL U
3
6
9
ENTER
CAMERACAMERA
OPTIONOPTION
SETU
NIT..
OPTIONOPTION
1
AUTO
PAN
PATROLPATROL
P..POSI ITON
PAN/TILT
control lever
REMOTE CONTROL UNIT REMOTE CONTROL UNIT
AUTO F-1 F-2 F-3
POSI-POSI-
TIONTION
2
AUTO
RM-P2580
PAN/TILTLENS
Submenu
to be
followed
1.
Turn the rear power switch of the RM-P2580 to ON.
2.
Pressing the MENU button for approximately 3 seconds
will light the LED and the SETUP screen will be outputted
from the rear MONITOR OUTPUT-1.
3.
Use the pan/tilt control lever to move the cursor (>) and
select CAMERA.
• The cursor will move up when the lever is pressed up
(6).
• The cursor will move down when the lever is pressed
down (7).
4.
Press the SET button to display the SETUP screen of the
camera.
MEMO
Submenu is to follow for items with · · .
5.
Select the item in the same manner as step 3.
SETUP screen (main menu)
CAME ARMO
CAME ARV
VIDEO A JD
SETUP
DE S
DEOI
FOR
.TEXT ED .TI
ET. .AUTO PA SN
LSET..AUTO PA ORT
TTINGS. .FACT ROY ES
SETUP screen of the camera
V.PH SAE
POS. ETXT
AUTO FL PI
AREA T I ELT
DE SELECTCAME ARMO
LOC.
EEDVAR. APN PS
SIZE NORMALALM. TE TX
Sample screen display
Change
mark
V .PH SAE
POS. ETXT
AUTO FL PI
AREA T I ELT
DE SELECTCAME ARMO
LOC.
EEDVAR. APN PS
SIZE NORMALALM. TE TX
ELECT. .
ADJUST . .
POS I . .
127
UP—L
OFF
OFF
OFF
130
UP L
OFF
OFF
OFF
6.
Change the value of the selected item by moving the pan/
tilt control elver right and left.
• The value will become smaller when the lev er is pressed
to the left (8).
• The value will become larger when the lever is pressed
to the right (t).
The change mark ( ) shown in the diagram on the left will
appear when changes have been made.
MEMO
For details concerning submenu settings, see the next
page.
7.
When changes have been made, press the MENU button
to return to the normal screen.
10
Sample screen after change
Page 11

Menu screen flow
The menu screen flow is as follows. For details, see the reference pages.
Normal screen
Menu settings (continued)
Camera SETUP screen
CAME ARMO
CAME ARV
VIDEO A JD
SETUP
DE S
DEOI
FOR
.TEXT ED .TI
ET. .AUTO PA SN
LSET..AUTO PA ORT
TTINGS. .FACT ROY ES
ELECT. .
ADJUST . .
POS I . .
CAMERA MODE SELECT screen
DE SELECTCAME ARMO
V.PH SAE
POS. ETXT
AUTO FL PI
AREA T I ELT
LOC.
127
UP—L
OFF
EEDVAR. APN PS
OFF
OFF
SIZE NORMALALM. TE TX
Z Page 12
VIDEO ADJUST FOR POSITION screen
ST FOR PO ISIDEO ADJVU
POSI ITON
IRIS MOD
BLC OMDE
W.BA ALNEC
RB G IAN
TEXT . .
E
AUTO
OFF
ATW
127
Z Page 14
CAMERA VIDEO ADJUST screen
AGC OMDE
SHUT ETR
ENHA CNE
AV/ P AEK
COLOR LLEVE
DEO AD JUSTCAME ARVI
PEEDS
12dB
1/60
HHIG
8/2
5
Z Page 13
TEXT EDIT screen
TEDITTEX
CAME ARTE
ALARM TE
AREA TE .TX
XT . .
T..X
.
AUTO PAN SET screen
AUTO PAN
STAR T PO
RETU NRSOP
PAN SETUATO
MODE
ITIOS
ITION
RETURN
NSET..
SET . .
Z Page 19
FACTORY SETTINGS screen
SETTINGSFA TCORY
ETT INGS YESFACT ROYS
Z Page 21
Z Page 15
AUTO PATROL SETUP screen
TROL MO E1DAU OTPA
HOME 3 0 SECPAT ORL1
POS1 3 0SECPAT ORL2
POS2 3 0SECPAT ORL3
POS3 3 0SECPAT ORL4
POS4 3 0SECPAT ORL5
POS5 3 0SECPAT ORL6
POS6 3 0SECPAT ORL7
POS7 3 0SECPAT ORL8
M MODE F OCUS/BWFWD D Z O O
Z Page 20
11
Page 12

Menu settings (continued)
CAMERA MODE SELECT screen
Item
V.PHASE
POSITION TEXT
LOCA TION
AUTO FLIP
Function
Set when adjusting the vertical of other cameras operating in
the line lock (LL) mode.
Adjust while viewing the screen.
The value will become smaller when the pan/tilt lev er is pressed
to the left (8).
The value will become larger when the pan/tilt lever is pressed
to the right (t).
Used to set the display position of position titles.
UP: positions the title at the top of the screen.
DOWN: positions the title at the bottom of the screen.
L: positions the title towards the left of the screen.
C: positions the title in the center of the screen.
R: positions the title towards the rigt of the screen.
The camera is flipped over automatically by 180 degree at the
tilting limit.
(This makes it possible for the camer a to continue tilted straight
down ward.)
ON: Auto flip will funtion
OFF: Auto flip will not funtion
Variable
range
0 ~ 255
UP–L, DOWN–L
UP–C, DOWN–C
UP–R, COWN–R
OFF
ON
Factory
setting
127
UP–L
OFF
V AR.PAN SPEED
AREA TITLE
ALM.TEXT SIZE
The panning speed is varied automatically according to the zoom
ratio of the lens.
(The panning speed decreases when the zoom lens is set near
TELE and increases when it is set near WIDE).
ON: Var. pan speed will function
OFF: Var. pan speed will not function
The Area Title function divides the space covered by a camera
into sixteen units, with a 16-character ID allocated to each unit.
(AREA 1 ~ AREA16)
The set AREA TITLE is displayed when manually panning the
camera.
ON: Area title is displayed
OFF: Area title is not displayed
The character size to display during ALARM is set.
ALARM
ALARM
OFF
ON
OFF
ON
NORMAL
DOUBLE
AREA
16
AREA
1
AREA
2
OFF
OFF
AREA
3
DOUBLE
12
NORMAL SIZE DOUBLE SIZE
Page 13

CAMERA VIDEO ADJUST screen
Menu settings (continued)
Item
AGC MODE
SHUTTER
SPEED
Function
The maximum gain of the AGC (Automatic gain control) is set.
This setting value becomes a maximum limit when the gain is
automatically changed according to brightness.
Set this to 20dB when there is little light on the subject.
MEMO
The gain is automatically raised in dark areas when the
AGC is in operation. At this time, the screen may appear
rough; however, this is not a malfunction.
Set the electronic shutter speed for each camera.
To reduce flickering of fluorescent lighting, set the electronic
shutter is speed to 1/100 (1/50) when in areas with commercial
power supply frequency of 50Hz, and 1/60 when in areas of
60Hz, set to 1/60.
MEMO
More of the smearing effect, which is characteristic of CCD ,
will be noticed when the shutter speed is increased.
Variable
range
OFF
12 dB
20 dB
1/60 (1/50), 1/100 (1/60),
1/1000, 1/2000, 1/4000,
1/10000
( ) is version E.
Factory
setting
12 dB
1/60 (1/50)
ENHANCE
AV/PEAK
COLOR LEVEL
This function compensates the edge to enhance the sharpness
of the monitor screen and can be set per camera.
LOW: low edge enhancement
HIGH: high edge enhancement
This setting is effective only during auto iris.
For the exposure detection, the ratio of the average value (AV)
and the peak value (PK) is set for each camera.
Increase the AV (ex. 10/0):
Increase the A V when portions other than the highlighted areas of the screen is dark. Conv enient when there is lighting in
a dark room.
Increase the PK (ex. 5/5):
Increased when there is halation on the highlighted areas of
the screen.
Used when setting the color level of the image signal. The screen
colors will become lighter when small value is set. The colors
will become darker when large value is set.
LOW
HIGH
10/0
9/1
8/2
7/3
6/4
5/5
0 ~ 10
(increments of 1)
HIGH
8/2
5
13
Page 14

Menu settings (continued)
VIDEO ADJUST FOR POSITION screen
Item
POSITION TEXT
IRIS MODE
BLC MODE
Function
It is possible to set up to 16 characters to use as titles for set
positions (max. 63) and home positions (max. 1).
See the next page for details on settings
MEMO
Always register positions before setting titles. Positions
cannot be selected unless they have been registered. For
details on registering positions, see the instruction manual of the used remote control.
Set the iris depending on the brightness.
AUTO: the iris is automatically adjusted to the normal value.
AUT O+: the iris is automatically adjusted brighter than the nor-
mal value
AUTO–: the iris is automatically adjusted darker than the nor-
mal value.
MANU: used when settings the iris manually
With this setting, light measurement areas are selected during
auto iris control.
Set when there is light in the background of the subject.
There are 4 types of settings. Choose depending on the location of the light source.
Light measurement
area
Light
measurement
area
OFF AREA 1 AREA 2 AREA 3 AREA 4
Light measurement
area
Light measurement
area
Light measurement
area
AUTO
AUTO+
AUTO–
MANUAL
OFF
AREA1
AREA2
AREA3
AREA4
Variable
range
Factory
setting
AUTO
OFF
W. BALANCE
RB GAIN
The white balance is adjusted manually or automatically for light
within the range of 2000°k and 7000°k.
ATW: automatic light temperature adjustment mode
MANU: manual adjustment mode
(Adjustment is made in the next item, RB GAIN)
Used when adjusting the white balance manually.
Small value: blue is enhanced
Large value: red is enhanced
MEMO
Value cannot be changed when W. BALANCE is set to
ATW.
ATW
MANUAL
0 ~ 255
(increments of 1)
ATW
127
14
Page 15

Menu settings (continued)
POSITION TEXT screen
It is possible to set titles to positions (max. 63) and home positions (max. 1) using text of 16 characters or less.
MEMO
Always register positions before setting titles. Positions cannot be selected when they are not registered.
To register positions, see the instruction manual of the used remote control unit.
SPACE Character section (blink)
NTEXTPO ISTIO
9ABCDEFGHIJK0123 54678
VWXYZabcdefgNMLOPRQSTU
/–:
Title input section (blink)
POSITION TEXT screen
POSITION TEXT screen
rs tuvwxyz. ,'jkhi l nmopq
TEXT ZOOMSE ELCT
(U version)
NTEXTPO ISTIO
9ABCDEFGHIJK0123 54678
VWXYZabcdefgNMLOPRQSTU
rs tuvwxyz. ,'jkhi l nmopq
ЫЗСдлпцьвкоф/–: ÄÖ ÂÜÊÎÔ
ùçñß¡¿éíûá ó àúèìò
TEXT ZOOMSE ELCT
(E version)
1.
Select the camera using the remote control (See the instruction manual of the used remote control)
The image signal of the home position of the selected camera will be outputted.
Press the MENU button to display the SETUP screen of
the remote control, select CAMERA, then press the SET
button to display the CAMERA SETUP screen.
2.
Select POSITION TEXT item in the VIDEO ADJUST FOR
POSI screens, then press the SET button to display the
POSITION TEXT screen (see left).
3.
To set a home position title, skip to 4.
To set a position title, select the position to title from the
remote control unit. The camera will move to the selected
position.
4.
In the POSITION TEXT screen, the first characters of the
character area and the title input area will flash, allowing
input.
5.
Use the 6, 7, 8 and t of the pan/tilt control lever to
select the character.
NTEXTPO ISTIO
9ABCDEFGHIJK0123 54678
VWXYZabcdefgNMLOPRQSTU
rs tuvwxyz. ,'jkhi l nmopq
ЫЗСдлпцьвкоф/–: ÄÖ ÂÜÊÎÔ
ùçñß¡¿éíûá ó àúèìò
VEDDA ATSA
When selecting the next position
6.
When the first character of the title as been selected, press
the ZOOM (TELE) button to move on to the next character.
At this time, the first character will be confirmed.
Pressing the ZOOM (WIDE) button will move the flashing
position in the title input area to the left. Use when correcting errors to the set title.
7.
To set the next position title, repeat steps 3 through 6.
DAT A SA VED will appear for appro ximately 3 seconds when
selecting the next position.
8.
To set other position title of a camera, repeat steps
through 7.
9.
When all positions have been set, press the MENU button
to return to the normal screen.
1
15
Page 16

Menu settings (continued)
CAMERA TEXT screen
It is possible to set up to 16 characters to use as a title during camera selection.
ZOOM(WIDE)
button
ZOOM(TELE)
button
SETUP
SETU
CAME AR..
CONT ORL U
P..POSI ITON
NIT..
Remote control SETUP screen
SETUP
MENU SET
CLOSE
NEAR
WIDE
SPEED
IRIS
FOCUS
ZOOM
buttonbutton
AF
SETMENU
POWERPOWER
ALARM
KEY LOCKKEY LOCK
OPEN
FAR
TELE CLEAR
CAMERA POSITION
CAMERA/POSITION
1
2
3
4
5
6
7
8
9
0
ENTER
/HOME
PAN/TILT
control lever
REMOTE CONTROL UNIT REMOTE CONTROL UNIT
AUTO F-1 F-2 F-3
RM-P2580
Numeric Key
buttons
CAMERACAMERA
OPTION
AUTOAUTO
POSI-
TION
OPTION
1
AUTOAUTO
PANPAN
PATROLPATROL
PAN/TILTLENS
2
CAMERA
button
ENTER
button
1.
Select the camera to set the camera title (See the instruction manual of the used remote control).
The image signal of the selected camera will be outputted
when pressing CAMERA → Numeric Key → ENTER button.
2.
Press the MENU button to display the SETUP screen of
the remote control.
Use the pan/tilt control lever to select CAMERA, then press
the SET button to display the SETUP screen of the camera.
At this time, the camera will move to the home position.
CAME ARMO
CAME ARV
VIDEO A JD
SETUP
DE S
DEOI
FOR
.TEXT ED .TI
ET. .AUTO PA SN
LSET..AUTO PA ORT
TTINGS. .FACT ROY ES
Camera SETUP screen
TEDITTEX
CAME ARTE
ALARM TE
AREA TE .TX
XT . .
T..X
.
TEXT EDIT screen
ATEXTACMER
9ABCDEFGHIJK0123 54678
VWXYZabcdefgNMLOPRQSTU
rs tuvwxyz. ,'jkhi l nmopq
ЫЗСдлпцьвкоф/–: ÄÖ ÂÜÊÎÔ
ùçñß¡¿éíûá ó àúèìò
TEXT ZOOMSE ELCT
ELECT. .
ADJUST . .
POS I . .
Displayed
only for
E version.
3.
Use the pan/tilt control lever to select TEXT EDT , then press
the SET button to display the TEXT EDUT screen.
4.
Select CAMERA TEXT, then press the SET button to display the CAMERA TEXT screen.
5.
In the CAMERA TEXT screen, the first characters of the
character area and the title area will flash, allowing input.
6.
Use the 6, 7, 8 and t of the pan/tilt control lever to
select the character.
7.
When the first character of the title as been selected, press
the ZOOM (TELE) button to confirm the first character and
to move on to the next character of the title.
Pressing the ZOOM (WIDE) button will move the flashing
position in the title input area to the left. Use when correcting errors to the set title.
1
■ To set the next camera title, repeat steps
8.
When all camera title have been set, press the MENU b ut-
through 7.
ton to return to the normal screen.
16
CAMERA TEXT screen
Page 17

Menu settings (continued)
AREA TEXT screen
The 360° panning angle (horizontal rotation) is divided into 16 sectors, allowing you to check the title in each area. When the
camera is manually panned, the preset area designation is shown on the screen.
It is possible to set titles of 16 characters or less to each area.
To select whether to display the title or not is made in AREA TITLE.
AREA
16
AREA
1
AREA
AREA
CAME AR..
CONT ORL U
3
2
SETUP
SETU
NIT..
Remote control SETUP screen
SETUP
MENUMENU SET
SETMENU
buttonbutton
CAMERACAMERA POSITION
POWERPOWER
ALARMALARM
KEY LOCKKEY LOCK
PAN/TILT
control lever
REMOTE CONTROL UNIT REMOTE CONTROL UNIT
AUTO F-1 F-2 F-3
RM-P2580
Numeric Key
buttons
FOCUS(FAR)
button
FOCUS(NEAR)
button
ZOOM(WIDE)
CAMERA/POSITION
CAMERACAMERA
1
SPEED
IRIS
OPEN
CLOSE
FOCUS
FAR
NEAR
AF
TELE CLEAR
WIDEWIDE
ZOOM
2
4
5
7
8
0
ENTER
/HOME/HOME
POSI-
3
TION
OPTION
OPTION
6
1
AUTOAUTO
AUTOAUTO
9
PANPAN
PATROLPATROL
PAN/TILTLENS
CAMERA
button
2
button
ZOOM(TELE)
button
ENTER
button
1.
Select the camera to set the area title (See the instruction
P..POSI ITON
manual of the used remote control).
The image signal of the selected camera will be outputted
when pressing CAMERA → Numeric Key → ENTER button.
2.
Press the MENU button to display the SETUP screen of
the remote control.
Use the pan/tilt control lever to select CAMERA, then press
the SET button to display the SETUP screen of the camera.
At this time, the camera will move to the home position.
CAME ARMO
CAME ARV
VIDEO A JD
SETUP
DE S
DEOI
FOR
.TEXT ED .TI
ET. .AUTO PA SN
LSET..AUTO PA ORT
TTINGS. .FACT ROY ES
Camera SETUP screen
TEDITTEX
CAME ARTE
ALARM TE
AREA TE .TX
XT . .
T..X
.
TEXT EDIT screen
TEXT 10RAEA
9ABCDEFGHIJK0123 54678
VWXYZabcdefgNMLOPRQSTU
rs tuvwxyz. ,'jkhi l nmopq
ЫЗСдлпцьвкоф/–: ÄÖ ÂÜÊÎÔ
ùçñß¡¿éíûá ó àúèìò
AREA FOCUSEXTTZOOM
ELECT. .
ADJUST . .
POS I . .
Displayed
only for
E version.
3.
Use the pan/tilt control lever to select TEXT EDIT, then
press the SET button to display the TEXT EDIT screen.
4.
Select AREA TEXT, then press the SET button to display
the AREA TEXT 1 screen.
This corresponds to home position area 1.
5.
In the AREA TITLE 1 screen, the first characters of the
character area and the title area will flash, allowing input.
6.
Use the 6, 7, 8 and t of the pan/tilt control lever to
select the character.
7.
When the first character of the title as been selected, press
the ZOOM (TELE) button to confirm the first character and
to move on to the next character of the title.
Pressing the ZOOM (WIDE) button will move the flashing
position in the title input area to the left. Use when correcting errors to the set title.
8.
To set the next area title, press the FOCUS (FAR) button.
The camera will move to the ne xt area and the AREA TEXT
2 screen will appear. In the same manner as AREA TEXT
5
1, repeat steps
9.
When all area title have been set, press the MENU button
through 7 to set the title.
to return to the normal screen.
AREA TEXT screen
17
Page 18

Menu settings (continued)
ALARM TEXT screen
It is possible to set up to 12 characters to use as a title during alarm.
FOCUS(FAR)
button
FOCUS(NEAR)
button
ZOOM(WIDE)
button
ZOOM(TELE)
button
SETUP
SETU
CAME AR..
CONT ORL U
P..POSI ITON
NIT..
Remote control SETUP screen
SETUP
MENU SET
CLOSE
NEAR
WIDE
SPEED
FOCUS
ZOOM
buttonbutton
IRIS
AF
SETMENU
POWER
ALARM
KEY LOCKKEY LOCK
OPEN
FAR
TELE CLEAR
CAMERA POSITION
CAMERA/POSITION
1
2
3
4
5
6
7
8
9
0
ENTER
/HOME
PAN/TILT
control lever
REMOTE CONTROL UNIT REMOTE CONTROL UNIT
AUTO F-1 F-2 F-3
RM-P2580
Numeric Key
buttons
CAMERACAMERA
OPTION
AUTOAUTO
POSI-
TION
OPTION
1
AUTOAUTO
PANPAN
PATROLPATROL
PAN/TILTLENS
2
CAMERA
button
ENTER
button
1.
Select the camera to set the alarm title (See the instruction manual of the used remote control).
The image signal of the selected camera will be outputted
when pressing CAMERA → Numeric Key → ENTER button.
2.
Press the MENU button to display the SETUP screen of
the remote control.
Use the pan/tilt control lever to select CAMERA, then press
the SET button to display the SETUP screen of the camera.
At this time, the camera will move to the home position.
CAME ARMO
CAME ARV
VIDEO A JD
SETUP
DE S
DEOI
FOR
.TEXT ED .TI
ET. .AUTO PA SN
LSET..AUTO PA ORT
TTINGS. .FACT ROY ES
Camera SETUP screen
TEDITTEX
CAME ARTE
ALARM TE
AREA TE .TX
XT . .
T..X
.
TEXT EDIT screen
TEXT 1AALRM
9ABCDEFGHIJK0123 54678
VWXYZabcdefgNMLOPRQSTU
rs tuvwxyz. ,'jkhi l nmopq
ЫЗСдлпцьвкоф/–: ÄÖ ÂÜÊÎÔ
ùçñß¡¿éíûá ó àúèìò
A L ARM F OCUSETXTZOOM
ELECT. .
ADJUST . .
POS I . .
Displayed
only for
E version.
3.
Use the pan/tilt control lever to select TEXT EDIT, then
press the SET button to display the TEXT EDIT screen.
4.
Select ALARM TEXT, then press the SET button to display
the ALARM TEXT 1 screen.
5.
In the ALARM TITLE 1 screen, the first characters of the
character area and the title area will flash, allowing input.
6.
Use the 6, 7, 8 and t of the pan/tilt control lever to
select the character.
7.
When the first character of the title as been selected, press
the ZOOM (TELE) button to confirm the first character and
to move on to the next character of the title.
Pressing the ZOOM (WIDE) button will move the flashing
position in the title input area to the left. Use when correcting errors to the set title.
8.
T o set the ne xt alarm title, press the FOCUS (FAR) button.
The ALARM TEXT 2 screen will appear . In the same man-
5
ner as ALARM TEXT 1, repeat steps
through 7 to set
the title.
9.
When all alarm title have been set, press the MENU button to return to the normal screen.
18
ALARM TEXT screen
Page 19

Menu settings (continued)
FOCUS
button
ZOOM
button
IRIS
button
buttonbutton
PAN/TILT
SETMENU
control lever
SETUP
MENU SET
SPEED
IRIS
AF
FOCUS
ZOOM
OPEN
FAR
TELE CLEAR
/HOME
7
4
1
8
0
5
2
9
6
3
ENTER
AUTOAUTO
PANPAN
OPTION
1
OPTION
2
CAMERACAMERA
POSI-
TION
AUTOAUTO
PATROLPATROL
CLOSE
NEAR
WIDE
AUTO F-1 F-2 F-3
PAN/TILTLENS
CAMERA/POSITION
CAMERA POSITION
REMOTE CONTROL UNIT REMOTE CONTROL UNIT
RM-P2580
ALARM
POWERPOWER
KEY LOCKKEY LOCK
button
CAMERA
button
ENTER
buttons
Numeric Key
AUTO PAN SET screen
Auto pan is a feature which allows the camera to slowly move sideways automatically and is set per each camera.
There are 3 AUTO PAN modes: RETURN that goes back and forth between two points,
RIGHT that makes a right rotation and LEFT that makes a left rotation.
Picture at the
start position
Example:
Action of Retun mode
Remote control SETUP screen
CAME ARMO
CAME ARV
VIDEO A JD
AUTO PAN
STAR T PO
RETU NRSOP
START POSITION SET screen
RETURN POSITION SET screen
Slow speed
SETUP
SETU
FOR
.TEXT ED .TI
ET. .AUTO PA SN
LSET..AUTO PA ORT
TTINGS. .FACT ROY ES
NIT..
P..POSI ITON
ELECT. .
ADJUST . .
POS I . .
CAME AR..
CONT ORL U
SETUP
DE S
DEOI
Camera SETUP screen
PAN SETUATO
MODE
ITIOS
SITION SETSTA TRPO
NSET..
ITION
RETURN
SET . .
SITION SETRETU NRPO
Picture at the
stop position
1.
Select the camera to set (See the instruction manual of the used
remote control).
Press CAMERA → Numeric Key → ENTER button to output the image signal to the selected camera.
2.
Press the MENU button to display the SETUP screen of the remote
control.
Use the pan/tilt control lever to select CAMERA, then press the SET
button to display the SETUP screen of the camera.
At this time, the camera will move to the home position.
3.
Use the pan/tilt control lever to AUTO PAN SET, then press the SET
button to display the AUTO PAN SET screen.
4.
In the AUTO PAN SET screen, select AUTO PAN MODE.
Select the auto pan mode from RETURN, RIGHT and LEFT using
the pan/tilt control lever.
5.
Next, select START POSITION SET, then press the SET button to
display the START POSITION SET screen.
Adjust the angle of view at the start position using the pan/tilt control
lever, IRIS, focus and zoom button.
6.
Pressing the MENU button will display the AUTO PAN SET screen
and the set angle of view at the start position will be registered. At
this time, DATA SAVED will appear on the screen.
■ When selecting the mode to RETURN, set RETURN POSITION SET .
7.
Select RETURN POSITION SET, then press the SET button to display the RETURN POSITION SET screen.
Adjust the angle of view at the stop position, then press the MENU button. DATA SAVED will appear and the stop position will be registered.
MEMO
• Shifting in the direction of the tilt and lens operations cannot be
made at the stop position. To mak e field of view changes and lens
operations, press the SET button and set the stop position after
setting the field of view and making lens operations in the START
POSITION SETUP screen.
• Correct data will not be written when pressing the MENU button or
SET button while the camera is in motion. Always check to make
sure that the camera is still before pressing the MENU or SET button.
8.
When the start and stop positions have been set, press the MENU
button to return to the normal screen.
19
Page 20

Menu settings (continued)
AUTO PATROL SETUP screen
The auto patrol is a feature to mov e the camera to m ultiple positions at high speed in a set sequence and time and is set per each
camera.
SETMENU
buttonbutton
PAN/TILT
control lever
High speed
POSITION
POSITION
High speed
SETUP
CAME AR..
CONT ORL U
SETU
Remote control SETUP screen
CAME ARMO
CAME ARV
VIDEO A JD
SETUP
DE S
DEOI
FOR
.TEXT ED .TI
ET. .AUTO PA SN
LSET..AUTO PA ORT
TTINGS. .FACT ROY ES
POSITION
High speedHigh speed
POSITION
P..POSI ITON
NIT..
ELECT. .
ADJUST . .
POS I . .
FOCUS
button
SETUP
MENU SET
POWER
ALARM
KEY LOCKKEY LOCK
CAMERA POSITION
REMOTE CONTROL UNIT REMOTE CONTROL UNIT
AUTO F-1 F-2 F-3
RM-P2580
Numeric Key
buttons
CAMERA/POSITION
CAMERACAMERA
1
SPEED
IRIS
OPEN
CLOSE
FOCUS
FAR
NEAR
AF
TELE CLEAR
WIDE
ZOOM
2
4
5
7
8
0
ENTER
/HOME
POSI-
3
TION
OPTION
OPTION
6
1
AUTOAUTO
AUTOAUTO
9
PANPAN
PATROLPATROL
PAN/TILTLENS
CAMERA
button
2
ENTER
button
1.
Select the camera to set for auto patrol (See the instruction manual of the used remote control)
Press CAMERA → Numeric Key → ENTER button to output the image of the selected camera.
2.
Press the MENU button to display the SETUP screen of
the remote control.
Use the pan/tilt control lever to select the camera, then
press the SET button to display the SETUP screen of the
camera.
At this time, the camera will move to the home position.
3.
Select AUTO PATROL SET using the the pan/tilt control
lever, then press te SET button to display the AUTO PATROL MODE 1 screen.
20
Camera SETUP screen
TROL MO E1DAU OTPA
HOME 3 0 SECPAT ORL1
POS1 3 0SECPAT ORL2
POS2 3 0SECPAT ORL3
POS3 3 0SECPAT ORL4
POS4 3 0SECPAT ORL5
POS5 3 0SECPAT ORL6
POS6 3 0SECPAT ORL7
POS7 3 0SECPAT ORL8
M MODE F OCUS/BWFWD D Z O O
AUTO PATROL MODE 1 screen
4.
Use the pan/tilt control lever to set the auto patrol positions and time.
The time can be selected from 30 sec., 45 sec., 1 min.,
2 min., 3 min., 6 min. and SKIP.
If the selection of auto patrol position is not necessary ,
set to SKIP.
The factory setting for auto patrol will move the camera from HOME to POS63 at 30 seconds.
5.
The setting of the next mode is made using the FOCUS
(FAR) and FOCUS (NEAR) button.
6.
When all settings have been made, press the MENU button. At this time, DATA SAVED will appear on the screen.
Page 21

FACTORY SETTINGS screen
It is possible to return all camera settings to the factory settings.
Menu settings (continued)
MENU SET
CLOSE
NEAR
WIDE
SETUP
SETU
CAME AR..
CONT ORL U
P..POSI ITON
NIT..
Remote control SETUP screen
SETUP
SPEED
FOCUS
ZOOM
IRIS
AF
SETMENU
buttonbutton
OPEN
FAR
TELE CLEAR
POWERPOWER
ALARM
KEY LOCKKEY LOCK
CAMERA POSITION
CAMERA/POSITION
1
2
3
4
5
6
7
8
9
0
ENTER
/HOME
PAN/TILT
control lever
REMOTE CONTROL UNIT REMOTE CONTROL UNIT
AUTO F-1 F-2 F-3
RM-P2580
Numeric Key
buttons
CAMERACAMERA
OPTION
AUTOAUTO
PAN/TILTLENS
POSI-
TION
OPTION
1
2
AUTOAUTO
PANPAN
PATROLPATROL
CAMERA
button
ENTER
button
1.
Select the camera to initialize settings (See the instruction
manual of the used remote control).
Press CAMERA → Numeric Key → ENTER b utton to output the image signal of the selected camera.
2.
Press the MENU button to display the SETUP screen of
the remote control. Use the pan/tilt control lever to select
CAMERA, then press the SET button to display the SETUP screen of the camera.
At this time, the camera will move to the home position.
CAME ARMO
CAME ARV
VIDEO A JD
SETUP
DE S
DEOI
FOR
.TEXT ED .TI
ET. .AUTO PA SN
LSET..AUTO PA ORT
TTINGS. .FACT ROY ES
ELECT. .
ADJUST . .
POS I . .
Camera SETUP screen
SETTINGSFA TCORY
ETT INGS YESFACT ROYS
FACTORY SETTINGS screen
3.
Use the pan/tilt control lever to select FACTORY SETTINGS, then press the SET button to display the FACTORY SETTINGS screen.
4.
Use 8 and t of the pan/tilt control lever to select the
FACTORY SETTINGS item to YES.
5.
Pressing the SET button will initialize settings in approximately 3 seconds and DATA SAVED will appear.
6.
Press the MENU button to return to the normal screen.
CAUTION
If this setting operation is performed, various settings
memorized in the camera will all return to the state of factory shipment.
Especially , all the preset positions will be cleared. Therefore, exercise utmost caution!
21
Page 22

Troubleshooting
Symptom
Video is not
output.
Power cannot be
turned on.
The camera
moves from the
preset position.
Power can be
turned on, but it
later turns off
when the pan/tilt
unit is operated.
Cause (Information)
• Is there a problem in the power cables con-necting the camera to the power supply unit.
(If the power cables are too long or are of the wrong
size, the correct voltage ma y not be supplied due
to an increase in resistance.)
• Are cables connected properly to the ter minal
board on the ceiling mount?
• Was the AC 24 V power supply switched ON and
OFF repeatedly?
(The protection circuit may be activated when the
power is switched ON → OFF → ON within 5 sec.)
• Has the panning been rotated manually for cleaning, etc., while the power was on?
(The camera controls the panning position based
on the initial operation at the time the power is
turned on. If the camera position is changed manually after the initial operation. the preset camera
position is displaced.)
• Is there a problem with the power cables con-necting the camera to the power supply unit.
(If the power cables are too long or are of the wrong
size, the voltage may drop due to an increase in
resistance during the panning operation.)
Remedy
• Connect low resistance cables.
• Place the AC 24V power supply near to the camera.
(Check that the voltage supplied to the terminal
board is as rated when the camera is operating,
that is, when the rated current flows through it.)
• Connect cables properly.
• Once the AC 24 V po wer is switched OFF, it should
be switched ON again only after a lapse of more
than 5 seconds.
• Switch the camera power supply OFF then ON
again.
• Change the power cables to ones of a lower resistance
(i.e. thicker or shorter) cables.
• Place the AC 24V power supply near to the camera.
The remote
control unit does
not function.
Operation is
abnormally slow
when controlling
the unit with the
RM-P2580.
• Is the cable connected correctly?
• Are the dip switches set correctly?
• Is the cable (particularly the line connecting to TX+
and TX– of the camera) correctly connected to
the RM-P2580?
• The PROTOCOL (2) switch is set on the “Simplex” side b y mistake . Is it not? (Ref er to P age 6)
• Connect the cable correctly according to the instructions given in Page 9.
• Set the dip switches correctly according to the instructions given in Page 6, and turn the power on
again.
• Connect the cable correctly according to the instructions given in Page 9.
• Set the PROT OCOL (2) switch to the “Duple x” side.
22
Page 23

Specifications
■ CAMERA
Signal system : U type Based on NTSC standard
E type Based on PAL standard
Image device : 1/3"IT CCD
Effective picture:U type 380,000 pixels, 771 (H) × 492 (V)
E type
element
440,000 pixels, 753 (H) × 582 (V)
Sync system : Line lock/Internal
Video S/N : 48dB (Typ.)
Horizontal : 470 TV lines (Typ.)
resolution
Minimum : 3 lx (Typ. at F1.2)
illumination
Camera ID : 16 letters
White balance : ATW/Manual
■ LENS
Zoom ratio : ×16, f4.5 to f72mm
Iris range : F1.2 to F170 (suitable)
Zooming speed : Approx. 2 sec. (MAX)
Focus speed : Approx. 1 sec. (MAX)
■ External dimensions [Unit : mm]
■ MOVING MECHANISM
Panning : 360 degree endless
Tilting :0 to 90 degrees
Panning speed : 240 degree/sec, 80 degree/sec,
60 degree/sec, 40 degree/sec,
20 degree/sec, 12 degree/sec,
6 degree/sec, 4 degree/sec,
2 degree/sec
Tilting speed :
120 degree/sec, 60 degree/sec,
40 degree/sec, 30 degree/sec,
20 degree/sec, 10 degree/sec,
6 degree/sec, 2 degree/sec, 1 degree/sec,
■ GENERAL
Remote control input :RS-422A or RS-485 (non-isolated)
terminal
Power requirement : AC24V`, 50/60Hz
Power consumption :U type Approx. 23W
E type Approx. 1.4A
Operation temperature
range
Dimensions :Approx. 154mm diameter × 185mm
Mass :Approx. 2.0kg (with Ceiling mount)
Accessories :INSTRUCTIONS × 1
:–10°C to 50°C
(recommendation : 0°C to 40°C)
Ferrite core × 3
Ceiling mount × 1
87
ø154
1
ø152
ø143
ø152
)
T
L
I
T
(
˚
0
9
29
85
116
185
ø88
ø143
Ceiling
Ceiling mount hole
Screw
positions
Mounting hole ø90
113
113
Screw
positions
23
Page 24

TK-C675B COMBINATION CAMERA
is a registered Trademark owned by VICTOR COMPANY OF JAPAN, LTD.
is a registered Trademark in JAPAN, the U.S.A., the U.K. and many other countries.
© 1999 VICTOR COMPANY OF JAPAN, LIMITED
VICTOR COMPANY OF JAPAN, LIMITED
Printed in Japan
SC96898-001
 Loading...