

Page 1
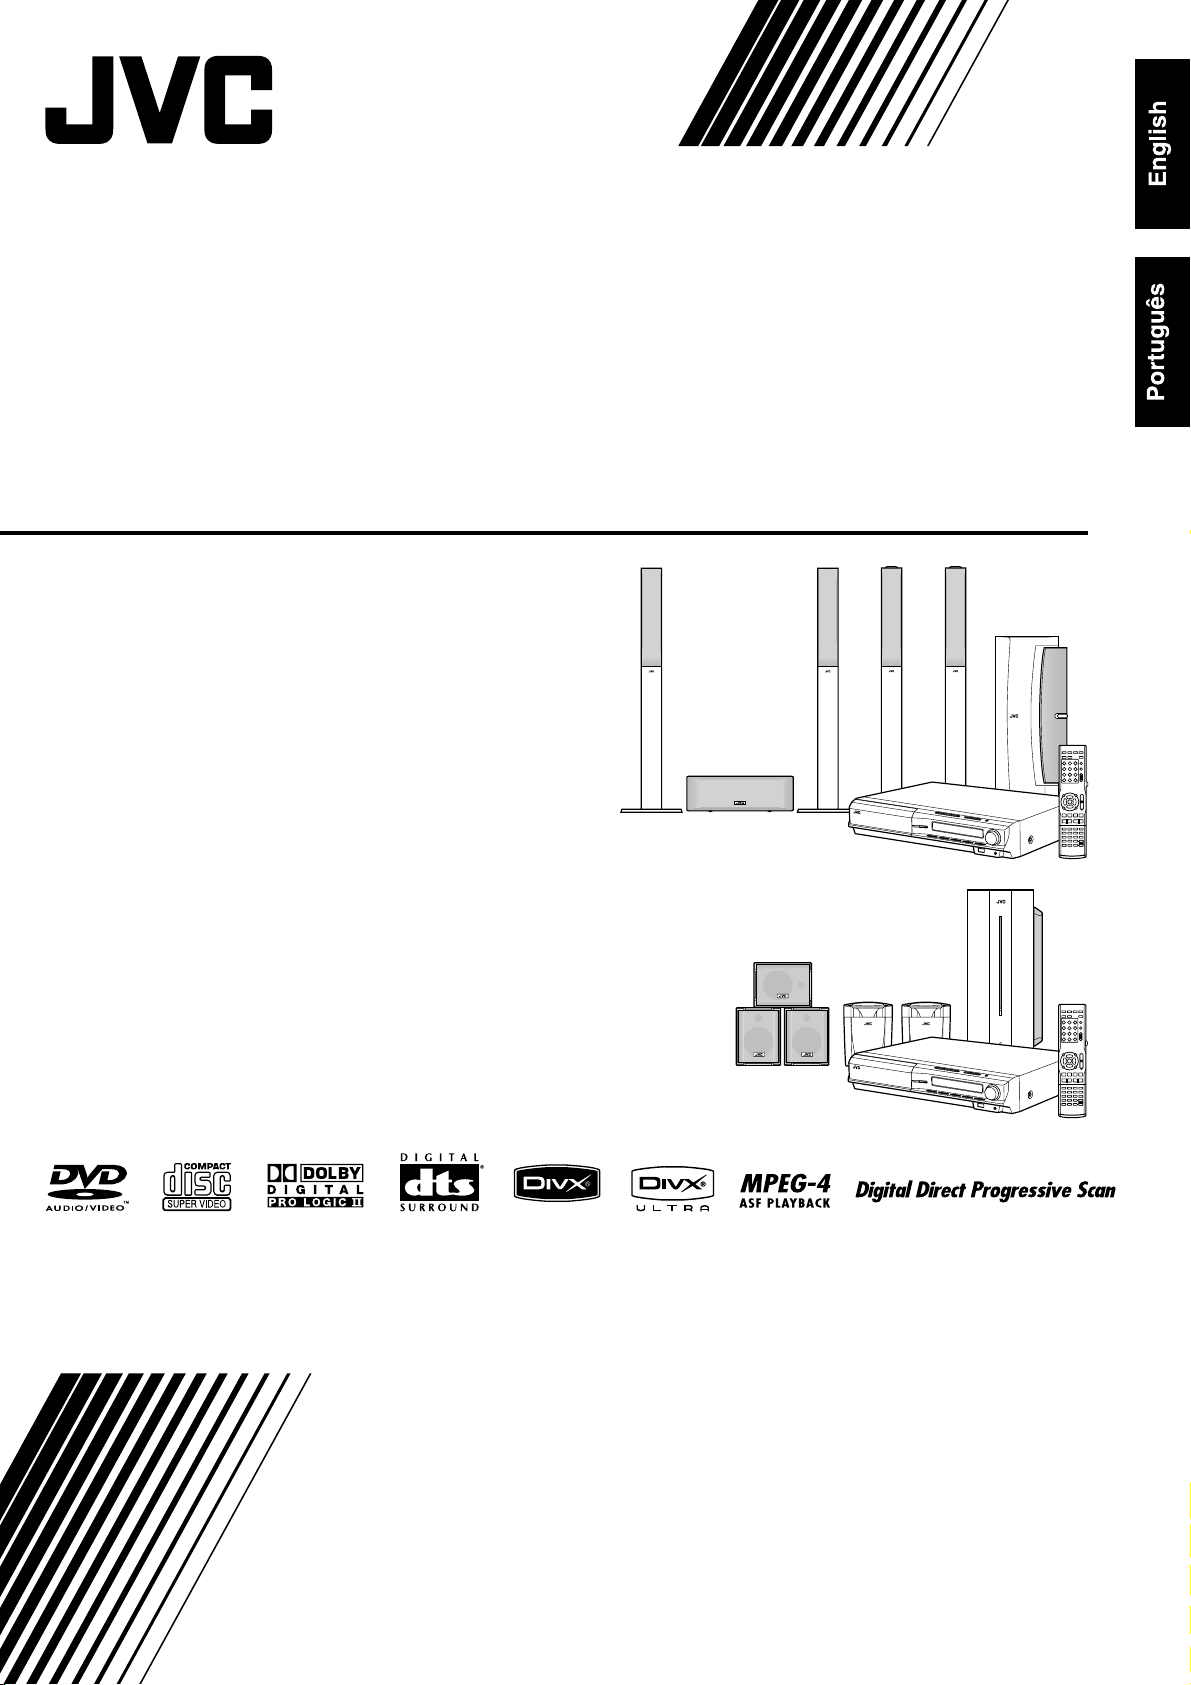
DVD DIGITAL CINEMA SYSTEM
SISTEMA DE CINEMA DE DVD DIGITAL
TH-C60
Consists of XV-THC60, SP-PWC60,
SP-THC60F, SP-THC60C and SP-THC60S
Consiste em XV-THC60, SP-WC60,
SP-THC60F, SP-THC60C e SP-THC60S
TH-C30
Consists of XV-THC30, SP-PWC30,
SP-THC40F, SP-THC40C and SP-THC40S
Consiste em XV-THC30, SP-PWC30,
SP-THC40F, SP-THC40C e SP-THC40S
INSTRUCTIONS
INSTRUÇÕES
LVT1504-008A
[UW]
Page 2
Warnings, Cautions and Others/
Advertêcias, precauções e outras notas
IMPORTANT FOR LASER PRODUCTS
1. CLASS 1 LASER PRODUCT
2.
CAUTION: Do not open the top cover. There are no user
serviceable parts inside the unit; leave all servicing to qualified
service personnel.
3.
CAUTION: Visible and/or invisible class 1M laser radiation
when open. Do not view directly with optical instruments.
CAUTION
To reduce the risk of electrical shocks, fire, etc.:
1. Do not remove screws, covers or cabinet.
2. Do not expose this appliance to rain or moisture.
CAUTION — button!
(XV-THC60/XV-THC30)
Disconnect the mains plug to shut the power off completely
(the STANDBY lamp goes off). When installing the apparatus,
ensure that the plug is easily accessible.
The button in any position does not disconnect the mains
line.
• When the system is on standby, the STANDBY lamp lights
red.
• When the system is turned on, the STANDBY lamp goes off.
The power can be remote controlled.
CAUTION
(SP-PWC60/SP-PWC30)
The power supply to the subwoofer is linked to the center unit.
The POWER ON lamp on the subwoofer lights green when the
power is turned on.
PARA PRODUTOS LASER, IMPORTANTE
1. PRODUTO LASER DE CLASSE 1
2. PRECAUÇÃO: não abrir a cobertura superior. Dentro da
unidade não existem partes cuja manutenção tenha de ser feita
pelo usuário; deixe qualquer manutenção a cargo do pessoal de
serviço qualificado.
3.
PRECAUÇÃO: Radiação laser de classe 1M visível e/ou
invisível quando aberto. Não olhe diretamente com instrumentos
óticos.
PRECAUÇÃO
Para reduzir o riscos de choques eléctricos, incêndio, etc.:
1. Não retire parafusos nem desmonte as tampas ou o gabinete.
2. Não exponha este aparelho à chuva nem à umidade.
PRECAUÇÃO — botão !
(XV-THC60/XV-THC30)
Desligue a ficha principal da parede para desligar totalmente a
energia (a lâmpada STANDBY apaga-se). Ao instalar o
aparelho, certifique-se de que o plugue do cabo de alimentação
fique facilmente acessível.
O botão em qualquer posição não desliga o cabo principal.
• Quando o sistema está em espera, a luz da lâmpada
STANDBY fica vermelha.
• Quando o sistema está ligado, a lâmpada STANDBY apagase.
A energia pode ser controlada à distância.
PRECAUÇÃO
(SP-PWC60/SP-PWC30)
O fornecimento de energia ao subwoofer está vinculado à
unidade central. A lâmpada POWER ON do subwoofer
acende-se em verde quando a alimentação está ligada.
G-1
Page 3
Warnings, Cautions and Others/ Advertêcias, precauções e outras notas
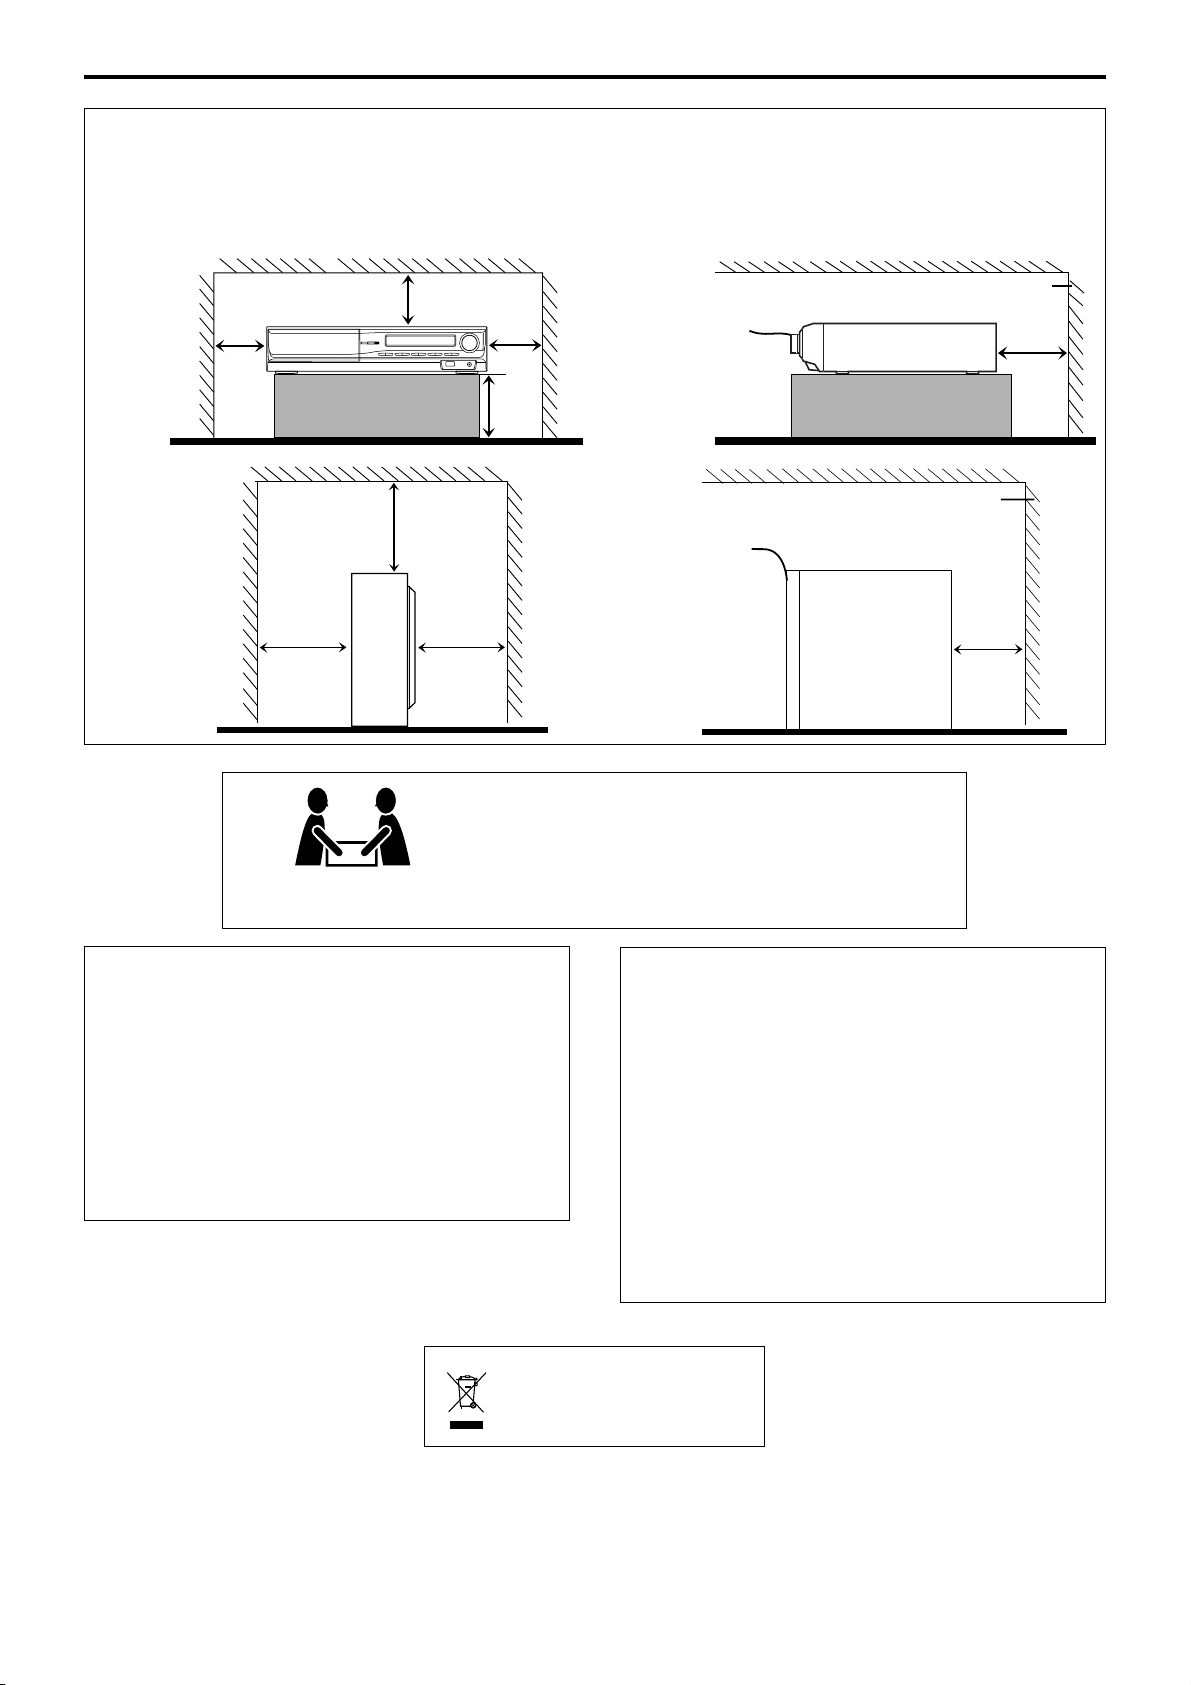
Caution: Proper Ventilation
To avoid risk of electric shock and fire and to protect from damage, place the apparatus on a level surface. The minimal clearances are
shown below:
Precaução: ventilação apropriada
Para evitar o risco de choque eléctrico e incêndio e prevenir avarias, coloque o aparelho em superfície nivelada. Os espaços mínimos
necessários encontram-se abaixo:
Wall or
obstructions
Parede ou
obstáculo
obstructions
Parede ou
obstáculo
Wall or
XV-THC60/
XV-THC30
3 cm
SP-PWC60/
SP-PWC30
15 cm 15 cm
SP-THC60: 32.5 kg
8 cm
20 cm
3 cm
15 cm
CAUTION!
To avoid personal injury
or accidentally dropping
the unit, have two persons
unpack, carry, and install
the unit.
XV-THC60/
XV-THC30
Front
Frente
No
obstructions
Sem
obstruções
Front
Frente
No
obstructions
Sem
obstruções
SP-PWC60/
SP-PWC30
PRECAUÇÃO!
Para evitar lesões pessoais ou
queda acidental do aparelho, o
aparelho deve ser desembalado,
carregado e instalado por duas
pessoas.
Wall or obstructions
Parede ou obstáculo
10 cm
Wall or obstructions
Parede ou obstáculo
15 cm
CAUTION
• Do not block the ventilation openings or holes.
(If the ventilation openings or holes are blocked by a
newspaper or cloth, etc., the heat may not be able to get out.)
• Do not place any naked flame sources, such as lighted
candles, on the apparatus.
• When discarding batteries, environmental problems must be
considered and local rules or laws governing the disposal of
these batteries must be followed strictly.
• Do not expose this apparatus to rain, moisture, dripping or
splashing and that no objects filled with liquids, such as
vases, shall be placed on the apparatus.
[European Union only]
[Só União Europeia]
PRECAUÇÃO
• Não obstrua as aberturas e orifícios de ventilação. (Se os
orifícios ou aberturas de ventilação estiverem obstruídos por
qualquer papel ou tecido, não haverá circulação do ar
quente.)
• Não coloque nenhum objeto com chamas, como velas
acesas, sobre o aparelho.
• Ao descartar as baterias, leve em consideração os problemas
que possam ser causados ao meio ambiente e os
regulamentos e leis locais e governamentais sobre
recolhimento dessas baterias devem ser rigorosamente
seguidos.
• Não exponha este aparelho à chuva, umidade, pingos ou
esguichos de água, nem coloque em cima do mesmo
qualquer tipo de recipiente que contenha líquidos, como por
exemplo vasos.
G-2
Page 4

Table of contents
Introduction ....................................................2
Notes on handling ..................................................................... 2
Supplied accessories .................................................................. 2
About discs ......................................................3
Playable disc types ..................................................................... 3
Playable file types ....................................................................... 4
Description of parts and controls ..................5
Connections .....................................................8
Connecting the FM and AM antennas ................................... 8
Connecting the satellite (front, center, surround) speakers ......
Speaker layout .......................................................................... 11
Connecting a TV ...................................................................... 11
Connecting the powered subwoofer ..................................... 11
Connecting to an analog component ................................... 12
Connecting to a digital component ...................................... 12
Connecting a USB mass storage class device ....................... 12
Connecting the power cord .................................................... 12
Operating external components with the
remote control ..............................................13
Operating the TV ..................................................................... 13
Operating the DBS tuner or CATV converter .................... 14
Operating the VCR .................................................................. 14
Playback ........................................................ 18
Basic playback ...........................................................................18
One Touch Replay ...................................................................20
Fast-forward/fast-reverse search ............................................20
Skip to the beginning of a desired selection .........................21
Skipping at about 5-minute intervals ....................................21
Locating a desired title/group using number buttons ........21
Playing back a bonus group ....................................................22
Selecting the desired title/playlist from the control display .....
22
Advanced operations ................................... 23
9
Using the surround mode .......................................................23
Using the on-screen bar ..........................................................24
Playing from a specified position on a disc ..........................26
Using the file control display .................................................. 27
Resume Playback ......................................................................28
Selecting a view angle ..............................................................28
Selecting the subtitle ................................................................ 28
Selecting the audio ................................................................... 29
Special picture playback .......................................................... 29
Program Playback .................................................................... 31
Random Playback ....................................................................32
Repeat Playback ........................................................................32
Tray lock ....................................................................................33
Setting the sound balance .......................................................33
Basic operations ............................................15
Turning the system on/off ...................................................... 15
Selecting the source to play .................................................... 16
Adjusting the volume [VOLUME] ....................................... 16
Listening with headphones (not supplied) .......................... 16
Turning off the sound temporarily [MUTING] ................. 16
Adjusting the brightness of the indications [DIMMER] ... 16
Sleep Timer [SLEEP] ............................................................... 17
Adjusting the output level of the subwoofer and speakers ......
Adjusting the sound ................................................................17
Changing the scan mode ........................................................ 17
17
Setting DVD preferences ............................. 34
Using the setup menus ............................................................34
Menu description .....................................................................34
Tuner operations .......................................... 36
Setting the AM tuner interval spacing ..................................36
Manual tuning .......................................................................... 36
Preset tuning .............................................................................37
Selecting the FM reception mode ..........................................37
Reducing the noise of AM broadcast ....................................37
References .................................................... 38
Maintenance .............................................................................38
Troubleshooting .......................................................................38
Specifications ............................................................................39
1
Page 5
Introduction
Notes on handling
7 Important cautions
Installation of the system
• Select a place which is level, dry and neither too hot nor too cold;
between 5°C and 35°C.
• Leave sufficient distance between the system and the TV.
• Do not use the system in a place subject to vibration.
Power cord
• Do not handle the power cord with wet hands.
• A small amount of power is always consumed while the power
cord is connected to the wall outlet (center unit only).
• When unplugging the power cord from the wall outlet, always
pull on the plug, not the power cord.
To prevent malfunctions of the system
• There are no user-serviceable parts inside. If anything goes
wrong, unplug the power cord and consult your dealer.
• Do not insert any metallic object into the system.
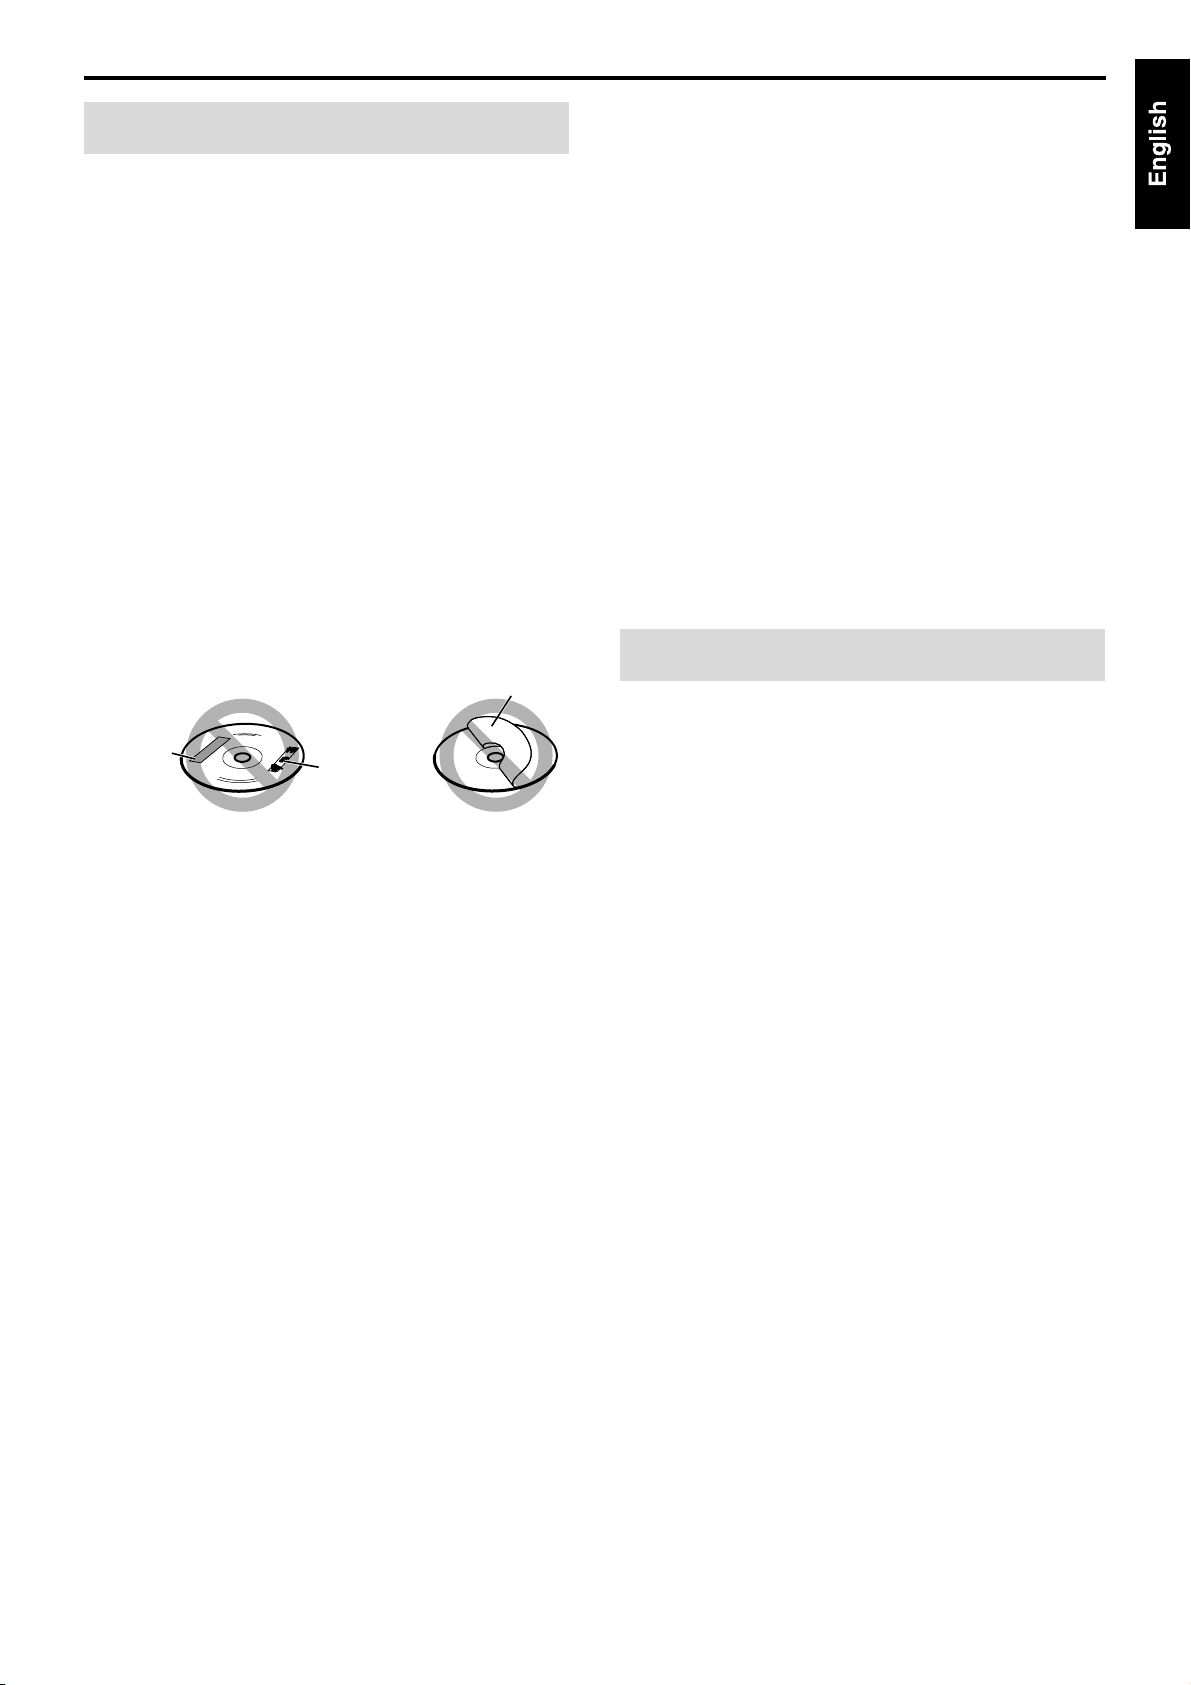
• Do not use any non-standard shape disc (like a heart, flower or
credit card, etc.) available on the market, because it may damage
the system.
• Do not use a disc with tape, stickers, or paste on it, because it may
damage the system.
Label sticker
Sticker
Paste
Note about copyright laws
Check the copyright laws in your country before recording from the
discs. Recording of copyrighted material may infringe copyright
laws.
Note about copyguard system
The discs are protected by copyguard system. When you connect
the system to your VCR directly, the copyguard system activates and
the picture may not be played back correctly.
7 Safety precautions
Avoid moisture, water and dust
Do not place the system in moist or dusty places.
Avoid high temperatures
Do not expose the system to direct sunlight and do not place it near
a heating device.
When you are away
When away on travel or for other reasons for an extended period of
time, disconnect the power cord plugs from the wall outlet.
Do not block the vents
Blocking the vents may damage the system.
Care of the cabinet
When cleaning the system, use a soft cloth and follow the relevant
instructions on the use of chemically-coated cloths. Do not use
benzene, thinner or other organic solvents including disinfectants.
These may cause deformation or discoloring.
If water gets inside the system
Turn the system off and disconnect the power cord plug from the
wall outlet, then call the store where you made your purchase. Using
the system in this condition may cause a fire or electrical shock.
Supplied accessories
Check to be sure you have all of the supplied accessories.
The number in parentheses is the quantity of the pieces supplied.
If anything is missing, contact your dealer immediately.
•Remote control (1)
• Batteries (2)
• FM antenna (1)
• AM loop antenna (1)
•Power cord (1)
•System cord (1)
• Composite video cord (1)
• AC plug adapters (2)
• Speaker cords (only for TH-C60)
4 m: For satellite (front left/right) and center speakers (3)
10 m: For satellite speakers (surround left/right) (2)
•Screws (only for TH-C60)
M5 x 40 mm (4)
M4 x 20 mm (8)
• Speaker cord clamps (only for TH-C60) (4)
2
Page 6
About discs
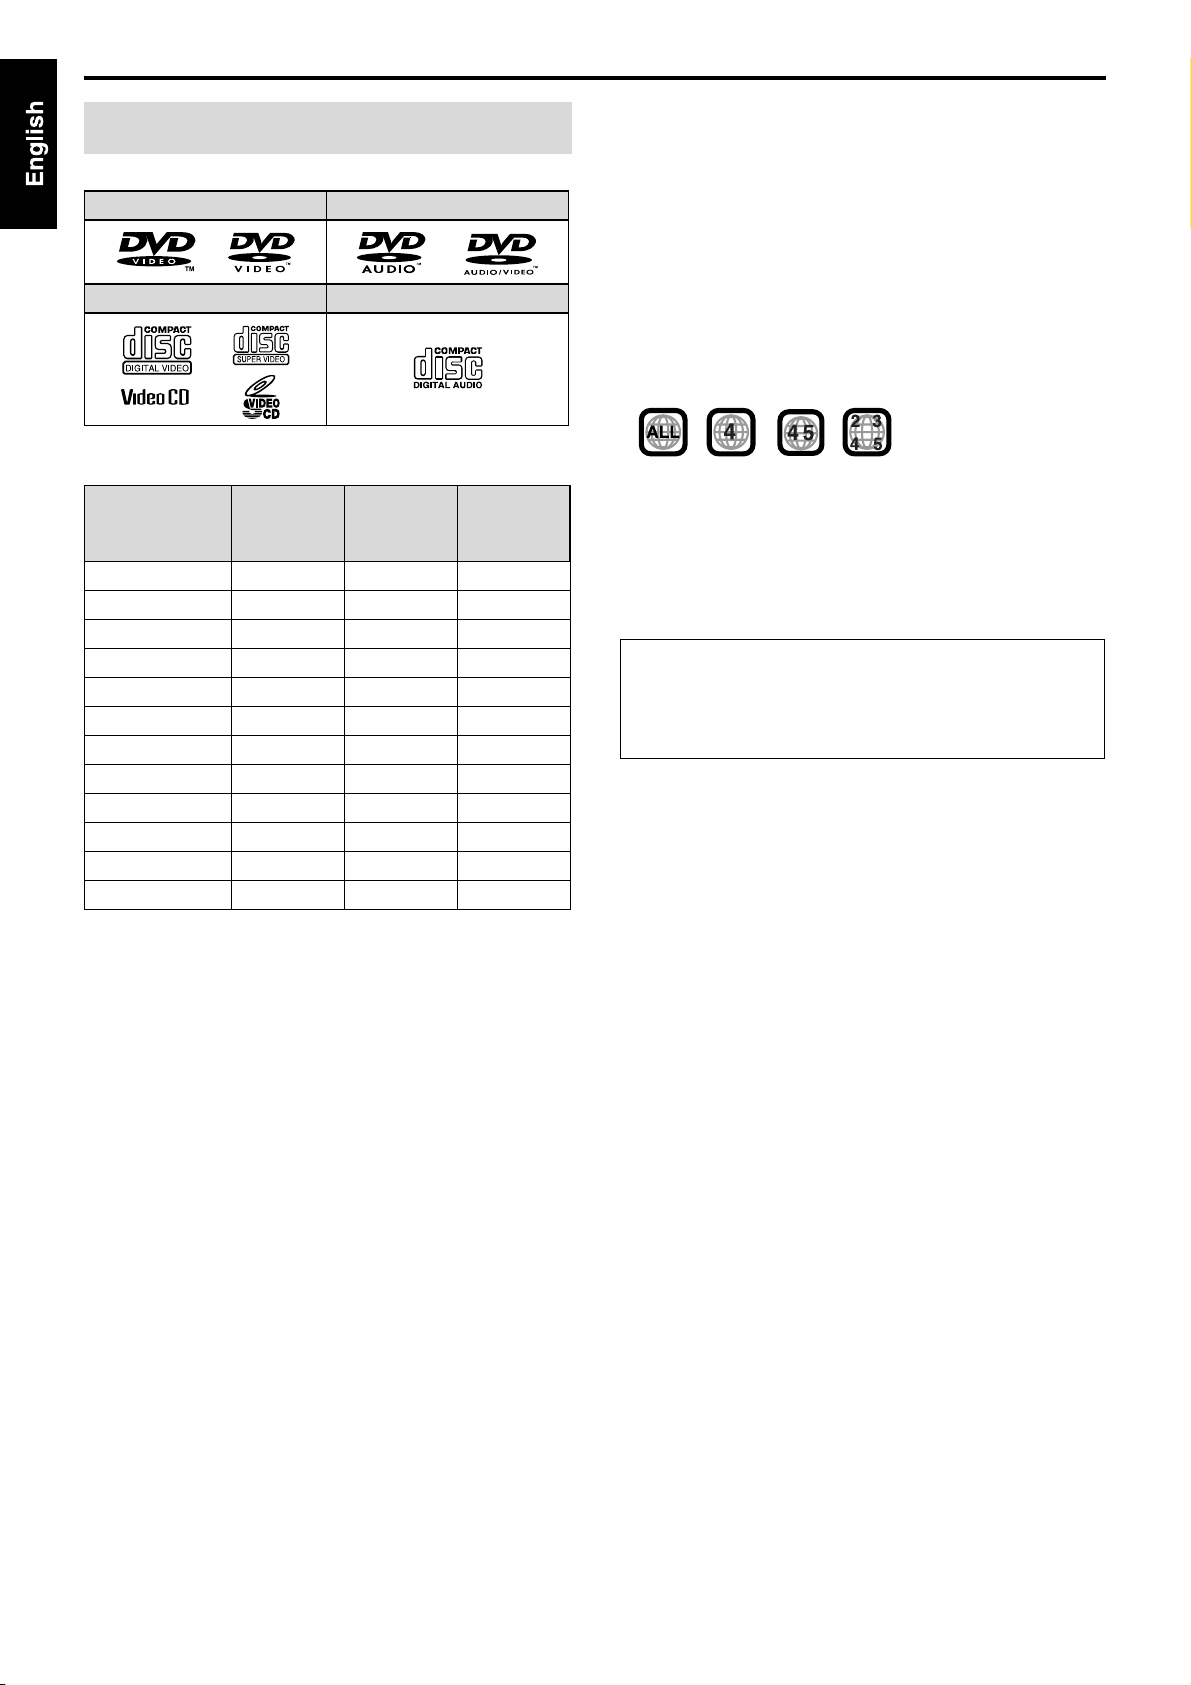
Playable disc types
This system has been designed to play back the following discs:
DVD VIDEO DVD AUDIO
VCD/SVCD Audio CD
The √ in the list below shows available disc types and recording
formats.
Disc type
Recording
format
DVD Video — √√
DVD Audio — √√
DVD VR — √√
VCD/SVCD √ ——
Audio CD √ ——
MP3 √√*
WMA √√*
JPEG √√*
ASF √√*
MPEG-2 √*
MPEG-1 √*
DivX √√*
1
*
This system can play finalized discs only.
*2Recorded with UDF Bridge format.
3
*
This system may not be able to play back a file if the file size is
CD-R/-RW*
too large.
1
3
3
DVD-R*
2
2
2
2
2
√*
2
√*
2
1
DVD-RW*
2
√*
2
√*
2
√*
2
√*
2
√*
2
√*
2
√*
1
Notes on DVD-R and DVD-RW
• This system does not support “multi-border” disc.
Notes on CD-R and CD-RW
• This system can play CD-Rs or CD-RWs recorded with ISO 9660
format.
• This system supports “multi-session” discs (up to 20 sessions).
• This system cannot play “packet write” discs.
Region code of DVD VIDEO
DVD VIDEO players and DVD VIDEO discs have their own
Region Code numbers. This system can play back DVD VIDEO
discs whose Region Code numbers include the system’s Region
Code, which is indicated on the rear panel.
• Example of playable DVD:
If a DVD with an improper Region Code number is loaded,
“REGION CODE ERROR!” appears on the TV screen and playback
cannot start.
Some discs may not be played back because of their disc
characteristics, recording conditions, or damage or stain on them.
Unplayable discs
DVD-ROM, DVD-RAM, CD-I (CD-I Ready), Photo CD, SACD,
etc.
Playing back these discs will generate noise and damage the
speakers.
• It is possible to play back finalized +R/+RW (DVD Video Format
only) discs. “DVD” lights on the display panel when a +R/+RW
disc is loaded.
• This system accommodates the NTSC and PAL system. When
you play an NTSC disc with the scan mode set to PAL (see page
17), the NTSC video signal is converted to the PAL60 signal and
output.
• The Non-DVD side of a “DualDisc” does not comply with the
“Compact Disc Digital Audio” standard. Therefore, the use of
Non-DVD side of a DualDisc on this product may not be
recommended.
• On some DVD VIDEOs, DVD AUDIOs, VCDs or SVCDs,
their actual operation may be different from what is explained
in this manual. This is due to the disc programming and disc
structure, not a malfunction of this system.
DVD Logo is a trademark of DVD Format/Logo Licensing
Corporation.
3
Page 7

About discs
Playable file types
For all playable files
• The system can only recognize and play files with one of the
following extensions, which can be in any combination of upper
and lower case;
MP3: “.MP3”, “.mp3”
WMA: “. W MA”, “. wm a”
JPEG: “. J PG”, “. JP E G”, “.jp g ”, “. jp e g”
ASF: “.A S F”, “.a s f ”
MPEG-2/MPEG-1: “.MPG”, “.MPEG”, “.mpg”, “.mpeg”
DivX: “.DIVX”, “.DIV”, “.divx”, “.div”, and “.AVI”, “.avi”
• Some files may not be played back. In this case, “NOT
SUPPORTED” appears on the TV screen.
• Some files may not be played back normally because of their disc
characteristics or recording conditions.
• The system recognizes up to 150 tracks (files) per group, 99
groups per disc/device, and the total number of the tracks (files)
that the system can play is 4000.
• MP3/WMA/JPEG/ASF/MPEG-2/MPEG-1/DivX files require a
longer readout time. (It differs due to the complexity of the
directory/file configuration.)
• If different kinds of files are mixed, set the FILE TYPE setting in
the PICTURE menu to the appropriate setting for the data to be
read (“AUDIO”, “STILL PICTURE” or “VIDEO”). (See page 35.)
For MP3/WMA files
• The system supports MP3/WMA files recorded with a bit rate of
32 – 320 kbps and a sampling frequency of 16 kHz, 22.05 kHz,
24 kHz*, 32 kHz, 44.1 kHz, or 48 kHz.
• If the track information (track title, artist, and album name, etc.)
is recorded, it appears in the file control display on the TV screen.
(See page 27.)
• We recommend to record each piece of material (song) at a
sample rate of 44.1 kHz and at a data transfer rate of
128 (96*)kbps.
* For WMA only
For JPEG files
• We recommend to record a file at 640 x 480 resolution. (If a file
has been recorded at a resolution of more than 640 x 480, it will
take a longer time to be displayed.)
• This system can only play baseline JPEG files.
For ASF files
• The system supports the types of the advanced simple profile as
MPEG-4 files (MPEG-4 ASF).
• The system supports MPEG-4 files with the following conditions:
File format: ASF
Visual profile: MPEG-4 SP (Simple Profile)
Audio CODEC: G.726
Max. picture size: 352 x 288 (CIF)
Max. bit rate: 384 kbps
For MPEG-2/MPEG-1 files
• The stream format should conform to MPEG system/program
stream.
• 720 x 576 pixels (25 fps)/720 x 480 pixels (30 fps) is
recommended for the highest resolution.
• This system also supports the resolutions of 352 x 576/480 x 576/
352 x 288 pixels (25 fps) and 352 x 480/480 x 480/352 x 240 pixels
(30 fps).
• The file format should be MP@ML (Main Profile at Main Level)/
SP@ML (Simple Profile at Main Level)/MP@LL (Main Profile at
Low Level).
• Audio streams should conform to MPEG1 Audio Layer-2 or
MPEG2 Audio Layer-2.
For DivX files
• The system supports DivX 6.x, 5.x, 4.x and 3.11.
• The system supports DivX files whose resolution is 720 x 480
pixels or less (30 fps), and 720 x 576 pixels or less (25 fps).
• Audio stream should conform to Dolby Digital (including multi
channel) or MPEG1 Audio Layer-3 (MP3).
• The system does not support GMC (Global Motion
Compression).
• The file encoded in the interlaced scanning mode may not be
played back correctly.
• The system has its own Registration Code for DivX playback.
If necessary, you can confirm the Registration Code of your
system using the OTHERS menu. (See page 36.)
• This product incorporates copyright protection technology that
is protected by U.S. patents and other intellectual property rights.
Use of this copyright protection technology must be authorized
by Macrovision, and is intended for home and other limited
viewing uses only unless otherwise authorized by Macrovision.
Reverse engineering or disassembly is prohibited.
• “CONSUMERS SHOULD NOTE THAT NOT ALL HIGH
DEFINITION TELEVISION SETS ARE FULLY COMPATIBLE
WITH THIS PRODUCT AND MAY CAUSE ARTIFACTS TO
BE DISPLAYED IN THE PICTURE. IN CASE OF 525 OR 625
PROGRESSIVE SCAN PICTURE PROBLEMS, IT IS
RECOMMENDED THAT THE USER SWITCH THE
CONNECTION TO THE ‘STANDARD DEFINITION’
OUTPUT.
IF THERE ARE QUESTIONS REGARDING OUR TV SET
COMPATIBILITY WITH THIS MODEL 525p AND 625p DVD
PLAYER, PLEASE CONTACT OUR CUSTOMER SERVICE
CENTER.”
• USE OF THIS PRODUCT IN ANY MANNER THAT
COMPLIES WITH THE MPEG-4 VISUAL STANDARD IS
PROHIBITED, EXCEPT FOR USE BY A CONSUMER
ENGAGING IN PERSONAL AND NON-COMMERCIAL
ACTIVITIES.
• DivX, DivX Ultra Certified, and associated logos are trademarks
of DivX, Inc. and are used under license.
• Official DivX
• Plays all versions of DivX® video (including DivX® 6) with
enhanced playback of DivX
Format
®
Ultra Certified product
®
media files and the DivX® Media
4
Page 8
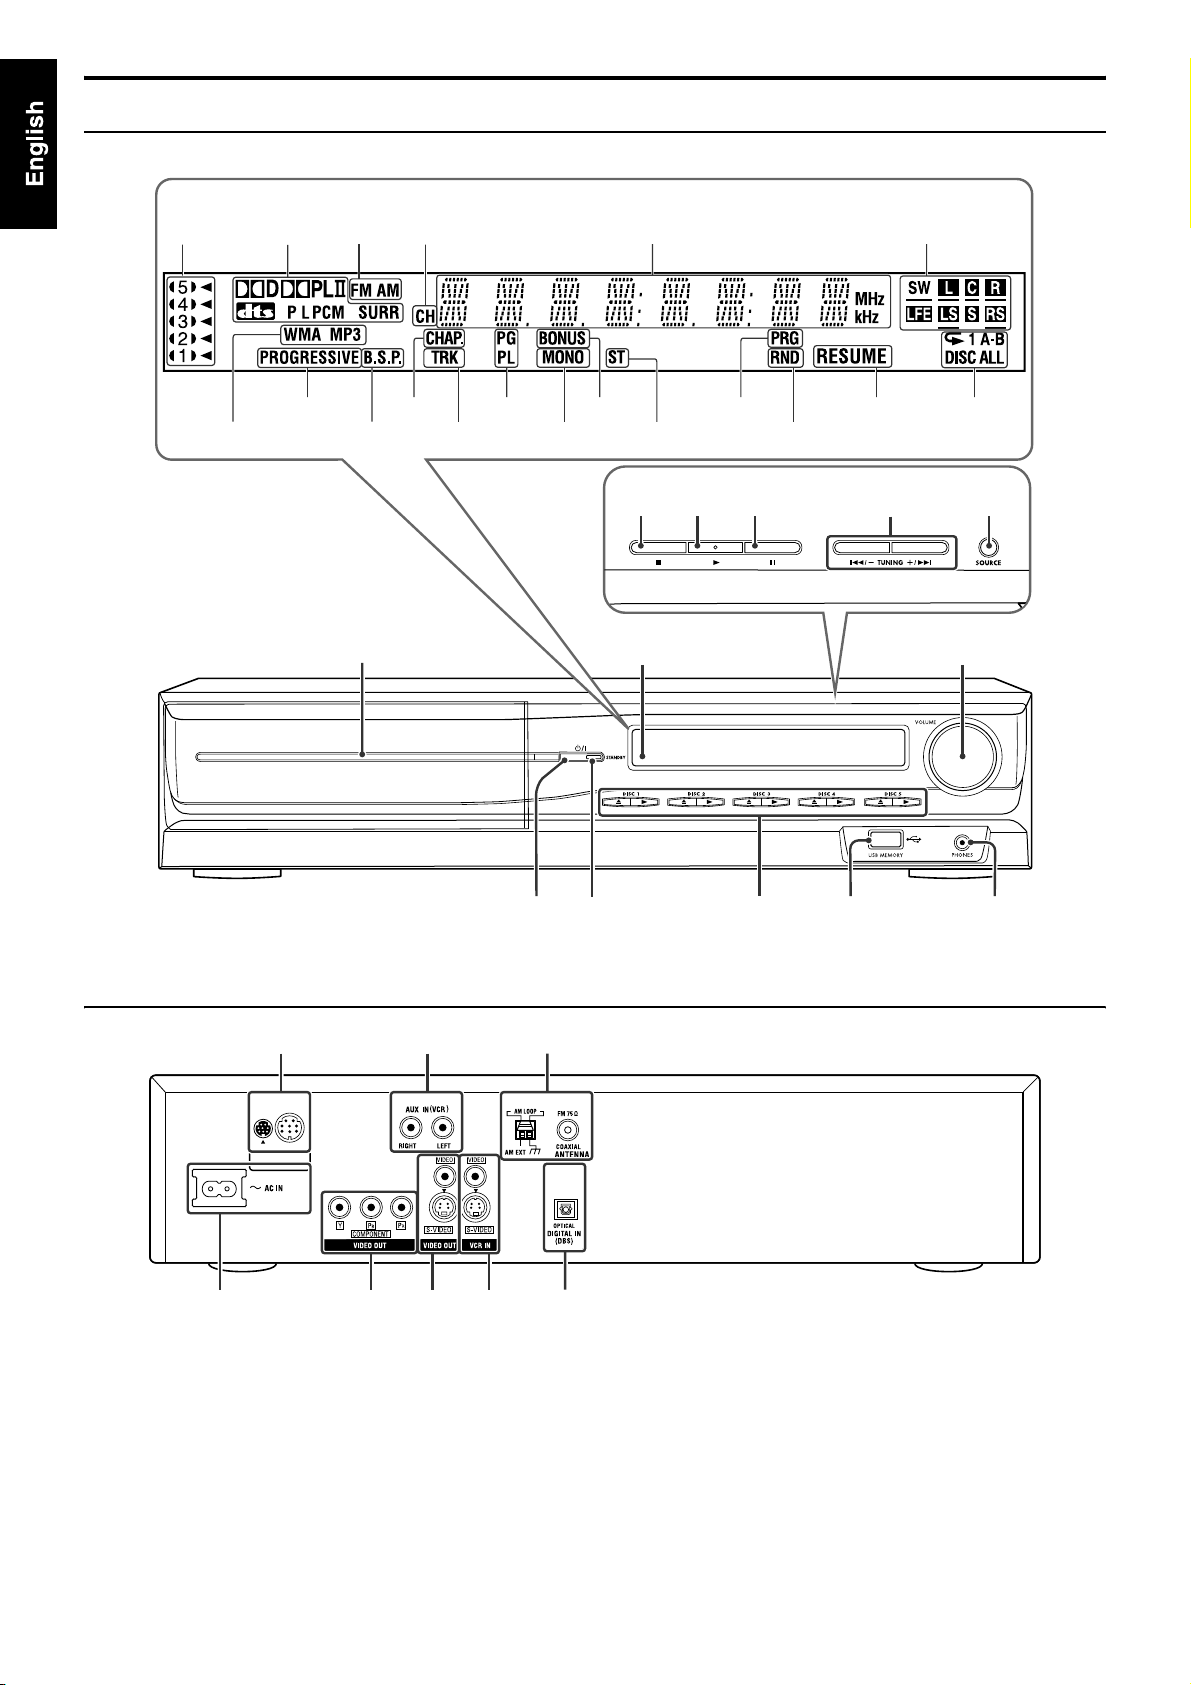
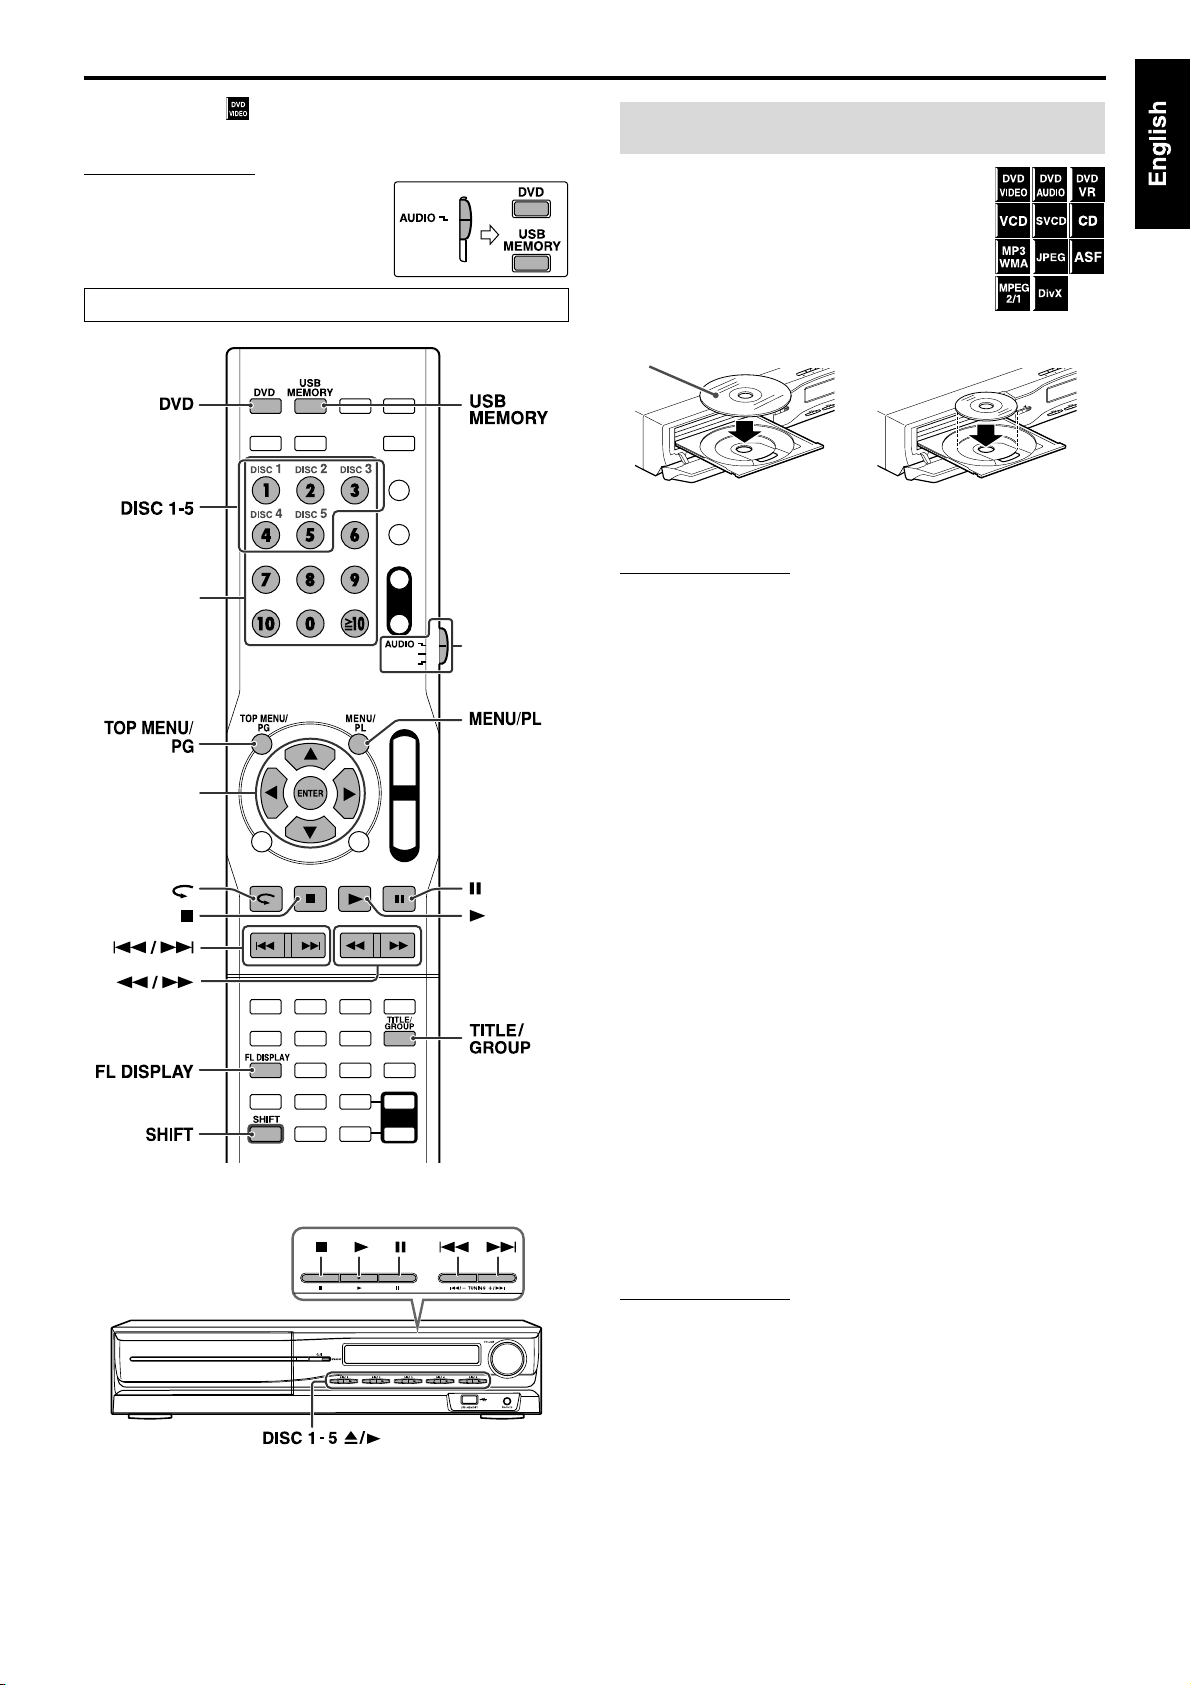
Description of parts and controls
Front panel (center unit)
The numbers in the figures indicate the pages where the details of the parts are described.
Display window
20
24 37 19 24
36
17 2822
19 37
Disc tray (inside): 18
19
21
19
31
3630
18 18 18 20, 36 16
Remote sensor: 7
32
12
32, 33
16
161815 15
Rear panel (center unit)
11
12 11 1211
12 8
12
5
Page 9
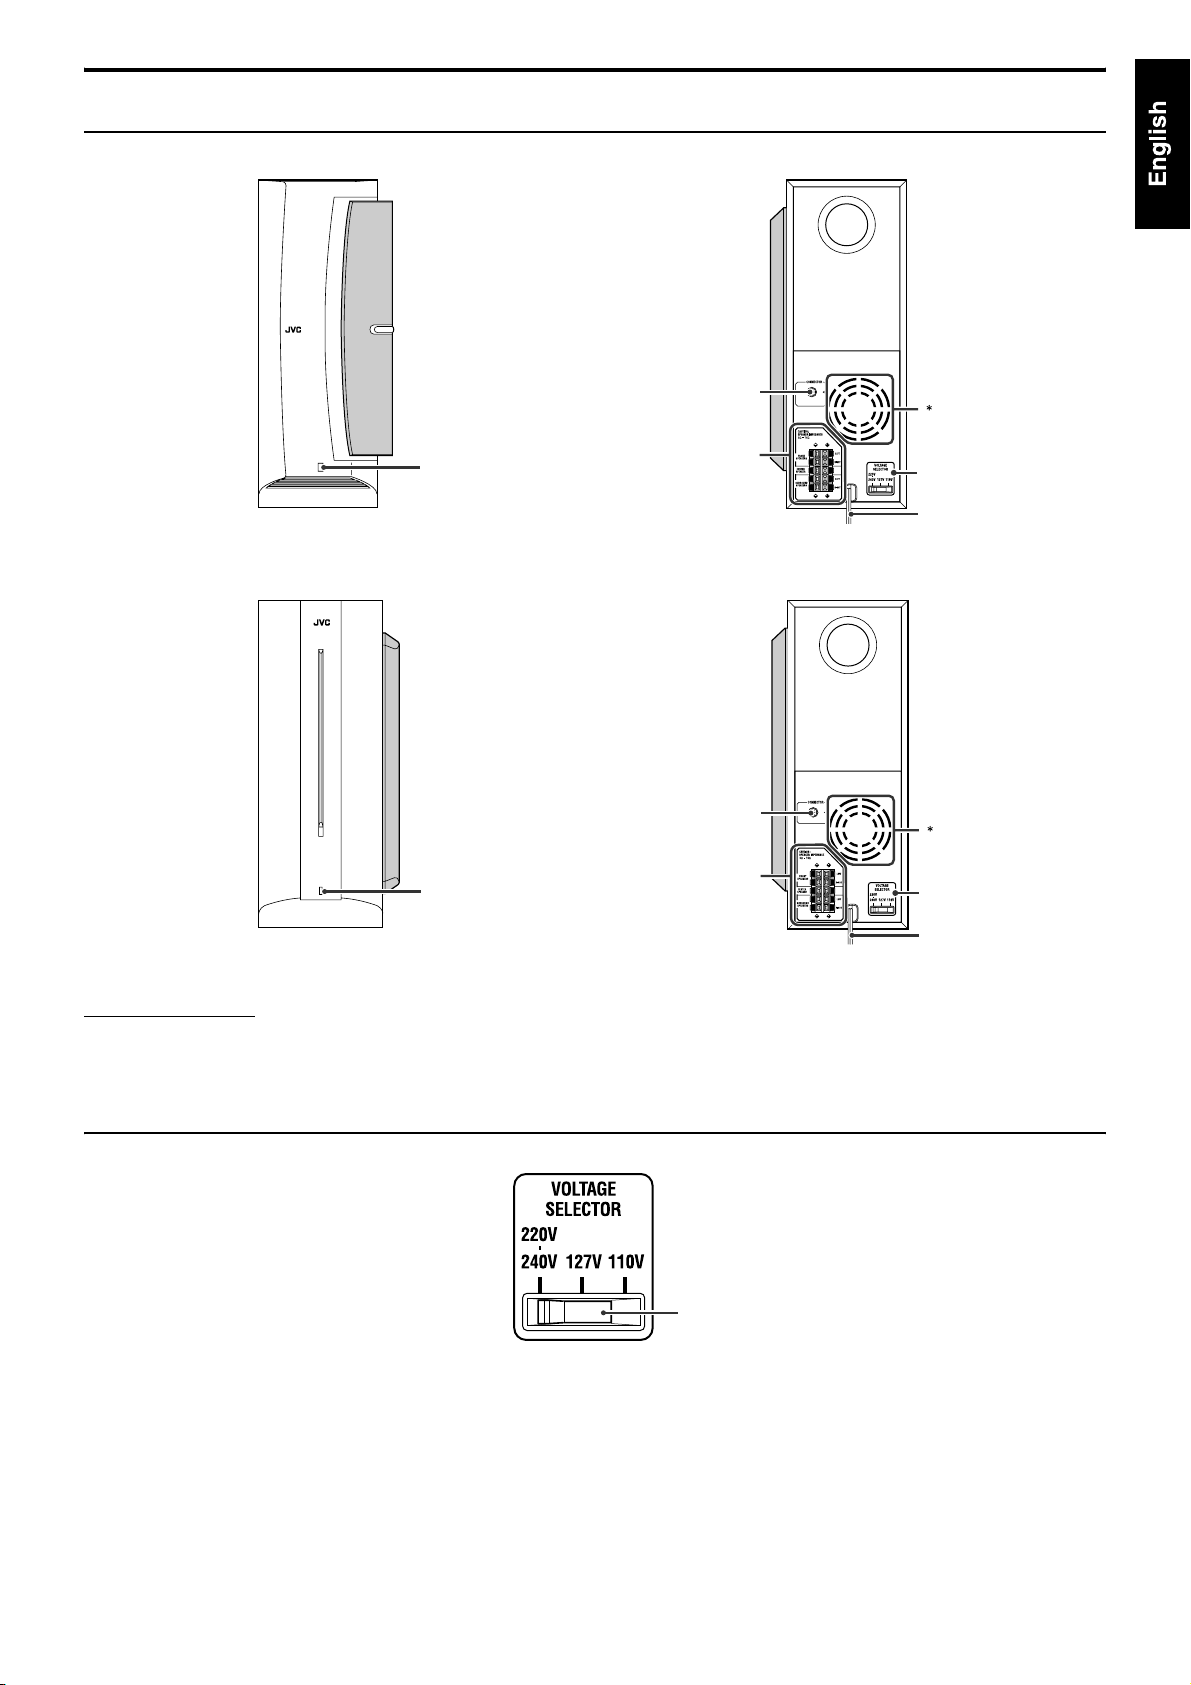
Description of parts and controls
Powered subwoofer
SP-PWC60
11
POWER ON lamp: 15
Front Rear
SP-PWC30
POWER ON lamp: 15
Front Rear
NOTE
• For safety reasons, always ensure that there is sufficient space behind
the powered subwoofer.
10
See below.
Power cord: 12
11
10
See below.
Power cord: 12
* Do not block the ventilation openings to allow proper air
circulation by the cooling fan.
Setting the VOLTAGE SELECTOR
Before plugging, set the correct voltage for your area with the voltage selector switch on the rear panel of the powered subwoofer.
Voltage selector switch
6
Page 10
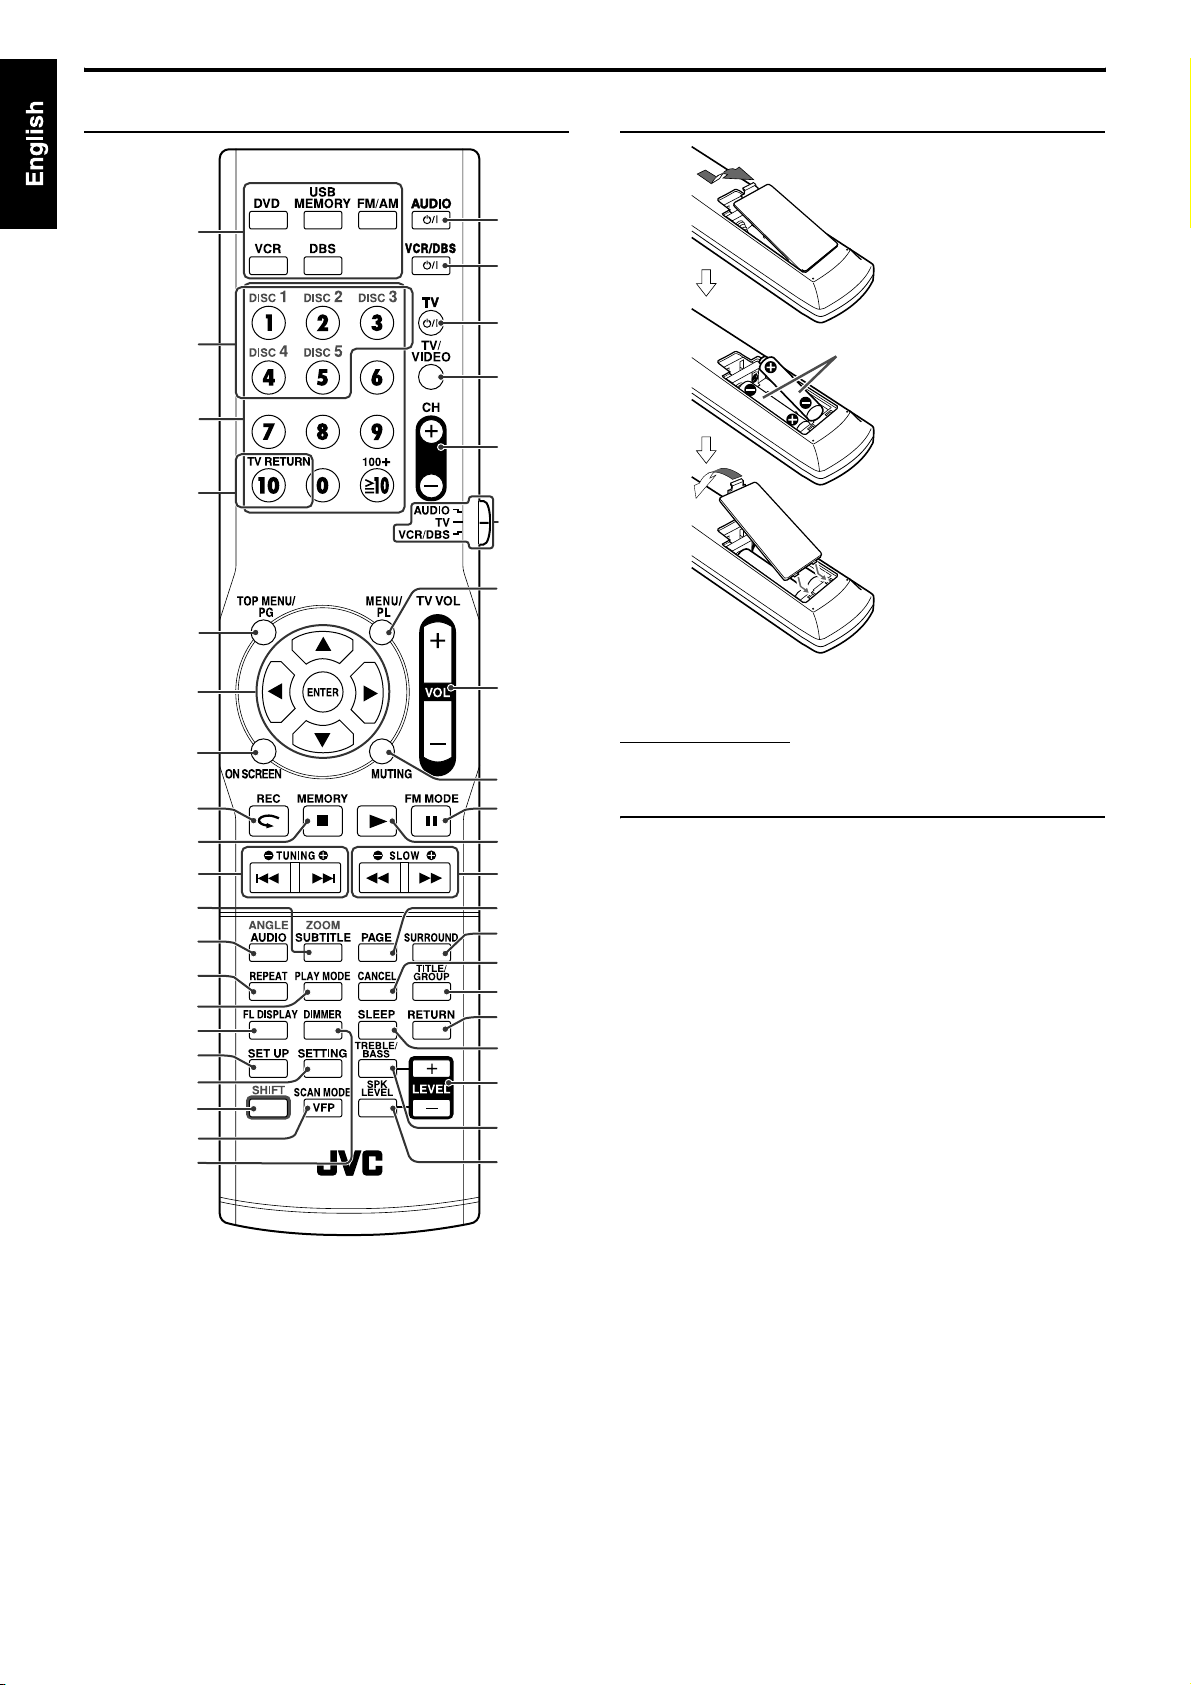
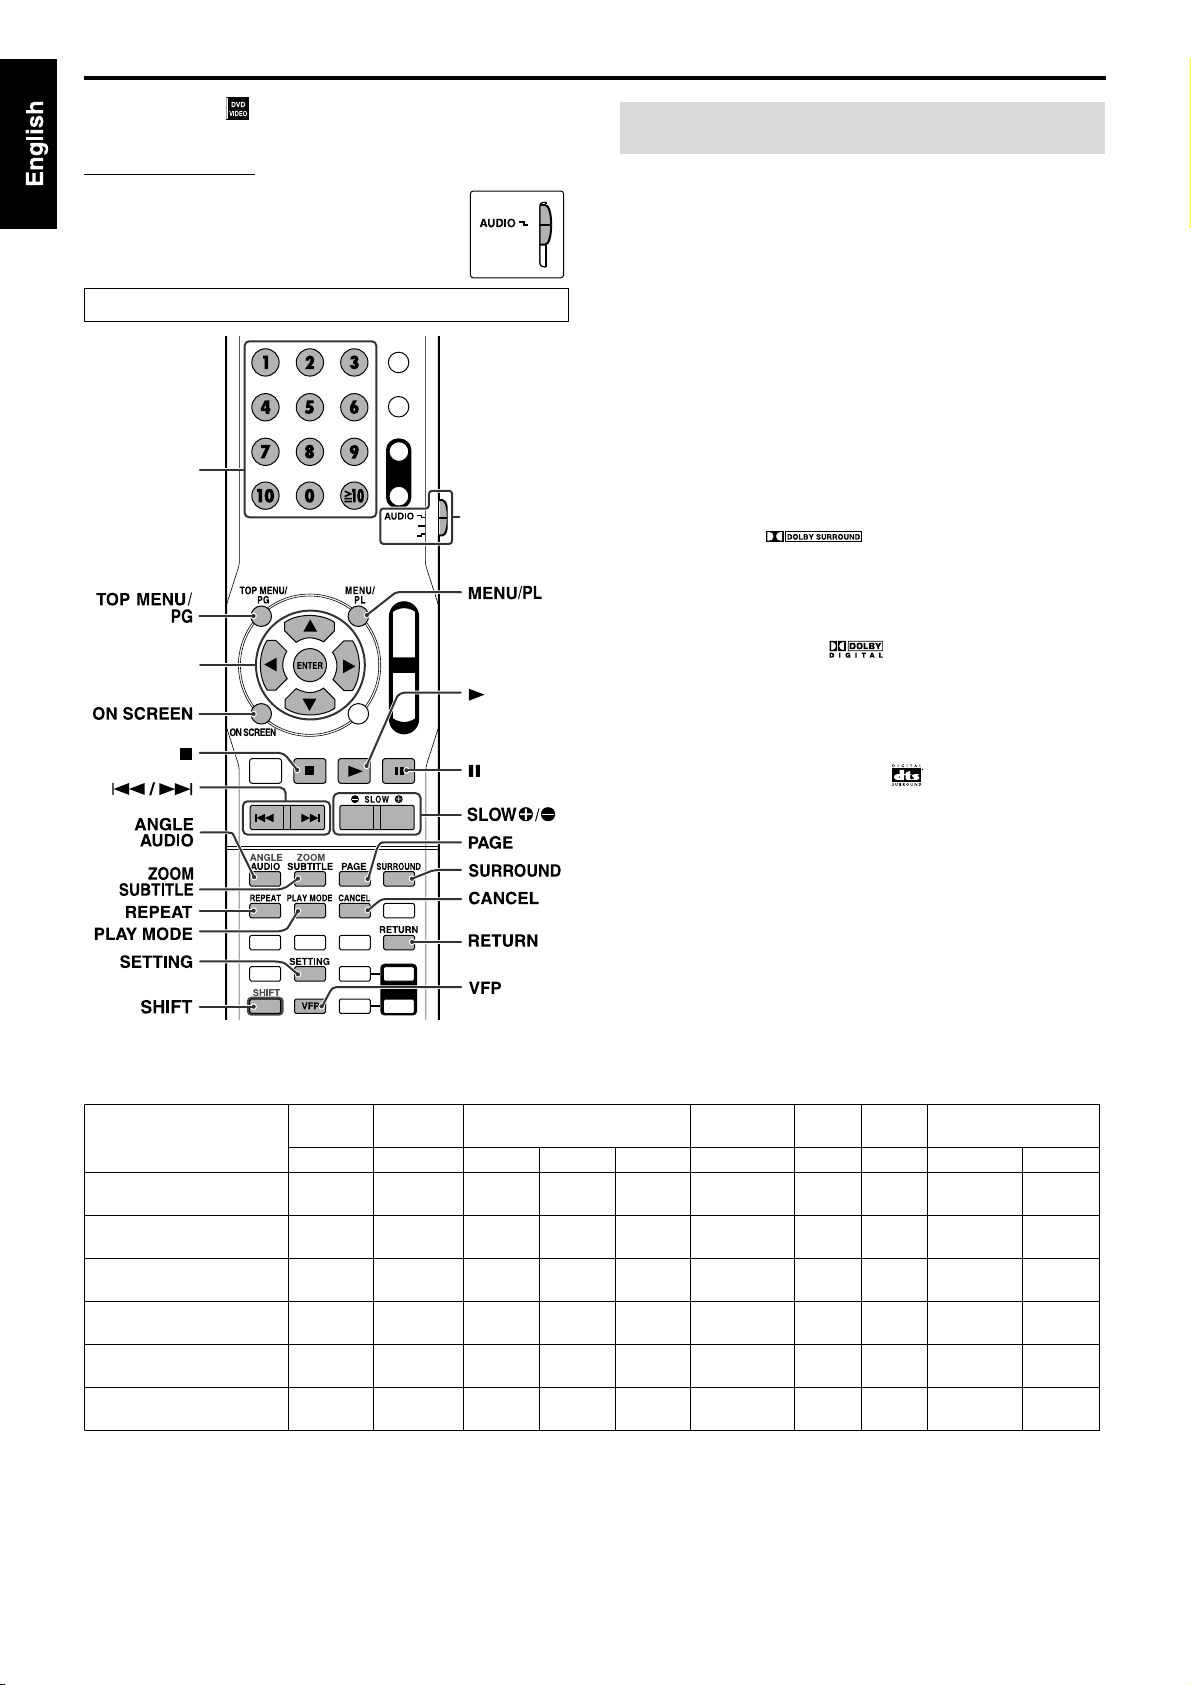
Description of parts and controls
Remote control Putting batteries in the remote control
16
18
Number
buttons:
18, 28, 30
21
13
22, 26
17 - 37
24 - 33
14, 20
18, 37
21, 36
28, 30
28, 29
32
31, 32
19
34
33
17, 30
16
15
14
13
13
13
13 - 36
22, 26
13, 16
16
18, 37
18
20, 29
30
24
31
21
26
17
17
17
17
R03 (UM-4)/AAA (24F) type dry-cell
batteries (supplied)
If the range or effectiveness of the remote control decreases, replace
both batteries.
CAUTION
• Do not expose batteries to heat or flame.
Operating the system from the remote control
Aim the remote control directly to the front panel of the center unit.
• Do not block the remote sensor.
7
Page 11
2
Connections
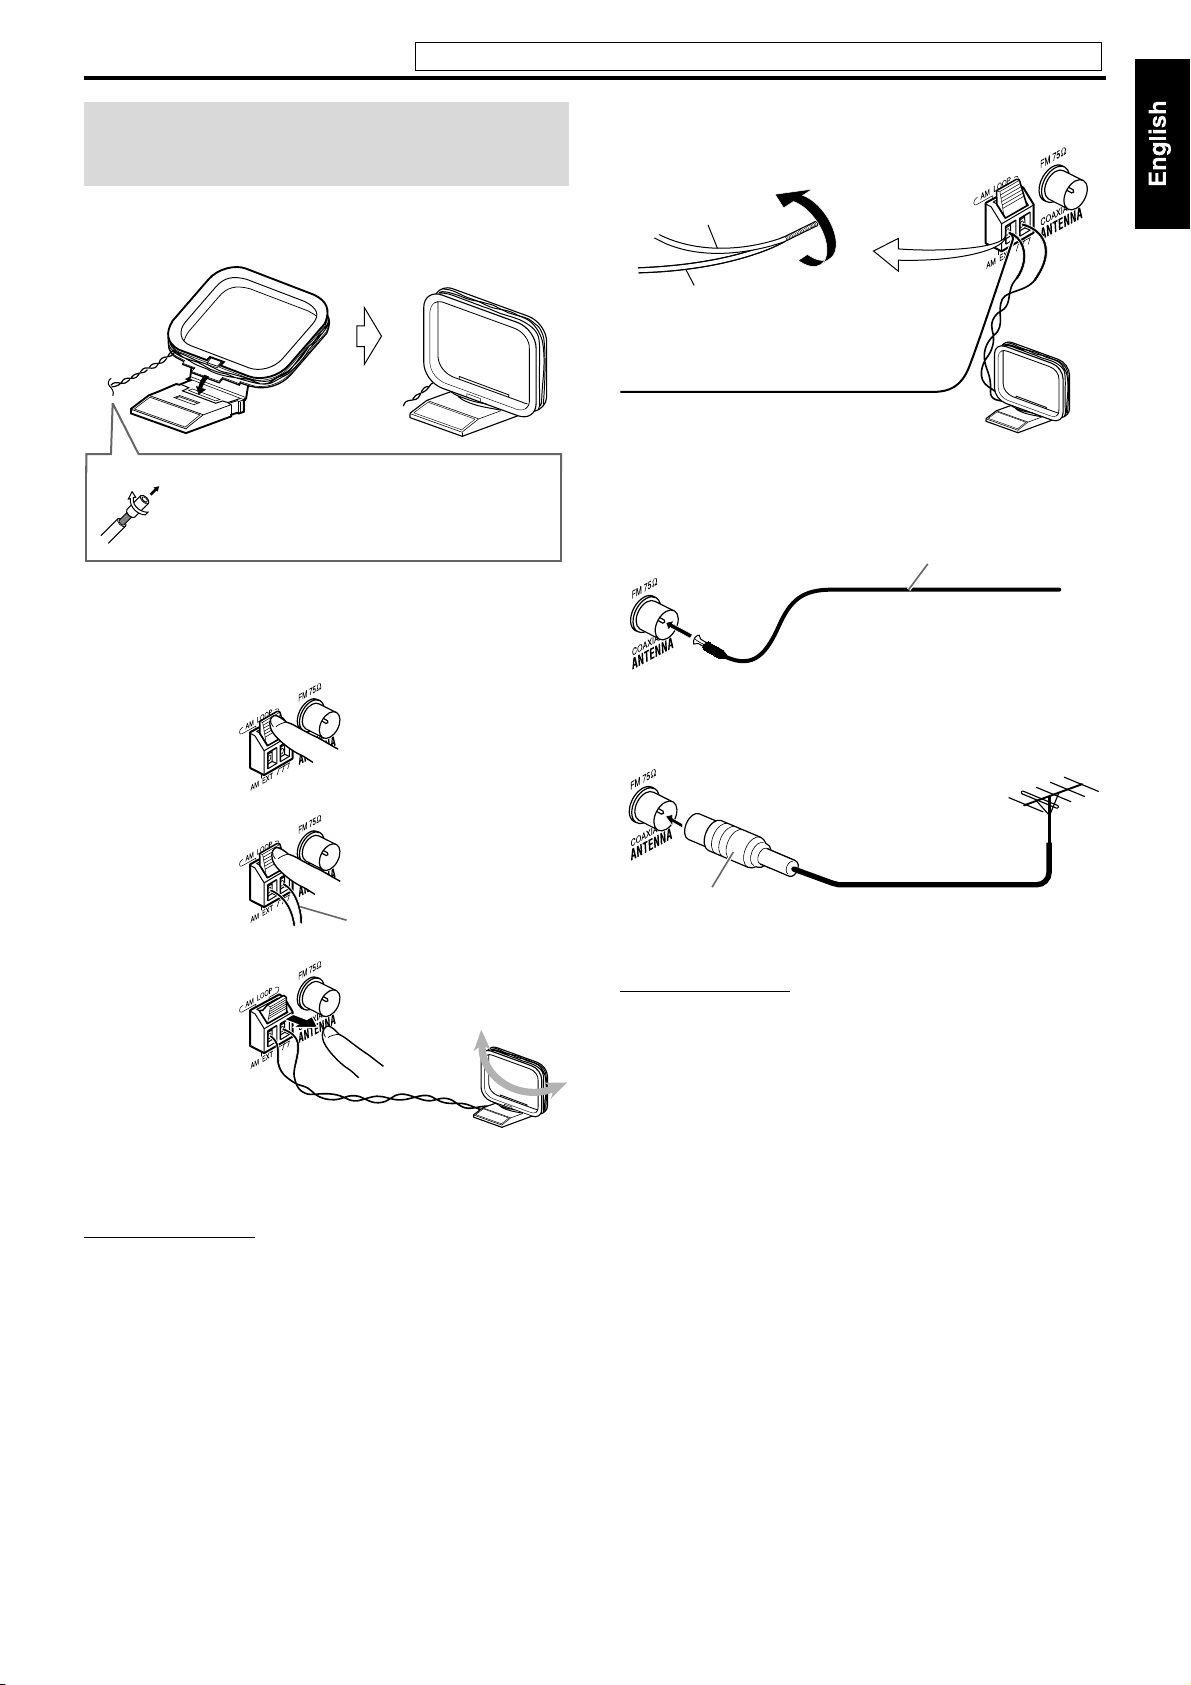
Connecting the FM and AM antennas
Do not connect the power cord until all other connections have been made.
If reception is poor
Center unit
7 AM loop antenna
Setting up supplied AM loop antenna
If the antenna cord is covered with the insulation
coat, twist and pull the insulation coat off and
remove.
Connecting AM loop antenna
1
Center unit
AM loop antenna
Outdoor single vinyl-covered wire antenna
(not supplied)
7 FM antenna
Center unit
If reception is poor
Center unit
FM antenna (supplied)
Extend the supplied FM antenna
horizontally.
Outdoor FM antenna (not
supplied)
Antenna cord
3
• Turn the loop antenna until you have the best reception during
AM broadcast program reception.
NOTE
• Make sure the antenna conductors do not touch any other terminals,
connecting cords or power cords. This could cause poor reception.
Standard type (75 Ω
coaxial) connector
NOTE
• We recommend that you use coaxial cable for the FM antenna as it is
well-shielded against interference.
Outdoor FM antenna cord (not
supplied)
8
Page 12
Connections
Do not connect the power cord until all other connections have been made.
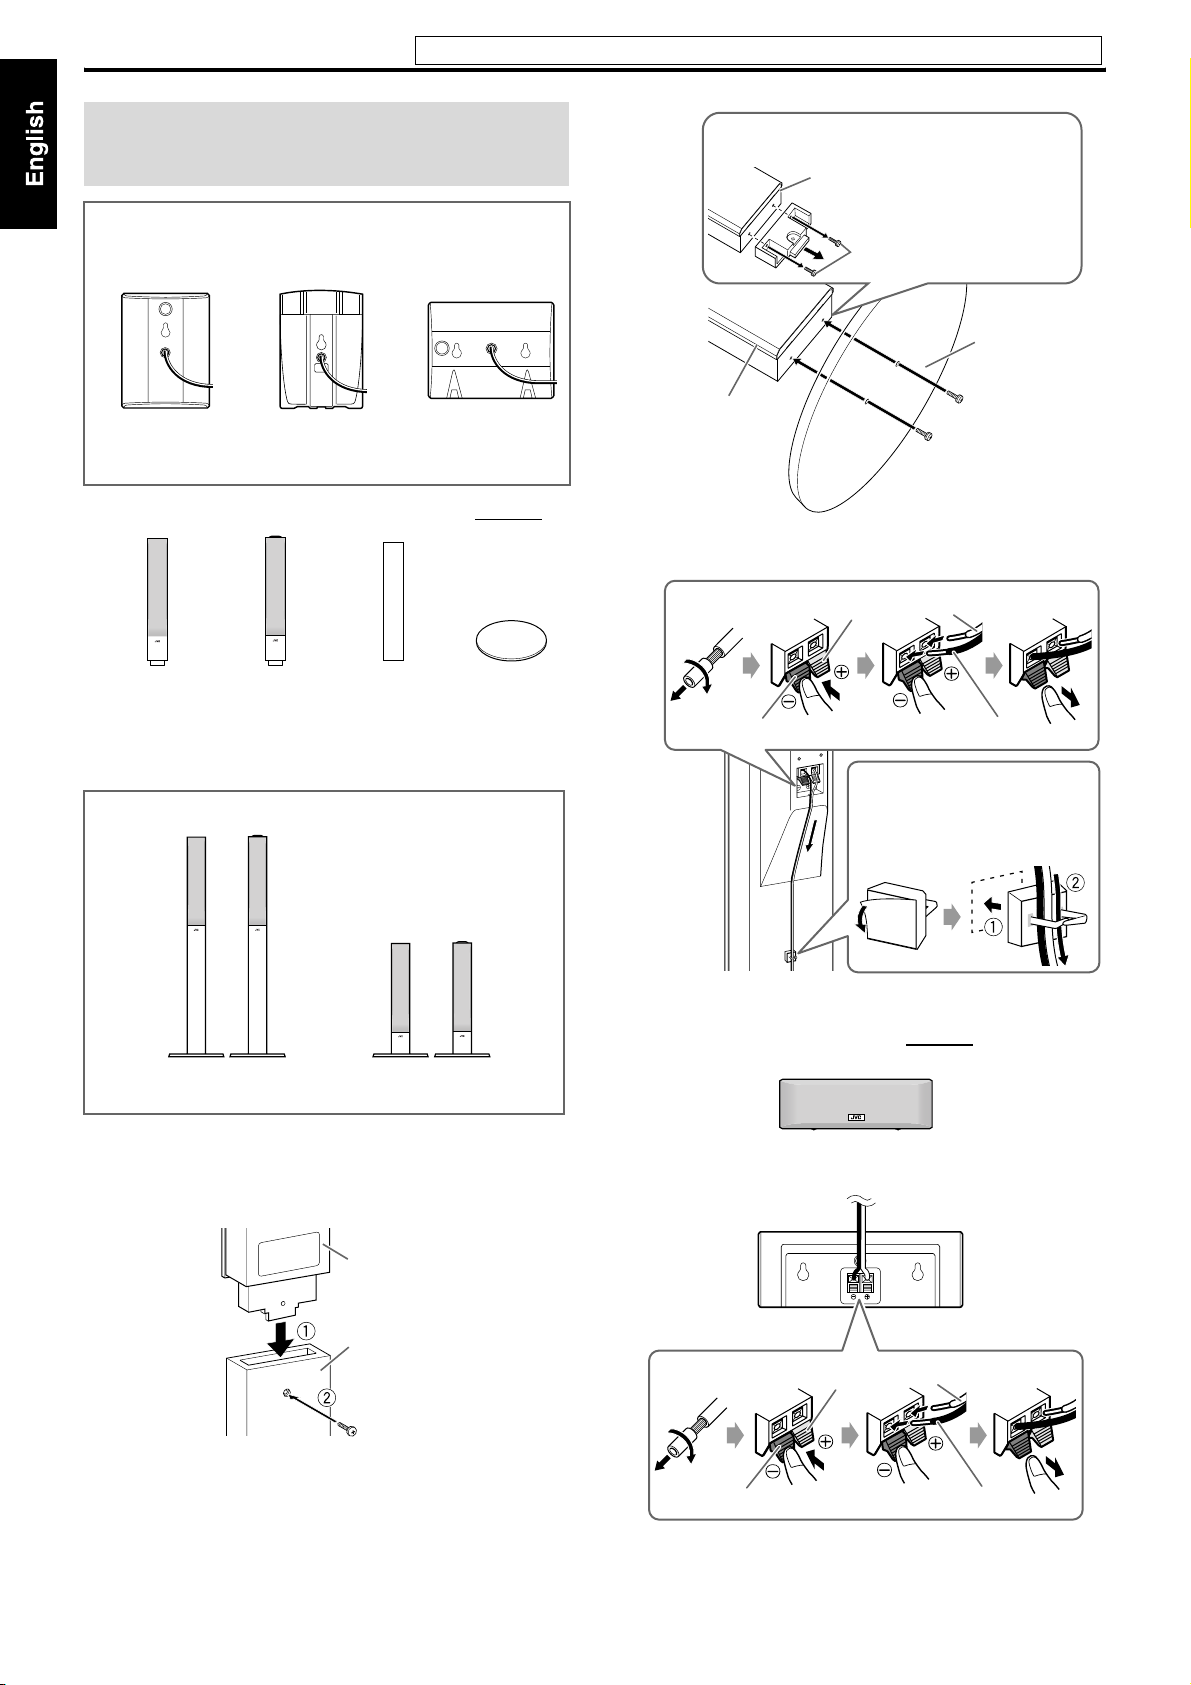
Connecting the satellite (front, center, surround) speakers
For TH-C30, the front, surround and center speakers are
equipped with their speaker cords attached directly to their
speaker unit instead of having speaker terminals on their cabinet.
Front speaker
(SP-THC40F)
Surround speaker
(SP-THC40S)
7 Assembling the front and surround speakers— TH-C60
Front speaker
(SP-THC60F) (2)
• Check the model name of each speaker from the label on the
rear to locate each speaker correctly.
Assembled speakers
Surround
speaker
(SP-THC60S) (2)
Stand (4)
Center speaker
(SP-THC40C)
Base plate (4)
2
Stand (or speaker
directly)*
* When assembling the speaker with the base plate, use the
3
When assembling a speaker without stand:
Speaker
A: Use these screws (M4 x
45 mm) when assembling the
speaker with the base plate.
Screw M4 x 20 mm
(supplied)*
screws A.
Red
Black
White
You can route the speaker cord
by using speaker cord clamp
(supplied).
Base plate
Black
or
With stand: Refer to steps 1 to 3.Without stand: Refer to steps
2 and 3.
Before assembling —
• Prepare a Phillips screwdriver (not supplied).
• Take care not to drop any component part while assembling;
otherwise, it may cause damage to the floor or injury.
1
Speaker
Stand
Screw M5 x 40 mm (supplied)
7 Connecting the center speaker— TH-C60
Center speaker (SP-THC60C) (1)
Red White
Black
Black
9
Page 13
Connections
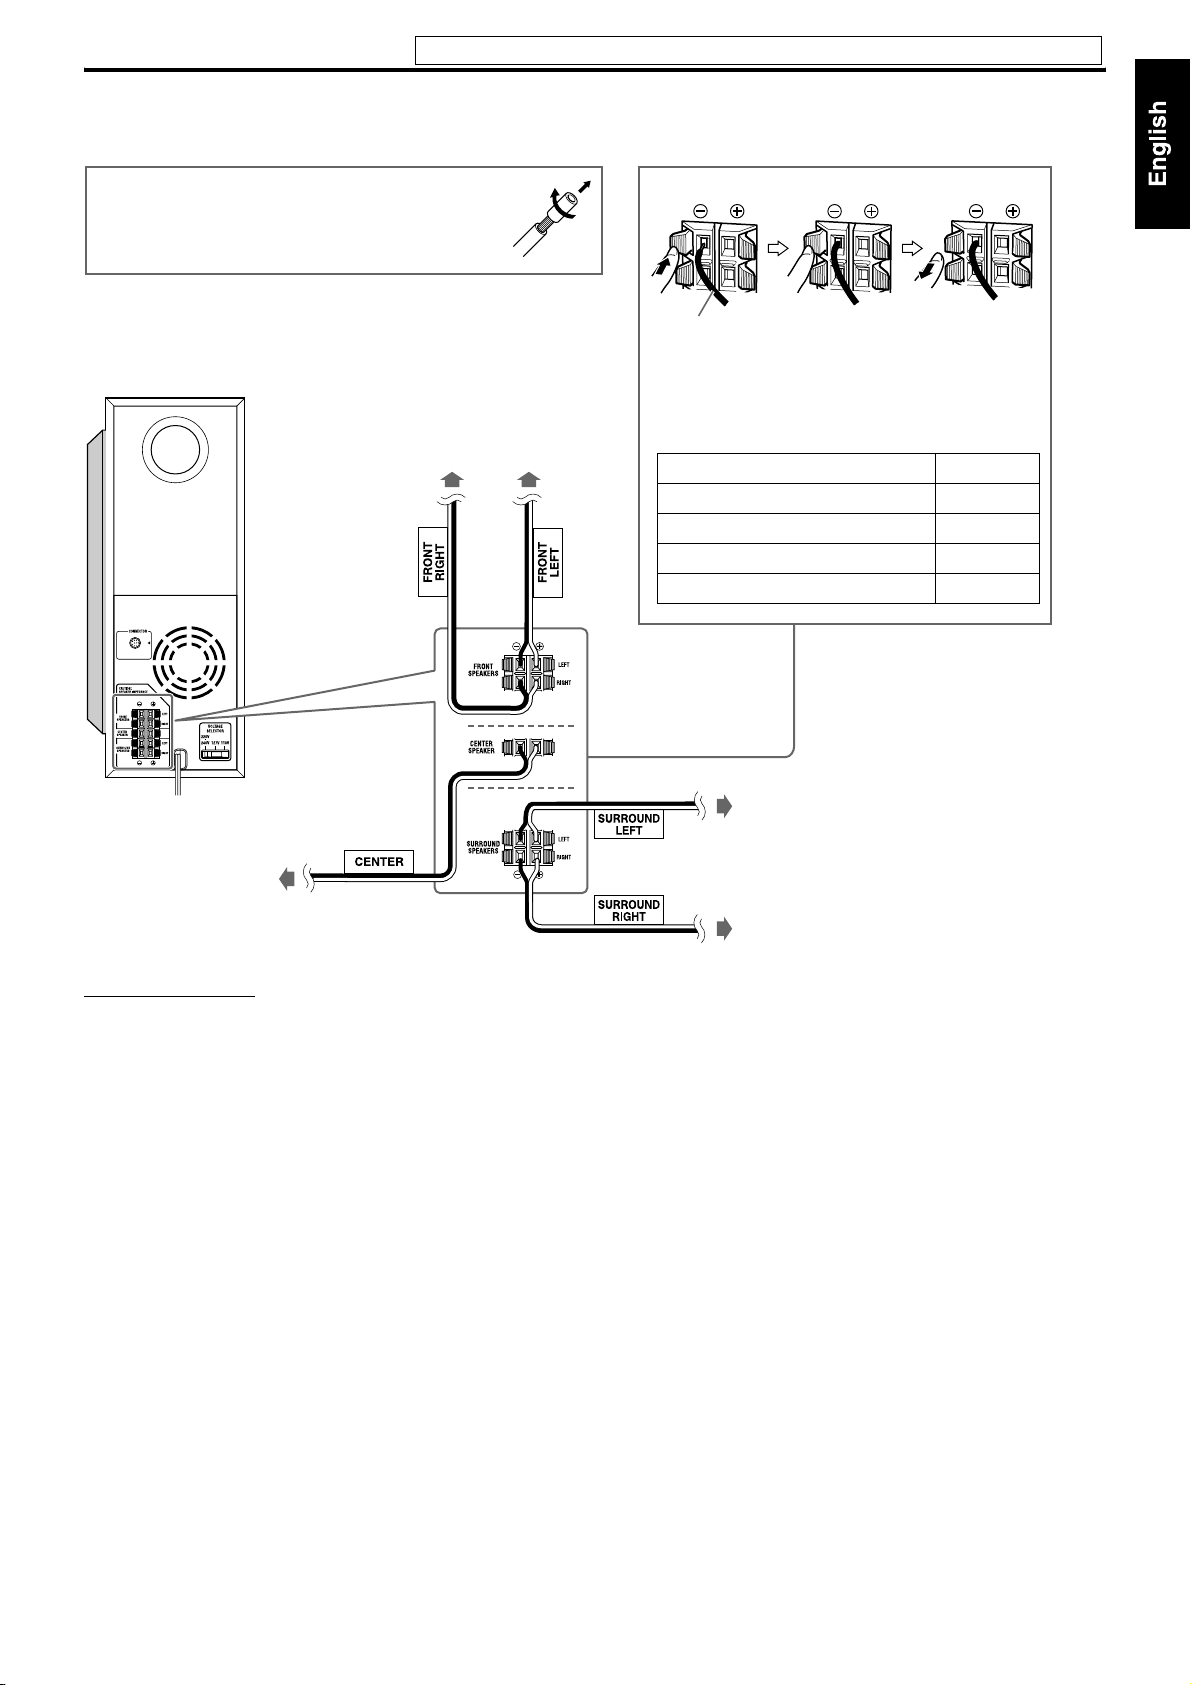
7 Connecting the satellite speakers to the subwoofer
Note that the illustration below is for SP-PWC60.
Before connecting the speaker cords;
Twist and pull the insulation coat off and remove.
Do not connect the power cord until all other connections have been made.
Powered subwoofer
TH-C60: SP-PWC60
TH-C30: SP-PWC30
Center speaker
TH-C60: SP-THC60C
TH-C30: SP-THC40C
Front speakers
TH-C60: SP-THC60F
TH-C30: SP-THC40F
Speaker cord
• Connect the black cords to the black (r) terminals.
• Connect the white cords to the (q) terminals
referring to the table below:
FRONT SPEAKERS (LEFT) White
FRONT SPEAKERS (RIGHT) Red
CENTER SPEAKER Green
SURROUND SPEAKERS (LEFT) Blue
SURROUND SPEAKERS (RIGHT) Gray
Surround speakers
TH-C60: SP-THC60S
TH-C30: SP-THC40S
CAUTION
• If you connect speakers other than the supplied ones, use speakers of
the same speaker impedance (SPEAKER IMPEDANCE) indicated
near the speaker terminals on the rear of the powered subwoofer.
• DO NOT connect more than one speaker to one speaker terminal.
• When installing the satellite speakers on the wall;
– Be sure to have them installed on the wall by qualified personnel.
DO NOT install the satellite speakers on the wall by yourself to
avoid unexpected damage from falling off the wall due to incorrect
installation or weakness in wall structure.
– Care must be taken in selecting a location for speaker installation
on a wall. Injury to personnel or damage to equipment may result
if the speakers installed interfere with daily activities.
Precautions for daily use
• When moving the speakers, do not pull the speaker cords;
otherwise, the speakers may fall over, causing damage or injury.
• Do not reproduce sounds at so high a volume that the sound is
distorted; otherwise, the speakers may be damaged by internal
heat buildup.
For TH-C60:
• When holding a speaker, always grasp the lower portion.
• Do not lean against the speakers, as the speakers could fall down
or break, possibly causing an injury. Especially be careful that
children do not lean against them.
10
Page 14
Connections
Do not connect the power cord until all other connections have been made.
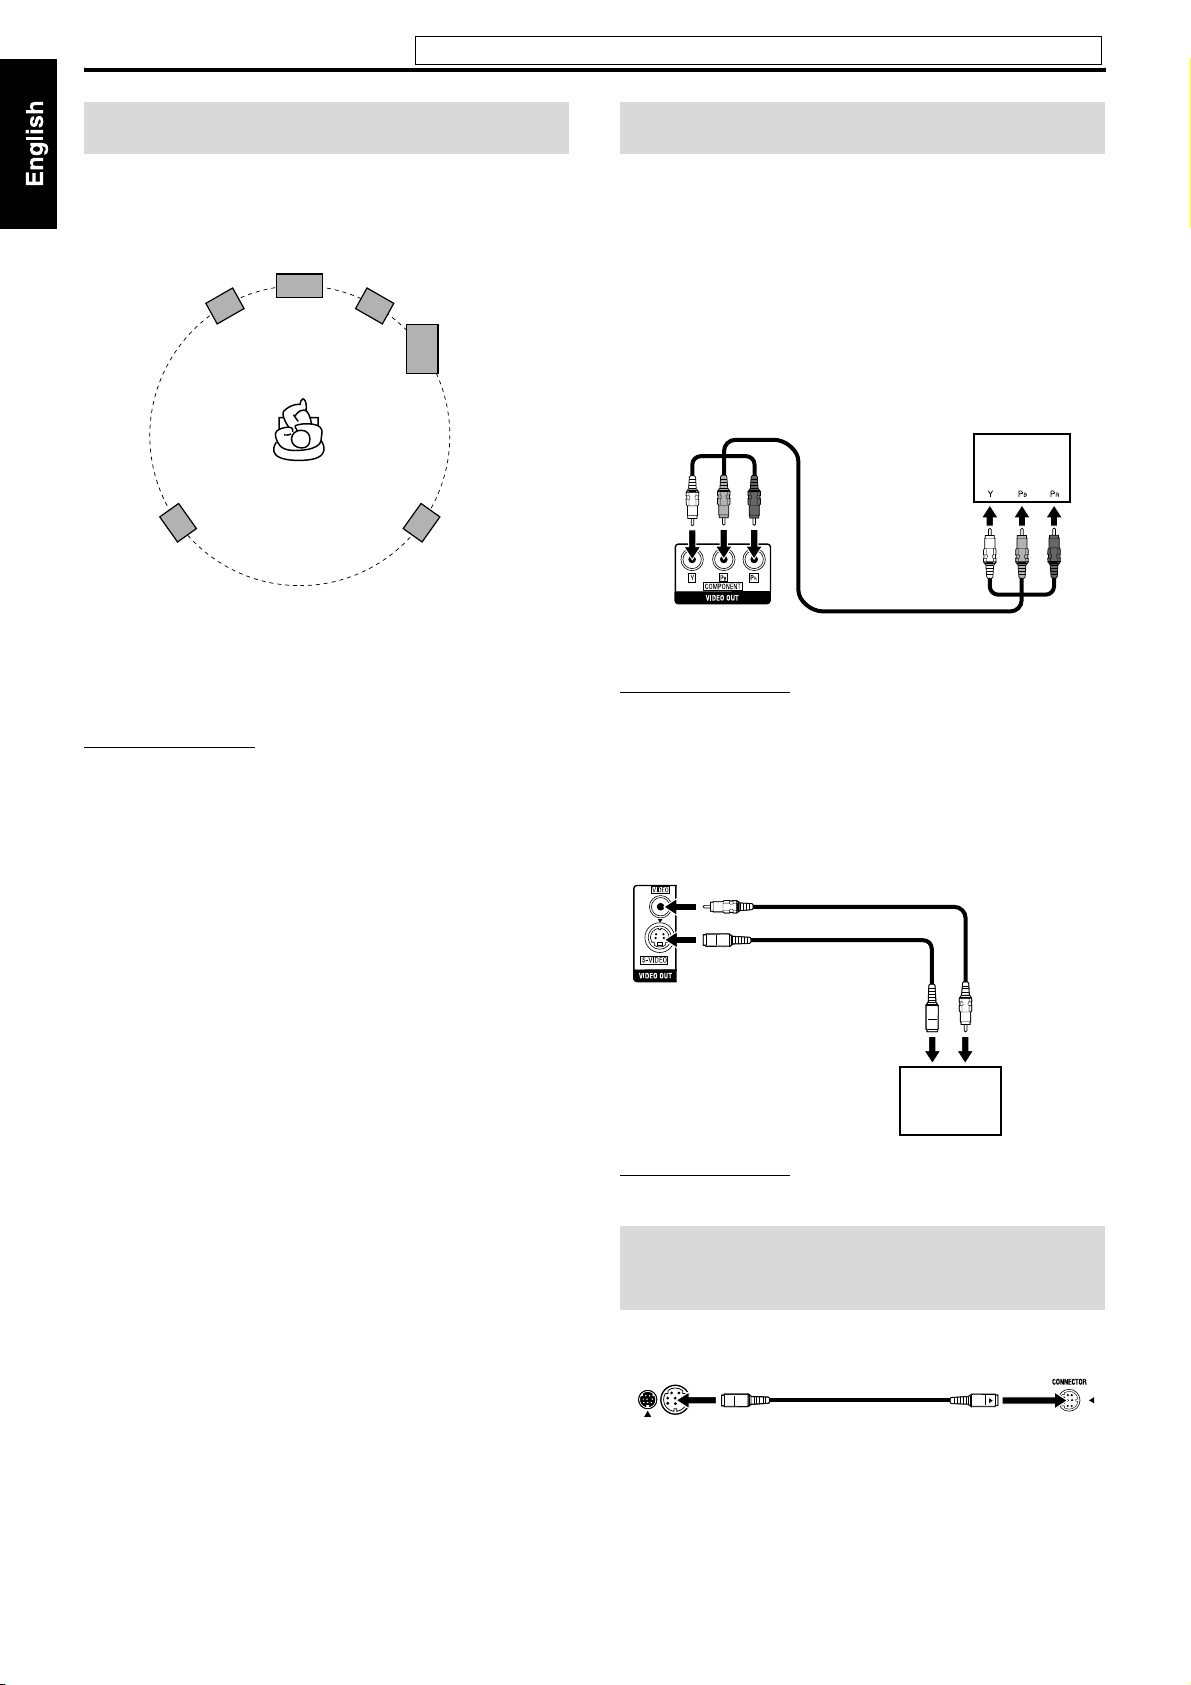
Speaker layout
To obtain the best possible sound from this system, you need to
place all the speakers except the subwoofer at the same distance
from the listening position.
Center speaker
Front left
speaker
Surround left
speaker
If your speakers cannot be placed at the same distance from the
listening position
You can adjust the delay time of the speakers. See “Delay menu
(DELAY)” on page 35.
NOTE
• Place the satellite speakers on a flat and level surface.
• T he front and center speakers are magnetically shielded to avoid color
distortions on TVs. However, if not installed properly, they may cause
color distortions. So, pay attention to the following when installing
the speakers.
– When placing the speakers near a TV set, turn off the TV’s main
power switch or unplug it before installing the speakers. Then wait
at least 30 minutes before turning on the TV’s main power switch
again.
Some TVs may still be affected even though you have followed the
above. If this happens, move the speakers away from the TV.
• The surround speakers are not magnetically shielded.
If they are located nearby the TV or monitor, it will probably cause
color distortion on the screen. To avoid this, do not place the speakers
nearby the TV or monitor.
• Be sure to place the powered subwoofer to the TV’s right. If you place
the powered subwoofer to the TV’s left, keep sufficient distance
between them to prevent the TV screen from appearing mottled.
Front right
speaker
Powered
subwoofer
Surround right
speaker
Connecting a TV
• You can get better picture quality in the order — Component
video > S-video > Composite video.
• Distortion of picture may occur when connecting to the TV via a
VCR, or to a TV with a built-in VCR.
• You need to set “MONITOR TYPE” in the PICTURE menu
correctly according to the aspect ratio of your TV. (See page 35.)
7 To connect a TV equipped with the component video input
jacks
If your TV supports progressive video input, you can enjoy a high
quality picture by setting the progressive scan mode to active. (See
page 17.)
Center unit
To component
video input
Component video cord (not supplied)
NOTE
• If the component video input jacks of your TV are of the BNC type,
use a plug adapter (not supplied) to convert the pin plugs to BNC
plugs.
• The component video signals can be output only when you select
DVD or USB MEMORY as the source to play. (See page 16.)
7 T o conn ect a TV e quip ped wi th the composite or S-video jacks
Center unit
Composite video cord (supplied)
or
S-video cord
(not supplied)
Align the 5 marks.
To S-video input
TV
TV
To composite
video input
11
NOTE
• Select the appropriate scan mode according to your TV. (See page 17.)
Connecting the powered subwoofer
Powered
Center unit
Align the 5 marks. Align the 5 marks.
System cord
(supplied)
subwoofer
Page 15
Connections
Do not connect the power cord until all other connections have been made.
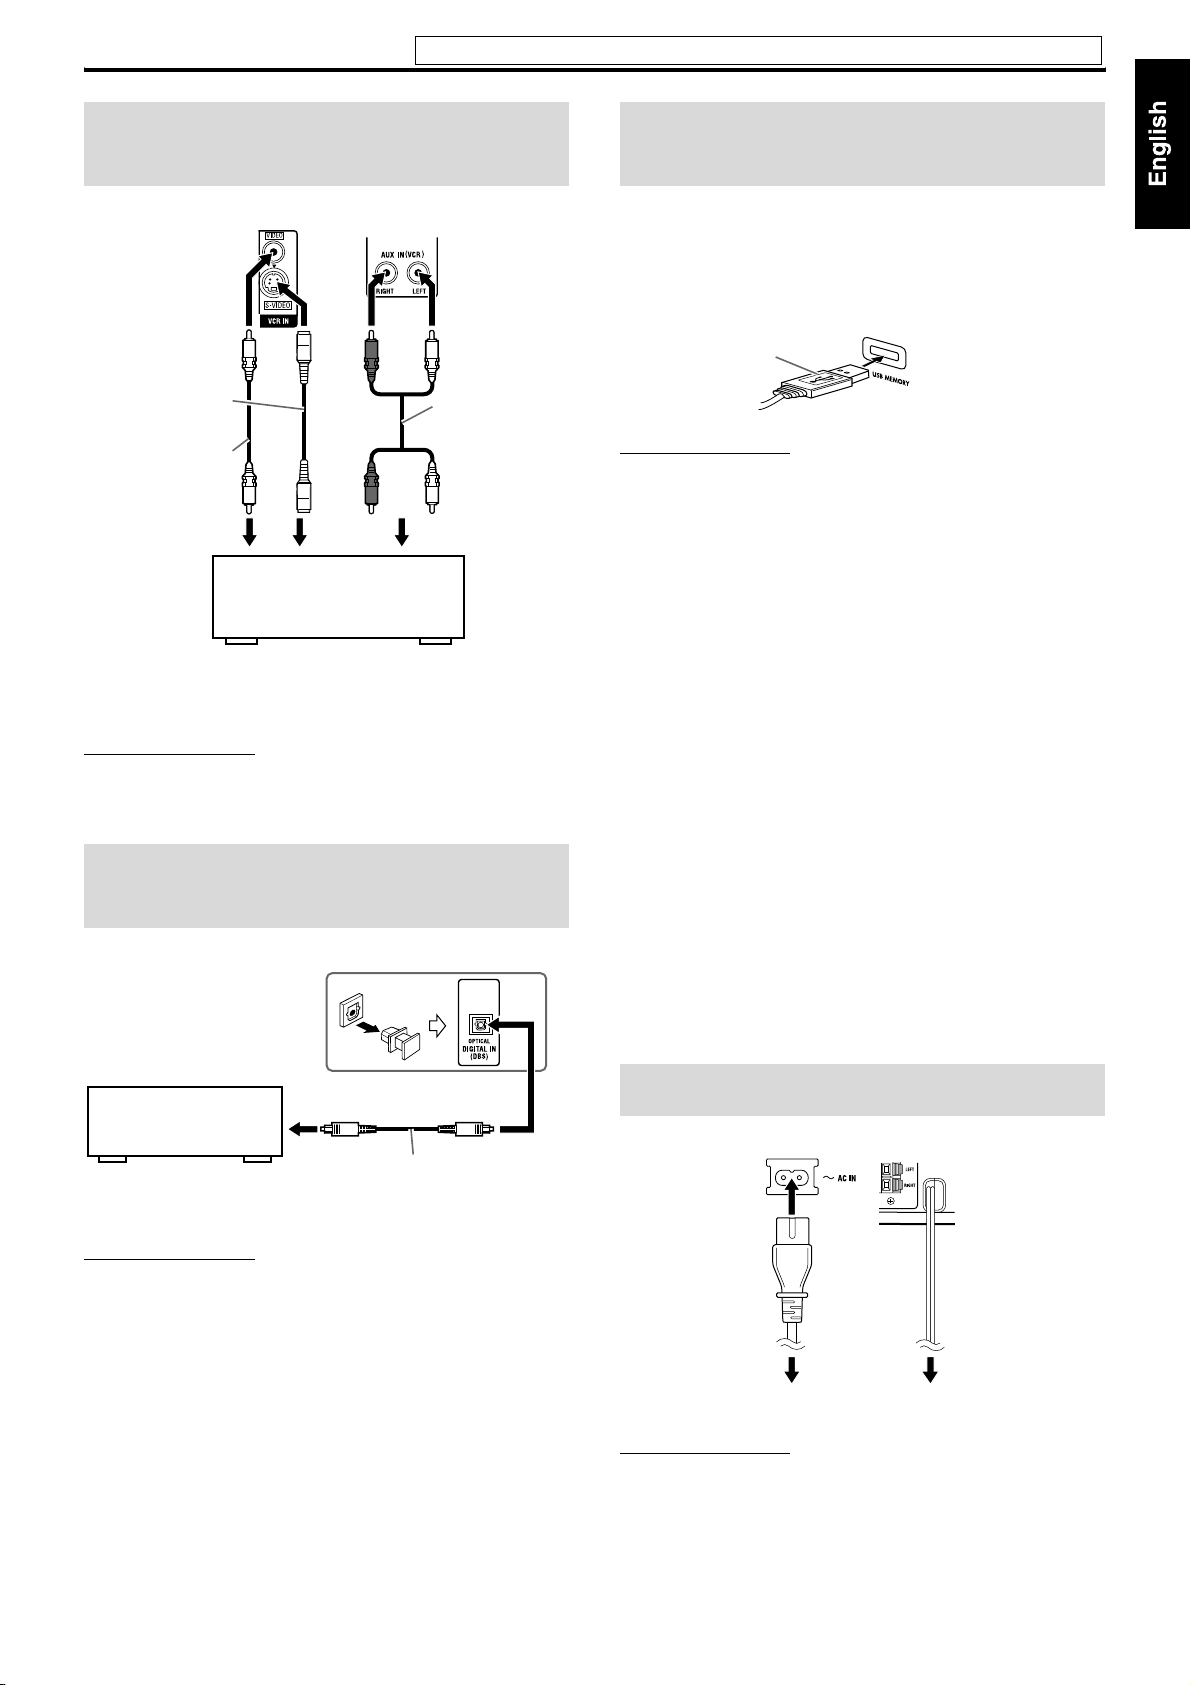
Connecting to an analog component
You can enjoy the sound of an analog component.
Center unit
S-video cord
(not supplied)
or
Composite video
(not supplied)
1
2 To S -v i d eo o u tput
3 To a u di o o utpu t
NOTE
• The signals input to the VIDEO jack of the VCR IN jacks will be
output only from the VIDEO jack of the VIDEO OUT jacks, not from
the S-VIDEO jack of the VIDEO OUT jacks.
cord
12 3
3 or 2 3)
VCR (1
TV (3)
Cassette recorder (3)
To composite video output
RCA pin plug
cord
(not supplied)
Connecting to a digital component
You can enjoy the sound of a digital component.
Center unit
Connecting a USB mass storage class device
You can connect a USB mass storage class device such as a USB
flash memory device, hard disc drive, multimedia card reader,
digital camera, etc. to this system.
• After connecting a USB mass storage class device to this system
and selecting USB MEMORY as the source, the file control
display appears on the TV screen. (See page 27.)
USB cable (not supplied)
NOTE
• When connecting a USB mass storage class device, refer also to its
manual.
• Connect one USB mass storage class device to the system at a time. Do
not use a USB hub.
• You cannot charge the USB mass storage class device while
connecting it to the USB MEMORY jack.
• While playing back a file in a USB mass storage class device, do not
disconnect the device. It may cause a malfunction of both the system
and the device.
• JVC bears no responsibility for any loss of data in the USB mass
storage class device while using this system.
• When connecting with a USB cable, use a cable less than 1 m in
length.
• This system is compatible with the USB 2.0 Full-Speed (not
compatible with the USB 1.1).
• You can play back the following types of files in a USB mass storage
class device (maximum data transfer rate: 2 Mbps):
–Music: MP3, WMA
– Picture: JPEG
– Movie: MPEG-4 (ASF), DivX (maximum frame rate of 30 fps for
progressive)
• You cannot play back a file larger than 2 GB.
• When playing a file which has a large transfer rate, frames or sounds
may be dropped during playback.
• This system cannot recognize a USB mass storage class device whose
rating exceeds 5 V/500 mA.
• This system may not recognize some USB mass storage class devices.
• This system may not play back some files even though their formats
are listed above.
.
Center unit (on the
front panel)
DBS* tuner
MD player
* DBS = Direct Broadcasting Satellite
NOTE
• Only digital audio signals can be input when selecting “DBS” as the
source to play. (See page 16.) When connecting a video component
such as a DBS tuner, operate this system to listen to the sound.
To digital optical output
Digital optical cord (not supplied)
Connecting the power cord
Make sure that all other connections have been completed.
Center unit Powered
Power cord
(supplied)
Plug into AC outlets.
CAUTION
• Disconnect the power cord before cleaning or moving the system.
• Do not pull on the power cord to unplug the cord. When unplugging
the cord, always grasp and pull the plug so as not to damage the cord.
• If the AC outlets do not match the AC plugs, use the supplied AC plug
adapter.
subwoofer
Power cord
12
Page 16
Operating external components with the remote control
The buttons described below are used on pages 13 and 14.
Number
buttons
Remote
control mode
selector
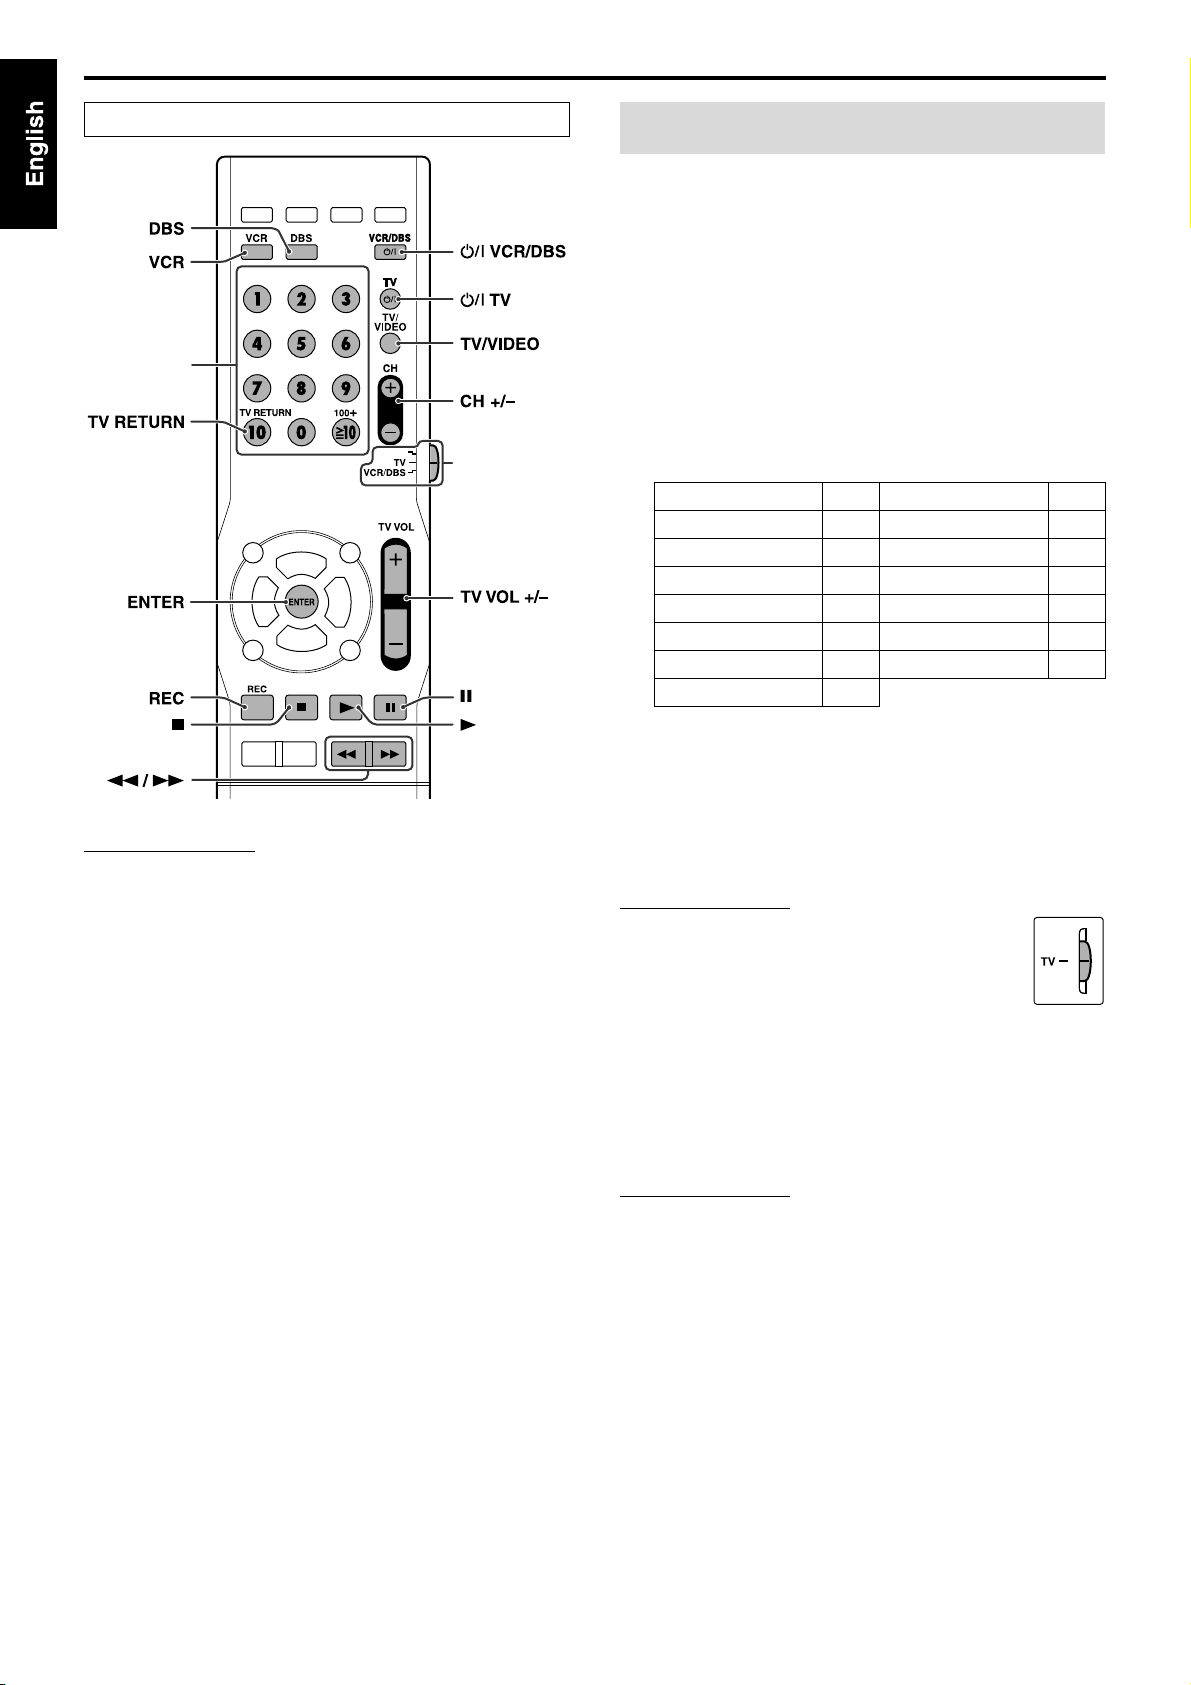
Operating the TV
7 To set the manufacturer’s code
1 Slide the remote control mode selector
to TV.
2 Press and hold F TV.
Keep the button pressed until step 4 is finished.
3 Press ENTER.
4 Press number buttons (1-9, 0) to enter
the manufacturer’s code (2 digits).
Examples:
For a Hitachi TV: Press 1, then 0.
For a Toshiba TV: Press 0, then 8.
Manufacturer Code Manufacturer Code
JVC 01* Samsung 12
Hitachi 10 Sanyo 13, 14
Magnavox 02 Sharp 06
Mitsubishi 03 Sony 07
Panasonic 04, 11 Toshiba 08
Philips 15 Zenith 09
RCA 05
(play button)
NOTE
• Manufacturers’ codes are subject to change without notice.
• Set the codes again after replacing the batteries of the remote control.
* “01” is the initial setting.
5 Release F TV.
If there is more than one code listed for corresponding brand,
try each one until you enter the correct one.
7 Operation
Aim the remote control at the TV.
IMPORTANT
Before using the remote control to operate a TV;
• Set the remote control mode selector to TV.
The following buttons are available:
F TV: Turns TV on and off.
TV VOL +/–: Adjusts the volume.
TV/VIDEO: Selects the input mode (either TV or
VIDEO).
CH +/–: Changes the channels.
1-10, 0, h10 (100+): Selects the channel.
TV RETURN: Alternates between the previously selected
channel and the current channel.
NOTE
• The operating buttons may differ depending on manufacturers.
13
Page 17
Operating external components with the remote control
See page 13 for button locations.
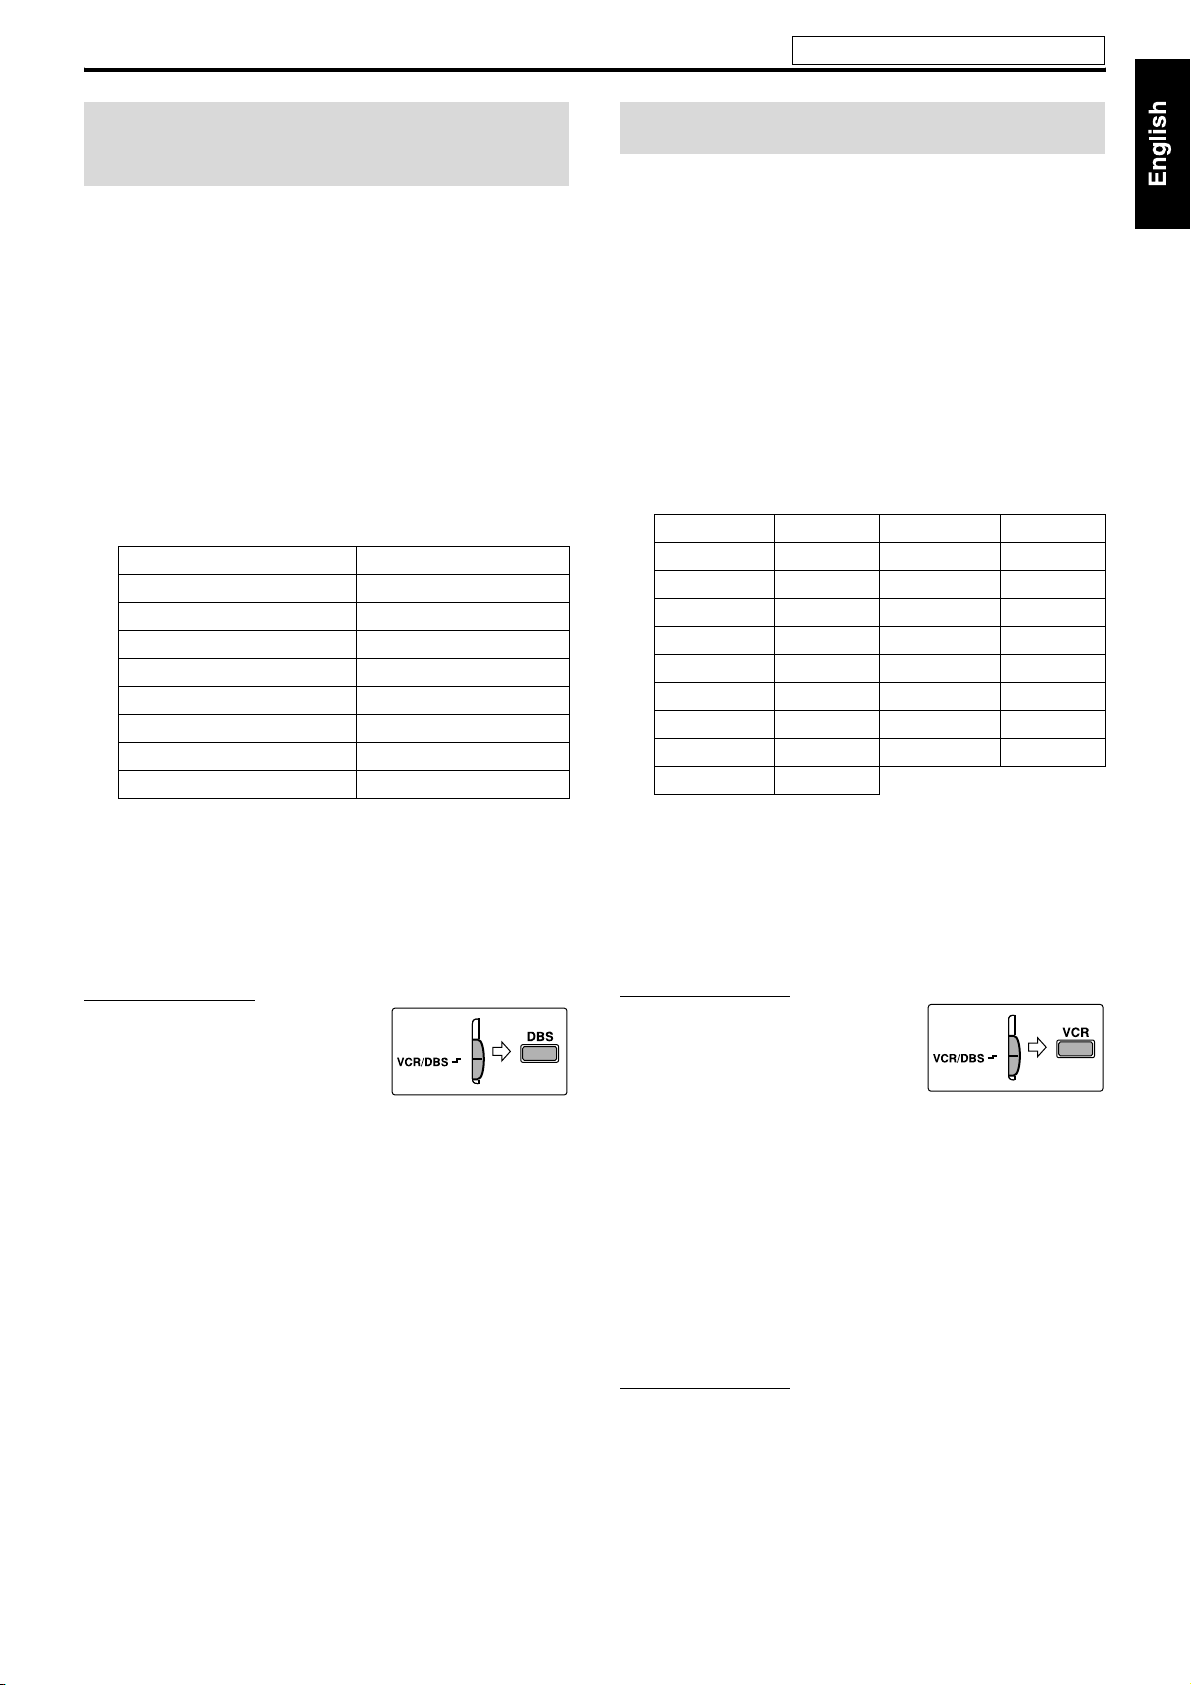
Operating the DBS tuner or CATV converter
7 To set the manufacturer’s code
1 Slide the remote control mode selector
to VCR/DBS.
2 Press DBS.
3 Press and hold F VCR/DBS.
Keep the button pressed until step 5 is finished.
4 Press ENTER.
5 Press number buttons (1-9, 0) to enter
the manufacturer’s code (2 digits).
Examples:
For a GI Jerrold product: Press 0, then 1.
For a Sony product: Press 2, then 0.
Manufacturer Code
Echostar 21
GI Jerrold 01*, 02, 03, 04, 05, 06, 07, 08
Hamlin 15, 16, 17, 18
Pioneer 13, 14
RCA 19
Scientific Atlanta 09, 10
Sony 20
Zenith 11, 12
* “01” is the initial setting.
6 Release F VCR/DBS.
If there is more than one code listed for your brand, try each
one until you enter the correct one.
Operating the VCR
7 To set the manufacturer’s code
1 Slide the remote control mode selector
to VCR/DBS.
2 Press VCR.
3 Press and hold F VCR/DBS.
Keep the button pressed until step 5 is finished.
4 Press ENTER.
5 Press number buttons (1-9, 0) to enter
the manufacturer’s code (2 digits).
Examples:
For a Philips VCR: Press 0, then 9.
For an NEC VCR: Press 2, then 5.
Manufacturer Code Manufacturer Code
JVC 01*, 02, 03 Philips 09
Emerson 11, 26 RCA 05, 06
Fisher 29 Samsung 24
Funai 10, 14, 15, 16 Sanyo 21, 22, 23
Gold Star 12 Sharp 27, 28
Hitachi 04 Shintom 30
Mitsubishi 13 Sony 18, 19, 20
NEC 25 Zenith 08
Panasonic 07, 17
* “01” is the initial setting.
6 Release F VCR/DBS.
If there is more than one code listed for your brand, try each
one until you enter the correct one.
7 Operation
Aim the remote control at the DBS tuner or CATV converter.
IMPORTANT
Before using the remote control to operate a
DBS tuner or CATV converter;
1 Set the remote control mode selector
to VCR/DBS.
2 Press DBS.
The following buttons are available:
F VCR/DBS: Turns DBS tuner or CATV converter on and
off.
CH +/–: Changes the channels.
1-10, 0, h10 (100+): Selects the channel.
7 Operation
Aim the remote control at the VCR.
IMPORTANT
Before using the remote control to operate a
VCR;
1 Set the remote control mode selector
to VCR/DBS.
2Press VCR.
The following buttons are available:
F VCR/DBS: Turns VCR on and off.
3 (play button): Starts playback.
7: Stops operation.
8:Pauses playback.
y:Fast forwards video tape.
1: Rewinds video tape.
REC: Press this button together with 3 (play
button) to start recording or together with 8
to pause recording.
CH +/–: Changes the TV channels on the VCR.
NOTE
• When operating a VCR or DBS tuner/CATV converter;
– The source setting of VCR or DBS remains after you have changed
the remote control mode selector to AUDIO or TV. When operating
VCR or DBS tuner/CATV converter again, it is not necessary to
press VCR or DBS after setting the remote control mode selector.
14
Page 18
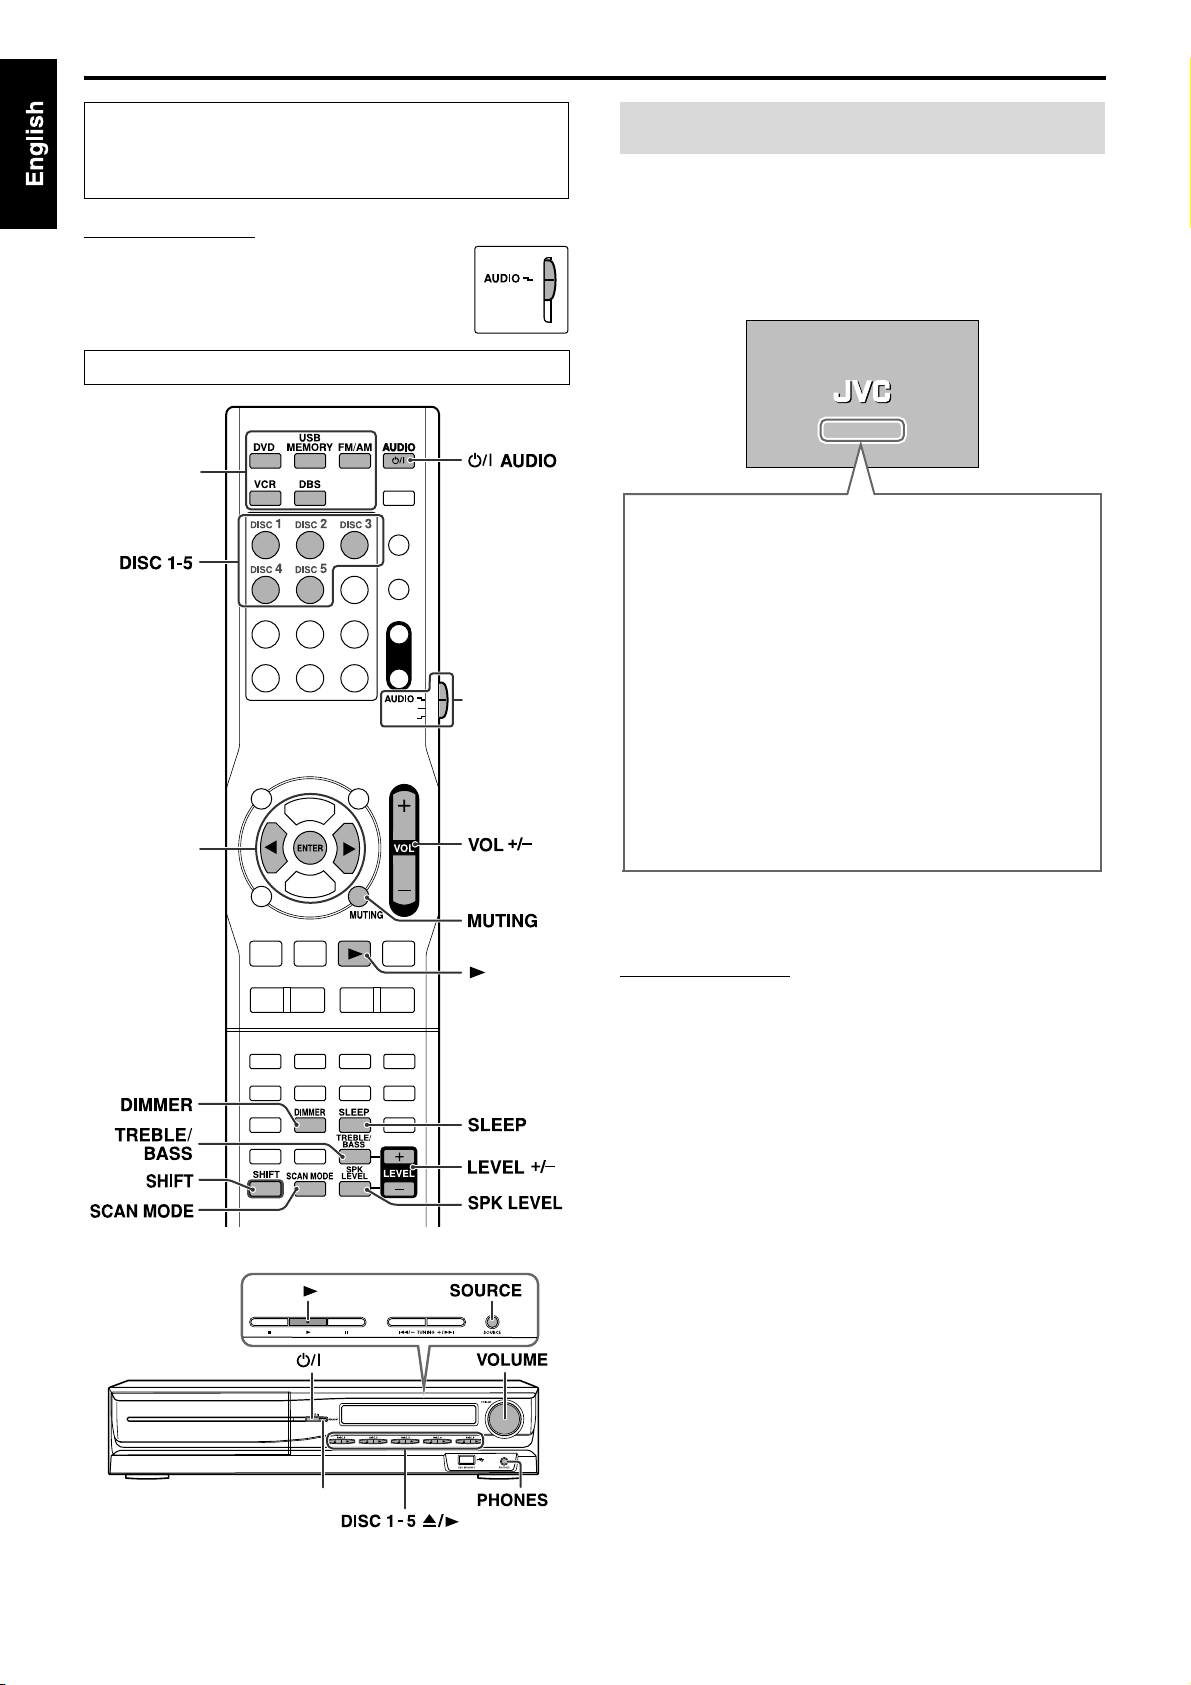
Basic operations
The buttons on the remote control are used to explain most of the
operations in this manual. You can use the buttons on the center
unit same as on the remote control for operations unless
otherwise noted.
IMPORTANT
Before using the remote control for the following
operation;
• Set the remote control mode selector to AUDIO .
The buttons described below are used on pages 15 to 17.
Source
selecting
buttons
Remote
control mode
selector
Cursor
(3/2)/
ENTER
Turning the system on/off
On the remote control:
Press F AUDIO.
On the center unit:
Press F.
When DVD or USB MEMORY is selected as the source (see page
16), the following messages will appear on the TV screen.
• “OPEN”/“CLOSE”:
Appears when opening or closing the disc tray.
• “NOW READING”:
Appears when the system is reading the disc/file information.
• “REGION CODE ERROR!”:
Appears when the Region Code of the DVD VIDEO does not
match the code the system supports. The disc cannot be
played back.
•“NO DISC”:
Appears when no disc is loaded.
• “NO USB DEVICE”:
Appears when no USB mass storage class device is connected.
• “CANNOT PLAY THIS DISC”:
Appears when unplayable disc is loaded.
• “CANNOT PLAY THIS DEVICE”:
Appears when unplayable USB mass storage class device is
connected.
STANDBY lamp
NOTE
• The STANDBY lamp on the center unit lights red when the power is
turned off. The lamp goes off when the power is turned on.
• The power supply to the subwoofer is linked to the center unit. The
POWER ON lamp on the subwoofer lights green when the power is
turned on.
• A small amount of power is consumed even when the power is turned
off (center unit only). This is called standby mode and the STANDBY
lamp lights in this mode. Unplug the power cord from the AC outlet
to turn the power off completely.
• You can also turn on the system by pressing the following buttons:
– One of the DISC (1-5) buttons (with SHIFT pressed) on the remote
control
– One of the DISC (1-5) 0 buttons on the center unit
– One of the source selecting buttons or 3 on the remote control
– One of the DISC (1-5) 3 buttons or 3 on the center unit
15
Page 19

Basic operations
See page 15 for button locations.
Selecting the source to play
On the remote control:
Press one of the source selecting buttons
(DVD, USB MEMORY, FM/AM, VCR or DBS).
DVD:
To play back a disc (DVD VIDEO, VCD etc.). (See page 18.)
USB MEMORY:
To play back a file in a USB mass storage class device. (See “To play
a file in a USB mass storage class device” on page 18.)
FM/AM:
To tune in an FM or AM station. (See page 36.) Each time you press
the button, the band alternates between FM and AM.
VCR:
To select the source from a component connected to the VCR IN
jacks and AUX IN (VCR) jacks. (See page 12.)
DBS:
To select the source from a component connected to the DIGITAL
IN (DBS) jack. (See page 12.)
On the center unit:
Press SOURCE repeatedly until the source
name you want appears on the display
window.
NOTE
• When AM, FM or DBS is selected, this system does not output video
signals.
• It may take time to change the source.
Adjusting the volume [VOLUME]
CAUTION
• Always set the volume to minimum level before starting any source.
If the volume is set at a high level, the sudden blast of sound could
permanently damage your hearing and/or blow out the speakers.
On the remote control:
Press VOL +/–.
On the center unit:
Turn VOLUME.
• To increase the volume, turn VOLUME clockwise.
• To decrease the volume, turn VOLUME counterclockwise.
Listening with headphones (not supplied)
CAUTION
Be sure to turn down the volume;
• Before connecting or putting on headphones as high volume may
damage both the headphones and your hearing.
• Before disconnecting headphones as high volume may be suddenly
output from the speakers.
While connecting a pair of headphones to the PHONES jack on the
center unit, the system automatically cancels the surround mode
(see page 23) currently selected, deactivates the speakers, turns the
subwoofer’s power off, and activates the headphone mode.
“H. PHONE” appears on the display window.
Headphone mode
When using the headphones, the following signals are output
regardless of your speaker setting;
• For 2 channel sources, the front left and right channel signals are
output from the headphones.
• Multi-channel signals are down-mixed and output from the
headphones.
• (For DVD AUDIO) When the disc prohibits down-mixing, only
the front left and right channels are output from the headphones.
Turning off the sound temporarily [MUTING]
Press MUTING.
To restore the sound
Perform one of the following:
•Press MUTING again.
•Press VOL +/– (or turn VOLUME on the center unit).
Adjusting the brightness of the indications [DIMMER]
Press DIMMER.
Each time you press the button, you can change the brightness level
in 3 steps.
16
Page 20
Basic operations
See page 15 for button locations.
Sleep Timer [SLEEP]
The system turns off automatically when the specified period of
time has passed.
Press SLEEP.
Each time you press the button, the shut-off time changes as
follows:
– – (off) Z 10 Z 20 Z 30 Z 60 Z 90 Z 120 Z 150 Z
(back to the beginning) (Unit: min.)
Example:
minutes
To check the remaining time
Press SLEEP once.
To change the remaining time
Press SLEEP repeatedly.
To cancel
Press SLEEP repeatedly until “SLEEP – –” appears.
• Turning off the power also cancels the Sleep Timer.
Adjusting the output level of the subwoofer and speakers
1 Press SPK LEVEL to show the target
speaker indication on the display
window.
Each time you press the button, the indication of the speakers
changes as follows:
FRNT L (Front Left speaker) Z FRNT R (Front Right
speaker) Z CENTER (Center speaker) Z SURR L
(Surround Left speaker) Z SURR R (Surround Right
speaker) Z SUBWFR (Subwoofer) Z (back to the
beginning)
2 Press LEVEL +/– to adjust the output
level from –6 to +6.
NOTE
• You can also make adjustments by using the setup menu shown on
the TV screen. (See page 35.)
• The adjustments take effect for all sources other than FM/AM. For
FM/AM, adjust the level separately by repeating the procedure above.
Adjusting the sound
1 Press TREBLE/BASS to show “TRE” or
“BASS” on the display window.
Each time you press the button, the indication alternates
between “TRE” and “BASS”.
• TRE: Select this to adjust treble sound.
• BASS: Select this to adjust bass sound.
2 Press LEVEL +/– to adjust the level from
– 10 to +10 (in 2 steps).
NOTE
• The adjustments take effect for all sources.
Changing the scan mode
The system can be accommodated to your TV’s scan mode.
NOTE
• To use the system in the progressive mode, it is required that the
center unit is connected to the TV by using a component video cord
(not supplied). (See page 11.)
7 While DVD or USB MEMORY is selected as the source and
stopped
1 Press and hold SCAN MODE for
2seconds.
Currently selected scan mode appears on the display window.
2 Press Cursor 3/2 to select the desired
mode.
• NT. 480I: Select when your TV supports the NTSC
interlaced video input only.
• NT. 480P: Select when your TV equipped with component
jacks supports the NTSC progressive video input.
• PAL. 576I: Select when your TV supports the PAL interlaced
video input only.
• PAL. 576P: Select when your TV equipped with component
jacks supports the PAL progressive video input.
You can get better picture quality in the progressive mode
(“NT. 480P” or “PAL. 576P”) than in the interlace mode
(“NT. 480I” or “PAL. 576I”).
3 Press ENTER while the selected mode is
displayed.
When the progressive mode is selected, the PROGRESSIVE
indicator lights on the display window.
NOTE
• Changing the scan mode does not take effect when connecting the TV
with the S-video or the composite video cord.
• Although the picture may be distorted when you press ENTER, this is
not a malfunction of the system.
17
• There are some progressive TVs and High-Definition TVs that are
not fully compatible with this system, resulting in an unnatural
picture when playing back a DVD VIDEO in the progressive scan
mode. In such a case, change the scan mode to the interlace mode.
• All JVC progressive TVs and High-Definition TVs are fully
compatible with this system.
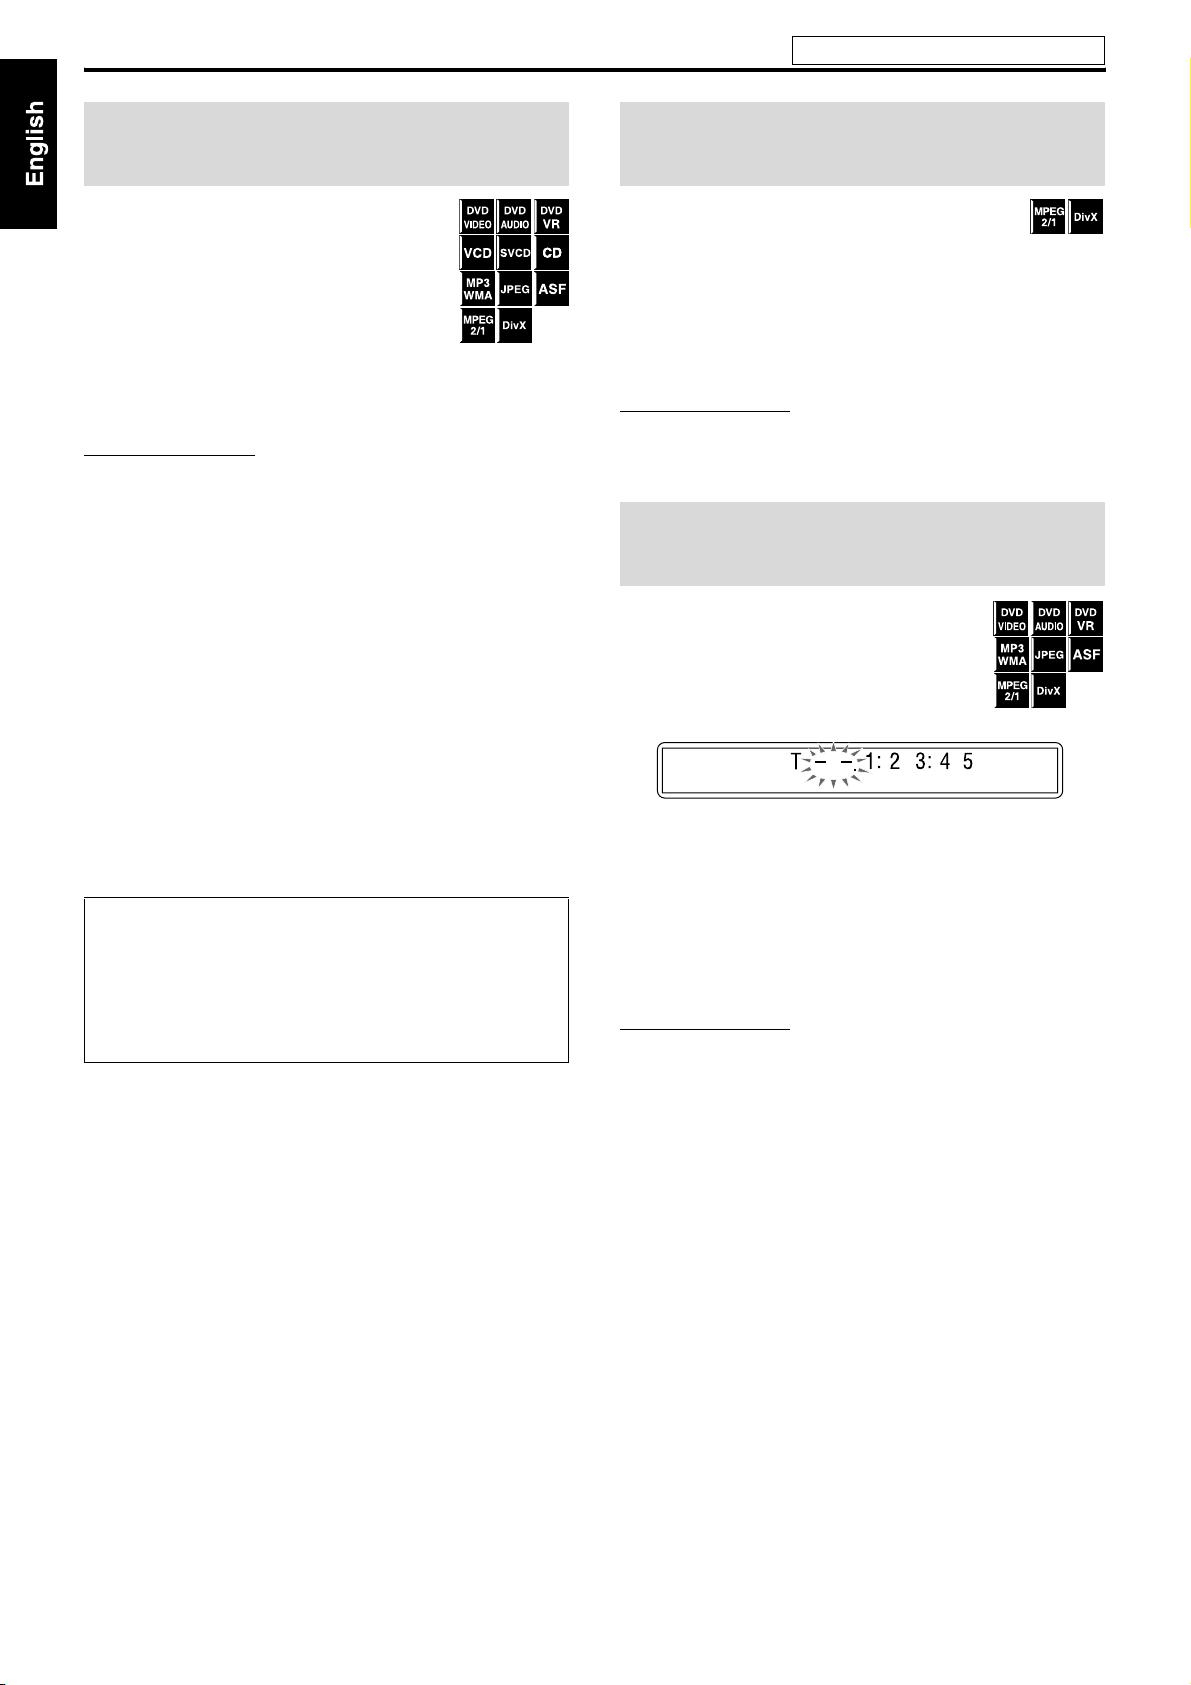
Page 21
Playback
• The icon such as shows the disc formats or file types the
operation is available for.
IMPORTANT
Before using the remote control for the
following operation;
1 Set the remote control mode selector
to AUDIO.
2 Press DVD or USB MEMORY.
The buttons described below are used on pages 18 to 22.
Number
buttons
Remote
control mode
selector
Basic playback
7 To play a disc
1 Press the desired DISC (1-5)
0 on the center unit.
The system turns on and the disc tray comes
out.
2 Place a disc.
When placing an 8 cm discLabel side up
3 Press DISC (1-5), with SHIFT pressed.
NOTE
• Up to 5 discs can be loaded.
• You can also start playback by pressing the following buttons:
– DVD or 3 (play button) on the remote control
– DISC (1-5) 3 or 3 on the center unit
• The system plays back available discs sequentially until you stop
playback or until the disc loaded on the DISC 5 tray reaches to the
end. However, when DVD VIDEO or DVD AUDIO is loaded in the
system, playback of the disc next to the DVD VIDEO or DVD
AUDIO will not start.
Cursor
(3/2/Y/5)/
ENTER
(play button)
7 To play a file in a USB mass storage class device
Press USB MEMORY.
The operations of the files in a USB mass storage class device
depend on the file types stored in the device.
• For details on connecting a USB mass storage class device, see
“Connecting a USB mass storage class device”. (See page 12.)
7 When playing the following files...
• For MP3/WMA files
The file control display (see page 27) appears on the TV screen.
• For JPEG files
Each file (still pictures) is shown on the TV screen for about 3
seconds (slide-show). When stopping playback, the file control
display (see page 27) appears on the TV screen.
• For ASF/MPEG-2/MPEG-1 files
Pressing TOP MENU/PG or MENU/PL shows the file control
display (see page 27) on the TV screen during playback.
• For DivX files
During the readout time, “READING INDEX” may appear on
the TV screen.
Pressing TOP MENU/PG or MENU/PL shows the file control
display (see page 27) on the TV screen during playback.
NOTE
• When several types of files are recorded on a disc/device, select
appropriate file type on the setup menu. (See page 35.)
• (For JPEG) The system cannot accept operations even though you
press any buttons before the entire picture appears on the TV screen.
7 To pause playback
Press 8.
To continue playback, press 3 (play button).
7 To stop
Press 7.
18
Page 22
Playback
See page 18 for button locations.
7 On-screen guide icons
During DVD VIDEO playback, the following guide icons may
appear for a while on the TV screen;
• : appears at the beginning of a scene containing multi-subtitle
languages.
• : appears at the beginning of a scene containing multi-audio
languages.
• : appears at the beginning of a scene containing multi-angle
views.
• (Play), (Pause), / (Fast forward/
fast-reverse), / (Slow-motion forward/
reverse): appears when you perform each operation.
• : the disc cannot accept an operation you have tried to do.
NOTE
• If you do not want the on-screen guide icons to appear, see page 36.
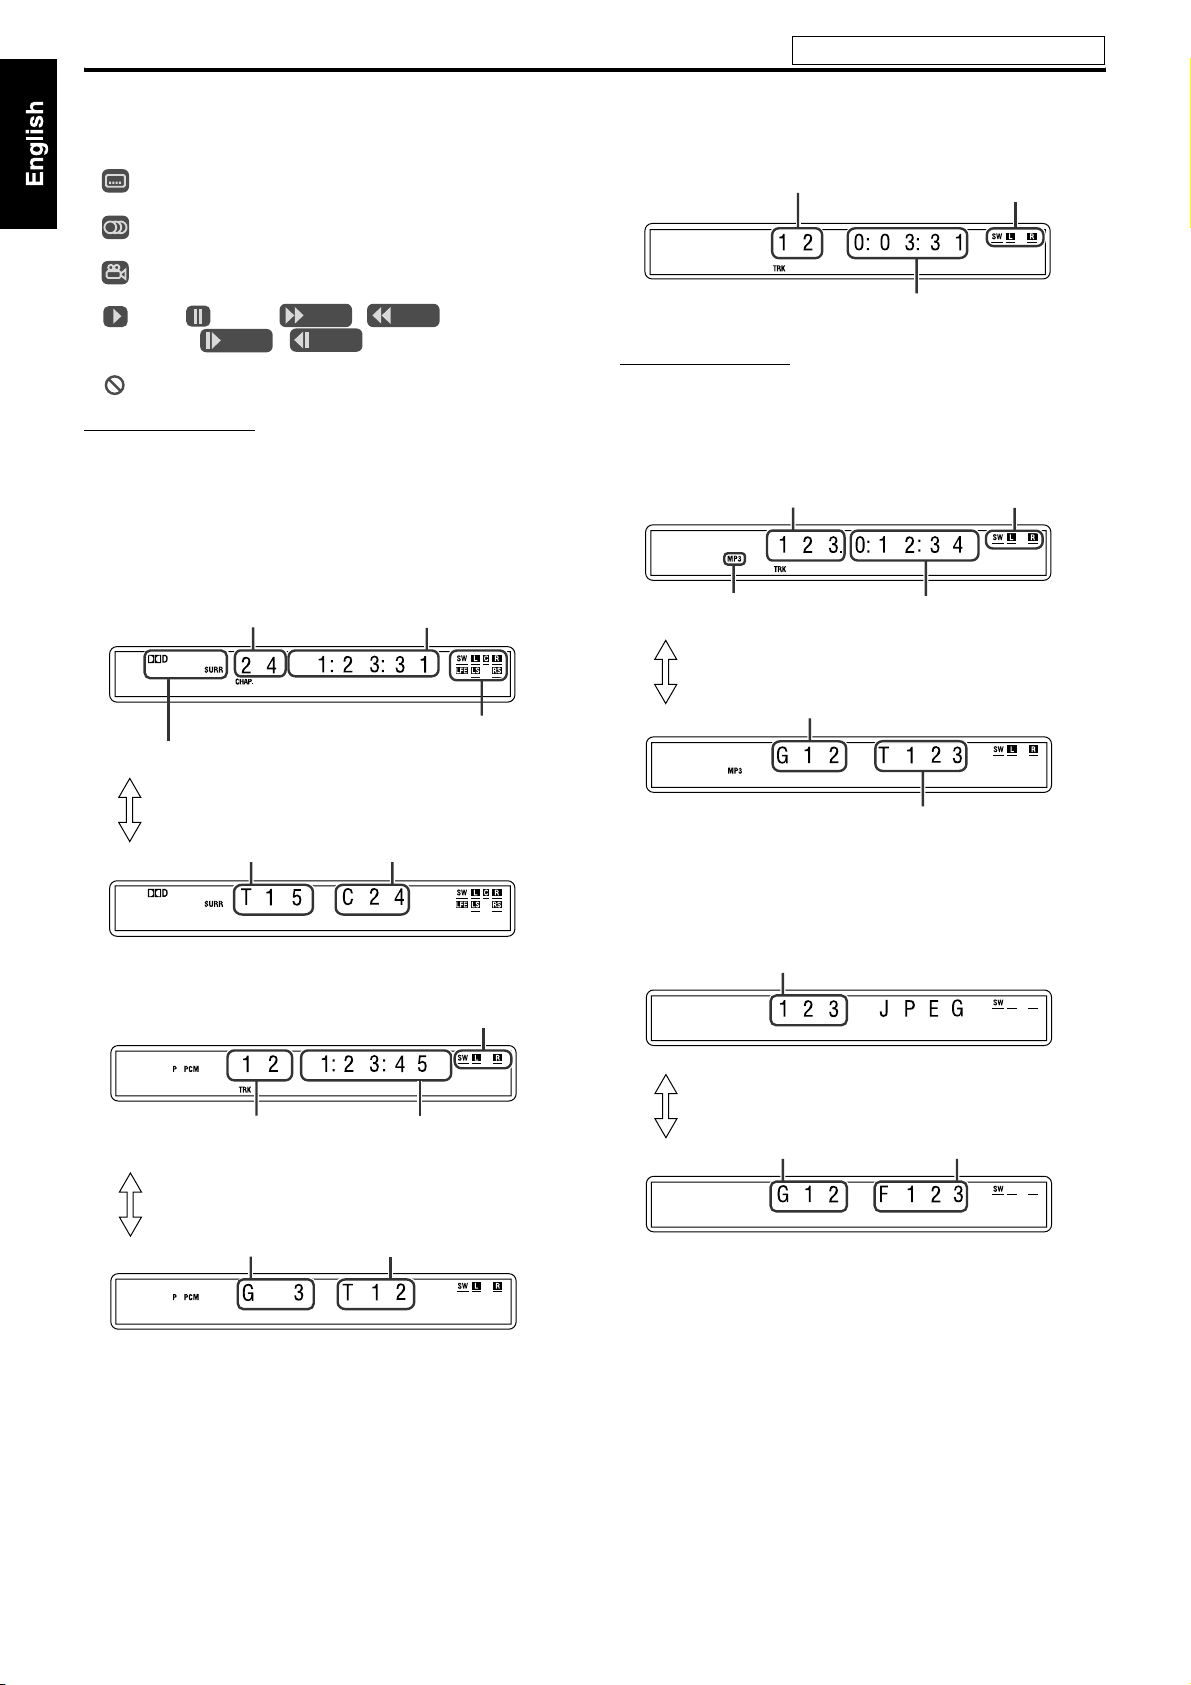
7 Playback information on the display window
DVD VIDEO
Example: When a DVD VIDEO encoded with Dolby Digital 5.1 ch
is played
Chapter number
Elapsed playing time
(hour:minute:second)
VCD/SVCD/CD
Example: When a CD is played back
Track number
Elapsed playing time (hour:minute:second)
Signal and speaker
indicators
NOTE
• When a VCD or SVCD with PBC function is played, the elapsed
playing time does not appear, but “PBC” appears.
MP3/WMA file
Example: When an MP3 file is played back
Track number
MP3 indicator*
Elapsed playing time (hour:minute:second)
Signal and speaker
indicators
(during playback only)
Pressing FL DISPLAY
Signal and speaker indicators (See page 24.)
Surround mode and digital signal format (See page 24.)
Pressing FL DISPLAY
DVD AUDIO
Title number
Track number Elapsed playing time
Chapter number
Signal and speaker indicators
(hour:minute:second)
Pressing FL DISPLAY
Group number
Track number
Group number
Track number
* WMA indicator lights for a WMA file.
JPEG file
Example: When slide-show is played back
File number
Pressing FL DISPLAY
Group number File number
19
Page 23
Playback
See page 18 for button locations.
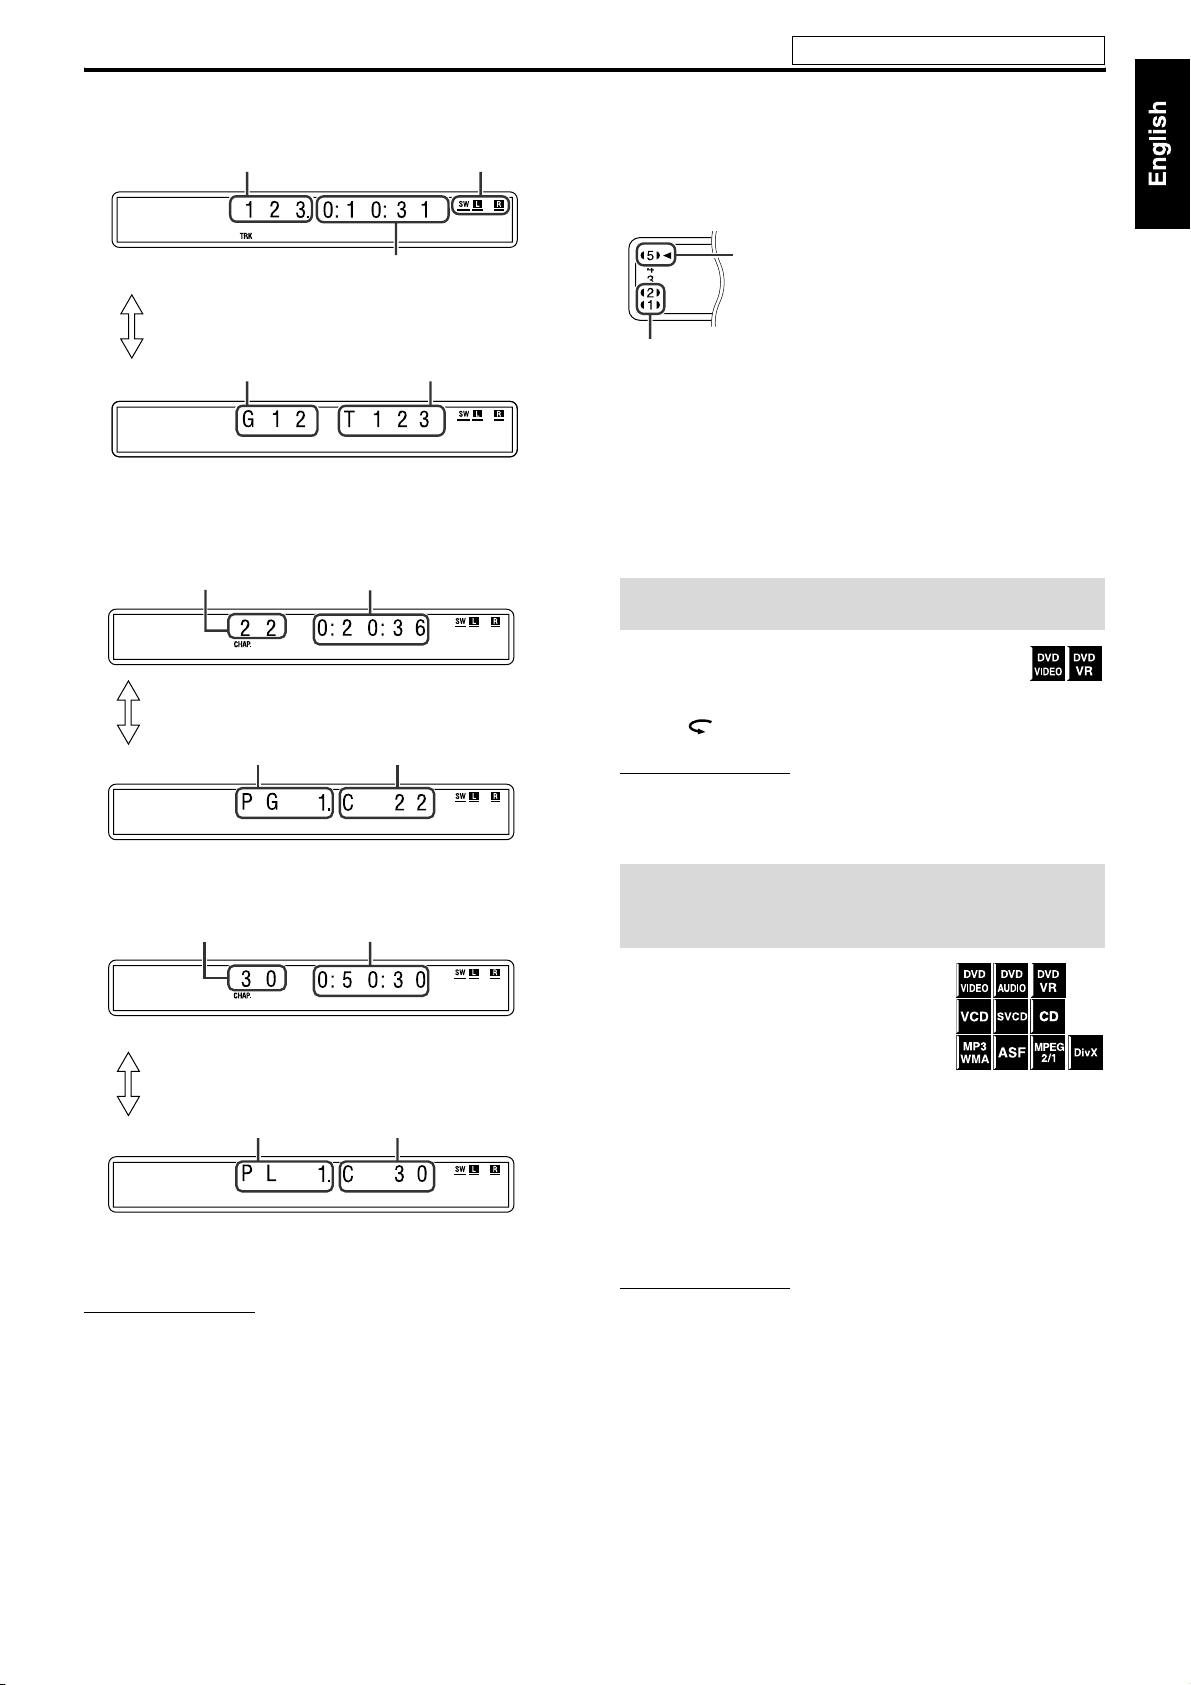
ASF/MPEG-2/MPEG-1/DivX file
Example: When an ASF file is played
Track number
Elapsed playing time (hour:minute:second)
(during playback only)
Pressing FL DISPLAY
Group number
DVD VR disc
Example: During playback on the Original program*
Chapter number
Pressing FL DISPLAY
Title number
Signal and speaker indicators
Track number
Elapsed playing time
(hour:minute:second)
Chapter number
7 Disc information on the display window
The disc indicators on the display window show the current status
of the corresponding disc tray.
Example: When the discs are loaded to disc trays 1, 2 and 5, and the
disc in the disc tray 5 is selected.
Currently selected disc
number
Currently loaded disc number
7 Screen saver
An image may burn in on a TV screen if a static picture is displayed
for a long time. To prevent this, the system automatically dims the
screen if a static picture is displayed for over 5 minutes (the screen
saver function).
• Pressing any button will cancel the screen saver function.
• If you do not want to use the screen saver function, see page 35.
One Touch Replay
You can move back the playback position by 10 seconds
from the current position.
7 During playback
Press .
NOTE
• This function works in the same title.
• This function is not available during the repeat playback.
• This feature may not work for some discs.
Example: During playback on the Playlist*
Chapter number
Pressing FL DISPLAY
Playlist number
* Pressing TOP MENU/PG or MENU/PL, you can change the play
mode. (See page 22.)
NOTE
• You can change the time information mode (except for MP3/WMA/
ASF/MPEG-2/MPEG-1/DivX). (See page 25.)
• You can also check the playback information on the TV screen. (See
page 24.)
Elapsed playing time
(hour:minute:second)
Chapter number
Fast-forward/fast-reverse search
7 During playback
On the remote control:
Press y or 1.
Each time you press the button, the search
speed changes (x2, x5, x10, x20, x60).
To return to normal speed playback
Press 3 (play button).
On the center unit:
Press and hold x or 4.
Continuously pressing x or 4 increases the fast-forward/
reverse search speed (x5, x20).
NOTE
• When a DVD VIDEO, DVD VR, VCD, SVCD, or ASF/MPEG-2/
MPEG-1/DivX is played back, no sound comes out during fastforward/reverse search.
• When a DVD AUDIO, CD, or MP3/WMA is played back, sound is
intermittent and low during fast-forward/reverse search.
• This feature may not work for some discs/files.
• For MP3/WMA, the search speed is not shown.
• The search speed for DivX is y1, y2, y3 for forward search,
and 11, 12 and 13 for reverse search.
20
Page 24
Playback
See page 18 for button locations.
Skip to the beginning of a desired selection
7 Using x/4 buttons
7 For DVD VIDEO/DVD VR (chapter): During
playback
7 For VCD/SVCD (track): During playback
without PBC function
7 For DVD AUDIO/CD/MP3/WMA/JPEG/
ASF/MPEG-2/MPEG-1/DivX (track/file): During playback or
while stopped
Press x or 4 repeatedly.
NOTE
• When playing back an MP3/WMA/JPEG/ASF/MPEG-2/MPEG-1/
file, you can make operations using the file control display. (See
DivX
page 27.)
• This feature may not work for some discs/files.
7 Using number buttons on the remote control
7 For DVD VIDEO/DVD VR (title, chapter):
While stopped, the title number is selected.
During playback, the chapter number is selected.
7 For DVD AUDIO (track):
During playback or while stopped
7 For VCD/SVCD (track):
During playback or while stopped without PBC function
7 For CD/MP3/WMA/JPEG/ASF/MPEG-2/MPEG-1/DivX
(track/file):
During playback or while stopped
Press number buttons (0-10, h10) to
select the desired number.
• For details on using the number buttons, see “How to use the
number buttons” below.
How to use the number buttons
To select 3: Press 3.
To select 10: Press 10.
To select 14: Press h10, 1, then 4.
To select 24: Press h10, 2, then 4.
To select 40: Press h10, 4, then 0.
To select 114: Press h10, h10, 1, 1, then 4.
Skipping at about 5-minute intervals
You can skip within the file at about 5-minute intervals.
This is useful especially when you want to skip within a
long file.
7 During playback
Press Cursor 3/2.
Each time you press the button, the playback position skips to the
beginning of the previous or next interval. Each interval is about
5minutes.
NOTE
• Intervals are automatically assigned from the beginning of a file.
• This feature is available only within the same file.
• This feature may not work for some discs/files.
Locating a desired title/group using number buttons
7 During playback or while stopped
1 Press TITLE/GROUP.
“– –” is shown in the title/group display area
in the display window.
Example: During DVD VIDEO playback
2 While the display window shows “– –”,
use number buttons (0-10, h10) to
enter the desired title or group
number.
The system starts playback from the first chapter/track/file of
the selected title/group.
• For details on using the number buttons, see “How to use the
number buttons” on the left column.
NOTE
• When locating a title of a DVD VR disc, the PG or PL indicator may
light on the display window.
• This feature may not work for some discs/files.
21
Page 25
Playback
See page 18 for button locations.
Playing back a bonus group Selecting the desired title/
Some DVD AUDIOs have a special group called “bonus
group” whose contents are not open to the public. The
bonus group is always assigned to the last group of a disc. To
play back a bonus group, you have to enter the specific “key
number” (a password). The way of getting the key number depends
on the disc. After getting the key number, you can play back the
bonus group by following the procedure below.
7 While the BONUS indicator lights up on the display window
1 Select the bonus group.
For selecting the group, see “Locating a desired title/group
using number buttons” described on page 21.
The key number entry indication appears.
On the TV
On the display window
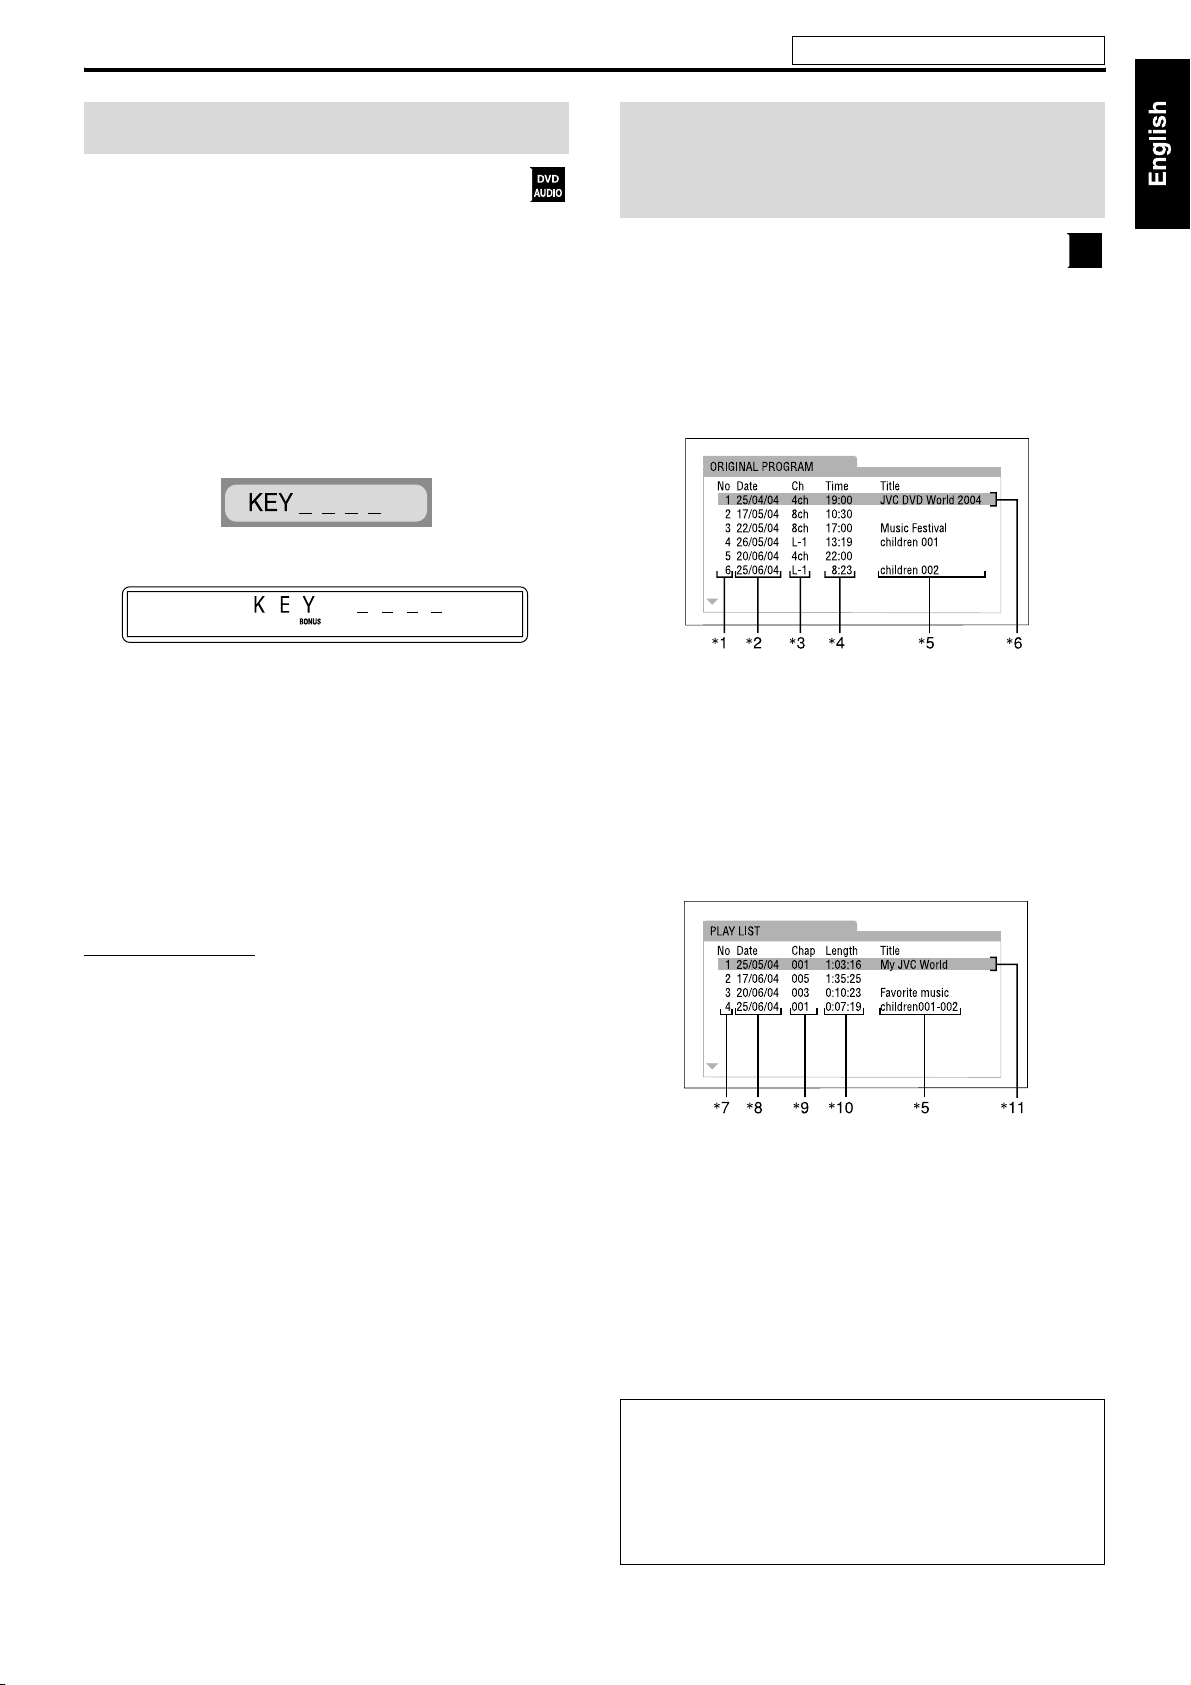
playlist from the control
display
7 During playback or while stopped
1 Press TOP MENU/PG or MENU/PL.
The control display is shown on the TV screen, and the system
starts playback of the first title/playlist.
• The PLAY LIST is shown only when the playlist is on the
DVD VR disc.
TOP MENU/PG: shows the ORIGINAL PROGRAM.
Example:
DVD
VR
2 Press number buttons (0-9) to enter the
key number, then press ENTER.
When you enter the correct key number, playback starts and
the BONUS indicator goes off.
• If you enter a wrong number, reenter the correct number.
To clear the key number entry
Perform whichever one of the following:
•Press 7.
• Open the disc tray.
• Turn off the system.
NOTE
• In Random Playback, tracks in the bonus group are not played back.
*1:Title number
*2: Recording date
*3: Recording source (TV station, the input terminal of the
recording equipment etc.)
*4: Start time of recording
*5: Title of the original program/playlist (The title may not be
displayed depending on the recording equipment.)
*6: Current title
MENU/PL: shows the PLAY LIST.
Example:
*7:Playlist number
*8: Creating date of playlists
*9: Number of chapters
*10: Total playing time
*11:Current playlist
2 Press Cursor Y/5 to select the desired
title/playlist.
The system starts playback of the selected title/playlist.
To clear the control display
Press ENTER.
About the play mode on a DVD VR disc
• Original program (ORIGINAL PROGRAM):
The system can play back the original picture in the recorded
order.
• Playlist (PLAY LIST):
The system can play back the playlist edited by the recording
equipment.
22
Page 26
Available S
l
Advanced operations
• The icon such as shows the disc formats or file types the
operation is available for.
IMPORTANT
Before using the remote control for the following
operation;
• Set the remote control mode selector to AUDIO .
• There are exceptions in the operation mentioned
above. In such a case, follow each instruction.
The buttons described below are used on pages 23 to 33.
Number
buttons
Remote
control m ode
selector
Cursor
(3/2/Y/5)/
ENTER
(play button)
Using the surround mode
You can enjoy more realistic sound field than a stereo sound by
using the surround mode.
7 Auto Surround (AUTO SUR)
Used to reproduce the sound as it is recorded without any
conversion (downmixing or simulation, etc.). For example, a
multichannel source is automatically reproduced in multichannel
audio.
7 Dolby Surround
Dolby Pro Logic II*
Dolby Pro Logic II has a newly developed multichannel playback
format to decode all 2 channel sources — stereo source and Dolby
Surround encoded source — into a 5.1 channel.
Dolby Pro Logic II has two modes — Movie mode and Music mode:
• Pro Logic II Movie (MOVIE)
Suitable for reproduction of Dolby Surround encoded sources
bearing the mark .
• Pro Logic II Music (MUSIC)
Suitable for reproduction of any 2 channel stereo music sources.
Dolby Digital*
Used to reproduce multichannel soundtracks of the software
encoded with Dolby Digital ( ).
• There are other encoding formats of digital surround introduced
by Dolby Laboratories, such as Dolby Digital EX.
7 DTS Digital Surround*
Used to reproduce multichannel soundtracks of the software
encoded with DTS Digital Surround ( ).
DTS Digital Surround (DTS) is another discrete multichannel
digital audio format available on CD and DVD software.
• There are other encoding formats of multi-channel digital
surround introduced by Digital Theater Systems, Inc., such as
DTS-ES, DTS 96/24.
1
1
2
urround modes for each input signa
The √ marks show available surround modes.
Signal OFF AUTO SUR MOVIE*
Dolby D
(Multichannel)
Dolby D
(2 channel)
DTS Digital Surround
(Multichannel)
DTS Digital Surround
(2 channel)
Linear/Packed PCM
(Multichannel)
Analog (VCR) or Linear/
Packed PCM (2 channel)
Mode Surround
off
√√—— √ —————
√√√√————√√
√√——— √ —— — —
√√√√————√√
√√——— — √√ ——
√√√√————√√
Auto
Surround
Dolby Surround
3
MUSIC*3DOLBY D DTS LPCM PPCM STADIUM*3ALL ST*
DTS Digital
Surround
Linear
PCM
Packed
PCM
DSP
*1Manufactured under license from Dolby Laboratories. “Dolby”, “Pro Logic”, “MLP Lossless”, and the double-D symbol are trademarks of
Dolby Laboratories.
2
*
“DTS” and “DTS Digital Surround” are registered trademarks of Digital Theater Systems, Inc.
3
*
You can select these modes by pressing SURROUND. (See page 24.)
23
3
Page 27

Advanced operations
See page 23 for button locations.
7 DSP
• STADIUM
STADIUM mode adds clarity and spreads the sound, like in an
outdoor stadium.
• All Channel Stereo
All Channel Stereo (ALL ST) mode can reproduce a larger stereo
sound field using all the connected (and activated) speakers.
All Channel Stereo can be used while reproducing 2 channel stereo
source.
Normal stereo sound All Channel Stereo
7 Indicators on the display window
Digital signal format indicators
PPCM: Lights when DVD AUDIO packed PCM signals
comes in.
LPCM: Lights when Linear PCM signal comes in.
GD: Lights when Dolby Digital signals come in.
C: Lights when DTS Digital (Surround) signals come
in.
No indication: No digital signal indicator lights when analog
signals come in.
Dolby Surround mode indicator
GPLII: Lights when Dolby Pro Logic II mode is activated.
Surround indicator
SURR: Lights when the surround mode is activated.
Source signal indicators, etc.
Light to indicate the incoming signals.
a: Lights when the left channel signal comes
in.
b: Lights when the center channel signal comes in.
c: Lights when the right channel signal comes in.
d: Lights when the LFE channel signal comes in.
g: Lights when the surround left channel signal comes in.
i: Lights when the surround right channel signal comes in.
h: Lights when the monaural surround channel signal or 2
channel Dolby Surround signal comes in.
SW (Subwoofer): Always lights.
The channel with “ ” shows that the corresponding speakers are
reproducing the channels’ sound.
If the channels’ sound decoded into 5.1 channel is reproduced, only
“” lights.
7 When playing back digital multichannel software (except
while OFF is selected)
The appropriate multichannel surround mode (Dolby Digital, DTS
Digital Surround or Linear/Packed PCM) is automatically selected.
7 When playing back a 2 channel source
You can select either Dolby Pro Logic II (MOVIE/MUSIC) or the
DSP mode.
Press SURROUND repeatedly to select the
desired mode.
The surround mode is turned on and the current surround mode
appears on the display window.
Each time you press the button, the surround mode changes.
For details on each mode, see “Available Surround modes for each
input signal”. (See page 23.)
To turn off the surround mode
Press SURROUND repeatedly until “OFF”
appears on the display window.
Storing adjustments — auto memory
When you turn the power off, the system memorizes the current
surround mode. The memorized mode is automatically recalled
when you turn the power on.
NOTE
• For a down-mixing prohibited DVD AUDIO disc, the system
continues to output multi-channel signals with “MULTI CH” shown
on the display window even if the surround mode is turned off during
playback. On the other hand, the system outputs only the front left
and right channel signals with “LR ONLY” shown on the display
window when you start playback with the surround mode having
been set to “OFF” or “H. PHONE”.
• For ASF, MPEG-2, MPEG-1 and DivX (except DivX version 6), the
surround mode takes no effects.
Using the on-screen bar
You can check disc information and you can use some functions
using the on-screen bar.
Showing the on-screen bar
7 Whenever a disc is loaded
Press ON SCREEN.
Each time you press the button, the on-screen bar
changes as follows on the TV screen.
Example: During DVD VIDEO playback
Selecting the surround mode
The system is set up to automatically select the optimal surround
mode for input signal from digital multichannel software.
When playing back a 2 channel source, you can select the desired
surround mode manually.
IMPORTANT
Before using the remote control for the following
operation;
• Set the remote control mode selector to AUDIO .
(The on-screen bar disappears)
OFF
(back to the beginning)
• The currently selected item shows green.
24
Page 28

Advanced operations
See page 23 for button locations.
7 Contents of the on-screen bar during playback
DVD VIDEO
DVD AUDIO
VCD
SVCD
CD
DVD VR disc
7 Shows playback status.
: appears during playback.
/ : appears during fast forward/reverse.
/ : appears during playback in forward slow-motion/
reverse slow-motion.
: appears when paused.
: appears when stopped.
8 Select this to change time information (F). See “Changing the
time information” below.
9 Select this for Repeat Playback. (See page 32.)
0 Select this for time search function. (See page 27.)
K For DVD VIDEO and DVD VR: Select this for chapter search
function. (See page 26.)
For DVD AUDIO: Select this for track search function. (See page
26.)
L Select this to change audio language or channel. (See page 29.)
M Select this to change subtitle language and subpicture. (See page
28.)
N Select this to change view angle. (See page 28.)
O Select this to change the page. (See page 30.)
P Shows Playback mode status.
PROGRAM: appears during Program Playback. (See page 31.)
RANDOM: appears during Random Playback. (See page 32.)
Q Shows Repeat mode status. (See page 32.)
Changing the time information
You can change the time information in the onscreen bar on the TV screen and the display
window of the center unit.
7 During playback
1 Press ON SCREEN twice.
The on-screen bar appears on the TV screen.
2 Press Cursor 3/2 to highlight .
3 Press ENTER repeatedly to select the
desired information.
ASF/MPEG-2/MPEG-1/DivX
1 Shows disc type.
2 Shows audio information.
3 Shows disc number.
4 For DVD VIDEO: Shows current title number.
For DVD AUDIO: Shows current group number.
For DVD VR: Shows current play mode (PG: for Original
program, PL: for Playlist) and title number.
5 For DVD VIDEO and DVD VR: Shows current chapter number.
For other type of discs: Shows current track number.
6 Shows time information. See “Changing the time information”
on the right column.
Example: When elapsed playing time of disc is selected.
7 DVD VIDEO/DVD AUDIO/DVD VR
• TIME: Elapsed playing time of current chapter/track
• REM: Remaining time of current chapter/track
• TOTAL: Elapsed time of Title/Group/Program
• T. REM: Remaining time of Title/Group/Program
7 VCD/SVCD/CD
• TIME: Elapsed playing time of current track
• REM: Remaining time of current track
• TOTAL: Elapsed time of disc
• T. REM: Remaining time of disc
4 Press ON SCREEN.
The on-screen bar disappears.
NOTE
• When playing back DVD VR, “TIME” and “REM” cannot be shown.
25
Page 29

Advanced operations
See page 23 for button locations.
Playing from a specified position on a disc
You can start playing a title, chapter or track you specify. You can
also play a disc from specified time.
Locating a desired scene from the DVD menu
DVD VIDEOs and DVD AUDIOs generally have their
own menus which show disc contents and you can
display them on the TV screen. You can locate a desired
scene by using these menus.
7 Whenever a DVD VIDEO or DVD AUDIO is loaded
1 Press TOP MENU/PG or MENU/PL.
The menu appears on the TV screen.
Normally, a DVD VIDEO or DVD AUDIO which contains
more than one title will have a “top” menu which lists the titles.
Press TOP MENU/PG to show the title menu.
Some discs may also have a different menu which is shown by
pressing MENU/PL.
See the instructions for each discs regarding its particular
menu.
2 Use Cursor 3/2/Y/5 to select a
desired item.
3 Press ENTER.
• With some discs, you can also select items by entering the
corresponding number using number buttons.
NOTE
• This feature may not work for some discs.
Locating a desired chapter/track using the onscreen bar
7 During playback
1 Press ON SCREEN twice.
The on-screen bar appears on the TV screen.
2 Press Cursor 3/2 to highlight /
.
3 Press ENTER.
Example: During DVD VIDEO playback
4 Press number buttons (0-9) to enter the
desired chapter number.
Example:
To select 8: Press 8.
To select 10: Press 1, then 0.
To select 20: Press 2, then 0.
To select 37: Press 3, then 7.
To correct a misentry
Repeat step 4.
5 Press ENTER.
6 Press ON SCREEN.
The on-screen bar disappears.
NOTE
• You can select up to the 99th chapter/track.
Locating a desired scene using a VCD/SVCD menu
with PBC
A VCD or SVCD recorded with PBC has its own menus
such as a list of contained songs. You can locate a
specific scene by using these menus.
7 During playback with PBC function
1 Press RETURN repeatedly until the
menu appears on the TV screen.
2 Press number buttons (1-10, h10) to
select the number of the desired item.
• For details on using the number buttons, see “How to use the
number buttons”. (See page 21.)
To return to the menu
Press RETURN repeatedly until the menu screen appears.
When “NEXT” or “PREVIOUS” is shown on the TV screen:
• To go to the next page, press x.
• To return to the previous page, press 4.
NOTE
• If you want to play a PBC-compatible VCD/SVCD without using the
PBC function, perform any of the following:
– Start playback by pressing number buttons while stopped.
– Press x repeatedly until the desired track number is displayed,
then start playback by pressing 3 (play button). The track number
appears on the display window instead of “PBC”.
• To activate the PBC function when playing a PBC-compatible VCD/
SVCD without using the PBC function, perform any of the following:
– Press TOP MENU/PG or MENU/PL.
– Press 7 twice to stop playback, then press 3 (play button).
26
Page 30

1
Advanced operations
See page 23 for button locations.
Locating a desired position by specifying the time
7 For DVD VIDEO/DVD AUDIO/DVD VR:
During playback
7 For VCD/SVCD: While stopped or during
playback without PBC function
7 For CD: During playback or while stopped
7 When specifying the elapsed playing time from the
beginning of the disc
Perform the following procedure while stopped.
7 When specifying the elapsed playing time from the
beginning of the current title/track
Perform the following procedure during playback.
1 Press ON SCREEN twice.
The on-screen bar appears on the TV screen.
2 Press Cursor 3/2 to highlight .
3 Press ENTER.
4 Use number buttons (0-9) to enter the
time.
Example: To play back from a point 2 (hours): 34 (minutes): 08
(seconds) elapsed
Press 2 Press 3
Press 4
Press 8
To cancel a misentry
Press Cursor 2 repeatedly.
Press 0
5 Press ENTER.
6 Press ON SCREEN.
The on-screen bar disappears.
Using the file control display
You can search and play desired groups and tracks/
files using the file control display on the TV
screen.
Example: When the source is DVD.
Current group/total group
number
Track information (for MP3/
2
*
Current group
Current track (file) / total track (file)
1
*
(For JPEG/ASF/MPEG-2/MPEG-1/DivX) The Program and
Random mode are not available.
2
*
When the source is USB MEMORY, “USB” appears.
The file control display appears automatically during playback
(MP3/WMA) or while stopped.
7 For MP3/WMA: During playback or while stopped
7 For JPEG/ASF/MPEG-2/MPEG-1/DivX: While stopped
WMA only)
number on current group
Playback mode*
RANDOM, REPEAT)
Elapsed playing time of current
track (except for JPEG)
Current track (file)
(PROGRAM,
Total track (file)
number on disc
Playback status
1 Press Cursor 3/2/Y/5 to select the
desired group/track/file.
2 Press 3 (play button) or ENTER.
• Track playback/slide-show starts from the selected track/file.
•When you press ENTER for JPEG, only the selected file is
played back.
NOTE
• (For MP3/WMA) During playback, you can change the playback
track/file by pressing x/4 or Cursor 5 /Y.
• You can also check playback information on the display window. (See
page 19.)
• Some group, track and file names may not be displayed correctly
depending on recording conditions.
• The order of groups, tracks, and files may be displayed differently
from the order displayed on your personal computer.
27
Page 31

Advanced operations
See page 23 for button locations.
Resume Playback
When Resume Playback is set to “ON” (see page
36) and you stop playback by the following
operations, the position where playback has been
stopped is stored. (The RESUME indicator lights
on the display window.)
• Turning off the power (See page 15.)
• Pressing 7 once
• Changing the source (See page 16.)
To start playback from the stored position
Press 3 (play button) or corresponding source button (DVD or USB
MEMORY).
• There may be a case when 3 (play button) does not work after
changing the source. In this case, select DVD or USB MEMORY
as a source.
• Pressing DISC (1-5) (with SHIFT pressed) on the remote control or
DISC (1-5) 3 on the center unit also resumes disc playback.
To clear the stored position
Press 7 again.
• Opening the disc tray with the playback disc or disconnecting the
USB mass storage class device also clears the stored position.
NOTE
• (For DivX) The beginning of a scene where playback has been
stopped may be stored.
Selecting a view angle
7 During playback of a disc containing multi-view
angles
When using the ANGLE button:
1 Press ANGLE with SHIFT pressed.
Example: The first view angle is selected out of 3 view angles
recorded.
NOTE
• During DVD AUDIO playback, this feature is available only for the
video part.
Selecting the subtitle
7 During playback of a disc/file containing
subtitles in several languages
When using the SUBTITLE button:
1 Press SUBTITLE.
Example (DVD VIDEO): “ENGLISH” is selected out of 3
subtitle languages recorded.
2 Press Cursor Y/5 to select the desired
subtitle.
For DVD VR
• Pressing SUBTITLE activates the subtitles (subpictures)
regardless of whether the subtitles are recorded or not.
(Subpictures will not change if no subpicture is recorded.)
For SVCD
• An SVCD can contain up to four subtitles. Pressing SUBTITLE
changes the subtitles regardless of whether the subtitles are
recorded or not. (Subtitles will not change if no subtitle is
recorded.)
When using the on-screen bar:
1 Press ON SCREEN twice.
The on-screen bar appears on the TV screen.
2 Press Cursor 3/2 to highlight .
3 Press ENTER.
2 Press ANGLE repeatedly with SHIFT
pressed, or press Cursor Y/5 to select
the desired view angle.
When using the on-screen bar:
1 Press ON SCREEN twice.
The on-screen bar appears on the TV screen.
2 Press Cursor 3/2 to highlight .
3 Press ENTER.
4 Press Cursor Y/5 to select the desired
view angle.
5 Press ENTER.
6 Press ON SCREEN.
The on-screen bar disappears.
4 Press Cursor Y/5 repeatedly to select
the desired subtitle.
5 Press ENTER.
6 Press ON SCREEN.
The on-screen bar disappears.
NOTE
• To clear the subtitle, press SUBTITLE. Each time you press SUBTITLE,
subtitle appears and disappears alternately.
• Some subtitle or audio languages are abbreviated in the pop-up
window. See “The language codes list”. (See page 34.)
• During DVD AUDIO playback, this feature is available only for the
video part.
• For DivX, you cannot operate this procedure using the on-screen bar.
28
Page 32

Advanced operations
See page 23 for button locations.
Selecting the audio Special picture playback
7 During playback of a disc/file containing audio
in several languages
When using the AUDIO button:
1 Press AUDIO.
Example (DVD VIDEO): “ENGLISH” is selected out of 3 audio
languages recorded.
2 Press AUDIO repeatedly or press Cursor
Y/5 to select the desired audio.
When using the on-screen bar:
1 Press ON SCREEN twice.
The on-screen bar appears on the TV screen.
2 Press Cursor 3/2 to highlight .
3 Press ENTER.
4 Press Cursor Y/5 to select the desired
audio.
5 Press ENTER.
6 Press ON SCREEN.
The on-screen bar disappears.
NOTE
• Some subtitle or audio languages are abbreviated in the pop-up
window. See “The language codes list”. (See page 34.)
• “ST”, “L”, or “R” is displayed when playing a VCD respectively
representing “stereo”, “left sound” and “right sound”.
When playing a SVCD, “ST1”, “ST2”, “L1”, “R1”, “L2”, or “R2” is
displayed.
• For DivX, you cannot operate this procedure using the on-screen bar.
Frame-by-frame playback
7 During playback
Press 8 repeatedly.
Each time you press the button, the still
picture advances by one frame.
To return to normal playback
Press 3 (play button).
Playing back in slow-motion
7 During playback
1 Press 8 at the point where
you want to start playback
in slow-motion from.
The system pauses playback.
2 Press SLOW 9.
Playback in forward slow-motion starts.
For DVD VIDEO/DVD AUDIO only:
• To play back in reverse slow-motion, press SLOW (.
Each time you press the button, the playback speed becomes
faster (1/32, 1/16, 1/8, 1/4, 1/2).
Example: On the TV
To return to normal playback
Press 3 (play button).
NOTE
• Sound cannot be heard during slow-motion playback.
• During DVD AUDIO playback, this feature is available only for the
video part.
29
Page 33

Advanced operations
See page 23 for button locations.
Selecting browsable still picture recorded on DVD
AUDIO
Most DVD AUDIOs include browsable still pictures (B.S.P.),
which usually appear by turns automatically during
playback according to the playback sequence. You can
change the picture (turn the page) manually when the current
group/track has selectable pictures (pages).
7 During playback and while the B.S.P. indicator lights up on the
display window
When using the PAGE button:
Press PAGE repeatedly to select a desired
still picture.
When using the on-screen bar:
1 Press ON SCREEN twice.
The on-screen bar appears on the TV screen.
2 Press Cursor 3/2 to highlight .
3 Press ENTER.
4 Press Cursor 5/Y to select the desired
still picture.
5 Press ENTER.
6 Press ON SCREEN.
The on-screen bar disappears.
Zooming in
7 During playback or while paused
1 Press ZOOM with SHIFT
pressed.
Each time you press ZOOM with SHIFT
pressed, scene magnification changes.
2 While zoomed in, press Cursor 3/2/
Y/5 to move zoom-in area.
To return to normal playback
Press ZOOM repeatedly with SHIFT pressed, to select ZOOM OFF.
NOTE
• The number of the magnification steps varies depending on the disc
type.
• During slide-show playback of JPEG, zooming in is not available. In
such a case, press 8 to pause slide-show playback, then zoom in.
• During DVD AUDIO playback, this feature is available only for the
video part.
• During playback, there may be a case where Cursor (3/2/Y/5)
does not work in step 2 above.
Changing the VFP setting
The VFP (Video Fine Processor) function enables
you to adjust the picture character according to the
type of programming, picture tone or personal
preference.
7 During playback
1 Press VFP.
The current VFP settings appear on the TV screen.
Example:
2 Press Cursor 3/2 repeatedly to select
the VFP mode.
• NORMAL: Normally select this.
• CINEMA: Suitable for movies.
When you select “NORMAL” or “CINEMA”, press VFP to
complete the setting.
• USER 1 and USER 2: You can adjust parameters that affect
picture appearance.
Only when selecting “USER 1” or “USER 2” in step 2, proceed
to perform the following operation;
3 Press Cursor Y/5 repeatedly to select
a parameter you want to adjust.
Adjust gradually and confirm picture appearance results are as
preferred.
• GAMMA: Controls brightness of neutral tints while
maintaining brightness of dark and bright portions (–3 to
+3).
• BRIGHTNESS: Controls screen brightness (–8 to +8).
• CONTRAST: Controls screen contrast (–7 to +7).
• SATURAT ION: C ontrols scr een col or depth (–7 to +7).
• TINT: Controls screen tint (–7 to +7).
• SHARPNESS: Controls screen sharpness (–8 to +8).
4 Press ENTER.
Example:
5 Press Cursor Y/5 to change the
setting.
6 Press ENTER.
The current VFP settings appear again.
7 Repeat steps 3 to 6 to adjust other
parameters.
8 Press VFP.
NOTE
• Although the setting display disappears in the middle of the
procedure, the setting at that time will be stored.
30
Page 34

Advanced operations
Program Playback
7 While stopped
1 Press PLAY MODE
repeatedly until program
window appears on the TV screen.
The PRG indicator lights on the display window.
2 Follow the instructions that appear on
the TV screen to program the desired
chapters/tracks.
• For details on using the number buttons, see “How to use the
number buttons”. (See page 21.)
• The content’s numbers that you have to specify for
programming varies depending on the disc/file type:
– DVD VIDEO: Titles and chapters
– VCD, SVCD, CD: Tracks
– DVD AUDIO, MP3, WMA: Groups and tracks
• Before you program the tracks in bonus group on a DVD
AUDIO, perform the procedure of “Playing back a bonus
group” (see page 22) to turn off the BONUS indicator on the
display window.
• You can specify the chapters/tracks whose number is up to
99.
• There may be a case that the group or title number can be
entered even for discs that contain no groups or titles. In such
a case, press ENTER to proceed to the Track/Chapter column.
•When you press ENTER instead of the number buttons in the
Track/Chapter column, “ALL” appears and all the tracks or
chapters on the selected group or title are programmed as a
step.
To clear the programs one by one from the last entered
number
Press CANCEL repeatedly.
To clear all programs
Press and hold CANCEL.
You can also clear the program by turning off the system.
See page 23 for button locations.
3 Press 3 (play button).
If all of the programmed tracks/files have been played back,
playback stops and the program window appears again. Note
that program setting remains.
To check the program contents
During playback, press 7. Playback stops and the program window
appears.
To quit the Program mode
While stopped, press PLAY MODE repeatedly until both program
window and disappear from the TV screen.
NOTE
• When the source is USB MEMORY, Program Playback does not
work.
• There may be a case where bonus group on a DVD AUDIO cannot be
played.
• The Resume function cannot be used with Program Playback.
• DISC (1-5) on the remote control and DISC (1-5) 3 on the c ente r uni t
do not work during Program Playback.
• Program Playback may not work for some discs.
31
Page 35

Advanced operations
See page 23 for button locations.
Random Playback
You can play titles or tracks on a disc in random
order.
7 While stopped
1 Press PLAY MODE repeatedly until
appears on the TV screen.
The RND indicator lights on the display window.
2 Press 3 (play button).
• When more than one discs are loaded, the system starts
Random Playback of the next disc after completing current
disc playback.
To quit Random mode
While stopped, press PLAY MODE repeatedly until both program
window and disappear from the TV screen.
You can also clear the Random mode by turning off the system.
NOTE
• When the source is USB MEMORY, Random Playback does not
work.
• The same title/track will not be played back more than once during
Random Playback.
Repeat Playback
Repeating the current selection or all discs
7 For DVD VIDEO/DVD VR: During playback
7 For VCD/SVCD: During playback without PBC
function or while stopped
7 For DVD AUDIO/CD/MP3/JPEG/ASF/
MPEG-2/MPEG-1/DivX: During playback or
while stopped
When using the REPEAT button:
Press REPEAT.
Repeat mode indicator
Each time you press REPEAT, the Repeat mode changes.
Display
window
DISC
ALL
1
No
indication
NOTE
• When DVD VIDEO or DVD AUDIO is loaded in the system,
playback of the disc next to the DVD VIDEO or DVD AUDIO will
not start, although /REPEAT ALL on the TV screen or
ALL in the display window is shown.
• For DVD VIDEO and DVD AUDIO, REPEAT ALL and REPEAT
DISC may not be available depending on the disc.
When using the on-screen bar (except for MP3/WMA/JPEG/
ASF/MPEG-2/MPEG-1/DivX):
TV screen Meanings
Repeats the current group for
REPEAT GROUP
REPEAT DISC
REPEAT ALL
, Repeats the current track for
REPEAT TRACK,
REPEAT STEP
,
DVD AUDIO/MP3/WMA/
JPEG/ASF/MPEG-2/MPEG-1/
DivX.
Repeats the current title for
DVD VIDEO.
(For DVD VR) Repeats the
current title for Original
program.
(For DVD VR) Repeats the
current playlist for Playlist.
Repeats all titles and tracks on
the current disc for DVD VR/
VCD/SVCD/CD/MP3/WMA/
JPEG/ASF/MPEG-2/MPEG-1/
DivX.
Repeats all the available discs/
files.
DVD AUDIO/VCD/SVCD/
CD/MP3/WMA/ASF/MPEG2/MPEG-1/DivX.
Repeats the current chapter for
DVD VIDEO/DVD VR.
Repeat mode is off.
The system plays back the disc/
file normally.
1 Press ON SCREEN twice.
The on-screen bar appears on the TV screen.
2 Press Cursor 3/2 to highlight .
3 Press ENTER.
4 Press Cursor Y/5 repeatedly to select
the Repeat mode.
5 Press ENTER.
6 Press ON SCREEN.
The on-screen bar disappears.
To cancel Repeat Playback
Select “OFF” in step 4.
32
Page 36

Advanced operations
See page 23 for button locations.
Repeating a desired part [A-B Repeat]
You can repeat playback of a desired part by
specifying the beginning (point A) and ending
(point B).
7 During playback
1 Press ON SCREEN twice.
The on-screen bar appears on the TV screen.
2 Press Cursor 3/2 to highlight .
3 Press ENTER.
4 Press Cursor Y/5 repeatedly to select
“A- B” .
5 Press ENTER at the beginning of the
part you want to repeat (point A).
The repeat mode indicator “ ” appears on the display
window.
6 Press ENTER at the end of the part you
want to repeat (point B).
The repeat mode indicator on the display window changes to
“ ” and A-B Repeat Playback starts.
7 Press ON SCREEN.
The on-screen bar disappears.
To cancel
Select “OFF” in step 4, then press ENTER.
NOTE
• When playing back a DVD VIDEO/DVD VR, A-B Repeat Playback is
possible only within the same title.
• “A-B” cannot be selected during Program and Random Playback.
• “A-B” cannot be selected during playback with PBC function.
Tray lock
You can lock the tray and prohibit unwanted disc ejection.
On the center unit ONLY:
7 While the system is turned off
Press and hold
• “LOCKED” appears on the display window.
• If you try to eject the disc, “LOCKED” appears to indicate that
the tray is locked.
To cancel
Carry out the same operation again.
• “UNLOCKED” appears on the display window.
Setting the sound balance
IMPORTANT
Before using the remote control for the following
operation;
• Set the remote control mode selector to AUDIO.
NOTE
• Before you start operation; There is a time limit when
doing the following steps. If the setting is canceled before you finish,
start from step 1 again.
1 Press SETTING.
2 Press Cursor 3/2 to make an
adjustment or selection.
You can adjust the balance of the sound between “R (right)
–21” and “L (left) –21”. To set the balance to normal, select
“CNTR (center)”.
33
The adjustment is set and the display automatically disappears
a few seconds later.
Page 37

Setting DVD preferences
Using the setup menus
• You can change the language used in the setup menus. See “Menu
description” below.
Basic operation on the setup menus
IMPORTANT
Before using the remote control for the
following operation;
1 Set the remote control mode selector
to AUDIO.
2 Press DVD or USB MEMORY.
Cursor
(3/2/Y/5)/
ENTER
7 While stopped
1 Press SET UP.
2 Follow the instructions that appear on
the TV screen.
Menu description
: Language menu (LANGUAGE)
7 MENU LANGUAGE
Some DVDs have their own menus in multiple languages.
• Select the initial language*.
7 AUDIO LANGUAGE
Some DVDs have multiple audio languages.
• Select the initial audio language*.
NOTE
• See the following “The language codes list” for the code of each
language, such as “AA”, etc.
The language codes list
AA Afar IK Inupiak RN Kirundi
AB Abkhazian IN Indonesian RO Rumanian
AF Afrikaans IS Icelandic RW Kinyarwanda
AM Ameharic IW Hebrew SA Sanskrit
AR Arabic JI Yiddish SD Sindhi
AS Assamese JW Javanese SG Sangho
AY Aymara KA Georgian SH Serbo-Croatian
AZ Azerbaijani KK Kazakh SI Singhalese
BA Bashkir KL Greenlandic SK Slovak
BE Byelorussian KM Cambodian SL Slovenian
BG Bulgarian KN Kannada SM Samoan
BH Bihari KO Korean (KOR) SN Shona
BI Bislama KS Kashmiri SO Somali
BN Bengali, Bangla KU Kurdish SQ Albanian
BO Tibetan KY Kirghiz SR Serbian
BR Breton LA Latin SS Siswati
CA Catalan LN Lingala ST Sesotho
CO Corsican LO Laothian SU Sundanese
CS Czech LT Lithuanian SV Swedish
CY Welsh LV Latvian, Lettish SW Swahili
DA D anish MG Malagasy TA Tamil
DZ Bhutani MI Maori TE Telugu
EL Greek MK Macedonian TG Tajik
EO Esperanto ML Malayalam TH Thai
ET Estonian MN Mongolian TI Tigrinya
EU Basque MO Moldavian TK Turkmen
FA P ers ian MR M ara th i TL Taga lo g
FI Finnish MS Malay (MAY) TN Setswana
FJ Fiji MT Maltese TO Tonga
FO Faroese MY Burmese TR Turkish
FY Frisian NA Nauru TS Tsonga
GA Irish NE Nepali TT Tatar
GD Scots Gaelic NL Dutch TW Twi
GL Galician NO Norwegian UK Ukrainian
GN Guarani OC Occitan UR Urdu
GU Gujarati OM (Afan) Oromo UZ Uzbek
HA Hausa OR Oriya VI Vietnamese
HI Hindi PA Panjabi VO Volapuk
HR Croatian PL Polish WO Wolof
HU Hungarian PS Pashto, Pushto XH Xhosa
HY Armenian PT Portuguese YO Yoruba
IA Interlingua QU Quechua ZU Zulu
IE Interlingue RM Rhaeto-Romance
7 SUBTITLE
Some DVDs have multiple subtitle languages.
• Select the initial subtitle language*.
7 ON SCREEN LANGUAGE
Select the language shown on the TV screen when operating this
system.
* When the language you have selected is not recorded to a disc,
the original language is automatically used as the initial language.
34
Page 38

Setting DVD preferences
: Picture menu (PICTURE)
7 MONITOR TYPE
You can select the monitor type to match your TV when you play
DVDs recorded in the picture’s height/width ratio of 16:9.
• 16:9/16:9 MULTI (Wide television conversion)
Select this when the aspect ratio of your TV is fixed on 16:9 (wide
TV).
When you play DVDs recorded in the picture’s height/width ratio
of 4:3, the system adjust the ratio of output signal automatically.
• 4:3 LB/4:3 MULTI LB (Letter Box conversion)
Select this when the aspect ratio of your TV is 4:3 (conventional
TV). While viewing a wide screen picture, the black bars appear
on the top and the bottom of the screen.
• 4:3 PS/4:3 MULTI PS (Pan Scan conversion)
Select this when the aspect ratio of your TV is 4:3 (conventional
TV). While viewing a wide screen picture, the black bars do not
appear, however, the left and right edges of the pictures will not
be shown on the screen.
Ex.: 16:9 Ex.: 4:3 LB Ex.: 4:3 PS
NOTE
• Even if “4:3 PS” or “4:3 MULTI PS” is selected, the screen size may
become “4:3 LB” or “4:3 MULTI LB” with some DVDs. This depends
on how DVDs are recorded.
• When selecting “MULTI” options as the monitor type for the multicolor system TV, the system outputs PAL or NTSC video signal
according to the disc/file, regardless of the scan mode setting (see
page 17).
7 PICTURE SOURCE
When you set the scan mode to the progressive mode (see page 17),
you can obtain optimal picture quality by selecting whether the
content on the disc/file is processed by frame (film source) or by
field (video source).
Normally set to “AUTO”.
•AUTO
Used to play a disc/file containing both video and film source
materials.
This system recognizes the source type (video or film) of the
current disc/file according to the disc/file information.
If the playback picture is unclear or noisy, or the oblique lines of
the picture are rough, try to change to other modes.
•FILM
Suitable for playing back a film source disc/file.
•VIDEO
Suitable for playing back a video source disc/file.
7 SCREEN SAVER (See page 20.)
You can activate or deactivate screen saver function.
7 FILE TYPE
When several types of files are recorded on a disc/device, you can
select which files to play.
•AUDIO
Select this to play MP3/WMA files.
• STILL PICTURE
Select this to play JPEG files.
•VIDEO
Select this to play ASF/MPEG-2/MPEG-1/DivX files.
: Audio menu (AUDIO)
7 D. RANGE COMPRESSION
(Dynamic range compression)
You can enjoy low level recorded sound clearly at night even at a low
volume when listening to the sound with Dolby Digital.
•AUTO
Select this when you want to enjoy surround sound with its full
dynamic range (no effect applied).
•ON
Select this when you want to fully apply the compression effect
(useful at midnight).
NOTE
• When you play a multichannel Dolby Digital source with the
surround mode is off, the setting of D. RA NGE COMPRESSION is set
to ON automatically.
: Speaker setting menu (SPK. SETTING)
7 Level menu (LEVEL)
FRONT LEFT SPEAKER/FRONT RIGHT SPEAKER/CENTER
SPEAKER/SURROUND RIGHT SPEAKER/SURROUND LEFT
SPEAKER
While monitoring the test tone, adjust the center and surround
speakers volume as much as that of the front speakers.
You can adjust the output level in the –6 dB to +6 dB range.
TEST TONE*
Outputs the test tone.
* The test tone comes out of all of the activated speakers in the
following sequence:
Front left speaker Z Center speaker Z Front right speaker
Z Surround right speaker Z Surround left speaker Z (back
to the beginning)
NOTE
• For adjustment of subwoofer output level, see page 36.
7 Delay menu (DELAY)
FRONT LEFT SPEAKER/FRONT RIGHT SPEAKER/CENTER
SPEAKER/SURROUND RIGHT SPEAKER/SURROUND LEFT
SPEAKER
Adjust the distance from the listening position to the speakers.
Within the range from 0 ms to 15 ms (by 1 ms).
Example:
Center speaker
1 ms
Front left
0 ms
2.7 m
2.4 m
Surround left
2 ms
1 ms increase (or decrease) in delay time corresponds to about
30 cm decrease (or increase) in distance.
Set to “0 ms” for the furthest speaker from your position as the basis
for the delay time setting.
In this case, set the delay time of each speaker as follows;
• Delay time of front speakers: 0 ms
• Delay time of center speaker: 1 ms
• Delay time of surround speakers: 2 ms
2.1 m
Surround right
2 ms
Subwoofer
Front right
0 ms
3.0 m
35
Page 39

Setting DVD preferences
7 Subwoofer menu (SUBWOOFER)
LEVEL
You can set the output level of the subwoofer in the –6 dB to +6 dB
range.
CROSS OVER
The signals below the preset frequency level will be sent to and be
reproduced by the subwoofer.
Select one of the crossover frequency levels according to the size of
the small speaker connected.
• 120Hz: Select when the cone speaker unit built in the speaker is
about 8 cm.
• 150Hz: Select when the cone speaker unit built in the speaker is
about 6 cm.
• 200Hz: Select when the cone speaker unit built in the speaker is
about 5 cm.
Tuner operations
IMPORTANT
Before using the remote control for the
following operation;
1 Set the remote control mode selector to
AUDIO.
2 Press FM/AM.
The buttons described below are used on pages 36 and 37.
: Other setting menu (OTHERS)
7 RESUME
You can activate or deactivate Resume Playback function. (See page
28.)
7 ON SCREEN GUIDE
You can activate or deactivate the on-screen guide icons. (See page
19.)
7 DivX registration menu (DivX REGISTRATION)
The system has its own Registration Code for DivX playback.
You can confirm the code of your system.
• Once you play back a disc created by using the Registration Code,
the system’s code is overwritten by a totally different new one for
copyright protection purpose.
Setting the AM tuner interval spacing
Some countries space AM stations 9 kHz apart, and some countries
use 10 kHz spacing.
You can only change the AM tuner interval spacing while selecting
AM as the band.
On the center unit ONLY:
7 To change the interval spacing into 10 kHz
Press 8 while holding down 7.
7 To change the interval spacing into 9 kHz
Press 3 while holding down 7.
Number
buttons
Cursor
(3/2)
Remote
control mode
selector
Manual tuning
On the remote control:
1 Press FM/AM repeatedly to select the
band.
Example: When the system is tuned in to AM 810 kHz.
2 Press TUNING 9/( repeatedly until
you find the frequency you want.
When you hold down the button until the system starts
searching for stations and then release it, the system stops
searching automatically when a station of sufficient signal
strength is tuned in to.
On the center unit:
1 Press SOURCE repeatedly to select the
band (FM or AM).
2 Press TUNING +/– repeatedly until you
find the frequency you want.
NOTE
• When an FM stereo program is received, the ST indicator lights on
the display window.
36
Page 40

Tuner operations
See page 36 for button locations.
Preset tuning Selecting the FM reception
Once a station is assigned to a channel number, the station can be
quickly tuned in. You can preset 30 FM and 15 AM stations.
7 To preset the stations
1 Tune in the station you want to preset.
• If you want to store the FM reception mode for an FM
station, select the reception mode you want. See “Selecting
the FM reception mode” on the right column.
Example: When the system is tuned in to FM 103.50 MHz.
2 Press MEMORY.
mode
When the stereo FM program currently tuned in is noisy, you can
change the FM reception mode to improve the reception.
7 While listening to an FM station
Press FM MODE.
The FM reception mode appears on the display window.
Each time you press the button, the FM reception mode changes.
•AUTO:
When a program is broadcast in stereo, you will hear stereo
sound. (The ST indicator lights on the display window.) When in
monaural, you will hear monaural sound. This mode is also
useful to suppress static noise between stations.
• MONO:
Reception will be improved although you will lose the stereo
effect. (The MONO indicator lights on the display window.) In
this mode, you will hear noise until you are tuned in to a station.
While “CH” and “_ _” are flashing:
3 Press number button(s) (1-10, h10) to
select a preset number you want.
• For details on using the number buttons, see “How to use the
number buttons”. (See page 21.)
Example: When the preset channel 1 is selected.
If the setting is canceled before you finish, start from step 2
again.
While the selected number is flashing:
4 Press MEMORY.
“STORED” appears on the display window.
The station is assigned to the selected preset number.
If the setting is canceled before you finish, start from step 2
again.
5 Repeat steps 1 to 4.
• Storing a new station to a used number erases the previously
stored one.
7 To tune in to a preset station
1 Press FM/AM repeatedly to select FM or
AM.
Reducing the noise of AM broadcast
When listening to an AM broadcast with a lot of noise interference,
you can change the Beat Cut mode to reduce the noise.
7 While listening to an AM station
Press FM MODE.
The current Beat Cut mode appears on the display window.
Each time you press the button, the Beat Cut mode changes.
• Choose “BEATCUT1” or “BEATCUT2” according to which gives
clearer sound.
2 Press number button(s) (1-10, h10) to
select a preset number.
• For details on using the number buttons, see “How to use the
number buttons”. (See page 21.)
NOTE
• You can also select a preset number by pressing Cursor 3/2.
37
Page 41

References
To clean the disc
Maintenance
7 Handling Discs
• Remove the disc from its case by holding it at
the edge while pressing the center hole lightly.
• Do not touch the shiny surface of the disc or
bend the disc.
• Put the disc back in its case after use to
prevent warping.
• Be careful not to scratch the surface of the disc
when placing it back in its case.
• Avoid exposure to direct sunlight, extreme
temperature and moisture.
Troubleshooting
PROBLEM POSSIBLE CAUSE SOLUTION
Power does not come on. The power cord and/or system cord is not connected. Connect the power cord and system cord correctly. (See
The remote control does
not work.
No sound. The system cord and/or speaker cord is not connected. Check the connection.
No picture is displayed
on the TV screen.
No picture is displayed
on the TV screen, the
picture is blurred, or the
picture is divided into
two parts.
Video and audio are
distorted.
The picture does not fit
the TV screen.
The broadcast is hard to
hear because of noise.
If there are any other cases than the noted above or if this system does not seem to work properly, turn off the system and turn it back on.
The batteries are exhausted. Replace the batteries. (See page 7.)
Sunlight is shining directly on the remote sensor. Hide the remote sensor from direct sunlight.
The audio cord is not connected to AUX IN (VCR) and/
or DIGITAL IN (DBS) correctly.
An incorrect source has been selected. Select the correct source. (See page 16.)
The video cord is not connected correctly. Connect the cord correctly. (See page 11.)
The disc or file is not playable. Use a playable disc or file. (See pages 3 and 4.)
The scan mode is set to the progressive mode
(“NT. 480P” or “PAL. 576P”) though the center unit is
connected to the TV which does not support the
progressive video input such as a conventional TV.
The disc is scratched or dirty. Replace or clean the disc.
A VCR is connected between the center unit and the
TV.
The monitor type is not set correctly. Set “MONITOR TYPE” properly. (See page 35.)
Antennas are disconnected. Reconnect the antennas correctly and securely. (See
Wipe the disc with a soft cloth in a straight line
from center to edge.
• DO NOT use any solvent — such as
conventional record cleaner, spray,
thinner or benzine — to clean the disc.
7 Cleaning the system
• Stains on the system should be wiped off with a soft cloth. If the
system is heavily stained, wipe it with a cloth soaked in waterdiluted neutral detergent and wrung well, then wipe clean with a
dry cloth.
• Since the system may deteriorate in quality, become damaged or
get its paint peeled off, be careful about the following.
–DO NOT wipe it with a hard cloth.
–DO NOT wipe it forcefully.
–DO NOT wipe it with thinner or benzine.
–DO NOT apply any volatile substance such as insecticides to it.
–DO NOT allow any rubber or plastic to remain in contact with
it for a long time.
pages 11 and 12.)
Connect the cord correctly. (See page 12.)
Change the scan mode to the interlace mode
(“NT. 480I” or “PAL. 576I”). (See page 17.)
Connect the center unit and TV directly. (See page 11.)
page 8.)
38
Page 42

References
Specifications
7 Center unit (XV-THC60/XV-THC30)
Audio section
Digital input*:
DIGITAL IN (DBS): –21 dBm to –15 dBm
(OPTICAL) (660 nm E30 nm)
* Corresponding to Linear PCM, Dolby Digital, and DTS Digital
Surround (with sampling frequency — 32 kHz, 44.1 kHz,
48 kHz)
Analog input: AUX IN (VCR)
Video section
Video System: PAL/NTSC
Horizontal Resolution: 500 lines
Signal-to-Noise Ratio: 64 dB
Video output level
Composite: 1.0 V(p-p)/75 Ω
S-video-Y: 1.0 V(p-p)/75 Ω
S-video-C: For PAL: 0.3 V(p-p)/75 Ω
For NTSC: 0.286 V(p-p)/75 Ω
Component-Y: 1.0 V(p-p)/75 Ω
Component-P
Video input sensitivity/Impedance (VCR IN)
Composite: 1.0 V(p-p)/75 Ω
S-video-Y: 1.0 V(p-p)/75 Ω
S-video-C: For PAL: 0.3 V(p-p)/75 Ω
USB storage
USB specification: Compatible with the USB 2.0 Full-
Compatible device: Mass Storage Class
Compatible file system: FAT16, FAT32
Bus power supply: Max. 500 mA
Tuner section
Tuning Range
FM: 87.50 MHz to 108.00 MHz
AM: At 10 kHz intervals
General
Power Requirements: AC 110-240 V , 50/60 Hz
Power Consumption: 25 W (at operation)
Dimensions (W M H M D):
Mass: 3.8 kg
B/PR: 0.7 V(p-p)/75 Ω
For NTSC: 0.286 V(p-p)/75 Ω
Speed
530 kHz to 1 710 kHz
At 9 kHz intervals
531 kHz to 1 710 kHz
1.2 W (in standby mode)
400 mm M 85 mm M 316 mm
7 Subwoofer (SP-PWC60)
Amplifier section
Front/Center/Surround: 135 W per channel, RMS at 4 Ω at
1 kHz, with 10 % total harmonic
distortion.
Subwoofer: 135 W, RMS at 4 Ω at 100 Hz, with
10 % total harmonic distortion.
Speaker section
Speaker unit: 16 cm Bass-reflex
Power Handling Capacity: 140 W
Impedance: 4 Ω
Frequency Range: 30 Hz to 200 Hz
Sound Pressure Level: 75 dB/
General
Power Requirements: AC 110 V/ AC 127 V/
Power Consumption: 135 W (at operation)
Dimensions (W M H M D):
Mass: 12.3 kg
W·m
AC 220 - 240 V , 50/60 Hz
0 W (in standby mode)
171 mm M 411 mm M 458 mm
7 Subwoofer (SP-PWC30)
Amplifier section
Front/Center/Surround: 135 W per channel, RMS at 4 Ω at
1 kHz, with 10 % total harmonic
distortion.
Subwoofer: 135 W, RMS at 4 Ω at 100 Hz, with
10 % total harmonic distortion.
Speaker section
Speaker unit: 16 cm Bass-reflex
Power Handling Capacity: 140 W
Impedance: 4 Ω
Frequency Range: 30 Hz to 200 Hz
Sound Pressure Level: 74 dB/
General
Power Requirements: AC 110 V/ AC 127 V/
Power Consumption: 135 W (at operation)
Dimensions (W M H M D):
Mass: 11.5 kg
W·m
AC 220 - 240 V , 50/60 Hz
0 W (in standby mode)
170 mm M 411 mm M 458 mm
39
Page 43

References
7 Satellite Speakers (SP-XTHC60)
Front speakers (SP-THC60F)
Type: 1-way 2-speaker Bass reflex type
(Magnetically shielded Type)
Speaker: 5.5 cm cone M 2
Power Handling Capacity: 140 W
Impedance: 4 Ω
Frequency Range: 100 Hz to 20 000 Hz
Sound Pressure Level: 79 dB/
Dimensions (W M H M D):
Mass: 3.3 kg each
Center speaker (SP-THC60C)
Type: 1-way 2-speaker Bass reflex type
Speaker: 6.5 cm cone M 2
Power Handling Capacity: 140 W
Impedance: 4 Ω
Frequency Range: 90 Hz to 20 000 Hz
Sound Pressure Level: 82 dB/
Dimensions (W M H M D):
Mass: 0.8 kg
Surround speakers (SP-THC60S)
Type: 2-way 3-speaker Bass reflex type
Speaker: 5.5 cm cone M 2
Power Handling Capacity: 140 W
Impedance: 4 Ω
Frequency Range: 100 Hz to 20 000 Hz
Sound Pressure Level: 79 dB/
Dimensions (W M H M D):
Mass: 3.4 kg each
W·m
280 mm M 1 106 mm M 280 mm
(Magnetically shielded Type)
W·m
250 mm M 85 mm M 91 mm
3.0 cm dome M 1
W·m
280 mm M 1 114 mm M 280 mm
7 Satellite Speakers (SP-XTHC30)
Front speakers (SP-THC40F)
Type: 2-way 2-speaker Bass reflex type
(Magnetically shielded Type)
Speaker: 8.0 cm cone M 1
1.5 cm dome M 1
Power Handling Capacity: 140 W
Impedance: 4 Ω
Frequency Range: 80 Hz to 20 000 Hz
Sound Pressure Level: 78 dB/
Dimensions (W M H M D):
Mass: 0.56 kg each
Center speaker (SP-THC40C)
Type: 2-way 2-speaker Bass reflex type
Speaker: 8.0 cm cone M 1
Power Handling Capacity: 140 W
Impedance: 4 Ω
Frequency Range: 80 Hz to 20 000 Hz
Sound Pressure Level: 78 dB/
Dimensions (W M H M D):
Mass: 0.57 kg
Surround speakers (SP-THC40S)
Type: 1-way Bass reflex type
Speaker: 8.0 cm cone M 1
Power Handling Capacity: 140 W
Impedance: 4 Ω
Frequency Range: 80 Hz to 20 000 Hz
Sound Pressure Level: 71 dB/
Dimensions (W M H M D):
Mass: 0.56 kg each
W·m
104.5 mm M 139 mm M 101 mm
(Magnetically shielded Type)
1.5 cm dome M 1
W·m
137 mm M 105 mm M 104.5 mm
W·m
111.5 mm M 148 mm M 106.5 mm
Designs & specifications are subject to change without notice.
40
Page 44

Sumário
Introdução .......................................................2
Notas sobre a manipulação ...................................................... 2
Acessórios fornecidos ............................................................... 2
Sobre os discos ................................................3
Tipos de discos reproduzíveis .................................................. 3
Tipos de arquivos reproduzíveis ............................................. 4
Descrição dos componentes e controles .......5
Conexões .........................................................8
Conexão das antenas FM e AM ............................................... 8
Conexão das caixas acústicas satélite (frontais, central,
surround) ..........................................................................................
Arranjo das caixas acústicas ................................................... 11
Conexão a um televisor ........................................................... 11
Conexão do subwoofer auto-alimentado ............................. 11
Conexão a um componente analógico ................................. 12
Conexão a um componente digital ....................................... 12
Conexão de um dispositivo de classe de armazenamento
massivo USB ............................................................................. 12
Conexão do cabo de alimentação .......................................... 12
Operação dos componentes externos com o
controle remoto ............................................13
Operação do televisor ............................................................. 13
Operação de um sintonizador DBS ou conversor CATV ....14
Operação do videocassete ....................................................... 14
Operações básicas .........................................15
Maneira de ligar/desligar o sistema ...................................... 15
Seleção da fonte de reprodução ............................................. 16
Ajuste do volume [VOLUME] .............................................. 16
Audição com fones de ouvido (não fornecidos) ................. 16
Maneira de apagar o som temporariamente [MUTING] ....16
Ajuste do brilho das indicações [DIMMER] ....................... 16
Timer para dormir [SLEEP] ................................................... 17
Ajuste do nível de saída do subwoofer e caixas acústicas ........
Ajuste do som ........................................................................... 17
Mudança do modo de exploração ......................................... 17
17
Reprodução .................................................. 18
Reprodução básica ...................................................................18
Repetição por um toque .......................................................... 20
Busca com avanço rápido/retrocesso rápido .......................20
Salto ao começo de uma seleção desejada ............................21
Salto em intervalos de aproximadamente 5 minutos ..........21
Localização de um título/grupo desejado utilizando os botões
numéricos .......................................................................................21
Reprodução de um grupo de bônus ......................................22
Seleção do título/lista de reprodução desejado(a) da exibição de
controle .................................................................................................
9
Operações avançadas .................................. 23
Uso do modo surround ...........................................................23
Uso da barra na tela ................................................................. 24
Reprodução a partir de uma posição especificada em um
disco ...........................................................................................26
Uso da exibição de controle de arquivo ................................27
Reprodução continuada .......................................................... 28
Seleção de um ângulo de visão ...............................................28
Seleção da legenda ....................................................................28
Seleção do áudio .......................................................................29
Reprodução de imagem especial ............................................29
Reprodução programada ........................................................31
Reprodução aleatória ............................................................... 32
Reprodução repetida ...............................................................32
Bloqueio da bandeja .................................................................33
Definição do balanço do som ................................................. 33
22
Definição das preferências de DVD ............ 34
Uso dos menus de configuração ............................................34
Descrição dos menus ............................................................... 34
Operações do sintonizador ......................... 36
Definição o espaçamento do intervalo do sintonizador AM ...36
Sintonia manual .......................................................................36
Sintonia predefinida ................................................................37
Seleção do modo de recepção FM ..........................................37
Redução do ruído de transmissão AM ..................................37
Referências ................................................... 38
Manutenção ..............................................................................38
Localização e solução de problemas ......................................38
Especificações ...........................................................................39
1
Page 45

Introdução
Notas sobre a manipulação
7 Precauções importantes
Instalação do sistema
• Selecione um lugar nivelado, seco, e não muito quente nem muito
frio, entre 5ºC e 35ºC.
• Deixe uma distância suficiente entre o sistema e o televisor.
• Não utilize o sistema em um lugar sujeitos a vibrações.
Cabo de alimentação
• Não manipule o cabo de alimentação com as mãos molhadas.
• Uma pequena quantidade de energia é sempre consumida
enquanto o cabo de alimentação está conectado à tomada de
parede (somente componente central).
• Ao desconectar o cabo de alimentação da tomada elétrica, sempre
puxe pelo plugue, e nunca pelo próprio cabo de alimentação.
Para evitar mau funcionamentos do sistema
• Não há peças dentro do aparelho que o usuário possa mexer. Se
acontecer algo errado, desconecte o cabo de alimentação e
consulte o seu revendedor.
• Não insira nenhum objeto metálico no sistema.
• Não utilize discos de formas irregulares (tais como em forma de
coração, flor, cartão de crédito, etc.) disponíveis no comércio,
pois isso pode danificar o sistema.
• Não utilize discos com fitas, adesivos ou colas aderidas nos
mesmos, pois isso pode danificar o sistema.
7 Precauções relativas à segurança
Evite a umidade, água e poeira
Não coloque o sistema em lugares úmidos ou poeirentos.
Evite altas temperaturas
Não exponha o sistema à luz direta do sol e não o coloque perto de
um dispositivo de aquecimento.
Quando ausentar-se
Quando se ausentar de viagem ou por outras razões durante um
longo período de tempo, desconecte os cabos de alimentação da
tomada de parede.
Não obstrua as aberturas de ventilação
Obstruir as aberturas de ventilação pode danificar o sistema.
Cuidados com o gabinete
Ao limpar o sistema, utilize um pano macio e siga as instruções
relevantes sobre o uso de panos tratados quimicamente. Não utilize
benzina, diluentes de tinta ou outros solventes orgânicos, incluindo
desinfetantes. Tais substâncias podem deformar ou descolorir o
gabinete.
Se entrar água no sistema
Desligue o sistema e desconecte o cabo de alimentação da tomada
de parede e, em seguida, entre em contato com a loja onde adquiriu
o produto. Utilizar o sistema nesta condição pode causar um
incêndio ou choque elétrico.
Rótulo adesivo
Adesivo
Cola
Notas sobre as leis de direitos autorais
Verifique as leis de direitos autorais em seu país antes de gravar
discos. A gravação de materiais protegidos por direitos autorais
pode constituir uma contravenção às leis de direitos autorais.
Notas sobre o sistema de proteção de cópia
Os discos são protegidos pelo sistema de proteção de cópia. Ao
conectar o sistema diretamente ao seu videocassete, o sistema de
proteção de cópia é ativado e a imagem pode não ser reproduzida
corretamente.
Acessórios fornecidos
Certifique-se de que todos os seguintes acessórios estejam
incluídos.
O número entre parênteses indica a quantidade de cada item
fornecido.
Se estiver faltando algo, entre em contato com o seu revendedor
imediatamente.
• Controle remoto (1)
•Pilhas (2)
• Antena FM (1)
• Antena AM de quadro (1)
•Cabo de alimentação (1)
•Cabo de sistema (1)
• Cabo de vídeo composto (1)
• Adaptadores de plugue de CA (2)
• Cabos de alto-falante (somente para TH-C60)
4 m: Para caixas acústicas satélites (frontais esquerda/direita) e
central (3)
10 m: Para caixas acústicas satélite (surround esquerda/direita)
(2)
• Parafusos (somente para TH-C60)
M5 x 40 mm (4)
M4 x 20 mm (8)
• Braçadeiras de cabo de alto-falante (somente para TH-C60) (4)
2
Page 46

Sobre os discos
Tipos de discos reproduzíveis
Este sistema foi projetado para reproduzir os seguintes discos:
DVD-VIDEO DVD-AUDIO
VCD/SVCD CD de áudio
O √ na lista abaixo mostra os tipos de disco e os formatos de
gravação disponíveis.
Tipo do disco
Formato de
gravação
DVD Video — √√
DVD Audio — √√
DVD VR — √√
VCD/SVCD √ ——
CD de áudio √ ——
MP3 √√*
WMA √√*
JPEG √√*
ASF √√*
MPEG-2 √*
MPEG-1 √*
DivX √√*
1
*
Este sistema só pode reproduzir discos finalizados.
*2Gravado no formato UDF Bridge.
3
*
Este sistema pode não ser capaz de reproduzir um arquivo se o
CD-R/-RW*
tamanho do arquivo for muito grande.
1
3
3
DVD-R*
2
2
2
2
2
√*
2
√*
2
1
DVD-RW*
2
√*
2
√*
2
√*
2
√*
2
√*
2
√*
2
√*
1
Notas sobre DVD-R e DVD-RW
• Este sistema não suporta discos “multi-border”.
Notas sobre CD-R e CD-RW
• Este sistema pode reproduzir CD-Rs ou CD-RWs gravados no
formato ISO 9660.
• Este sistema suporta discos de “sessões múltiplas” (até 20
sessões).
• Este sistema não pode reproduzir discos “escritos em pacote”.
Código regional do DVD-VIDEO
Os DVD-VIDEO players e os discos DVD-VIDEO têm seus
próprios códigos regionais. Este sistema pode reproduzir discos
DVD-VIDEO cujos números de código regional incluam o código
regional do sistema, o qual é indicado no painel traseiro.
• Exemplo de DVD reproduzível:
Se um DVD com um código regional inadequado for colocado,
“REGION CODE ERROR!” aparecerá na tela do televisor e sua
reprodução não poderá ser feita.
Alguns discos podem não ser reproduzidos por suas características,
condições de gravação, ou danos ou manchas nos mesmos.
Discos não reproduzíveis
DVD-ROM, DVD-RAM, CD-I (CD-I Ready), Photo CD, SACD,
etc.
A reprodução desses discos produzirá ruídos e danificará os altofalantes.
• É possível reproduzir discos +R/+RW (somente no formato de
DVD de vídeo). “DVD” se ilumina no mostrador quando um
disco +R/+RW é colocado.
• Este sistema incorpora os sistemas NTSC e PAL. Ao reproduzir
um disco NTSC com o modo de exploração definido como PAL
(consulte a página 17), o sinal de vídeo NTSC é convertido para o
sinal PAL60 e emitido.
• O lado sem DVD de um “DualDisc” não cumpre com o padrão
“Compact Disc Digital Audio”. Portanto, o uso do lado sem DVD
de um DualDisc neste produto pode não ser recomendável.
• Com alguns DVD-VIDEOs, DVD-AUDIOs, VCDs ou SVCDs,
sua operação real pode diferir do que é explicado neste
manual. Isso ocorre em virtude da programação e estrutura do
disco, e não é um mau funcionamento deste sistema.
O logotipo DVD é uma marca registrada da DVD Format/Logo
Licensing Corporation.
3
Page 47

Sobre os discos
Tipos de arquivos
reproduzíveis
Para todos os arquivos reproduzíveis
• O sistema só pode reconhecer e reproduzir arquivos com uma
das seguintes extensões, que podem estar em qualquer
combinação de letras maiúsculas ou minúsculas:
MP3: “.MP3”, “.mp3”
WMA: “. W MA”, “. wm a”
JPEG: “.J PG”, “. JP E G”, “.jp g ”, “. jp e g”
ASF: “.A S F”, “.a s f ”
MPEG-2/MPEG-1: “.MPG”, “.MPEG”, “.mpg”, “.mpeg”
DivX:“.DIVX”, “.DIV”, “.divx”, “.div” e “.AVI”, “.avi”
• Alguns discos podem não ser reproduzidos. Neste caso, “NOT
SUPPORTED” aparece na tela do televisor.
• Alguns discos podem não ser reproduzidos normalmente por
duas características ou condições de gravação.
• O sistema reconhece até 150 faixas (arquivos) por grupo, 99
grupos por disco/dispositivo, e o número total de faixas
(arquivos) que o sistema pode reproduzir é 4000.
• Os arquivos MP3/WMA/JPEG/ASF/MPEG-2/MPEG-1/DivX
requerem um tempo de leitura mais longo. (Isso difere com a
complexidade da configuração dos diretórios/arquivos.)
• Se houver tipos diferentes de arquivos misturados, realize a
definição FILE TYPE no menu PICTURE apropriadamente para
os dados que deseja reproduzir (“AUDIO”, “STILL PICTURE” ou
“VIDEO”). (Consulte a página 35.)
Para arquivos MP3/WMA
• O sistema suporta arquivos MP3/WMA gravados com uma taxa
de bits de 32 – 320 kbps e uma freqüência de amostragem de 16
kHz, 22,05 kHz, 24 kHz*, 32 kHz, 44,1 kHz ou 48 kHz.
• Se houver informação de faixa (título de faixa, artista, nome do
álbum, etc.) gravada, ela aparecerá na exibição de controle do
arquivo na tela do televisor. (Consulte a página 27.)
• Recomendamos a gravação de grave cada material (canção) com
uma taxa de amostragem de 44,1 kHz e com uma taxa de
transferência de dados de 128 (96*)kbps.
* Apenas para WMA
Para arquivos JPEG
• Recomendamos a gravação de um arquivo com uma resolução de
640 x 480. (Se um arquivo tiver sido gravado com uma resolução
superior a 640 x 480, levará mais tempo para que o mesmo seja
exibido.)
• Este sistema só pode reproduzir arquivos JPEG na linha de base.
Para arquivos ASF
• O sistema suporta os tipos de perfil simples avançado como
arquivos MPEG-4 (MPEG-4 ASF).
• O sistema suporta arquivos MPEG-4 com as seguintes condições:
Formato do arquivo: ASF
Perfil visual: MPEG-4 SP (Perfil Simples)
CODEC de áudio: G.726
Tamanho máximo da imagem: 352 x 288 (CIF)
Taxa de bits máxima: 384 kbps
Para arquivos MPEG-2/MPEG-1
• Este formato de fluxo de bits deve cumprir com o fluxo de bits de
programa/sistema MPEG.
• 720 x 576 pixels (25 fps)/720 x 480 pixels (30 fps) é recomendado
para a resolução mais alta.
• Este sistema também suporta as resoluções de 352 x 576/480 x
576/352 x 288 pixels (25 fps) e 352 x 480/480 x 480/352 x 240
pixels (30 fps).
• O formato de arquivo deve ser MP@ML (Main Profile at Main
Level)/SP@ML (Simple Profine at Main Level)/MP@LL (Main
Profile at Low Level).
• Os fluxos de áudio devem cumprir com MPEG1 Audio Layer-2
ou MPEG2 Audio Layer-2.
Para arquivos DivX
• O sistema suporta DivX 6.x, 5.x, 4.x e 3.11.
• O sistema suporta arquivos DivX com uma resolução de 720 x
480 pixels ou menos (30 fps), e 720 x 576 pixels ou menos (25
fps).
• O fluxo de áudio deve conformar com Dolby Digital (incluindo
canais múltiplos) ou MPEG1 Audio Layer-3 (MP3).
• O sistema não suporta GMC (Global Motion Compression).
• Um arquivo codificado no modo de exploração entrelaçada pode
não ser reproduzido corretamente.
• O sistema tem o seu próprio código de registro para a reprodução
DivX.
Se for necessário, você pode confirmar o código de registro do
sistema utilizando o menu OTHERS. (Consulte a página 36.)
• Este produto inclui tecnologia de proteção de direitos autorais
que, por sua vez, esta protegida por patentes dos Estados Unidos
e outros direitos de propriedade intelectuai. O uso dessa
tecnologia de proteção de diretos autorais deve ser autorizado
pela Macrovision. Esta tecnologia destina-se à utilização
doméstica e outras utilizações de exibição limitadas, a não ser que
haja autorização em contrário concedida pela Macrovision. É
proibido realizar engenharia reversa ou desmontagem.
• “OS CONSUMIDORES DEVEM OBSERVAR QUE NEM
TODOS OS TELEVISORES DE ALTA DEFINIÇÃO SÃO
COMPLETAMENTE COMPATÍVEIS COM ESTE PRODUTO
E, PORTANTO, PODEM OCORRER IRREGULARIDADES NA
IMAGEM. NO CASO DE PROBLEMAS COM IMAGENS DE
EXPLORAÇÃO PROGRESSIVA DE 525 OU 625,
RECOMENDAMOS QUE O USUÁRIO MUDE A CONEXÃO
PARA SAÍDA DE ‘DEFINIÇÃO PADRÃO’.
NO CASO DE DÚVIDAS COM RESPEITO À
COMPATIBILIDADE DE NOSSO TELEVISOR COM ESTE
DVD PLAYER MODELO 525p E 625p, ENTRE EM CONTATO
COM O NOSSO CENTRO DE ATENDIMENTO AO CLIENTE.”
• O USO DESTE PRODUTO DE QUALQUER MANEIRA QUE
CUMPRA A NORMA VISUAL MPEG-4 É PROIBIDO,
EXCETO PARA USO POR UM CLIENTE PARA FINS
PESSOAIS OU NÃO COMERCIAIS.
• DivX, DivX Ultra Certified e os logotipos associados são marcas
comerciais da DivX, Inc. e são usados sob licença.
•Produto DivX
• Reproduz todas as versões de vídeo Divx
com reprodução melhorada de arquivos de mídia DivX® e o
formato de mídia DivX.
®
Ultra Certified oficial.
®
(inclusive DivX® 6)
4
Page 48

Descrição dos componentes e controles
Painel frontal (componente central)
Os números das figuras indicam as páginas onde os detalhes relevantes são descritos.
Mostrador
20
24 37 19 24
36
17 2822
19 37
Bandeja de disco (dentro): 18
19
21
19
31
3630
18 18 18 20, 36 16
Sensor remoto: 7
32
12
32, 33
16
161815 15
Painel traseiro (componente central)
11
12 11 1211
12 8
12
5
Page 49

Descrição dos componentes e controles
Subwoofer auto-alimentado
SP-PWC60
11
Luz POWER ON: 15
Parte frontal Parte traseira
SP-PWC30
Luz POWER ON: 15
Parte frontal Parte traseira
NOTA
• Por razões de segurança, certifique-se sempre de que haja suficiente
espaço atrás do subwoofer auto-alimentado.
10
Veja abaixo.
Cabo de alimentação: 12
11
10
Veja abaixo.
Cabo de alimentação: 12
* Não bloqueie as aberturas de ventilação para permitir a
circulação de ar apropriada pelo ventilador de refrigeração.
Ajuste do seletor VOLTAGE SELECTOR
Antes de conectar, ajuste a voltagem correta para sua área com o seletor de voltagem no painel traseiro do subwoofer auto-alimentado.
Seletor de voltagem
6
Page 50

Descrição dos componentes e controles
Controle remoto Instalação de pilhas no controle remoto
16
18
Botões
numéricos:
21
13
22, 26
17 - 37
24 - 33
14, 20
18, 37
21, 36
28, 30
28, 29
32
31, 32
19
34
33
18, 28, 30
17, 30
16
15
14
13
13
13
13 - 36
22, 26
13, 16
16
18, 37
18
20, 29
30
24
31
21
26
17
17
17
17
Pilhas secas do tipo R03 (UM-4)/AAA
(24F) (fornecidas)
Se o alcance ou eficácia do controle remoto diminuir, troque ambas
as pilhas.
PRECAUÇÃO
• Não exponha as pilhas ao calor ou flamas.
Operação do sistema com o controle remoto
Aponte o controle remoto diretamente para o painel frontal do
componente central.
• Não obstrua o controle remoto.
7
Page 51

2
Conexões
Não conecte o cabo de alimentação até que todas as outras conexões sejam feitas.
Conexão das antenas FM e AM
7 Antena AM de quadro
Se a recepção não estiver boa
Componente central
Ajuste da antena AM de quadro fornecida
Se o cabo da antena estiver coberto com o
revestimento de isolamento, torça e puxe o
revestimento de isolamento para retirá-lo.
Conexão da antena AM de quadro
1
Componente
central
Antena AM de quadro
Antena de fio coberta com vinil para uso ao ar
livre (não fornecida)
7 Antena FM
Componente central
Se a recepção não estiver boa
Componente central
Antena FM (fornecida)
Estenda a antena FM fornecida
horizontalmente.
Antena FM externa (não
fornecida)
Cabo de antena
Conector tipo padrão
(coaxial de 75Ω)
Cabo da antena FM externa
(não fornecido)
3
NOTA
• Recomendamos que você utilize um cabo coaxial para a antena FM,
pois o mesmo é bem protegido contra interferências.
• Gire a antena de quadro até que obtenha a melhor recepção
durante uma recepção AM.
NOTA
• Certifique-se de que os condutores da antena não toquem em outros
terminais, cabos de conexão ou cabos de alimentação. Isso poderia
causar uma má recepção.
8
Page 52

Conexões
Não conecte o cabo de alimentação até que todas as outras conexões sejam feitas.
Conexão das caixas acústicas
satélite (frontais, central,
surround)
Para o TH-C30, as caixas acústicas frontais, surround e central
são equipadas com seus cabos de alto-falante diretamente em seus
alto-falantes, em vez de terem terminais de alto-falantes em suas
caixas.
Caixa acústica
frontal
(SP-THC40F)
7 Montagem das caixas acústicas frontais e surround—
TH-C60
Caixa acústica surround
(SP-THC40S)
Caixa acústica
central
(SP-THC40C)
2
Suporte (ou caixa
acústica
diretamente)*
* Quando montar uma caixa acústica com a placa de base,
3
Quando montar uma caixa acústica sem
suporte:
Caixa acústica
A: Utilize estes parafusos (M4
x 45 mm) quando montar uma
caixa acústica com a placa de
base.
utilize os parafusos A.
Vermelho
Branco
Placa base
Parafuso M4 x 20 mm
(fornecido)*
Caixa acústica
frontal
(SP-THC60F) (2)
• Verifique o nome do modelo de cada caixa acústica pela
etiqueta na parte traseira para localizar cada caixa acústica
corretamente.
Caixas acústicas montadas
Com suporte: Consulte os
passos 1 a 3.
Antes de montar —
• Prepare uma chave Phillips (não fornecida).
• Tome cuidado para não derrubar nenhuma peça componente
durante a montagem, pois isso poderia danificar o piso ou causar
ferimentos.
Caixa acústica
surround
(SP-THC60S) (2)
Suporte (4)
ou
Sem suporte: Consulte os
passos 2 e 3.
Placa base (4)
Preto
Você pode encaminhar o cabo
de alto-falante utilizando a
braçadeira de cabo de altofalante (fornecida).
7 Conexão da caixa acústica central— TH-C60
Caixa acústica central (SP-THC60C) (1)
Preto
1
Caixa acústica
Suporte
Parafuso M5 x 40 mm
(fornecido)
Preto
Vermelho Branco
Preto
9
Page 53

Conexões
Não conecte o cabo de alimentação até que todas as outras conexões sejam feitas.
7 Conexão das caixas acústicas satélite ao subwoofer
Repare que a ilustração abaixo é para o SP-PWC60.
Antes de conectar os cabos de alto-falante;
Torça e puxe o revestimento de isolamento para retirálo.
Subwoofer auto-alimentado
TH-C60: SP-PWC60
TH-C30: SP-PWC30
Caixa acústica central
TH-C60: SP-THC60C
TH-C30: SP-THC40C
Caixas acústicas frontais
TH-C60: SP-THC60F
TH-C30: SP-THC40F
Cabo de alto-falante
• Conecte os cabos pretos aos terminais pretos (r).
• Conecte os cabos brancos aos terminai (q)
referindo-se à tabela abaixo:
FRONT SPEAKERS (LEFT) Branco
FRONT SPEAKERS (RIGHT) Vermelho
CENTER SPEAKER Verde
SURROUND SPEAKERS (LEFT) Azul
SURROUND SPEAKERS (RIGHT) Cinza
Caixas acústicas surround
TH-C60: SP-THC60S
TH-C30: SP-THC40S
PRECAUÇÃO
• Se você conectar caixas acústicas diferentes das fornecidas, utilize
caixas acústicas com a mesma impedância (SPEAKER
IMPEDANCE) indicada perto dos terminais de alto-falante na parte
posterior do subwoofer auto-alimentado.
• NÃO conecte mais de uma caixa acústica a um único terminal de altofalante.
• Quando instalar as caixas acústicas satélite em uma parede
– Certifique-se de solicitar a instalação na parede a pessoal
qualificado.
NÃO instale as caixas acústicas satélite em uma parede por si
mesmo para evitar danos inesperados causados pela queda das
mesmas da parede devido a uma instalação incorreta ou fraqueza
da estrutura da parede.
– Deve-se tomar cuidado ao selecionar o local para a instalação das
caixas acústicas em uma parede. Podem ocorrer ferimentos
pessoais ou danos materiais se as caixas acústicas instaladas
interferirem com as atividades diárias.
Precauções durante o uso diário
• Ao mover as caixas acústicas, não puxe os cabos de alto-falante,
pois isso pode derrubar as caixas acústicas, causando danos ou
ferimentos.
• Não reproduza sons em um volume muito alto, de tal maneira
que fiquem distorcidos, pois as caixas acústicas podem sofrer
danos pela formação de calor interna.
Para TH-C60:
• Ao segurar uma caixa acústica, sempre segure por baixo.
• Nunca se apóie nas caixas acústicas, pois as caixas acústicas
podem virar ou quebrar-se, possivelmente causando ferimentos.
Tome especial cuidado para que crianças não se apóiem nelas.
10
Page 54

Conexões
Não conecte o cabo de alimentação até que todas as outras conexões sejam feitas.
Arranjo das caixas acústicas
Para obter o melhor som possível deste sistema, você precisa colocar
todas as caixas acústicas, com exceção o subwoofer, na mesma
distância desde a posição de escuta.
Caixa acústica central
Caixa acústica
frontal
esquerda
Caixa acústica
surround
esquerda
Se as suas caixas acústicas não puderem ser colocada na mesma
distância desde a posição de escuta
Você pode ajustar o tempo de retardo das caixas acústicas. Veja
“Menu de retardo (DELAY)” na página 35.
NOTA
• Coloque as caixas acústicas satélite em uma superfície plana e
nivelada.
• As caixas acústicas frontais e central são blindadas magneticamente
para evitar distorções das cores nos televisores. No entanto, se não
forem instaladas adequadamente, pode ocorrer uma distorção das
cores. Portanto, preste atenção ao seguinte quando instalar as caixas
acústicas.
– Quando colocar as caixas acústicas perto de um televisor, desligue
a alimentação principal do televisor ou desconecte-o da rede
elétrica antes de instalar as caixas acústicas. Logo, espere pelo
menos 30 minutos antes de ligar de novo a alimentação principal
do televisor.
Alguns televisores podem ser afetados mesmo que você siga o
procedimento acima. Se isso acontecer, afaste as caixas acústicas do
televisor.
• As caixas acústicas surround não são blindadas magneticamente.
Se as mesmas forem colocadas perto de um televisor ou monitor,
provavelmente causarão uma distorção das cores na tela. Para evitar
isto, não coloque as caixas acústicas perto de um televisor ou monitor.
• Certifique-se de colocar o subwoofer auto-alimentado à direita do
televisor. Se você colocar o subwoofer auto-alimentado à esquerda do
televisor, mantenha uma distância suficiente entre os mesmo para
evitar que a tela do televisor sofra distorções.
Caixa acústica
frontal direita
Subwoofer autoalimentado
Caixa acústica
surround direita
Conexão a um televisor
• Você pode obter uma melhor qualidade da imagem na ordem —
Vídeo componente > S-video > Vídeo composto.
• Pode ocorrer uma distorção na imagem se conectar a um
televisor através de um videocassete, ou a um televisor com um
videocassete incorporado.
• Você precisa definir “MONITOR TYPE” no menu PICTURE
corretamente de acordo com a razão de aspecto do seu televisor.
(Consulte a página 35.)
7 Para conectar um televisor equipado com os jaques de
entrada de vídeo componente
Se o seu televisor suportar entrada de vídeo progressivo, você
poderá desfrutar de uma imagem de alta qualidade ativando o
modo de exploração progressiva. (Consulte a página 17.)
Componente
central
À entrada de vídeo
componente
Cabo de vídeo componente (não fornecido)
NOTA
• Se os jaques de entrada de vídeo componente do televisor forem to
tipo BNC, utilize um adaptador de plugue (não fornecido) para
converter os plugues de pinos para plugues BNC.
• Os sinais de vídeo componente só podem ser gerados se você
selecionar DVD ou USB MEMORY como a fonte de reprodução.
(Consulte a página 16.)
7 Para conectar a um televisor equipado com tomadas
compostas ou S-video.
Componente central
Cabo de vídeo composto (fornecido)
ou
Cabo S-Video
(não fornecido)
Alinhe as marcas 5.
À entrada S-video
Televisor
Televisor
À entrada de
vídeo composto
11
NOTA
• Selecione o modo de exploração apropriado de acordo com o
televisor. (Consulte a página 17.)
Conexão do subwoofer autoalimentado
Subwoofer auto-
Componente central
Alinhe as marcas 5. Alinhe as marcas 5.
Cabo de sistema
(fornecido)
alimentado
Page 55

Conexões
Não conecte o cabo de alimentação até que todas as outras conexões sejam feitas.
Conexão a um componente
analógico
Você pode desfrutar do som de um componente analógico.
Componente
central
Cabo de S-video
(não fornecido)
ou
Cabo de vídeo
composto
(não fornecido)
12 3
VCR (1
3 ou 2 3)
Televisor (3)
Gravador de fita (3)
1
À saída de vídeo composto
2 À saída S-video
3 À saída de áudio
NOTA
• Os sinais introduzidos na tomada VIDEO das tomadas VCR IN só
serão emitidos pela tomada VIDEO das tomadas VIDEO OUT, e não
pela tomada S-VIDEO das tomadas VIDEO OUT.
Cabo com
plugue de pino
RCA
(não fornecido)
Conexão a um componente
digital
Você pode desfrutar do som de um componente digital.
Componente central
Conexão de um dispositivo de
classe de armazenamento
massivo USB
Você pode conectar um dispositivo de classe de armazenamento
massivo USB tal como um dispositivo de memória flash USB, disco
duro, leitor de cartões de multimídia, câmera digital, etc., a este sistema.
• Depois de conectar um dispositivo de classe de armazenamento
massivo USB a este sistema e de selecionar USB MEMORY como
a fonte, a exibição de controle de arquivo aparece na tela do
televisor. (Consulte a página 27.)
Cabo USB (não fornecido)
NOTA
• Quando conectar um dispositivo de classe de armazenamento
massivo USB, refira-se também ao seu manual.
• Conecte somente um dispositivo de classe de armazenamento
massivo USB ao sistema por vez. Não utilize um concentrador USB.
• Não é possível carregar o dispositivo de classe de armazenamento massivo
USB enquanto o mesmo está conectado ao jaque USB MEMORY.
• Enquanto estiver reproduzindo um arquivo no dispositivo de classe
de armazenamento massivo USB, não desconecte o dispositivo. Isso
pode causar um mau funcionamento do sistema e do dispositivo.
• A JVC não se responsabiliza por quaisquer perdas de dados no
dispositivo de classe de armazenamento massivo USB com a
utilização deste sistema.
• Ao conectar com um cabo USB, utilize um cabo com um
comprimento inferior a 1 m.
• Este sistema é compatível com USB 2.0 Full-Speed (não compatível
com USB 1.1).
• Você pode reproduzir os seguintes tipos de arquivos em um
dispositivo de classe de armazenamento massivo USB (taxa de
transferência de dados máxima: 2 Mbps):
–Música: MP3, WMA
– Imagem: JPEG
– Filme: MPEG-4 (ASF), DivX (taxa de quadro máxima de 30 fps
para exploração progressiva)
• Você não pode reproduzir um arquivo maior do que 2 GB.
• Quando reproduzir um arquivo que tenha uma taxa de transferência
grande, os quadros ou sons podem ser interrompidos durante a reprodução.
• Este sistema não pode reconhecer um dispositivo de classe de
armazenamento massivo USB cujo regime exceda de 5 V/500 mA.
• Este sistema pode não reconhecer alguns dispositivos de classe de
armazenamento massivo USB.
• Este sistema pode não reproduzir alguns arquivos mesmo que seus
formatos estejam listados acima.
Componente central
(no painel frontal)
Sintonizador DBS*
MD player
* DBS = Direct Broadcasting Satellite (Satélite de Transmissão
Direta)
NOTA
• Somente os sinais de áudio digitais podem ser introduzidos quando
se seleciona “DBS” como a fonte de reprodução. (Consulte a página
16.) Quando conectar um componente de vídeo como um
sintonizador DBS, opere este sistema para escutar o som.
À saída ótica digital
Cabo ótico digital (não fornecido)
Conexão do cabo de alimentação
Certifique-se de que todas as outras conexões tenham sido finalizadas.
Componente
central
Cabo de
alimentação
(fornecido)
Conecte a uma tomada de CA.
PRECAUÇÃO
• Desconecte o cabo de alimentação antes de limpar ou mover o sistema.
• Não puxe pelo próprio cabo para desconectar o cabo de alimentação.
Para desconectar o cabo, sempre segure e puxe o plugue para não
danificar o cabo.
• Se os plugues de CA não entrarem nas tomadas de CA, utilize o
adaptador de plugue de CA fornecido.
Subwoofer autoalimentado
Cabo de
alimentação
12
Page 56

Operação dos componentes externos com o controle remoto
Os botões descritos abaixo são usados nas páginas 13 e 14.
Botões
numéricos
Seletor do
modo do
controle
remoto
(Botão de
reprodução)
NOTA
• Os códigos dos fabricantes estão sujeitos a modificações sem aviso
prévio.
• Defina os códigos de novo depois de trocar as pilhas do controle
remoto.
Operação do televisor
7 Para definir o código do fabricante
1 Deslize o seletor do modo do controle
remoto para TV.
2 Mantenha F TV pressionado.
Mantenha o botão pressionado até que o passo 4 seja
finalizado.
3 Pressione ENTER.
4 Pressione os botões numéricos (1-9, 0)
para introduzir o código do fabricante
(2 dígitos).
Exemplos:
Para um televisor Hitachi: Pressione 1 e, em seguida, 0.
Para um televisor Toshiba: Pressione 0 e, em seguida, 8.
Fabricante
JVC 01* Samsung 12
Hitachi 10 Sanyo 13, 14
Magnavox 02 Sharp 06
Mitsubishi 03 Sony 07
Panasonic 04, 11 Toshiba 08
Philips 15 Zenith 09
RCA 05
* “01” é a definição inicial.
Código
Fabricante
Código
5 Solte F TV.
Se houver mais de um código listado para a marca
correspondente, tente cada um deles até introduzir o código
correto.
7 Operação
Aponte o controle remoto para o televisor.
IMPORTANTE
Antes de utilizar o controle remoto para operar um
televisor;
• Ajuste o seletor do modo do controle remoto para TV.
13
Os seguintes botões se encontram disponíveis:
F TV: Liga e desliga o televisor.
TV VOL +/–:Ajusta o volume.
TV/VIDEO: Seleciona o modo de entrada (TV ou
VÍDEO).
CH +/–: Muda os canais.
1-10, 0, h 10 (100+): Seleciona o canal.
TV RETURN: Alterna entre o canal selecionado
anteriormente e o canal atual.
NOTA
• Os botões de operação podem diferir dependendo dos fabricantes.
Page 57

Operação dos componentes externos com o controle remoto
Consulte a página 13 para as localizações dos botões.
Operação de um sintonizador
DBS ou conversor CATV
7 Para definir o código do fabricante
1 Deslize o seletor do modo do controle
remoto para VCR/DBS.
2 Pressione DBS.
3 Mantenha F VCR/DBS pressionado.
Mantenha o botão pressionado até que o passo 5 seja
finalizado.
4 Pressione ENTER.
5 Pressione os botões numéricos (1-9, 0)
para introduzir o código do fabricante
(2 dígitos).
Exemplos:
Para um produto GI Jerrold: Pressione 0 e, em seguida, 1.
Para um produto Sony: Pressione 2 e, em seguida, 0.
Fabricante Código
Echostar 21
GI Jerrold 01*, 02, 03, 04, 05, 06, 07, 08
Hamlin 15, 16, 17, 18
Pioneer 13, 14
RCA 19
Scientific Atlanta 09, 10
Sony 20
Zenith 11, 12
* “01” é a definição inicial.
6 Solte F VCR/DBS.
Se houver mais de um código listado para sua marca, tente
cada um deles até introduzir o código correto.
7 Operação
Aponte o controle remoto para o sintonizador DBS ou conversor
CATV.
IMPORTANTE
Antes de utilizar o controle remoto para
operar um sintonizador DBS ou conversor
CATV;
1 Ajuste o seletor do modo do controle
remoto para VCR/DBS.
2 Pressione DBS.
Os seguintes botões se encontram disponíveis:
F VCR/DBS: Liga ou desliga o sintonizador DBS ou
conversor CATV.
CH +/–: Muda os canais.
1-10, 0, h 10 (100+): Seleciona o canal.
Operação do videocassete
7 Para definir o código do fabricante
1 Deslize o seletor do modo do controle
remoto para VCR/DBS.
2 Pressione VCR.
3 Mantenha F VCR/DBS pressionado.
Mantenha o botão pressionado até que o passo 5 seja
finalizado.
4 Pressione ENTER.
5 Pressione os botões numéricos (1-9, 0)
para introduzir o código do fabricante
(2 dígitos).
Exemplos:
Para um videocassete Philips: Pressione 0 e, em seguida, 9.
Para um videocassete NEC: Pressione 2 e, em seguida, 5.
Fabricante Código Fabricante Código
JVC 01*, 02, 03 Philips 09
Emerson 11, 26 RCA 05, 06
Fisher 29 Samsung 24
Funai 10, 14, 15, 16 Sanyo 21, 22, 23
Gold Star 12 Sharp 27, 28
Hitachi 04 Shintom 30
Mitsubishi 13 Sony 18, 19, 20
NEC 25 Zenith 08
Panasonic 07, 17
* “01” é a definição inicial.
6 Solte F VCR/DBS.
Se houver mais de um código listado para sua marca, tente
cada um deles até introduzir o código correto.
7 Operação
Aponte o controle remoto para o videocassete.
IMPORTANTE
Antes de utilizar o controle remoto para
operar um videocassete;
1 Ajuste o seletor do modo do controle
remoto para VCR/DBS.
2 Pressione VCR.
Os seguintes botões se encontram disponíveis:
F VCR/DBS: Liga e desliga o videocassete.
3 (Botão de reprodução):Inicia a reprodução.
7: Pára a operação.
8: Pausa a reprodução.
y: Avança a fita rapidamente.
1:Rebobina a fita.
REC: Pressione este botão junto com 3
(botão de reprodução) para iniciar a
gravação ou junto com 8 para pausar a
gravação.
CH +/–: Muda os canais de TV no videocassete.
NOTA
• Quando operar um videocassete ou sintonizador DBS/conversor
CATV;
– A definição da fonte do videocassete ou DBS permanecerá depois
que você mudar o seletor do modo de controle remoto para AUDIO
ou TV. Quando operar o videocassete ou sintonizador DBS/
conversor CATV de novo, não precisará pressionar VCR ou DBS
depois de definir o seletor do modo do controle remoto.
14
Page 58

Operações básicas
Os botões no controle remoto são usados para explicar a maioria
das operações neste manual. Você pode utilizar os botões no
componente central da mesma maneira que no controle remoto
para as operações, exceto quando especificado em contrário.
IMPORTANTE
Antes de utilizar o controle remoto para a seguinte
operação:
• Ajuste o seletor do modo do controle remoto para
AUDIO.
Os botões descritos abaixo são usados nas páginas 15 a 17.
Botões de
seleção de
fonte
Seletor do
modo do
controle
remoto
Cursor
(3/2)/
ENTER
Maneira de ligar/desligar o
sistema
No controle remoto:
Pressione F AUDIO.
No componente central:
Pressione F.
Quando DVD ou USB MEMORY for selecionado como a fonte
(consulte a página 16), as seguintes mensagens aparecerão na tela
do televisor.
• “OPEN”/“CLOSE”:
Aparece ao abrir ou fechar a bandeja de disco.
• “NOW READING”:
Aparece quando o sistema está lendo a informação do disco/
arquivo.
• “REGION CODE ERROR!”:
Aparece quando o código regional do DVD-VIDEO não
corresponde ao código suportado pelo sistema. O disco não
pode ser reproduzido.
•“NO DISC”:
Aparece quando não há um disco carregado.
• “NO USB DEVICE”:
Aparece quando o dispositivo de classe de armazenamento
massivo USB é conectado.
• “CANNOT PLAY THIS DISC”:
Aparece quando se coloca um disco que não pode ser
reproduzido.
• “CANNOT PLAY THIS DEVICE”:
Aparece quando um dispositivo de classe de armazenamento
massivo USB não reproduzível é conectado.
15
NOTA
• A luz STANDBY no componente central se acende em vermelho
quando a alimentação é desligada. A luz se apaga quando a
alimentação é ligada.
• O fornecimento de energia para o subwoofer está ligado ao
componente central. A luz POWER ON no subwoofer se acende em
verde quando a alimentação é ligada.
• Uma pequena quantidade de energia é consumida mesmo quando a
alimentação está desligada (somente componente central). Isso é
denominado modo de prontidão e a luz STANDBY se ilumina neste
modo. Desconecte o cabo de alimentação da tomada de CA para
desligar a alimentação completamente.
• Você também pode ligar o sistema pressionando os seguintes botões:
–Um dos botões DISC (1-5) (com SHIFT pressionado) no controle
remoto
–Um dos botões de DISC (1-5) 0 no componente central
– Um dos botões de seleção de fonte ou 3 no controle remoto
–Um dos botões de DISC (1-5) 3 ou 3 no componente central
Luz STANDBY
Page 59

Operações básicas
Consulte a página 15 para as localizações dos botões.
Seleção da fonte de
reprodução
No controle remoto:
Pressione um dos botões de seleção de
fonte (DVD, USB MEMORY, FM/AM, VCR ou
DBS).
DVD:
Para reproduzir um disco (DVD-VIDEO, VCD, etc.). (Consulte a
página 18.)
USB MEMORY:
Para reproduzir um arquivo em um dispositivo de classe de
armazenamento massivo USB. (Veja “Para reproduzir um arquivo
em um dispositivo de classe de armazenamento massivo USB” na
página 18.)
FM/AM:
Para sintonizar uma emissora FM ou AM. (Consulte a página 36.)
Cada vez que você pressiona o botão, a banda alterna-se entre FM e
AM.
VCR:
Para selecionar a fonte de um componente conectado aos jaques
VCR IN e AUX IN (VCR). (Consulte a página 12.)
DBS:
Para selecionar a fonte de um componente conectado ao jaque
DIGITAL IN (DBS). (Consulte a página 12.)
No componente central:
Pressione SOURCE repetidamente até que
o nome da fonte desejada apareça no
mostrador.
NOTA
• Se AM, FM ou DBS for selecionado, o sistema não gerará sinais de
vídeo.
• Pode levar algum tempo para mudar a fonte.
Audição com fones de ouvido
(não fornecidos)
PRECAUÇÃO
Certifique-se de baixar o volume:
• Antes de conectar ou colocar os fones de ouvido, pois o volume alto
pode causar danos tanto aos fones de ouvido como à sua audição.
• Antes de desconectar os fones de ouvido, pois o volume alto pode sair
repentinamente dos alto-falantes.
Ao conectar fones de ouvido ao jaque PHONES no componente
central, o sistema cancela automaticamente o modo surround
(consulte a página 23) selecionado atualmente, desativa as caixas
acústicas, desliga o subwoofer, e ativa o modo de fones de ouvido.
“H. PHONE” aparece no mostrador.
Modo de fones de ouvido
Ao utilizar fones de ouvido, os seguintes sinais são gerados
independentemente da definição das caixas acústicas:
• Para fontes de 2 canais, os sinais dos canais frontais esquerdo e
direito são gerados pelos fones de ouvido.
• Os sinais de canais múltiplos são misturados e gerados pelos
fones de ouvido.
• (Para DVD-AUDIO) Quando o disco proíbe a mistura, apenas os
canais frontais esquerdo e direito são gerados pelos fones de
ouvido.
Maneira de apagar o som
temporariamente [MUTING]
Pressione MUTING.
Para restaurar o som
Realize uma das seguintes operações:
•Pressione MUTING de novo.
•Pressione VOL +/– (ou gire VOLUME no componente central).
Ajuste do volume [VOLUME]
PRECAUÇÃO
• Sempre ajuste o volume ao nível mínimo antes de iniciar qualquer
fonte. Se o volume for ajustado a um nível alto, o sopro repentino do
som poderia causar danos permanentes à sua audição e/ou estourar
os alto-falantes.
No controle remoto:
Pressione VOL +/–.
No componente central:
Gire VOLUME.
• Para aumentar o volume, gire VOLUME no sentido horário.
• Para diminuir o volume, gire VOLUME no sentido antihorário.
Ajuste do brilho das indicações
[DIMMER]
Pressione DIMMER.
Cada vez que você pressionar o botão, poderá alterar o nível do
brilho em 3 passos.
16
Page 60

Operações básicas
Consulte a página 15 para as localizações dos botões.
Timer para dormir [SLEEP]
O sistema é desligado automaticamente quando o período de tempo
especificado é decorrido.
Pressione SLEEP.
Cada vez que você pressiona o botão, o tempo de desligamento
muda como segue:
– –
(desativado) Z 10 Z 20 Z 30 Z 60 Z 90 Z
(de volta ao começo) (Unidade: min.)
Exemplo:
minutos
Para verificar o tempo restante
Pressione SLEEP uma vez.
Para mudar o tempo restante
Pressione SLEEP repetidamente.
Para cancelar
Pressione SLEEP repetidamente até que “SLEEP – –” apareça.
• Desligar a alimentação também cancela o timer para dormir.
120 Z 150 Z
Ajuste do nível de saída do
subwoofer e caixas acústicas
1 Pressione SPK LEVEL para exibir a
indicação da caixa acústica desejada
no mostrador.
Cada vez que você pressiona o botão, a indicação das caixas
acústicas muda como segue:
FRNT L (Caixa acústica frontal esquerda) Z FRNT R
(Caixa acústica frontal direita) Z CENTER (Caixa acústica
central) Z SURR L (Caixa acústica surround esquerda) Z
SURR R (Caixa acústica surround direita) Z SUBWFR
(Subwoofer) Z (de volta ao começo)
2 Pressione LEVEL +/– para ajustar o
nível de saída de –6 a +6.
NOTA
• Você também pode fazer ajustes utilizando o menu de configuração
mostrado na tela do televisor. (Consulte a página 35.)
• Os ajustes entram em efeito para todas as fontes com exceção de FM/
AM. Para FM/AM, ajuste o nível separadamente repetindo o
procedimento acima.
Ajuste do som
1 Pressione TREBLE/BASS para exibir
“TRE” ou “BASS” no mostrador.
Cada vez que você pressiona o botão, a indicação alterna-se
entre “TRE” e “BASS”.
• TRE: Selecione isto para ajustar o som dos agudos.
• BASS: Selecione isto para ajustar o som dos graves.
2 Pressione LEVEL +/– para ajustar o
nível de –10 a +10 (em 2 passos).
NOTA
• Os ajustes são aplicados a todas as fontes.
Mudança do modo de exploração
O sistema pode ser ajustado ao modo de exploração do seu
televisor.
NOTA
• Para utilizar o sistema no modo progressivo, é preciso que o
componente central seja conectado ao televisor usando um cabo de
vídeo componente (não fornecido). (Consulte a página 11.)
7 Enquanto DVD ou USB MEMORY estiver selecionado como a
fonte e parado.
1 Pressione SCAN MODE durante 2
segundos.
O modo de exploração selecionado atualmente aparece no
mostrador.
2 Pressione o cursor 3/2 para
selecionar o modo desejado.
• NT. 480I: Selecione se o seu televisor suporta apenas entrada
de vídeo entrelaçado NTSC.
• NT. 480P: Selecione se o seu televisor, equipado com jaques
de vídeo componente, suporta a entrada de vídeo progressivo
NTSC.
• PAL. 576I: Selecione se o seu televisor suporta apenas
entrada de vídeo entrelaçado PAL.
• PAL. 576P: Selecione se o seu televisor, equipado com jaques
de vídeo componente, suporta a entrada de vídeo progressivo
PA L.
Você pode obter uma qualidade de imagem melhor no modo
progressivo (“NT. 480P” ou “PAL. 576P”) do que no modo
entrelaçado (“NT. 480I” ou “PAL. 576I”).
3 Pressione ENTER enquanto o modo
selecionado estiver exibido.
Quando o modo progressivo estiver selecionado, o indicador
PROGRESSIVE se acende no mostrador.
NOTA
• A mudança de modo de exploração não tem efeito quando o televisor
está conectado com o cabo de S-video ou de vídeo composto.
• Embora a imagem pode aparecer distorcida ao pressionar ENTER, isso
não indica um mau funcionamento do sistema.
17
• Existem alguns televisores progressivos e televisores de alta
definição que não são completamente compatíveis com este
sistema, o que resulta em uma imagem inatural ao reproduzir um
DVD-VIDEO no modo de exploração progressiva. Neste caso,
mude o modo de exploração para o modo entrelaçado.
• Todos os televisores pr ogressivos JVC e televisores de alta definição
são completamente compatíveis com este sistema.
Page 61

Reprodução
• Um ícone como mostra os formatos dos discos ou os tipos de
arquivos para os quais a operação se encontra disponível.
IMPORTANTE
Antes de utilizar o controle remoto para a
seguinte operação:
1 Ajuste o seletor do modo do controle
remoto para AUDIO.
2 Pressione DVD ou USB MEMORY.
Os botões descritos abaixo são usados nas páginas 18 a 22.
Botões
numéricos
Seletor do
modo do
controle
remoto
Cursor
(3/2/Y/5)/
ENTER
(Botão de
reprodução)
Reprodução básica
7 Para reproduzir um disco
1 Pressione o DISC (1-5) 0
desejado no componente
central.
O sistema é ligado e a bandeja de disco é ejetada.
2 Coloque um disco.
Ao colocar um disco de 8 cmEtiqueta para cima
3
Pressione DISC (1-5), com SHIFT pressionado.
NOTA
• Até 5 discos podem ser carregados.
• Você também pode iniciar a reprodução pressionando os seguintes botões:
– DVD ou 3 (botão de reprodução) no controle remoto
– DISC (1-5) 3 ou 3 no componente central
• O sistema reproduz os discos disponíveis em seqüência até que você
pare a reprodução ou até que o disco carregado na bandeja DISC 5
chegue ao fim. No entanto, quando um disco DVD-VIDEO ou DVDAUDIO estiver carregado no sistema, a reprodução do disco seguinte
ao disco DVD-VIDEO ou DVD-AUDIO não começará.
7 Para reproduzir um arquivo em um dispositivo de classe de
armazenamento massivo USB
Pressione USB MEMORY.
As operações dos arquivos em um dispositivo de classe de
armazenamento massivo USB dependem dos tipos de arquivos
armazenados no dispositivo.
• Para maiores detalhes sobre como conectar um dispositivo de
classe de armazenamento massivo USB, consulte “Conexão de
um dispositivo de classe de armazenamento massivo USB”.
(Consulte a página 12.)
7 Para reproduzir os seguintes arquivos...
• Para arquivos MP3/WMA
A exibição de controle de arquivo (consulte a página 27) aparece na tela
do televisor.
• Para arquivos JPEG
Cada arquivo (imagem fixa) aparece na tela do televisor durante
aproximadamente 3 segundos (show de slides). Ao parar a reprodução, a
exibição de controle de arquivo (consulte a página 27) aparece na tela do
televisor.
• Para arquivos ASF/MPEG-2/MPEG-1
Pressionar
arquivo (consulte a página 27) na tela do televisor durante a reprodução.
• Para arquivos DivX
Durante o tempo de leitura, “READING INDEX” pode aparecer na tela
do televisor.
Pressionar
arquivo (consulte a página 27) na tela do televisor durante a reprodução.
TOP MENU/PG
TOP MENU/PG
ou
MENU/PL
ou
MENU/PL
mostra a exibição de controle de
mostra a exibição de controle de
NOTA
• Quando vários tipos de arquivos foram gravados em um disco/dispositivo,
selecione o tipo apropriado no menu de configuração. (Consulte a página 35.)
• (Para JPEG) O sistema não pode aceitar operações mesmo que você
pressione botões antes que a imagem inteira apareça na tela do televisor.
7 Para pausar a reprodução
Pressione 8.
Para continuar a reprodução, pressione 3 (botão de reprodução).
7 Para parar
Pressione 7.
18
Page 62

Reprodução
Consulte a página 18 para as localizações dos botões.
7 Ícones de guia na tela
Durante a reprodução de DVD-VIDEO, os seguintes ícones podem
aparecer na tela do televisor durante um breve momento.
• : aparece no começo de uma cena que contenha gravações em
vários idiomas de legenda.
• : aparece no começo de uma cena que contenha gravações em
vários idiomas de áudio.
• : aparece começo de uma cena que contenha gravações em
multi-ângulo.
• (Reprodução), (Pausa), / (Avanço
rápido/retrocesso rápido), / (Avanço/
retrocesso em câmera lenta): aparece quando realiza a respectiva
operação.
• : o disco não pode aceitar a operação tentada.
NOTA
• Se não quiser os ícones de guia na tela, consulte a página 36.
7 Informação de reprodução no mostrador
DVD-VIDEO
Exemplo: Quando um DVD-VIDEO codificado com Dolby Digital
5.1 ch canais é reproduzido
Tempo decorrido de reprodução
Número do capítulo
(horas:minutos:segundos)
VCD/SVCD/CD
Exemplo: Quando um CD é reproduzido
Número da faixa
Tempo decorrido de reprodução (horas:minutos:segundos)
Indicadores do sinal e
caixas acústicas
NOTA
• Quando um VCD ou SVCD com função PBC é reproduzido, o tempo
decorrido de reprodução não aparece, mas “PBC” aparece.
Arquivo MP3/WMA
Exemplo: Quando um arquivo MP3 é reproduzido
Número da faixa
Indicador MP3*
Indicadores do sinal e caixas
acústicas
Tempo decorrido de reprodução
(horas:minutos:segundos)
(apenas durante reprodução)
Pressionando FL DISPLAY.
Indicadores do sinal e caixas acústicas (Consulte a
Modo surround e formato do sinal digital
(Consulte a página 24.)
Pressionando FL DISPLAY
Número do título
DVD-AUDIO
Número da faixa Tempo decorrido de reprodução
Indicadores do sinal e caixas acústicas
Pressionando FL DISPLAY.
Número do grupo
Número do grupo
página 24.)
Número da faixa
* O indicador WMA se ilumina para um arquivo WMA.
Número do capítulo
Arquivo JPEG
Exemplo: Quando um show de slides é reproduzido
Número do arquivo
Pressionando FL DISPLAY.
Número do grupo Número do arquivo
(horas:minutos:segundos)
Número da faixa
19
Page 63

Reprodução
Consulte a página 18 para as localizações dos botões.
Arquivo ASF/MPEG-2/MPEG-1/DivX
Exemplo: Quando um arquivo ASF é reproduzido
Número da faixa
Tempo decorrido de reprodução (horas:minutos:segundos)
(apenas durante reprodução)
Pressionando FL DISPLAY.
Número do grupo
Disco DVD VR
Exemplo: Durante a reprodução do programa original*
Número do capítulo
Pressionando FL DISPLAY.
Número do título
Exemplo: Durante a reprodução na lista de reprodução*
Número do capítulo
Indicadores do sinal e caixas acústicas
Número da faixa
Tempo decorrido de reprodução
(horas:minutos:segundos)
Número do capítulo
Tempo decorrido de reprodução
(horas:minutos:segundos)
7 Informação de reprodução no mostrador
Os indicadores de disco no mostrador mostram o estado atual da
bandeja de disco correspondente.
Exemplo: Quando os discos são carregados nas bandejas 1, 2 e 5, e o
disco na bandeja 5 é selecionado.
Número do disco
selecionado atualmente
Número do disco carregado atualmente
7 Protetor de tela
Uma imagem pode queimar-se na tela de um televisor se uma
imagem estática permanecer exibida durante um longo período de
tempo. Para evitar isso, o sistema escurece a tela automaticamente
se uma imagem estática permanecer exibida durante mais de 5
minutos (função do protetor de tela).
• Pressionar qualquer botão cancelará a função do protetor de tela.
• Se não quiser utilizar o protetor de tela, consulte a página 35.
Repetição por um toque
Você pode mover a posição de reprodução para trás em
10 segundos desde a posição atual.
7 Durante a reprodução
Pressione .
NOTA
• Esta função funciona no mesmo título.
• Esta função não se encontra disponível durante a reprodução
repetida.
• Este função pode não funcionar com alguns discos.
Busca com avanço rápido/
retrocesso rápido
Pressionando FL DISPLAY.
Número da lista de reprodução
* Uti lizando TOP MENU/PG ou MENU/PL, você pode mudar o
modo de reprodução. (Consulte a página 22.)
NOTA
• Você pode mudar o modo de informação do tempo (exceto para
MP3/WMA/ASF/MPEG-2/MPEG-1/DivX). (Consulte a página 25.)
• Você também verificar a informação de reprodução na tela do
televisor. (Consulte a página 24.)
Número do capítulo
7 Durante a reprodução
No controle remoto:
Pressione y ou 1.
Cada vez que você pressiona o botão, a
velocidade de busca muda (x2, x5, x10, x20,
x60).
Para voltar à reprodução na velocidade normal
Pressione 3 (botão de reprodução).
No componente central:
Mantenha pressionado x ou 4.
Pressionar continuamente x ou 4 aumenta a velocidade de
busca com avanço rápido/retrocesso rápido (x5, x20).
NOTA
• Quando um DVD-VIDEO, DVD VR, VCD, SVCD ou ASF/MPEG-2/
MPEG-1/DivX é reproduzido, nenhum som é produzido durante a
busca com avanço/retrocesso rápido.
• Quando um DVD-AUDIO, CD ou MP3/WMA é reproduzido, o som
é produzido intermitentemente e baixo durante a busca com avanç/
retrocesso rápido.
• Este função pode não funcionar com alguns discos/arquivos.
• Para MP3/WMA, a velocidade de busca não é exibida.
• A velocidade de busca para DivX é y1, y2, y3 para a busca
progressiva, e 11, 12 e 13 para a busca regressiva.
20
Page 64

Reprodução
Consulte a página 18 para as localizações dos botões.
Salto ao começo de uma
seleção desejada
7 Uso dos botões x/4
7 Para DVD-VIDEO/DVD VR (capítulo):
Durante a reprodução
7 Para VCD/SVCD (faixa): Durante a
reprodução sem função PBC
7 Para DVD-AUDIO/CD/MP3/WMA/JPEG/
ASF/MPEG-2/MPEG-1/DivX (faixa/arquivo): Durante a
reprodução ou modo de parada
Pressione x ou 4 repetidamente.
NOTA
• Ao reproduzir um arquivo MP3/WMA/JPEG/ASF/MPEG-2/
MPEG-1/DivX
de controle de arquivo. (Consulte a página 27.)
• Este função pode não funcionar com alguns discos/arquivos.
7 Uso dos botões numéricos no controle remoto
7 Para DVD-VIDEO/DVD VR (título, capítulo):
No modo de parada, o número do título é selecionado.
Durante a reprodução, o número do capítulo é selecionado.
7 Para DVD-AUDIO (faixa):
Durante a reprodução ou modo de parada
7 Para VCD/SVCD (faixa):
Durante a reprodução ou parada sem função PBC
7 Para CD/MP3/WMA/JPEG/ASF/MPEG-2/MPEG-1/DivX
(faixa/arquivo):
Durante a reprodução ou modo de parada
Pressione os botões numéricos (0-10,
h 10) para selecionar o número desejado.
• Para maiores detalhes sobre o uso dos botões numéricos, consulte
“Como utilizar os botões numéricos” a seguir.
, você pode realizar as operações utilizando a exibição
Salto em intervalos de
aproximadamente 5 minutos
Você pode saltar dentro do arquivo em intervalos de
aproximadamente 5 minutos.
Isso é útil especialmente quando se quer saltar dentro de um
arquivo longo.
7 Durante a reprodução
Pressione o cursor 3/2.
Cada vez que pressionar o botão, a posição de reprodução saltará
para o começo do intervalo anterior ou seguinte. Cada intervalo é
de aproximadamente 5 minutos.
NOTA
• Os intervalos são atribuídos automaticamente desde o começo de um
arquivo.
• Esta função se encontra disponível somente dentro do mesmo
arquivo.
• Este função pode não funcionar com alguns discos/arquivos.
Localização de um título/grupo
desejado utilizando os botões
numéricos
7 Durante a reprodução ou modo de parada
1 Pressione TITLE/GROUP.
“– –” aparece na área de exibição do título/
grupo no mostrador.
Exemplo: Durante a reprodução de
DVD-VIDEO
Como utilizar os botões numéricos
Para selecionar 3: Pressione 3.
Para selecionar 10: Pressione 10.
Para selecionar 14: Pressione h 10, 1 e, em seguida, 4.
Para selecionar 24: Pressione h 10, 2 e, em seguida, 4.
Para selecionar 40: Pressione h 10, 4 e, em seguida, 0.
Para selecionar 114: Pressione h 10, h 10, 1, 1 e, em seguida, 4.
2 Enquanto o mostrador estiver exibindo
“– –”, utilize os botões numéricos (0-10,
h 10) para introduzir o número do
título ou grupo desejado.
O sistema inicia a reprodução a partir do primeiro capítulo/
faixa/arquivo do título/grupo selecionado.
• Para maiores detalhes sobre o uso dos botões numéricos,
consulte “Como utilizar os botões numéricos” na coluna
esquerda.
NOTA
• Ao localizar um título de um disco DVD VR, o indicador PG ou PL
pode acender-se no mostrador.
• Este função pode não funcionar com alguns discos/arquivos.
21
Page 65

Reprodução
Consulte a página 18 para as localizações dos botões.
Reprodução de um grupo de
bônus
Alguns DVD-AUDIOs têm um grupo especial chamado
“grupo de bônus”, cujo conteúdo não é aberto ao público. O
grupo de bônus é sempre atribuído ao último grupo de um
disco. Para reproduzir um grupo de bônus, é preciso introduzir o
“número-chave” específico (uma senha). A maneira de obter o
número-chave depende do disco. Depois de obter o número-chave,
você pode reproduzir o grupo de bônus seguindo o procedimento
abaixo.
7 Com o indicador BONUS iluminado no mostrador
1 Selecione o grupo de bônus.
Para selecionar o grupo, consulte “Localização de um título/
grupo desejado utilizando os botões numéricos” que se
descreve na página 21.
A indicação de entrada do número-chave aparece.
No televisor
No mostrador
2 Pressione os botões numéricos (0-9)
para introduzir o número-chave e, em
seguida, pressione ENTER.
Ao introduzir o número-chave correto, a reprodução começará
e o indicador BONUS se apagará.
Seleção do título/lista de
reprodução desejado(a) da
exibição de controle
7 Durante a reprodução ou modo de parada
1
Pressione TOP MENU/PG ou MENU/PL.
A exibição de controle aparece na tela do televisor, e o sistema
inicia a reprodução do primeiro título/lista de reprodução.
• PLAY LIST só aparece quando a lista de reprodução está no
disco DVD VR.
TOP MENU/PG: mostra ORIGINAL PROGRAM.
Exemplo:
*1
:Número do título
*2
: Data de gravação
*3
: Fonte de gravação (emissora de TV, terminal de entrada de
equipamento de gravação, etc.)
*4
: Hora inicial da gravação
*5
: Título do programa original/lista de reprodução (O título pode
não ser exibido dependendo do equipamento de gravação.)
*6
: Título atual
MENU/PL: mostra PLAY LIST.
Exemplo:
DVD
VR
• Se você introduzir um número errado, introduza de novo o
número correto.
Para limpar a entrada do número-chave
Realize uma das seguintes operações:
• Pressione 7.
• Abra a bandeja de disco.
• Desligue o sistema.
NOTA
• Na reprodução aleatória, as faixas no grupo de bônus não são
reproduzidas.
*7
: Número da lista de reprodução
*8
: Criação da data de listas de reprodução
*9
: Criação da data de listas de reprodução
*10
:Tempo total de reprodução
*11
:Lista de reprodução atual
2
Pressione o cursor Y/5 para selecionar
o título/lista de reprodução desejado(a).
O sistema inicia a reprodução do título/lista de reprodução
selecionado(a).
Para limpar a exibição de controle
Pressione ENTER.
Sobre o modo de reprodução em um
disco DVD VR
• Programa original (ORIGINAL PROGRAM):
O sistema pode reproduzir a imagem original na ordem
gravada.
• Lista de reprodução (PLAY LIST):
O sistema pode reproduzir a lista de reprodução editada pelo
equipamento de gravação.
22
Page 66

Mod
Operações avançadas
• Um ícone como mostra os formatos dos discos ou os tipos de
arquivos para os quais a operação se encontra disponível.
IMPORTANTE
Antes de utilizar o controle remoto para a seguinte
operação;
• Ajuste o seletor do modo do controle remoto para
AUDIO.
• Há exceções na operação mencionada acima.
Neste caso, siga as instruções apropriadas.
Os botões descritos abaixo são usados nas páginas 23 a 33.
Botões
numéricos
Seletor do
modo do
controle
remoto
Cursor
(3/2/Y/5)/
ENTER
(Botão de
reprodução)
Uso do modo surround
Você pode desfrutar de um campo sonoro mais realístico do que
um som estéreo utilizando o modo surround.
7 Surround automático (AUTO SUR)
Utiliza-se para reproduzir o som como está gravado sem conversão
(decodificação ou simulação, etc.). Por exemplo, uma fonte
multicanal é reproduzida automaticamente em áudio multicanal.
7 Dolby Surround
Dolby Pro Logic II*
Dolby Pro Logic II tem um formato de reprodução de canais
múltiplos recém desenvolvido para decodificar todas as fontes de 2
canais — fonte estéreo e fonte codificada com Dolby Surround —
em um 5.1 canais.
Dolby Pro Logic II tem dois modos — Modo de filme e modo de
música:
• Pro Logic II Movie (MOVIE)
Adequado para reprodução de fontes codificadas com Dolby
Surround que levam a marca .
• Pro Logic II Music (MUSIC)
Adequado para reprodução de quaisquer fontes de música estéreo
de 2 canais.
Dolby Digital*
Usado para reproduzir trilhas sonoras de canais múltiplos de
softwares codificados com Dolby Digital ( ).
• Há outros formatos de codificação do som surround digital
introduzidos pela Dolby Laboratories, como o Dolby Digital EX.
7 DTS Digital Surround*
Usado para reproduzir trilhas sonoras de canais múltiplos de
softwares codificados com DTS Digital Surround ( ).
DTS Digital Surround (DTS) é um outro formato de áudio digital
multicanal discreto disponível em CDs e DVDs.
• Há outros formatos de codificação de som surround digital de
canais múltiplos introduzidos pela Digital Theater Systems, Inc.,
como o DTS-ES, DTS 96/24.
1
1
2
os surround disponíveis para cada sinal de entrada
As marcas √ mostram os modos surround disponíveis.
Sinal OFF AUTO SUR MOVIE*
Dolby D
(Multicanal)
Dolby D
(2 canais)
DTS Digital Surround
(Multicanal)
DTS Digital Surround
(2 canais)
Linear/Packed PCM
(Multicanal)
Analógico (VCR) ou
Linear/Packed PCM
(2 canais)
Modo
Surround
desativado
√√—— √ —————
√√√√————√√
√√——— √ —— — —
√√√√————√√
√√——— — √√ ——
√√√√————√√
Surround
automático
Dolby Surround
3
MUSIC*3DOLBY D DTS LPCM PPCM STADIUM*3ALL ST*
DTS Digital
Surround
Linear
PCM
Packed
PCM
DSP
3
*1Fabricado sob licença da Dolby Laboratories. “Dolby”, “Pro Logic”, “MLP Lossless” e o símbolo do duplo D são marcas comerciais da Dolby
Laboratories.
2
*
“DTS” e “DTS Digital Surround” são marcas comerciais da Digital Theater Systems, Inc.
3
*
Você pode selecionar esses modos pressionando SURROUND. (Consulte a página 24.)
23
Page 67

Operações avançadas
Consulte a página 23 para as localizações dos botões.
7 DSP
• STADIUM
O modo STADIUM adiciona claridade e expande o som, como em
um estádio ao ar livre.
• Estéreo em todos canais
O modo estéreo em todos canais (ALL ST) pode reproduzir um
campo sonoro estéreo mais amplo usando todas as caixas acústicas
conectadas (e ativadas).
O modo estéreo em todos canais pode ser usado durante a
reprodução de fontes estéreo de 2 canais.
Som estéreo normal Estéreo em todos canais
7 Indicadores no mostrador
Indicadores do formato do sinal digital
PPCM: Ilumina-se quando sinais Packed PCM são
recebidos de um DVD-AUDIO.
LPCM: Ilumina-se quando sinais Linear PCM são
recebidos.
GD: Ilumina-se quando sinais Dolby Digital são
recebidos.
C: Ilumina-se quando sinais DTS Digital
(Surround) são recebidos.
Nenhuma indicação: Nenhum indicador de sinal digital se ilumina
quando sinais analógicos são recebidos.
Indicador de modo Dolby Surround
GPLII: Ilumina-se quando o modo Dolby Pro Logic
II é ativado.
Indicador surround
SURR: Ilumina-se quando o modo surround é
ativado.
Indicadores do sinal da fonte, etc.
Iluminam-se para indicar os sinais recebidos.
a: Ilumina-se quando o sinal do canal
esquerdo é recebido.
b: Ilumina-se quando o sinal do canal central é recebido.
c: Ilumina-se quando o sinal do canal direito é recebido.
d: Ilumina-se quando o sinal do canal LFE é recebido.
g: Ilumina-se quando o sinal do canal surround esquerdo é
recebido.
i: Ilumina-se quando o sinal do canal surround direito é
recebido.
h: Ilumina-se quando um sinal de canal surround monofônico
ou Dolby Surround de 2 canais é recebido.
SW (Subwoofer): Ilumina-se sempre.
7 Quando reproduzir um software digital de canais múltiplos
(exceto enquanto OFF estiver selecionado)
O modo surround multicanal apropriado (Dolby Digital, DTS
Digital Surround ou Linear/Packed PCM) é selecionado
automaticamente.
7 Quando reproduzir uma fonte de 2 canais
Você pode selecionar Dolby Pro Logic II (MOVIE/MUSIC) ou o
modo DSP.
Pressione SURROUND repetidamente
para selecionar o modo desejado.
O modo surround é ativado e o modo surround atual aparece no
mostrador.
Cada vez que você pressiona o botão, o modo surround muda.
Para maiores detalhes sobre cada modo, consulte “Modos surround
disponíveis para cada sinal de entrada”. (Consulte a página 23.)
Para desativar o modo surround
Pressione SURROUND repetidamente até
que “OFF” apareça no mostrador.
Armazenamento dos ajustes — memória automática
Ao desligar o sistema, o mesmo memoriza o modo surround atual.
O modo memorizado será chamado automaticamente quando você
ligar o sistema de novo.
NOTA
• Para um disco DVD-AUDIO com mistura proibida, o sistema
continua a emitir os sinais de canais múltiplos com “MULTI CH”
mostrado no visor, mesmo que o modo surround seja desativado
durante a reprodução. Por outro lado, o sistema só emitirá os sinais
dos canais frontais esquerdo e direito com “LR ONLY” exibido no
mostrador se você iniciar a reprodução com o modo surround
definido para “OFF” ou “H. PHONE”.
• Para ASF, MPEG-2, MPEG-1 e DivX (exceto DivX versão 6), o modo
surround não tem efeito.
Uso da barra na tela
Você pode verificar a informação do disco, bem como utilizar
algumas funções com a barra na tela.
Exibição da barra na tela
7 Sempre que um disco é colocado
Pressione ON SCREEN.
Cada vez que você pressiona o botão, a barra na
tela muda como segue na tela do televisor.
Exemplo: Durante a reprodução de DVD-VIDEO
Um canal com “ ” indica que as caixas acústicas correspondentes
estão reproduzindo o som de tal canal.
Se o som de um canal decodificado com 5.1 canais for reproduzido,
somente “ ” se iluminará.
Seleção do modo surround
O sistema é configurado para selecionar automaticamente o modo
surround ótimo para o sinal de entrada desde o software multicanal.
Ao reproduzir uma fonte de 2 canais, você pode selecionar o modo
surround desejado manualmente.
IMPORTANTE
Antes de utilizar o controle remoto para a seguinte
operação;
• Ajuste o seletor do modo do controle remoto para
AUDIO.
(A barra na tela desaparece.)
OFF
(de volta ao começo)
• O item selecionado atualmente aparece em verde.
24
Page 68

Operações avançadas
Consulte a página 23 para as localizações dos botões.
7 Conteúdo da barra na tela durante a reprodução
DVD-VIDEO
DVD-AUDIO
VCD
SVCD
CD
Disco DVD VR
ASF/MPEG-2/MPEG-1/DivX
7 Exibe o estado de reprodução.
: aparece durante a reprodução.
/ : aparece durante o avanço/retrocesso rápido.
/ : aparece durante a reprodução em câmera lenta
progressiva/câmera lenta regressiva.
: aparece no modo de pausa.
: aparece no modo de parada.
8 Selecione isto para mudar a informação do tempo (F). Veja
“Mudança da informação do tempo” abaixo.
9 Selecione isto para reprodução repetida. (Consulte a página 32.)
0 Selecione isto para busca de tempo. (Consulte a página 27.)
K Para DVD-VIDEO e DVD VR: Selecione isto para a função de
busca de capítulo. (Consulte a página 26.)
Para DVD-AUDIO: Selecione isto para a função de busca de
faixa. (Consulte a página 26.)
L Selecione isto para mudar o idioma ou canal de áudio (Consulte
a página 29.)
M Selecione isto para mudar o idioma da legenda e imagem
secundária. (Consulte a página 28.)
N Selecione isto para mudar o ângulo de visão. (Consulte a página
28.)
O Selecione isto para mudar a página. (Consulte a página 30.)
P Exibe o estado do modo de reprodução.
PROGRAM: aparece durante a reprodução programada.
(Consulte a página 31.)
RANDOM: aparece durante a reprodução aleatória. (Consulte a
página 32.)
Q Exibe o estado do modo de repetição. (Consulte a página 32.)
Mudança da informação do tempo
Você pode mudar a informação do tempo na barra
na tela do televisor e no mostrador do componente
central.
7 Durante a reprodução
1 Pressione ON SCREEN duas vezes.
A barra na tela aparece na tela do televisor.
2 Pressione o cursor 3/2 para realçar
.
3 Pressione ENTER repetidamente para
selecionar a informação desejada.
1 Exibe o tipo do disco.
2 Mostra a informação de áudio.
3 Mostra o número do disco.
4 Para DVD-VIDEO: Mostra o número do título atual.
Para DVD-AUDIO: Mostra o número do grupo atual.
Para DVD VR: Mostra o modo de reprodução atual (PG: para
programa original, PL: para lista de reprodução) e o número do
título.
5 Para DVD-VIDEO e DVD VR: Mostra o número do capítulo
atual.
Para outros tipos de disco: Mostra o número da faixa atual.
6 Exibe a informação do tempo. Consulte “Mudança da
informação do tempo” na coluna direita.
25
Exemplo: Quando o tempo decorrido de reprodução do disco é
selecionado.
7 DVD-VIDEO/DVD-AUDIO/DVD VR
• TIME: Tempo decorrido de reprodução do capítulo/faixa atual
• REM: Tempo restante da capítulo/faixa atual
• TOTAL: Tempo decorrido de Título/Grupo/Programa
• T. REM: Tempo restante do Título/Grupo/Programa
7 VCD/SVCD/CD
• TIME: Tempo decorrido de reprodução da faixa atual
• REM: Tempo restante da faixa atual
• TOTAL: Tempo decorrido do disco
• T. REM: Tempo restante do disco
4 Pressione ON SCREEN.
A barra na tela desaparece.
NOTA
• Ao reproduzir um disco DVD VR, “TIME” e “REM” não podem ser
mostrados.
Page 69

Operações avançadas
Consulte a página 23 para as localizações dos botões.
Reprodução a partir de uma
posição especificada em um disco
Você pode iniciar a reprodução de um título, capítulo ou faixa
especificado(a). Você também pode reproduzir um disco a partir de
um tempo especificado.
Localização de uma cena desejada a partir do
menu de DVD
Geralmente os DVD-VIDEOs e DVD-AUDIOs têm
seus próprios menus que mostram o conteúdo do disco,
e você pode exibi-los na tela do televisor. Você pode
localizar uma cena desejada utilizando esses menus.
7 Sempre que um DVD-VIDEO ou DVD-AUDIO é carregado
1 Pressione TOP MENU/PG ou MENU/PL.
O menu aparece na tela do televisor.
Normalmente, um DVD-VIDEO ou DVD-AUDIO que contenha
mais de um título terá um menu “principal” com uma lista dos
títulos. Pressione
Alguns discos também podem ter um menu diferente que pode ser
exibido mediante a pressão de
Consulte as instruções para cada disco com respeito ao seu menu
particular.
TOP MENU/PG
MENU/PL
para exibir o menu dos títulos.
.
2 Utilize o cursor 3/2/Y/5 para
selecionar o item desejado.
3 Pressione ENTER.
• Com alguns discos, você também pode selecionar itens
introduzindo o número correspondente com os botões numéricos.
NOTA
• Este função pode não funcionar com alguns discos.
Localização de uma cena desejada usando um
menu de VCD/SVCD com PBC
Um VCD ou SVCD gravado com PBC tem seus próprios
menus, tal como uma lista das canções contidas. Você pode
localizar uma cena especificada utilizando esses menus.
7 Durante a reprodução com função PBC
1
Pressione RETURN repetidamente até
que o menu apareça na tela do televisor.
2 Pressione os botões numéricos (1-10,
h 10) para selecionar o número do
item desejado.
• Para maiores detalhes sobre o uso dos botões numéricos, consulte
“Como utilizar os botões numéricos”. (Consulte a página 21.)
Para voltar ao menu
Pressione RETURN repetidamente até que a tela do menu apareça.
Quando “NEXT” ou “PREVIOUS” estiver exibido na tela do
televisor:
• Para ir à próxima página, pressione x.
• Para voltar à página anterior, pressione 4.
NOTA
• Se quiser reproduzir um VCD/SVCD compatível com PBC sem utilizar a
função PBC, realize qualquer uma das seguintes operações:
– Inicie a reprodução pressionando os botões numéricos no modo de parada.
– Pressione x repetidamente até que o número da faixa desejado seja
exibido e, em seguida, inicie a reprodução pressionando
reprodução). O número da faixa aparece no mostrador no lugar de “PBC”.
• Para ativar a função PBC ao reproduzir um VCD/SVCD compatível com PBC
sem utilizar a função PBC, realize qualquer uma das seguintes operações:
– Pressione
– Pressione
pressione
TOP MENU/PG
7
duas vezes para parar a reprodução e, em seguida,
3
(botão de reprodução).
ou
MENU/PL
.
3
(botão de
Localização de um capítulo/faixa usando a barra
na tela
7 Durante a reprodução
1 Pressione ON SCREEN duas
vezes.
A barra na tela aparece na tela do televisor.
2 Pressione o cursor 3/2 para realçar
/.
3 Pressione ENTER.
Exemplo: Durante a reprodução de DVD-VIDEO
4 Pressione os botões numéricos (0-9)
para introduzir o número capítulo
desejado.
Exemplo:
Para selecionar 8: Pressione 8.
Para selecionar 10: Pressione 1 e, em seguida, 0.
Para selecionar 20: Pressione 2 e, em seguida, 0.
Para selecionar 37: Pressione 3 e, em seguida, 7.
Para corrigir uma entrada errada
Repita o passo 4.
5 Pressione ENTER.
6 Pressione ON SCREEN.
A barra na tela desaparece.
NOTA
• Você pode selecionar até o 99º capítulo/faixa.
26
Page 70

1
Operações avançadas
Consulte a página 23 para as localizações dos botões.
Localização de uma posição desejada
especificando o tempo
7 Para DVD-VIDEO/DVD-AUDIO/DVD VR:
Durante a reprodução
7 Para VCD/SVCD: No modo de parada ou
durante a reprodução sem função PBC
7 Para CD: Durante a reprodução ou modo de parada
7 Qu ando especificar o tempo decorrido de reprodução desde o
começo do disco
Realize o seguinte procedimento no modo de parada.
7 Qu ando especificar o tempo decorrido de reprodução desde o
começo do título/faixa atual
Realize o seguinte procedimento durante a reprodução.
1 Pressione ON SCREEN duas vezes.
A barra na tela aparece na tela do televisor.
2 Pressione o cursor 3/2 para realçar
.
3 Pressione ENTER.
Uso da exibição de controle de
arquivo
Você pode buscar e reproduzir os grupos e faixas/
arquivos desejados utilizando a exibição de
controle de arquivo na tela do televisor.
Exemplo: Quando a fonte é DVD.
Número do grupo atual/
número total de grupos
Informação de faixa (apenas
2
*
para MP3/WMA)
Modo de reprodução*
RANDOM, REPEAT)
Tempo decorrido de reprodução
da faixa atual (exceto para JPEG)
(PROGRAM,
4 Utilize os botões numéricos (0-9) para
introduzir o tempo.
Exemplo: Para reproduzir desde um ponto de 2 (horas): 34
(minutos): 08 (segundos)
Pressione 2 Pressione 3
Pressione 4
Pressione 8
Para cancelar uma entrada errada
Pressione o cursor 2 repetidamente.
Pressione 0
5 Pressione ENTER.
6 Pressione ON SCREEN.
A barra na tela desaparece.
Grupo atual
Número da faixa (arquivo) atual /
número total de faixas (arquivo) no
1
*
(Para JPEG/ASF/MPEG-2/MPEG-1/DivX) O modo de
reprodução programada e reprodução aleatória não estão
disponíveis.
2
*
Quando a fonte é USB MEMORY, “USB” aparece.
A exibição de controle de arquivo aparece automaticamente durante
a reprodução (MP3/WMA) ou modo de parada.
7 Para MP3/WMA: Durante a reprodução ou modo de parada
7 Para JPEG/ASF/MPEG-2/MPEG-1/DivX: Modo de parada
grupo atual
Faixa (arquivo) atual
Número total de faixas
(arquivos) no disco
Estado de reprodução
1 Pressione o cursor 3/2/Y/5 para
selecionar o grupo/faixa/arquivo
desejado(a).
2 Pressione 3 (botão de reprodução) ou
ENTER.
• A reprodução da faixa/show de slides começa a partir da
faixa/arquivo selecionada(o).
•Ao pressionar ENTER para JPEG, apenas o arquivo
selecionado será reproduzido.
NOTA
• (Para MP3/WMA) Durante a reprodução, você pode alterar a faixa/
arquivo de reprodução pressionando x/4 ou o cursor 5/Y.
• Você também verificar a informação de reprodução no mostrador.
(Consulte a página 19.)
• Alguns nomes de grupo, faixa e arquivo podem não ser exibidos
corretamente dependendo das condições de gravação.
• A ordem dos grupos, faixas e arquivos pode ser exibida de maneira
diferente da ordem exibida no seu computador pessoal.
27
Page 71

Operações avançadas
Consulte a página 23 para as localizações dos botões.
Reprodução continuada
Quando a reprodução continuada estiver definida
para “ON” (consulte a página 36) e você parar a
reprodução através das seguintes operações, a
reprodução será restaurada onde foi parada. (O
indicador RESUME se ilumina no mostrador.)
• Maneira de desligar o sistema (Consulte a
página 15.)
• Pressionando 7 uma vez
• Mudando a fonte (Consulte a página 16.)
Para iniciar a reprodução desde a posição armazenada
Pressione 3 (botão de reprodução) ou o botão da fonte
correspondente (DVD ou USB MEMORY).
• Podem haver casos em que 3 (botão de reprodução) não
funcione após a mudança da fonte. Neste caso, selecione DVD ou
USB MEMORY como uma fonte.
• Pressionar DISC (1-5) (com SHIFT pressionado) no controle
remoto ou DISC (1-5) 3 no componente central também
continua a reprodução do disco.
Para limpar a posição armazenada
Pressione 7 de novo.
• Abrir a bandeja de disco com o disco de reprodução ou
desconectar o dispositivo de classe de armazenamento massivo
USB também limpa a posição armazenada.
NOTA
• (Para DivX) O começo de uma cena onde a reprodução foi parada
pode ser armazenado.
Seleção de um ângulo de visão
7 Durante a reprodução de um disco com vários
ângulos de visão
Quando utilizar o botão ANGLE:
1 Pressione ANGLE com SHIFT
pressionado.
Exemplo: O primeiro ângulo de visão é selecionado dentre 3
ângulos de visão gravados.
NOTA
• Durante a reprodução de DVD-AUDIO, esta função funciona
somente para a parte de vídeo.
Seleção da legenda
7 Durante a reprodução de um disco/arquivo com
legendas em vários idiomas
Quando utilizar o botão SUBTITLE:
1 Pressione SUBTITLE.
Exemplo (DVD-VIDEO): “ENGLISH” é selecionado dentre 3
idiomas de legenda gravados.
2 Pressione o cursor Y/5 para
selecionar a legenda desejada.
Para DVD VR
•Pressionar SUBTITLE muda as legendas (imagens
secundárias) independentemente se houver ou não legendas
gravadas. (As imagens secundárias não mudarão se não
houver imagens secundárias gravadas.)
Para SVCD
• Um SVCD pode conter até quatro legendas. Pressionar
SUBTITLE muda a legenda independentemente se houver ou
não legendas gravadas. (A legenda não mudará se não houver
legendas gravadas.)
Quando utilizar a barra na tela:
1 Pressione ON SCREEN duas vezes.
A barra na tela aparece na tela do televisor.
2 Pressione o cursor 3/2 para realçar
.
3 Pressione ENTER.
2 Pressione ANGLE repetidamente com
SHIFT pressionado, ou pressione o
cursor Y/5 para selecionar o ângulo
de visão desejado.
Quando utilizar a barra na tela:
1 Pressione ON SCREEN duas vezes.
A barra na tela aparece na tela do televisor.
2 Pressione o cursor 3/2 para realçar
.
3 Pressione ENTER.
4 Pressione o cursor Y/5 para
selecionar o ângulo de visão desejado.
5 Pressione ENTER.
6 Pressione ON SCREEN.
A barra na tela desaparece.
4 Pressione o cursor Y/5
repetidamente para selecionar a
legenda desejada.
5 Pressione ENTER.
6 Pressione ON SCREEN.
A barra na tela desaparece.
NOTA
• Para limpar a legenda, pressione SUBTITLE. Cada vez que você
pressiona SUBTITLE, a legenda aparece e desaparece alternadamente.
• Alguns idiomas de legenda ou áudio aparecem abreviados na janela
instantânea. Consulte “Lista dos códigos de idioma”. (Consulte a
página 34.)
• Durante a reprodução de DVD-AUDIO, esta função funciona
somente para a parte de vídeo.
• Para DivX, não é possível realizar este procedimento utilizando a
barra na tela.
28
Page 72

Operações avançadas
Consulte a página 23 para as localizações dos botões.
Seleção do áudio Reprodução de imagem
7 Durante a reprodução de um disco/arquivo com
áudio em vários idiomas
Quando utilizar o botão AUDIO:
1 Pressione AUDIO.
Exemplo (DVD-VIDEO): “ENGLISH” é selecionado dentre 3
idiomas de áudio gravados.
especial
Reprodução de quadro a quadro
7 Durante a reprodução
Pressione 8 repetidamente.
Cada vez que você pressiona o botão, a
imagem fixa avança em um quadro.
Para voltar à reprodução normal
Pressione 3 (botão de reprodução).
2 Pressione AUDIO repetidamente ou o
cursor Y/5 para selecionar o áudio
desejado.
Quando utilizar a barra na tela:
1 Pressione ON SCREEN duas vezes.
A barra na tela aparece na tela do televisor.
2 Pressione o cursor 3/2 para realçar
.
3 Pressione ENTER.
4 Pressione o cursor Y/5 para
selecionar o áudio desejado.
5 Pressione ENTER.
6 Pressione ON SCREEN.
A barra na tela desaparece.
NOTA
• Alguns idiomas de legenda ou áudio aparecem abreviados na janela
instantânea. Consulte “Lista dos códigos de idioma”. (Consulte a
página 34.)
• O indicador “ST”, “L” ou “R” é exibido ao reproduzir um VCD,
representando respectivamente “estéreo”, “som esquerdo” e “som
direito”.
Ao reproduzir um SVCD, “ST1”, “ST2”, “L1”, “R1”, “L2” ou “R2” é
exibido.
• Para DivX, não é possível realizar este procedimento utilizando a
barra na tela.
Reprodução em câmera lenta
7 Durante a reprodução
1 Pressione 8 no ponto onde
deseja iniciar a reprodução
em câmera lenta.
O sistema pausa a reprodução.
2 Pressione SLOW 9.
A reprodução em câmera lenta progressiva começa.
Apenas para DVD-VIDEO/DVD-AUDIO:
• Para reproduzir em câmera lenta regressiva, pressione
SLOW (.
Cada vez que você pressionar o botão, a velocidade de
reprodução aumentará (1/32, 1/16, 1/8, 1/4, 1/2).
Exemplo: No televisor
Para voltar à reprodução normal
Pressione 3 (botão de reprodução).
NOTA
• O som não pode ser ouvido durante a reprodução em câmera lenta.
• Durante a reprodução de DVD-AUDIO, esta função funciona
somente para a parte de vídeo.
29
Page 73

Operações avançadas
Consulte a página 23 para as localizações dos botões.
Seleção de imagens fixas navegáveis em um
DVD-AUDIO
A maioria dos DVD-AUDIOs incluem imagens fixas
navegáveis (B.S.P.), que usualmente aparecem uma após
outra automaticamente durante a reprodução de acordo
com uma seqüência de reprodução. Você pode mudar a imagem
(virar a página) manualmente quando o grupo/faixa atual tiver
imagens selecionáveis (páginas).
7 Durante a reprodução e com o indicador B.S.P. iluminado no
mostrador
Quando utilizar o botão PAGE:
Pressione PAGE repetidamente para
selecionar a imagem fixa desejada.
Quando utilizar a barra na tela:
1 Pressione ON SCREEN duas vezes.
A barra na tela aparece na tela do televisor.
2 Pressione o cursor 3/2 para realçar
.
3 Pressione ENTER.
4 Pressione o cursor 5/Y para
selecionar a imagem fixa desejada.
5 Pressione ENTER.
6 Pressione ON SCREEN.
A barra na tela desaparece.
Zoom
7 Durante a reprodução ou modo de pausa
1 Pressione ZOOM com SHIFT
pressionado.
Cada vez que você pressiona ZOOM com
SHIFT pressionado, a amplificação da cena
muda.
2 Durante o zoom, pressione o cursor 3/
2/Y/5 para mover a área do zoom.
Para voltar à reprodução normal
Pressione ZOOM repetidamente, com SHIFT pressionado para
selecionar ZOOM OFF.
NOTA
• O número dos passos de amplificação varia dependendo do tipo do
disco.
• Durante a reprodução de show de slides de JPEG, o zoom não
funciona. Neste caso, pressione 8 para pausar a reprodução de show
de slides e, em seguida, aplique o zoom.
• Durante a reprodução de DVD-AUDIO, esta função funciona
somente para a parte de vídeo.
• Durante a reprodução, pode haver casos em que o cursor (3/2/Y/
5) não funcione no passo 2 acima.
Mudança da definição VFP
A função VFP (Vídeo Fine Processor) permite-lhe
ajustar a característica da imagem de acordo com o
tipo de programação, tonalidade da imagem ou
preferências pessoais.
7 Durante a reprodução
1 Pressione VFP.
As definições VFP atuais aparecem na tela do televisor.
Exemplo:
2 Pressione o cursor 3/2
repetidamente para selecionar o modo
VFP.
• NORMAL: Normalmente, selecione isto.
• CINEMA: Adequado para filmes.
Quando selecionar “NORMAL” ou “CINEMA”, pressione VFP
para completar a definição.
• USER 1 e USER 2: Você pode ajustar os parâmetros que
afetam a aparência da imagem.
Apenas quando selecionar “USER 1” ou “USER 2” no passo 2,
continue para realizar a seguinte operação;
3 Pressione o cursor Y/5
repetidamente para selecionar o
parâmetro que deseja ajustar.
Ajuste gradualmente e confira os resultados da aparência da
imagem.
• GAMMA: Controla o brilho de tons neutros enquanto
mantém o brilho de porções escuras e brilhantes (–3 a +3).
• BRIGHTNESS: Controla o brilho da tela (–8 a +8).
• CONTRAST: Controla o contraste da tela (–7 a +7).
• SATURATION: Controla a profundidade das cores na tela
(–7 a +7).
• TINT: Controla o tom da tela (–7 a +7).
• SHARPNESS: Controla a nitidez da tela (–8 a +8).
4 Pressione ENTER.
Exemplo:
5 Pressione o cursor Y/5 para mudar a
definição.
6 Pressione ENTER.
As definições VFP atuais aparecem de novo.
7 Repita os passos de 3 a 6 para ajustar
outros parâmetros.
8 Pressione VFP.
NOTA
• Embora a exibição de definição desapareça no meio do
procedimento, a definição até esse ponto será armazenada.
30
Page 74

Operações avançadas
Reprodução programada
7 Modo de parada
1 Pressione PLAY MODE
repetidamente até que a
janela de programa apareça na tela do
televisor.
O indicador PRG se ilumina no mostrador.
2 Siga as instruções que aparecem na
tela do televisor para programar os
capítulos/faixas desejados(as).
• Para maiores detalhes sobre o uso dos botões numéricos,
consulte “Como utilizar os botões numéricos”. (Consulte a
página 21.)
• O número do conteúdo que você deve especificar para a
programação varia dependendo do tipo do disco/arquivo:
– DVD-VIDEO: Títulos e capítulos
– VCD, SVCD, CD: Faixas
– DVD-AUDIO, MP3, WMA: Grupos e faixas
• Antes de programar as faixas no grupo de bônus em um
DVD-AUDIO, realize o procedimento descrito em
“Reprodução de um grupo de bônus” (consulte a página 22)
para apagar o indicador BONUS no mostrador.
• Você pode especificar capítulos/faixas cujo número seja de
até 99.
• Podem haver casos em que o número de grupo ou de título
pode ser introduzido mesmo para discos que não contêm
grupos ou títulos. Neste caso, pressione ENTER para
prosseguir à coluna Track/Chapter.
• Ao pressionar ENTER em vez dos botões numéricos na coluna
Track/Chapter, “ALL” aparece e todas as faixas ou capítulos
no grupo ou título selecionado são programados como um
passo.
Para apagar os passos programados um por um a partir
do último número introduzido
Pressione CANCEL repetidamente.
Para apagar todo o programa
Mantenha CANCEL pressionado.
Você também pode apagar o programa desligando o sistema.
Consulte a página 23 para as localizações dos botões.
3 Pressione 3 (botão de reprodução).
Quando todas as faixas/arquivos programados(as) forem
reproduzidas, a reprodução pára e a janela de programa
aparece novamente. Repare que a definição de programa
permanece.
Para verificar o conteúdo programado
Durante a reprodução, pressione 7. A reprodução pára e a janela de
programa aparece.
Para sair do modo de programa
No modo de parada, pressione PLAY MODE repetidamente até que a
janela de programa e desapareçam da tela do televisor.
NOTA
• Quando a fonte for USB MEMORY, a reprodução programada não
funcionará.
• Pode haver casos em que o grupo de bônus em um DVD-AUDIO não
possa ser reproduzido.
• A função de continuação não pode ser usada com a reprodução
programada.
• DISC (1-5) no controle remoto e DISC (1-5) 3 no componente central
não funcionam durante a reprodução programada.
• A reprodução programa não funciona com alguns discos.
31
Page 75

Operações avançadas
Consulte a página 23 para as localizações dos botões.
Reprodução aleatória
Você p ode reproduz ir títulos ou faixas de um disco
em uma ordem aleatória.
7 Modo de parada
1 Pressione PLAY MODE repetidamente
até que apareça na tela do
televisor.
O indicador RND se ilumina no mostrador.
2 Pressione 3 (botão de reprodução).
• Quando houver mais de um disco carregado, o sistema inicia
a reprodução aleatória do próximo disco depois de finalizar a
reprodução do disco atual.
Para sair do modo de reprodução aleatória
No modo de parada, pressione PLAY MODE repetidamente até que a
janela de programa e desapareçam da tela do televisor.
Você também pode cancelar o modo de reprodução aleatória
desligando o sistema.
NOTA
• Quando a fonte for USB MEMORY, a reprodução aleatória não
funciona.
• O mesmo título/faixa não será reproduzido(a) mais de uma vez
durante a reprodução aleatória.
Reprodução repetida
Repetição da seleção atual ou de todos os discos
Mostrador Tela do televisor Significados
Repete o grupo atual para
DVD-AUDIO/MP3/WMA/
JPEG/ASF/MPEG-2/MPEG-1/
DivX.
Repete o título atual para
DVD-VIDEO.
(Para DVD VR) Repete o título
atual para o programa original.
(Para DVD VR) Repete a lista
de reprodução atual para a lista
de reprodução.
Repete todos os títulos e faixas
no disco atual para DVD VR/
VCD/SVCD/CD/MP3/WMA/
JPEG/ASF/MPEG-2/MPEG-1/
DivX.
Repete todos os discos/
arquivos disponíveis.
AUDIO/VCD/SVCD/CD/
MP3/WMA/ASF/MPEG-2/
MPEG-1/DivX.
Repete o capítulo atual para
DVD-VIDEO/DVD VR.
O modo de repetição é
desativado.
O sistema reproduz o disco/
arquivo normalmente.
DISC
ALL
1
Nenhuma
indicação
REPEAT GROUP
REPEAT DISC
REPEAT ALL
, Repete a faixa atual para DVD-
REPEAT TRACK,
REPEAT STEP
,
7 Para DVD-VIDEO/DVD VR: Durante a
reprodução
7 Para VCD/SVCD: Durante a reprodução sem
função PBC ou parada
7 Para DVD-AUDIO/CD/MP3/JPEG/ASF/
MPEG-2/MPEG-1/DivX: Durante a reprodução
ou modo de parada
Quando utilizar o botão REPEAT:
Pressione REPEAT.
Indicador do modo de repetição
Cada vez que você pressiona REPEAT, o modo de repetição muda.
NOTA
• Quando DVD-VIDEO ou DVD-AUDIO estiver carregado no
sistema, a reprodução do disco seguinte ao DVD-VIDEO ou DVDAUDIO não começará, embora apareça /REPEAT ALL na
tela do televisor ou ALL no mostrador.
• Para DVD-VIDEO e DVD-AUDIO, REPEAT ALL e REPEAT DISC
pode não funcionar dependendo do disco.
Quando utilizar a barra na tela (exceto para MP3/WMA/JPEG/
ASF/MPEG-2/MPEG-1/DivX):
1 Pressione ON SCREEN duas vezes.
A barra na tela aparece na tela do televisor.
2 Pressione o cursor 3/2 para realçar
.
3 Pressione ENTER.
4 Pressione o cursor Y/5
repetidamente para selecionar o modo
de repetição.
5 Pressione ENTER.
6 Pressione ON SCREEN.
A barra na tela desaparece.
Para cancelar a reprodução repetida
Selecione “OFF” no passo 4.
32
Page 76

Operações avançadas
Consulte a página 23 para as localizações dos botões.
Repetição de uma parte desejada [Repetição A-B]
Você pode realizar a reprodução repetida de uma
porção desejada especificando o começo (ponto
A) e o fim (ponto B).
7 Durante a reprodução
1 Pressione ON SCREEN duas vezes.
A barra na tela aparece na tela do televisor.
2 Pressione o cursor 3/2 para realçar
.
3 Pressione ENTER.
4 Pressione o cursor Y/5
repetidamente para selecionar “A-B”.
5 Pressione ENTER no começo da parte
que deseja repetir (ponto A).
O indicador do modo de repetição “ ” aparece no
mostrador.
6 Pressione ENTER no fim da parte que
deseja repetir (ponto B).
O indicador do modo de repetição no mostrador muda para
“ ” e a reprodução repetida A-B começa.
7 Pressione ON SCREEN.
A barra na tela desaparece.
Para cancelar
Selecione “OFF” no passo 4 e, em seguida, pressione ENTER.
NOTA
• Quando reproduzir um DVD-VIDEO/DVD VR, a reprodução
repetida A-B só é possível dentro do mesmo título.
• “A-B” não pode ser selecionado durante a reprodução programada ou
aleatória.
• “A-B”não pode ser selecionado durante a reprodução com a função
PBC.
Bloqueio da bandeja
Você pode bloquear a bandeja e proibir a ejeção indesejada do
disco.
APENAS no componente central:
7 Com o sistema desligado
Mantenha pressionado
• “LOCKED” aparece no mostrador.
• Se você tentar ejetar o disco, “LOCKED” aparecerá para indicar
que a bandeja está bloqueada.
Para cancelar
Realize a mesma operação de novo.
• “UNLOCKED” aparece no mostrador.
Definição do balanço do som
IMPORTANTE
Antes de utilizar o controle remoto para a seguinte
operação:
• Ajuste o seletor do modo do controle remoto para
AUDIO.
NOTA
• Antes de iniciar a operação; Há um limite de tempo para realizar os
seguintes passos. Se a definição for cancelada antes que a finalize,
comece de novo a partir do passo 1.
1 Pressione SETTING.
2 Pressione o cursor 3/2 para fazer um
ajuste ou seleção.
Você pode ajustar o balanço do som entre “R (direita) –21”
e “L (esquerda) –21”. Para ajustar o balanço para normal,
selecione “CNTR (centro)”.
33
A exibição de ajuste desaparece automaticamente após alguns
segundos.
Page 77

Definição das preferências de DVD
Uso dos menus de configuração
• Você pode mudar o idioma usado nos menus de configuração.
Veja “Descrição dos menus” abaixo.
Operações básicas nos menus de configuração
IMPORTANTE
Antes de utilizar o controle remoto para a
seguinte operação;
1 Ajuste o seletor do modo do controle
remoto para AUDIO.
2 Pressione DVD ou USB MEMORY.
Cursor
(3/2/Y/5)/
ENTER
7 Modo de parada
1 Pressione SET UP.
2 Siga as instruções que aparecem na
tela do televisor.
Descrição dos menus
: Menu de idioma (LANGUAGE)
7 MENU LANGUAGE
Alguns DVDs têm seus próprios menus em vários idiomas.
• Selecione o idioma inicial*.
7 AUDIO LANGUAGE
Alguns DVDs têm vários idiomas de áudio.
• Selecione o idioma de áudio inicial*.
NOTA
• Consulte a seguinte “Lista dos códigos de idioma” para o código de
cada idioma, como “AA”, etc.
Lista dos códigos de idioma
AA Afar IK Inupiak RN Kirundi
AB Abkhazian IN Indonésio RO Romeno
AF Línguas africanas IS Islandês RW Kinyarwanda
AM Amárico IW Hebraico SA Sânscrito
AR Árabe JI Yiddish SD Sindhi
AS Assamese JW Javanês SG Sangho
AY Aym ar á KA Ge or gi ano S H Se rv o- cr oat a
AZ Azerbaidjiano KK Cazaque SI Sinhala
BA Bashkir KL Groenlandês SK Eslovaco
BE Bielorrusso KM Cambojano SL Esloveno
BG Búlgaro KN Kannada SM Samoano
BH Bihari KO Coreano (KOR) SN Chishona
BI Bislama KS Kashmiri SO Somali
BN Bengali, Bangla KU Curdo SQ Albanês
BO Tibetano KY Quirguiz SR Servo
BR Bretão LA Latim SS Sisuati
CA Catalão LN Lingala ST Sesoto
CO C órsego LO Lao SU Sudanês
CS Tcheco LT Lituano SV Sueco
CY Welsh LV Látvio SW Suahili
DA Dinamarquês MG Malgaxe TA Tâmil
DZ Dzongká MI Maori TE Telugu
EL Grego MK Macedônio TG Tajik
EO Esperanto ML Malayolan TH Tailandês
ET Estoniano MN Mongol TI Tigrinia
EU Basco MO Moldavo TK Turcomano
FA Persa MR Marati TL Tagalog
FI Finlandês MS Malay (MAY) TN Setswana
FJ Fijiano MT Maltês TO Tonganês
FO Faroese MY Birmanês TR Turco
FY Frisiano NA Nauru TS Tsonga
GA Irlandês NE Nepali TT Tatar
GD Gaélico escocês NL Holandês TW Twi
GL Galego NO Norueguês UK Ucraniano
GN Guarani OC Occitan UR Urdu
GU Gujarati OM (Afan) Oromo UZ Uzbeque
HA Hausa OR Oriya VI Vietnamita
HI Hindi PA Panjabi VO Volapuk
HR Croata PL Polonês WO Uolof
HU Húngaro PS Pashtu XH Xhosa
HY Armênio PT Português YO Yoruba
IA Interlíngua QU Quéchua ZU Zulu
IE Interlíngue RM Romanche
7 SUBTITLE
Alguns DVDs têm vários idiomas de legenda.
• Selecione o idioma de legenda inicial*.
7 ON SCREEN LANGUAGE
Selecione o idioma que é exibido na tela do televisor ao operar este
sistema.
* Se o idioma selecionado não estiver gravado em um disco, o
idioma original será usado automaticamente como o idioma
inicial.
34
Page 78

Definição das preferências de DVD
: Menu de imagem (PICTURE)
7 MONITOR TYPE
Você pode selecionar o tipo do monitor de acordo com seu televisor
ao reproduzir DVDs gravados com a razão de altura/largura da
imagem de 16:9.
• 16:9/16:9 MULTI (Conversão de televisão ampla)
Selecione isto quando a razão de aspecto do seu televisor for 16:9
(televisor amplo).
Ao reproduzir DVDs gravados com uma razão de altura/largura
da imagem de 4:3, o sistema ajusta a razão do sinal de saída
automaticamente.
• 4:3 LB/4:3 MULTI LB (Conversão de caixa de letra)
Selecione isto quando a razão de aspecto do seu televisor for 4:3
(televisor convencional). Ao assistir uma imagem de tela ampla,
aparecem barras pretas nas partes superior e inferior da tela.
• 4:3 PS/4:3 MULTI PS (Conversão de exploração panorâmica)
Selecione isto quando a razão de aspecto do seu televisor for 4:3
(televisor convencional). Ao assistir uma imagem de tela ampla,
as barras pretas não aparecem; no entanto, as bordas esquerda e
direita das imagens não serão exibidas na tela.
Ex.: 16:9 Ex.: 4:3 LB Ex.: 4:3 PS
NOTA
• Mesmo que “4:3 PS” ou “4:3 MULTI PS” esteja selecionado, o
tamanho da tela torna-se “4:3 LB” ou “4:3 MULTI LB” com alguns
DVDs. Isso depende de como os DVDs foram gravados.
• Ao selecionar as opções “MULTI” como o tipo de monitor para um
televisor de sistema multicor, o sistema gera sinais de vídeo PAL ou
NTSC de acordo com o disco/arquivo, independentemente da
definição do modo de exploração (consulte a página 17).
7 PICTURE SOURCE
Ao definir o modo de exploração para o modo progressivo
(consulte a página 17), você pode obter uma qualidade ótima da
imagem selecionando se o conteúdo do disco/arquivo é processado
por quadro (fonte de filme) ou por campo (fonte de vídeo).
Normalmente, ajuste para “AUTO”.
•AUTO
Usado para reproduzir um disco/arquivo com materiais de fonte
de vídeo e de filme.
Este sistema reconhece o tipo da fonte (vídeo ou filme) do disco/
arquivo atual de acordo com a informação do disco/arquivo.
Se a imagem de reprodução estiver borrada ou com ruídos, ou se
as linhas oblíquas da imagem estiverem irregulares, tente mudar
para outros modos.
•FILM
Adequado para reproduzir um disco/arquivo com fonte de filme.
•VIDEO
Adequado para reproduzir um disco/arquivo com fonte de vídeo.
7 SCREEN SAVER (Consulte a página 20.)
Você pode ativar ou desativar a função do protetor de tela.
7 FILE TYPE
Quando vários tipos de arquivos estiverem gravados em um disco/
arquivo, você pode selecionar os arquivos que deseja reproduzir.
•AUDIO
Selecione isto para reproduzir arquivos MP3/WMA.
• STILL PICTURE
Selecione isto para reproduzir arquivos JPEG.
•VIDEO
Selecione isto para reproduzir arquivos ASF/MPEG-2/MPEG-1/
DivX.
: Menu de áudio (AUDIO)
7 D. RANGE COMPRESSION
(Compressão da gama dinâmica)
Você pode desfrutar de um som gravado em nível baixo claramente
de noite, mesmo em um volume baixo ao escutar o com Dolby
Digital.
•AUTO
Selecione isto quando quiser desfrutar de som surround com sua
gama dinâmica completa (sem nenhum efeito aplicado).
•ON
Selecione isto quando quiser aplicar completamente o efeito de
compressão (útil durante a noite).
NOTA
• Quando reproduzir uma fonte Dolby Digital multicanal com o modo
surround desativado, a definição de D. RANGE COMPRESSION é
ajustada para ON automaticamente.
: Menu de definição das caixas acústicas
(SPK. SETTING)
7 Menu de nível (LEVEL)
FRONT LEFT SPEAKER/FRONT RIGHT SPEAKER/CENTER
SPEAKER/SURROUND RIGHT SPEAKER/SURROUND LEFT
SPEAKER
Enquanto monitora o som de teste, ajuste o volume das caixas
acústicas central e surround para o mesmo nível das caixas acústicas
frontais.
Você pode ajustar o nível de saída na faixa de –6 dB a +6 dB.
TEST TONE*
Gera um som de teste.
* O som de teste é gerado por todas caixas acústicas ativadas na
seguinte seqüência:
Caixa acústica frontal esquerda Z Caixa acústica central Z
Caixa acústica frontal direita Z Caixa acústica surround
direita Z Caixa acústica surround esquerda Z (de volta ao
começo)
NOTA
• Para o ajuste do nível de saída do subwoofer, consulte a página 36.
7 Menu de retardo (DELAY)
FRONT LEFT SPEAKER/FRONT RIGHT SPEAKER/CENTER
SPEAKER/SURROUND RIGHT SPEAKER/SURROUND LEFT
SPEAKER
Ajuste a distância da posição de áudio até as caixas acústicas.
Dentro da faixa de 0 ms a 15 ms (em unidades de 1 ms).
Exemplo:
Caixa acústica central
1 ms
Frontal esquerda
Surround esquerda
Um aumento (ou redução) de 1 ms no tempo de retardo
corresponde a aproximadamente uma redução (ou aumento) de
30 cm da distância.
Ajuste a “0 ms” para a caixa acústica mais afastada da sua posição
como a base para a definição do tempo de retardo.
Neste caso, ajuste o tempo de retardo de cada caixa acústica como
segue:
• Tempo de retardo das caixas acústicas frontais: 0 ms
• Tempo de retardo da caixa acústica central: 1 ms
• Tempo de retardo das caixas acústicas surround: 2 ms
0 ms
2 ms
2,1 m
2,4 m
2,7 m
Surround direita
2 ms
Subwoofer
Frontal direita
0 ms
3,0 m
35
Page 79

Definição das preferências de DVD
7 Menu de subwoofer (SUBWOOFER)
LEVEL
Você pode definir o nível de saída do subwoofer na faixa –6 dB a +6
dB.
CROSS OVER
Os sinais abaixo do nível de freqüência predefinido serão enviados e
reproduzidos pelo subwoofer.
Selecione um dos níveis de freqüência cruzada de acordo com o
tamanho da caixa acústica pequena conectada.
• 120Hz: Selecione quando o alto-falante cônico incorporado na
caixa acústica for de aproximadamente 8 cm.
• 150Hz: Selecione quando o alto-falante cônico incorporado na
caixa acústica for de aproximadamente 6 cm.
• 200Hz: Selecione quando o alto-falante cônico incorporado na
caixa acústica for de aproximadamente 5 cm.
Operações do sintonizador
IMPORTANTE
Antes de utilizar o controle remoto para a
seguinte operação:
1 Ajuste o seletor do modo do controle
remoto para AUDIO.
2 Pressione FM/AM.
Os botões descritos abaixo são usados nas páginas 36 e 37.
: Menu de outras definições (OTHERS)
7 RESUME
Você pode ativar ou desativar a função de reprodução continuada.
(Consulte a página 28.)
7 ON SCREEN GUIDE
Você pode ativar ou desativar os ícones de guia na tela. (Consulte a
página 19.)
7 Menu de registro de DivX (DivX REGISTRATION)
O sistema tem o seu próprio código de registro para a reprodução
DivX.
Você pode confirmar o código do seu sistema.
• Depois de reproduzir um disco criado com o código de registro, o
código do sistema é sobrescrito por um código novo totalmente
diferente para o propósito de proteção dos direitos autorais.
Definição o espaçamento do
intervalo do sintonizador AM
Em alguns países o espaçamento entre as emissoras AM é de 9 kHz,
enquanto que em outros países o espaçamento é de 10 kHz.
Você só poderá alterar o espaçamento do intervalo do sintonizador
AM quando selecionar AM como a banda.
APENAS no componente central:
7 Para mudar o espaçamento do intervalo para 10 kHz
Pressione 8 enquanto pressiona 7.
7 Para mudar o espaçamento do intervalo para 9 kHz
Pressione 3 enquanto pressiona 7.
Botões
numéricos
Cursor
(3/2)
Seletor do
modo do
controle
remoto
Sintonia manual
No controle remoto:
1 Pressione FM/AM repetidamente para
selecionar a banda desejada.
Exemplo: Quando o sistema está sintonizado em AM 810 kHz.
2 Pressione TUNING 9/(
repetidamente até encontrar a
freqüência desejada.
Ao manter o botão pressionado até que o sistema comece a
buscar as emissoras e então soltá-lo, o sistema parará a busca
automaticamente quando encontrar uma emissora com um
sinal suficientemente forte.
No componente central:
1 Pressione SOURCE repetidamente para
selecionar a banda (FM ou AM).
2 Pressione TUNING +/– repetidamente
até encontrar a freqüência desejada.
NOTA
• Quando um programa FM estéreo é recebido, o indicador ST se
ilumina no mostrador.
36
Page 80

Operações do sintonizador
Consulte a página 36 para as localizações dos botões.
Sintonia predefinida Seleção do modo de recepção
Uma vez que uma emissora seja atribuída a um número de canal, a
emissora pode ser sintonizada rapidamente. Você pode predefinir
30 emissoras FM e 15 emissoras AM.
7 Para memorizar as emissoras
1 Sintonize a emissora que deseja
memorizar.
• Se quiser armazenar o modo de recepção FM para uma
emissora FM, selecione o modo de recepção desejado.
Consulte “Seleção do modo de recepção FM” na coluna
direita.
Exemplo: Quando o sistema está sintonizado em FM
103,50 MHz.
2 Pressione MEMORY.
FM
Quando o programa FM estéreo sintonizado atualmente estiver
com muito ruído, você pode mudar o modo de recepção FM para
melhorar a recepção.
7 Enquanto escuta uma emissora FM
Pressione FM MODE.
O modo de recepção FM aparece no mostrador.
Cada vez que você pressiona o botão, o modo de recepção FM
muda.
•AUTO:
Quando um programa é transmitido em estéreo, você ouvirá som
estéreo. (O indicador ST se ilumina no mostrador.) Em
monofônico, você ouvirá o som monofônico. Este modo também
é útil para suprimir o ruído estático entre as emissoras.
• MONO:
A recepção melhorará, mas você perderá o efeito estéreo. (O
indicador MONO se ilumina no mostrador.) Neste modo, você
ouvirá ruído até que sintonize uma emissora.
Redução do ruído de
transmissão AM
Enquanto “CH” e “_ _” estiverem piscando:
3 Pressione o(s) botão(ões) numérico(s)
(1-10, h 10) para selecionar o número
de predefinição desejado.
• Para maiores detalhes sobre o uso dos botões numéricos,
consulte “Como utilizar os botões numéricos”. (Consulte a
página 21.)
Exemplo: Quando o canal predefinido 1 é selecionado.
Se uma transmissão AM estiver com muita interferência de ruído,
você pode alterar o modo Beat Cut para reduzir o ruído.
7 Enquanto escuta uma emissora AM
Pressione FM MODE.
O modo Beat Cut atual aparece no mostrador.
Cada vez que você pressiona o botão, o modo Beat Cut muda.
• Escolha “BEATCUT1” ou “BEATCUT2” de acordo com o que
produzir o melhor som.
Se a definição for cancelada antes que a finalize, comece de
novo a partir do passo 2.
Enquanto o número selecionado estiver piscando:
4 Pressione MEMORY.
“STORED” aparece no mostrador.
A emissora é atribuída ao número de predefinição selecionado.
Se a definição for cancelada antes que a finalize, comece de
novo a partir do passo 2.
5 Repita os passos de 1 a 4.
• Armazenar uma nova emissora em um número usado apago a
emissora armazenada anteriormente.
7 Para sintonizar uma emissora predefinida
1 Pressione FM/AM repetidamente para
selecionar FM ou AM.
2 Pressione o(s) botão(ões) numérico(s)
(1-10, h 10) para selecionar o número
de predefinição desejado.
• Para maiores detalhes sobre o uso dos botões numéricos,
consulte “Como utilizar os botões numéricos”. (Consulte a
página 21.)
NOTA
• Você também pode selecionar um número predefinido pressionando
o cursor 3/2.
37
Page 81

Referências
Manutenção
7 Manipulação dos discos
• Retire o disco do seu estojo segurando-o pela
borda enquanto pressiona ligeiramente o
orifício central.
• Não toque na superfície brilhante do disco,
nem dobre o disco.
• Coloque o disco de volta em seu estojo após o
uso para evitar o seu empenamento.
• Tome cuidado para não arranhar a superfície
do disco ao colocá-lo de volta em seu estojo.
• Evite expor os discos à luz direta do sol,
temperaturas extremas e umidade.
Para limpar um disco
Limpe o disco com um pano macio em uma
linha reta desde o centro para a borda.
• NÃO utilize solventes — tais como
limpadores de discos convencionais,
aerossóis, diluentes de tinta ou benzina
— para limpar os discos.
7 Limpeza do sistema
• As sujeiras no sistema devem ser removidas com um pano macio.
Se o sistema estiver muito sujo, limpe-o com um pano embebido
em um detergente neutro diluído em água, torcendo bem o pano
antes da limpeza, e enxugue-o com um pano seco.
• Como o sistema pode perder a sua qualidade ou avariar-se, ou a
sua pintura pode descascar-se, tome cuidado com os seguintes
itens.
–NÃO o limpe com um pano duro.
–NÃO o limpe com muita força.
–NÃO o limpe com diluentes de tinta ou benzina.
–NÃO aplique nenhuma substância volátil como inseticida, etc.,
nele.
–NÃO permita que borracha ou plástico fiquem em contato com
ele por muito tempo.
Localização e solução de
problemas
PROBLEMA CAUSA POSSÍVEL SOLUÇÃO
O aparelho não é ligado. O cabo de alimentação e/ou cabo de sistema não está
conectado.
O controle remoto não
funciona.
Não há som. O cabo de alimentação e/ou cabo de alto-falante não
A imagem não é exibida
na tela do televisor.
Nenhuma imagem é
exibida na tela do
televisor, a imagem está
borrada, ou a imagem
está dividida em duas
partes.
O vídeo e áudio estão
distorcidos.
A imagem não se ajusta
na tela do televisor.
A transmissão está difícil
de ouvir por causa de
ruídos.
Se houver outros casos além dos mencionados acima ou se este sistema não parecer funcionar corretamente, desligue o sistema e ligue-o de
novo.
As pilhas estão esgotadas. Troque as pilhas. (Consulte a página 7.)
A luz do sol está brilhando diretamente no sensor
remoto.
está conectado.
O cabo de áudio não está conectado a AUX IN (VCR) e/
ou DIGITAL IN (DBS) corretamente.
Uma fonte incorreta foi selecionada. Selecione a fonte correta. (Consulte a página 16.)
O cabo de vídeo não está conectado corretamente. Conecte o cabo corretamente. (Consulte a página 11.)
O disco ou arquivo não é reproduzível. Utilize um disco ou arquivo reproduzível. (Consulte as
O modo de exploração está definido para o modo
progressivo (“NT. 480P” ou “PAL. 576P”) embora o
componente central esteja conectado a um televisor que
não suporta uma entrada de vídeo progressivo, tal como
um televisor convencional.
O disco está arranhado ou sujo. Troque ou limpe o disco.
Há um videocassete conectado entre o componente
central e o televisor.
O tipo do monitor não está ajustado corretamente. Ajuste “MONITOR TYPE” adequadamente. (Consulte
As antenas estão desconectadas. Conecte as antenas correta e firmemente. (Consulte a
Conecte o cabo de alimentação e o cabo de sistema
corretamente. (Consulte as páginas 11 e 12.)
Oculte o sensor remoto da luz direta do sol.
Verifique as conexões.
Conecte o cabo corretamente. (Consulte a página 12.)
páginas 3 e 4.)
Altere o modo de exploração para o modo entrelaçado
(“NT. 480I” ou “PAL. 576I”). (Consulte a página 17.)
Conecte o componente central e televisor diretamente.
(Consulte a página 11.)
a página 35.)
página 8.)
38
Page 82

Referências
Especificações
7 Componente central (XV-THC60/XV-THC30)
Seção de áudio
Entrada digital*:
DIGITAL IN (DBS): –21 dBm a –15 dBm
(OPTICAL) (660 nm E30 nm)
* Correspondente a Linear PCM, Dolby Digital, e DTS Digital
Surround (com freqüência de amostragem — 32 kHz, 44,1 kHz,
48 kHz)
Entrada analógica: AUX IN (VCR)
Seção de vídeo
Sistema de vídeo: PAL/NTSC
Resolução horizontal: 500 linhas
Relação sinal-ruído: 64 dB
Nível de saída de vídeo
Composto: 1,0 V(p-p)/75 Ω
S-vídeo-Y: 1,0 V(p-p)/75 Ω
S-vídeo-C: Para PAL: 0,3 V(p-p)/75 Ω
Para NTSC: 0,286 V(p-p)/75 Ω
Componente-Y: 1,0 V(p-p)/75 Ω
Componente-P
Sensibilidade de entrada de vídeo/Impedância (VCR IN)
Composto: 1,0 V(p-p)/75 Ω
S-vídeo-Y: 1,0 V(p-p)/75 Ω
S-vídeo-C: Para PAL: 0,3 V(p-p)/75 Ω
Armazenamento USB
Especificação USB: Compatível com USB 2.0 Full-Speed
Dispositivo compatível: Classe de armazenamento massivo
Sistema de arquivos compatível:
Fornecimento de potência pelo barramento:
Seção do sintonizador
Faixa de sintonia
FM: 87,50 MHz a 108,00 MHz
AM: Em intervalos de 10 kHz
Generalidades
Requisito de energia: CA 110-240 V , 50/60 Hz
Consumo de energia: 25 W (em funcionamento)
Dimensões (L M A M P):
Peso: 3,8 kg
B/PR: 0,7 V(p-p)/75 Ω
Para NTSC: 0,286 V(p-p)/75 Ω
FAT16, FAT32
Máx. 500 mA
530 kHz a 1 710 kHz
Em intervalos de 9 kHz
531 kHz a 1 710 kHz
1,2 W (no modo de prontidão)
400 mm M 85 mm M 316 mm
7 Subwoofer (SP-PWC60)
Seção do amplificador
Frontal/Central/Surround: 135 W por canal, RMS a 4 Ω a 1 kHz,
com 10 % de distorção harmônica total.
Subwoofer: 135 W, RMS a 4 Ω a 100 Hz, com 10 %
de distorção harmônica total.
Seção das caixas acústicas
Alto-falante: Reflexão de graves de 16 cm
Capacidade de manipulação da potência:
140 W
Impedância: 4 Ω
Faixa de freqüência: 30 Hz a 200 Hz
Nível de pressão sonora: 75 dB/
Generalidades
Requisitos de energia: CA 110 V/CA 127 V/
Consumo de energia: 135 W (em funcionamento)
Dimensões (L M A M P):
Peso: 12,3 kg
W·m
CA 220-240 V , 50/60 Hz
0 W (no modo de prontidão)
171 mm M 411 mm M 458 mm
7 Subwoofer (SP-PWC30)
Seção do amplificador
Frontal/Central/Surround: 135 W por canal, RMS a 4 Ω a 1 kHz,
com 10 % de distorção harmônica total.
Subwoofer: 135 W, RMS a 4 Ω a 100 Hz, com 10 %
de distorção harmônica total.
Seção das caixas acústicas
Alto-falante: Reflexão de graves de 16 cm
Capacidade de manipulação da potência:
140 W
Impedância: 4 Ω
Faixa de freqüência: 30 Hz a 200 Hz
Nível de pressão sonora: 74 dB/
Generalidades
Requisitos de energia: CA 110 V/CA 127 V/
Consumo de energia: 135 W (em funcionamento)
Dimensões (L M A M P):
Peso: 11,5 kg
W·m
CA 220-240 V , 50/60 Hz
0 W (no modo de prontidão)
170 mm M 411 mm M 458 mm
39
Page 83

Referências
7 Caixas acústicas satélite (SP-XTHC60)
Caixas acústicas frontais (SP-THC60F)
Tipo: 2 alto-falantes de 1 via tipo reflexão de
graves
(Tipo com blindagem magnética)
Alto-falante: Cone de 5,5 cm M 2
Capacidade de manipulação da potência:
140 W
Impedância: 4 Ω
Faixa de freqüência: 100 Hz a 20 000 Hz
Nível de pressão sonora: 79 dB/
Dimensões (L M A M P):
Peso: 3,3 kg cada
Caixa acústica central (SP-THC60C)
Tipo: 2 alto-falantes de 1 via tipo reflexão de
Alto-falante: Cone de 6,5 cm M 2
Capacidade de manipulação da potência:
Impedância: 4 Ω
Faixa de freqüência: 90 Hz a 20 000 Hz
Nível de pressão sonora: 82 dB/
Dimensões (L M A M P):
Peso: 0,8 kg
Caixas acústicas surround (SP-THC60S)
Tipo: 3 alto-falantes de 2 vias tipo reflexão de
Alto-falante: Cone de 5,5 cm M 2
Capacidade de manipulação da potência:
Impedância: 4 Ω
Faixa de freqüência: 100 Hz a 20 000 Hz
Nível de pressão sonora: 79 dB/
Dimensões (L M A M P):
Peso: 3,4 kg cada
W·m
280 mm M 1 106 mm M 280 mm
graves
(Tipo com blindagem magnética)
140 W
W·m
250 mm M 85 mm M 91 mm
graves
Domo de 3,0 cm M 1
140 W
W·m
280 mm M 1 114 mm M 280 mm
7 Caixas acústicas satélite (SP-XTHC30)
Caixas acústicas frontais (SP-THC40F)
Tipo: 2 alto-falantes de 2 vias tipo reflexão de
graves
(Tipo com blindagem magnética)
Alto-falante: Cone de 8,0 cm M 1
Domo de 1,5 cm M 1
Capacidade de manipulação da potência:
140 W
Impedância: 4 Ω
Faixa de freqüência: 80 Hz a 20 000 Hz
Nível de pressão sonora: 78 dB/
Dimensões (L M A M P):
Peso: 0,56 kg cada
Caixa acústica central (SP-THC40C)
Tipo: 2 alto-falantes de 2 vias tipo reflexão de
Alto-falante: Cone de 8,0 cm M 1
Capacidade de manipulação da potência:
Impedância: 4 Ω
Faixa de freqüência: 80 Hz a 20 000 Hz
Nível de pressão sonora: 78 dB/
Dimensões (L M A M P):
Peso: 0,57 kg
Caixas acústicas surround (SP-THC40S)
Tipo: Tipo reflexão de graves de 1 via
Alto-falante: Cone de 8,0 cm M 1
Capacidade de manipulação da potência:
Impedância: 4 Ω
Faixa de freqüência: 80 Hz a 20 000 Hz
Nível de pressão sonora: 71 dB/
Dimensões (L M A M P):
Peso: 0,56 kg cada
W·m
104,5 mm M 139 mm M 101 mm
graves
(Tipo com blindagem magnética)
Domo de 1,5 cm M 1
140 W
W·m
137 mm M 105 mm M 104,5 mm
140 W
W·m
111,5 mm M 148 mm M 106,5 mm
O design e especificações estão sujeitos a modificações sem aviso
prévio.
40
Page 84

Mains (AC) Line Instruction
Instrução sobre a tensão da rede eléctrica (CA)
TH-C60/TH-C30 DVD DIGITAL CINEMA SYSTEM
CAUTION for mains (AC) line
BEFORE PLUGGING IN, do check that your mains (AC) line voltage corresponds
with the position of the voltage selector switch provided on the outside of this
equipment and, if different, reset the voltage selector switch, to prevent from a
damage or risk of fire/electric shock.
PRECAUÇÃO para a ligação à tensão da rede (CA)
ANTES DE LIGAR O APARELHO A UMA TOMADA DA REDE, verifique se a
tensão da rede CA corresponde à posição do selector de voltagem localizado na
parte externa deste equipamento. Caso não corresponda, reajuste o selector de
voltagem a fim de evitar avarias ou riscos de incêndio e choque eléctrico.
EN, PR
0806RYMMDWJSC© 2006 Victor Company of Japan, Limited
 Loading...